


Instruction Manual and
Warranty Information
AG-3002
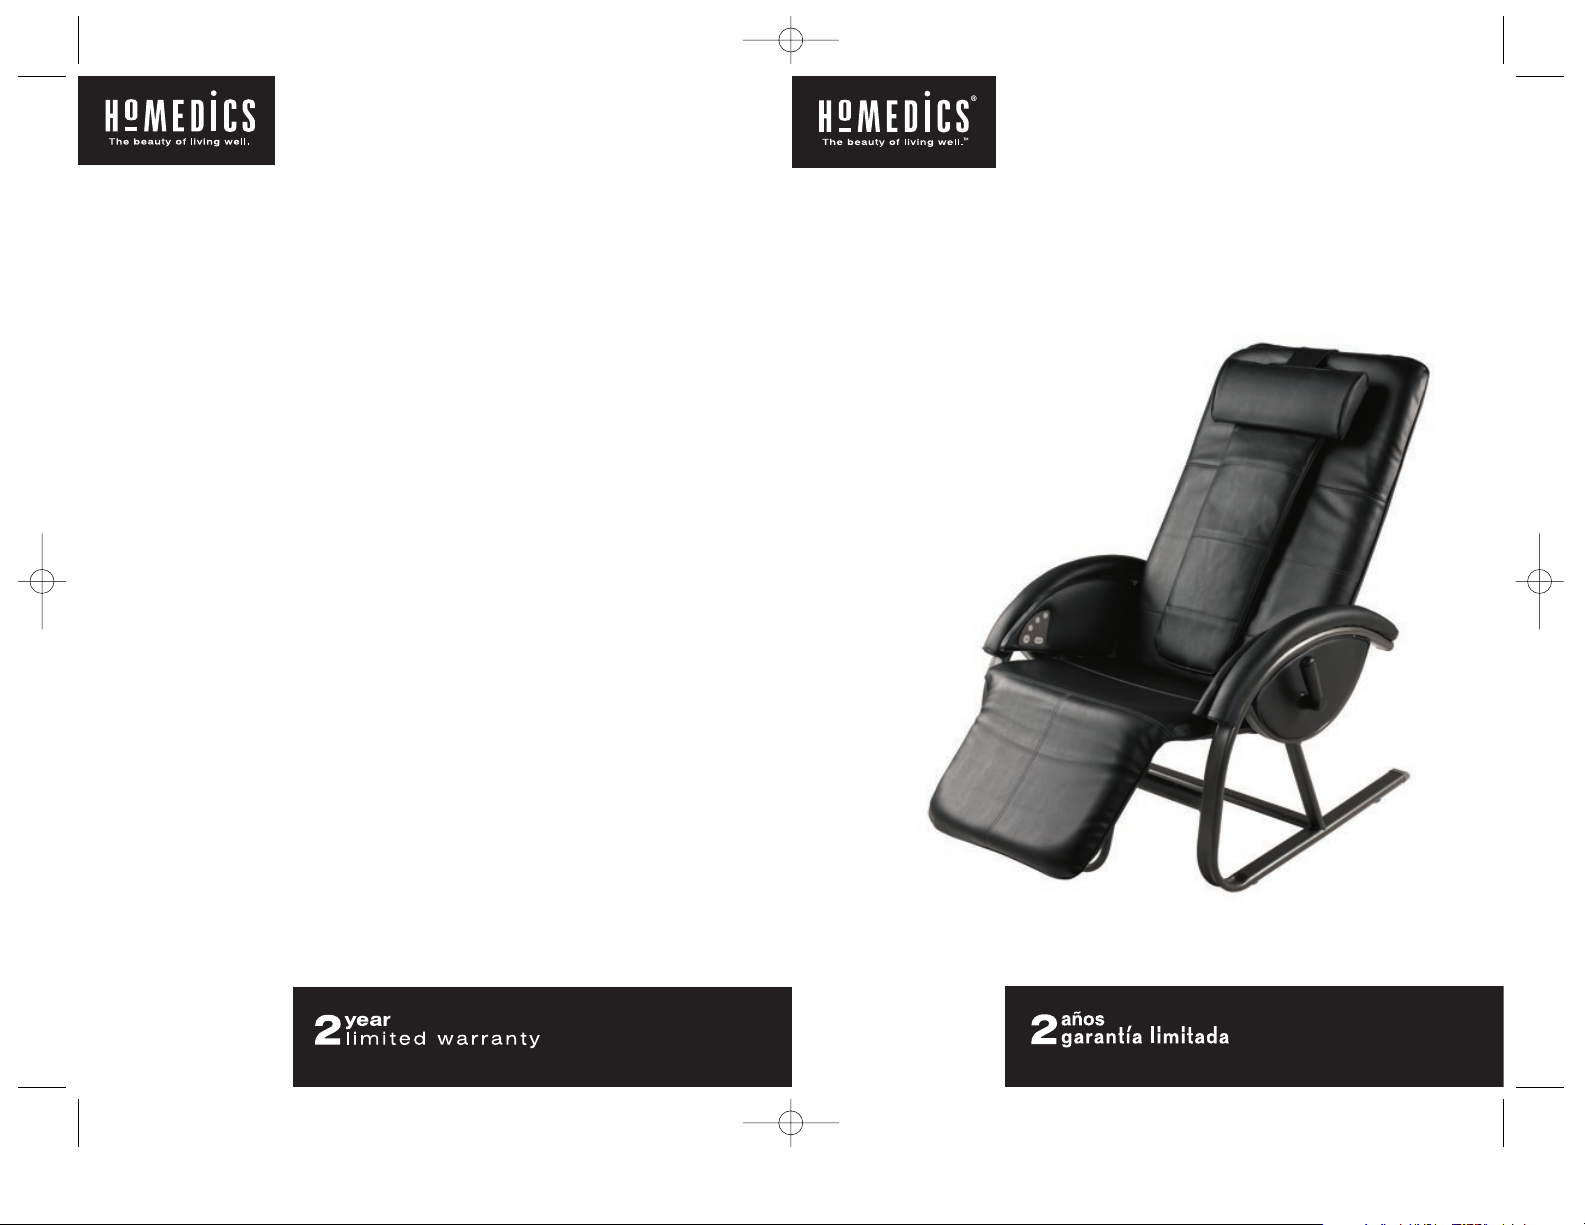
Shiatsu AntiGravity Recliner
L U XU RY RE C L I N E R WI T H
M O V I N G M A S S A G E ME C H A N I S M
Dirección postal:
HoMedics
Service Center Dept. 168
3000 Pontiac Trail
Commerce Township, MI
48390
Correo electrónico:
cservice@homedics.com
©2006 HoMedics, Inc. y sus compañías afiliadas, reservados todos los derechos.
HoMedics® es una marca registrada de HoMedics Inc. y sus compañías afiliadas.
The beauty of living well™ es una marca registrada de HoMedics, Inc. y sus compañías afiliadas.
Reservados todos los derechos.
IB-AG3002A
GARANTÍA LIMITADA POR DOS AÑOS
(Válida únicamente en los EE.UU.)
HoMedics vende sus productos con la intención de que no tengan defectos de fabricación
ni de mano de obra por un plazo de dos años a partir de la fecha de compra original, con
las siguientes excepciones. HoMedics garantiza que sus productos no tendrán defectos de
material ni de mano de obra bajo condiciones de uso y servicio normales. Esta garantía se
extiende únicamente a consumidores y no a distribuidores.
Para obtener servicio para su producto HoMedics, envíe por correo el producto y su recibo
de compra fechado (como comprobante de compra), con franqueo pago, a la siguiente
dirección:
HoMedics Consumer Relations
Service Center Dept. 168
3000 Pontiac Trail
Commerce Township, MI 48390
No se aceptarán pagos contra entrega.
HoMedics no autoriza a nadie, incluyendo, pero sin limitarse a, distribuidores, posteriores
consumidores compradores del producto a un distribuidor, o compradores remotos, a
obligar a HoMedics de forma alguna más allá de las condiciones aquí establecidas. La
garantía de este producto no cubre daños causados por uso inadecuado o abuso, accidente, conexión de accesorios no autorizados, alteración del producto, instalación inadecuada, reparaciones o modificaciones no autorizadas, uso inadecuado de la fuente de
energía/electricidad, cortes de energía, caída del producto, funcionamiento incorrecto o
daño de una pieza de funcionamiento debido al no cumplimiento del mantenimiento
recomendado por el fabricante, daños durante el transporte, robo, descuido, vandalismo,
condiciones climáticas, pérdida de uso en el período durante el cual el producto está en
una instalación de reparación o a la espera de piezas o reparación, o cualquier otra condición, sin importar cual sea, que se encuentre fuera del control de HoMedics.
Esta garantía es válida únicamente si el producto es comprado y operado en el país en el
cual se compró el producto. Un producto que requiera modificaciones o adaptación para
habilitar su funcionamiento en cualquier país que no sea aquél para el que fue diseñado,
fabricado, aprobado y/o autorizado, o la reparación de productos dañados por estas modificaciones no están cubiertos bajo esta garantía.
LA GARANTÍA AQUÍ ESTABLECIDA SERÁ LA ÚNICA Y EXCLUSIVA GARANTÍA. NO HABRÁ
NINGUNA OTRA GARANTÍA EXPRESA NI IMPLÍCITA, INCLUYENDO NINGUNA GARANTÍA
DE COMERCIALIZACIÓN O APTITUD NI NINGUNA OTRA OBLIGACIÓN POR PARTE DE LA
COMPAÑÍA CON RESPECTO A PRODUCTOS CUBIERTOS POR ESTA GARANTÍA. HOMEDICS NO TENDRÁ RESPONSABILIDAD ALGUNA POR NINGÚN DAÑO INCIDENTAL, CONSECUENTE NI ESPECIAL. BAJO NINGÚN CONCEPTO ESTA GARANTÍA REQUERIRÁ MÁS
QUE LA REPARACIÓN O CAMBIO DE ALGUNA PIEZA O PIEZAS QUE SE HALLEN DEFECTUOSAS DENTRO DEL PERÍODO DE VIGENCIA DE ESTA GARANTÍA. NO SE
EFECTUARÁN REEMBOLSOS. SI NO HAY PIEZAS DE REPUESTO DISPONIBLES PARA
LOS MATERIALES DEFECTUOSOS, HOMEDICS SE RESERVA EL DERECHO DE REALIZAR
SUSTITUCIONES EN VEZ DE REPARAR O CAMBIAR.
Esta garantía no se extiende a la compra de productos abiertos, usados, reparados, embalados otra vez y/o abiertos y vueltos a cerrar, incluyendo entre otras cosas la venta de
dichos productos en sitios de remate por Internet y/o la venta de dichos productos por
revendedores o mayoristas. Todas y cada una de las garantías cesarán y terminarán inmediatamente con respecto a cualquier producto o pieza del mismo que estén reparados, cambiados, alterados o modificados sin el consentimiento previo explícito y por escrito de
HoMedics.
Esta garantía le proporciona derechos legales específicos. Es posible que usted tenga derechos adicionales que pueden variar de un país a otro. Debido a las regulaciones de ciertos
países, es posible que algunas de las limitaciones y exclusiones no se apliquen en su caso.
Por más información con respecto a nuestra línea de productos en los EE.UU., visítenos en:
www.homedics.com
El manual en
español empieza
a la página 13
™
AG-3002A 10/9/06 10:06 AM Page 1

IMPORTANT SAFEGUARDS
WHEN USING ELECTRICAL PRODUCTS, ESPECIALLY WHEN
CHILDREN ARE PRESENT, BASIC SAFETY PRECAUTIONS SHOULD
ALWAYS BE FOLLOWED, INCLUDING THE FOLLOWING:
READ ALL INSTRUCTIONS BEFORE USING
DANGER
- TO REDUCE THE RISK OF ELECTROCUTION:
• ALWAYS unplug the appliance from the electrical outlet immediately after using and
before cleaning.
• DO NOT reach for an appliance that has fallen into water. Unplug it immediately.
• DO NOT use while bathing or showering.
WARNING
- TO REDUCE THE RISK OF BURNS,
ELECTROCUTION, FIRE OR INJURY TO PERSONS:
• An appliance should NEVER be left unattended when plugged in. Unplug from outlet
when not in use and before putting on or taking off parts or attachments.
• Close supervision is necessary when this appliance is used by, on or near children,
invalids or disabled persons.
• Use this appliance only for its intended use as described in this manual. DO NOT use
attachments not recommended by HoMedics; specifically any attachments not
provided with the unit.
• NEVER operate this appliance if it has a damaged cord or plug, if it is not working
properly, if it has been dropped or damaged, or dropped into water. Return it to
HoMedics Service Center for examination and repair.
• NEVER use pins or other metallic fasteners with this appliance.
• Keep cord away from heated surfaces.
• NEVER use while sleeping or fall asleep while using the massager.
• NEVER drop or insert any object into any opening.
• DO NOT operate where aerosol (spray) products are being used or where oxygen is
being administered.
2
• DO NOT carry this appliance by supply cord or use cord as handle.
• To disconnect, turn all controls to the “OFF” position, then remove
plug from outlet.
• This appliance is designed for household use only.
• This appliance is designed for personal, non-professional use only.
This appliance should be used only for personal, non-professional
uses.
SAVE THESE INSTRUCTIONS
Caution— Please read all instructions carefully
before operating.
• If you have any concerns regarding your health consult your
doctor before using this product.
• Individuals with pacemakers should consult a doctor before use.
•
NEVER leave the appliance unattended, especially if children are
present.
• NEVER cover the appliance when it is in operation.
• DO NOT use this product for more than 15 minutes at a time.
• Extensive use could lead to the products excessive heating and
shorter life. Should this occur, discontinue use and allow the unit
to cool before operating.
• NEVER use this product directly on swollen or inflamed areas or
skin eruptions.
• This product is a non-professional appliance designed to provide
soothing massage to worn muscles. DO NOT use this product as
a substitute for medical attention.
• DO NOT use this product before bed. The massage has a
stimulating effect and can delay sleep.
• This product should NEVER be used by any individual suffering
from any physical ailment that would limit the user’s capacity to
operate the controls.
• This product should never be used by any individual suffering
from any ailments that would limit or altogether inhibit the user’s
capacity to feel or have any sensation in the body part that the
product is being used on.
• This unit should not be used by children or invalids without adult
supervision.
3
Caution: All
servicing of this
massager must
be performed
by authorized
HoMedics service
personnel only.
AG-3002A 10/9/06 10:06 AM Page 3

Easy to Follow Guide to Chair Assembly
1. Assemble Chair Base
• Attach the front cross bar C to left armrest A by lining up the labeled “1” on the cross bar with the “1” on
the left armrest. Secure with the provided large bolts and bolt sleeves G using the allen wrench I . Attach the
bottom cross bar D to the left armrest ensuring the labeled “3” on the crossbar lines up with the “3” on the
armrest. Secure with the provided large bolts and bolt sleeves using the allen wrench.
DO NOT FULL
Y TIGHTEN BOLTS AT THIS POINT. See Figure 2.
• Attach right armrest B to cross bars C D making sure to line up the labeled “2” and “4” on the cross bars
with the “2” and “4” on the armrest. Secure with large bolts and bolt sleeves using the allen wrench.
See Figure 3.
• Tighten all bolts, ensuring the base sits level without wobbling.
NOTE: ASSEMBLE BASE ON ITS SIDE.
2. Attach Seat Cushion/Frame to Base
• Align the seat with pre-attached bolts. From the bottom side add washer and caps/nuts to secure the
Seat frame to the base. See Figure 4.
• Use the provided allen wrench to tighten partially.
NOTE: IT MAY BE EASIER TO TURN THE BASE ON ITS SIDE TO INSERT THE BOLTS.
3. Attach Back Cushion/Frame to Base
• Align the back with the pre-attached bolts to the frame. From the back side, add washer and caps/nuts to secure to
Back frame to Chair Base. See Figure 5.
• Attached correctly, the back frame will form a concave shape and fabric stitching should face up. See Figure 6.
• Tighten all caps/nuts using the allen wrench.
4
Figure 2
Figure 3
Figure 4
5
Components
Carefully remove all contents from packaging and inspect the product
to make sure all components of the chair have been received. These should include:
• Left armrest A
• Right armrest with control panel B
• Front cross bar C
• Bottom cross bar D
• Back frame with attached cushion and massage mechanism E
• Seat frame with attached cushion F
• Large bolts and bolt sleeves for crossbars (8) G
• Washers and Caps/Nuts (8) H
• Small Allen wrenches I
• Optional softening pad J
• Detachable headrest K
• AC adaptor L
See Figure 1.
A
D
B
L
H
G
I
Figure 1
Figure 6
D
C
A
A
B
D
C
Figure 5
F
1
2
6
6
7
E
4
8
8
3
2
5
K
Output
Jack
Input
Jack
J
C
1
4
3
AG-3002A 10/9/06 10:06 AM Page 5

4. Connect Power Source
• Locate the output jack behind the AntiGravity chair in the lower right corner of the back cushion. The input jack
will also be found behind the AntiGravity chair on the right side of the seat cushion.
See Figure 7. Firmly insert
the output jack into the input jack to connect the massage mechanism with the control panel.
• To attach the softening pad J align the loop strip located on the softening pad strap to the hook strip on
the back of the chair cushion to secure into place. See Figure 8.
• To attach the headrest
K to the back cushion, align the loop strip on the strap of the headrest with the
hook strip on the softening pad or back of the chair cushion to secure in place. See Figure 9.
• Ensure the AC power adaptor cord and extends through the back of the frame. Be sure the AC adaptor
cord is not twisted or crimped between the mat and the metal frame.
6
7
Instructions for Shiatsu AntiGravity Recliner Use
Your Shiatsu AntiGravity recliner is designed to provide relaxation in a variety of positions utilizing the easylock levers on each side of the armrests. The ideal position for optimum relaxation is one in which the feet are
above the heart. This position will reduce pressure on the spine and help relieve muscle tension.
NOTE: The Shiatsu AntiGravity recliner design has a weight limit of 300 pounds. Persons exceeding this
body weight should not use this recliner.
• Before sitting in the Shiatsu AntiGravity recliner, be sure it is in the complete upright position by pushing the
levers forward toward the footrest.
• Sit in the chair and lean back slowly. Sitting all the way back in the seat will make it easier to recline. To
adjust the angle of the chair, hold on to the armrests and lean back or forward until you reach the desired
position. Lock the position into place by pulling the levers back.
• The AnitGravity recliner’s ergonomic design ensures proper spine alignment in any of its reclining positions.
• The footrest may be raised by pulling it upward. Each position will sound with a click. To lower the footrest,
raise it until it stops and then push it back towards the floor.
• Before getting out of the AntiGravity recliner, be sure to return it to its full upright position and lock into place
by pulling the easy-lock levers back.
• Stand up using the armrests for support.
Tip: To help you recline, unlock the levers and slowly raise your hands above your head and lean back. Lock
in your desired position by pulling the levers back. To sit upright, unlock the levers and move hands slowly
towards your knees while leaning slightly forward. This will bring the recliner back to its full upright position.
Power Adaptor Instructions
Connect the adaptor jack to the massage chair power receptacle located along the right side of
the chair. Once inserted, plug the other end into an AC power outlet. Use only the AC power
adaptor provided with this unit.
AC Power Adaptor Information
Your massage chair is powered by an attached custom AC home adaptor. Use only the supplied
AC home adaptor as other similar-looking adaptors may cause irreparable damage to the unit
and will void your warranty.
Massage Chair and Control Panel Instructions
Press the POWER button once to activate the control panel. The LED indicator will illuminate.
To deactivate, press again. For complete instructions, please see pages 8-9.
NOTE: The intensity of the massage will change with the angle of the chair back. Generally,
the more the chair is reclined, the more intense the massage will be. You can adjust the
chair angle to suit your personal comfort level. You may also soften the massage force by
placing a towel between yourself and the unit.
Caution: Do not jam or force any part of your body in the moving
massage mechanism.
Automatic Shut Off
The Shiatsu AntiGravity recliner has been designed for convenience and safety. As a special
precaution against falling asleep while using the unit, or leaving the unit on while it is still in
operation, we’ve programmed it to automatically stop working after 15 minutes. This special
feature should not be considered as a substitute for OFF. Always remember to turn your unit off
when not in use.
Figure 7
Figure 8
Figure 9
Output Jack
Input Jack
AG-3002A 10/9/06 10:06 AM Page 7

8
9
Shiatsu Massage
Shiatsu is a deep kneading
circular massage. This unit
features a massage mechanism
that travels up and down the
back of the cushion.
NOTE: The moving shiatsu
massage mechanism
always “parks” or finishes
in its highest position. It
will continue to this
position after the power
has been turned off. If the
electrical supply is interrupted, when power is
restored, the mechanism
will “park” or move to its
highest position.
Shiatsu Massage
Zone Buttons
Zone buttons cause the moving
shiatsu massage mechanism to
target specific areas of the back:
F
ull Back
The shiatsu massage mechanism
travels up and down the back.
Upper Back
The shiatsu massage mechanism
focuses from the mid to upper back.
Lower Back
The shiatsu mechanism focuses from
the mid to lower back.
To select a massage area, simply push
the button and the corresponding
L.E.D. light will illuminate. To deselect,
simply push the button again and the
corresponding L.E.D. light will turn off.
NOTE: There is a 15-minute auto
shut off on the unit for your safety.
Power Button
To turn on the massage functions, first press the POWER
button. The L.E.D. indicator
will illuminate and confirm
your selection. To turn off the
massage functions, simply
press the button again. The
L.E.D. indicator will blink
while the shiatsu massage
mechanism returns to its
highest point and then it will
turn off.
Power Adaptor
The Shiatsu Massaging
Cushion is powered by a
custom 120 volt AC adaptor,
which is included with your
unit.
Demo Button
For a brief demonstration
of the features of the
Shiatsu Massaging
Cushion, press the
Demo button. The unit
will complete one cycle
of shiatsu back massage
(down and then up the
back). Once complete,
the unit automatically
turns off.
Shiatsu AntiGravity Recliner
™
L U XU RY RE C L I N E R WI T H
M O V I N G M A S S A G E ME C H A N I S M
AG-3002A 10/9/06 10:06 AM Page 9

Built-In
Control
Panel
2 Easy-Lock
Levers
Adjustable Footrest
Adjustable Headrest
11
Maintenance
To Store: Avoid contact with sharp edges or pointed objects which might
damage/puncture the fabric.
To Clean: Disconnect massage cushion from power source before cleaning.
The massage cushion and control panel may be cleaned with a soft, damp
cloth only.
• The massage cushion is not machine washable and must not come into
contact with water or any other liquids.
• Do not immerse into liquids to clean.
• Never use abrasive cleaners, brushes, gasoline, kerosene, polish or paint
thinner to clean.
• Do not attempt to repair your AntiGravity recliner. There are no user serviceable
parts. For service, send the unit to the HoMedics service address listed in the
warranty section.
Frame: Periodically, the frame should be checked to ensure the screws are tight.
If the frame is found to be loose, tighten screws with the tools provided.
The AntiGravity recliner and massage cushion are designed for indoor
applications only. Use of this product for outdoor applications may cause
irreparable damage and void your warranty.
Back Cushion/Frame Removal
for Warranty Service
If you experience a problem with the massage mechanism located in the back
frame/cushion of the Shiatsu AntiGravity Recliner within a two year period, send
this component to the HoMedics Service Center for repair as noted in the
warranty on page 12.
To disassemble the back cushion/frame, first disconnect the power source
located behind the chair at the back cushion base and seat cushion. See figure
7 on page 6 for an illustration. Now completely unscrew the bolts located along
the base of the back cushion to detach from the chair. See figure 5 on page 5.
Once removed, please see the warranty on page 12 for further instruction.
Do not use the chair or connect it to a power source
while disassembled.
10
Shiatsu AntiGravity Recliner
L U XU RY RE C L I N E R WI T H
M O V I N G M A S S A G E ME C H A N I S M
NOTE: Color of fabric and chair components may differ from colors shown above.
Softening Pad
Moving Shiatsu
Massage Mechanism
Sleek Steel Frame
AG-3002A 10/9/06 10:06 AM Page 11
Mail To:
HoMedics
Service Center Dept. 168
3000 Pontiac Trail
Commerce Township, MI
48390
Email:
cservice@homedics.com
©2006 HoMedics, Inc. and its affiliated companies, all rights reserved.
HoMedics® is a registered trademark of HoMedics Inc. and its affiliated companies.
The beauty of living well.™ is a trademark of HoMedics Inc. and its affiliated companies. All rights reserved.
IB-AG3002A
TWO YEAR LIMITED WARRANTY
(Valid in USA only)
HoMedics sells its products with the intent that they are free of defects in manufacture
and workmanship for a period of two years from the date of original purchase, except
as noted below. HoMedics warrants that its products will be free of defects in material
and workmanship under normal use and service. This warranty extends only to consumers and does not extend to Retailers.
To obtain warranty service on your HoMedics product, mail the product and your
dated sales receipt (as proof of purchase), postpaid, to the following address:
HoMedics Consumer Relations
Service Center Dept. 168
3000 Pontiac Trail
Commerce Township, MI 48390
No COD's will be accepted.
HoMedics does not authorize anyone, including, but not limited to, Retailers, the sub-
sequent consumer purchaser of the product from a Retailer or remote purchasers, to
obligate HoMedics in any way beyond the terms set forth herein. This warranty does
not cover damage caused by misuse or abuse; accident; the attachment of any unauthorized accessory; alteration to the product; improper installation; unauthorized
repairs or modifications; improper use of electrical/power supply; loss of power;
dropped product; malfunction or damage of an operating part from failure to provide
manufacturer’s recommended maintenance; transportation damage; theft; neglect;
vandalism; or environmental conditions; loss of use during the period the product is
at a repair facility or otherwise awaiting parts or repair; or any other conditions whatsoever that are beyond the control of HoMedics.
This warranty is effective only if the product is purchased and operated in the country
in which the product is purchased. A product that requires modifications or adoption
to enable it to operate in any other country than the country for which it was
designed, manufactured, approved and/or authorized, or repair of products damaged
by these modifications is not covered under this warranty.
THE WARRANTY PROVIDED HEREIN SHALL BE THE SOLE AND EXCLUSIVE WARRANTY. THERE SHALL BE NO OTHER WARRANTIES EXPRESS OR IMPLIED
INCLUDING ANY IMPLIED WARRANTY OF MERCHANTABILITY OR FITNESS OR ANY
OTHER OBLIGATION ON THE PART OF THE COMPANY WITH RESPECT TO PRODUCTS COVERED BY THIS WARRANTY. HOMEDICS SHALL HAVE NO LIABILITY FOR
ANY INCIDENTAL, CONSEQUENTIAL OR SPECIAL DAMAGES. IN NO EVENT SHALL
THIS WARRANTY REQUIRE MORE THAN THE REPAIR OR REPLACEMENT OF ANY
PART OR PARTS WHICH ARE FOUND TO BE DEFECTIVE WITHIN THE EFFECTIVE
PERIOD OF THE WARRANTY. NO REFUNDS WILL BE GIVEN. IF REPLACEMENT
PARTS FOR DEFECTIVE MATERIALS ARE NOT AVAILABLE, HOMEDICS RESERVES
THE RIGHT TO MAKE PRODUCT SUBSTITUTIONS IN LIEU OF REPAIR OR
REPLACEMENT.
This warranty does not extend to the purchase of opened, used, repaired, repackaged and/or resealed products, including but not limited to sale of such products on
Internet auction sites and/or sales of such products by surplus or bulk resellers. Any
and all warranties or guarantees shall immediately cease and terminate as to any
products or parts thereof which are repaired, replaced, altered, or modified, without
the prior express and written consent of HoMedics.
This warranty provides you with specific legal rights. You may have additional rights
which may vary from country to country. Because of individual country regulations,
some of the above limitations and exclusions may not apply to you.
For more information regarding our product line in the USA,
please visit: www.homedics.com
Manual de instrucciones e
información de garantía
AG-3002
Asiento reclinable AntiGravity
ASIENTO RECLINABLE DE LUJO CON
MECANISMO DE MASAJE MÓVIL
AG-3002A 10/9/06 10:06 AM Page 13

PRECAUCIONES IMPORTANTES
CUANDO UTILICE PRODUCTOS ELÉCTRICOS, ESPECIALMENTE CUANDO ESTÁN NIÑOS PRESENTES, SE
DEBEN CUMPLIR CIERTAS PRECAUCIONES BÁSICAS
DE SEGURIDAD, INCLUYENDO LO SIGUIENTE:
LEA TODAS LAS INSTRUCCIONES ANTES DE USAR
PELIGRO
- PARA REDUCIR EL RIESGO DE
ELECTROCUCIÓN:
• SIEMPRE desenchufe el artefacto del tomacorriente, inmediatamente
después de usar y antes de limpiarlo.
• NUNCA intente tomar un artefacto que haya caído al agua.
Desenchúfelo de inmediato.
• No lo use mientras toma un baño o se ducha.
ADVERTENCIA
- PARA REDUCIR EL RIESGO DE
QUEMADURAS, ELECTROCUCIÓN, INCENDIO O
LESIONES A LAS PERSONAS:
• Un artefacto nunca debe ser dejado sin atención cuando está enchufado. Desenchúfelo del tomacorriente cuando no lo esté usando y antes
de colocar o quitar piezas o accesorios.
• Es necesaria una supervisión estricta cuando este artefacto sea usado
por niños o personas inválidas o con incapacidades, o próximo a ellos.
• Utilice este artefacto sólo para el uso para el cual está diseñado y como
se describe en este manual. NO use accesorios no recomendados por
HoMedics, particularmente accesorios no proporcionados con la
unidad.
• NUNCA haga funcionar este artefacto si tiene el cable o enchufe dañado, si no está funcionando adecuadamente, si se cayó o se dañó o si
se dejó caer al agua. Envíelo al Centro de servicio de HoMedics para
que lo examinen y lo reparen.
• NUNCA use alfileres ni otros sujetadores metálicos con este artefacto.
• NUNCA obstruya las aberturas de ventilación del artefacto ni lo ubique
en una superficie blanda, como por ejemplo una cama o sofá donde las
aberturas de ventilación puedan quedar bloqueadas. Mantenga las
aberturas libres de pelusas, cabellos, etc.
• NUNCA lo use mientras duerme ni se duerma mientras usa el
masajeador.
• NUNCA lo deje caer ni inserte ningún objeto en ninguna abertura.
• NO lo haga funcionar donde se utilizan productos de rociado por
aerosol ni donde se está administrando oxígeno.
14
• NO lo haga funcionar debajo de una manta o almohada. Puede ocurrir un
calentamiento excesivo y provocar un incendio, electrocución o lesiones a las
personas.
• NO lleve este artefacto tomado del cable, ni use el cable como manija.
• Para desconectar, coloque todos los controles en la posición “OFF” y luego
retire el enchufe del tomacorriente.
• Este artefacto está diseñado para uso doméstico exclusivamente.
• Este artefacto está diseñado únicamente para uso personal, no profesional.
Este artefacto debe ser utilizado únicamente con fines personales, no profesionales.
GUARDE ESTAS INSTRUCCIONES
Precaución — sírvase leer todas las instrucciones con
atención antes de poner en funcionamiento.
• Si tiene alguna preocupación con respecto a su salud, consulte a su doctor
antes de usar este producto.
• Los individuos con marcapasos deben consultar a un médico antes de usarlo.
• NUNCA deje el artefacto sin supervisión, especialmente si hay niños presentes.
• NUNCA cubra el artefacto mientras está en funcionamiento.
• NO use este producto durante más de 15 minutos por vez.
• El uso prolongado puede causar un recalentamiento del producto y disminuir
su vida útil. Si esto sucediera, discontinúe su uso y permita que la unidad se
enfríe antes de volver a ponerla en funcionamiento.
• NUNCA use este producto directamente sobre áreas hinchadas o inflamadas
ni sobre erupciones cutáneas.
• Este producto es un artefacto no profesional diseñado para proporcionar
masajes calmantes a los músculos cansados. NO utilice este producto como
sustituto de la atención médica.
• NO use este producto antes de ir a dormir. El masaje tiene un efecto estimulante y puede retrasar el sueño.
• Este producto no debe ser usado NUNCA por individuos que padezcan algún
tipo de enfermedad que pueda limitar la capacidad del usuario de manejar los
controles.
• Este producto no debe ser usado NUNCA por individuos que padezcan algún
tipo de enfermedad que pueda limitar o inhibir totalmente la capacidad del
usuario de sentir o tener cualquier sensación en la parte del cuerpo donde
está siendo usado el producto.
• Esta unidad no debe ser usada por niños o personas inválidas sin la supervisión de un adulto.
15
Precaución:
Todo el servicio
de este
masajeador
debe ser
realizado
únicamente
por personal
de servicio
autorizado de
HoMedics.
AG-3002A 10/9/06 10:06 AM Page 15

Guía fácil para armar el sillón
1. Arme la base del sillón
• Adjunte la barra frontal cruzada C al brazo izquierdo A alineando la etiqueta “1” de la barra cruzada con la
"1" en el brazo izquierdo. Asegure con los pernos grandes y los manguitos de los pernos proporcionados G
usando la llave allen I Adjunte la barra cruzada superior D al brazo izquierdo asegurándose que la etiqueta
“3” de la barra cruzada esté alineada con la “3” del brazo. Asegure con los pernos grandes y los manguitos de los
pernos proporcionados usando la llave allen. No apriete los pernos por completo todavía. Vea la Figura 2.
• Adjunte el brazo derecho B a las barras cruzadas C D asegurándose de alinear las etiquetas “2” y “4” de las
barras cruzadas con la "2" y la "4" del brazo. Asegure con los pernos grandes y los manguitos de los pernos
usando la llave allen. Vea la Figura 3.
• Ajuste todos los pernos, asegurándose que la base quede nivelada sin que se tambalee.
NOTA: ARME LA BASE DE COSTADO.
2. Adjunte el almohadón/marco del asiento a la base
• Alinee el asiento con los pernos ya colocados. Desde el lado del fondo, coloque la
arandela y las tapa/tuercas para sujetar el marco del asiento a la base. Ver Figura 4.
• Use la llave Allen incluida para apretar parcialmente.
NOTA: PUEDE SER MÁS FÁCIL GIRAR LA BASE HACIA EL COSTADO PARA INTRODUCIR LOS PERNOS.
3. Adjunte el almohadón del respaldo/marco a la base.
• Alinee el espaldar con los pernos ya sujetados al marco. Desde el lado de atrás, coloque la
arandela y las tapa/tuercas para sujetar el marco del espaldar a la base del sillón. Ver Figura 5.
• Correctamente adjuntado, el marco del respaldo tendrá una forma cóncava y las
puntadas de la tela estarán hacia arriba. Ver Figura 6.
• Apriete todas las tapa/tuercas con la llave Allen.
16
17
Componentes
Retire cuidadosamente todos los elementos del paquete e inspeccione el producto para asegurarse de
haber recibido todas las piezas del sillón. Deben incluir:
• Brazo izquierdo A
• Brazo derecho con panel de control B
• Barra cruzada frontal C
• Barra cruzada posterior D
• Marco posterior con almohadón adjunto y mecanismo de masajes E
• Marco del sillón con almohadón adjunto F
• Pernos grandes y manguitos de pernos para las barras cruzadas (8) G
• Arandelas y Tapas/Tuercas (8) H
• Llaves Allen I
• Almohadilla amortiguadora opcional J
• Apoyacabeza desmontable K
• Adaptador de CA L
Vea la Figura 1.
Figura 6
Figura 1
Ficha
macho
Ficha
hembra
Figura 2
Figura 3
D
C
A
A
B
D
C
Figura 4
Figura 5
A
D
B
L
H
G
I
F
1
2
6
6
7
E
4
8
8
3
2
5
K
J
C
1
4
3
AG-3002A 10/9/06 10:06 AM Page 17

4. Conexión a la fuente de energía
• Ubique la ficha macho detrás del sillón AntiGravity, en la esquina inferior derecha del almohadón del respaldo. La
ficha hembra también se encontrará detrás del sillón AntiGravity, en el lado derecho del almohadón del asiento.
Vea la figura 7. Introduzca firmemente la ficha macho en la ficha hembra para conectar el mecanismo de
masajes con el panel de control.
• Para adjuntar la almohadilla amortiguadora J alinee la tira con lazos ubicada en la tira de la almohadilla amortiguadora con la tira con ganchos del almohadón del sillón para asegurarla en su lugar. Vea la Figura 8.
• Para adjuntar el apoyacabeza K al almohadón del respaldo, alinee la tira con lazos de la tira del apoyacabeza
con la tira con ganchos de la almohadilla amortiguadora o de la parte trasera del almohadón del sillón para asegurarla en su lugar. Vea la Figura 9.
• Asegure el cable del adaptador de CA y sus extensiones por la parte posterior del marco. Asegúrese de que el
cable del adaptador de CA no esté torcido ni ondulado entre el colchón y el marco de metal.
18
19
Instrucciones para el uso del sillón reclinable AntiGravity
Su sillón reclinable AntiGravity está diseñado para brindarle relajación en una variedad de posiciones utilizando las palancas de bloqueo fácil a los lados de los brazos. La posición ideal para una relajación óptima es
una en la cual los pies estén por encima del corazón. Esta posición reducirá la presión en la columna y ayudará a aliviar la tensión muscular.
ATENCIÓN: El diseño del sillón reclinable AntiGravity tiene un límite de peso de 300 libras (136 kg). Las
personas que excedan este peso corporal no deben usar este sillón reclinable.
• Antes de sentarse en el sillón reclinable AntiGravity, asegúrese de que está en la posición completamente
derecha oprimiendo las palancas hacia delante en dirección al descanso de los pies.
• Siéntese en el sillón y recuéstese hacia atrás despacio. Sentarse lo más atrás posible en el sillón le hará
más fácil reclinarse. Para ajustar el ángulo del sillón, sujétese de los brazos y recuéstese hacia atrás o
hacia adelante hasta que alcance la posición deseada. Vuelva a la posición original tirando de las palancas hacia atrás.
• El diseño ergonómico del sillón reclinable AntiGravity asegura la alineación adecuada de la columna en
cualquiera de sus posiciones de reclinación.
• Puede levantar el apoyapies tirándolo hacia arriba. Cada vez que el sillón adopte una posición determinada hará un clic. Para bajar el apoyapies, levántelo hasta que se detenga y luego oprima de nuevo hacia
abajo en dirección al piso.
• Antes de bajarse del sillón AntiGravity, asegúrese de regresarlo a su posición completamente derecha y
bloquéelo en ese lugar, tirando de las palancas de fácil bloqueo hacia atrás.
• Póngase de pie utilizando los brazos como apoyo.
Consejo: Para ayudar a reclinarse, desbloquee las palancas, levante despacio las manos hacia su cabeza y
recuéstese. Bloquee en la posición deseada tirando de las palancas hacia atrás. Para sentarse derecho, desbloquee las palancas y mueva las manos despacio hacia sus rodillas mientras se inclina levemente hacia adelante. Esto regresará el sillón reclinable a su posición completamente derecha.
Instrucciones del adaptador de corriente
Conecte la ficha del adaptador al receptáculo de corriente del almohadón masajeador, ubicado en el
lado derecho del almohadón. Una vez introducido, enchufe el otro extremo a un tomacorriente de CA.
Use únicamente el adaptador de CA eléctrica proporcionado con esta unidad.
Información del adaptador de CA
Su almohadón masajeador se alimenta con un adaptador de CA doméstica normal adjunto. Use
únicamente el adaptador de CA doméstica proporcionado ya que otros adaptadores que
parezcan similares pueden causar daño irreparable a la unidad y anularán su garantía.
Instrucciones del sillón masajeador y del panel de control
Oprima el botón de encendido (POWER) una vez para activar el panel de control. El indicador
LED se iluminará. Para desactivar, oprima nuevamente. Para obtener instrucciones completas,
consulte las páginas 8 y 9.
NOTA: La intensidad del masaje cambiará con el ángulo del respaldo del sillón.
Generalmente, cuanto más reclinado esté el sillón, más intenso será el masaje. Puede
ajustar el ángulo del sillón para adaptarlo a su nivel personal de comodidad. También puede
suavizar la fuerza del masaje colocando una toalla entre usted y la unidad.
Precaución: No introduzca ni fuerce ninguna parte de su cuerpo en
el mecanismo de masajes mientras está movimiento
Apagado automático
El sillón reclinable AntiGravity ha sido diseñado para su comodidad y seguridad. Como precaución especial para no quedarse dormido mientras usa la unidad, o dejar la unidad encendida
mientras está todavía en funcionamiento, hemos programado el sillón para que se apague
automáticamente despues de 15 minutos. Esta característica especial no debe ser considerada
como un sustituto de APAGADO (OFF). Siempre recuerde apagar su unidad cuando no la esté
usando.
Figura 7
Figura 8
Figura 9
Ficha macho
Ficha hembra
AG-3002A 10/9/06 10:06 AM Page 19

20
21
Masaje shiatsu
El shiatsu es un masaje circular
profundo. Esta unidad presenta un
mecanismo de masajes que se
mueve hacia arriba y hacia abajo
de la parte posterior del
almohadón.
NOTA: El mecanismo móvil
de masajes shiatsu siempre
"estaciona" o termina en su
posición más alta.
Continuará en esta posición
después de que haya apagado la energía. Si se interrumpe el suministro eléctrico, al restablecerse la
energía, el mecanismo
"estacionará” o se moverá
hacia su posición más alta.
Masaje shiatsu
botones de zona
Los botones de zona hacen que el
mecanismo móvil del masaje shiatsu
se concentre en áreas específicas de
la espalda:
Espalda completa (FULL BACK)
El mecanismo de masaje shiatsu sube
y baja por la espalda.
P
arte superior de la espalda
(UPPER BACK)
El mecanismo de masaje shiatsu se
concentra en la zona que va desde la
mitad de la espalda hacia arriba.
Zona lumbar (L
OWER BACK)
El mecanismo shiatsu se concentra en
la zona lumbar, desde la mitad de la
espalda hacia abajo.
Para seleccionar un área de masaje,
simplemente presione el botón y el
LED correspondiente se iluminará.
Para anular la selección, simplemente
vuelva a presionar el botón y la luz
LED correspondiente se apagará.
NOTA: Para su seguridad, en la
unidad hay un apagado automático
de 15 minutos.
Botón de encendido
Para encender las funciones
de masaje, presione primero
el botón de encendido
(POWER). El indicador LED
se iluminará y confirmará su
selección. Para apagar las
funciones de masaje, simplemente presione el botón una
vez más. El indicador LED
destellará mientras el mecanismo de masajes shiatsu
vuelve a su punto más alto, y
luego se apagará.
Adaptador de energía
El almohadón de masajes shiatsu funciona con un adaptador
de CA de 120 voltios, que se
incluye con su unidad.
Botón de
demostración
Para una breve
demostración de las
características del
almohadón de masajes
shiatsu, presione el
botón de demostración
(DEMO). La unidad
completará un ciclo de
masajes shiatsu para
la espalda (hacia abajo
y luego hacia arriba
por la espalda). Una
vez completada, la
unidad se apaga
automáticamente.
Asiento reclinable AntiGravity
™
A S I E N T O R E C L I NA BL E DE L U J O CO N
M E C A N I S M O MÓ VI L DE MA S A J E S
AG-3002A 10/9/06 10:06 AM Page 21

23
22
Asiento reclinable AntiGravity
ASIENTO RECLINABLE DE LUJOCON
MECANISMO DE MASAJE MÓVIL
Mantenimiento
Para guardar: Coloque el control manual dentro su bolsa correspondiente, que está
colgada del brazo derecho. Evite el contacto con bordes filosos u objetos punzantes
que puedan dañar/perforar el material que lo recubre.
Para limpiar: Desconecte el almohadón masajeador de la fuente de energía antes de
limpiar. El almohadón masajeador y el control manual pueden limpiarse únicamente
con un paño suave húmedo.
• El almohadón masajeador no se puede lavar a máquina y no debe entrar en
contacto con agua ni ningún otro líquido.
• NO sumerja la unidad en ningún líquido para limpiarla.
• NUNCA utilice limpiadores abrasivos, cepillos, gasolina, querosén, barniz o
diluyente de pintura para limpiar.
• NO intente reparar su sillón reclinable AntiGravity. No hay piezas que necesiten
servicio. Por servicio, envíe la unidad a la dirección del servicio HoMedics que se
detalla en la sección de garantía.
Marco: El marco debe verificarse periódicamente para asegurarse de que los tornillos
estén apretados. Si el marco está flojo, ajuste los tornillos con las herramientas
proporcionadas.
El sillón reclinable y el almohadón masajeador AntiGravity están diseñados para
aplicaciones interiores solamente. El uso de este producto para aplicaciones
exteriores puede causar daño irreparable y anular su garantía.
Retiro del almohadón/ marco del respaldo
para servicio de garantía
Si experimenta un problema con el mecanismo de masajes ubicado en el marco o el
almohadón del asiento reclinable AntiGravity en un período de dos años, envíe este
componente al Centro de servicio de HoMedics para que lo reparen, según se detalla
en la garantía de la página 24.
Para desarmar el almohadón/ marco del respaldo, desconecte primero la fuente de
energía ubicada detrás del sillón, en la base del almohadón del respaldo y del
almohadón del asiento. Vea la ilustración en la figura 7 de la página 18. Ahora,
desatornille completamente los pernos ubicados a lo largo de la base del almohadón
del respaldo, para separarlo del sillón. Vea la figura 5 en la página 17. Una vez que lo
haya retirado, vea la garantía en la página 24 para obtener más instrucciones.
No use el sillón ni lo conecte a una fuente de energía
mientras esté desarmado.
NOTA: El color de la tela y las piezas del sillón pueden diferir de los colores que se
muestran arriba.
Control
remoto
manual y
funda
2 Palancas
de fácil
bloqueo
Descanso para los
pies ajustable
Apoyacabeza ajustable
Colchoneta
masajeadora
Mecanism
de masaje
móvil
Original marco de acero
AG-3002A 10/9/06 10:06 AM Page 23
 Loading...