

Page 1
Page 2
EN
Thank you for purchase on HOMECHO products. Please contact us if you have difficulty
with assembly or need replacement parts. HOMECHO customer service is here to assist you.
Email: [email protected]
Please attach your User Name or Order ID so that we can assist you better.
WARNING
Serious or fatal injury may occur from unexpected assembly or use.
1. During the assembly process, keep all parts away from babies or children.
2. Always securely fix this product to the wall. Make sure the wall area to be drilled is
free from hidden electrical wires, water and gas pipes.
3. Use of tip-over restraints may only reduce, but not eliminate the risk of tip-over.
4. Unless specially designed to accommodate, do not set heavy objects on top of this
product.
5. Place the heaviest items on the lowest shelf.
6. Never allow children to climb or bang on drawers, doors or shelves.
DE
Vielen Dank für Ihren Kauf von HOMECHO Produkten. Bitte kontaktieren Sie uns, wenn Sie
Probleme mit Montage haben oder Ersatzteile benötigen. HOMECHO Kundenservice
ist für Sie da.
Email: [email protected]
Bitte geben Sie Ihren Benutzernamen oder Ihre Bestellnummer an, damit wir Sie besser
unterstützen können.
WARNUNG
Bei unerwarteter Montage oder Verwendung können schwere oder tödliche
Verletzung auftreten.
1. Legen Sie in den Montageprozess alle Teile weg von Babys oder Kindern.
2. Stellen Sie sicher, dass der gebohrte Wandbereich frei von verborgenen Stromkabeln,
Wasser- und Gasleitungen ist, wenn Sie dieses Produkt an der Wand befestigen.
3. Die Verwendung von Kippsicherungen kann die Gefahr eines Kippens nur verringern,
jedoch nicht beseitigen.
4. Setzen Sie bitte keine schweren Gegenstände auf dieses Produkt, es sei denn, dass
das Produkt speziell für die Unterbringung konzipiert wird.
5. Legen Sie bitte die schwersten Gegenstände auf das unterste Regal.
6. Erlauben Sie nie Kindern, auf Schubladen, Türen oder Regale zu klettern oder zu knallen.
- 1 -
Page 3
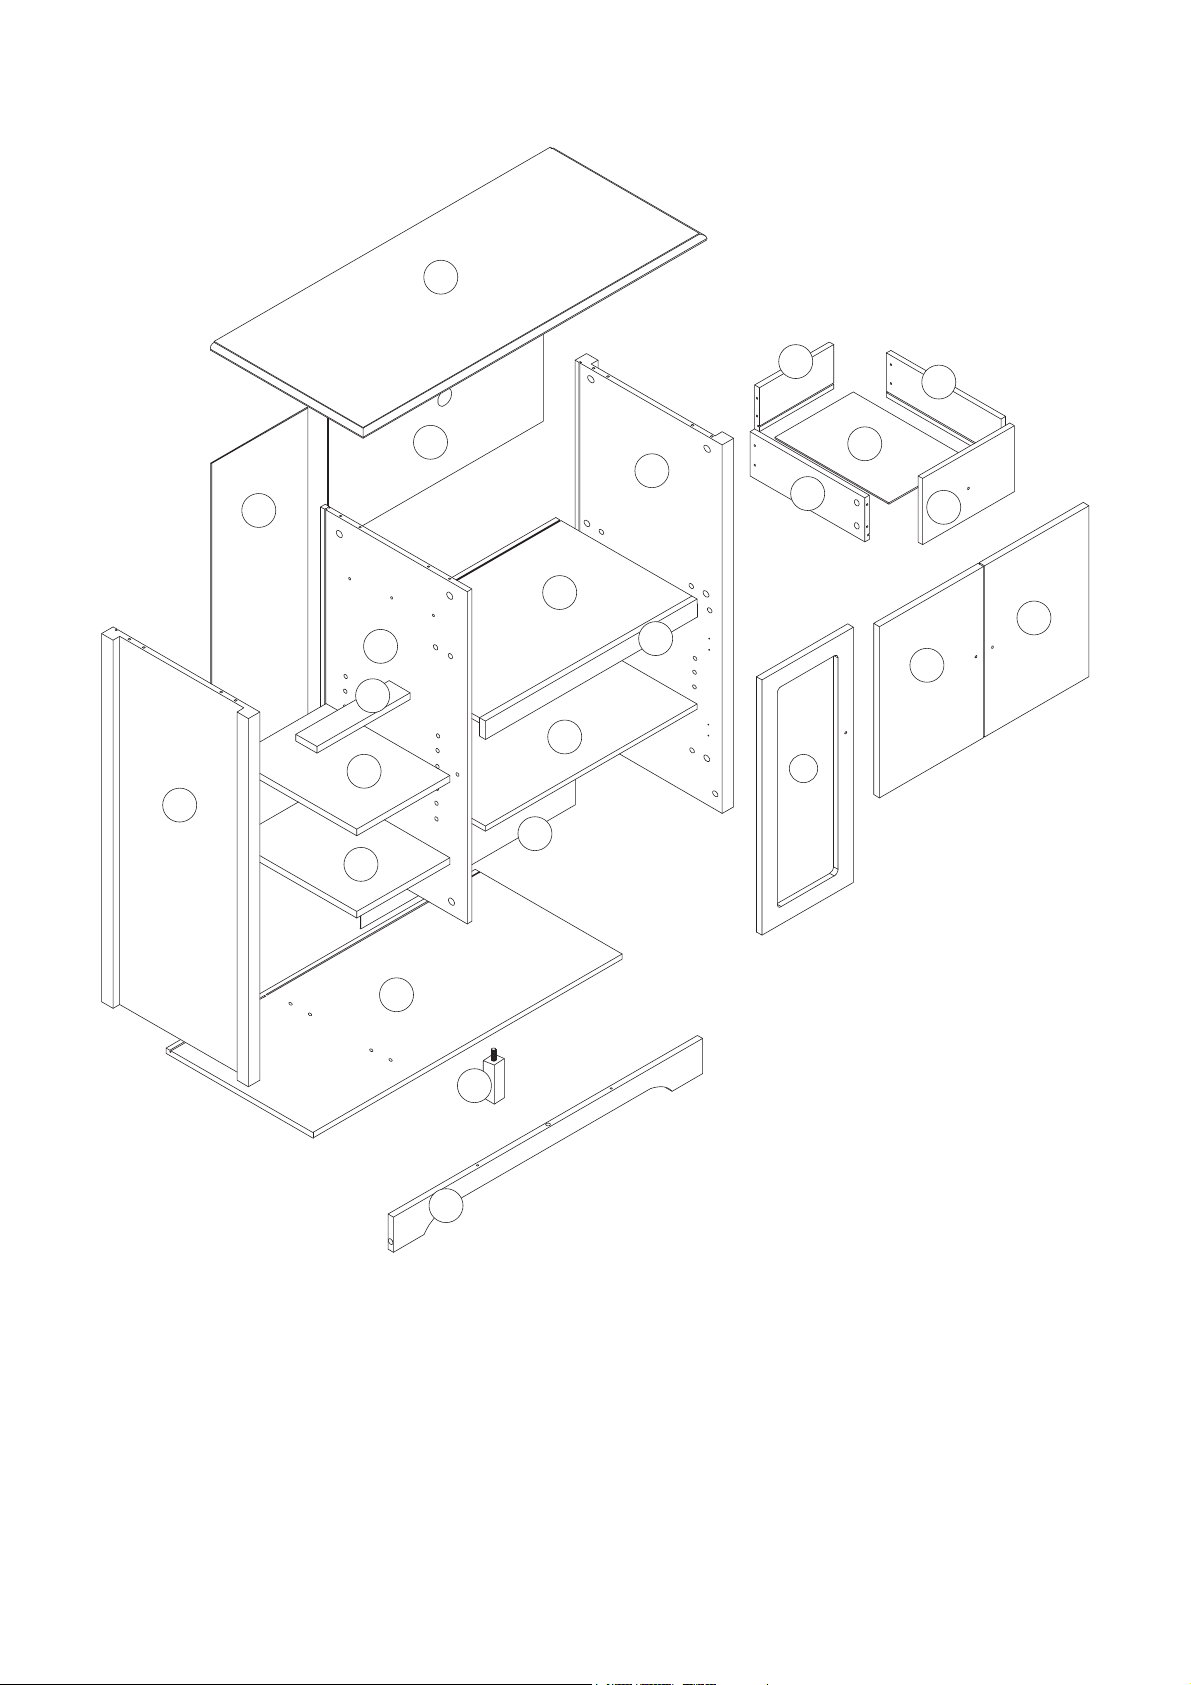
Parts List(EN) / Teile Liste(DE)
1
21
20
12
17
3
11
19
18
5
16
4
22
16
7
14
15
6
2
13
15
8
10
9
- 2 -
Page 4
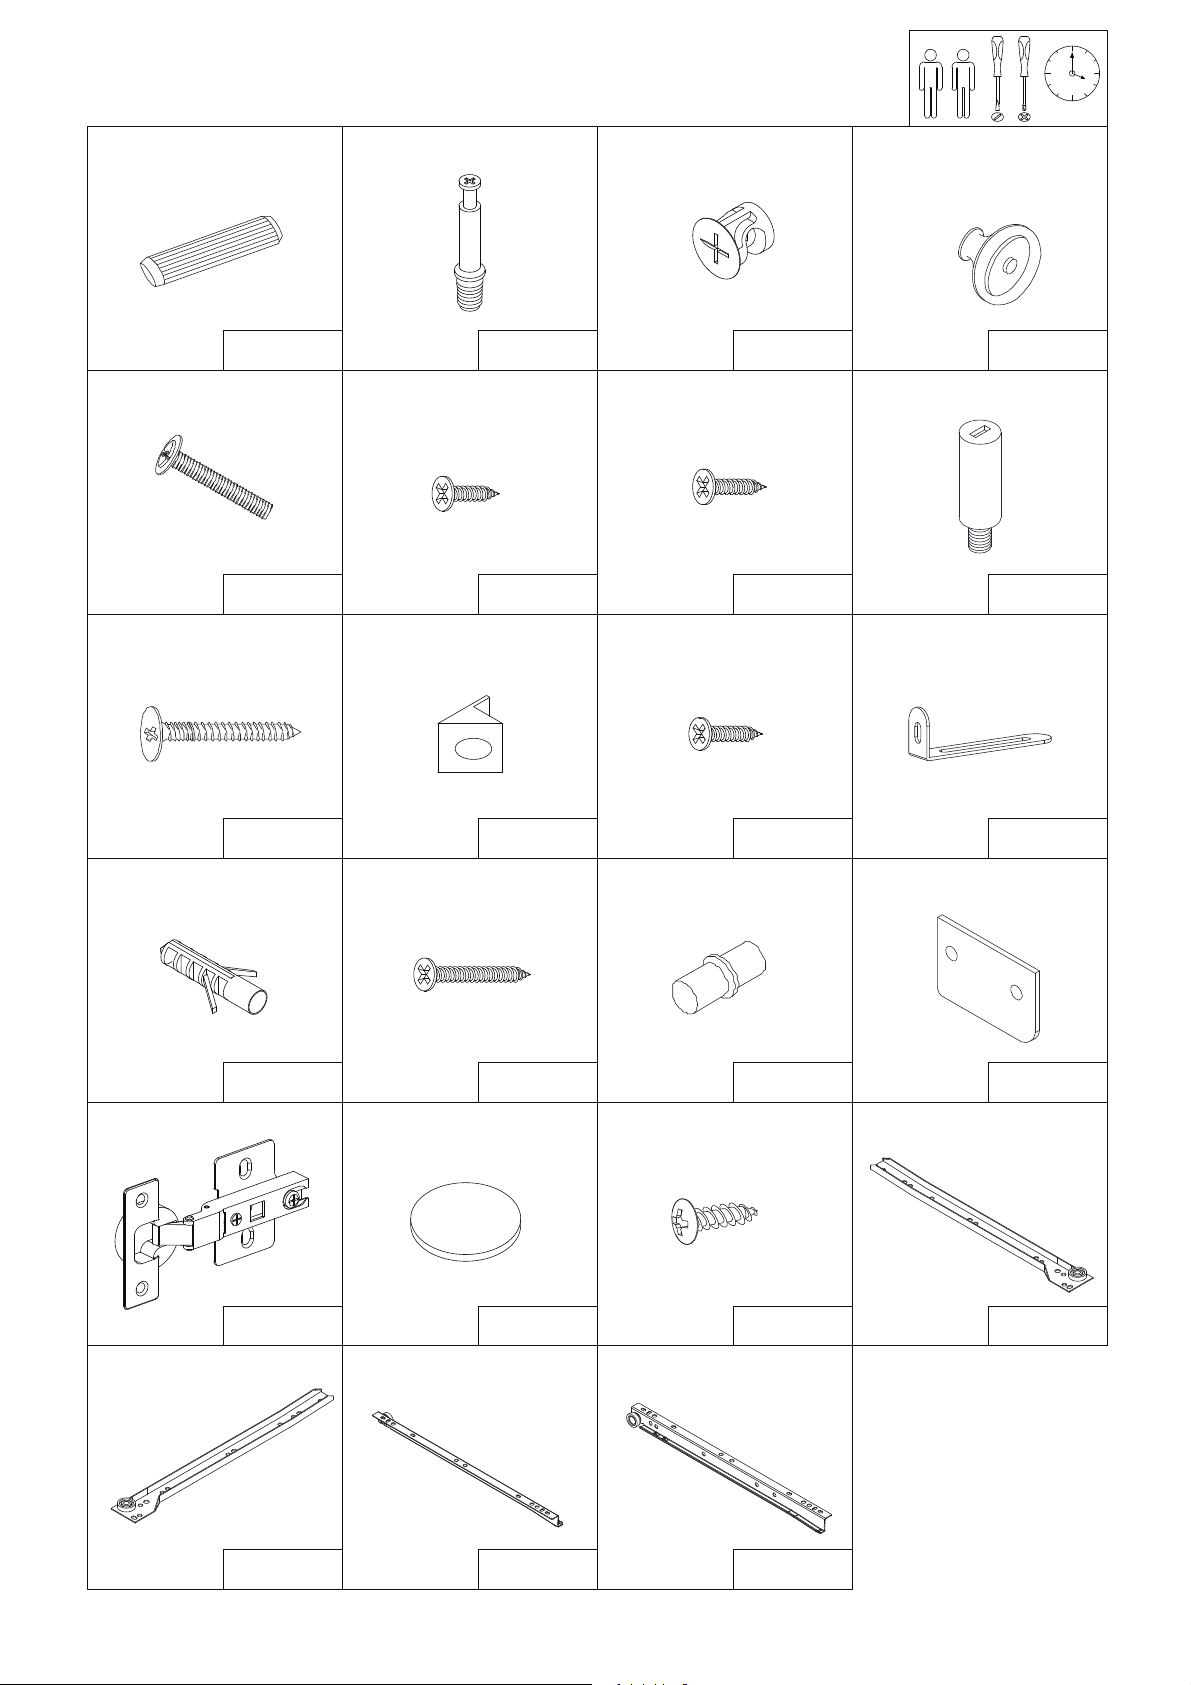
Parts List(EN) / Teile Liste(DE)
1:00
A
Φ6×30mm
E
M4×16mm
I
24+2PCS
4PCS
B
M6×35mm
F
M3×12mm
J
27+2PCS
10+1PCS
C
Φ15×9mm
G
M4×14mm
K
27+2PCS
24+2PCS
D
H
Φ6×Φ
L
8×21mm
4PCS
1PC
M4×35mm
M
Φ6×30mm
Q
CR
4PCS
1PC
6PCS
16×16×1mm
N
M4×40mm
R
DL
16+2PCS
1PC
5PCS
M3×14mm
O
Φ6×17mm
S
M4×12mm L300mm
16+2PCS
P
12+1PCS
CL
1PC
DR
1PC
1PC
1PC
L300mm L300mm L300mm
1PC
1PC
- 3 -
1PC
Page 5
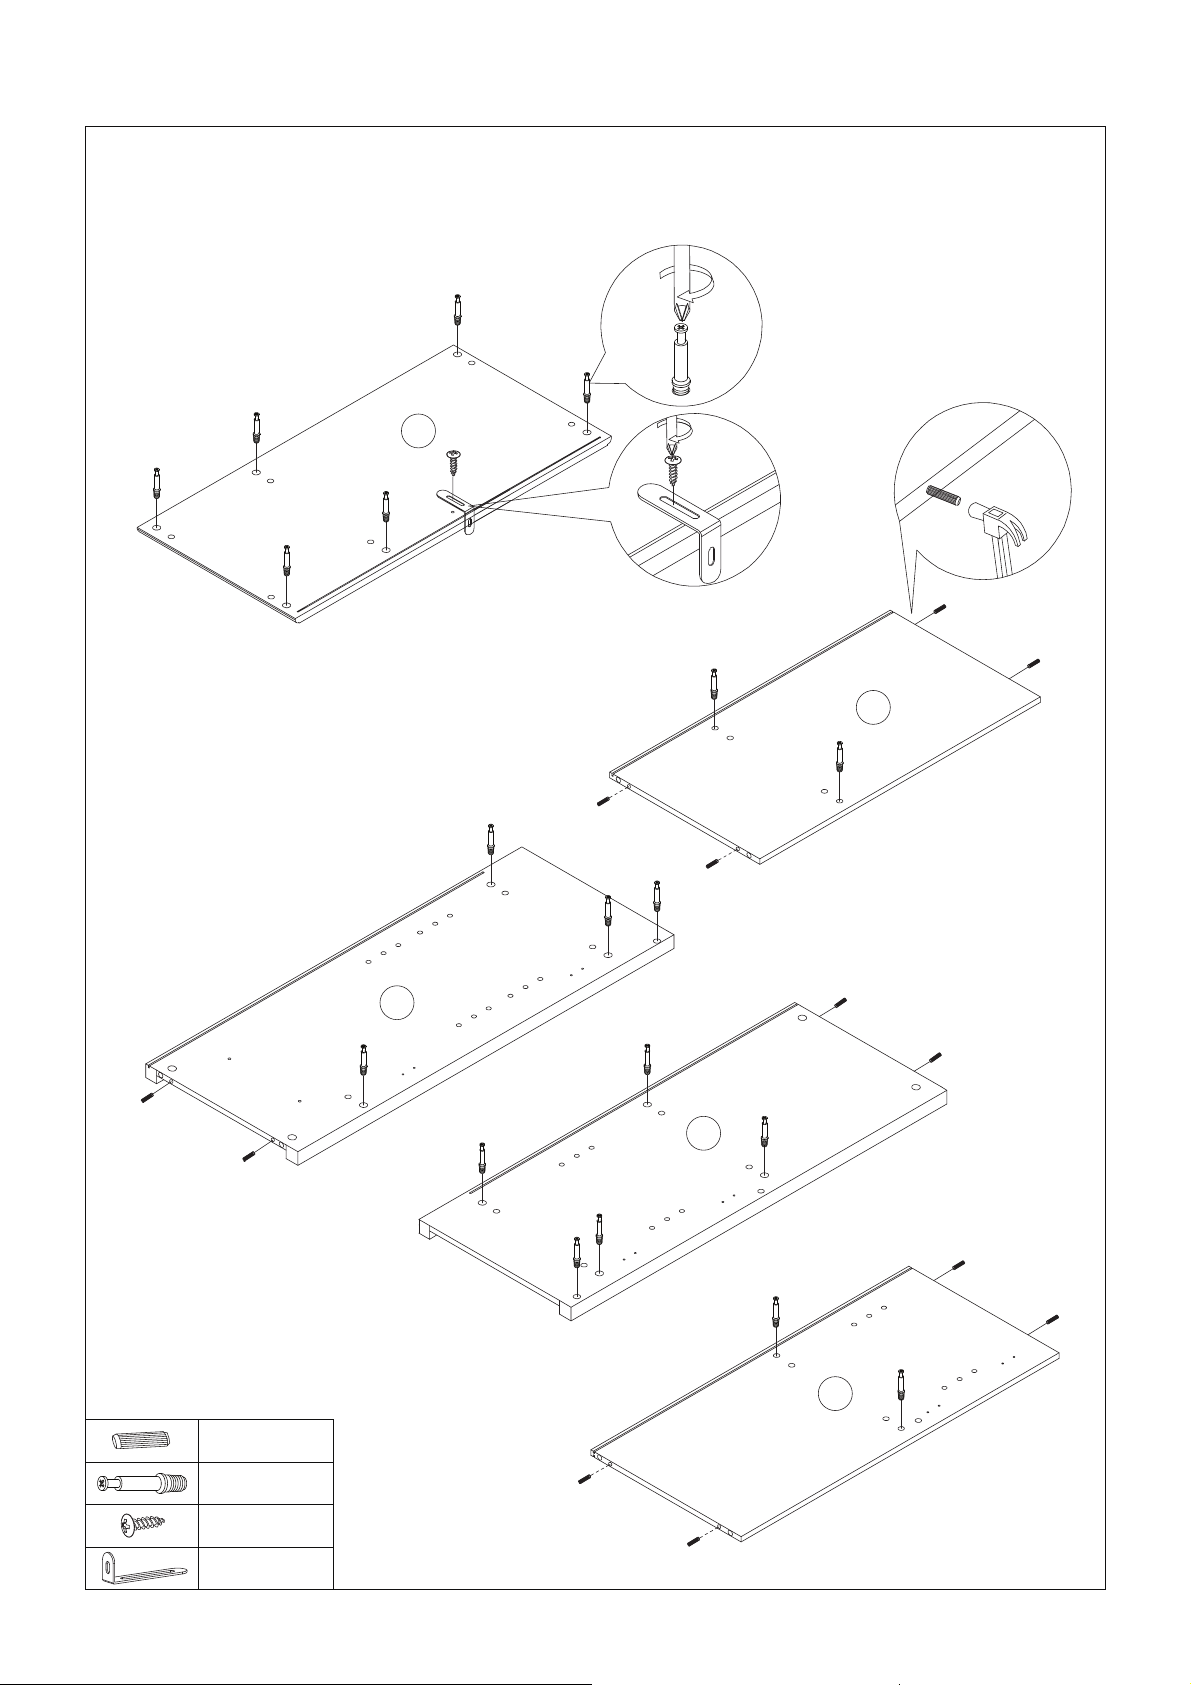
Assembly Steps(EN) / Montageschritte(DE)
STEP 1
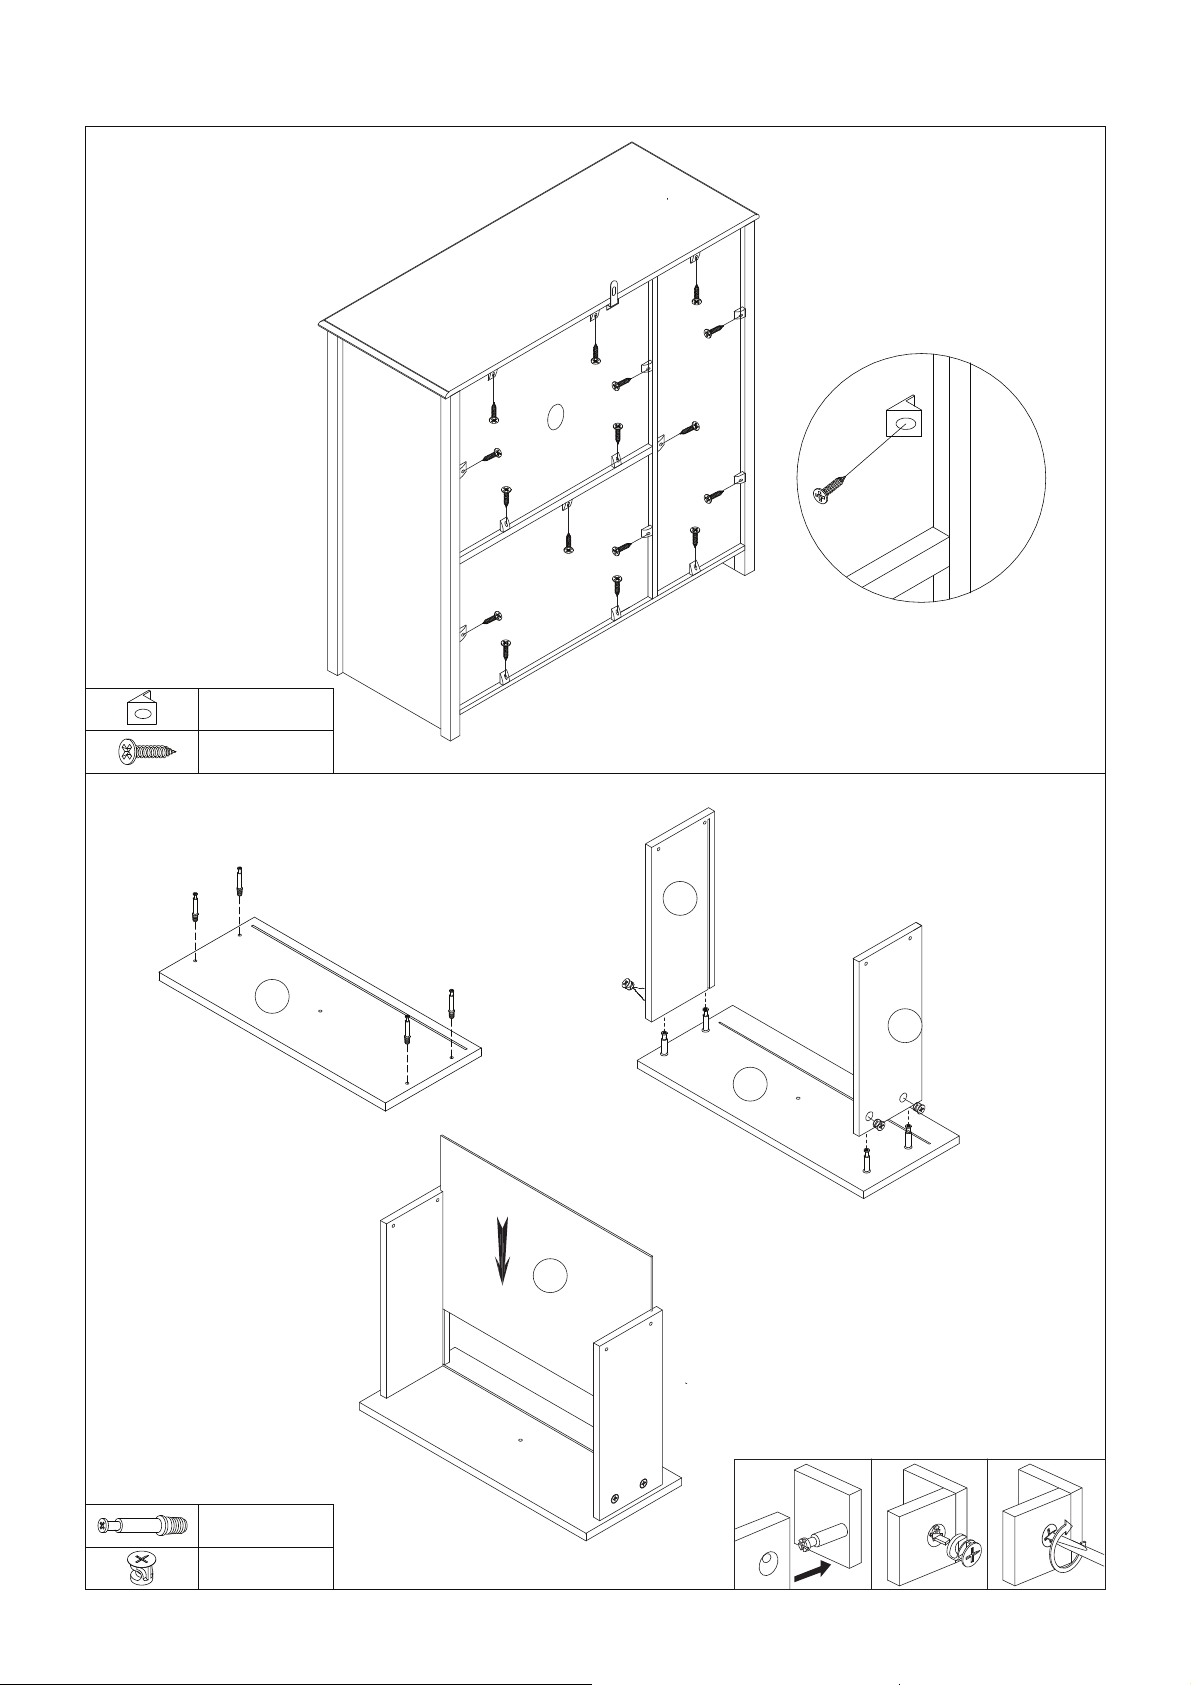
Please refer to the installation method and position on Step 1 - Lock the long
side of the L L-shaped metal plate to the ① board with the S short screw.
B
B
1
S
L
8
A
A
B
2
A
B
3
A
B
4
x 12PCS
A
x 19PCS
B
x 1PC
S
x 1PC
L
A
- 4 -
Page 6
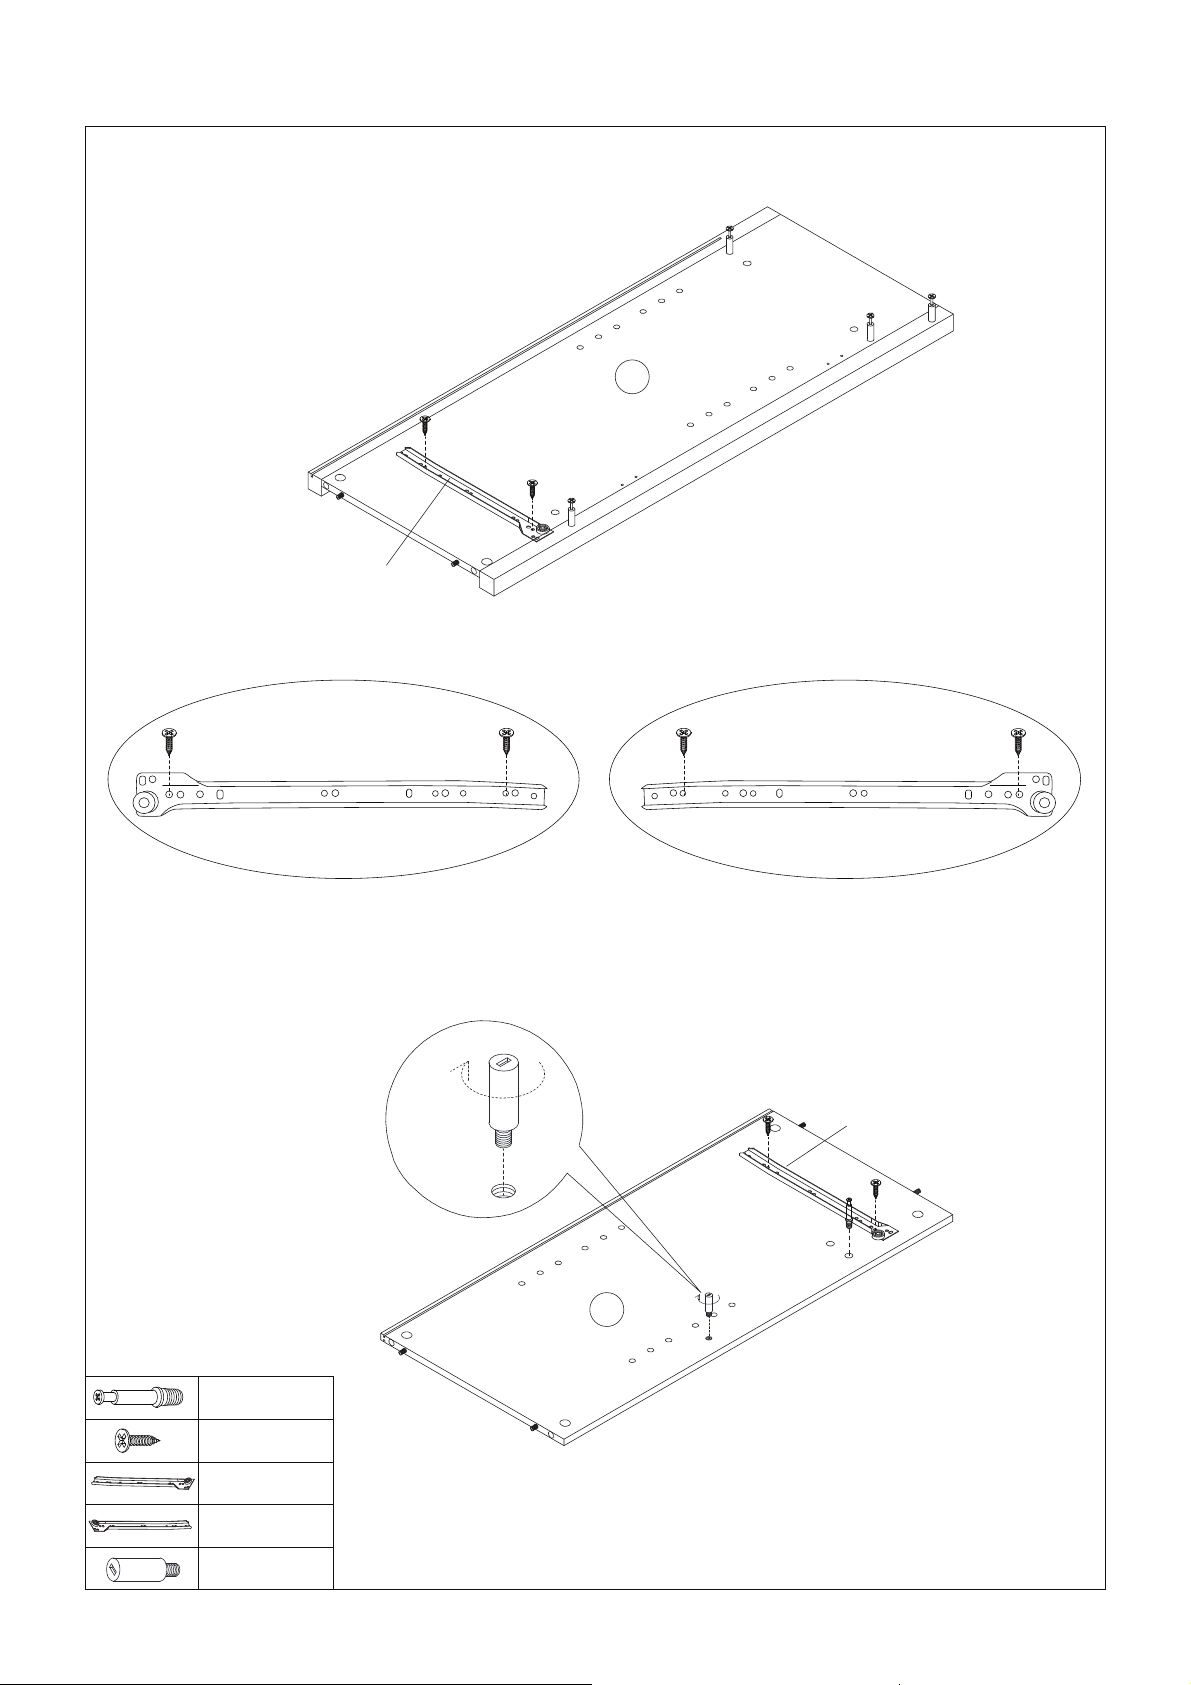
STEP 2
Assembly Steps(EN) / Montageschritte(DE)
2
F
CL
F F F F
CL
CL
H
CR
CR
B
4
CR
F
x 1PC
B
x 4PCS
F
CL
CR
x 1PC
H
x 1PC
x 1PC
- 5 -
Page 7
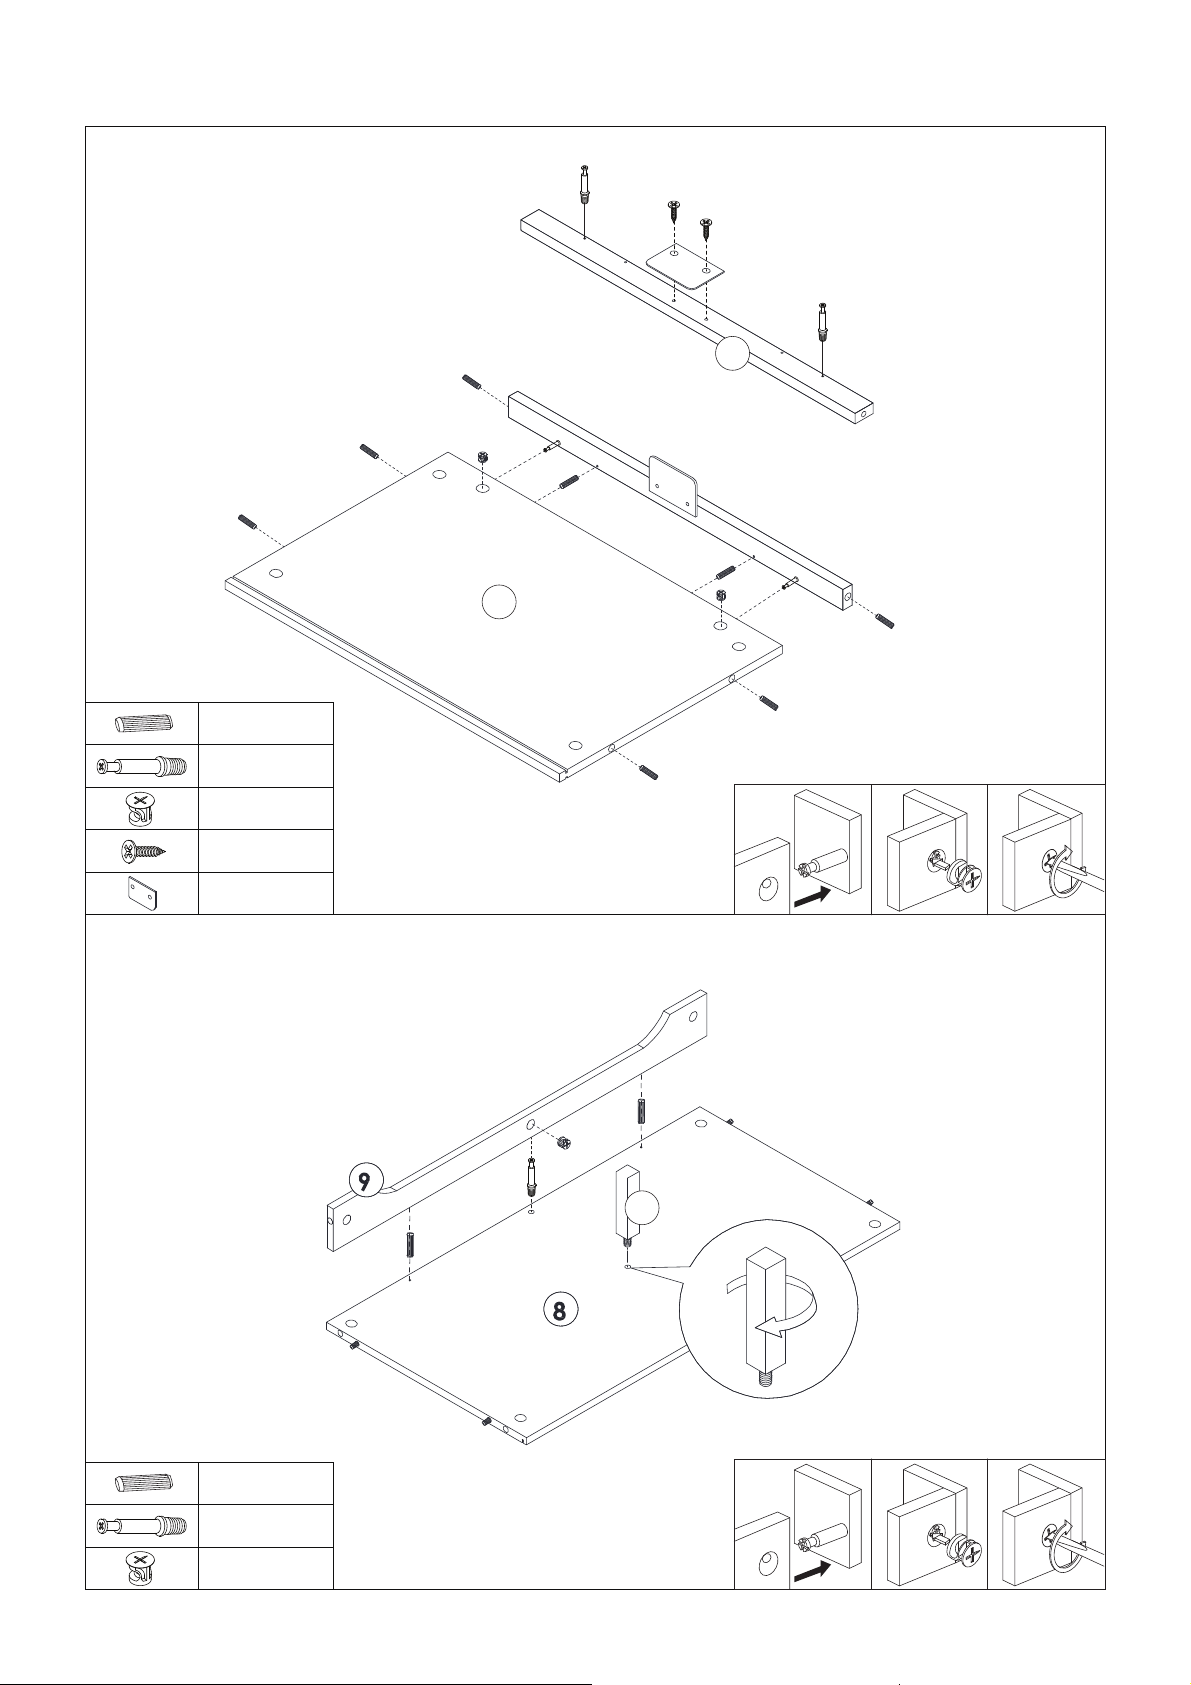
STEP 3
Assembly Steps(EN) / Montageschritte(DE)
B
F
P
22
A
STEP 4
x 8PCS
A
x 2PCS
B
x 2PCS
C
x 2PCS
F
x 1PC
P
A
C
A
5
1 2 3
>90°
x 2PCS
A
x 1PC
B
x 1PC
C
A
C
B
10
1 2 3
>90°
- 6 -
Page 8
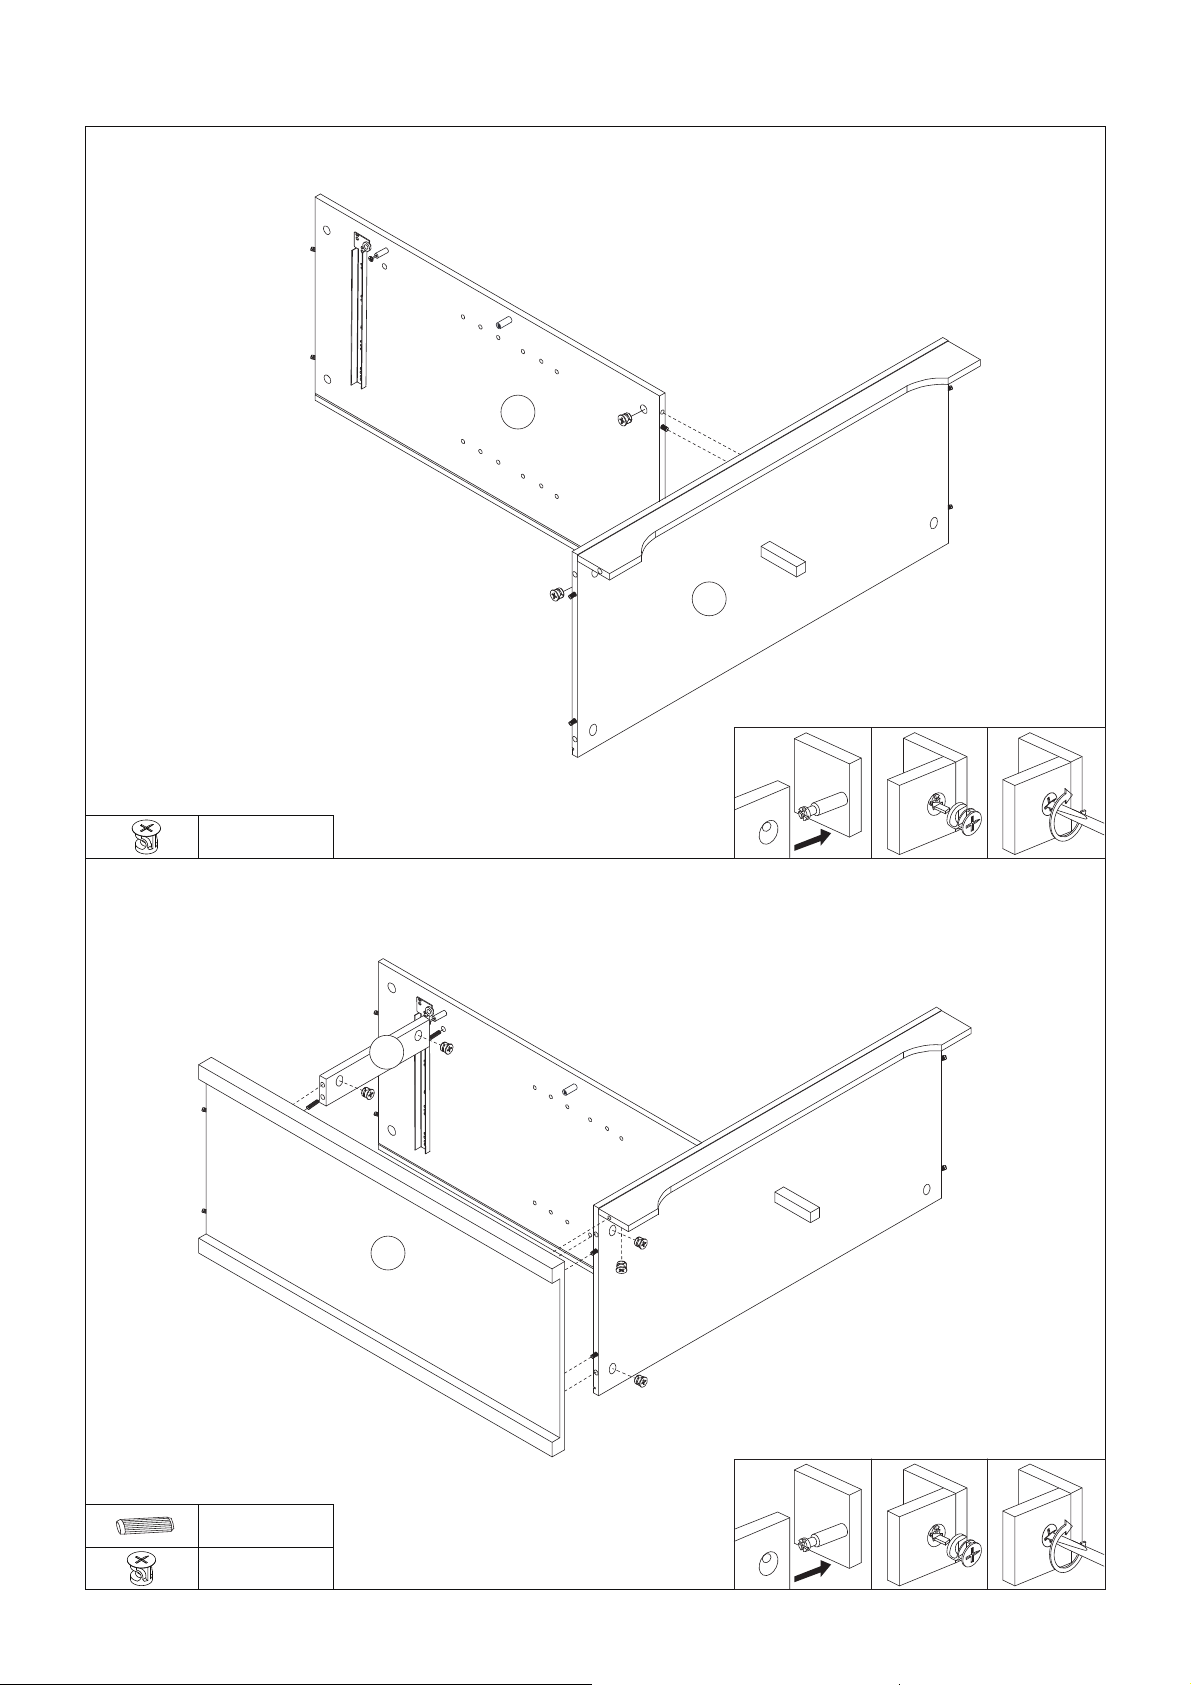
STEP 5
Assembly Steps(EN) / Montageschritte(DE)
4
C
STEP 6
x 2PCS
C
A
C
C
8
1 2 3
>90°
7
x 2PCS
A
x 5PCS
C
2
C
C
1 2 3
>90°
- 7 -
Page 9
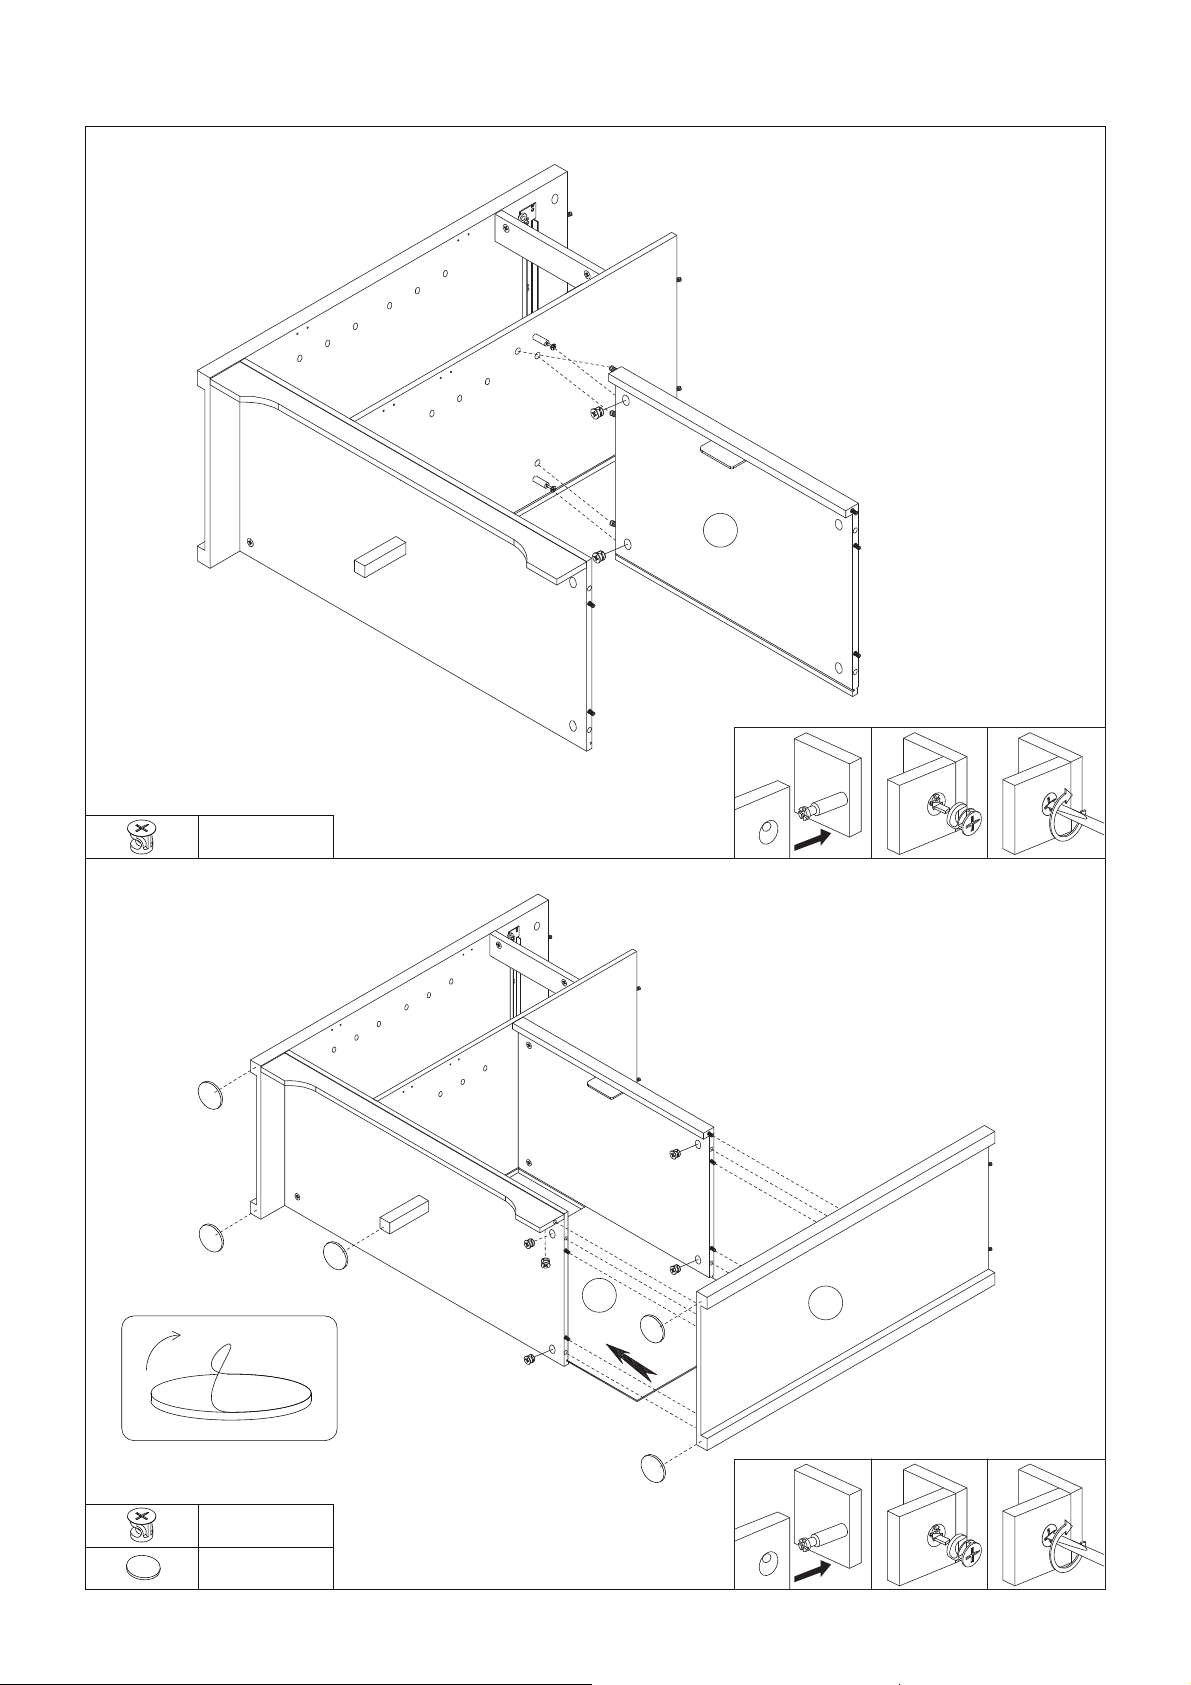
STEP 7
Assembly Steps(EN) / Montageschritte(DE)
C
5
STEP 8
x 2PCS
C
R
C
13
1 2 3
>90°
C
3
x 5PCS
C
x 5PCS
R
R
C
- 8 -
R
1 2 3
>90°
Page 10
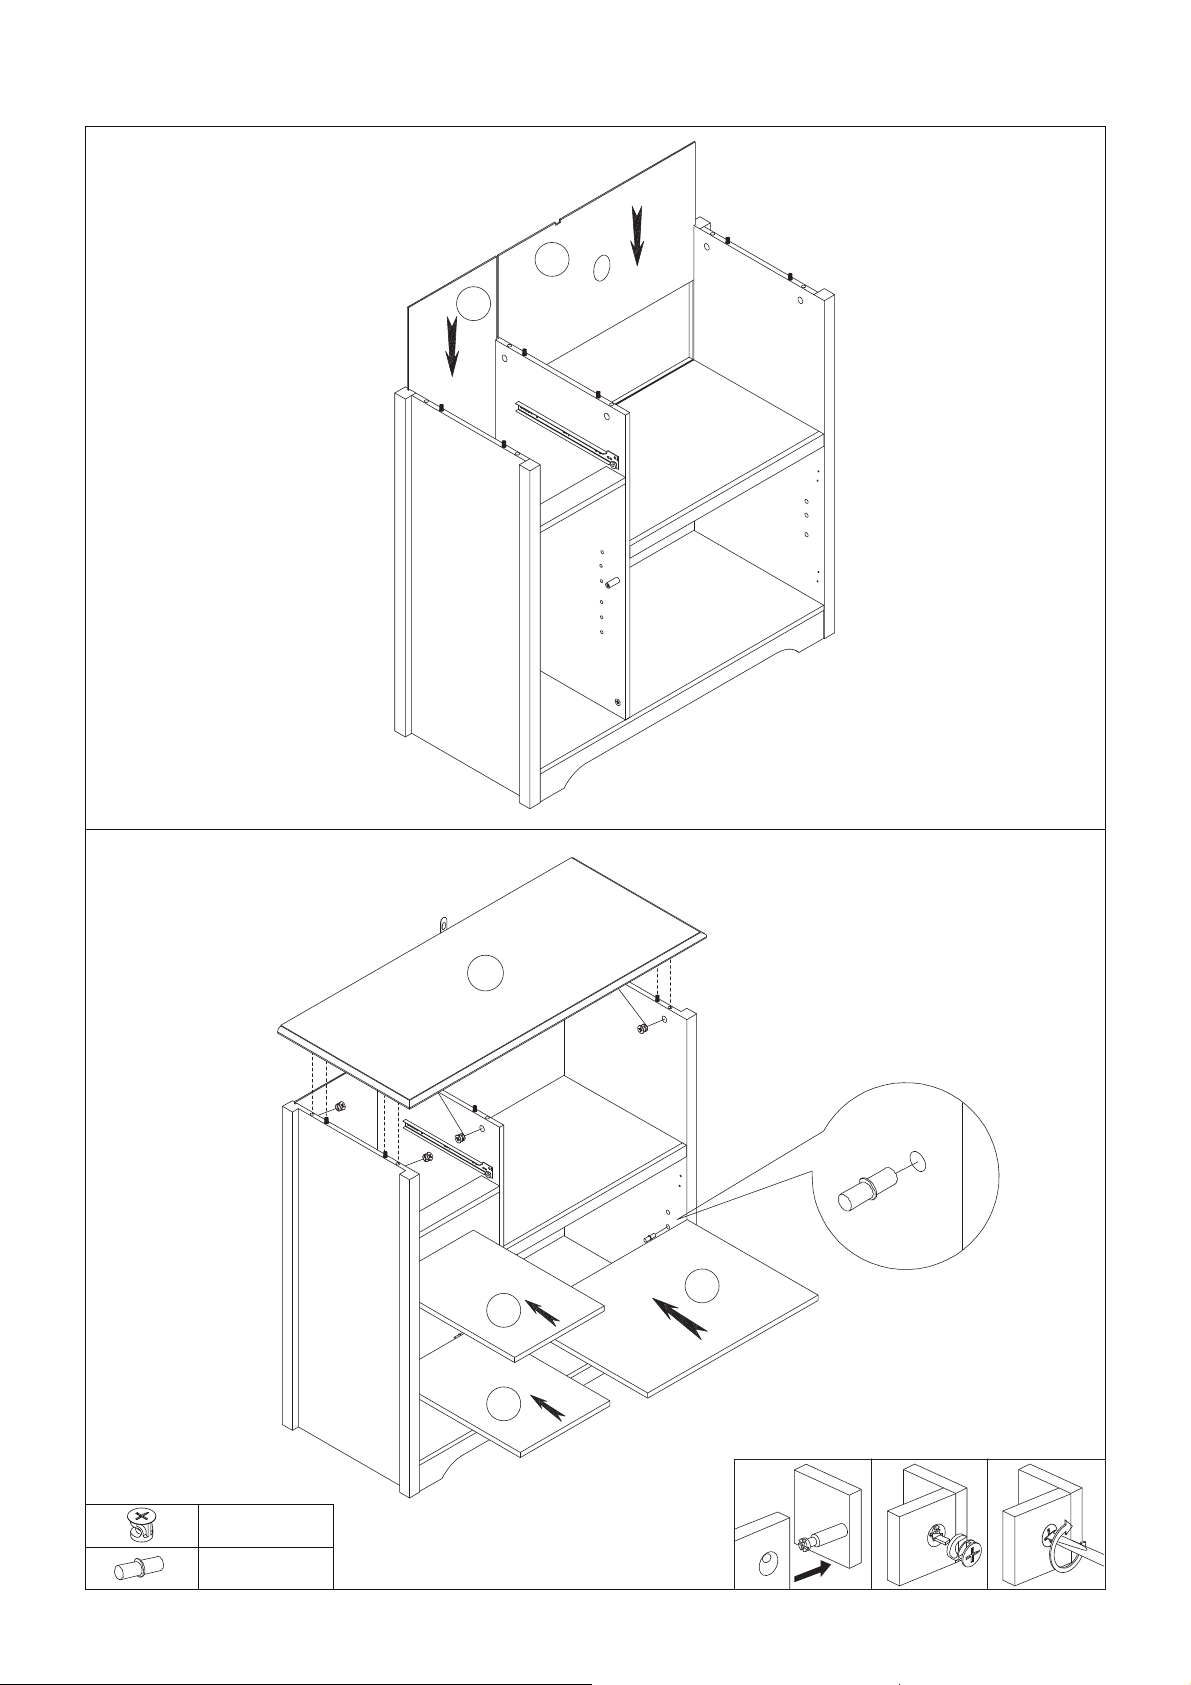
STEP 9
Assembly Steps(EN) / Montageschritte(DE)
12
11
STEP 10
1
C
C
O
14
15
15
x 6PCS
C
x 12PCS
O
1 2 3
>90°
- 9 -
Page 11
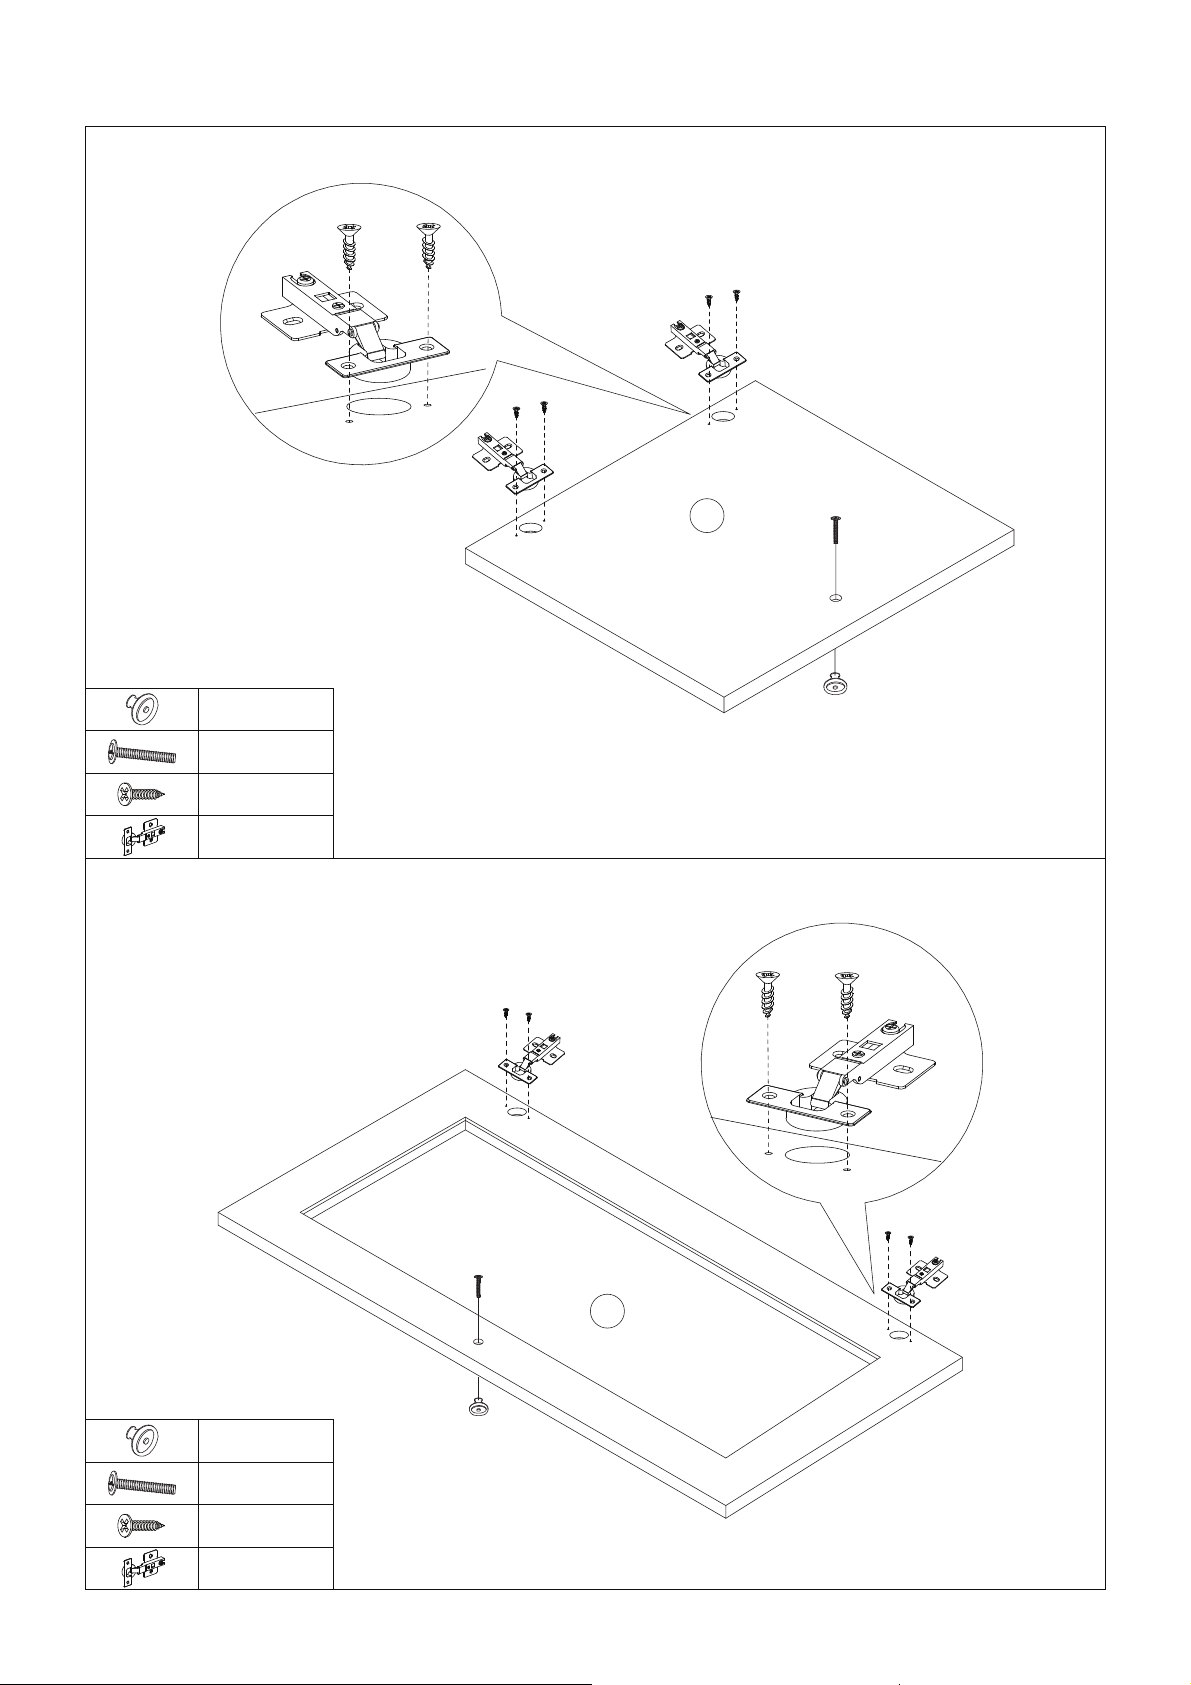
STEP 11
Assembly Steps(EN) / Montageschritte(DE)
G
Q
D
E
G
Q
STEP 12
x 2PCS
x 2PCS
x 8PCS
x 4PCS
16
E
D
x2
G
x 1PCS
D
x 1PCS
E
x 4PCS
G
x 2PCS
Q
Q
E
6
D
- 10 -
Page 12
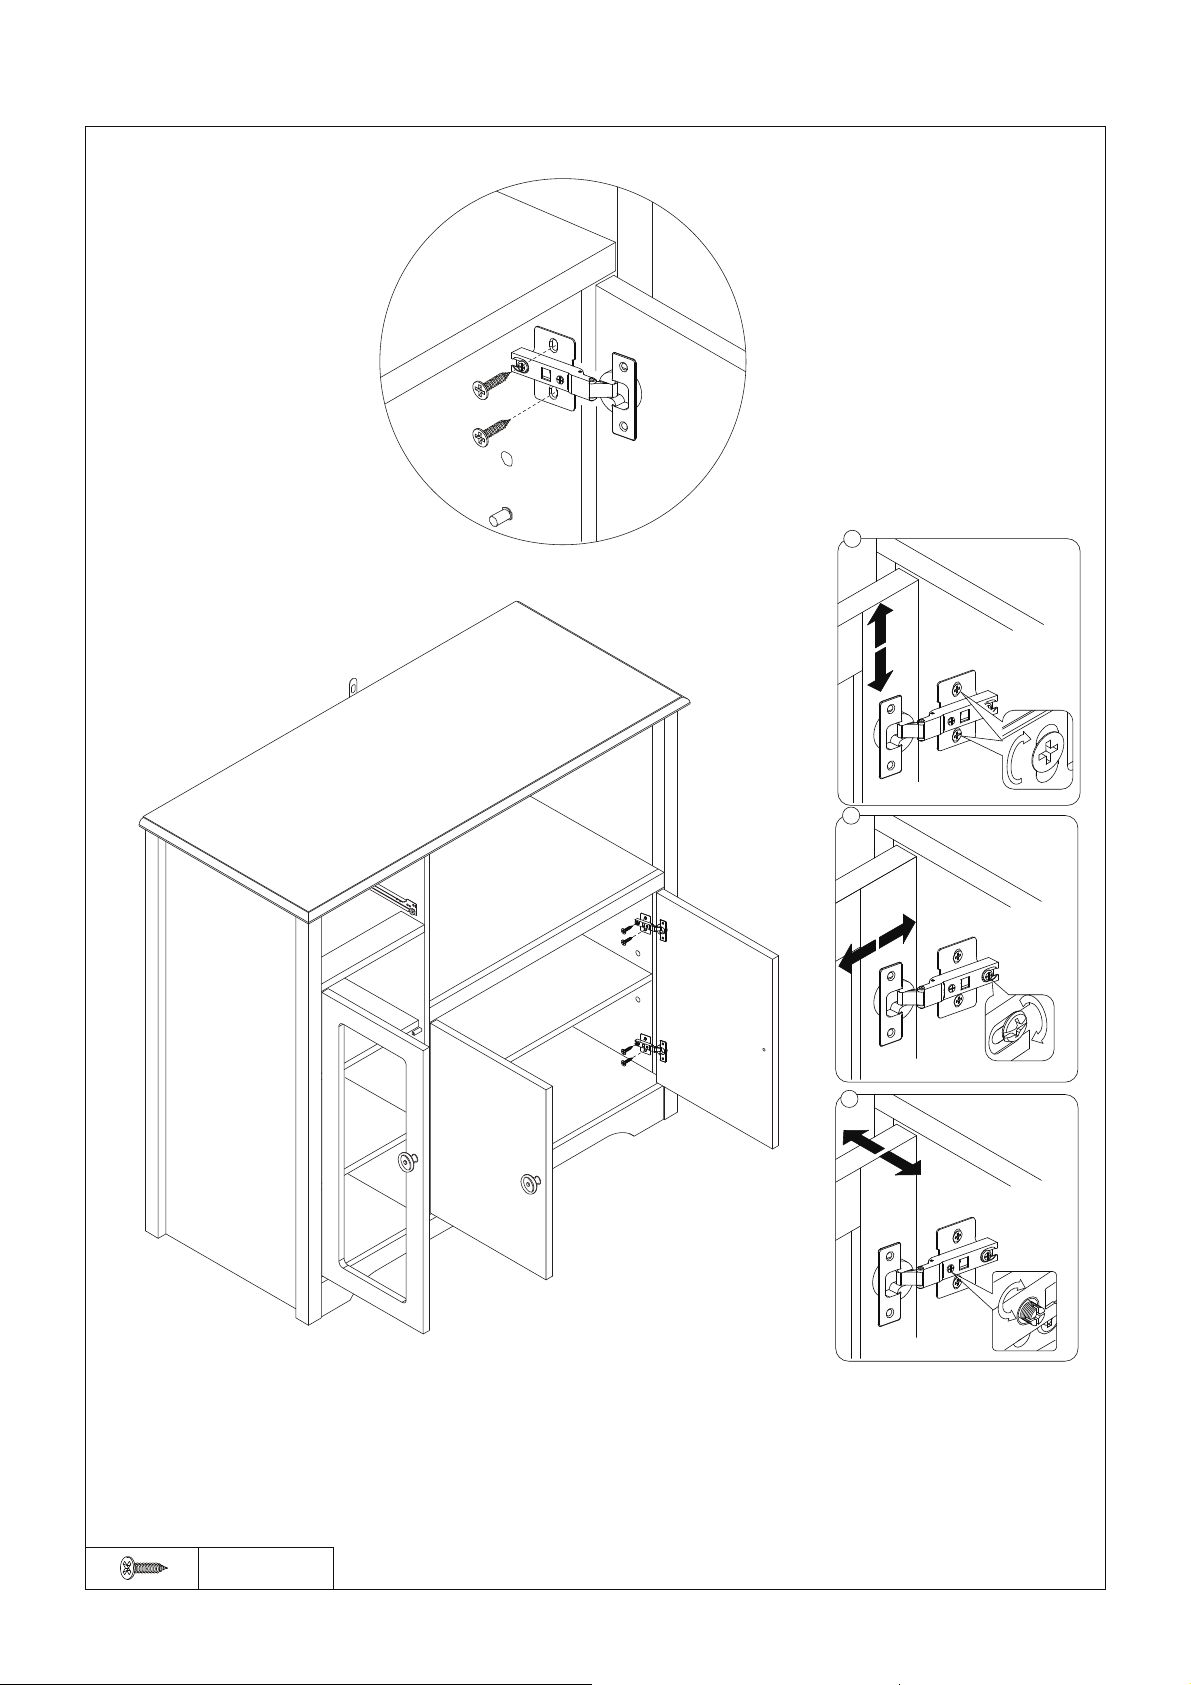
STEP 13
Assembly Steps(EN) / Montageschritte(DE)
G
a
G
b
c
x 12PCS
G
- 11 -
Page 13
STEP 14
Assembly Steps(EN) / Montageschritte(DE)
J
K
J
K
STEP 15
B
x 16PCS
x 16PCS
18
19
C
B
20
18
17
x 4PCS
B
x 4PCS
C
1 2 3
>90°
- 12 -
Page 14
STEP 16
I
Assembly Steps(EN) / Montageschritte(DE)
DL
I
x 4PCS
I
x 1PC
D
x 1PC
E
x 4PCS
F
DL
DR
x 1PC
x 1PC
21
DR
F
I
E
D
F
20
18
F
DR
F
STEP 17
- 13 -
Page 15
STEP 18
WALL
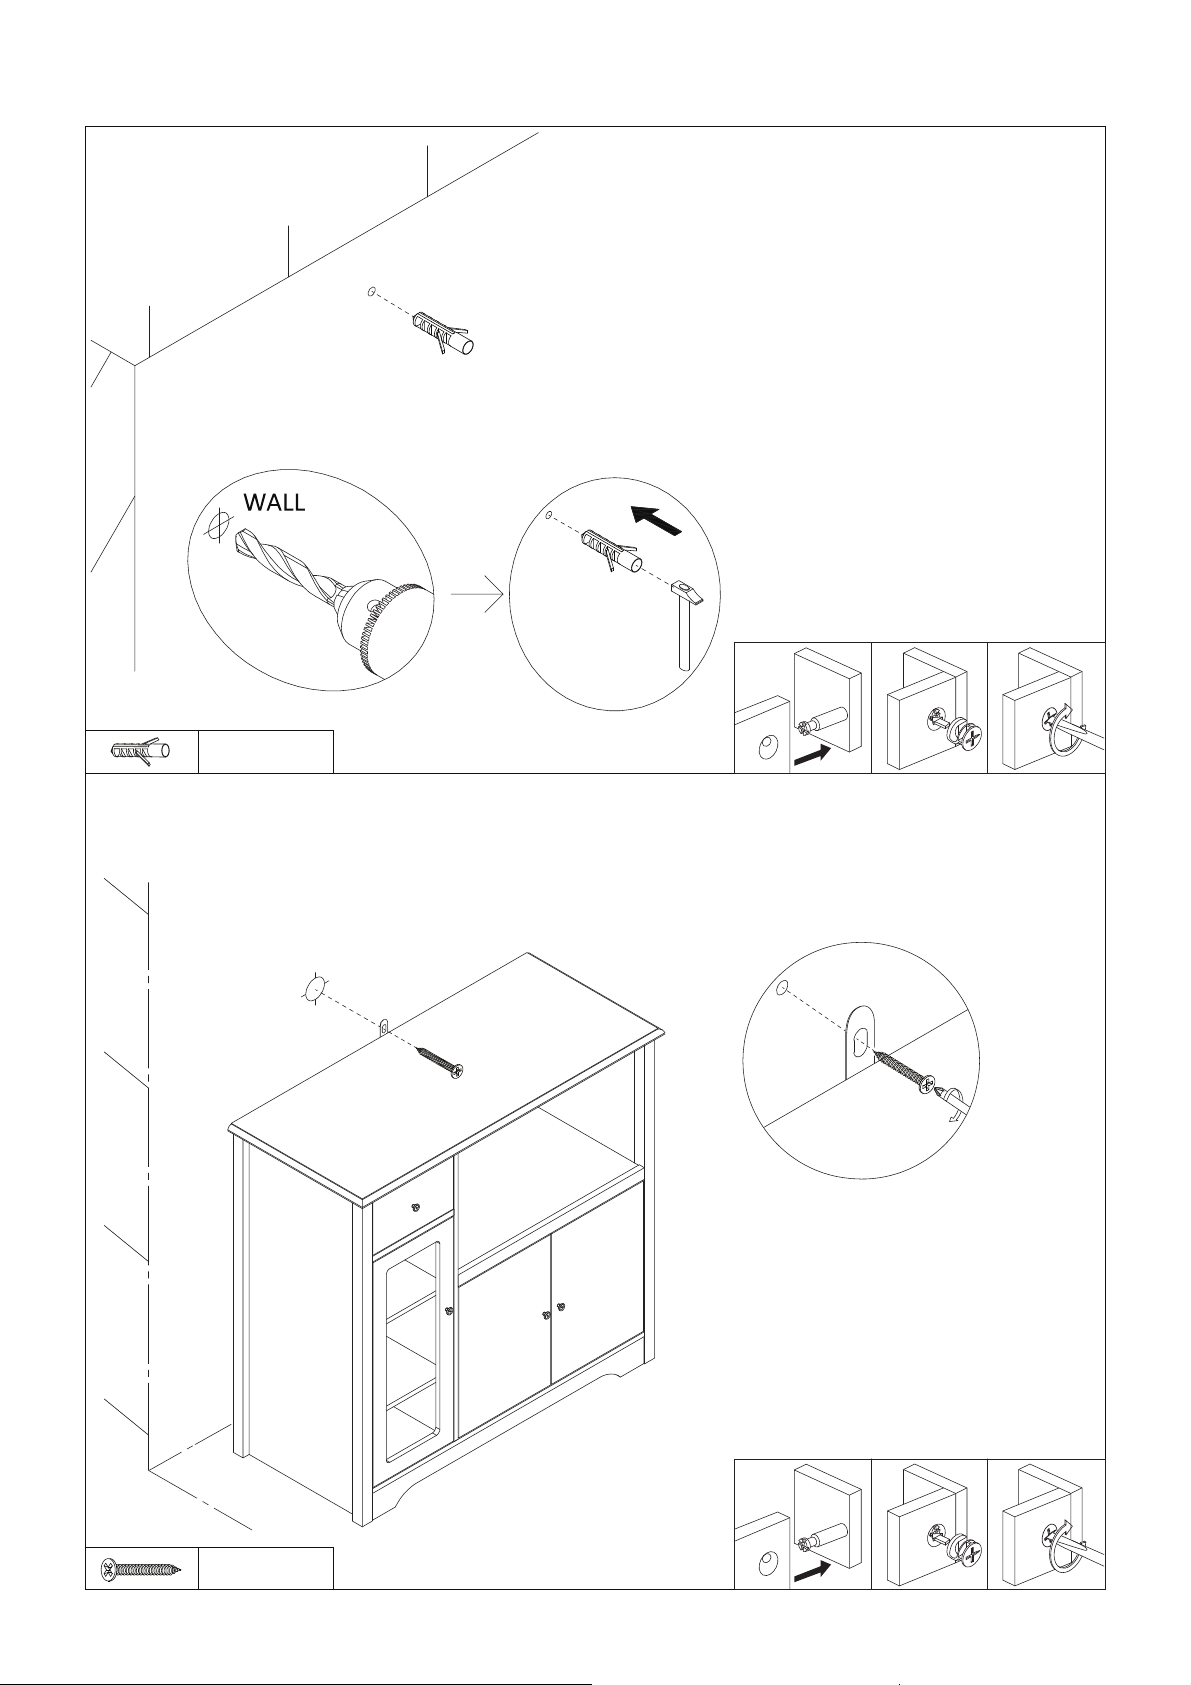
Please refer to Step 19 - Drill a hole in the wall at the
required height and position for anti-falling device
after product installed, and then put the M plastic
part into the hole.
M
M
1 2 3
>90°
M
STEP 19
WALL
x 1PC
Move the cabinet to the appropriate position, and then use the N long
screw to lock the plastic part in the wall through the holes of L-shaped
metal plate.
N
N
x 1PC
N
1 2 3
>90°
- 14 -
Page 16
WARNING
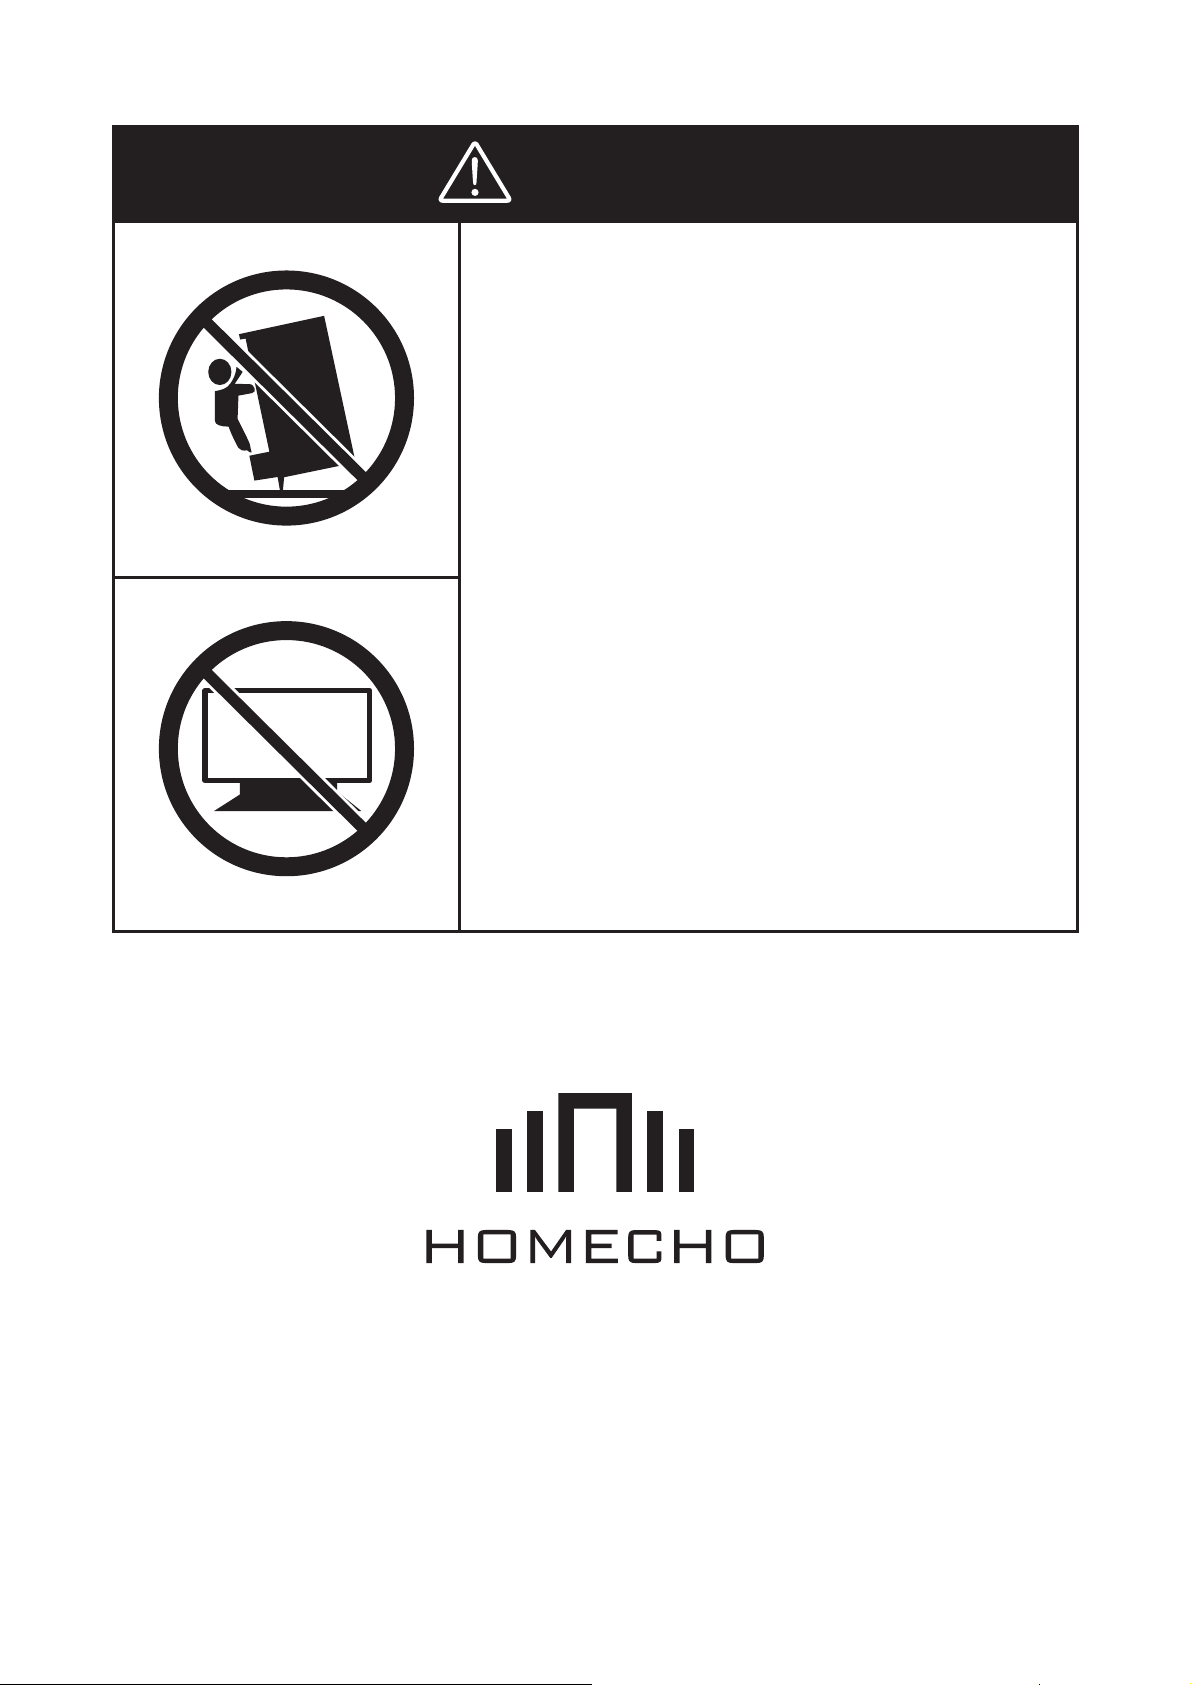
Children have died from furniture
tipover. To reduce the risk of
furniture tipover:
●
ALWAYS install tipover restraint
provided.
●
NEVER put a TV on this product.
●
NEVER allow children to stand,
climb or hang on drawers,
doors, or shelves.
●
NEVER open more than one
drawer at a time.
TV
Place heaviest items in the
●
lowest drawers.
Made in China
 Loading...