

Page 1

O M N I S T A T
ELECTRONIC COMMUNICATING THERMOSTAT
:
COOL
P
AUTO
DAY
Hold Prog Mode Fan
OMNISTAT
Owner's Manual
RC-80 Single Stage Heat/Cool
Document Number 13R00-1
January, 1997
Page 2

Copyright © 1997 Home Automation, Inc.
All Rights Reserved
Page 3

CONTENTS
INTRODUCTION
DESCRIPTION
MAINTENANCE
OPERATION
DISPLAY
FILTER REMINDER
ANTICIPATION
SETTING THE CURRENT TIME AND DAY
PROGRAMMING
SETTING TIME SCHEDULES
DAY/NIGHT MODE
..................................
....................................
...................................
.....................................
........................................
................................
...................................
..................................
.........................
................................
...............
1
1
1
2
4
6
6
7
8
9
10
PROGRAMMABLE ENERGY SAVER MODE (PESM)
SYSTEM MODE
AUTOMATIC TIME UPDATE
...................................
.........................
........
10
11
11
Page 4

This thermostat is Listed by Underwriter's Laboratories and
UL Canada.
This thermostat has been tested and found to comply with the
requirements of the European Union for Electromagnetic
Interference, Electromagnetic Immunity and Safety under the
applicable EMI and Low Voltage Directives and Standards.
FCC
This thermostat has been tested and found to comply with the
limits for a Class B digital device, pursuant to part 15 of the
FCC Rules.
This product generates and can radiate radio frequency
energy. Due to its low power design, it is unlikely to
interfere with radio and TV communications. If it is
suspected of doing so, the user is encouraged to try to correct
the problem by reorienting the receiver's antenna, moving the
receiver away from the product, or consulting an experienced
radio/TV technician for help.
Page 5

INTRODUCTION
Thank you for purchasing your new RC-80 electronic communicating
thermostat. Your thermostat will provide you with comfort,
convenience, and energy savings for years to come.
We hope that you take a few moments to become familiar with all of
the features of this fine product by reviewing this manual. Please
keep this manual on file for future reference.
DESCRIPTION
The RC-80 is a precision digital thermostat for single stage heating
and cooling systems. It has the capability of being controlled both
locally and by remote control. It offers programmability, stand alone
operation, and robust, optically isolated communications with
automation systems, utility control systems, and personal computers.
There are several items which can be configured at the time of
installation. These items have a check box (
indicate which features are used in your system.
As an EPA ENERGY STAR Partner, Home Automation, Inc. has
determined that this thermostat meets the ENERGY STAR
guidelines for energy efficiency.
) for your installer to
MAINTENANCE
Your new thermostat is maintenance free. There is no battery to
install or replace. If necessary, clean unit carefully with a mild soap
solution on a soft cloth.
1
Page 6
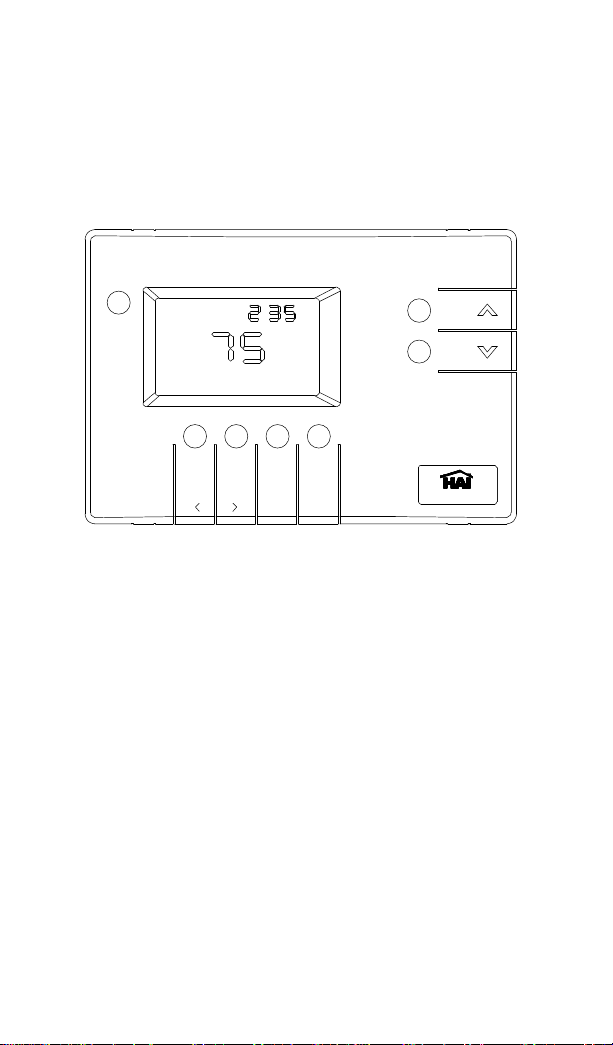
OPERATION
To take advantage of all the benefits and features offered by your
thermostat, we recommend that you start by becoming familiar with
its operation.
1
DAY
:
P
COOL
AUTO
4
3
5
ModeHold2Prog
Fan
7
6
OMNISTAT
1- Display
The Display is used to show current time, temperature, outdoor
temperature (optional), mode, and to give useful information that
will guide you through normal operation of your thermostat.
2- Hold
Press the Hold key to set the system into Hold mode. In Hold
mode, the thermostat will not change its settings by program.
3- Prog
Press the Prog (programming) key to set the current time and day
(hours, minutes, day of week), and to program the temperature
time schedules for the MORN, DAY, EVE, and NITE periods.
2
Page 7

4- Mode
Press the Mode key to set the thermostat mode to Off, Heat,
Cool, or Auto.
In Off mode, the heating and cooling systems are both off and do
not respond to changes in temperature settings.
In Heat mode, the heating system responds to maintain your
desired heating setting.
In Cool mode, the cooling system responds to maintain your
desired cooling setting.
In Auto mode, your thermostat will automatically switch between
heat and cool to maintain your desired heating and cooling
settings.
5- Fan
Press the Fan key to set the system fan to Fan Auto or Fan On.
In Fan Auto mode, the fan runs only when the system calls for
heating or cooling.
In Fan On mode, the fan runs continuously.
6- Down Arrow (
Press the Down Arrow key to lower the desired temperature.
7- Up Arrow (
Press the Up Arrow key to raise the desired temperature.
:
Note
To check your desired setting without changing it, press the
up or down arrow key
∧)
∨)
(∧ or ∨)
once.
3
Page 8

DISPLAY
The following icons will be displayed during normal operation:
1
13
12
11
HOLD
MORN
DAY
EVE
NITE
REMOTE
OFF COOL
FAN AUTO
10 9 876
HEAT
2
::
DESIRED
OUTSIDE
A
3
5
1- Temperature Display
Shows the current temperature, desired temperature, or heating
and cooling settings.
2- Time Display
Shows the current time of day.
DESIRED
3-
DESIRED is displayed when the temperature display shows the
desired temperature setting.
4
OUTSIDE
4-
OUTSIDE will be displayed when the temperature display shows
the outdoor temperature. The outdoor temperature will be
displayed every 4 seconds.
4
Page 9

5-
The
is displayed when the heating or cooling system is
running.
6-
COOL
COOL is displayed when the system is in Cool mode.
7-
AUTO
AUTO is displayed when in automatic changeover mode.
8-
HEAT
HEAT is displayed when the system is in Heat mode.
9-
FAN
FAN is displayed when the fan is set to run continuously.
10-
OFF
OFF is displayed when the system is in the Off mode.
11-
REMOTE
REMOTE is displayed when the last command received by the
thermostat was sent by a remote system.
12- Period Indicators
MORN, DAY, EVE, or NITE is displayed when scheduled
temperature changes are made by the thermostat programs.
13-
HOLD
HOLD is displayed when the system is in Hold mode.
5
Page 10

FILTER REMINDER
Your thermostat logs the amount of time your heating and cooling
system has been running and gives you a reminder when it's time to
replace your filter.
t
" F I L
time display when it is time to change you filter. To clear the
reminder, press the Prog key. The display will return to normal in 10
seconds. Don't forget to change your filter!
"
will be displayed every four seconds in the place of the
ANTICIPATION
Your thermostat has a sophisticated control system designed to keep
you comfortable while saving energy. Part of the control system is a
feature called "anticipation", which anticipates the need to turn the
system on or off before the temperature is actually at the setting.
As humans, we perceive temperature as a combination of heat in the
air and heat radiated from the walls and surroundings. The
thermostat also measures a combination of air and wall temperature.
When heating, the air temperature rises faster than the wall
temperature. The thermostat will turn the heat off briefly to prevent
overheating the air while the wall temperature catches up. Your
comfort is assured without overshooting the heat setting, which
wastes energy.
In summer, the thermostat will periodically run the cooling system to
circulate the air and remove humidity when the temperature is close,
but not above the cool setting. You will be more comfortable at a
higher cool setting, which saves energy.
Remember to allow some time for the thermostat to adapt to a new
setting.
6
Page 11

SETTING THE CURRENT TIME AND DAY
To set or change the current time and day, press and release the Prog
key. The hour will blink.
∧-∨
1. Use the arrow keys (
OFF
2. Press the Prog key to advance to minutes.
3. Use the arrow keys (
OFF
) to change the hour.
::
P
∧-∨
) to change minutes.
::
P
4. Press the Prog key to advance to day of week.
∧-∨
5. Use the arrow keys (
) to set the day of week
(1=Monday - 7=Sunday).
::
DAY
OFF
P
Press the Mode key when complete, or simply wait 8 seconds for the
display to return to normal.
7
Page 12

PROGRAMMING
Your thermostat may be programmed to adjust the heating and
cooling settings up to 4 times per day (MORN, DAY, EVE, NITE).
You can setup a temperature time schedule for weekdays, Saturday,
and Sunday.
To enter programming mode, press the Prog key 4 times.
When in programming mode:
1. The item that is being programmed will flash.
2. The up arrow key (
3. The down arrow key (
4. The Prog (>) key is used to advance to the next item.
5. The Hold (<) key is used to return to the previous item.
6. To exit programming mode, press the Mode key.
The thermostat will automatically exit programming mode after 20
seconds of no key activity.
When programming a time for the Morning, Day, Evening, or Night
period, the time will be increased or decreased in 15 minute
increments. If the up arrow is pressed at 11:45 PM, or the down
arrow is pressed at 12:00 AM, the time display will be blank,
indicating that no scheduled temperature changes will be made for
that period.
Your thermostat will follow a set of time scheduled programs on
weekdays (Monday-Friday), on Saturday, and on Sunday. This will
allow you to have different heating and cooling settings on Saturday
and Sunday, than you normally would have for weekdays (Monday Friday). When programming the time schedules, the weekday time
schedule is programmed first. The Saturday time schedule is
programmed second, and the Sunday time schedule is programmed
last.
∧
) is used to increase the value.
∨
) is used to decrease the value.
8
Page 13

SETTING TIME SCHEDULES
To view or change the programming time schedules of your
thermostat, press and the Prog key four times. The weekday MORN
time will flash.
∧-∨
1. Use the arrow keys (
) to change the scheduled time for the
displayed period (MORN, DAY, EVE, or NITE).
A
::
MORN
DESIRED
2. Press the Prog key to advance to the next item.
∧-∨
3. Use the arrow keys (
MORN
) to change the desired cool setting.
A
::
DESIRED
COOL
4. Press the Prog key to advance to the next item.
∧-∨
5. Use the arrow keys (
MORN
HEAT
) to change the desired heat setting.
A
::
DESIRED
9
Page 14

6. Press the Prog key to advance to the next period.
10
Page 15

Repeat steps 1-6 for the
repeat steps 1-6 for 4 daily periods on Saturdays (Day 6), and 4
daily periods on Sundays (Day 7). The temperature display will
show "6" for Saturdays, and "7" for Sunday times.
Note: If Programming Mode is not being used and Day/Night Mode
is being used, only the Weekday - DAY and NITE settings can
be programmed.
DAY, EVE
, and
periods. Afterwards,
NITE
DAY/NIGHT MODE
Your thermostat can be configured to change its temperature settings
from "DAY" to "NITE"
If so, the thermostat will use the weekday "DAY" and the weekday
"NITE" settings.
"REMOTE" and either "DAY" or "NITE" will be displayed when a
command is sent from a remote location. You can use the arrow keys
(∧-∨) to override the temperature settings, or press the Hold key to
prevent any future remote changes.
Follow the procedure shown in Programming Mode, to change the
programmed DAY and NITE settings.
when commanded from a remote location.
PROGRAMMABLE ENERGY SAVER MODE
(PESM)
Your thermostat can be configured to allow a remote system to
override it. The thermostat sends the temperature to the remote
system. The remote system will use the temperature to determine
whether or not to override the thermostat based on its own
temperature settings.
"REMOTE" will be displayed when the remote system has control of
the thermostat. You cannot use the arrow keys (∧-∨) or any other key
on the thermostat to override the remote system. To resume normal
operation of your thermostat, you must turn the energy saver feature
off at the remote system.
11
Page 16

SYSTEM MODE
Your thermostat can be connected to an automation system or
personal computer. With network software, the remote system can
send commands to the thermostat to change mode, cool setting, heat
setting, status of fan and hold, and other items.
"REMOTE" will be displayed when a command is sent from the
automation system or personal computer. You can use the arrow
keys (∧-∨) on the thermostat to change the temperature settings.
When the temperature settings are changed at the thermostat,
"REMOTE" will no longer be displayed. Press the Hold key to
prevent thermostat programs or the remote system from changing
temperature settings. "HOLD" will be displayed at the thermostat.
AUTOMATIC TIME UPDATE
The thermostat time will automatically be updated by the connected
automation system.
POWER OUTAGES
The thermostat will restart the heating/cooling system 3 to 8 minutes
after the electricity comes back on. All settings and programs are
stored permanently, and will not be affected by a power outage.
CLOCK
The thermostat clock is maintained for approximately 25 minutes
during an electrical outage.
12
Page 17

TIME SCHEDULES
The table below shows the time schedules that are currently set into
your thermostat. There is a blank table at the bottom that can be
used to plan changes to the current schedule.
WEEKDAYS SATURDAYS SUNDAYS
MORN 6:00 AM 8:00 AM 8:00 AM
COOL 78 78 78
HEAT 70 70 70
DAY 8:00 AM
COOL 85 85 85
HEAT 62 62 62
EVE 6:00 PM
COOL 78 78 78
HEAT 70 70 70
NITE 10:00 PM 11:00 PM 10:00 PM
COOL 82 82 82
HEAT 62 62 62
MORN
COOL
HEAT
DAY
COOL
HEAT
EVE
COOL
HEAT
NITE
WEEKDAYS SATURDAYS SUNDAYS
Page 18

COOL
HEAT
Page 19

TWO YEAR LIMITED WARRANTY
Home Automation, Inc. (HAI), warrants this product against defects in
material and workmanship, under normal use and service, for a period of
two (2) years from the date of purchase by the consumer.
During the warranty period, HAI will repair or replace, at its option, any HAI
thermostat that fails due to defect.
This warranty does not cover the cost of removal or reinstallation of any
thermostat. This warranty does not cover failure caused by damage
to the thermostat while in your possession (other than damage
caused by defect or malfunction), or by its improper installation,
including failure to follow the written installation and operation
instructions, alterations, misuse, or abuse. The remedies provided for
in this warranty are the sole and exclusive remedies therefor. In no event
shall HAI be liable for incidental expenses or consequential loss or
damages.
Any implied warranties, including warranties of merchantability and
fitness for particular use or purpose is limited to a period of two (2)
years from purchase date.
This warranty gives you specific legal rights, and you may have other legal
rights, which vary from state to state. Some limitations may not apply to
you.
For warranty and repair service,
Within Continental United States, send defective unit carefully
packaged, postage prepaid, along with description of trouble and return
address to:
Home Automation, Inc.
Service Department
5725 Powell Street, Suite A
New Orleans, LA 70123
Outside of Continental United States:
Contact an Authorized Distributor for repair/replacement instructions.
For Customer Service or Technical Support
Monday - Friday, 9:00 a.m. to 5:00 p.m. Central time
Call us at (504) 736-9810
 Loading...