

Page 1

INSTRUCTION MANUAL
STEAM MOP
SM-13001R
Page 2
EN
INSTRUCTION MANUAL
Dear Customer, thank you for buying Home Electronics appliance. Before use, carefully read the instructions and save
them for future tips and pass them if you lend or give the appliance. This appliance is intended solely for domestic use.
AL
UDHËZIM PËR PËRDORIM
Të ndëruar përdorues, ju falenderojmë për blerjen e pajisjes elektronike Home Electronics. Para përdorimit, lexojini me
kujdes udhëzimet dhe ruajini për këshilla në të ardhmen dhe në qoftë se ia jepni pajisjen Tuaj dikujt tjetër, jepeni edhe
udhëzimin për përdorim me pajisjen. Kjo pajisje është synuar vetëm për përdorim shtëpiak.
BA
UPUTSTVO ZA UPOTREBU
Dragi korisniče, hvala Vam na kupovini Home Electronics uređaja.
Prije upotrebe pažljivo pročitajte uputstva i sačuvajte ih za buduće savjete i proslijedite ih ako pozajmljujete ili dajete
ueđaj. Ovaj uređaj je namijenjen isključivo za kućnu upotrebu.
HR
UPUTE ZA KORIŠTENJE
Dragi korisniče, hvala Vam na kupnji Home Electronics uređaja. Prije uporabe pozorno pročitajte upute i sačuvajte ih
za buduće savjete i proslijedite ih ako dugome posuđujete ili darujete uređaj. Ovaj uređaj je namijenjen isključivo za
kućnu uporabu.
ME
UPUTSTVO ZA UPOTREBU
Dragi korisniče, hvala Vam na kupovini Home Electronics uređaja.
Prije upotrebe pažljivo pročitajte uputstva i sačuvajte ih za buduće savjete i proslijedite ih ako pozajmljujete ili dajete
ueđaj. Ovaj uređaj je namijenjen isključivo za kućnu upotrebu.
RS
UPUTSTVO ZA UPOTREBU
Dragi korisniče, hvala Vam na kupovini Home Electronics uređaja. Pre upotrebe pažljivo pročitajte uputstva i sačuvajte ih za buduće savete i prosledite ih ako pozajmljujete ili dajete ueđaj. Ovaj uređaj je namenjen isključivo za kućnu
upotrebu.
SI
NAVODILA ZA UPORABO
Spoštovani uporabnik, hvala Vam za nakup Home Electronics aparata. Pred uporabo pozorno preberite navodila in
jih shranite za kasnejši pregled, prav tako pa jih priložite aparatu, če ga nekomu podarite ali posodite. Ta aparat je
namenjen izključno gospodinjski uporabi.
MK
Драги корисници, ви благодариме што ги купувате Home Electronics апаратите. Пред употреба внимателно
прочитајте ги упатствата и сочувајте ги за понатамошна употреба и проследете ги доколку го позајмувате или
го давате апаратот. Овој уред е исклучиво за домашна употреба.
Page 3

3
ENGLISH
IMPORTANT SAFETY INSTRUCTIONS
When using electrical appliances basic safety precautions should always be followed:
1. Read all instructions before using the appliance.
2. To protect against electric shock do not immerse cord, plug or appliance in water or other
liquids. Follow the instructions for cleaning.
3. Young children should be supervised to ensure that they do not play with this appliance.
4. Do not leave the appliance unattended when it is plugged in.
5. Unplug when not in use and before cleaning. Allow to cool before disposal, cleaning or
before moving.
6. If the power cord is damaged, it must be replaced by an authorized service technician or a
qualified person in order to avoid accidents.
7. The use of an extension cord is not recommended.
8. Be careful not to tangle and not to twist the power cord.
9. Do not pull the power cord. Do not use it to move or carry the appliance. When you
disconnect the appliance from the power supply, pull the plug, not the cord.
10. The use of accessory attachments that are not supplied with the appliance can cause a fire,
electric shock or injury.
11. Do not let the power cord to hang over the edge of a table or an element or touch hot
surfaces, including a stove. Ensure that the power cord does not hang and that nobody /
nothing get stuck on it.
12. Do not place the appliance on or near a gas or electric stove, in a warm oven or near
combustible materials.
13. Do not use outdoors or when standing on wet surfaces.
14. Do not touch the plug and the appliance with wet hands!
15. Only use this appliance for its intended domestic use.
16. The appliance is not intended for use by persons (including children) with reduced
physical, sensory or mental capabilities, or lack of experience and knowledge, unless they
have been given supervision or instruction concerning use the appliance by a responsible
person for their safety.
17. Before switching on the appliance, check if the voltage stated on the plate corresponds to
the voltage of your electrical network.
18. Do not use the appliance if it has been dropped and there are visible signs of damage or
leaks.
19. Store in a dry place, protected from dust and away from direct sunlight.
20. Any misuse or failure to follow the instructions for use makes the guarantee invalid and
frees the manufacturer / distributor / seller of any responsibility.
21. The Iiquid or steam shouId not be direded towards equipment containing electricaI
components,such as the interlor of ovens.
22. Provide attention to when using the unit near children, pets and plants.
23. Never direct the flow of steam towards people, animals or plants!
24. Do not insert foreign objects into the openings in the device. Do not use the device if any
of its openings.
Page 4

4
ENGLISH
25. Do not use a nozzle head without floor nozzle.
26. Do not use the appliance without water in the containe.
27. Be more careful when using the appliance on stairs.
28. Keep the work area well-lit.
29. Never pour hot water or any other liquid, such as flavoring agents or alcohol-based
detergents in the container. Such an action will make the operation unsafe and damage
the appliance.
30. Always keep the steam outlet clean and free. Avoid placing the steam openings on a soft
surface that may block the flow of steam. Keep the openings free from lint, hair and other
potential obstructions to ensure proper steam flow.
31. Stop using the mop if you observe wate leakage and contact a qualified technician.
32. Do not use the steam mop in enclosed spaces with flammable, explosive and toxic vapors,
such as solvents for paints or oil paints.
33. Do not use to the leather, wax polished floors or furniture, unsealed hardwood floors,
synthetic fabrics, velvet or other delicate steam-sensitive materials.
34. Do not use for space heating purposes!
35. Do not touch hot surfaces!
36. To disconnect the the appliance from the mains, turn the power switch (O / I) to position
“OFF”, then pull out the plug from the wall outlet.
37. Care should be taken when using appliance due to emission of steam.
38. To avoid circuit overload, do not operate another appliance on the same socket (circuit), as
the steam cleaner.
39. Do not pull the extension hose, because you can damage it. At the damaged may occur
leakage of water vapor.
40. Do not touch the nozzle for cleaning windows or cloth during use.
41. During operation, these supplements are hot and may cause burns.
42. Keep the extension hose away from you and to avoid touching the hose as it can be
extremely hot and burn you.
Do not dispose of electrical appliances as unsorted municipal waste, but use special
collection points for electrical waste. Please contact your local authorities for information
regarding the systems that are available for the disposal of electronic waste. In the case of
disposal in landfills or dumps, hazardous substances can leak into groundwater and enter the
food chain, adversely affecting your health and the environment.
Page 5

5
ENGLISH
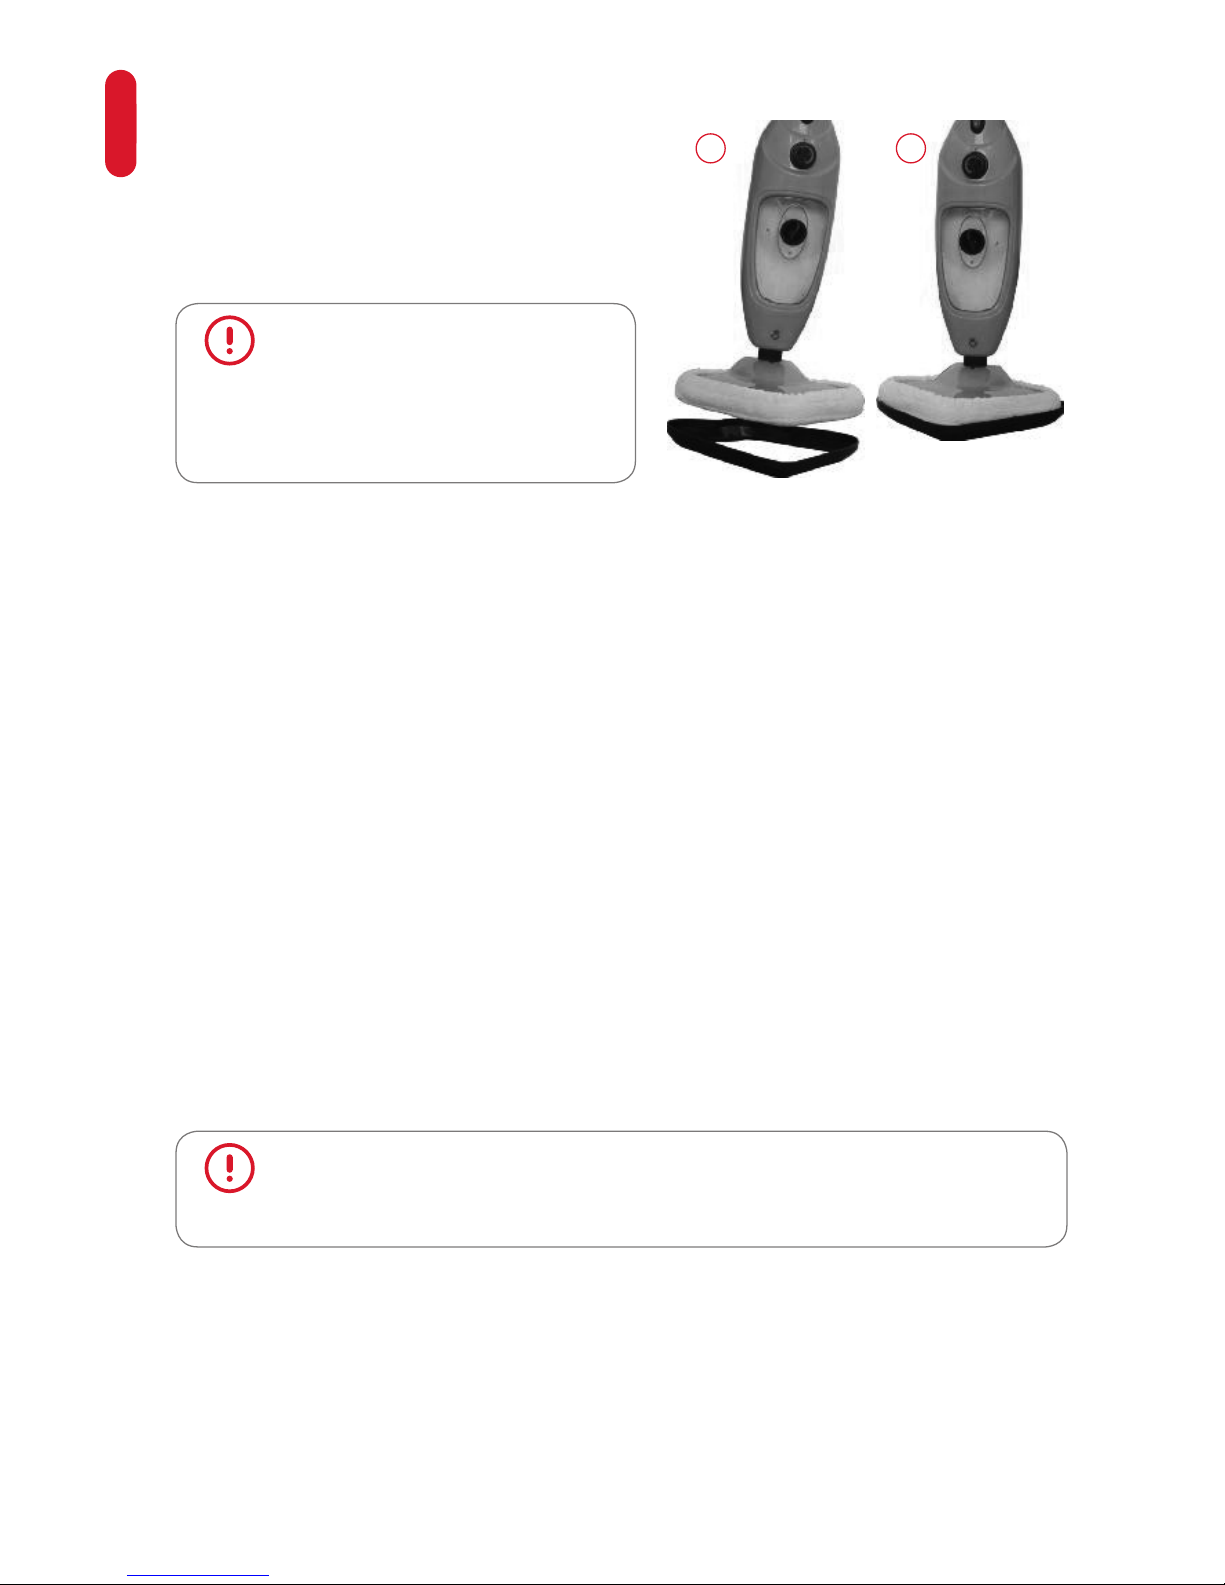
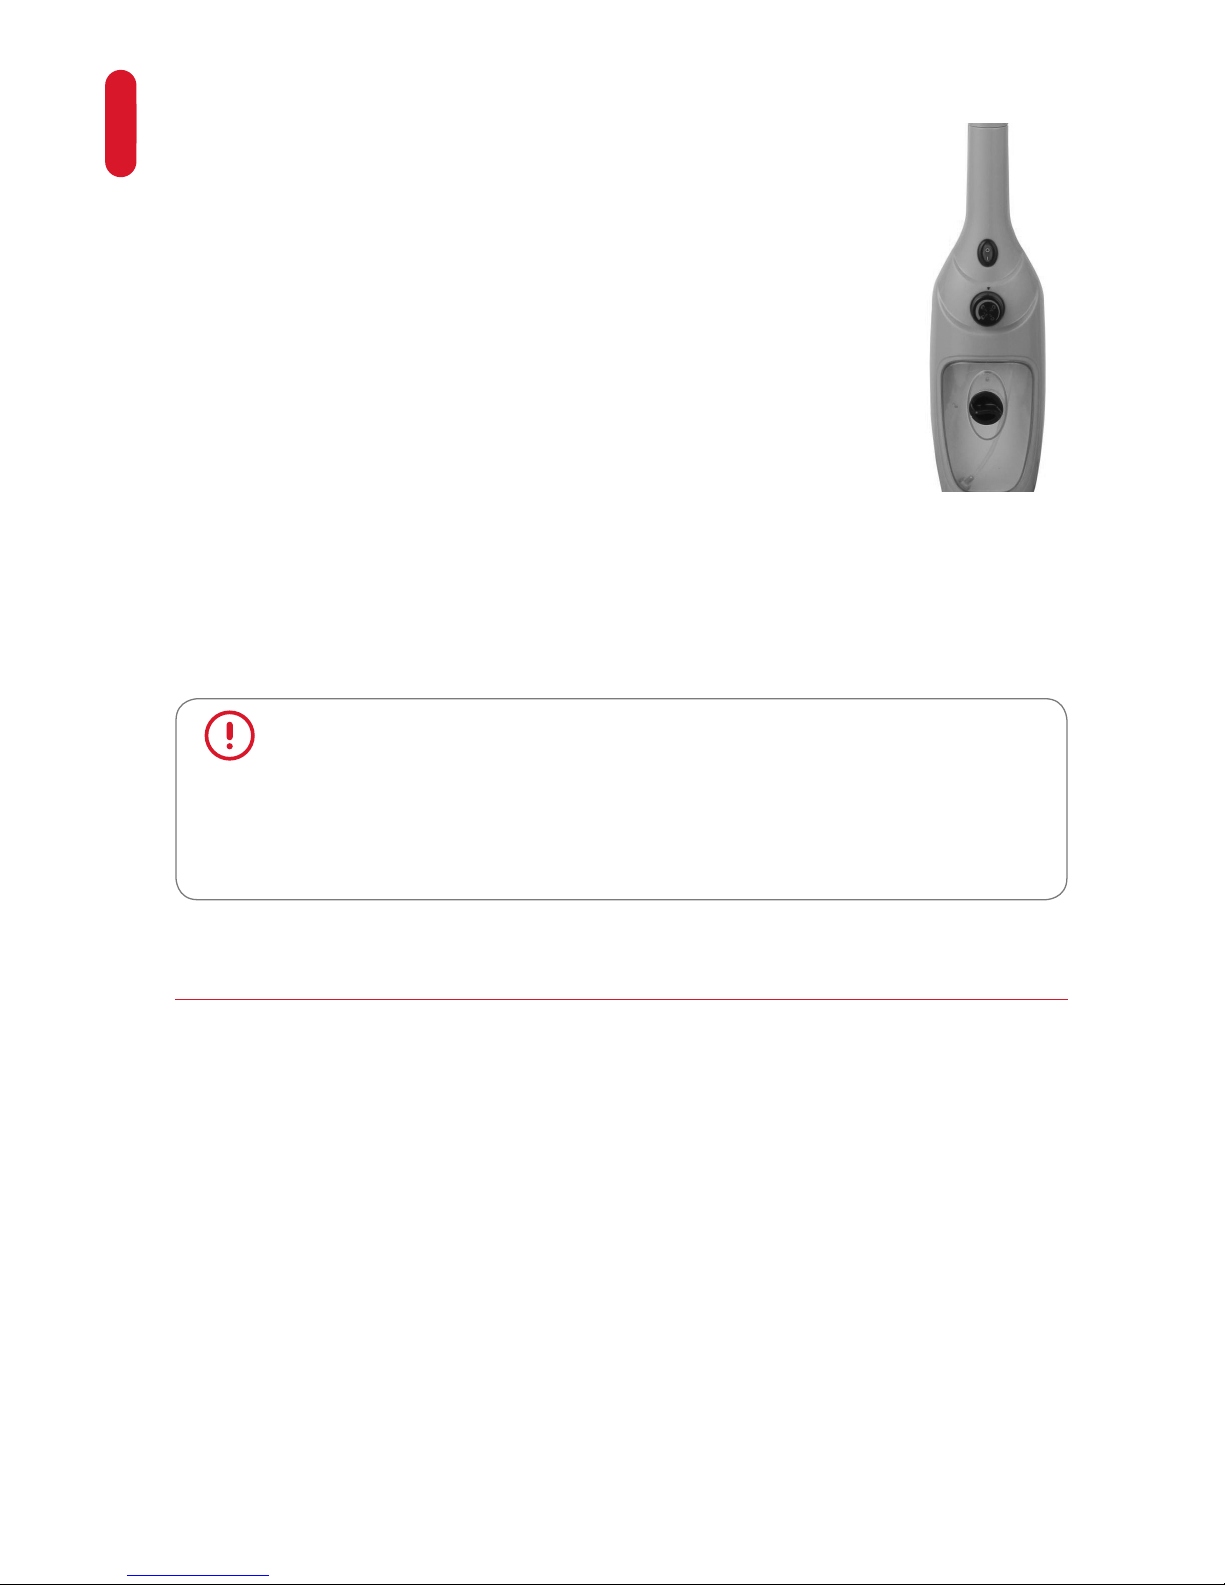
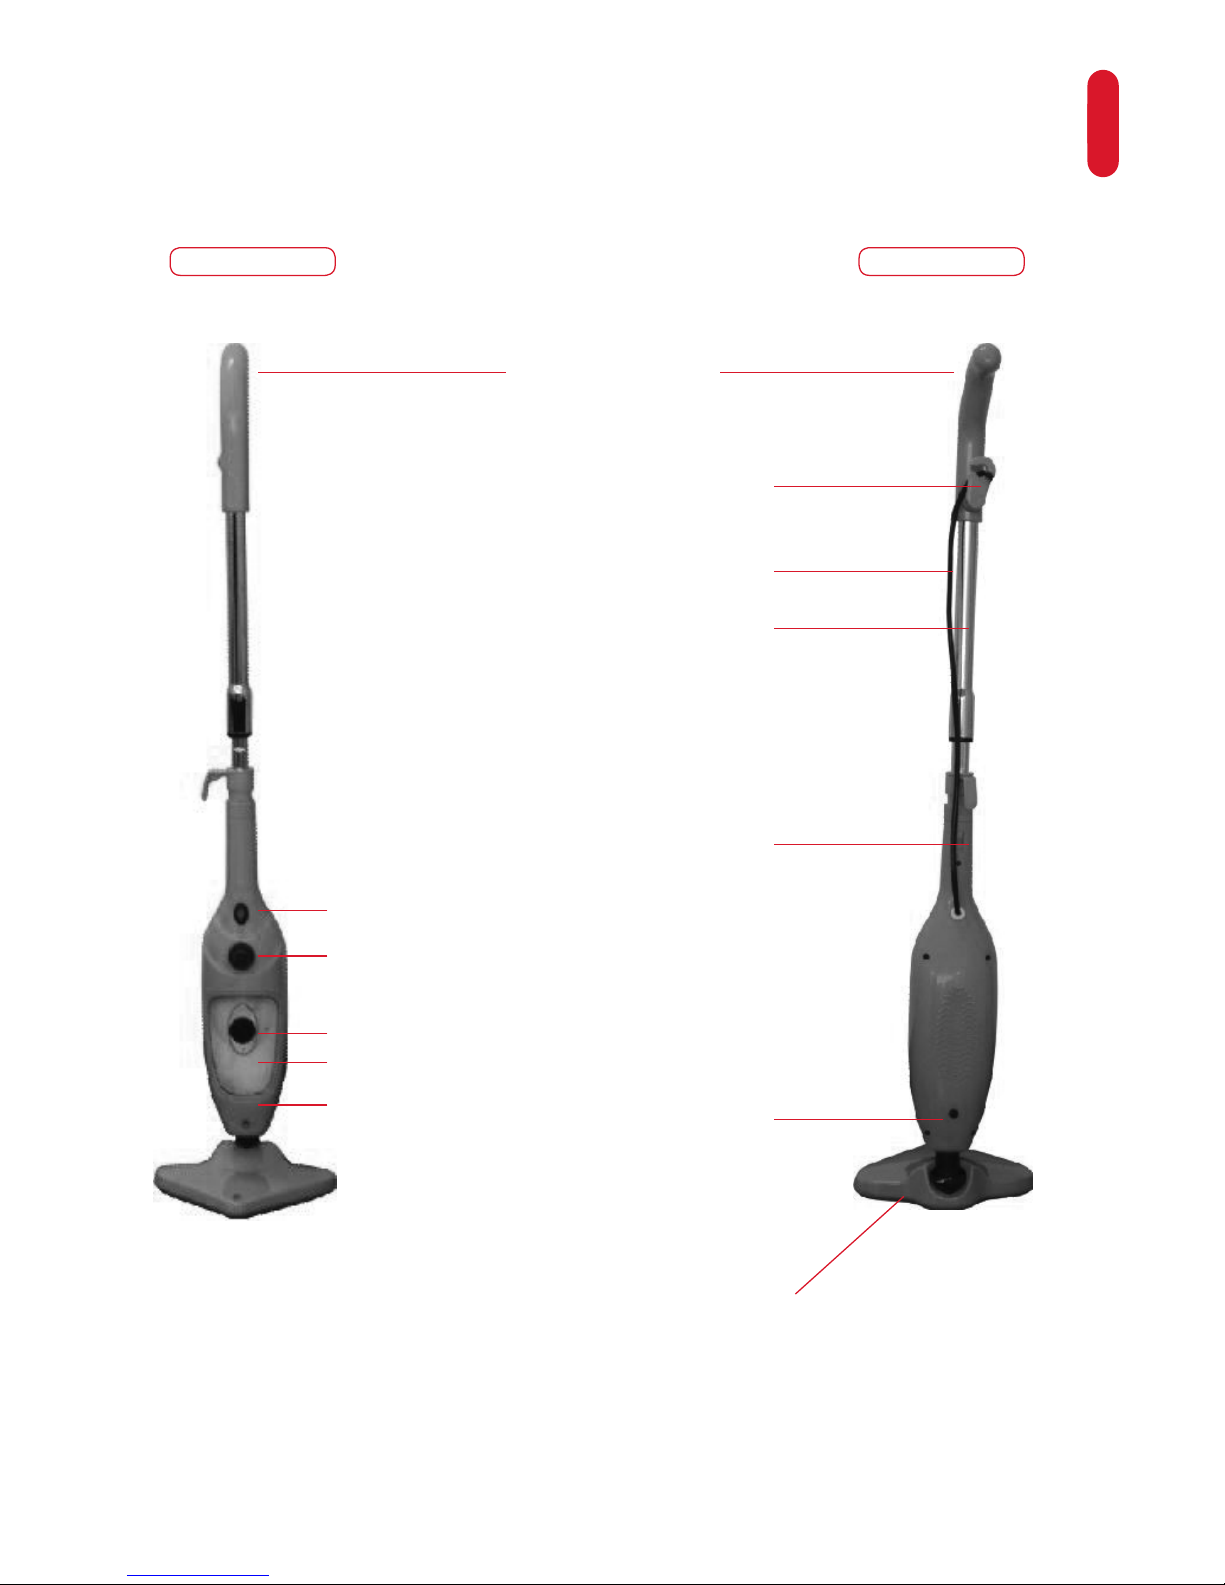
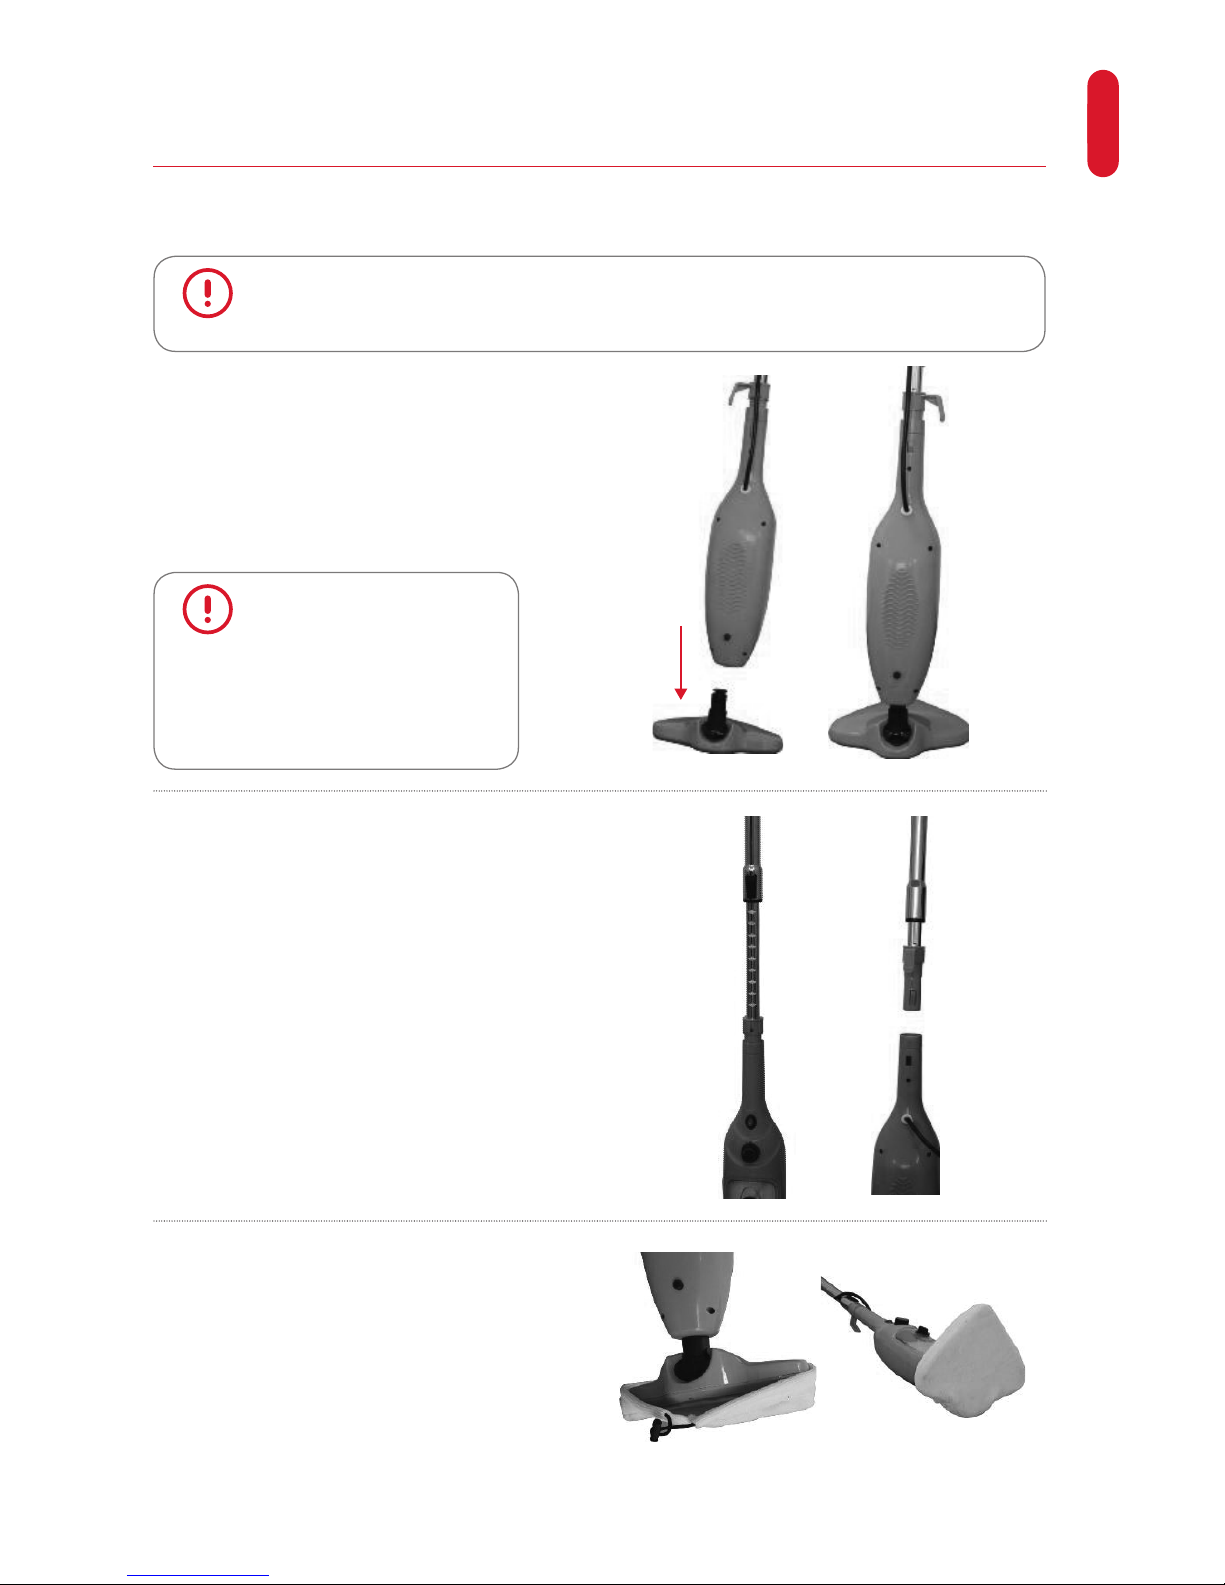
PARTS OF THE APPLIANCE
Curved Handle
Power Switch ( O / I ) with LED ON/OFF Light
Steam Regulator
Water Tank Cap
Water Tank
Main Body
Upper Cord Wrap
Power Supply Cord
Extension Handle
Extension Handle Lock Button
Lock Button
(on Main Body)
Mop Head
Front view Back view
Page 6

6
ENGLISH
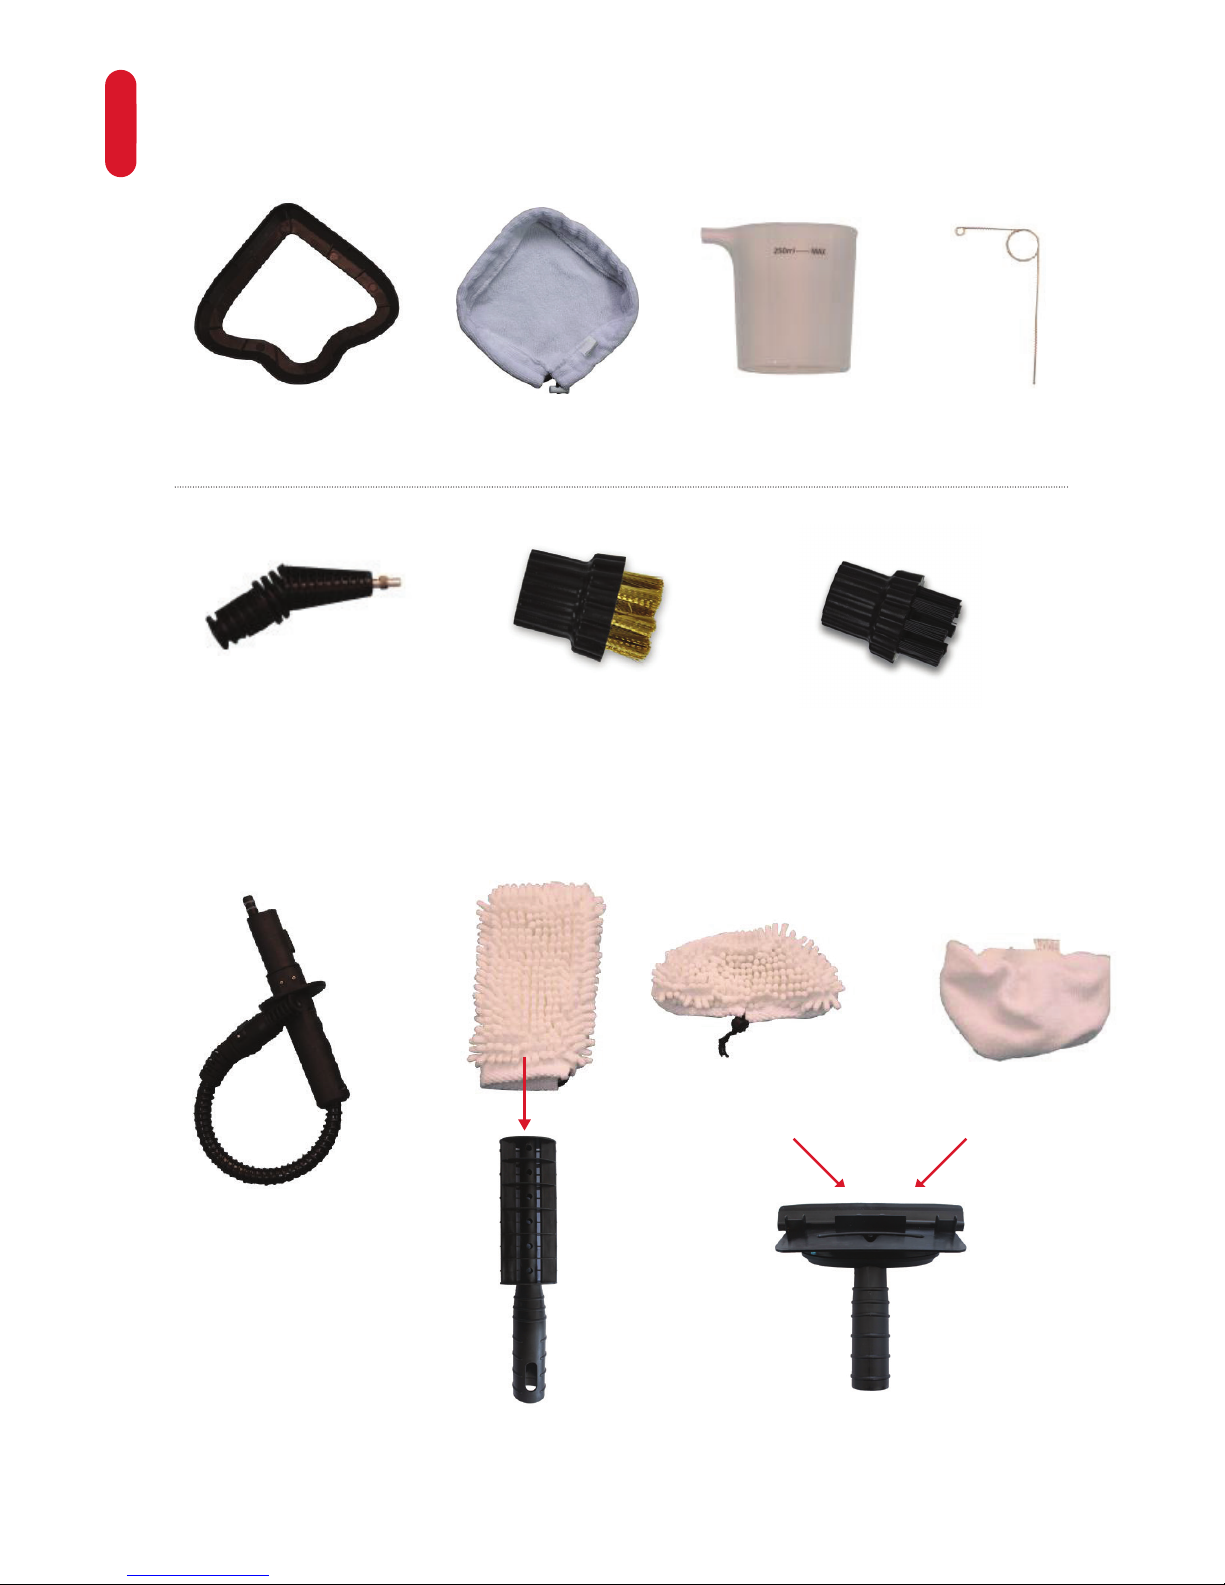
ACCESSORIES
OPTIONAL ACCESSORIES
Glider
Jet Nozzle
Microfiber
Cloth
Duster
Round Brush
(Brass)
Round Brush
(Nylon)
Cleaning Pin
Lint ClothWindow
Cleaning cloth
Measuring
Cup
Window Cleaning Tool
Extension Hose
Page 7

7
ENGLISH
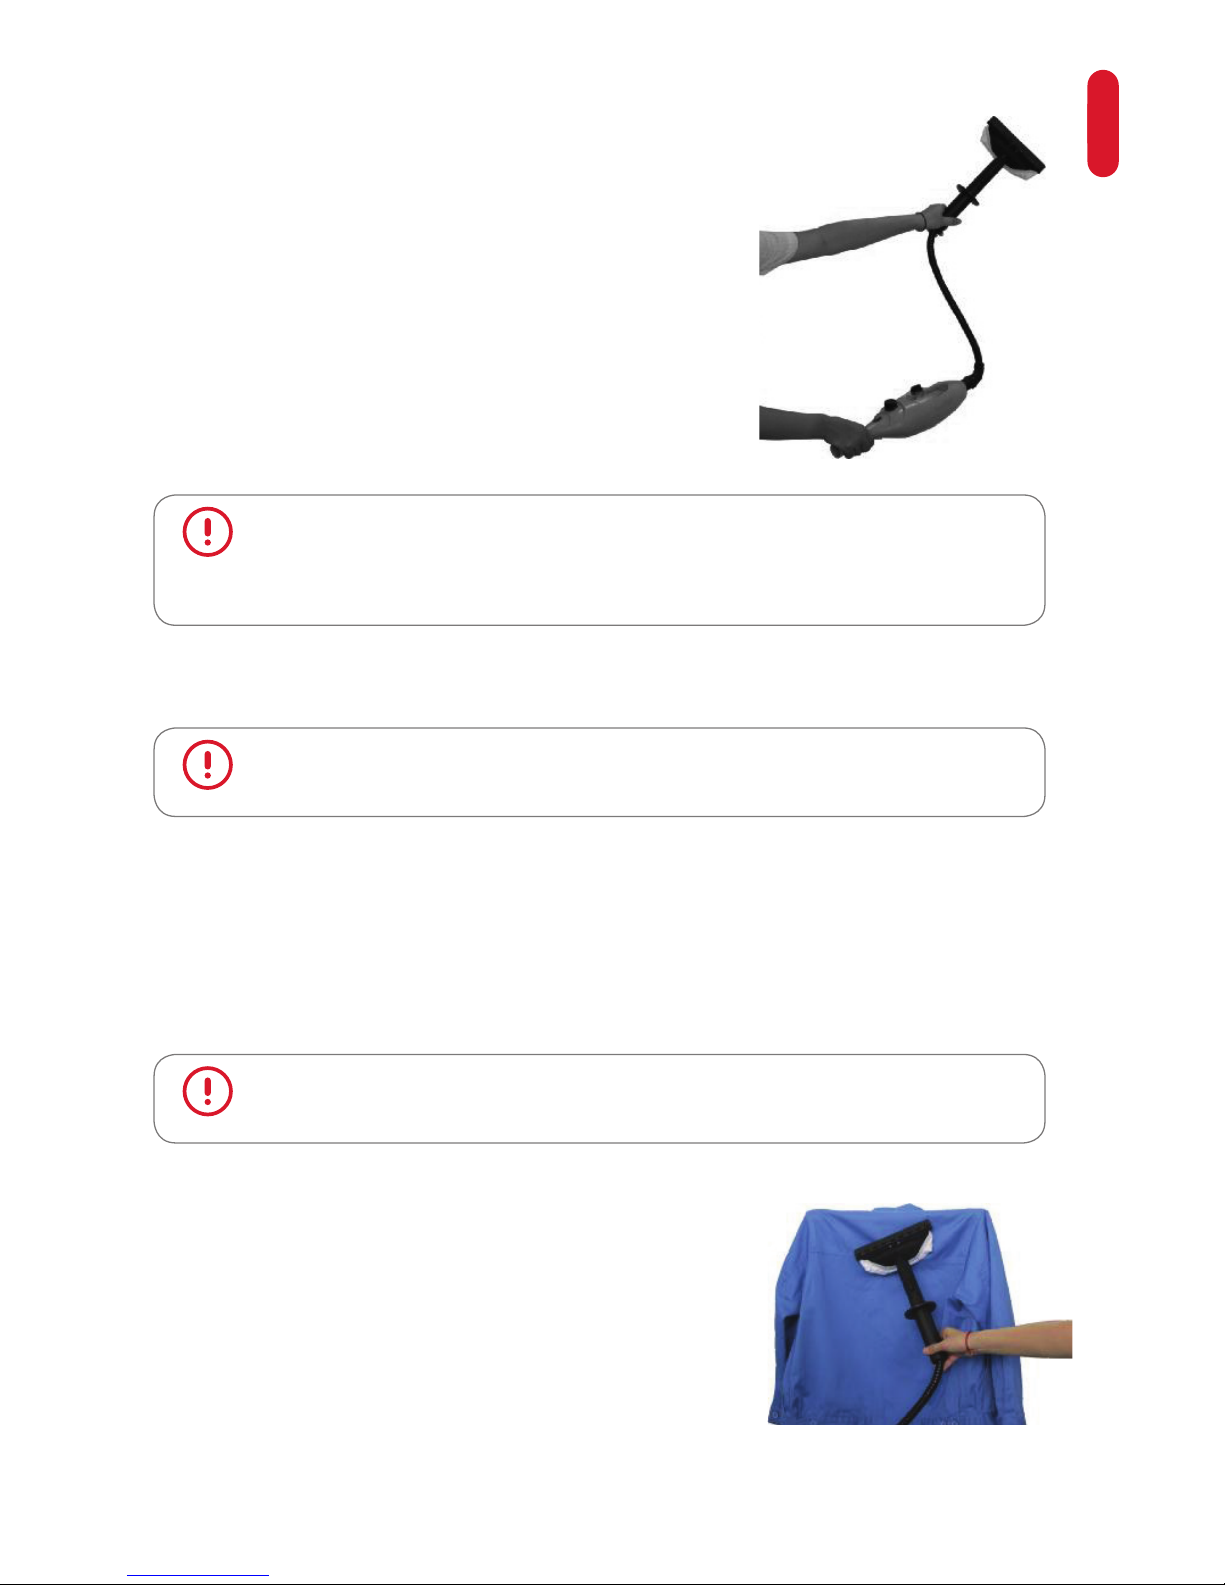
CAUTION: Please make sure that the unit is unplugged from an electrical outlet
and the Power Switch ( O / I ) is in the “OFF” ( O ) position.
CAUTION: Make sure
that the Mop Head is
securely locked into place
before usage.
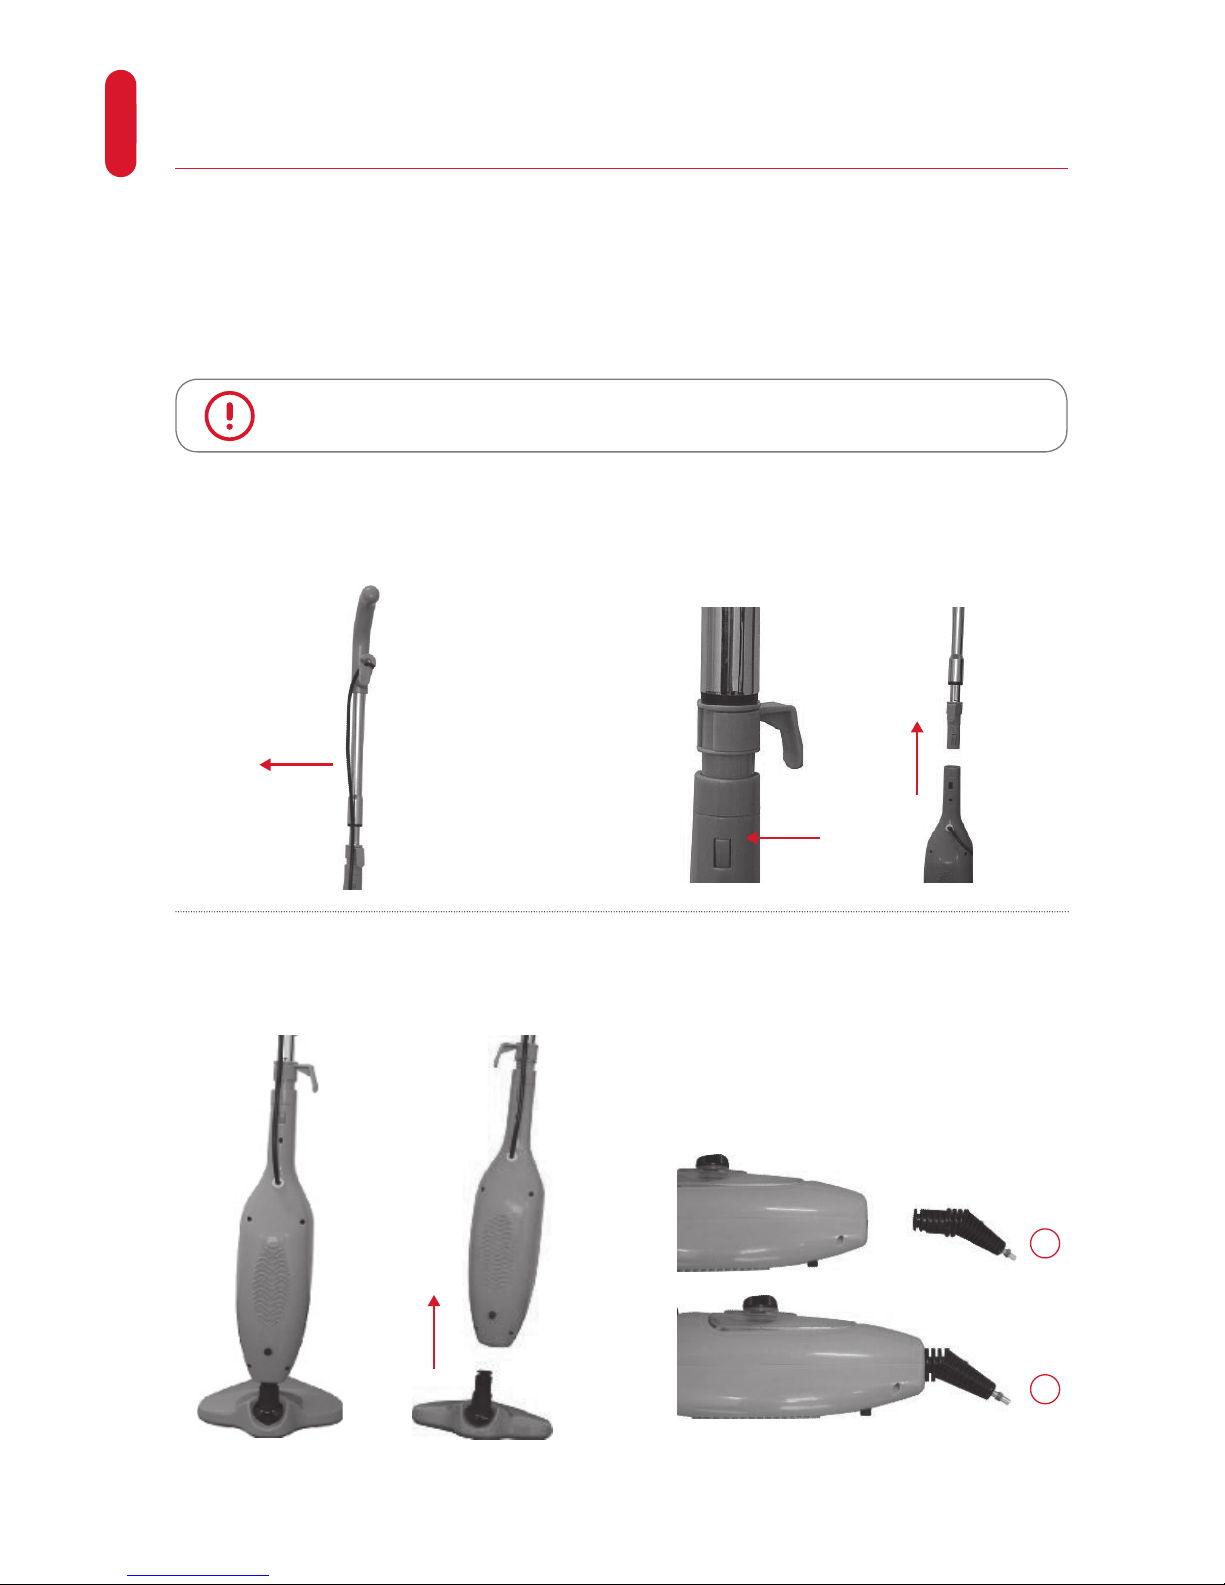
HOW TO USE THE APPLIANCE
1. Attach the mop head to the main
body as follows: Insert the Swivel
Joint into designated hole in the
main body until it locks in place.
2. Insert the extension handle into
the designated opening in in the
appliance until it gets locked in
place in place with the extension
handle lock button.
3. Place the mircofiber cloth on the
bottom of the mop head. Press the
cloth against the mop head so the
loops on the cloth catch the gripping
strips on the Mop Head, while
pressing a button on a loop.
ASSEMBLING
Page 8
8
ENGLISH
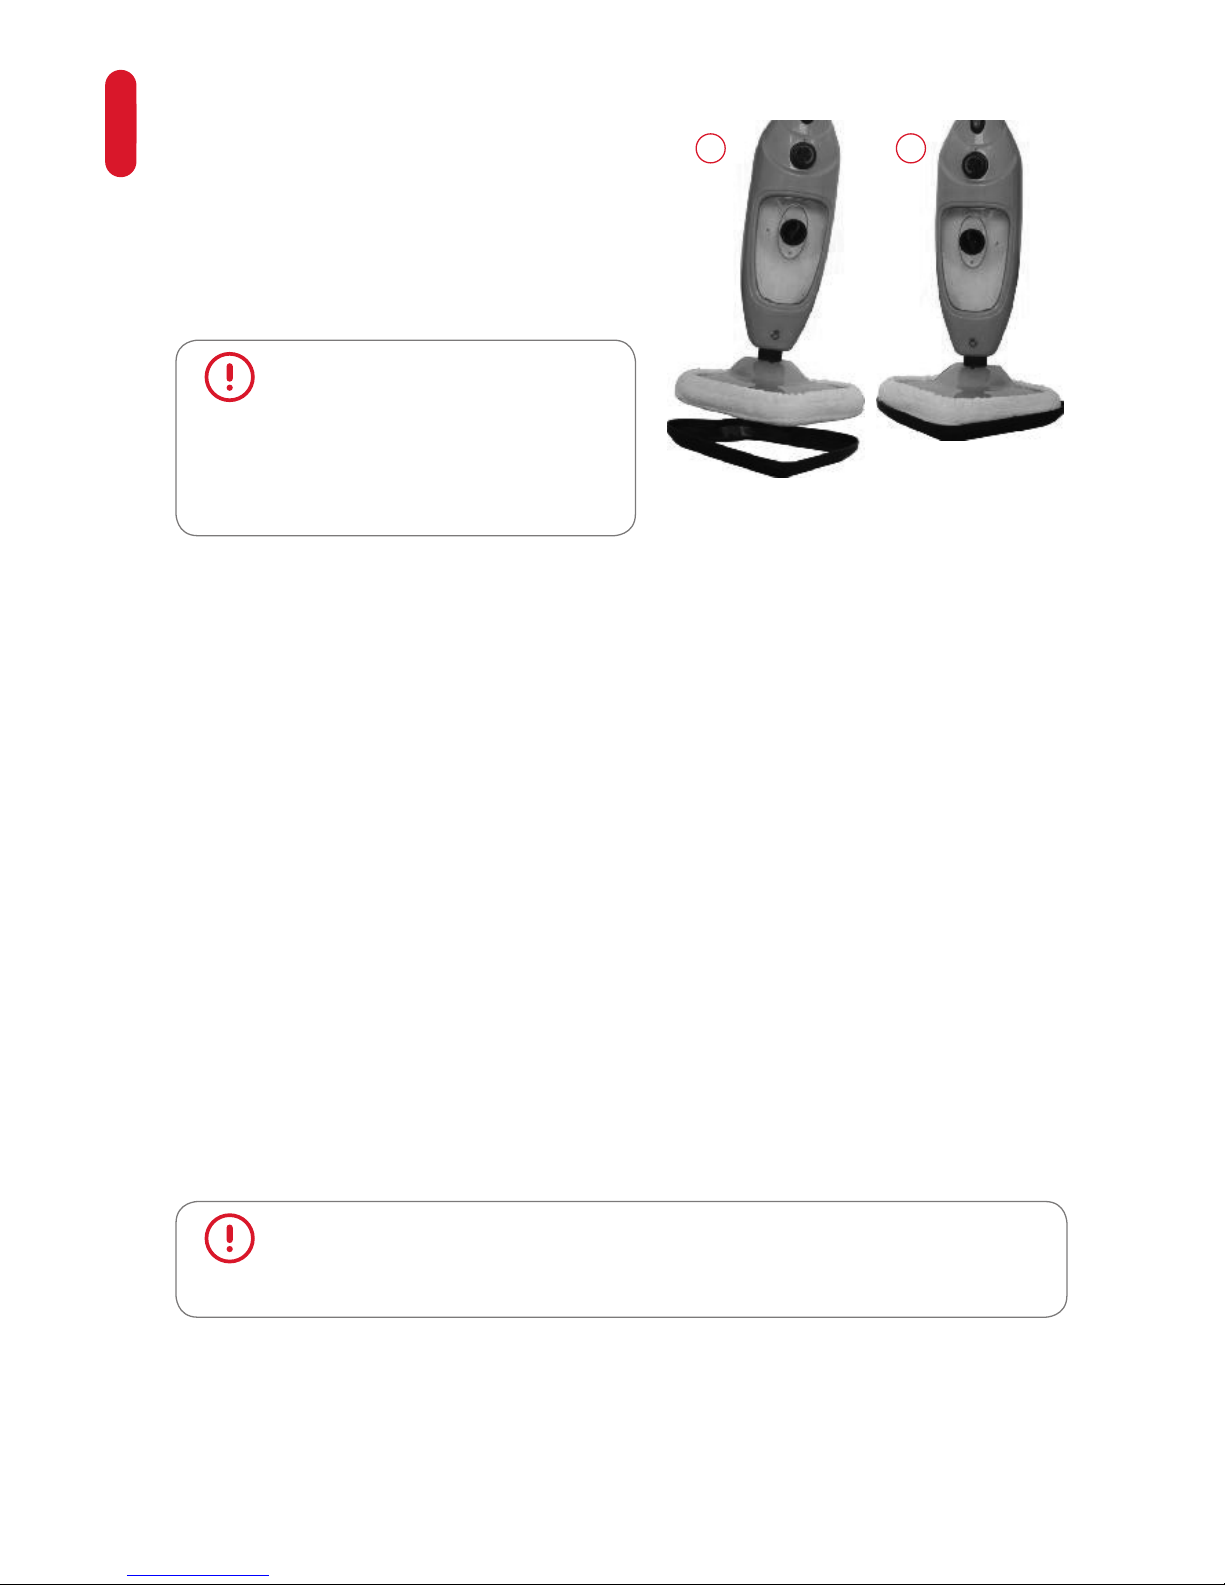
4. When using the mop on carpets, Place the mop
head, with microfiber cloth in place, on top of
the carpet glider as illustrated in Fig 6a. Do not
attempt to use the mop on carpets without the
carpet glider in place, because you may damage
the carpet.
The mop is designed to thoroughly clean floor surfaces, such as marble, ceramic, carpet,
stone, linoleum, and sealed hardwood floors and parquet. Not all floor types are suitable for
steam cleaning.
The heat and steam action my remove the wax on surfaces treated with wax. Do not use on
unsealed flooring or let unit stand on any wood or heat sensitive floor for an extended period
of time. This could cause the wood grain to rise, in addition to other types of damage.
When using on vinyl, linoleum or any other heat sensitive floors, use extra caution. Too
much heat can melt glue in the flooring. Use only on laminated flooring that has been laid
professionally and without any gaps or cracks that would permit the entry of moisture.
Test the mop on a small isolated area of your flooring prior to overall use on any floor surface.
Always check the use and care instructions of your flooring manufacturer or distributor before
using the mop.
When in doubt, please consult a flooring specialist. Only use the carpet glider on carpeting
and rugs. Use of the carpet glider on other floor surfaces will cause streaking and possibly
scratching.
CAUTION: Never use the carpet
glider on surfaces that are prone to
scratching. Never assemble or remove
the accessories while the appliance is
in operation!
USAGE
CAUTION: This product emits steam and creates moisture. Water marks,
discoloration or damage to the floor surface can occur if the unit is left operating
too long in one place.
4a 4b
Page 9
9
ENGLISH
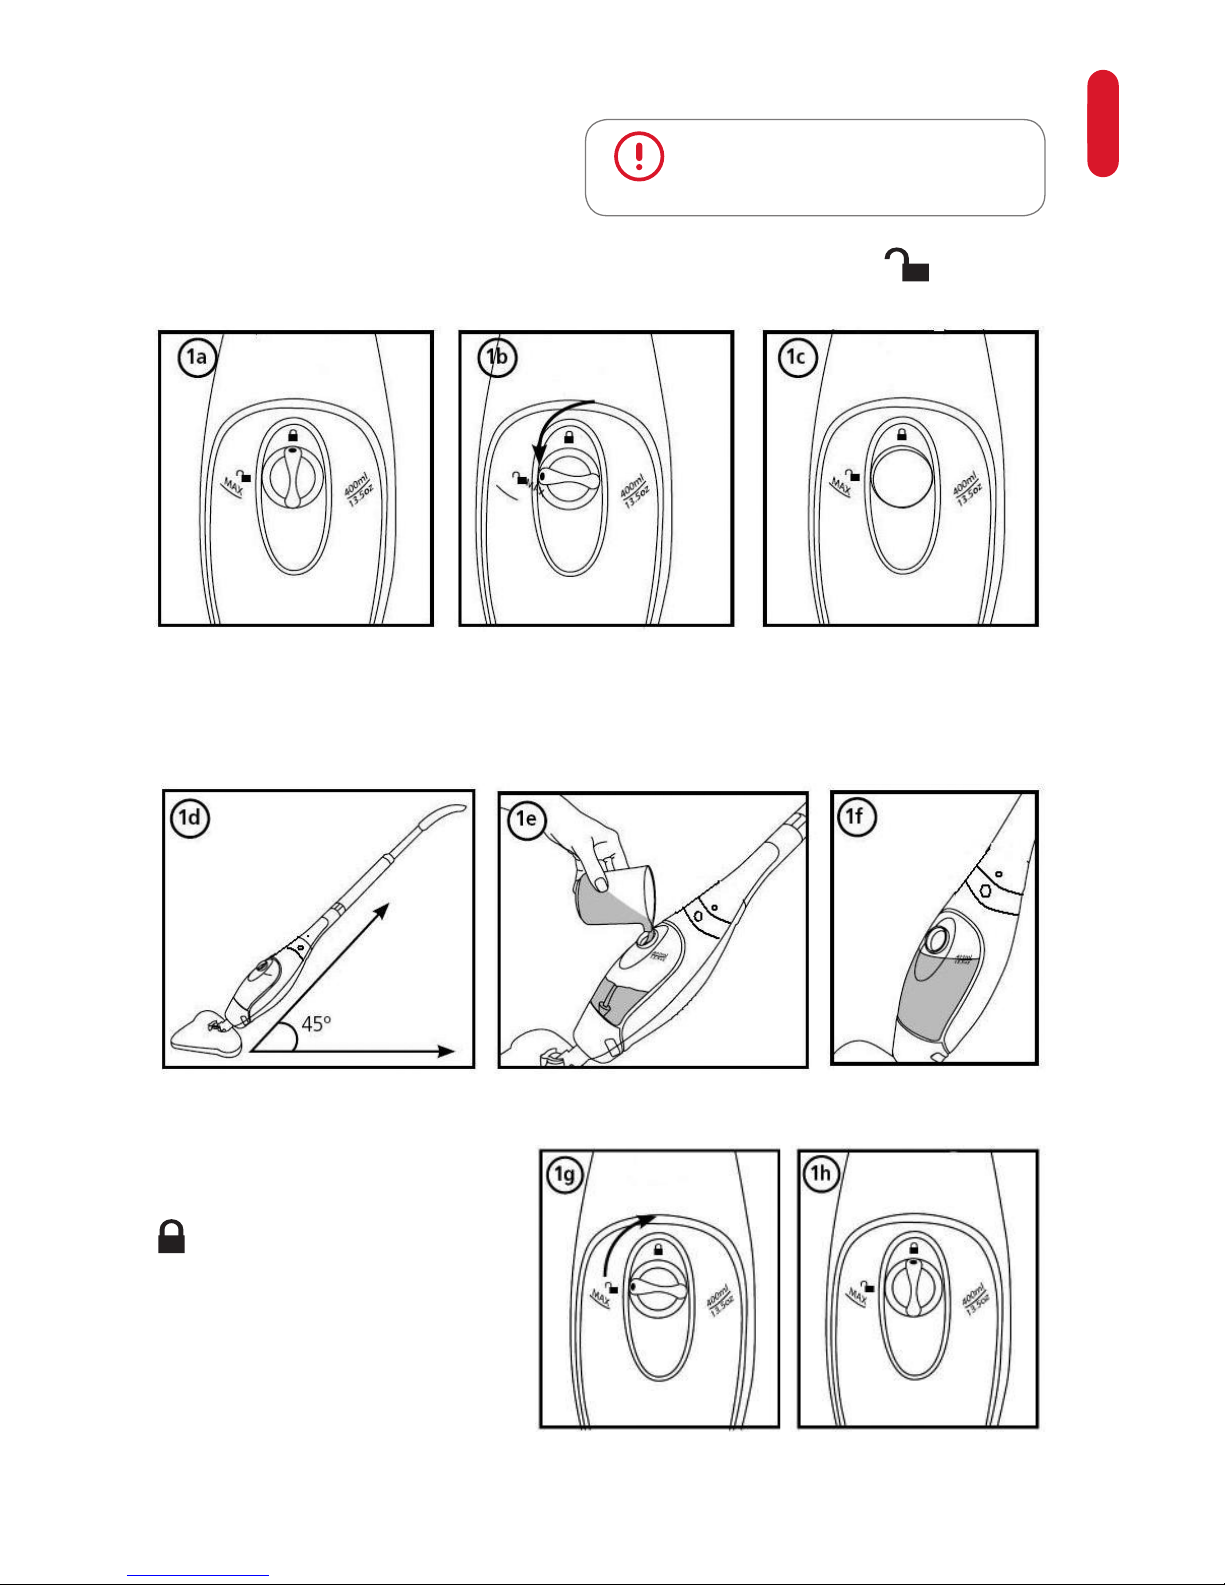
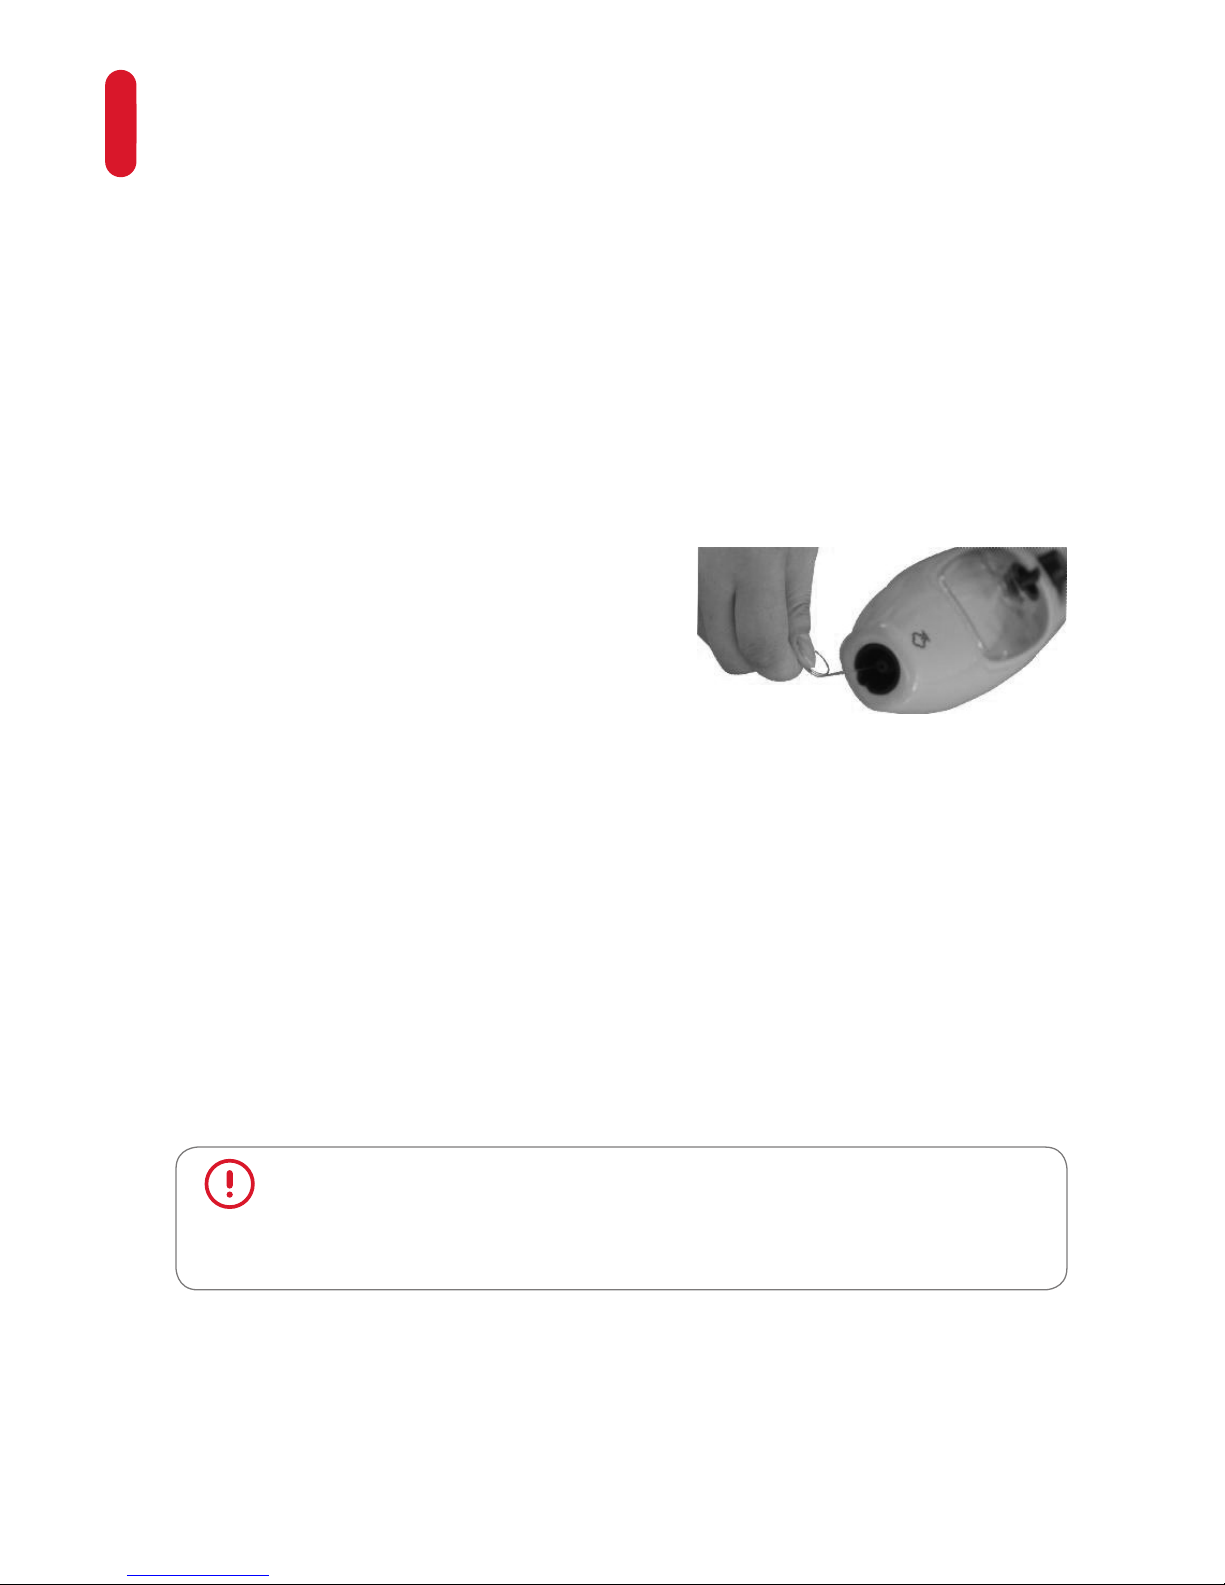
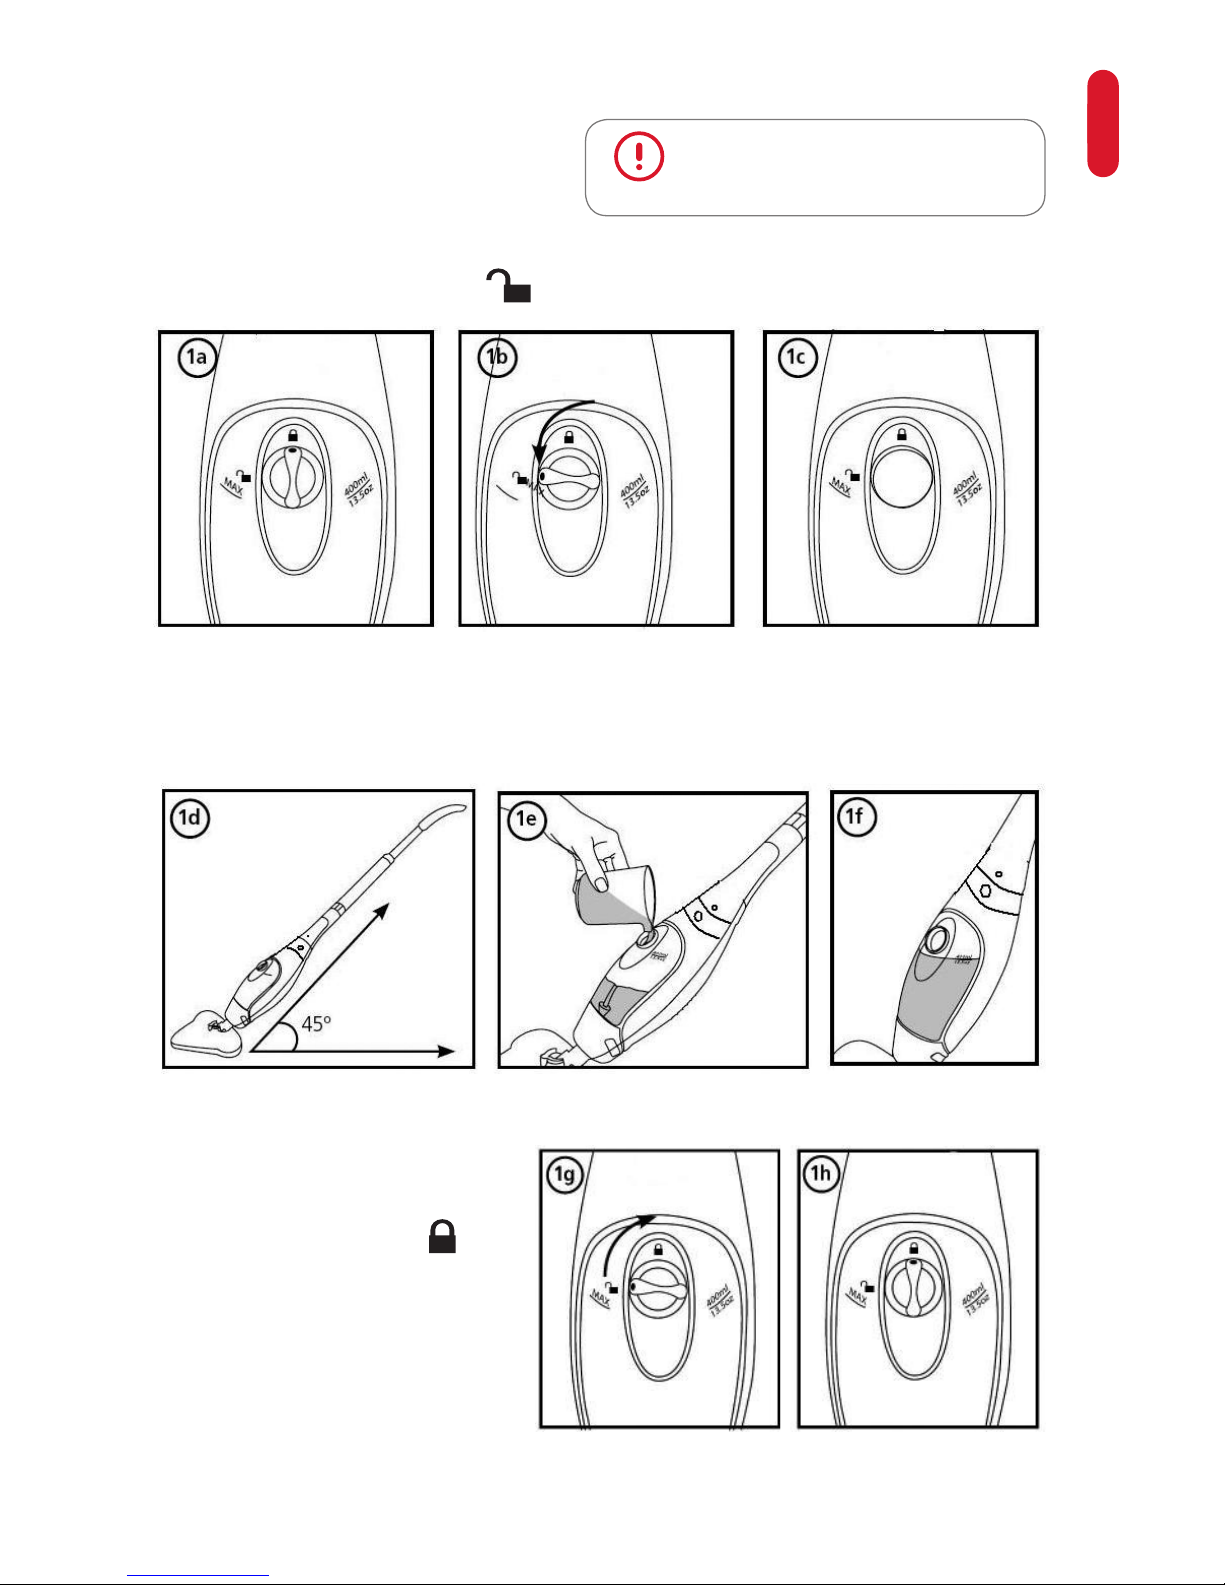
1. Fill the water tank with water:
CAUTION: Make sure that the mop
is unplugged.
Turn the Water Tank cap counter-clockwise approximately 90° to the ‘’OPEN’’
position
and remove the cap as illustrated in Fig. 1a, b and c.
Hold the mop at a 45° angle as illustrated in Fig. 1d and add water in the tank up
to the MAX level by using the measuring cup. Do not overfill. The maximum tank capacity is
275ml/9.2OZ.
Replace the water tank cap and
turn clockwise approximately
90º, to the ‘’CLOSE’’ position
until the cap is tightened.
Page 10

10
ENGLISH
CAUTION: The H2O MOP X5™ uses tap water. However, in areas with hard
water, distilled water should be used for better performance.
CAUTION: Never put cleaning detergents or
scented products into the mop. This will make
operation unsafe and damage the appliance.
uređaj.
Make sure the Copper Cone inside the Water Tank is always
submerged in water (As illustrated in Fig. 1i) while operating
the mop.
2. Select one of the following steam regulator positions:
1 - Low, 2 – Medium, 3 – High and 4 – Hot Spray
• 1 – – Low and 2 – Medium Setting: Ideal for cleaning all
hard floors, such as linoleum, ceramic, marble, wood, etc.
• 3- High Setting: Ideal for cleaning carpets and rugs.
• 4- Hot Spray Setting: Ideal for cleaning bathrooms,
kitchens, window sills, car wheels, etc.
You can change the steam regulator position and change
the steam output while operating the mop.
3. Kada Once the unit has been fully assembled and filled with
water, plug in the Power Cord to a grounded electrical outlet.
The RED light - Power Indicator will indicate when power is
on. Power Switch ( O / I ) is in the OFF ( O ) position (higher
position). Wait for the Ready-to-Use indicator to turn green
- approximately 20 - 30 seconds. GREEN light will turn on
when the steam mop is ready for use. When the Ready-toUse indicator light turns Green press the Power Switch ( O /
I ) to the ON ( I ) position (lower position). The mop will start
emitting steam. To stop emitting steam turn OFF ( O ) the
unit by pressing the Power Switch ( O / I ) again. If the power
switch ( O / I ) is pressed (lower position) prior to Ready-toUse light indicator turning green, water from the previous use
will not be heated and will be forced out by present steam
and will cause puddling to occur. This may also happen if the
power switch was left in the ON ( I ) position (lower position)
from the previous use and the unit was disconnected by
unplugging only. Make sure to turn the unit OFF after each
usage.
Page 11
11
ENGLISH
CAUTION: Do not carry out this procedure on heat and steam sensitive floors.
4. Slowly pass over the surface to be cleaned. The absorbent mop cloth picks up the dirt
loosened by the steam. Apply steam liberally. Keep a towel handy and wipe away any excess
water that may accumulate.
5. When the mop stops emitting steam, simply turn OFF and unplug the appliance, refill the
water tank and continue cleaning.
For Best Results:
1. Sweep or vacuum floor prior to using the mop.
2. Da To avoid puddling of water, the Microfiber Cloth must
be clean and dry for use. To replace the cleaning cloth,
proceed as follows: Let the cleaning cloth cool down,
remove cloth from unit, replace with a new microfiber
cloth (Optional Item) and continue use. Select low steam
regulator position.
3. To sanitize an area of your floor, leave the mop at high
steam setting over the steam area for about 10 seconds,
but no longer than 15 second. Always take into account
the structure of the floor and whether is designed for vapor
cleaning.
• Never steam at one spot for too long. This can cause oor surface damage.
• Do not put hands or feet under the steam mop. That part of the appliance is very hot and can
cause burns.
• During use a pulsing noise may be heard indicating that the mop is producing steam. This
noise is normal.
• There may be some minor “spitting” of water mixed with the steam. This is also normal.
• The force and heat of the steam may adversely affect certain materials. Always check the
suitability of using the steam mop on a surface by carrying out a preliminary test on a hidden
area.
Page 12
12
ENGLISH
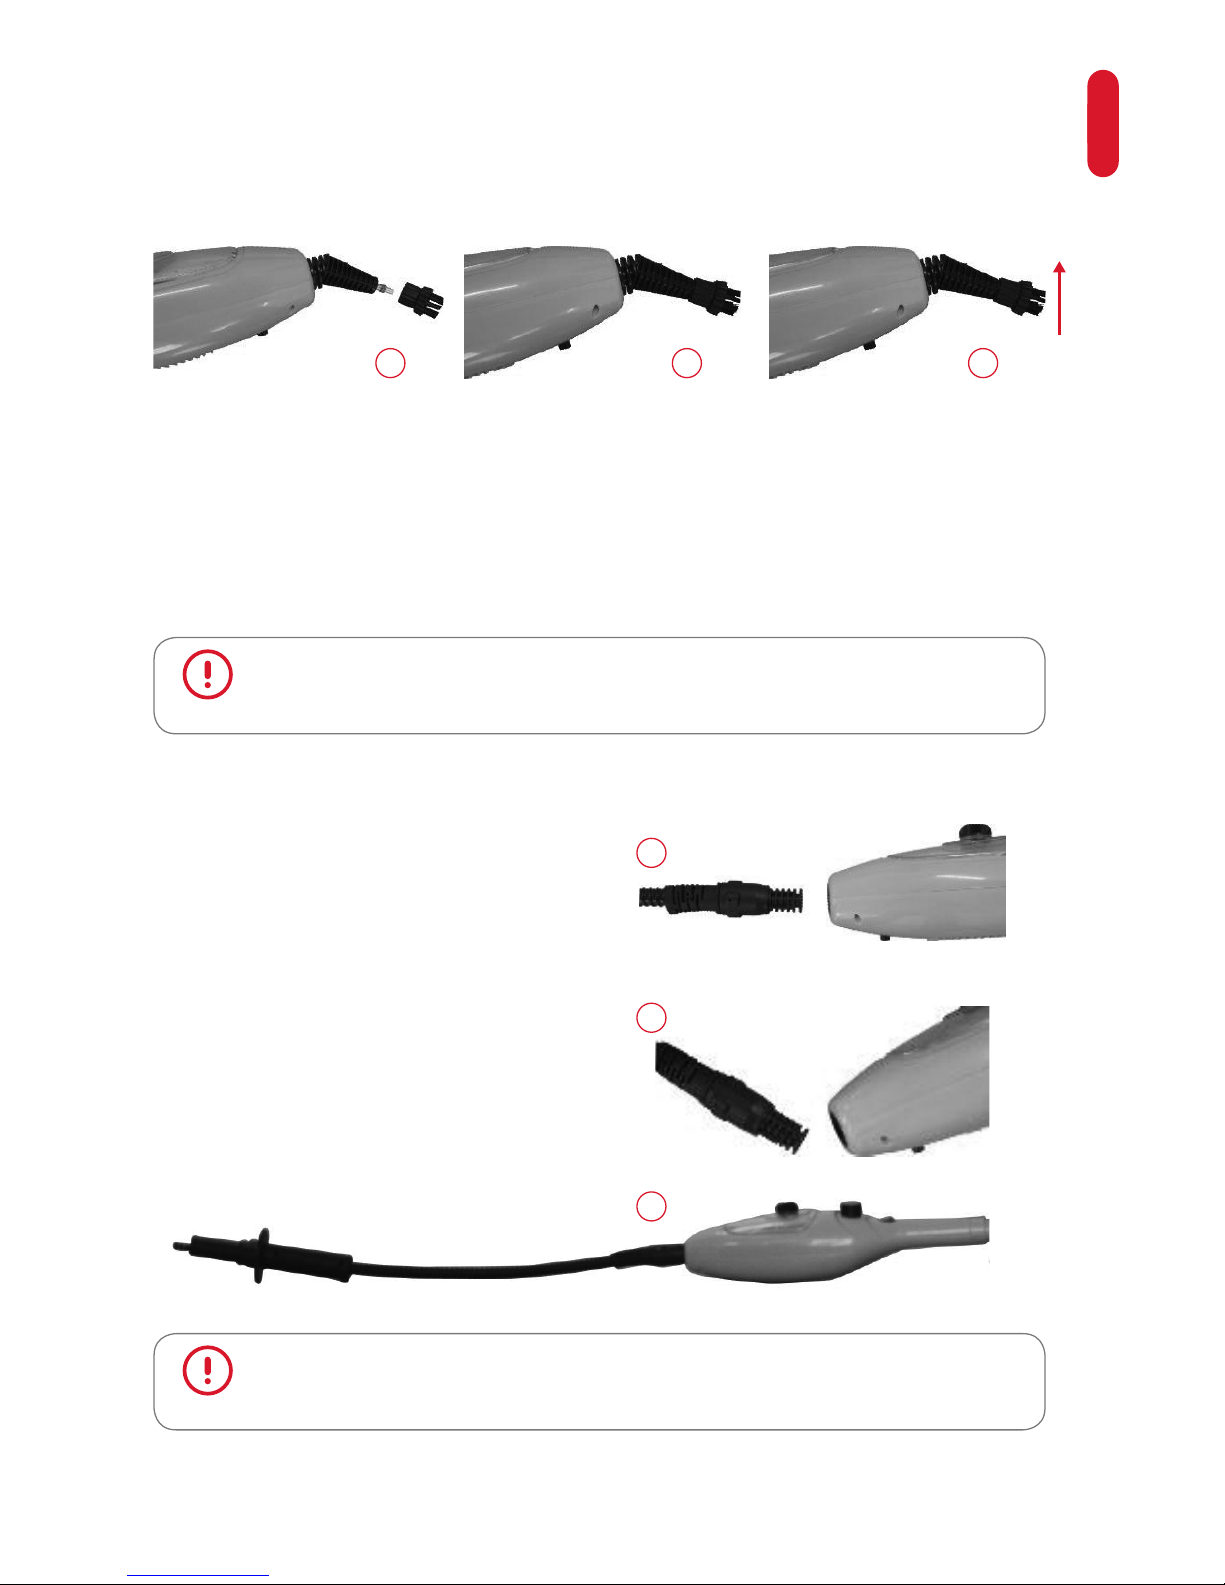
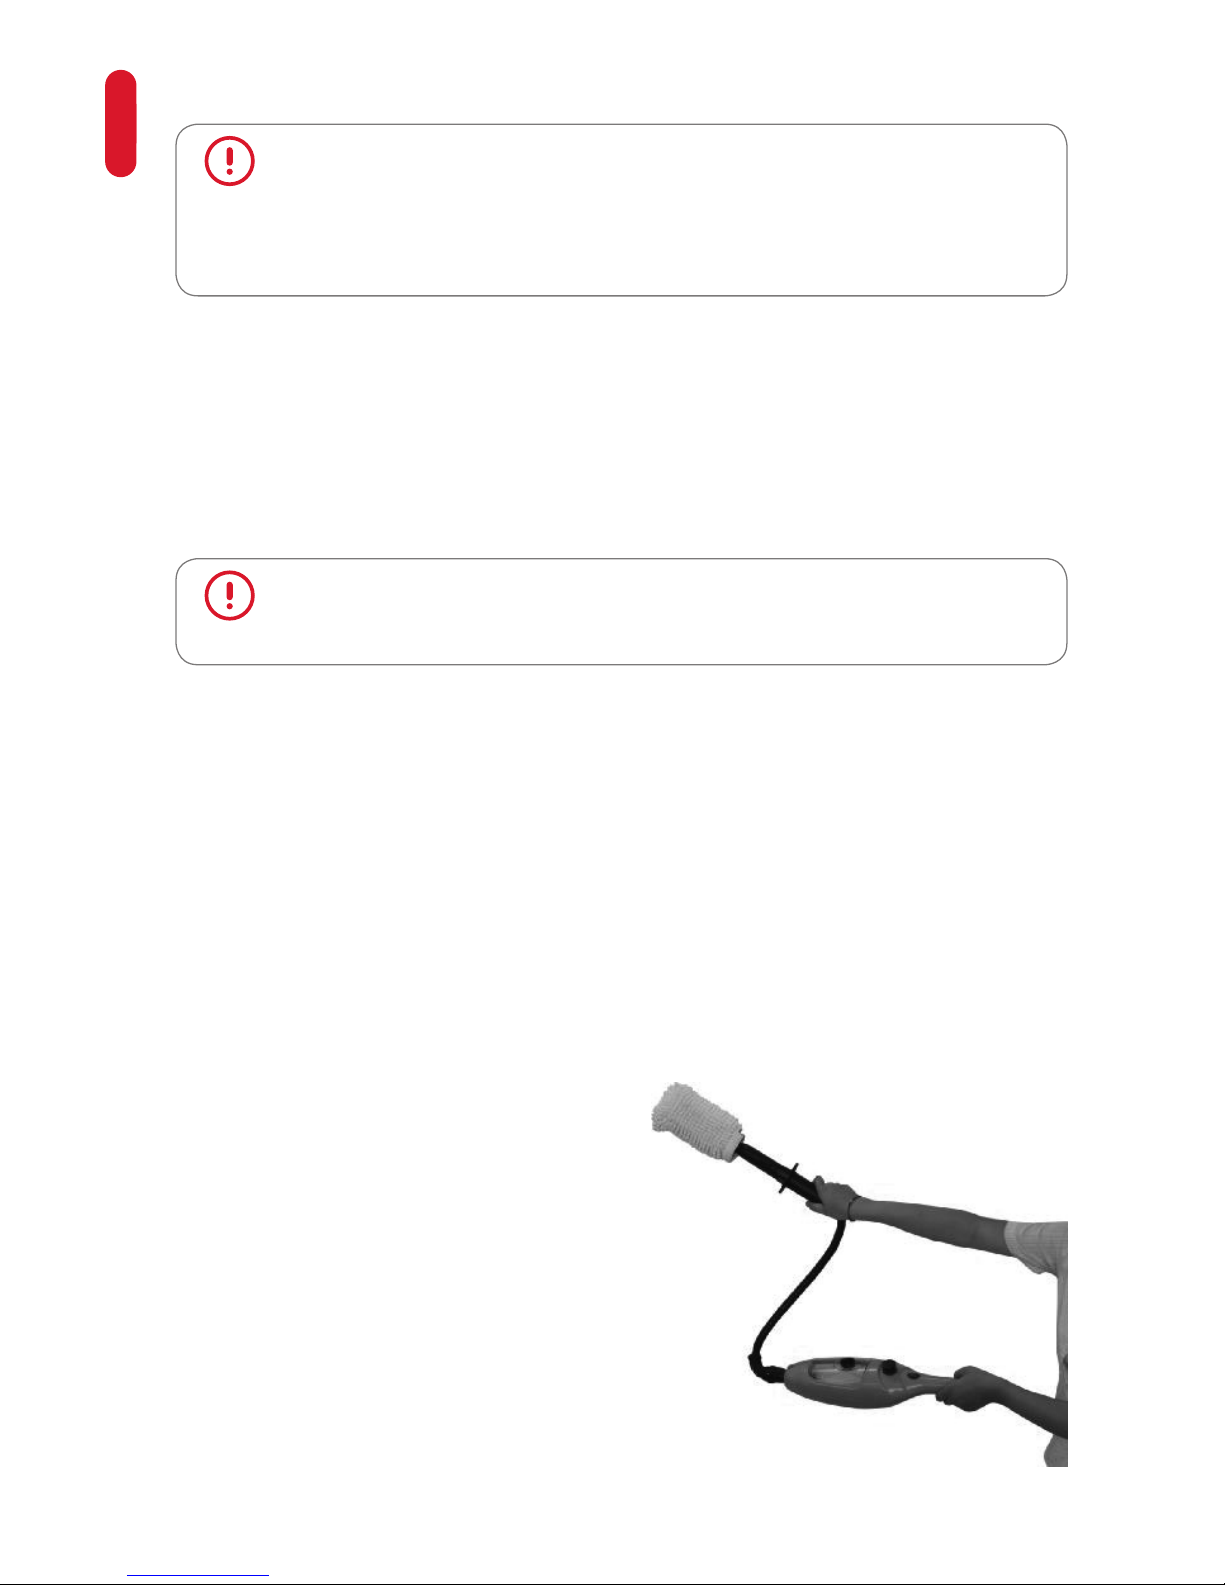
HAND-HELD STEAMER
ASSEMBLING
The Hand-Held Steamer is an ideal portable cleaner for use on work surfaces, countertops,
sinks, windows, mirrors, tiles and spot cleaning on floors, carpets and rugs. Use it with the jet
nozzle, brass brush or nylon brush attachments to spray away dirt, grease, mold and more.
1. Remove the power supply cord from the
upper cord wrap, as illustrated in Fig.
3. Press the lock button on main body and
remove the mop head.
2. Press the Extension Handle lock button
and remove the extension handle and
the curved handle from the main body.
4. To attach the jet nozzle: Insert the jet
nozzle into the designated hole illustrated
in Fig 4a. Connecting is successful when
the lock button on main body clicks.Make
sure that the jet nozzle is securely locked
in place before usage.
CAUTION: Make sure that the mop is unplugged before assembly.
4a
4b
Page 13
13
ENGLISH
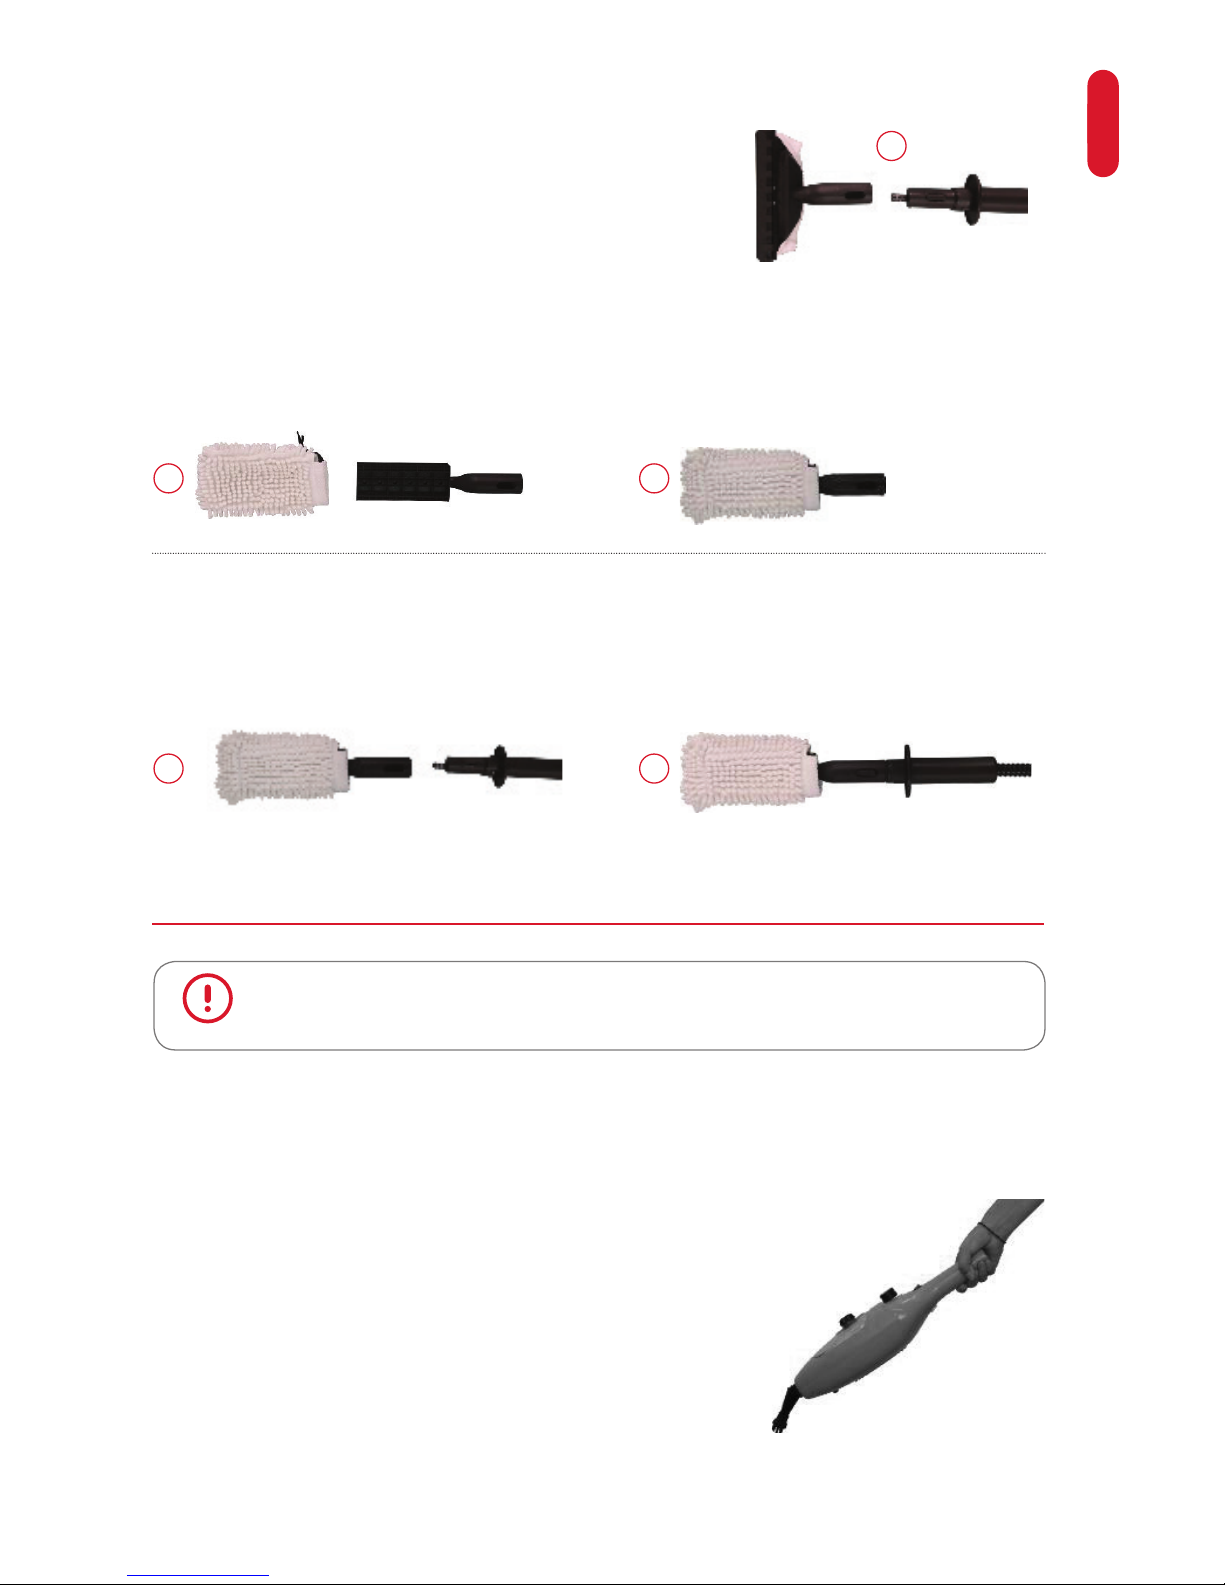
HOW TO ASSEMBLE THE OPTIONAL ACCESSORIES
5. Attach either the round nylon brush or round copper brush by screwing onto the threaded
end of the Jet Nozzle as illustrated in Fig. 5a i 5b. To remove either round brush, unscrew
from the jet nozzle, as illustrated in Fig. 5c.
1. Remove the mop head by pressing
the lock button on the main body or
remove the jet nozzle following the same
procedure.
2. To connect the extension hose, place it in
the hole in the body of the appliance as
illustrated in Fig. 1a, 1b i 1c. Connecting is
successful when the lock button on main
body clicks.
• The round nylon brush is great for cleaning smooth hard surfaces, such as toilets, sinks, and
kitchen counters, etc i slično.
• The round copper brush is great for cleaning coarse or metal surfaces, such as brick oors,
car wheels, metal doors, and metal frames, etc i slično.
• Both brushes can also effectively clean the grease on pans, stoves and ovens in the kitchen.
They can be used with soap or detergent to clean dirty areas.
CAUTION: Never use the round brass brush on surfaces that are prone to
scratching.
CAUTION: Make sure that the jet nozzle is securely locked in place before
usage.
5a
1a
1b
5b 5c
1c
Page 14

14
ENGLISH
WINDOW CLEANING TOOL
GARMENT STEAMING TOOL
1. Loosen up the drawstring on the designated hooks on the window cleaning tool frame. pull
up the drawstring to secure the cloth in place.
2. Attach the window cleaning tool to the extension hose as follows: Align the lock button on
the Extension Hose with the designated hole on the window cleaning tool frame and then
push in the extension hose until it locks in place (as illustrated in Fig. 2a i 2b).
4. To use the window cleaning tool as a garment steamer, attach the
microfiber cloth as illustrated in Fig. 1a, 1b i 1c.
Make sure to attach the cloth to all hooks on the cleaning tool frame to prevent slipping or
falling from the frame during use (as illustrated in Fig 1a, 1b i 1c).
CAUTION: Do not cover the squeegee blade.
1a
2a
1a
1b
2b
1b
1c
1c
Page 15
15
ENGLISH
DUSTER
USAGE
2. Attach the garment steamer tool to the extension hose
as follows: Align the lock button on the extension hose
with the designated hole on the garment steaming
tool frame and then push the extension hose until it
locks in place (as illustrated in Fig. 2a).
1. Install the cleaning Cloth onto the Duster Frame (as illustrated in Fig. 1a i 1b).
2. Attach the duster frame to the extension hose as follows: Align the lock button on the
extension hose with the designated hole on the Duster Frame and then push in the
extension hose until it locks in place (as illustrated in Fig. 2a i 2b).
1. Fill the water tank with water. Please refer to the “HOW TO USE THE MOP” section in this
manual. Attach either the round nylon brush or the round copper brush as explained in the
“How to assemble Hand-Held Steamer” section in this manual.
2. Select one of the following steam regulator position:
1 - Low, 2 – Medium, 3 – High or 4 – Hot Spray.
You can change the steam regulator position while operating.
CAUTION: Make sure if the appliance is turned off and that the switch is (O / I)
to OFF position.
2a
1a 1b
2a 2b
Page 16
16
ENGLISH
3. Once the unit has been fully assembled and filled with water, plug in
the appliance. Power switch ( O / I ) is in the OFF ( O ) position. Turn the
switch to the ON position. After approximately 15 seconds, steamer
will start emitting steam. Then turn the steam regulator and adjust
steam to your needs. In order to stop the production of steam, turn off
(O) the device by pressing the power switch (O/ I) to OFF position. If
water remained from the previous use, when switching on again and
before the appliance starts to produce steam, the water from previous
use will not be heated and will be expelled out by the current of steam,
so this can cause the appearance of steam. This can happen if you just
switch (O / I) turn off to OFF position and leave the steam regulator
turned on from previous use and the appliance is turned off only by
unplugging the power cord. Make sure the appliance is completely
turn off and emptied after each use.
HOW TO USE THE OPTIONAL ACCESSORIES
WINDOW CLEANING TOOL
Make sure if the device is turned off and that the switch is (O / I) to OFF position.
4. Slowly pass over the surface to be cleaned. The absorbent mop cloth picks up the dirt
loosened by the steam. Apply steam liberally. Keep a towel handy and wipe away any excess
water that may accumulate.
5. When the mop stops emitting steam, simply turn OFF and unplug the appliance, refill the
water tank and continue cleaning.
CAUTION: To disinfect your desktop, kitchen cabinets, sinks, baths and the
like, using a hand-held steam cleaner over the same area for a maximum of 15
seconds. Do not perform this procedure on surfaces sensitive to heat and steam.
The force of heat of the steam may adversely affect certain materials. Always
check the suitability of using the steam mop on a surface by carrying out a
preliminary test on a hidden area.
1. Fill the water tank with water. Please refer to the “HOW TO USE THE MOP” section in this
manual.
2. Install the cloth onto the window cleaning tool and attach the window cleaning tool to the
extension hose as described in the “How To Assemble the Optional Accessories”.
3. Follow Steps 2 and 3 described in the “How To Use the Hand-Hand Steamer“section.
4. Hold the Hand-Held Steamer in one hand and grasp the handle grip on the Extension
Hose with the other hand as illustrated.
Page 17
17
ENGLISH
GARMENT STEAMER
CAUTION:
• Do not use the steam to clean frozen windows.It will break!
• Be careful when using the steamer on glass, as it may break!
5. Slowly pass over glass surface to be cleaned. Apply
steam liberally. The absorbent cloth picks up the dirt
loosened by the steam, and the squeegee blade
removes any remaining trails of water. Keep a towel
handy and wipe away any excess water that may
accumulate.
6. When the mop stops emitting steam, simply turn OFF
and unplug the appliance, refill the water tank and
continue cleaning.
7. After cleaning, do not touch the cloth until cooled. Then
carefully remove the tools for cleaning windows. Be
careful, the cloth is perhaps still hot.
1. Fill the Water Tank with water. Please refer to the “HOW TO USE THE STEAM MOP section
in this manual.
2. Install the garment steamer cloth onto the garment steaming tool as described in the
“How to Assemble the Optional Accessories” section.
3. Select one of the following Steam Regulator Positions:
1-Low or 2-Medium
4. Step 3 described in the “How to Use the Hand-Held
Steamer” section i.
5. To steam a garment, place item of clothing on the hanger
and steam the garment directly. Hold the Hand-Held
Steamer in one hand and grasp the handle grip on the
telescopic hose with the other hand as illustrated. Slowly
slide the garment steamer head vertically, from the top
to the bottom of the garment. You may also reverse this
motion and steam from the bottom to the top. Curtains and
draperies can be steamed while they are hanging.
CAUTION: Make sure if the device is turned off and that the switch is (O / I) to
OFF position.
CAUTION: Do not use 3-High and 4-Hot Spray steam settings when using the
garment steamer.
Page 18
18
ENGLISH
CAUTION: Please refer to label on item of clothing to check if garment can
be steamed. Some fabrics like leather, suede, and velvet may not be suitable for
steaming. If you are not sure then steam a small part of the inside of the garment
to test that it does not damage the fabric before steaming the entire garment or
fabric.
CAUTION: Make sure if the device is turned off and that the switch is (O / I) to
OFF position.
6. When the Hand-Held Steamer stops emitting steam, simply turn off and unplug the unit,
refill the water tank and continue cleaning.
7. Once you finish cleaning allow the garment steamer cloth to cool down and carefully
remove it from the window cleaning tool, as the cloth could still be hot.
1. Fill the Water Tank with water. Please refer to the “HOW TO USE THE STEAM MOP” section.
2. Install the cloth onto the duster frame and attached the duster to the extension hose as
described in the “How To Assemble the Optional Accessories” section.
3. Select one of the following Steam Regulator position:
1 – Low,2-Medium or 3-High
Do not use 4-Hot Spray steam setting when using the Duster. You can change the steam
regulator position and change the steam output while operating.
4. Follow Step 3, described in the “How To Use the Hand-Held Steamer” section. Hold the
Hand-Held Steamer in one hand and grasp the handle grip on the telescopic hose with
the other hand as illustrated above. Slowly pass over surface to be cleaned. The absorbent
cloth picks up the dirt loosened by the steam. Keep a towel handy and wipe away any
excess water that may accumulate.
5. When the Hand-Held Steamer stops emitting steam, simply turn off and unplug the
appliance, refill the water tank and continue
cleaning. Once you finish cleaning allow the
duster cloth to cool down and carefully
remove it from the duster frame, as the cloth
could still be hot.
DUSTER
Page 19
19
ENGLISH
CAUTION: Make sure if the device is turned off and that the switch is (O / I) to
OFF position.
1. Attach the triangle shaped cloth to the mop head following the same instructions as
provided for the microfiber cloth with Hook and loop tape in the “HOW TO ASSEMBLE
THE STEAM MOP” section.
2. The Cloth is soft and durable with hundreds of super absorbing fringes, ideal for your
sealed headword, ceramic and other types of flooring.
1. Unplug Power Cord from outlet.
2. Allow mop cloths to cool down and carefully remove cleaning cloth from mop head, as
cleaning cloth could still be hot.
3. Always empty the water tank at the end after each use.
4. Let any water that may remain as a product of condensation drain from the steam opening
prior to storing the appliance.
5. Wrap power cord around upper and lower cord wrap.
6. Wipe all surfaces of the mop with a soft cloth. Please store the appliance in a cool and dry
place when not in use.
7. Do not leave it exposed to sunlight or rain. Please store the appliance in a cool and dry
place when not in use.
8. Upright storage of the mop with a wet Mop pad/cloth may result in the formation of white
marks on your floor. To remove the white marks, clean the specific area with vinegar. Make
sure to remove the Mop pad/cloth before storage.
1. Drain the remaining water in the tank and clean the tank after every use. Please use
detergent to clean the accessories (Jet Nozzle and Rough Brush) when they are dirty, then
wash with clean water and air dry.
2. To clean calcium deposits that build up inside the Water Tank, add one or two tablespoons
of white vinegar to a full Water Tank, close the Water Tank cap and shake the contents. DO
NOT TURN THE STEAMER ON. Let the unit sit for a few hours. Then, empty the Water Tank
and refill with clean water and empty until it rinses clear.
CLEANING CLOTH
AFTER USE
CLEANING
Page 20
20
ENGLISH
CLEANING PROCEDURE TO REMOVE LIME SCALE
If your mop begins to produce steam more slowly than usual or stops producing steam, you
may need to remove lime scale. Lime scale can develop over time on the metal parts and
greatly affect mop performance. It is necessary to remove the scale on a regular basis every
25-50 times you use a full tank of water or at least once a month, especially in areas with hard
water. The frequency of lime scale removal depends upon the hardness of your tap water and
how often you use the steam mop. The mop uses tap water. However, in areas with hard water,
Distilled water should be used for better performance.
• By using Scraper
1. Make sure if the device is turned off and that the switch is (O / I) to OFF position.
2. Use the cleaning pin to remove scale deposits
from the small hole of the stream outlet in the
Main Body by swirling and pushing the pin up
and down you will clean the steam outlet. Always
ensure that all scale debris has been removed
from the steam outlet before reassembling.
Continue swirling Cleaning Pin until no further
debris is evident.
• By using cleaning solution
1. Prepare a solution of 1/3 white vinegar and 2/3 tap water and add to the water tank.
2. Secure and position the unit to ensure steam released is slimed away from the floor or
surrounding objects and surfaces. Plug the unit in, turn the unit ON by pressing the Power
Switch (O/I) and allow the unit to produce steam until the vinegar/water solution is used up.
3. Repeat the above procedures as many times as necessary until a normal steam flow rate is
achieved.
4. Fill the water tank with fresh water and rinse out.
5. Fill the water tank with fresh water, attach to the unit and release steam through the system
until the water tank is empty.
To remove lime scale from the mop, please follow these procedures:
CAUTION: Do not leave the steamer unattended during the lime scale
removal process and /or while in use. Perform a test cleaning on a suitable
isolated area after each lime scale removal to ensure that there is no debris in the
system.
Page 21
21
ENGLISH
Cleaning blocked steamer accessories:
Due to the high mineral content of water in some areas, you may notice that less steam comes
out from the Hand-Held Steamer accessories. This may be caused by calcium build-up inside
the tip of the nozzle. To clean calcium build-up, we recommend using a spray lubricant. Spray a
small burst or two of the lubricant inside the tip of the jet nozzle. After spraying lubricant inside
the component, fill the steamer with water according to the directions and run a continuous jet
of steam through the affected accessory to several minutes to remove the deposit. Once the
steam pathway is clean, aim the steamer at a neutral surface or a cleaning cloth to make sure
no debris is emitted.
Microfiber cloth care
1. Machine wash at 60º (140º)
2. Do not bleach
3. Do not use fabric softener
CAUTION: WE RECOMMEND PREFORMING THIS PROCEDURE IN A
PROTECTED AND WELL-VENTILATED AREA.
CAUTION: Make sure if the device is turned off and that the switch is (O / I) to
OFF position.
TROUBLESHOOTING GUIDE
Problem Possible Cause Solution
The unit does not power on The unit is not plugged in.
Make sure the unit is
plugged into a proper outlet
and the switch is ON(I).
Reduced steam or no steam
Water Tank empty Fill Water Tank
Blocked Steam Nozzle
Remove the mop head and
clean the nozzle
Lime Scale
Follow cleaning procedure in
this manual
Page 22
22
ENGLISH
Problem Possible Cause Solution
Steam escapes from
connections
Attachment is not connected
properly.
Turn the unit OFF, allow it to
cool down, disconnect the
accessories and reattach
them properly.
There’s debris/obstructions
at the connection points.
Remove the accessory,
check and clean the
connection
The cleaning cloth gets wet
Exposure to moisture,
saturated with liquid
Remove the wet cloth and
replace with a new Cleaning
cloth (optional item). Or,
wring out and reattach.
Page 23

23
Shqiptari
UDHËZIME TË RËNDËSISHME TË SIGURIMIT
Kada koristitie električne uređaje, pridržavajte se osnovnih mera bezbednosti:
1. Lexojini të gjitha udhëzimet para se të përdorni pajisjen.
2. Për të reduktuar rrezikun nga goditja e rrymës, mos e zhyt pajisjen, ose kabllon / spinën në
ujë ose ndonjë lëng tjetër. Ndiqni udhëzimet për pastrim.
3. I mbikëqyrni fëmijët të mos luajnë me pajisjen.
4. Mos e lini pajisjen të pambikëqyrur, ndërsa ajo është e lidhur me rrymë
5. Shkëputeni pajisjen nga rryma kur nuk është në përdorim dhe para pastrimi.
6. Nëse kablloja elektike është e dëmtuar, duhet të zëvendësohet nga një serviser i autorizuar
apo persona me kualifikime të barabarta, për t’i shmangur aksidentet.
7. Përdorim i një kablloje zgjatuese nuk është i rekomanduar.
8. Sigurohuni që kablloja elektrike mos të jetë i gërshëtuar.
9. Mos e tërhiqni kabllon elektrike. Mos e përdorni atë për të lëvizur ose për të mbajtur
pajisjen. Kur shkëpusni pajisjen nga rryma elektrike, tërhiqeni spinën, jo kabllon.
10. Përdorimi i shtojcave që nuk janë furnizuar me pajisjen, mund të shkaktojë zjarr, goditje
elektrike ose lëndime.
11. Mos lejoni që kablloja elektrike të varet mbi buzën e një tryeze ose një elementi tjetër
apo të presë një sipërfaqe të nxehtë, duke përfshirë edhe sobë. Sigurohuni që kablloja
elektrike të mos varet dhe që askush / asgjë të mos pëngohet në të.
12. Mos e vendosni pajisjen në ose pranë një gazi ose sobe elektrike, në një furrë të ngrohtë
ose në afërsi të materialeve të djegshme.
13. Mos e përdorni pajisjen jashtë ose kur qëndroni në një sipërfaqe të lagësht.
14. Mos e prekni spinën e pajisjen me duar të lagura
15. Përdoreni pajisjen vetëm për qëllime për të cilat është krijuar.
16. Pajisja nuk është synuar për përdorim nga personat (duke përfshirë edhe fëmijët) me
aftësitë fizike, ndijore apo mendore që nuk janë të zhvilluara plotësisht apo që kanë
mungesë njohurie dhe eksperience me përdorimin e pajisjes perveç se kur ata janë
të mbikëqyrur nga ana e personës që është përgjegjës për sigurinë e tyre dhe cila
ua shpjegon atyre mënyrën e sigurt për përdorimin e pajisjes dhe nëse i kuptojnë
instruksionet themelore.
17. Para ndezjes së pajisjes, kontrolloni që tensioni i treguar në pllakën e pajisjes t’i përshtatet
tensionit të furnizimit të rrjetit elektrike Tuaj..
18. Mos e përdorni pajisjen nëse ajo ka rënë, nësa ka një dëmtim i dukshëm ose nëse pikon.
19. Ruajeni pajisjen në një vend të thatë, i mbrojtur nga pluhuri dhe nga rrezet e diellit direkte.
20. Çdo keqpërdorim apo dështim në ndjekjen e udhëzimeve për përdorim, e bën garancinë
të pavlefshme dhe liron prodhues / distributor / tregtar nga çdo përgjegjësi.
21. Lëngu ose avulli nuk duhet të orientohen në mënyrën drejtpërdrejtë te pajisje që përmban
komponente elektrike, siç është brendësia e furrës..
22. Kini shumë kujdes kur e përdoreni pajisjen në afërsi të fëmijëve, kafshëve shtëpiake ose
bimëve.
23. Kurrë nuk e drejtoni avullin në drejtim të njerëzve, kafshëve ose bimëve!
Page 24

24
Shqiptari
24. Mos i futni objektet nëpër hapjet në paisjen. Mos përdoreni pajisjen nëse njëra prej
hapjeve është i bllokuar.
25. Mos përdoreni kokën për pastrimin pa leckën e vendosur në mënyrë të rregullt
26. Mos përdoreni pastruesin me avull pa ujë në rezervuarin e ujit.
27. Kini shumë kujdes kur e përdorni pajisjen në shkallët.
28. Ndriçoeni mire mjedisin e punës.
29. Asnjëherë mos e dridhni ujin e nxehtë në rezervuarin apo ndonjë lëng tjetër, siç janë
lëngat aromatike, ato në bazë të alkoolit apo deterxhentet. Më vonë, kjo do të shkaktojë
një përdorim jo i sigurt dhe do ta dëmtoj pajisjen.
30. Gjithmonë e mbani daljen e avullit të pastër. Shmangeni vendosjen e hapjeve në zonat e
butë që mund të bllokojnë rrjedhjen e avullit. I mbani hapjet të pastër, pa qimeve dhe dhe
pengesa të tjera të mundshme, për të siguruar qarkullimin e duhur të avullit.
31. Ndaloeni përdorimin e pastruesit me avull nëse vëreni rrjedhjen e ujit dhe kontaktoeni
servisin e autorizuar.
32. Mos përdoerni pastruesin me avull në hapësira të mbyllura që janë të mbushura me
substanca të djegshme, eksplozive ose ato toksike siç janë holluesi për boje ose boje vaj.
33. Mos përdoreni pajisjen në lëkurë, ndaj bazave prej dyllit, në dysheme të pangjurosur, ndaj
përhulave sintetike, ndaj pelushit ose ndaj materiale të tjera që janë të ndjeshme në avull.
34. Mos përdoreni pajisjen për ngrohjen e hapësirës!
35. Mos i prekni sipërfaqet të ngrohta e sapo të fhsira !
36. Shtypeni çelësin OFF për ta fikur pajisjen dhe fikeni rregullatorin e avullit, dhe tërhiqeni
spinën nga rryma.
37. Pajisjen e përdorni kujdesshëm, për shkak të avullit që emiton.
38. Për ta shmangur ngarkesën e qarkut elektrik, mos i përdorni pajisjet e tjera në të njejtën
prize e në të njejtën kohë kur edhe pastruesi me avull.
39. Mos tërhiqeni zorrën zgjatuese, sepse mund t’a dëmtoni. Zorra e dëmtuar mund të
shkaktojë rrjedhjen e avullit.
40. Mos e prekni shtojcën për pastrimin e dritareve apo leckën gjatë përdorimit.
41. Gjatë përdorimit, këto shtojcat janë të nxehta dhe mund t’i shkaktojnë djegiet.
42. Mbajeni zorrën zgjatuese larg vetës dhe shmangeni prjekjen e zorrës, sepse mund të jetë
jashtëzakonisht e nxehtë e t’ju djeg.
Mos i hidhni pajisjet elektrike si mbeturina e paklasifikuara komunale, por përdorni vende
të veçanta për grumbullimin e mbeturinave elektronike. Kontaktoni me autoritetet lokale
për informacion në lidhje me sistemet që janë në dispozicion për asgjësimin e mbeturinave
elektronike. Nëse pajisjet elektrike hidhen në deponi, substanca të rrezikshme mund të
rrjedhin në ujërat nëntokësore dhe të hyjnë në zinxhirin ushqimor, duke ndikuar negativisht në
shëndetin Tuaj dhe mjedisin.
Page 25
25
Shqiptari
PJESËT E PAJISJES
Doreza e
shtrembëruar
Butoni ndriçues për ndezjen/fikjen
Regulatori i avullit
Tapa e rezervuarit për ujë
Rezervuari për ujë
Trupi i pajisjes
Grepi për mbështjelljen e kabllos
Kablloja elektrike
Doreza teleskopike
Butoni për bllokimin e dorezës
Butoni për t’i kyçur
shtojcat
(në trupin e pajisjes)
Koka për fshirje
Ana e përparme Ana e pasme
Page 26
26
Shqiptari
SHTOJCAT
PAJISJE
Rëshqitësi për
pastrimin e qilimave
Spërkatës
Leckë
Microfiber
Fshirëse
Furçja e rrumbullakët
(tunxh)
Furçja e rrumbullakët
(najlon)
Gjilpëra
pastrimi
Lecka për
pastrami rrobash
Lecka për
pastrimin e
dritareve
Dozeri
Shtojca për pastrimin e
dritareve
Zorra zgjeruese
Page 27
27
Shqiptari
KUJDES: Para montimit të pajisjes apo ndryshimit të shtojcave, bëhuni të sigurt
se pajisja është e fikur nga rryma e nëse çelësi (O/I) është në pozicionin OFF.
KUJDES: Para
përdorimit kontrolloni
nëse koka për pastrimin
e pastruesit me avull
është e pozicionuar në
mënyrë të sigurt.
SI PËRDORET PAJISJA?
1. Lidheni kokën për pastrim me trupin e
pajisjes sipas parimet në vijim: futeni
lidhëzen e kthyeshme në vrimën e
shënuar në trupin e pajisjes; Bashkimi
është i sukseshëm kur butoni për
bllokimin e shtojcave në trup kllikon.
2. Futeni dorezën teleskopike në
hapjen e përcaktuar në trupin
e pajisjes, derisa bllokohet me
ndihmen e butonit për bllokimin
në dorezën teleskopike.
3. Vendoseni leckën microfiber në
kokën për pastrimin. Shtrëngoeni
leckën microfiber duke e tërhequr
litarin, dhe në të njëjtën kohë shypeni
butonin në litar.
MONTIMI
Page 28
28
Shqiptari
4. Gajtë përdorimit të pastruesit me avull për
qilima, vendoseni kokën për pastrimin me
leckën microfiber mbi rrëshqitësit për pastrimin
e qilimave, siç është ilustruar në foto 4a. Mos
provoni ta përdorni pastruesin me avull për qillim
pa rrëshqitësit për pastrim, sepse do ta dëmtoni
qilimin.
Pastruesi me avull është krijuar të pastrojë plotësisht sipërfaqet e dyshemesë, siç janë mermer,
qeramik, qilima, guri, linoleum dhe parket. Jo të gjitha llojet e dyshemeve janë të dizajnuara
për pastrimin me avull.
Ngrohtësia dhe avulli mund ta heqin dyllin nga sipëerfaqet e trajtuara me dyll. Mos përdoreni
pastruesin me avull në dyshemen jo e ngjitur dhe mos e lini atë për një kohë të gjatë mbi
çdolloji të drurit të ndjeshëm ndaj nxehtësisë. Përkundrazi, druri mund të bymehet e parketi
të ngrihet apo dëmtohet në ndonjë mënyrë tjetër. Kur e përdorni pajisjen mbi vinyl, linoleum
ose mbi çdo dysheme të ndjeshme ndaj nxehtësisë, jini tepër të kujdesshëm. Shumë nxehtësi
mund ta shkrin ngjitës në dysheme. Kini kujdes duke e përdorur në laminat, vendoseni atë në
mënyrën profesionale pa asnjë vrimë dhe çarë, të cilat e mundësojnë hyrjen e lagështisë.
Së pari, bëni një test me pastruesin me avull në një sipërfaqe të vogël e të izoluar të
dyshemesë Suaj, para se ta përdorni në ndonjë sipërfaqe të dyshemesë tjetër.
Gjithmonë i kontrolloni udhëzimet për përdorim dhe pastrim para se ta përdorni pastruesin
me avull.
Në rast të ndonjë dyshimi, këshillohuni me një ekspert për dysheme. Përdoreni rrëshqitësin
për pastrimin e qilimave vetëm për qilimat dhe shtigjet. Përdorimi i rrëshqitësit për pastrimin e
qilimave në sipërfaqe të tjera të dyshemesë, mund të shkaktojë vijat dhe gërvishtjet.
KUJDES: Mos përdoreni kurrë
rrëshqitësin për pastrimin e qilimave
në sipërfaqet që janë të prirur
për gërvishtjen. Mos e heqni apo
ndryshoni shtojcat ndërsa paisja është
në përdorim!
PËRDORIMI
KUJDES: Kjo pajisje emiton avull dhe krijon lagështi. Gjurmët e ujit dhe
ndryshimi i ngjyrës dhe dëmtimi në dysheme, mund të ndodhen në qoftë se
pajisja përdoret për një periudhë të gjatë kohor në të njëtin vend.
4a 4b
Page 29
29
Shqiptari
1. Mbushja me ujë e rezervuarit për ujë:
KUJDES: Kontrolloni nëse pastruesi
për avull është hequr nga rryma.
Kthejeni tapën e rezervuart për ujë në drejtim të kundërt me lëvizjen e akrepave te orës
përafërsisht 90º, te shenja ‘’OPEN’’
dhe hiqeni tapën siç ilustrohet në fotot 1a, b i c.
Mbaeni pastruesin me avull në një kënd prej 45 °, siç ilustrohet në foto 1d dhe shtoni ujë në
rezervuar deri në maksimumin e shënuar, me ndihmën e dozerit
Mos e tejmbushni rezervuarin. Kapaciteti maksimal është 275ml / 9.2OZ.
Khtejeni mbrapë tapën e rezervuarit
dhe Kthejeni në drejtim me lëvizjen
e akrepave te ores,përafërsisht 90º,
deri te mbishkrimi ‘’CLOSE’’
derisa tapa shtrëngohet
plotësisht.
Page 30

30
Shqiptari
KUJDES: Pastruesi për avull e përdor ujin nga çezma. Nëse uji është shumë i
forte,rekomandohet përdorimi i ujit të destiluar apo të zier.
KUJDES: Mos i futni kurrë deterxhentat
apo prodhimet aromatike. Në këtë rast,
përdorimi do të jetë i pasigurt dhe do ta
dëmtojë pajisjen.
Kur e përdorni pastruesin me avull, kontrolloni nëse
ngrohës bakri është brenda rezervuarit për ujë, gjithmonë i
mbytur (siç është ilustruar në foto 1i).
2. Zgjidhni një nga mundësitë të mëposhtme në
rregullatorin e avullit:
1 – e dobët, 2 - e mesme, 3- e fuqishme i 4-Spreji i
nxehtë
• Regullimet 1 –e dobët dhe 2- e mesme janë ideale
për pastrimin e dyshemeve të forta, siç janë linoleum,
keramikë, mermer, dru, etj.
• 3-Rregullimi i fuqishëm është ideal për pastrimin e
qilimave dhe shtigjeve.
• 4- Spreji i nxehtë është ideal për pastrimin e banjave,
kuzhinave, dritareve, rrotave automatike, etj. Mundeni
t’i ndryshoni rregullimet në rregullatorin e avullit ndërsa
pastruesi me avull punon.
3. Kur paisja është plotësisht e montuar dhe e mbushur me
ujë, futeni spinën në rrymë në prizën e tokëzuar të rrymës.
Çelësi i fikur (O/ I) është në pozicionin OFF. Ndizeni çelësin në
pozicioninON Pas përafërsisht 15 sekonda, pastruesi me avull
do të fillojë të lëshojë avull. Pastaj, ndizeni rregullatorin i avullit
dhe e rregulloni avullin sipas nëvojave Tuaja. Për të ndaluar
lëshimin e avullit, fikeni rregullatorin e avullit dhe pastaj fikeni
pajisjen duke shtypur çelësin (O/ I) në pozicionin OFF Në
qoftë se ka ujë në pajisjen nga përdorimin e mëparshëm, gjatë
ndezjes së përsëritshme, dhe para se pajisja fillon të prodhojë
avull, ajo ujë nga përdorimi i mëparshëm nuk do të ngrohet
dhe do të dalë jashtë, me ndikimin e avullit të tanishme, dhe
e gjitha kjo mund të shkaktojë paraqitjen e pellgjeve. Kjo
mund të ndodhë edhe nëse vendosni vetëm çelësin (O/ I) në
pozicionin OFF, dhe rregullatori i avullit të jetë i ndezur nga
përdorimi i mëparshëm edhe pse paijisja është e fikur vetëm
kur është shkëputur nga rryma. Sigurohuni se paijisja është e
fikur dhe e zbrazur plotësisht pas çdo përdorimi.
Page 31

31
Shqiptari
KUJDES: Mos kryeni këtë procedurë mbi dyshemeve të ndjeshme ndaj
nxehtësisë e avullit.
4. Lëvizni ngadalë me pastrues me avull mbi sipërfaqjen që doni ta pastroni. Lecka absorbuese
në kokën për pastrimin, do ta mbledhë me tërë felliqësinë e tretur me avull. Mbaeni leckën
në afërsi, me të cilën mund ta pastroni ujin e tepërt, nëse del në sipërfaqe..
5. Kur pastruesi me avull ndalon me lëshimin e avullit, së pari fikeni rregulatorrin e avullit e
atëherë pajisjen me çellësin OFF dhe shkëputeni kabllon nga rryma. Rimbusheni rezervuarin
për ujë, ndezeni pajisjen përsëri, rregulloeni rregullatorin e avullit dhe vazhdoni me
pastrimin.
Për rezultatet më të mira:
1. Pastroeni dhe thitheni sipërfaqen para se ta përdorni
pastruesin me avull.
2. Për ta shmangur paraqitjen e pllegjeve, lecka microfiber
duhet të jetë e pastër dhe e thatë për përdorim. Për ta
ndryshoni leckën, ndiqeni udhëzimin në vijim: lini leckën
të ftohet, hiqeni nga koka e pajisjes dhe zëvendësoeni me
leckën microfiber e re(pajisja). Pastaj,vazhdoni ta përdorni
pastruesin me avull. Zgjidheni rregullimin e dobët të
rregullatorit të avullit.
3. Për të dezinfektuar një pjesë së dyshemesë Suaj, lini
pastruesin me avull të jetë në rregullimin e forte, në zonën
që e doni të dezinfektoni në periudhë prej përafërsisht
10 sekonda, por jo më shumë se15 sekonda. Gjithmonë
kini kujdes rreth strukturës së dyshemesë dhe a është e
parashikuar të pastrohet me avull.
• Mos e përdorni pajisjen në të njëjtin vend për një kohë të gjatë. Përdorimi i till mund ta
dëmtojë dyshemen.
• Mos i futni duart e këmbët nën kokën për pastrimi. Kjo pjesë e pajisjes është shumë e nxehtë
dhe mund të shkaktojë djegiet.
• Gjatë përdorimit pajisja prodhon një zë, e cila na lajmëron se uji është duke ngrohur, pra,
pajisja e prodhon avullin. Kjo zë është normale.
• Mund të ndodh spërkatje uji që është i përzier me avull. Kjo është gjithashtu normale.
• Nxehtësia e avullit ujor mund të ndikojë negativisht në disa materialeve. Gjithmonë
sigurohuni se dyshemeja juaj është përshtatshme për pastruesin me avull, apo provoni vet
në ndonjë zone të fshehur.
Page 32

32
Shqiptari
PASTRUESI ME AVULL PËR DORË
MONTIMI
Kjo pajisje është ideale për përdorimin mbi sipërfaqeve të punës, pultëve, lavamanit, dritareve,
pasqyrave, pllakave si edhe për pastrimin e njollave në dyshemetë, qillimat dhe shtigjet.
Përdoreni me spërkatësin, furçën tunxhi apo najloni, për ta hequr fëlliqjen, mykun, yndyrën etj.
1. Hiqeni kabllon e rrymës nga mbajtësi
i sipërm për mbështjellje , siç është
ilustruar në foto.
3. Shtypeni butonin për bllokim në trupin e
pajisjes dhe hiqeni kokën për pastrimin.
2. Shypeni butonin për bllokimin në
dorezën teleskopike dhe tërhiqeni
dorezën e shtrembëruar mbrapa trupit
të pajisjes.
4. Për ta bashkuar spërkatësin, vendoseni
atë në hapjen në trupin e pajisjes, siç
është ilustruar në foto 4a. Bashkimi është
i sukseshëm kur butoni për bllokimin
klikon. Kontrolloni nëse spërkatësi është i
fiksuar mire në vend para përdormit.
KUJDES: Para montimin e pajisjes apo zëvendësimin e shtojcave, konotrolloni
nëse pajisja është e fikur nga rryma e nëse çelësi(O/I) është vendosur në
pozicionin OFF.
4a
4b
Page 33

33
Shqiptari
SI MONTOHEN SHTOJCAT
5. Furçën e rrumbullakët prej najlonit apo tunxhit, fiksoeni në fund të spërkatësit, siç është
ilustruar në fotot 5a i 5b.Për të hequr njërën prej furçave, zhvidoseni nga spërkatësi,siç është
ilutruar në foto 5c.
1. Hiqeni kokën për pastrimin duke stypur
butonin për bllokimin në trupin e pajisjes
dhe në të njëjtën mënyrë vendoseni apo
hiqeni spërkatësin.
2. Për të lidhur zorrën zgjatuese, vendoseni
atë në hapjen e trupit të pajisjes, siç është
ilustruar në fotot 1a, 1b i 1c. Bashkimi
është i sukseshëm kur butoni për bllokimin
e shtojcave në trupin e pajisjes klikon.
• Furçja e rrumbullakët prej najlonit është ideale për pastrimin e sipërfaqëve të lemur e të forte
siç janë banjo, lavamani, elementet e kuzhinës etj.
• Furçja e rrumbullakët prej tunxhit është ideale për pastrimin e sipërfaqeve të përafërta dhe
metalike, siç janë dyshemetë tullesh, rrotat automatike, dera metalike, kornizat etj.
• Të dyja furçat pastrojnë në mënyrën ekase yndyrë nga pani, soba, furra në kuzhinë.Mundeni
ta përdorni sapunin apo deterxhentin për larjen e pjesëve të fëliqura, të cilin duhet të
vendosni në sipërfaqën të cilën po e pastroni.
KUJDES: Mos e përdorni kurrë furçën e rrumbullakët prej tunxhit në sipërfaqet
që janë të prirura për gërvishtjen.
KUJDES: Kontrolloni nëse zorra zgjatuese është e fiksuar mirë para përdorimit.
5a
1a
1b
5b 5c
1c
Page 34

34
Shqiptari
SHTOJCA PËR PASTRIMIN E DRITAREVE
SHTOJCA PËR RROBA
1. Tërhiqeni litarin në leckën dhe futeni atë në mbajtëset të parashikuara në kornizën e
zgjatuesit për pastrimin e dritareve. Tërhiqëni litarin dhe shtrëngoeni leckën në vend.
2. Vendoseni shtojcën për pastrimin e dritareve në zorrën zgjatuese sipas parimit në vijim:
Vendoseni butonin për bllokimin në zorrën zgjatuese në pozicion kështu që të jetë në një
linje me hapjen e përcaktuar në zgjatuesin për pastrimin dhe futeni në zorrën zgjatuese,
derisa bllokohet. ( siç është ilustruan në fotot 2a i 2b).
1. Për ta përdorur shtojcën për pastrimin e dritareve si pastruesi me avull për
rroba, futeni leckën micforbier siç është ilustruar në fotot 1a, 1b i 1c.
Sigurohuni se e keni vendosur leckën në të gjithë mbajtëset në kornizën e zgjatuesit për
pastrimin e dritareve për të parandaluar rrëshqitjen apo rënien e leckës nga shtojca gjatë
përdorimit. (siç është ilustruar në foto 1a, 1b i 1c).
KUJDES: Mos e mbylloni tehun prej gomës.
1a
2a
1a
1b
2b
1b
1c
1c
Page 35

35
Shqiptari
FSHIRËSE
PËRDORIM
2. Futeni shtojcën për pastrimin e dritareve/e rrobave në
zorrën zgjatuese siç është shpjeguar në vijim: vendoseni
butonin për bllokimin në zorrën zgjatuese në pozicion
kështu që të jetë në një linje me hapjen e përcaktuar në
zgjatuesin për pastrimin dhe futeni në zorrën zgjatuese,
derisa bllokohet. (siç është ilustruan në foto 2a).
1. Vendoseni leckën në kornizën e fhirëses (siç është ilustruar në fotot 1a i 1b).
2. Vendoseni kornizën e fshirëses në zorrën zgjatuse sipas spjegimit në vijim: vendoseni
butonin për bllokimin në zorrën zgjatuese në pozicion kështu që të jetë në një linje me
hapjen e përcaktuar e fshirëses, dhe futeni në zorrën zgjatuese, derisa bllokohet.(siç është
ilustruan në fotot 2a i 2b).
1. Rimbushni me ujë rezervuar. Shikoeni fragmentin SI PËRDORET PAJISJA / Rimbushja e
rezervuarit për ujë me ujë. Vendoseni njërën prej furçat në mënyrë si është shpjeguar në
fragmentin SI MONTOHEN SHTOJCAT.
2. Zgjidhni një prej mundësive në rregullatorin e avullit:
1 –e dobët, 2- e mesme, 3-e fortë i 4-Spreji i nxehtë.
Mund të ndryshoni rregullimet në rregullatorin e avullit gjatë funksionimit.
KUJDES: Kontrolloni se pajisja është e fikur nga rryma dhe se çelësi (O/I) është
në pozicionin OFF.
2a
1a 1b
2a 2b
Page 36

36
Shqiptari
3. Kur paisja është plotësisht e montuar dhe e mbushur me ujë, futeni spinën
në rrymë. Çelësi i fikur (O/ I) është në pozicionin OFF. Ndizeni çelësin në
pozicionin ON Pas përafërsisht 15 sekonda, pastruesi me avull do të fillojë
të lëshojë avull. Pastaj, ndizeni rregullatorin i avullit dhe e rregulloni avullin
sipas nëvojave tuaja. Për të ndaluar lëshimin e avullit, fikeni rregullatorin e
avullit dhe pastaj fikeni pajisjen duke shtypur çelësin (O/ I) në pozicionin
OFF Në qoftë se ka ujë në pajisjen nga përdorimin e mëparshëm, gjatë
ndezjes së përsëritshme, dhe para se pajisja fillon të prodhojë avull, ajo
ujë nga përdorimi i mëparshëm nuk do të ngrohet dhe do të dalë jashtë
me ndikimin e avullit të tanishme, dhe e gjitha kjo mund të shkaktojë
paraqitjen e pellgjeve. Kjo mund të ndodhë edhe nëse vendosni vetëm
çelësin (O/ I) në pozicionin OFF, dhe rregullatori i avullit të jetë i ndezur
nga përdorimi i mëparshëm edhe pse paijisja është e fikur vetëm kur është
shkëputur nga rryma. Kontrolloni se paijisja është e fikur dhe e zbrazur
plotësisht pas çdo përdorimi.
SI PËRDOREN SHTOJCAT
SHTOJCA PËR PASTRIMIN E DRITAREVE
Kontrolloni se pajisja është e fikur nga rryma dhe se çelësi (O/I) është në pozicionin OFF.
4. Lëvizni ngadalë me pastrues me avull mbi sipërfaqjen që doni ta pastroni.Lecka absorbuese
në kokën për pastrimin, do ta mbledhë tërë felliqësinë e tretur me avull. Mbaeni leckën në
afërsi, me të cilën mund ta pastroni ujin e tepërt, nëse del në sipërfaqe.
5. Kur pastruesi me avull ndalon me lëshimin e avullit, së pari fikeni rregulatorin e avullit e
atëherë pajisjen me çellësin OFF dhe shkëputeni kabllon nga rryma. Rimbusheni rezervuarin
për ujë, ndezeni pajisjen përsëri, rregulloeni rregullatorin e avullit dhe vazhdoni me
pastrimin.
KUJDES: Për të dezinfektuar sipërfaqet siç janë pultët, lavamani, dritaret,
pasqyret, pllakat, përdoreni pastruesin me avull jo më shumë se 15 sekonda në
të njëjtën zonë. Mos kryeni këtë procedurë mbi sipërfaqeve të ndjeshme ndaj
nxehtësisë e avullit. Fuqia e avullit ujor mund të ndikojë negativisht në disa
materiale. Gjithmonë kontrolloni se sipërfaqja është përshtatshme për pastruesin
me avull, apo provoni vet në ndonjë zone të fshehur.
1. Rimbushni me ujë rezervuar. Shikoeni fragmentin SI PËRDORET PAJISJA / Rimbushja e
rezervuarit për ujë me ujë.
2. Vendoseni leckën në zgjatuesin për pastrimin e dritareve, pastaj vendoseni zgjatuesin
për pastrimin e dritareve në zorrën zgjatuese, siç është shpjeguar në fragmentin SI
MONTOHEN SHTOJCAT
3. Ndiqni hapin 1 dhe 3 në fragmentin SI PËRDORET PAJISJA.
4. Mbaeni pastruesin me avull për dorë, në një dorë, dhe me dorën tjetër mbaeni dorezën e
zorrës zgjatuese, siç është ilustruar në foto.
Page 37

37
Shqiptari
ZGJATUESI PËR RROBA / LECKA PËR RROBA
KUJDES:
• Mos e përdorni avullin për pastrimin e dritarëve të acaruara. Do të thyejnë!
• Kini kujdes kur e përdorni pastruesin me avull për xham.Është i brishtë!
5. Lëvizni ngadalë me pastrues me avull mbi sipërfaqjen
që doni ta pastroni.Lecka absorbuese në kokën për
pastrimin, do ta mbledhë tërë felliqësinë e tretur me avull.
Mbaeni leckën në afërsi, me të cilën mund ta pastroni ujin
e tepërt, nëse del në sipërfaqe
6. Kur pastruesi me avull ndalon me lëshimin e avullit, së pari
fikeni rregulatorrin e avullit e atëherë pajisjen me çellësin
OFF dhe shkëputeni kabllon nga rryma. Rimbusheni
rezervuarin për ujë, ndezeni pajisjen përsëri, rregulloeni
rregullatorin e avullit dhe vazhdoni me pastrimin.
7. Kur mbaroni me pastrimin mos e prekni leckën derisa
të ftohet, pastaj hiqeni nga zgjatuesi për pastrimin e
dirtareve.Kini kujdes, mbase lecka është akoma e nxehtë.
1. Rimbushni me ujë rezervuar. Shikoeni fragmentin SI PËRDORET PAJISJA / Rimbushja e
rezervuarit për ujë me ujë.
2. Vendoseni leckën për rroba në zgjatuesin për pastrimin e dritareve, pastaj vendoseni
zgjatuesin për pastrimin e dritareve në zorrën zgjatuese, siç është shpjeguar në fragmentin
SI MONTOHEN SHTESAT
3. Zgjidhni një prej rregullimeve në rregulatorin e avullit:
1 –e dobët ili 2- e mesme
4. Ndiqeni happen 3 e përshkruar në fragmentin SI
PËRDORET PAJISJA.
5. Për trajtimin e veshjes me pastruesin për avull, vendosni një
pjesë së veshjes në varëse rrobash dhe e drejtoni avullin
drejt veshjes në mënyrë drejtprdrejtë. Mbaeni pastruesin
me avull për dorë në një dorë, dhe me dorën tjetër mbaeni
dorezën e zorrës zgjatuese, siç është ilustruar në foto.
KUJDES: Kontrolloni se pajisja është e fikur nga rryma dhe se çelësi (O/I) është
në pozicionin OFF.
KUJDES: Mos përdorni rregullimet 3-e fortë dhe 4-Spreji i nxehtë e
rregullimeve të avullit kur e përdorni pastruesin me avull për rroba. Mund t’i
ndryshoni rregullimet në rregullatorin e avullit gjatë funksionimit.
Page 38

38
Shqiptari
KUJDES: Lexoeni etiketën në pjesën e veshjes për të kontrolluar a është e
parashikuar për trajtimin me avull (nëse nuk është e parashikuar për hekurosjen
atëherë, nuk është edhe për trajtimin me avull).Disa materiale si lëkur, material
kamoshi apo pelush, nuk janë të parashikuara për trajtimin me avull. Nëse s’jeni të
sigurt, bëni një testim me avull në pjesën e veshjes që nuk është e dukshme.
KUJDES: Kontrolloni nëse pajisja është e fikur nga rryma dhe se çelësi (O/I)
është në pozicionin OFF.
6. Ngadalë lëvizni me zgjatuesin për rroba verikalisht, nga maja deri në fund të veshjes
apo lëvizni në drejtimin të kundërt. Rrudhat e perdes mund të hekurosni me ndihmën e
pastruesin me avull ndërsa është varur.
7. Kur pastruesi me avull ndalon me lëshimin e avullit, së pari fikeni rregulatorrin e avullit
e atëherë pajisjen me çellësin OFF dhe shkëputeni kabllon nga rryma. Rimbusheni
rezervuarin për ujë, ndezeni pajisjen përsëri, rregulloeni rregullatorin e avullit dhe
vazhdoni me pastrimin.
1. Rimbushni me ujë rezervuar. Shikoeni fragmentin SI PËRDORET PAJISJA / Rimbushja e
rezervuarit për ujë me ujë
2. Vendoseni leckën në kornizën e fshirëses, pastaj vendoseni zgjatuesin për pastrimin
e dritareve në zorrën zgjatuese, siç është shpjeguar në fragmentin SI MONTOHEN
SHTOJCAT.
3. Zgjidhni një prej rregullimeve në rregulatorin e avullit:
1 –e dobët ili 2- e mesme 3- e fortë
Mos përdorni rregullimi 4-Spreji i nxehtë kur e përdorni fshirësen.
Mund t’i ndryshoni rregullimet në rregullatorin e avullit gjatë funksionimit
4. Ndiqeni hapjen 3 e përshikuar në fragmentin SI PËRDORET PAJISJA.
5. Mbaeni pastruesin me avull për dorë në një dorë, dhe me dorën tjetër mbaeni dorezën e
zorrës zgjatuese, siç është ilustruar në foto.
Lëvizni ngadalë me pastrues me avull mbi sipërfaqjen që doni ta pastroni.Lecka
absorbuese pastron tërë felliqësinë e tretur me avull. Mbaeni leckën në afërsi, me të cilën
mund ta pastroni ujin e tepërt, nëse del në
sipërfaqe.
6. Kur pastruesi me avull ndalon me lëshimin
e avullit, së pari fikeni rregulatorrin e avullit
e atëherë pajisjen me çellësin OFF dhe
shkëputeni kabllon nga rryma. Rimbusheni
rezervuarin për ujë, ndezeni pajisjen përsëri,
rregulloeni rregullatorin e avullit dhe
vazhdoni me pastrimin.
7. Kur mbaroni me pastrimin mos e prekni
leckën derisa të ftohet, pastaj hiqeni nga
zgjatuesi për pastrimin e dirtareve.Kini
kujdes, mbase lecka është akoma nxehtë.
FSHIRËSE
Page 39

39
Shqiptari
KUJDES: Kontrolloni se pajisja është e fikur nga rryma dhe se çelësi (O/I) është
në pozicionin OFF.
1. Vendoseni leckën në formën e një trekëndësh në kokën për pastrimi,duke ndjekur të
njejta udhezime si edhe për leckën microfiber me grepa dhe litarin në fragmentin SI
MONTOHEN SHTOJCAT.
2. Lecka është shumë e butë dhe i forte, me qindra fibra absorbuese, shumë përkatëse për
drurin e mbyllur, qeramikën dhe për llojat e tjera të dyshemeve.
1. Fikeni kabllonë furnizuese nga spine.
2. I lini leckat dhe shtojcat të ftohen dhe me shumë kujdes i hiqni nga trupin e pajisjes. Kini
kujdes, mbase janë akoma të nxehtë.
3. Gjithmonë zbrazeni rezervuarin me ujë pas çdo përdorim.
4. Lini ujin të avullon,mbase ka mbetur si një produkt të kondenzimit,pas përdorimit.
5. Mbështjellni kabllonë e rrymës mbi grepit të sipërm dhe të poshtëm.
6. Fshini të gjitha sipërfaqet e pastruesit me avull, me një leckë të butë.Ruani pajisjen në
hapësirën e mbyllur.
7. Mos e vendosni pajisjen në diell apo në shi. E ruani atë në vendin e thatë dhe i fothë kur
nuk e përdorni..
8. Heqja vertikale e pastruesit me avull, me kokën/leckën e lagësht për pastrim, do të krijojë
gjurmat e bardha në dysheme. Për t’i pastruar gjurmat e bardha, i fhihni me uthull. Hiqeni
kokën për pastrimin/leckën para heqjet.
1. Nga rezervuari për ujë zbrazni të gjitë që ka mbetur dhe thajeni atë pas çdo përdorimi.
Mund të përdorni deterxhent për të pastruar shtojcat(spërkatës dhe furçat e rrumbullakët),
kur fëlliqen. Pastaj i lani me ujë të pastër dhe prisni të bëhen të thatë.
2. Për pastrimin e qëlqerjes, që ka grumbulluar në rezervuarin për ujë, fusni një apo dy lugë e
uthullës së bardhë në rezervuarin e plotë për ujë. Mbylleni rezervuarin dhe shkundni apo
përzieni përbërësit. MOS E NDIZENI PASTRUESIN ME AVULL! Mos e prekni për disa orë.
Pastaj, zbrazeni rezervuarin për ujë dhe e mbushni atë me ujë të pastër. Laeni rezervuarin
për ujë tërësisht.
LECKA E KOKËS PËR PASTRIMIN
PAS PËRDORIMIT
PASTRIMI
Page 40

40
Shqiptari
PROCESI I PASTRIMIT TË QËLQERJES
Nëse pastruesi juaj me avull e prodhon avullin më ngadalë se zakonisht apo e ndalon me
prodhimin e avullit, mbase është e nëvojshme të kryhet pastrami i qëlqerjes. Qëlqerja mund
të kijohet me kalimin e kohës në pjesat prej metali dhe ndikon shumë në efikasitetin e pajisjes.
Është i nëvojshëm pastrami i qëlqerjes rregullisht, çdo 25-50 përdorime të rezervuarit të plotë
me ujë apo minimum një herë në muaj, veçanërisht në zonat me ujë të forte. Frekuenca e
pastrimit varet nga fortësia e ujit që e përdorni dhe nga fakti sa shpesh ju e përdorni pastruesin
me avull. Megjithatë, në zonat me ujë të fortë, duhet të përdoret uji destiluar apo i zier për
efikasitetin më e mire.
• Me përdorimin e krueses
1. Kontrolloni se pajisja është e fikur nga rryma dhe se çelësi (O/I) është në pozicionin OFF.
2. Përdorni një gjilpërë për t’i hequr depozitat e qëlqerjes nga hapjat e vogla për daljen e
avullit në trupin e pajisjes siç është ilustruar në foto. Hapjen për avull do ta pastroni nga
qëlqerija me kurajtjen dhe duke e future gjilpërën
në të. Gjihthmonë kontrolloni nëse qëlqerja nga
hapja për daljen e avullit është e hequr, para se të
bashkoni me të ndonjë prej shtojcave. Vazhdoni
të rrothulloni me gjilpërën për pastrim derisa nuk
e heqni qëlqerjen plotësisht.
• Me përdorimin e mjetave pastruese
1. Përgatini një tretësirë nga 1/3 e uthullit të bardhë dhe 2/3 e ujit nga çezma dhe futeni atë
në rezervuarin për ujë.
2. Siguroeni pozicionin për pajisjen në mënyrë që të mundësohet lëshimi i çurgut të fortë të
avullit, pa rrezikuar asgjë dhe askënd në atë moment. Ndezeni pajisjen në rrymë, ndezeni
çelësin dhe i lejoni pajisjes ta prodhon avullin, derisa përzierja në rezervuarin ekziston.
3. Përsëriteni këtë proces sa herë sa të jetë e nëvojshme, derisa pajisja krijon rrjedhimin
normal e avullit.
4. Kur pajisja është e pastër, pa qëlqerjen, mbusheni rezervuarin për ujë me ujin e freskët dhe
e lani atë.
5. Mbusheni rezervuarin për ujë me ujin e freskët, ndizeni atë dhe lini avullin nëpër sistemit
derisa rezervuarin për ujë zbrazet.
Për ta hequr qëlqerjen nga pastruesi me avull, ndiqni udhëzime në vijim:
KUJDES: Mos e lini pastruesin me avull pa mbikëqyrjen derisa pastrimi i
qëlqerjes është në proces. Bëni një test pastrimi në zonën e përshtatshme, çdo
herë pas pastrimit i qëlqerjes, në mënyrë që të jeni të sigurt që nuk ka asnjëlloj
mbetjesh në sistem.
Page 41

41
Shqiptari
• Pastrimi i shtesave të bllokuara për pastruesin me avull.
Për shkak të përmbajtjes së lartë të ujit mineral në disa zona, ndoshta mund të vëreni se pak
avulli ujor del nga shtojcat. Kjo mund të jetë për shkak të akumulimit të kalciumit në krye të
spërkatësit.
Si pastrohet kalciumi i akumuluar:
Në rrekomandojmë përdorimin e lubrifikantit në sprej. Vini një sasi të vogël në maj të
spërkatësit. Pas spërkatjes së lubrifikantit në shtesë, mbusheni pastruesin me avull, me
ujë, sipas udhëzimeve dhe ndizeni çurkun e vazhdueshme të avullit nëpër shtojcës disa
minuta, për ta pastruar kalciumin e akumuluar. Kur hapja për avullin është e pastër, e drejtoni
pastruesin me avull drejt ndonjë sipërfaqe neutrale, në mënyrë që të jeni të sigurt që nuk ka
asnjëlloj mbetjesh.
Mirëmbajtja e leckës microfiber
1. Larja me lavatriçen me 60ºC (140ºF)
2. Mos zbardhoni!
3. Mos përdoreni zbutësim!
KUJDES: Keto precudurat i praktikoni në dhomën e mbrojtur dhe shumë e
ventiluar.
KUJDES: Proverite da li je uređaj isključen iz struje i da je prekidač (O/I) na OFF
poziciji.
UDHËZIMI PËR ZGJIDHJEN E PROMBLEMIT
Problem Shkaku i mundshëm Zgjidhje
PAJISJA NUK FIKETU
Pajisja nuk është ndezur
në rrymë apo në çelës.
Kontrolloni nëse pajisja është
ndezur në prizën dhe se
çelësi është ndezur.
AVULLI I DOBËT APO
MUNGES E TIJ
Rezervuari për ujë i boshë.
Mbusheni rezervuarin për
ujë.
Spërkatësi i bllokuar.
Shtojcën dhe pastroeni
spërkatësin.
Guraleci i akumulluar.
I ndiqni udhëzimet për
pastrimin në këtë udhëzim
për përdorim, për pastrimin
e guralecit.
Page 42

42
Shqiptari
Problem Shkaku i mundshëm Zgjidhje
AVULLI DEL NGA PJESA
E BASHKIMIT TË TRUPIT E
SHTESËN
Shtesa s’është e bashkuar
mirë
Fikeni pajisjen, pritni derisa
shtesa të ftohet plotësisht
dhe duke ndjekur udhëzimin
bashkoni shtojcën sërish.
Ka një penges në pjesën e
bashkimit
Hiqeni shtojcën dhe
kontrolloni çfarë pengon
dhe pastroni.
LECKA PËR RROBA ËSHTË E
LAGËSHT
Lecka e mblodhi avullin ujor
Hiqeni leckën e lagësht,
zëvendësoeni me një e
thatë (leckat reserve mund
t’i marrni te distributeri apo
në servis të autorizuar) apo
e, freskoni, e shtrydhni, e
bëni e thatë dhe vazhdoni
ta përdorni.
Page 43

43
CRNOGORSKI BOSANSKI
VAŽNA SIGURNOSNA UPUTSTVA
Kada koristitie električne uređaje, pridržavajte se osnovnih mjera bezbijednosti:
1. Pročitajte sva uputstva prije korištenja uređaja.
2. Da biste smanjili rizik od strujnog udara, ne potapajte uređaj, niti kabl/utikač u vodu ili bilo
koju drugu tečnost. Poštujte uputstva za čišćenje.
3. Djecu nadzirite da se ne bi igrala sa uređajem.
4. Ne ostavljajte uređaj bez nadzora dok je uključen u struju.
5. Isključite uređaj iz struje kada ga ne koristite i prije čišćenja.
6. Ukoliko je strujni kabl oštećen, mora da ga zamijeni ovlašteni serviser ili jednako
kvalifikovana osoba, da bi se izbjegla nesreća.
7. Korištenje produžnog kabla nije preporučljivo.
8. Pazite da ne zamrsite i ne uvrćete strujni kabl.
9. Ne vucite i ne teglite strujni kabl. Ne koristite ga za pomeranje ili nošenje uređaja. Kada
uređaj isključujete iz struje, povucite utikač, ne kabl.
10. Korištenje dodataka koji nisu isporučeni sa uređajem, može da izazove požar, strujni udar
ili povrede.
11. Ne dozvoljavajte da strujni kabl visi preko ivice stola ili nekog elementa ili da dodiruje tople
povšine, uključujući i šporet. Vodite računa da strujni kabl ne visi i da ne može niko/ništa za
zapne o njega.
12. Ne stavljajte uređaj na ili blizu gasa ili elektricnog šporeta , u toplu rernu ili blizu lako
zapaljivih materijala.
13. Ne koristite uređaj napolju ili ako stojite na mokroj podlozi.
14. Ne dirajte utikač i aparat mokrim rukama !
15. Uređaj koristite isključivo za ono čemu je namenjen.
16. Uređaj nije manjenen za upotrebu osobama (uključujući i djecu) sa smanjenim fizičkim,
motornim ili mentalnim sposobnostima ili u nedostatku iskustva i znanja, osim ako su pod
nadzorom ili na osnovu instrukcija za upotrebu od strane osobe odgovorne za njihovu
bezbijednost.
17. Prije uključivanja uređaja, provjerite da li napon naveden na pločici uređaja, odgovara
naponu Vaše električne mreže.
18. Ne koristite uređaj ako je pao, ako ima vidiljivih oštecćnja ili ako curi.
19. Čuvajte uređaj na suhom mjestu, zaštićenog od prašine i van domašaja direktne sunčeve
svjetlosti.
20. Svaka zloupotreba ili neuspjeh da pratite uputstva za korištenje, čini garanciju nevažećom i
oslobađa proizvođča/distributera/prodavca svake odgovornosti.
21. Tečnost ili para ne smiju direktno da budu usmjerene ka opremi koja sadrži električne
komponente, kao što je unutrašnjost rerne.
22. Posebna pažnja je potrebna kada se uređaj koristi u blizini djece, kućnih ljubimaca ili
biljaka.
23. Nikad ne usmjeravajte paru prema ljudima, životinjama ili biljkama !
24. Ne ubacujte predmete u otvore na uređaju. Ne koristite uređaj ako je blokiran neki od
otvora.
Page 44

44
BOSANSKI CRNOGORSKI
25. Ne koristite glavu za čišćenje bez propisno nameštene krpe.
26. Ne koristite paročistač bez vode u rezervoaru za vodu.
27. Dodatna opreznost je potrebna pri korištenju uređaja na stepenicama.
28. Dobro osvijetlite radni prostor.
29. Nikad ne sipajte u rezervoar toplu vodu ili bio koje druge tečnosti, kao što su aromatične,
alkoholno bazirane tečnosti ili deterdženti. To bi korištenje učinilo ne bezbijednim i oštetilo
bi uređaj.
30. Uvijek održavajte izlaz za paru čistim. Izbjegavajte postavljanje otvora na mekane
povrašine, koje mogu da blokiraju protok pare. Održavajte otvore čistim, bez dlaka i drugih
potencijalnih prepreka, da biste osigurali pravilan protok pare.
31. Prekinite korištenje paročistača ako primjetite curenje vode i kontaktirajte ovlašteni servis.
32. Ne koristite paročistač u zatvorenim prostorijama koje su napunjene zapaljivim,
eksplozivnim ili toksičnim supstancama kao što su razređivač za boju ili uljane boje.
33. Ne koristite uređaj na koži, voskiranim podlogama, nelakiranom parketu, sintetičkim
tkaninama, plišu ili drugim na paru osjetljivim materijalima.
34. Ne koristite uređaj za zagrijavanja prostora!
35. Ne dirajte tople tek obrisane površine !
36. Da biste isključili uređaj, pritisnite dugme na OFF poziciju, isključite regulator pare, zatim
izvucite utikač iz struje.
37. Pažljivo koristite uređaj, zbog pare koju emituje.
38. Da biste izbjegli opterećenje električnog kola, ne koristitite druge uređaje na istu utičnicu
kada i paročistač.
39. Ne vucite i ne teglite produžno crijevo, jer možete da ga oštetite. Na oštećenom crijevu
može da dođe do curenja vodene pare.
40. Ne dirajte nastavak za čišćenje prozora ili krpu tokom upotrebe.
41. Tokom rada, ovi dodaci su vrući i može doći do opekotina.
42. Držite produžno crijevo dalje od sebe i izbjegavate da dirate crijevo, jer može da bude
izuzetno vruće i da Vas opeče.
Ne bacajte električne uređaje kao običan otpad, već koristitie posebna mjesta za
sakupljanje električnog otpada.Obratite se svojim lokalnim vlastima za informaciju u vezi sa
sistemima koji su na raspolaganju za odlaganje električnog otpada. U slučaju odlaganja na
deponije ili smetljišta, opasne materije mogu da procure u podzemne vode i uđu u lanac
ishrane, utičući nepovoljno na Vaše zdravlje i okolinu.
Page 45

45
CRNOGORSKI BOSANSKI
DIJELOVI UREĐAJA
Zakrivljena drška
Svjetlosni prekidač za uključivanje/isključivanje
Regulator pare
Čep rezervoara za vodu
Rezervoar za vodu
Tijelo uređaja
Kuka za namotavanje kabla
Strujni kabl
Teleskopska drška
Dugme za zaključavanje ručke
Dugme za
zaključavanje dodataka
(na tijelu uređaja)
Glava za brisanje
Prednja strana Zadnja strana
Page 46

46
BOSANSKI CRNOGORSKI
DODACI
PRIBOR
Klizač za čišćenje
tepiha
Prskalica
Mikrofiber
krpa
Pajalica
Okrugla četka
(mesing)
Okrugla četka
(najlon)
Igla za
čišćenje
Krpa za čišćenje
odjeće
Krpa za čišćenje
prozora
Dozer
Nastavak za čišćenje
prozora
Produžno crijevo
Page 47

47
CRNOGORSKI BOSANSKI
PAŽNJA: Prije sklapanja uređaja ili mijenjanja dodataka, provjerite da li je uređaj
isključen iz struje i da je prekidač (O/I) na OFF poziciji.
PAŽNJA: Prije korištenja
provjerite da li je glava
za čišćenje paročistača
sigurno postavljena.
KAKO DA KORISTITE UREĐAJ
1. Spojite glavu za čišćenje za tijelo
uređaja po sljedećem principu:
ubacite okretnu spojnicu u
označenu rupu na tijelu uređaja;
spajanje je uspješno kada dugme
za zaključavanje dodataka na tijelu
uređaja klikne.
2. Ubacite teleskopsku dršku u za to
namenjen otvor na tijelu uređaja,
dok se ne zaključa uz pomoć
dugmeta za zaklljučavanje na
teleskopskoj dršci.
3. Postavite mikrofiber krpu na glavu za
čišćenje.Zategnite mikrofiber krpu
povlačenjem uzice, dok istovremeno
pritiskate dugme na uzici.
SKLAPANJE
Page 48

48
BOSANSKI CRNOGORSKI
4. Prilikom korištenja paročistača na tepisima,
postavite glavu za čišćenje sa mikrofiber krpom
preko klizača za čišćenje tepiha, kao sto je
ilustrovano na slici 4a. Ne pokušavajte da koristitie
paročistač na tepihu bez klizača za čišćenje, jer
ćete da oštetite tepih.
Paročistač je napravljen da u potpunosti očisti podne površine, kao sto su mermer, keramika,
tepisi, kamen, linoleoum i parket. Nisu sve vrste podova predviđene za čišćenje parom.
Toplota i para mogu da skinu vosak sa površina tretiranih voskom. Ne koristite paročistač
na nezalijepljenom podu i ne ostavljajte ga na bilo kom drvetu osetljivom na toplotu duži
vremenski period. U suprotnom, drvo bi moglo da se naduje i parket podigne ili na drugi
način ošteti.
Kada upotrebljavate uređaj na vinilu, linoleumu ili bilo kom podu osetljivom na toplotu,
budite dodatno oprezni. Previše toplote može da istopi ljepilo u podu. Vodite računa prilikom
korištenja na laminatu, da je postavljen profesionalno i bez ikakvih šupljina ili pukotina, koje bi
omogućile ulazak vlažnosti.
Testirajte paročistač prvo na maloj izolovanoj površini Vašeg poda, prije upotrebe na bilo kojoj
podnoj površini.
Uvijek prvo provjerite uputstva za upotrebu i čišćenje prije korištenja paročistača.
U slučaju neke nedoumice, konsultujte se sa stručnjakom za podove. Koristite klizač za čišćenje
tepiha isključivo na tepisima i stazama. Upotreba klizača za čišćenje tepiha na drugim podnim
površinama, može da prouzrokuje pruge i ogrebotine.
PAŽNJA: Nikad ne koristite klizač
za čišćenje tepiha na površinama
sklonim grebanju. Nikad ne skidajte i
ne mijenjajte dodatke dok je uređaj u
upotrebi!
UPOTREBA
PAŽNJA: Ovaj uređaj emituje paru i stvara vlagu. Tragovi vode, promena boje
i oštećenja na podu, mogu da se pojave ukoliko se uređaj koristi duži vremenski
preiod na jednom mjestu.
4a 4b
Page 49

49
CRNOGORSKI BOSANSKI
1. Punjenje vodom rezervoara za vodu:
PAŽNJA: : Provjerite da li je
paročistač isključen iz struje.
Okrenite čep rezervoara za vodu suprotno od smjera kazaljki sata, približno 90º, do znaka
‘’OPEN’’
i skinite čep kao sto je ilustrovano na slikama 1a, b i c.
Držite paročistač pod uglom od 45º, kao što je ilustrovano na slici 1d i sipajte vodu u rezervoar
do označenog maksimuma, uz pomoć dozera.
Nemojte da prepunite rezervoar. Maksimalni kapacitet je 275ml/9.2OZ.
Vratite nazad čep rezervoara i
okrenite ga u smjeru kazaljki sata,
približno 90º, do natpisa ‘’CLOSE’’
dok čep ne bude skroz zategnut.
Page 50

50
BOSANSKI CRNOGORSKI
PAŽNJA: Paročistač koristi vodu sa česme. Ako je voda previse tvrda,
preporučuje se korišćenje destilovane ili prokuhane vode.
PAŽNJA: NIkad ne stavljajte deterdžente ili
mirisne proizvode u paročistač. To bi učinilo
korištenje nebezbijednim i oštetilo bi uređaj.
Dok upotrebljavate paročistač, provjerite da li je bakarni
grijač unutar rezervoara za vodu, uvijek potopljen
(kao sto je ilustrovano na slici 1i).
2. Izaberite jednu od sjledećih opcija na regulatoru pare:
1 -Slabo, 2- Srednje, 3-Jako i 4-Vruć sprej
• 1 –Slabo i 2- Srednje podešavanje idealni su za čišćenje
svih tvrdih podova, kao što su linoleum, keramika, mermer,
drvo, itd.
• 3-Jako podešavanje idealno je za čišćenje tepiha i staza.
• 4- Vruć sprej podešavanje je idealno za čišćenje, kupatila,
kuhinja, prozora, automobilskih točkova, itd.
Možete da promjenite podešavanje na regulatoru pare dok
je paročistač u funkciji.
3. Kada je uređaj u potpunosti sklopljen i napunjen vodom,
uključite utikač u struju na uzemljenoj strujnoj utičnici.
Isključeni prekidač (O/ I) je u OFF poziciji. Uključite prekidač
na ON poziciju. Poslije približno 15 sekundi, paročistač će
početi da emituje paru. Onda uključite regulator pare i
prilagodite paru Vašim potrebama. Da bi uređaj prestao da
emituje paru, isključite regulator pare i zatim isključite uređaj
prekidačem (O/ I) na OFF poziciju. Ukoliko je u uređaju
ostalo vode od predhodnog korištenja, prilikom ponovnog
uključivanja i prije nego što uređaj počne da proizvodi paru,
ta voda od prethodnog korištenja se neće zagrejati i biće
isterana napolje od strane trenutne pare, pa to može da
izazove pojavu bara. Ovo može da se dogodi i ako samo
prekidač (O/ I) isključite u OFF poziciju, a ostavite regulator
pare uključen od prethodne upotrebe i ako je uređaj
ugašen samo isključivanjem iz struje. Provjerite da li je uređaj
potpuno isključen i ispražnjen nakon svake upotrebe.
Page 51

51
CRNOGORSKI BOSANSKI
PAŽNJA: Ne sprovodite ovu proceduru na podovima osetljivim na toplotu i
paru.
4. Polako pređite paročistačem preko površine koju želite da očistitie. Upijajuća krpa na glavi
za čišćenje će da pokupi parom razloženu prljavštinu. Imajte pri ruci krpu, kojom možete da
pokupite višak vode, ako se pojavi na podlozi.
5. Kada paročistač prestane da emituje paru, jednostavno isključite prvo regulator pare, onda
uređaj na prekidač OFF i izvucite kabl iz struje. Dopunite rezervoar za vodu, ponovo uključite
uređaj, podesite regulator pare i nastavite da čistite.
Za najbolje rezultate:
1. Očistite ili usisajte podlogu pre nego što primenite
paročistač.
2. Da biste izbegli pojavu bara, mikrofiber krpa mora da bude
čista i suva za upotrebu. Da biste zamenili krpu pratite
sledeće uputstvo: pustite krpu da se ohladi, skinite je sa
glave uređaja i zamenite novom microfiber krpom (pribor).
Onda nastavite da koristitie paročistač. Izaberite slabo
podešavanje regulatora pare.
3. Da biste dezinfikovali jedan deo vašeg poda, ostavite
paročistač na najjačem podešavanju na predelu koji želite
da dezinfikujete u trajanju od približno 10 sekundi, ali ne
duže od 15 sekundi. Uvek vodite računa o strukturi poda i
da li je predviđen za čišćenje parom.
• Nikad ne koristite uređaj na jednom mestu predugo. To može da ošteti pod.
• Nikad ne stavljajte šake ili stopala ispod glave za čišćenje. Taj dio uređaja je veoma vruć i
može da izazove opekotine.
• Tokom upotrebe uređaj emituje zvuk, koji nam daje do znanja da se voda zagrijava i da
uređaj proizvodi paru. Taj zvuk je normalan.
• Može da se dese manja prskanja vode pomiješane sa parom. Ovo je takođe normalno.
• Toplota vodene pare može negativno da utiče na određene materijale. Uvijek provjerite
da li je na Vašem podu preporučljivo korištenje paročistača ili isprobajte sami na skrivenoj
površini.
Page 52

52
BOSANSKI CRNOGORSKI
RUČNI PAROČISTAČ
SKLAPANJE
Ručni paročistač je idealan za korištenje na radnim površinama, pultovima, lavaboima,
prozorima, ogledalima, pločicama i za čišćenje fleka na podovima, tepisima i stazama. Koristite
ga sa prskalicom, mesinganom četkom ili najlonskom četkom, da biste skinuli prljavštinu,
masnoću, buđ i slično.
1. Skinite strujni kabl sa gornjeg držača za
namotavanje, kao sto je ilustrovano na
slici 1a.
3. Pritisnite dugme za zaključavanje na tijelu
uređaja i skinite glavu za čišćenje.
2. Pritisnite dugme za zaključavanje na
teleskopskoj dršci i izvucite teleskopsku i
zakrivljenu dršku iz tela uređaja.
4. Da biste spojili prskalicu, postavite
je u otvor na tijelu uređaja, kao što
je illustrovano na slici 4a. Spajanje je
uspešno kada dugme za zaključavanje
dodataka na tijelu uređaja klikne.
Provjerite da li je prskalica čvrsto
postavljena na mjesto prije korištenja.
PAŽNJA: Prije sklapanja uređaja ili mijenjanja dodataka, provjerite da li je
uređaj isključen iz struje i da je prekidač (O/I) na OFF poziciji.
4a
4b
Page 53

53
CRNOGORSKI BOSANSKI
KAKO SKLOPITI DODATKE
5. Okruglu najlon ili okruglu mesinganu četku, pričvrstite navojem za kraj prskalice, kao što je
ilustrovano na slikama 5a i 5b.Da biste skinuli bilo koju četku, odvrnite je sa prskalice, kao što
je ilustrovano na slici 5c.
1. Skinite glavu za čišćenje pritiskom na
dugme za zaključavanje na telu uređaja i
na isti način postavite ili skinite prskalicu.
2. Da biste spojili produžno crijevo, postavite
ga u otvor na tijelu uređaja, kao što je
ilustrovano na slikama 1a, 1b i 1c. Spajanje
je uspješno kada dugme za zaključavanje
dodataka na tijelu uređaja klikne.
• Okrugla najlon četka je idealna za čišćenje glatkih i tvrdih površina, kao što su toaleti, lavaboi,
kuhinjski elementi i slično.
• Okrugla mesingana četka je idealna za cišćenje grubih i metalnih površina kao sto su ciglani
podovi, automobilski točkovi, metalna vrata i ramovi i slično.
• Obe četke ekasno čište masnoću sa tiganja, šporeta i rerni u kuhinji. Možete da koristite
sapun ili deterdžent za pranje prljavih područja, koji nanosite na podlogu koju čistite.
PAŽNJA: Nikada ne koristite okruglu mesinganu četku na podlogama koje su
sklone grebanju.
PAŽNJA: Provjerite da li je produžno crijevo čvrsto postavljeno na mjesto prije
korištenja.
5a
1a
1b
5b 5c
1c
Page 54

54
BOSANSKI CRNOGORSKI
DODATAK ZA ČIŠĆENJE PROZORA
DODATAK ZA ODJEĆU
1. Otpustitie uzicu na krpi i zakačite je na predviđene držače na ramu nastavka za čišćenje
prozora. Povucite uzicu i zategnite krpu na mjesto.
2. Zakačite nastavak za čišćenje prozora na produžno crijevo po sljedećem principu:
poravnajte dugme za zaključavanje na produžnom crijevu sa predodređenim otvorom na
nastavku za čišćenje i zatim gurnite u produžno crijevo, dok se na zaključa u mjestu ( kao sto
je ilustrovano na slikama 2a i 2b).
1. Da biste koristili nastavak za čišćenje prozora kao paročistač za odjeću,
zakačite mikrofiber krpu kao što je ilustrovano na slikama 1a, 1b i 1c.
Provjerite da li ste zakačili krpu na sve držače na ramu nastavka za čišćenje prozora, da biste
sprečili klizanje ili spadanje krpe sa nastavka tokom upotrebe (kao što je ilustrovano na slici
1a, 1b i 1c).
PAŽNJA: Nepokrivatje gumenastu oštricu.
1a
2a
1a
1b
2b
1b
1c
1c
Page 55

55
CRNOGORSKI BOSANSKI
PAJALICA
UPOTREBA
2. Zakačite nastavak za čišćenje prozora/za odjeću
na produžno crijevo na sjledeći način: poravnajte
dugme za zaključavanje na produžnom crijevu sa
predodređenim otvorom na nastavku za čišćenje i
zatim gurnite u produžno crijevo, dok se na zaključa u
mjestu ( kao što je ilustrovano na slici 2a).
1. Zakačite krpu za čišćenje na ram pajalice ( kao što je ilustrovano na slikama 1a i 1b).
2. Zakačite ram pajalice na produžno crijevo na sljedeći način: poravnajte dugme za
zaključavanje na produžnom crevu sa predodređenim otvorom na ramu pajalice i zatim
gurnite u produžno crijevo, dok se na zaključa u mjestu (kao što je ilustrovano na slikama
2a i 2b).
1. Napunite vodom rezervoar za vodu. Pogledate odeljak KAKO DA KORISTITE UREĐAJ /
Punjenje vodom rezervoara za vodu. Zakačite jednu od četki kao sto je objašnjeno u odeljku
KAKO SKLOPITI DODATKE.
2. Izaberite jedno od podešavanja na regulatoru pare:
1 -Slabo, 2- Srednje, 3-Jako i 4-Vruć sprej.
Možete da mijenjate podešavanja na regulatoru pare tokom rada.
PAŽNJA: Provjerite da li je uređaj isključen iz struje i da je prekidač (O/I) na
OFF poziciji.
2a
1a 1b
2a 2b
Page 56

56
BOSANSKI CRNOGORSKI
3. Kada je uređaj u potpunosti sklopljen i napunjen vodom, uključite
utikač u struju. Isključeni prekidač (O/ I) je u OFF poziciji. Uključite
prekidač na ON poziciju. Posle približno 15 sekundi, paročistač će
početi da emituje paru. Onda uključite regulator pare i prilagodite
paru Vašim potrebama. Da bi uređaj prestao da emituje paru,
isključite regulator pare i zatim isključite uređaj prekidačem (O/ I)
na OFF poziciju. Ukoliko je u uređaju ostalo vode od predhodnog
korištenja, prilikom ponovnog uključivanja i prije nego što uređaj
počne da proizvodi paru, ta voda od prethodnog korištenja se neće
zagrijati i biće istjerana napolje od strane trenutne pare, pa to može
da izazove pojavu bara. Ovo može da se dogodi i ako samo prekidač
(O/ I) isključite u OFF poziciju, a ostavite regulator pare uključen od
prethodne upotrebe i ako je uređaj ugašen samo isključivanjem iz
struje. Provjerite da ste uređaj potpuno isključili i ispraznili nakon svake
upotrebe.
KAKO KORISTITI DODATKE
NASTAVAK ZA ČIŠĆENJE PROZORA
Provjerite da li je uređaj isključen iz struje i da je prekidač (O/I) na OFF poziciji.
4. Polako pređite paročistačem preko površine koju želite da očistitie. Upijajuća krpa na glavi
za čišćenje će da pokupi parom razloženu prljavštinu. Imajte pri ruci krpu, kojom možete da
pokupite višak vode, ako se pojavi na podlozi.
5. Kada paročistač prestane da emituje paru, jednostavno isključite prvo regulator pare, onda
uređaj na prekidač OFF i izvucite kabl iz struje. Dopunite rezervoar za vodu, ponovo uključite
uređaj, podesite regulator pare i nastavite da čistite.
PAŽNJA: Da biste dezinfikovali svoje radne površine, kuhinjske elemente,
lavaboe, kupatila i slično, koristite ručni paročistač preko istog područja u trajanju
od najviše 15 sekundi. Ne izvodite ovu proceduru na površinama osetljivim na
toplotu i paru. Snaga vodene pare može ozbiljno da ošteti neke materijale. Uvijek
proverite da li je material predviđen za tretiranje paročistačem ili testirajte prvo na
skrivenom području.
1. Napunite vodom rezervoar za vodu. Pogledate odeljak KAKO DA KORISTITE UREĐAJ /
Punjenje vodom rezervoara za vodu.
2. Stavite krpu na nastavak za čišćenje prozora, onda zakačite nastavak za čišćenje prozora na
produžno crijevo, kao što je objašnjeno u odeljku KAKO SKLOPITI DODATKE.
3. Pratite korake 2 i 3 opisane u odeljku KAKO DA KORISTITE UREĐAJ.
4. Držite ručni paročistač u jednoj ruci, a drugom rukom držite dršku produžnog crijeva, kao
što je ilustrovano na slici.
Page 57

57
CRNOGORSKI BOSANSKI
NASTAVAK ZA ODJEĆU / KRPA ZA ODEĆU
PAŽNJA:
• Ne koristite paru za čišćenje zaleđenih prozora. Pući će!
• Budite pažljivi kad koristite paročistač na staklu. Lomljivo je!
5. Polako pređite paročistačem preko površine koju želite
da očistitie.Upijajuća krpa sakuplja prljavštinu razloženu
parom, a gumenasta oštrica uklanja preostale tragove
vode. Imajte pri ruci krpu, kojom možete da pokupite
višak vode, ako se pojavi na podlozi.
6. Kada paročistač prestane da emituje paru, jednostavno
isključite prvo regulator pare, onda uređaj na prekidač
OFF i izvucite kabl iz struje. Dopunite rezervoar za vodu,
ponovo uključite uređaj, podesite regulator pare i
nastavite da čistite.
7. Kada završite sa čišćenjem, ne dirajte krpu dok se ne
ohladi. Onda je pažljivo skinite sa nastavka za čišćenje
prozora. Pazite, možda je krpa još uvijek vruća.
1. Napunite vodom rezervoar za vodu. Pogledate odeljak KAKO DA KORISTITE UREĐAJ /
Punjenje vodom rezervoara za vodu.
2. Stavite krpu za odjeću na nastavak za čišćenje prozora, onda zakačite nastavak za čišćenje
prozora na produžno crijevo, kao što je objašnjeno u odeljku KAKO SKLOPITI DODATKE.
3. Izaberite jedno od podešavanja na regulatoru pare:
1 –Slabo ili 2- Srednje
4. Pratite korak 3 opisan u odeljku KAKO DA KORISTITE
UREĐAJ.
5. Da biste tretirali odeću paročistačem, postavite komad
odjeće na vješalicu i paru usmjerite na odjeću direktno.
Držite ručni paročistač u jednoj ruci, a drugom rukom
držite dršku produžnog creva, kao što je ilustrovano na slici.
Polako povlačite nastavak za odjeću vertikalno, od vrha do
dna odjeće ili orbnutim smjerom. Nabore na zavjesama i
draprijama možete da ispravite uz pomoć paročistača dok
su okačene.
PAŽNJA: Proverite da li je uređaj isključen iz struje i da je prekidač (O/I) na OFF
poziciji.
PAŽNJA: Ne koristite 3-Jako i 4-Vruć sprej podešavanja pare kada korsitite
paročistač na odjeći. Možete da mijenjate podešavanja na regulatoru pare tokom
rada.
Page 58

58
BOSANSKI CRNOGORSKI
PAŽNJA: Pročitajte etiketu na komadu odjeće da biste provjerili da li su
predviđene za tretiranje parom (ako tkanina nije predviđena za peglanje, onda
nije ni za tretiranje parom).Neke tkanine kao sto su koža, antilop i pliš, nisu
predviđene za tretiranje parom. Ako niste sigurni, testirajte paru na malom dijelu
na odjeći iznutra, koji nije vidljiv.
PAŽNJA: Provjerite da li je uređaj isključen iz struje i da je prekidač (O/I) na
OFF poziciji.
6. Kada paročistač prestane da emituje paru, jednostavno isključite prvo regulator pare,
onda uređaj na prekidač OFF i izvucite kabl iz struje. Dopunite rezervoar za vodu, ponovo
uključite uređaj, podesite regulator pare i nastavite da čistite.
7. Kada završite sa čišćenjem, ne dirajte krpu dok se ne ohladi. Onda je pažljivo skinite sa
nastavka za čišćenje prozora. Pazite, možda je krpa još uvek vruća.
1. Napunite vodom rezervoar za vodu. Pogledajte odeljak KAKO DA KORISTITE UREĐAJ /
Punjenje vodom rezervoara za vodu.
2. Stavite krpu na ram pajalice, onda zakačite nastavak za čišćenje prozora na produžno
crevo, kao što je objašnjeno u odeljku KAKO SKLOPITI DODATKE.
3. Izaberite jedno od podešavanja na regulatoru pare:
1 –Slabo, 2- Srednje ili 3-Jako
Ne koristite 4-Vruć sprej podešavanje pare kada korsitite pajalicu.
Možete da menjate podešavanja na regulatoru pare tokom rada.
4. Pratite korak 3 opisan u odeljku KAKO DA KORISTITE UREĐAJ.
5. Držite ručni paročistač u jednoj ruci, a drugom rukom držite dršku produžnog crijeva,
kao što je ilustrovano na slici.Polako pređite paročistačem preko površine koju želite da
očistitie.Upijajuća krpa sakuplja prljavštinu razloženu parom. Imajte pri ruci krpu, kojom
možete da pokupite višak vode, ako se pojavi na podlozi.
6. Kada paročistač prestane da emituje paru,
jednostavno isključite prvo regulator pare,
onda uređaj na prekidač OFF i izvucite
kabl iz struje. Dopunite rezervoar za vodu,
ponovo uključite uređaj, podesite regulator
pare i nastavite da čistite.
7. Kada završite sa čišćenjem, ne dirajte krpu
dok se ne ohladi. Onda je pažljivo skinite sa
nastavka za čišćenje prozora. Pazite, možda
je krpa još uvijek vruća.
PAJALICA
Page 59

59
CRNOGORSKI BOSANSKI
PAŽNJA: Provjerite da li je uređaj isključen iz struje i da je prekidač (O/I) na
OFF poziciji.
1. Zakačite krpu u obliku trougla na glavu za čišćenje, prateći ista uputstva kao za mikrofiber
krpu sa kukicama i uzicama u odeljku KAKO SKLOPITI DODATKE.
2. Krpa je veoma mekana i izdržljiva, sa stotinama absorbujućih vlakana, idealnih za zatvoreno
tvrdo drvo, keramiku i druge tipove poda.
1. Isključite napajajući kabl iz utičnice.
2. Dozvolite dodacima/krpama da se ohlade i pažljivo ih skinite sa tijela uređaja. Pazite,
možda su još uvek vrući.
3. Uvijek ispraznite rezervoar za vodu na kraju svake upotrebe.
4. Dozvolite vodi, koja je možda ostala kao product kondezacije, da ispari iz otvora za paru
prije nego što odložite uređaj.
5. Namotajte strujni kabl preko gornje i donje kuke.
6. Obrišite sve površine paročistača mekanom krpom. Čuvajte uređaj u zatvorenom prostoru.
7. Ne ostavljajte uređaj na suncu ili kiši. Čuvajte uređaj na suhom i hladnom mjestu kada ga
ne koristite.
8. Uspravno oslaganje paročistača, sa mokrom glavom za čišćenje/krpom, ostaviće bijele
tragove na podu. Da biste skinuli bijele tragove, očisitite ih sirćetom. Skinite glavu za
čišćenje/krpu prije odlaganja.
1. Iz rezervoara za vodu ispraznite sve što je ostalo i osušite ga posle svake upotrebe.
Možete da koristite deterdžent da biste očistili nastavke (prskalicu i okrugle četke), kada se
zaprljaju. Onda ih isperite čistom vodom i ostavite da se osuše.
2. Da biste očistili kamenac, koji se nagomilao u rezervoaru za vodu, dodajte jednu do dvije
kašike bijelog sirćeta u pun rezervoar vode. Zatvorite rezervoar i protresite sastojke. NE
UKLJUČUJTE PAROČISTAČ! Pustite da odstoji nekoliko sati. Zatim ispraznite rezervoar za
vodu i napunite ga čistom vodom. Isperite rezervoar za vodu temeljno.
KRPA ZA GLAVU ZA ČIŠĆENJE
NAKON UPOTREBE
ČIŠĆENJE
Page 60

60
BOSANSKI CRNOGORSKI
POSTUPAK ČIŠĆENJA OD KAMENCA
Ako Vaš paročistač proizvodi paru sporije nego inače ili prestane da proizvodi paru, možda
mu je potrebno čišćenje od kamenca. Kamenac može da se stvori vremenom na metalnim
dijelovima i veoma utiče na efkasnost uređaja. Neophodno je čišćenje kamenca redovno,
svakih 25-50 korištenja punog rezervoara vode ili minimum jednom mjesečno, posebno u
područjima sa tvrdom vodom. Učestalost čišćenja od kamenca zavisi od tvrdoće vode koju
koristite i od toga koliko često koristite paročistač. Paročistač koristi vodu sa česme. Međutim,
u područjima sa tvrdom vodom, trebalo bi koristiti destilovanu ili prokuhanu vodu, radi bolje
efikasnosti.
• Korištenjem strugalice
1. Proverite da li je uređaj isključen iz struje i da je prekidač (O/I) na OFF poziciji.
2. Koristite iglu da biste skinuli naslage kamenca iz
malih otvora za izlaz pare na tijelu uređaja, kao što
je ilustrovano na slici. Otvor za paru očistićete od
kamenca struganjem i uvlačenjem igle u njega.
Uvek provjerite da li je kamenac iz otvora za
izlaz pare skinut, prije nego što ponovo na njega
prikačite neki od nastavaka. Nastavite da kružite
iglom za čišćenje dok ne skinete kamenac potpuno.
• Korišćenjem sredstva za čišćenje
1. Pripremite rastvor od 1/3 bijelog sirćeta i 2/3 vode sa česme i to sipajte u rezervoar za
vodu.
2. Obezbijedite poziciju za uređaj tako da može da ispušta jak mlaz pare, a da pritom ne
ugrožava bilo šta i bilo koga u tom trenutku oko sebe. Uključite uređaj u struju, uključite
prekidač i dozvolite uređaju da proizvodi paru, dok se mješavina u rezervoaru skroz ne
potroši.
3. Ponovite ovaj postupak koliko god je puta potrebno, dok uređaj ne uspostavi normalan
protok pare.
4. Kada je uređaj čist, bez kamenca, napunite rezervoar za vodu svježom vodom i isperite ga.
5. Napunite rezervoar za vodu svježom vodom, uključite ga i pustite paru kroz sistem dok se
ne isprazni rezervoar za vodu.
Da biste skinuli kamenac sa paročistača, pratite sljedeće instrukcije:
PAŽNJA: Ne ostavljajte paročistač bez nadzora dok je proces čišćenja
kamenca u toku ili tokom korištenja. Uradite test čišćenje na adektvnom području,
svaki put poslije čišćenja kamenca, da biste bili sigurni da nema nikakvih ostataka
u sistemu.
Page 61

61
CRNOGORSKI BOSANSKI
• Čišćenje začepljenih dodataka za paročistač
Zbog visoko mineralnog sastava vode u nekim predjelima, možda ćete primijetiti da manje
vodene pare izlazi iz nastavaka. Ovo može biti posljedica gomilanja kalcijuma na vrhu
brizgalice.
Kako očistiti nagomilani kalcijum:
Mi preporučujemo korištenje podmazivača u spreju. Naprskajte malu količinu u vrh prskalice.
Nakon prskanja podmazivača u dodatak, napunite paročistač vodom prema uputstvima i
uključite kontinuirani mlaz pare kroz nastavak nekoliko minuta, da biste očistili nagomilani
kalcijum. Kada je otvor za paru čist, usmerite paročistač ka neutralnoj podlozi ili krpi, da biste
bili sigurni da nema nikakvih ostataka.
Održavanje mikrofiber krpe
1. Mašinsko pranje na 60ºC (140ºF)
2. Ne izbjeljivati!
3. Ne koristite omekšivač!
PAŽNJA: Ovu procedure praktikujte u zaštićenoj i dobro provjetrenoj prostoriji.
PAŽNJA: Provjerite da li je uređaj isključen iz struje i da je prekidač (O/I) na
OFF poziciji.
UPUTSTVO ZA RJEŠAVANJE PROBLEMA
Problem Mogući uzrok Rješenje
UREĐAJ SE NE UKLJUČUJE
Uredjaj nije uključen u struju
ili na prekidač.
Provjerite da li je uređaj
uključen u ispravnu utičnicu i
da je uključen prekidač.
SLABA PARA ILI NEMA PARE
Prazan rezervoar za vodu. Napunite rezervoar za vodu.
Začepljena prskalica.
Skinite nastavak i očistite
prskalicu.
Nagomilani kamenac
Pratite uputstva za čišćenje u
ovom uputstvu za korišćenje,
da biste očistili naslage
kamenca.
Page 62

62
BOSANSKI CRNOGORSKI
Problem Mogući uzrok Rješenje
PARA IZLAZI IZ SPOJA
TIJELA I NASTAVKA
Nastavak nije dobro spojen.
Isključite uređaj, ostavite da
se nastavak potpuno ohladi
i prateći uputstvo spojite
ponovo nastavak.
Postoji prepreka na spoju
Skinite nastavak i provjerite
šta smeta i očistite.
KRPA ZA ODRŽAVANJE
ODJEĆE JE VLAŽNA
Krpa je upila vodenu paru
Skinite vlažnu krpu i
zamijenite je suhom
(rezervne krpe možete da
nabavite kod distributera ili
u ovlaštenom servisu) ili je
ohladite, iscijedite, osušite i
nastavite da je koristite.
Page 63

63
HRVATSKI
VAŽNE SIGURNOSNE UPUTE
Kada koristite električne uređaje, pridržavajte se osnovnih sigurnosnih mjera:
1. Pročitajte sve upute prije korištenja uređaja.
2. Kako biste smanjili rizik od strujnog udara, ne uranjajte uređaj, niti kabel/utikač u vodu ili
bilo koju drugu tekućinu. Poštujte upute za čišćenje.
3. Djecu nadzirite kako se ne bi igrala sa uređajem.
4. Ne ostavljajte uređaj bez nadzora dok je ukopčan u struju.
5. Iskopčajte uređaj iz struje kada ga ne koristite i prije čišćenja.
6. Ukoliko je strujni kabel oštećen, mora ga zamijeniti ovlašteni serviser ili jednako
kvalificirana osoba, kako bi se izbjegla nesreća.
7. Korištenje produžnog kabla nije preporučljivo.
8. Pazite da ne zamrsite i ne uvrnete strujni kabel.
9. Ne vucite i ne naprežite strujni kabel. Ne koristite ga za pomicanje ili nošenje uređaja. Kada
uređaj iskopčavate iz struje, potegnite utikač, ne kabel.
10. Korištenje dodataka koji nisu isporučeni s uređajem, može izazvati požar, strujni udar ili
ozljede.
11. Ne dopustite da strujni kabel visi preko ruba stola ili nekog elementa ili da dotiče tople
površine, uključujući i štednjak. Vodite računa da strujni kabel ne visi i da se ne može nitko/
ništa saplesti o njega.
12. Ne stavljajte uređaj na ili blizu plina ili električnog štednjaka, u toplu pećnicu ili blizu lako
zapaljivih materijala.
13. Ne koristite uređaj vani ili ako stojite na mokroj podlozi.
14. Ne dotičite utikač i aparat mokrim rukama!
15. Uređaj koristite isključivo za ono čemu je namijenjen.
16. Uređaj nije namijenjen za uporabu osobama (uključujući i djecu) sa smanjenim tjelesnim,
motoričkim ili duševnim sposobnostima ili s nedostatnim znanjem i iskustvom, osim ako su
pod nadzorom ili na temelju instrukcija za uporabu od strane osobe odgovorne za njihovu
sigurnost.
17. Prije ukapčanja uređaja, provjerite odgovara li napon naveden na pločici uređaja naponu
Vaše električne mreže.
18. Ne koristite uređaj ako je pao, ako ima zamjetnih oštećenja ili ako curi.
19. Čuvajte uređaj na suhom mjestu, zaštićenog od prašine i izvan dosega izravne sunčeve
svjetlosti.
20. Svaka zlouporaba ili neuspjeh u praćenju uputa za korištenje, čini jamstvo nevažećim i
oslobađa proizvođača/distributera/trgovca svake odgovornosti.
21. Tekućina ili para ne smiju biti izravno usmjerene ka opremi koja sadrži električne
komponente, kao što je unutrašnjost pećnice.
22. Posebna POZOR je potrebna kada se uređaj koristi u blizini djece, kućnih ljubimaca ili
biljaka.
23. Nikad ne usmjeravajte paru prema ljudima, životinjama ili biljkama!
24. Ne ubacujte predmete u otvore na uređaju. Ne koristite uređaj ako je blokiran neki od
otvora.
Page 64

64
HRVATSKI
25. Ne koristite glavu za čišćenje bez propisno namještene krpe.
26. Ne koristite parni čistač bez vode u spremniku za vodu.
27. Dodatni oprez je potreban pri korištenju uređaja na stubištu.
28. Dobro osvijetlite radni prostor.
29. Nikad ne sipajte u spremnik toplu vodu ili bio koje druge tekućine, kao što su aromatične,
alkoholno bazirane tekućine ili deterdženti. To bi korištenje učinilo nesigurnim i oštetilo bi
uređaj.
30. Uvijek održavajte izlaz za paru čistim. Izbjegavajte postavljanje otvora na mekane površine,
koje mogu blokirati protok pare. Održavajte otvore čistim, bez dlaka i drugih potencijalnih
prepreka, kako biste osigurali pravilan protok pare.
31. Prekinite korištenje parnog čistača zamijetite li curenje vode i kontaktirajte ovlašteni servis.
32. Ne koristite parni čistač u zatvorenim prostorijama koje su pune zapaljivih, eksplozivnih ili
toksičnih tvari kao što su razrjeđivač za boju ili uljane boje.
33. Ne koristite uređaj na koži, voskiranim podlogama, nelakiranom parketu, sintetičkim
tkaninama, plišu ili drugim na paru osjetljivim materijalima.
34. Ne koristite uređaj za zagrijevanje prostora!
35. Ne dirajte tople tek obrisane površine !
36. Kako biste isključili uređaj, pritisnite gumb na OFF poziciju, isključite regulator pare, zatim
iskopčajte utikač iz struje.
37. Pažljivo koristite uređaj, zbog pare koju emitira.
38. Kako biste izbjegli opterećenje strujnog kruga, ne koristite druge uređaje na istu utičnicu
kada i parni čistač.
39. Ne vucite i ne naprežite produžno crijevo, jer ga možete oštetiti. Na oštećenom crijevu može
doći do curenja vodene pare.
40. Ne dirajte nastavak za čišćenje prozora ili krpu tijekom upotrebe.
41. Tijekom rada, ovi dodaci su vrući i može doći do opeklina.
42. Držite produžno crijevo dalje od sebe i izbjegavate dirati crijevo, jer može biti vrelo i opeći Vas.
Ne bacajte električne uređaje kao običan otpad, već koristite posebna mjesta za
skupljanje električnog otpada. Obratite se svojim lokalnim vlastima za informaciju u svezi
sa sustavima koji su na raspolaganju za odlaganje električnog otpada. U slučaju odlaganja
na odlagališta otpada ili smetlišta, opasne tvari mogu dospjeti u podzemne vode i ući u
prehrambeni lanac, utječući nepovoljno na Vaše zdravlje i okoliš.
Page 65

65
HRVATSKI
DIJELOVI UREĐAJA
Zakrivljena ručka
Svjetlosni prekidač za uključivanje/isključivanje
Regulator pare
Čep spremnika za vodu
Spremnik za vodu
Tijelo uređaja
Kuka za namotavanje kabla
Strujni kabel
Teleskopska ručka
Gumb za zaključavanje ručke
Gumb za
zaključavanje dodataka
(na tijelu uređaja)
Glava za brisanje
Prednja strana Stražnja strana
Page 66

66
HRVATSKI
DODACI
PRIBOR
Klizač za čišćenje
tepiha
Prskalica
Mikrofiber
krpa
Pajalica
Okrugla četka
(mjed)
Okrugla četka
(najlon)
Igla za
čišćenje
Krpa za čišćenje
odjeće
Krpa za čišćenje
prozora
Dozer
Nastavak za čišćenje
prozora
Produžno crijevo
Page 67

67
HRVATSKI
POZOR: Prije sklapanja uređaja ili mijenjanja dodataka, provjerite je li uređaj
isključen iz struje i je li prekidač (O/I) na OFF poziciji.
POZOR: Prije korištenja
provjerite je li glava za
čišćenje parnog čistača
sigurno postavljena.
KAKO DA KORISTITE UREĐAJ
1. Spojite glavu za čišćenje za tijelo
uređaja na sljedeći način: ubacite
okretnu spojnicu u označenu
rupu na tijelu uređaja; spajanje
je uspješno kada gumb za
zaključavanje dodataka na tijelu
uređaja klikne.
2. Ubacite teleskopsku ručku u
za to namijenjen otvor na tijelu
uređaja, dok se ne zaključa uz
pomoć gumba za zaključavanje na
teleskopskoj ručci.
3. Postavite mikrofiber krpu na glavu za
čišćenje.Zategnite mikrofiber krpu
povlačenjem uzice, dok istovremeno
pritišćete gumb na uzici.
SKLAPANJE
Page 68

68
HRVATSKI
4. Pri korištenju parnog čistača na tepisima,
postavite glavu za čišćenje s mikrofiber krpom
preko klizača za čišćenje tepiha, kao što je
ilustrirano na slici 4a. Ne pokušavajte koristiti
parni čistač na tepihu bez klizača za čišćenje, jer
ćete oštetiti tepih.
Parni čistač je napravljen da u potpunosti očisti podne površine, kao sto su mramor, keramika,
tepisi, kamen, linoleoum i parket. Nisu sve vrste podova predviđene za čišćenje parom.
Toplina i para mogu svući vosak s površina tretiranih voskom. Ne koristite parni čistač na
nezalijepljenom podu i ne ostavljajte ga na bilo kojem drvetu osjetljivom na toplinu duže
vremensko razdoblje. U protivnom, drvo bi moglo nabubriti a parket se podići ili na drugi
način ošteti.
Kada upotrebljavate uređaj na vinilu, linoleumu ili bilo kojem podu osjetljivom na toplinu,
budite dodatno oprezni. Previše topline može istopiti ljepilo u podu. Pri korištenju na laminatu,
vodite računa o tome da je postavljen profesionalno i bez ikakvih šupljina ili pukotina, koje bi
omogućile prodor vlage.
Testirajte parni čistač prvo na maloj izoliranoj površini Vašega poda, prije uporabe na bilo kojoj
podnoj površini.
Uvijek prvo provjerite upute za uporabu i čišćenje prije korištenja parnih čistača.
U slučaju neke dvojbe, konzultirajte stručnjaka za podove. Koristite klizač za čišćenje tepiha
isključivo na tepisima i stazama. Uporaba klizača za čišćenje tepiha na drugim podnim
površinama, može prouzročiti pruge i ogrebotine.
POZOR: Nikad ne koristite klizač
za čišćenje tepiha na površinama
sklonim grebanju. Nikad ne skidajte i
ne mijenjajte dodatke dok je uređaj u
uporabi!
UPORABA
POZOR: Ovaj uređaj emitira paru i stvara vlagu. Tragovi vode, promjena boje
i oštećenja na podu, mogu se pojaviti ukoliko se uređaj koristi dulje vremensko
razdoblje na jednom mjestu.
4a 4b
Page 69

69
HRVATSKI
1. Punjenje vodom spremnika za vodu:
POZOR: Provjerite je li parni čistač
isključen iz struje.
Okrenite čep spremnika za vodu suprotno od smjera kazaljki sata, približno 90º, do znaka
‘’OPEN’’
skinite čep kao sto je ilustrirano na slikama 1 a, b i c.
Držite parni čistač pod kutom od 45º, kao što je ilustrirano na slici 1d i sipajte vodu u spremnik
do označenog maksimuma, uz pomoć dozera.
Nemojte prepuniti spremnik. Maksimalni kapacitet je 275ml/9.2OZ.
Vratite nazad čep spremnika i
okrenite ga u smjeru kazaljki sata,
približno 90º, do natpisa ‘’CLOSE’’
dok čep ne bude skroz zategnut.
Page 70

70
HRVATSKI
POZOR: Parni čistač koristi vodu sa slavine. Ako je voda suviše tvrda, preporuča
se korištenje destilirane ili prokuhane vode.
POZOR: NIkad ne stavljajte deterdžente ili
mirisne proizvode u parni čistač. To bi učinilo
korištenje nesigurnim i oštetilo bi uređaj.
Dok upotrebljavate parni čistač, provjerite je li bakreni grijač
unutar spremnika za vodu, uvijek potopljen (kao sto je
ilustrirano na slici 1i).
2. Izaberite jednu od sljedećih opcija na regulatoru pare:
1 -Slabo, 2- Srednje, 3-Jako i 4-Vruć sprej
• 1 –Slabo i 2- Srednje podešavanje idealni su za čišćenje
svih tvrdih podova, kao što su linoleum, keramika,
mramor, drvo, itd.
• 3-Jako podešavanje idealno je za čišćenje tepiha i staza.
• 4- Vruć sprej podešavanje je idealno za čišćenje,
kupaonica, kuhinja, prozora, automobilskih kotača, itd.
Možete promijeniti podešavanje na regulatoru pare dok je
parni čistač u funkciji.
3. Kada je uređaj u potpunosti sklopljen i napunjen vodom,
uključite utikač u struju na uzemljenoj strujnoj utičnici.
Isključeni prekidač (O/ I) je u OFF poziciji. Uključite prekidač
na ON poziciju. Nakon približno 15 sekundi, parni čistač
će početi emitirati paru. Zatim uključite regulator pare i
prilagodite paru Vašim potrebama. Kako bi uređaj prestao
emitirati paru, isključite regulator pare i zatim isključite uređaj
sklopkom (O/ I) na OFF poziciju. Ukoliko je u uređaju ostalo
vode od prethodnog korištenja, pri ponovnom uključivanju
i prije nego što uređaj počne proizvoditi paru, ta voda od
prethodnog korištenja se neće zagrijati i trenutačna para će
je potjerati van, pa to može izazvati pojavu lokvica. Ovo se
može dogoditi i ako samo prekidač (O/ I) isključite u OFF
poziciju, a ostavite regulator pare uključen od prethodne
uporabe i ako je uređaj ugašen samo isključivanjem iz struje.
Provjerite je li uređaj potpuno isključen i ispražnjen nakon
svake uporabe.
Page 71

71
HRVATSKI
POZOR: Ne provodite ovu proceduru na podovima osjetljivim na toplinu i
paru.
4. Polako prijeđite parnim čistačem preko površine koju želite očistiti. Upijajuća krpa na glavi za
čišćenje će pokupiti parom razloženu nečistoću. Imajte pri ruci krpu, kojom možete pokupiti
višak vode, ako se pojavi na podlozi.
5. Kada parni čistač prestane emitirati paru, jednostavno isključite prvo regulator pare, zatim
uređaj na prekidač OFF i izvucite kabel iz struje. Dopunite spremnik za vodu, ponovno
uključite uređaj, podesite regulator pare i nastavite čistiti.
Za najbolje rezultate:
1. Očistite ili usišite podlogu prije nego što primijenite parni
čistač.
2. Kako biste izbjegli pojavu lokvi, mikrofiber krpa mora biti
čista i suha za upotrebu. Kako biste zamijenili krpu pratite
sljedeće upute: pustite krpu da se ohladi, skinite je s glave
uređaja i zamijenite novom mikrofiber krpom (pribor). Zatim
nastavite koristiti parni čistač. Izaberite slabo podešavanje
regulatora pare.
3. Kako biste dezinficirali jedan dio vašega poda, ostavite
parni čistač na najjačem podešavanju na dijelu koji želite
dezinficirati u trajanju od približno 10 sekundi, ali ne duže
od 15 sekundi. Uvijek vodite računa o strukturi poda i je li
predviđen za čišćenje parom.
• Nikad ne koristite uređaj na jednom mjestu predugo. To može oštetiti pod.
• Nikad ne stavljajte šake ili stopala ispod glave za čišćenje. Taj dio uređaja je vrlo vruć i može
izazvati opekline.
• Tijekom uporabe uređaj emitira zvuk, koji nam daje do znanja da se voda zagrijava i da
uređaj proizvodi paru. Taj zvuk je normalan.
• Moguća su manja prskanja vode pomiješane s parom. Ovo je također normalno.
• Toplina vodene pare može negativno utjecati na određene materijale. Uvijek provjerite
je li na Vašem podu preporučljivo korištenje parnih čistača ili isprobajte sami na skrivenoj
površini.
Page 72

72
HRVATSKI
RUČNI PARNI ČISTAČ
SKLAPANJE
Ručni parni čistač je idealan za korištenje na radnim površinama, pultovima, umivaonicima,
prozorima, zrcalima, pločicama i za čišćenje mrlja na podovima, tepisima i stazama. Koristite ga
s prskalicom, mjedenom četkom ili najlonskom četkom, kako biste skinuli nečistoću, masnoću,
plijesan i slično.
1. Skinite strujni kabl s gornjeg držača za
namotavanje, kao što je ilustrirano na slici.
3. Pritisnite gumb za zaključavanje na tijelu
uređaja i skinite glavu za čišćenje.
2. Pritisnite gumb za zaključavanje na
teleskopskoj ručci izvucite teleskopsku i
zakrivljenu ručku iz tijela uređaja.
4. Kako biste spojili prskalicu, postavite
je u otvor na tijelu uređaja, kao što
je ilustrirano na slici 4a. Spajanje je
uspješno kada gumb za zaključavanje
dodataka na tijelu uređaja klikne.
Provjerite je li prskalica čvrsto postavljena
na mjesto prije korištenja.
POZOR: Prije sklapanja uređaja ili mijenjanja dodataka, provjerite je li uređaj
isključen iz struje i je li prekidač (O/I) na OFF poziciji.
4a
4b
Page 73

73
HRVATSKI
KAKO SKLOPITI DODATKE
5. Okruglu najlon ili okruglu mjedenu četku, pričvrstite navojem za kraj prskalice, kao što je
ilustrirano na slikama 5a i 5b.Kako biste skinuli bilo koju četku, odvijte je s prskalice, kao što
je ilustrirano na slici 5c.
1. Skinite glavu za čišćenje pritiskom na
gumb za zaključavanje na tijelu uređaja i
na isti način postavite ili skinite prskalicu.
2. Kako biste spojili produžno crijevo,
postavite ga u otvor na tijelu uređaja,
kao sto je ilustrirano na slikama 1a, 1b i
1c. Spajanje je uspješno kada gumb za
zaključavanje dodataka na tijelu uređaja
klikne.
• Okrugla najlon četka je idealna za čišćenje glatkih i tvrdih površina, kao što su zahodi,
umivaonici, kuhinjski elementi i slično.
• Okrugla mjedena četka je idealna za čišćenje grubih i metalnih površina kao sto su podovi
od opeke, automobilski kotači, metalna vrata i okviri slično.
• Obje četke učinkovito čiste masnoću s tava, štednjaka i pećnica u kuhinji. Možete koristiti
sapun ili deterdžent za pranje prljavih područja, koji nanosite na podlogu koju čistite.
POZOR: Nikada ne koristite okruglu mjedenu četku na podlogama koje su
sklone grebanju.
POZOR: Provjerite je li produžno crijevo čvrsto postavljeno na mjesto prije
korištenja.
5a
1a
1b
5b 5c
1c
Page 74

74
HRVATSKI
DODATAK ZA ČIŠĆENJE PROZORA
DODATAK ZA ODJEĆU
1. Otpustite uzicu na krpi i postavite je na predviđene držače na okviru nastavka za čišćenje
prozora. Povucite uzicu i zategnite krpu na mjesto.
2. Postavite nastavak za čišćenje prozora na produžno crijevo na sljedeći način: poravnajte
gumb za zaključavanje na produžnom crijevu s predviđenim otvorom na nastavku za
čišćenje i zatim gurnite u produžno crijevo, dok se na zaključa u mjestu ( kao sto je ilustrirano
na slikama 2a i 2b).
1. Kako biste koristili nastavak za čišćenje prozora kao parni čistač za odjeću,
postavite mikrofiber krpu kao što je ilustriramo na slikama 1a, 1b i 1c.
Provjerite jeste li zakvačili krpu na sve držače na okviru nastavka za čišćenje prozora, kako
biste spriječili klizanje ili spadanje krpe s nastavka tijekom uporabe (kao što je ilustrirano na
slici 1a, 1b i 1c).
POZOR: Ne pokrivajte gumastu oštricu.
1a
2a
1a
1b
2b
1b 1c
1c
Page 75

75
HRVATSKI
PAJALICA
UPORABA
2. Postavite nastavak za čišćenje prozora/za odjeću
na produžno crijevo na sljedeći način: poravnajte
gumb za zaključavanje na produžnom crijevu s
predodređenim otvorom na nastavku za čišćenje i
zatim gurnite u produžno crijevo, dok se na zaključa u
mjestu ( kao sto je ilustrirano na slici 2a).
1. Postavite krpu za čišćenje na okvir nastavka za prašinu (kao sto je ilustrirano na slikama 1a i 1b).
2. Postavite okvir dodatka za prašinu na produžno crijevo na sljedeći način: poravnajte gumb
za zaključavanje na produžnom crijevu s odgovarajućim otvorom na okviru dodatka i zatim
gurnite u produžno crijevo, dok se na zaključa u mjestu (kao sto je ilustrirano na slikama 2a
i 2b).
1. Napunite vodom spremnik za vodu. Pogledate odjeljak KAKO KORISTITI UREĐAJ / Punjenje
vodom spremnika za vodu. Postavite jednu od četki kao sto je objašnjeno u odjeljku KAKO
SKLOPITI DODATKE.
2. Izaberite jedno od podešavanja na regulatoru pare :
1 -Slabo, 2- Srednje, 3-Jako i 4-Vruć sprej.
Možete mijenjati podešavanja na regulatoru pare tijekom rada.
POZOR: Provjerite je li uređaj iskopčan iz struje i je li prekidač (O/I) na OFF
poziciji.
2a
1a 1b
2a 2b
Page 76

76
HRVATSKI
3. Kada je uređaj u potpunosti sklopljen i napunjen vodom, uključite
utikač u struju. Prekidač je tada (O/ I) u OFF poziciji. Uključite prekidač
na ON poziciju. Nakon približno 15 sekundi, parni čistač će početi
emitirati paru. Zatim uključite regulator pare i prilagodite paru Vašim
potrebama. Kako bi uređaj prestao emitirati paru, isključite regulator
pare i zatim isključite uređaj sklopkom (O/ I) na OFF poziciju. Ukoliko
je u uređaju ostalo vode od prethodnog korištenja, pri ponovnom
uključivanju i prije nego što uređaj počne proizvoditi paru, ta voda
od prethodnog korištenja se neće zagrijati i bit će potjerana van od
strane trenutne pare, pa to može izazvati pojavu bara. Ovo se može
dogoditi i ako samo prekidač (O/ I) isključite u OFF poziciju, a ostavite
regulator pare uključen od prethodne uporabe i ako je uređaj ugašen
samo isključivanjem iz struje. Provjerite jeste li uređaj potpuno isključili i
ispraznili nakon svake uporabe.
KAKO KORISTITI DODATKE
NASTAVAK ZA ČIŠĆENJE PROZORA
Provjerite je li uređaj iskopčan iz struje i je li prekidač (O/I) na OFF poziciji.
4. Polako prijeđite parnim čistačem preko površine koju želite očistiti. Upijajuća krpa na glavi za
čišćenje će pokupi parom razloženu nečistoću. Imajte pri ruci krpu, kojom možete pokupiti
višak vode, ako se pojavi na podlozi.
5. Kada parni čistač prestane emitirati paru, jednostavno isključite prvo regulator pare, zatim
uređaj na prekidač OFF i iskopčajte kabel iz struje. Dopunite spremnik za vodu, ponovno
uključite uređaj, podesite regulator pare i nastavite čistiti.
POZOR: Kako biste dezinficirali svoje radne površine, kuhinjske elemente,
umivaonike, kupaonice i slično, koristite ručni parni čistač preko istog područja
u trajanju od najviše 15 sekundi. Ne izvodite ovu proceduru na površinama
osjetljivim na toplinu i paru. Snaga vodene pare može ozbiljno oštetiti neke
materijale. Uvijek provjerite je li materijal predviđen za tretiranje parnim čistačem
ili testirajte prvo na skrivenom području.
1. Napunite vodom spremnik za vodu. Pogledate odjeljak KAKO KORISTITI UREĐAJ /
Punjenje vodom spremnika za vodu.
2. Stavite krpu na nastavak za čišćenje prozora, zatim postavite nastavak za čišćenje prozora
na produžno crijevo, kao što je objašnjeno u odjeljku KAKO SKLOPITI DODATKE.
3. Pratite korake 2 i 3 opisane u odjeljku KAKO KORISTITI UREĐAJ.
4. Držite ručni parni čistač u jednoj ruci, a drugom rukom držite ručku produžnog crijeva, kao
što je ilustrirano na slici.
Page 77

77
HRVATSKI
NASTAVAK ZA ODJEĆU / KRPA ZA ODJEĆU
POZOR:
• Ne koristite paru za čišćenje zaleđenih prozora. Puknut će!
• Budite pažljivi kad koristite parni čistač na staklu. Lomljivo je!
5. Polako prijeđite parnim čistačem preko površine koju
želite očistiti. Upijajuća krpa skuplja nečistoću razloženu
parom, a gumasta oštrica uklanja preostale tragove
vode. Imajte pri ruci krpu, kojom možete pokupiti višak
vode, ako se pojavi na podlozi.
6. Kada parni čistač prestane emitirati paru, jednostavno
isključite prvo regulator pare, zatim uređaj na prekidač
OFF i iskopčajte kabel iz struje. Dopunite spremnik za
vodu, ponovno uključite uređaj, podesite regulator pare
i nastavite čistiti.
7. Kada završite sa čišćenjem, ne dirajte krpu dok se ne
ohladi. Zatim je pažljivo skinite s nastavka za čišćenje
prozora. Pazite, možda je krpa još uvijek vruća.
1. Napunite vodom spremnik za vodu. Pogledate odjeljak KAKO KORISTITI UREĐAJ /
Punjenje vodom spremnika za vodu.
2. Stavite krpu za odjeću na nastavak za čišćenje prozora, zatim postavite nastavak za čišćenje
prozora na produžno crijevo, kao što je objašnjeno u odjeljku KAKO SKLOPITI DODATKE.
3. Izaberite jedno od podešavanja na regulatoru pare:
1 –Slabo ili 2- Srednje
4. Pratite korak 3 opisan u odjeljku KAKO KORISTITI UREĐAJ.
5. Kako biste tretirali odjeću parnim čistačem, postavite komad
odjeće na vješalicu i paru usmjerite na odjeću izravno.
Držite ručni parni čistač u jednoj ruci, a drugom rukom
držite ručku produžnog crijeva, kao što je ilustrirano na slici.
Polako povlačite nastavak za odjeću okomito, od vrha do
dna odjeće ili obrnutim smjerom. Nabore na zavjesama i
draperijama možete ispraviti uz pomoć parnog čistača dok
su ovješene.
POZOR: Provjerite je li uređaj isključen iz struje i je li prekidač (O/I) na OFF
poziciji.
POZOR: Ne koristite 3-Jako i 4-Vruć sprej podešavanja pare kada koristite parni
čistač na odjeći. Možete mijenjati podešavanja na regulatoru pare tijekom rada.
Page 78

78
HRVATSKI
POZOR: Pročitajte etiketu na komadu odjeće kako biste provjerili jesu li
predviđene za tretiranje parom (ako tkanina nije predviđena za glačanje, tada nije
ni za tretiranje parom). Neki materijali poput kože, antilopa i pliša, nisu predviđeni
za tretiranje parom. Ako niste sigurni, testirajte paru na malom dijelu na odjeći
iznutra, koji nije vidljiv.
POZOR: Provjerite je li uređaj isključen iz struje i je li prekidač (O/I) na OFF
poziciji.
6. Kada parni čistač prestane emitirati paru, jednostavno isključite prvo regulator pare, zatim
uređaj na prekidač OFF i iskopčajte kabel iz struje. Dopunite spremnik za vodu, ponovno
uključite uređaj, podesite regulator pare i nastavite čistiti.
7. Kada završite s čišćenjem, ne dirajte krpu dok se ne ohladi. Zatim je pažljivo skinite s
nastavka za čišćenje prozora. Pazite, možda je krpa još uvijek vruća.
1. Napunite vodom spremnik za vodu. Pogledate odjeljak KAKO KORISTITI UREĐAJ /
Punjenje vodom spremnika za vodu.
2. Stavite krpu na okvir nastavka, zatim postavite nastavak za čišćenje prozora na produžno
crijevo, kao što je objašnjeno u odjeljku KAKO SKLOPITI DODATKE.
3. Izaberite jedno od podešavanja na regulatoru pare :
1–Slabo, 2- Srednje ili 3-Jako
Ne koristite 4-Vruć sprej podešavanje pare kada koristite nastavak za čišćenje prašine.
Možete mijenjati podešavanja na regulatoru pare tijekom rada.
4. Pratite korak 3 opisan u odjeljku KAKO KORISTITI UREĐAJ.
5. Držite ručni parni čistač u jednoj ruci, a drugom rukom držite ručku produžnog crijeva, kao
što je ilustrirano na slici. Polako prijeđite parnim čistačem preko površine koju želiteočistiti.
Upijajuća krpa skuplja nečistoću razloženu parom. Imajte pri ruci krpu, kojom možete
pokupiti višak vode, ako se pojavi na podlozi.
6. Kada parni čistač prestane emitirati paru,
jednostavno isključite prvo regulator pare,
zatim uređaj na prekidač OFF i izvucite
kabel iz struje. Dopunite spremnik za
vodu, ponovno uključite uređaj, podesite
regulator pare i nastavite čistiti.
7. Kada završite sa čišćenjem, ne dirajte krpu
dok se ne ohladi. Zatim je pažljivo skinite sa
nastavka za čišćenje prozora. Pazite, možda
je krpa još uvijek vruća.
NASTAVAK ZA ČIŠĆENJE PRAŠINE
Page 79

79
HRVATSKI
POZOR: Provjerite je li uređaj iskopčan iz struje i je li prekidač (O/I) na OFF
poziciji.
1. Postavite krpu u obliku trokuta na glavu za čišćenje, prateći iste upute kao za mikrofiber
krpu s kukicama i uzicama u odjeljku KAKO SKLOPITI DODATKE.
2. Krpa je vrlo mekana i izdržljiva, sa stotinama apsorbirajućih vlakana, idealnih za zatvoreno
tvrdo drvo, keramiku i druge tipove poda.
1. Iskopčajte napajajući kabel iz utičnice.
2. Dopustite dodacima/krpama da se ohlade i pažljivo ih skinite s tijela uređaja. Pazite, možda
su još uvijek vrući.
3. Uvijek ispraznite spremnik za vodu na kraju svake uporabe.
4. Dopustite vodi, koja je možda ostala kao produkt kondenzacije, da ispari iz otvora za paru
prije nego što odložite uređaj.
5. Namotajte strujni kabel preko gornje i donje kuke.
6. Obrišite sve površine parnog čistača mekanom krpom. Čuvajte uređaj u zatvorenom
prostoru.
7. Ne ostavljajte uređaj na suncu ili kiši. Čuvajte uređaj na suhom i hladnom mjestu kada ga
ne koristite.
8. Uspravno odlaganje parnog čistača, s mokrom glavom za čišćenje/krpom, ostavit će
bijele tragove na podu. Kako biste skinuli bijele tragove, očistite ih octom. Skinite glavu za
čišćenje/krpu prije odlaganja.
1. Iz spremnika za vodu ispraznite sve što je ostalo i osušite ga nakon svake uporabe. Možete
koristiti deterdžent kako biste očistili nastavke (prskalicu i okrugle četke), kada se zaprljaju.
Zatim ih isperite čistom vodom i ostavite da se osuše.
2. Kako biste očistili vapnenac, koji se nataložio u spremniku za vodu, dodajte jednu do
dvije žice bijelog octa u pun spremnik vode. Zatvorite spremnik i protresite sastojke. NE
UKLJUČUJTE PARNI ČISTAČ! Pustite da odstoji nekoliko sati. Zatim ispraznite spremnik za
vodu i napunite ga čistom vodom. Isperite spremnik za vodu temeljito.
KRPA ZA GLAVU ZA ČIŠĆENJE
NAKON UPORABE
ČIŠĆENJE
Page 80

80
HRVATSKI
POSTUPAK ČIŠĆENJA OD VAPNENCA
Ako Vaš parni čistač proizvodi paru sporije nego inače ili prestane proizvoditi paru, možda
mu je potrebno čišćenje od vapnenca. Vapnenac se može stvoriti vremenom na metalnim
dijelovima i jako utječe na učinkovitost uređaja. Neophodno je čišćenje vapnenca redovito,
svakih 25-50 korištenja punog spremnika vode ili minimum jednom mjesečno, posebno
u područjima s tvrdom vodom. Učestalost čišćenja od vapnenca ovisi o tvrdoći vode koju
koristite i od toga koliko često koristite parni čistač.
Parni čistač koristi vodu sa slavine. Međutim, u područjima s tvrdom vodom, trebalo bi koristiti
destiliranu ili prokuhanu vodu, radi bolje učinkovitosti.
• Korištenjem strugalice
1. Provjerite je li uređaj isključen iz struje i je li prekidač (O/I) na OFF poziciji.
2. Koristite iglu kako biste skinuli naslage vapnenca
iz malih otvora za izlaz pare na tijelu uređaja, kao
što je ilustrirano na slici. Otvor za paru očistit ćete
od vapnenca struganjem i uvlačenjem igle u
njega. Uvijek provjerite je li vapnenac iz otvora za
izlaz pare skinut, prije nego što ponovno na njega
postavite neki od nastavaka. Nastavite kružiti
iglom za čišćenje dok potpuno ne skinete vapnenac.
• Korištenjem sredstva za čišćenje
1. Pripremite otopinu od 1/3 bijelog octa i 2/3 vode sa slavine i to ulijte u spremnik za vodu.
2. Omogućite uređaju takvu poziciju da može ispuštati jak mlaz pare, a da pritom ne
ugrožava bilo što i bilo kojega u tom trenutku oko sebe. Ukopčajte uređaj u struju, uključite
prekidač i dopustite uređaju da proizvodi paru, dok se otopina u spremniku skroz ne
potroši.
3. Ponovite ovaj postupak koliko god je puta potrebno, dok uređaj ne uspostavi normalan
protok pare.
4. Kada je uređaj čist, bez vapnenca, napunite spremnik za vodu svježom vodom i isperite ga.
5. Napunite spremnik za vodu svježom vodom, uključite ga i pustite paru kroz sustav dok se
ne isprazni spremnik za vodu.
Kako biste skinuli vapnenac s parnog čistača, pratite sljedeće instrukcije:
POZOR: Ne ostavljajte parni čistač bez nadzora dok traje proces čišćenja
vapnenca ili tijekom korištenja. Uradite test čišćenje na adekvatnom području,
svaki put nakon čišćenja vapnenca, kako biste bili sigurni da nema nikakvih
ostataka u sustavu.
Page 81

81
HRVATSKI
• Čišćenje začepljenih dodataka za parni čistač
Zbog visoko mineralnog sastava vode u nekim predjelima, možda ćete zamijetiti da manje
vodene pare izlazi iz nastavaka. Ovo može biti posljedica gomilanja kalcija na vrhu brizgaljke
Kako očistiti nagomilani kalcij:
Preporučamo korištenje podmazivača u spreju. Poprskajte malu količinu u vrh prskalice. Nakon
prskanja podmazivača u dodatak, napunite parni čistač vodom prema uputama i uključite
kontinuirani mlaz pare kroz nastavak nekoliko minuta, kako biste očistili nagomilani kalcij. Kada
je otvor za paru čist, usmjerite parni čistač ka neutralnoj podlozi ili krpi, kako biste bili sigurni
da nema nikakvih ostataka.
Održavanje mikrofiber krpe
1. Strojno pranje na 60ºC (140ºF)
2. Ne izbjeljivati!
3. Ne koristite omekšivač!
POZOR: Ovu procedure obavljajte u zaštićenoj i dobro prozračenoj prostoriji.
POZOR: Provjerite je li uređaj isključen iz struje i da je prekidač (O/I) na OFF
poziciji.
UPUTE ZA RJEŠAVANJE PROBLEMA
Problem Mogući uzrok Rješenje
UREĐAJ SE NE UKLJUČUJE
Uređaj nije ukopčan u struju
ili na prekidač.
Provjerite je li uređaj
ukopčan u ispravnu utičnicu i
je li uključen prekidač.
SLABA PARA ILI NEMA PARE
Prazan spremnik za vodu. Napunite spremnik za vodu.
Začepljena prskalica.
Skinite nastavak i očistite
prskalicu.
Nagomilan vapnenac.
Pratite upute za čišćenje u
ovim uputama za korištenje,
kako biste očistili naslage
vapnenca.
Page 82

82
HRVATSKI
Problem Mogući uzrok Rješenje
PARA IZLAZI IZ SPOJA
TIJELA I NASTAVKA
Nastavak nije dobro spojen.
Isključite uređaj, ostavite
da se nastavak potpuno
ohladi i prateći upute spojite
ponovno nastavak.
Postoji prepreka na spoju
Skinite nastavak i provjerite
što smeta i očistite.
KRPA ZA ODRŽAVANJE
ODJEĆE JE VLAŽNA
Krpa je upila vodenu paru
Skinite vlažnu krpu i
zamijenite je suhom
(zamjenske krpe možete
nabaviti kod distributera ili u
ovlaštenom servisu) ili je
ohladite, iscijedite, osušite i
nastavite je koristiti.
Page 83

83
Македонски
ВАЖНИ СИГУРНОСНИ УПАТСТВАUPUTSTVA
Кога користите електрични уреди, придржувајте се до основните мерки за безбедност:
1. Прочитајте ги сите упатства пред да почнете да го користите уредот.
2. За да го смалите ризикот од струен удар, не го потопувајте уредот ниту кабелот/
утикачот во вода или било каква друга течност. Почитувајте ги упатствата за чистење.
3. Внимавајте на децата за да не се играат со уредот.
4. Не го оставајте уредот без надзор додека е вклуен во струја.
5. Исклучете го уредот од струја кога не го користите и пред чистење.
6. Доколку струјниот кабел е оштетен, мора да го смени овластен сервисер или друго
лице со еднаква квалификација, за да се избегне несреќа.
7. Не е препорачливо користење на продолжен кабел.
8. Внимавајте да не го замрсите или превиткате кабелот.
9. Не го влечете и не го тегнете струјниот кабел. Не го користете за поместување или
носење на уредот. Кога го исклучувате уредот од струја, повлечете го утикачот, не
кабелот.
10. Користење на додатоци кои не се испорачани со уредот може да предизвика пожар,
струен удар или повреди.
11. Не дозволувајте кабелот да виси преку работ од масата или од некој елемент или да
допира топли површини, вклучувајќи го и шпоретот. Внимавајте кабелот да не виси
и никој/ништо да не може да се сопне на него.
12. Не го ставајте уредот на или во близина на гас или електричен шпорет, во топла
релна или близу лесно запалливи материјали.
13. Не го користете уредот надвор или ако стоите на влажна подлога.
14. Не го допирајте утикачот или уредот со водени раце!
15. Уредот користете го исклучиво за тоа за што е наменет.
16. Уредот не е наменет за употреба за лица (вклучувајќи ги и децата) со намалени
физички, моторни или ментални способности или со недостаток на искуство и
знаење, освен ако се под надзор или според инструкциите за употреба од страна на
лице одговорно за нивната безбедност.
17. Пред вклучување на уредот проверете дали напонот наведен на плочката на уредот
одговара на напонот на вашата електрична мрежа.
18. Не го користете уредот ако паднал, ако има видливи оштетувања или ако нешто
тече од него.
19. Чувајте го уредот на суво место, заштитен од прашина и без излагање на директна
сончева светлина.
20. Секоја злоупотреба или неуспех во следењето на упатството за користење ја прави
гаранцијата неважечка и производителот/дистрибутерот/продавачот го ослободува
од секоја одговорност.
21. Течностa или пареатa не смеат директно да бидат усмерени кон опремата која
содржи електрични компоненти, како што е внатрешноста на релната.
22. Посебно внимание е потребно кога уредот се користи во близина на деца, домашни
миленици или растенија.
23. Никогаш не ја насочувајте переата кон луѓе, животни или растенија.
Page 84

84
Македонски
24. Не вметнувајте предмети во отворите на уредот. Не го користете уредот ако некој
отвор е блокиран.
25. Не ја користете главата за чистење без соодветно наместена крпа.
26. Не го користете чистачот на пареа без вода во резервоарот за вода.
27. Дополнително внимание е потребно при користење на уредот на скали.
28. Добро осветлете го работниот простор.
29. Никогаш не ставајте во резервоарот топла вода или било која друга течност,
како што се ароматични, алкохолно базирани течности или детргенти. Таквото
користиње би го направило небезбеден и би го оштетило уредот.
30. Секогаш одржувајте го отворот за пареа чист. Избегнувајте поставување на отворот
на меки површини, кои можат да го блокираат протокот на пареа. Одржувајте
ги отворите чисти, без влакна и други потенцијални препреки, за да овозможите
правилен тек на пареата.
31. Прекинете го користењето на чистачот на пареа доколку приметите протекување на
вода и контактирајте го овластениот сервис.
32. Не го користете чистачот на пареа во затворени простории кои се наполнети со
запаливи, експлозивни или токсични супстанци како што се разредувач за боја или
масни бои.
33. Не го користете уредот на кожа, подлоги од восок, нелакиран паркет, синтетички
ткаенини, плиш или други материјали осетливи на пареа.
34. Не го користете уредот за загревање на просторот.
35. Не ги допирајте топлите штотуку избришани површини.
36. За исклучување на уредот, притиснете го копчето на OFF позиција, исклучете го
регулаторот на пареа, потоа извлечете го утикачот од струја.
37. Внимателно користете го уредот, заради пареата које се емитува.
38. За да избегнете оптеретување на струјното коло, не користете други уреди на
истиот приклучок во исто време со чистачот на пареа.
39. Не го влечете и не го тегнете продолжното црево, бидејки може да го оштетите. На
оштетеното црево може да дојде до протекување на водена пареа.
40. Не го допирајте продолжетокот за чистење прозори или крпата во текот на
употреба.
41. Во текот на работата, овие додатоци се жешки и може да дојде до изгореници.
42. Држете го продолжното црево подалеку од себе и избегнувајте да го допирате
цревото, бидејки може да биде исклучително врело и да Ве изгори.
Не ги исфрлајте електронските уреди како секој друг отпад, туку користете
посебени места за собирање електричен отпад. Обратете им се на вашите локални
власти за информација во врска со системите кои се на располагање за собирање
електричен отпад. Во случај да се исфрлаат на депонии или складишта за отпад,
опасните материи можат да истечат во подземните води и да влезат во синџирот на
исхрана, што неповолно ќе влијае врз вашето здравје и околината.
Page 85

85
Македонски
Закривена дршка
Светлосен прекинувач за вклучување/исклучување
Регулатор на пареа
Затворач на рервоарот за вода
Резервоар за вода
Тело на уредот
Кука за намотување на кабел
Кабел за струја
Телескопска дршка
Копче за заклучување на рачката
Копче за заклучување
на додатоците
(на телото на уредот)
Глава за бришење
Предна страна Задна страна
Page 86

86
Македонски
Лизгач за чистењена
теписи
Прскалка
Микрофибер
крпа
Продолжеток за
чистење прашина
Кружна четка
(месинг)
Кружна четка
(најлон)
Игла за
чистење
Крпа за чистење
облека
Крпа за чистење
прозори
Дозер
Продолжеток за
чистење прозори
Продолжно црево
Page 87

87
Македонски
: Пред составување на уредот или менување на додатоците,
проверете дали уредот е исклучен од струја и дали прекинувачот (O/I) е на
OFF позиција.
: Пред
користење проверете дали
главата на чистачот на пареа
е сигурно оставена.
КАКО ДА ГО КОРИСТИТЕ УРЕДОТ
1. Составете ја главата за чистење со
телото на уредот според следниот
принцип: ставете ја обртната спојница
во означениот отвор на телото на
уредот; составувањето е успешно кога
копчето за заклучување на додатокот
на телото ќе кликне.
2. Уфрлете ја телескопската дршка
во за тоа наменетиот простор
на телото на уредот, додека не
се заклучи со помош на копчето
за заклучување на телескопската
дршка .
3. Поставете ја микрофибер
крпата на главата за чистење.
Затегнете ја микрофибер крпата
со повлекување на јажето, додека
истовремено го притискате
копчето на јажето.
Page 88

88
Македонски
4. При користење на чистачот на пареа на
теписи, поставете ја главата за чистење со
микрофибер крпа преку лизгачот за чистење
теписи, како што е прикажано на слика 4a. Не
се обидувајте да користите чистач на пареа
на тепих без лизгач за чистење, бидејки ќе го
оштетите тепихот.
Чистачот на пареа e направен потполнода ги исчисти подните површини, како што се
керамика, теписи, камен, линолеум и паркет. Не се сите видови подови наменети за
чистење со пареа.
Топлината и пареата можат да го одстранат восокот од површинате третирани со восок.
Не го користете парочистачот на незалепен под и не го оставајте подолго време на
било кое дрво кое е осетливо на топлина. Во спротивно дрвото може да се подуе или
паркетот да се дигне или на друг начин да се оштети.
Кога го користите уредот на винил, линолеум или било кој под осетлив на топлина,
бидете посебно внимателни. Премногу топлина може да го истопи лепакот во подот.
Будете претпазливи при користење на ламинат, да е поставен професионално и без
празнини и пукнатини кои би овозможиле влез на влагата.
Тестирајте го уредот најпрво на мала изолирана површина од Вашиот под, пред
употреба на било која подна површина.
Секогаш прво проверете го упатството за употреба и чисење пред користење на
уредот. Во случај на сомнеж консултирајте се со стручно лице за подови. Лизгачот за
чистење теписи користете го исклучиво на теписи и патеки. Употреба на лизгачот за
чистење теписи на други подни површини може да предизвика ленти и гребнатини.
: Никогаш не
користете лизгач за чистење теписи
на површини подложни на гребење.
Никогаш не ги отстранувајте и не
менувајте додатоци додека уредот е
во употреба!
: Овој уред испушта пареа и ствара влага. Доколку уредот се
користи подолг временски период на едно место, можат да се појават траги
од вода, менување на боја и оштетувања на подот.
4a 4b
Page 89

89
Македонски
1. Полнење на резервоарот за вода:
: Првоерете дали
уредот е исклучен од струја.
Свртете го чепот на резервоарот за вода во спротивна насока од стрелките на
часовникот, приближно 90°, до знакот ‘’OPEN’’
и тргнете го чепот како што е
илустрирано на сликите 1а, b и c.
Држете го парочистачот под агол од 45°, како што е илустрирано на сликата 1d и
ставете вода во резервоарот до означениот максимум, со помош на дозер.
Не го преполнувајте резервоарот. Максимален капацитет е 275 ml/9.2OZ.
Вратете го чепот назад на
резервоарот и свртете во насока
на стрелките на часовникот,
приближно 90°, до натписот
‘’CLOSE’’
додека чепот не
биде сосема затегнат.
Page 90

90
Македонски
: Чистачот на пареа користи вода од чешма. Aко водата е
премногу тврда, се препорачува користете на дестиирана или варена вода.
: Никогаш не ставајте
детергенти или мирисни производи во
парочистачот. Тоа би госторило користењето
не безбедно и би оштетило уредот.
Додека го користите чистачот на пареа, проверете дали
бакарниот грејач во резервоарот за вода секогаш е
потопен (како што е илустрирано 1i).
2. Изберете една од следните опции на регулаторот на
пареата:
1 -Слабо, 2- Средно, 3-Силно i 4-Жежок спреј
• 1 –Слабо i 2- Средно подесување се идеални за
чистење на сите видови тврди подови, како што се
линолеум, керамика, мермер, дрво, итн.
• 3-Силното подесување е идеално за чистење на
теписи и патеки.
• 4- Жешкиот спреј е идеално подесување за чистење
на купатила, кујни, прозори, автомобилски тркала,
итн.
Подесувањата можете да ги промените на регулаторот
за пареа додека чистачот на пареа е во функција.
3. Кога уредот е целосно склопен и наполнет со вода,
вклучете го утикачот во струја на заземјен струјен
приклучок. Исклучениот прекинувач (O/I) е во позиција
OFF. Вклучете го прекинувачот на позиција ОN. После
приближно 15 секунди уредот ќе почне да испушта
пареа. Потоа вклучете го регулаторот за пареа и
наместете ја пареата според вашите потреби. За уредот
да престане да пушта пара, исклучете го регулаторот на
пареа и потоа исклучете го уредот со прекинувачот (O/
I) на позиција OFF. Доколку во уредот има останато вода
од претходното користење, при повторното вклучување
и пред уредот да почне да произведува пареа, таа
вода од претходното користење нема да се загрее туку
ќе биде исфрлена надвор со сегашната пареа, па тоа
може да направи локви вода. Ова може да се случи и
ако само прекинувачот (O/ I) го исклучите во позиција
OFF, а регулаторот на пареата го оставите вклучен од
претходната употреба и ако уредот е згаснат само со
исклучување од струја. После секоја употреба проверете
дали уредот е потполно исклучен и празен.
Page 91

91
Македонски
: Не ја спроведувајте оваа постапка на подови осетливи на
топлина и пареа.
4. Полека поминете со парочистачот преку површината што сакате да ја чистите. Крпата
на главата за чистење ќе ја впие и собере нечистотијата што е разложена со пареата.
При рака иамјте крпа со која можете да го соберете вишокот вода ако се појави на
подлогата.
5. Кога чистачот на пареа ќе престане да испушта пареа, едноставно исклучете го
регулаторот на пареата, потоа уредот на прекинувачот OFF и извлечете го кабелот од
струја. Дополнете го резервоарот за вода, повторно вклучете го уредот, подесете го
регулаторот за пареа и продолжете со чистење.
За најдобри резултати:
1. Исчистете ја или усисајте ја подлогата пред да употребите
чистач на пареа.
2. За да избегнете бара, микрофибер крпата мора да биде
чиста и сува за употреба. За да ја замените крпата следете
го следното упатство: оставете крпата да се олади, тргнете
ја од главата на чистачот и заменете ја со нова микрофибер
крпа (прибор). Потоа продолжете да ранотите со
парочистачот. Изберете слабо подесување на регулаторот
за пареа.
3. За да дезинфицирате еден дел од вашиот под, оставете го
парочистачот на најјако подесување на местото кое што
сакате да го дезинфицирате во траење од приближно 10
секунди, но не подолго од 15 секунди. Секогаш имајте ја
во предвид структурата на подот и дали е предвиден за
чистење со пареа.
• Никогаш не го користете уредот предолго на едно место. Тоа може да го оштети
подот.
• Никогаш не ги ставајте рацете или нозете под главата за чистење. Тој дел од уредот е
мошне жежок и може да предизвика изгореници.
• Во текот на употреба уредот испушта звук кој што ни дава знак дека водата се загрева
и дека уредот произведува пареа. Тој звук е нормален.
• Може да се случат мали прскања на вода со пареата. Ова е исто така нормално.
• Топлината на водената пареа може да влијае негативно на некои материјали. Секогаш
проверете да ли на вашиот под се препорачува користење на парочистач или
испробајте го сами на скриена површина.
Page 92

92
Македонски
РАЧЕН ЧИСТАЧ НА ПАРЕА
Рачниот чистач е идеален за користење на работни површини, пултови, лавабоа,
прозори, огледала, плочки и за чистење флеки на подовите, теписите и патеките.
Користете го со прскалка, месингана четка или најлонска четка, за да ги одстраните
нечистотијата, маснотијата, гнилежот и слично.
1. Симнете го струниот кабел од горниот
држач за намотување, како што е
прикажано на сликата.
3. Притиснете го копчето за заклучување
на телото на уредот и извадете ја
главата за чистење.
2. Притиснете го копчето за заклучување
на телескопската дршка и извлечете ја
телескопската и закривената дршка од
телото на уредот.
4. За да ја споите прскалката, ставете
ја во отворот на телото на уредот,
како што е прикажано на сликата
4a. Спојувањето е успешно кога
копчето за заклучување на додатоците
на телото од уредот ќе кликне.
Проверете дали прскалката е цврсто
поставена на местото пред користење.
: Пред склопување на уредот или менување на додатоците,
проверете дали уредот е исклучен од струја и дали прекинувачот (O/ I) е на
позиција OFF.
4a
4b
Page 93

93
Македонски
5. Кружниот најлон или кружната месингана четка прицврстете ги со навој на крајот од
прскалката, како што е прикажано на сликите 5a и 5b. За да ја извадите било која од
четките, одвртете ја од прскалката, како што е покажано на сликата 5c.
1. Тргнете ја главата за чистење со
притисок на копчето за заклучување
на телото од уредот и на ист начин
ставете ја или тргнете ја прскалката.
2. За да го споите продолжното црево
ставете го во отворот на телото од
уредот, како што е прикажано на
сликите 1a, 1b и 1c. Спојувањето е
успешно кога ќе кликне копчето за
заклучување 1б на додатоците на
телото од уредот.
• Округлата најлонска четка е идеална за чистење мазни и тврди површини, како што се
тоалети, лавабоа, кујнски елементи и слично.
• Округлата месингана четка е идеална за чистење груби и метални површини, како што
се подови од цигла, автомобилски тркала, метални врати и рамки и слично.
• И двете четки ефикасно чистат маснотии од тави, шпорети и релни во кујна. Можете
да користите сапун или детергент за перење валкани површини, кои ги нанесувате на
подлогата што ја чистите.
: Никогаш не ја користете округлата месингана четка на
подлоги кои можат да се изгребат.
: Проверете дали продолжното црвео е цврсто поставено
на место пред користење.
5a
1a
1b
5b 5c
1c
Page 94

94
Македонски
1. Отпуштете го јажето на крпата и закачете ја на предвидените држачи на рамката од
додатокот за чистење прозори. Повлечете го јажето и затегнете ја крпата на место.
2. Закачете го продолжетокот за чистење прозори на продолжното црево по следниов
принцип: поставете го копчето за заклучување на продлжното црево во правец со
предодредениот отвор на продожетокот за чистење и потоа турнете во продолжното
црево, додека не се заклучи во место (како што е прикажано на сликите 2a и 2b).
1. За да го користите продолжетокот за чистење прозорци како
парочистач за облека, закачете ја микрофибер крпата како што е
илустрирано на сликите 1a, 1b i 1c.
Проверете дали сте ја закачиле крпата на сите држачи на рамката од додатокот за
чистење прозори, за да спречите лизгање или паѓање на крпата од продолжетокот во
тек на употреба (како што е прикажано на сликите 1a, 1b и 1c).
: Не покривајте го гуменото сечило.
1a
2a
1a
1b
2b
1b
1c
1c
Page 95

95
Македонски
УПОТРЕБА
2. Закачете го продолжението за чистење прозорци/
за облека на продолжното црево на следен начин:
поставете го копчето за заклучување на продлжното
црево во правец со предодредениот отвор на
продожетокот за чистење и потоа турнете во
продолжното црево, додека не се заклучи во место
(како што е илустрирано на сликата 2а)
1. Закачете ја крпата за чистење на рамката од четката за прашина ( како што е
илустрирано на сликите 1a i 1b).
2. Закачете ја рамката од четката за прашина на продолжното црево на следен
начин: поставете го копчето за заклучување на продлжното црево во правец
со предодредениот отвор на рамката од четката за прашина и потоа турнете во
продолжното црево, додека не се заклучи во место (како што е илустрирано на
сликите 2a i 2b).
1. Наполнете го резервоарот со вода. Прочитајте го одделот КАКО ДА ГО КОРИСТИТЕ
УРЕДОТ/Полнење на резервоарот за вода. Закачете една од четките како што е
објаснето во одделот КАКО ДА ГИ СКЛОПИТЕ ДОДАТОЦИТЕ.
2. Изберете едно од подесувањата на регулаторот за пареа:
1 –Слабо, 2- Средно, 3-Силно i 4-Жежок спреј
Подесувањата на регулаторот за пареа можете да ги
енувате во тек на работата.
: Проверете дали уредот е исклучен од струја и дали
прекинувачот (O/I) е на позиција OFF.
2a
1a 1b
2a 2b
Page 96

96
Македонски
3. Кога уредот е целосно склопен и наполнет со вода, вклучете го
утикачот во струја. Исклучениот прекинувач (O/I) е во позиција
OFF. Вклучете го прекинувачот на позиција ОN. После приближно
15 секунди уредот ќе почне да испушта пареа. Потоа вклучете
го регулаторот за пареа и наместете ја пареата според вашите
потреби. За уредот да престане да пушта пара, исклучете го
регулаторот на пареа и потоа исклучете го уредот со прекинувачот
(O/ I) на позиција OFF. Доколку во уредот има останато вода од
претходното користење, при повторното вклучување и пред уредот
да почне да произведува пареа, таа вода од претходното користење
нема да се загрее туку ќе биде исфрлена надвор со сегашната пареа,
па тоа може да направи локви вода. Ова може да се случи и ако само
прекинувачот (O/ I) го исклучите во позиција OFF, а регулаторот на
пареата го оставите вклучен од претходната употреба и ако уредот
е згаснат само со исклучување од струја. После секоја употреба
проверете дали уредот е потполно исклучен и празен.
КАКО ДА ГИ КОРИСТИТЕ ДОДАТОЦИТЕ
Проверете дали уредот е исклучен од струја и дали прекинувачот (O/I) е на позиција OFF.
4. Полека поминете со парочистачот преку површината што сакате да ја чистите. Крпата на
главата за чистење ќе ја впие и собере нечистотијата што е разложена со пареата. При
рака имајте крпа со која можете да го соберете вишокот вода ако се појави на подлогата.
5. Кога чистачот на пареа ќе престане да испушта пареа, едноставно исклучете го
регулаторот на пареата, потоа уредот на прекинувачот OFF и извлечете го кабелот од
струја. Дополнете го резервоарот за вода, повторно вклучете го уредот, подесете го
регулаторот за пареа и продолжете со чистење.
: За да дезинфицирате вашите работни површини,
кујнски елементи, лавабоа, купатила и слично, користете го рачниот
парочистач преку истото подрачје во траење од најмногу 15 секунди. Не
ја спроведувајте оваа постапка на подови осетливи на топлина и пареа.
Силата на водената пареа може сериозно оштети некои материјали.
Секогаш проверете дали материјалот е предвиден за чистење со пареа и
прво испробајте го сами на скриена површина.
1. Наполнете го резервоарот со вода. Прочитајте го одделот КАКО ДА ГО КОРИСТИТЕ УРЕДОТ/
Полнење на резервоарот за вода.
2. Ставете ја крпата на продолжетокот за чистење позори, потоа закачете го продолжетокот
за чистење прозори на продолжното црево, како што е објаснето во одделот КАКО ДА ГИ
СКЛОПИТЕ ДОДАТОЦИТЕ.
3. Следете ги чекорите 2 и 3 опишани во одделот КАКО ДА ГО КОРИСТИТЕ УРЕДОТ
4. Држете го парочистачот во една рака, а со другата рака држете ја дршката од продолжното
црево, како што е прикажано на сликата.
Page 97

97
Македонски
/
:
• Не користете пареа за чистење на замрзнати прозори. Ќе пукнат!
• Бидете претпазливи кога го користите парочистачот на стакло. Се крши!
5. Полека поминете со парочистачот преку површината што
сакате да ја чистите. Крпата ќе ја впие и собере нечистотијата
што е разложена со пареата, а гумената острица ги одстранува
останатите траги од вода. При рака имајте крпа со која можете
да го соберете вишокот вода ако се појави на подлогата.
6. Кога чистачот на пареа ќе престане да испушта пареа,
едноставно исклучете го прво регулаторот на пареата, потоа
уредот на прекинувачот OFF и извлечете го кабелот од струја.
Дополнете го резервоарот за вода, повторно вклучете го уредот,
подесете го регулаторот за пареа и продолжете со чистење.
7. Кога ќе завршите со чистење, не ја допирајте крпата додека
не се олади. Потоа внимателно тргнете ја од продолжетокот
за чистење прозори. Внимавајте, крпата може сеуште да биде
жешка.
1. Наполнете го резервоарот со вода. Прочитајте го одделот КАКО ДА ГО КОРИСТИТЕ
УРЕДОТ/Полнење на резервоарот за вода.
2. Ставете ја крпата за облека на продолжетокот за чистење позори, потоа закачете го
продолжетокот за чистење прозори на продолжното црево, како што е објаснето во
одделот КАКО ДА ГИ СКЛОПИТЕ ДОДАТОЦИТЕ.
3. Изберете едно од подесувањата на регулаторот за пареа:
1 –Слабо или 2- Средно
4. Следете го чекорот 3 опишан во одделот КАКО ДА ГО
КОРИСТИТЕ УРЕДОТ.
5. За да ја третирате облеката со парочистач, ставете парче
облека на закачалка и пареата насочете ја директно
кон облеката. Држете го парочистачот во една рака,
а со другата рака држете ја дршката од продолжното
црево, како што е прикажано на сликата. Полека влечете
го продолжетокот за облека вертикално, од врвот до
дното на облеката или во спротивна насока. Наборите
на завесите и срапериите можете да ги исправите со
помош на парочистач додека се закачени.
: Проверете дали уредот е исклучен од струја и дали
прекинувачот (O/I) е на позиција OFF.
: не ги користете подесувањата 3-Силно i 4-Жежок спреј
кога го користите парочистачот на облека. Подесувањата на регулаторот за
пареа можете да ги менувате во тек на работата.
Page 98

98
Македонски
: Прочитајте ја етикетата на облеката за да проверите дали
е пердвидена за третирање со пареа (доколку ткаенината не е предвидена
за пеглање, тогаш не е ни за третирање со пареа). Некои ткаенини како што
се кожа, антилоп и плиш не се предвидени за третирање со пареа. Ако не
сте сигурни, тестирајте ја пареата на мал внатрешен дел од облеката, кој
што не се гледа.
: Проверете дали уредот е исклучен од струја и дали
прекинувачот (O/I) е на позиција OFF.
6. Кога чистачот на пареа ќе престане да испушта пареа, едноставно исклучете го прво
регулаторот на пареата, потоа уредот на прекинувачот OFF и извлечете го кабелот
од струја. Дополнете го резервоарот за вода, повторно вклучете го уредот, подесете
го регулаторот за пареа и продолжете со чистење.
7. Кога ќе завршите со чистење, не ја допирајте крпата додека не се олади. Потоа
внимателно тргнете ја од продолжетокот за чистење прозори. Внимавајте, крпата
може сеуште да биде жешка.
1. Наполнете го резервоарот со вода. Прочитајте го одделот КАКО ДА ГО КОРИСТИТЕ
УРЕДОТ/Полнење на резервоарот за вода.
2. Ставете ја крпата на рамката од четката за прашина, потоа закачете го продолжетокот за
чистење прозори на продолжното црево, како што е објаснето во одделот КАКО ДА ГИ
СКЛОПИТЕ ДОДАТОЦИТЕ.
3. Изберете едно од подесувањата на регулаторот за пареа:
1 –Слабо, 2- Средно или 3-Силно
Не го користете подесувањето 4-Жежок спреј кога ја користите четката за прашина.
Подесувањата на регулаторот за пареа можете да ги менувате во тек на работата.
4. Следете го чекорот 3 опишан во одделот КАКО ДА ГО КОРИСТИТЕ УРЕДОТ.
5. Држете го парочистачот во една рака, а со другата рака држете ја дршката од
продолжното црево, како што е прикажано на сликата. Полека поминете со парочистачот
преку површината што сакате да ја чистите. Крпата ќе ја впие и собере нечистотијата што
е разложена со пареата. При рака имајте крпа со која можете да го соберете вишокот
вода ако се појави на подлогата.
6. Кога чистачот на пареа ќе престане да
испушта пареа, едноставно исклучете го
прво регулаторот на пареата, потоа уредот
на прекинувачот OFF и извлечете го кабелот
од струја. Дополнете го резервоарот за вода,
повторно вклучете го уредот, подесете го
регулаторот за пареа и продолжете со чистење.
7. Кога ќе завршите со чистење, не ја допирајте
крпата додека не се олади. Потоа внимателно
тргнете ја од продолжетокот за чистење
прозори. Внимавајте, крпата може сеуште да
биде жешка.
Page 99

99
Македонски
: Проверете дали уредот е исклучен од струја и дали
прекинувачот (O/I) е на позиција OFF.
1. Закачете ја крпата в облик на триаголник на главата за чистење, следејќи ги
упатствата како за микрофибер крпа со закачки и јажиња во одделот КАКО ДА ГИ
СКЛОПИТЕ ДОДАТОЦИТЕ.
2. Крпата е многу мека и издржлива, со стотици абсорбирачки влакна, идеални за
затворено тврдо дрво, керамика и други видови подови.
1. Исклучете го кабелот од струја.
2. Оставете ги додатоците/крпите да се оладат и внимателно тргнете ги од телото на
уредот. Внимавајте, може да се сеуште жешки.
3. Секогаш испразнете го резервоарот за вода на крајот на секоја употреба.
4. Оставете ја водата што можеби останала од кондензацијата да испари од отворот за
пареа пред да го оставите уредот.
5. Намотајте го кабелот преку горната и долната закачалка.
6. Избришете ги површините од парочистачот со мека крпа. Уредот чувајте го во
затворен простор.
7. Не го ставајте уредот на сонце или на дожд. Чувајте го уредот на суво и ладно место
кога не го користите.
8. Ако го оставите парочистачот да стои со мокра глава за чистење/крпа, ќе остави
бели траги на подот. За да ги одстраните белите траги, исчистете ги со оцет.
Извадете ја главата за чистење/крпата пред оставање.
1. Испразнете ја од резервоарот за вода сета вода што останала и осушете го после
секоја употреба. Можете да користите детергент за да ги чистите продолжетоците
(прскалката и округлите четки) кога ќе се извалкаат. Потоа измијте ги со чиста вода и
оставете ги да се исушат.
2. За да го одстраните бигорот што е наталожен на резервоарот за вода, додадете
една до две лажици бел оцет во полн резервоар вода. Затворете го резервоарот
и протресете ги состојките. НЕ ГО УКЛУЧУВАЈТЕ ПАРОЧИСТАЧОТ ! Оставете го да
одстои неколку саати. Потоа испразнете го резервоарот и наполнете го повторно со
чиста вода. Темелно измијте го резервоарот за вода.
ПОСЛЕ УПОТРЕБА
ЧИСТЕЊЕ
Page 100

100
Македонски
Ако вашиот парочистач прозиведува пареа побавно или престане да произведува
пареа, можеби му е потребно чистење од бигор. Бигорот може да се створи со
време на металните делови и многу влијае на ефикасноста на уредот. Неопходно
е редовно чистење на бигорот, секои 25-50 користења на полниот резервоар вода
или најмалку еднаш месечно, посебно во подрачјата со тврда вода. Колку често ќе го
чистите бигорот зависи од тоа колку е тврда водата што ја користите и колку често го
користите парочистачот. Парочистачот користи вода од чешма. Меѓутоа, во подрачјата
со тврда вода би требало да се користи дестилирана или варена вода, заради подобра
ефикасност.
• Со користење на стругалка
1. Проверете дали уредот е исклучен од струја и дали прекинувачот (O/I) е на позиција OFF.
2. Користете игла за да го одстраните бигорот од
малите отвори за излез на пареата на телото
од уредот, како што е илустрирано на сликата.
Отворот за пареа исчистет го од бигор со
стругање и вовлекување игла во него. Секогаш
проверете дали е бигорот од итворот за излез на
пареата одстранет, пред да закачите повторно на
него некој од продолжетоците. Продолжете да
кружите со иглата за чистење додека потполно не го одстраните бигорот.
• Со користење на средства за чистење
1. Подгответе раствор од 1/3 бел оцет и 2/3 вода од чешма.
2. Обезбедете позиција на уредот така да може да испушта силен млаз пареа но при
тоа да не загрозува било што и било кого во тој момент околу себе. Вклучете го
уредот во струја, вклучете го прекинувачот и пуштете го уредот да произведува
пареа се додека сета мешавина од резервоарот не се потроши.
3. Повторете ја оваа постапка колку пати и да е потребно, се додека уредот не
воспостави нормален проток на пареа.
4. Кога е уредот чист, без бигор, напонете го резервоарот со свежа вода и исперете го.
5. Наполнете го резервоарот со свежа вода, вклучете го и пуштете пареа низ системот
додека резервоарот не се испразни.
, :
: не го оставајте парочистачот без надзор додека трае
процесот на чистење бигор или во тек на користењето. Направете тест на
чистење на адекватно подрачје, секој пат после чистењето на бигор за да
бидете сигурни дека во системот нема никакви остатоци.
 Loading...