

Page 1

Page 2
GB
4
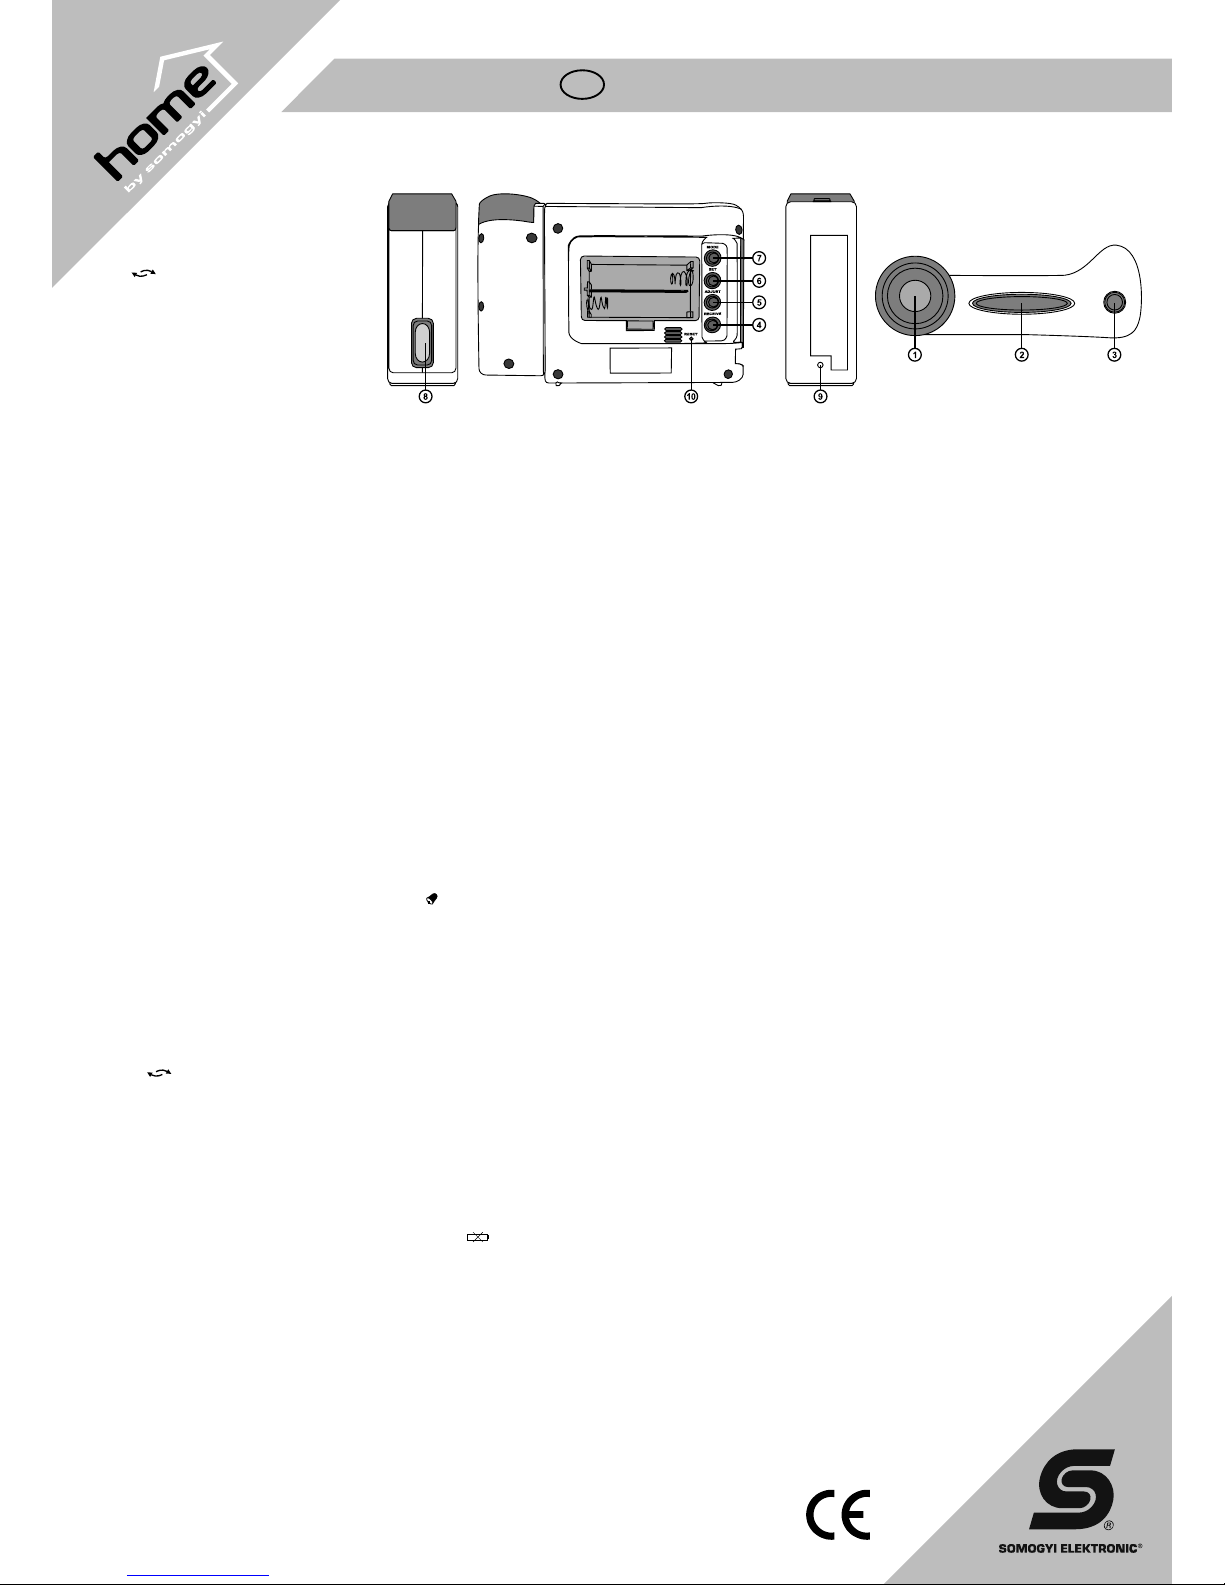
Features:
• projects current time and temperature onto the wall • projected image can be rotated and focused • DCF-77 radio control (Frankfurt) • date display, alarm function • measures indoor temperature • large display with blue
background light • battery status display
accessories:
1. PROJECTOR
2. PROJECTOR ON/OFF Zz
(Projector power on/off and snooze) button
- starts the projector, enters snooze mode
3.
(Flip) button - ips projected image
4. RECEIVE (Synchro) button - starts synchronization
5. ADJUST button – increase selected value
6. SET button - enters settings mode
7. MODE button - stores settings
8. FOCUS – adjusts focus of projected image
9. DC 4.5 V (Adaptor socket)
10. RESET button - return to defaults
Power suPPly, synchronization
After removing the battery compartment cover at the back of the device, insert two type AA alkaloid batteries with the indicated polarity, and close the battery cover. After emitting a beep the device starts in the default mode, and clock starts ticking. The transmission
tower symbol ashing under the number for seconds indicates that the automatic clock setting process has started, and the device is seeking for the radio control signal.*
If the process is working properly, symbols of radio signals will also appear around the image of the tower. If they do not appear then the signal at your location is too weak to receive. In this case try to change the direction of the device, or move it to a different
location. (The clock has an internal ferrite antenna, similar to an AM receiver.) Depending on the signal strength, synchronization may take 2-10 minutes. After that the image of the transmission tower is shown permanently without ashing. You can start
synchronization manually by pressing the RECEIVE button at the back of the device.
Attention: While synchronization is in progress, it is not possible to set any function manually.
*Clocks controlled by a radio signal have a special built-in radio receiver besides the traditional quartz clock. The radio receiver receives the signal of the DCF-77 transmission tower in Maining (Germany, close to Frankfurt) to periodically reset the clock to the
exact time. Because the radio signals transmit the information of an atomic clock, such devices effectively have the precision of an atomic clock. The maximum deviation from the exact time in 1 million years is ±1 second.
Good reception is ensured within a radius of 1500 km of the transmission tower. Should there be no signal at the location of use, the devices continue to work as a traditional quartz clock.
Manually setting the clock
1. Make sure radio signal control is switched off (the transmission tower is not displayed) and the bottom row of the display shows the date.
2. After pressing the ADJUST button, press and hold the SET button for 2 seconds: the four-digit year will start ashing. You can increase the value by pressing ADJUST. When the correct value is reached, press the MODE button.
3. The next step is to set the date: press and hold the SET button for 2 seconds, then keep pressing it until you reach the icons for day and month. You can increase the values with the ADJUST button. When the correct value is reached, use the MODE button
to store.
4. You can also use the SET button to select the language for displaying the day of week. The available languages are English (GB), German (DE), French (FR), Italian (IT) and Spanish (ES). The ADJUST button will move to the next value; pressing MODE
stores the selection.
5. In the next phase, you can use the SET button to select 12-hour or 24-hour time display; press ADJUST to change, and MODE to store.
6. After moving on with the SET button, you can set the current time with the ADJUST button, and store it with the MODE button.
7. Pressing MODE for the last time stores the selected values, and the display will show the exact date and time.
Note:
– you can press and hold the ADJUST button to quickly reach a greater value
– if you do not press any key for 5 seconds, the device returns to the default status, i.e., displays the date and time)
setting the alarM
When the clock is in the default mode, you can show the alarm time by pressing MODE.
1. Press and hold SET for 2 seconds: the displayed time will start ashing.
2. Increase the value by pressing ADJUST.
3. Pressing SET again moves on to the value for minutes; you can repeat the previous steps to change and store.
4. When you reach the desired alarm time, store it by pressing MODE.
5. Pressing MODE again returns to the standby mode.
alarM, using the snooze Mode
When the clock is in the default mode, you can show the alarm time by pressing MODE.
1. Pressing the ADJUST button once activates the stored value, and the alarm icon (
) appears on the display.
2. Pressing the ADJUST button again activates the snooze mode, and the snooze icon Zz appears on the display. When this function is activated, the alarm’s sound will increase in 5 steps, and the alarm will sound 4 times after each other, at an interval of 5
minutes. The alarm sound is emitted for 120 seconds.
3. Pressing ADJUST a third time clears the alarm.
4. The alarm sound can be switched off by pressing any of the buttons; the snooze mode will remain active.
Measuring teMPerature
The bottom right-hand corner of the display continuously shows in the indoor temperature in °C. The display’s precision is 0.1°C.
In the default mode, you can press SET to toggle between Fahrenheit and Celsius values.
using the Projector
After pressing the PROJECTOR ON/OFF button, the device will project the current time and temperature for 5 seconds. The recommended distance from the projection surface is 1-3 meters. By twisting the projector you can project either on the ceiling or on a
wall. Depending on the distance to the projection surface you might need to adjust the focus to get a sharp image. You can turn the rugged ring on the side of the clock to change the focus.
By pressing the button at the top of the clock, the projected image can be ipped.
Keep the lens clean as accumulated dust will decrease readability. Use the device at night or in a dark place. Do not look into lens when it is lit.
If you connect an external adaptor to the socket at the back, you can use the projector continuously. Make sure to use a 4.5 Volt adaptor with the polarity as indicated by the sign. Recommended adaptor type: SAX 500, SAX 500D, SAX 800…
Background light
When the clock is in the default mode, pressing the POJECTOR ON/OFF button at the top will turn off the display’s background light for 5 seconds.
reverting to Factory deFaults
If you encounter an inexplicable malfunction (e.g., unusual icons are displayed or the device does not react when a button is pressed), press the RESET button at the back using a thin, pointed object (e.g., a pin).
Battery status disPlay
When the batteries in the device need to be replaced, the display will show a low power icon ( ). When this happens, it is recommended to replace the batteries. Only long-life alkaloid batteries are recommended. Do not mix batteries that are of a different
type or have been used for different amounts of time.
warnings
• When selecting the location of the device, consider the signal strength of the atomic clock.
• Do not place it next to large metal objects as these can block radio signals.
• The presence of certain electronic equipment nearby (e.g., uorescent lamps, TV sets, computers) can interfere with the clock.
• Do not expose the device to direct sunlight or heat.
• Do not place it next to an air conditioner, heater or fan.
• For indoor use only.
• Protect from water, humidity, shocks, vibration and aggressive detergents.
• When the display becomes faint or the background light is weak, replace the batteries. Preferably use alkaloid batteries.
technical ParaMeters
clock: DCF-77 radio signal control, quartz clock
precision: ± 1 second / 1 million years
temperature range: -5 + 50°C
resolution: 0,1 °C
power supply: 2 x AA (1,5 V) batteries (not included)
size of the device/display: 140 x 100 x 35 / 60 x 30 mm
Page 3
D
4
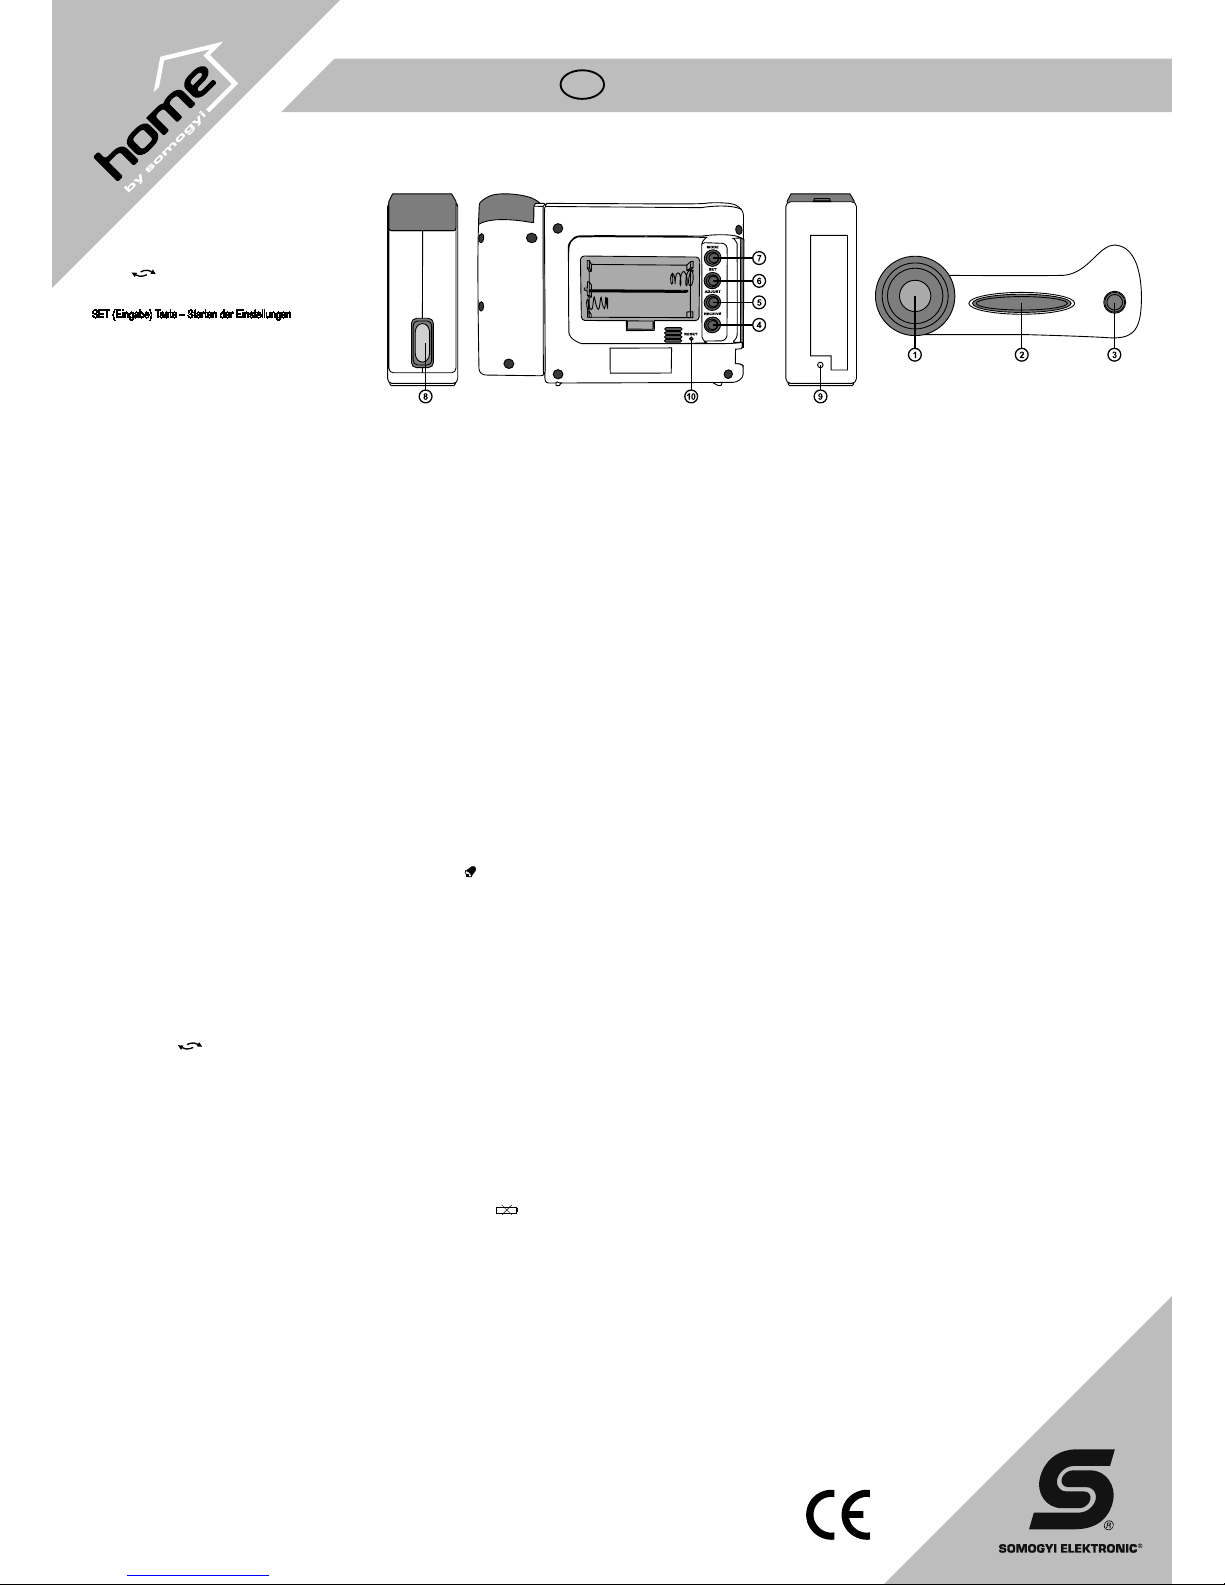
Jellemzők:
Projektion von Zeit und Datum an die Wand • Schwenkbare und Fokussierbare Projektion • DCF-77 (Frankfurt) Funksteuerung • Kalender (Monat, Tag, Wochentag) und Wecker • Anzeige der Batterieladung • Große,
Zweizeilen-Anzeige • Blaue Hintergrundbeleuchtung
tartozékok:
1. PROJECTOR (Projektor)
2. PROJECTOR ON/OFF Zz (Projektor Ein/Aus- und
Schlummer-) Taste – Einschalten des Projektors
und Verwendung der Schlummerfunktion
3.
(Spiegeln) Taste – Spiegeln des projektierten Bildes
4. RECEIVE (Synchronisieren) Taste – Starten der Synchronisation
5. ADJUST (Einstellung) Taste – Schrittweise weitergehen
6.
SET (Eingabe) Taste – Starten der Einstellungen
7. MODE (Mód) gomb - beállítások érvényesítése
8. FOCUS (Fókusz) – kivetített kép élesítése
9. DC 4,5V (Adapter csatlakozó)
10. RESET (Reset) gomb - alaphelyzetbe állítás
táPellátás, szinkronizálás
A készülék hátlapján található elemtartó fedelének eltávolítása után - a megadott polaritásnak megfelelően - helyezzen be két darab AA méretű elemet, majd zárja vissza az elemtartót. Hangjelzést követően alaphelyzetbe áll a készülék, elindul az óra. A másodpercek felett villogó adótorony szimbólum azt jelenti, hogy elindult az önműködő beállítási folyamat, a készülék keresi a rádiójel vezérlést sugárzó adótorony jelét.*
Megfelelő működés esetén a torony körül rádióhullámok is láthatóak. Amennyiben ez utóbbiak nem jelennek meg, az azt jelenti, hogy az adott használati helyen rosszak a vételi viszonyok. Ez esetben próbálja meg a készüléket elfordítani, esetleg máshova
áthelyezni. (Az óra beépített ferritantennával rendelkezik, hasonlóan az AM rádiókészülékekhez.) A vételi viszonyoktól függően a szinkronizálás 2-10 percig is eltarthat. Utána az adótorony jele már folyamatosan látható. A készülék hátlapján található RECEIVE
gomb megnyomásával indítható a szinkronizálás.
Figyelem! A szinkronizálás alatt semmilyen funkciót sem lehet manuálisan beállítani!
*A rádiójel vezérlésű órák a hagyományos kvarc óramű mellett rendelkeznek egy beépített speciális rádióvevővel is. Ez a Mainingenben működő (Németország, Frankfurt mellett) DCF-77 elnevezésű adótorony által sugárzott rádiójelet veszi és ez alapján –
rendszeres időközönként – korrigálja a pontos idő beállítását. Mivel a rádiójelek egy atomóra kódolt információit hordozzák, az ilyen típusú készülékek atomóra pontossággal rendelkeznek. A pontos időtől való eltérés 1 millió év alatt max. ± 1 másodperc lehet.
Az adótorony 1500 km-es körzetében biztosított a jó minőségű vétel. Amennyiben a használati helyen vételkiesés történne, hagyományos kvarcóraként működnek tovább.
az óra kézi Beállítása
1. Győződjön meg róla, hogy a rádiójel vezérlés ki van kapcsolva (nem látható az adótorony) és a kijelző alsó sora a dátumot mutatja.
2. Az ADJUST gomb megnyomása után tartsa nyomva a SET gombot 2 másodpercig és elkezd villogni az évszám négy számjegye, amit az ADJUST billentyűvel lehet előre léptetni. A megfelelő értéknél nyomja meg a MODE gombot.
3. Következő lépés a dátum megadása: tartsa nyomva 2 másodpercig a SET gombot, majd léptessen vele a nap, hónap ikonokig. Az ADJUST billentyűvel lehet előre léptetni ismét. A megfelelő értéknél szintén a MODE gombbal lehet rögzíteni.
4. A hét napjainak nyelvét szintén a SET gombbal tudjuk állítani. Megjelenítése történhet angol (GB), német (DE), francia (FR), olasz (IT) és spanyol (ES) nyelven. Léptetés szintén az ADJUST, rögzítés a MODE gombbal.
5. A következő fázisban lehetőség van 12 vagy 24 órás időkijelzés kiválasztására a SET gombbal; léptetés az ADJUST, rögzítés a MODE gombbal.
6. Pontos idő beállítása a SET gombbal történő léptetés után az ADJUST gombbal érhető el, rögzítés szintén a MODE gombbal történik.
7. A MODE utolsó megnyomása rögzíti a megadott adatokat, a kijelző a pontos időt és a dátumot mutatja.
Megjegyzés:
– ha távolabbi értéket keres – a beállítás felgyorsításához – tartsa lenyomva a léptető gombot.
– amennyiben 5 másodpercig nem történik adatbevitel, visszakapcsol alaphelyzetbe (óra- és dátumkijelzés).
éBresztés Beállítása
Alaphelyzetben a MODE gomb megnyomásával hívja le az ébresztési időt.
1. Tartsa nyomva 2 másodpercig a SET gombot, majd villogni kezd az óra kijelzése.
2. Az ADJUST gomb használatával lehet léptetni a kívánt értékre.
3. A SET gomb ismételt megnyomásával lehet átváltani percre és megismételni az előző műveletet.
4. Ha elértük a kívánt ébresztési értéket, a MODE gomb használatával tudjuk memorizálni az adatokat.
5. A MODE ismételt megnyomásával kiléphetünk a készenléti állapotba.
éBresztés, szundi üzeMMód használata
Alaphelyzetben a MODE gomb megnyomásával hívja le az ébresztési időt.
1. Az ADJUST gomb egyszeri megnyomásával aktiválhatja a beállított értéket, megjelenik az (
) a kijelzőn.
2. Az ADJUST gomb ismételt megnyomásával aktiválhatja a szundi üzemmódot, megjelenik a „szundi ikon” (Zz) a kijelzőn. Mikor aktiváltuk ezt a funkciót, az ébresztés 5 lépésben erősödő hangja 4-szer ismétlődik meg 5 percenként. Az ébresztési hang
120 másodpercig hallható.
3. Az ADJUST gomb harmadszori megnyomásával tudjuk érvényteleníteni az ébresztést.
4. Az ébresztés hangjelzése bármelyik gombbal kikapcsolható és a szundi üzemmód is aktív marad.
Hőmérséklet mérése
A kijelző jobb alsó sarkában folyamatosan a belső hőmérséklet látható °C fokban kifejezve. A leolvasás pontossága 0,1°C.
A mértékegységet alaphelyzetben a SET gomb megnyomásával lehet változtatni Fahrenheit és Celsius között.
Vetítő Használata
PROJECTOR ON/OFF gomb benyomásakor 5 másodpercig kivetítésre kerül a pontos idő és a hőmérséklet. 3 másodperces nyomva tartása esetén a háttérvilágítás 5 másodpercig, a vetítés pedig 30 percig aktív. A javasolt vetítési távolság 1-3 méter közötti.
A kivetítő forgatásával lehetőség van nem csak mennyezetre, hanem oldalfalra is vetíteni. A megcélzott felület távolságától függően az éles kép eléréséhez szükség lehet a fókusz beállítására. Erre szolgál az óra oldalán található recés gyűrű.
Az óra tetején található
gomb megnyomásával a kivetített képet tükrözni tudjuk a kívánt kép eléréséhez.
Tartsa tisztán a lencsét, a rárakódott por csökkenti az olvashatóságot! Alkalmazza este, illetve sötétített helyiségben! Ne nézzen a világító lencsébe!
Folyamatos vetítés valósítható meg, ha külső hálózati adaptert csatlakoztat a hátsó aljzatba. Ügyeljen arra, hogy a jelölés szerinti polaritást és 4,5 Voltos feszültséget állítson be. Javasolt típus: SAX 500, SAX 500D, SAX 800…
háttérvilágítás
Normál működés közben, a készülék tetején található POJECTOR ON/OFF gomb megnyomását követően 5 másodpercig megvilágításra kerül a kijelző.
alaPhelyzetBe állítás
Ha megmagyarázhatatlan működési rendellenességet tapasztal (pl. a kijelzőn szokatlan ábrák jelennek meg, vagy a készülék nem reagál gombnyomásra), nyomja be egy vékony, hegyes eszközzel (pl. gombostű) az óra hátlapján található RESET gombot.
eleM-állaPot Megjelenítése
Ha a készülékben lévő elemek cserére szorulnak, a kijelzőn megjelenik az „alacsony töltöttség” ikon (
). Ilyenkor célszerű az elemek cseréje. Kizárólag tartós, alkáli elemek használata ajánlott. Ne keverjen különböző típusú és állapotú elemeket.
FigyelMeztetések
• A készülék elhelyezésekor vegye gyelembe az „atomóra” működéséhez szükséges megfelelő vételi viszonyok meglétét!
• Ne tegye nagyobb fém felület közelébe, mert az leárnyékolhatja a rádióhullámok terjedését!
• Egyes elektromos berendezések közelsége zavarhatja az óra korrekt működését (pl. fénycső, televízió, számítógép...).
• Ne érje közvetlenül napfény vagy hőhatás!
• Ne helyezze légkondicionáló, fűtőberendezés vagy ventilátor közelébe!
• Csak beltéri használatra alkalmas!
• Óvja víztől, párától, ütéstől, rázkódástól és agresszív tisztítószerektől!
• Elhalványuló kijelző vagy gyengülő háttérvilágítás esetén cserélje ki az elemeket! Lehetőség szerint alkáli típusokat használjon!
mŰszakI aDatOk
óra: DCF-77 rádiójel vezérlés, kvarc óramű
pontosság: ± 1 mp / 1 millió év
hőmérséklettartomány: -5 + 50°C
felbontás: 0,1 °C
tápellátás: 2 x AA (1,5V) elem (nem tartozék)
készülék/kijelző mérete: 140 x 100 x 35 / 60 x 30 mm
Page 4

H
4
Jellemzők:
pontos idő és dátum kivetítése a falra • elforgatható és fókuszálható kivetítés • DCF-77 (Frankfurt) rádiójel vezérlés • naptár (hónap, nap, hét napja) és ébresztőóra • elemállapot megjelenítése • nagyméretű, két soros
kijelző • kék háttérvilágítás
tartozékok:
1. PROJECTOR (Projektor)
2. PROJECTOR ON/OFF Zz
(Projektor be/ki és szundi) gomb - projektor indítása,
szundi üzemmód használata
3.
(Tükrözés) gomb - kivetített kép tükrözése
4. RECEIVE (Szinkronizálás) gomb - szinkronizálás indítása
5. ADJUST (Beállítás) gomb – léptetés
6. SET (Beírás) gomb - beállítások indítása
7. MODE (Mód) gomb - beállítások érvényesítése
8. FOCUS (Fókusz) – kivetített kép élesítése
9. DC 4,5V (Adapter csatlakozó)
10. RESET (Reset) gomb - alaphelyzetbe állítás
táPellátás, szinkronizálás
A készülék hátlapján található elemtartó fedelének eltávolítása után - a megadott polaritásnak megfelelően - helyezzen be két darab AA méretű elemet, majd zárja vissza az elemtartót. Hangjelzést követően alaphelyzetbe áll a készülék, elindul az óra. A másodpercek felett villogó adótorony szimbólum azt jelenti, hogy elindult az önműködő beállítási folyamat, a készülék keresi a rádiójel vezérlést sugárzó adótorony jelét.*
Megfelelő működés esetén a torony körül rádióhullámok is láthatóak. Amennyiben ez utóbbiak nem jelennek meg, az azt jelenti, hogy az adott használati helyen rosszak a vételi viszonyok. Ez esetben próbálja meg a készüléket elfordítani, esetleg máshova
áthelyezni. (Az óra beépített ferritantennával rendelkezik, hasonlóan az AM rádiókészülékekhez.) A vételi viszonyoktól függően a szinkronizálás 2-10 percig is eltarthat. Utána az adótorony jele már folyamatosan látható. A készülék hátlapján található RECEIVE
gomb megnyomásával indítható a szinkronizálás.
Figyelem! A szinkronizálás alatt semmilyen funkciót sem lehet manuálisan beállítani!
*A rádiójel vezérlésű órák a hagyományos kvarc óramű mellett rendelkeznek egy beépített speciális rádióvevővel is. Ez a Mainingenben működő (Németország, Frankfurt mellett) DCF-77 elnevezésű adótorony által sugárzott rádiójelet veszi és ez alapján –
rendszeres időközönként – korrigálja a pontos idő beállítását. Mivel a rádiójelek egy atomóra kódolt információit hordozzák, az ilyen típusú készülékek atomóra pontossággal rendelkeznek. A pontos időtől való eltérés 1 millió év alatt max. ± 1 másodperc lehet.
Az adótorony 1500 km-es körzetében biztosított a jó minőségű vétel. Amennyiben a használati helyen vételkiesés történne, hagyományos kvarcóraként működnek tovább.
az óra kézi Beállítása
1. Győződjön meg róla, hogy a rádiójel vezérlés ki van kapcsolva (nem látható az adótorony) és a kijelző alsó sora a dátumot mutatja.
2. Az ADJUST gomb megnyomása után tartsa nyomva a SET gombot 2 másodpercig és elkezd villogni az évszám négy számjegye, amit az ADJUST billentyűvel lehet előre léptetni. A megfelelő értéknél nyomja meg a MODE gombot.
3. Következő lépés a dátum megadása: tartsa nyomva 2 másodpercig a SET gombot, majd léptessen vele a nap, hónap ikonokig. Az ADJUST billentyűvel lehet előre léptetni ismét. A megfelelő értéknél szintén a MODE gombbal lehet rögzíteni.
4. A hét napjainak nyelvét szintén a SET gombbal tudjuk állítani. Megjelenítése történhet angol (GB), német (DE), francia (FR), olasz (IT) és spanyol (ES) nyelven. Léptetés szintén az ADJUST, rögzítés a MODE gombbal.
5. A következő fázisban lehetőség van 12 vagy 24 órás időkijelzés kiválasztására a SET gombbal; léptetés az ADJUST, rögzítés a MODE gombbal.
6. Pontos idő beállítása a SET gombbal történő léptetés után az ADJUST gombbal érhető el, rögzítés szintén a MODE gombbal történik.
7. A MODE utolsó megnyomása rögzíti a megadott adatokat, a kijelző a pontos időt és a dátumot mutatja.
Megjegyzés:
– ha távolabbi értéket keres – a beállítás felgyorsításához – tartsa lenyomva a léptető gombot.
– amennyiben 5 másodpercig nem történik adatbevitel, visszakapcsol alaphelyzetbe (óra- és dátumkijelzés).
éBresztés Beállítása
Alaphelyzetben a MODE gomb megnyomásával hívja le az ébresztési időt.
1. Tartsa nyomva 2 másodpercig a SET gombot, majd villogni kezd az óra kijelzése.
2. Az ADJUST gomb használatával lehet léptetni a kívánt értékre.
3. A SET gomb ismételt megnyomásával lehet átváltani percre és megismételni az előző műveletet.
4. Ha elértük a kívánt ébresztési értéket, a MODE gomb használatával tudjuk memorizálni az adatokat.
5. A MODE ismételt megnyomásával kiléphetünk a készenléti állapotba.
éBresztés, szundi üzeMMód használata
Alaphelyzetben a MODE gomb megnyomásával hívja le az ébresztési időt.
1. Az ADJUST gomb egyszeri megnyomásával aktiválhatja a beállított értéket, megjelenik az (
) a kijelzőn.
2. Az ADJUST gomb ismételt megnyomásával aktiválhatja a szundi üzemmódot, megjelenik a „szundi ikon” (Zz) a kijelzőn. Mikor aktiváltuk ezt a funkciót, az ébresztés 5 lépésben erősödő hangja 4-szer ismétlődik meg 5 percenként. Az ébresztési hang
120 másodpercig hallható.
3. Az ADJUST gomb harmadszori megnyomásával tudjuk érvényteleníteni az ébresztést.
4. Az ébresztés hangjelzése bármelyik gombbal kikapcsolható és a szundi üzemmód is aktív marad.
Hőmérséklet mérése
A kijelző jobb alsó sarkában folyamatosan a belső hőmérséklet látható °C fokban kifejezve. A leolvasás pontossága 0,1°C.
A mértékegységet alaphelyzetben a SET gomb megnyomásával lehet változtatni Fahrenheit és Celsius között.
Vetítő Használata
PROJECTOR ON/OFF gomb benyomásakor 5 másodpercig kivetítésre kerül a pontos idő és a hőmérséklet. 3 másodperces nyomva tartása esetén a háttérvilágítás 5 másodpercig, a vetítés pedig 30 percig aktív. A javasolt vetítési távolság 1-3 méter közötti.
A kivetítő forgatásával lehetőség van nem csak mennyezetre, hanem oldalfalra is vetíteni. A megcélzott felület távolságától függően az éles kép eléréséhez szükség lehet a fókusz beállítására. Erre szolgál az óra oldalán található recés gyűrű.
Az óra tetején található gomb megnyomásával a kivetített képet tükrözni tudjuk a kívánt kép eléréséhez.
Tartsa tisztán a lencsét, a rárakódott por csökkenti az olvashatóságot! Alkalmazza este, illetve sötétített helyiségben! Ne nézzen a világító lencsébe!
Folyamatos vetítés valósítható meg, ha külső hálózati adaptert csatlakoztat a hátsó aljzatba. Ügyeljen arra, hogy a jelölés szerinti polaritást és 4,5 Voltos feszültséget állítson be. Javasolt típus: SAX 500, SAX 500D, SAX 800…
háttérvilágítás
Normál működés közben, a készülék tetején található POJECTOR ON/OFF gomb megnyomását követően 5 másodpercig megvilágításra kerül a kijelző.
alaPhelyzetBe állítás
Ha megmagyarázhatatlan működési rendellenességet tapasztal (pl. a kijelzőn szokatlan ábrák jelennek meg, vagy a készülék nem reagál gombnyomásra), nyomja be egy vékony, hegyes eszközzel (pl. gombostű) az óra hátlapján található RESET gombot.
eleM-állaPot Megjelenítése
Ha a készülékben lévő elemek cserére szorulnak, a kijelzőn megjelenik az „alacsony töltöttség” ikon ( ). Ilyenkor célszerű az elemek cseréje. Kizárólag tartós, alkáli elemek használata ajánlott. Ne keverjen különböző típusú és állapotú elemeket.
FigyelMeztetések
• A készülék elhelyezésekor vegye gyelembe az „atomóra” működéséhez szükséges megfelelő vételi viszonyok meglétét!
• Ne tegye nagyobb fém felület közelébe, mert az leárnyékolhatja a rádióhullámok terjedését!
• Egyes elektromos berendezések közelsége zavarhatja az óra korrekt működését (pl. fénycső, televízió, számítógép...).
• Ne érje közvetlenül napfény vagy hőhatás!
• Ne helyezze légkondicionáló, fűtőberendezés vagy ventilátor közelébe!
• Csak beltéri használatra alkalmas!
• Óvja víztől, párától, ütéstől, rázkódástól és agresszív tisztítószerektől!
• Elhalványuló kijelző vagy gyengülő háttérvilágítás esetén cserélje ki az elemeket! Lehetőség szerint alkáli típusokat használjon!
mŰszakI aDatOk
óra: DCF-77 rádiójel vezérlés, kvarc óramű
pontosság: ± 1 mp / 1 millió év
hőmérséklettartomány: -5 + 50°C
felbontás: 0,1 °C
tápellátás: 2 x AA (1,5V) elem (nem tartozék)
készülék/kijelző mérete: 140 x 100 x 35 / 60 x 30 mm
Engedélyszám: S5998K524
Page 5

RO
4
Jellemzők:
proiectează pe perete ora exactă şi temperatura • proiectarea este mobilă şi poate focusată • comandă prin unde radio DCF-77 (Frankfurt) • calendar (luna, ziua, ziua săptămânii) şi alarmă • indică nivelul de încărcare
a bateriei • aşaj mare, pe două rânduri • iluminare albastră de fond
denuMirile Pe iMagine:
1. PROJECTOR (Proiector)
2. PROJECTION ON/OFF Zz
(Proiector pornit/oprit şi somn) buton – pornirea
proiectorului, folosirea modului de funcţionare somn
3. (Reectare) buton – reectarea imaginii proiectate
4. RECEIVE (Sincronizare) buton – pornirea sincronizării
5. ADJUST (Reglare) buton – modicare
6. SET (Setare) buton – pornirea reglărilor
7. MODE (Mod) buton – validarea reglărilor
8. FOCUS (Focus) – reglarea acuităţii imaginii proiectate
9. DC 4,5 V (Racord adaptor)
10. RESET (Reset) buton - reglare în poziţia de bază
aliMentare, sincronizare
După îndepărtarea capacului de susţinere a bateriilor, aat pe partea din spate a aparatului – corespunzător polarităţii indicate -, introduceţi două bucăţi de baterii de mărimea AA şi puneţi înapoi capacul de susţinere a bateriilor. După semnalizare sonoră aparatul
va în poziţia de bază, ceasul va porni. Simbolul de turn de emisie ce se aă peste semnalizarea secundelor indică, că a pornit procesul de reglare automată, aparatul caută semnalul turnului de emisie care emite comanda prin unde de radio.*
Dacă funcţionarea este corespunzătoare pot văzute unde radio în jurul turnului. Dacă acestea nu apar, înseamnă că în locul respectiv de folosire condiţiile de recepţie sunt proaste. În acest caz încercaţi să întoarceţi aparatul sau puneţi-l altundeva. (Ceasul
dispune de antenă de ferită montată, asemenea aparatelor de radio AM). În funcţie de condiţiile de recepţie sincronizarea poate dura şi 2-10 minute. După aceea semnul turnului de emisie deja poate văzut constant. Prin apăsarea butonului RECEIVE care
se aă in partea din spate a aparatului poate pornită sincronizarea.
Atenţie! În timpul sincronizării niciun fel de funcţie nu poate reglată manual!
* Ceasurile cu comandă prin unde radio pe lângă mecanismul de ceasornic din cuarţ dispun şi de un receptor special de radiodifuziune. Aceasta preia semnalul radio emis de turnul de emisie cu denumirea DCF-77 care funcţionează în Mainingen (Germania,
lângă Frankfurt) şi în funcţie de acesta – la intervale regulate – corectează reglarea orei exacte. Fiindcă semnalele radio au încorporate informaţiile codicate ale unui ceas atomic, aparatele de acest tip au exactitatea ceasului atomic. La 1 milion de an abaterea
de la ora exactă poate de max. ±1 secundă.
În rază de 1500 km de la turnul de emisie recepţia de calitate bună este asigurată. În cazul în care la locul de folosire ar o scădere de recepţie, aparatele funcţionează în continuare ca ceas de cuarţ tradiţional.
reglarea manuală a ceasuluI
1. Vericaţi ca comanda prin unde radio să e oprită (turnul de emisie nu apare) şi rândul de jos de pe ecran arată data.
2. După apăsarea butonului ADJUST timp de 2 secunde ţineţi apăsat butonul SET şi cele patru cifre ale anului vor începe să clipească. Acestea pot modicate prin butonul ADJUST. La valoarea corespunzătoare xaţi cu butonul MODE.
3. Următorul pas este indicarea datei: timp de 2 secunde ţineţi apăsat butonul SET, după aceea mutaţi până la simbolurile ziuă, lună. Cu butonul ADJUST puteţi din nou să modicaţi. La valoarea corespunzătoare din nou xaţi cu butonul MODE.
4. Limba zilelor săptămânii de asemenea puteţi să reglaţi cu butonul SET. Limbile sunt: engleză (GB), germană (DE), franceză (FR), italiană (IT) şi spaniolă (SP). Modicarea de asemenea va avea loc prin ADJUST, xarea cu butonul MODE.
5. În următoarea fază cu butonul SET puteţi să selectaţi semnalizarea timpului în regim de 12 sau 24 de ore. Modicarea de asemenea va avea loc prin ADJUST, xarea cu butonul MODE.
6. După modicarea prin butonul ADJUST puteţi să setaţi ora exactă prin butonul SET, xarea de asemenea va avea loc cu butonul MODE.
7. Ultima apăsare a butonului MODE xează valorile indicate, ecranul va arăta ora şi data exactă.
Menţiune:
– dacă căutaţi alte valori – pentru accelerarea reglării – ţineţi apăsat butonul ADJUST
– în cazul în care timp de 5 secunde nu sunt modicate datele, aparatul revine la starea iniţială (indicarea ceasului şi a datei)
reglarea alarMei ceasului
În poziţia de bază prin apăsarea butonului MODE xaţi deşteptătorul.
1. Timp de 2 secunde ţineţi apăsat butonul SET, după aceea ora va începe să clipească.
2. Prin folosirea butonului ADJUST puteţi să modicaţi la valoarea dorită.
3. Prin apăsarea repetată a butonului SET puteţi să treceţi la minute şi repetaţi procedura precedentă.
4. La valoarea de deşteptare dorită cu ajutorul butonului MODE puteţi memora datele.
5. Prin apăsarea repetată a butonului MODE puteţi să treceţi în starea iniţială.
DeşteptătOrul, fOlOsIrea mODuluI De funcţIOnare sOmn
În poziţia de bază prin apăsarea butonului MODE xaţi deşteptătorul.
1. Apăsând o singură dată butonul ADJUST puteţi activa valoarea reglată şi pe ecran va apărea „simbolul deşteptător”.
2. Prin apăsarea repetată a butonului ADJUST puteţi activa modul de funcţionare somn şi pe ecran va apărea „simbolul somn” Zz. La activarea acestei funcţii la intervale de 5 minute semnalul ceasului deşteptător se va repeta de 4 ori cu sonor crescând în 5 paşi.
3. Apăsând a treia oară butonul ADJUST puteţi anula deşteptarea.
4. Semnalul sonor al ceasului deşteptător poate oprit cu oricare din butoane şi modul de funcţionare somn va rămâne activ.
măsurarea temperaturII
Jos, pe partea dreaptă a ecranului în mod constant poate văzută temperatura interioară exprimată în 0C. Exactitatea măsurării este de 0,1 0C.
În poziţia de bază unitatea de măsură poate schimbată între Fahrenheit şi Celsius prin apăsarea butonului SET.
Folosirea Proiectorului
La apăsarea butonului PROJECTION ON/OFF timp de 5 secunde ora şi temperatura exactă va proiectată. În cazul în care ţineţi apăsat timp de 3 secunde fondul va iluminat timp de 5 secunde şi proiectarea va activă timp de 30 de minute. Distanţa de
proiectare recomandată este de 1-3 metri. Prin rotirea proiectorului puteţi proiecta atât pe tavan, cât şi pe pereţii laterali. În funcţie de distanţa suprafeţei vizate pentru stabilirea acuităţii imaginii poate nevoie de reglarea focusului. Pentru aceasta este inelul
striat care se aă pe partea laterală a ceasului. Prin apăsarea butonului care se aă pe capacul ceasului puteţi reecta imaginea proiectată pentru atingerea imaginii dorite.
Aveţi grijă ca lentila să e curăţată, praful depus pe aceasta reduce claritatea! Folosiţi-l seara în încăpere întunecată! Nu vă uitaţi în lentila luminoasă!
Puteţi să realizaţi o proiectare constantă în cazul în care racordaţi un adaptor în partea din spate. Aveţi grijă să utilizaţi polaritatea conform marcării şi tensiunea de 4.5 Volt. Tipul recomandat: SAX 500, SAX 500D, SAX 800…
iluMinarea de Fond
În timpul funcţionării normale după apăsarea butonului PROJECTION ON / OFF timp de 5 secunde ecranul va luminat.
reglarea în pOzIţIa De bază
În cazul în care experimentaţi o disfuncţie neobişnuită (de exemplu pe ecran apar simboluri ciudate sau aparatul nu reacţionează la apăsarea butonului), cu un instrument subţire, ascuţit (de exemplu un ac de gămălie) apăsaţi butonul RESET care se aă în
partea din spate a ceasului.
vizualizarea nivelului Bateriei
În cazul în care bateriile aate în aparat necesită schimbare, pe ecran va apărea simbolul „încărcare scăzută”. În astfel de situaţii este recomandată schimbarea bateriilor. Recomandăm să folosiţi exclusiv baterii durabile, alcaline. Nu folosiţi amestecat baterii de
diverse tipuri şi cu diverse nivele de încărcare.
avertisMente
• La alegerea locului de aşezare a aparatului aveţi grijă să existe circumstanţele de recepţie corespunzătoare necesare pentru funcţionarea „ceasului atomic”.
• Nu-l aşezaţi în apropiere de suprafeţe din metal, indcă aceasta inuenţează negativ propagarea undelor radio.
• Apropierea altor aparate electronice poate să inuenţeze funcţionarea corectă a ceasului (de exemplu: neon, televizor, calculator …).
• A se feri de razele soarelui sau de efecte termice.
• Nu-l aşezaţi în apropierea aparatului de aer condiţionat, de instalaţie de încălzire sau de ventilator!
• Numai pentru uz intern!
• A se feri de aburi, de lovire, de scuturare şi de produse de curăţat agresive!
• În cazul în care ecranul nu mai luminează corespunzător sau iluminarea de fond este mai slabă, schimbaţi bateriile! Dacă puteţi folosiţi numai baterii alcaline!
date tehnice
Ora: DCF-77 comandă prin unde radio, mecanism de ceasornic din cuarţ
Exactitatea: ±1 secundă/1 milion de an
Domeniu de temperatură: -5 + 50 0C
Defalcare: 0,1 0C
Alimentare: 2 x AA (1,5 V) baterie (nu este accesoriu)
Dimensiunea aparatului/ecranului: 140 x 100 x 35/60 x 30 mm
Page 6

SRB
4
Jellemzők:
Projekcija tačnog vremena i datuma na zid • Okretljiv projektor sa fokusom • Radio kontrola DCF-77 (Frankfurt) • Kalendar (mesec, dan, dan u nedelji) i budilnik • Prikaz stanja baterije • Dvoredni displej velikih dimenzija
• Plavo pozadinski osvetljenje
siMBoli na skici:
1. PROJECTOR (Projektor)
2. PROJECTOR ON/OFF Zz
(Uključenje isključenje projektora i odloženo zvonjenje)
3.
(Ogledalo) taster – rotiranje projekcije
4. RECEIVE (Sinkronizacija) taster – pokretanje sinkronizacije
5. ADJUST (Podešavanje) taster – koračanje
6. SET (Upis) taster – pokretanje podešavanja
7. MODE (Mod) taster – potvrđivanje podešavanja
8. FOCUS (Fokus) – fokusiranje projektovane slike
9. DC 4,5V (Utičnica za napajanje)
10. RESET (Reset) taster – postavljanje u početno stanje
naPajanje, sinhronizacija
Odstranite poklopac baterje sa poleđine uređaja. Pazeći na polaritet postavite dve baterije AA tipa i vratite poklopac. Nakon zvučnog signala sat je spreman za podešavanja (sat je pokrenut). Simbol tornja iznad pokazivača sekundi pokazuje da je sat automatski
započeo sinhronizaciju tačnog vremena (traži se signal predajnika). *
Ukoliko je sinkhonizacija dobra oko simbola antene se mogu videti simboli radio talasa. Ukoliko se ne vide simboli radio talasa nema prijema signala. U tom slučaju promenite poziciju ili mesto sata. (Sat ima ugrađenu feritnu antenu sličnu onim u FM prijemnicima).
U zavisnosti od prijema, sinhronizacija može da traje od 2-10 minuta. Nakon uspešne sinhronizacije simbol tornja konstantno svetli.Ponovnu sinhronizaciju možete pokrenuti tasterom na poleđini sata RECEIVE.
Napomena! Dok traje sinhronizacija druge funkcije nisu dostupne!
*Radiokontrolisani satovi pored klasičnih kvarcnih satova imaju ugrađen prijemnik koji u određenim intervalima prima signala tačnog vremena i koriguje na vašem satu. Predajnik se nalazi u Mainingenu pored Frankfurta u Nemačkoj, predajnik je nazvan DCF-77.
Pošto primljeni signali potiču od jednog “atomskog sata “ odstupanje je ± 1sekunda u roku od milion godina.
Predajnik šalje signal u krugu od 1500 km ukoliko se sat (prijemnik) nalazi izvan dometa predajnika, sat funkcioniše kao običan kvarcni sat.
ručnO pODešaVanJe sata
1. Uverite se da je isključena automatska sinhronizacija (nema simbola predajnika na displeju) i da donji red na displeju pokazuje datum.
2. Nakon pritiska tastera ADJUST držite pritisnut taster SET. Nakon dve sekunde počeće treptati ispis za godinu koju podešavate tasterom ADJUST. Nakon podešavanja pritisnite MOD taster.
3. Sledeći korak je podešavanje datuma. Držite pritisnuto dve sekunde taster SET i koračajte sa tasterom SET između dana i meseca. Sa ADJUST tasterom podešavamo, a sa MODE tasterom potvrđujemo podešavanje.
4. Moguće je odrediti jezik za ispis dana. Podešavanje se isto vrši sa tasterom SET. Mogući jezici su: engleski (GB), nemački (DE), francuski (FR), italijanski (IT) i španski (ES). Odabir se radi sa ADJUST tasterom a potvrđivanje tasterom MODE.
5. U sledećoj fazi se sa SET tasterom može menjati način prikaza vremena (12 ili 24 sata). Koračanje se radi sa ADJUST tasterom a potvrđivanje tasterom MODE.
6. Podešavnje tačnog vremena isto radimo uz pomoć tastera ADJUST i potvrđujemo tasterom MODE.
7. Zadnjim pritiskom tastera MODE potvrđujemo sve unete podatke i na displeju se može očitati tačno namešteno vreme i datum.
Napomena:
– Za brzo biranje vrednosti držite pritisnutio taster za koračanje
– Ukoliko se u roku od pet sekundi ne unesei podatak, sat se automatski vraća u osnovni položaj (sat, datum)
pODešaVanJe buDIlnIka
U osnovnom položaju (sat, datum) pritiskom tastera MODE pozivate namešteno buđenje.
1. Držite pritisnuto dve sekunde taster SET. Nakon toga počinje treptati ispis sata.
2. Korišćenjem tastera ADJUST možete koračati na željenu vrednost.
3. Pritiskom tastera SET možete preći na podešavanje minuta. Podešavanje minuta vršimo istim postupkom kao i nameštanje sata.
4. Nakon nameštanja vremena buđenja unete podatke potvrdite MODE tasterom.
5. Ponovnim pritiskom MODE tastera vraćate sa u osnovni položaj sata (sat, datum).
kOrIšćenJe buDIlnIka I ODlOženOg buđenJa
U osnovnom položaju (sat, datum) pritiskom tastera MODE pozivate aktivaciju budilnika.
1. Jednim pritiskom tastera ADJUST aktiviramo budilnik. Na displeju se pojavljulje ikonica za budilnik .
2. Ponovnim pritiskom ADJUST tastera aktivira se odloženo buđenje i na displeju se pojavljulje ikonica Zz . Kada je ova funkcija aktivirana buđenje je u intervalima od 5 minuta a zvuk buđenja se čuje svaki put 120 sekundi.
3. Trećim pritiskom tastera ADJUST možete deaktivirati budilnik.
4. U toku buđenja zvuk budilnika se može isključiti bilo kojim tasterom ali funkcija odloženog buđenja ostaje aktivna (ukoliko je uključena).
Merenje teMPerature
Unutrašnja temperatura se može konstantno očitati u desnom dolnjem uglu displeja u °C. Tačnost očitavanja je 0,1°C.
Jedinicu mere možete menjati tasterom SET (Fahrenhait i Celsius).
kOrIšćenJe prOJektOra
Tasterom PROJECTOR ON/OFF možete uključiti prijektor u trajanju od pet sekundi. Kada se projektuje tačno vreme i datum preporučena razdaljina je 1-3 m. Okretanjem projektora možete projektovati na samo na plafon nego i na zid. U Zavisnosti od razdaljine
moguće je podešavanje fokusa radi oštre slike. Foku se podešava prstenom na projektoru.
Na gornjoj strani sata se nalazi taster kojim možete okreteti projektovanu sliku.
Sočivo uvek držite čisto. Prljavo sočivo kvari kvalitet projekcije! Projektovana slika je čitka u tamnim i mračnim prostorijama! Ne gledajte direktno u projektor!
Konstantna projekcija se postiže korišćenjem spoljnjeg strujnog adaptera. Obratite pažnju na polaritet i na napon koji treba da bude 4.5 V. Preporučijemo strujne adaptere sa oznakom:
SAX 500, SAX 500D, SAX 800…
Pozadinsko osvetljenje
Pozadinsko osvetljenje se uključuje sa tasterom POJECTOR ON/OFF u trajanju od 5 sekunde.
resetovanje sata
Ukoliko se na displeju pojavljulju nedenisani simboli ili sat ne reaguje na tastere imate mogućnost resetovanja čitavog sata uz pomoć šiljastog predmata s kojim se stisne taster RESET na poleđini sata.
Prikaz stanja Baterija
Ukoliko su baterije toliko prazne da ih treba menjati na displeju se pojavljulje simbol prazne baterije ’ ’. Preporučujemo korišćenje trajnih alkalnih baterija. Ne mešajte stare baterije sa novim.
naPoMena
• Prilikom postavljanja sata obratite pažnju na signal „atomskog sata”!
• Ne postavljaljte blizu velikih metalnih predmeta, to može da utiče na prijem radijo signala!
• Neki električni uređaji mogu smetati korektnom radu sata. (uo cevi, TV prijemnici, računari...)
• Sat štitite od direktnog uticaja sunca i toplote!
• Ne postavljaljte blizu klima uređaja, ventilatora i grejnih tela!
• Koristite samo u unutrašnjim prostorijama!
• Štitite od pare, vlage, udaraca, treskanja i agresivnih sredstava za čišćenje!
• U slučaju oslabljenja displeja promenite baterije, koristite alkalne baterije!
teHnIčkI pODacI
sat: radio kontrolisani DCF-77, kvarcni sat
preciznost: ± 1 sek. / 1 milion godina
merenje temperature: -5 + 50°C
rezolucija: 0,1°C
napajanje: 2 x AA (1,5V) baterija (nije u sklopu)
uređaj/displej: 140 x 100 x 35 / 60 x 30 mm
Page 7

SK
4
Jellemzők:
projekcia presného času a teploty na stenu • otáčateľný projektor s možnosťou zaostrenia zobrazenia • riadenie rádiovým signálom DCF-77 (Frankfurt) • kalendár (mesiac, deň, deň v týždni) a budík • zobrazenie stavu
batérií • veľkorozmerný, dvojriadkový displej • modré podsvietenie
PoMenovania:
1. PROJECTOR (Projektor)
2. PROJECTOR ON/OFF Zz
(Za-/vypnutie projektora a snooze) tlačidlo – zapnutie
projektora, použitie režimu snooze (opakované budenie)
3.
(Zrkadlenie) tlačidlo – zrkadlenie premietaného obrazu
4. RECEIVE (Synchronizácia) tlačidlo – zapnutie synchronizácie
5. ADJUST (Nastavenie) tlačidlo – krokovanie
6. SET (Záznam) tlačidlo – nastavenia
7. MODE (Mód) tlačidlo – potvrdenie nastavení
8. FOCUS (Fókus) – zaostrenie premietaného obrazu
9. DC 4,5V (Adaptér konektor)
10. RESET (Reset) tlačidlo – nastavenie pôvodného stavu
naPájanie, synchronizácia
Po odstránení krytu na zadnej strane prístroja vložte dva ks batérií AA, pričom dbajte na správnu polaritu, potom puzdro na batérie uzavrite. Po zvukovom signáli sa spustí základné nastavenie a na displeji sa objaví čas. Blikajúci znak vysielajúcej veže signalizuje
začatie automatického nastavovania a prístroj hľadá signál vysielajúcej veže.*
V prípade vhodnej prevádzky sa na displeji okolo znaku vysielajúcej veže objavia aj znaky rádiových signálov. Ak sa tak nestane to znamená, že je na danom mieste slabý príjem. V takomto prípade skúste prístroj pootočiť alebo premiestniť. (Hodiny sú vybavené
zabudovanou feritovou anténou podobne ako AM rádioprijímače.)
V závislosti od kvality prijímaných signálov synchronizácia môže trvať 2 až 10 minút. Po úspešnej synchronizácii je znak vysielača trvale zobrazený na displeji.
Stlačením tlačidla RECEIVE - nachádzajúcim sa na zadnej strane prístroja – môžete synchronizáciu zapnúť.
Pozor! Počas synchronizácie sa nedá manuálne nastavovať žiadna ďalšia funkcia!
* Rádiovým signálom riadené hodiny popri klasickej kremennej mechanike majú aj vstavaný špeciálny prijímač rádiových signálov. Prijímajú signál z vysielača DCF-77 nachádzajúceho sa v Mainingene (Nemecko, pri Frankfurte) a podľa toho koriguje – v
pravidelných intervaloch – nastavenie presného času. Nakoľko signály obsahujú kódované informácie atómových hodín, presnosť takýchto typov hodín sa zhoduje s presnosťou atómových hodín. Odchýlka presného času je ± 1 sekunda za 1 milión rokov.
Dobrý príjem signálu je zabezpečený v okruhu 1500 km od vysielacej veže. V prípade, že na danom mieste je výpadok príjmu, hodiny fungujú ako klasické kremenné hodiny.
Manuálne nastavenie
1. Presvedčte sa, že riadenie rádiovým signálom je vypnuté (na displeji sa nenachádza znak vysielajúcej veže) a v dolnom riadku je zobrazený dátum.
2. Po stlačení tlačidla ADJUST podržte tlačidlo SET po dobu 2 sekúnd, začne blikať štvorčíslie roka, ktorého hodnotu možno meniť prostredníctvom tlačidla ADJUST. Pri vhodnej hodnote stlačte tlačidlo MODE.
3. Nasledovným krokom je zadanie dátumu: podržte po dobu 2 sekúnd tlačidlo SET a potom s ním zvoľte ikony deň, mesiac. Tlačidlom ADJUST možno meniť hodnotu. Potom vhodnú hodnotu potvrdíte opäť tlačidlom MODE.
4. Jazyk dní v týždni možno nastaviť takisto tlačidlom SET. Jeho zobrazenie je možné v anglickom (GB), nemeckom (DE), francúzskom (FR), talianskom (IT) a španielskom (ES) jazyku. Prepínať možno opäť tlačidlom ADJUST a potvrdiť tlačidlom MODE.
5. V nasledujúcej fáze je daná možnosť vybrať tlačidlom SET režim 12- alebo 24-hodinového zobrazenia času; prepínať možno tlačidlom ADJUST, potvrdiť výber zas tlačidlom MODE.
6. Presný čas možno po výbere vhodnej hodnoty tlačidlom SET nastaviť prostredníctvom tlačidla ADJUST, potvrdenie výberu vykonajte tlačidlom MODE.
7. Posledné stlačenie tlačidla MODE uloží zadané údaje, na displeji sa zobrazí presný čas a dátum.
Poznámka:
– pri vyhľadávaní ďalších hodnôt – na urýchlenie vyhľadávania - podržte tlačidlo voľby
– v prípade, že v priebehu 5 sekúnd sa neuskutoční žiadna zmena, prístroj prepne do pôvodného stavu (zobrazenie času a dátumu)
nastavenie Budenia
V základnom režime podržaním tlačidla MODE možno nastavovať čas budenia.
1. Podržte po dobu 2 sekúnd tlačidlo SET, na displeji začne blikať čas.
2. Použitím tlačidla ADJUST možno zvoliť vhodnú hodnotu.
3. Opätovným stlačením tlačidla SET možno prepnúť na minúty a zopakovať predchádzajúcu operáciu.
4. Ak sme vybrali požadovaný čas budenia, použitím tlačidla MODE možno údaje uložiť.
5. Opätovným stlačením MODE sa možno dostať do základného režimu.
pOužItIe buDenIa, režImu snOOze (OpakOVané buDenIe)
V základnom režime stlačením tlačidla MODE možno zobraziť čas budenia.
1. Jednorázovým stlačením tlačidla ADJUST možno aktivovať nastavenú hodnotu, na displeji sa objaví „symbol budenia“ .
2. Opätovným stlačením tlačidla ADJUST možno aktivovať režim snooze (opakované budenie), na displeji sa objaví „symbol snooze“ Zz. Ak sme túto funkciu aktivovali budenie sa zopakuje 4-krát, ktorého tón sa postupne zosilňuje v 5 krokoch, pričom medzi
budeniami je 5-minútový interval. Tón budenia možno počuť po dobu 120 sekúnd.
3. Stlačením tlačidla ADJUST po tretí krát možno budenie deaktivovať.
4. Tón budenia možno hocijakým tlačidlom vypnúť, režim snooze však ostáva aktívny.
Meranie tePloty
Hodnota vnútornej teploty v °C je zobrazená nepretržite v pravom dolnom rohu displeja. Presnosť merania je 0,1°C.
V základnom režime možno meniť jednotku merania - Fahrenheit alebo Celsius - stlačením tlačidla SET.
pOužItIe prOJektOra
Po zatlačení tlačidla PROJECTOR ON/OFF sa premietne presný čas a teplota na dobu 5 sekúnd. Jeho 3-sekundovým podržaním podsvietenie bude aktívne po dobu 5 sekúnd a projekcia 30 minút. Odporúčaná vzdialenosť pri projekcii je medzi 1 až 3 metrov.
Otáčaním projektora je daná možnosť projekcie nielen na strop, ale aj na bočné steny. V závislosti od vzdialenosti vybratej plochy, pre dosiahnutie ostrého obrazu možno bude treba nastaviť aj fókus. Na tento účel slúži vrúbkovaný prstenec nachádzajúci sa na
boku hodiny.
Stlačením tlačidla nachádzajúceho na hornej časti hodiny možno premietaný obraz zrkadliť pre dosiahnutie požadovaného obrazu.
Šošovku udržujte v čistote, usadnutý prach znižuje čitateľnosť! Prístroj používajte večer, respektíve v zatemnenom priestore: Nepozerajte sa do svietiacej šošovky!
Možno zabezpečiť nepretržitú projekciu, ak do zadnej zásuvky pripojíte vonkajší sieťový adaptér. Dbajte na to, aby ste nastavili polaritu podľa označenia a 4,5 V napätie. Odporúčaný typ:
SAX 500, SAX 500D, SAX 800…
Podsvietenie
Počas bežnej prevádzky stlačením tlačidla POJECTOR ON/OFF umiestnenom na vrchu prístroja možno zapnúť podsvietenie displeja na dobu 5 sekúnd.
nastavenie Pôvodného stavu
V prípade nevysvetliteľných porúch (napr. na displeji sa objavujú nezvyčajné znaky alebo prístroj nereaguje na stlačenie tlačidiel) stlačte tenkým, špicatým prostriedkom (napr. špendlíkom) tlačidlo RESET, ktoré sa nachádza na zadnej strane hodiny.
zoBrazenie stavu Batérií
Ak batérie v prístroji potrebujú výmenu, na displeji sa objaví symbol ’ ’ „nízka úroveň stavu nabitia“ . V tomto prípade je účelné batérie vymeniť. Nemiešajte batérie rôzneho typu a stavu.
uPozornenia
• Pri umiestnení hodín dbajte na to, aby pre prevádzku „atómových hodín“ bol zabezpečený optimálny príjem signálu!
• Nedávajte prístroj do blízkosti väčších kovových plôch, pretože tie by mohli tieniť rádiové vlny!
• Blízkosť rôznych elektrických spotrebičov môže rušiť správnu prevádzku hodín (napr. žiarivka, televízor, počítač....)
• Nevystavujte priamemu slnečnému alebo tepelnému žiareniu!
• Neumiestňujte do blízkosti klimatizácie, ohrievača alebo ventilátora!
• Prístroj je vhodný pre použitie len vo vnútornom prostredí!
• Chráňte pred vodou, parou, údermi, otrasmi a agresívnymi čistiacimi prostriedkami!
• V prípade zoslabnutého displeja alebo podsvietenia vymeňte batérie! Podľa možnosti používajte alkalické monočlánky!
technické Údaje
hodiny: rádiovým signálom DCF-77 riadené kremenné hodiny
presnosť: ± 1 sec. / 1 milión rokov
rozsah meranej teploty: -5 + 50°C
rozlíšenie: 0,1°C
napájanie: 2 x AA (1,5V) batérie (nie sú súčasťou príslušenstva)
rozmery prístroja/displeja: 140 x 100 x 35 / 60 x 30 mm
Page 8

Importálja: Somogyi Elektronic Kft.
H-9027 Győr, Gesztenyefa út 3 • Tel.: +36 96 512-512; Fax: +36 96 512-522 E-mail: somogyi@somogyi.hu • Web: somogyi.hu
Származási hely: Kína
Distribuitor: S.C. Somogyi Elektronic S.R.L.
Complex Logistic Coratim II Floreşti, sector XII. str. Avram Iancu nr. 442-446 (drum E60, lângă Metro) com. Floreşti, judeţul Cluj, România
Ţară de origine: China
Uvoznik za SRB: Elementa d.o.o.
Jovana Mikića 56, 24000 SUBOTICA, SERBIA • tel:++381(0)24 686 270
Zemlja uvoza: Mađarska • Zemlja porekla: Kina
Distribútor: Somogyi Elektronic Slovensko s.r.o.
Záhradnícka 10, 945 01 Komárno, SK • Tel.: +421/0/ 35 7902400 • somogyi.sk
Krajina pôvodu: Čína
 Loading...