

Page 1
HEAT SYSTEM
GUIDE & USER MANUAL
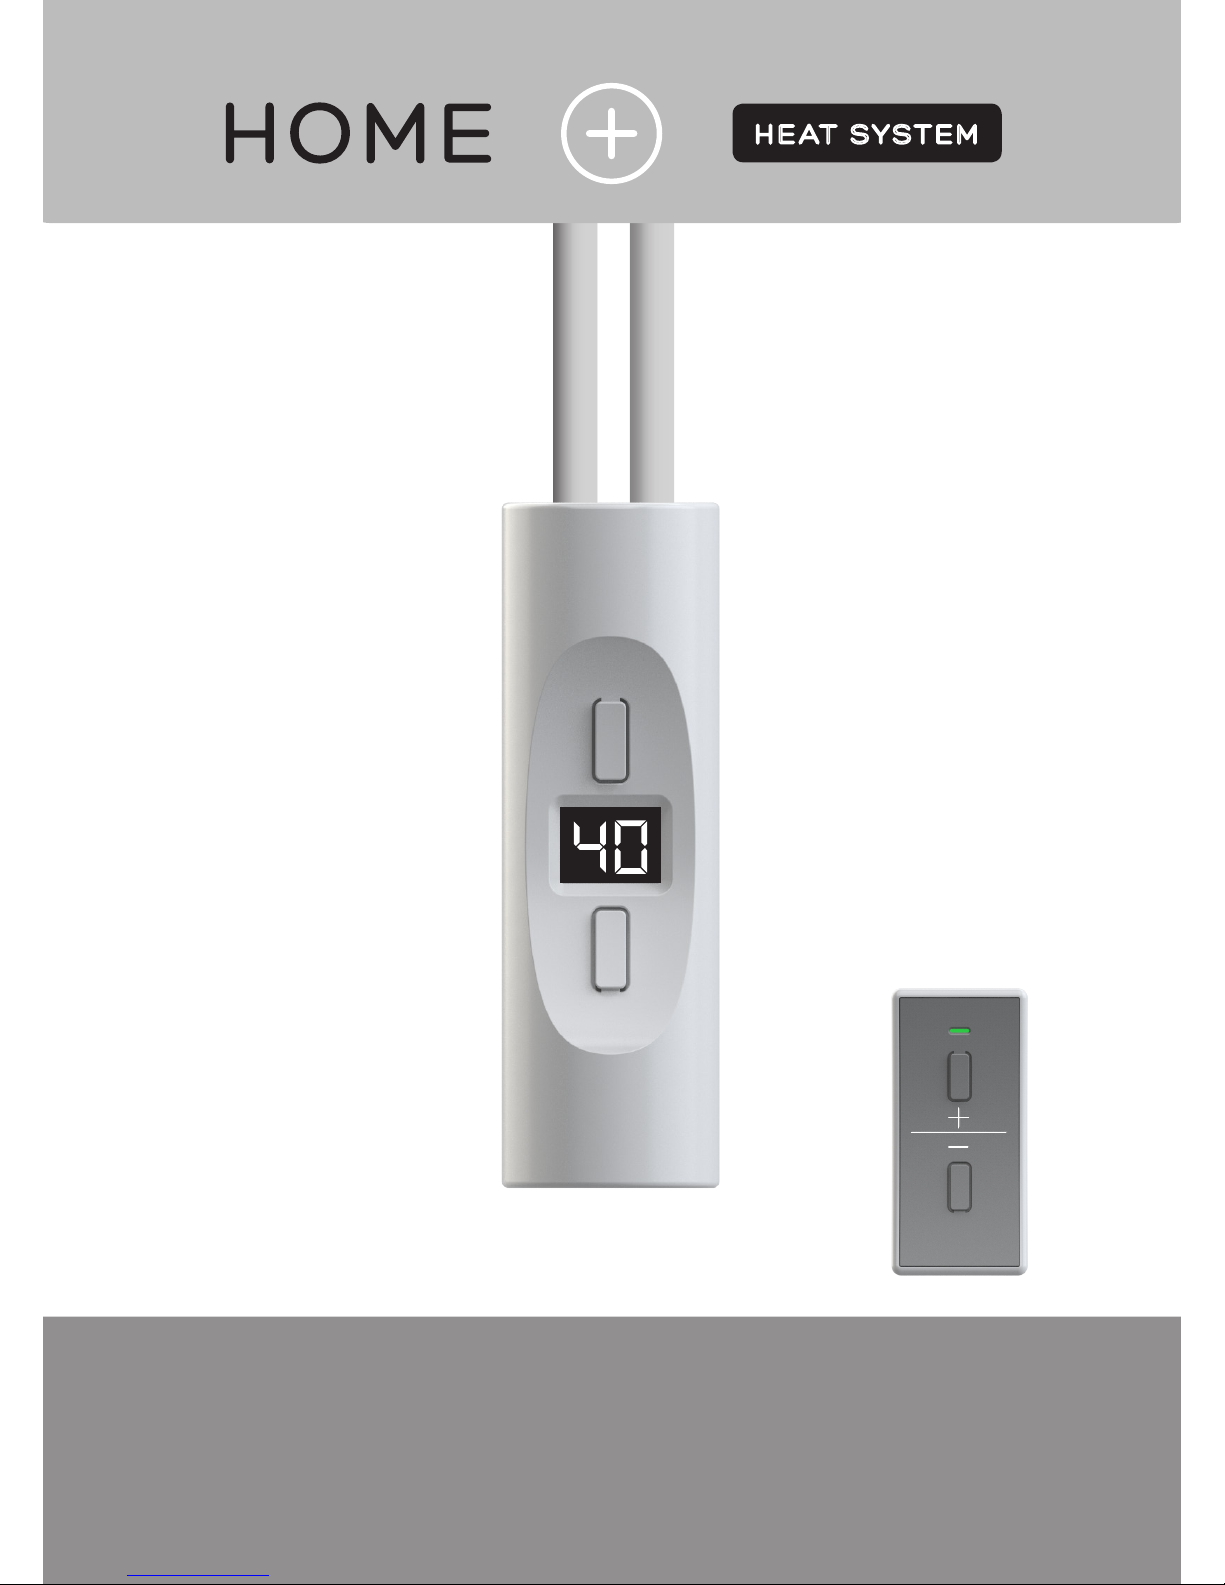
HEATER CONTROLLER H+ | REMOTE CONTROLER H+R
HEATER
CONTROLLER
–
VERTICAL
+
REMOTE
CONTROLLER
Page 2
SAFETY:
1. The heater should be installed by a qualied person.
2. Bathroom radiators tted with electric heaters should be xed not less than 60 cm from a bath, shower or wash basin,
and never above abath.
3. For the heater permanently connected (hard wire) there must be applied a cut-off device from the mains. Such a device
must disconnect the heater from the supply mains in 2 poles, with contact separation of at least 3 mm.
4. This appliance can be used by children aged from 8 years and above and persons with reduced physical, sensory or
mental capabilities or lack of experience and knowledge if they have been given supervision or instruction concerning
use of the appliance in a safe way and understand the hazards involved
5. Children shall not play with the appliance. Cleaning and user maintenance shall not be made by children without
supervision.
6. The heater MUST BE DISCONNECTED before cleaning the casing. AVOID SOAKING THE CASING.
7. One radiator valve must always be open when a heater is in use (liquid thermal expansion).
CAUTION: To avoid the risk of re or electric shock the heater should be protected from water spray or ooding. This
appliance is not intended for use by persons (including children) of limited physical, sensory or mental abilities, or persons inexperienced or not familiar with the appliance, unless supervised or instructed on the appliance use by persons
responsible fo r their safe t y. Particular at tention sh ould be paid to childre n, to preclude playing wi t h the ap pliance by them.
Exclamation mark on triangular eld signals: information important for the user.
CAUTION: electric shock hazard!, lightning mark ended with arrow on triangular eld
CAUTION:
in order to reduce electric shock hazard, do not remove the casing (nor its rear cover). There are no user-
serviceable parts inside the appliance; the product must be returned to the manufacturer for repair via the distributor who
sold the product.
GUARANTEE TERMS:
Guarantee is granted by manufacturer for 24 months period star ting from date of sale, but no longer than 36 months from
date of the heater manufacture. Defects revealed within this period, resulting from a fault of manufacturer will be repaired
free of charge or the item replaced with new, equivalent one. Term of complaints’ investigation up to 14 (fourteen) days
from date of submission to the manufacturer.
Guarantee does not cover:
1. Using of product in a manner noncompliant with attached instructions.
2. Any visible damage to the heating element or controller due to improper use. Damaging of manufacturer’s seals makes
the guarantee null and void.
In the event that Heatpol are unable to repair or replace this product we reserve the right to refund the purchase price
as an alternative.
GUARANTEE CARD
Serial No.:
Date of sale:
Stamp of retail outlet, signature of seller
Caution: The guarantee card should be legibly lled in retail outlet. Any corrections on the guarantee card will invalidate
the guarantee. Guarantee card valid only with proof of purchase.
Mników 322, 32-084 Morawica, Poland
Tel/fax: +48 12 656 44 91
www.homeplus-system.com
Page 3
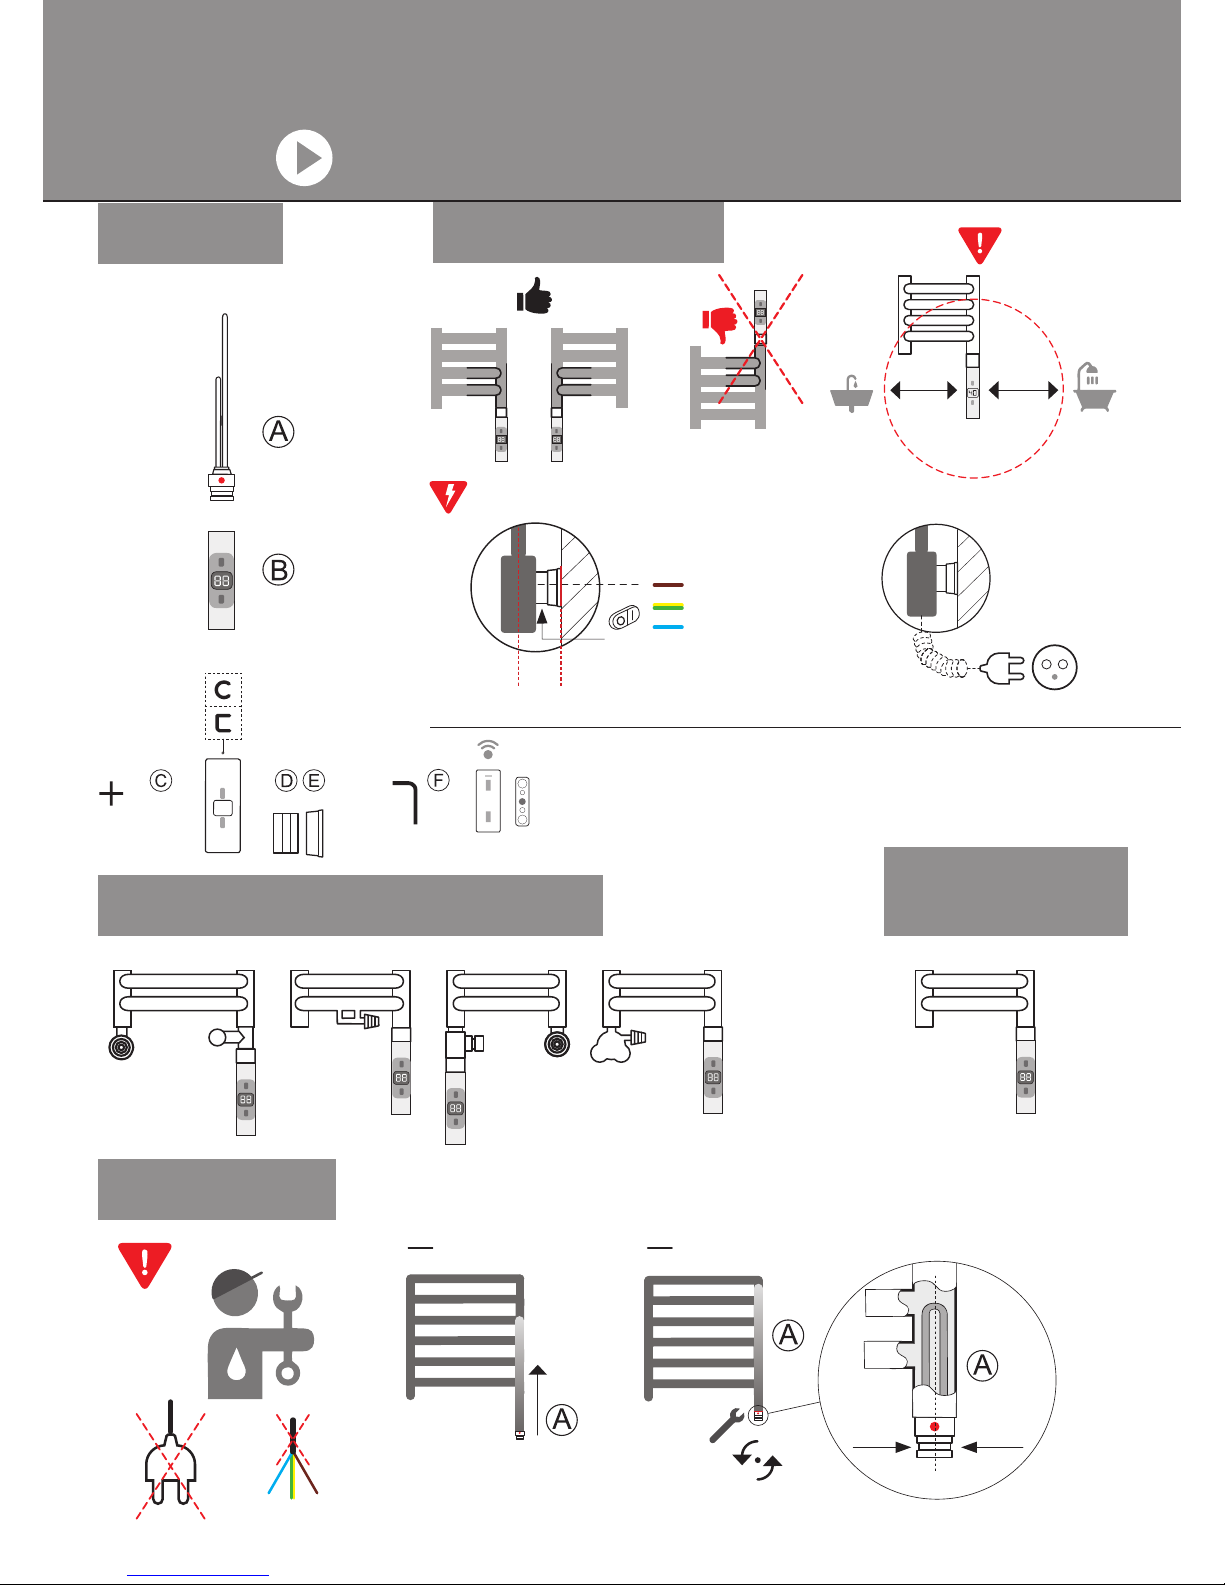
Instllation options: CH system
USER MANUAL: Heating element + Heater controller (vertical) H+
Kit content
Mounting in radiators
Installation options:
electric radiator
Heating
element
Heater
controller
Allen
key
O/D shaped
color cover
Wall mount
plastic cover
+
_
System option:
Remote controller
Wall clip
>60cm>60cm
Instllation details
S24
S24
1 2
230 V
230 V
How to
Hard Wir e
Live
Earth
Neutral
ON/OFF
Switch
40 mm
CAUTION! Do not disconnect heater controller when the system is powered
Hard wire connection Connection with plug and spiral cable
VIDEO available at: www.homeplus-system.com
Page 4

5
4
3-5 cm
6A
7
Finishing
3
Electric radiators
CH system
6B
S22
Cut to length
S22
?
?
?
8
Element (D) must be cut
the correct lenght
How to Hard Wire
Live
Earth
Neutral
230 V
230 V
CAUTION! Do not disconnect heater
controller when the system is powered.
For the heater permanently connected (hard wire) there must be
applied a cut-off device from the mains. Such a device must
disconnect the heater from the supply mains in 2 poles, with
contact separation of at least 3 mm
9
Connection with a coiled cable and a plug Hard wire connection
ON/OFF
Switch
Page 5

Max heating temperature, selection for 1/2/3 hours
Off selection
TURBO mode activation
3
sec
USER MANUAL: How to use heater controller (optional remote controller)
VIDEO available at www.homeplus-system.com
Heater
controller
display
LED (Activity)
–
+
Heater controller Remote controller
Heater controller
Remote controller
Push for pairing button using allen key to activate
the controller. Locate suitable place to mount the clip
Pairing button
for allen key (F )
Back
Magnet clip
Wall clip mounting
Run the controller
Hold upper button
for 3 seconds
Switch off the controller
Hold lower button
for 5 seconds
40˚C
Standard heating
temperature
1
3
sec
5
sec
20˚C - 65˚C
Select temperature
+
–
+
–
TURBO mode activation - max heating temperature
Hold button for 3 seconds
2
3
LED activity: heating element is working
Turn ON the controller
ON/OFF
When switched to an ambient temperature control, a remote controller
is simultaneously a temperature sensor
Page 6

DO NOT DISCONNECT!
controller from heating element, when connected to the power supply
Settings water or ambient temperature
No enough water in a radiator -
check a water level
Heating element damaged return a heater to a sale point
No communication with a remote
controller - check a remote
controller presence or replace batteries
Errors
Pairing nished!
Remote controller
is already working
Allen key
included
1x
1x
Press once
upper and lower
button together
Press twice
upper and lower button
together
Temperature selection.
Water temperature
*Ambient temperature
2x
+
This function is available
if heater controller is paired
with remote controller
2x
–
Hold 3 sec.
Start countdown
3
sec
During countdown
within 30 seconds
Reverse remote controller.
Push pairing button!
Prepare remote controller + allen key for use
Heater controller and remote controller pairing
If you bought a remote controller together with H+heater you do not need to pair it!
Remote controller is an
ambient temperature sensor
*
Page 7

Remote controller
Pairing
button
Back
Magnet clip
Wall clip mounting
Remote controller
USER MANUAL: How to use remote controller (to control the heater controller)
Heater
controller
display
LED (Activity)
–
+
Heater controller
Turn ON the controller
ON/OFF
Heater controller
START: Heater controller and remote controller pairing
If you bought a remote controller together with H+heater you do not need to pair it!
1
During countdown
within 30 seconds
Reverse remote controller.
Push pairing button!
1x
1x
Hold 3 sec.
Start countdown
3
sec
Press once
upper and lower
button together
Pairing nished!
Remote controller
is already working
Allen key
included
Prepare remote controller + allen key for use
Push for pairing button using
allen key to activate the controller
Locate suitable place to mount the clip
When switched to an ambien t temperat ure control, a remote con troller is simult aneously
a temperature sensor
Page 8

Max heating temperature, selection for 1/2/3 hours
Off selection
TURBO mode activation
3
sec
+
–
TURBO mode activation - max heating temperature
Hold button for 3 seconds
4
Press twice
upper and lower
button together
2x
2x
Run the heater controller
via remote controller
Hold upper button
for 3 seconds
Switch off the controller
via remote controller
Hold lower button
for 5 seconds
40˚C
Standard heating
temperature
3
sec
5
sec
2
20˚C - 65˚C
Select temperature
+
–
3
Temperature selection.
Water temperature
Ambient temperature
+
–
Settings water or ambient temperature
Remote controller is an
ambient temperature sensor
*
 Loading...