

Page 1

INSTRUCTION MANUAL
C010
Page 2

Contents
Contents
Scope of delivery........................................................................................................................ 3
1 Safety................................................................................................................................. 4
1.1 Intended use.......................................................................................................... 4
1.2 Safety instructions
.................................................................................................
4
2 Description
........................................................................................................................
2.1 Description of the machine.................................................................................... 7
2.2 Control panel......................................................................................................... 8
3 Unpacking and setting up the machine ....................................................................... 10
4 Switching the machine on or off ................................................................................... 12
5 Tips and tricks.................................................................................................................
13
5.1 Hygiene............................................................................................................... 13
5.2 Product................................................................................................................
5.3 Packing................................................................................................................
5.4 Film pouch...........................................................................................................
6 Operation.........................................................................................................................
13
13
13
15
6.1 Selecting function and setting values ................................................................. 15
6.2 Packing products................................................................................................. 15
6.3 Evacuating vacuum boxes or bottles .................................................................. 19
6.4 Interrupting the evacuation.................................................................................. 21
6.5 Cancelling packing ............................................................................................. 21
6.6 Changing favourites 1,2 or 3 .............................................................................. 21
7 Cleaning........................................................................................................................... 23
7.1 Cleaning the machine.......................................................................................... 23
7.2 Cleaning vacuum stopper for bottles................................................................... 24
7
8 What to do if ................................................................................................................... 25
9 Spare parts and accessories......................................................................................... 28
9.1 Changing the sealing bar.................................................................................... 29
9.2 Changing chamber lid gasket.............................................................................. 30
10 Disposal...........................................................................................................................
31
11 Technical specifications................................................................................................. 32
12 EU Declaration of Conformity........................................................................................ 33
Index.......................................................................................................................................... 34
34
2 /
25.09.2017
Page 3
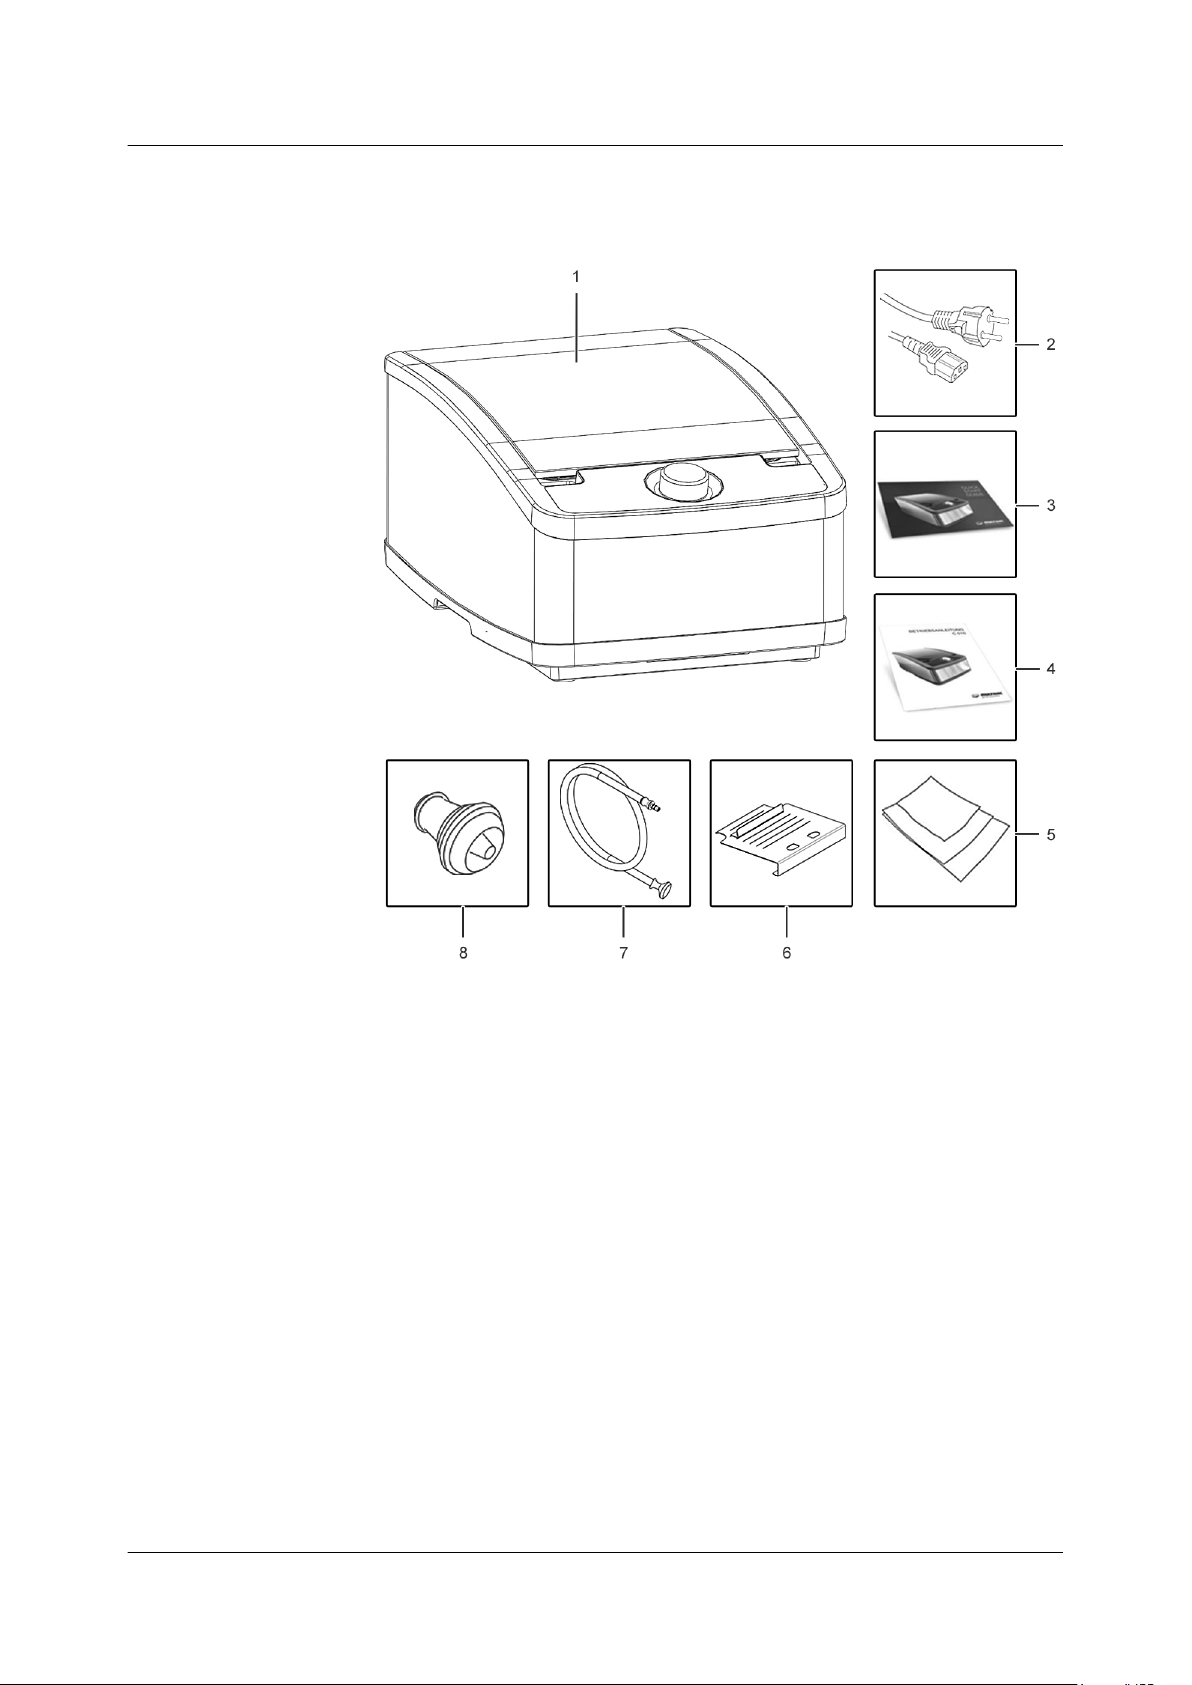
Scope of delivery
Scope of delivery
1 Machine
2 The power cord
3 Quick Start Guide
4 Instruction manual
5 Film pouch starter set
6 Sloping insert with support angle
7 Vacuum hose
8 Vacuum stopper (2 items)
This instruction manual is an important part of the machine. Keep the
instruction manual near the machine for future reference and provide
it to others if you sell or loan the machine.
25.09.2017 3 / 34
Page 4

Safety
Safety instructions
1 Safety
1.1 Intended use
• The machine is intended for domestic use.
• The machine can be used to pack and marinate products in film
pouches.
– Only suitable, pre-made film pouches may be used for the
packing and marinating of products. See Section 5.4 "F
pouch" on page 13
• The machine is suitable for 30 sequential packaging procedures.
Then let the machine cool down to room temperature.
• Bottles and vacuum boxes can be evacuated by the machine, using the vacuum hose supplied.
– Only glass bottles may be used for evacuating bottles.
– No damaged or thin-walled glass bottles may be used for evac-
uating bottles.
– Only suitable vacuum boxes may be used for evacuating vac-
uum boxes.
• Food that contains carbon dioxide may not be evacuated.
• Powder-forming products may not be evacuated.
• No liquids may be sucked in via the suction opening or the vacuum
hose.
• Living creatures may not be packed.
• Electronic devices may not be packed.
• The machine is not suitable for use in outdoor areas.
.
ilm
1.2 Safety instructions
The machine incorporates state-of-the-art standards. Nevertheless,
potential hazards for persons, the machine and other material assets
cannot be entirely excluded.
• If the machine is damaged or dropped it must not be switched on.
• Repairs may only be performed by the manufacturer or a service
centre that has been authorised by the manufacturer.
• Do not pack or marinate any highly flammable, combustible or explosion-prone products using the machine.
• Do not pack any dust-forming or powder-forming products with the
machine.
Protection from electric shock
• Do not touch damaged power cords or damaged mains plugs. Replace the power cord immediately.
• The mains voltage of the machine must match the mains voltage
of the mains electricity. Compare the mains voltage on the type
plate of the machine with the mains voltage of the mains electricity
before inserting the mains plug of the machine into the socket.
4 /
34
25.09.2017
Page 5
Safety
Safety instructions
• There are live components inside the machine. Do not open the
housing.
• Do not immerse the machine in water or other liquids.
• The machine may only be operated when the electrical fuse cover
is attached.
Children at home and persons with disabilities
• Children under eight years of age are not allowed to use the machine.
• The machine can be used by children 8 years old and above, and
also by persons with reduced physical, sensory or mental capacities or insufficient experience and knowledge, if they are supervised or instructed in the safe use of the machine and understand
the resulting risks.
• Children are not allowed to play with the machine.
• Cleaning and user servicing must not be performed by children
without supervision.
• The sealing bar reaches a heat of approx. 140 °C (284 °F) during
operation. The seal seam of the sealed film pouch is also hot just
after sealing. Children must not touch the machine while the sealing bar and the seal seam are hot.
• Risk of suffocation! The thin film of the packaging material can adhere to the mouth and nose and interfere with breathing. Keep the
packaging material away from babies and small children. Do not
use the packaging material in cribs, beds, carrying bags or playpens. Packaging material is not a toy.
Protection from burns
• The sealing bar reaches a heat of approx. 140 °C (284 °F) during
operation. The seal seam of the sealed film pouch is also hot just
after sealing. Do not touch the sealing bar or the seal seam.
Eye injuries
• A damaged or scratched chamber lid can implode and splinter. If
the chamber lid is damaged, do not switch the machine on. Replace the chamber lid.
• Do not scratch the chamber lid.
• Do not use the chamber lid as a storage, working or cutting surface.
25.09.2017 5 / 34
Page 6

Safety
Safety instructions
Hygiene
• Insufficient hygiene when dealing with the product and the machine can contaminate the product and the pack. Regularly clean
the machine, the work equipment, the work environment and your
hands before and after every use. In this way undesired transmission of contaminants to objects and the product can be avoided.
Protection from other injuries
• If body parts are sucked with the vacuum hose this can cause injuries.
During operation
• Do not leave the machine unsupervised during operation.
6 / 34 25.09.2017
Page 7

2 Description
2.1 Description of the machine
Description
Description of the machine
1 The chamber lid
2 Vacuum hose for the evacuation of vacuum boxes and bottles
3 Suction opening
4 Sloping insert with support angle
5 Sealing bar
6 Rotary knob
7 Control panel
8 Handle
25.09.2017 7 / 34
Page 8
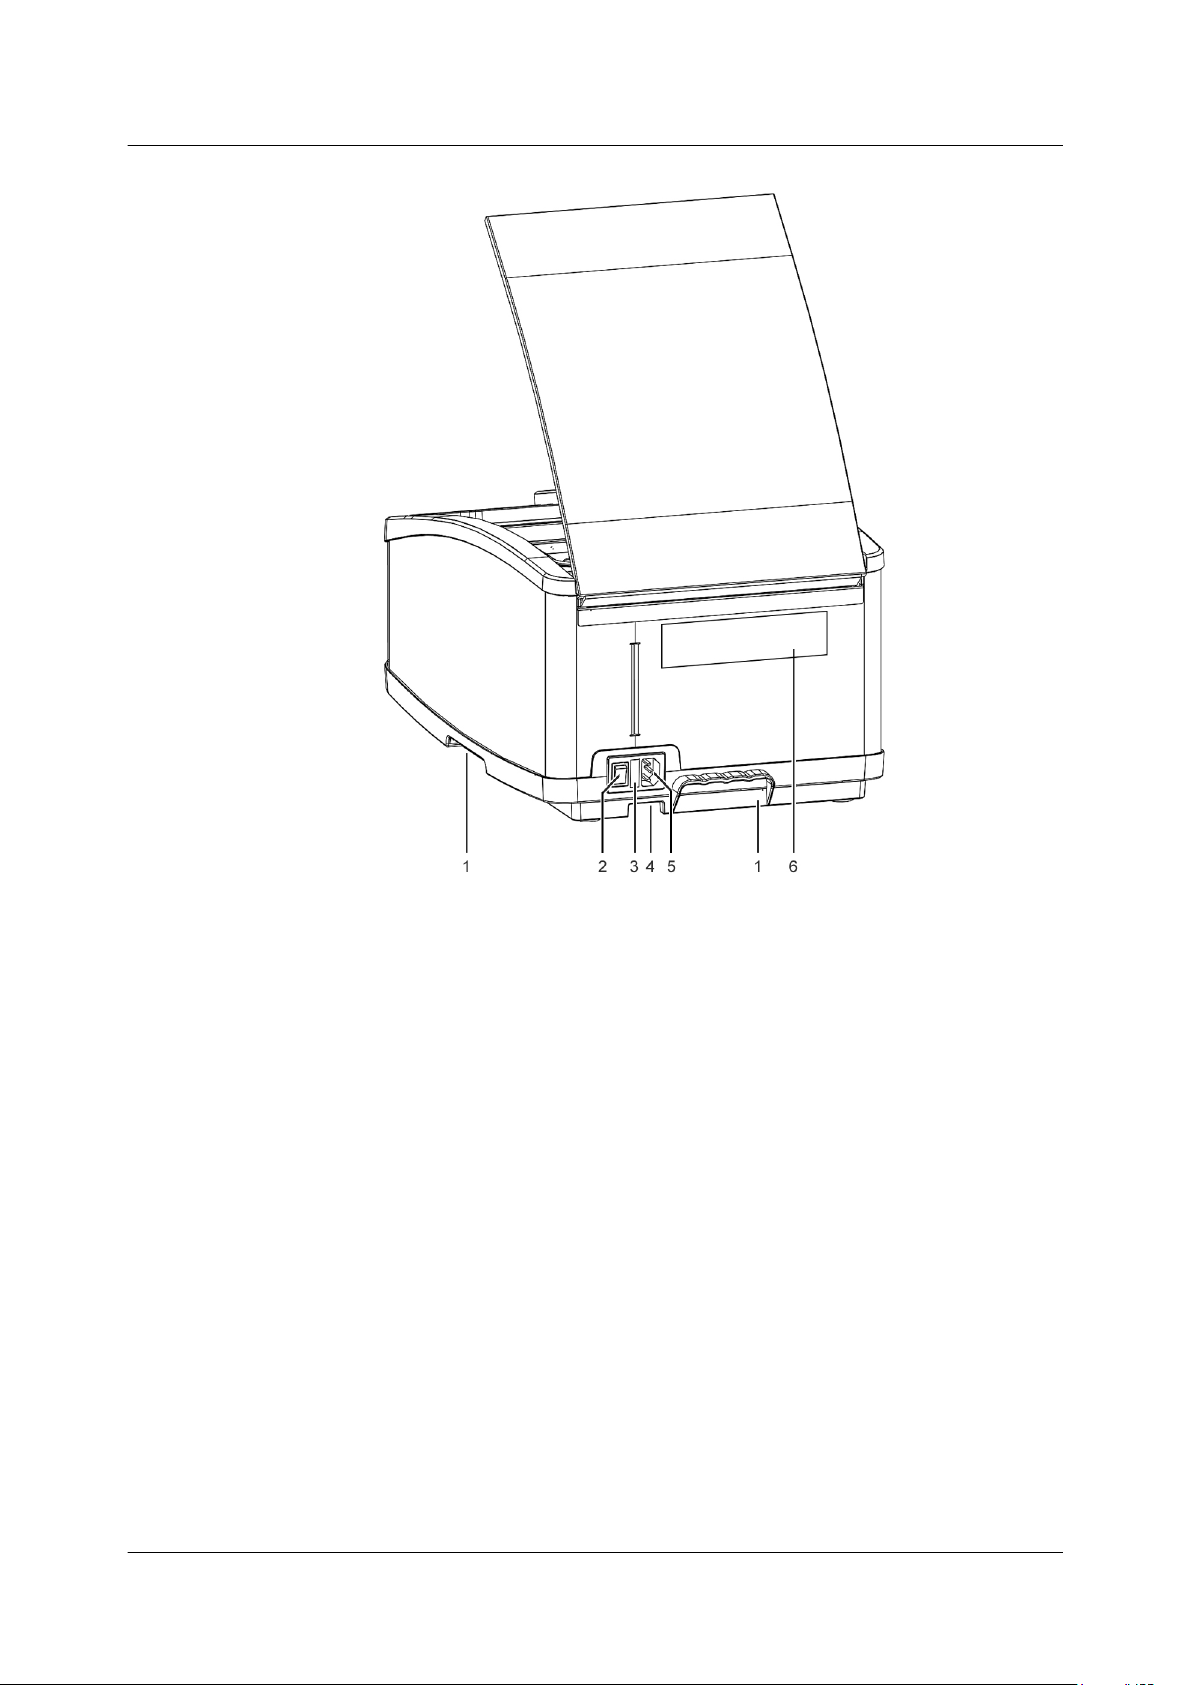
Description
Control panel
1 Handle
2 The mains switch
3 Fuse with cover
4 Cord storage compartment for the power cord
5 Connection for the power cord
6 Type plate
8 / 34 25.09.2017
Page 9

Description
Control panel
2.2 Control panel
Function Description
1 Stand-by The control light illuminates after a long machine downtime and
signals that the machine is operational.
2 Low vacuum This function can be used to evacuate soft and pressure-sensitive
products, e.g. cooked noodles, pastries and fruit.
3
Maximum vacuum This function can be used to evacuate products that are less pres-
sure-sensitive, such as meat, sausages and root vegetables.
4 Sous-vide This function can be used to produce packs for the sous-vide
cooking method.
• 1: for firm products, e.g. meat and root vegetables
• 2: for soft products, e.g. fish and cucurbits (gourd family)
• 3: for particularly soft products, e.g. delicate vegetables
5 Adjustable vacuum This function can be used to evacuate products with a vacuum of
40% to 100%.
The higher the set value, the higher the vacuum.
If the set vacuum cannot be reached, the machine automatically
selects the optimum vacuum. See Section 5.2 "Product" on
page 13. The message "OPT" appears on the display.
6 Favourites This function can be used to save up to three custom-selected
vacuums. The saved value is shown on the display.
If the set vacuum cannot be reached, the machine automatically
selects the optimum vacuum. See Section 5.2 "Product" on
page 13. The message "OPT" appears on the display.
7 Marinating This function can be used to accelerate the marinading of food.
The marinating time can be set between 10 minutes and 30 minutes.
8 External vacuum This function can be used to evacuate vacuum boxes or bottles
with a vacuum stopper using the vacuum hose.
25.09.2017 9 / 34
Page 10
Unpacking and setting up the machine
3 Unpacking and setting up the
machine
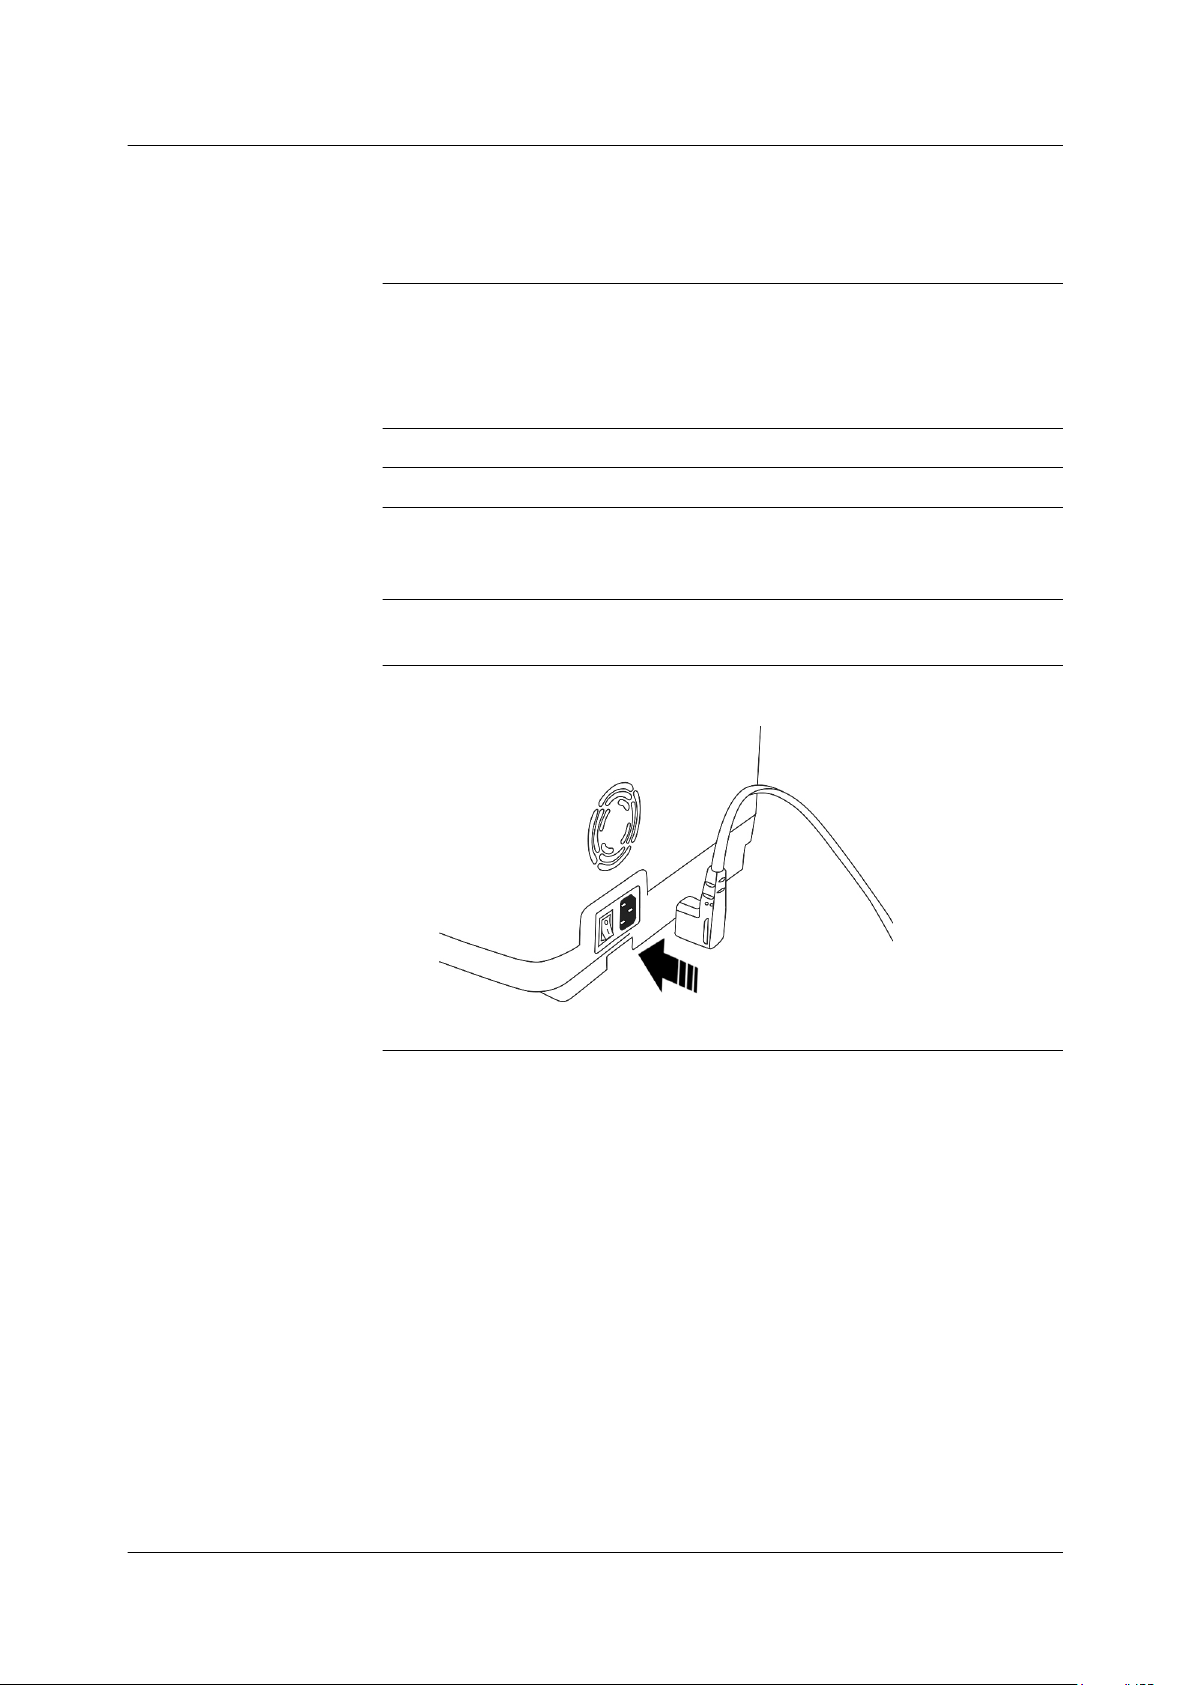
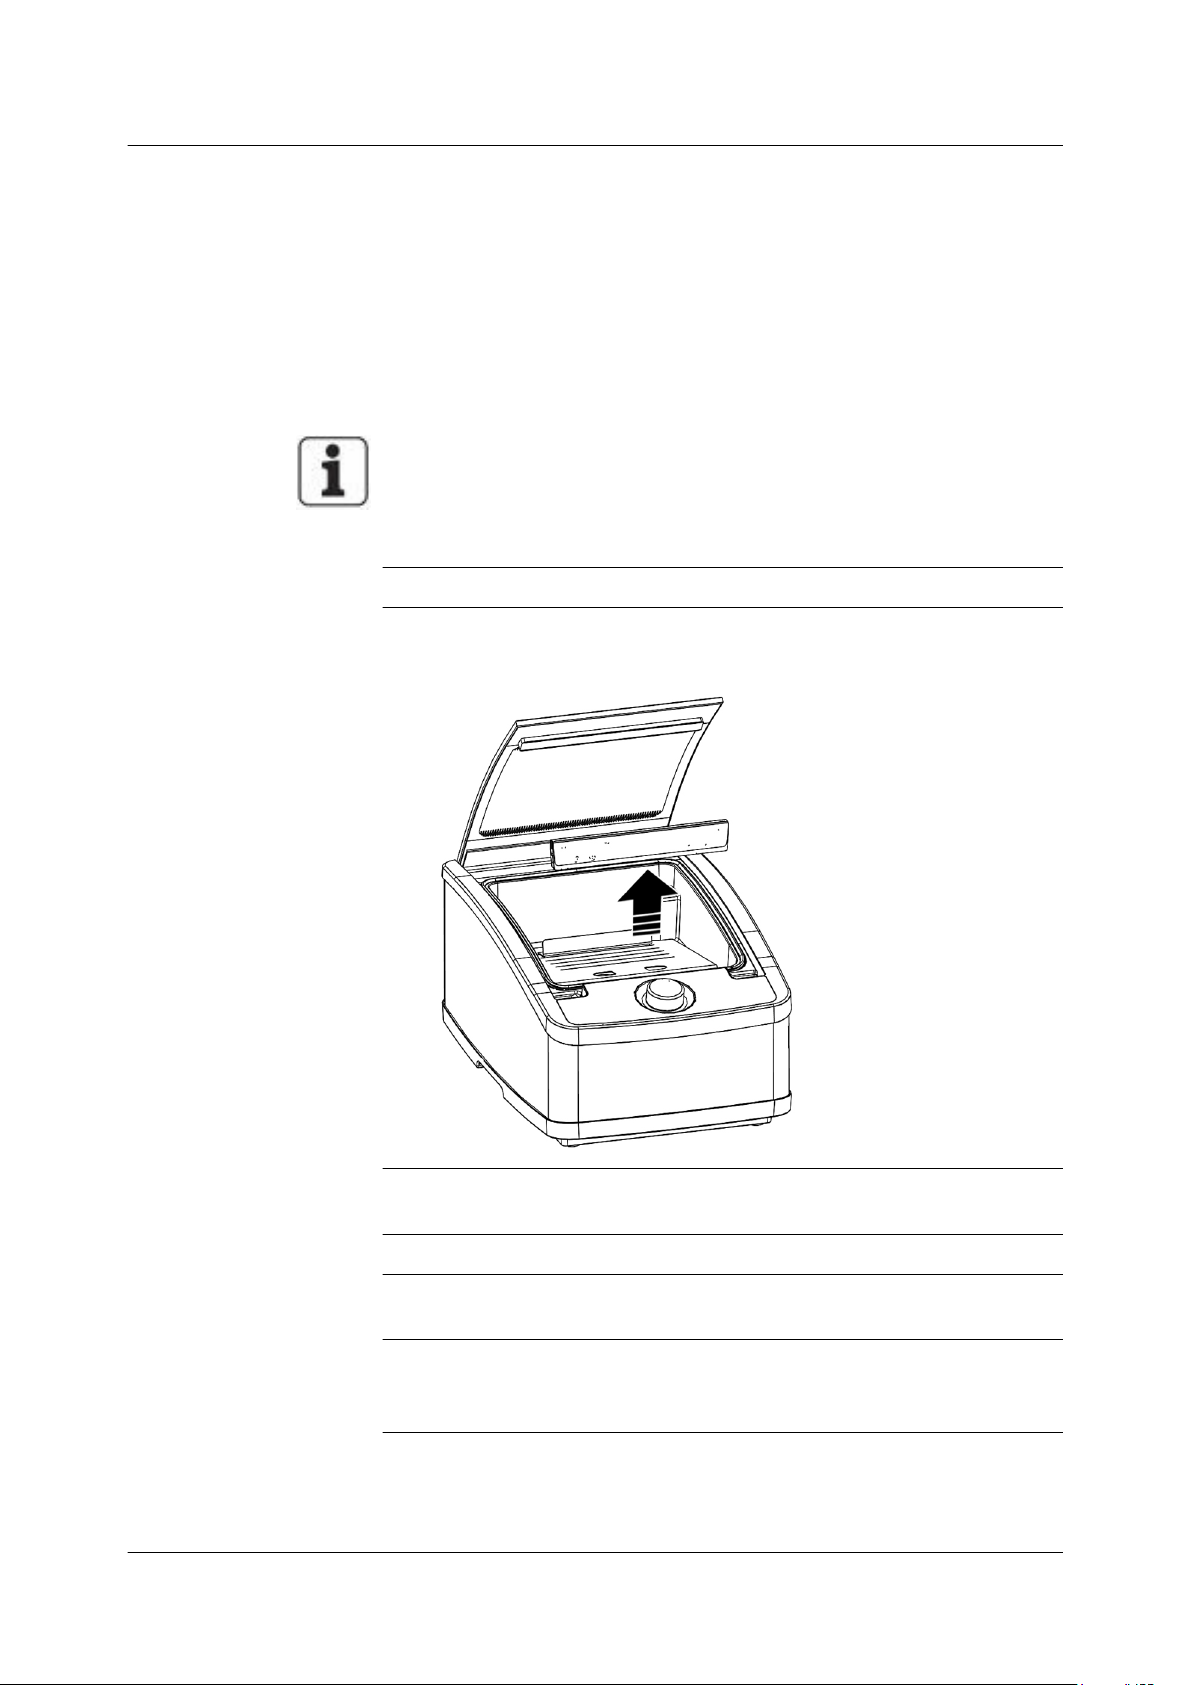
1.
Lift the machine out of the box and place it on a clean and
even work surface.
1.1
Ensure that there is enough free space above the machine to be able to open the chamber lid.
1.2
The distance from all side panels must be at least 10 cm.
2.
Check whether the scope of delivery is complete.
3.
Remove all the protective film.
4.
Check whether the machine is damaged. If the machine is
damaged, inform the manufacturer and send the machine
back to them.
5.
Clean the machine. See Section 7 "Cleaning" on page
23.
6.
Insert the power cord into the machine.
7.
Plug the mains plug into the socket.
10 /
34
25.09.2017
Page 11
Unpacking and setting up the machine
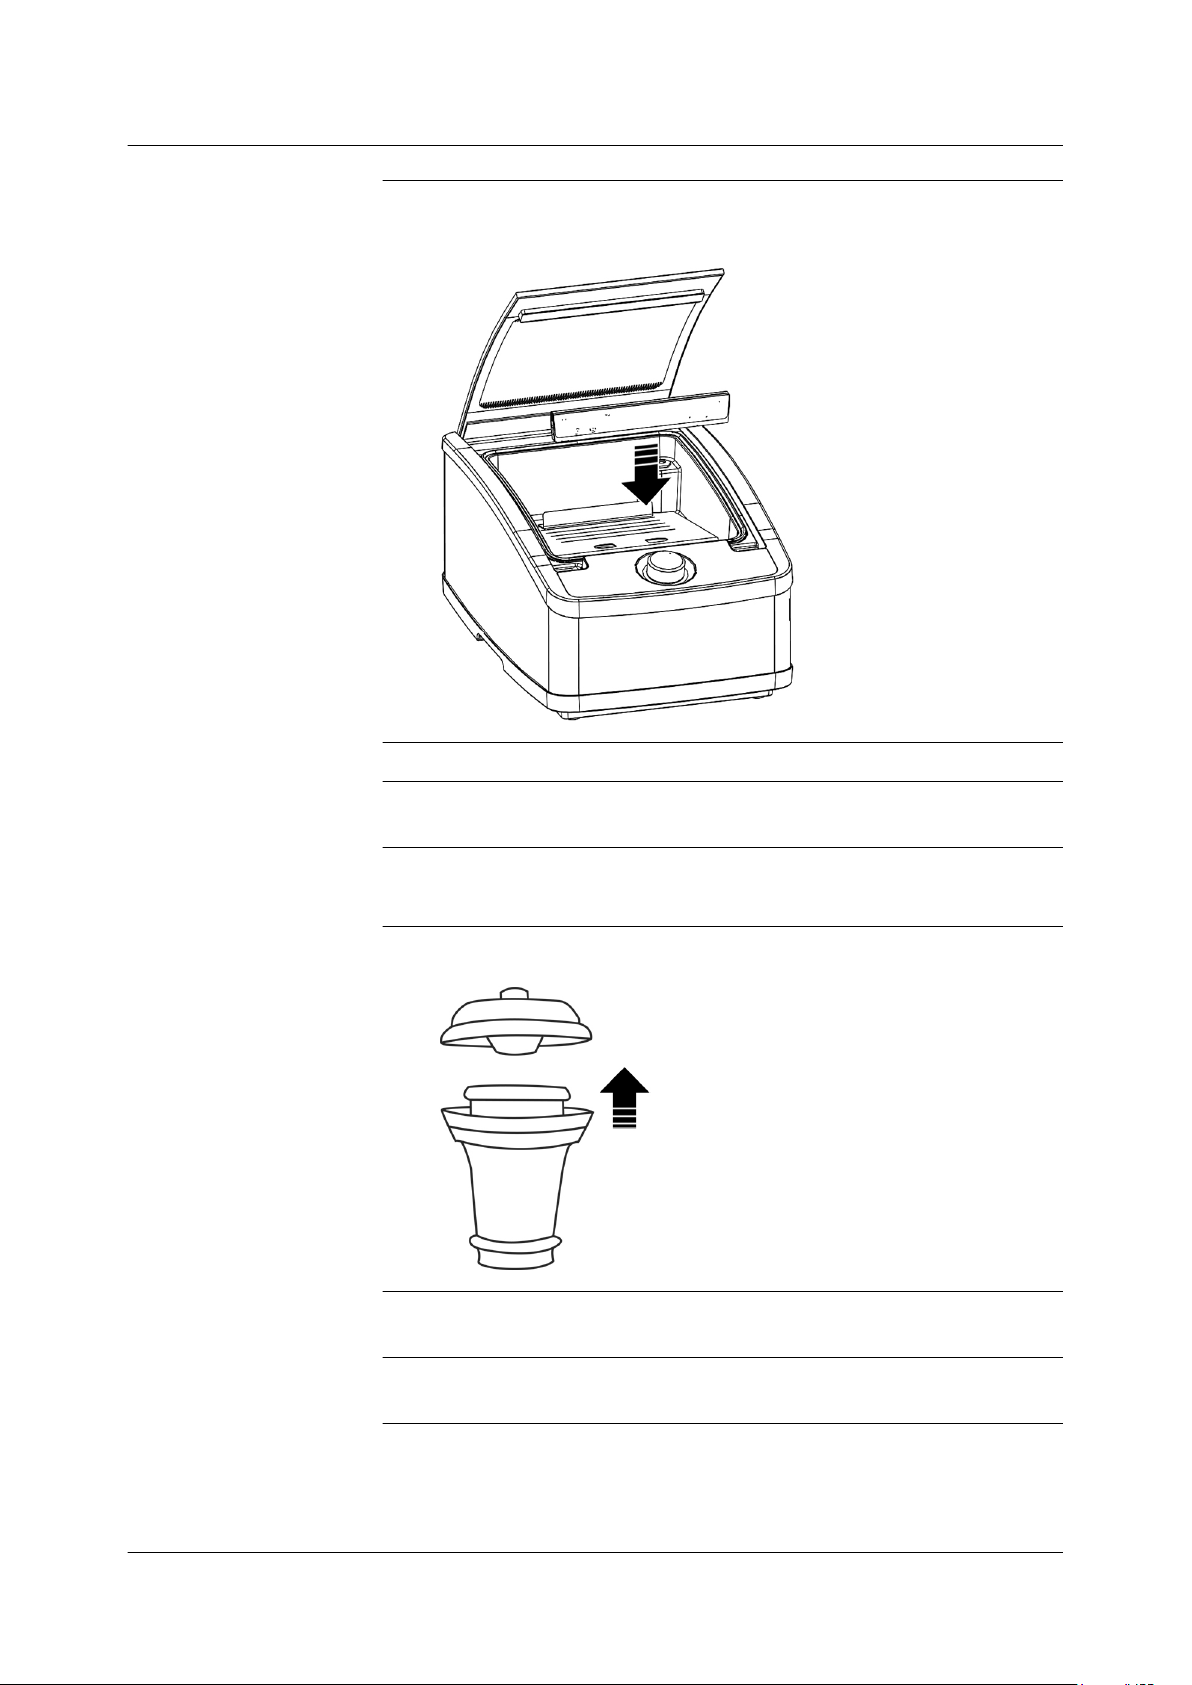
8.
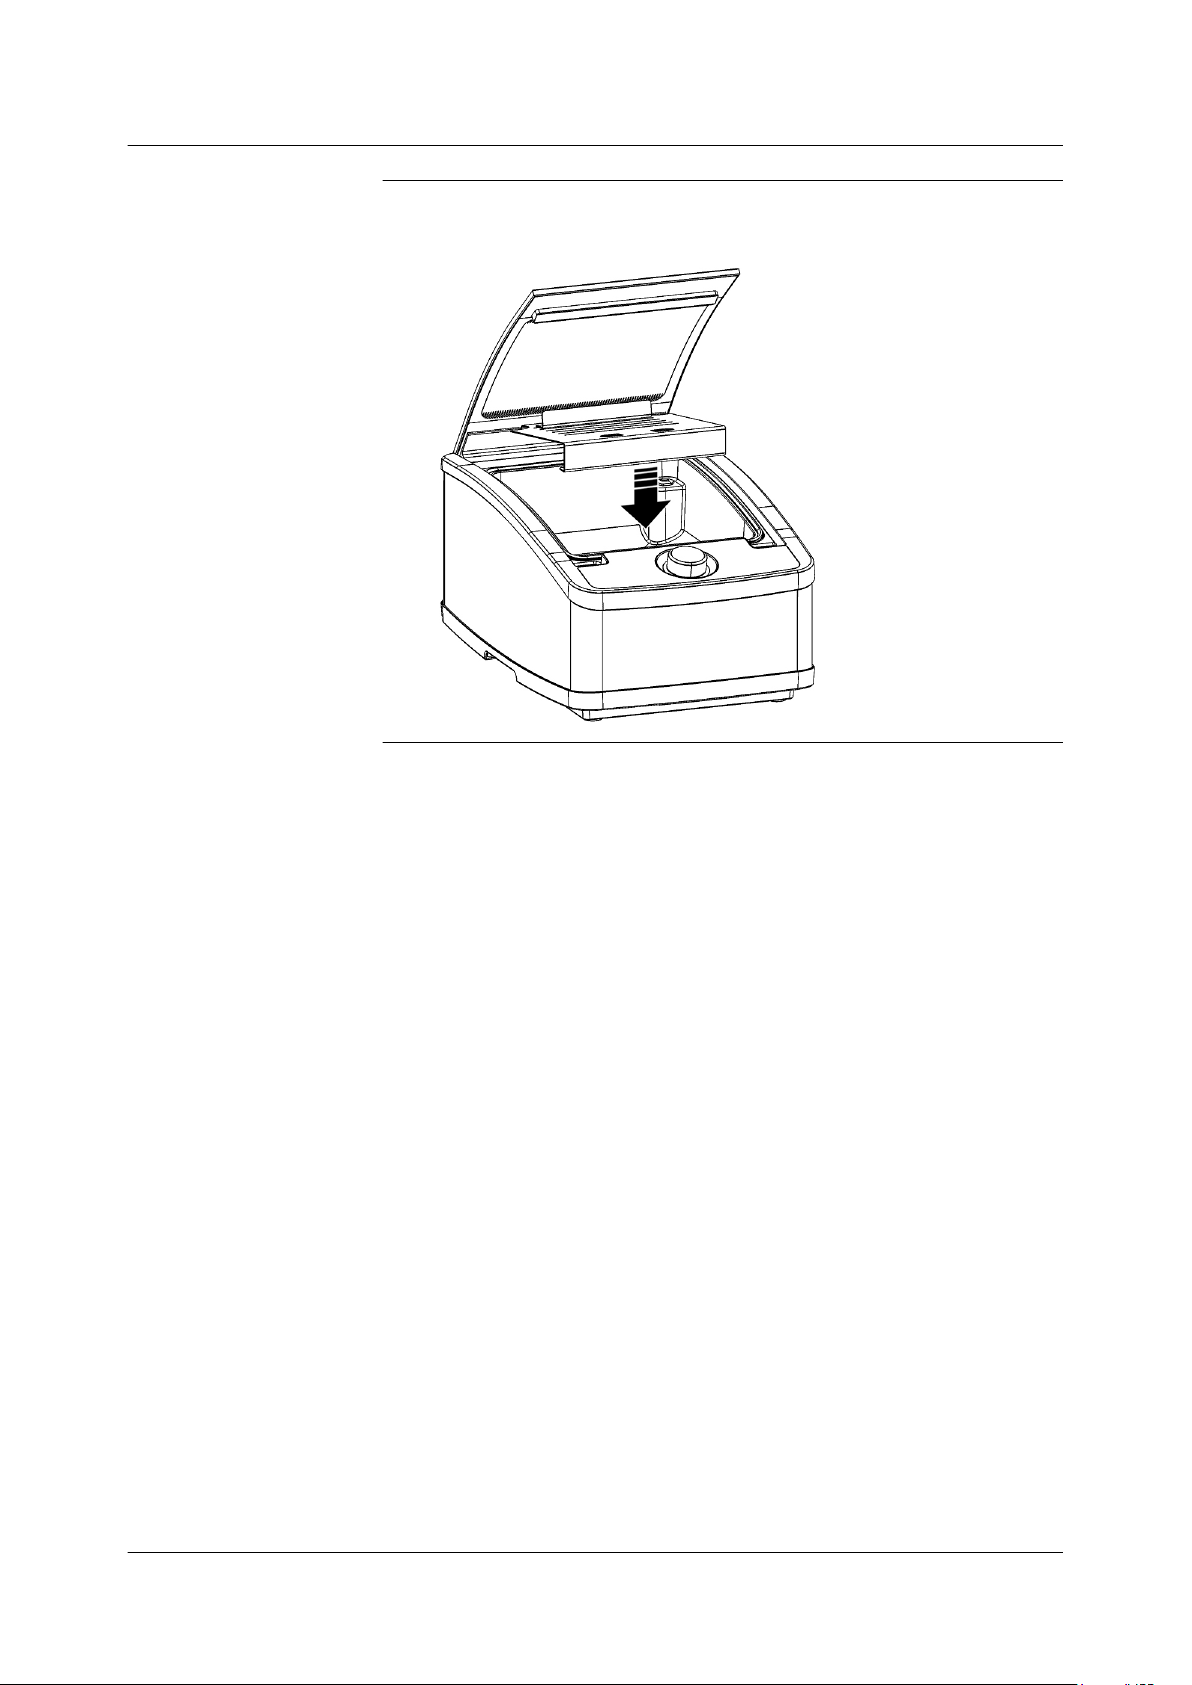
Insert the sloping insert and the support angle for supporting the film pouch in the chamber.
25.09.2017 11 / 34
Page 12

Switching the machine on or off
4 Switching the machine on or off
1.
Switch the machine on or off using the mains switch.
When the machine is switched on two clicking sounds
ü
are emitted one after the other.
12 /
34
25.09.2017
Page 13

Tips and tricks
Film pouch
5 Tips and tricks
5.1 Hygiene
• A clean and hygienic work environment is the basis for high-quality
packed food. For this reason, it is very important to regularly clean
and kept the machine, the work environment and your hands hygienic before and after every use.
• Do not use the film pouch multiple times.
• Only touch the outside of the film pouch with clean hands. This
way you avoid unwanted transmission of contaminants to the film
pouch or the product and unpleasant smells in the refrigerator.
5.2 Product
• Only fresh and cooled foods can be stored for longer. Therefore,
only pack fresh food. Do not interrupt the cold chain.
• Pack food immediately and do not store it prior to packing.
• A high vacuum can be achieved for cooled food. Pack cooled
foods as much as is possible.
• A high vacuum can increase the shelf life of a foodstuff.
• Liquids can be managed more easily when packaging if they are
frozen in advance.
• Let precooked food cool down to a temperature of no more than
approx. 20 °C before packing it.
• Treat foods that have a tendency to ferment before packing them,
e.g. by blanching, frying, etc.
5.3 Packing
• The edges of the film pouch can be turned outwards when filling,
to prevent them from being dirtied in the seal seam. The edges of
the film pouch thus stay clean and the film pouch is sealed securely.
5.4 Film pouch
Depending on the application, the film pouch must satisfy various demands.
• The film pouch must be suitable for the packing of food.
The film pouch must not transfer any of its components onto the
food.
• The film pouch must be sealable.
In order to seal the opening of the film pouch, it must melt and bind
when exposed to heat. The material and seal of the film pouch
must be solid enough that the pack is airtight after sealing.
• The film pouch must be impermeable to oils, fats, alkaline solutions and flavours. In addition, the film pouch must have high tear
and puncture resistance.
25.09.2017 13 / 34
Page 14

Tips and tricks
Film pouch
• The film pouch must have a barrier effect.
• The film pouch must be heat-resistant.
If the packaged food is immersed in hot water, such as in sousvide cooking, the film pouch must be able to withstand this temperature.
• The film pouch must be frost-resistant.
For optimal packaging results, the use of MULTIVAC film pouches is
recommended.
14 /
34
25.09.2017
Page 15

Operation
Packing products
6 Operation
6.1 Selecting function and setting values
A function can be selected by turning the rotary knob.
The selected function is immediately active and is performed by the
machine as soon as the chamber lid is closed.
Pressing the rotary knob switches to the respective sub-menu.
A value can be selected or set in the sub-menu by turning the rotary
knob.
Pressing the rotary knob again exits the sub-menu. The selected or
set value is then active and is performed by the machine as soon as
the chamber lid is closed.
6.2
1.
Packing products
Filling an unused film pouch. Ensure that the area inside
and outside the film pouch's seal seam remains clean.
25.09.2017 15 / 34
Page 16
Operation
Packing products
2.
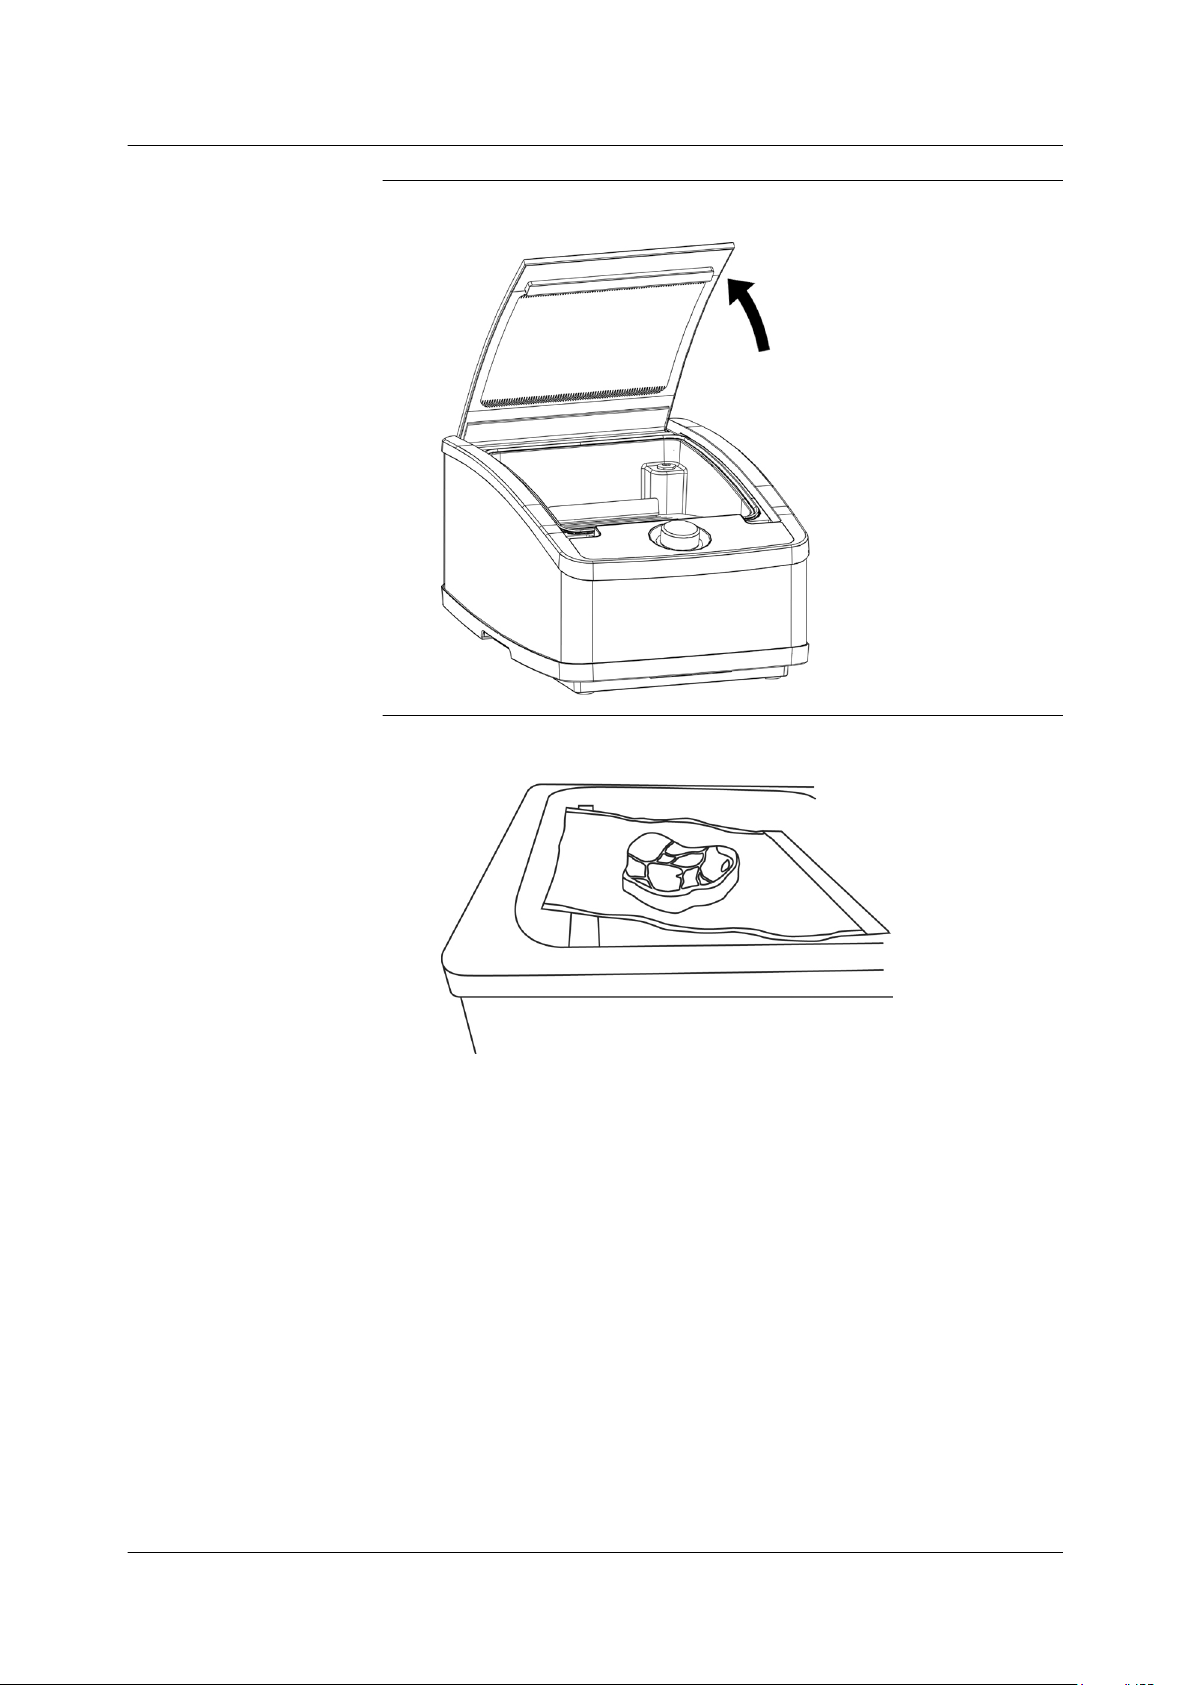
Open the chamber lid.
3.
Place the film pouch in the chamber.
3.1
Place the opening of the film pouch centrally on the sealing bar and smooth it flat.
The opening of the film pouch must be inside the cham-
ü
ber.
The film pouch must not hang over the sides of the seal-
ü
ing bar.
16 /
34
25.09.2017
Page 17
4.
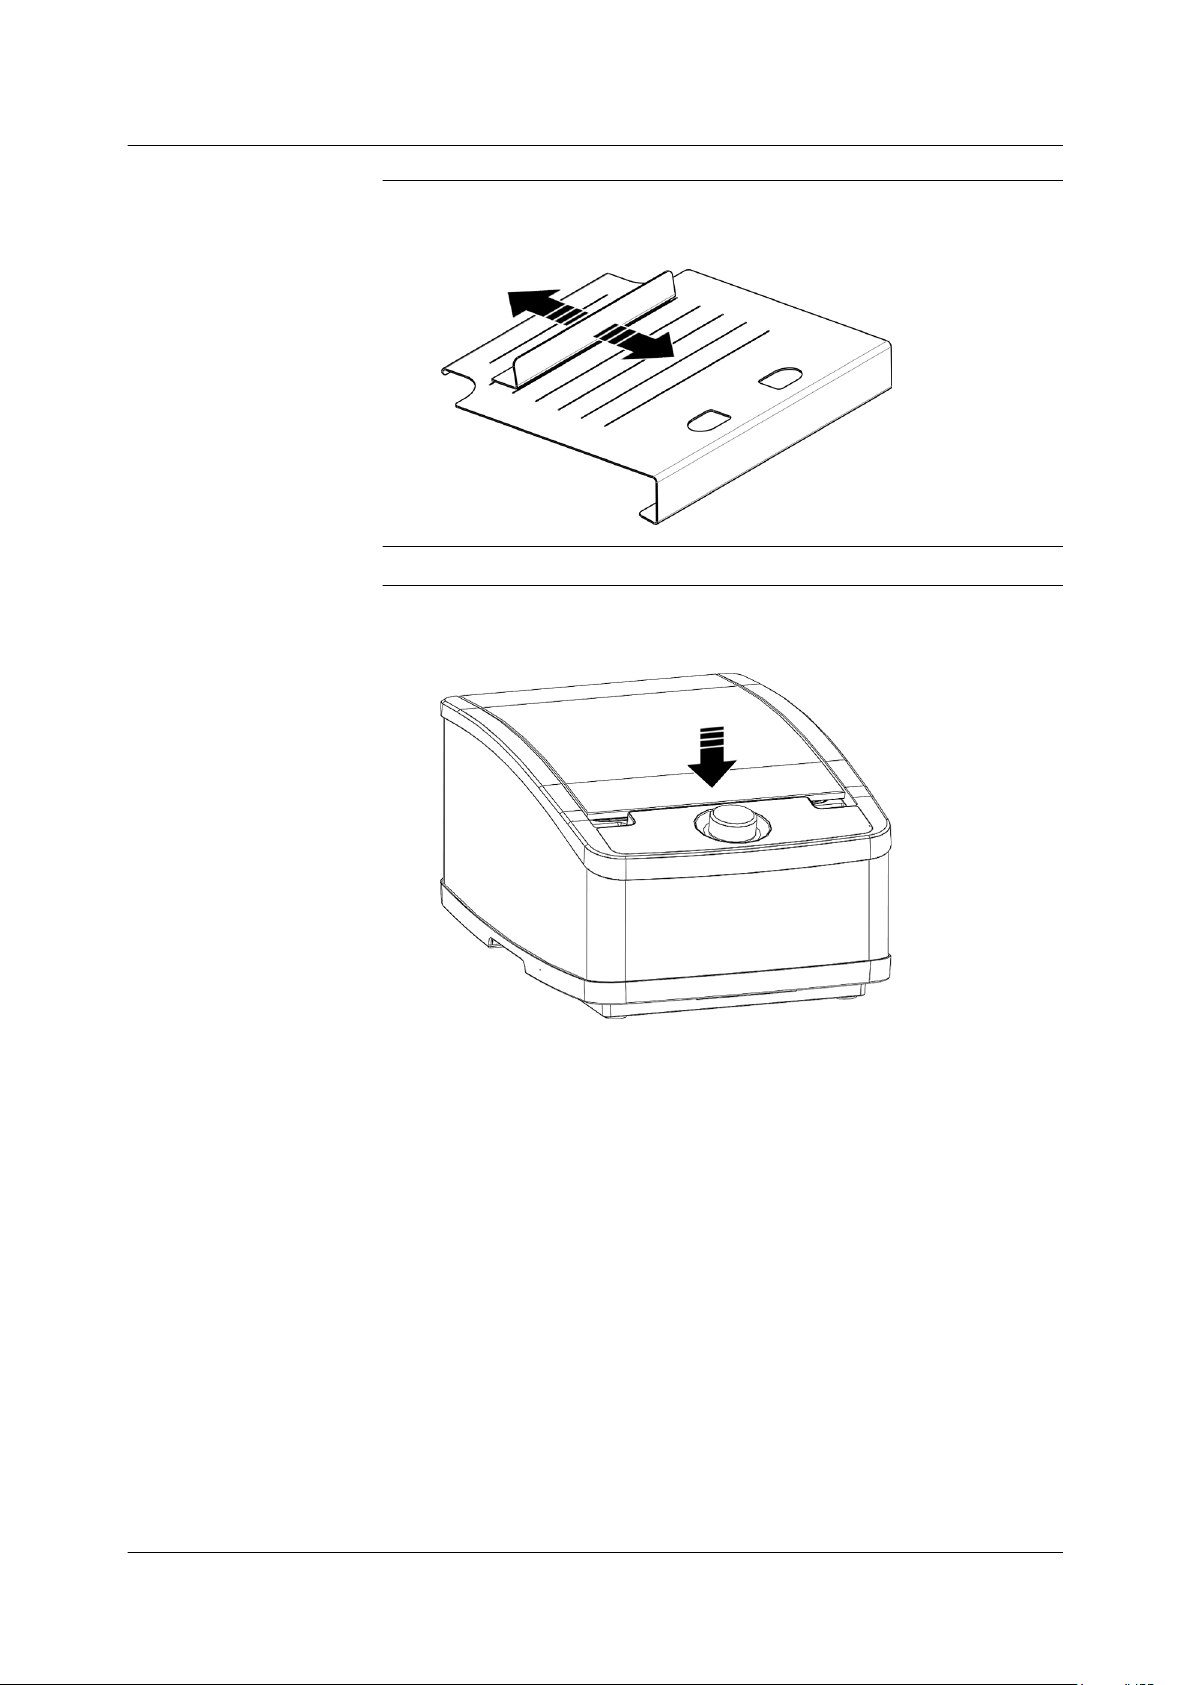
To avoid the film pouch slipping, adjust the support angle
to the length of the film pouch.
5.
Select the function required.
6.
Close the chamber lid, firmly press it closed and hold
pressed for 2 to 3 seconds.
Operation
Packing products
The packaging procedure starts and runs automatically.
ü
The packaging procedure takes up to 90 seconds.
ü
25.09.2017 17 / 34
Page 18

Operation
Packing products
7.
Open the chamber lid.
8.
Remove the pack from the chamber and detach the excess length of the film pouch.
9.
If no further products are to be packaged, switch the machine off.
18 /
34
25.09.2017
Page 19
Evacuating vacuum boxes or bottles
6.3 Evacuating vacuum boxes or bottles
1.
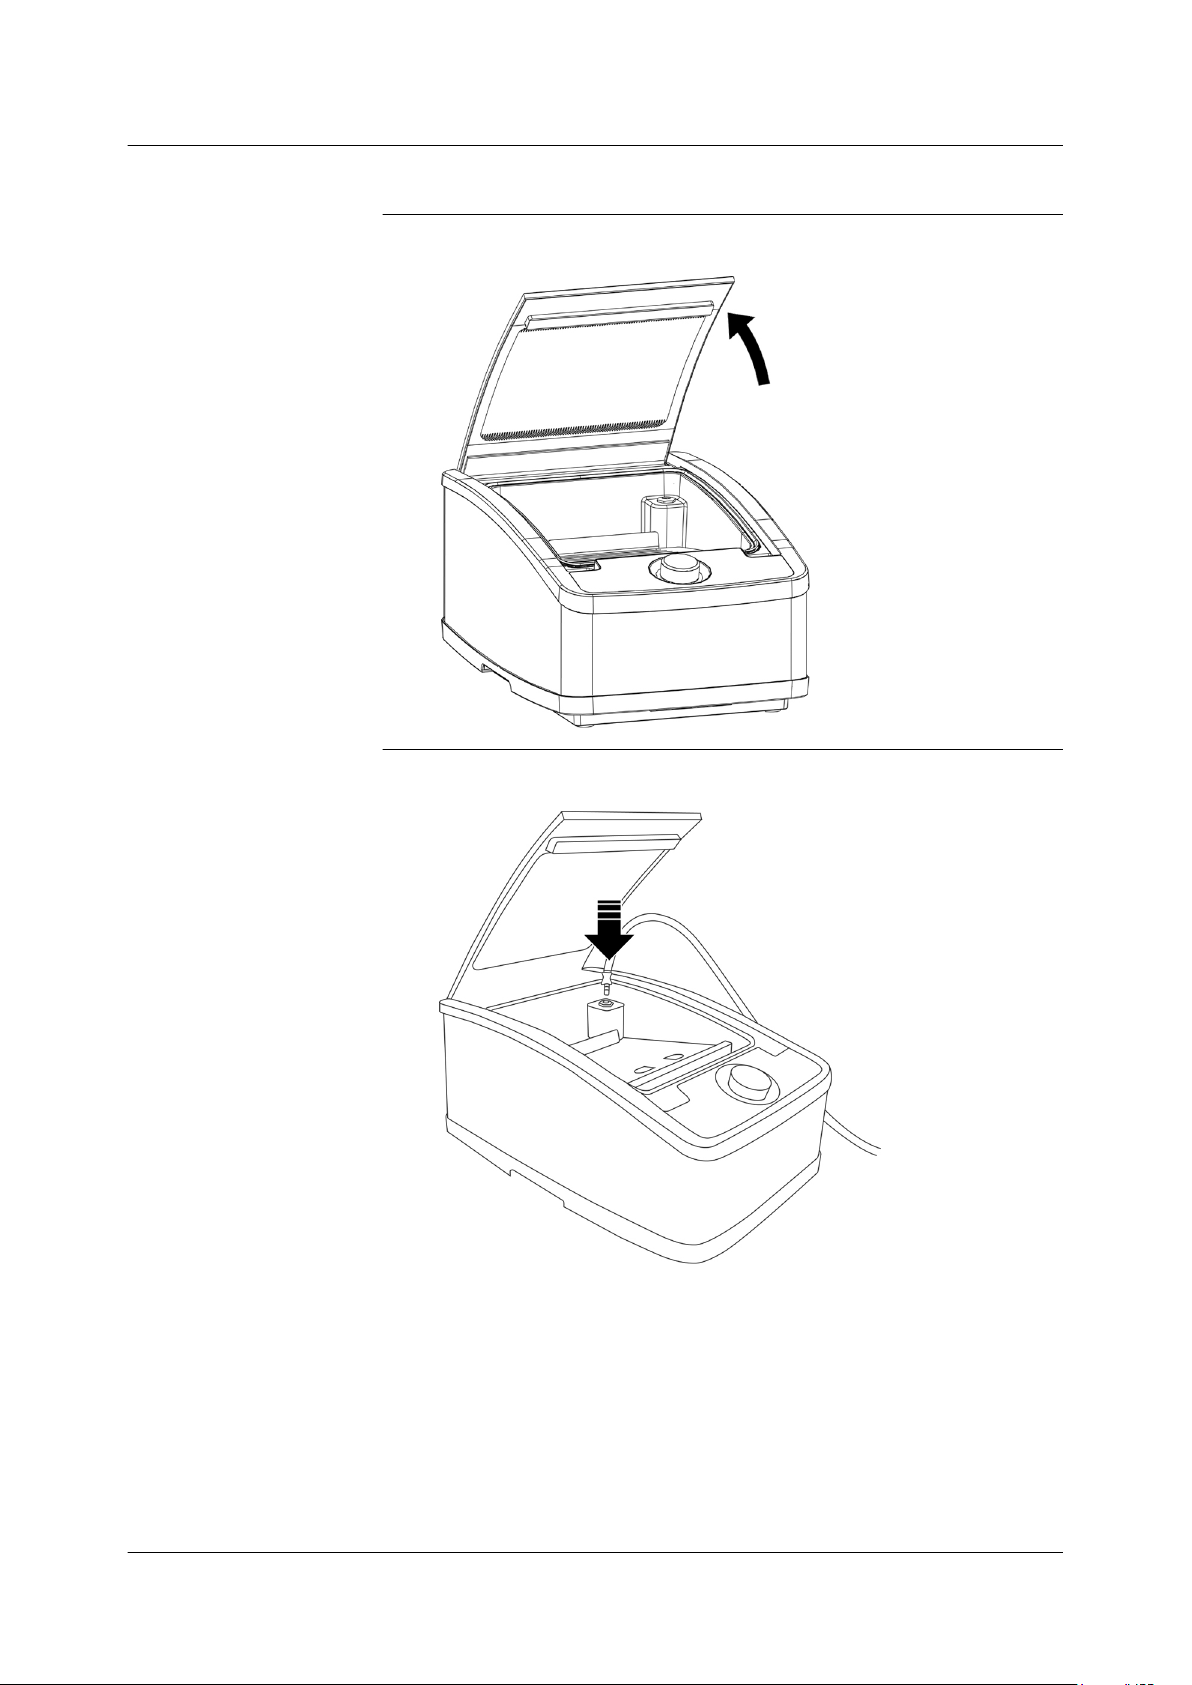
Open the chamber lid.
Operation
2.
Plug the vacuum hose into the suction opening.
25.09.2017 19 / 34
Page 20

Operation
Evacuating vacuum boxes or bottles
3.
If a bottle is to be evacuated, clean the vacuum stopper
and insert it into the bottle.
4.
Select the External vacuum
5.
Insert the other end of the vacuum hose onto the vacuum
function.
stopper or the valve of the vacuum box and hold firmly
during the evacuation process. Do not evacuate any bottles or vacuum boxes that have contents containing carbon dioxide.
6.
Press the <rotary knob>.
The evacuation starts. The pressure in the bottle or the
ü
vacuum box is shown on the display.
The machine stops when the optimal vacuum has been
ü
achieved.
20 /
34
7.
If no further bottles or vacuum boxes are to be evacuated,
switch the machine off.
Info
• Store the evacuated bottle upright.
• To ventilate the bottle, kink the valve in the vacuum stopper.
25.09.2017
Page 21

Operation
Changing favourites 1,2 or 3
6.4 Interrupting the evacuation
Info
The evacuation can be cancelled, e.g. if bubbles form in the film
pouch during the evacuation. To ensure that the film pouch is securely sealed, it can take several seconds before the evacuation stops.
1.
Press the <rotary knob> during the evacuation.
The evacuation is cancelled.
ü
The pack is sealed.
ü
6.5 Cancelling packing
1.
Press and hold the <rotary knob> longer than 2 s during
the packing.
The packing is immediately cancelled.
ü
The film pouch is not sealed.
ü
6.6 Changing favourites 1,2 or 3
1.
Select the desired favourite 1, 2 or 3 under Favourites.
2.
Press and hold the <rotary knob> until the vacuum value
flashes on the display.
25.09.2017 21 / 34
Page 22

Operation
Changing favourites 1,2 or 3
3.
Turn the <rotary knob> and set the desired vacuum.
4.
Press the <rotary knob>.
The selected vacuum is saved.
ü
22 /
34
25.09.2017
Page 23
Cleaning
Cleaning the machine
7 Cleaning
A clean and hygienic work environment is the basis for high-quality
packed food. For this reason, it is very important to regularly clean the
machine, the work environment and your hands before and after each
use and to keep them hygienically clean.
7.1 Cleaning the machine
Info
• The machine is not dishwasher safe.
• Clean the machine with a damp cloth using a conventional dishwashing liquid.
1.
Switch off the machine and disconnect the mains plug.
2.
Allow the sealing bar to cool down and remove it from the
machine.
3.
Remove the sloping insert and the support angle from the
machine.
4.
Clean the machine thoroughly.
5.
Clean the sealing bar, the sloping insert and the support
angle thoroughly.
6.
Wipe everything thoroughly dry with a clean and damp,
soft cloth. Remove all dishwashing detergent residue
while doing so.
7.
Leave everything to dry, or dry off with a clean, soft cloth.
25.09.2017 23 / 34
Page 24
Cleaning
Cleaning vacuum stopper for bottles
8.
Insert the sealing bar into the machine. The marking
points towards the front.
9.
Close the chamber lid.
10.
Plug the mains plug into the socket.
The machine is ready for operation.
ü
7.2 Cleaning vacuum stopper for bottles
1.
Remove the valve of the vacuum stopper.
2.
Clean the vacuum stopper and the valve either in the
dishwasher or thoroughly by hand.
24 /
34
3.
Leave the vacuum stopper and the valve to dry. Then
place the valve on the vacuum stopper again.
25.09.2017
Page 25

8 What to do if ...
Symptom Cause Solution
What to do if ...
The machine cannot be
switched on.
The machine does not
evacuate.
• The mains plug is unplugged. • Plug in the mains plug.
• The fuse is defective. • Insert a new fuse. See Section 9 "Spare parts
cessories" on page 28.
• The power cord is defective. • Use a new power cord. See
Section 9 "Spare
accessories" on page 28.
• The machine is defective. • Have the machine inspected
by the manufacturer or a service centre authorised by the
manufacturer.
• The machine is switched off. • Switch on the machine.
• The packaging procedure
does not start.
• The evacuation of the bottle or
the vacuum box does not
start.
• A function or a favourite was
not selected.
• Start the packaging procedure
by pressing on the chamber
lid.
• Start the evacuation by pressing the <rotary knob>.
• Select a function or a favourite.
and ac
parts and
• The machine is defective. • Have the machine inspected
The chamber lid is
closed and does not
suck despite the pump
running.
The pack is leaking. • When the chamber lid closes,
• The chamber lid was not
pressed firmly enough or long
enough.
• The chamber lid gasket is
dirty.
• The chamber lid gasket is
damaged.
the pouch neck is jammed in.
by the manufacturer or a service centre authorised by the
manufacturer.
• Press the chamber lid firmly
and hold pressed for 2 to 3
seconds.
• Clean the chamber lid gasket.
• Replace the chamber lid gasket.
• Insert the film pouch in such a
way that the opening of the
film pouch is inside the chamber. If necessary, use a smaller film pouch.
25.09.2017 25 / 34
Page 26

What to do if ...
Symptom Cause Solution
• The film pouch slides from the
sealing bar during the packaging procedure.
• Position the film pouch on the
sloping insert with the support
angle. Ensure that the opening of the film pouch is centred on the sealing bar and
does not jam when the chamber lid closes.
• The film pouch was incorrectly
positioned on the sealing bar.
• Place the film pouch in the
centre of the sealing bar.
• The film pouch must not hang
over the sides of the sealing
bar.
• The film pouch was not completely sealed.
• Place the film pouch in the
centre of the sealing bar.
• The film pouch must not hang
over the sides of the sealing
bar.
• The film pouch is overfilled. • Fill an unused film pouch with
less product.
• The film pouch is damaged. • Use a new film pouch.
The seal seam is uneven and wavy.
The pack is not evacuated enough.
• The film pouch is unsuitable. • Use a sealable film pouch.
• The seal seam is dirty. • Keep the seal seam of the film
pouch clean.
• The sealing bar is dirty. • Clean the sealing bar.
• The sealing bar damaged. • Replace the sealing bar.
• The Teflon tape of the sealing
• Replace the sealing bar.
bar is worn out.
• The selected function or the
selected vacuum is not suita-
• Select a function or a vacuum
that is suitable for the product.
ble for the product.
• The product is too warm. • Cool the product down before
packing.
• The product is too liquid or too
• Freeze the product.
moist.
• The evacuating was cancelled
by pressing the <rotary knob>.
• Fill the product in an unused
film pouch and pack it again.
26 /
34
25.09.2017
Page 27

Symptom Cause Solution
What to do if ...
The packed food becomes mouldy or perishes faster than it
should.
The pack swells up during storage.
• The chamber lid does not sit
tight on the chamber lid gasket.
• Check whether the chamber
lid gasket is unclean or damaged. If necessary, clean or
replace the chamber lid gasket.
• The food was contaminated
when it was packed.
• Only pack fresh foodstuffs.
• Ensure a sufficient level of hygiene when packing.
• A film pouch was used several
times.
• A foodstuff that was stored for
a long time was then packed.
• Only use the film pouches
once and do not reuse them.
• Only pack fresh foodstuffs.
• Pack food immediately and do
not store it prior to packing.
• Observe the cool chain for
perishable foodstuffs.
• An unsuitable film pouch was
used.
• Use a suitable film pouch.
Section 5.4 "Film
pouch" on
page 13.
• The foodstuff is fermenting. • This food is not suitable for
vacuum packing in this state.
Treat the food before packing,
e.g. by blanching, frying etc.
See
When removing the excess length of the film
pouch, the seal seam is
uneven or pulls threads.
• The sealing bar is overheated. • Let the sealing bar cool down.
• Before removing the excess
length of the film pouch, let
the film pouch cool down for
20 to 30 seconds.
25.09.2017 27 / 34
Page 28

Spare parts and accessories
9 Spare parts and accessories
Use only original MULTIVAC spare parts and original MULTIVAC accessories.
The spare parts and the accessories are available from the MULTIVAC home webshop.
1 Quick Start Guide
2 Film pouch
3 Instruction manual
4 Power cord (Europe type 303/303A)
5 Vacuum hose
6 Vacuum stopper
7 Sloping insert with support angle
8 Sealing bar
9 Chamber lid gasket
28 / 34 25.09.2017
Page 29
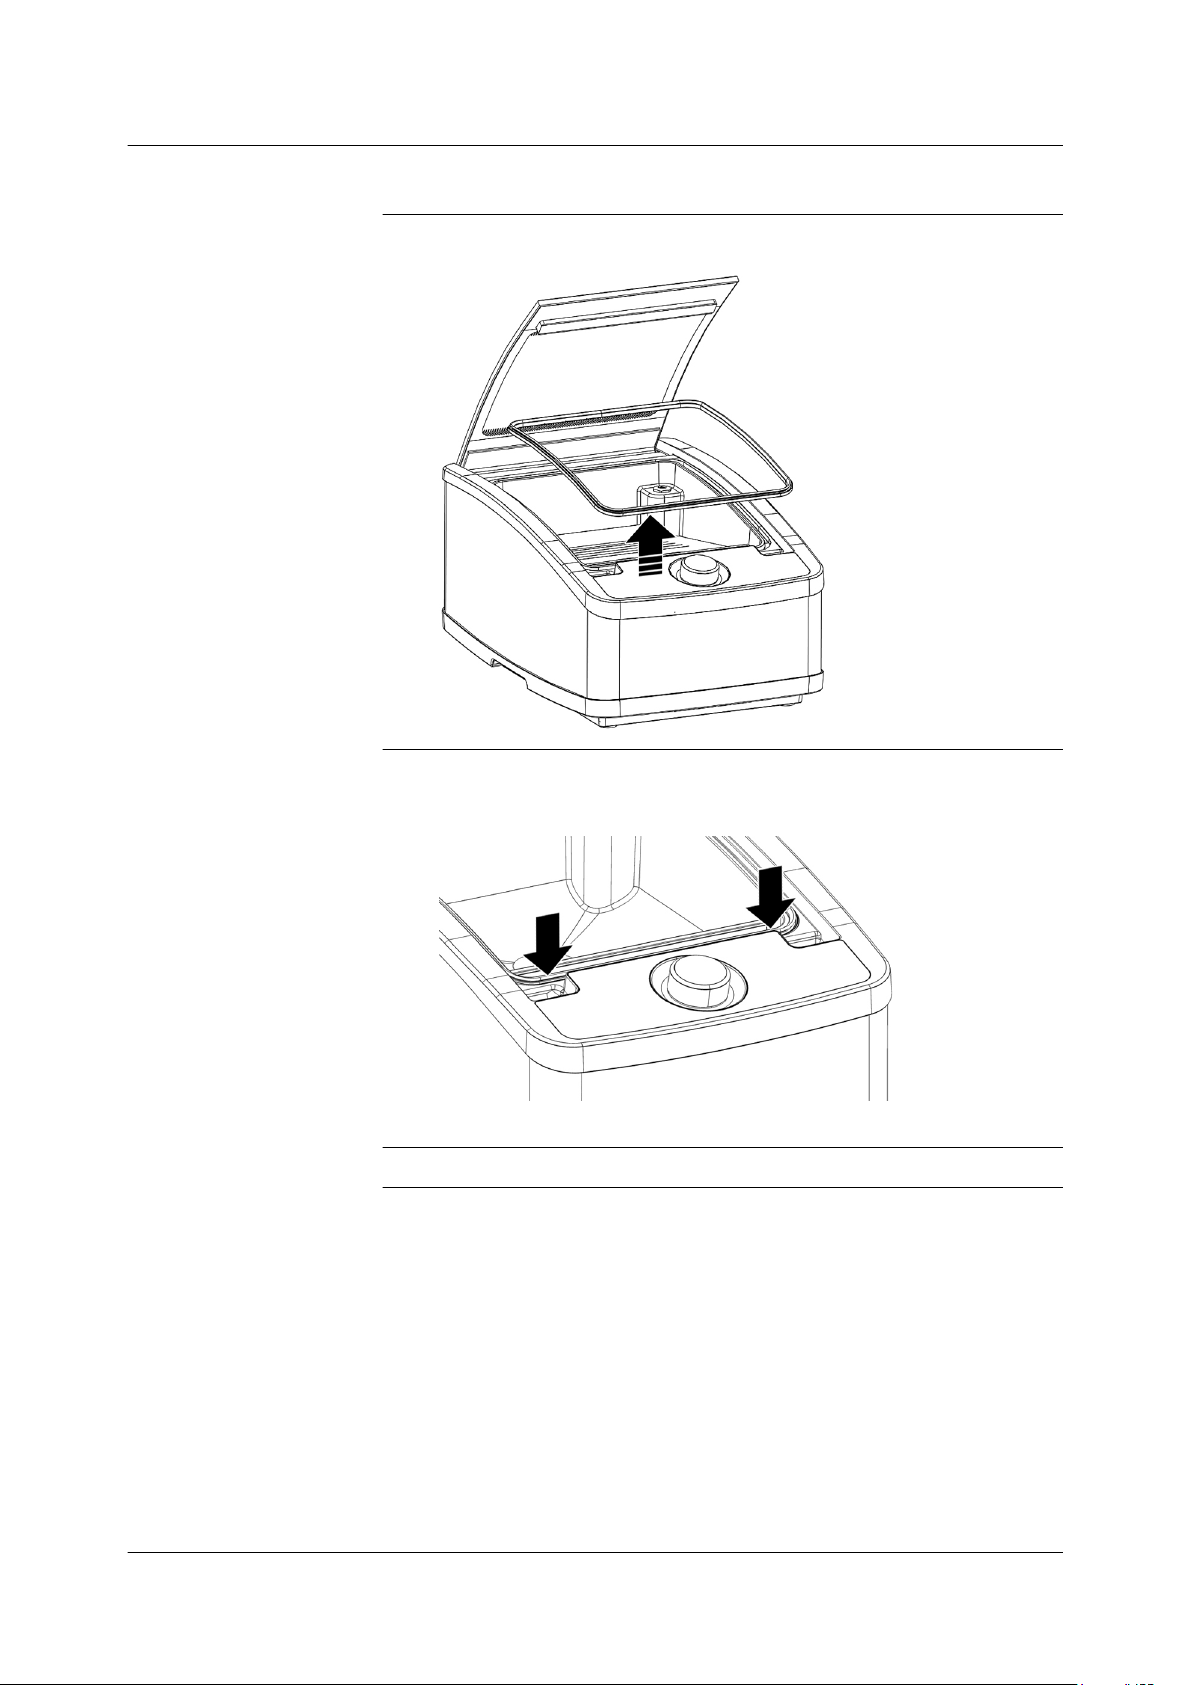
9.1 Changing the sealing bar
1.
Pull out the sealing bar.
Spare parts and accessories
Changing the sealing bar
2.
Insert the sealing bar into the machine. The marking
points towards the front.
25.09.2017 29 / 34
Page 30
Spare parts and accessories
Changing chamber lid gasket
9.2 Changing chamber lid gasket
1.
Remove the chamber lid gasket from the groove.
2.
Press the chamber lid gasket into the groove. When doing
this, do not stretch the chamber lid gasket.
The opening of the chamber lid gasket points outwards.
ü
3.
Smooth the chamber lid gasket flat.
30 /
34
25.09.2017
Page 31

Disposal
10 Disposal
• Packaging
The packaging is recyclable. Feeding the packaging material back
into the material cycle saves on raw materials. Return the packaging material to the appropriate collection point or the manufacturer.
• Old machine
All electrical and electronic machines contain materials that are still
valuable. However, the machines can also contain dangerous or
damaging materials. Therefore these machines must not be disposed of in household rubbish.
Return the machine to the local collection point for processing
used electrical and electronic appliances or return it to the manufacturer.
25.09.2017 31 / 34
Page 32

Technical specifications
11 Technical specifications
Machine technical specifications
Mains voltage 220 V to240 V 50 Hz / 60 Hz
Rated power 0.1 kW
Machine dimensions
(Width x height x length)
Usable chamber size
(Width x height x length)
Maximum size of the film pouch
(Width x length)
310 mm (12.2 in) x 225 mm
(8.86 in) x 480 mm (18.9 in)
200 mm (7.87 in) x 100 mm
(3.94 in) x 230 mm (9.06 in)
200 mm (7.87 in) x 300 mm
(11.81 in)
Sealing length 210 mm (8.27 in)
Weight approx. 12.2 kg (26.9 lb)
Suction power of the vacuum
2.5 m³/h (11.01 gal/min)
pump
Minimum technically achievable
< 15 bar (217.56 psi)
vacuum pressure
Noise emission < 70 dB
Installation conditions and ambient conditions
Ambient temperature 10 °C (50 °F) to 30 °C (86 °F)
Storage temperature -25 °C (-13 °F) to 80 °C (176 °F)
32 /
34
Relative air humidity during oper-
85 % non-condensing
ation or storage of the machine,
max.
Requirements for the location of
the machine
• Level surface
• Horizontal surface
• Sufficient load bearing capacity
Minimum distance from all side
100 mm (3.94 in)
panels and rear panel of the machine
Free space above the machine 300 mm (11.81 in)
25.09.2017
Page 33

EU Declaration of Conformity
MULTIVAC Sepp
Haggenmüller SE & Co. KG
Manufacturer TypeType
The manufacturer declares, with sole responsibility, that the packaging machine described above fulfills
the following relevant harmonisation legislation of the Union:
- 2014/35/EU - Low Voltage Directive
- 2014/30/EU - Electromagnetic Compatibility (EMC) Directive
Relevant harmonised norms used as a basis:
- DIN EN 60335-1:2012-10; VDE 0700-1:2012-10 Safety of electrical devices for domestic use
and similar purposes - Part 1: General requirements
- DIN EN 60335-1 amendment 1:2014-04; VDE 0700-1 amendment 1:2014-04
- DIN EN 60335-1 amendment 2:2014-11; VDE 0700-1 amendment 2:2014-11
Packaging machine C010
Wolfertschwenden, 01/07/2016
H.-J. Boekstegers
Managing Director
MULTIVAC Sepp Haggenmüller SE & Co. KG • Bahnhofstr. 4 • 87787 Wolfertschwenden • Germany
Language: EN – Original Document
egkonform_home_EN01.fm
Tel. +49(0)8334 601-0 • Fax +49(0)8334 601-199 • www.multivac.com
Page 34

Index
Index
A
Accessories
28
Air humidity 32
Ambient conditions
Ambient temperature
32
32
B
Bottles, evacuating 19, 20
Boxes, evacuating 19, 20
C
Cancelling, packing
21
Chamber size 32
Control panel 8, 9
D
Disposal
31
E
EU Declaration of Conformity
Evacuation, interrupting 21
33
R
Rated power
32
Relative air humidity 32
S
Sealing bar, changing 29
Sealing length 32
Setting up the machine 10, 11
Sloping insert, inserting
11
Spare parts 28–30
Starting up the machine 10, 11
Storage temperature
Switching off
Switching on
12
12
32
T
Technical specifications
32
Tips about packing 13
Tips about the product
Tips for the film pouch
13
13
Troubleshooting 25–27
Type plate
8
F
Favourites 1,2,3, changing 21, 22
Film pouch 13, 14
Function, selecting
15
Fuse 8, 25
H
Hygiene
Hygiene tips
13
13
I
Installation conditions 32
M
Machine, cleaning
Mains voltage
23
32
O
Old machine 31
P
Packaging 31
Packing products 15–18
Packing, cancelling 21
Product 13
V
Vacuum packing 15
Vacuum value, changing 21, 22
Value, setting
15
W
Weight
32
34 /
34
25.09.2017
Page 35

Page 36

MULTIVAC
Sepp Haggenmüller SE & Co. KG
Bahnhofstr. 4
87787 Wolfertschwenden
Germany
Tel.: +49 8334 601-0
www.multivac.com
3:27EN
107975857
 Loading...