

Page 1
Bluetooth Mesh 40W LED Driver
User Guide
SMART LED DRIVER
Page 2
Module Features
1
HLD503-B-CT is a 40w constant LED driver embedded bluetooth mesh module.It works
w i t h c c t o r d i m m a b l e p a n e l , d o w n l i g h t c e l l i n g l i g h t .
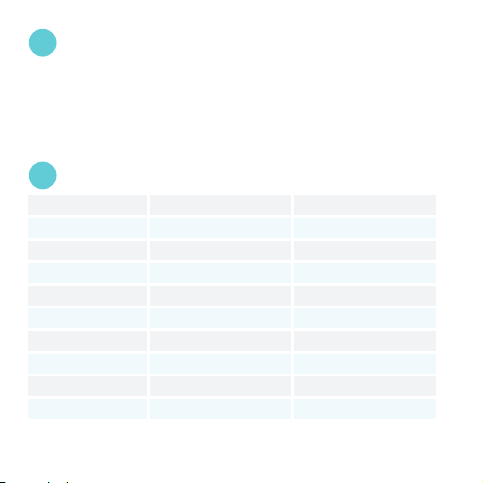
Environment and Electrical Parameters
2
Para meters
Inp ut power
Cha nnels
Out put Cur rent
Out put DC
PF
EFF ICIEN CY
Wire less fr equen cy
Ope ration t empera ture
No la nd power
HLD 503-B -CT
100 -277VAC
40 Cha nnels
950 mA MAX
24- 38V
> 0.9
Max 8 5%
2.4 GHz
-20℃ to 40℃
< 0. 5W
HLD 503-B -SC
100 -277VAC
40 Cha nnel
950 mA MAX
24- 38V
> 0.9
Max 8 5%
2.4 GHz
-20℃ to 40℃
< 0. 5W
1
Page 3
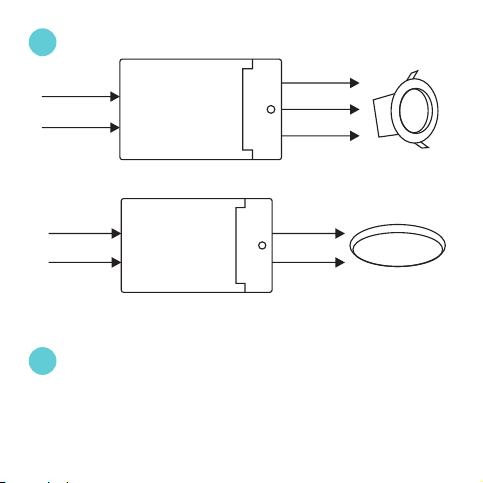
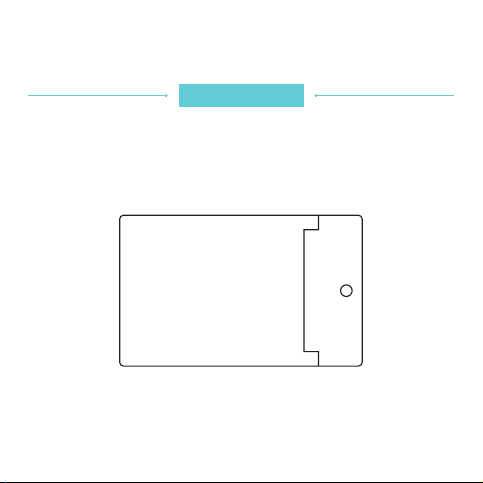
Wiring Diagram
3
ACL
ACN
HLD5 03-B- CT
W-
C-
V+
CCT Do wnlig ht
ACL
ACN
HLD5 03-B- SC
Restore Factory Setting
4
Ste p 1. Power o n and wai t 2seco nds.
Ste p 2. Power o ff, and wai t above 3 secon ds.
Ste p 3. Repea t 1st step a nd 2nd st ep 3 time s.
Ste p 4. Then p ower on, lig ht will ke ep flas hing.
C-
V+
Ceil ing
2
Page 4

5
Installation
Install the app on your smart phone or table device.
5.1
iOS: Search for and download the “iBLEs” app in the APP Store or download it directly by
5.2
scanning the iOS QR code below.
Android: Search for and install the “iBLES” app from the Google Play Store or download it
5.3
directly by scanning the android QR code below.
iOS
iBLEs App User Guide
6
6.1
Connecting your Bluetooth Device
With Bluetooth on your mobile device switched on,
run the iBLES App. Once the connection between
your mobile/ tablet device and touch switch is
established the main menu will appear.
If the connections fails, iBLEs will automatically
continue to attempt to pair the devices in the
background.
NOTE: Only one parent phone/ tablet device can be
connected to your switches in this manner.
Additional mobile/ tablet devices can then be given
access to the switches by synchronizing with the
parent mobile/ tablet device.
Android
Devices
Loa ding. ..
We are co nnect ing you t o your Bl uetoo th
netwo rk.
3
Page 5

6.2
Add Device
Click to find devices. New devices will begin to
populate the list. Select and pair the devices.
Devices
Fin d Device s
Dimma ble lig ht 1
CCT Li ght 1
CCT Li ght 2
4
Page 6
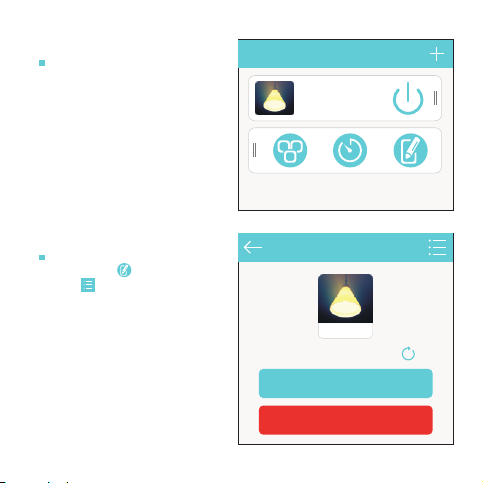
6.3
Accessing the Functions Menu
Once device has been paired, the user may view
the functions menu by swiping across on the device
in the main menu list.
6.3.1
Edit Devices
Once in the functions menu the user may click
on the edit button followed by the menu
button to:
- Change device name
- Synchronize time
- Test Device
- Delete device.
NOTE: If the time on the bluetooth device is
different from that of the mobile device, the timer
function will not operate accurately. To avoid this,
ensure that the two device times are synchronized.
Devi ces
CCT Li ght
Edit D evice s
CCT Li ght
Device Time: 2016-07-25 17:25:10
Sync Ti me
Try me!
5
Page 7

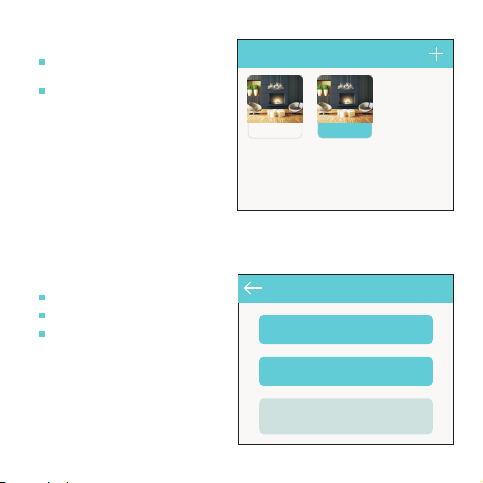
Add/ Edit Group
6.3.2
Once in the functions menu (ref 5.3), click on
to add group.
The user may click on the edit button to
delete the group or modify the group name. Click
“Select Device” to add devices to your new group.
NOTE: One device can be stored in up to 4 groups.
Once this is exceeded the device will no longer
appear in the “Select Device” listing for future
groups.
Add/ Edit Timer
6.4
Click button to add the timer function. Within
the timer function, set the time, week and how
often you wish the timer to repeat. The device can
then be set.
Click the button to add an on & off timer.
Long press the timer button to edit or delete the
timer.
NOTE: Each device can support up to 8 timers only.
17:30
Edit G roup
Group 1
Selec t Devic e
Try me!
Tim er
S M W T F ST
40% 80%
6
Page 8

Add Scene
6.5
Click to add scene, then click to edit
scene name or delete the scene.
Click Select Device to select devices and preset
status.
NOTE: The user may set the device status in the
“Select Device” menu by clicking on the left most
section of the select option.
Sce ne
Edit S cene
All On
Selec t Devic e
7
Page 9
Control/ Edit Scene
6.6
Click the scene icon to view or set the preset status
of the devices in this scene.
Long press the scene icon to edit or delete the
scene.
6.7
Data Synchronization
Export data to SD Card. (For Android App only)
Import data from SD card. (For Android App only)
Import data from WLAN - Prior to proceeding,
ensure that the 2 mobile devices are connected to
the same WLAN and are running the iBLEs app.
Once this is done, click on “import from WLAN” and
find the synchronized mobile device. Once the
device accepts synchronization will begin.
NOTE: Ensure you backup your iBLEs database. This
will ensure any lost data can be recovered and will
avoid any factory reset’s that may be required.
Scene
All Off
All On
Import Data
Import from SD Card
Finding Mobile Device…
HUAWEI G750-T00(192.168.31.156)
8
Page 10

Thi s device c ompli es with p art 15 of t he FCC Ru les. Op eratio n is subj ect to th e condi tion th at this
devi ce does n ot caus e harmf ul inte rferen ce (1) th is devi ce may not c ause ha rmful i nterfe rence ,
and ( 2) this d evice mu st acce pt any int erfere nce rec eived , inclu ding in terfere nce tha t may cau se
und esired o perat ion.
Cha nges or mo dific ation s not exp ressly a pprov ed by the p arty res ponsi ble for c ompli ance cou ld
void t he user 's auth ority t o operat e the equ ipmen t.
NOTE : This eq uipme nt has be en teste d and fou nd to comp ly with t he limi ts for a Cl ass B dig ital
devi ce, pur suant t o Part 15 of t he FCC Ru les. Th ese lim its are d esign ed to prov ide rea sonab le
prot ectio n again st harmf ul inte rferen ce in a resi denti al inst allat ion. Th is equi pment ge nerate s,
use s and can ra diate ra dio fre quenc y energy a nd, if no t insta lled an d used in a ccorda nce wit h the
inst ructi ons, ma y cause h armfu l interf erence t o radio co mmuni catio ns. How ever, ther e is no
gua rantee t hat inte rferen ce will n ot occu r in a part icula r instal latio n.
If th is equi pment do es caus e harmf ul inte rferen ce to radi o or tele visio n recept ion,w hich ca n be
dete rmine d by turn ing the e quipm ent off a nd on, th e user is e ncoura ged to tr y to corre ct the
inte rferen ce by one o r more of t he follo wing me asure s:
-- Reo rient o r reloca te the re ceivi ng anten na.
-- In crease t he sepa ratio n betwee n the equ ipmen t and rec eiver.
-- Co nnect t he equi pment in to an out let on a ci rcuit di fferen t
from t hat to wh ich the re ceive r is conn ected .
-- Co nsult t he deal er or an exp erien ced rad io/TV t echni cian for h elp.
To maint ain com plian ce with F CC’s RF Ex posur e guide lines , This eq uipme nt shou ld be ins talled
and o perate d with mi nimum d istanc e betwe en 20cm t he radia tor your b ody: Us e only th e
sup plied a ntenna .
FCC ID : 2AJ7 E-HLD5 03-B
9
 Loading...