

Page 1
Ethernet-ZigBee Gateway
User Manual
HGW735
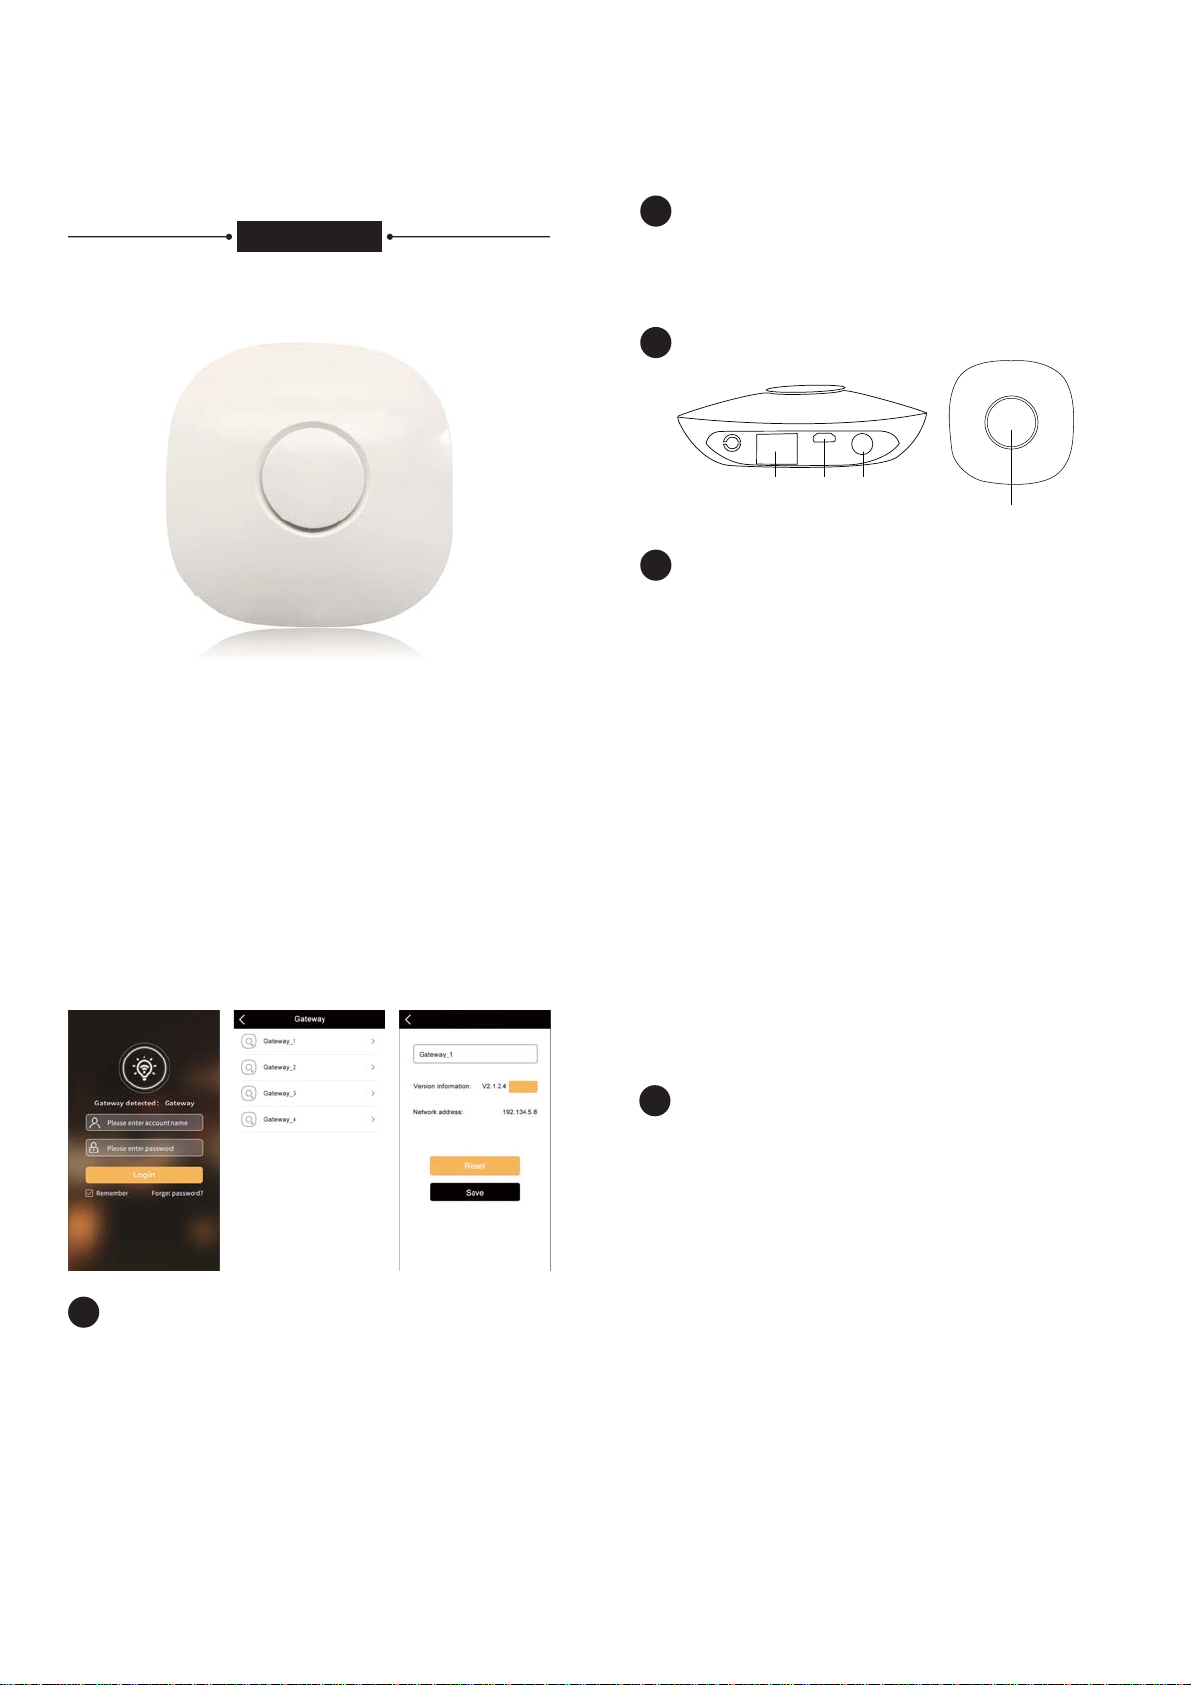
Product Introduction
1
HGW735 is a ZigBee HA1.2 gateway with Ethernet interface. It works with
other ZigBee HA devices. With the App downloaded from App Store or
Google Play to mobile phone or tablet, users can set account/ area/ scene/
schedule/ group/ binding with the gateway.
Product Parameters
2
Edit a gateway
upgrade
Gateway
4
Pic2Pic1
Pic3
4.1.Add a gateway
Power on the gateway before opening the App “iLightsIn Pro” and entering
into the Login menu. Short press round button in the middle of the gateway
and the gateway information will display in Login menu. Then users may
login with the default administrator account.
Default user name: Admin
Default password:00000000
Each gateway supports max 100 devices.
5v 500mA
Reset
Report gateway information to App
RJ45 DC In
App Download
3
Mobile OS: Android 4.1 or higher/ iOS 9.0 or higher
iOS: Search “iLightsIn Pro” and install from App Store
Android: Search “iLightsIn Pro” and install from Google Play
Windows: Please contact us to get installer package
4.2.Edit a gateway
Click Setting/ Gateway list. Click a gateway to rename, recover default
settings, delete, and set parameters (pic 2&3).
Device
5
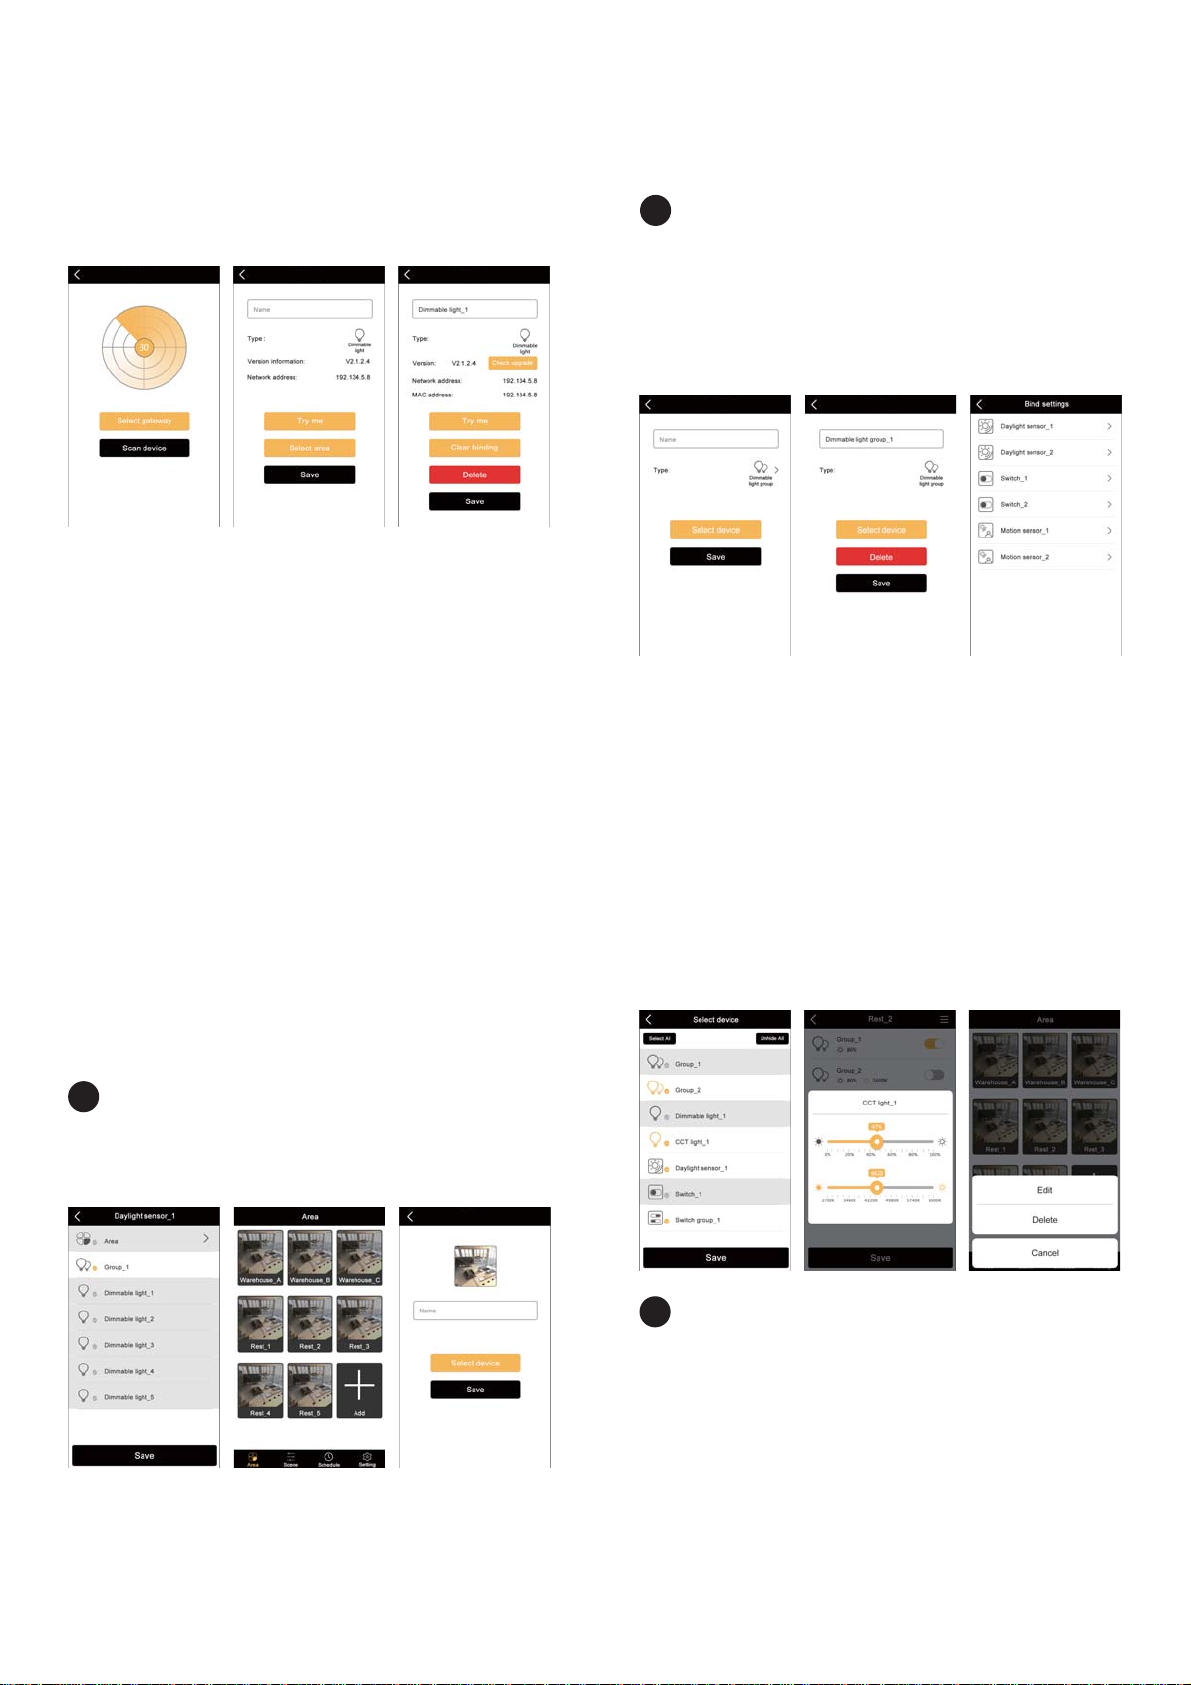
5.1.Add a device
Power on initial devices and gateway for adding operation. Max 20 initial
devices are allowed for each power up. Open App and select the gateway
from Setting/ Add a device. Click Scan device and the gateway will start
to search automatically (pic 4). Click the device from search list to rename.
Click Try me to check if the device is connected or where the device is
located. Select area is to put these found devices into it (pic 5). Keep all
first 20 initial devices added successfully on, then power on other 20 initial
devices. Follow the same procedure until the gateway finishes adding all
devices needed. The initial device can be searched by gateway in 30
minutes after power on. After adding devices, users can start to control
them from corresponding areas. When multiple gateways are needed under
the same LAN, power off the gateways and devices already added, and
power on the new gateway and initial devices. If you want to add the device
in previous gateway to a new one, reset the device first.
a.Delete the device on App while the device and its gateway are power on.
b.Reset the device to initial settings by physical switch. Please refer to
device user manual for detailed steps.
Attention: When there’s no proper area to put a device, create a new area
Page 2
by clicking ‘+’ upper right corner of the app. Max 20 areas are allowed to be
created per gateway per user account. Each area supports max 100
devices and 30 groups.
Add a device
Add a device
Edit a device
Group
6
6.1.Add a group
Users can put same-type devices into a group. The devices in the group
access synchronization effects. From Settings/ Add a group, you can input
group name, choose group type, and select devices to add into the group
(pic 7).
Attention: When saving the group setting, the gateway and devices in that
group are required to be powered on. Each gateway supports max 30
groups.
Add a group
Edit a group
Pic4
Pic5
Pic6
5.2.Edit a device
From Setting/ Edit a device on App, users can rename the device,
clear binding, and delete the device. When a new version has been
detected for this device, the Upgrade button will be activated. Users
can decide to update or not (pic 6).
6.2.Edit a group
Click the group from Settings/ Edit group. Edit a group, delete a group, etc
(Pic 8).
Binding settings
7
From Binding settings, users are able to bind sensors, remote control,
switches that ever added with the lights. The gateway and devices to be
bound are required to be powered on during binding process. It can be
done on App, Setting/ Binding settings (Pic 9&10).
Add an area
Pic8
Pic9Pic7
Pic11Pic10 Pic12
Pic13 Pic14 Pic15
Area
8
8.1.Add an area
Click Area to enter into the menu. Add an area by clicking ‘+’ (pic 11). Name
the area and choose a photo for this area. Select device to choose the
devices for this new area.
Attention: Priority in this system goes like, Area – Group – Single Device.
Each area supports max 100 devices and 30 groups.
8.2.Area Sub Menu
Click one of the area to enter into sub-menu of this area. Users can control
Page 3

a single device or a group of devices here. Click upper right corner icon to
choose a sorted manner for easier search of a group or a device. Move the
slider to change color temperature or brightness (pic14).
8.3.Edit an area
Long press an area to display pop-up menu. Edit or delete the area (pic 15).
Add a scene
Pic18Pic16 Pic17
Scene
9
9.1.Add a scene
The system provides one-click scene function where users simple click a
button to make different devices go to different preset statuses. Click
“Scene” and add a new scene by clicking “+”. Name the scene and choose
a photo for the scene. Users can add fixtures, schedules and sensors into
the scene with different preset statuses. Max 30 scenes are allowed to be
created per user account per gateway. Each scene supports max 20
devices or groups.
9.2.Edit a scene
From the Scene menu, long press a scene to edit, check details and delete
the scene (pic 19).
Add a schedule
Pic19 Pic20 Pic21
Schedule
10
10.1.Add a schedule
Schedules allows users to add a schedule on a single device or different
devices to realize smarter control over the device(s). Click upper right
corner icon “+” to set up a schedule (pic 20). Choose a start time and an
end time. Select devices with different statuses to start and to end (pic 21).
Click on Repeat and toggle among no-repeat, repeat every week and Run
sequentially (pic 22). If click Run sequentially, choose running days and
when finished the next schedule will start automatically (pic 21). Max 20
Pic24Pic22 Pic23
schedules are allowed to be created per gateway per user account. Each
schedule controls up to 20 devices or groups.
10.2.Edit a schedule
From the Schedule menu, long press a Schedule to edit, sort, check
details, delete the Schedule(pic 23).
Add a sub account
Account Management
11
Pic26Pic25
Edit a sub account
Pic27
11.1.Administration Account & Sub Accounts
One gateway supports management up to 11 user accounts:
Page 4

1 Administration Account and 10 Sub Accounts. Administration account is
authorized to allocate devices to the sub accounts, delete and modify
passwords for sub accounts, and control authority for all devices. Sub
account is authorized to change own password and control devices under
its account. Add a sub account from on App, Settings/ Account manage-
ment – upper right “+” (pic 24). Name the sub account and modify
password, allocate devices for the sub account (pic 25&26). A sub account
is able to manage its own area, scene and schedule.
11.2.Edit an account
Go to account list from Setting on App. Click the sub account to edit or
delete (pic 27).
This device complies with part 15 of the FCC Rules. Operation is subject to
the condition that this device does not cause harmful interference (1) this
device may not cause harmful interference, and (2) this device must accept
any interference received, including interference that may cause undesired
operation.
Changes or modifications not expressly approved by the party responsible
for compliance could void the user's authority to operate the equipment.
NOTE: This equipment has been tested and found to comply with the limits
for a Class B digital device, pursuant to Part 15 of the FCC Rules. These
limits are designed to provide reasonable protection against harmful
interference in a residential installation. This equipment generates, uses
and can radiate radio frequency energy and, if not installed and used in
ac
cordance with the instructions,
communications. However, there is no guarantee that interference will not
occur in a particular installation.
If this equipment does cause harmful interference to radio or television
reception,which can be determined by turning the equipment off and on, the
user is encouraged to try to c
following measures:
-- Reorient or relocate the receiving antenna.
-- Increase the separation between the equipment and receiver.
-- Connect the equipment into an outlet on a circuit different
from that to which the receiver is connected.
-- Consult the dealer or an experienced radio/TV technician for help.
To maintain compliance with FCC’s RF Exposure guidelines, This equipment should be installed and operated with minimum distance between
20cm the radiator your body: Use only the supplied antenna.
FCC ID: 2AJ7E-HGW735
may cause harmful interference to radio
orrect the interference by one or more of the
 Loading...