

Homa Technologies JSC NEPHUBL001 Users manual
NEPTUNE IoT HUB LITE - QUICK START GUIDE
⑪
⑫
⑬
⑭
⑯, ⑰
⑮
⑯
⑰
⑱
①
②
③
④
⑤
⑥
⑦
⑧
+
WiPoN
TM
Backhaul
+ Cascaded LAN
-
LAN modem
to hub
(bridge mode)
These devices
will be on different IP segments
.
1. ABOUT YOUR NEPTUNE
The Neptune IoT Hub Lite is not only a professional AC3000 Tri-Band WiFi router that provides data assessment for client
devices such as laptop, cellphones, printers, cameras…but also a smart hub to connect Internet of Things (IoT) devices
through either Zigbee or WiFi protocols. It can also connect Z-wave IoT devices and 3G/LTE network through USB dongles.
To extend the network, you can connect more Neptunes together through Homa’s propriety technology WiPoNTM
(Wireless-Powerline Network). The backhaul connections between Neptunes are setup using both WiFi and Powerline
Communications (PLC) which ensures maximum coverage and worry-free connectivity to every corner of a large house.
The product box includes the following items: (1) main wireless router and smart controller, (2) G.hn PLC – AC/DC power
adapter, (3) Ethernet and DC power Y-cable, (4) AC power cable, (5) ceiling/wall mounting kits, and (6) Quick Start Guide.
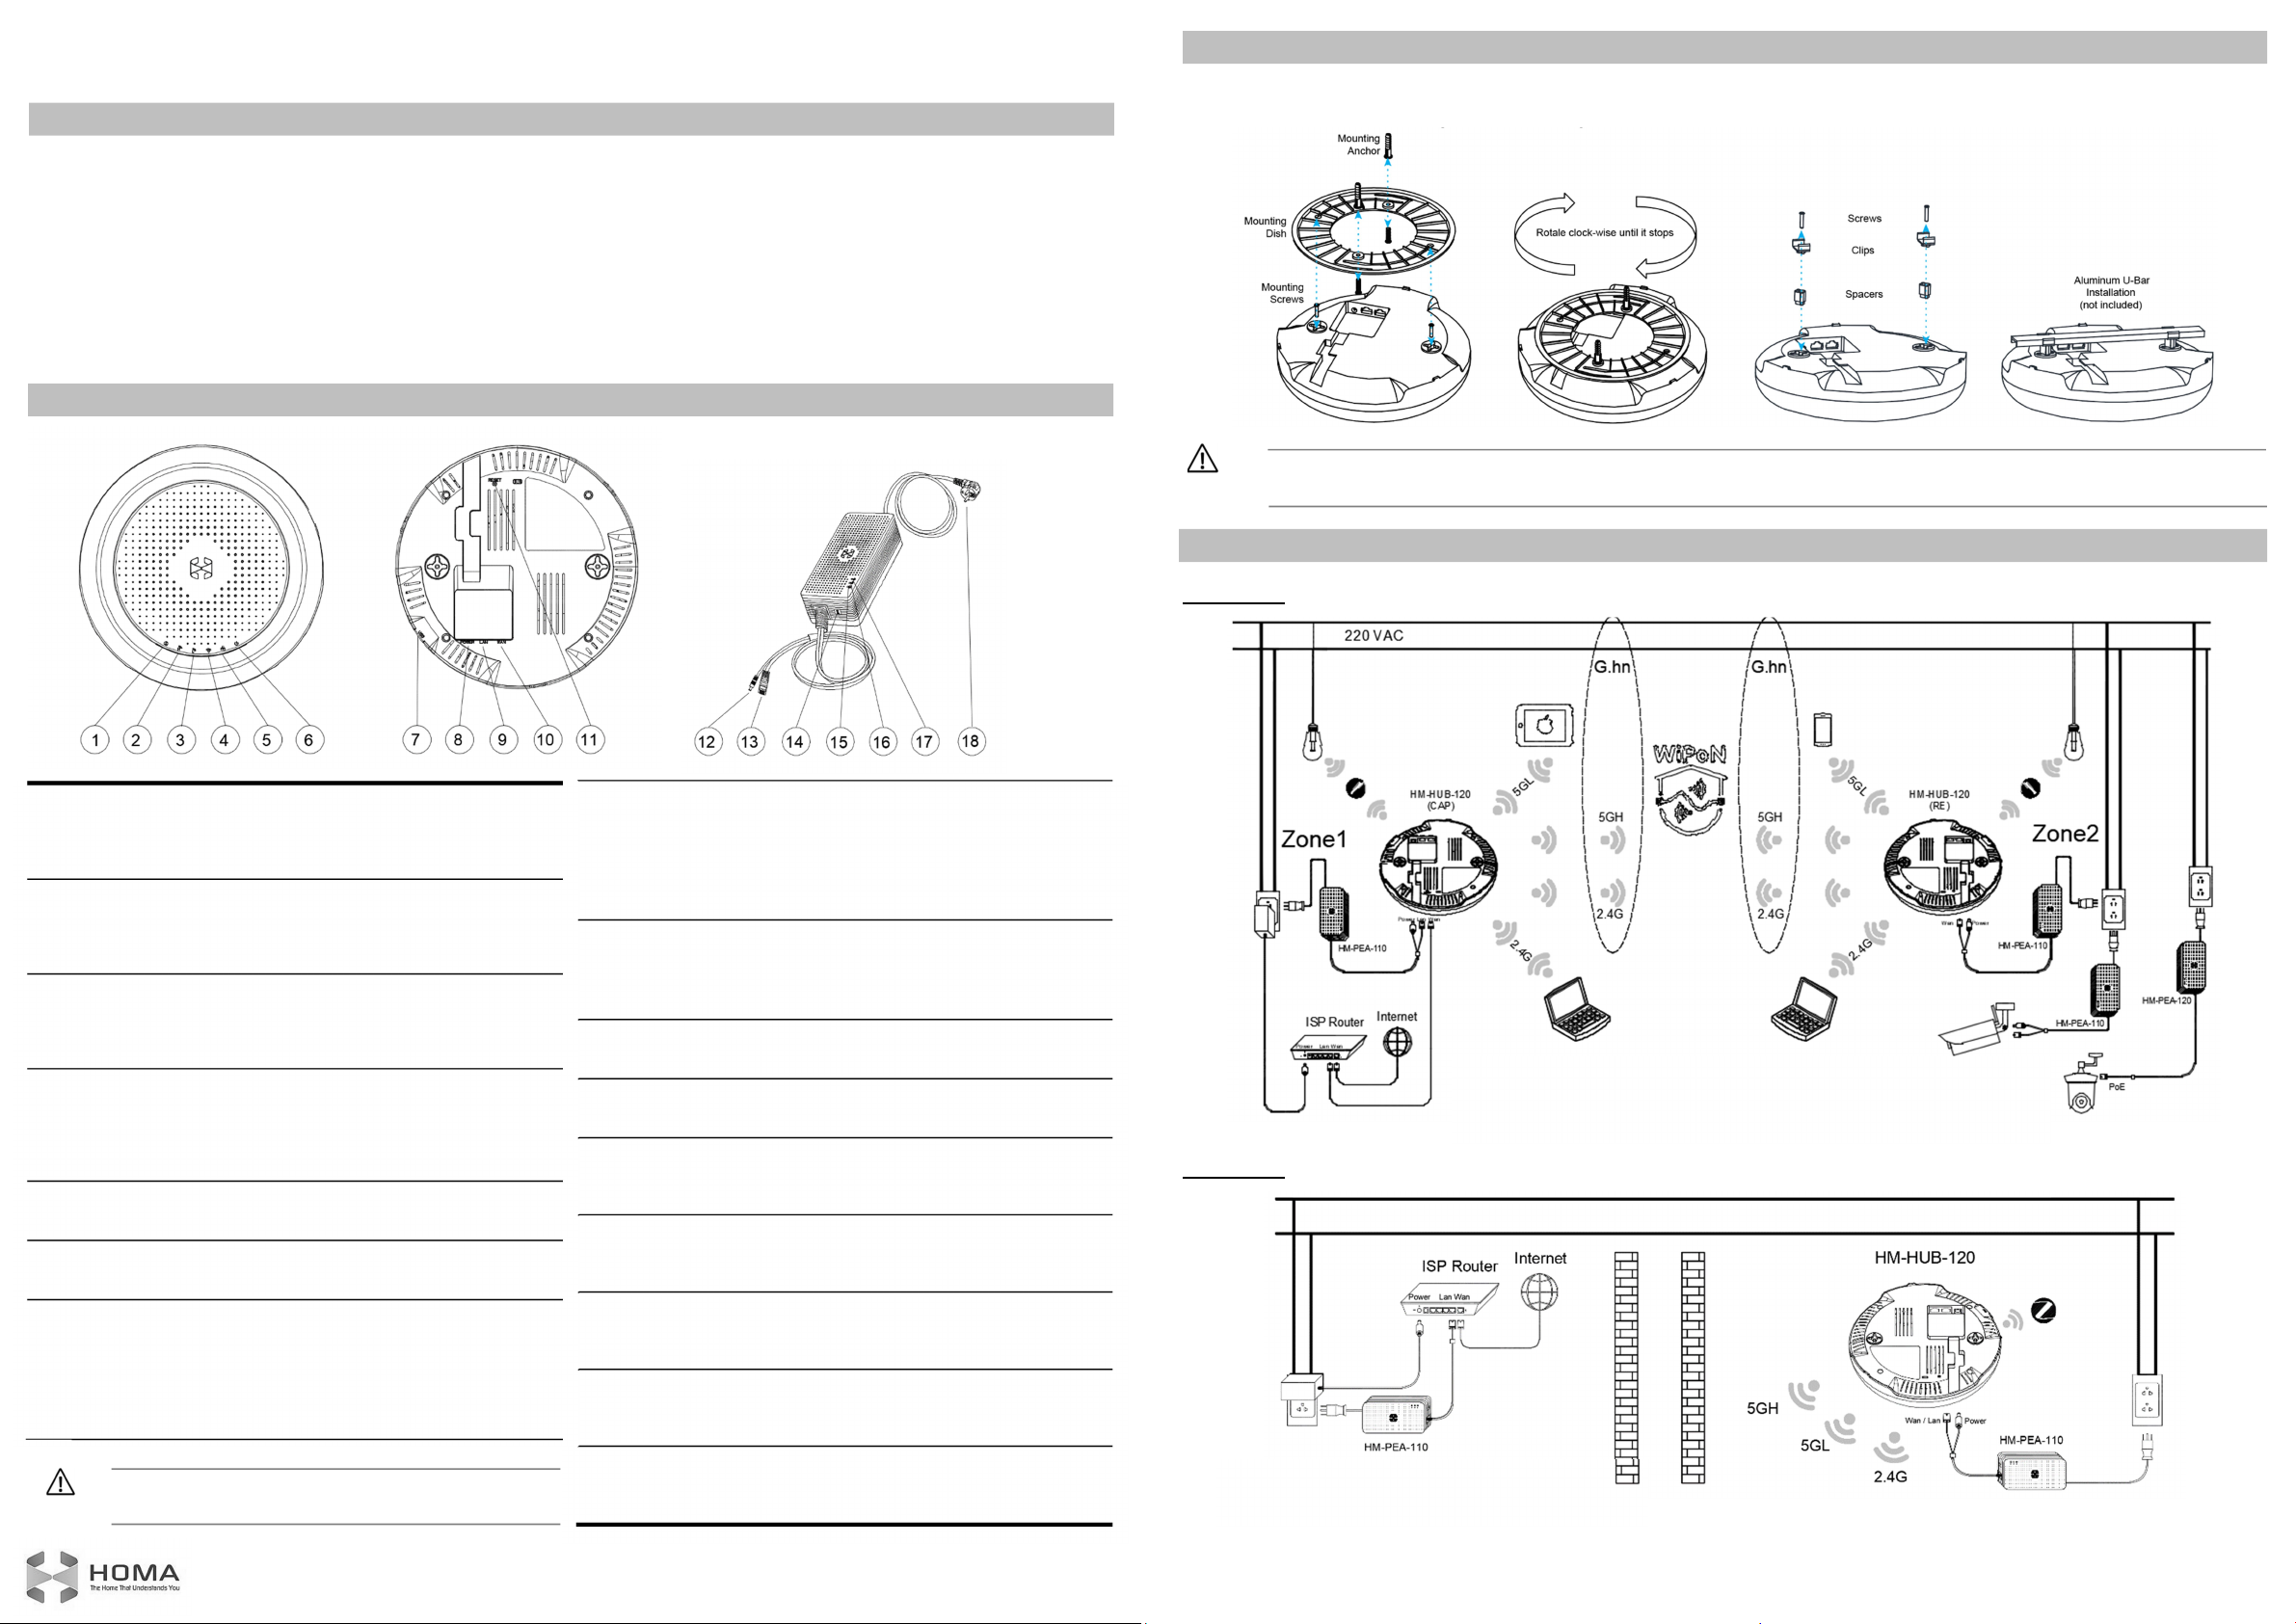
2. DEVICE LAYOUT
3. INSTALLATION
Desktop Mounting: simply putting the device on a flat surface so that it sits on its three plastic feet
Ceiling or Wall Mounting: using either mounting dish or U-bar accessories as follows:
Insecure mounting might damage the hub or cause injury. Homa is not responsible for damages incurred due to insecure mounting.
Warning Do not operate the hub in an area that exceeds an ambient temperature of 40
0
C (1040F).
4. NETWORK CONNECTION SETUP
Use Case 1: completed WiPoN
TM
setup to bring seamless and worry-free connectivity to every corner of the house.
Zigbee LED
Use only the power adapter that is supplied with the hub. Using a
Warning different power adapter could damage the hub.
Off: no power or physical failure.
On (solid blue): Zigbee system is ready.
On (blinking blue): transmitting or receiving data via Zigbee.
5GHz_H, 5GHz_L, and 2.4GHz WiFi LEDs
Off: no power, no ready WiFi signal, or physical failure.
On (solid blue): corresponding WiFi system is ready.
On (blinking blue): transmitting or receiving data via WiFi.
WAN (Internet), LAN LEDs
Off: no power, no connection to WAN/LAN or physical failure.
On (solid blue): has physical connection to a WAN or a LAN.
On (blinking blue): transmitting or receiving data via WAN/LAN.
Power LED (for the main wireless router)
Off: no power or physical failure.
On (solid pink): software error.
On (flashing pink): Zigbee “permit join” status is enabled.
On (solid blue): system is ready (solid amber at booting up).
USB Port
Insert USB 3.0 devices including 3G/LTE and Z-wave dongles.
Power (DC-IN) port
Insert the DC plug ⑫ from the AC/DC adapter to this port.
LAN Port
Connect the RJ45 connector of ⑬ to this port to setup the hub as
a CAP (Central Access Point) for WiPoNTM or to cascade the hub
⑨
to other routers through PLC.
Connect Ethernet cable to this port to establish LAN for client
devices (laptop, TV,…) or to cascade the hub to other routers.
WAN Port
Connect the RJ45 connector of ⑬ to this port to setup the hub as
a RE (Range Extender) for WiPoNTM or to cascade the hub to
⑩
other routers through PLC.
Connect this port to Internet Service Provider - ISP’s modem or to
other routers (cascading) using Ethernet cable to receive data.
Reset Button
This button restores Neptune to its factory default settings. Press
the button in 11s (the Power LED of ⑥ will change from blue to
amber), then continue to press it three times to complete the reset.
DC Cable (a part of Y-cable)
This cable is used to provide DC power supply for the hub.
Ethernet cable (a part of Y-cable)
This cable is used for data transmission through PLC adapter.
Unpair Button
Press this button in 11s (until three LEDs ⑮,
unpair the adapter out of the PLC network.
Ethernet LED
Off: no power or physical failure.
On (solid green): if there is active device connect to port ⑬.
PLC Network LED
Off: no power, no detected PLC network or physical failure.
On (blinking green): data transmission on PLC network.
Power LED (for the PLC Adapter)
Off: no power or physical failure.
On (solid green): PLC adapter is ready.
AC Power Cable
This cable is used to provide both AC power supply and data path
for the PLC adapter.
blink once) to
Option 1: G.hn PLC and 5GH WiFi (recommend).
Option 2: G.hn PLC, 5GH and 2.4G WiFi.
Use Case 2: Access Point (AP) and Bridge mode setups to connect ISP modem and Neptune hub through PLC.
These devices will be on same IP segments.
+ Cascaded LAN-WAN modem to hub (AP mode)
+ Client Link
Client devices can connect to Neptune hubs through G.hn PLC, 5GL/2.4G WiFi, and Zigbee.
Neptune IoT Hub Lite
HM-HUB-120
5. NETWORK CONFIGURATION SETUP
The Neptune hub comes with an intuitive web graphical user interface (Web-GUI) that allows users to easily configure its
various features through a web browser such as Internet Explorer, Firefox, Safari, or Chrome. Following these steps to access
the Web-GUI configuration utility from computer:
STEP 1: Connect computer to Neptune hub through its LAN port or WiFi access.
Ethernet: select “Obtain an IP address automatically” option for the computer’s network adapter, and then connect
it to the hub’s LAN port.
WiFi: search WiFi SSIDs: “Neptune_2.4G”, “Neptune_5GH”, “Neptune_5GL”, and connect to one of these SSIDs (no
password is required).
STEP 2: Open a web browser, and then enter the default IP address of the hub: 192.168.123.1.
STEP 3: Enter the default username: homa and password: homa in the Username and Password fields. Click Login to bring
up interface for configuration.
For WiFi Access Point mode (or Bridge mode) configuration, proceed further as follows:
STEP 4: Switch to /Network/WiFi menu, select Access Point mode (or Bridge mode), then select operating frequency band
(2.4GHz, 5GHz High-Band, or 5GHz Low-Band). For each frequency band, set the desired SSID name, password,
encryption type, access channel, and transmitted power level.
STEP 5: Click Apply to save the configuration.
After finishing WiFi configuration setups, following these steps to form Zigbee network:
STEP 6: Switch to /Network/Zigbee menu. Enable Permit Join to allow Zigbee client devices to join the network.
STEP 7: Follow the instructions on each Zigbee client device to register them to the network.
For complete WiPoNTM mode configuration to extend the network, and other advanced settings (such as forming Z-wave
network to connect Z-wave enabled IoT devices or connecting to 3G/LTE network through USB dongles), download the full
User’s Manual for Neptune IoT Hub Lite from the link: www.homatechs.com/support/Neptune/manual.
6. HOMA SMART APPS TO MANAGE AND CONTROL IOT DEVICES
Homa Home App is pre-installed on Homa Panel, a 10-inch Android tablet (Model: HM-PAN-210). This app is used to
communicate with the Neptune hub through WiFi to control IoT devices in every room, to get important notifications about what
is happening in your house, and to do the settings for whole Homa’s smart system.
Homa Mobile App lets you easily control, monitor, and secure your house from anywhere in the world. The app is
available to download on both Android and iOS platforms.
Federal Communication Commission Interference Statement
This equipment complies with Part 15 of the FCC Rules. Operation is subject to the following two conditions:
(1) This equipment may not cause harmful interference
(2) This equipment must accept any interference received, including interference that may cause undesired operation.
This equipment has been tested and found to comply with the limits for a Class B digital device, pursuant to Part 15 of the FCC
Rules. These limits are designed to provide reasonable protection against harmful interference in a residential installation. This
equipment generates, uses and can radiate radio frequency energy and, if not installed and used in accordance with the
instructions, may cause harmful interference to radio communications. However, there is no guarantee that interference will not
occur in a particular installation. If this equipment does cause harmful interference to radio or television reception, which can be
determined by turning the equipment off and on, the user is encouraged to try to correct the interference by one of the following
measures:
Reorient or relocate the receiving antenna.
Increase the separation between the equipment and receiver.
Connect the equipment into an outlet on a circuit different from that to which the receiver is connected.
Consult the dealer or an experienced radio/TV technician for help.
FCC Caution: Any changes or modifications not expressly approved by the party responsible for compliance could void the
user's authority to operate this equipment.
IMPORTANT NOTE:
Radiation Exposure Statement:
This equipment complies with FCC radiation exposure limits set forth for an uncontrolled environment. This equipment should
be installed and operated with minimum distance 24 cm between the radiator and your body.
This transmitter must not be co-located or operating in conjunction with any other antenna or transmitter.
Country Code selection feature to be disabled for products marketed to the US/CANADA.
Operation of this device is restricted to indoor use only.
Support
Thank you for purchasing this HOMA product.
You can visit www.homatechs.com/support/Neptune to access the latest downloads and user manuals. We recommend that
you use only official HOMA support resources. If you need further assistance, please email HOMA Technical Support:
support@homatechs.com.
HOMA Copyrights and Trademarks
©Copyright HOMA TECHNOLOGIES, JSC, 2019. All Rights Reserved.
HOMA, the HOMA logo, WiPoNTM are all trademarks or registered trademarks of HOMA TECHNOLOGIES, JSC (“HOMA”).
Any non-HOMA trademarks or trade-names in this publication are used for reference purposes only.
No part of this publication may be reproduced in any form or by any means or used to make any derivative work (such as
translation or adaptation) without written permission from HOMA. HOMA reserves the right to revise this publication and to
make changes in content from time to time without obligation on the part of HOMA to provide notification of such revision or
change.
HOMA provides this guide without warranty of any kind, implied or expressed, including, but not limited to, the implied
warranties of merchantability and fitness for a particular purpose. HOMA may make improvements or changes in the product(s)
described in this guide at any time. The capabilities, system requirements and/or compatibility with third-party products
described herein are subject to change without notice.
Neptune IoT Hub Lite
HM-HUB-120
 Loading...