


DigiSpeed-GX™
- Users Guide Page 1
Updated: 12. December 2006
DigiSpeed-GX™ DC-03
Isolated Control Voltage Generator
User’s Guide
DigiSpeed-GX™ PCB Ver:1.0
Firmware Ver: 1.0
Mach3 Ver: 1.84
Copyright 2006 © Homann Designs Revision 0.1

DigiSpeed-GX™
- Users Guide Page 2
Homann Designs
20 View St
HIGHETT VIC, 3190
AUSTRALIA
info@homanndesigns.com
http://www.homanndesigns.com
Copyright 2006 © Homann Designs. All rights reserved.
No part of this publication may be reproduced, transmitted, transcribed, stored in a retrieval
system, or translated into any language or computer language, in any form or by any means,
electronic, mechanical, magnetic, optical, chemical, manual or otherwise, without the prior
written permission of Homann Designs.
Disclaimer
Homann Designs makes no representation or warranties with respect to the contents
hereof and specifically disclaim any implied warranties or merchantability or fitness for any
particular purpose. Information in this publication is subject to change without notice and
does not represent a commitment on the part of Homann Designs.
Feedback
We appreciate any feedback you may have for improvements on this document. Please send
your comments to info@homanndesigns.com
Trademarks
DigiSpeed™ and DigiSpeed-GX™ are trademarks of Homann Designs. All other brand and
product names mentioned herein are trademarks, services marks, registered trademarks, or
registered service marks of their respective owners and should be treated as such.
Copyright 2006 © Homann Designs Revision 0.1

DigiSpeed-GX™
- Users Guide Page 3
Table of Contents
1 Introduction...................................................................................................................................... 5
1.1 Contents.....................................................................................................................................5
1.2 Overview................................................................................................................................... 6
2 Options............................................................................................................................................. 7
2.1 5Vdc – 15Vdc isolated DC-DC Converter................................................................................ 7
3 Features.............................................................................................................................................8
4 Board Description.............................................................................................................................9
4.1 Introduction............................................................................................................................... 9
4.2 Mode Indication LED..............................................................................................................10
4.2.1 Mode Indication.............................................................................................................. 10
4.2.2 Input Activity Indication................................................................................................. 10
4.3 Output Attenuation Trimpot.................................................................................................... 11
4.4 Output Voltage Selection JP1..................................................................................................11
4.5 Mode Selection Jumper Block JP2..........................................................................................12
5 Quick Start Guide – PWM Mode................................................................................................... 13
5.1 What you need.........................................................................................................................13
5.2 Mach3 Configuration Setup.................................................................................................... 13
5.2.1 Port Setup........................................................................................................................14
5.2.2 Spindle Setup Tab........................................................................................................... 14
5.3 Power to the DigiSpeed-GX....................................................................................................15
5.4 Connect the PWM Signal........................................................................................................ 15
5.5 Conclusion...............................................................................................................................16
6 Installation...................................................................................................................................... 16
6.1 DC Motor Speed Controller housing.......................................................................................16
6.2 Wiring installation................................................................................................................... 16
6.2.1 Motor Controller Connection..........................................................................................17
6.2.2 Initial Testing.................................................................................................................. 17
6.2.2.1 Attenuation Trimpot Speed Control........................................................................ 17
6.2.2.2 Computer Speed Control......................................................................................... 17
7 Operation........................................................................................................................................ 19
7.1 Operation Modes..................................................................................................................... 19
7.1.1 Analog Input Mode......................................................................................................... 19
7.1.2 PWM Input Mode........................................................................................................... 19
7.1.3 Attenuation Trimpot........................................................................................................20
8 Board Dimensions.......................................................................................................................... 21
Copyright 2006 © Homann Designs Revision 0.1

DigiSpeed-GX™
- Users Guide Page 4
Index of Tables
Table 1: Mode Select Jumper Block.................................................................................................. 12
Table 2: DigiSpeed-GX™ - Breakout board Connections................................................................. 14
Table 3: Mode Selection Jumpers...................................................................................................... 19
Illustration Index
Illustration 1: Mach3 Port Setup.........................................................................................................14
Illustration 2: Mach3 Spindle Setup Tab............................................................................................15
Illustration 3: PCB Dimensions and Layout.......................................................................................21
Copyright 2006 © Homann Designs Revision 0.1

DigiSpeed-GX™
- Users Guide Page 5
1 Introduction
Thank you for purchasing Homann Designs' DigiSpeed-GX™ Isolated Voltage interface
unit. The DigiSpeed-GX™ provides a way for controlling DC motor speed controllers and
other devices that accept a 0-5Vdc, 0-10Vdc, 0-15Vdc voltage signal
This document is a User's Guide that describes the operation of the DigiSpeed-GX™. The
document contains information on how to use and integrate the board into your own
systems.
1.1 Contents
The box received when ordering the DigiSpeed-GX™ contains the following:
• DigiSpeed-GX™ isolated voltage interface unit.
• 2 x 0.1” jumpers.
• 4 x 4mm plastic PCB stand-offs.
Copyright 2006 © Homann Designs Revision 0.1
*** WARNING ***
The KB Electronics DC speed controller circuit, and other similar
speed controllers as found in Asian imported mini lathes and mini
mills are at mains voltage potential. This voltage is lethal. Do not
attempt to do this conversion if you are not qualified to do so.
Confidence is no replacement for qualification!
If you feel that this project is beyond your abilities to SAFELY
complete, we can install the unit for you. Please contact us for details
Please ensure you read the complete manual before attempting to
install or use this device.

DigiSpeed-GX™
- Users Guide Page 6
1.2 Overview
The DigiSpeed-GX Isolated Voltage Interface Unit is designed to allow devices such as
the Gecko G-100 motion controller and computer CNC programs such as Mach2,
TurboCNC and other CNC programs to control devices that require an isolated DC control
voltage.
DigiSpeed-GX is designed primarily for use with KB Electronics style DC motor
controllers, such as the KBIC-120. This is the type of controller found in the Sherline
Mills and Lathes. DigiSpeed-GX will work with other types of DC motor controllers
such as those found in the Asian imported mini lathes and Mills.
The DigiSpeed-GX™ is also well suited for use with VFDs such as the Automation Direct
GS2 series and other motor speed controllers which accept a 0-5Vdc, 0-10Vdc speed
control voltage.
The form factor of the DigiSpeed-GX PCB has been designed for easy installation. Due
to its compact size, it can also be installed unobtrusively into many of the existing speed
controller or CNC controller enclosures.
Copyright 2006 © Homann Designs Revision 0.1

DigiSpeed-GX™
- Users Guide Page 7
2 Options
The DigiSpeed-GX™ is a versatile unit. It has an on-board LED indicator, mode select
jumpers, and an attenuation multi-turn trim-pot The board is designed to be installed into
existing motor speed controller housings, external CNC housings or other enclosures.
2.1 5Vdc – 15Vdc isolated DC-DC Converter.
Depending on the installation, the device being controlled by the DigiSpeed-GX™ may
not be able to provide the 10Vdc supply required by the isolated analog circuitry. In such
situations, the optional On-board 5Vdc - 15Vdc isolated DC-DC converter may be used to
provide the required supply.
Note: The DigiSpeed-GX™ Attenuation trimpot may be used to scale the output voltage to 0-10Vdc,
or to a voltage that is required by the device being controlled by the DigiSpeed-GX™ .
Copyright 2006 © Homann Designs Revision 0.1

DigiSpeed-GX™
- Users Guide Page 8
3 Features
The main features of the DigiSpeed-GX controller are;
• Controlled by a RISC Microchip micro-controller.
• PCB
o FR4 Material
o Double Sided, Plated through holes
o Silk-Screened on Component Side
o Solder Mask on Both Sides
• Small PCB footprint 2”(L) x 1”(W)
• Four 4mm mounting holes (supplied with matching stand-offs)
• 5V dc XXXmA power requirements.
• Opto-isolation between the computer logic Voltages and the analolg output control voltages.
• Maximum DC Speed controller voltage for the control supply of 15Vdc
• 10 bit resolution providing more than 1000 steps from 0 to Max Output voltage.
• Four methods to control motor speed.
o 0-5V analog Voltage
o PWM - A low frequency PWM signal. (2Hz – 100Hz )
o On-Board multi-turn trimpot
• Output Control Voltage Attenuator.
• SMT LED indicating the mode and state of the DigiSpeed-GX controller.
• Pluggable 3.5mm terminal block connectors for easy installation and maintenance.
Copyright 2006 © Homann Designs Revision 0.1

DigiSpeed-GX™
- Users Guide Page 9
4 Board Description
4.1 Introduction
The DigiSpeed-GX controller provides the capability to
control a device such as the the spindle speed of a DC or AC
motor via computer control
May of the devices that the DigiSpeed-GX is designed to
work with such as the KBIC-120 controller supplied by KB
Electronics, use a “Hot Ground” circuitry. That is, the
reference voltages for setting the speed are at MAINS
POTENTIAL voltage. This voltage is dangerous and can be
lethal.
This style of controller uses a control voltage, usually in the
0 –10Vdc range to control the motor speed from 0 – max
speed. In reality, this voltage can be anywhere in the range
of 5Vdc to 15vdc. The maximum output voltage of the
DigiSpeed-GX and thus the speed of the motor can be
limited by an attenuation trim-pot that reduces this control
voltage supply.
AC motor controllers are usually Variable Frequency Drives (VFD) and have terminals for
the connection of an external manual control potentiometer, or a 0-5Vdc, 0-10Vdc control
voltage.
The DigiSpeed-GX circuitry is essentially in two parts. One part contains low voltage
logic level circuitry that includes a micro controller and interfaces to the PC or controlling
device. It is supplied by 5Vdc that is referenced to the controlling devices ground. The
other part of the DigiSpeed-GX circuitry is connected to the DC Speed controller
control circuitry. This part is at MAINS POTENTIAL.
The two parts of the circuitry are separated by opto-isolation. This ensures that the
dangerous MAINS POTENTIAL voltages are kept away from the low level logic
circuitry. The two parts of circuitry must never be connected together. If it happens, a
catastrophic failure of the DigiSpeed-GX circuit and your PC will occur.
Copyright 2006 © Homann Designs Revision 0.1

DigiSpeed-GX™
- Users Guide Page 10
The DigiSpeed-GX controller provides a control voltage in place of the control voltage
provided by the manual speed control potentiometer. This voltage can be varied from 0V
to 100% of the maximum control voltage by computer software.
There are 1023 steps from 0 to the maximum control voltage. If your maximum spindle
speed is 6000 rpm, this effectively provides for a 6-rpm resolution in controlling spindle
speed.
4.2 Mode Indication LED
The DigiSpeed-GX controller contains a SMT LED that is used to indicate the input
mode that has been selected and when activity on the input is present.
4.2.1 Mode Indication
The DigiSpeed-GX controller used the indicator LED to show which input mode is
selected. It does this by flashing the LED on power up as described below;
• LED Off – This indicates that there is no 5Vdc power supplied to the DigiSpeed-
GX .
• Single Flash – Indicates that the DigiSpeed-GX is powered in Analog input
Mode.
• Double Flash – Indicates that the DigiSpeed-GX is powered in PWM input
Mode.
• Triple Flash – Indicates that the DigiSpeed-GX is powered in Multi-turn
Trimpot input Mode.
4.2.2 Input Activity Indication
The DigiSpeed-GX controller uses the LED to indicate when there is activity on the
input. This activity is as described below;
Copyright 2006 © Homann Designs Revision 0.1
DO NOT GROUND THE MAINS POTENTIAL SIDE OF THE
***YOU HAVE BEEN WARNED***
CIRCUITRY

DigiSpeed-GX™
- Users Guide Page 11
• LED Off – This indicates that there is no 5Vdc power supplied to the DigiSpeed-
GX .
• Lazy RED Double Flash – Indicates that the DigiSpeed-GX is powered on, and
there is no activity on the input source.
• Fast RED Flash – Indicates that the DigiSpeed-GX is powered, and there is
activity on the input source.
4.3 Output Attenuation Trimpot
The DigiSpeed-GX controller contains an Output Attenuation Trimpot. The purpose of
this is to attenuate or reduce the full scale output voltage of the controller. This may be
used to reduce the maximum speed of a spindle.
By turning the screw in the 11 turn trimpot VR1, in a Counter-Clockwise direction, the
output voltage will be reduced, or attenuated.
Some VFDs and motor controllers require a 0 – 5Vdc voltage to control spindle speed, yet
provide a 10Vdc voltage supply. In this instance, the attenuator may be used to reduce the
10V control voltage to 5V as required by the controller.
4.4 Output Voltage Selection JP1
Note: This jumper is only fitted when the optional DC-DC isolated voltage generator is fitted.
The DigiSpeed-GX controller contains an Output voltage selection jumper, JP1. The
purpose of this is to select the source of the isolated voltage that is generated.
If the jumper is fitted between pins 1-2 (towards the DC-DC generator) then the
Generators 15Vdc voltage will be used. In this instance there is no need to connect the
motor controller to pin AV+ on connector J2
If the jumper is fitted between pins 2-3 (away from the DC-DC generator) then the voltage
supplied by the DC motor controller via connector J2, pin AV+ will be used.
Copyright 2006 © Homann Designs Revision 0.1

DigiSpeed-GX™
- Users Guide Page 12
4.5 Mode Selection Jumper Block JP2
The DigiSpeed-GX can operate in a number of modes, depending on the type of control
signal that is provided by your CNC software and or controller. The mode is selected via
the mode selection jumpers as shown in the picture below;
Jumper JP2 consists of a two jumpers . MSI is the jumper closest to the Input Terminal
block J1. MS2 is immediately below MS2.
Jumper Function Position
MS1 Mode
Select
Top
MS2 Mode
Select
Bottom
Table 1: Mode Select Jumper Block
Copyright 2006 © Homann Designs Revision 0.1

DigiSpeed-GX™
- Users Guide Page 13
5 Quick Start Guide – PWM Mode
This section is intended to allow you to quickly setup and verify the operation of your
DigiSpeed-GX™ controller with Mach3 for use in PWM mode. Initially, this will be done
with the DigiSpeed-GX™ unit being connected to computer but not your Motor Drive.
Once you are familiar with the operation of the DigiSpeed-GX's operation, it can then be
connected to the motor drive.
The DigiSpeed-GX circuitry is essentially in two parts. One part contains low voltage
logic level circuitry that includes a micro controller and interfaces to the PC via the parallel
port. It is supplied by 5Vdc that is referenced to the PC parallel port ground. The other part
of the DigiSpeed-GX circuitry is connected to the DC Speed controller control circuitry.
This part is at MAINS POTENTIAL.
The quick start setup will verify the connection to the Microprocessor and logic side of the
DigiSpeed-GX™ controller.
5.1 What you need
To get started, you need:
• DigiSpeed-GX™ controller.
• Breakout board or other mechanism for connecting the DigiSpeed-GX™ control
lines to the Computer Printer port.
• A PC with a printer port and Mach3 installed and running.
This quick start setup is done with the DigiSpeed-GX™ unit sitting on the bench and NOT
connected to your Motor controller.
Mach3 controls the DigiSpeed-GX™ in PWM mode only. Therefore you need to place
jumper JP1 into the mode selection jumper block.
5.2 Mach3 Configuration Setup
The example setup describes how Mach3 is configured for the DigiSpeed-GX™. Your
configuration may differ depending on what Printer Port number you are using, and what
pins in the port are connected to which DigiSpeed-GX™ pins.
For this example, printer port 2 is being used with the port pins connected as shown in
Table 2 below.
Notes:
1. It is advisable to use a breakout board between the Printer port and the DigiSpeed-GX™.
2. The 5V supply for the DigiSpeed-GX™ must be obtained from the breakout board, as it cannot be
supplied from the printer port.
Copyright 2006 © Homann Designs Revision 0.1
DigiSpeed-GX™
- Users Guide Page 14
Signal Printer
Port Pin
Number
PC
Input/Out
put
DigiSpeed-GX
J1 Pins
PC Parallel Port GND (0V) 18-25 - GND
PWM 1 Out VIn
5Vdc with respect to Pin 1 - - +5V
Table 2: DigiSpeed-GX™ - Breakout board Connections
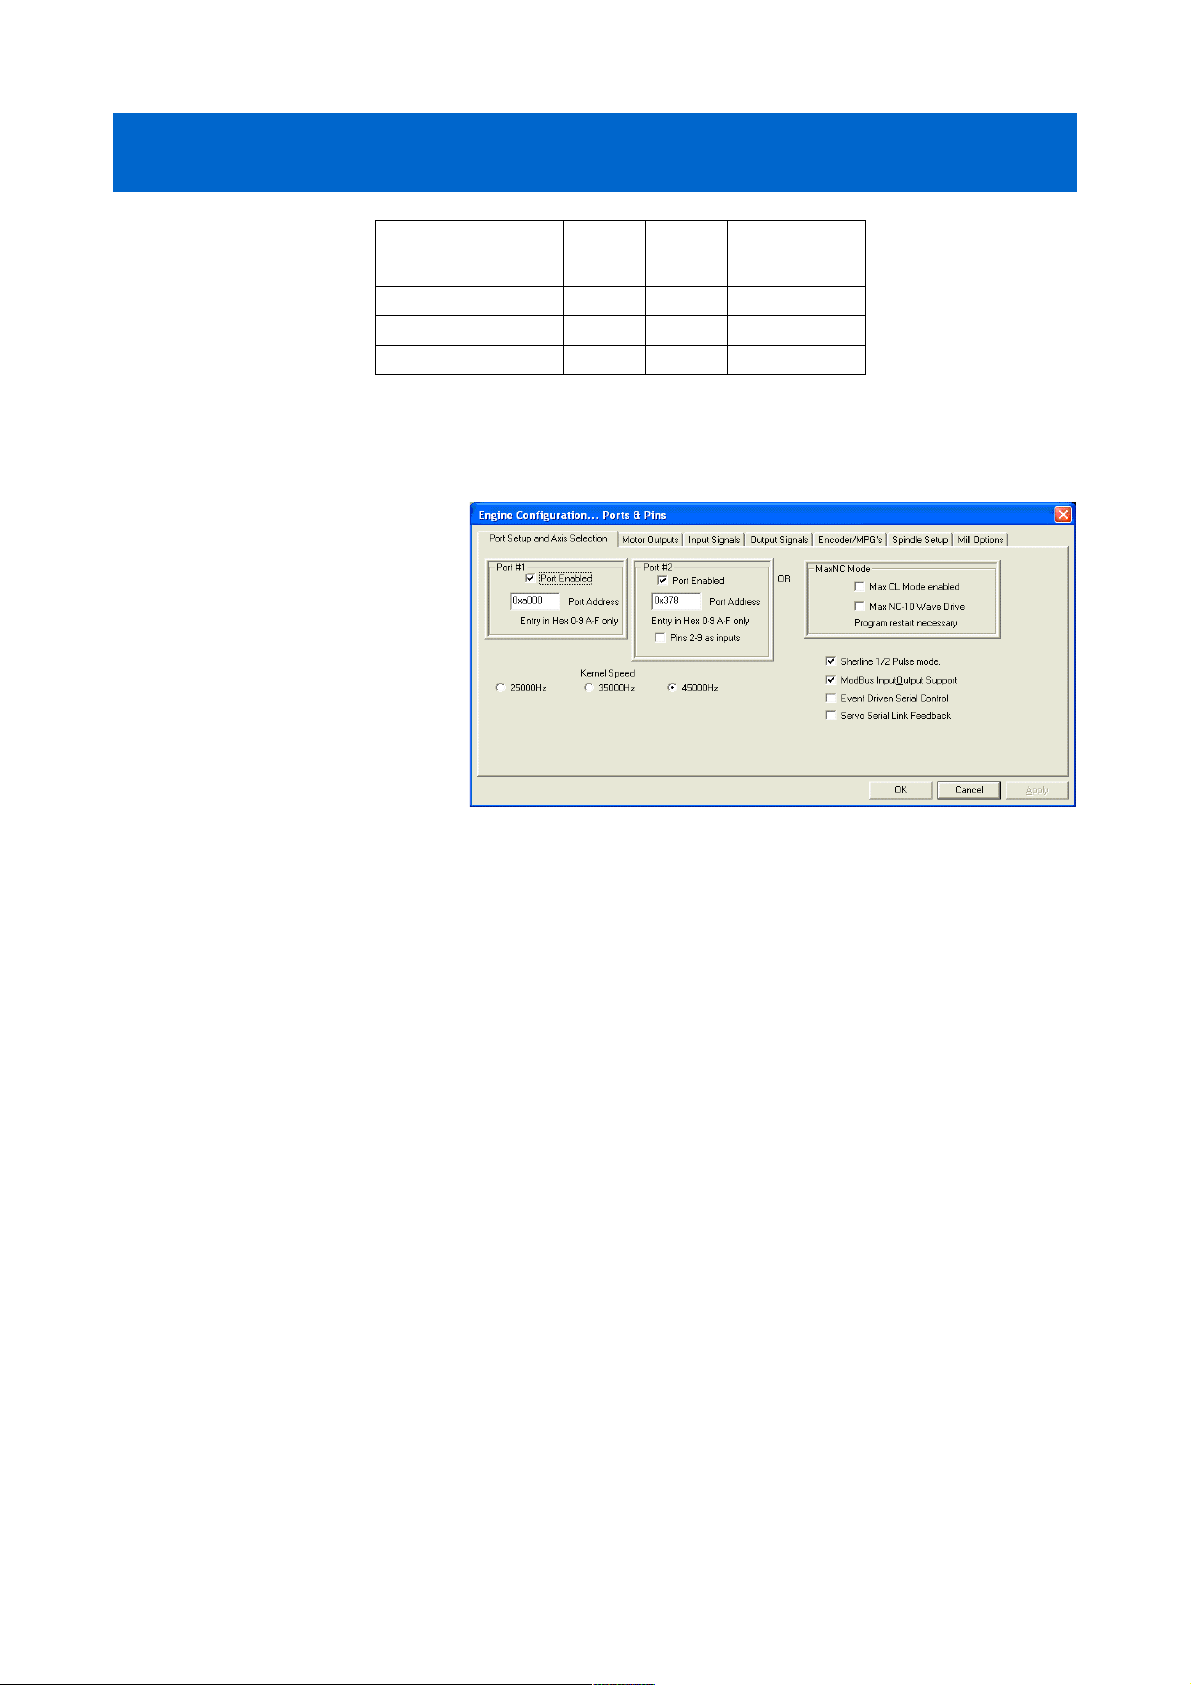
5.2.1 Port Setup
From the Options menu
in Mach3, select the
Ports & Pins Setup
item. As shown in
Illustration 1 below,
Port 2 is enabled and is
set to the default printer
port address 0X378.
The other items on this
page are not concerned
with the DigiSpeedGX™ Setup.
5.2.2 Spindle Setup Tab
The Spindle setup tab is used to configure various option regarding the Spindle operation.
As shown in Illustration 2 below, the following items are configured:
• Motor Control – As shown below, the following items are setup:
• The Use 'Spindle Motor Output' check box is ticked.
• The 'PWM Control' check box is ticked.
• The PWM base frequency is set to 50.
• The minimum PWM % is set to 0
• Pulley ratios – The maximum spindle speeds for the pulley ratios you have are set up
to allow Mach3 to calculate the required PWM percentage.
Copyright 2006 © Homann Designs Revision 0.1
Illustration 1: Mach3 Port Setup

DigiSpeed-GX™
- Users Guide Page 15
This now concludes the configuration of the Mach3 software for the DigiSpeed-GX™. The
next step is to hook up the unit to your breakout board for testing.
5.3 Power to the DigiSpeed-GX
The first step in the installation is to provide 5V power to the DigiSpeed-GX™ controller.
Wire DigiSpeed-GX™ J1- GND pin to a logic ground terminal on your CNC controller
breakout board. This logic ground is the same as the PC printer port 0V potential, found on
pins 18 to 25 of your printer port.
Wire DigiSpeed-GX™ J1-+5V to a 5Vdc supply on your CNC controller's breakout
board. This needs to be 5Vdc with respect to the PC printer port ground.
Turn on your CNC controller. This should provide the 5Vdc supply to the DigiSpeedGX™. Verify this is the case, by checking that the Mode Indicator LED is flash a slow
double flash. If not, turn off the CNC controller and check the wiring.
5.4 Connect the PWM Signal
Wire DigiSpeed-GX™ J1-Vin to pin 1 of the printer port via your CNC controller's
breakout board.
You can now test that the PWM speed value is being received by the DigiSpeed-GX™. Set
the spindle speed to zero typing it into the speed DRO, or entering the command 'S 0' into
the MDI window .
Copyright 2006 © Homann Designs Revision 0.1
Illustration 2: Mach3 Spindle Setup Tab

DigiSpeed-GX™
- Users Guide Page 16
Now enter a spindle speed of 1000 into the DRO and enable the spindle. You should now
observe the DigiSpeed-GX™ Mode Indicator LED perform a continuous Red fast flash.
This indicates that the DigiSpeed-GX™ is enabled and is generating an analog control
voltage on the output.
5.5 Conclusion
You should now have your DigiSpeed-GX™ operating correctly with Mach3. You are now
ready to install the unit into your Motor Speed controller's enclosure, your CNC controller
or a separate enclosure.
6 Installation
Before attempting the installation please read the entire manual. If you are unsure of
anything, do not do the installation. Get help from someone who is qualified for this type
of work. I am not responsible for damage or injury resulting from the installation or use of
this device.
It is advisable to integrate the The DigiSpeed-GX with your control software before
installing and connecting it to your Motor Controller. The unit is powered from a breakout
board. Therefore it is possible to test and become familiar with it's operation prior to
connecting it to a motor controller.
The board has indicator LEDs that provide status of what is occurring. These can be used
to assist in the integration.
The DigiSpeed-GX may be mounted into an existing motor controller enclosure or
external enclosures. The hardware installation is dependent on what you are installing the
DigiSpeed-GX into. The physical installation is first covered in the section below,
followed by the electrical installation.
6.1 DC Motor Speed Controller housing
If the DigiSpeed-GX™ is to be installed into an existing Motor speed controller housing,
ensure that there is sufficient space to safely install the DigiSpeed-GX™.
Refer to the PCB layout and dimensions diagram in determining the positions of holes for
mounting. The unit may be mounted using the 4 stand-offs provided.
6.2 Wiring installation
Once the DigiSpeed-GX controller is installed into a housing the following wiring is
required.
Copyright 2006 © Homann Designs Revision 0.1

DigiSpeed-GX™
- Users Guide Page 17
6.2.1 Motor Controller Connection
The DigiSpeed-GX is connected to the motor controller via the three terminal pluggable
connector J2.
• The terminal labeled AV+ connects to the potentiometer positive voltage
connector on the speed controller.
• The terminal labeled Vout connects to the potentiometer connector on the speed
controller.
• The terminal labeled AGnd connects to the potentiometer control voltage on the
speed controller.
These three connections plug into your speed controller in place of your existing manual
speed potentiometer. Unless you are using a voltage isolation board these leads are at
***MAINS VOLTAGE POTENTIAL ***. They can cause serious injury or death. Do
not connect any earthed test equipment to this terminal block as it is at mains potential.
6.2.2 Initial Testing
6.2.2.1 Attenuation Trimpot Speed Control.
To test the DigiSpeed-GX control manually via the attenuation trimpot VR1:
1. Turn off the Motor Speed controller and the CNC controller .
2. Set the DigiSpeed-GX mode to Attenuation Trimpot by inserting jumpers MS1
and MS2.
3. Turn the attenuation trimpot Anti-Clockwise eleven complete turns.
4. Power up the DigiSpeed-GX .
5. Turn on the Motor Speed controller. Ensure that there is 5Vdc power applied to the
DigiSpeed-GX. You can verify this by the Lazy Double Flash of the LED
illuminated on the DigiSpeed-GX.
6. Slowly turn the trimpot Clockwise unit the required maximum spindle speed is
reached.
6.2.2.2 Computer Speed Control.
To test the DigiSpeed-GX control from Mach3:
1. Turn off the Motor Speed controller and the CNC controller .
2. Set the DigiSpeed-GX mode to :PWM by inserting jumpers MS1 only.
3. Power up the DigiSpeed-GX .
4. Turn on the Motor Speed controller. Ensure that there is 5Vdc power applied to the
Copyright 2006 © Homann Designs Revision 0.1

DigiSpeed-GX™
- Users Guide Page 18
DigiSpeed-GX. You can verify this by the Lazy Double Flash of the LED
illuminated on the DigiSpeed-GX.
Run through the tests detailed in the Quick Start Guide section with the understanding that
the spindle is not powered and operational.
Copyright 2006 © Homann Designs Revision 0.1

DigiSpeed-GX™
- Users Guide Page 19
7 Operation
7.1 Operation Modes
The DigiSpeed-GX™ has four operational modes, selected by jumpers MS1, MS2 in
jumper block JP2. The selection of the modes is described below.
Mode MS1 MS2
ANALOG
Removed Don't Care
PWM
Installed Removed
Attenuation Trimpot
Installed Installed
Table 3: Mode Selection Jumpers
The selection of the mode is done at power up initialization.
Note: If the mode selection jumpers are modified after the unit is powered up, the new mode will
not take effect until the power is cycled.
Each of the modes is discussed in detail below.
7.1.1 Analog Input Mode
In this mode the DigiSpeed-GX controller accepts an analog 0-5Vdc signal. 0Vdc
represents 0%, varying to 5Vdc which represents 100% of maximum spindle speed.
This will provide 1023 speed increments from 0 to 100% of maximum spindle speed.
With the DigiSpeed-GX module supplied with power, and no analog signal is present,
the LED will be a Red slow double flash. This indicates that the spindle is active but the
speed is set to 0 %. Then, when an analog voltage signal is present, the LED will be a fast
continuous flash, indicating that the spindle is active and the speed is set to a value greater
than 0 %.
7.1.2 PWM Input Mode
In this mode the DigiSpeed-GX controller accepts an “Active Low” Pulse Width
Modulation signal. The duty cycle of this signal represents 0 to 100% of maximum spindle
speed.
The PWM signal period can be in the range of 2Hz to 50Hz. The optimum period is 50Hz.
Copyright 2006 © Homann Designs Revision 0.1

DigiSpeed-GX™
- Users Guide Page 20
This will provide 1023 speed increments from 0 to 100% of maximum spindle speed.
With +5V is supplied to the DigiSpeed-GX module, and no PWM signal is present, the
LED will be a Red slow double flash. This indicates that the spindle is active but the speed
is set to 0 %. Then, when a PWM signal is present, the LED will be a fast continuous
flash, indicating that the spindle is active and the speed is set to a value greater than 0 %.
7.1.3 Attenuation Trimpot
In this mode the DigiSpeed-GX controller uses the attenuation trimpot to generate the
oiutput voltage. It assumes there is a fullscale analog voltage input and then attenuates it
to produce 0% to 100% of the output voltage.
With +5V is supplied to the DigiSpeed-GX module, the LED will be a slow double flash
when the trimpot is set to maximum attenuation by turning the screw fully counterclockwise..
When the attenuation is not set at maximum, the LED will flash at a fast rate, with the
output voltage generated as a percentage of the full scale voltage.
Copyright 2006 © Homann Designs Revision 0.1

DigiSpeed-GX™
- Users Guide Page 21
8 Board Dimensions
Copyright 2006 © Homann Designs Revision 0.1
Illustration 3: PCB Dimensions and Layout

DigiSpeed-GX™
- Users Guide Page 22
Copyright 2006 © Homann Designs Revision 0.1
 Loading...