


GM-138
User’s Manual

Safety Precautions
•
Use the power adapter included with the package, using power adapters
other than the one provided will result in malfunction and could prove
dangerous.
• Battery replacement should not be performed by consumers, only
professionally trained maintenance personnel should do the removal of the
cover and the internal components. Note: It may cause explosion if the
battery is not properly replaced with the same or equivalent model. Please
contact the original professional service personnel to replace the battery.
• Do not use the power adapter in a wet environment. When hands and feet
are wet, do not touch the power adapter.
• While using the power adaptor ensure that the area is well ventilated. Do
not let paper or other material cover the power adaptor, as this will interfere
with cooling. Do not use the power adaptor whilst it is in a bag.
• Do not attempt to repair the device. If this device is damaged or is in a wet
environment, replace the device immediately.
• This device is waterproof (meets IPX 6 standard) but not protected against
water immersion.
Warranty Information
The GM-138 is warranted to be free from defects in material and functions for a
period of one year from the date of purchase. If there is a product failure of
within this period (under normal conditions), a replacement will be provided at
no charge to the customer.
ii
- -

Copyright Information
No part of this manual, including the products and software described in it, may
be reproduced, transmitted, transcribed, stored in a retrieval system, or
translated into any language in any form or by any mean, without the express
written permission of Holux Technology, Inc.
Copyright, All Rights Reserved.
Federal Communications Commission (FCC)
Statement
This equipment has been tested and found to comply with the limits for a Class
B digital device, pursuant to Part 15 of the FCC Rules. These limits are
designed to provide reasonable protection against harmful interference in a
residential installation. This equipment generates, uses and can radiate radio
frequency energy and, if not installed and used in accordance with the
instructions, may cause harmful interference to radio communications.
However, there is no guarantee that interference will not occur in a particular
installation. If this equipment does cause harmful interference to radio or
television reception, which can be determined by turning the equipment off and
on, the user is encouraged to try to correct the interference by one or more of
the following measures:
• Reorient or relocate the receiving antenna.
• Increase the separation between the equipment and receiver.
• Connect the equipment into an outlet on a circuit different from that to
which the receiver is connected.
• Consult the dealer or an experienced radio/TV technician for help.
iii
- -

CAUTION
Any changes or modifications not expressly approved by the grantee of this
device could void the user's authority to operate this equipment.
This device complies with Part 15 of the FCC Rules. Operation is subject to the
following two conditions: (1) This device may not cause harmful interference,
and (2) this device must accept any interference received, including interference
that may cause undesired operation.
For product available in the USA/Canada market, only channel 1~11 can be
operated. Selection of other channels is not possible.
RF Exposure Warning
This equipment must be installed and operated in accordance with provided
instructions and the antenna(s) used for this transmitter must be installed to
End-users and installers must be provided with antenna installation instructions
and transmitter operating conditions for satisfying RF exposure compliance.
iv
- -

Table of Contents
Parts and Functions.............................................................................. 1
Product Outlook ................................................................................... 1
Main Display Icons............................................................................... 2
Basic Operation..................................................................................... 3
Power on and off .................................................................................. 3
Charging Battery .................................................................................. 4
Install/ Remove microSD card ............................................................. 4
Home Screen Shortcuts ....................................................................... 5
ADD ...................................................................................................... 5
WALLPAPER........................................................................................ 8
NOTIFICATIONS.................................................................................. 8
SETTINGS ........................................................................................... 9
Delete SHORTCUT from Home Screen ............................................ 10
Home Screen Pages...........................................................................11
App Selector ........................................................................................ 12
Applications......................................................................................... 13
Alarm Clock........................................................................................ 13
Calculator ........................................................................................... 16
Calendar............................................................................................. 17
E-mail ................................................................................................. 17
ES File Explorer ................................................................................. 18
Web Browser...................................................................................... 22
Touch panel Calibration ..................................................................... 26
YGPS Satellites.................................................................................. 26
Settings ................................................................................................ 27
Wireless & Network............................................................................ 27
v
- -

Sound ................................................................................................. 30
Display................................................................................................ 31
Applications........................................................................................ 32
Factory Data Reset ............................................................................ 34
SD Card Storage................................................................................ 35
Language & Keyboard ....................................................................... 36
Date & Time........................................................................................ 38
About Device...................................................................................... 41
Normal Care and Maintenance .......................................................... 42
Specifications ...................................................................................... 44
vi
- -
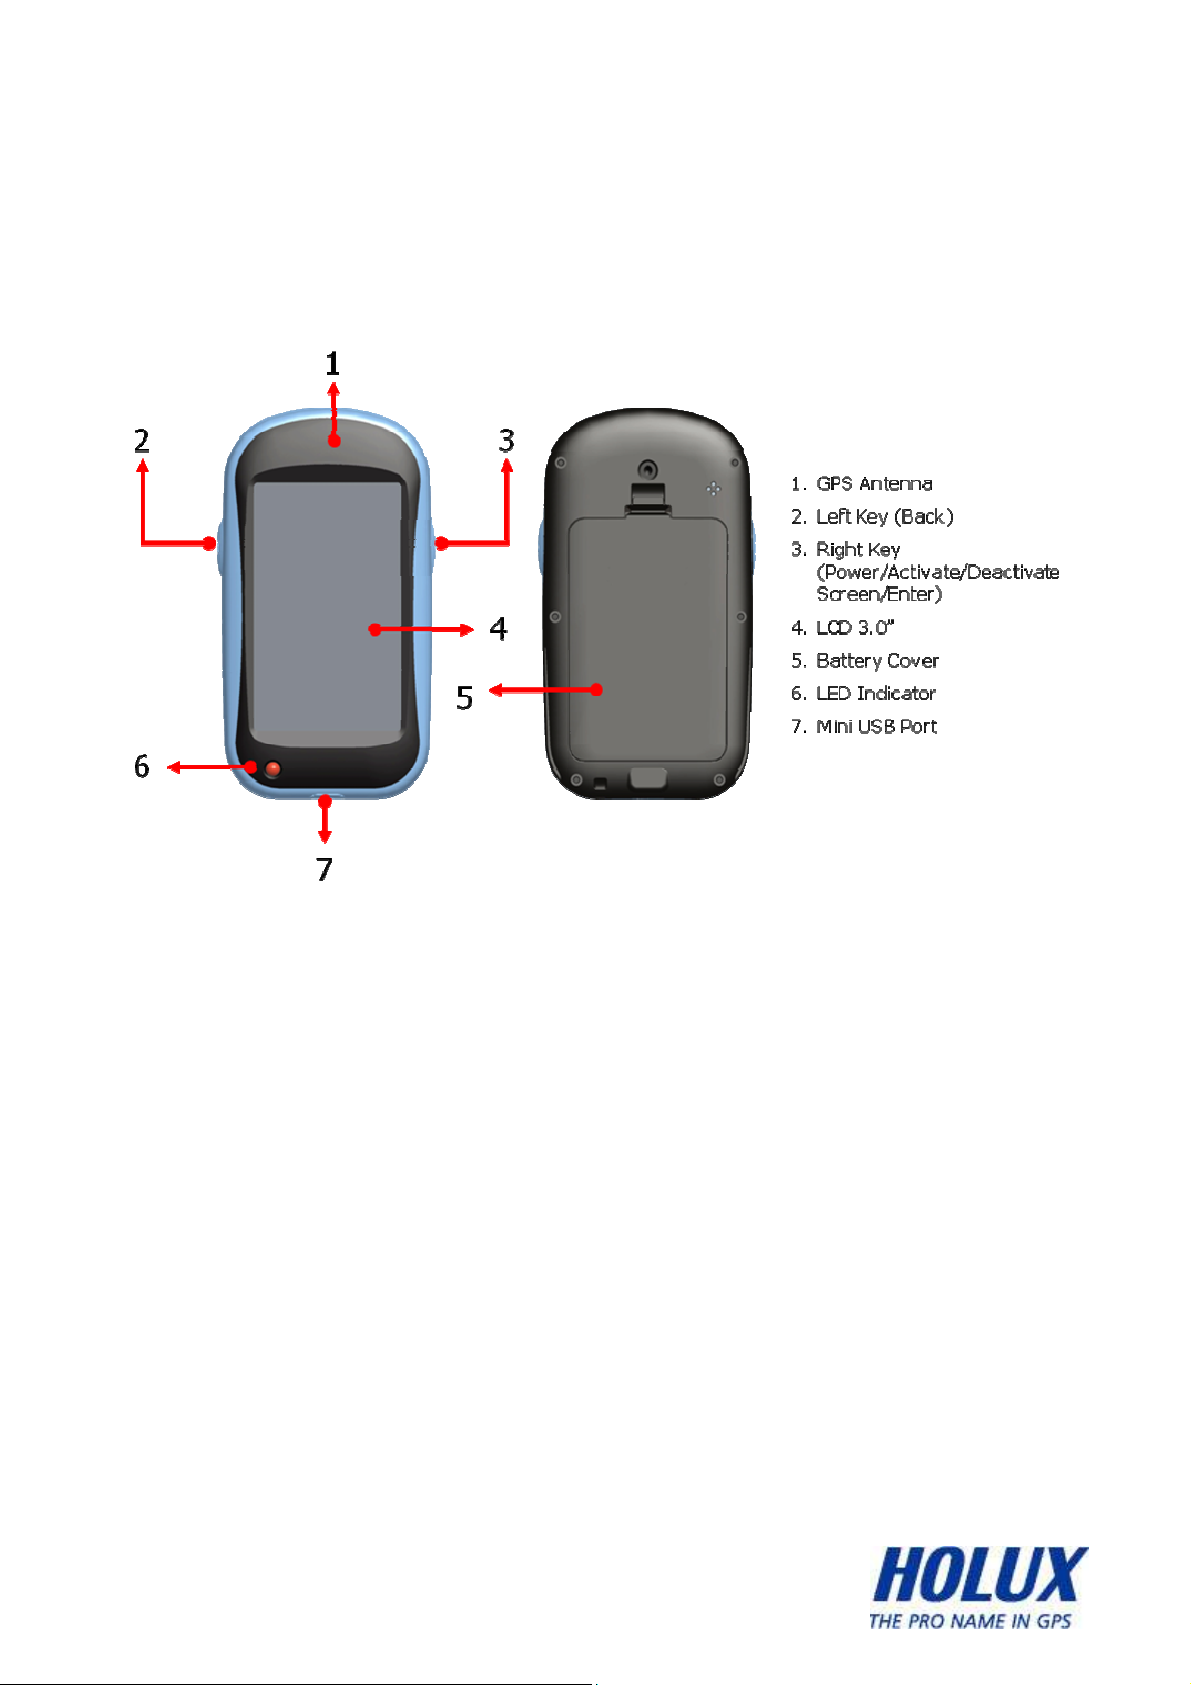
Parts and Functions
Product Outlook
1
- -
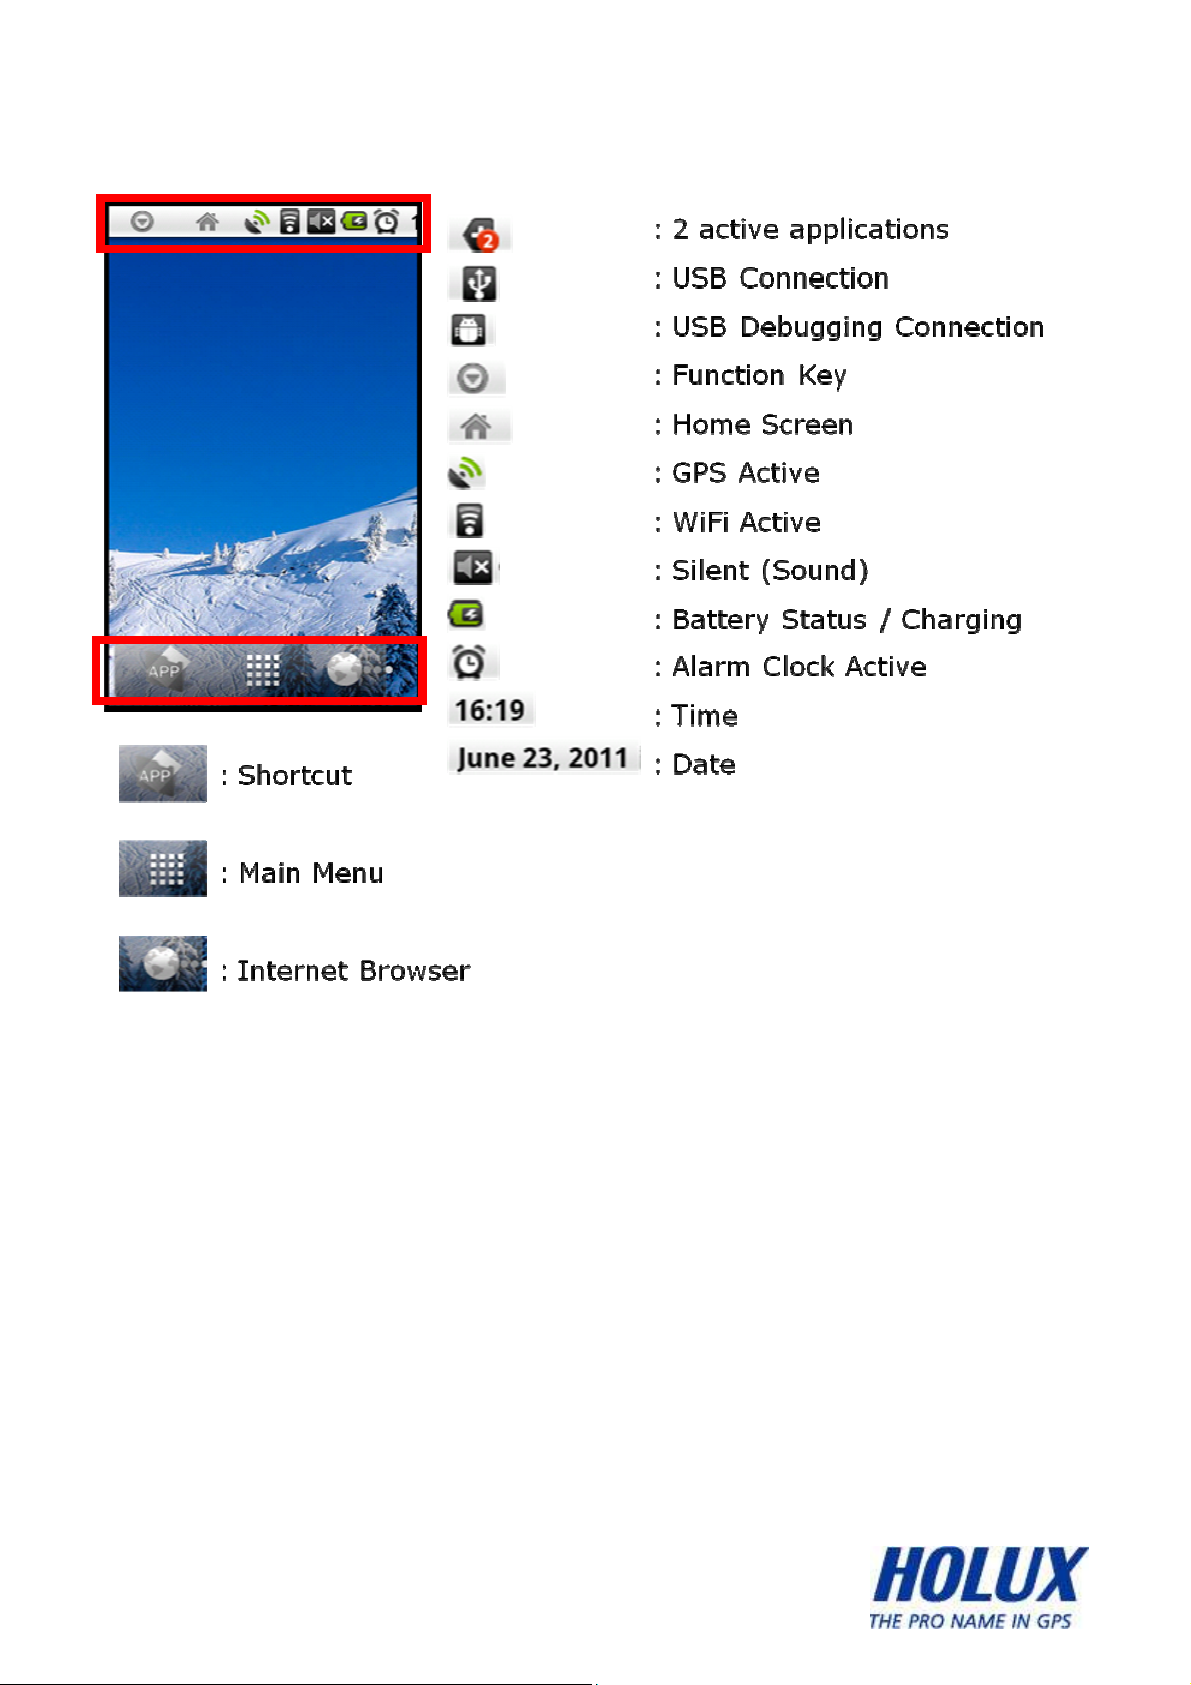
Main Display Icons
2
- -
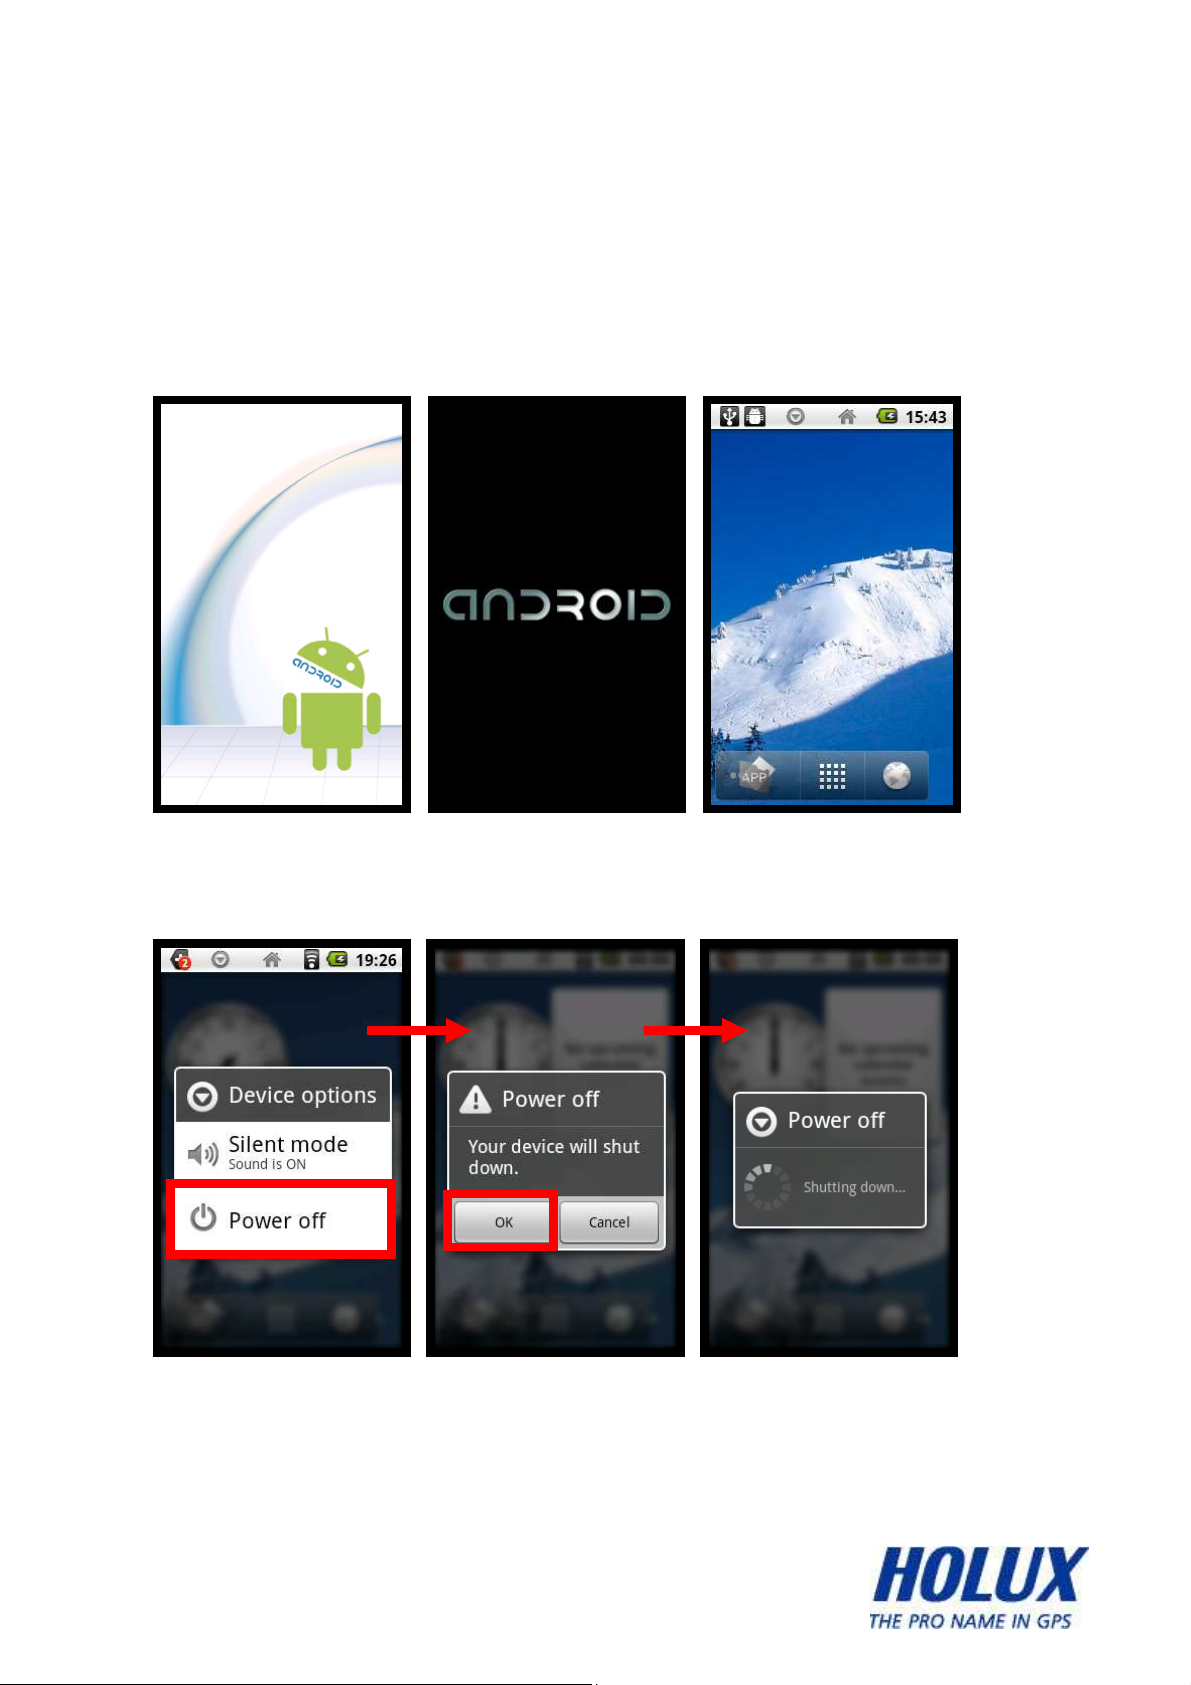
Basic Operation
Power on and off
Just push Right-Key for 3 seconds to turn-on the device
Also push Right-Key 3 seconds to turn-off the device
3
- -
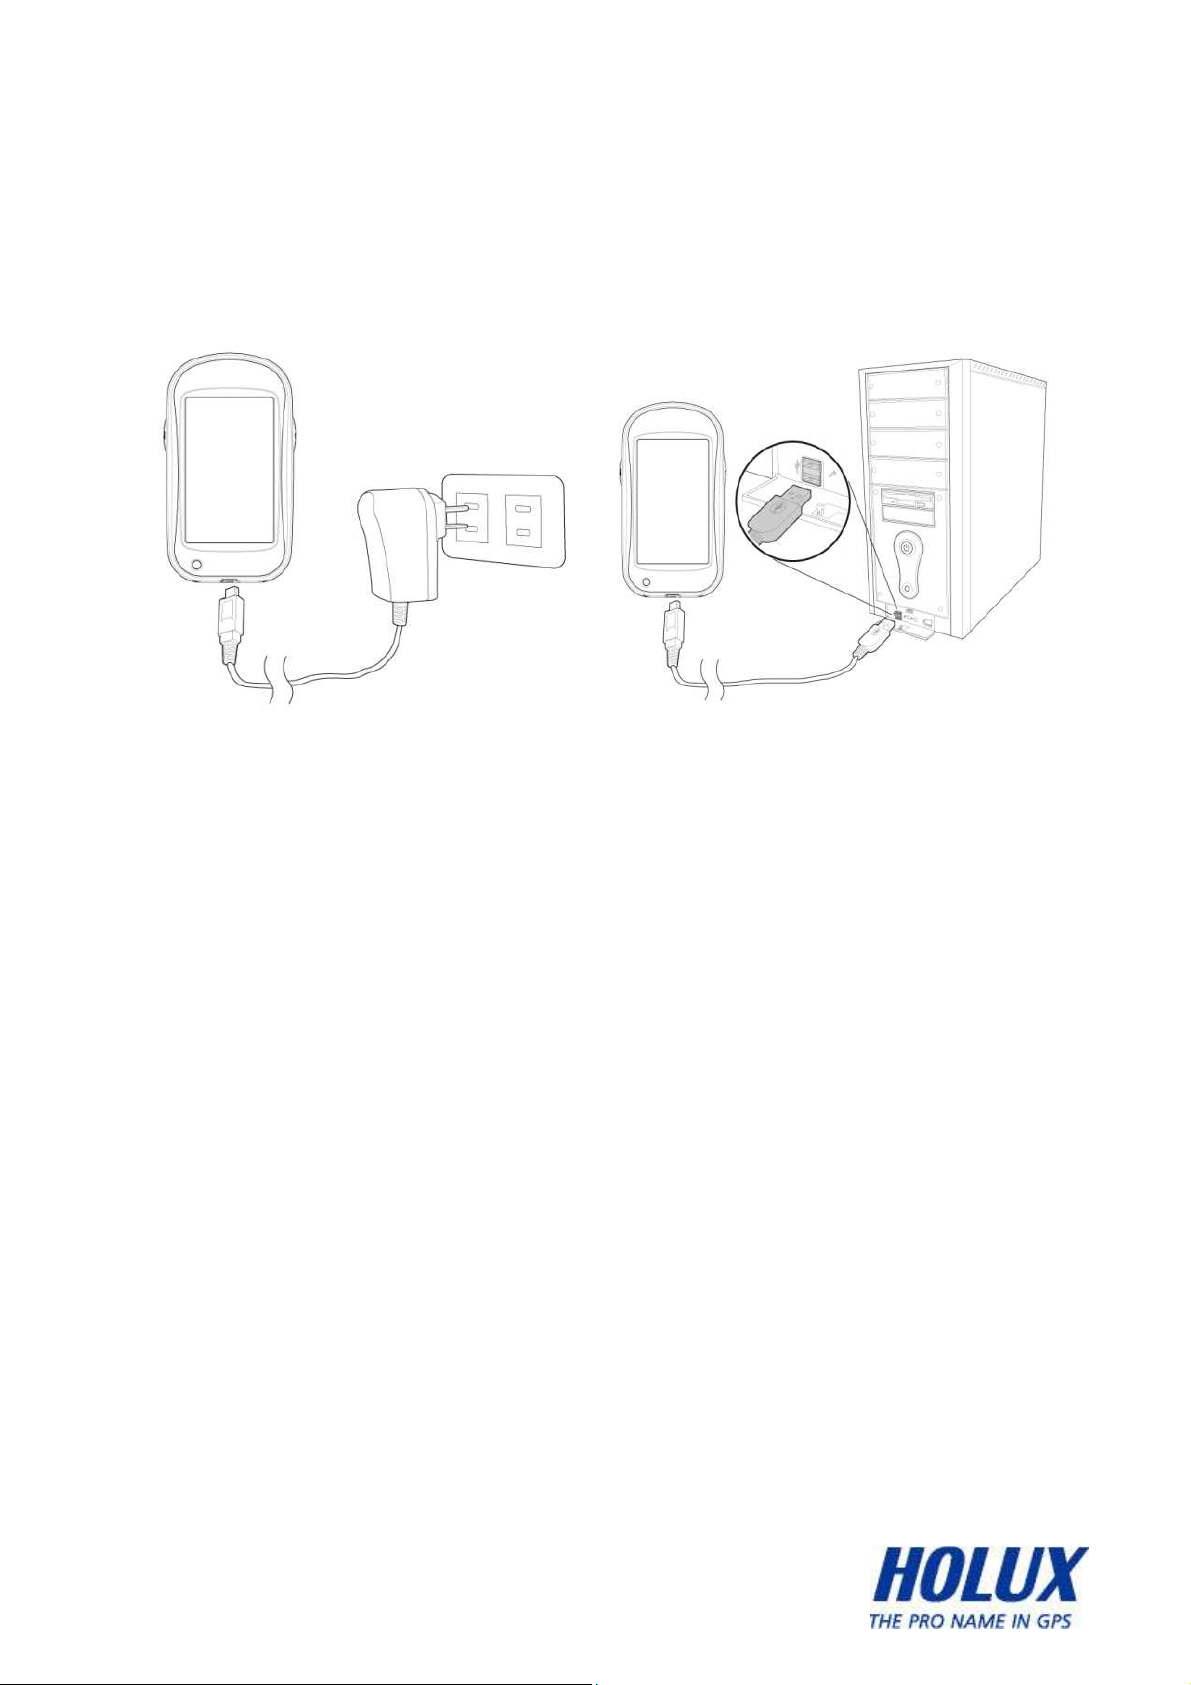
Charging Battery
You may choose one of the following methods to charge the device.
1. Connect the USB adapter to a wall outlet.
2. Connect the USB cable to your computer.
3. If the supplier includes with a car power adapter, plug the respective
ends of the device to the card cigarette lighter and the USB cable
interface in order to charge the device.
Install/ Remove microSD card
Step:
1. Open the battery lid and remove the battery.
2. Insert microSD with its chip facing down and flat into the microSD
slot and push upward to lock the microSD card slot.
3. To remove the microSD card, unlock the SD socket and remove the
SD card.
4
- -
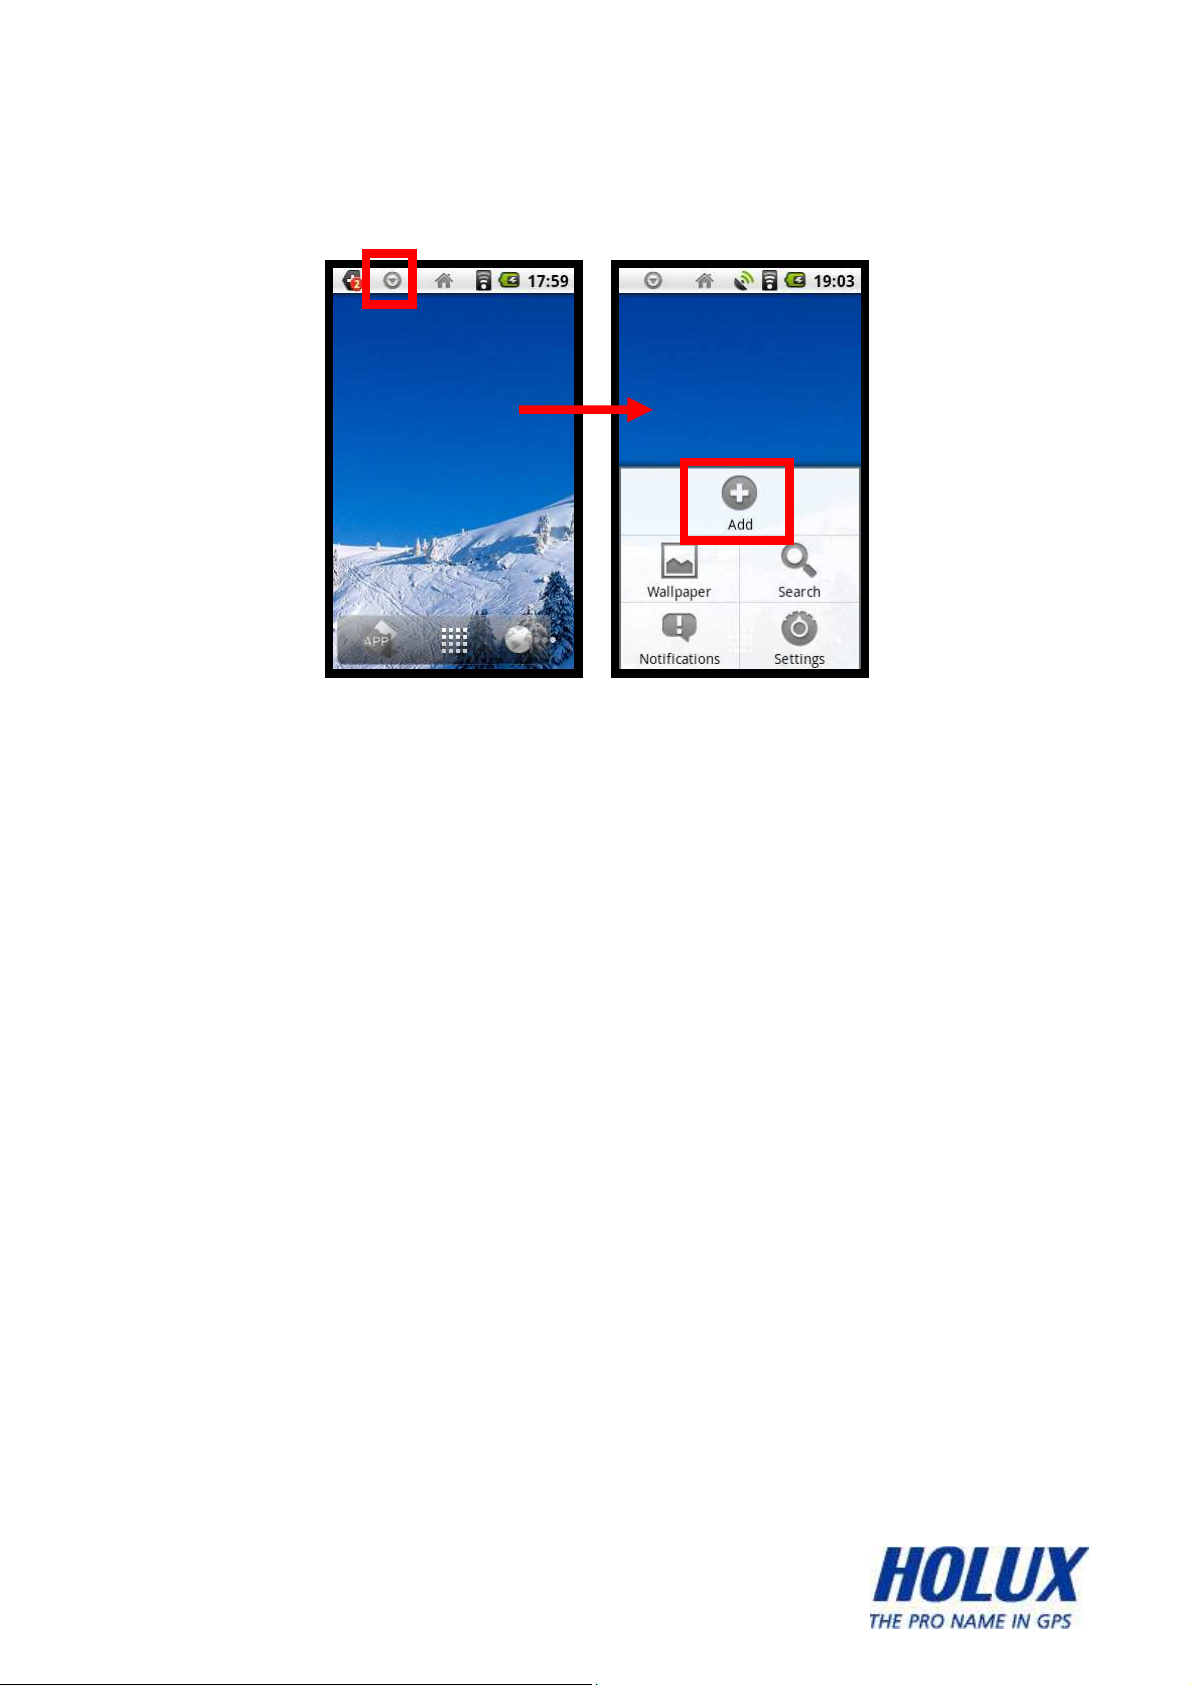
Home Screen Shortcuts
ADD
There are 4 types of shortcuts that can be added to home-screen:
a) Shortcuts: Applications, Bookmarks, Settings
b) Widgets: Analog Clock, Calendar, Power Control
c) Folders: New Folder
d) Wallpapers: Select new wallpaper from wallpaper list
5
- -
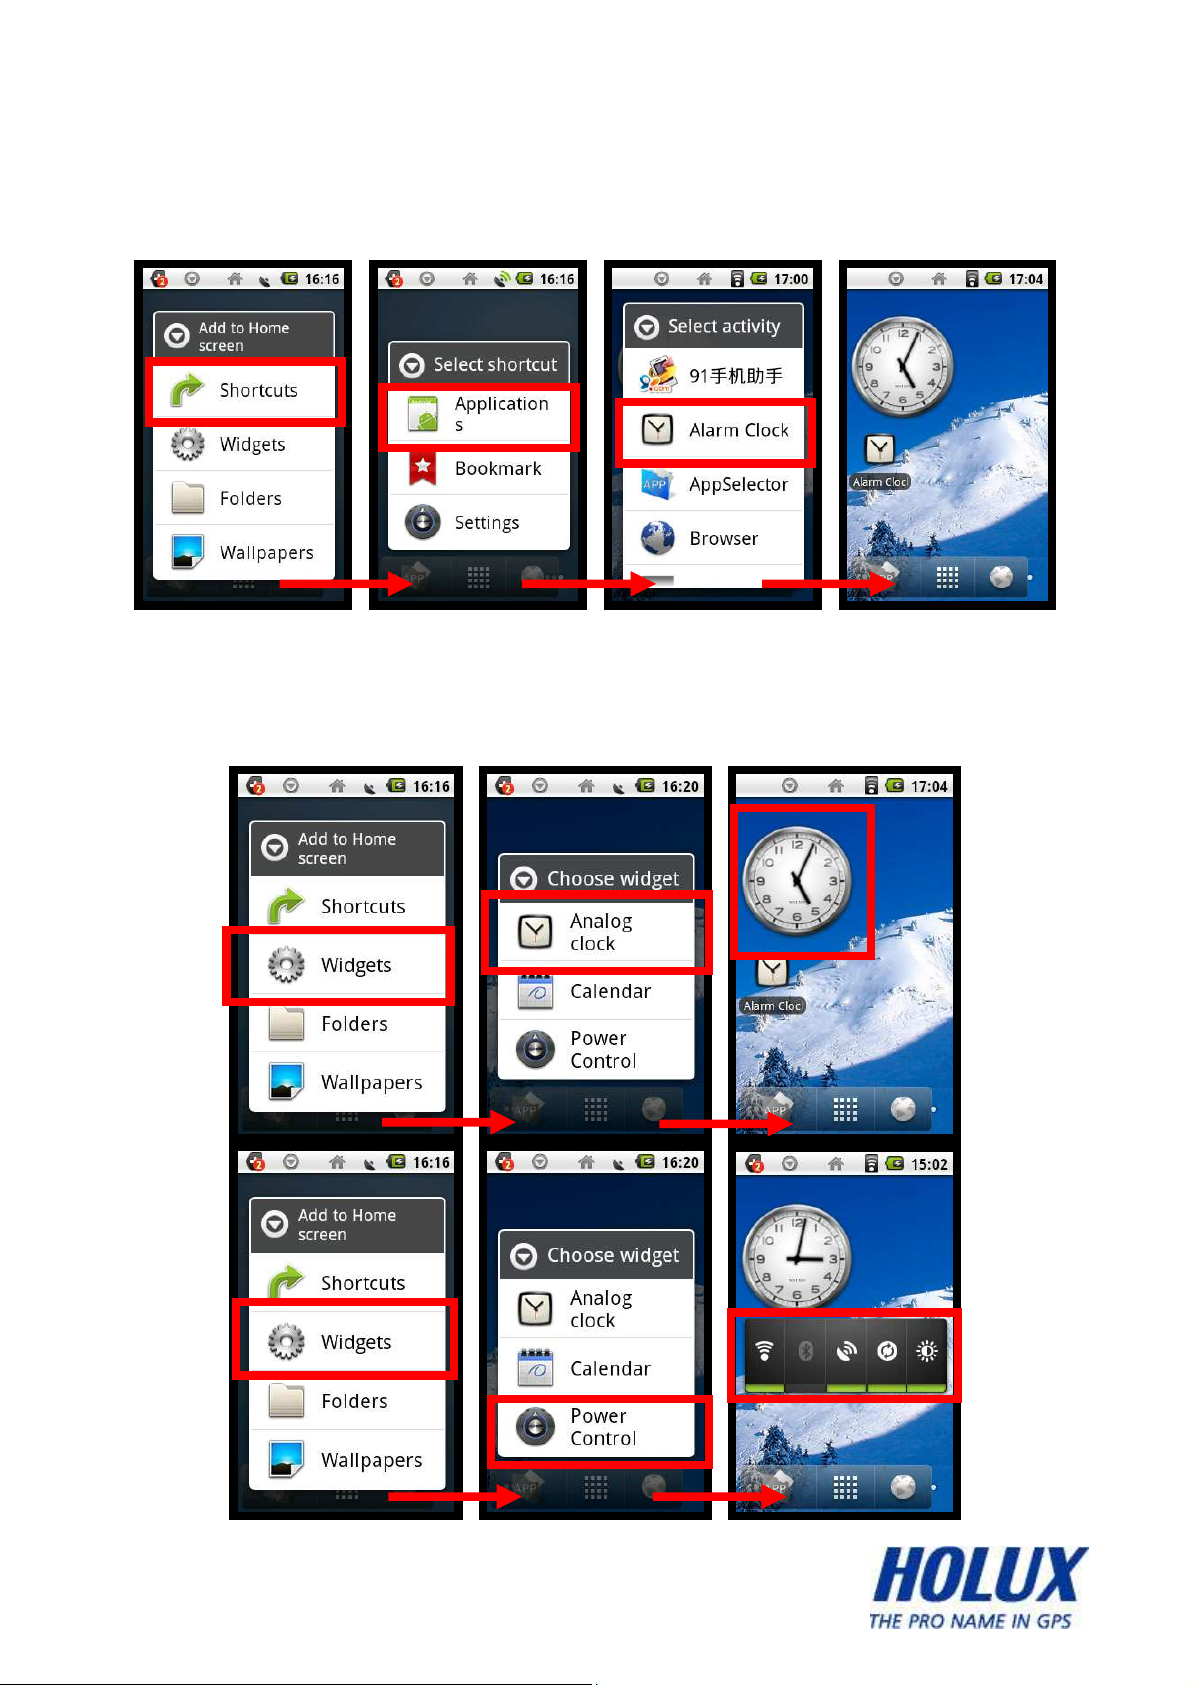
a) Home Screen Shortcuts:
User can add their favorite shortcuts to home-screen
b) Home Screen Widgets:
User can add their favorite widgets to home-screen
6
- -
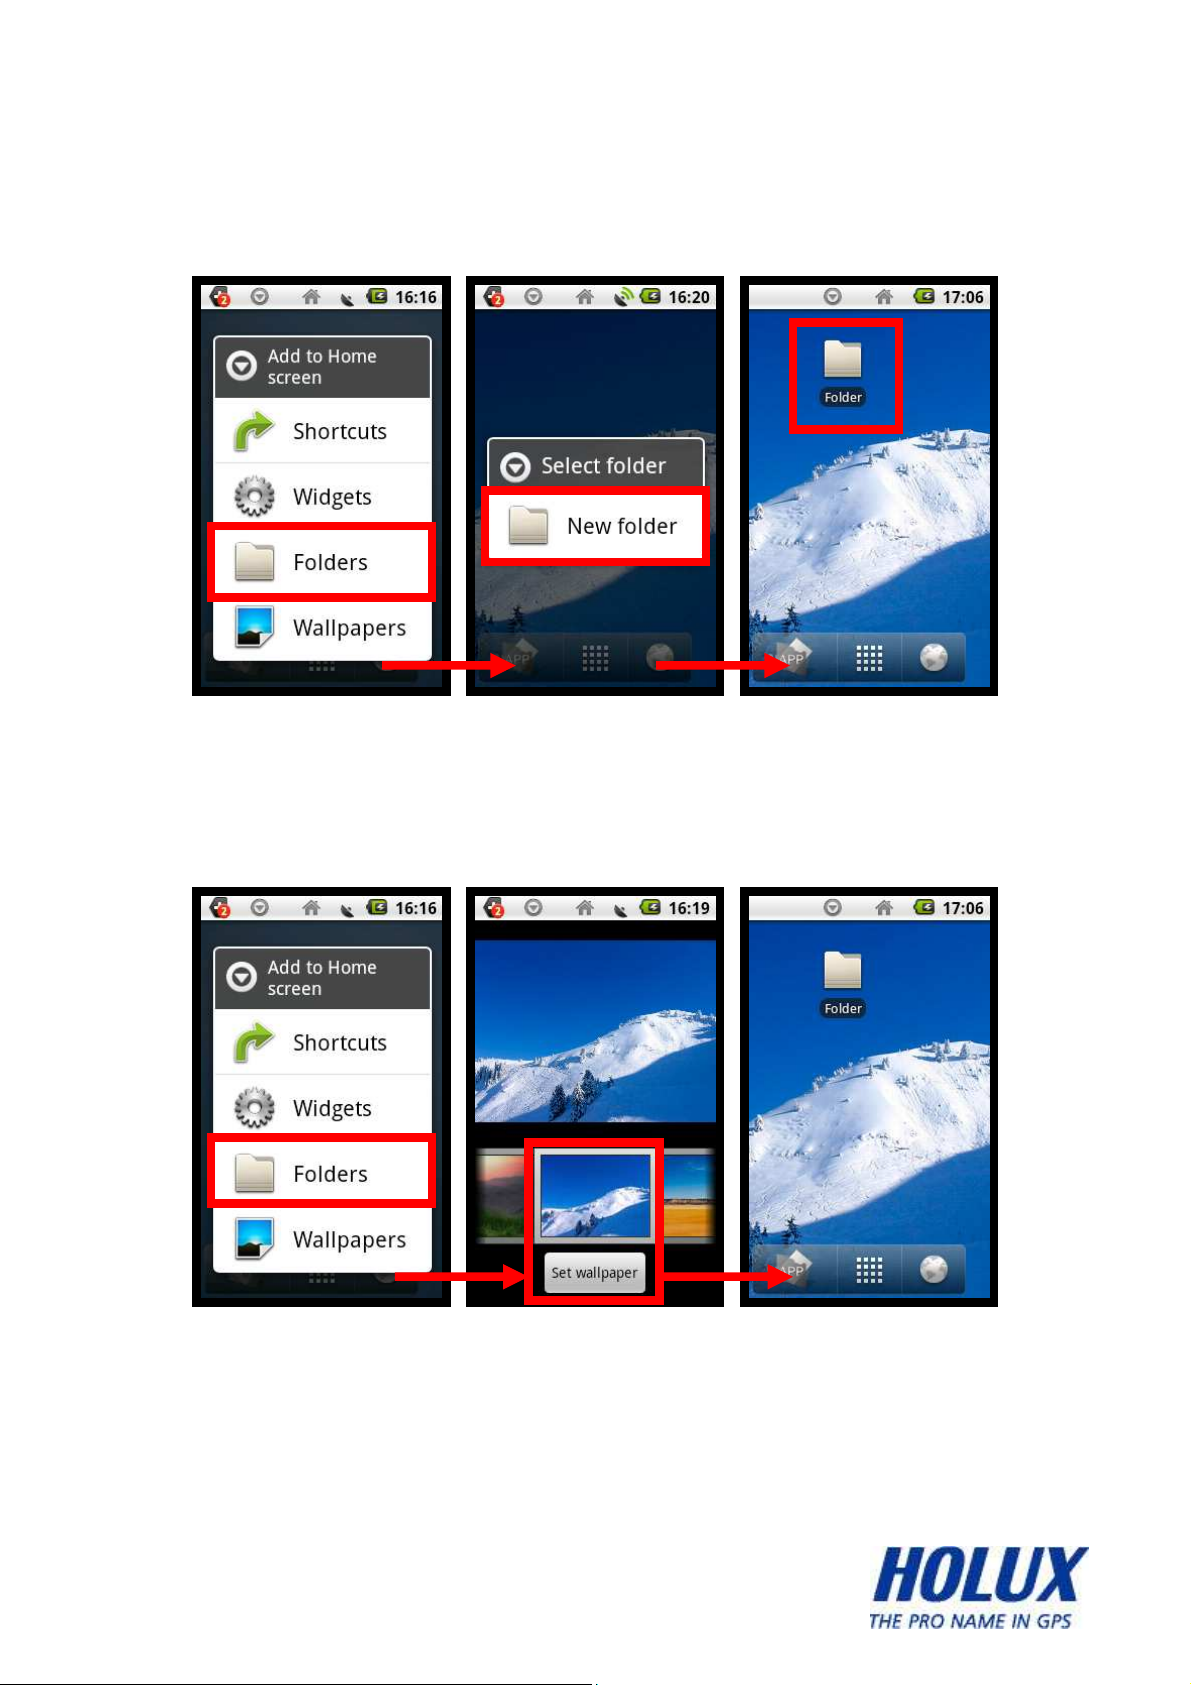
c) Home Screen Folders:
User can add folders to home-screen
d) Home Screen Wallpapers:
User can change their favorite wallpapers to home-screen
7
- -
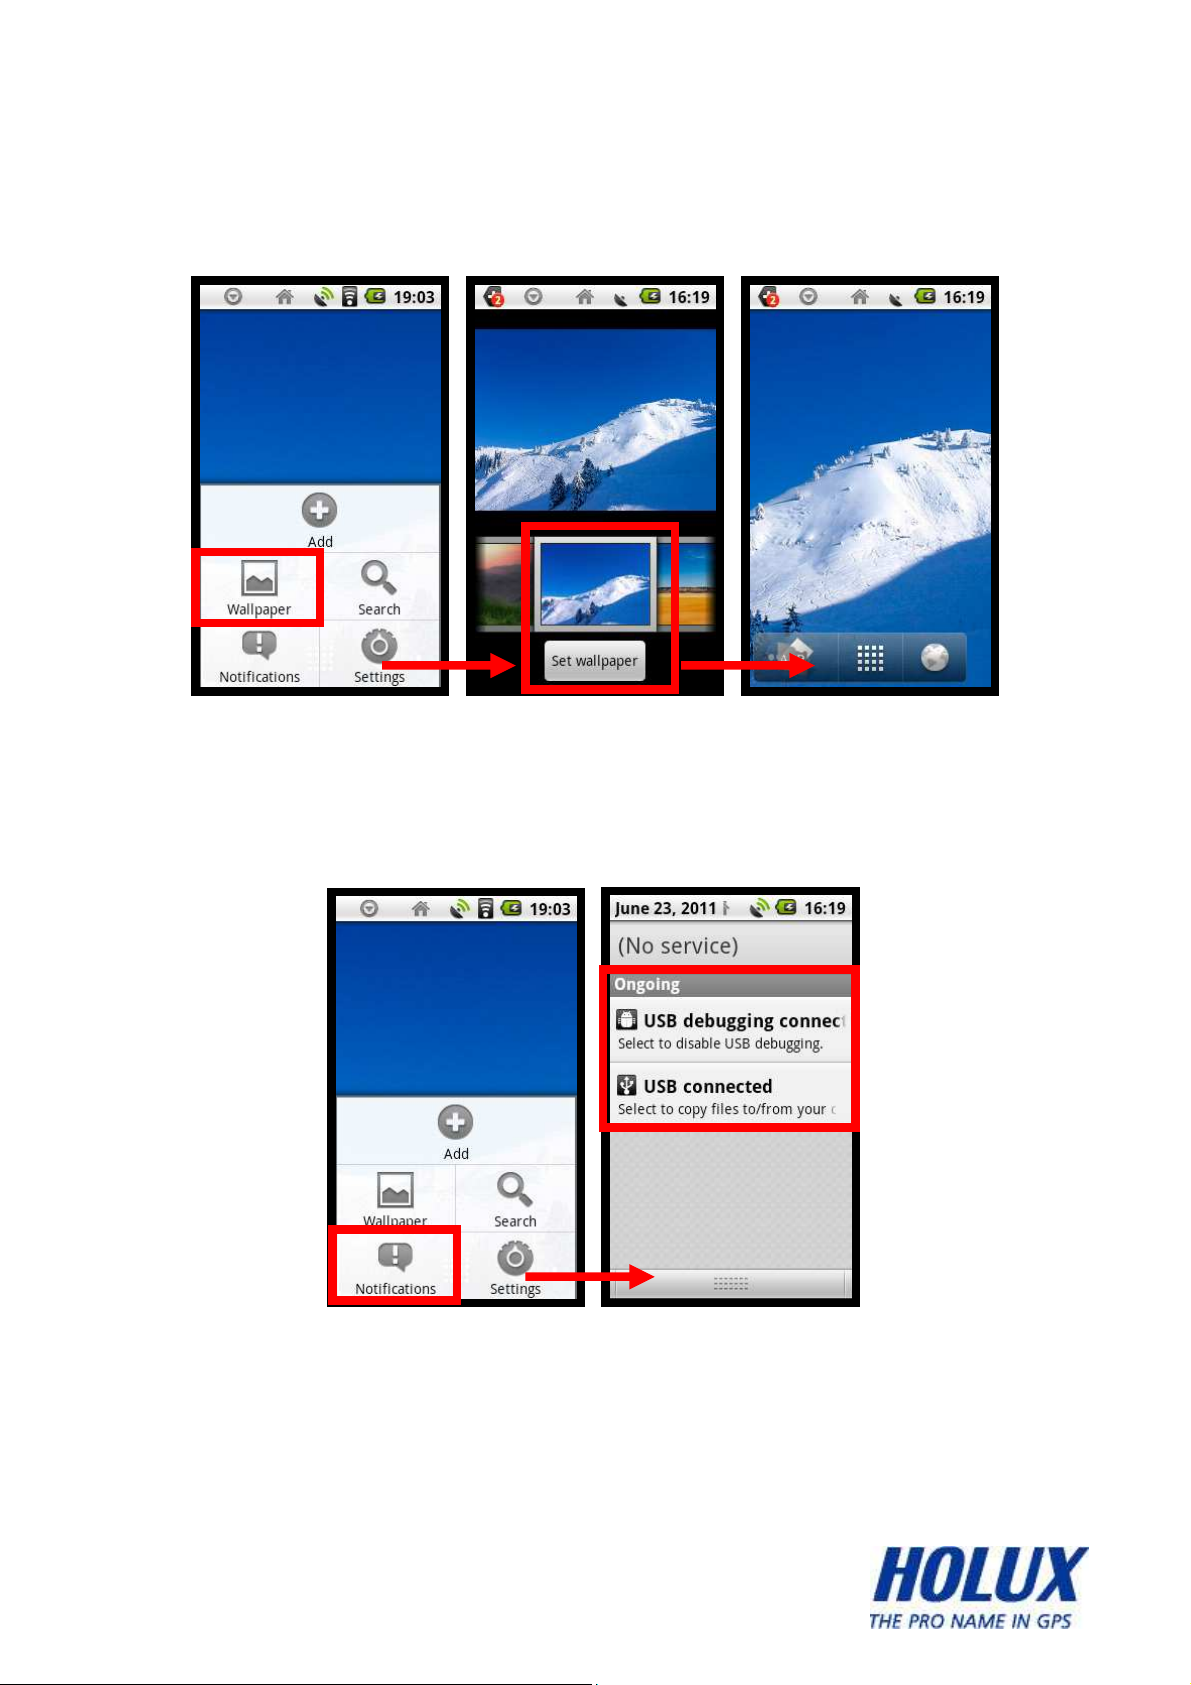
WALLPAPER
User can change wallpaper from internal setting or download from PC
NOTIFICATIONS
Show ongoing connection in device
8
- -
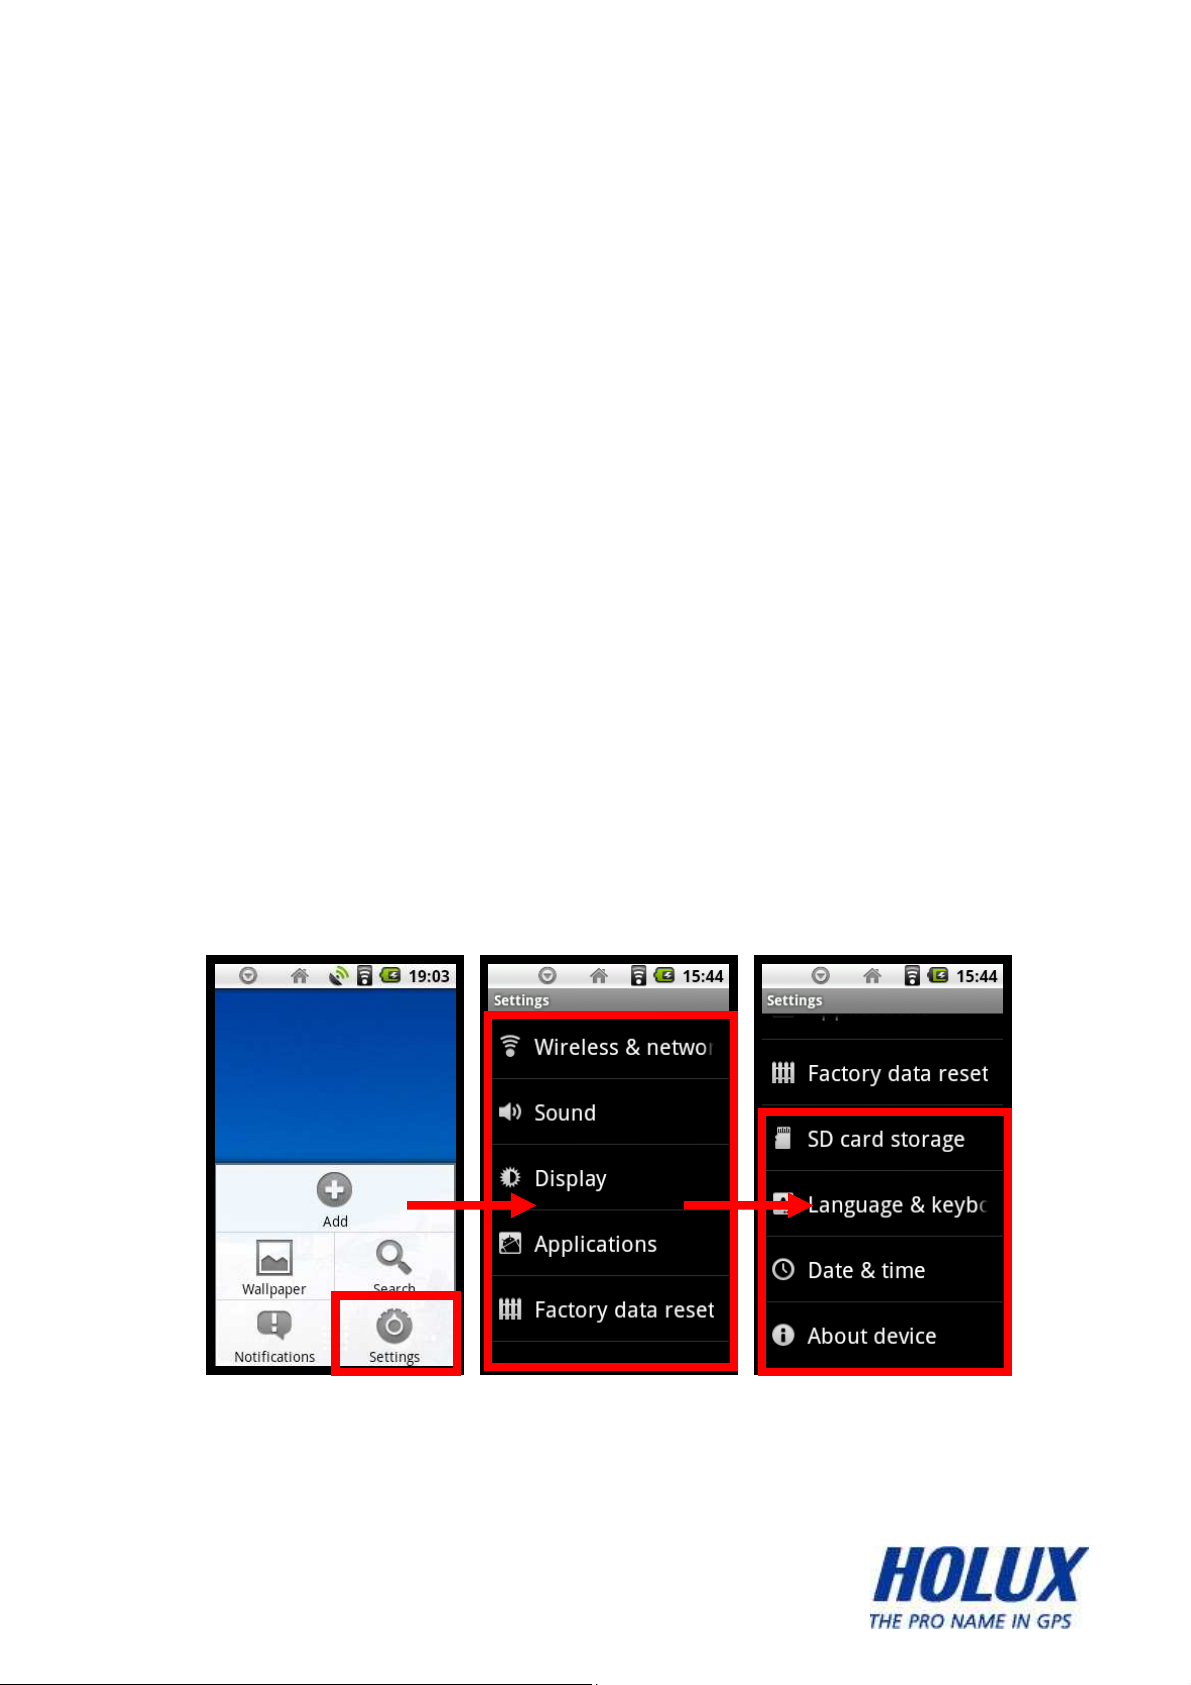
SETTINGS
The settings include:
a) Wireless & Network
b) Sound
c) Display
d) Applications
e) Factory Data Reset
f) SD Card Storage
g) Language & Keyboard
h) Date & Time
i) About Device
For details information about Settings, please refer to section 6
9
- -
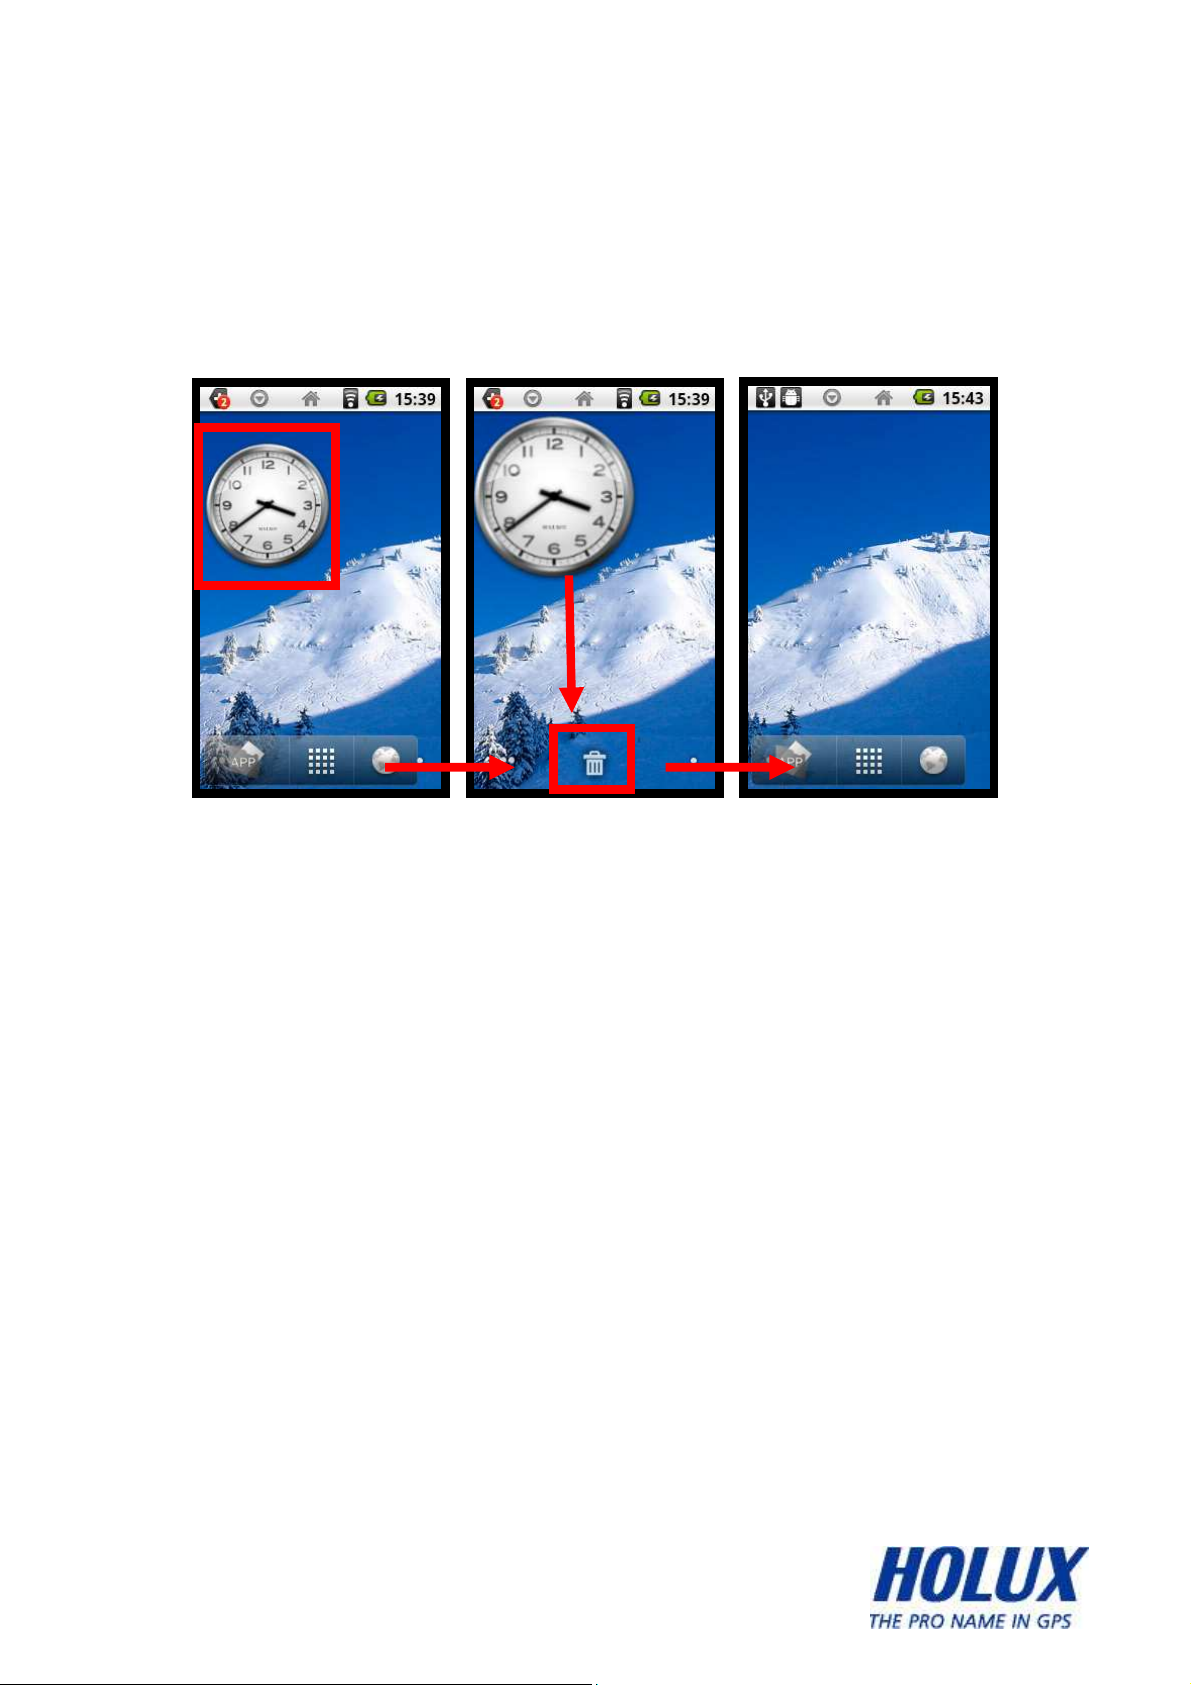
Delete SHORTCUT from Home Screen
We can delete the shortcut that have been created in Home Screen by
clicking the shortcut’s icon for 3 seconds, and then drag the shortcut’s
icon into trash-bin in the bottom of home-screen.
10
- -

Home Screen Pages
There are 5 pages in Home-Screen, each page can load the user’s
selected shortcuts, user can quickly change home-screen page by
pushing the main menu icon 3 seconds and then select the page they
want.
11
- -

App Selector
There are several applications that can be selected from APP
SELECTOR, the application that selected will also be a shortcut in APP
Home Screen.
12
- -
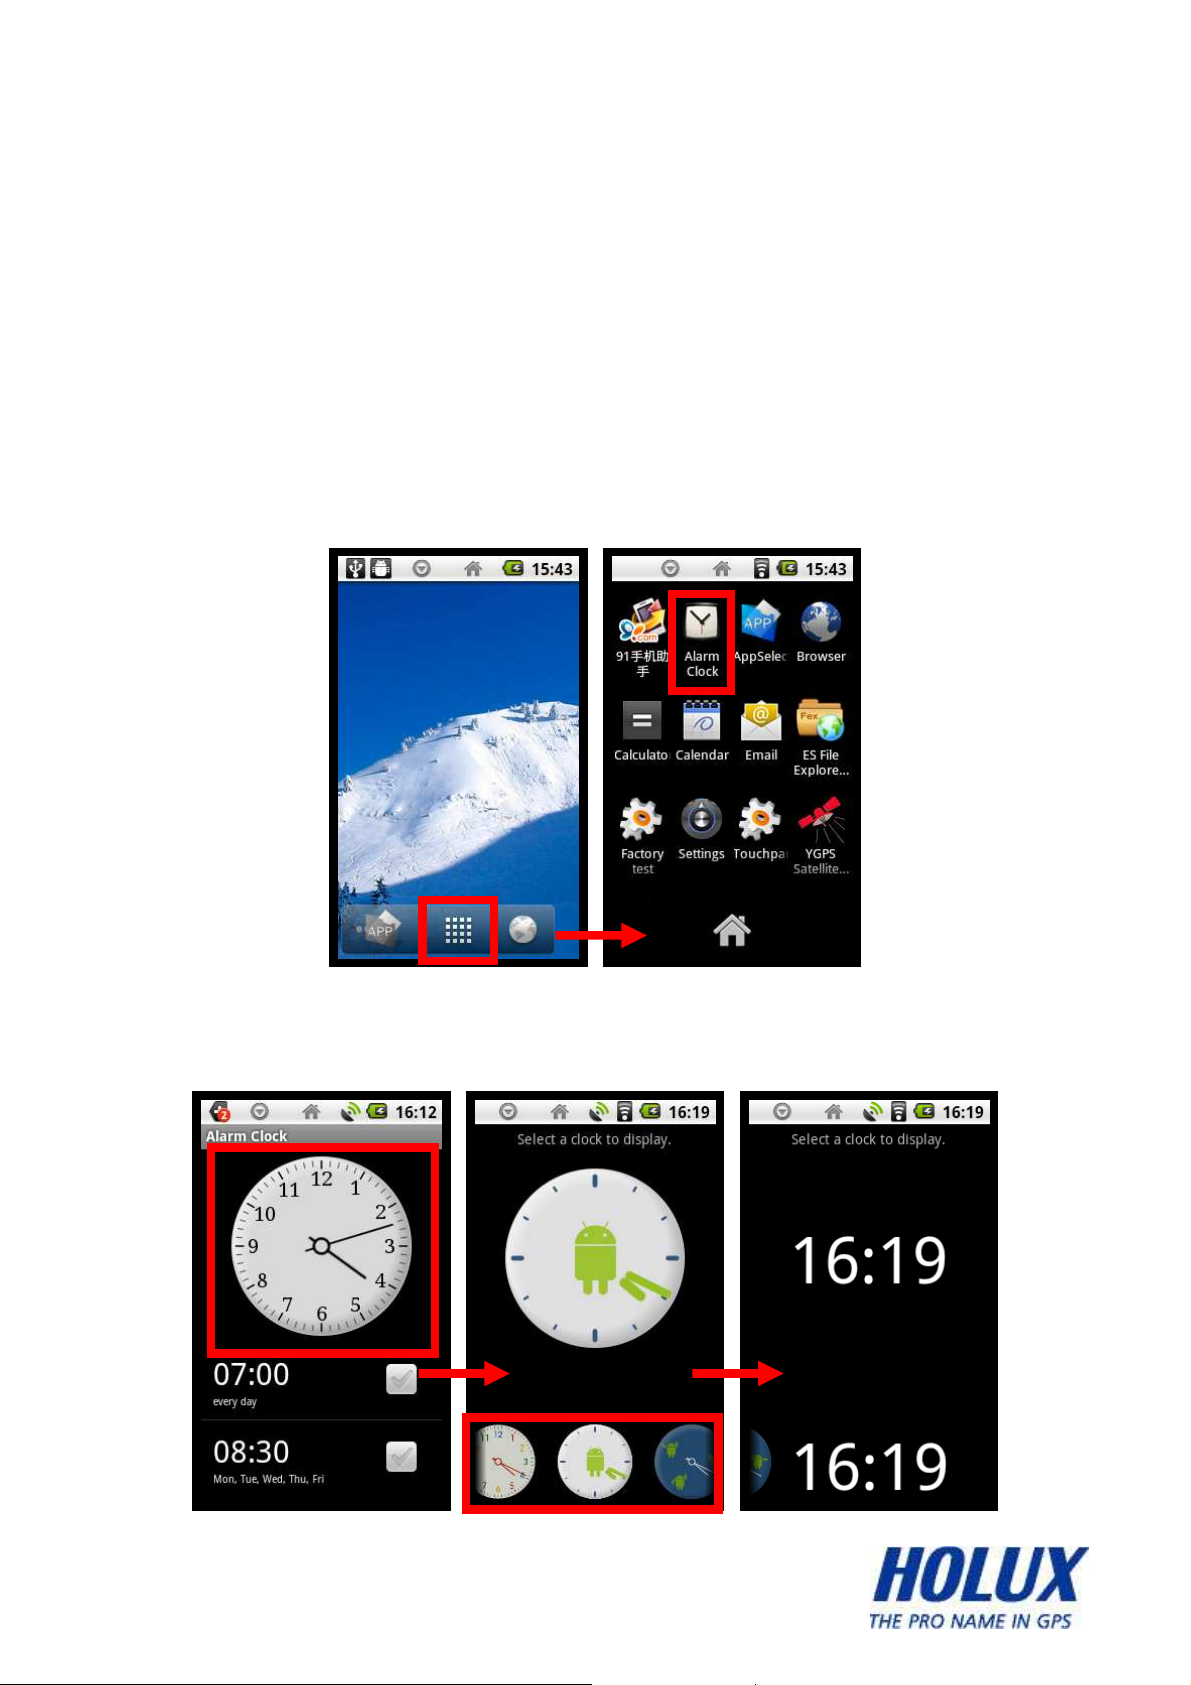
Applications
Alarm Clock
In Alarm Clock, user can set the time, choose the ringtone, vibration,
repetition days, and rename the alarm’s label. Besides that, user can
choose the analog or digital mode clock, set alarm volume, snooze
duration.
Choose the clock-mode
13
- -

Set the alarm volume, snooze
Set the alarm time, ringtone, vibration, repeatation days, label
14
- -

15
- -

Calculator
The device provides a simply usable calculator, which contains some
basic function, such as plus, subtract, multiply, divide
16
- -

Calendar
In Android OS, Calendar will sync with mail-exchange account, before
enter the calendar, device will ask user to submit their e-mail address &
password, and then all of the appointments, meetings & tasks will be set
in calendar notes.
E-mail
In this application, user can set-up their e-mail account to receive/send
e-mail through Wi-Fi connection.
17
- -

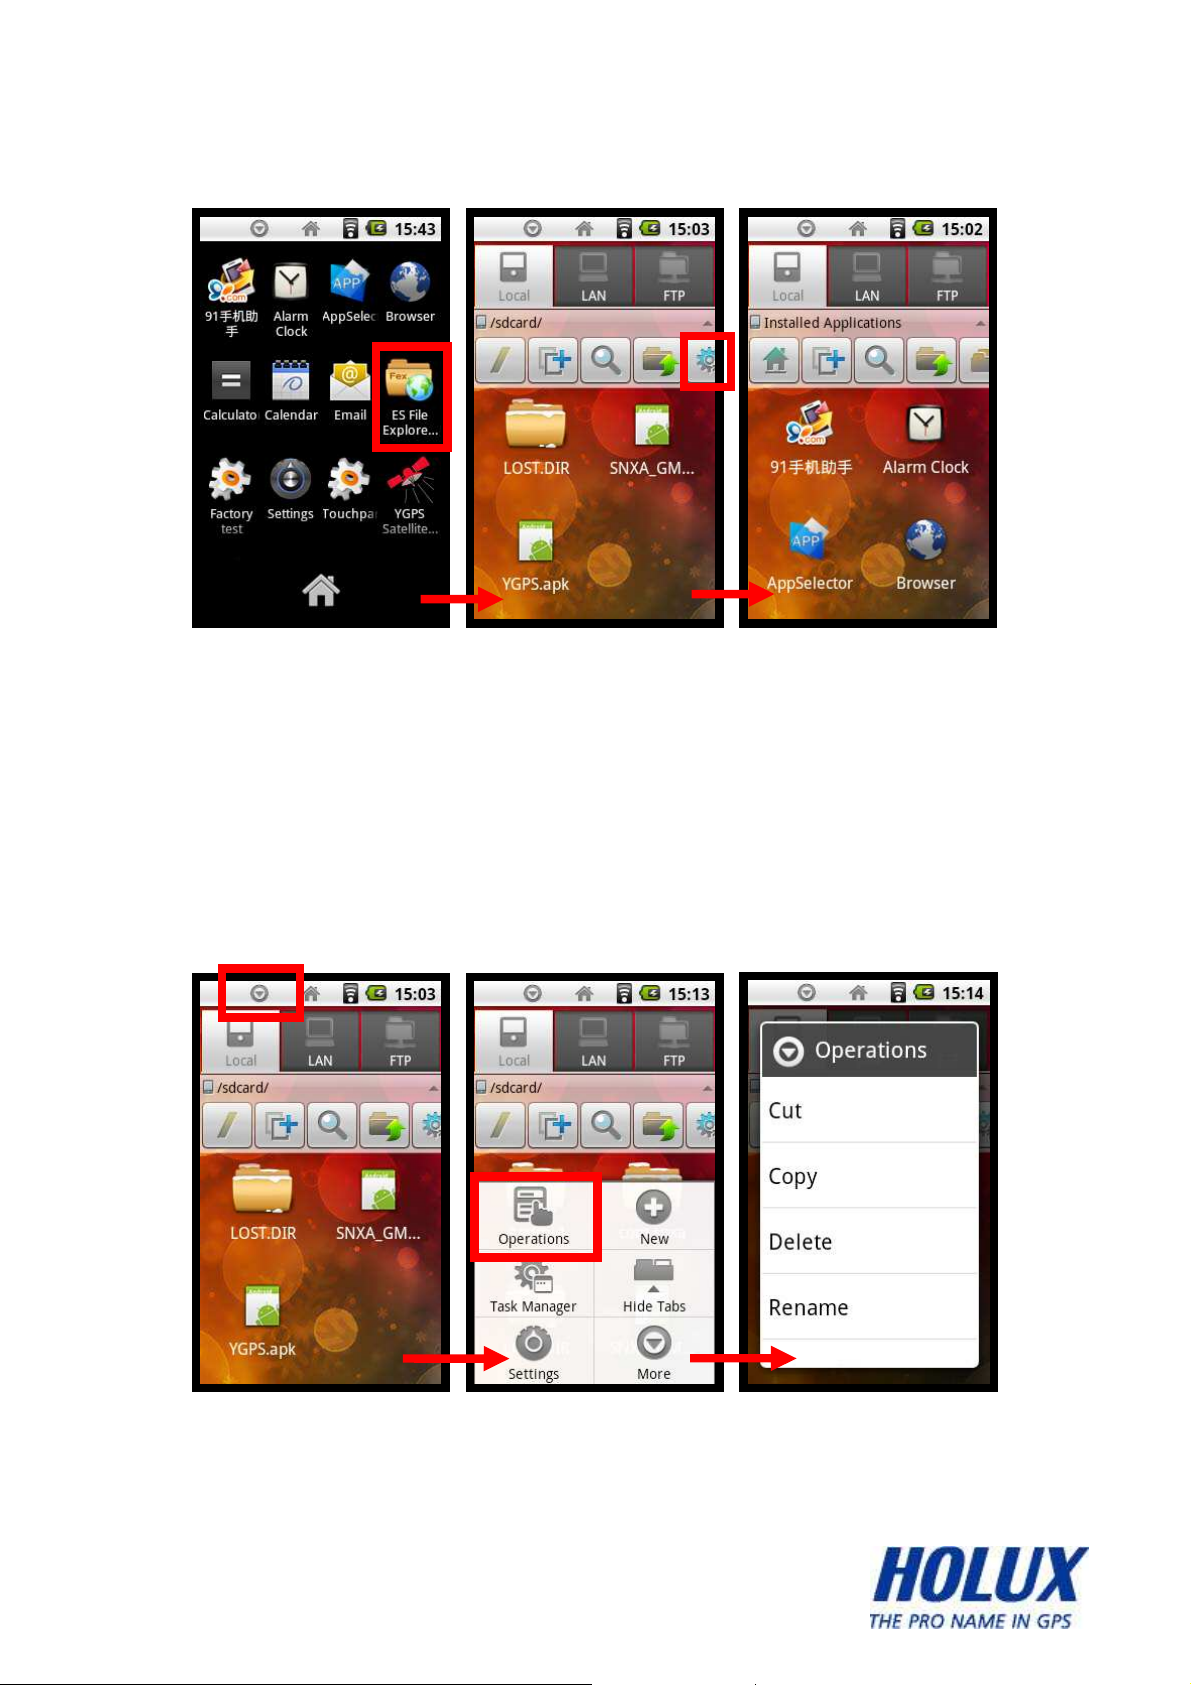
ES File Explorer
Act as File Manager in Android OS, user can see & search all contents
of SD Card, LAN & FTP connection list, applications that be set-up in
device.
Browse SD Card Files
18
- -
Browse the device’s application list
Besides that, by clicking function key, user can see some settings of ES
File Explorer, such as Operations (Cut, Copy, Delete or Rename),
Create New File / Folder, Task Manager, Display Settings, Flip
Orientation, Help, About Us & Exit.
Operations (Cut, Copy, Delete & Rename Files):
19
- -

Create New (File, Folder & Search):
Browse Task Manager:
20
- -

Settings:
More Options (contain Flip Orientation/Rotate Screen, Help, About
us, & Exit)
21
- -

Web Browser
User can use browser to browse the website through Wi-Fi connection,
besides that there are some settings in function key, such as Open new
window, save bookmarks, check active windows, refresh / move forward
of webpage, find on webpage, select web text, webpage info, website
downloads, & settings.
22
- -

Add Bookmarks :
23
- -

See active windows or add new window :
24
- -

More Options (Add Bookmark, Find on Page, Select Text, Page
Info, Downloads & Settings):
25
- -
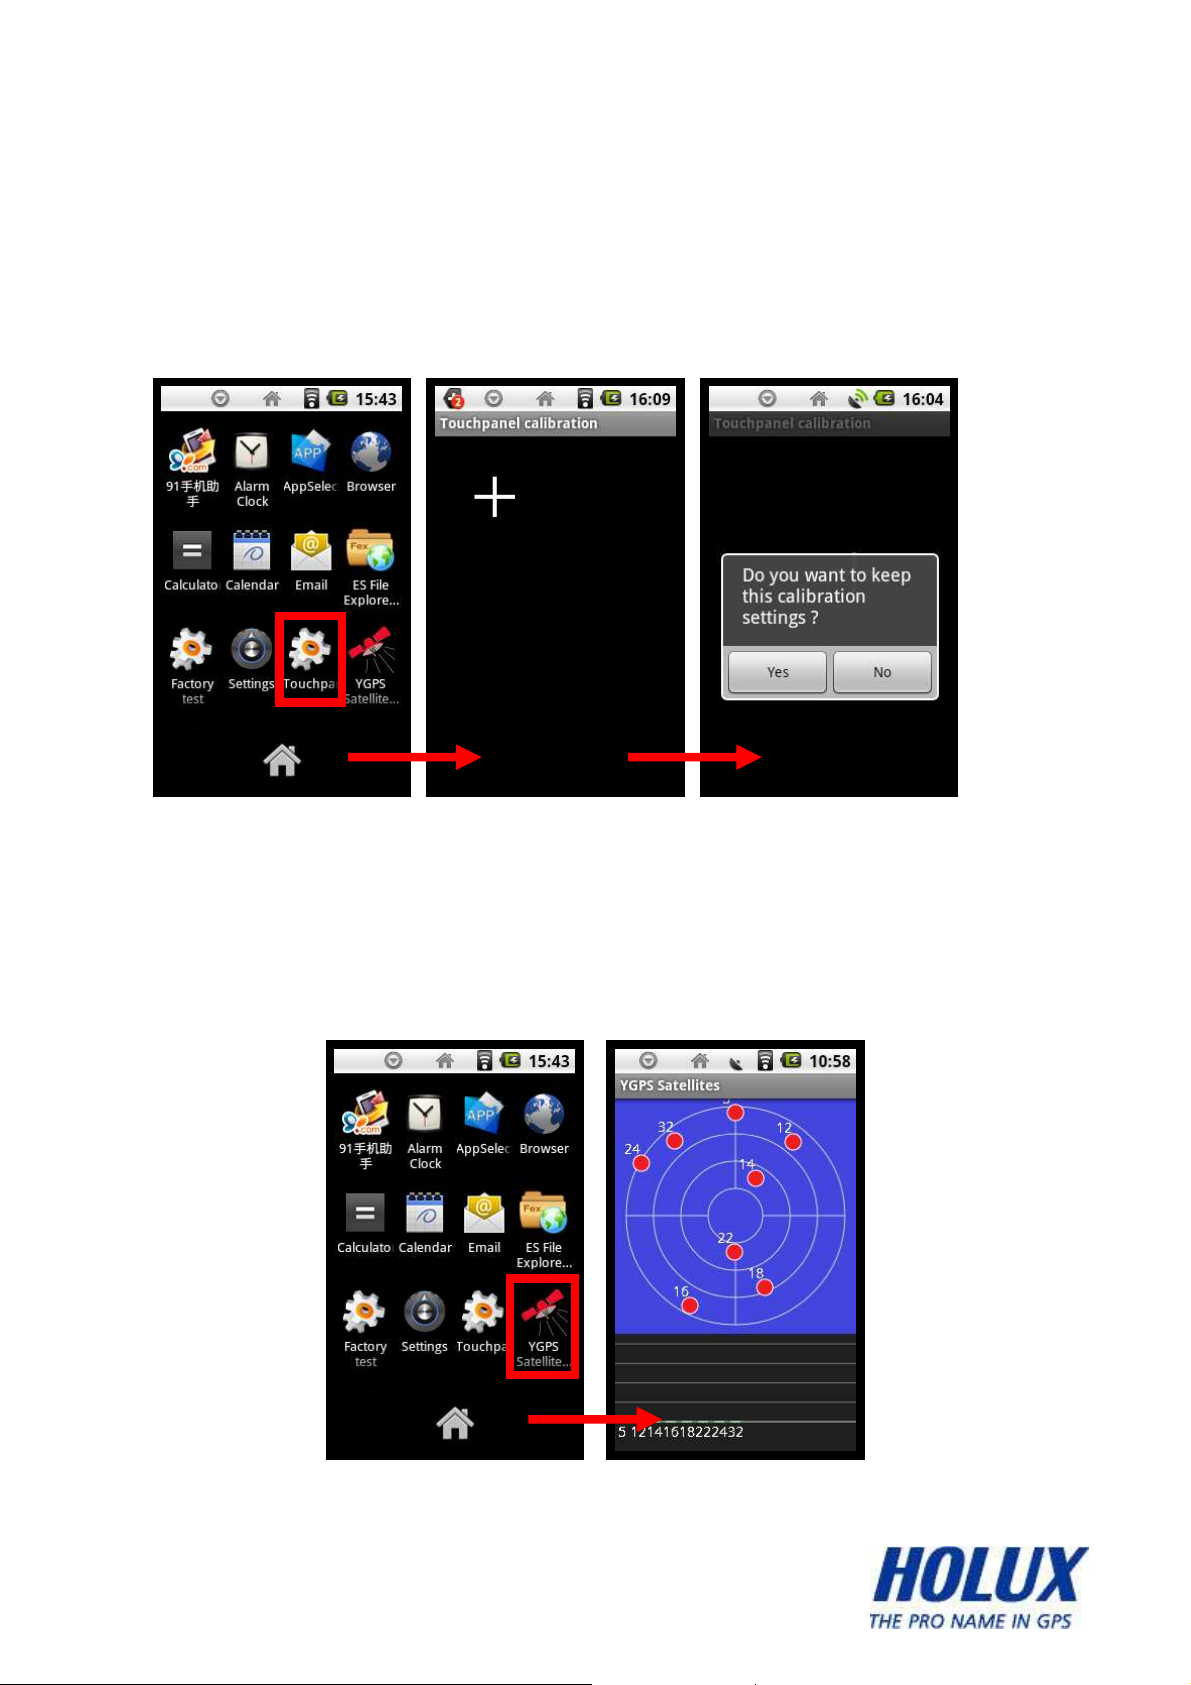
Touch panel Calibration
User can calibrate the touch panel sensitivity, after succeed to calibrate,
system will ask user whether they need to keep the calibration setting or
not.
YGPS Satellites
YGPS Satellites show active satellite’s number that caught by GPS
Receiver.
26
- -

Settings
Wireless & Network
User can connect to internet through Wi-Fi connection, first need to
turn-on the Wi-Fi, then search for Wi-Fi network, besides that, user can
also set-up & manage the VPN (Virtual Private Networks).
27
- -

Connect through Wi-Fi
28
- -

Add a secure way of connecting to a private Local Area Network
(LAN) through Virtual Private Network (VPN) PPTP VPN / L2TP
VPN / L2TP/IPSec PSK / L2TP/IPSec CRT
29
- -

Sound
In Sound, user can set whether they need to silent all sounds or not, &
set notifications volume.
30
- -

Display
There are Brightness controller, window animation & Screen Time-Out
set-up. User can auto or manually adjust the brightness, set no, some or
all animations that showed in window, power-save screen time (from 15
seconds to 30 minutes).
31
- -

Applications
In Applications settings, user can allow installation of non-market
applications or not, manage & remove the installed applications, view &
control currently running services, set options for application
development.
32
- -

33
- -

Factory Data Reset
User can through Factory Data Reset to delete all data on this device
including system & downloaded application data, but won’t delete the
current system software, bundled applications & SD Card Files.
34
- -

SD Card Storage
SD Card Storage will show us Internal Phone & SD Card Storage Info,
including SD Card’s Total Space, Available Space, Mounting &
Formatting the SD Card.
35
- -

Language & Keyboard
Users are able to select their device’s language, language selection that
available in device (English UK, English US, German, Spanish, French,
Italian, Portuguese, Swedish, Turkish, Russian, Norwegian, Korean,
Japanese, Traditional Chinese, & Simplified Chinese) also with
keyboard’s settings & user dictionary.
36
- -

37
- -

Date & Time
In this setting, user can manually set the date, date format, time zone,
time, and time format or select the network-provided values.
38
- -

39
- -

40
- -

About Device
User can see all information about device, such as legal information
(open source licenses), model number, android version, baseband
version, kernel version, & build number.
41
- -

Normal Care and Maintenance
To ensure the unit’s normal operation and extended life span, please
note the following while using and storing:
Do not drop the unit
If violently impacted or shocked, serious damage may be caused.
Avoid sudden temperature changes
Condensation may occur when entering a warm room on a cold day.
To prevent condensation from damaging the unit, please place into
an airtight plastic bag before sudden temperature changes.
Keep away from strong magnetic fields
When using or storing, please keep away from strong
electromagnetic/radioactive or magnetic field equipment.
Operating temperature
The products operating temperature is between 0°C ~ 40°C; please
do not operate under extreme temperatures.
Avoid exposure to sunlight
Please avoid long periods of sunlight or high temperature exposure.
Cleaning the screen
Using a soft clean cloth to wipe the screen is recommended; do not
use ordinary tissue to wipe the screen.
Do not disassemble
Please do not disassemble the product, this may void the warranty
and damage the unit.
Storage
When the product is not being used for a long period, store the
device in a cool and dry place. For long-term storage, keeping the
42
- -

unit in a dry box is recommended.
Please do not keep the product in the following environments:
• Unventilated and humid locations.
• In a car window that is exposed to excessive amounts of sunlight.
• In an environment where humidity is over 90%.
43
- -

Specifications
CPU SiRF Atlas-V (ARM-11 core)
Integrated single-chip GPS solution
GPS chip
Built-in Patch antenna
128MB mibile-DDR
Memory
4GB MLC NAND flash
Display
3.0 ‘’LQVGA (16:9) TFT LCD
Transflective Touch Screen (Sunlight viewable)
240 x 400 Pixels Resolution
Dimension 60 x 105 x 23 mm
Weight 124g (with battery)
Battery
>8 hrs (run GPStest, GPS ON, Backlight OFF,
Wi-Fi OFF)
Rechargeable, Li-Ion 1050mAh
Operating Temperature
Charge: 0℃~45℃ ( accuracy: ±3℃)
Discharge: -10℃~60℃
Adaptor
Input AC 100~240 V, 0.15 A, 50~60Hz
Output DC 5 V, 1.0 A
IO Interface USB 2.0 high speed (mini USB connector)
Buzzer Built-in
Light Sensor Built-in, support Auto-backlight
WIFI Built-in
44
- -

Environmental
Operating Temp: -10℃~60℃
Temperature
Storage Temp: -20℃~70℃
Water proof IPX6
45
- -
 Loading...