

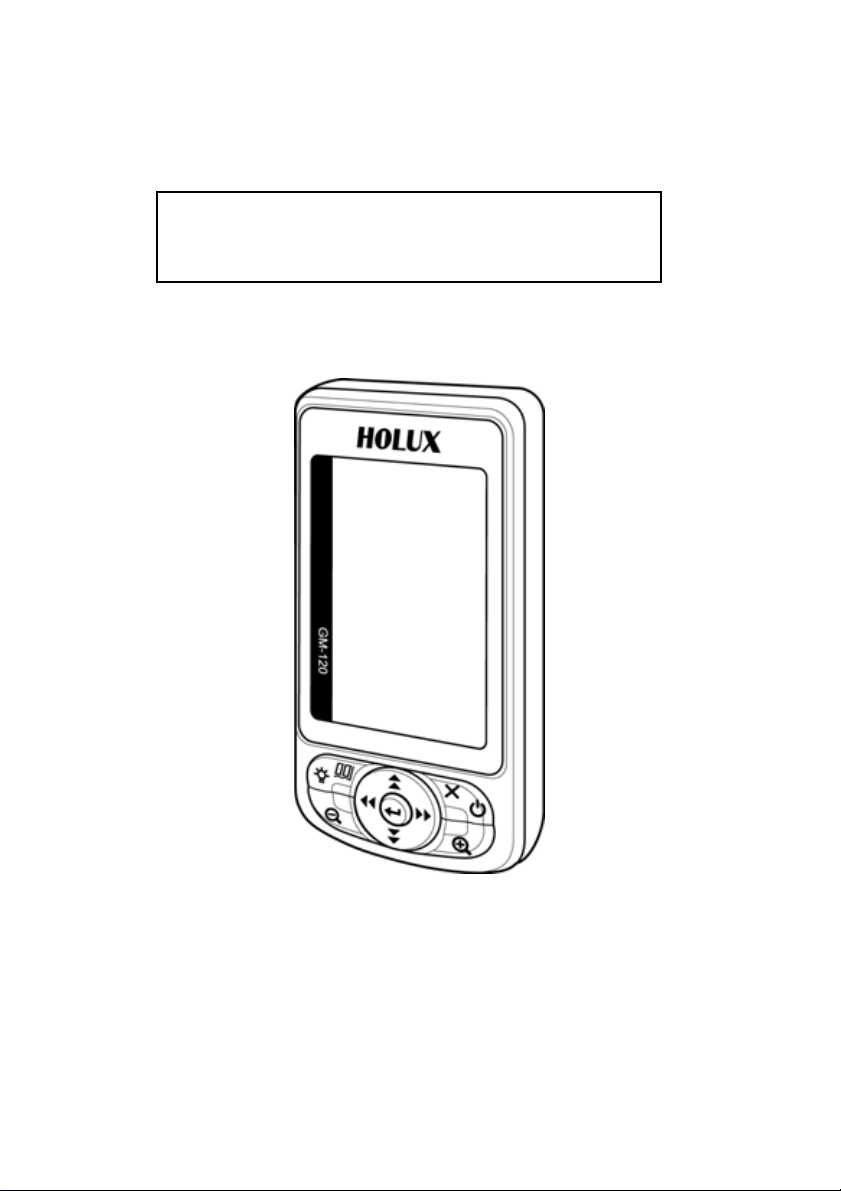
Holux Handheld GPS
GM-120
User Manual

About This Manual
Thank you for choosing the Holux GM-120 Handheld Navigator. This
manual helps you to familiarize yourself with this product to best suit your
needs. Keep this manual for future reference.
Warranty
The GM-120 Handheld GPS Navigator is warranted to be free from defects
in material and functions for a period of one year from the date of purchase.
If there is a product failure within this period (under normal conditions), a
replacement will be provided at no charge to the customer.
Copyright Information
No part of this manual, including the products and software described in it,
may be reproduced, transmitted, transcribed, stored in a retrieval system,
or translated into any language in any form or by any means, without the
express written permission of Holux Technology, Inc.
Copyright© 2006 Holux Technology, Inc. All Rights Reserved.
Safety Information
• Read and understand all instructions.
• When using this product, heed the safety precautions to reduce the risk
of fire, electric shock, or personal injury.
• Do not disassemble the device. The product contains no user-
replaceable parts.
Maintenance Service
HOLUX Technology, Inc.
Tel: +886-3-6687000
Web Site: www.holux.com
E-mail: info@holux.com
i

Table of Contents
Product Overview .......................................................................................1
Package Contents..................................................................................2
Main Features ........................................................................................3
Hardware Components ..............................................................................5
Front View ..............................................................................................5
Rear View...............................................................................................6
Bottom View ...........................................................................................7
Setting up the GM-120................................................................................7
Installing the Battery...............................................................................7
Installing the Holder Assembly...............................................................9
Turning on for the First Time...................................................................10
Acquiring Satellite Information .............................................................10
Turning the GPS On/Off.......................................................................11
Viewing the Map Page .........................................................................11
Zooming In/Out.....................................................................................12
Turning on the Backlight ......................................................................13
Adjusting the Screen Contrast .............................................................13
Using the GM-120 in Simulation Mode ................................................13
Viewing the compass page ..................................................................15
Using Easy Mode ......................................................................................17
Setting the Home Location...................................................................17
Using the Navigation Feature...............................................................18
Calibrating the Compass......................................................................19
Using Professional Mode.........................................................................20
Search Object.......................................................................................20
Nearest Search ....................................................................................21
ii

Creating Waypoints........................................................................22
Modifying Waypoints......................................................................23
Deleting Waypoints........................................................................24
Using the Routes Feature ....................................................................24
Creating a Route............................................................................24
Editing Routes................................................................................26
Using the Track Log Feature................................................................26
Creating a Track Log .....................................................................26
Viewing Track Log Information ......................................................28
Using the Shortcut On Feature ............................................................29
Using Map Scale Feature.....................................................................29
Using the Set Location Feature............................................................29
Using Measure Distance Feature.........................................................30
Viewing Trip Status ..............................................................................31
Resetting Trip Data ........................................................................32
Changing the Fields .......................................................................32
Moving to the Next Waypoint ...............................................................33
Calibrating Altitude ...............................................................................34
Using Geocaching Mode..........................................................................35
Setting Geocaching Coordinates .........................................................35
Viewing the Geocaching Page .............................................................36
Using Sports Mode ...................................................................................37
Training Setup ......................................................................................37
Setting the Timer............................................................................37
Setting the Distance.......................................................................37
Setting the Pace.............................................................................38
Setting the Speed ..........................................................................38
Setting the Lap...............................................................................39
Setting Auto Pause ........................................................................40
iii

Miscellaneous Settings ..................................................................40
Start Training........................................................................................41
Viewing Training History ......................................................................42
Transferring Data......................................................................................44
Making Connections.............................................................................44
Starting Data Transfer..........................................................................45
Using Maproute.........................................................................................46
System Requirements ..........................................................................46
Features ...............................................................................................47
File Menu..............................................................................................47
Show Menu ..........................................................................................48
Tools Menu...........................................................................................50
List Menu..............................................................................................54
Transfer Menu ......................................................................................54
About Menu ..........................................................................................55
Context Menu .......................................................................................55
Viewing Sports Logs.............................................................................56
Downloading Fonts...............................................................................57
Downloading Map.................................................................................57
Downloading Track Logs......................................................................58
Downloading Waypoints and Routes ...................................................58
Downloading Geocaching Coordinates................................................58
Uploading Data.....................................................................................59
Setting the Pressure Units.......................................................................59
Setting the Navigation Mode ...................................................................61
Changing the Map Direction ....................................................................61
Setting the Bluetooth ...............................................................................62
Setting the Display Units .........................................................................62
iv

Setting the DMS Format ...........................................................................63
Setting the WAAS/EGNOS .......................................................................63
Setting the Backlight ................................................................................64
Setting the Beeper ....................................................................................64
Setting the Startup Page ..........................................................................65
Setting the Time........................................................................................65
Making a Cold Start ..................................................................................67
Resetting to Factory Defaults..................................................................67
Viewing Device Information.....................................................................68
Troubleshooting........................................................................................69
Specifications............................................................................................70
Federal Communications Commission (FCC) Statement.....................71
RF Exposure Warning ..............................................................................71
v
IInnttrroodduucciinngg tthhee GGMM--112200
Product Overview
Congratulations on your purchase of the
GPS Navigator. The GM-120 is an easy-to-use, multi-function handheld
GPS navigator which allows you to enjoy outdoor activities without worrying
about losing your way in unknown locations. The GM-120 helps you to
locate your position anywhere in the world and navigate your way easily. It
HOLUX
GM-120 Handheld
also features a geocaching function for users to participate and enjoy
treasure hunting games. The sports mode acts as a personal training aid to
help you set up training programs and calculate the calories you burn
during training. The various features of the GM-120 make it your ideal
companion for outdoor activities.
1
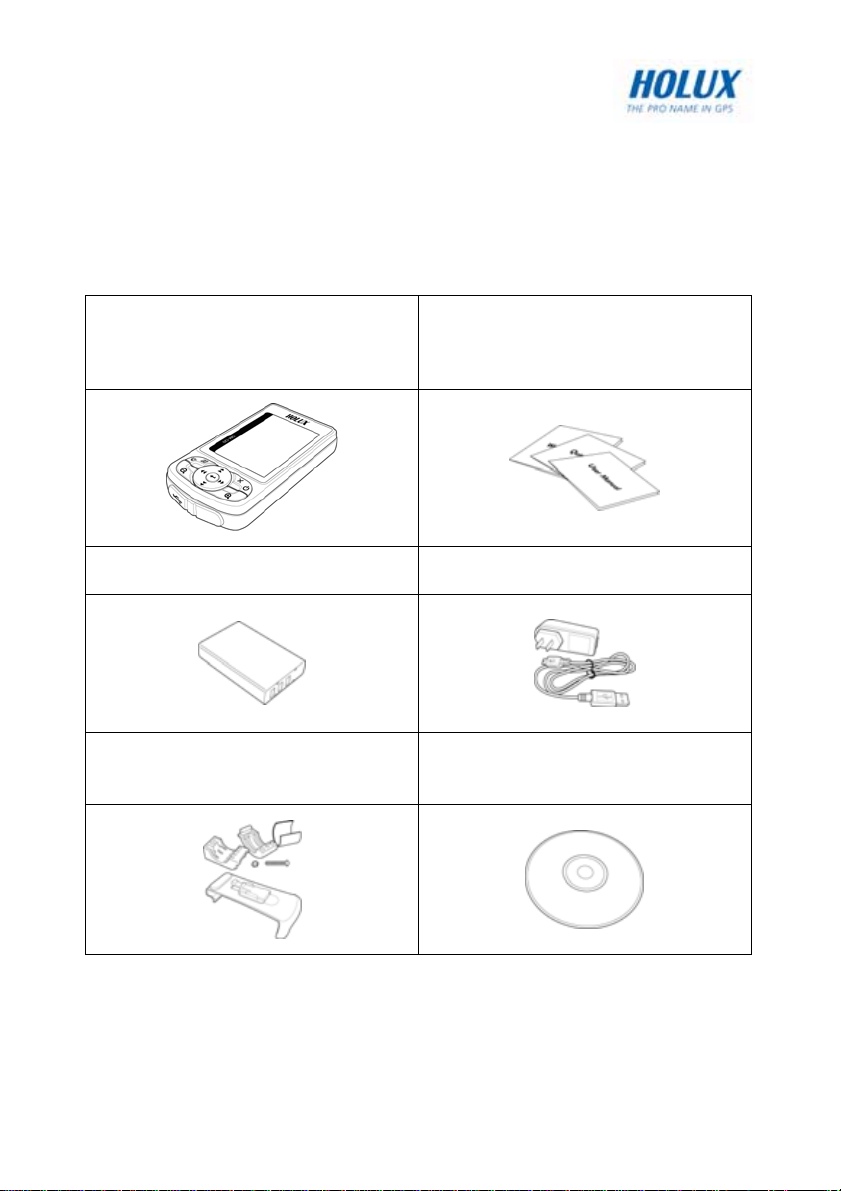
Package Contents
Before you start using your GM-120 Handheld GPS Navigator, make sure
that your package contains the following items. If anything appears to be
missing or damaged, contact your local Holux dealer or distributor for a
replacement.
GR-120 Handheld GPS
Navigator
Li-Ion battery
Bicycle holder attachment
(optional)
Documentation
(Quick Start Guide and
Warranty Card)
Power / USB
data cable
Software CD
* USB data cable can be used for battery charging and data transfer
between the GM-120 and a Notebook / PC.
2

Main Features
• Point tracking /Route recording
• Object quick search
• 4 gray level display
• 20 parallel satellite-tracking channels for fast acquisition and
reacquisition (TTFF)
• Waterproof—ideal for outdoor sports
• Specially designed for personal navigation, mountaineering,
investigation and military purposes
• WAAS (North America) and EGNOS (Europe) GPS receiver with
accuracy to 3 meters
• Features an electronic compass and altimeter sensor
• Bluetooth integrated (GM-120B, GM-120C Optional)
• Battery life up to 20 hours under normal use
• With map. It stores roads, river, lakes, borders, cities and POIs.
(GM-120C)
3

GM-120A GM-120B GM-120C
Features:
• SiRF GSC3
• 9 keys (Menu, Esc,
Zoom in, Zoom
out, Hotkey, 4-way
navigation keys)
• 2MB program code
in NOR flash
• 2MB pseudo
SRAM
• Buzzer
• Waypoint, track log
stored in NOR
flash
• 1600 mAh battery
Equipped with GM120A features plus:
• Electronic
compass
• Altimeter
• Barometer
• Bluetooth (Option)
Equipped with GM120B features plus:
• 128MB memory
build-in for support
map.
• It stores roads,
river, lakes,
borders, cities and
POIs.
• Bluetooth (Option)
4
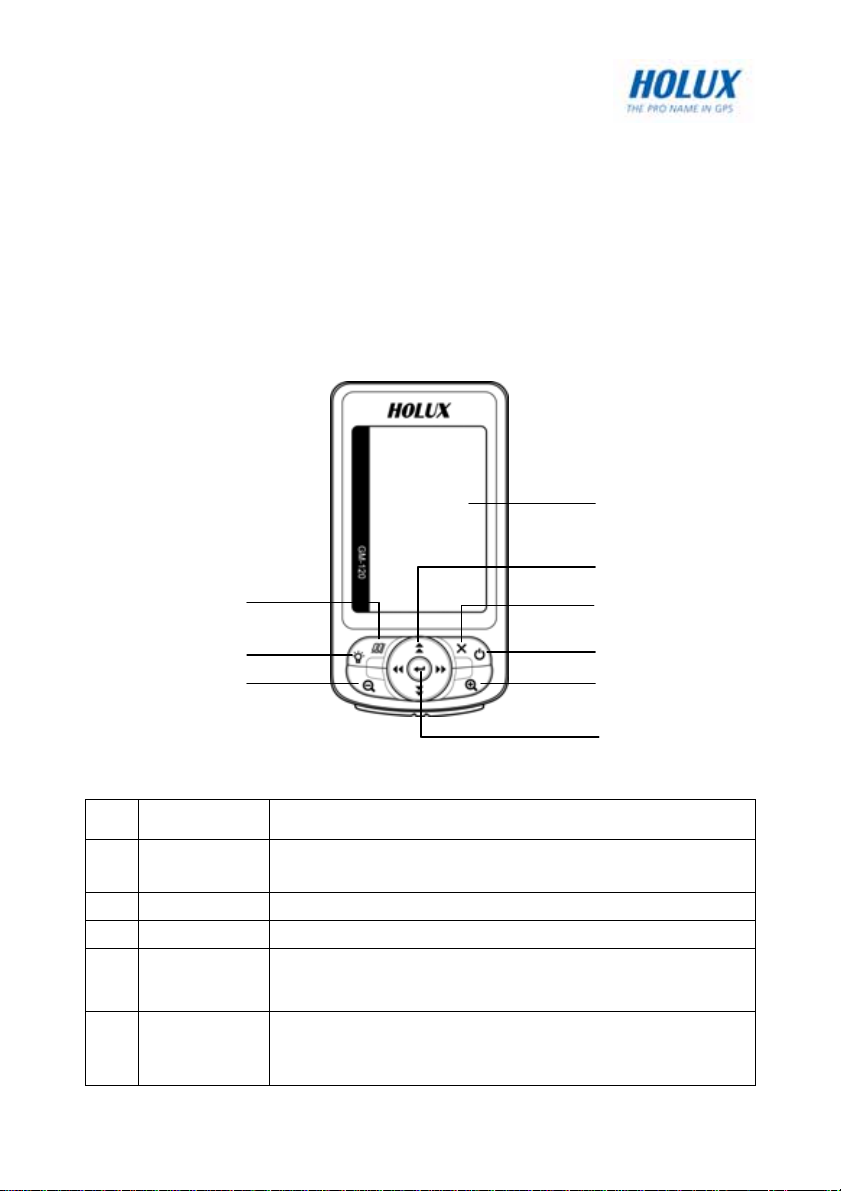
Hardware Components
Take a moment to familiarize yourself with your GM-120 Handheld GPS
Navigator. The following illustrations provide information about the
components of the unit.
Front View
4
5
1
2
3
No. Item Function
1. Menu
2. Backlight Press and hold to turn the backlight on/off.
3. Zoom out Press to zoom out on a map page.
4. LCD screen
5.
Four way
navigation
keys
Press once to display the OSD menu.
Press twice to display the Main Features menu.
Displays the map page, satellite information, OSD
menus and so on.
Up arrow: Press to move the cursor up in OSD
menus or on the map page.
Down arrow: Press to move the cursor down in
5
6
7
8
9

OSD menus or on the map page.
No. Item Function
6. ESC/Page Press to exit the OSD menu.
7. Power Press and hold to turn the power on/off.
8. Zoom in Press to zoom in on the map page.
9. OK/Enter
Left arrow: Press to move the cursor left in the
OSD menus or on the map page.
Right arrow: Press to move the cursor right in the
OSD menus or on the map page.
Press to toggle between the map page and the
compass page.
Press to toggle between the map page and
navigation mode.
On the menu page, press to confirm your selection.
Rear View
compartment
Battery
latch
6
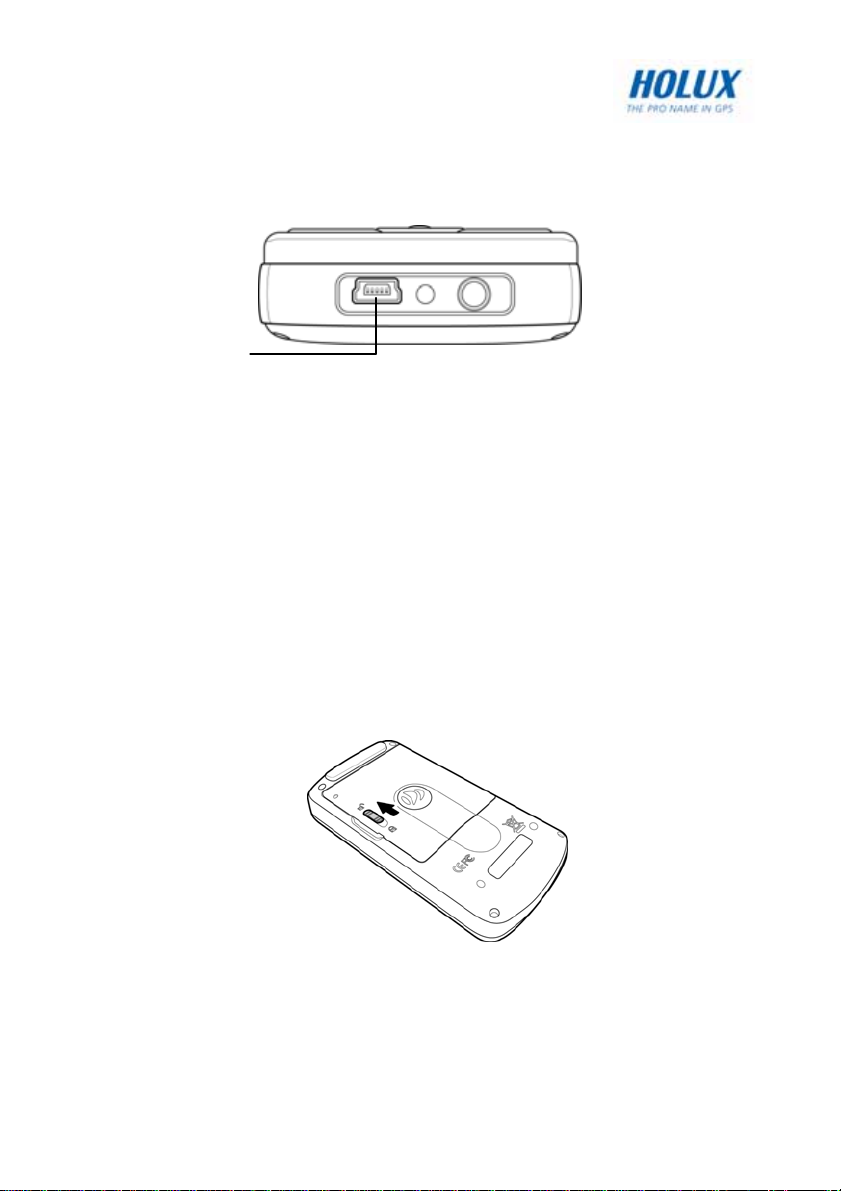
Bottom View
USB port
Setting up the GM-120
This section contains instructions about setting up your GPS navigator by
inserting the battery, charging the battery, and installing the holder
assembly.
Installing the Battery
1. Slide the battery compartment latch to the unlocked position.
2. Lift up the battery compartment cover as shown.
7
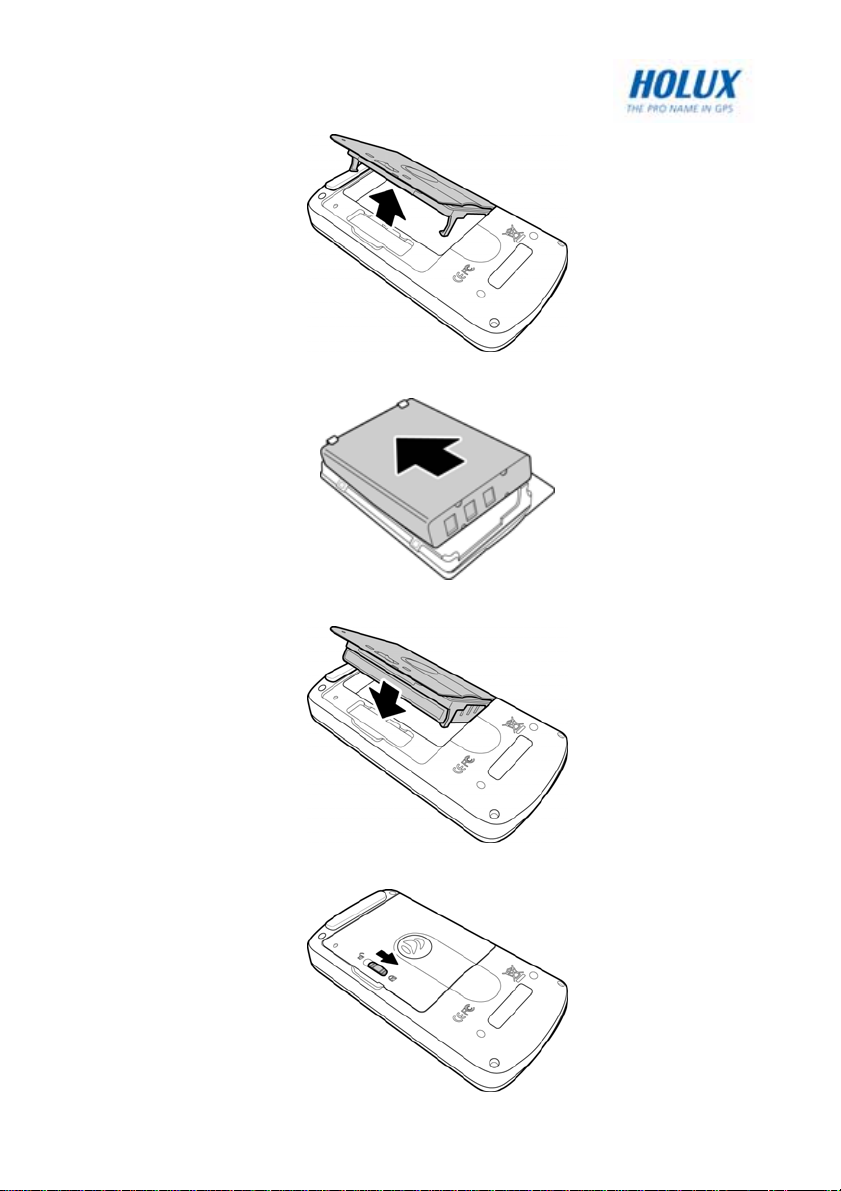
3. Insert the battery in the direction as shown.
4. Close the battery compartment cover.
5. Slide the battery compartment latch to the locked position.
8
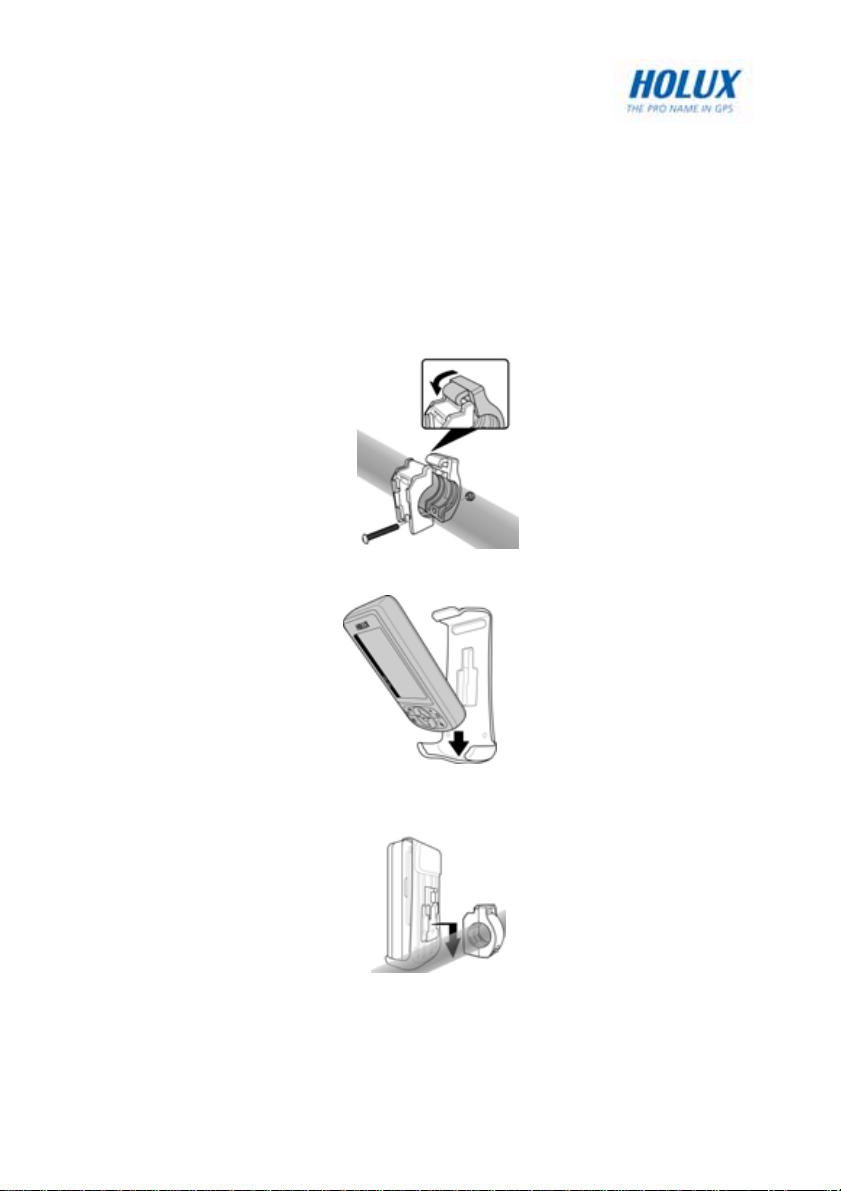
Installing the Holder Assembly
The GM-120 comes with a holder assembly that you can mount on your car
dashboard to hold the device.
To fix the holder assembly to your car dashboard:
1. Hook both parts of the bicycle holder assembly onto the front bar of
your bike and fix it securely with the screw provided.
2. Insert the GM-120 into the assembly holder.
3. Insert the top of the base into the notch on the back of the holder
assembly and slide it upwards to fix it firmly as shown.
9
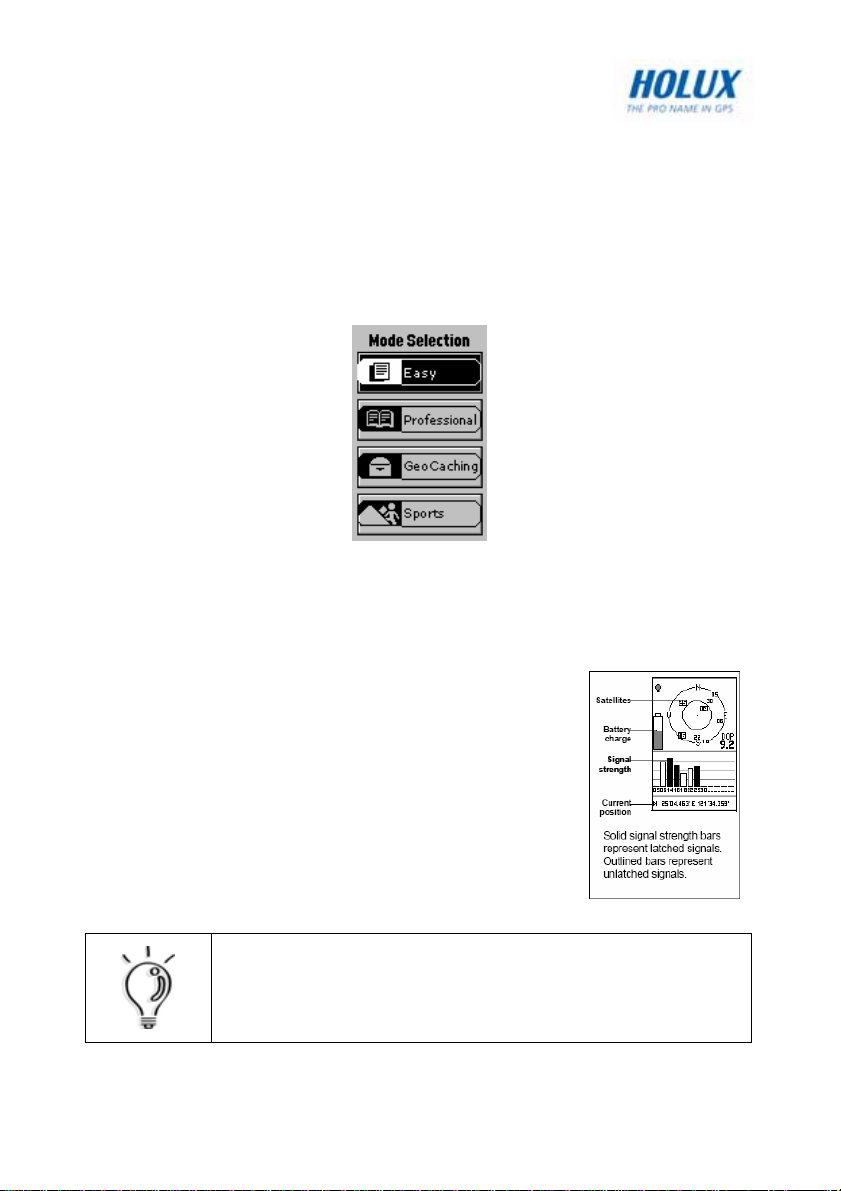
Turning on for the First Time
To turn on your GM-120 Handheld GPS Navigator, press and hold the
Power button for two seconds. The product information page is displayed.
Next, the Mode Selection menu appears. Use the navigation keys to
select the mode you want and press the OK button to confirm.
Press the Menu button twice and select Satellite. The GM-120 starts
acquiring satellite information as described in the following section.
Acquiring Satellite Information
The satellite page displays information obtained from
the GPS satellites. The upper half of the screen
displays the satellites found in the vicinity and their
respective numbers.
The vertical bars on the bottom of the screen show the
signal strengths acquired from the satellites. The GPS
requires at least 4 satellites to determine its position.
Once the GPS position has been correctly determined,
the position coordinates are displayed at the bottom of
the screen.
NOTE:
In order to operate each mode at its optimal performance,
the GM-120 must have its position determined by the
satellites.
10

Turning the GPS On/Off
When the GM-120 is used indoors, the device may not receive a sufficient
GPS signal and a warning message will appear on the screen. This
warning message does not go off until GPS is turned off.
To turn off GPS, do the following:
1. Press the Menu button twice to display the OSD menu.
2. Select GPS Off to turn off the GPS function. The device will stop
acquiring satellite data.
3. To resume the GPS function, press the Menu button to choose
GPS On and press OK.
Viewing the Map Page
Press the Page button to toggle between the map page and the compass
page. On the map page, a ▲ icon indicates your current location and the
icon indicates your home location. Press the Menu button to start
navigation.
When navigation is initiated, a route between the Home location and your
current location is displayed on the screen. You can refer to the route to
help you go back to your Home location. Press the ESC button to return to
the map page.
11
Zooming In/Out
You can change the map scale while viewing the map with one of the
following ways:
• Press the + button to zoom in and increase the map scale.
• Press the – button to zoom out and reduce the map scale.
Alternatively, you can adjust the map scale from the OSD menu.
1. In Professional mode, press the Menu button to
display the OSD menu.
2. Select Map Scale and press OK to confirm. A
map scale bar is displayed on the map page.
3. Use the left/right navigation keys to adjust the map
scale. Press the navigation key to the right to
increase the map scale and to the left to decrease
the map scale.
4. Press OK to save the changes.
The GM-120 features nine zoom levels. You can select
from 50m, 100m, 200m, 500m, 1km, 2km, 5km, 25km, and
100km.
12
Turning on the Backlight
The GM-120 is quipped with a built-in backlight to illuminate the screen
when you are using it in poor lighting conditions. Press and hold the
Backlight button to turn the backlight on or off as required.
The backlight status is displayed as the icon on the bottom left corner of the
screen.
Adjusting the Screen Contrast
To adjust the contrast of the LCD screen:
1. Press the Menu button twice to display the OSD
menu.
2. Select LCD Level and press OK to confirm. A
LCD scale bar is displayed on the map page.
3. Use the navigation keys to adjust the LCD level.
Press the navigation key to the right to increase
the LCD contrast and to the left to decrease the
contrast as required.
Using the GM-120 in Simulation Mode
In normal or navigation mode, the GM-120 tracks its position through
satellite information. In simulation mode, the device stops acquiring data
from the satellites. When you are planning a trip, use the simulation mode
to look up maps, to adjust system settings, and to conserve battery
consumption.
You can switch to simulation mode with one of the
following ways:
To switch to simulation mode from the satellite page:
1. Press the Menu button to display the OSD menu.
2. Use the navigation keys to select GPS Off and
press OK to confirm. The device stops acquiring
satellite information and enters simulation mode.
13
3. To return to navigation mode, repeat steps 1 and 2, and select
GPS On to resume satellite navigation.
To switch between simulation and navigation mode from any page:
1. Press the Menu twice button to display the OSD menu.
2. Use the navigation keys to select System Setting and press OK.
3. Under the Set 1 tab, use the navigation keys to highlight
Navigation Mode option and press OK.
4. Use the navigation keys to select Simulation or Normal (for
navigation mode) as required and press OK to save your settings.
14
Viewing the compass page
The compass page display information about the
direction in which you are moving, the time and
distance required to reach the next waypoint and
your destination. The inner heddle of the compass
points in the direction in which you are moving. The
outer small pointer points in the direction of north
measure by electronic compass.
To view the compass page, press ESC button once
on the map page. Some mode may select Compass
tab by left/Right keys.
NOTE:
If a navigable route is not available, the compass needle is
not visible and all field values will be set to 0.
15
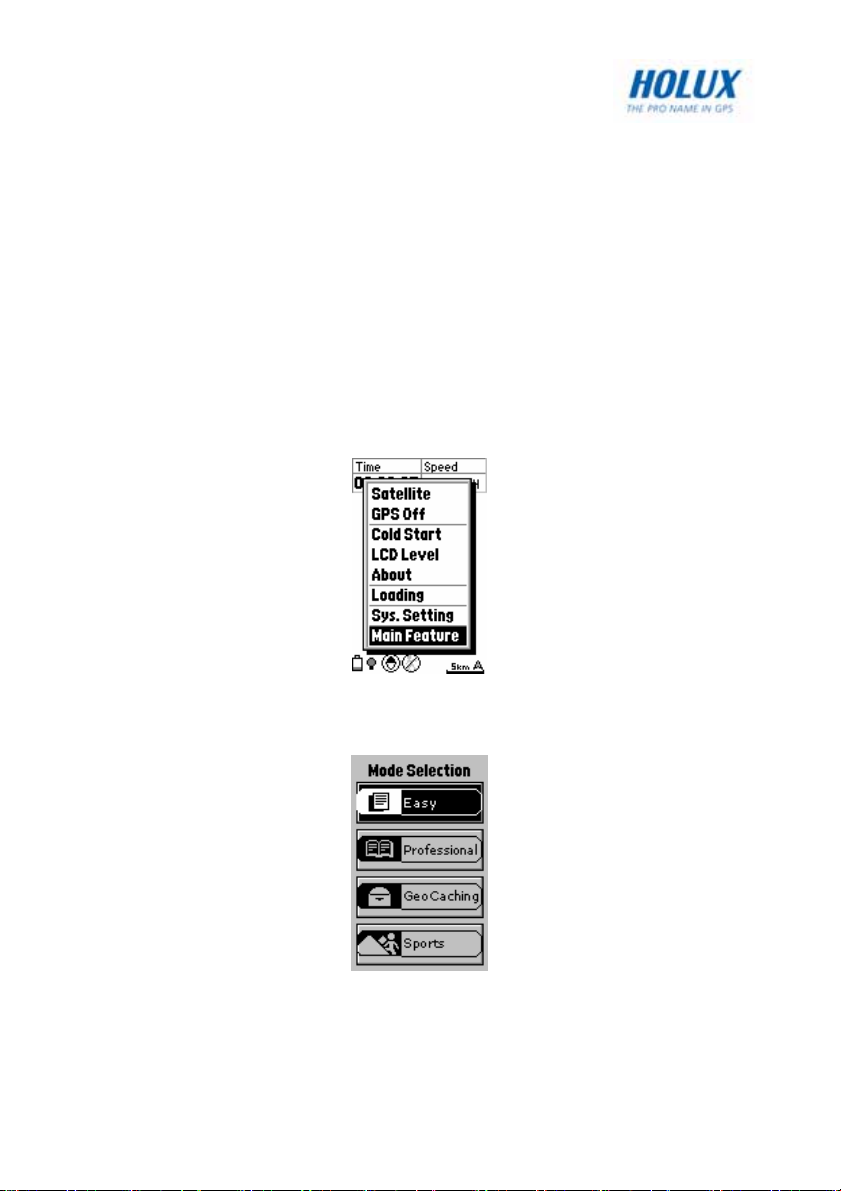
UUssiinngg tthhee GGMM--112200
Now you have familiarized yourself with the GM-120 and learned about its
basic features, you can start using this device to plan routes and to act as
your navigator when traveling and doing exercise. Read this section to
learn more about the various functions and take full advantage of its useful
features.
The GM-120 features four modes: Easy, Professional, Geocaching, and
Sports modes.
Press the Menu button twice and select Main Feature, the Mode
Selection screen will appear.
Use the navigation keys to select the mode you want to use and press OK
to enter the chosen mode.
16

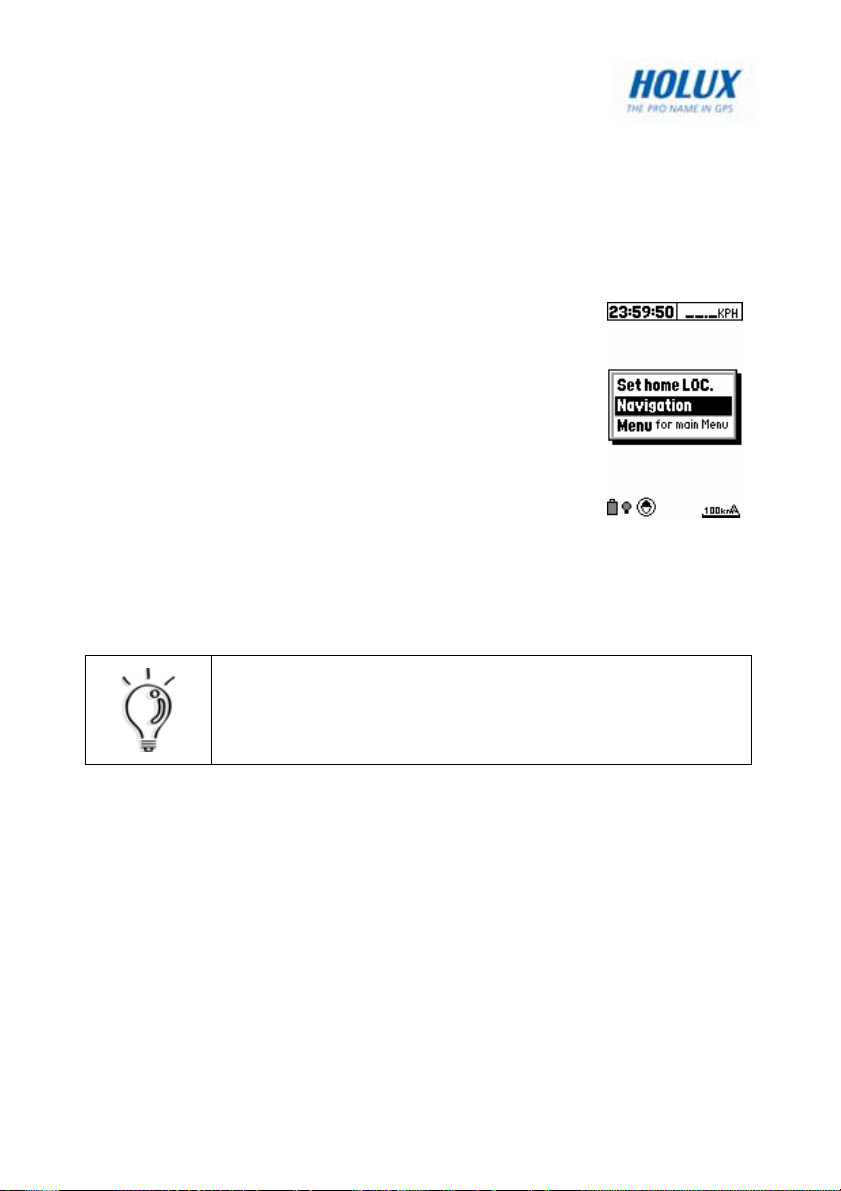
Using Easy Mode
In Easy mode, you can set a home location before you start out shopping
or taking a walk in an unfamiliar neighborhood. You can then track the
route you have taken using the navigation function to get back to your
home location.
Setting the Home Location
To set your Home Location:
1. In Easy mode, press the Menu button to display
the menu options.
2. Use the navigation keys to select Set Home LOC.
and press OK.
3. You can set your home location with one of the
following ways:
• Press the navigation keys to highlight Edit
Home Position and press OK. Use the
navigation keys to set the home position
manually.
• Select Copy GPS to Home by pressing the
navigation keys. Your home location is
automatically set to the location acquired from
the GPS.
4. Use the navigation keys to highlight √ to save your
settings. When a new home location is set, the
previous log will be deleted. A warning message
prompts you to confirm the new setting.
17
Using the Navigation Feature
After setting your home location, you can start navigation and recording
track logs. The navigation log is recorded every 50 meters.
To turn on the Navigation function:
1. In Easy mode, press the Menu button to display
the OSD menu.
2. Use the navigation keys to select Navigation.
The device will stop recording log and a tracking
line will be displayed on the screen.
3. The arrow pointing to the direction which leads
to your home location. It also displays the time
and distance before you reach your home
location.
4. Press the Page button to go to the Navigation page. A route
between the home location and your current location is displayed.
You can refer to the route to go back to your home position.
NOTE:
After setting your home location, you can start navigation
and recording track logs. Press OK to clear the log history
and start recording a new log.
18

Calibrating the Compass
Compass calibration is the process used with electronic digital compass to
separate the earth's magnetic field from stray magnetic fields emitted by
your vehicle. Calibration is necessary to ensure accurate compass
readings.
To perform compass calibration:
1. In Easy mode, press the Page button to display
the Compass page.
2. Press the Menu button to display the menu
options.
3. Use the navigation keys to select Calibration
and press OK to confirm.
4. The compass starts calibrating. This takes 15
seconds. Place the GM-120 on a level surface
and start rotating the unit through 360 degrees
three times every 5 seconds.
19

Using Professional Mode
In Professional mode, you can search the objects step by step or by
nearest search. Also you can set waypoints and create routes for important
locations and store them on the GM-120 for future reference.
Search Object
You can search objects including roads, hotels, banks,
restaurants…etc. in this function. Read the following
sections to learn how to search the object you want.
5. On the map page, press the Menu button to
display the menu options.
6. Use the navigation keys to select the Search
Object option and press OK.
7. Select A Region first, you can use the
navigation keys to select the region you want and press OK.
8. Then Select A Type you want to search, use
the navigation keys to select the type and
press OK.
9. Finally you can Select A Name of the object.
Use the navigation keys to move the highlight
to the search bar and press OK, the you can
use up/down keys to select the object and
press OK to the map page. You will see the
object on the map page.
20

Nearest Search
You also can use the nearest search function to search the nearest object.
Read the following sections to learn how to search the nearest object you
want to find.
1. On the map page, press the Menu button to
display the Menu options.
2. Use the navigation keys to select the Nearest
Search option and press OK.
3. Select A Type first, you can use the
navigation keys to select the type and press
OK.
4. Select the Distance and Select A Name, you
can use the navigation keys to move the
highlight you want to select and press OK.
Then use the up/down keys to move to what
you want to select and press OK. Finally you
will see the object on the map page.
21

Using Waypoints
Read the following sections to learn how to utilize the waypoint function.
Creating Waypoints
To create a new waypoint using the map:
5. On the map page, position the cursor at the
location where you want to set a waypoint.
6. Press the Menu button to display the menu
options.
7. Use the navigation keys to select the Waypoints
option and press OK.
8. The waypoint screen is displayed. Highlight the
name column and press OK to display the
alphanumeric keyboard and enter a name for the
new waypoint.
9. Press the Menu button and select New from the
dropdown box. Press OK to confirm.
A waypoint of the chosen location is created and
its location information is displayed.
10. You can specify the name and add a comment for
the waypoint you just created. Use the navigation
keys to highlight each field and make changes as required.
11. Highlight the Active box and press OK to check
the option. An active waypoint will be displayed on
the map page.
12. Highlight the √ and press OK to save changes.
22

13. Highlight the GOTO option and press OK to create an auto-route
from your current location to the waypoint.
NOTE:
GM-120 saves up to 1000 waypoints.
To create a new waypoint from the map page:
1. On the map page, move the cursor to where you want to create a
new waypoint.
2. Press and hold the OK button. The new waypoint page will be
displayed.
3. Use the navigation keys to highlight each field and make changes
as required.
4. Highlight the √ option and press OK to save changes.
Modifying Waypoints
To modify an existing waypoint:
1. On the map page, press the Menu button to
display the menu options.
2. Use the navigation keys to select the Waypoints
option and press OK. A list of all waypoints is
displayed on the screen.
3. Use the navigation keys to highlight the waypoint
you want to modify and press the Menu button.
4. Select Edit from the dropdown box and press OK.
5. Use the navigation keys to highlight the field you want to modify
and make the changes as required.
6. Highlight the √ option and press OK to save changes.
23

Deleting Waypoints
To delete an unused waypoint:
1. On the map page, press the Menu button to
display the menu options.
2. Use the navigation keys to select the Waypoints
option and press OK.
3. A list of all waypoints is displayed on the screen.
The active waypoint which is currently used for
navigation is denoted by an asterisk (*) sign next
to it.
4. Use the navigation keys to highlight the waypoint
you want to delete and press the Menu button to
display the OSD menu.
5. Select Delete from the dropdown box and press
OK to confirm.
6. A message prompts you to confirm the action.
Press OK to delete or the ESC button to cancel.
Using the Routes Feature
Read this section to learn how to create a route manually
using the previously created waypoints.
Creating a Route
To create a route using the waypoints previously created:
1. In Professional mode, press the Menu button to
display the menu options.
2. Use the navigation keys to select the Routes
option and press OK.
3. A list of routes will be displayed on screen. Press
the Menu button and use the navigation keys to
select New.
24

4. A new route is created and its information is
displayed on screen. Use the navigation keys to
highlight each field to input information such as
name, comment, and so on.
5. Use the up/down navigation keys to highlight the
waypoints field. Press the Menu button to select
from the following options to create a route:
• Select Add WP to add existing waypoints to
the route.
• Select Insert WP to insert a waypoint starting
at the selected location on the route.
6. You can set the priority of the waypoints on the
route by selecting the waypoint and pressing the
OK button. The order of the waypoints on the
route is displayed on the right column of the
respective waypoint.
7. Press the Page button to highlight the waypoints
field.
8. Use the down navigation key to highlight the √
option and press OK to save changes.
9. Select the route you just created and press the
Menu button to view the menu options.
10. Highlight the Set Navi option and press OK to
confirm. The selected route is activated and the
GM-120 switches to navigation mode.
25

Editing Routes
You can modify or delete all the routes that you created as required.
To edit routes:
1. In Professional mode, press the Menu button and select the
Routes option. A list of all the routes is displayed on screen.
The route being navigated is denoted by an asterisk sign next to it.
2. Press the Menu button to display the routes menu.
Select from the following options to modify the
routes as required:
• Select Edit to modify the chosen route.
• Select Delete to delete the chosen route.
• Select Delete All to delete all routes.
• Select Set Navi to activate navigation mode.
• Select Cancel Navi to disable navigation mode.
Using the Track Log Feature
In the track log menu, you can configure track log settings, change track
log type, and view the track log information.
Creating a Track Log
The GM-120 also features a track log function that records information
about your trip to help you track your journey in the future.
To create a track log:
1. In Professional mode, press the Menu button to
display the menu options.
2. Highlight the Track Logs option and press OK.
3. Under the Track tab use the navigation keys to
highlight the Tracking field and press OK to
display the drop down menus.
4. Select from the following options:
• Select Off to disable tracking.
26

• Select Fill to save track logs with no more
than 2500 track points.
• Select Wrap to create track logs in a cyclical
manner. After a track log with 2500 track
points is saved, new track points are saved by
overwriting the old track points starting from 0.
• Select Continue to create a single continuous
track log of all track points. You can save up to
8 continuous track logs.
5. Press the Menu button to view the track log menu and select from
the following options:
• Select Clear Tracking to clear all current
tracking points.
• Select Save Tracking to save the current
track log to the system’s internal flash memory.
Up to 8 track logs can be saved.
• Select Tracking Dist to calculate the tracking
distance from the start point to the end point.
• Select Tracking Area to calculate the tracking
area from the start point to the end point.
• Select Delete to delete the selected track log.
• Select Show ON to display the track log.
6. Under the Type tab, follow the steps below to select the tracking
method using distance or time intervals:
• Highlight the Dist Interval field and press OK
to view the options. Use the navigation keys to
select the distance interval and press OK to
save your settings. Select the ----- option if you
do not wish to specify the distance interval.
27

• Highlight the Time Interval field and press OK view the options.
Use the navigation key to select the time interval and press OK
to save your settings. Select the ----- option if you do not wish
to specify the time interval.
7. Use the down navigation key to highlight the √ option and press OK
to save changes.
NOTE:
• If you select a value for both the distance interval and
time interval, a tracking point is recorded when either of
the interval value is reached.
• To ensure the integrity of data structure, the track log
cannot be saved into non-volatile memory when battery
is low.
• When saving track logs, select Continue option and
the track log setting will automatically be set to Show
ON. If you select Wrap or Fill, the track log setting will
automatically be set to Show Off.
Viewing Track Log Information
To view track log information:
1. In Professional mode, press the Menu button to
display the menu options.
2. Highlight the Track Logs option and press OK to
confirm.
3. Under the Info tab use the navigation keys to
view the distance and the area traveled of the
selected track log.
28

Using the Shortcut On Feature
The Shortcut On features allows user to create a short cut
from your current location to the location of the cursor on
the map page.
To enable on the Shortcut On feature:
1. On the map page, press OK and the cursor will
change to a cross icon. Move the cursor to the
location you want to go
2. Press the Menu button to display the menu options.
3. Select Shortcut On and press OK.
4. A route between your current location and the location of your
cursor is displayed on the map.
5. Press the Menu button and select Shortcut Off to disable it.
Using Map Scale Feature
Refer to Zooming In/Out on page 12 to learn about the map scale function.
Using the Set Location Feature
The Set Location feature enables the user to view a specified location
where the user utilizes frequently. It can automatically go to the location
you specified instead searching for it on the map.
To enable the Set Location feature:
1. On the map page, press OK and the cursor will
change to a cross icon.
2. Move the cursor to the point where you wish to
set as a constantly used location.
3. Press the Menu button to display the menu
options.
4. Select Set Location On and press OK. It will
automatically return to the map page.
5. Press OK and the cursor will move to the location you just set.
29

Using Measure Distance Feature
The Measure Distance features enables users to measure the distance
from the current position to the specified destination.
To enable the measure distance function:
1. On the map page, press the Menu button to
display the menu options.
2. Select Measure Dist. On and press OK.
3. A ruler appears at the cursor point on the map
screen. Use the navigation keys to move to your
destination and press OK.
4. The distance between the start point and end
point is displayed.
30

Viewing Trip Status
To view trip information such as your speed, direction, trip
time, and so on:
1. From the map page, press the Page button to
view the trip status information.
2. Use the navigation keys to toggle between 6
fields and 2 fields tabs and choose the
information you want to view.
• Speed: shows the speed at which you are
traveling
• Track: shows the tracking direction
• Trip Odom: shows the distance traveled so
far
• Trip Time: shows the time elapsed
• Altitude: shows the altitude of your current
location
• Signal: shows the current signal strength of
the device
NOTE:
The ▲ icon at the top of the trip status page indicates the
location whose information is being displayed on the map
in navigation mode. The ▲ icon cannot be selected or
modified.
31

Resetting Trip Data
Resetting trip data will reset the value of Trip Odom and
Trip Time to zero.
To set the trip data and display new data:
1. On the trip status page, press the Menu button
to display the menu options.
2. Select the Trip Reset option and press OK to
confirm. The trip status data is reset to default
settings.
Changing the Fields
You can specify the items to be displayed in the trip status fields.
To change the field items:
1. On the trip status page, press the Menu button
to display the menu options.
2. Highlight the Change Field option and press OK
3. Select the field you want to change and press
OK to view the available options.
• Speed: shows the speed at which you are
traveling
• Track: shows the tracking direction
• Trip Odom: shows the distance traveled so
far
• Trip Time: shows the time elapsed
• Altitude: shows the altitude of your current
location
• Signal: shows the current signal strength of
the device
• Speed Avg.: shows the average speed
• Speed Max: shows the maximum speed
• To Dest.: shows the distance to your destination
32

4. Use the navigation key to toggle between the 6
fields and 2 fields tab and repeat the steps 1 to 3
to change the fields accordingly.
Moving to the Next Waypoint
On the compass page, you can switch to the next waypoint and view the
direction and distance information with ease.
To change to the next waypoint:
1. On the map page, press the Page button and use
the left/right navigation keys to choose the
Compass tab.
2. The compass shows the direction and distance to
the next waypoint. Press the Menu button to
display the menu options.
3. Select Change Next WP and press OK.
4. A list of all waypoints on the route is displayed on
screen. Select the next waypoint to be displayed
and press OK.
5. The selected waypoint information is then
displayed on the compass page.
33

Calibrating Altitude
Altitude calibration is the process used with barometer altimeter and GPS
altitude. GPS altitude is used as the reference.
To perform altitude calibration:
1. In Professional mode, press the Page button to
display the Info page.
2. Press the Menu button to display the menu
options.
3. Use the up/down navigation keys to select
Calibration
4. Select Auto by GPS or Manual and press OK
to confirm.
Alt.
and press OK to confirm.
34

Using Geocaching Mode
The GM-120 features a geocaching function which enables users to use
location coordinates and set up caches to participate in treasure hunting
games.
Setting Geocaching Coordinates
To set up the cache box from the Geocaching menu:
1. In Geocaching mode, press the Menu button to
display the menu options.
2. Select Check Box Information and press OK to
display the Treasure Box List.
3. Select a box to set up the location coordinates.
You can set up to 3 cache boxes on the GM-120.
4. Use the navigation keys to highlight the field you
want to change such as name, comment,
coordinates, and radius.
5. Check the Alert box to enable an alert to be
displayed when the cache is reached.
6. Highlight the √ option and press OK to save
changes. The cache box you just set up is shown
on the map page.
Repeat steps 1 to 6 to set up other cache boxes.
You can also set up cache boxes directly from the map
page:
1. Move the cursor to the location where you want to
set up a cache box.
2. Hold the OK button to save the current location.
The cache box that has not been alerted by user
will be used for saving automatically. If all three
cache boxes have been set up, the device will
save data to Box 3 and replace the current data.
35

Viewing the Geocaching Page
After setting up the cache box, you can start the treasure hunt by using the
coordinates on the geocaching page.
Follow the steps below to access to the cache boxes location on your map
page:
1. On the map page, press the Menu button to
display the menu options.
2. Select the box location you want to view, and
press OK to confirm.
3. A warning message prompts to start recording
track log. Press OK to proceed.
4. The map page will switch to the compass page
showing the direction, distance and time from
your current position to the chosen cache box.
The white arrow shows the direction of your final
destination, while the black arrow show the
direction you are traveling.
5. You can pause or stop recording the track log
during the treasure hunting. Press the Menu
button to display the menu options.
• If Choose Stop Box, the track log recording
will stop and a guiding line will be deleted.
• If you choose Log Pause, the recorded
guiding line will be deleted. Press Menu
button again and select Log Continue to
resume recording the track log.
36

Using Sports Mode
The GM-120 features a sports mode which allows users to set up a training
session and record their performance for post exercise evaluation.
Training Setup
The Training Setup menu enables you to set up the time,
distance, pace, speed, lap when you are taking a walk,
jogging, or cycling, and view your exercise performance
afterwards.
Setting the Timer
To set up the timer:
1. In Sports mode, press the Menu button to display
the menu options.
2. Select Training Setup and press OK to display
the menu options.
3. Highlight Timer and press the OK button.
4. Use the navigation keys to select the field you
want to change and press the OK button.
5. Use the navigation keys to adjust each field and
press the OK button to confirm.
6. Highlight the √ option and press the OK button to save changes.
Setting the Distance
To set up the training distance:
1. In Sports mode, press the Menu button to display
the menu options.
2. Select Training Setup and press OK to display
the menu options.
3. Highlight Distance and press the OK button.
4. Use the navigation keys to select the field you
want to change and press the OK button.
37

5. Use the navigation keys to adjust each field and press the OK
button to confirm.
6. Highlight the √ option and press the OK button to save changes.
Setting the Pace
To set up the training pace:
1. In Sports mode, press the Menu button to display
the menu options.
2. Select Training Setup and press OK to display
the menu options.
3. Highlight Pace and press the OK button.
4. Use the navigation keys to select the field you
want to change and press the OK button.
5. Use the navigation keys to adjust each field and
press the OK button to confirm.
6. Highlight the √ option and press the OK button to save changes.
Setting the Speed
To set up the training speed:
1. In Sports mode, press the Menu button to display
the menu options.
2. Select Training Setup and press OK to display
the menu options.
3. Highlight Speed and press the OK button.
4. Use the navigation keys to select the field you
want to change and press the OK button.
5. Use the navigation keys to adjust each field and
press the OK button to confirm.
6. Highlight the √ option and press the OK button to save changes.
38

Setting the Lap
This feature allows users to set up the lap counter to count automatically
after specified distance or time elapsed during training or manually by
pressing the Menu key when a lap has been completed.
To set up the training laps:
1. In Sports mode, press the Menu button to
display the menu options.
2. Select Training Setup and press OK to display
the menu options.
3. Highlight Lap and press OK.
4. Use the navigation keys to select Auto or
Manual and press OK to confirm.
5. Use the navigation keys to adjust each field and
press OK to confirm.
6. Highlight the √ option and press OK to save the changes.
A message will pop up to inform the user when a lap has been completed.
If you set the lap counter to manual, press the Menu button when a lap has
been completed and the following screen appears. Press OK to start a new
lap.
39

Setting Auto Pause
The auto pause function reminds users to pause recording the sports log
after a specified period.
To set up the auto pause during training:
1. In Sports mode, press the Menu button to
display the menu options.
2. Select Training Setup and press OK to display
the menu options.
3. Highlight Auto Pause and press OK.
4. Use the left/right navigation keys to select the
field you want to change and press OK.
5. Use the up/down navigation keys to adjust each
field and press OK to confirm.
6. Highlight the √ option and press OK to save changes.
Miscellaneous Settings
In the Miscellaneous setting menu, you can personalize the training type
and set up the way your training is recorded.
You can set up training by selecting the type of exercise and your weight.
By the end of the training, you can view your training performance and the
calories you consumed in the History menu.
To configure miscellaneous settings:
1. In Sports mode, press the Menu button to
display the menu options.
2. Select Training Setup and press OK to display
the menu options.
3. Highlight Misc. and press the OK button.
4. Use the left/right navigation keys to select the
Misc. tab.
5. Use the up/down navigation keys to select the
field you want to change and press OK.
6. Use the navigation keys to adjust each field and press OK.
40

7. Highlight the √ option and press OK to save changes.
To set the record distance and time interval:
1. In Sports mode, press the Menu button to display
the menu options.
2. Select Training Setup and press OK to display
the menu options.
3. Highlight Misc. and press OK.
4. Use the left/right navigation keys to select the
Record tab.
• Highlight the Dist Interval field and press OK to view the
options. Use the up/down navigation keys to select the
distance interval and press the OK button to save your settings.
Select the ----- option if you do not wish to specify the distance
interval.
• Highlight the Time Interval field and press OK view the options.
Use the up/down navigation keys to select the time interval and
press OK to save your settings. Select the ----- option if you do
not wish to specify the time interval.
5. Highlight the √ option and press the OK button to save changes.
Start Training
After you have configured training settings, you can start the training
session and have your sports track and performance recorded.
To start a training session:
1. On the map page, press OK to start training. The ”Start Training”
message pops up. The icon at the bottom of the screen
indicates training is in progress The route taken, time elapsed,
current altitude, pace, and speed are displayed on the screen.
2. To stop training, press OK again. The “Stop Training” message
pops up and the device stops recording. The icon at the bottom
of the screen indicates that the training has ended.
41

Viewing Training History
The Training History keeps a record of your training sessions on a weekly
basis. You can view the training records either from the Training History or
the Training Summary page.
To view the summary of your last training:
1. On the map page, press the Page button to view
the Training Summary page. You will see the total
distance, time, max. speed, pace, and calories
you burnt for each training session you completed.
2. Press the Page button again to return to the map
page.
To view the information page:
1. On the map page, press the Page button and
then the right navigation key to view the
information page. Here you can see the current
barometer, altitude and the direction you are
traveling.
2. Press the Page button again to return to the map
page.
To view your training history:
1. On the map page, press the Menu button to
display the sports menu options.
2. Select History and press OK. A training record of
the current week is displayed on the screen.
3. Press OK to view a complete list of the training
records.
4. Use the navigation keys to highlight a training
record and press OK to view the lap information
of the selected training.
42

5. Use the up/down navigation keys to select a lap and press OK.
6. Use the left/right navigation keys to toggle between Lap Detail and
Diagram tab and view the lap information.
To delete the training records:
1. On the training history page, press the Menu button to display the
menu options.
2. Use the navigation keys to select an option to delete the records
and press OK to confirm.
43

Transferring Data
You can transfer maps, waypoints, routes, track logs, and fonts to and from
a PC using the Loading feature.
Making Connections
To connect the GM-120 to your laptop, use the USB cable provided in the
package. Connect the smaller end of the cable to the data port on the
device and connect the other end of the cable to a free USB port on your
laptop.
Please execute the setup.exe in CD-ROM to install Maproute program first.
Execute USB-V2.1.0.exe to install USB driver. Follow the instructions on
the screen to complete the driver installation.
NOTE:
• Make sure that the USB cable is working properly
and connected correctly to the GM-120 and the
PC. If not, an error message will be displayed on
the PC’s screen.
• You must connect the GM-120 to the PC and use
the Maproute program to upload or download
data. Both devices are needed to transfer data.
• A virtual COM port will appear in the PC/laptop.
44

Starting Data Transfer
To transfer data, do the following:
1. Press the Menu button twice to display the main
menu.
2. Scroll to the Loading option and press OK.
3. Press the Menu key as prompted.
4. Choose the appropriate option from those
displayed on the screen as follows:
• PC->GPS Track: to transfer track logs from a
PC to the GM-120. See Downloading Track
Logs on page 57.
• PC->GPS Wp&Rt: to transfer waypoints and
routes from a PC to the GM-120. See
Downloading Waypoints and Routes on
page 58.
• PC->GPS Geocaching: to transfer
geocaching coordinates from a PC to the GM-
120. See Downloading Geocaching
Coordinates on page 58.
• GPS->PC Track: to transfer track logs from
the GM-120 to a PC. See Uploading Data on
page 59.
• GPS->PC Wp&Rt: to transfer waypoints and
routes from the GM-120 to a PC. See
Uploading Data on page 59.
• GPS->PC Spt Rec: to transfer sports records from the GM-120
to a PC. See Uploading Data on page 59.
To transfer data to your laptop or PC, use the Maproute utility provided on
the software CD. The following sections provide more information about
using this utility.
45

Using Maproute
After connecting the GM-120 to the PC (see Making Connections on page
44) and setting it up with the Loading menu (see Uploading Data on page
59) to select the type of data transfer, run the Maproute.exe program from
the software CD to start data transfer. Refer to the following sections to
learn more about the software and how to transfer different types of data.
NOTE:
Use the following tools in the Maproute utility to view and
manage the map files as follows:
System Requirements
• Click Tools | Zoom In to enlarge the map scale.
• Click Tools | Zoom Out to reduce the map scale.
• Click Tools | Move to pan and scan different
areas of the map.
• Click Tools | Arrow to show the names of roads
or interesting points when moving the cursor over
the map.
Make sure that the host PC meets the following system requirements:
• PC: Pentium or above, or compatible PC
• Memory: 16 MB (minimum)
• Operating system: Windows XP/2000/Me/98/95
• Hard disk space: 100MB (minimum)
46

Features
You can use the menu bar to perform various tasks from the main program
window. The following sections describe how to use the Maproute menu
items. You can also use the toolbar icons to carry out various functions.
Move your mouse over the toolbar icons to view a tool-tip about the icon
and learn what each icon represents.
File Menu
Click File | Open to open map card files (*.ard) or map list files (*.arl, which
contains a list of several map card files).
Select a map list file (*.arl) from the File Open menu and click OK.
The selected map file opens and the roads and points of interests are
displayed on the map.
47

Show Menu
Click Show and choose the item that you want to display on the map. Move
the cursor over the map and hold it over a road or any other point of
interest to view information about the location. The exact latitude, longitude,
name of the road, district, and name (if any) of the location are displayed
next to the cursor.
Use the following items on the Show menu as follows:
• Show Roads – displays all roads on the map.
• Show POIs – displays points of interest on the map.
• Show POIs Name – displays the names of the points of interest
48

• Display Icons – enables you to choose which points of interests
are displayed on the map. You can select locations such as
government buildings, shopping places, restaurants and so on to
be displayed on the map by selecting the required check boxes.
• Show/Hide | Track Log – displays or hides details of a track log
(*.trl).
• Show/Hide | Waypoint_Route – displays or hides routes (*.wpr)
created from waypoints on the map.
• Show/Hide | SportLog – enables or disables the display of sports
logs (*.spt).
49

Tools Menu
The Tools menu enables you to view the map, move across the map,
search for locations, and so on.
• Arrow – Cursor becomes an arrow. Move the cursor to a road or
point of interest to view information about it.
• Move – Cursor becomes a hand and allows you to pan across the
map. Press the left mouse button to drag and move the map. The
cursor turns into a closed fist when the left mouse button is
pressed.
• Zoom out – Cursor changes to a magnifier with a minus (–) sign in
the center. Click to zoom out and view a larger area of the map.
• Zoom in – Cursor changes to a magnifier with a plus (+) sign in the
center. Click to zoom in and view more details of the map.
• New Waypoint – Click the map on any location that you want to
mark as a waypoint. You are prompted to specify the file in which
you want to save the waypoints. Click Open to use an existing file
or New to open a new file.
50

Specify the location to save the waypoint file and click Save.
A new waypoint screen appears. Enter information such as the
name of the waypoint and comments for the waypoint. If required,
edit the latitude and longitude of the waypoint to get an accurate
location.
• Waypoints List – Displays a list of all the waypoints. Select a
waypoint and click Go To to view the location of the waypoint on
the map. Click Edit to modify the waypoint.
51

• Routes – Enables you to create and edit routes using waypoints. If
(i)
(
)
(ii)
no waypoints have been created, this option will not be available.
Create a route as follows:
i. Click New under Route to create a new route. Modify the route
name if desired in the Name field.
ii. Select a waypoint from the waypoint list and click Add to add it
to the route. Repeat as required.
iii. Click Set Navi to create the route and display it on the map.
iii
• Geocaching – Click to create or open a geocaching file. You are
prompted to specify the file in which you want to save the
geocaching file. Click OPEN to use an existing file or CREATE to
open a new file.
52

Specify the location to save the geocaching file and click Save.
A dialog for new box pops up. Enter information such as the name
of the box and comments for the box. If required, edit the latitude
and longitude of the box to get an accurate location. You can also
establish a new box point by importing a (*.loc) file from the
Internet.
• Metric System – Click to set the measurement units on the map to
the metric system. Distances are shown in meters (m) or kilometers
(km). If not enabled, distances are shown in miles (mi).
53

List Menu
The List menu enables you to merge map card files (*.ard) and create a list
map file (*.arl).
Follow these steps to use this menu:
1. Click File | Open to open a map file.
2. Click List | Add An Item to add the file to the list. The selected
item is displayed in the left pane of the program window.
3. Repeat the first two steps to add the required maps. The file list in
the left pane shows all the component map card files and their size.
The total file size is displayed in the lower left corner.
4. After adding all the required files, a map list file (*.arl) is created.
Transfer Menu
The transfer menu enables you to transfer data such as maps, track logs,
and waypoints and routes between the GM-120 and your host PC.
• PC->GPS | Program – downloads firmware files (*.s) to the GM-
120.
• PC->GPS | Track Log– downloads track logs (*.trl) to the GM-120.
• PC->GPS | Waypoint And Route– downloads waypoint and route
files (*.wpr) to GM-120.
• PC->GPS | Geocaching– downloads geocache files (*.geo) to
GM-120.
• PC->GPS | FONT– downloads font files to GM-120.
• GPS->PC | Track Log – uploads track logs (*.trl) from the GM-120
to a host PC.
54

• GPS->PC | Waypoint And Route– uploads waypoint and route
files (*.wpr) from the GM-120 to a host PC.
• GPS->PC | Spt Rec: transfers sports logs from the GM-120 to a
PC.
About Menu
Click this menu item to view company and software version information.
Context Menu
You can view the context-sensitive menu by right-clicking anywhere in the
map window. This menu provides the same options as those available from
the menu bar.
• Show Roads – displays all roads on the map.
• Show POIs – displays points of interest on the map.
• Show POIs Name – displays the names of the points of interest.
• Display Icons – enables you to choose which points of interests
are displayed on the map. You can select locations such as government buildings, shopping places, restaurants and so on to be
displayed on the map by selecting the required check boxes.
• Show/Hide | Track Log – displays or hides details of a track log
(*.trl).
• Show/Hide | Waypoint_Route – displays or hides routes (*.wpr)
created from waypoints on the map.
55

• Show/Hide | SportLog – enables or disables the display of sports
logs (*.spt).
Viewing Sports Logs
To view the details of your sports logs, do the following:
1. Right-click anywhere in the map window and select Show |
SportLog.
2. Specify the location of the sport log file (*.spt) and click Open.
3. The sports log file opens and displays the amount of exercise
within a week.
4. Double-click a log to view the types of exercise done.
5. Click the exercise type to display the lap information. The track
diagram is displayed on the upper right screen and the lap detail
diagram is displayed on the screen at the lower right corner.
56

Downloading Fonts
To download fonts to the GM-120, do the following:
1. Click Transfer | PC->GPS | FONT in the Maproute window.
2. The Open dialog window opens. Locate the desired font file and
click Open to copy the font to the GM-120.
3. The selected font file is copied to the internal memory of the GM120 through the USB cable. The correct USB port will be detected
automatically. Download status is displayed on the screen while
downloading is in progress.
Downloading Map
To download map to the GM-120, do the following:
1. Click Transfer | PC->GPS | Map in the Maproute window.
2. The Open dialog window opens. Locate the desired map file (*.are)
and click Open to copy a new map to the GM-120.
3. The selected map file is copied to the internal memory of the GM120 through the USB cable. The correct USB port will be detected
automatically. Download status is displayed on the screen while
downloading is in progress.
57

Downloading Track Logs
To download track logs to the GM-120, do the following:
1. Click Transfer | PC->GPS | Track Log in the Maproute window.
2. The Open dialog window opens. Locate the desired track log file
(*.trl) and click Open to copy the track log to the GM-120.
3. The selected track log file is copied to the internal memory of the
GM-120 through the USB cable. The correct USB port will be
detected automatically. Download status is displayed on the screen
while downloading is in progress.
Downloading Waypoints and Routes
To download waypoints and routes to the GM-120, do the following:
1. Click Transfer | PC->GPS | Waypoint and Route in the Maproute
window.
2. The Open dialog window opens. Locate the desired waypoint and
route file (*.wpr) and click Open to copy the waypoint and route to
the GM-120.
3. The selected waypoint and route file gets copied to the internal
memory of the GM-120 through the USB cable. The correct USB
port will be detected automatically. Download status is displayed
on the screen while downloading is in progress.
Downloading Geocaching Coordinates
To download geocaching coordinates to the GM-120, do the following:
1. Click Transfer | PC->GPS | Geocaching in the Maproute window.
2. The Open dialog window opens. Locate the desired geocaching
file (*.geo) and click Open to copy the data to the GM-120.
3. The selected geocaching file gets copied to the internal memory of
the GM-120 through the USB cable. The correct USB port will be
detected automatically. Download status is displayed on the screen
while downloading is in progress.
58

Uploading Data
To upload track logs, waypoints, and routes from the GM-120 to a PC, do
the following after setting up the device with the Loading menu (see
Starting Data Transfer on page 45):
1. Click Transfer | GPS->PC | Track Log to copy track logs to the PC
from the device.
2. Click Transfer | GPS->PC | Waypoint and Route to copy
waypoints and routes to the PC.
3. Click Transfer | GPS->PC | SportLog to copy sports logs to the
PC.
4. The selected data starts getting transferred to your PC. Upload
status is displayed on the screen while uploading is in progress.
AAddjjuussttiinngg tthhee SSyysstteemm SSeettttiinnggss
The System Settings menu enables you to customize the GM-120
according to your needs. To view the system settings, do the following:
1. Press the Menu button twice to display the main menu and scroll to
the System Settings option.
2. Press OK to select the option and change the system settings.
3. There are four tabs in the System Settings menu – Set 1, Set 2,
Set 3, and Time. Refer to the following sections to learn how to
adjust the various settings.
Setting the Pressure Units
Units can be set to atm, kPa, or mmHg.
To set the Pressure Unit option:
1. Press the Menu button twice to display the main
menu.
2. Select Sys. Settings and press OK.
59

3. Select the Set 1 tab using the left/right navigation keys.
4. Use the up/down navigation keys to highlight the Pressure Unit
option.
5. Press OK to display the available settings.
6. Use the up/down navigation keys to select a setting.
7. Use the up/down navigation keys to highlight √ and press OK.
60

Setting the Navigation Mode
Navigation mode can be set to Normal or Simulation. Normal mode is
used with live satellite data. Simulation mode does not use live satellite
data; therefore, functions that require live satellite data cannot be used.
To set the Navigation Mode:
1. Press the Menu button twice to display the main
menu.
2. Select Sys. Settings and press OK.
3. Select the Set 1 tab using the left/right navigation
keys.
4. Use the up/down navigation keys to highlight the
Navigation Mode option.
5. Press OK to display the available settings.
6. Use the up/down navigation keys to select a setting.
7. Use the up/down navigation keys to highlight √ and press OK.
Changing the Map Direction
The map can be set to either display with north always at the top of the
screen, or to rotate according to the direction the GM-120 is facing. When
the map is set to North Up, the map will always display with north at the
top of the screen. When set to Track Up, the map will rotate as the GM-
120 is rotated and a North Indicator appears on the screen.
To set the Map Direction:
8. Press the Menu button twice to display the main
menu.
9. Select Sys. Settings and press OK.
10. Select the Set 1 tab using the left/right navigation
keys.
11. Use the up/down navigation keys to highlight the
Map Direction option.
61

12. Press OK to display the available settings.
13. Use the up/down navigation keys to select a setting.
14. Use the up/down navigation keys to highlight √ and press OK.
Setting the Bluetooth
To enable/disable the Bluetooth feature:
1. Press the Menu button twice to display
the main menu.
2. Select Sys. Settings and press OK.
3. Use the up/down navigation keys to
highlight the Bluetooth option in Set1 tab.
4. Press OK to display the available settings.
5. Use the up/down navigation keys to select On/Off.
6. Use the up/down navigation keys to highlight and press OK.
Setting the Display Units
Units can be set to either metric (KM/KPH), or traditional (Mi/MPH).
To set the Units option:
1. Press the Menu button twice to display the main
menu.
2. Select Sys. Settings and press OK.
3. Select the Set 2 tab using the left/right navigation
keys.
4. Use the up/down navigation keys to highlight the
Units option.
5. Press OK to display the available settings.
6. Use the up/down navigation keys to select a setting.
7. Use the up/down navigation keys to highlight √ and press OK.
62

Setting the DMS Format
DMS format defines how Degrees, Minutes, and Seconds are displayed.
You can either set the GM-120 to display degrees followed by minutes and
fraction of a minute, or you can set it to display degrees and minutes
followed by seconds and fractions of a second.
To set the DMS format:
1. Press the Menu button twice to display the main
menu.
2. Select Sys. Settings and press OK.
3. Select the Set 2 tab using the left/right navigation
keys.
4. Use the up/down navigation keys to highlight the
DMS Format option.
5. Press OK to display the available settings.
6. Use the up/down navigation to select a setting.
7. Use the up/down navigation keys to highlight √ and press OK.
Setting the WAAS/EGNOS
To enable/disable the WAAS/EGNOS feature:
1. Press the Menu button twice to display the main
menu.
2. Select Sys. Settings and press OK.
3. Select the Set 2 tab using the left/right navigation
keys.
4. Use the up/down navigation keys to highlight the
WAAS/EGNOS option.
5. Press OK to display the available settings.
6. Use the up/down navigation keys to select On/Off.
7. Use the up/down navigation keys to highlight √ and press OK.
63

Setting the Backlight
The backlight can be set to always remain on, or turn off after 30 seconds,
3 minutes, or 10 minutes. The more you use the Backlight, the faster the
batteries will drain. When the Backlight goes out, press any key to turn it
on again.
To set the Backlight:
1. Press the Menu button twice to display the main
menu.
2. Select Sys. Settings and press OK.
3. Select the Set 3 tab using the left/right
navigation keys.
4. Use the up/down navigation keys to highlight the
Backlight option.
5. Press OK to display the available settings.
6. Use the up/down navigation keys to select a setting.
7. Use the up/down navigation keys to highlight √ and press OK.
Setting the Beeper
You can set the beeper on for keypad, warning messages, or both.
To set the Beeper:
1. Press the Menu button twice to display the main
menu.
2. Select Sys. Settings and press OK.
3. Select the Set 3 tab using the left/right
navigation keys.
4. Use the navigation keys to highlight the Beeper
option.
5. Press OK to display the available settings.
6. Use the up/down navigation keys to select a setting.
7. Use the up/down navigation keys to highlight √ and press OK.
64

Setting the Startup Page
You can choose to display or hide the startup page when turning on
GM-120.
To enable/disable the startup page:
1. Press the Menu button twice to display the main
menu.
2. Select Sys. Settings and press OK.
3. Select the Set 3 tab using the left/right navigation
key.
4. Use the up/down navigation keys to highlight the
Startup Page option.
5. Press OK to display the available settings.
6. Use the up/down navigation keys to select On/Off.
7. Use the up/down navigation keys to highlight √ and press OK.
Setting the Time
The local time can be set on the GM-120 using the Time setting function.
Local time is set by entering the offset from Greenwich mean time. For
instance, if local time is 7 hours ahead of Greenwich mean time, you will
need to enter an offset of plus (+) seven hours.
To change the Time setting:
1. Press the Menu button twice to display the main
menu.
2. Select Sys. Settings and press OK.
3. Use the left/right navigation keys to select the
Time tab.
4. Use the up/down navigation keys to select the
Adjust Time field.
5. Press OK to toggle between Plus and Minus.
65

6. Use the up/down navigation keys to highlight the Hour field and
press OK.
7. Use the up/down navigation keys to change the Hour field and
press OK to confirm your setting. The Current Time field shows
the corrected time.
8. In the Minute field, press OK to toggle between 0 and 30.
9. Use the up/down navigation keys to highlight √ and press OK to
confirm the time setting.
66

Making a Cold Start
Use this feature to locate your position correctly, if the GM-120 is unable to
identify your position after being powered on for a few minutes. This may
happen if there is old, incorrect data in the device and the signal strength is
poor due to uneven distribution of the satellites. In some cases, you may
also wish to acquire fresh information from the satellites and clear the
previous, obsolete data from the memory.
The Cold Start feature enables you to restart navigation by acquiring fresh
positioning information from the available satellites as follows:
1. Press the Menu button twice to display the main
menu.
2. Scroll to the Cold Start option and press OK. The
device starts acquiring fresh satellite information.
Resetting to Factory Defaults
When strange encoding appears on the screen, restore all setting to factory
default to acquire fresh information from the satellites and clear the
previous, obsolete data from the memory.
To reset all settings to factory defaults:
1. Press the Menu button twice to display the main
menu.
2. Scroll to Satellite and press OK to enter the
satellite page.
3. Press and hold Menu and OK buttons for three
seconds. A warning message appears to confirm
resetting to factory defaults.
4. Press OK to confirm.
67

Viewing Device Information
To view information about the device’s firmware:
1. Press the Menu button twice to display the main
menu.
2. Scroll to the About option and press OK.
3. The screen displays the device information and
the free memory available for track logs, routes,
and waypoints.
68

AAppppeennddiixx
This section contains troubleshooting solution and technical information for
your reference.
Troubleshooting
Problems Possible Solution
I pressed the power
button but the
device doesn’t
switch off.
The unit does not
respond when I try
to move the cursor.
What do I do to
return to my current
position on the map
page after I have
moved the map?
• Make sure that you hold the power button for
two seconds to turn it off.
• If the unit still doesn’t turn off, remove the
battery or the power source for five seconds
and install it again.
The map position may be latched. Check if the ▲
symbol is shown in the bottom right corner of the
map page. If so, press and hold a direction key to
unlatch the device.
Check if the ▲ symbol is showing in the bottom
right corner of the map page. Press the ESC
button to return to your current position.
The GM-120 fails to
locate my current
position.
• Make sure that you are not in simulation mode.
• Make sure you are in an area with no
obstruction such as trees or tall buildings.
• The GM-120 requires synchronization with at
least three satellites to identify with your
current location. Once the position has been
identified, it requires at least one satellite to
maintain status. If available satellite signals are
too low in orbit or all in a line, it may not be
able to locate your current location.
69

Specifications
Item Description
Navigation
Performance Acquisition Time:
Accuracy
Dynamic
Conditions
Interface RS-232 (for NMEA 0183) or USB
• Waypoints: Max. 1000 waypoints with name
(symbol) coordinate and remarks
• Route: 20 reversible and editable routes up to 30
waypoints each
• Track Log: 8 tracking logs with 2500 points each
• Cold Start: within 42 seconds
• Warm Start: within 38 seconds
• Hot Start: within 1 second in open sky and 15
seconds indoors
• Update Rate: every second
• Position: within 5 to 25m CEP
• Velocity: 0.1m/sec.
• Time: ±1µs
• Altitude: -1,000 to +18,000m
• Velocity: 515m/sec.
• Acceleration: ±4G
• Antenna: built-in patch antenna
• Alarm: built-in buzzer for warning messages
Physical
Operating
Temp.
* The specifications are subject to change without notice.
• Dimension: 109 (L) * 59 (W) * 22.8 (H) mm
• Weight: 130g with Li-Ion battery
• Casing: Waterproof up to IPX6 standards
• Operating temp.: -10°C to +60°C
• Storage temp.: -20°C to +70°C
70

Federal Communications Commission
(FCC) Statement
This equipment has been tested and found to comply with the limits for a
Class B digital device, pursuant to Part 15 of the FCC Rules. These limits
are designed to provide reasonable protection against harmful interference
in a residential installation. This equipment generates, uses and can
radiate radio frequency energy and, if not installed and used in accordance
with the instructions, may cause harmful interference to radio
communications. However, there is no guarantee that interference will not
occur in a particular installation. If this equipment does cause harmful
interference to radio or television reception, which can be determined by
turning the equipment off and on, the user is encouraged to try to correct
the interference by one or more of the following measures:
- Reorient or relocate the receiving antenna.
- Increase the separation between the equipment and receiver.
- Connect the equipment into an outlet on a circuit different from that to
which the receiver is connected.
- Consult the dealer or an experienced radio/TV technician for help.
CAUTION
Any changes or modifications not expressly approved by the grantee of this
device could void the user's authority to operate this equipment.
This device complies with Part 15 of the FCC Rules. Operation is subject to
the following two conditions: (1) This device may not cause harmful
interference, and (2) this device must accept any interference received,
including interference that may cause undesired operation.
71
 Loading...