

Holtkoetter 6317 User Manual

ASSEMBLY INSTRUCTIONS FOR
205 Hardman Avenue South, South Saint Paul, MN 55075
Voice: (800) 899-5444 • Fax: (888) 552-8661
e-mail: customerservice@holtkoetter.com
www.holtkoetter.com
CAUTION, IMPORTANT SAFETY INSTRUCTIONS
This portable luminaire has a polarized plug (one blade is wider than the other) as a feature to
reduce the risk of electrical shock. This plug will fit a polarized outlet only one way. If the plug does
not fit fully into the outlet, reverse the plug. If it still does not fit, contact a qualified electrician.
Never use with an extension cord unless plug can be fully inserted. Do not alter the plug.
INSTRUCTIONS PERTAINING TO A RISK OF FIRE, ELECTRIC
SHOCK, EXPOSURE TO EXCESSIVE UV RADIATION OR
INJURY TO PERSONS
Please make sure that the following parts for your lamp are enclosed:
A. Reflector
B. Aluminum Ring (attached to lamp)
C. Glass Shield
D. Allen Wrench (packed inside bulb box)
E. Large Washer (2 each, already installed)
F. Handle with plastic protector
G. Small Plastic Washer (attached to reflector)
H. Small Plastic Nut (attached to reflector)
I. Bayonet Base Halogen Bulb
J. Floor Lamp
K. Foot Dimmer
WARNING - To reduce the risk of FIRE, ELECTRIC SHOCK,
EXPOSURE TO EXCESSIVE UV RADIATION OR INJURY TO
PERSONS:
Halogen Pharmacy Lamp
No. 6317
1. Turn off power/unplug and allow to cool before replacing bulb.
2. Bulb gets HOT quickly. Contact only switch/plug when turning on.
3. Do not touch hot lens, guard or enclosure.
4. Do not remain in light if skin feels warm.
5. Do not look directly at lighted lamp.
6. Keep lamp away from materials that burn.
7. Use only with a 100 Watt, bayonet base halogen bulb or smaller bulb.
8. Do not touch the bulb at any time. Use a soft cloth. Oil from skin may damage bulb.
9. Do not operate the portable luminaire with a missing or damaged guard, lamp containment
barrier or UV filter.
SAVE THESE INSTRUCTIONS
Major lamp parts manufactured in Germany by Holtkötter Leuchten GmbH.
Bulbs manufactured in Germany by Osram GmbH. Final assembly by Holtkötter in South Saint Paul, MN.
Care Instructions
Use only a soft, dry cloth to clean. If necessary, a slightly damp, soft cloth may be used
to spot clean.
Do not use common household cleaners or brass cleaners on lamps or fixtures, as the
lacquer on the outside of the brass may be damaged as a result.
Enjoy your new Holtkötter lamp.
Holtkötter ® and Holtkötter Leuchten® are registered trademarks of Holtkötter. All Rights Reserved.
© Holtkötter
ASSEMBLY INSTRUCTIONS FOR
e-mail: customerservice@holtkoetter.com
www.holtkoetter.com
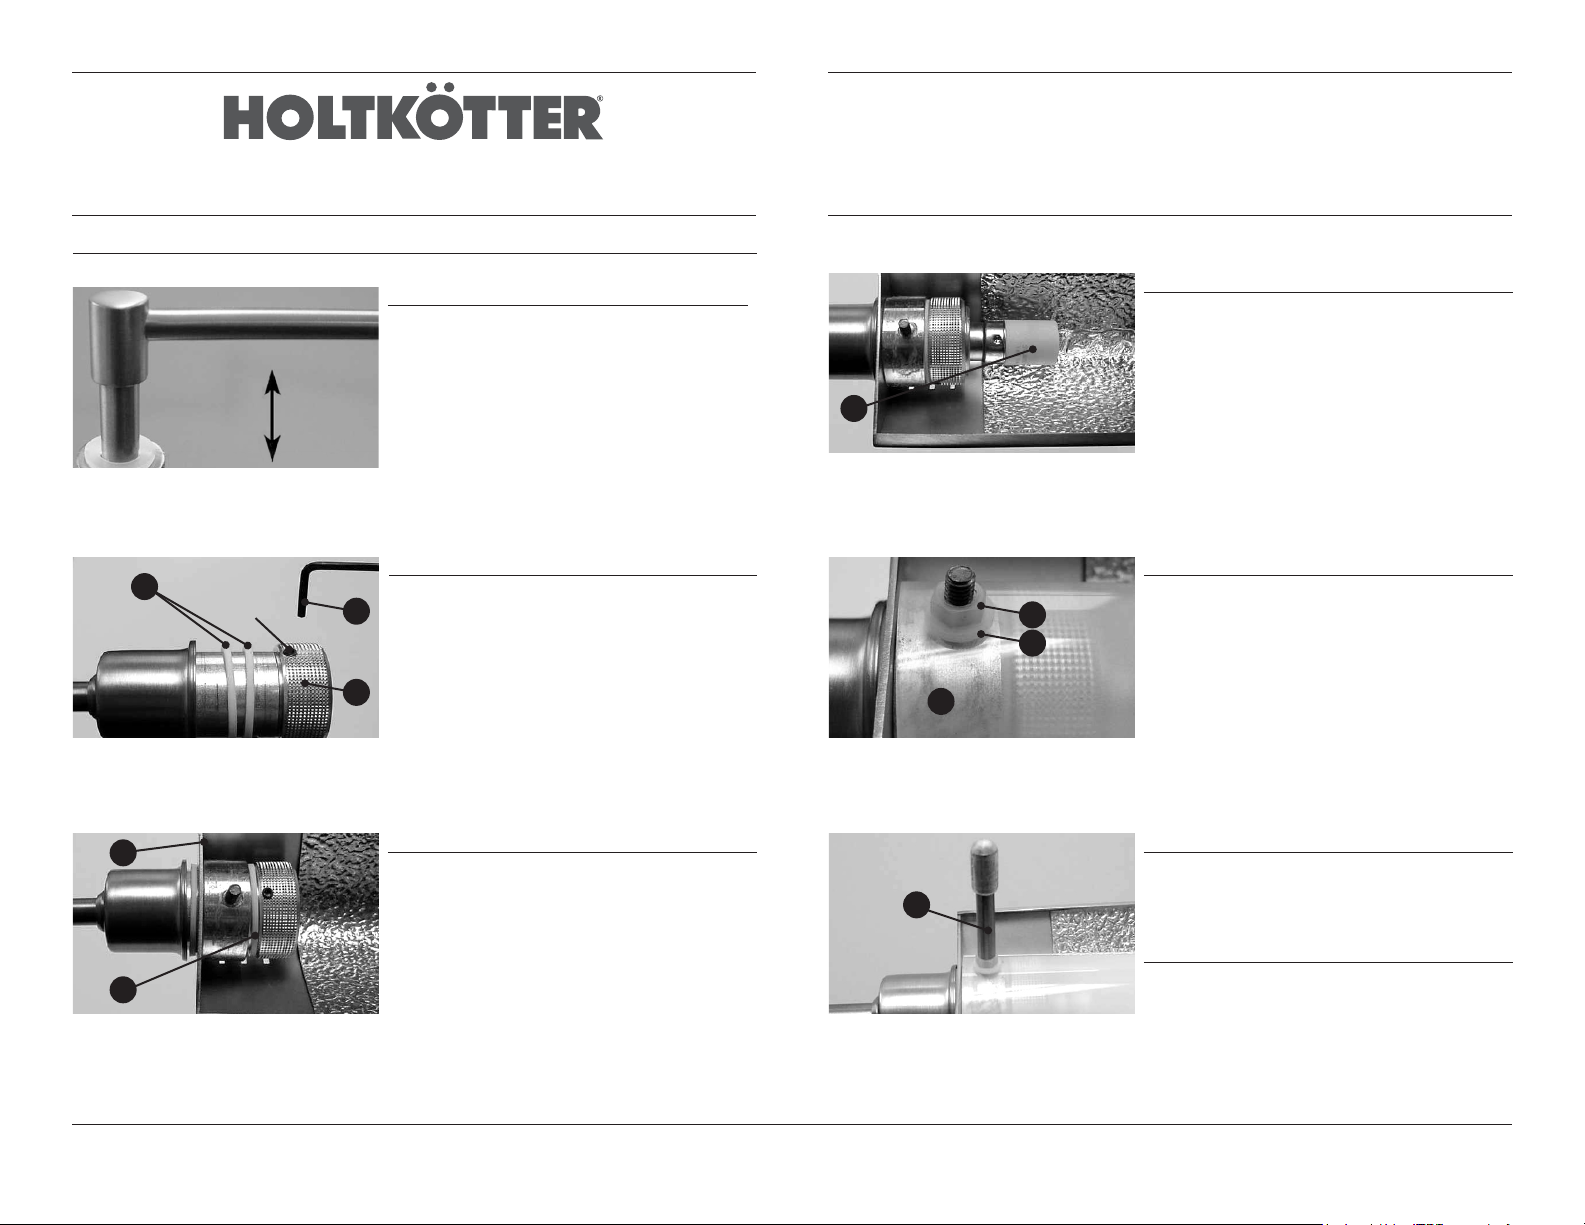
Bulb and Reflector Installation
E
Set Screw
Step 1.
The brass arms are made of soft, high-quality brass
that is pliable and may be bent from shipping. If
necessary, apply pressure to straighten.
Step 2.
Loosen the set screw with the allen wrench (D). Then
D
unscrew the aluminum ring (B) from the lamp arm.
Remove one of the large washers (E).
B
Halogen Pharmacy Lamp
No. 6317
Step 4.
Put the 100-Watt halogen bulb (I) into the
socket. Hold the bulb at the porcelain grip,
push it down slightly and turn it clockwise.
BE CAREFUL NOT TO TOUCH THE BULB ENVELOPE
I
Note of Caution: The recommended replacement bulbs for this fixture are 100 W
Osram Bayonet Base Halogen bulbs. Use of other brands of unknown quality may
cause a risk of overheating.
H
G
C
WITH YOUR BARE HANDS.
Step 5.
Align the glass shield (C) with the small screw
extending from the bottom of the socket. Place the
small washer (G) and the small plastic nut (H) over
the screw and finger tighten.
A
Step 3.
Slide the reflector (A) over the socket. Place the large
washer (E) that was removed back onto the socket.
Screw the aluminum ring (B) back onto the socket
until it is tight. Tighten the set screw on the aluminum
ring into place. DO NOT OVERTIGHTEN. MAKE SURE
THE REFLECTOR IS STILL LOOSE ENOUGH TO TURN.
E
Major lamp parts manufactured in Germany by Holtkötter Leuchten GmbH.
Bulbs manufactured in Germany by Osram GmbH. Final assembly by Holtkötter in South Saint Paul, MN.
Step 6.
Next, screw on the handle (F) and finger tighten.
F
DO NOT OVERTIGHTEN – THE GLASS SHIELD MAY
CRACK UNDER TOO MUCH PRESSURE.
Step 7.
Plug the lamp cord into the foot dimmer and the
cord from the foot dimmer into the wall outlet. Your
lamp is now operational.
Holtkötter ® and Holtkötter Leuchten® are registered trademarks of Holtkötter. All Rights Reserved.
© Holtkötter
 Loading...