

Page 1

User Guide
HOLSEM-A2 LED DISPLAY
www.holsem.com
Page 2
Specification & Feature:
-----Voltage:120V~ 60Hz
-----Wattage: 1500Watts
-----Capacity of basket: 3.4 Quart
-----Adjustable temperature:170℉—400
℉
-----Timer (0-60 min)
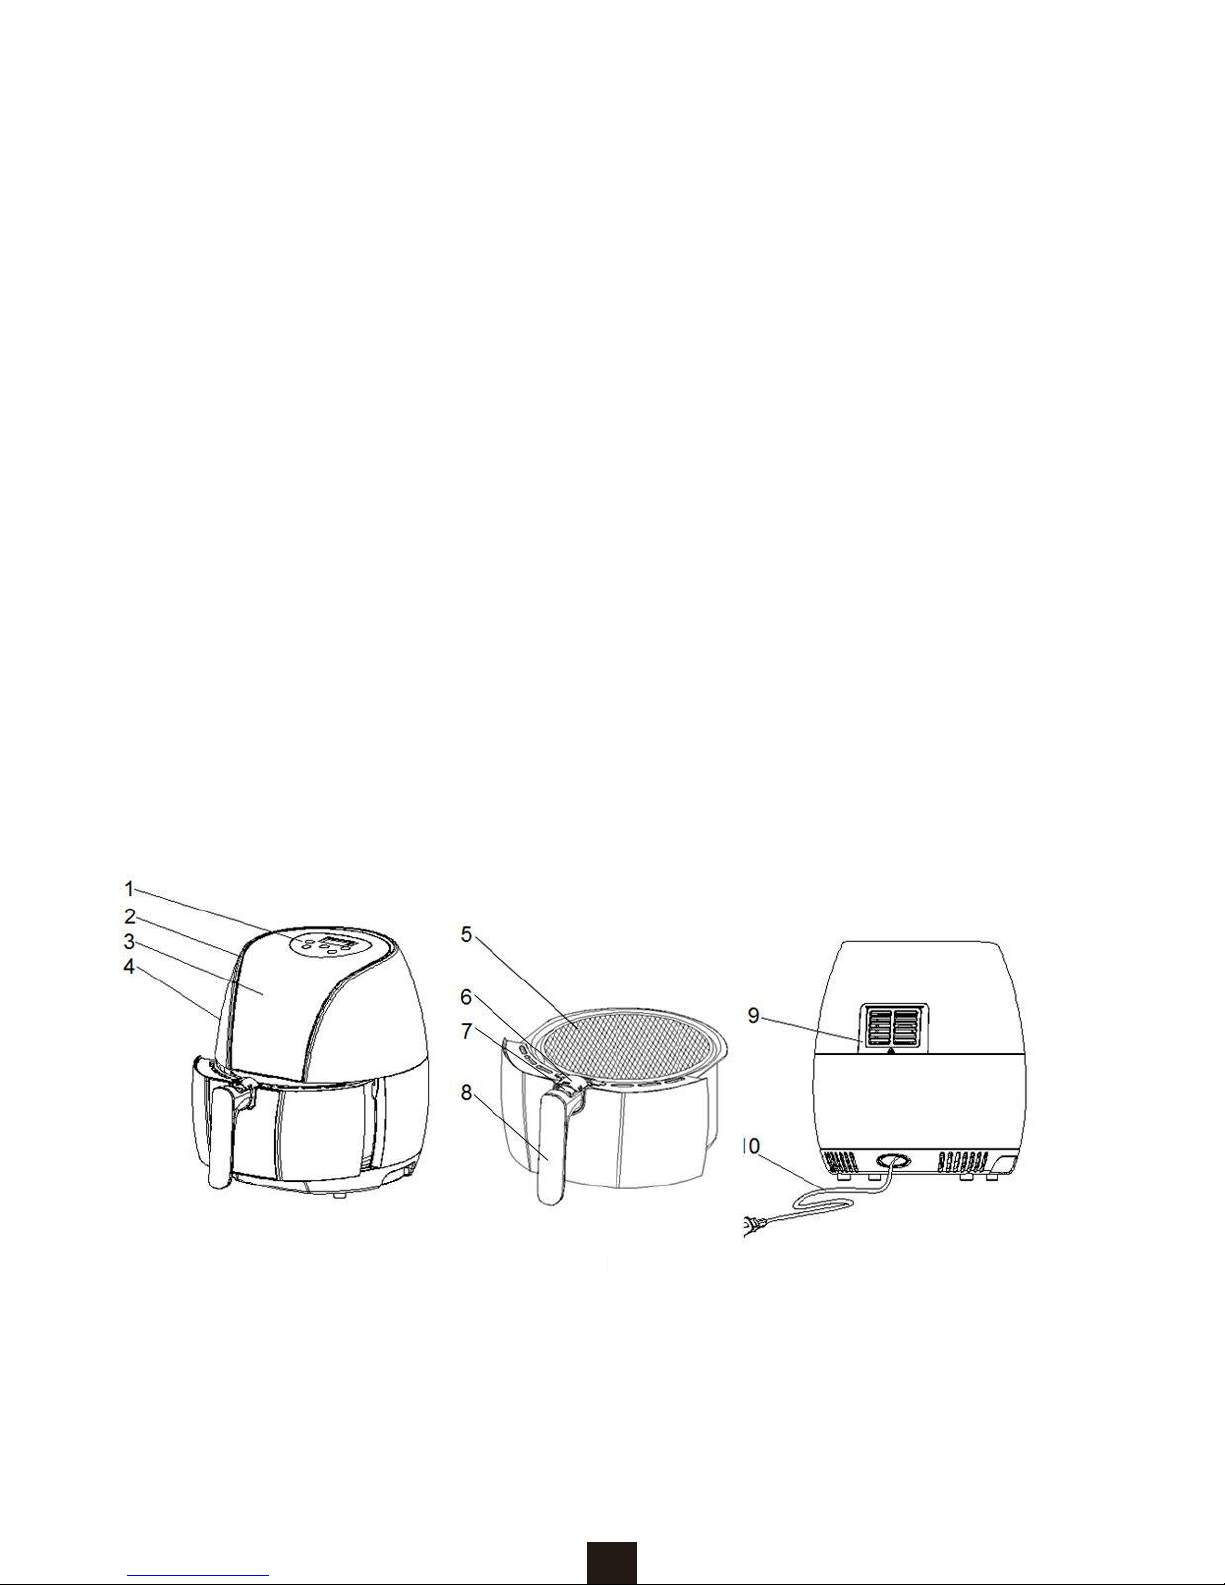
General description (Fig.1 )
1. Control panel
2. Lid
3. Lid ornament
4. Main housing
5. Basket
6. Button cover
7. Basket release butt
on
8. Basket handle
9. Air outlet openings
10. Power cord
Fig.1
2
Page 3
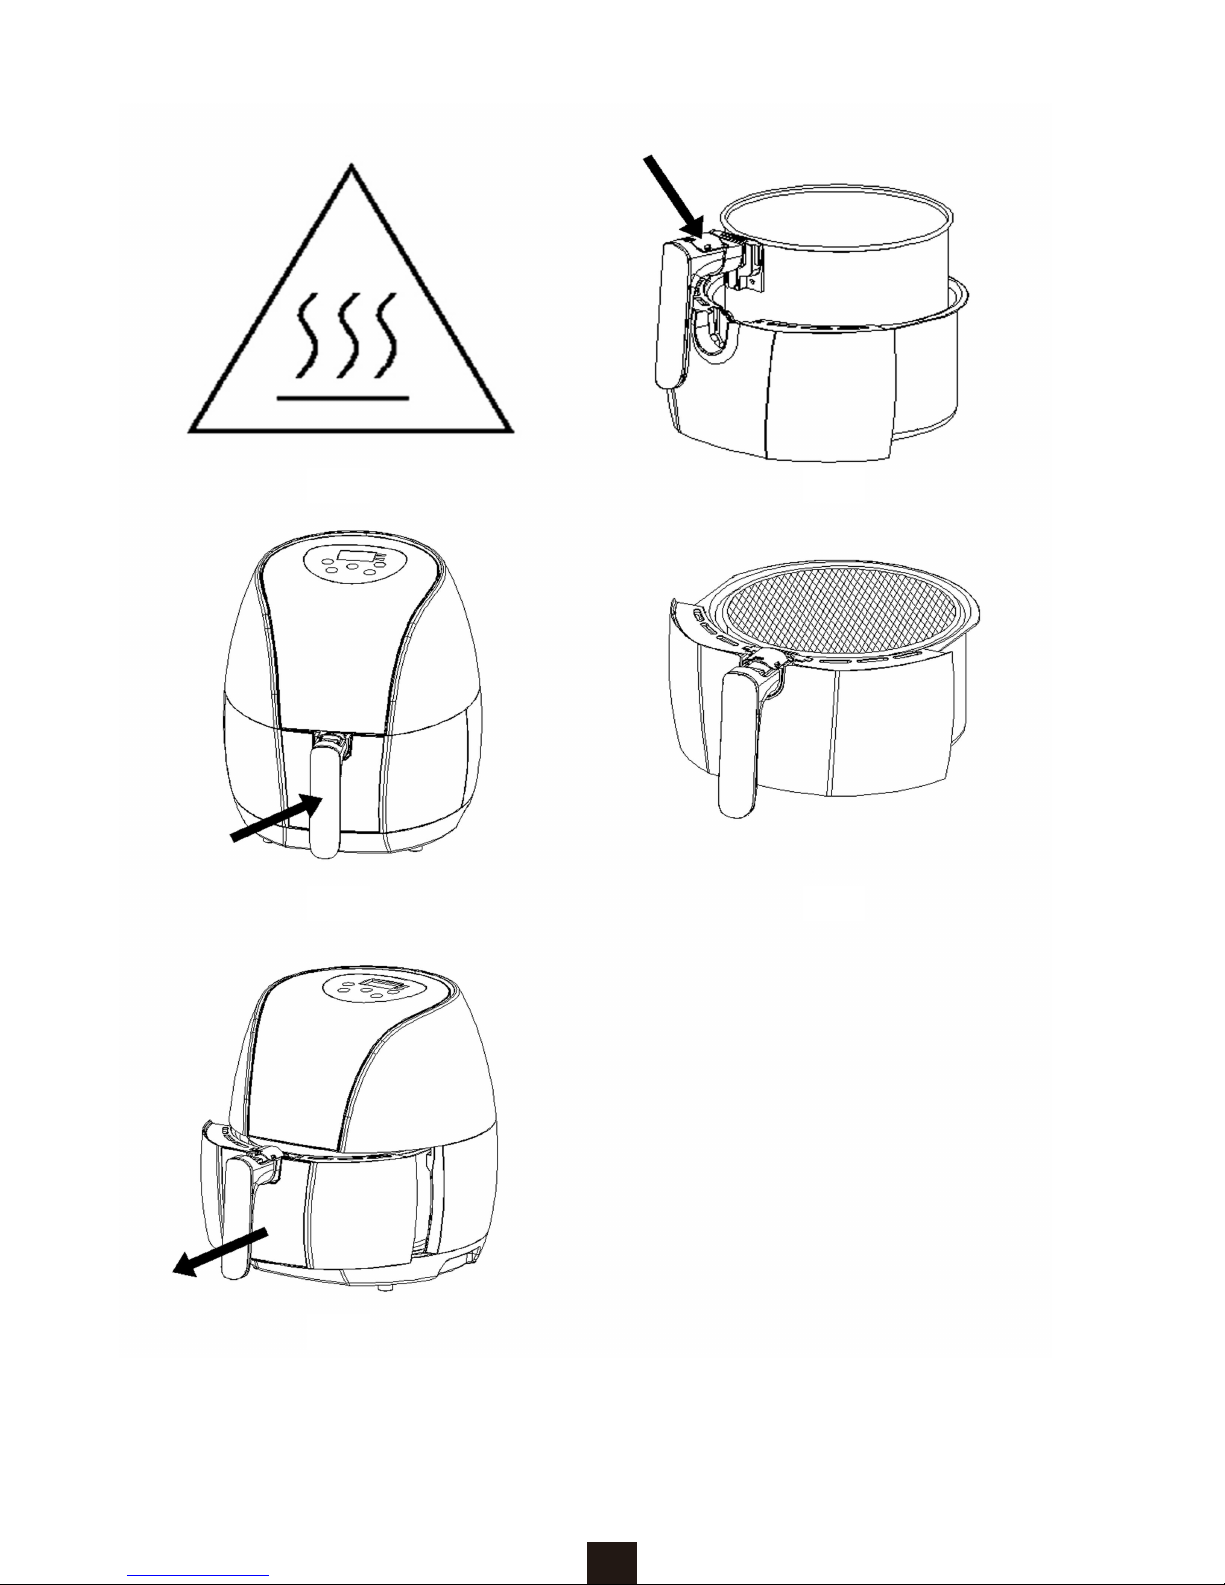
Fig.2 Fig.3
Fig.4 Fig.5
Fig.6
3
Page 4
For indoor use only
This appliance is designed for indoor use only.
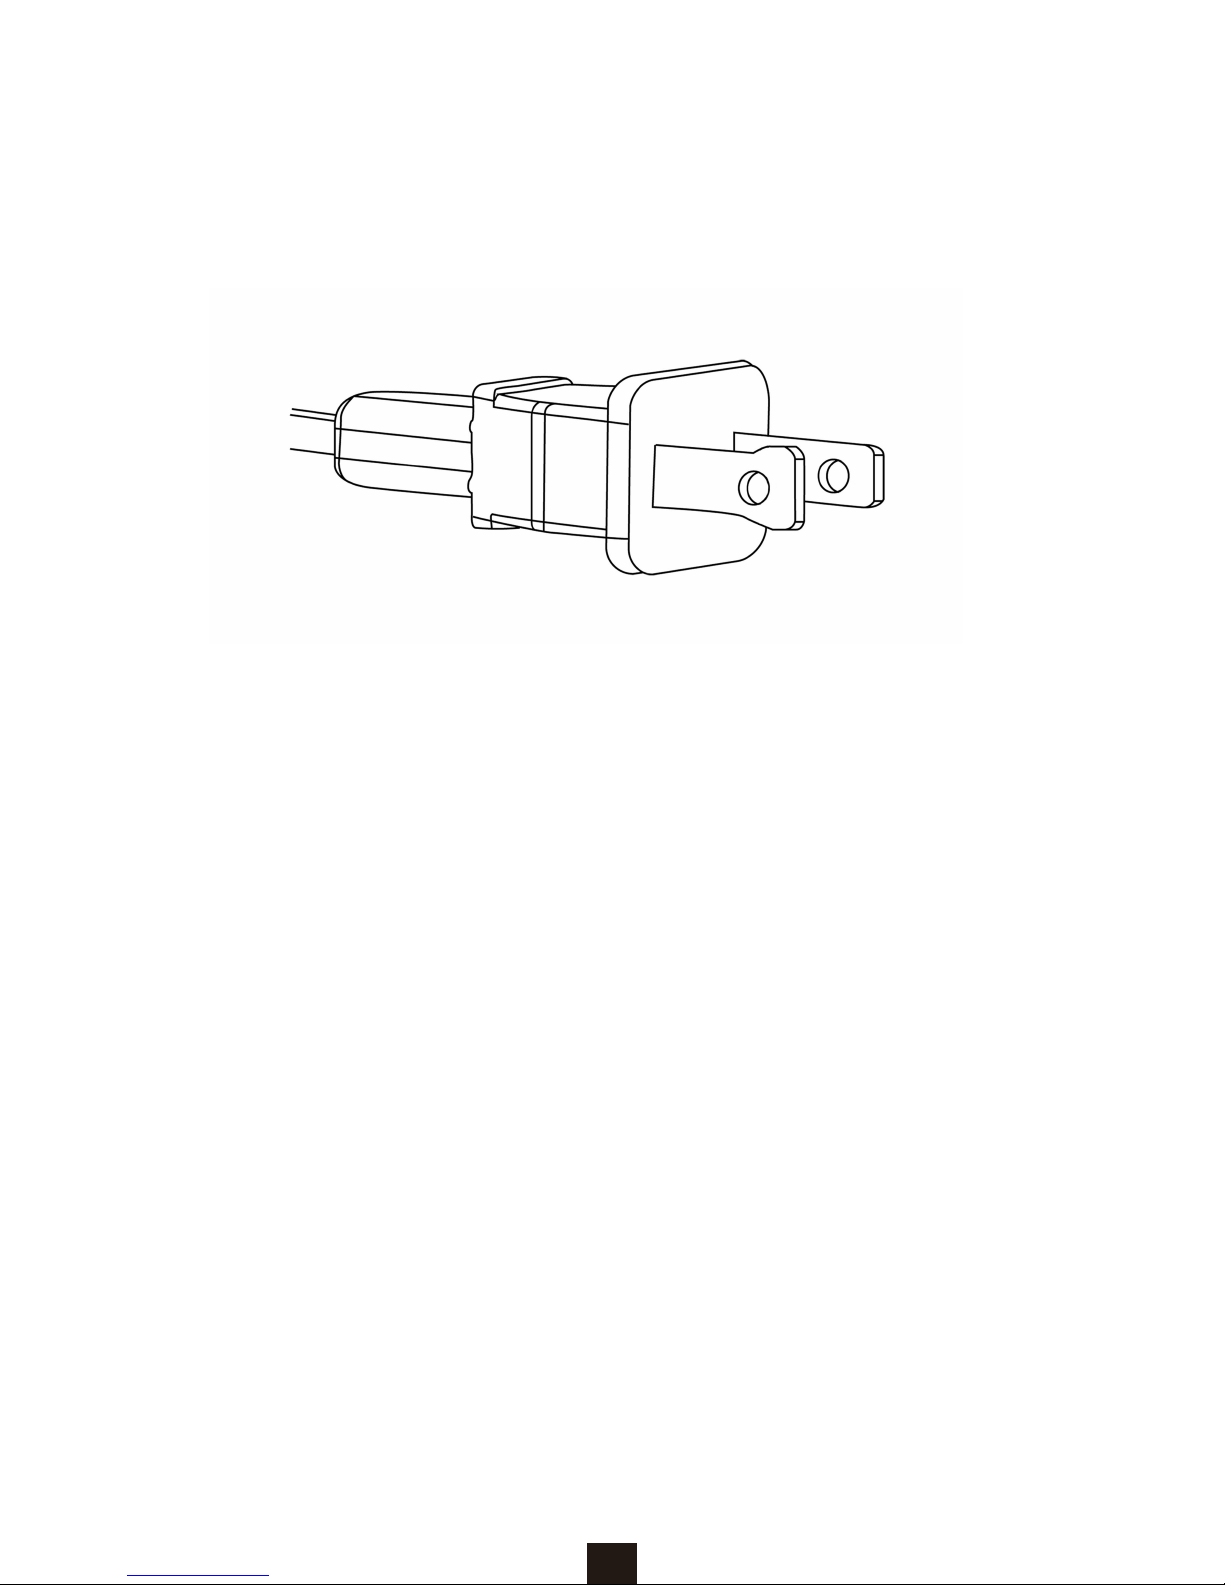
Polarized Pl u g
This appliance has a polarized plu g (one blade is wider than the other). With the safety feature
to reduce the risk of electrical shock, this plug is intended to fit in a polarized outlet only one
way. If the plug does not fit fully in the outlet, reverse the plug. If it still does not fit, contact a
qualified electrician. Do not attempt to defeat this safety feature or modify the plug in any way.
If t he plug fits loosely into the AC outlet or if the AC outlet feels warm, do not use that outlet.
Introduction
This air fryer provides an easy and healthy way of preparing your favorite ingredients. By
using hot and rapid air circulation and a t op grill, it is able to make numerous dishes. The best
part is that the air fryer heats food at all directions and most of the ingredients do not need any
oil.
Important
Please read this manual carefully before you use the appliance and save it for future
reference.
Danger
- Never immerse the housing, which contains electrical components and the heating elements
in wat er or rinsing under the tap.
- Avoid any liquid in the appliance to prevent electric shock or short circuit.
- Keep all ingredients in the basket and prevent any contact from heating elements.
- Do n ot cover the air outlet when the appliance is working.
- Filling the pan with oil may cause fire hazards.
- Don't touch the inside of the appliance while it is working.
4
Page 5

Warning
-This appliance is not intended for use by persons (including children ) with reduced physical,
sensory or mental capabilities, or lack of experience and knowledge, unless they are under
supervision or have been given instructions concerning use of the appliance by a person
responsible for their safety.
- Check if the voltage indicated on the appliance fits the local mains voltage.
- Do n ot use the appliance if there is any d amage on the plug, mains cord or other parts.
- Do n ot ask for any unauthorized person to replace or fix the damaged mains cord.
- Keep the mains cord away from hot surfaces.
- Do n ot plug in the appliance or operate the control panel with wet hands.
- Do not place the appliance against a wall or other appliances. Leave at least 10cm free
space on each side and 10cm free space above the appliance.
- Do n ot place anything on top of the appliance.
- Do n ot use the appliance for any other purposes t han described in this manual.
- Do n ot leave the appliance unattended in operation.
- During hot air frying, hot steam is released through the air outlet openings. Keep your hands
and face at a safe distance from the steam and from the a ir outlet openings. Also be careful of
hot steam and air when you pull out the pan from the appliance.
- Any accessible surfaces may become hot during use. (Fig.2)
- Immediately unplug the appliance if you see dark smoke coming out of the appliance. Wait
for the smoke emission to stop before you pull out the pan fro m the appliance.
Caution
- Ensure the appliance is placed on a horizontal, even and stable surface.
- This appliance is designed for indoor or household use only. It may not be suitable to be
safely used in environments such as staff canteens, farms, motels, and other non-residential
environments. Nor is it intended to be used by clients in hotels, motels, bed and breakfasts
and other residential environments.
- If the appliance is used improperly or for professional or semi-professional purposes or if it is
not used according to the instructions in the user manual, the guarantee becomes invalid and
we co uld re fuse any liability for any damages caused.
- Always unplug the appliance when it is not used.
- The appliance needs approximately 30 minutes to cool down for handling or cleaning safely.
Automatic switch-off
This appliance is equipped with a timer. W hen th e timer counts down t o 0, the appliance clicks
and switche
s off automatically. To switch off the appliance manually, press the button “ ” for
more than 3 seconds. (Fig.8)
Before first use
1. Remove all packaging materials.
2. Remove any stickers or labels from the appliance.
3. Thoroughly clean the basket an d pan with hot water, some dish washing liquid and a
non-abrasive sponge.
5
Page 6

Note: You can also clean these parts in the dishwasher.
4. Wipe the inside and outside of the appliance with moist cloth.
5. This oil-free fryer works with hot air. Do not fill t he pan with oil or frying fat.
Preparing for use
1. Place the appliance on a stable, horizontal and even surface.
Note: Do not place the appliance on a non-heat-resistant surface.
2. Place the basket in the pan. (Fig.3)
3. Pull out the cord from the storage compartment which is on the bottom of the appliance.
Note: Do not fill the pan with oil or any other liquid.
Do not put anything on top of the appliance, or the airflow will be disrupted and t he hot air
frying will be affected.
Using the appliance
The oil-free fryer can prepare a large range of ingredients. The recipe booklet can help you
get to know the appliance.
Hot-air frying
1. Plug in the mains plug.
2. Carefully pull the pan out of the air fryer. (Fig.6)
3. Put the ingredients in the basket. (Fig.5)
Note: Do not exceed the MAX indicator (see section "settings" in this chapter), as it may affect
the cooking quality of the food.
4. Slide the pan back into the air fryer. (Fig. 4)
Note: Never use the pan without the basket in it.
Do not t ouch the pan during and some time after use, as it gets very hot. On ly hold the
pan by the handle.
5. Determine the required preparation time for the ingredients (see section ‘Settings’ in this
chapter).
Note: Add 3 minutes to t he preparation time if the appliance is cold.
If you want, you can also let the appliance preheat without any ingredients inside. Then
fill the basket and press the timer to the required preparation time.
6. The timer starts counting down the set preparation time.
Note: Excess oil from the ingredients is collected on the bottom of th e pan.
7. Some ingredients require shaking halfway through the preparation time (see section
“Settings” in this chapter). To shake the in gredie nts, pull the pan out of the appliance by the
handle and shake it. Then slide the pan back into the fryer.
Tip: To reduce the weight, you can remove the basket from the pan and shake the basket only.
To do so, pull the pan out of the appliance, place it on a heat-resistant surface and press the
button on the handle and pull the basket out of the pan. (Fig.3)
Tip: If you se t the timer to half of the preparation time, you hear the timer clicks when yo u have
to shake the ingredients. However, this means that you have to set the timer again to the
remain
ing preparation time after shaking.
8. When you hear the timer clicks, the set preparation time has elapsed. Pull the pan out of
6
Page 7
the appliance and place it on a heat-resistant surface.
Note: You can also switch off the appliance manually. Press the “1” Power button for 3
seconds, and the unit turns off.
9.Check if the ingredients are ready. If the ingredients are not ready yet, simply slide the pan
back into the appliance and set the timer to a fe w extra minutes.
10. To remove ingredients (e.g. fries), pull the pan out of the air fryer and place it on a
heat-resistant surface, and press the basket release button and lift th e basket out of the pan.
(Fig.3)
Do not turn the basket upside down before p ulling it out of the pan, as any excess oil that has
been collected on the bottom of the pan will leak onto the ingredients.
Please note that the pan and the ingredients are hot. Depending on the type of the ingredients
in the air fryer, st eam may escape from the pan.
11. Empty the basket into a bowl or onto a plate.
Tip: To remove large or fragile ingredients, take the ingredients out of the basket by a pair of
tongs.
12. When a batch of ingredients is ready, the air fryer is instantly ready for preparing another
batch.
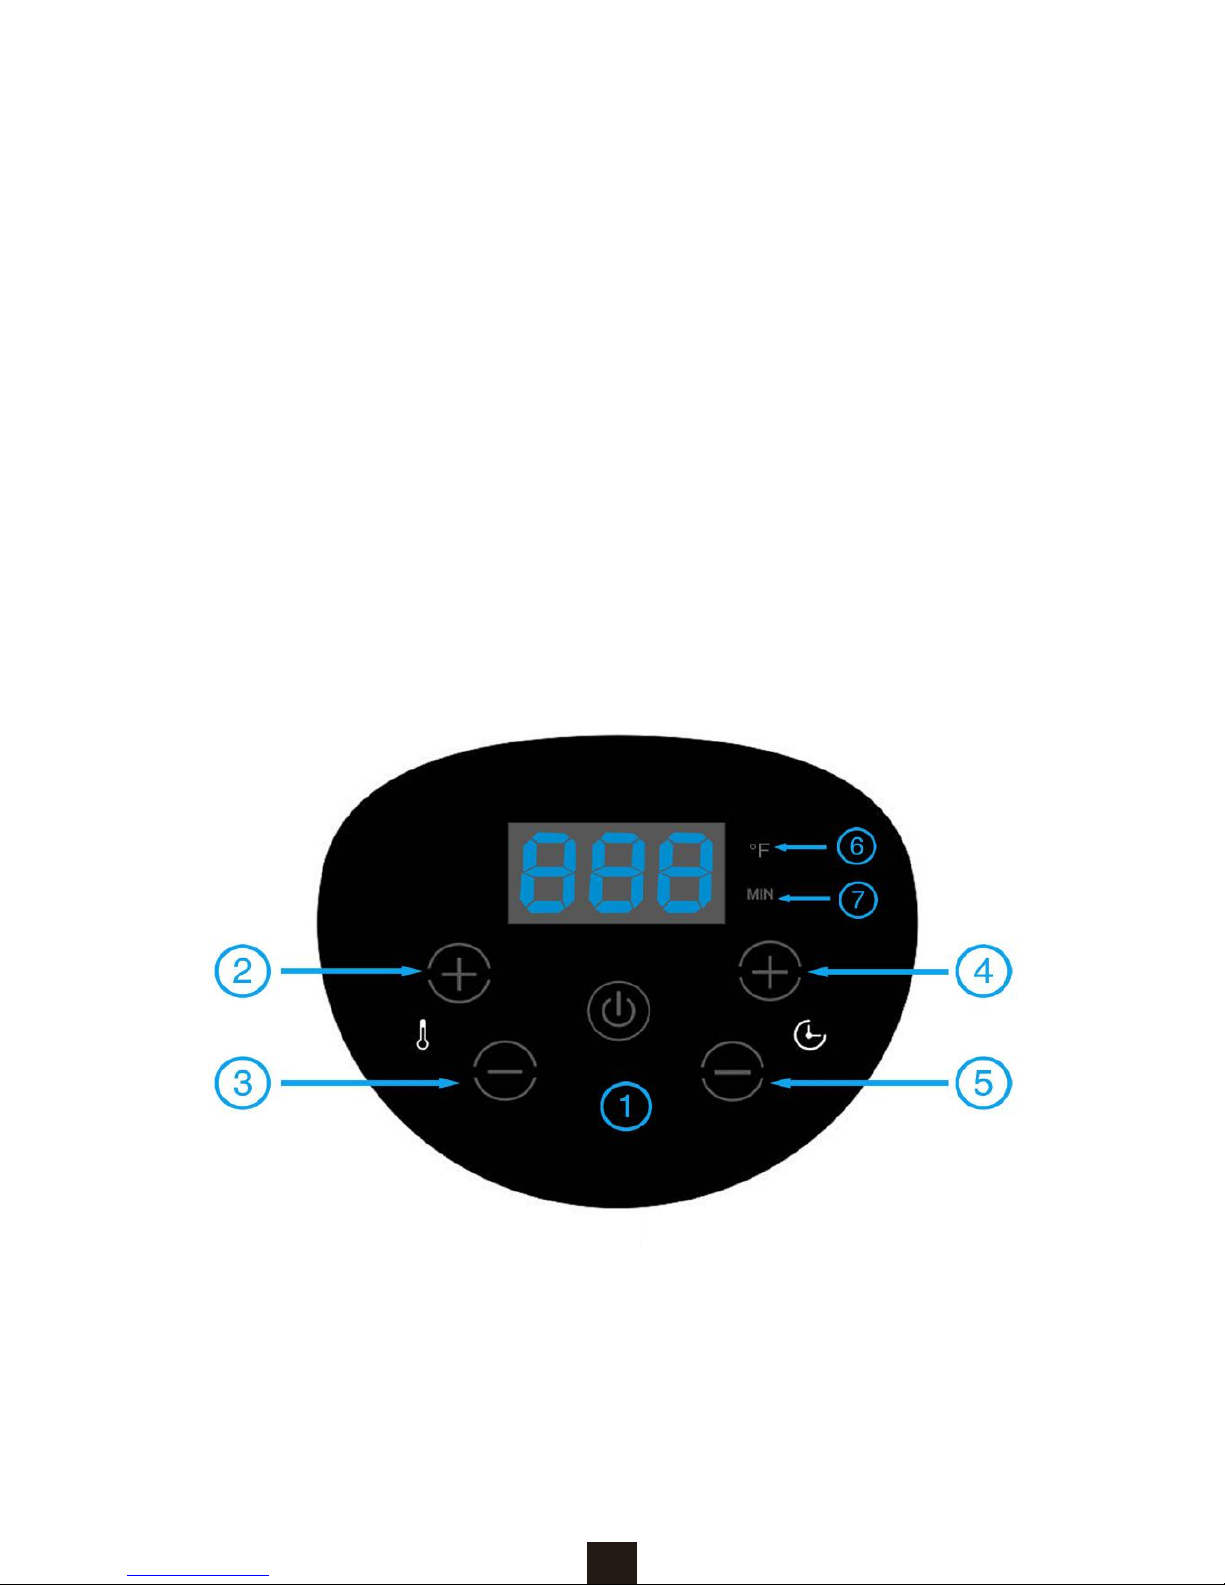
Fig.8
7
Page 8

Panel control instructions
Operate the control panel as follows: (Fig. 8)
Button 1 –Power Button
Once the pan and fry basket are properly placed, the Power Button will be illuminated.
Pressing the power button for 3 seconds will turn on the unit to the default temperature 360℉,
while the cooking time will be set to 15 minutes. Then pressing the Power Button a second
time will start the cooking process. Press th e power button for 3 seconds to turn off the entire
device during cooking. All the lights go off and the fan stops working.
Note: During cooking, you can touch the button to co ntrol t he pause and start of cooking.
Button 2&3 –Temperature Control Buttons
The “+” and “–” symb ols enable you to increase or decrease the cooking t emperature 10℉at
a time. Keep pressing the button, and you can rapidly change the temperature. Temperature
Control range: 170℉-400℉.
Button 4&5 –Timer Control Buttons
The “+” and “–” symbols enable you to increase or decrease the cookin g time, one minute at a
time. K eep pre ssing t he button, and you can rapidly change the time.
Indicator light 6
When this light is on, the panel displays temperature.
Indicator light 7
When this light is on, the panel displays time.
Settings
This table belo w will help you to select the basic sett ings for the ingredients.
Note: Keep in mind that these settings are indications. As ingredients differ in origin, size,
shape as well as brand, we cannot guarantee the best setting for your ingredients.
Because the rapid air technology instantly reheats the air inside the appliance, pulling
the pan briefly out of the appliance during hot air frying barely disturbs the process.
Tips:
-
A large amount of ingredients only requires a slightly longer preparation time, a smaller
amount of ingredients only requires a slightly shorter preparation time.
-
Shaking smaller ingredients halfway through the preparation time optimizes the frying and
can help pre vent unevenly fried ingredients.
-
Add some oil to fresh potatoes for a crispy result. Fry your ingredients in the air fryer
within a few minutes after you added the oil.
-
Do n ot prepare extremely gre asy ingredients such as sausages in the air fryer.
-
Snacks that can be prepared in an oven can also be prepared in the air fryer.
-
The optimal amount for preparing crispy fries is 500 grams.
-
Use premade dough to prepare filled snacks quickly and easily. Premade dough also
requires a shorter preparation time than homemade dough.
-
Place a baking tin or oven dish in the air fryer basket if you want to bake a cake or quiche
or if you want to fry fragile ingredients or f illed ing redien ts
-
You can also use the air fryer to reheat ingredients. To reheat ingredients, set the
temperature to 300℉for up t o 10 minutes.
8
Page 9
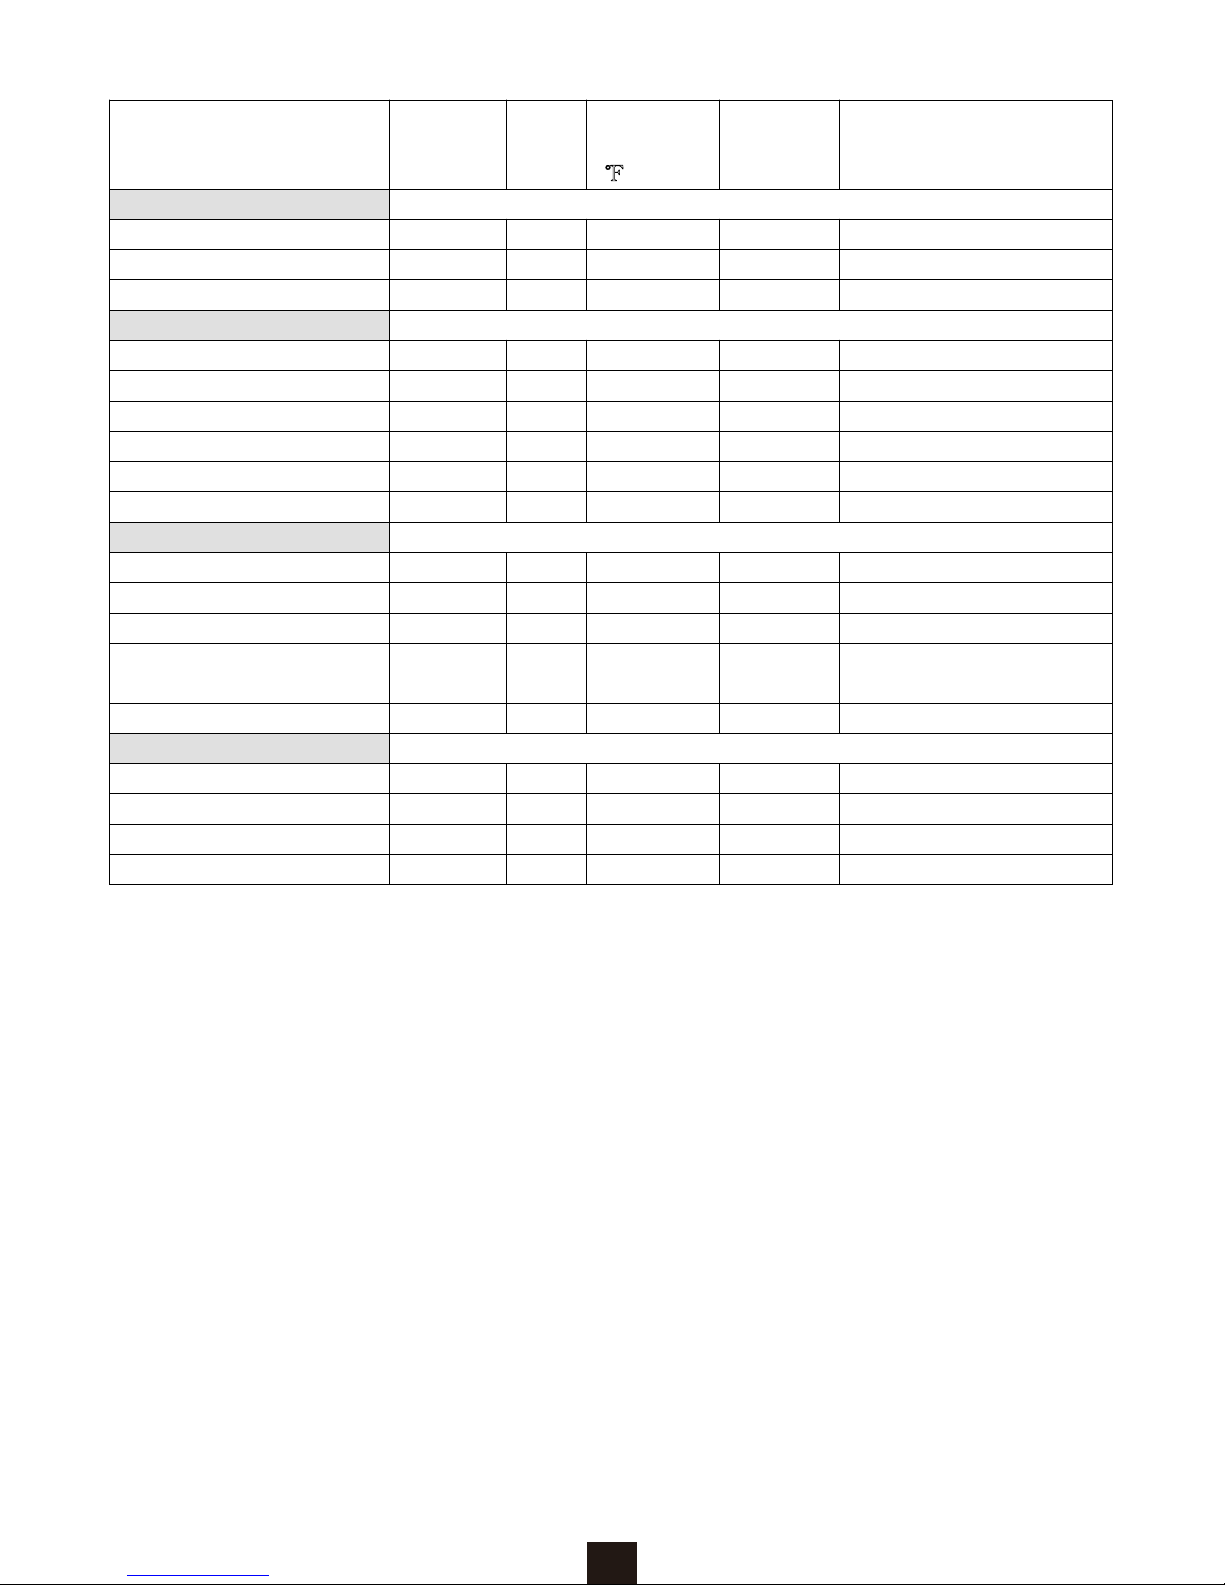
Min-max
Amount
(g)
Time
(min.)
Temperat
ure
(℉)
Shake
Extra information
Potato & fries
Thin frozen fries 300-400 15-20 400 shake
Thick frozen fries
300-400
20-25
400
shake
Potato gratin
500
20-25 390 shake
Meat & Poultry
Steak 100-500 15-20 360
Pork chops
100-500
15-20
360
Hamburger 100-500 15-20 360
Sausage roll
100-500
13-15
390
Drumsticks 100-500 15-22 400
Chicken breast
100-500
15-20
360
Snacks
Spring rolls
100-400
8-10
390
shake
Use o ven-ready food
Frozen chicken nuggets 100-500 10-15 390 shake Use o ven-ready food
Frozen fish fingers
100-400
15-20
400
Use o ven-ready food
Frozen bread crumbed
cheese snacks
100-400 8-10 360
Use o ven-ready food
Stuffed vegetables
100-400
10-15
320
Baking
Cake
300
10-15
360
Use b aking tin
Quiche 400 20-22 360 Use b aking tin/oven dish
Muffins
300
15-18
390
Use b aking tin
Sweet snacks 400 20 360 Use b aking tin/oven dish
Note: Add 3 minutes to the preparation time when you start frying while the air fryer is still cold.
Cleaning
The pan and the non-stick coated basket:
Note: Clean the appliance after every use.
Do not use metal kitchen utensils or abrasive cleaning materials to clean them, as they
may damage the non-stick coating.
1. Remove the mains plug from the wall socket and let the appliance cool down.
Note: Pull the pan out to let the hot air fryer cool down more quickly.
2. Wipe the outside o
f the appliance with moist cloth.
3. Clean the pan and basket with hot water, some dish wa shing liquid an d a non-abrasive
sponge.
You can use degreasing liquid to remove any remaining dirt.
Note: The pan and basket are dishwasher-safe.
Tip: If dirt is stuck to the basket or the bottom of the pan, fill the pan with hot water with
some dish washing liquid . Put the basket in the pan and let the p an and the basket soak for
approximately 10 minute s.
4. Clean the inside of the appliance with
hot water and non-abrasive sponge.
9
Page 10

5. Clean the heating elements with a cleaning brush to remove any food residues.
Storage
1 Un plug the a ppliance and let it cool down.
2 Make sure all parts are clean and dry.
Environment
Do not throw away the appliance with the common household wastes when it is exhausted,
but take it to an official collection point for recycling. By doing this, you help to protect the
environment.
10
Page 11
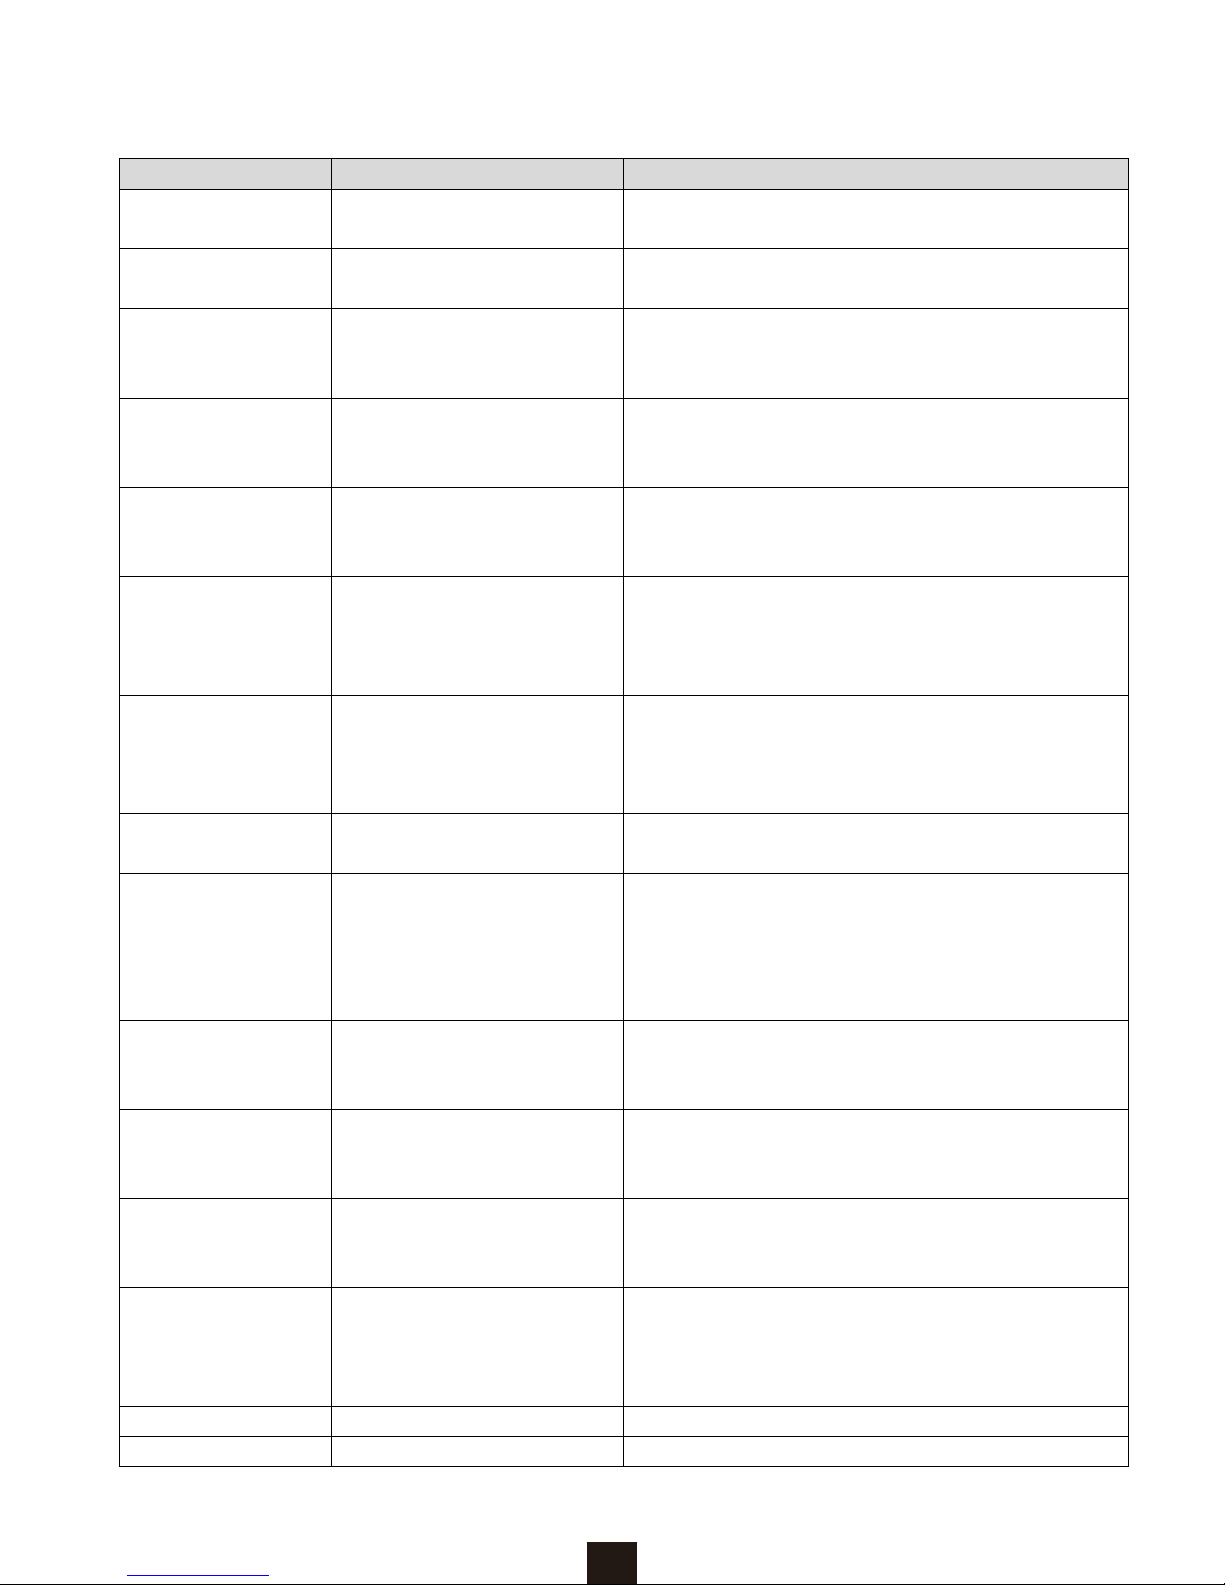
Troubleshooting
Problem
Possible cause
Solution
The air fryer does
not work.
The appliance is not
plugged in.
Put the mains plug in polarized outlet.
You have not set the timer. Press the timer to the required preparation time
to switch on the appliance.
The ingredients
fried with th e air
fryer are no t done.
The amount of ingredients
in the basket is too much,
or the size is too big.
Put sm aller batches of ingredients in the basket.
Smaller batches are fried more evenly.
The set temperature is too
low.
Press t he temperature control button t o the
required temperature setting (see sect ion
‘settings’ in chapter ‘Using the a ppliance’).
The preparation time is too
short.
Press t he timer to the required preparation time
(see section ‘Settings’ in chapter ‘Using the
appliance’).
The ingredients
are fried unevenly
in the air fryer.
Certain types of
ingredients need to be
shaken halfway thro ugh
the preparation time.
Ingredients that lie on top of or across each
other (e.g. fries) need to be shaken halfway
through the preparation time. See section
‘Settings’ in chapter ‘Using the appliance’.
Fried sn acks are
not crispy when
they come out of
the air fryer.
The type of snacks used is
meant to be prepared in a
traditional deep fryer.
Use o ven snacks or lightly brush some oil onto
the snacks for a crispier result.
The basket is not placed in
the pan correctly.
Push the basket d own into the pan until you hear
a click.
White smoke
comes out of the
appliance.
You are preparing greasy
ingredients.
When you fry greasy ingredients in the air fryer,
a la rge amount of oil will leak into the p an. The
oil produces white smoke an d the pan may heat
up more than usual. This does not affect the
appliance or the cooking result.
The pan still contains
grease resid ues from
previous use.
White smoke is caused by grease heating up in
the pan. Make sure you clean the pan properly
after each use.
Fresh f ries are
fried unevenly in
the air fryer.
You did not use the right
type of potato.
Use fresh potatoes and make sure they stay firm
during frying.
You did not rinse the potato
sticks properly before you
fried them.
Rinse t he potato sticks in water properly to
remove starch from the outside of the sticks.
Fresh f ries are not
crispy when they
come out of the air
fryer.
The crispiness of the fries
depends on the amount of
oil and water in the fries.
Make sure you dry the potato sticks properly
before you add the oil.
Cut t he potato sticks smaller for a crispier result.
Add slightly more oil for a crispier result.
11
Page 12

Guarantee and service
We provide 30-day no-hassle return & refund guarant ee, and worry-free 12-month warranty,
starting from the date on which the appliance is sold to our customer.
The warranty only covers defects in material or workmanship.
The repairs under warranty may only be carried out by an authorized service center. When
making a claim under the warranty, the original bill of purchase (with purchase date) must b e
submitted.
The warranty will not apply in cases of:
- Normal wear and tear
- Incorrect use, e.g. overloading of the appliance, use of non-approved accessories
- Use o f force, damage caused by external influences
- Damage caused by non-observance of the user manual, e.g. connection to an unsuitable
mains supply or non-compliance with the installation instructions
- Partially or completely dismantled appliances
12
Page 13

Add: 1045 E. Valley Blvd. A112, San Gabriel, CA 91776, United States
Email: [email protected]
HOLSEM
Your Safe is Our Priority
 Loading...