

Page 1
Quick Reference MTX 3.0
ENGLISH
15
1
14
2
3134
Important Note
12
11 10 9
5 7 8
6
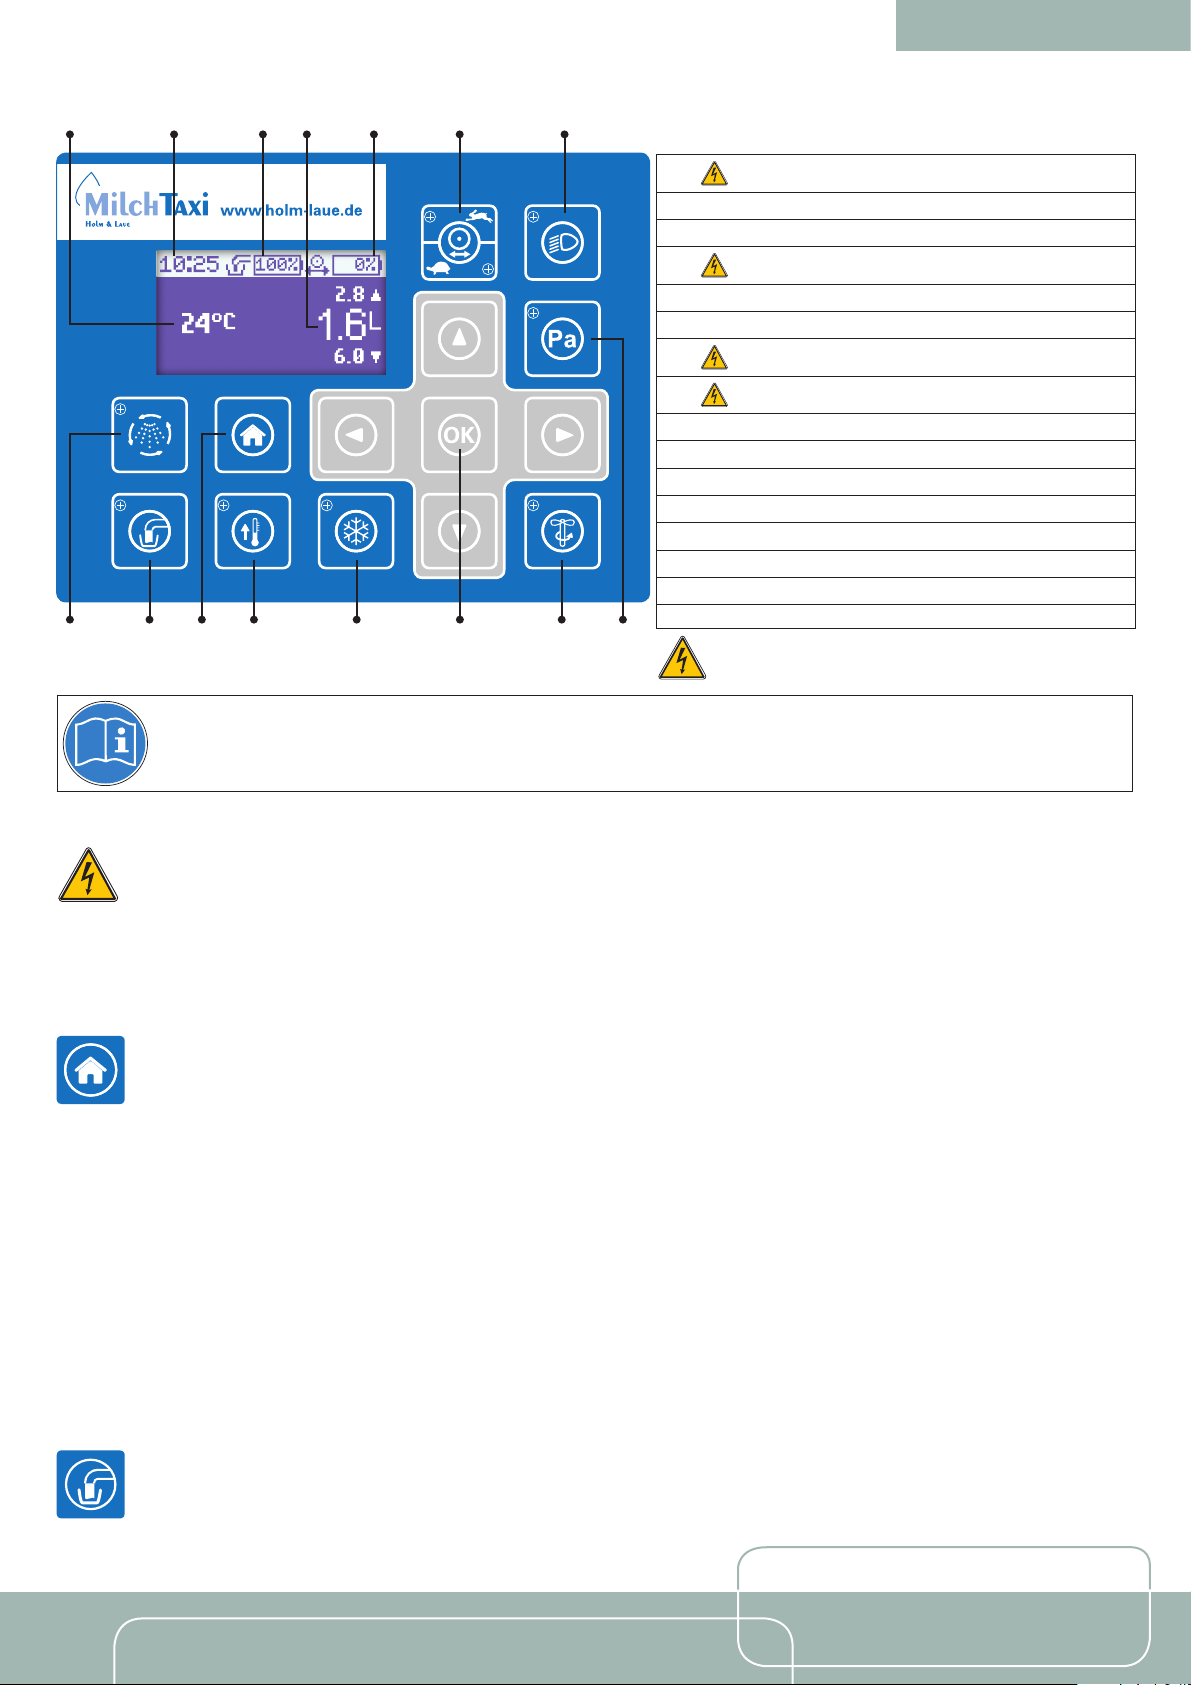
Keyboard Layout
1
2
3
4
5
6
7
8
9
10
11
12
13
14
15
* Optional component(s)
Cleaning function
Pump function
Home key
Heating function *
Cooling function *
Navigation pad for use with OK key
Agitator function
Manual pasteurisation *
Headlight *
Driving speed switch *
Battery charge indicator: 24V battery *
Current dosage quantity
Battery charge indicator: 12V battery
Time
Current tank temperature
To use these functions, your Milk Taxi has to be
connected to a power source.
The following instructions only provide a general overview of the functions. Before operating the equipment, be sure to
read the operating manual supplied with the machine in order to prevent bodily injury and avoid damaging the device!
Before Starting Up the Machine
Check to ensure that you have the correct electric power outlet and connection cable. The power supply speci cations can be
found on the type identi cation plate located on the bottom left of the stainless steel base.
The battery for your milk taxi has been fully charged and tested in the factory. However, during storage and transport, the battery may have
partially discharged. Please check the battery charge indicator for each battery on the main display screen and if needed, connect the milk
taxi to the correct power supply prior to operating it for the rst time.
Home Key
The Home key lets you access and exit the operating and maintenance menu. The menu is protected against unintended
changes by the password 683. To enter this password, proceed as follows: Use the / arrow keys to scroll through and
select the numbers in the highlighted eld. You can use the / arrow keys to switch between the elds. After entering the
password, press the OK key.
Calibrating the Dosage Quantities
The Milk Taxi has been pre-calibrated. To adjust the calibration settings, use the Home key to access the main menu and then go to the
“Pump” sub-menu. From there, select “Calibrate” and follow the instructions on the screen.
For more detailed information, see the “Pump” section in the “Main Menu: Basic Settings” chapter in the operating manual.
Setting and Adjusting the Dosage Quantities
You can select from the 6 pre-set dosage quantities using the / keys on the navigation pad. To adjust these settings or specify your
own dosage quantities, press the Home key to access the main menu and then select the “Pump” sub-menu. From there, select “Dos-
age setting”. Use the / arrow keys and the OK key to set the desired dosage quantity. The selected quantity will start to ash. You
can change the quantity with the / arrow keys and then con rm the change with OK.
For more detailed information, see the “Pump” section in the “Main Menu: Basic Settings” chapter in the operating manual.
Dispensing Milk
The pump key is used to switch between continuous pump operation and pump shutoff. The dispensing button on the left side
of the handle lets you dispense the amount of milk shown on the display. Alternatively, you can also use the dispensing key on
the remote control (the latter only when the “Dispensing Arm with Remote Control” option is used).
Page 2
Setting the Target Temperature for the Heating Function
After switching on the heating using the corresponding key on the control panel, the target temperature is displayed above the
current tank temperature. You can adjust the temperature via the / arrow keys and then con rm the change with OK. A red
LED next to the key indicates that the heating system is switched on.
Stirring and Mixing Milk Replacers
Pour the desired amount of water into the Milk Taxi and add the milk replacer according to the manufacturer’s instructions. If
applicable, please comply with the manufacturer’s speci cations regarding the mixing temperature and concentration. Close
the lid of the Milk Taxi and press the agitator key to activate the oor-mounted agitator. For better mixing results, the agitator
stirs at intervals instead of continuously.
Once the milk replacer is suf ciently dissolved, press the agitator key again to switch off the agitator. A red LED next to the key indicates
that the oor-mounted agitator is switched on.
Manual Pasteurisation
After you have poured the desired amount of milk into the Milk Taxi, connect the cold water supply to the “COLD IN” hose cou-
pling and the drain hose to the “COLD OUT” coupling on the connection plate. Ensure that the cold water supply is open. Place
the milk hose around the tank and attach the dispensing arm to the receiving sleeve on the tank. Make sure that the locking ring
is in the upper position. Now start the pasteurisation with the manual pasteurisation key. During the pasteurisation process, the
main display screen switches to the pasteurisation display. The target temperature is displayed above the current tank temperature. After
the dwell time has elapsed, the system automatically switches to the cooling function and cools the milk down to your speci ed feeding
temperature. During the cooling process, the target temperature is displayed below the current tank temperature. During the pasteurisation process, both the oor-mounted agitator and the heating function run automatically at intervals. For each function, a red LED next to
the key indicates they are running. For more detailed information, see the “Manual Pasteurisation” section in the “Milk Pasteurisation”
chapter in the operating manual.
Automatic Start
In addition to manual heating and pasteurisation, you can set up to 6 different heating or pasteurisation programmes (timer). At the speci ed times, these programmes will then start automatically. To set an automatic start time for heating, pasteurisation or heat treatment,
use the Home key to access the main menu and then go to the “Timer” sub-menu.
For more detailed information, see the “Timer” section in the “Main Menu: Basic Settings” chapter in the operating manual.
Cooling
This key is used to start the cooling function. Here as well, make sure that the cold water supply is connected and open (see
“Manual Pasteurisation” section in this guide). The main display screen now switches to the cooling screen. The current tem-
perature inside the tank is displayed on the left side of the screen. A stylised depiction of the cooling process is shown in the
centre of the screen. Once the set temperature is reached, the Milk Taxi automatically cools down the tank if the temperature of
the milk rises above the set temperature. During the cooling process, the oor-mounted agitator stirs the milk at periodic intervals, which
allows the Milk Taxi to achieve better cooling ef ciency. A red LED next to the control key indicates that the cooling process is running.
Cleaning the Milk Taxi
The Milk Taxi should be cleaned after each feeding. To clean: Empty the tank completely and open the return valve to empty
the milk hose as well. When cleaning the Milk Taxi, make sure to remove the coarse lter located in the bottom of the tank and
manually clean it if needed. To use the Milk Taxi’s automatic cleaning function, pour water (approx. 20% of the maximum lling
level) and detergent into the tank in accordance with the manufacturer’s instructions and place the milk hose around the tank.
Attach the dispensing arm to the receiving sleeve on the tank. Make sure that the locking ring is in the upper position and start the process
by pressing the Cleaning key. For information on setting the parameters, see the “Cleaning” section in the “Main Menu: Basic Settings”
chapter in the operating manual.
After cleaning, rinse the Milk Taxi and the milk hose with clean water to ensure that no traces of detergent remain in the Milk
Taxi. Remove any residue that may be located on the bottom of the Milk Taxi. We recommend manually cleaning the Milk Taxi
again with a brush to complete the cleaning process. Make sure that none of the built-in parts (for example, the temperature
sensor) get damaged during the cleaning process.
Headlight
The key shown on the left can be used to switch on and off the headlight of the Milk Taxi. If you ever forget to turn off the head-
light, it will switch off automatically after the maximum power-on time in order to protect the battery. For more detailed information, see the “Main Menu: Basic Settings” chapter in the operating manual.
 Loading...