

Page 1
Oscillating
Stand Fan
Owner ’s Guide
HASF1320
HASF1705
PLEASE READ AND SAVE THESE IMPORTANT INSTRUCTIONS
Page 2
PLEASE READ AND SAVE
ILLUSTRATION
THESE IMPORTANT
SAFETY INSTRUCTIONS
When using electrical appliances, basic safety precautions should always
be followed to reduce the risk of fire, electric shock, and injury to
persons, including the following:
1) Read all instructions before using the appliance.
2) To avoid fire or shock hazard, plug the appliance directly into a
120V AC electrical outlet.
3) Keep the cord out of heavy traffic areas. DO NOT let the cord
hang over the edge of a table or counter. To avoid fire hazard,
NEVER put the cord under rugs, near heat registers, radiators,
stoves, or heaters.
4) To protect against electrical hazards, DO NOT immerse in water or
other liquids. Do not use near water.
5) Close supervision is necessary when any appliance is used by or
near children, or by disabled people.
6) Always unplug the fan before moving it, putting on or taking off
parts, cleaning, or whenever the fan is not is use. Be sure to pull
by the plug and not the cord.
7) Avoid contact with moving parts. DO NOT operate without fan grills
properly in place.
8) DO NOT operate any appliance with a damaged cord or plug, if
motor fan fails to rotate, after the appliance malfunctions, or if it
has been dropped or damaged in any manner. Return appliance
to manufacturer for examination, electrical or mechanical
adjustment, or repair.
9) DO NOT operate in the presence of explosive and/or
flammable fumes.
10) Use appliance only for intended household use as described in this
manual. Any other use not recommended by the manufacturer
may cause fire, electric shock, or injury to persons. The use of
attachments not recommended or sold by The Holmes Group may
cause hazards.
11) DO NOT use outdoors.
12) Always use on a dr y, level surface.
13) Keep unit away from heated surfaces and open flames.
14) WARNING: To reduce the risk of fire or electric shock, DO NOT use
this fan with any solid-state speed control device.
15) DO NOT attempt to repair or adjust any electrical or mechanical
functions on this unit. Doing so will void your warranty. The inside
of the unit contains no user serviceable parts. All servicing should
be performed by qualified personnel only.
PLEASE READ AND SAVE
THESE IMPORTANT
SAFETY INSTRUCTIONS
THIS PRODUCT IS EQUIPPED WITH A POLARIZED AC
(Alternating Current)PLUG (a plug having one blade wider
than the other). This plug will fit into the power outlet
only one way. If the plug does not fit fully into the outlet,
reverse the plug. If it still does not fit, contact qualified
personnel to install the proper outlet.
DO NOT DEFEAT THE SAFETY PURPOSE OF THIS
POLARIZED PLUG IN ANY WAY.
I
J
A
B
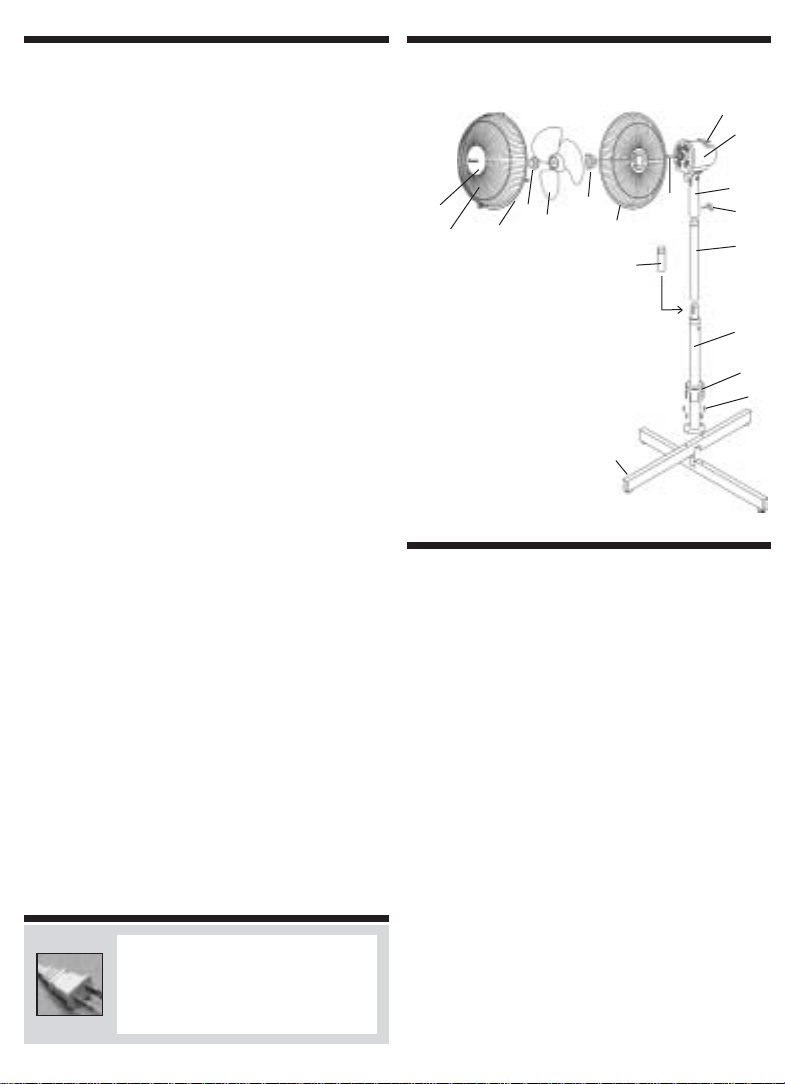
A. Logo Plate
B. Front Grill
C. Grill Clips
D. Blade Cap
E. Fan Blade
F. Rear Grill Mounting-Nut
G. Rear Grill
H. Motor Shaft
I. The Oscillation Control Knob
J. Motor Housing
K. Upper Pole
L. Fan Post Screw
M. Long Extension Pole
N. Short Extension Pole
O. Lower Pole
P. Base Cap
Q. Screws (4)
R. Foot Extensions (2)
D
E
C
F
R
H
G
N
K
L
M
O
ASSEMBLY INSTRUCTIONS
Base / Pole Assembly
Step 1: Unscrew the four screws on the two foot extensions.
Step 2: Attach the two foot extensions by placing the top foot over
the bottom foot. Make sure to insert the cut outs on each foot
extension into one another.
Step 3: Align the lower pole over the two foot extensions making sure
that the holes in the lower pole align with the holes in the two
foot extensions. Using the four screws, screw the lower pole
into the foot extensions until secure. Slide the base cap over
the lower pole until the cut outs on the base cap cover each
foot extension.
Step 4:
For Maximum Height:
Insert the long extension pole (M) into the lower pole making
sure to align the two dimples on the extension pole with the
keyed slot on the lower pole. Turn clockwise to lock into place.
For Minimum Height:
Insert the short extension pole (N) into the lower pole making
sure to align the two dimples on the extension pole with the
keyed slot on the lower pole. Turn clockwise to lock into place.
P
Q
Page 3

ASSEMBLY INSTRUCTIONS CONTINUED
Fan Head Assembly
NOTE: Remove the plastic piece covering the motor shaft and discard.
Also remove the plastic covering the logo plate.
Step 1: Position the rear grill over the motor shaft, making certain the
3 holes at the top and bottom of the rear grill fit over the
3 prongs on the motor housing. Please make sure the rear grill
fits securely against the motor housing.
Step 2: Secure the rear grill in its place using the rear grill mounting-nut.
Turn this ring clockwise and tighten firmly.
Step 3: Slide the fan blade; with the hollowed interior of the blade facing
towards the rear grill firmly onto the motor shaft. Make sure the
shaft protrudes from the front of the blade.
Step 4: Secure the fan blade onto the motor shaft by turning the blade
cap in a counter-clockwise direction until it is firmly in place.
Step 5: Center the front grill by aligning the Holmes logo so it is
horizontal and parallel to the floor. Then secure the front and
rear grills completely together by placing the front grill onto the
back grill making sure the Holmes logo is straight. Then close
and lock the clips into place around both grills.
Final Assembly
Step 1: Place and slide the upper pole and fan head assembly onto one
of the extension poles. Then, simply insert the fan post screw
into the hole and tighten until a secure fit is obtained.
OPERATING INSTRUCTIONS
Step 1: Set the fan base on a dry, level surface.
Step 2: Please make sure the On/Speed knob is in the "O" Off position.
Plug the cord into any standard 120-volt A/C outlet.
Step 3: The SPEED is adjusted by moving the knob left or right to
the desired setting.
Step 4: The OSCILLATION control knob is located on the top of the fan
motor housing. To start oscillation, push control knob down. To
stop oscillation, pull control knob up.
ADJUSTMENT INSTRUCTIONS
Tilt Adjustment
To change the tilting angle of the fan head, move the fan head to the
desired angle.
Height Adjustment
(See instructions for base/pole assembly)
This fan is equipped with two extension poles, which allow you to adjust
the height of the fan for two height settings.
CLEANING/MAINTENANCE
Follow these instructions to correctly and safely care for your Holmes
stand fan. Please remember:
• Always unplug the fan before cleaning or disassembling.
• Do not allow water to drip on or into the fan motor housing.
• Do not use any of the following as a cleaner: gasoline, thinner, benzine
(See instructions for fan head assembly)
Step 1: To access the fan blade, remove the front grill and the fan
blade nut.
Step 2: Clean the fan blade, both front and rear grills with a soft cloth
moistened with a mild soap solution.
Step 3: Replace blade, tighten the fan blade nut, and securely fasten
the front grill.
Fan Head, Base, and Pole Cleaning
Using a soft, moist cloth, with or without a mild soap solution, carefully
clean the fan base, pole, and head. Please use caution around the motor
housing area. Do not allow the motor or other electrical components to
be exposed to water.
Page 4

FAN STORAGE
ONE (1) YEAR LIMITED WARRANTY
Your fan can be stored in the off-season either partially disassembled
or assembled. It is important to keep it in a safe, dry location.
• If stored disassembled, we recommend using the original
(or appropriately sized) box.
• If stored assembled or partially assembled, remember to protect
the fan head from dust.
SERVICE INSTRUCTIONS
1. Do NOT attempt to repair or adjust any electrical or mechanical functions on
this unit. Doing so will void the warranty.
2. If you have any questions regarding this unit’s operation or believe any repair
is necessary, please write to our consumer service department.
3. If you need to exchange the unit, please return it in its original carton, with a
sales receipt, to the store you purchased it. If you are returning the unit more
than 30 days after the date of purchase, please see the enclosed warranty.
4. If you have any other questions or comments, see our correspondence below:
Please visit our website at www.holmesproducts.com
or write to:
The Holmes Group, Inc.
P.O. Box 769
Milford, MA 01757-0769
For your own records, staple or attach your sales receipt to this manual. Also,
please take a moment to write the store name/location and date purchased below.
STORE NAME:
LOCATION:
DATE PURCHASED:
(STAPLE RECEIPT HERE)
SAVE THIS WARRANTY INFORMATION
A. The quality controls used in the manufacture of this Holmes product are to
ensure your satisfaction.
B. The Warranty Registration Card enclosed with this product must be completed
and returned within 10 days of purchase for your Warranty to be effective.
This Warranty applies only to the original purchaser of this product.
C. This Warranty applies ONLY to repair or replacement of any supplied or
manufactured parts of this product that, upon inspection by Holmes authorized
personnel, proves to have failed in normal use due to defects in material or
workmanship. Holmes will determine whether to repair or replace the unit.
This Warranty does not apply to installation expenses.
D. Operating this unit under conditions other than those recommended or at
voltages other than the voltage indicated on the unit, or attempting to service
or modify the unit, will render this WARRANTY VOID.
E. Unless otherwise proscribed by law, Holmes shall not be liable for any personal
injury, property or any incidental or consequential damages of any kind
(including water damage) resulting from malfunctions, defects, misuse,
improper installation or alteration of this product.
F. All parts of this Holmes product are guaranteed for a period of 1 year
as follows:
1. Within the first 30 days from date of purchase, the store from which you
purchased your Holmes product should replace this product if it is defective in
material or workmanship (provided the store has in-stock replacement.)
2. Within the first twelve months from date of purchase, subject to the conditions
in paragraph H, Holmes will repair or replace the product if it is defective in
material or workmanship providing it is returned to Holmes, freight prepaid,
with PROOF OF PURCHASE date, together with $5.00 for handling and return
packing/shipping charges.
G. If you have any problem with this product, please write our Consumer
Service Dept.
H. IMPORTANT Return INSTRUCTIONS Your warranty depends on your following
these instructions if you are returning the unit more than 30 days after
the date of purchase:
1. Carefully pack the item in its original carton or other suitable box to avoid
damage in shipping.
2. Before packing your unit for return; be sure to enclose:
a) your name, full address with zip code and telephone number,
b) a dated sales receipt or PROOF OF PURCHASE,
c) your $5.00 check for return packaging, and
d) The model number of the unit and the problem you are having.
(Enclose in an envelope and tape directly to the unit before the box is sealed.)
3. Holmes recommends you insure the package (as damage in shipment is not
covered by your warranty).
4. All shipping charges must be prepaid by you (as noted in paragraph F).
5. Mark the outside of your package:
HOLMES
THE HOLMES GROUP, INC.
CONSUMERRETURNS
32B SPUR DRIVE
EL PASO, TX 79906
SHIPPING AND HANDLING CHARGES: $5.00
This warranty gives you specific legal rights, and you may have other rights which
vary from state to state. The provisions of this warranty are in addition to, and not
a modification of, or subtraction from, the statutory warranties and other rights
and remedies contained in any applicable legislation. To the extent that any
provision of this warranty is inconsistent with any applicable law, such provision shall
be deemed voided or amended, as necessary, to comply with such law.
Printed in ChinaH-F118.01
 Loading...