

Page 1
Conveyor Toasters Installation Instructions
IL2370
These symbols are intended to alert the
user to the presence of important operating
and maintenance instructions in the manual
accompanying the appliance.
Go to:
www.star-mfg.com/scripts/manuals.aspx
to obtain this units installation & operations
manual, warranty & other documents.
NOTICE
Using any part other than genuine Holman factory supplied parts
relieves the manufacturer of all liability.
Holman reserves the right to change specications and product
design without notice. Such revisions do not entitle the buyer to
corresponding changes, improvements, additions or replacements
for previously purchased equipment.
Due to periodic changes in designs, methods, procedures, policies
and regulations, the specications contained in this sheet are subject
to change without notice. While Holman Manufacturing exercises
good faith efforts to provide information that is accurate, we are
not responsible for errors or omissions in information provided
or conclusions reached as a result of using the specications.
By using the information provided, the user assumes all risks in
connection with such use.
CAUTION
This equipment is designed and sold for commercial use only by
personnel trained and experienced in its operation and is not sold
for consumer use in and around the home nor for use directly by
the general public in food service locations.
Before using your new equipment, read and understand all the
instructions & labels associated with the unit prior to putting it into
operation. Make sure all people associated with its use understand
the units operation & safety before they use the unit.
All shipping containers should be checked for freight damage both
visible and concealed. This unit has been tested and carefully
packaged to insure delivery of your unit in perfect condition.
If equipment is received in damaged condition, either apparent or
concealed, a claim must be made with the delivering carrier.
Concealed damage or loss - if damage or loss is not apparent until
after equipment is unpacked, a request for inspection of concealed
damage must be made with carrier within 15 days. Be certain to
retain all contents plus external and internal packaging materials
for inspection. The carrier will make an inspection and will supply
necessary claim forms.
GENERAL SAFETY INFORMATION
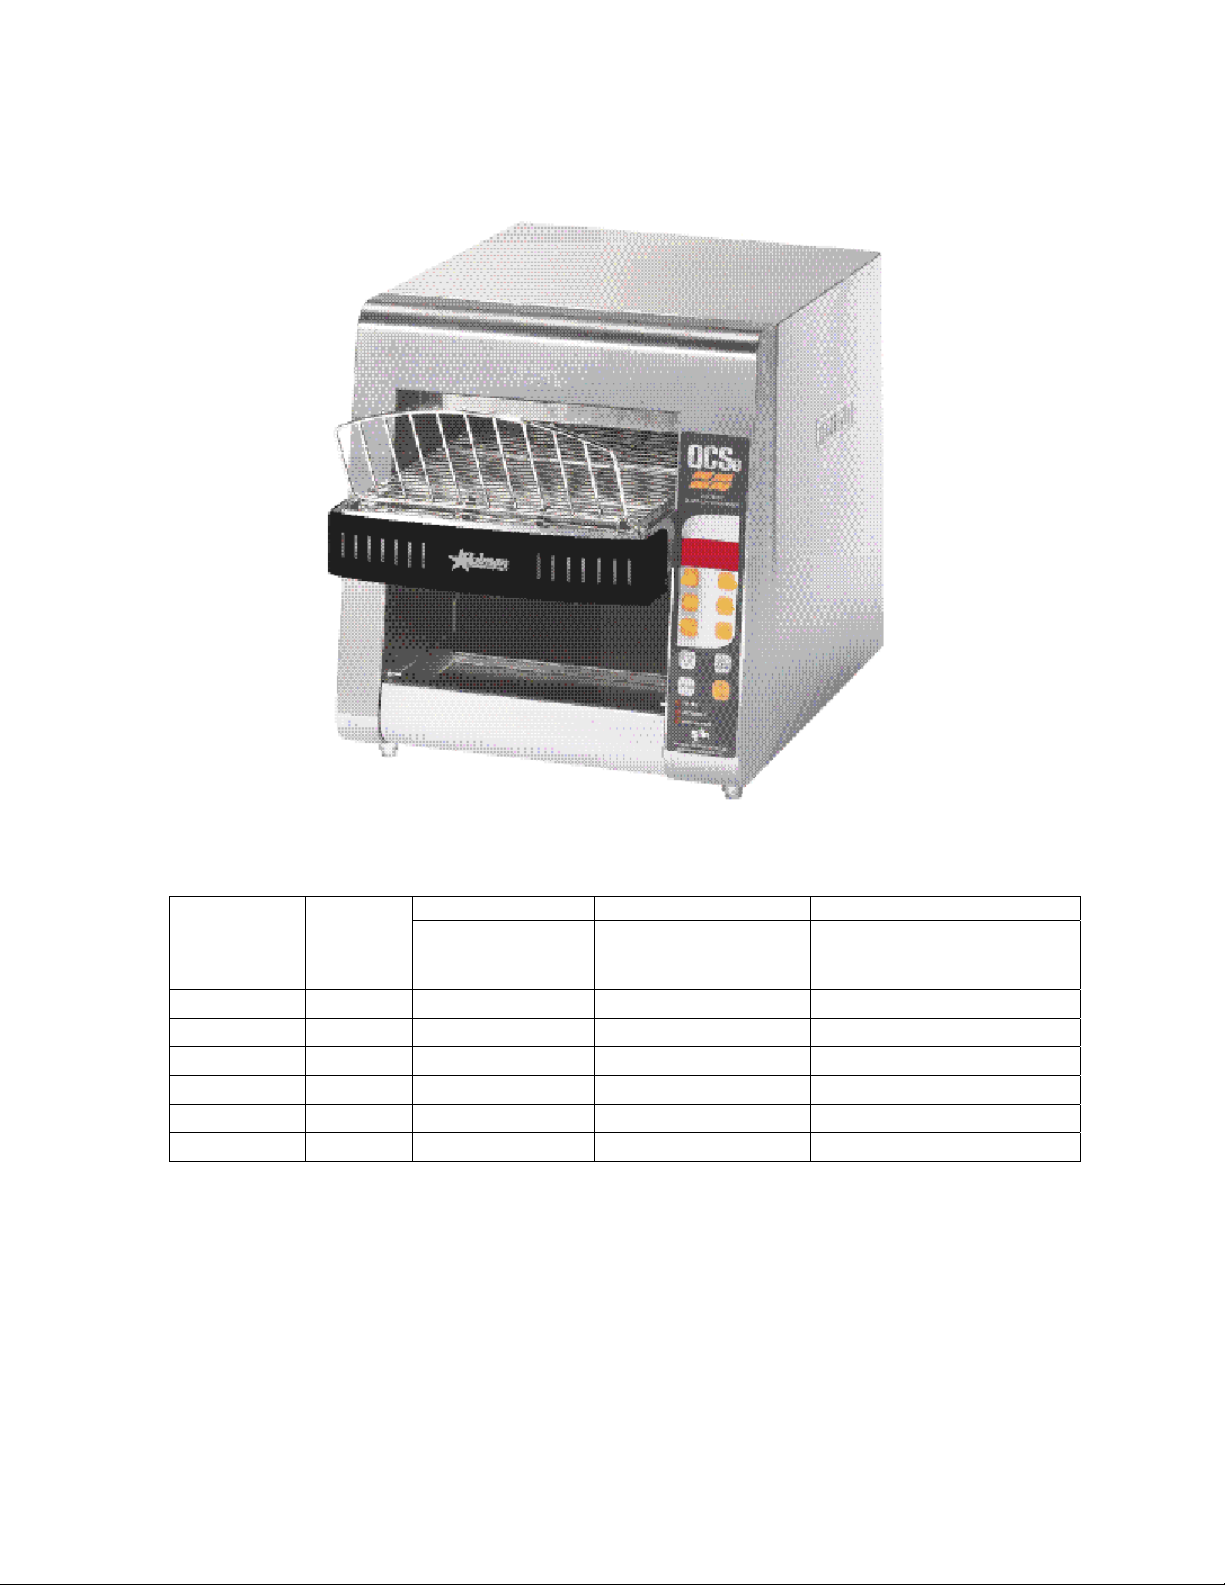
MODEL
QCSE-2-600HW
Conveyor Toasters
Electronic Controls
GENERAL INSTALLATION INFORMATION
The unit was shipped fully assembled and ready to plug into a
standard outlet specied for its voltage and amp draw. If improper
electrical supply is determined, contact a qualied electrician prior
to using the unit. Removal and replacement of the power cord
and plug will void the warranty. For assistance, contact your local
authorized service agent for service or required maintenance.
Level unit using the adjustable feet under the unit (approximately
1/2" adjustment).
Before using the unit for the rst time, wipe down the exterior with
a damp cloth.
Allow enough space around the toaster for adequate ventilation.
Do not operate the unit without the crumb tray properly positioned.
Overheating and poor toasting may occur. Read all labels on the
unit and follow their instructions.
MAINTENANCE AND REPAIRS
Contact the factory, a service representative or a local
se rvice c ompany fo r serv ice or required maintena nce.
Go to www.star-mfg.com/scripts/manuals.aspx to nd a service
agent near you. Replacement cord sets must be purchased from
Star Manufacturing International, Inc. or our authorized agents.
Should you need any assistance regarding the operation or
maintenance of any Holman equipment; write, phone, fax or
e-mail our service department. In all correspondence mention
the model number and the serial number of your unit, along with
the voltage.
Business Hours: 8 am to 4:30 p.m. Central Standard Time
Telephone: (314) 678-6303
E-mail: Parts@star-mfg.com
Service@star-mfg.com
Warranty@star-mfg.com
Website: www.star-mfg.com
Mailing Address: Holman Manufacturing
10 Sunnen Drive
St. Louis, MO 63143
U.S.A.
2M-Z13413, Rev. B 6/15/2012
Page 2
ELECTRICAL CONNECTION
Befor e mak ing any e lec trica l con necti on to this uni t,
check that the power supply is adequate for the voltage,
am pe ra ge and requirements st at ed o n the rating pl at e.
A wiring diagram is included in the Installation & Operations
m a n u a l , w h i c h c a n b e d o w n l o a d e d a t
WARNING
Disconnect the unit from the power source before installing or
removing any parts.
Be absolutely sure that the ground connection for the receptacle is
properly wired. Do not connect equipment to power without proper
ground connections. Improper grounding may result in personal
injury or fatality.
www.star-mfg. com /sc rip ts/ manuals.
aspx.
DO NOT CUT OR REMOVE THIS PLUG OR GROUNDING
PRONG FROM THE PLUG.
CONNECT/PLUG UNIT INTO DEDICATED
WARNING
A.C. LINE ONLY SPECIFIED ON THE DATA
PLATE OF THE UNIT.
WARNING
CERTAIN SURFACES ARE EXTREMELY HOT
DURING OPERATION AND CARE SHOULD
BE TAKEN WHILE USING THIS UNIT.
CAUTION
DO NOT IMMERSE OR LET THE UNIT STAND
IN WATER.
DO NOT HOSE DOWN THE UNIT OR THE
WARNING
TABLE/COUNTER IF THE UNIT IS ON THE
TABLE/COUNTER.
KEEP AWAY FROM RUNNING WATER.
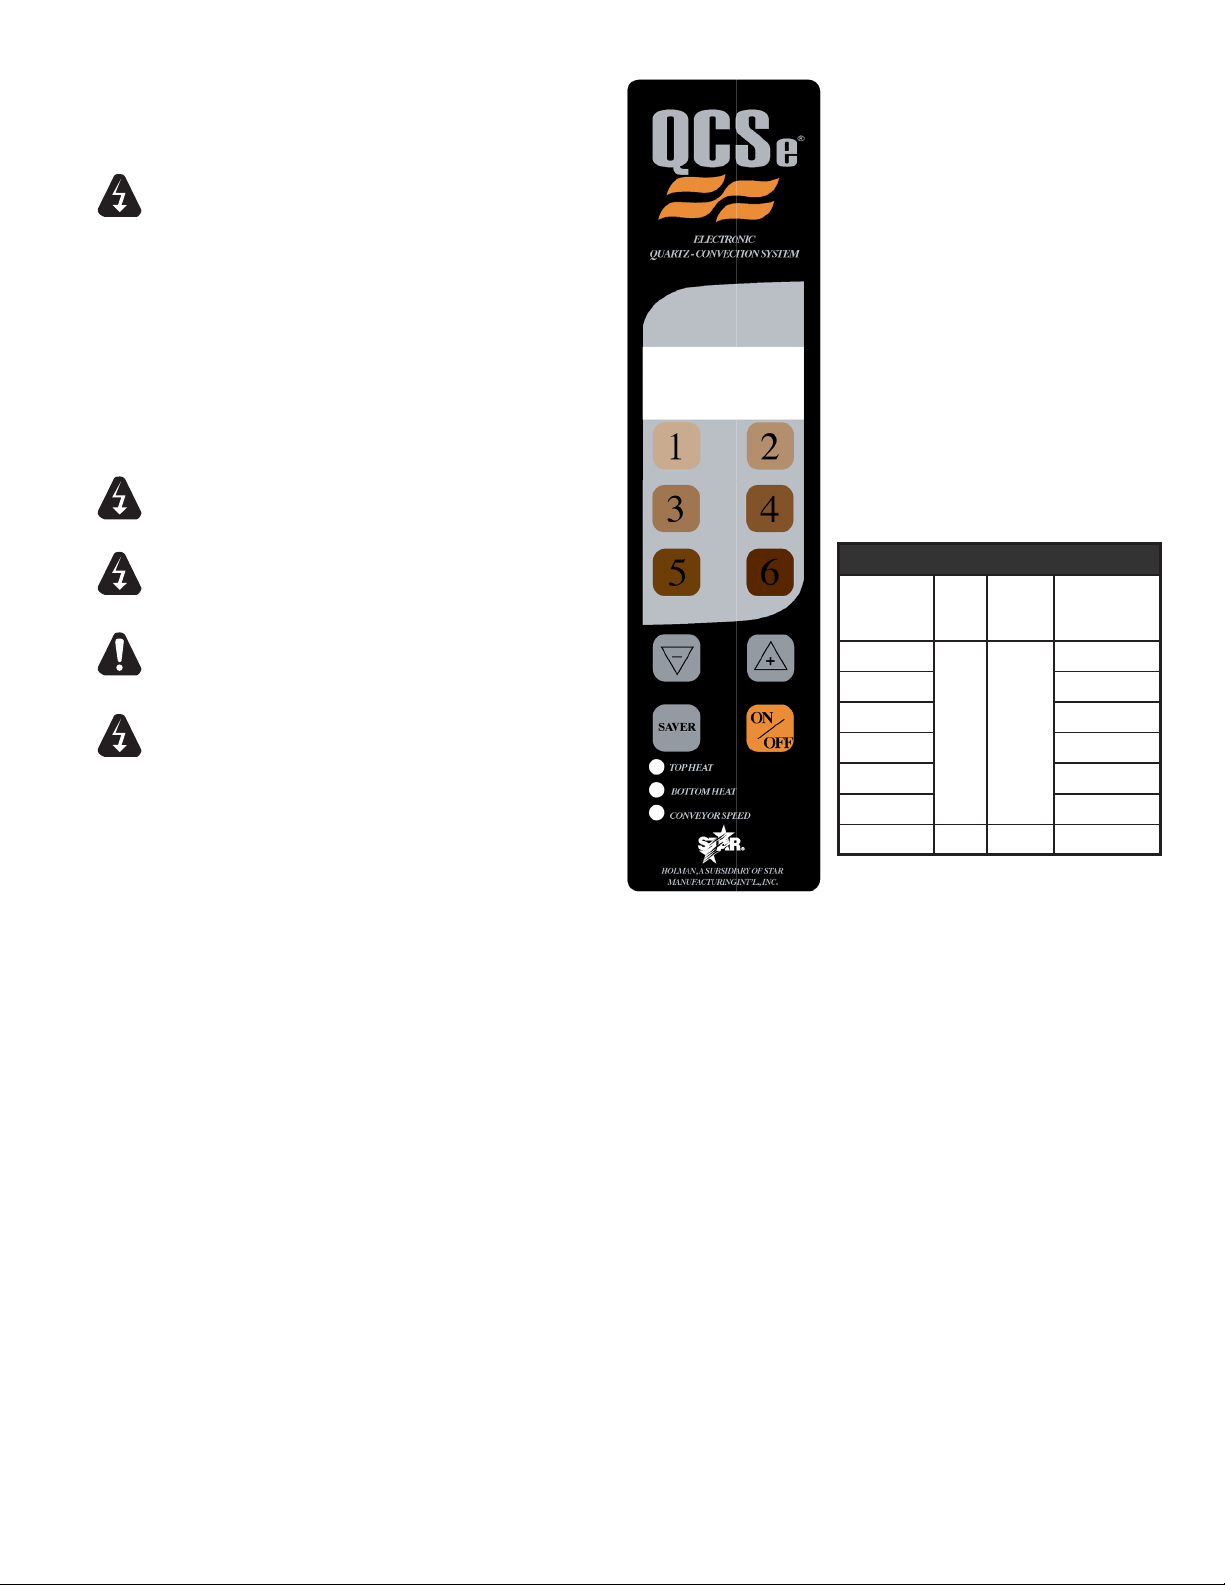
The Holman QCSe conveyor toaster
comes with pre-programmed factory
default settings for TST-1, TST-2, TST-3,
TST-4, TST-5, TST-6. The operator may
change these setting at any time.
Press 1 and TST-1 will appear
Press 2 and TST-2 will appear
Press 3 and TST-3 will appear
Press 4 and TST-4 will appear
Press 5 and TST-5 will appear
Press 6 and TST-6 will appear.
Factory default settings are as follow:
QCSE-2-600HW DEFAULT SETTINGS
Menu
Buttons
TST - 1
Top
Heat
Bottom
Heat
Conveyor
Speed
90
TST - 2 78
TST - 3 66
TST - 4 54
9 10
TST - 5 42
TST - 6 30
SAVER* 50% 50% OFF
POWER SAVER SWITCH
NOTE: This Power Saver Switch has been disabled from the
factory, it can be enabled through the programming procedures.
There are three Power Saver modes:
ON: Unit is in pre-programmed power saving setting.
OFF: Power Saver mode is turned off.
AUTO ON: Power Saver turns on when there has been no activity
for a programmed length of time.
The operator may adjust the level of power reduction for the saver
mode. (Note: conveyor may move slowly when in saver mode.)
Two buttons (+) and (-) are used when increasing or decreasing the
value of each programmable setting.
A red LED light located at the lower portion of the control panel label
will indicate if the value for top heat, bottom heat or conveyor speed
is being adjusted.
Page 3

CERTAIN SURFACES ARE EXTREMELY HOT
DURING OPERATION AND CARE SHOULD
CAUTION
BE TAKEN WHILE USING THIS UNIT.
START UP
When the toaster has been plugged into a suitable outlet and power
supply, the word OFF will be displayed on the L.E.D. read out.
A. Press the ON/OFF button once to turn on the toaster. The toaster
will now enter into pre-heat and PREHT will be displayed (the
elements will begin to glow but the conveyor and fan motor
will not turn on).
B. After one minute, the fan motor will turn on and the conveyor
will begin turning at the previously saved setting (for initial
start up, the drive motor will operate at the factory default
setting).
C. After four minutes, the display will show the last used program
selection i.e. (for initial startup, TST-1, TST-2, TST-3, TST-4,
TST-5, TST-6 will be the last program selected).
DAILY OPERATION
Check the power cord to insure that it is plugged into a proper
outlet.
Press the ON/OFF button once to turn the toaste r on.
Press the button a second time to turn the toaster off.
NOTE: When the toaster is turned off, the fan and conveyor motors
will continue to run for ve minutes. The words COOL and DOWN will
be alternately displayed during that time. After ve minutes, the word
OFF will be displayed until the ON/OFF button is pressed again.
Once the toaster has been pre-heated, the menu buttons can be
pressed to change to TST-1, TST-2, TST-3, TST-4, TST-5, TST-6.
OPERATING HINTS AND SAFETY
Disconnect power to the unit with the ON/OFF button at the end of
each day of operation.
Do not leave the unit in operation without an attendant.
Do not leave the unit at high temperature when not in use or during
idle periods. This will cause food particles and grease lm to
carbonize.
Page 4
PROGRAMING
Q
C
S
¨
e
A. CONVEYOR SPEED (temporary setting)
The conveyor speed is programmable with a range from 0 to 99 with
0 being the slowest and 99 being the fastest. Each menu item can
have independent conveyor speed settings.
B. PROGRAMING VALUES FOR MENU ITEMS
To make a program change to the top heat, bottom heat, or conveyor
speed, you must rst be in the menu item you want changed. Example:
to change the programmed conveyor speed for bagels, the display
must read BAGEL. To change the programmed conveyor speed
for TOAST, the display must read TOAST and so on for each menu
item.
1) Select the menu item you want to change i.e. TST-1, TST-2,
TST-3, TST-4, TST-5, TST-6.
2) Press and hold both ( + ) AND ( - ) buttons for 3 seconds until
the display goes blank, release the buttons and the display
will show three characters for the menu item elected and the
last two characters for the current value setting, i.e. TST-1,
TST-2, TST-3, TST-4, TST-5, TST-6. The red L.E.D. light for
top heat at the bottom of the label will ash.
3) Press the ( + ) or ( - ) buttons to increase or decrease the
setting for the top heat.
4) Press the button for the menu button again and the red L.E.D.
for the bottom heat will ash.
5) Press the ( + ) or ( - ) buttons to increase or decrease the
setting for the bottom heat.
6) Press the button for the menu button again and the red L.E.D.
for the conveyor speed will ash.
7) Press the ( + ) or ( - ) buttons to increase or decrease the
setting for the conveyor speed.
8) To skip one feature setting with out making any changes,
press the menu item button one time and the red L.E.D. light
for the next item will now ash.
9) To change the POWER SAVER values press the SAVER
button or to save your new setting(s), and exit the program
mode press the menu button.
10) The last two characters in the display will show MN for
minutes.
11) The rst three characters will be numerical to represent the
time setting.
12) When set to “OFF” the Saver button will be disabled during
operation. The PowerSaver can be set to “OFF” or using the
( + ) or ( - ) set the time from 15 to 480 minutes.
13) Press the SAVER button to change the power reduction using
the ( + ) or ( - ) buttons to increase or decrease the setting.
14) Press the POWER SAVER button to save changes and to
exit.
CLEANING
Preventive maintenance for your Holman toaster consists of the
following recommended cleaning procedures. To keep your toaster
in its top operating condition, these steps should be performed on a
daily or weekly as indicated.
A. Clean air intake on bottom of unit.
B. For lightly soiled conveyor belts, turn conveyor speed control
to fastest setting (100) and wipe with a damp cloth (daily) For
heavily soiled conveyors, turn conveyor speed control to fastest
setting and wipe with a light abrasive pad (as needed).
C. Turn Unit OFF, Allow to Cool, disconnect from power.
D. After the unit cools, remove interior crumb tray (as shown
below) and clean. Slide crumb tray back into position.
E. Wipe exterior surface of unit.
DO NOT IMMERSE OR LET THE UNIT STAND
WARNING
WARNING
WARNING
IN WATER.
DO NOT HOSE DOWN THE UNIT OR THE
TABLE/COUNTER IF THE UNIT IS ON THE
TABLE/COUNTER.
KEEP AWAY FROM RUNNING WATER.
STAR INTERNATIONAL GROUP INC., COMPANY
Star - Holman - Lang - Wells - Bloomeld - Toastmaster
10 Sunnen Drive, St. Louis, MO 63143 U.S.A.
(314) 678-6303
www.star-mfg.com
Page 5
STAR/Holman TOASTER
PROGRAMMING GUIDE
Programming Guide
STANDARD SETTINGS
Factory
Default
Label and
Display
(TST-1) 1 9 10 90
(TST-2) 2 9 10 78
(TST-3) 3 9 10 66
(TST-4) 4 9 10 54
(TST-5) 5 9 10 42
(TST-6) 6 9 10 30
Button
Label
Top Heat Bottom Heat Conveyor Speed
Range: (0-10) Range: (0-10) Range: (0-100%)
Engineering Specification #V3022_P4_RevA 10/28/10 Page 1 of 2
Page 6

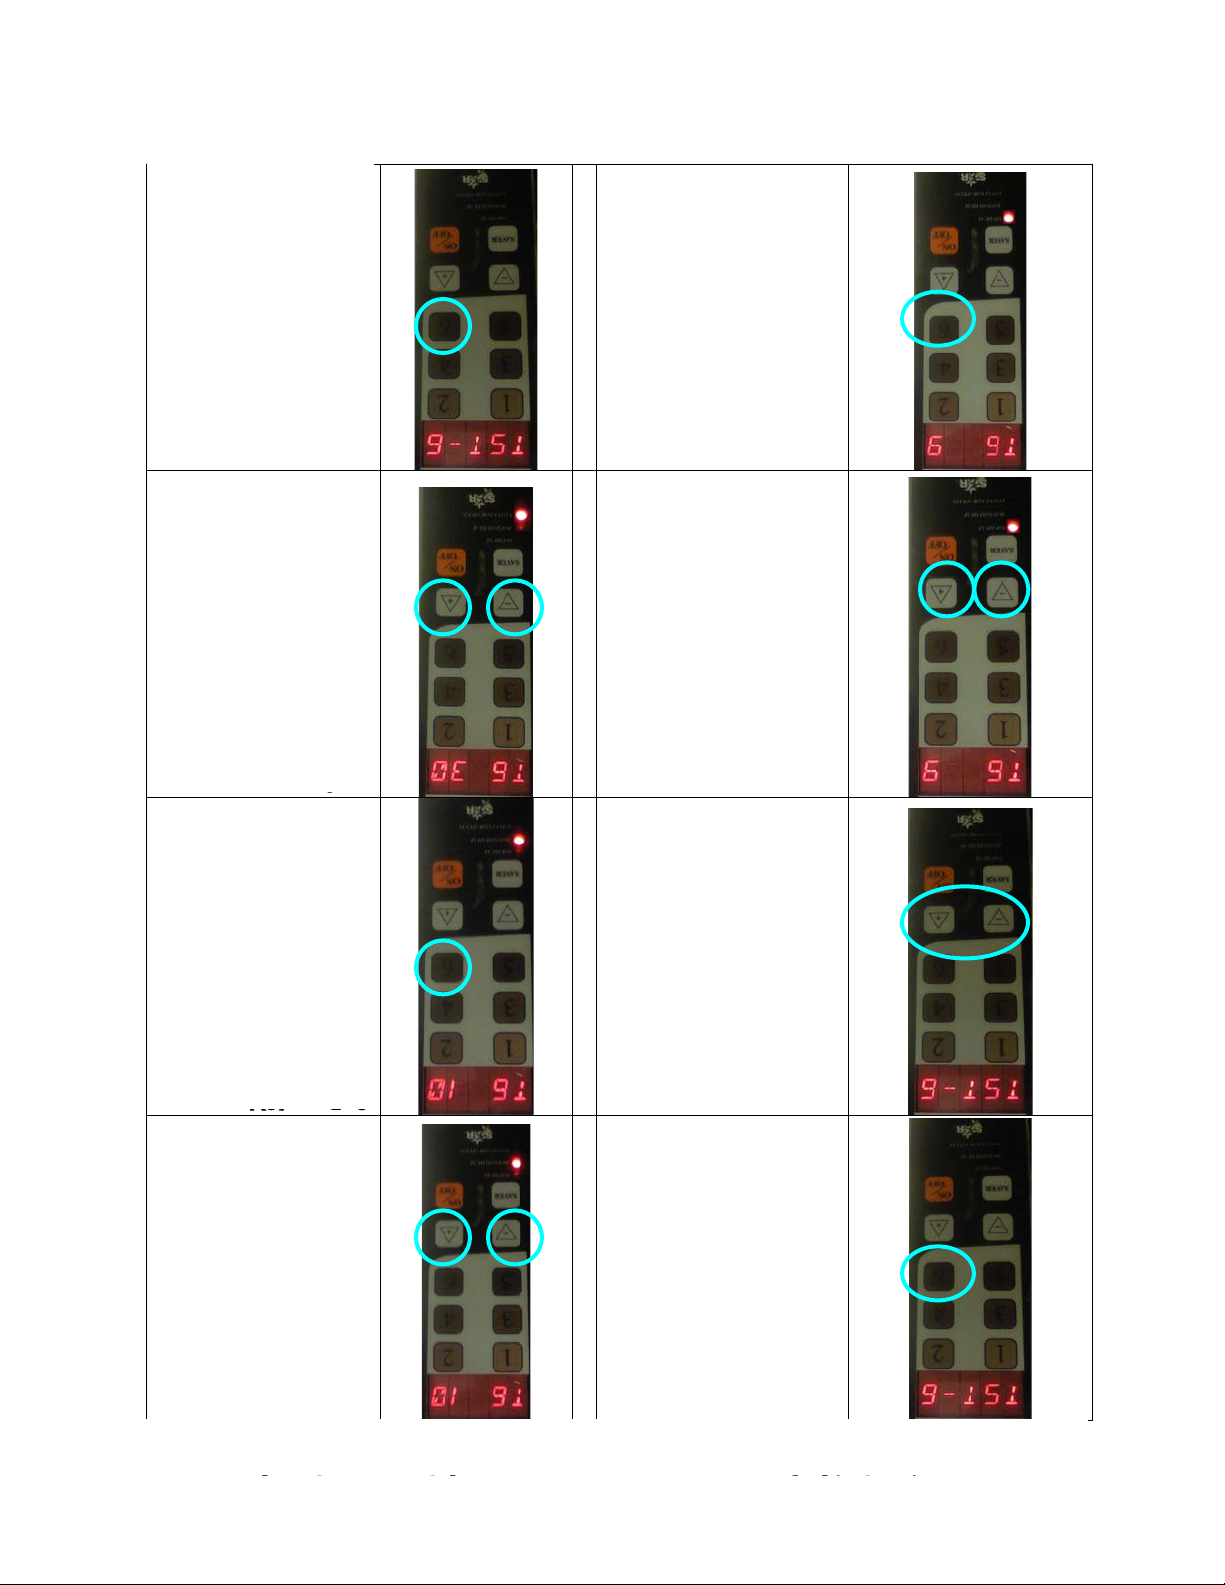
Programming Guide for Top Heat, Bottom Heat, and Conveyor Speed
Button #6 / TST-6
1. With the equipment
ON, and after the heat
up cycle: Press the
desired button to
program. In this
example, Press the [6]
button.
(NOTE: This guide
shows programming for
TST-6 [6] settings.
Repeat this process for
other buttons)
2. To enter the
program mode, press
and hold the up/plus “/\
+ ” and down/minus “\/
-” arrow buttons until
programming mode is
entered.
programming shown in example)
5. The current
programming value
for TST-6 [6] Bottom
Heat is displayed and
will flash below as
well. Use the up/plus
“/\ + ” and
down/minus “\/ -”
buttons to change the
Bottom Heat
10.
6. Press [6] button to
proceed to the next
setting.
value to
3. The current
programming value for
TST-6 [6] Top Heat
displayed and will flash
below as well. Use the
up/plus “/\ + ” and
down/minus “\/ -”
buttons to change the
Top Heat
value to 9.
is
4. Press [6] button to
proceed to the next
setting.
8. Press the TST-6 [6]
7. The current
programming value
for TST-6 [6]
Conveyor Speed
displayed and will
flash below as well.
Use the up/plus “/\ + ”
and down/minus “\/ -”
buttons to change the
Conveyor Speed
to 30.
Button to Exit the
programming. You
may repeat this entire
process for all 6
program buttons (1, 2,
3, 4, 5, 6) and
associated settings if
needed to match
values shown in the
table at the beginning
of this guide.
is
value
Engineering Specification #V3022_P4_RevA 10/28/10 Page 2 of 2
Page 7

STAR/HOLMAN RADIANT TOASTER: ARTISAN MUFFIN
Product / Operational Questions
1) Is the bread properly thawed?
>Frozen bread will toast lighter.
2) Is the bread past the expiration date?
>Older bread is dryer than newer bread. Older bread will toast darker (burnt).
3) Is the bread being loaded cut side up?
>Cut side up is the correct method.
>Cut side down will tend to burn the cut side and undertoast the non-cut side.
4) Is the color / quality toasting chart being utilized?
>Some black / burnt spots on the non-cut side, and around the edges are normal.
5) Is the toaster being heavily loaded with product?
>Heavy loading may tend the toaster to produce lighter toasting.
>Consider a darker setting temporarily if inserting more than (2) muffins at a time
consecutively.
6) Is the bread cut unevenly or abnormally?
>Thin slices will tend to overtoast or get burnt, possibly getting stuck in the
conveyor and catching on fire.
>Thick slices will tend to overtoast or get burnt on the cut side.
Equipment Questions
1) Is the toaster unit facing the drive thru window or another source of air?
>Facing a source of blowing air, like the drive-thru window will cause the hot air
to be blown out of the toaster. Air flowing in to the front of the toaster will tend
to cause inconsistency in the toaster and lighter toasting. Face toaster away from
blowing air sources.
2) Is the unit clean, and is the fan intake on the bottom of the toaster clear?
>A blocked fan intake will cause issues with the toaster, namely failure of the unit
and overheating of the toaster.
3) Are all of the elements inside glowing red on top and bottom (2 on top, 2 on
bottom)?
>Broken elements will not be glowing red, and will tend to toast light.
>Call for service
4) Is the store electrical voltage 208 V or 240 V, and does it match the unit’s tag and
model number?
> The unit must match the voltage in the store (240V or 208V)
ALL OTHER ISSUES: CALL FOR SERVICE
Page 8
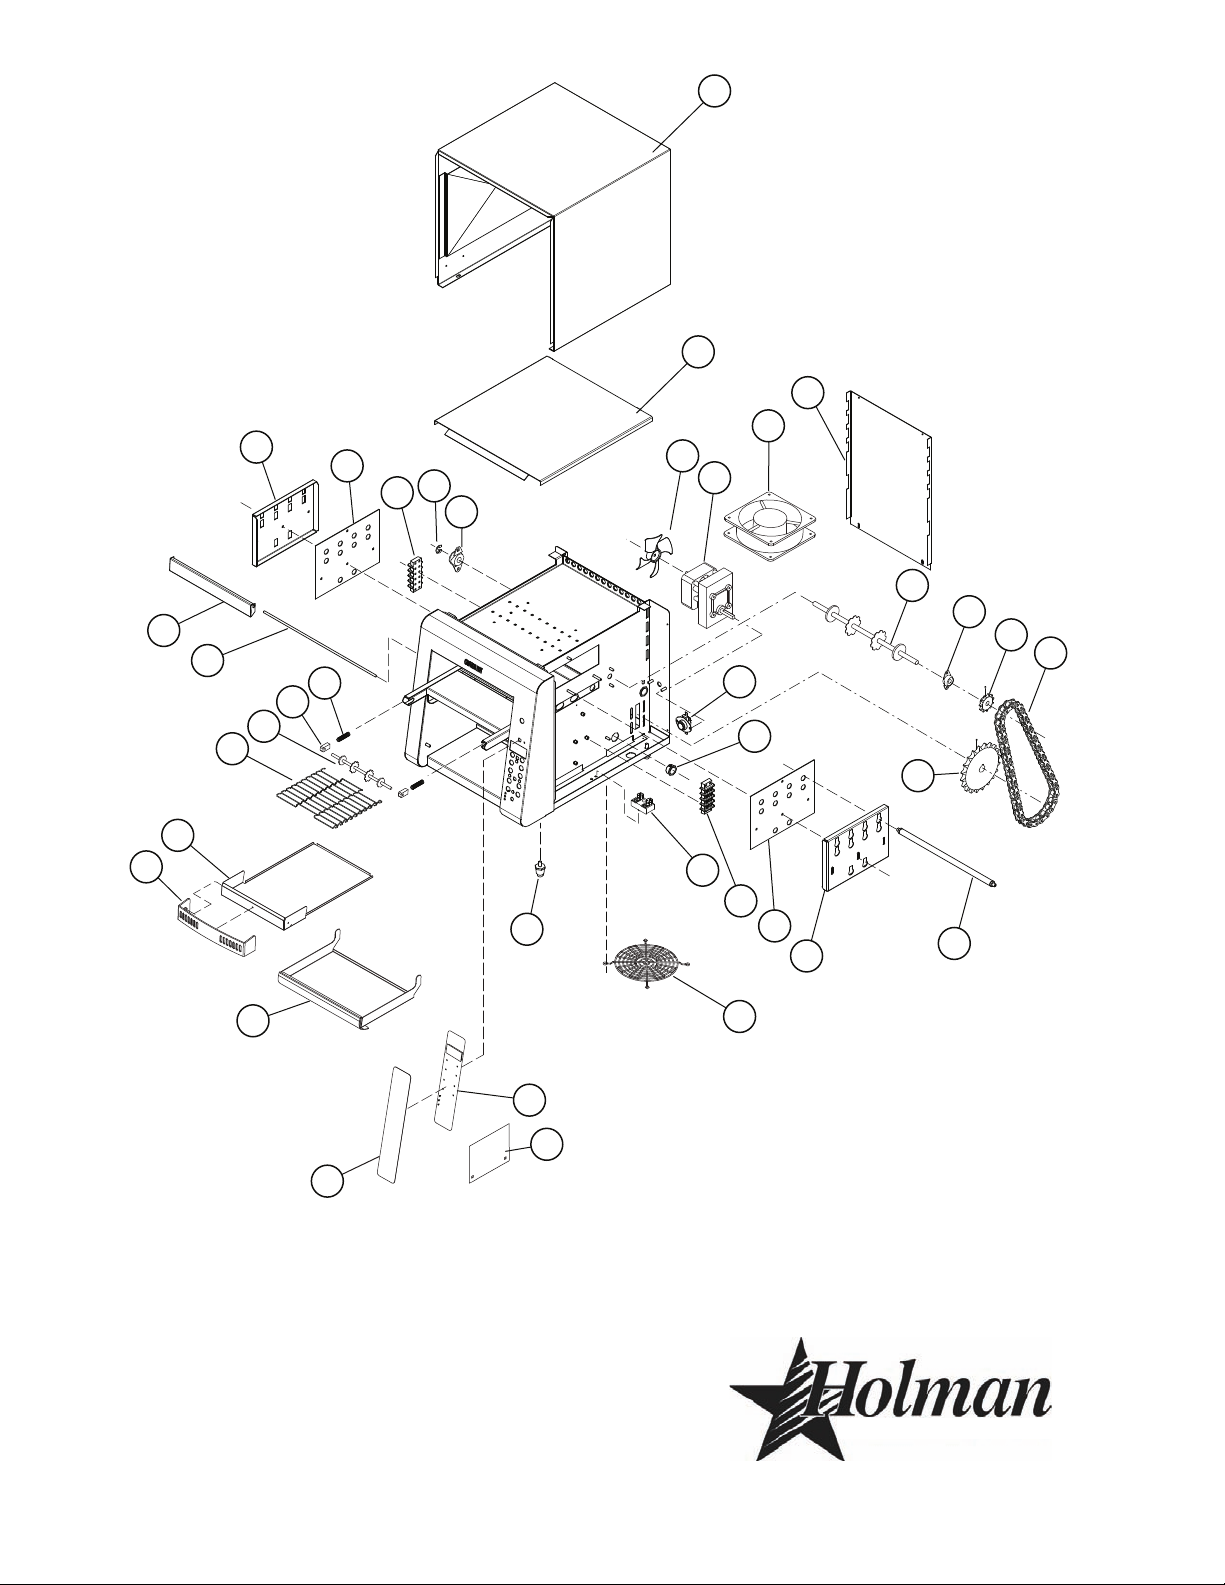
1
2
3
4
5
6
7
18
17
8
9
10
12
13
14
20
15
16
19
21
22
23
24
25
26
27
28
29
30
33
14
15
34
8
31
32
11
®
SK2521
Rev.- 6/13/11
Model
:
Q2E-600HW Conveyor Toaster
This drawing contains information confidential
to Star Manufacturing International, Inc.
No reproduction or disclosure of its
CERTAIN INSTANCES MAY NOT BE AVAILABLE
ILLUSTRATIVE PURPOSES ONLY AND IN
SOME ITEMS ARE INCLUDED FOR
contents is permitted.
Page 9
PARTS LIST June 13, 2011
MODEL: Q2E-600HW PARTS LIST
Fig No. Part Number Qty Description Application
1 HC-120258 1 ENCLOSURE ASSY - QCS-2 ALL
2 HB-120280 1 BAFFLE ASSEMBLY, HIGH ALL
3 2R-Z8879 1 FAN BLADE CCW BLACK ALL
4 HB-120262 1 MOTOR ASSY 208-240V ALL
5 2U-200560 1 FAN 240V ALL
6 HC-Z10412 1 BACK PANEL QCS-2 ALL
7 2A-202900 1 SHAFT, T710 DRIVE ALL
8 HA-112261 2 BEARING ASSY, 5/16 TEFLON ALL
9 2P-Z8779 1 SPROCKET 25P-11T .313 ID ALL
10 2P-150013 1 DRIVE CHAIN #25 ROLLER ALL
11 2P-200645 1 SPROCKET, 25B17 X 5/16 ALL
HO-197841
12
HO-197842 240V
13 HC-Z10390 1 ELEMENT RETAINER,RHT,QCS- ALL
14 HC-Z10388 2 ELEMENT GUIDE PLATE ALL
15 2E-Z10406 3 TERMINAL BLOCK 4 POS ALL
16 2E-Z9736 1 TERMINAL BLOCK - POWER ALL
17 2K-200464 2 BUSHING, WIRE RING 7/8” ALL
18 2E-200566 1 SWITCH, RESET, 0796 ALL
19 2R-200562 1 FAN GUARD ALL
20 2R-200709 4 LEG 1 INCH CHROME PLASTIC ALL
21 2E-Z13360 1 CONTROL BOARD Q2E-600HW ALL
22 2U-200592 1 QCSE POWER BOARD ALL
23 2M-Z13358 1 LABEL - CONTROL Q2E-600HW ALL
24 HA-100560 1 TRAY, PULL OUT, QCS, 10 ALL
25 2R-200787 1 QCS 1&2 CRUMB TRAY GUARD ALL
26 HB-120309 1 CRUMB TRAY ASSY Q2E-600HW ALL
27 SP-160027 1 BELT, CONVEYOR 10” ALL
28 2A-202904 1 SHAFT, 210HX IDLER ALL
29 2P-200700 2 BEARING-PTFE SPRING LOAD ALL
30 2P-200736 2 2 INCH BEARING SPRING ALL
31 HC-402134 1 NC10H SHUTTER ROD ALL
32 HC-402206 1 HEAT SHUTTER, SWINGING NC ALL
33 HC-Z10389 1 ELEMENT RETAINER,LFT,QCS- ALL
34 2A-200284 1 E-CLIP 5/16 ALL
AR 2M-Z10874 1 LABEL-W.D.,4 IN SERIES ALL
NI 2E-Z13364 1 CORD SET 14 GA. 6-20P 80” ALL
NI 2K-Y2968 1 BUSHING - HEYCO 7W-2 ALL
4 HEATERTUBE, QUARTZ
208V
Page 10

Page 11

Page 12

Page 13

®
MODEL:
QCSe 4 Tube wired Series
THIS DRAWING CONTAINS INFORMATION CONFIDENTIAL TO STAR MFG. INT'L. INC.
NO REPRODUCTION OR DISCLOSURE OF ITS CONTENTS IS PERMITTED.
SK2282 Rev - 7/2007
4
WHITE
3
BLACK
2
BLACK
1
BLACK
5
BLACK
7
BLACK
8 WHITE
6
WHITE
QCSe
OT1
HT1
HB1
F1
M1
L1
120V
OT2
F2
L2
M2
120V
240V
240V
HT2
HB2
TOP HEAT
BOTTOM HEAT
19
Page 14

TOUS LES AUTRES PROBLÈMES : APPELEZ LE SERVICE
> L’unité doit correspondre à la tension dans le magasin (240 V ou 208 V)
modèle de l’unité?
4) La tension électrique du magasin est-elle de 208 V ou 240 V et correspond-elle à l’étiquette et au numéro de
>Appelez le service
>Les éléments cassés ne luisent pas en rouge et tendent à griller légèrement.
3) Tous les éléments à l’intérieur luisent-ils d’une lumière rouge en haut et en bas (2 en haut, 2 en bas)?
et une surchauffe du grille-pain.
>Une entrée de ventilateur bloquée provoque des problèmes du grille-pain, notamment une panne de l’unité
2) L’unité est-elle propre et l’entrée du ventilateur au bas du grille-pain est-elle libre?
pain, qui grille aussi plus légèrement. Placez-le à l’écart de sources d’air soufant.
expulsé du grille-pain. L’air qui passe à l’avant du grille-pain provoque une performance irrégulière du grille-
>En cas de position face à une source d’air soufant telle que la fenêtre du service à l’auto, l’air chaud est
1) Le grille-pain est-il face à la fenêtre du service à l’auto ou une autre source d’air?
Questions relatives à l’équipement
>Les tranches épaisses ont tendance à trop griller ou à brûler du côté coupé.
feu.
>Les tranches nes ont tendance à trop griller ou brûler, peuvent être coincées dans le convoyeur et prendre
6) Le pain est-il coupé de manière irrégulière ou anormale?
consécutive.
>Envisagez temporairement un réglage plus foncé si vous insérez plus de (2) mufns à la fois de manière
>S’il est lourdement chargé, le grille-pain a tendance à griller plus légèrement.
5) Le grille-pain est-il lourdement chargé de produit?
>Quelques points noirs / brûlés du côté non coupé et sur les bords sont normaux.
4) Le tableau de couleur / qualité de toast est-il utilisé?
>Le côté coupé vers le bas a tendance à brûler le côté coupé et à ne pas assez griller le côté non coupé.
>Le côté coupé vers le haut est la bonne méthode.
3) Le pain est-il chargé avec le côté coupé vers le haut?
>Le vieux pain est plus sec que le pain nouveau. Le vieux pain grille plus foncé (brûlé).
2) Le pain a-t-il dépassé la date limite de conservation?
>Le pain congelé grillera plus légèrement.
1) Le pain est-il correctement décongelé?
Questions sur le produit / l’utilisation
GRILLE-PAIN À CHALEUR RAYONNANTE STAR/HOLMAN : MUFFIN ARTISANAL
Page 15
Engineering Specification #V3022_P4_RevA 10/28/10 Page 2 of 2
Programming Guide for Top Heat, Bottom Heat, and Conveyor Speed
Button #6 / TST-6
programming shown in example)
1. With the equipment
ON, and after the heat
up cycle: Press the
desired button to
program. In this
example, Press the [6]
button.
(NOTE: This guide
shows programming for
TST-6 [6] settings.
Repeat this process for
other buttons)
5. The current
programming value
for TST-6 [6] Bottom
Heat is displayed and
will flash below as
well. Use the up/plus
“/\ + ” and
down/minus “\/ -”
buttons to change the
Bottom Heat
value to
10.
2. To enter the
program mode, press
and hold the up/plus “/\
+ ” and down/minus “\/
-” arrow buttons until
programming mode is
entered.
6. Press [6] button to
proceed to the next
setting.
3. The current
programming value for
TST-6 [6] Top Heat
is
displayed and will flash
below as well. Use the
up/plus “/\ + ” and
down/minus “\/ -”
buttons to change the
Top Heat
value to 9.
7. The current
programming value
for TST-6 [6]
Conveyor Speed
is
displayed and will
flash below as well.
Use the up/plus “/\ + ”
and down/minus “\/ -”
buttons to change the
Conveyor Speed
value
to 30.
4. Press [6] button to
proceed to the next
setting.
8. Press the TST-6 [6]
Button to Exit the
programming. You
may repeat this entire
process for all 6
program buttons (1, 2,
3, 4, 5, 6) and
associated settings if
needed to match
values shown in the
table at the beginning
of this guide.
début de ce guide.
dans le tableau au
les valeurs indiquées
faire correspondre
associés s’il faut
les p ara mèt res
(1, 2, 3, 4, 5, 6) et
de programmation
pour les 6 boutons
de ce processus
répéter l’ensemble
V o u s p o u v e z
la programmation.
TST-6 [6] pour quitter
8. Appuyez sur le bouton
sur 30.
vitesse du convoyeur
modier la valeur de la
bas/moins « \/ - » pour
haut/plus « /\ + » et
Utilisez les touches
également en bas.
[6] s’afche et clignote
du convoyeur TST-6
actuelle de la vitesse
p ro g r a m m a t i o n
7 . La v al e ur d e
paramètre suivant.
[6] pour passer au
4. Appuyez sur le bouton
9.
chaleur supérieure sur
modier la valeur de la
bas/moins « \/ - » pour
haut/plus « /\ + » et
bas. Utilisez les touches
clignote également en
TST-6 [6] s’afche et
de la chaleur supérieure
programmation actuelle
3. L a v a le u r d e
paramètre suivant.
[6] pour passer au
6. Appuyez sur le bouton
sur 10.
la chaleur inférieure
modier la valeur de
bas/moins « \/ - » pour
haut/plus « /\ + » et
Utilisez les touches
également en bas.
s’afche et clignote
inférieure TST-6 [6]
actuelle de la chaleur
pr o g ra m m a ti o n
5. La v a le u r de
de programmation.
jusqu’à entrer en mode
+ » et bas/moins « \/ - »
échées haut/plus « /\
maintenez les touches
a p p u y e z s u r e t
de pro gram mati on,
2. Pour entrer en mode
boutons)
po ur le s au tr es
Répétez ce processus
paramètres TST-6 [6].
programmation des
: ce guide montre la
bouton [6]. (REMARQUE
exemple, appuyez sur le
programmer. Dans cet
bouton souhaité pour
A p pu y ez s ur l e
cycle de chauffage :
MARCHE et après le
1. Avec l’équipement en
Bouton de programmation No.6 / TST-6 montré dans l’exemple)
Guide de programmation pour la chaleur supérieure, chaleur inférieure et vitesse du convoyeur
Page 16

convoyeur
Vitesse du
inférieure
Chaleur
Plage : (0-10) Plage : (0-10) Plage : (0-100%)
supérieure
Chaleur
6 9 10 30
5 9 10 42
4 9 10 54
3 9 10 66
2 9 10 78
1 9 10 90
bouton
(TST-6)
(TST-5)
(TST-4)
(TST-3)
(TST-2)
(TST-1)
d’usine par défaut
Étiquette de
Guide de programmation ; paramètres standard
Étiquette et afchage
PROGRAMMING GUIDE
STAR/Holman TOASTER
Page 17

Q
C
S
¨
e
www.star-mfg.com
(314) 678-6303
AVERTISSEMENT
AVERTISSEMENT
AVERTISSEMENT
NETTOYAGE
10 Sunnen Drive, St. Louis, MO 63143 U.S.A.
Star - Holman - Lang - Wells - Bloomeld - Toastmaster
STAR INTERNATIONAL GROUP INC., COMPANY
MAINTENEZ À L’ÉCART DE L’EAU COURANTE.
SI L’UNITÉ EST SUR LA TABLE/LE COMPTOIR.
N’ARROSEZ PAS L’UNITÉ OU LA TABLE/LE COMPTOIR
DANS L’EAU.
N’IMMERGEZ PAS L’UNITÉ ET NE LA PLACEZ PAS
E. Essuyez la surface extérieure de l’unité.
le ramasse-miettes en position.
(comme indiqué ci-dessous) et nettoyez. Glissez de nouveau
D. Quand l’unité est refroidie, retirez le ramasse-miettes intérieur
l’alimentation.
C. Éteignez l’unité, laissez-la refroidir, déconnectez de
avec un tampon légèrement abrasif (si nécessaire).
vitesse du convoyeur sur le paramètre le plus rapide et essuyez
Pour les convoyeurs fortement souillés, réglez la commande de
rapide (100) et essuyez avec un chiffon humide (chaque jour).
commande de vitesse du convoyeur sur le paramètre le plus
B. Pour les courroies de transport légèrement souillées, placez la
A. Nettoyez l’entrée d’air au bas de l’unité.
être effectuées chaque jour ou semaine, selon l’indication.
votre grille-pain dans un état de marche optimal, ces étapes doivent
procédures de nettoyage recommandées suivantes. Pour maintenir
La maintenance préventive pour votre grille-pain Holman comporte les
pour enregistrer les modications et quitter.
14) Appuyez sur le bouton ÉCONOMISEUR D’ÉLECTRICITÉ
augmenter ou diminuer le paramètre.
réduction d’alimentation avec les boutons ( + ) ou ( - ) pour
13) Appuyez sur le bouton ÉCONOMISEUR pour modier la
( - ), réglez le temps de 15 à 480 minutes.
d’électricité peut être réglé sur « ARRÊT » ou avec le ( + ) ou
est désactivé pendant le fonctionnement. L’économiseur
12) Quand il est réglé sur « ARRÊT », le bouton de l’économiseur
le paramètre de temps.
11) Les trois premiers caractères sont numériques pour représenter
minutes.
10) Les deux derniers caractères à l’écran afchent MN pour les
appuyez sur le bouton de menu.
nouveau(x) paramètre(s) et quitter le mode de programmation,
appuyez sur le bouton ÉCONOMISEUR ou pour enregistrer vos
9) Pour modier les valeurs de l’ÉCONOMISEUR D’ÉLECTRICITÉ,
menu et la DEL rouge de l’élément suivant clignote.
changement, appuyez une fois sur le bouton de l’élément de
8) Pour passer un réglage de fonction sans effectuer de
diminuer le paramètre de la vitesse du convoyeur.
7) Appuyez sur les boutons ( + ) ou ( - ) pour augmenter ou
de la vitesse du convoyeur clignote.
6) Appuyez de nouveau sur le bouton du menu et la DEL rouge
diminuer le paramètre de la chaleur inférieure.
5) Appuyez sur les boutons ( + ) ou ( - ) pour augmenter ou
de la chaleur inférieure clignote.
4) Appuyez de nouveau sur le bouton du menu et la DEL rouge
diminuer le paramètre de la chaleur supérieure.
3) Appuyez sur les boutons ( + ) ou ( - ) pour augmenter ou
l’étiquette clignote.
TST-6. La DEL rouge pour la chaleur supérieure au bas de
de valeur actuel, c.-à-d. TST-1, TST-2, TST-3, TST-4, TST-5,
sélectionné et les deux derniers caractères pour le paramètre
et l’écran afche trois caractères pour l’élément de menu
secondes jusqu’à ce que l’écran soit vide, relâchez les boutons
2) Appuyez et maintenez les boutons ( + ) ET ( - ) pendant 3
c.-à-d. TST-1, TST-2, TST-3, TST-4, TST-5, TST-6.
1) Sélectionnez l’élément de menu que vous souhaitez modier,
suite pour chaque élément de menu.
programmée sur TOAST, l’écran doit afcher TOAST, et ainsi de
l’écran doit afcher BAGEL. Pour modier la vitesse du convoyeur
modier la vitesse du convoyeur programmée pour les baguels,
l’élément de menu que vous souhaitez modier. Exemple : pour
inférieure ou la vitesse du convoyeur, vous devez d’abord être dans
Pour modier la programmation de la chaleur supérieure, la chaleur
DE MENU
B. VALEURS DE PROGRAMMATION POUR LES ÉLÉMENTS
peut avoir des paramètres de vitesse du convoyeur indépendants.
0 étant la plus lente et 99 la plus rapide. Chaque élément de menu
La vitesse du convoyeur est programmable dans une plage de 0 à 99,
A. VITESSE DU CONVOYEUR (paramètre temporaire)
PROGRAMMATION
Page 18

TST-1, TST-2, TST-3, TST-4, TST-5,
DÉMARRAGE
EN UTILISANT CETTE UNITÉ.
FONCTIONNEMENT, FAITES ATTENTION
EXTRÊMEMENT CHAUDES PENDANT LE
CERTAINES SURFACES SONT
CONSEILS D’UTILISATION ET SÉCURITÉ
UTILISATION QUOTIDIENNE
sélectionné).
2, TST-3, TST-4, TST-5, TST-6 sera le dernier programme
programme utilisée (pour le démarrage initial, TST-1, TST-
l’usine).
d’entraînement fonctionne sur le paramètre par défaut de
précédemment enregistré (pour le démarrage initial, le moteur
le convoyeur commence à tourner selon le paramètre
et le moteur du ventilateur ne s’activent pas).
s’afche (les éléments commencent à luire mais le convoyeur
le grille-pain. Le grille-pain entre en préchauffage et PREHT
carbonisation des particules de nourriture et du lm de graisse.
utilisée ou pendant les périodes d’inactivité. Ceci provoquerait la
Ne laissez pas l’unité à température élevée quand elle n’est pas
Ne laissez pas l’unité fonctionner sans surveillance.
à la n de chaque jour d’utilisation.
Déconnectez l’alimentation de l’unité avec le bouton MARCHE/ARRÊT
TST-6.
être enfoncés pour passer à
Quand le grille-pain a été préchauffé, les boutons de menu peuvent
MARCHE/ARRÊT soit de nouveau enfoncé.
Après cinq minutes, le mot OFF s’afche jusqu’à ce que le bouton
mots COOL et DOWN s’afchent alternativement pendant ce temps.
et du convoyeur continuent de fonctionner pendant cinq minutes. Les
REMARQUE : quand le grille-pain est arrêté, les moteurs du ventilateur
pain.
Appuyez une deuxième fois sur le bouton pour éteindre le grillegrille-pain.
Appuyez une fois sur le bouton MARCHE/ARRÊT pour allumer le
dans une prise appropriée.
Contrôlez le cordon d’alimentation an de vous assurer qu’il est branché
C. Après quatre minutes, l’écran afche la dernière sélection de
B. Après une minute, le moteur du ventilateur s’active et
d’inactivité pendant une période programmée.
A. Appuyez une fois sur le bouton MARCHE/ARRÊT pour allumer
adaptée, le mot OFF s’afche sur l’écran DEL.
Quand le grille-pain a été branché dans une prise et une alimentation
d’électricité.
ATTENTION
chaleur inférieure ou vitesse du convoyeur est ajustée.
panneau de commande indique si la valeur de chaleur supérieure,
Une DEL rouge située dans la partie inférieure de l’étiquette du
valeur de chaque paramètre programmable.
Deux boutons (+) et (-) sont utilisés pour augmenter ou diminuer la
mode d’économie.)
d’économie. (Remarque : le convoyeur peut avancer lentement en
L’opérateur peut régler le niveau de baisse d’électricité pour le mode
AUTO : L’économiseur d’électricité s’allume en cas
MARCHE
ARRÊT : Le mode d’économie d’électricité est désactivé.
MARCHE : L’unité est pré-programmée sur le paramètre d’économie
Il existe trois modes d’économie d’électricité :
procédures de programmation.
a été désactivé à l’usine, il peut être activé à travers les
REMARQUE : cet interrupteur d’économie d’électricité
INTERRUPTEUR D’ÉCONOMIE D’ÉLECTRICITÉ
Page 19

90
convoyeur
Vitesse du
inférieure
Chaleur
50% 50% ARRÊT
9 10
supérieure
Chaleur
QCSE-2-600HW
PARAMÈTRES PAR DÉFAUT
ÉCONOMISEUR*
TST - 6 30
TST - 5 42
TST - 4 54
TST - 3 66
TST - 2 78
TST - 1
de menu
Boutons
MAINTENEZ À L’ÉCART DE L’EAU COURANTE.
SI L’UNITÉ EST SUR LA TABLE/LE COMPTOIR.
N’ARROSEZ PAS L’UNITÉ OU LA TABLE/LE COMPTOIR
AVERTISSEMENT
DANS L’EAU.
N’IMMERGEZ PAS L’UNITÉ ET NE LA PLACEZ PAS
ATTENTION
ATTENTION EN UTILISANT CETTE UNITÉ.
CHAUDES PENDANT LE FONCTIONNEMENT, FAITES
CERTAINES SURFACES SONT EXTRÊMEMENT
AVERTISSEMENT
PLAQUE SIGNALÉTIQUE DE L’UNITÉ.
CA SPÉCIALE UNIQUEMENT SPÉCIFIÉE SUR LA
CONNECTEZ/BRANCHEZ L’UNITÉ À UNE LIGNE
sont les suivants :
Les paramètres par défaut de l’usine
Appuyez sur 6 et TST-6 s’afche
Appuyez sur 5 et TST-5 s’afche
Appuyez sur 4 et TST-4 s’afche
Appuyez sur 3 et TST-3 s’afche
Appuyez sur 2 et TST-2 s’afche
Appuyez sur 1 et TST-1 s’afche
paramètres à tout moment.
TST-6. L’opérateur peut modier ces
TST-1, TST-2, TST-3, TST-4, TST-5,
par défaut programmés à l’usine pour
QCSe est livré avec des paramètres
Le grille-pain à convoyeur Holman
AVERTISSEMENT
BROCHE DE TERRE DE LA PRISE.
NE COUPEZ OU RETIREZ PAS CETTE PRISE OU
du personnel.
mauvaise mise à la terre peut provoquer des blessures ou décès
l’alimentation sans des connexions à la terre appropriées. Une
est correctement raccordée. Ne connectez pas l’équipement à
Soyez absolument certain que la connexion de terre du réceptacle
d’installer ou de retirer des pièces.
Déconnectez l’unité de la source d’alimentation avant
AVERTISSEMENT
www.star-mfg.com/scripts/manuals.aspx.
l’adresse
dans le manuel d’Installation et utilisation, pouvant être téléchargé à
indiquées sur la plaque signalétique. Un schéma de câblage est inclus
que l’alimentation est adaptée à la tension, l’ampérage et les exigences
Avant d’effectuer tout raccordement électrique sur cette unité, vériez
CONNEXION ÉLECTRIQUE
Page 20

les formulaires de réclamation nécessaires.
IL2370
l’inspection. Le transporteur effectuera une inspection et fournira
2M-Z13413-FR, Rev. - 6/14/2012
U.S.A.
St. Louis, MO 63143
10 Sunnen Drive
Mailing Address: Holman Manufacturing
Courriel : www.star-mfg.com
Warranty@star-mfg.com
Service@star-mfg.com
E-mail: Parts@star-mfg.com
Téléphone : (314) 678-6303
Heures d’ouverture : 8h à 16h30. Heure Normale du Centre
que la tension.
indiquez le numéro de modèle et de série de votre unité, ainsi
par écrit, téléphone ou télécopie. Dans toute correspondance,
tout équipement Holman, contactez notre département de service
Si vous avez besoin d’aide pour l’utilisation ou la maintenance de
Inc. ou de nos agents autorisés..
doivent être achetés auprès de Star Manufacturing International,
service près de chez vous. Les ensembles de cordon de rechange
www.star-mfg.com/scripts/manuals.aspx pour trouver un agent de
service locale pour le service ou la maintenance requise. Allez à
Contactez l’usine, un représentant de service ou une entreprise de
MAINTENANCE ET RÉPARATIONS
sur l’unité et suivez leurs instructions.
et affecter la performance du grille-pain. Lisez toutes les étiquettes
miettes soit correctement placé. Ceci peut provoquer une surchauffe
ventilation adaptée. N’utilisez pas l’unité sans que le ramasseLaissez sufsamment d’espace autour du grille-pain pour une
avec un chiffon humide.
Avant d’utiliser l’unité pour la première fois, essuyez l’extérieur
1/2 po d’ajustement).
Nivelez l’unité à l’aide des pieds réglables sous l’unité (environ
local autorisé pour le service ou la maintenance requise.
garantie. Pour obtenir de l’aide, contactez votre agent de service
le remplacement du cordon d’alimentation et de la prise annulent la
contactez un électricien qualié avant d’utiliser l’unité. Le retrait et
d’ampères. Si une alimentation électrique inappropriée est fournie,
prise standard spéciée pour cette tension et cette consommation
L’unité a été livrée entièrement montée et prête à brancher dans une
INFORMATIONS D’INSTALLATION GÉNÉRALES
AVIS
d’autres documents.
manuel d’installation et d’utilisation de cette unité, la garantie et
www.star-mfg.com/scripts/manuals.aspx pour obtenir le
Allez à :
le manuel qui accompagne l’appareil.
d’utilisation et de maintenance importantes dans
l’utilisateur de la présence de consignes
Ces symboles sont conçus pour prévenir
ainsi que les matériaux d’emballage externes et internes pour
un délai de 15 jours. Assurez-vous de conserver tout le contenu
pour dégât caché doit être déposée auprès du transporteur dans
avant la n du déballage de l’équipement, une demande d’inspection
Dégât ou perte caché - si un dégât ou une perte n’est pas apparent
doit être déposée auprès du transporteur de livraison.
reçu endommagé, de manière apparente ou cachée, une réclamation
garantir la livraison de votre unité en parfait état. Si l’équipement est
cachés. Cette unité a été testée et emballée avec soin an de
déterminer s’ils présentent des dégâts de transport visibles ou
Tous les conteneurs de livraison doivent être contrôlés an de
l’unité avant de l’utiliser.
son utilisation comprennent le fonctionnement et la sécurité de
en service. Assurez-vous que toutes les personnes associées à
les instructions et étiquettes associées à l’unité avant de la mettre
Avant d’utiliser votre nouvel équipement, lisez et comprenez toutes
public dans des lieux de service gastronomique.
dans ou autour du foyer, ni pour une utilisation directe par le grand
utilisation et n’est pas vendu pour une utilisation par le consommateur
uniquement pour du personnel formé et expérimenté dans son
Cet équipement est conçu et vendu à des ns commerciales
AVIS
INFORMATIONS DE SÉCURITÉ GÉNÉRALES
liés à cette utilisation.
des informations fournies, l’utilisateurs assume tous les risques
conclusions obtenues suite à l’utilisation des spécications. À l’aide
des erreurs ou omissions dans les informations fournies ou les
des informations exactes, nous ne sommes pas responsables
Manufacturing fasse preuve de bonne volonté et s’efforce de fournir
che peuvent être modiées sans avis préalable. Bien que Holman
procédures, politiques et régulations, les spécications de cette
En raison de modications périodiques des conceptions, méthodes,
acheté précédemment.
compléments ou remplacements correspondants pour l’équipement
donnent pas droit à l’acheteur aux modications, améliorations,
conception du produit sans avis préalable. Ces révisions ne
Holman se réserve le droit de modier les spécications et la
par l’usine Holman dégage le fabricant de toute responsabilité.
L’utilisation de toute autre pièce qu’une pièce authentique fournie
Consignes d’installation des grille-pain à convoyeur
Commandes électroniques
Grille-pain à convoyeur
QCSE-2-600HW
MODÈLE
 Loading...