

Holman QCS2-1200B Installation Manual

®
®
®
®
CONVEYOR
TOASTER
MODEL
QCS2, QCSe2, RCS2, R2e SERIES
QCS3, QCSe3 SERIES
®
Installation and
Operation
Instructions
2M-Z10651 Rev. G 1/26/2015
Q2-600H-208V
1

2
SAFETY SYMBOL
Using any part other than genuine Star factory supplied parts relieves the
manufacturer of all liability.
Star reserves the right to change specications and product design without
notice. Such revisions do not entitle the buyer to corresponding changes,
improvements, additions or replacements for previously purchased
equipment.
Due to periodic changes in designs, methods, procedures, policies and
regulations, the specications contained in this sheet are subject to change
without notice. While Star International Holdings Inc., Company exercises
good faith efforts to provide information that is accurate, we are not
responsible for errors or omissions in information provided or conclusions
reached as a result of using the specications. By using the information
provided, the user assumes all risks in connection with such use.
These symbols are intended to alert the user to the presence of
important operating and maintenance instructions in the manual
accompanying the appliance.
RETAIN THIS MANUAL FOR FUTURE REFERENCE
NOTICE
MAINTENANCE AND REPAIRS
Contact your local authorized service agent for service or required maintenance.
Please record the model number, serial number, voltage and purchase date in the area below and have it
ready when you call to ensure a faster service.
Authorized Service Agent Listing
Model No.
Serial No.
Voltage
Purchase Date
Reference the listing provided with the unit
or
for an updated listing go to:
Website: www.star-mfg.com
E-mail customerservice@star-mfg.com
Service Help Desk
Business 8:00 am to 4:30 p.m. Central Standard Time
Hours:
Telephone: (314) 678-6303
Fax: (314) 781-2714
E-mail customerservice@star-mfg.com
Website: www.star-mfg.com
Mailing Address: Star International Holdings Inc., Company
10 Sunnen Drive
St. Louis, MO 63143
U.S.A
2

TABLE OF CONTENTS
General Installation Data ......................................................4
Uncrating & Inspection ......................................................... 4
Assembly & Installation .......................................................4
Electrical Connection ............................................................ 4
QCS & RCS
Operation ............................................................................. 5
Cooking Procedures ............................................................5
Toaster Components ............................................................ 5
Daily Operation ...................................................................6
Operating Hints & Safety .................................................... 6
QCSe & RCSe
QCSe Operation ..................................................................7
Start-up ................................................................................8
Daily Operation ...................................................................8
Operating Hints & Safety .................................................... 8
Toaster Components ............................................................ 8
Programing
Conveyor Speed ................................................................. 9
Programing Values for Menu Items ...................................9
Cleaning ...............................................................................10
Maintenance Procedures ...................................................... 11
Trouble Shooting Guide .......................................................12
Warranty ............................................................................... 13
Wiring Diagrams
QCS2 & 3, RCS2 & 3, wired series ...................................14
QCS2 & 3, RCS2 & 3, wired parallel ................................14
QCS2 & 3, RCS2 &3, 3 wired in series .............................15
QCS2, RCS2 w/fan switch series ....................................... 15
QCS2 & 3, RCS2 & 3, 3 wired in series w/bun mode .......16
QCSe, 4 wired in series ......................................................16
QCSe, 6 wired in series ......................................................17
QCSe, 6 wired in parallel ...................................................17
QCS3, 6 wired in series, with fuses ....................................18
R2-600N & R2-600BN ......................................................18
Exploded View / Parts List
R2-600N (Narrow) .............................................................20
QCS2 & 3, RCS2 & 3 ........................................................22
3

CAUTION
GENERAL INSTALLATION DATA
This equipment is designed and sold for commercial use only by personnel trained and experienced
in its operation and is not sold for consumer use in and around the home nor for use directly by the
general public in food service locations.
Before using your new equipment, read and understand all the instructions & labels associated with
the unit prior to putting it into operation. Make sure all people associated with its use understand the
units operation & safety before they use the unit.
All shipping containers should be checked for freight damage both visible and concealed. This
unit has been tested and carefully packaged to insure delivery of your unit in perfect condition. If
equipment is received in damaged condition, either apparent or concealed, a claim must be made
with the delivering carrier.
Concealed damage or loss - if damage or loss is not apparent until after equipment is unpacked, a
request for inspection of concealed damage must be made with carrier within 15 days. Be certain to
retain all contents plus external and internal packaging materials for inspection. The carrier will make
an inspection and will supply necessary claim forms.
INSPECTION & ASSEMBLY
UNCRATING AND INSPECTING
Unpack the unit and components from the shipping container. Remove all visible packing material
and those from inside the cooking chamber. If damage is discovered, le a claim immediately with
the carrier that handled the shipment. Do not operate the unit if it was damaged during shipping.
ASSEMBLY AND INSTALLATION
The unit was shipped fully assembled and ready to plug into a standard outlet specied for its voltage
and amp draw. If improper electrical supply is determined, contact a qualied electrician prior to using
the unit. Removal and replacement of the power cord and plug will void the warranty. For assistance,
contact your local authorized service agent for service or required maintenance.
Level unit using the adjustable feet under the unit (approximately 1/2" adjustment).
Before using the unit for the rst time, wipe down the exterior with a damp cloth.
Allow enough space around the toaster for adequate ventilation. Do not operate the unit without the
crumb tray properly positioned. Overheating and poor toasting may occur. Read all labels on the unit
and follow their instructions.
CAUTION
WARNING
WARNING
ELECTRICAL CONNECTION
Before making any electrical connection to this unit, check that the power supply is adequate for the
voltage, amperage and requirements stated on the rating plate.
A wiring diagram is included herewith.
Disconnect the unit from the power source before installing or removing any parts.
Be absolutely sure that the ground connection for the receptacle is properly wired. Do not connect
equipment to power without proper ground connections. Improper grounding may result in personal
injury or fatality.
DO NOT CUT OR REMOVE THIS PLUG OR GROUNDING PRONG FROM THE
PLUG.
CONNECT/PLUG UNIT INTO DEDICATED A.C. LINE ONLY SPECIFIED ON THE
DATA PLATE OF THE UNIT.
4
CAUTION
Q
C
S
®
e
LOAD UP
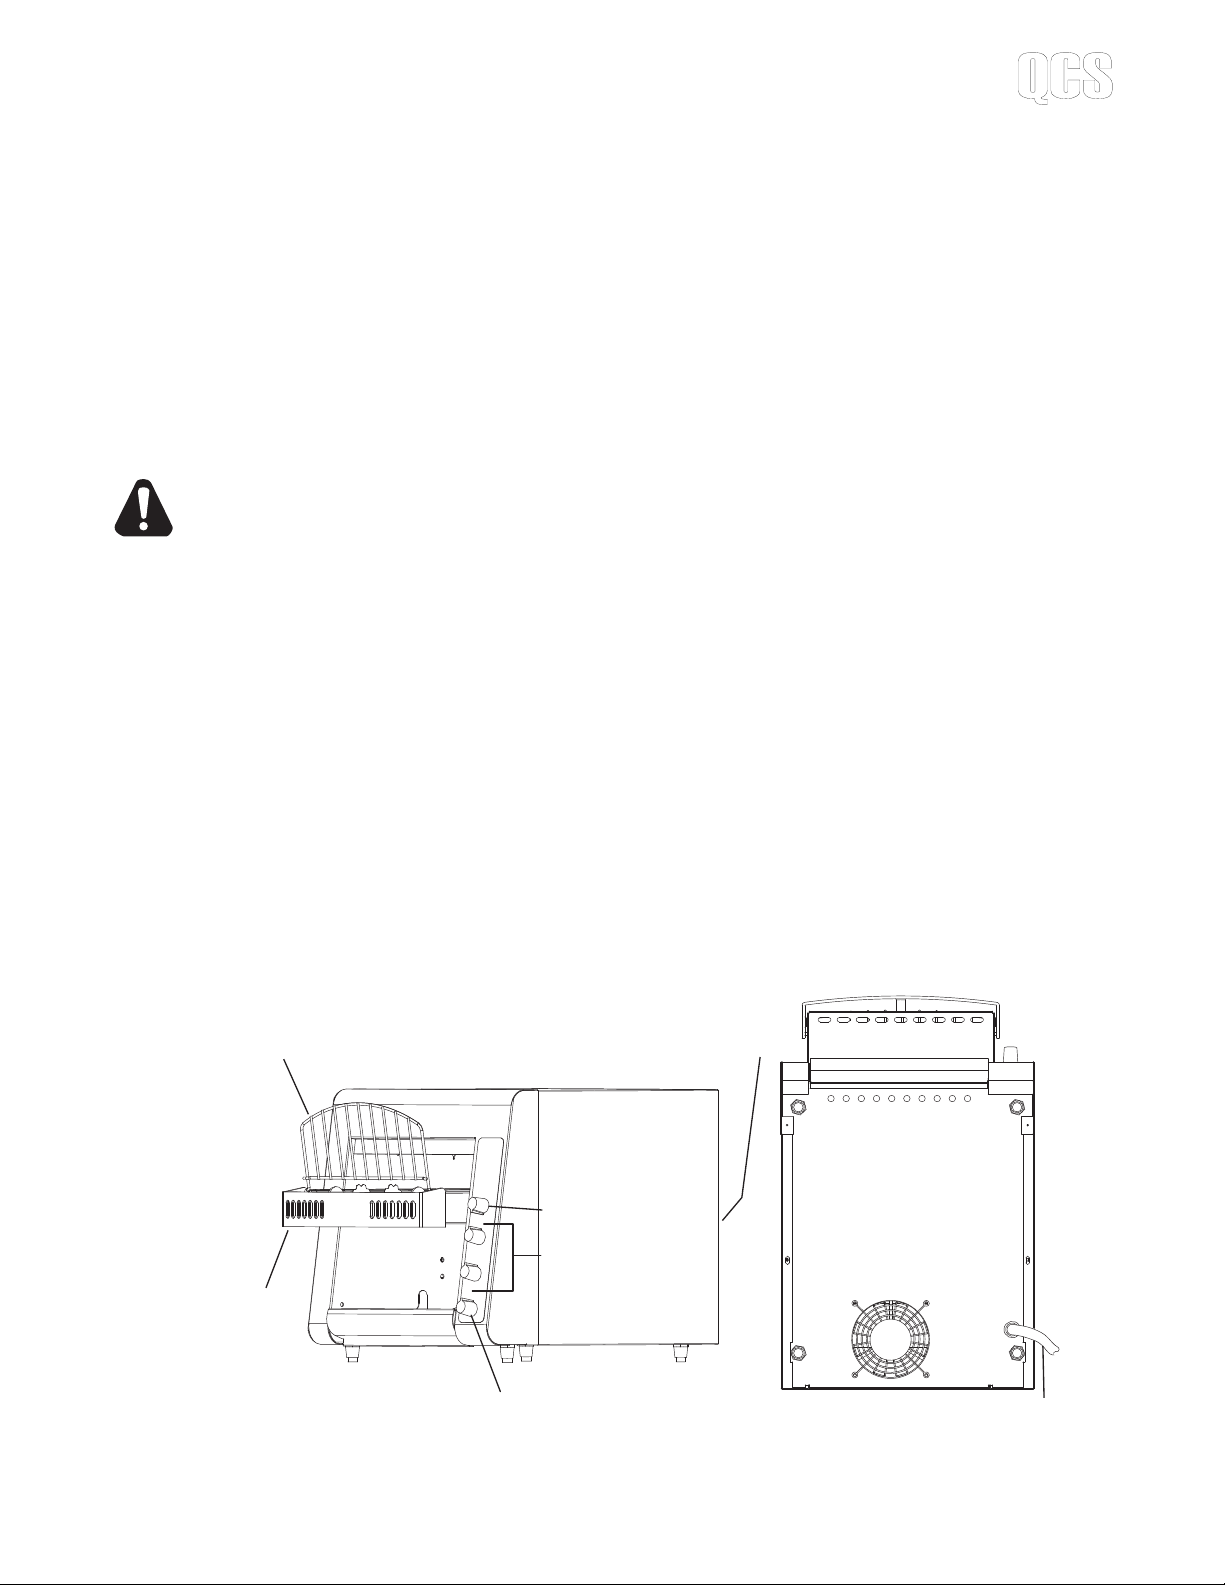
CRUMB TRAY
POWER SAVER SWITCH
HEAT CONTROLS
SPEED CONTROL
FRONT
AIR INTAKE FAN
HIGH LIMIT RESET
POWER CORD
IL1386
OPERATION
ROTARY POWER SAVER SWITCH
For toasters equipped with a Rotary Power Saver Switch, turn clockwise or counterclockwise to get in
the following positions.
FULL POWER
When in this position your equipment is at full power and ready to use.
OFF ROTARY
Two off positions are provided, a single rotation to either direction will shut the unit off.
STANDBY
The standby position reduces the power consumption by 75%. Using this position during the quiet
times will save electricity, and keep the toaster warm. When needed, turn the switch to FULL POWER.
Recovery time is about 30 seconds.
CERTAIN SURFACES ARE EXTREMELY HOT DURING OPERATION AND CARE
SHOULD BE TAKEN WHILE USING THIS UNIT.
COOKING PROCEDURES
BREAD TOASTING
Some toasters are equipped with a swinging heat shutter at the toaster entrance. This shutter will move
out of the way as the product passes under it.
1) Turn the power saver to FULL POWER.
2) Set the conveyor speed to HIGH.
3) If your toaster is equipped with separate top and bottom heat controls set them both
at HIGH.
4) Allow warm up time of 5 to 10 minutes.
5) Place a sample product on the conveyor belt to test the settings.
•If toasting is too light, turn conveyor speed control counterclockwise to a slower speed.
•If toasting is too dark, turn heat control to a lower heat.
(NOTE: Some products may require adjustment of the top and bottom heat controls in
order to achieve the desired results)
TOASTER COMPONENTS
5

DAILY OPERATION
Q
C
S
®
e
Check the power cord to insure that it is plugged into a proper outlet.
Set the heat control knobs to desired temperature.
Always allow 10 minutes of preheat time before loading the unit with product. Failure to allow sufcient
preheat time will result in unsatisfactory cooking until the unit reaches operating temperature.
OPERATING HINTS AND SAFETY
Disconnect power to the unit with the switch at the end of each day of operation.
Do not leave the unit in operation without an attendant.
CAUTION
Turn Power Saver Switch to Standby during idle periods. It will take only a few minutes to
regain operating temperature.
Do not leave the unit at high temperature when not in use or during idle periods.
This will cause food particles and grease lm to carbonize.
6
QCSe & RCSe OPERATION
Q
C
S
®
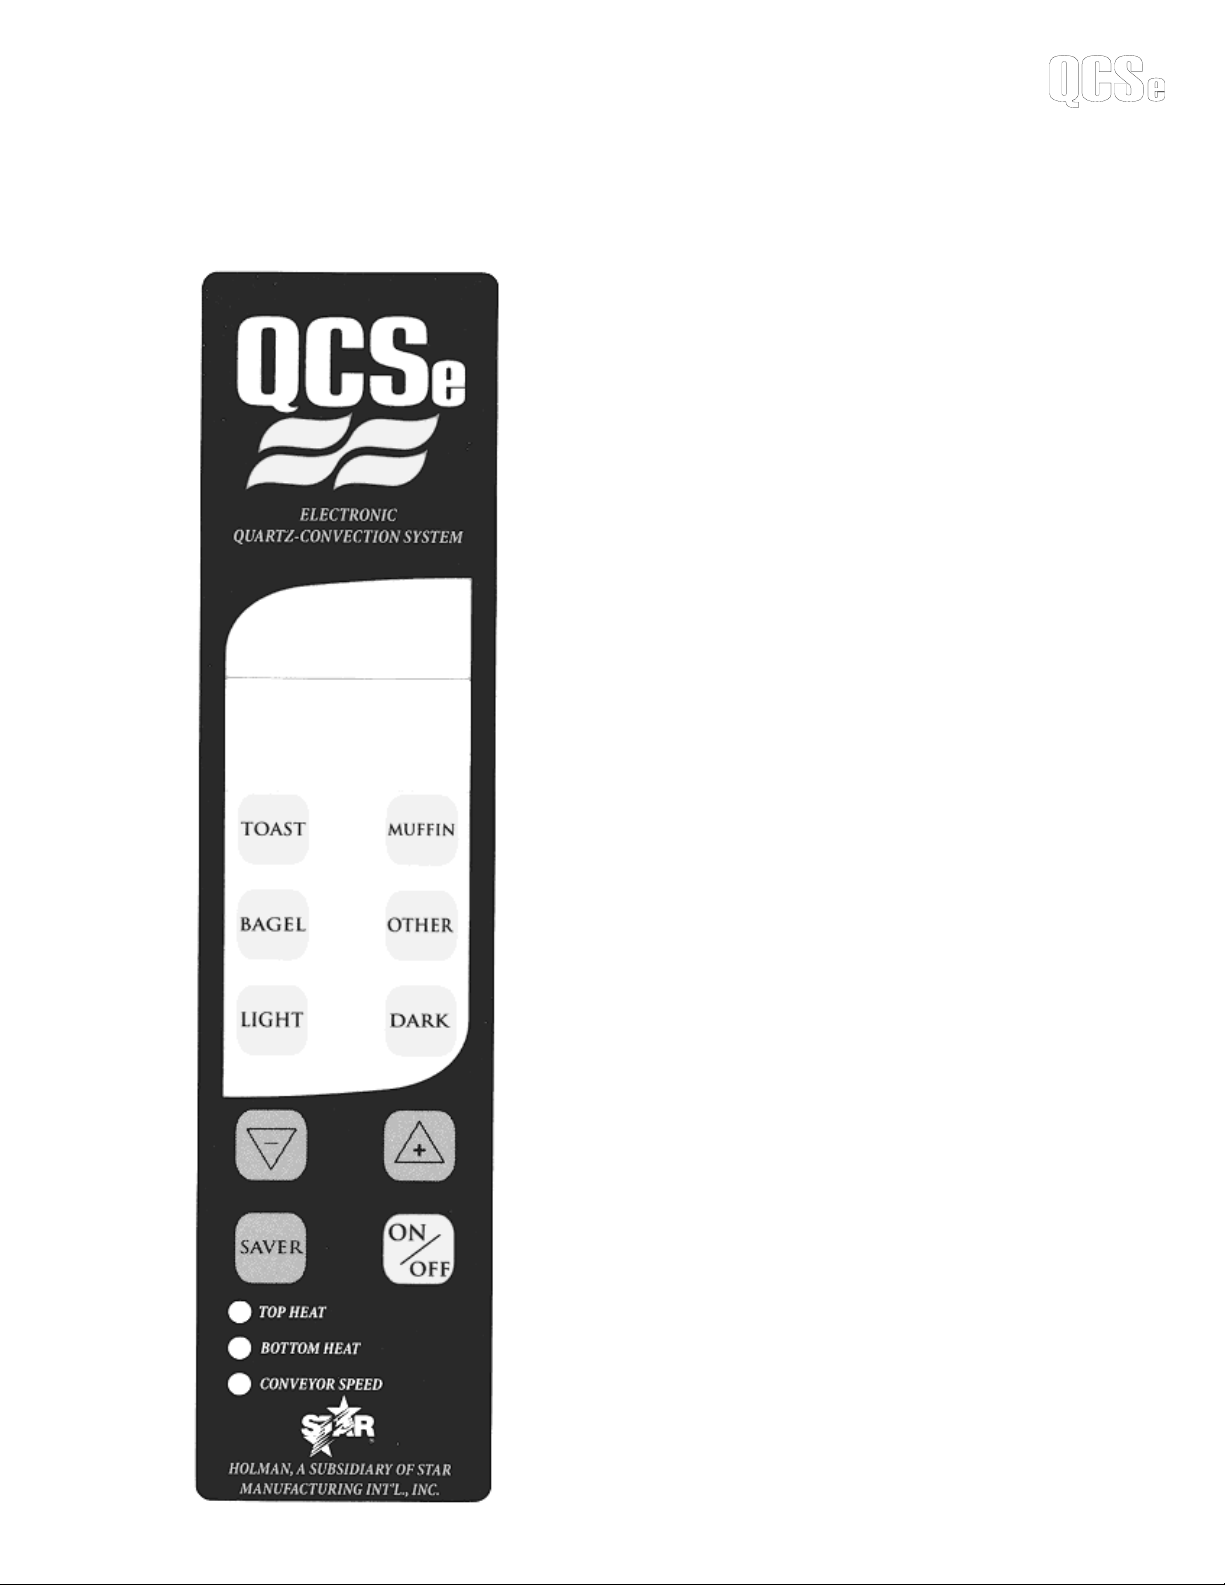
The Holman QCSe conveyor toaster comes with pre-programmed factory default settings for TOAST,
MUFFINS, and BAGELS. The operator may change these setting at any time. A button labeled OTHER is
provided to allow the operator to program settings for additional product(s).
Press TOAST and TST will appear in the display.
Press MUFFIN and MUF will appear in the display.
Press BAGEL and BGL will appear in the display.
Press OTHER and OTH will appear in the display.
LIGHT and DARK buttons are used to change the conveyor speeds
when in toast, mufn, or bagel modes.
Pressing the (LIGHT) button once will increase the conveyor speed
by 15%. Pressing twice (XLIGHT) will increase the conveyor speed by
30%.
Pressing the (DARK) button once will decrease the conveyor speed
by 10%. Pressing twice (XDARK) will decrease the conveyor speed by
20%.
Note: After 60 seconds the conveyor speed will return to the preprogrammed setting.
The factory default settings are as follow:
TOAST AND OTHER BAGEL:
TOP HEAT 9 TOP HEAT 9
BOTTOM HEAT 9 BOTTOM HEAT 9
CONVEYOR 59 CONVEYOR 24
e
OTHER: POWER SAVER:
TOP HEAT 9 TIME (minutes) 60
BOTTOM HEAT 9 HEAT 5
CONVEYOR 59
The QCSe toaster is equipped with a Power Saver Switch (SAVER)
that reduces the power used by the toaster after a pre-programmed
period of time. This Power Saver Switch has three modes:
ON: Unit is in pre-programmed power saving setting.
OFF: Power Saver mode is turned off.
AUTO ON: Power Saver turns on when there has been no activity
for a programmed length of time.
The operator may adjust the level of power reduction for the saver
mode. (Note: conveyor may move slowly when in saver mode.)
Two buttons (+) and (-) are used when increasing or decreasing the
value of each programmable setting.
A red LED light located at the lower portion of the control panel label
will indicate if the value for top heat, bottom heat or conveyor speed is
being adjusted.
7
CAUTION
Q
C
S
®
e
CERTAIN SURFACES ARE EXTREMELY HOT DURING OPERATION AND CARE SHOULD
BE TAKEN WHILE USING THIS UNIT.
START UP
When the toaster has been plugged into a suitable outlet and power supply, the word OFF will be
displayed on the L.E.D. read out.
A. Press the ON/OFF button once to turn on the toaster. The toaster will now enter into pre-heat and
PREHT will be displayed (the elements will begin to glow but the conveyor and fan motor will not
turn on).
B. After one minute, the fan motor will turn on and the conveyor will begin turning at the previously
saved setting (for initial start up, the drive motor will operate at the factory default setting).
C. After four minutes, the display will show the last used program selection i.e. TOAST, BAGEL,
MUFFIN or OTHER (for initial startup, TOAST will be the last program selected).
DAILY OPERATION
Check the power cord to insure that it is plugged into a proper outlet.
Press the ON/OFF button once to turn the toaster on.
Press the button a second time to turn the toaster off.
NOTE: When the toaster is turned off, the fan and conveyor motors will continue to run for ve minutes.
The words COOL and DOWN will be alternately displayed during that time. After ve minutes, the word
OFF will be displayed until the ON/OFF button is pressed again.
For units equipped with a POWER SAVER feature, the three operating modes are:
ON Unit has entered the pre-programmed level of power savings.
OFF Power Saver feature is turned off.
AUTO If the toaster has been idle for a pre-set period of time, the unit enters Power Saver
mode until one of the menu buttons has been pressed.
Once the toaster has been pre-heated, the menu buttons can be pressed to change to TOAST, BAGEL,
MUFFIN, or OTHER.
CAUTION
OPERATING HINTS AND SAFETY
Disconnect power to the unit with the ON/OFF button at the end of each day of operation.
Do not leave the unit in operation without an attendant.
Do not leave the unit at high temperature when not in use or during idle periods. This will cause food
particles and grease lm to carbonize.
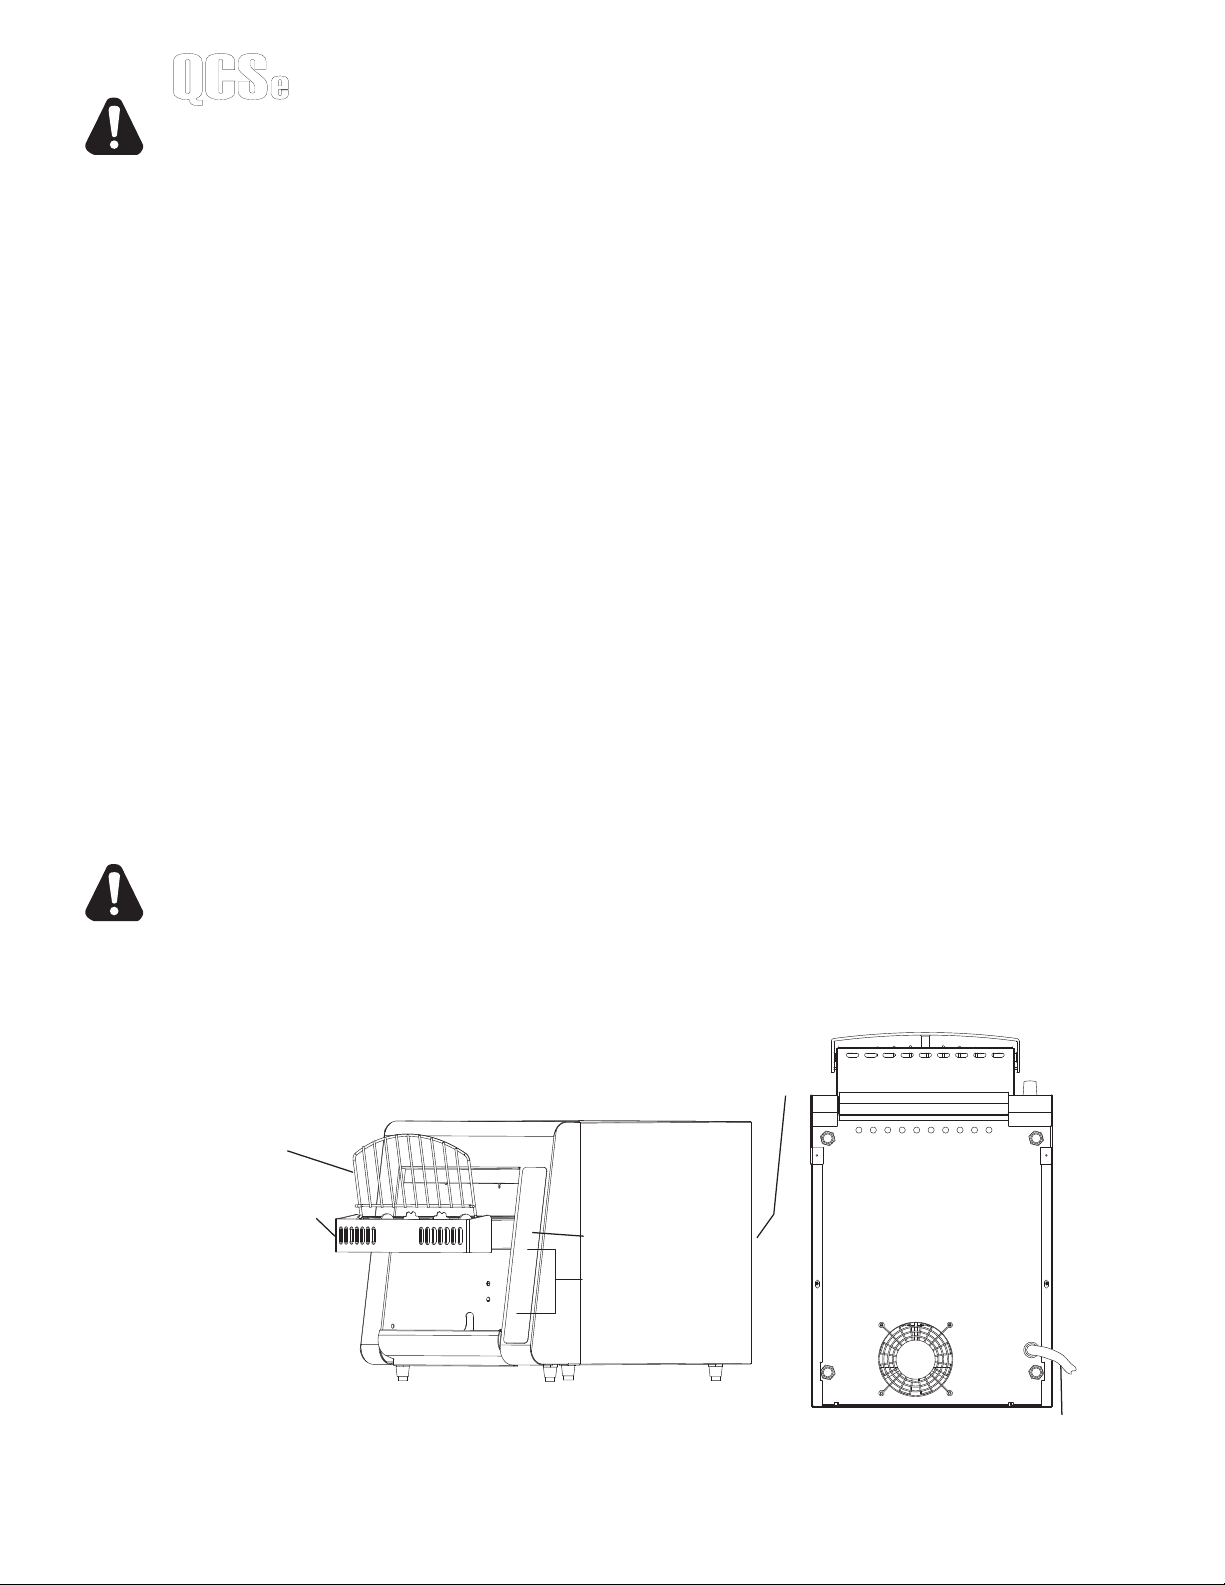
TOASTER COMPONENTS
HIGH LIMIT RESET
LOAD UP
CRUMB TRAY
LCD DISPLAY
CONTROLS
IL1385
FRONT
AIR INTAKE FAN
POWER CORD
8

PROGRAMING
Q
C
S
®
A. CONVEYOR SPEED (temporary setting)
The conveyor speed is programmable with a range from 0 to 99 with 0 being the slowest and 99 being
the fastest. Each menu item can have independent conveyor speed settings.
The LIGHT and DARK buttons can be used to temporarily change the conveyor speed.
Pressing the LIGHT button once will increase the conveyor speed by 15%. The word LIGHT
will be displayed. Pressing twice will increase the conveyor speed by 30% and XLIGHT will
now be displayed.
Pressing the DARK button once will decrease the conveyor speed by 15%. The word DARK
will be displayed. Pressing twice will decrease the conveyor speed by 30% and XDARK will
now be displayed.
NOTE: After 60 seconds, the conveyor speed will return to the pre-programmed setting.
WHEN USING THE LIGHT AND DARK BUTTONS TO ADJUST THE CONVEYOR SPEED
FOR A SINGLE ORDER OF PRODUCT, IT IS IMPORTANT TO REMEMBER TO ALLOW
THE PRODUCT ALREADY IN THE TOASTER TO EXIT BEFORE CHANGING THE
SPEED SETTING.
B. PROGRAMING VALUES FOR MENU ITEMS
To make a program change to the top heat, bottom heat, or conveyor speed, you must rst be in the
menu item you want changed. Example: to change the programmed conveyor speed for bagels, the
display must read BAGEL. To change the programmed conveyor speed for TOAST, the display must read
TOAST and so on for each menu item.
1) Select the menu item you want to change i.e. TOAST, MUFFIN, BAGEL or OTHER.
2) Press and hold both ( + ) AND ( - ) buttons for 3 seconds until the display goes
blank, release the buttons and the display will show three characters for the menu
item elected and the last two characters for the current value setting, i.e. TST, MUF,
BGL and OTH. The red L.E.D. light for top heat at the bottom of the label will ash.
3) Press the ( + ) or ( - ) buttons to increase or decrease the setting for the top heat.
4) Press the button for the menu button again and the red L.E.D. for the bottom heat
will ash.
5) Press the ( + ) or ( - ) buttons to increase or decrease the setting for the bottom heat.
6) Press the button for the menu button again and the red L.E.D. for the conveyor
speed will ash.
7) Press the ( + ) or ( - ) buttons to increase or decrease the setting for the conveyor
speed.
8) To skip one feature setting with out making any changes, press the menu item button
one time and the red L.E.D. light for the next item will now ash.
9) To change the POWER SAVER values press the SAVER button or to save your new
setting(s), and exit the program mode press the menu button.
10) The last two characters in the display will show MN for minutes.
11) The rst three characters will be numerical to represent the time setting.
12) Press the ( + ) or ( - ) buttons to increase or decrease the setting for the savor mode
time. The minimum value is 15 minutes to maximum value of 480 minutes.
13) Press the SAVER button to change the power reduction using the ( + ) or ( - ) buttons
to increase or decrease the setting.
14) Press the POWER SAVER button to save changes and to exit.
e
9
CLEAN
OPERATE
Q
C
S
®
e
Q
C
S
®
e
WARNING
CLEANING
Preventive maintenance for your Holman toaster consists of the following recommended cleaning
procedures. To keep your toaster in its top operating condition, these steps should be performed on a
daily or weekly as indicated.
A. Clean air intake on bottom of unit.
B. For lightly soiled conveyor belts, turn conveyor speed control to fastest setting (100) and
wipe with a damp cloth (daily) For heavily soiled conveyors, turn conveyor speed control to
fastest setting and wipe with a light abrasive pad (as needed).
C. Turn main power saver switch to the OFF position. Disconnect unit from power source.
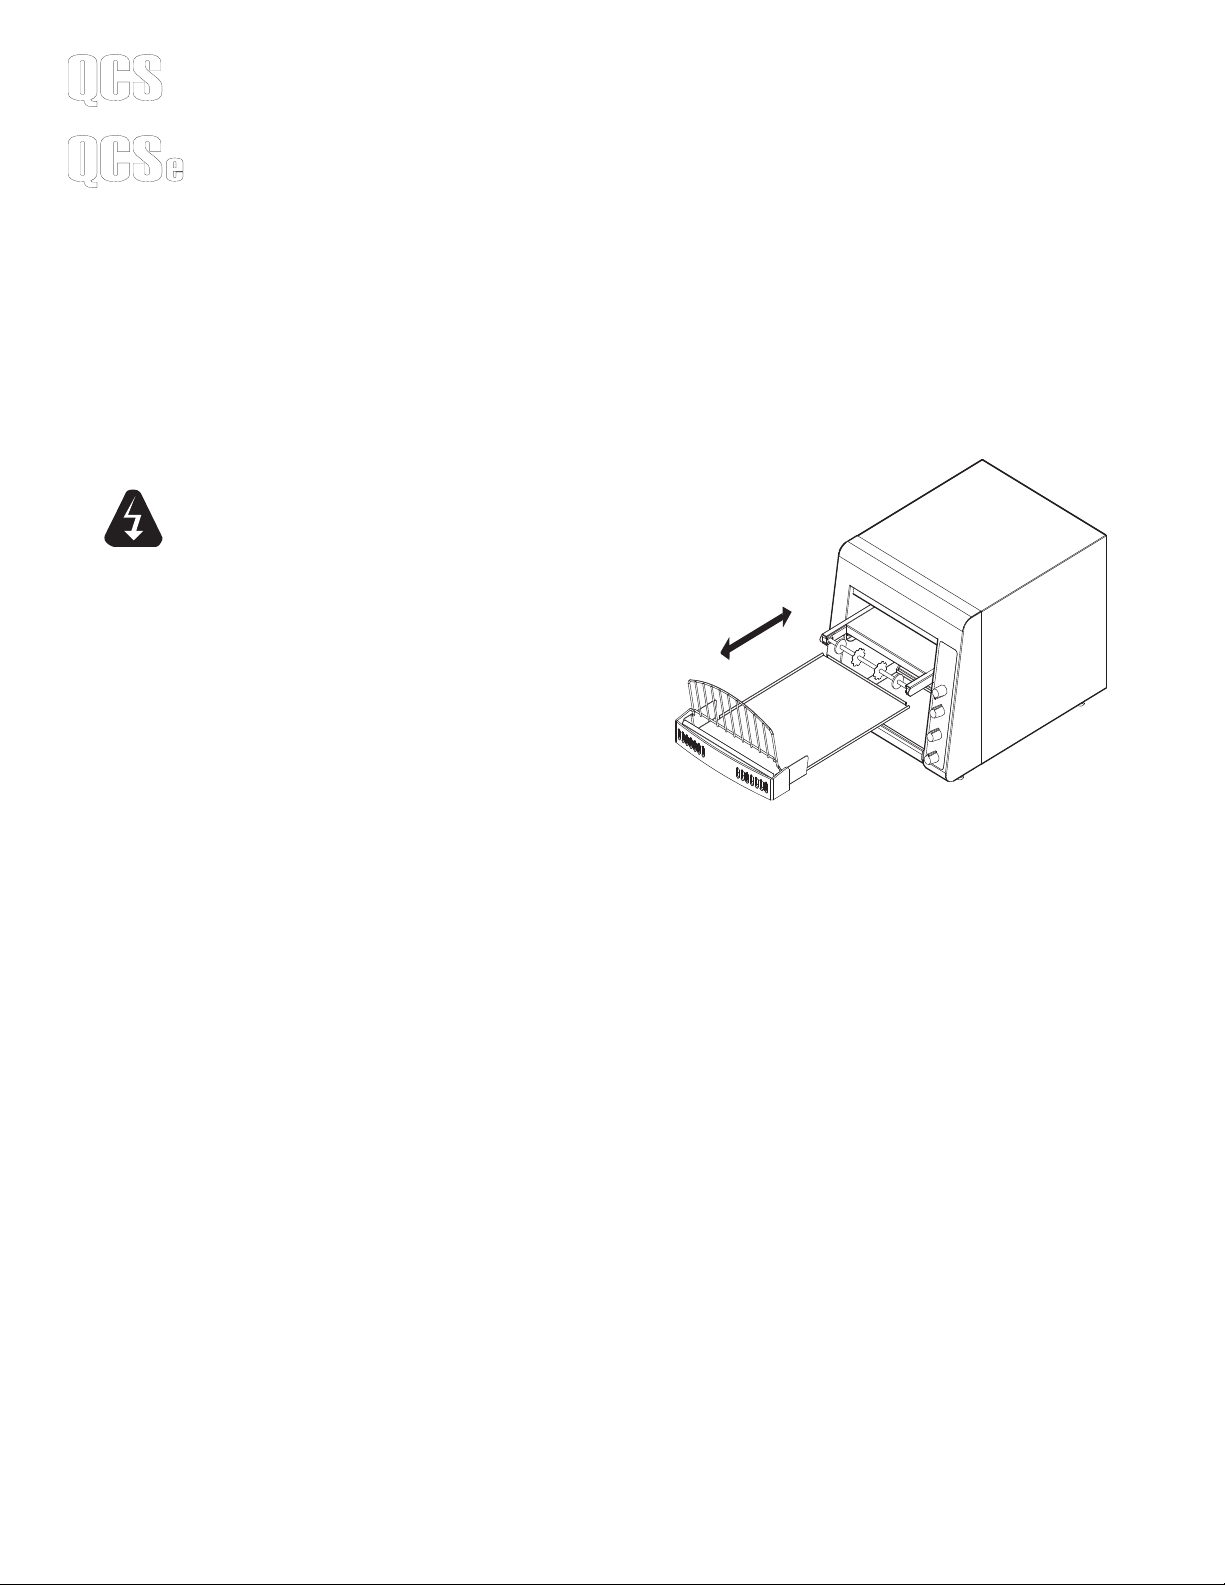
D. After the unit cools, remove interior crumb tray (as shown below) and clean.
Slide crumb tray back into position.
E. Wipe exterior surface of unit.
DO NOT IMMERSE OR LET THE UNIT
STAND IN WATER.
DO NOT HOSE DOWN THE UNIT OR THE
TABLE/COUNTER IF THE UNIT IS ON THE
TABLE/COUNTER.
KEEP AWAY FROM RUNNING WATER.
CRUMB TRAY REMOVAL
10
 Loading...