

Page 1

HOLMFIR User Guide
Document version 0.4.4 (November 1, 2008)
Compatible HOLMFIR versions 1.0.8.x
Compatible DSPre version DSPre 1
Compatible Microphone Mic 1
Page 2

CONTENTS i
Contents
Contents i
I HOLMFIR in Basic Mode 1
1 Introduction 2
1.1 How to use this User Guide . . . . . . . . . . . . . . . . . . . . . . . . . . . 2
2 Quick Start 3
2.1 The DSPre . . . . . . . . . . . . . . . . . . . . . . . . . . . . . . . . . . . . 3
2.2 Installing HOLMFIR . . . . . . . . . . . . . . . . . . . . . . . . . . . . . . . 4
2.2.1 Computer Requirements . . . . . . . . . . . . . . . . . . . . . . . . . 5
2.3 DSPre-1-way Setup . . . . . . . . . . . . . . . . . . . . . . . . . . . . . . . . 6
2.4 DSPre-2-way Setup . . . . . . . . . . . . . . . . . . . . . . . . . . . . . . . . 8
2.4.1 Adjusting Gain Levels . . . . . . . . . . . . . . . . . . . . . . . . . . 10
2.5 DSPre-3-way Setup . . . . . . . . . . . . . . . . . . . . . . . . . . . . . . . . 11
2.5.1 Adjusting Gain Levels . . . . . . . . . . . . . . . . . . . . . . . . . . 13
3 Crossover & Target 14
3.1 Crossovers (Only for DSPre-2,3-way) . . . . . . . . . . . . . . . . . . . . . . 14
3.2 Low Frequency Rolloff . . . . . . . . . . . . . . . . . . . . . . . . . . . . . . 15
3.3 High Frequency Rolloff . . . . . . . . . . . . . . . . . . . . . . . . . . . . . . 16
4 Equalization - Tonal Balance 17
4.1 Zoom with the Pointing Device (e.g. a mouse) . . . . . . . . . . . . . . . . . 18
4.2 Graphical Equalizer Tool . . . . . . . . . . . . . . . . . . . . . . . . . . . . . 19
4.3 Enable/Disable Equalization . . . . . . . . . . . . . . . . . . . . . . . . . . . 20
4.4 Open and Save Equalization . . . . . . . . . . . . . . . . . . . . . . . . . . . 20
4.5 Presets . . . . . . . . . . . . . . . . . . . . . . . . . . . . . . . . . . . . . . . 21
5 Filter Bank 22
5.1 Save and Open Configurations . . . . . . . . . . . . . . . . . . . . . . . . . . 23
5.2 Copy Filter Configuration . . . . . . . . . . . . . . . . . . . . . . . . . . . . 23
HOLM Acoustics HOLMFIR User Guide v0.4.4
Page 3

CONTENTS ii
6 Control the DSPre 24
6.1 Source Text in the Display . . . . . . . . . . . . . . . . . . . . . . . . . . . . 24
6.2 DSPre Mixer (Windows XP) . . . . . . . . . . . . . . . . . . . . . . . . . . 25
6.3 DSPre Mixer (Windows Vista) . . . . . . . . . . . . . . . . . . . . . . . . . 26
6.4 Playing Music via USB . . . . . . . . . . . . . . . . . . . . . . . . . . . . . . 27
6.5 Analog Input Gain . . . . . . . . . . . . . . . . . . . . . . . . . . . . . . . . 28
7 Customization (Look and Feel) 29
7.1 Linewidth . . . . . . . . . . . . . . . . . . . . . . . . . . . . . . . . . . . . . 29
7.2 Colors . . . . . . . . . . . . . . . . . . . . . . . . . . . . . . . . . . . . . . . 30
II HOLMFIR in Advanced Mode 31
8 Introduction to Advanced Mode 32
8.1 Functionality . . . . . . . . . . . . . . . . . . . . . . . . . . . . . . . . . . . 32
8.2 Configuring the DSPre with Full Correction . . . . . . . . . . . . . . . . . . 32
9 Get Ready to Measure 33
9.1 Microphone Connection . . . . . . . . . . . . . . . . . . . . . . . . . . . . . 33
9.2 Microphone Calibration File . . . . . . . . . . . . . . . . . . . . . . . . . . . 34
9.3 The Measurement Chain . . . . . . . . . . . . . . . . . . . . . . . . . . . . . 35
9.4 Protect Your Ears . . . . . . . . . . . . . . . . . . . . . . . . . . . . . . . . 35
9.5 DSPre Volume and Surroundings . . . . . . . . . . . . . . . . . . . . . . . . 35
9.6 What is Measured - and How? . . . . . . . . . . . . . . . . . . . . . . . . . . 36
10 Control Measurements 37
10.1 Target Frequency & Impulse Response . . . . . . . . . . . . . . . . . . . . . 37
10.2 Making a measurement . . . . . . . . . . . . . . . . . . . . . . . . . . . . . . 38
10.3 Customization and Presentation Options . . . . . . . . . . . . . . . . . . . . 40
10.3.1 Impulse Response Axis . . . . . . . . . . . . . . . . . . . . . . . . . . 40
10.4 Measurement Quality . . . . . . . . . . . . . . . . . . . . . . . . . . . . . . 41
10.5 Errors and Warnings . . . . . . . . . . . . . . . . . . . . . . . . . . . . . . . 42
10.6 Compare Different Measurement Conditions . . . . . . . . . . . . . . . . . . 42
11 Automatic Driver Alignment 43
11.1 Time Alignment . . . . . . . . . . . . . . . . . . . . . . . . . . . . . . . . . 44
11.2 DSPre-2-way Automatic Alignment . . . . . . . . . . . . . . . . . . . . . . . 45
11.3 DSPre-3-way Automatic Alignment . . . . . . . . . . . . . . . . . . . . . . . 46
12 Driver Correction 48
12.1 Extended Range . . . . . . . . . . . . . . . . . . . . . . . . . . . . . . . . . 48
12.1.1 DSPre-1-way Extended Range . . . . . . . . . . . . . . . . . . . . . . 49
12.1.2 DSPre-2-way Extended Range . . . . . . . . . . . . . . . . . . . . . . 49
12.1.3 DSPre-3-way Extended Range . . . . . . . . . . . . . . . . . . . . . . 50
HOLM Acoustics HOLMFIR User Guide v0.4.4
Page 4

CONTENTS iii
12.1.4 Uploading the Extended Range Filters . . . . . . . . . . . . . . . . . 50
12.2 Customization and Presentation Options . . . . . . . . . . . . . . . . . . . . 51
12.3 Correcting a Bass/Subwoofer (DSPre-2,3-way) . . . . . . . . . . . . . . . . . 52
12.3.1 Verification . . . . . . . . . . . . . . . . . . . . . . . . . . . . . . . . 54
12.3.2 Limit the Maximum Gain . . . . . . . . . . . . . . . . . . . . . . . . 54
12.4 Correcting a Midtone Driver (DSPre-2,3-way) . . . . . . . . . . . . . . . . . 56
12.5 Correcting a Tweeter (DSPre-2,3-way) . . . . . . . . . . . . . . . . . . . . . 56
12.6 Correcting a Bookshelf Speaker (DSPre-1-way) . . . . . . . . . . . . . . . . 56
III Appendices 57
A Support 58
A.1 The Forum at www.holmacoustics.com . . . . . . . . . . . . . . . . . . . . . 58
A.2 Emails to [email protected] . . . . . . . . . . . . . . . . . . . . . 58
A.3 Remote Assistance . . . . . . . . . . . . . . . . . . . . . . . . . . . . . . . . 59
B Frequently Asked Questions 60
C Troubleshooting 61
D Technical Note - Measuring Response 62
D.1 Frequency Response . . . . . . . . . . . . . . . . . . . . . . . . . . . . . . . 62
D.2 Nonlinearities . . . . . . . . . . . . . . . . . . . . . . . . . . . . . . . . . . . 62
E Technical Note - Fourier Transforms 63
E.1 The Time Window . . . . . . . . . . . . . . . . . . . . . . . . . . . . . . . . 63
Index 64
HOLM Acoustics HOLMFIR User Guide v0.4.4
Page 5

1 of 65
Part I
HOLMFIR in Basic Mo de
HOLM Acoustics HOLMFIR User Guide v0.4.4
Page 6

Introduction 2 of 65
Chapter 1
Introduction
The HOLMFIR application allows you to configure the DSPre using bleeding edge algorithmens, but to begin with you just want to get the DSPre playing.
HOLMFIR in ’Basic Mode’ lets you configure the DSPre as a digital active crossover (2,3way) with equalization option.
The ’Basic Mode’ makes it easy to configure the DSPre as the cornerstone of your personal
setup with amplifiers and speakers. The Quick Start (Chapter 2) guides you through the
initial setup of the DSPre, which can be done in just a few minutes.
1.1 How to use this User Guide
Please note that throughout the text the following nomenclature is used:
HOLMFIR The application HOLMFIR developed by HOLM Acoustics. Version 1.0.8.x
DSPre The DSPre 1 manufactured by HOLM Acoustics
DSPre-1-way A set of fullrange speakers
DSPre-2-way A set of bi-wired speakers with or without analog crossover
DSPre-3-way A set tri-wired speakers with or without analog crossover
HOLMFIR can be used to setup 1,2,3-way systems, so skip the pages not relevant for you
- hence do you have a DSPre-2-way system then skip the DSPre-1-way and DSPre-3-way
chapters/sections.
Typical usage of this user guide in ’Basic Mode ’is:
• Chapter 2 Quick Start: Get the DSPre playing within a few minutes
• Chapter 3 Crossover & Target: Tune the Crossovers and/or target for your system
• Chapter 4 Equalizing: Experience some of the cababilities in a DSPre
• Chapter 5,6,7: Use these chapters when needed
When you are familiar with HOLMFIR in ’Basic Mode’ and would like to take the DSPre a
step further regarding perfection of sound, then continue to Part II: HOLMFIR in Advanced
Mode.
HOLM Acoustics HOLMFIR User Guide v0.4.4
Page 7

Quick Start 3 of 65
Chapter 2
Quick Start
The purpose of this chapter is to get the DSPre playing in your setup, i.e. get sound out
of your speakers within a few minutes.
2.1 The DSPre
The DSPre interface with display fields is very simple:
HOLM Acoustics HOLMFIR User Guide v0.4.4
Page 8

Quick Start - Installing HOLMFIR 4 of 65
All connections are kept on the back panel of the DSPre:
2.2 Installing HOLMFIR
HOLMFIR is installed using a Microsoft installer package. It is recommended to
download the latest version found at www.holmacoustics.com/holmfir.php
HOLMFIR-1.0.8.x-wxp.msi Installer package for Windows XP (32 bit)
HOLMFIR-1.0.8.x-wvista.msi Installer package for Windows Vista (32 bit)
When executing the installer package you can safely answer ’Run’ to below security
question
Note when upgrading HOLMFIR then just execute the new installer package - it is not
necessary to uninstall the previous version.
HOLM Acoustics HOLMFIR User Guide v0.4.4
Page 9

Quick Start - Installing HOLMFIR 5 of 65
2.2.1 Computer Requirements
HOLMFIR is a lightweight application, but does require some computer power. HOLMFIR
will work if your computer is from an older date, but updating the graphs might take a
while.
Hardware requirements:
• Minimum 1 GHz CPU
• Minimum 512 MB RAM
• Minimum 50 MB free disk space
• USB port
Software requirements:
• Windows XP or Windows Vista
• .Net 2.0 platform (Standard free library for Windows XP and Vista )
Note, that when the DSPre once has been configured you can use ANY computer to play
sound via USB without having to install HOLMFIR - that is any computer supporting
the USB 1.1 audio standard. The most commonly used operative systems support this as
Plug’n’Play without installing any special drivers: Windows 2000, Windows ME, Windows
XP, Windows Vista, Mac OS X, Linux (Ubuntu, fedora, RedHat, ...) .
See Section 6.4 ’Playing Music via USB’ for further details.
HOLM Acoustics HOLMFIR User Guide v0.4.4
Page 10

Quick Start - DSPre-1-way Setup 6 of 65
2.3 DSPre-1-way Setup
In a DSPre-1-way setup the DSPre basically acts as a pre-amplifier with digital correction
and equalization options.
To use the DSPre-1-way setup you need:
1. A DSPre 1
2. A stereo amplifier (or two mono amplifiers)
3. Two full range speakers
4. Signal and speaker cables
5. A computer running Windows XP or Vista (only needed to configure the DSPre)
Connect the Cables
Connect the cables as shown in the diagram below.
Input sources available: 1 USB, 2 analog and 5 digital
HOLM Acoustics HOLMFIR User Guide v0.4.4
Page 11

Quick Start - DSPre-1-way Setup 7 of 65
Configure the DSPre using HOLMFIR
Turn on the DSPre and start the HOLMFIR application. The DSPre can easily be configured using the setup wizard found in the menu: ’Help’ → ’Setup Wizard’
Click ’Done’ and answer ’Ok’ to overwrite the current configuration
Upload these settings to the DSPre by clicking ’Upload Filters to DSPre’ in the
’Crossover & Target’ tab
After uploading, the DSPre is ready to play!
HOLM Acoustics HOLMFIR User Guide v0.4.4
Page 12

Quick Start - DSPre-2-way Setup 8 of 65
2.4 DSPre-2-way Setup
In a DSPre-2-way setup the DSPre basically acts as a pre-amplifier and active crossover
with digital correction and equalization options.
To use the DSPre-2-way setup you need:
1. A DSPre 1 with 2 output modules
2. Two stereo amplifiers (Can be of different kind)
3. Two speakers with two inputs (Bi-wire - with or without analog crossovers)
4. Signal and speaker cables
5. A computer running Windows XP or Vista (only needed to configure the DSPre)
Connecting the cables
Connect the cables as shown in the diagram below.
Input sources available: 1 USB, 2 analog and 5 digital
HOLM Acoustics HOLMFIR User Guide v0.4.4
Page 13

Quick Start - DSPre-2-way Setup 9 of 65
Configure the DSPre using HOLMFIR
Turn on the DSPre and start the HOLMFIR application. The DSPre can easily be configured using the setup wizard found in the menu: ’Help’ → ’Setup Wizard’
Click ’Done’ and answer ’Ok’ to overwrite the current configuration
Upload these settings to the DSPre by clicking ’Upload Filters to DSPre’ in the
’Crossover & Target’ tab.
HOLM Acoustics HOLMFIR User Guide v0.4.4
Page 14

Quick Start - DSPre-2-way Setup 10 of 65
After uploading, the DSPre is ready to play!
2.4.1 Adjusting Gain Levels
If the sensitivity of the amplifers or drivers are not the same - the gain levels can easily be
aligned in the ’DSPre Settings’ tab.
You can now align the levels of the outputs while playing music.
If you want to align levels using a microphone, please refer to ’Advanced Mode’ Chapter
11 Section 11.2 ’DSPre-2-way Automatic Alignment’
HOLM Acoustics HOLMFIR User Guide v0.4.4
Page 15

Quick Start - DSPre-3-way Setup 11 of 65
2.5 DSPre-3-way Setup
In a DSPre-3-way setup the DSPre basically acts as a pre-amplifier and active crossover
with digital correction and equalization options.
To use the DSPre-3-way setup you need:
1. A DSPre 1 with 3 output modules
2. Three stereo amplifiers (Or two HOLM Acoustics AMP 1 with three outputs)
3. Two speakers with three inputs (Tri-wire - with or without analog crossovers)
4. Signal and speaker cables
5. A computer running Windows XP or Vista (only needed to configure the DSPre)
Connecting the cables
Connect the cables as shown in the diagram below.
Input sources available: 1 USB, 2 analog and 5 digital
HOLM Acoustics HOLMFIR User Guide v0.4.4
Page 16

Quick Start - DSPre-3-way Setup 12 of 65
Configure the DSPre using HOLMFIR
Turn on the DSPre and start the HOLMFIR application. The DSPre can easily be configured using the setup wizard found in the menu: ’Help’ → ’Setup Wizard’
Click ’Done’ and answer ’Ok’ to overwrite the current configuration
Upload these settings to the DSPre by clicking ’Upload Filters to DSPre’ in the
’Crossover & Target’ tab.
HOLM Acoustics HOLMFIR User Guide v0.4.4
Page 17

Quick Start - DSPre-3-way Setup 13 of 65
After uploading, the DSPre is ready to play!
2.5.1 Adjusting Gain Levels
If the sensitivity of the amplifers or drivers are not the same - the gain levels can easily be
aligned in the ’DSPre Settings’ tab.
You can now align the levels of the outputs while playing music.
If you want to align levels using a microphone, please refer to ’Advanced Mode’ Chapter
11 Section 11.3 ’DSPre-3-way Automatic Alignment’
HOLM Acoustics HOLMFIR User Guide v0.4.4
Page 18

Crossover & Target 14 of 65
Chapter 3
Crossover & Target
Before the digital era one had to solder a new analog crossover with new components to
try out a new configuration. With the DSPre you can change the frequency and steepness
with a huge degree of freedom via a simple interface.
3.1 Crossovers (Only for DSPre-2,3-way)
A HOLMFIR digital crossover is defined by a crossover frequency and a transition band.
The HOLMFIR digital crossover is a FIR (Finite Impulse Response) filter customized
especially for HighEnd audio by HOLM Acoustics.
This digital filter can not be directly comparred with a classical analog filter due to the
completely separated frequency domains. When playing tones away from the transition
band the tone is only represented in one driver - this corresponds to an analog filter with
an infinite order.
HOLM Acoustics HOLMFIR User Guide v0.4.4
Page 19

Crossover & Target - Low Frequency Rolloff 15 of 65
3.2 Low Frequency Rolloff
The low frequency rolloff can be used to limit how low tones that are sent to your bass
driver. Often bass drivers do not play tones below 30 Hz and small bookshelf speakers
useally do not play tones below 40 Hz. When music consists of tones below this natural
limit of the speaker you get heareable distortion. When the lower frequencies are damped
this will not happen.
The amplifier will often also distort when playing low-frequencies at a high volume which
also validates the need to damp low frequencies.
In the above example frequencies above 40 Hz are not affected and frequencies below 25
Hz are simply not played.
Motivations for Low Frequency Rolloff
• Less distortion from the driver/speaker
• Less excursion of driver/speaker - hence can prevent no blown drivers
• Less power consumption from the amplifier - hence less distortion
• Less low frequency room-modes
• Less wide range deep sound presure for your nabo
HOLM Acoustics HOLMFIR User Guide v0.4.4
Page 20

Crossover & Target - High Frequency Rolloff 16 of 65
3.3 High Frequency Rolloff
The high frequency rolloff can be used if the tweeter of your system is poor - some fulltone
drivers do not have a pleasant sound in high frequencies, or if you have tinnitus, which is
triggered by high frequencies.
In the above example frequencies below 10 kHz are not affected and frequencies above 15
kHz are simply not played.
Motivations for High Frequency Rolloff
• Damp sharp and unpleasant high frequency sound
HOLM Acoustics HOLMFIR User Guide v0.4.4
Page 21

Equalization - Tonal Balance 17 of 65
Chapter 4
Equalization - Tonal Balance
Do you want more or less bass? Is the treble to sharp? By equalization you can modify
the frequency response of your system with a huge degree of freedom, or try out some of
the presets to obtain your preffered tonal balance.
Switching to Equalization Mode
The ’Equalization Mode’ helps you focus on the equalization, so please switch HOLMFIR
into ’Equalization Mode’ from the menu: ’Options’ → ’Equalization Mode’.
The starting point is a flat frequency response - hence no equalization is applied
HOLM Acoustics HOLMFIR User Guide v0.4.4
Page 22
Equalization - Tonal Balance - Zoom with the Pointing Device (e.g. a mouse) 18 of 65
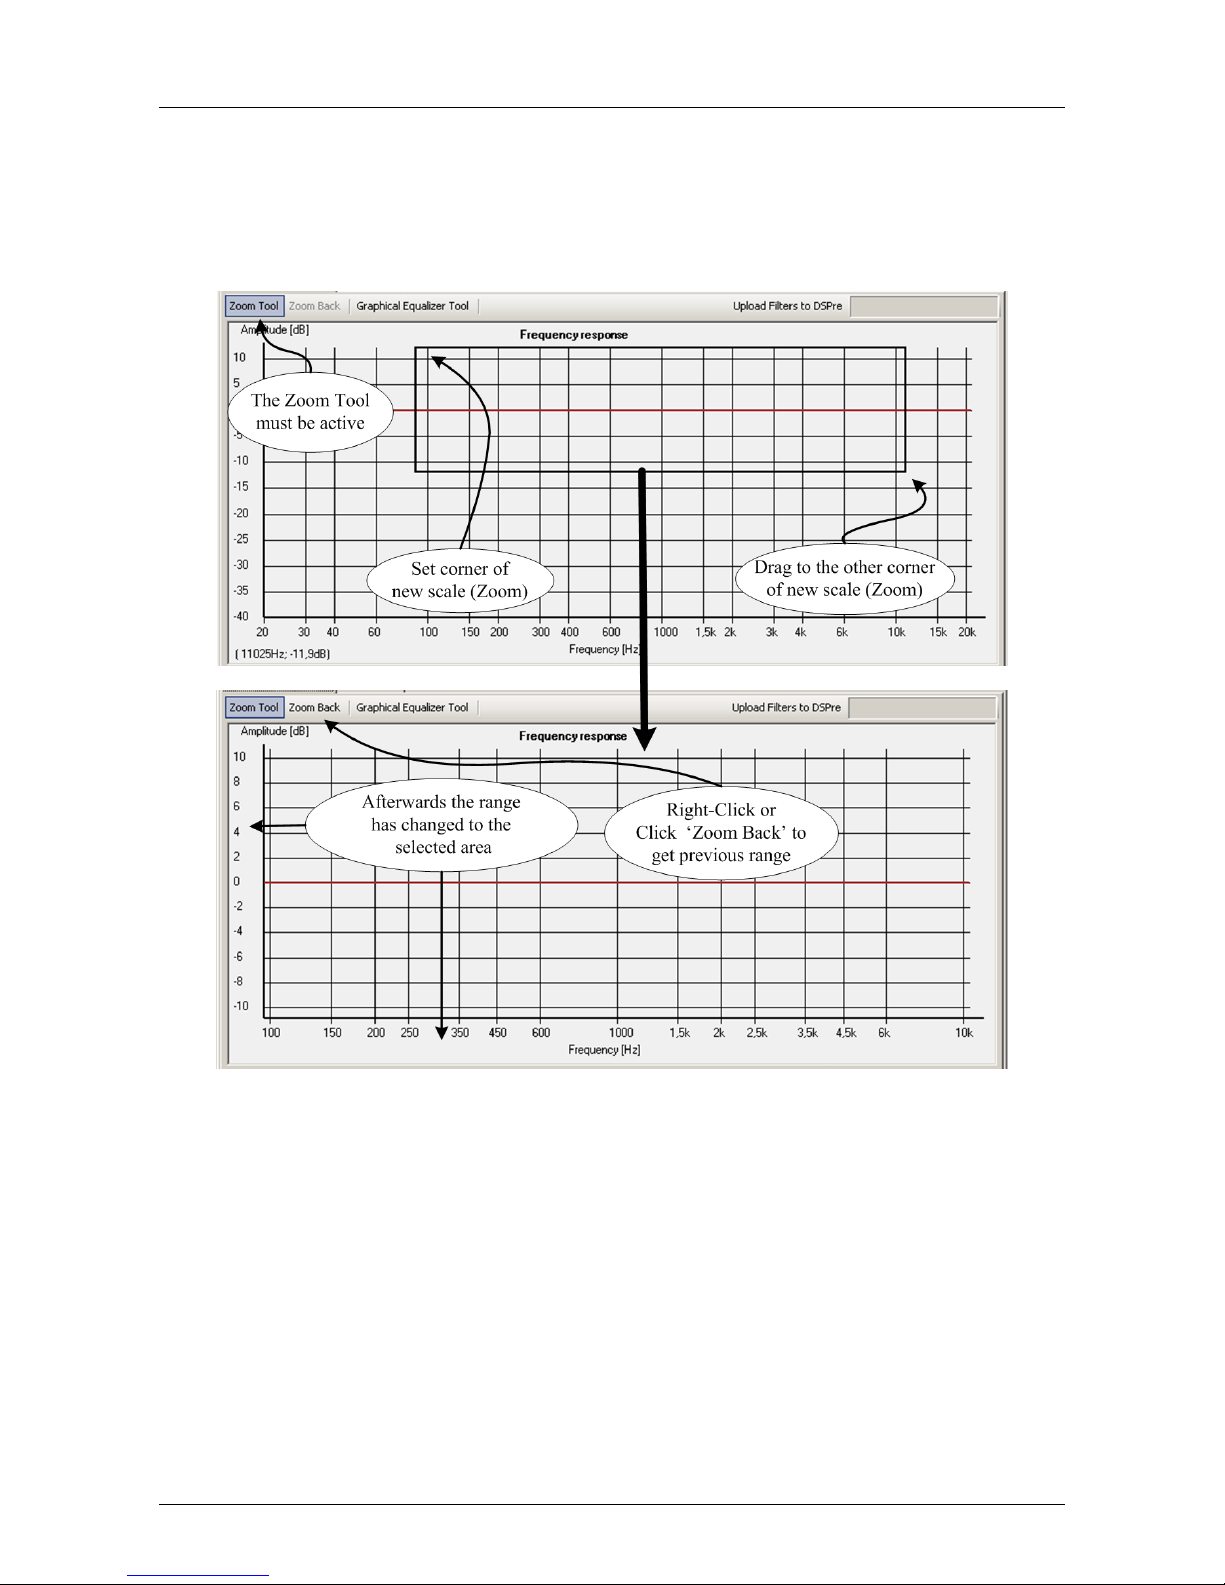
4.1 Zoom with the Pointing Device (e.g. a mouse)
When equalizing it is appropriate to view a smaller range so that you can fine-tune your
preference
To zoom back right-click or click the ’Zoom Back’ button.
HOLM Acoustics HOLMFIR User Guide v0.4.4
Page 23
Equalization - Tonal Balance - Graphical Equalizer Tool 19 of 65
4.2 Graphical Equalizer Tool
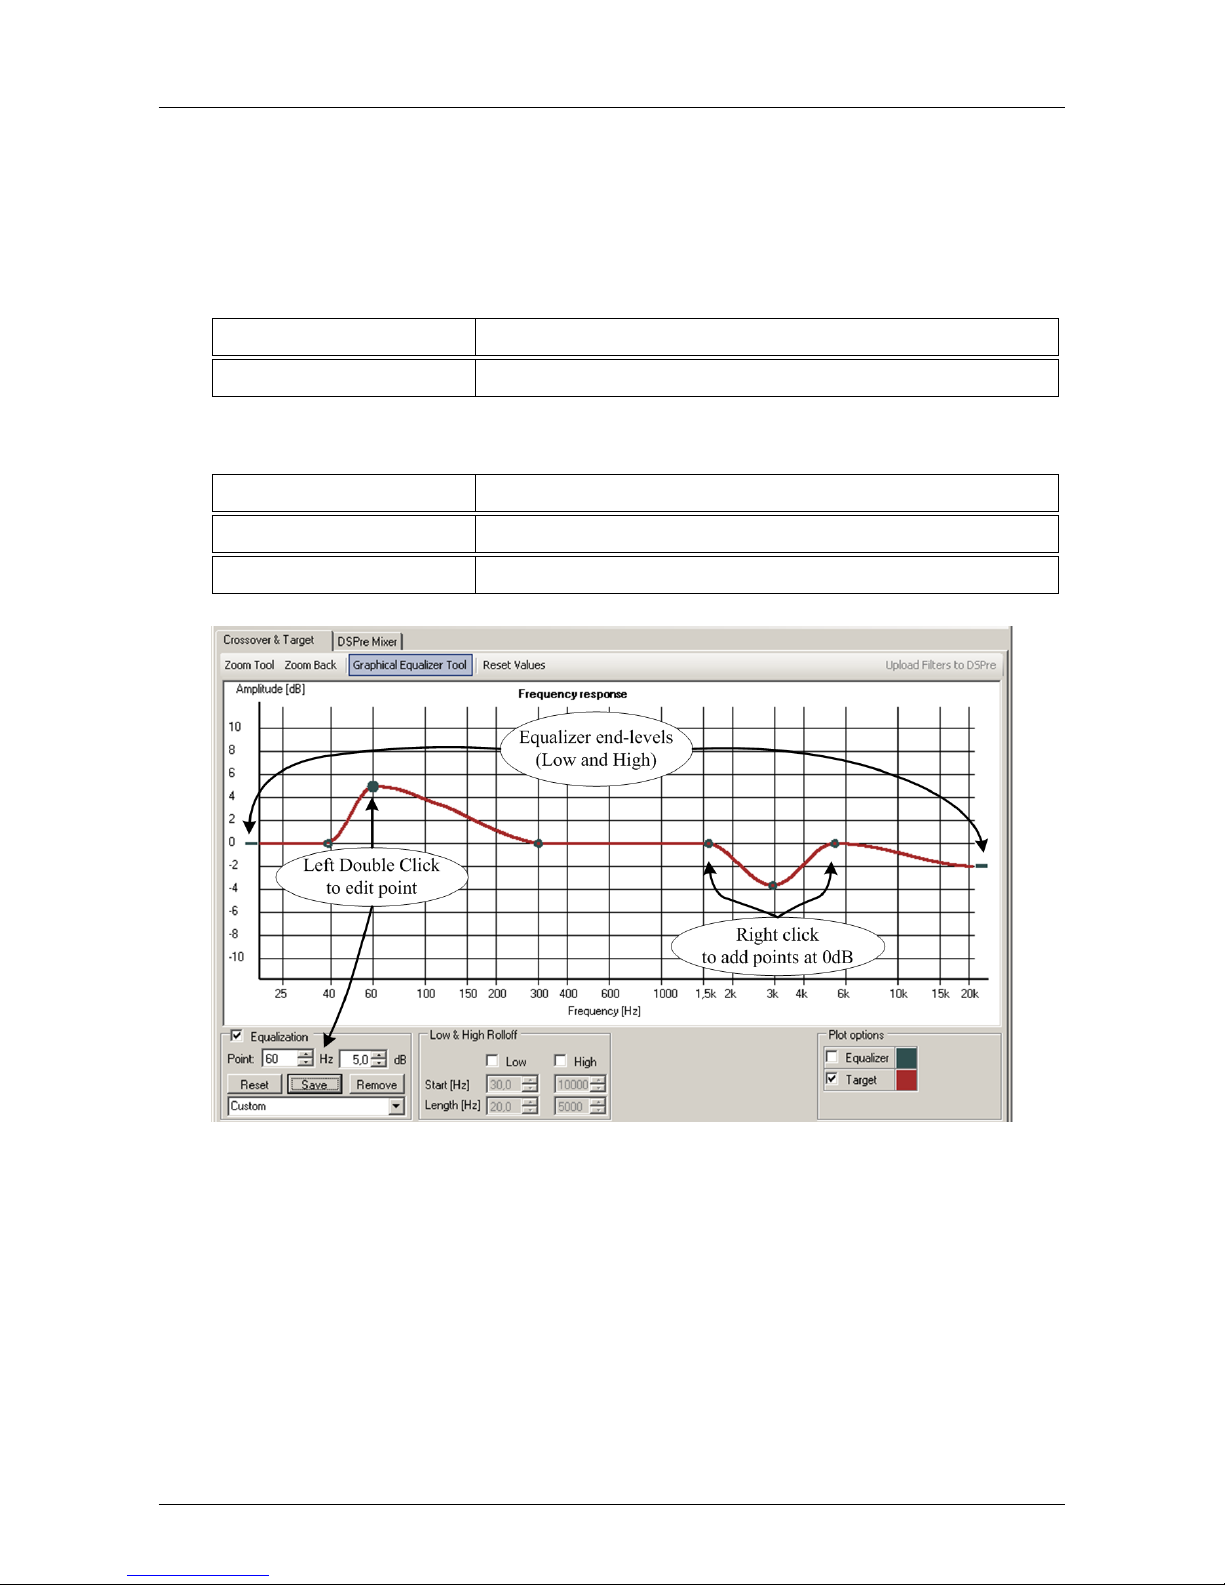
The equalization curve is defined with points, that can be placed at any freedom.
How to add new equalizer points
Left - Click Add a point
Right - Click Add a point at 0 dB - Hence bound the curve to be neutral
How to modify existing equalizer points
Left - Drag’n’Drop point Move a point
Right - Click point Delete a point
Left - Double click point Modify point by entering extact values in the Equalization box
The low- and high-frequency end-levels are edited the same way as normal equalizer
points, except that they have a static frequency and cannot be deleted.
HOLM Acoustics HOLMFIR User Guide v0.4.4
Page 24
Equalization - Tonal Balance - Enable/Disable Equalization 20 of 65
4.3 Enable/Disable Equalization
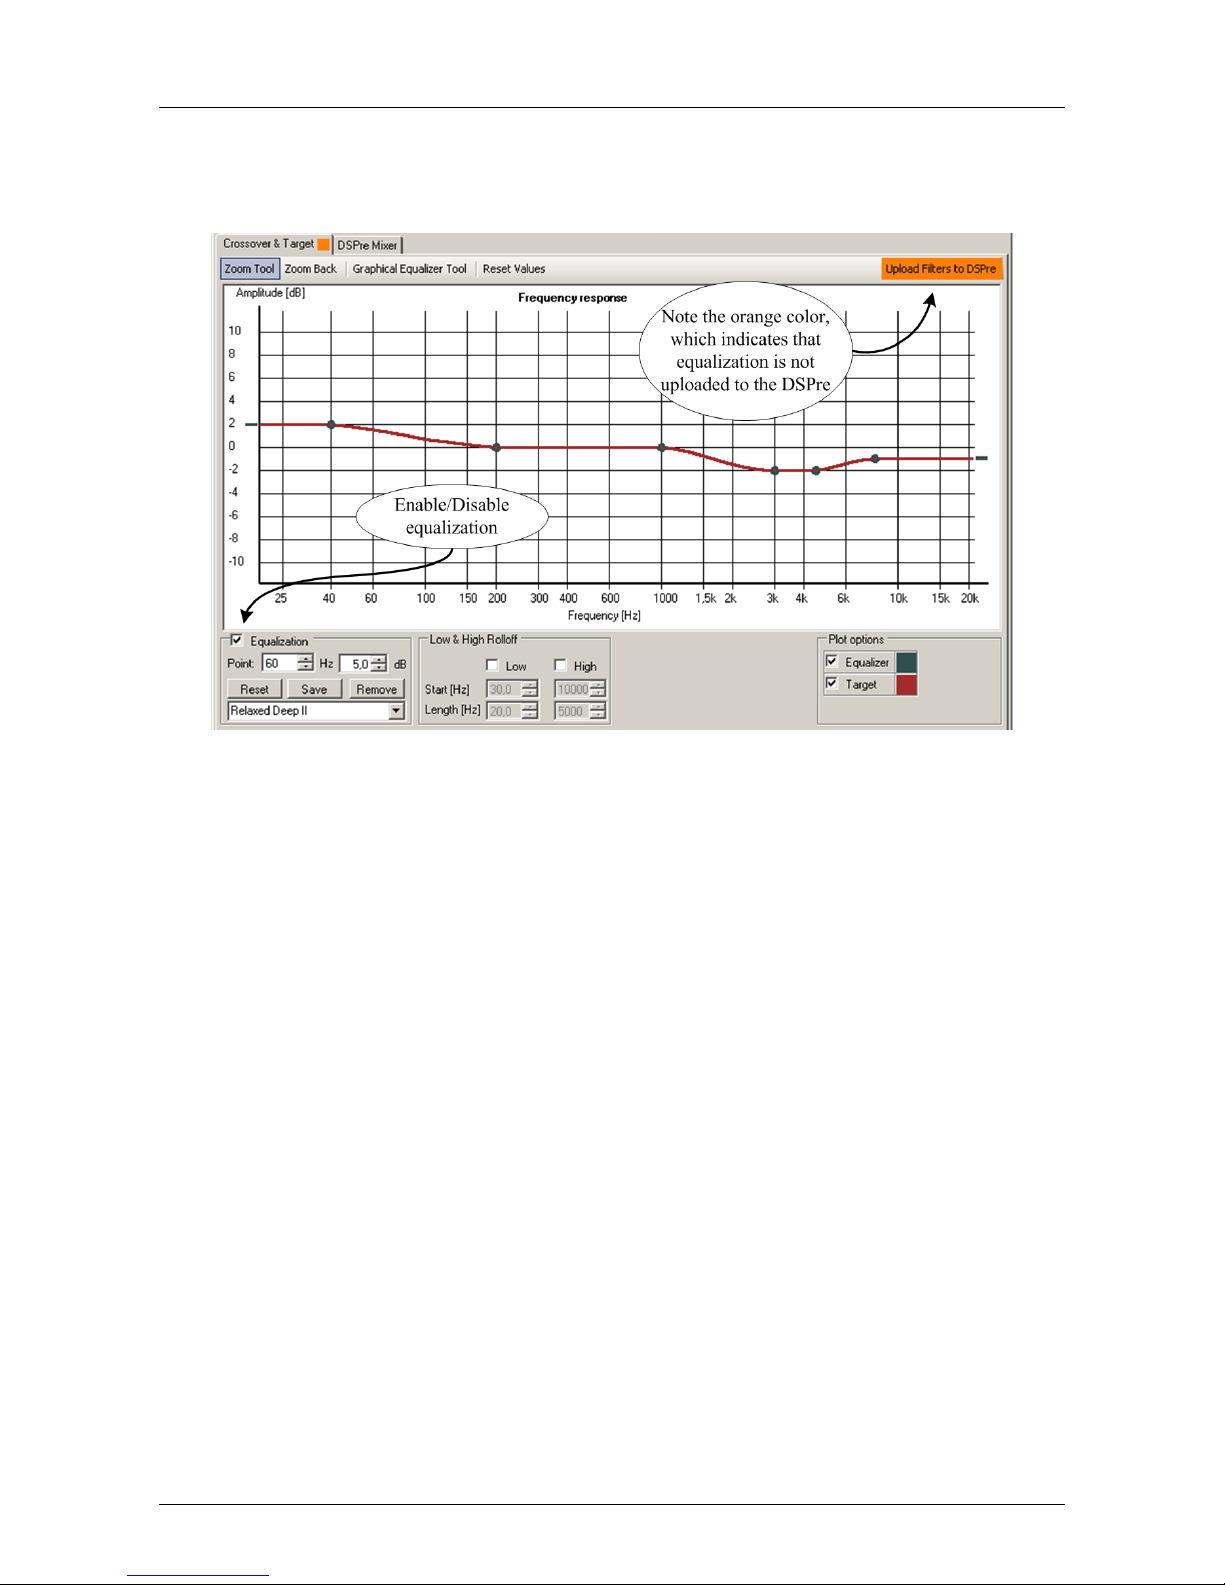
The equalization can be enabled or disabled by changing the checkbox status, but the new
equalization is not present on the DSPre before filters are uploaded.
A basic test is to listen to a piece of music without equalization and thereafter upload the
equalization and hear the difference.
4.4 Open and Save Equalization
From the ’Equalization’ menu you can also save and open equalization files. This feature is
convenient if you want to save your favorite equalization or interchange this with another
user.
’Equalization’ → ’Open Custom’
’Equalization’ → ’Save Custom’
HOLM Acoustics HOLMFIR User Guide v0.4.4
Page 25
Equalization - Tonal Balance - Presets 21 of 65
4.5 Presets
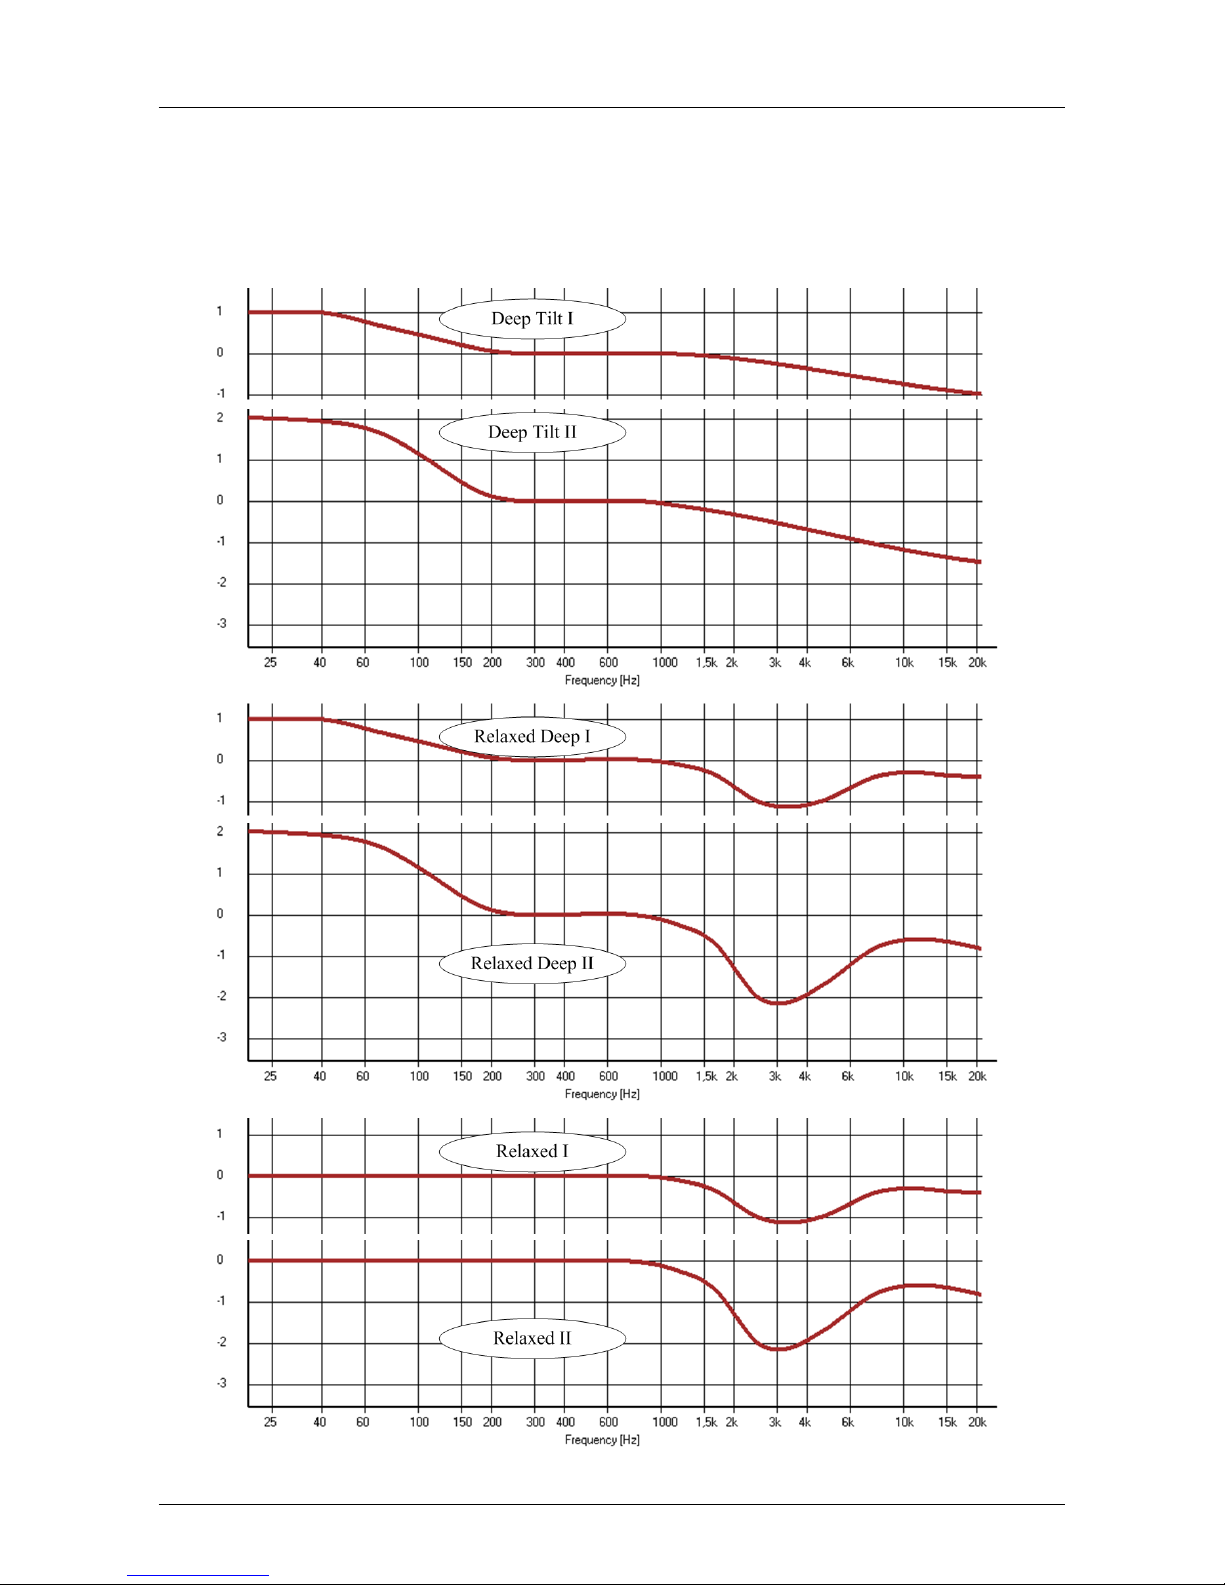
HOLM Acoustics has designed a collection of presets available from the menu. The collection might inspire you how to adjust the tonal balance.
HOLM Acoustics HOLMFIR User Guide v0.4.4
Page 26
Filter Bank 22 of 65
Chapter 5
Filter Bank
When you want to try out a new configuration or use the DSPre for an entirely different
system you can utilize the filter bank consisting of filters marked F0-F9.
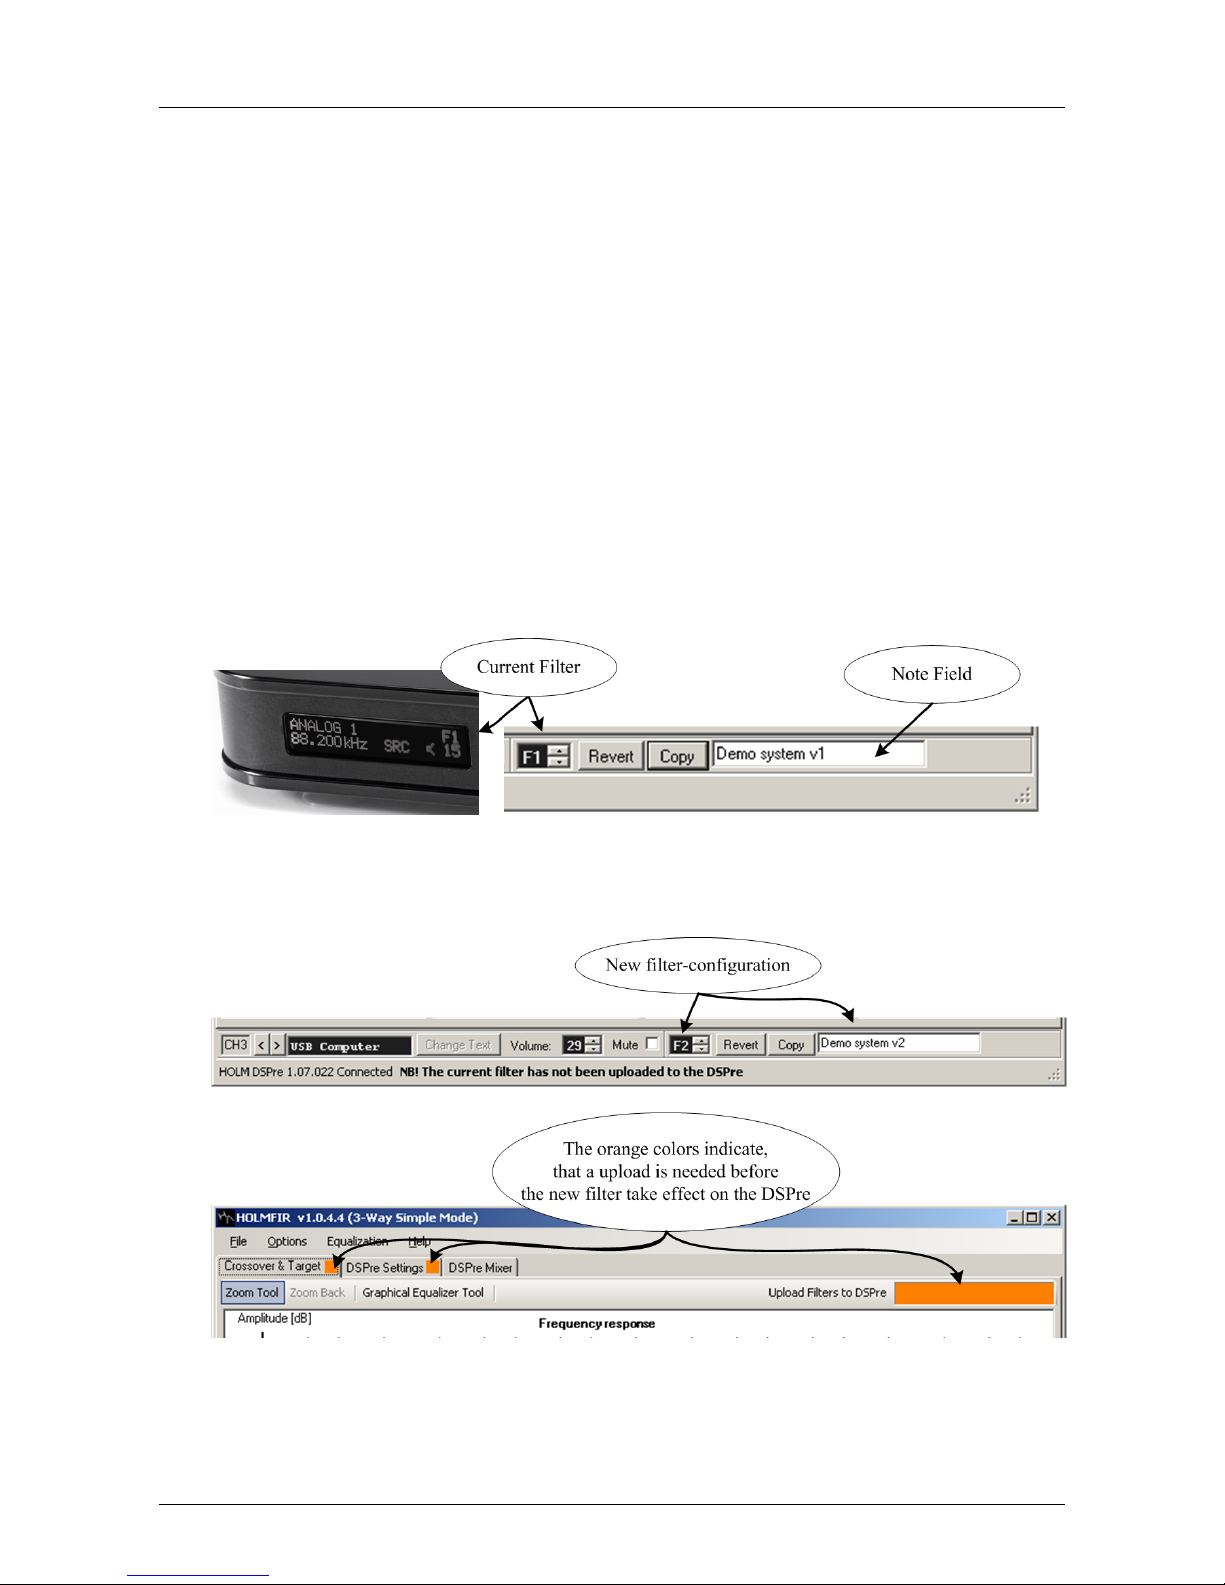
Enter a note to identify the configuration in the note field.
The current filter present on the DSPre can be identified on the display as F0-F9 in the
upper right corner.
Note that after a new filter has been selected the filters has to be uploaded to the DSPre
for the change to take effect. The filter number in the DSPre changes when the upload is
finished - that is when the DSPre is playing with the new filter.
HOLM Acoustics HOLMFIR User Guide v0.4.4
Page 27
Filter Bank - Save and Open Configurations 23 of 65
5.1 Save and Open Configurations
As an alternative to the filter bank you can save and open configurations as files from the
menu:
’File’ → ’Save current configuration as...’
’File’ → ’Open saved configuration to current bank’
Note that the configuration file is a human readable XML-file but it is strongly recommended not to edit saved configuration files by hand.
Autosave of the current configuration
The configuration is autosaved when HOLMFIR is closed, so when HOLMFIR is restarted
you will see the same configuration and have the same filterbank as when you closed the
application.
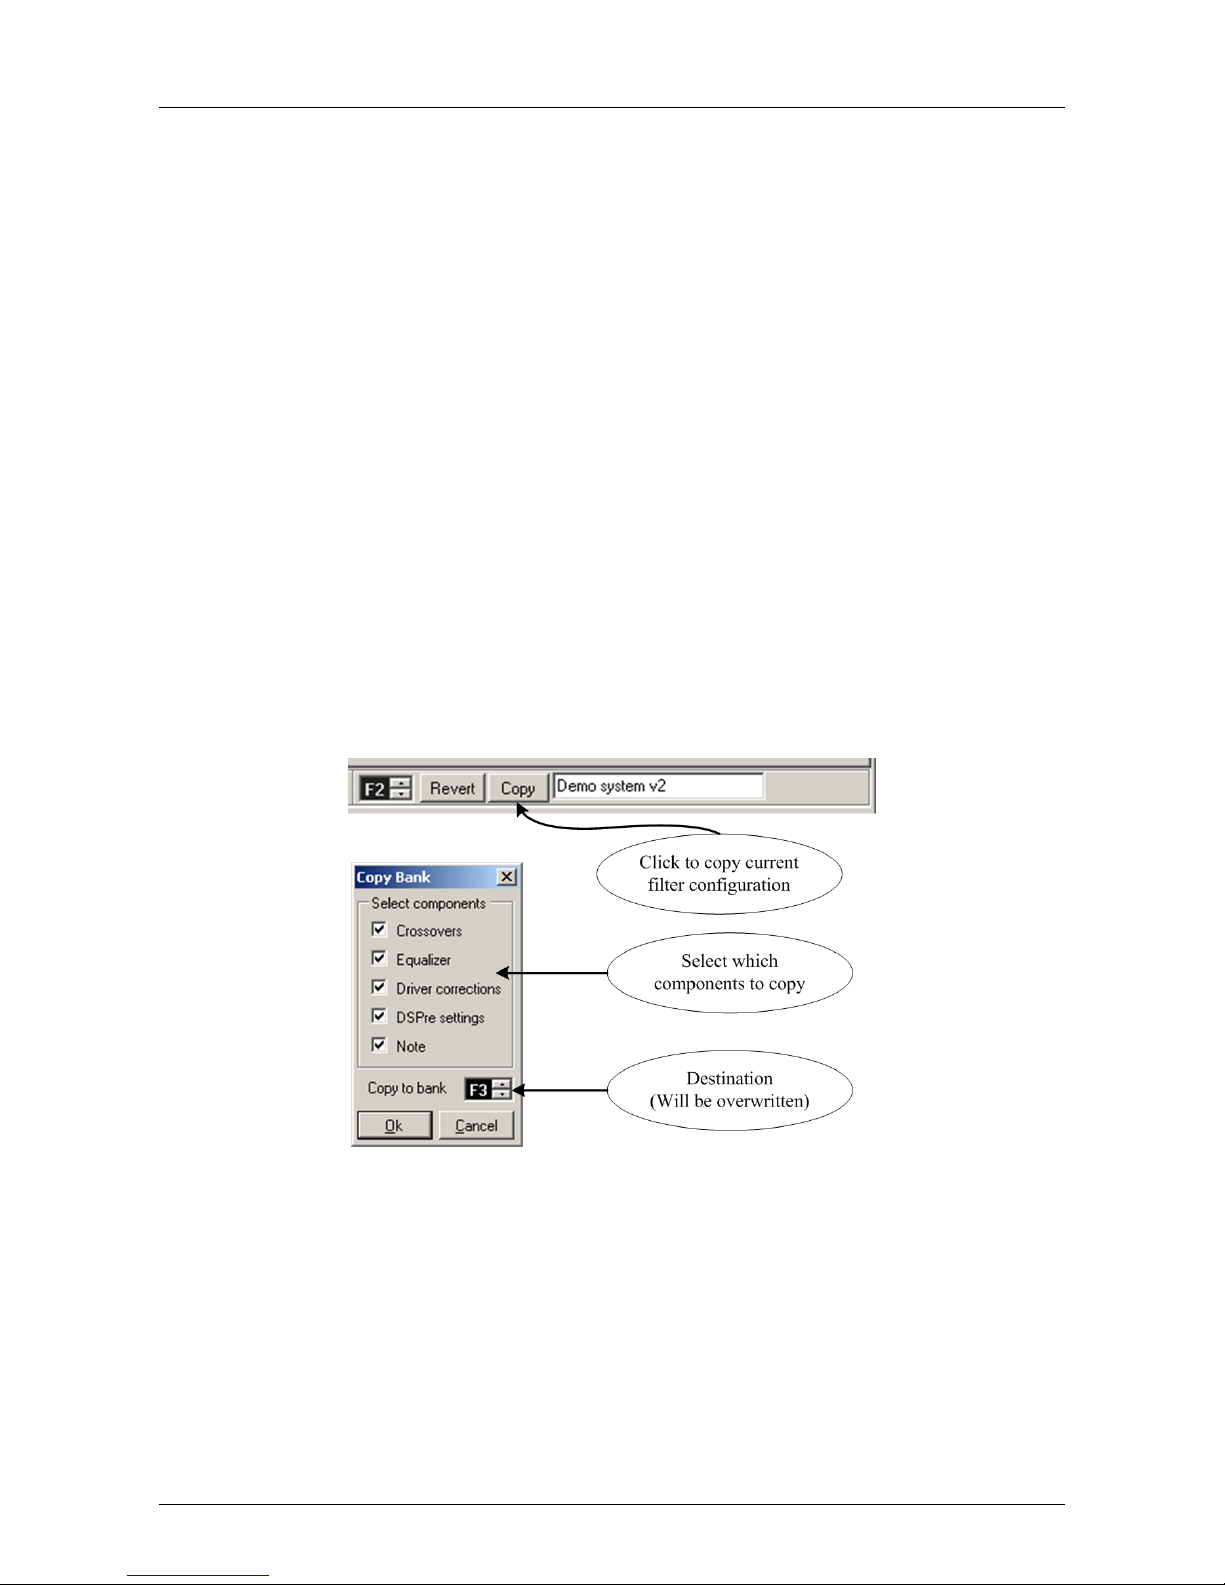
5.2 Copy Filter Configuration
You can copy a filter-configuration (or parts) from one filter to another. This is convenient
if you want to modify an already existing configuration, but would like to use another filter
in the bank.
HOLM Acoustics HOLMFIR User Guide v0.4.4
Page 28
Control the DSPre 24 of 65
Chapter 6
Control the DSPre
You can to some extend customize and control the DSPre from HOLMFIR. These settings
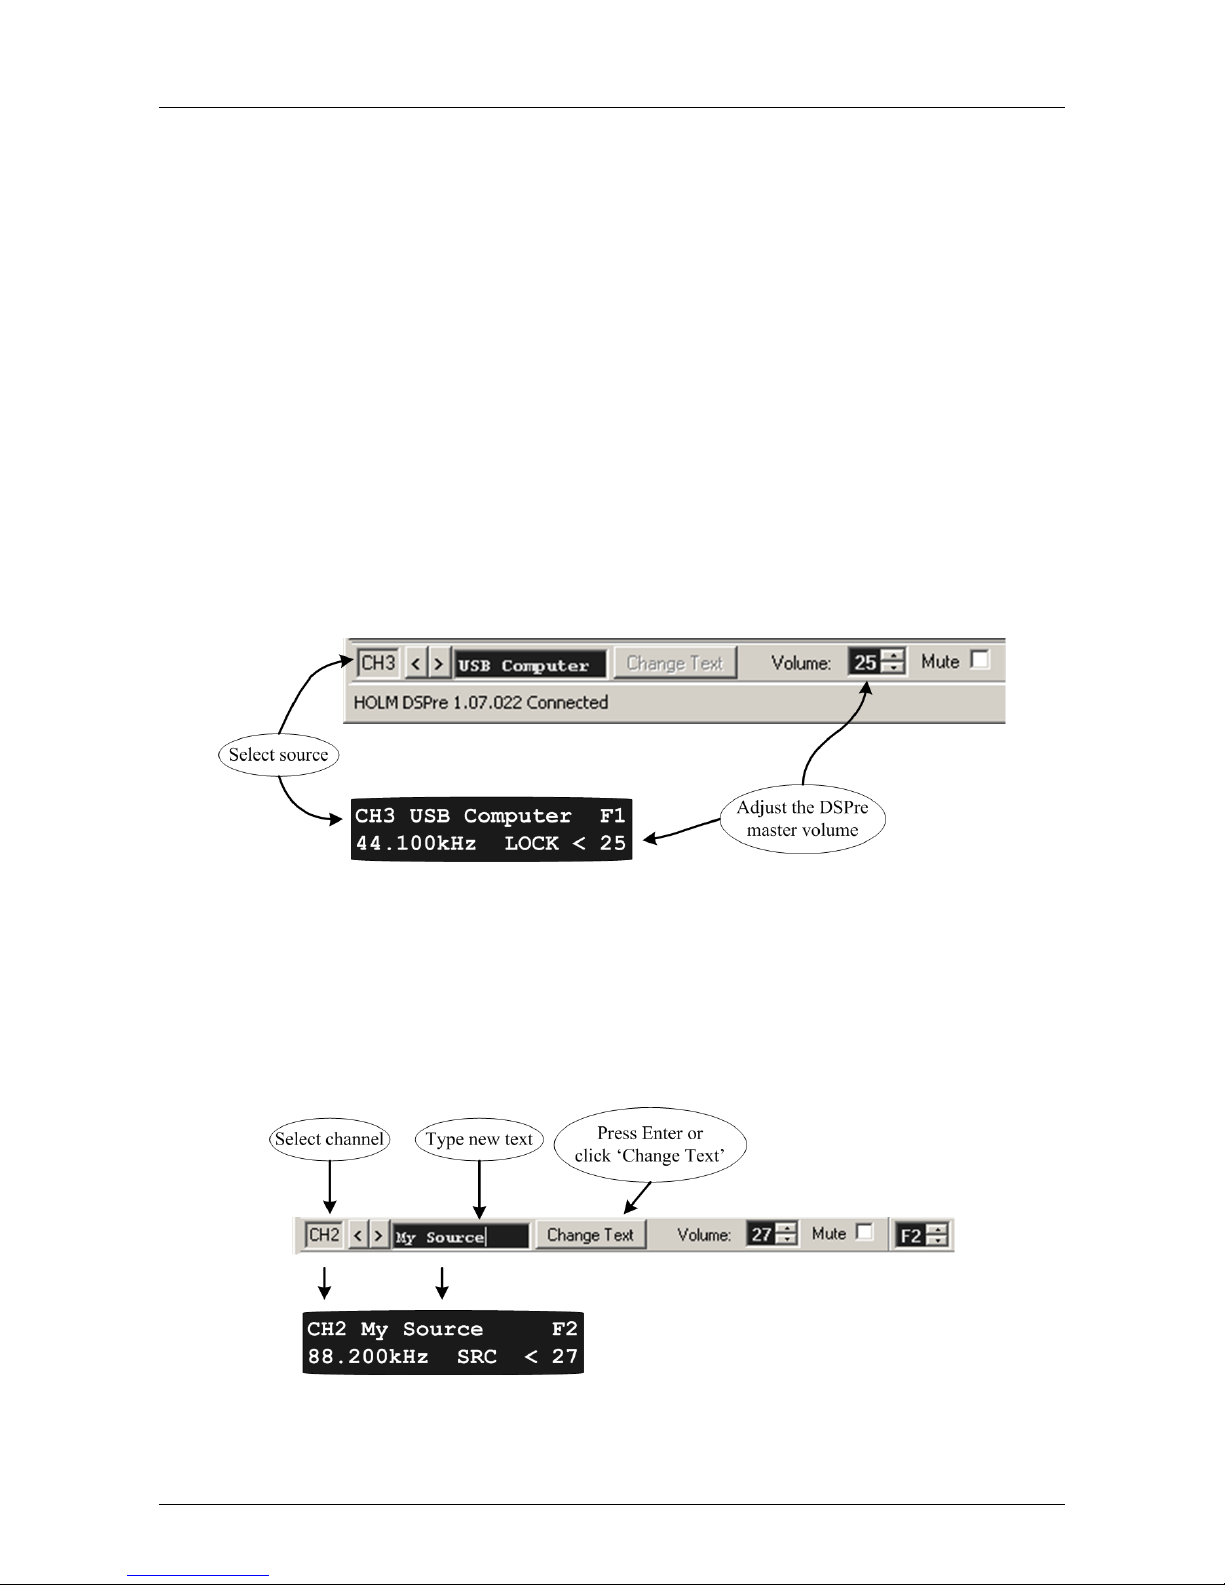
can of course only be controlled from HOLMFIR when the DSPre is turned on and connected via the USB-cable to the computer. Volume and source can be selected via the
DSPre remote-control, the DSPre frontpanel or HOLMFIR:
Note that when the DSPre has been turned off, the current source is remembered, but the
volume is reset to the moderate value 15.
6.1 Source Text in the Display
The source text can be specified with 13 characters. The source text is static - hence will
be remembered when the DSPre is turned off.
HOLM Acoustics HOLMFIR User Guide v0.4.4
Page 29
Control the DSPre - DSPre Mixer (Windows XP) 25 of 65
6.2 DSPre Mixer (Windows XP)
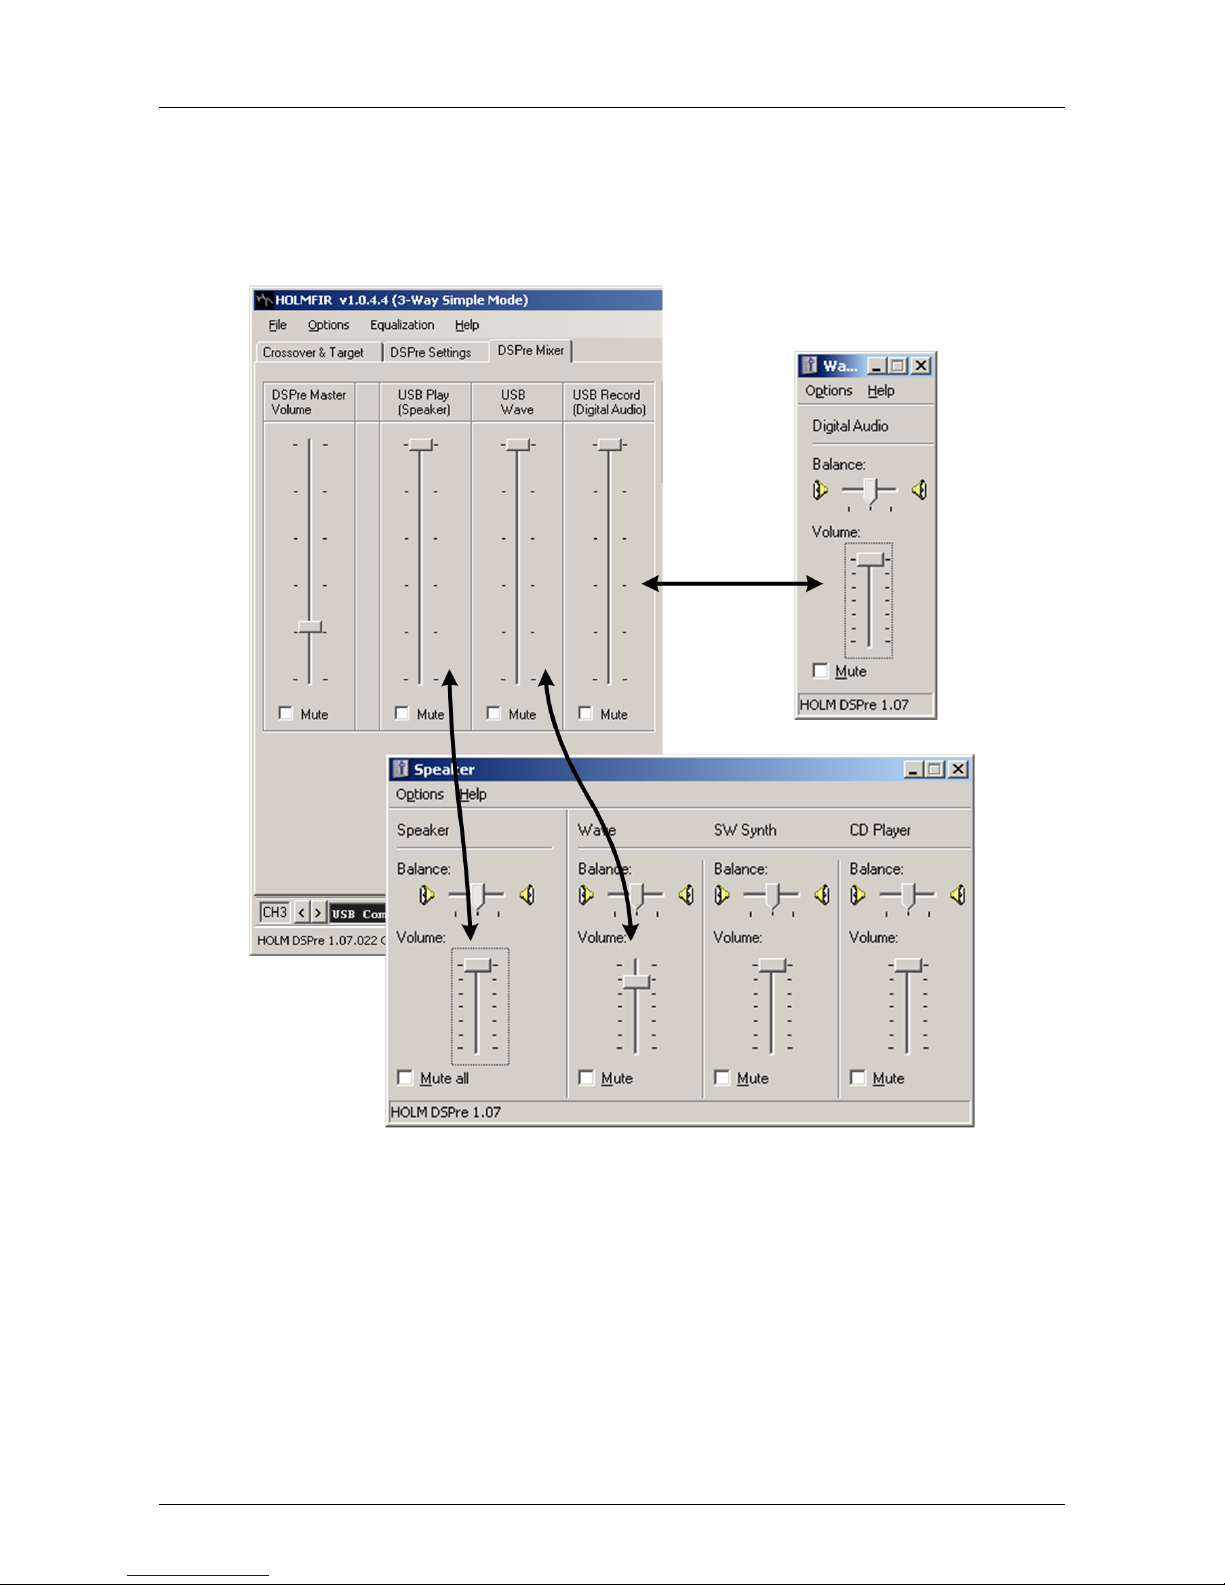
You can adjust the Microsoft Windows volume settings via the ’DSPre Mixer’ tab. The
HOLMFIR and Windows XP sliders corresponds as follows:
The optimal quality sound (from a digital point of view) is achieved when USB Play and
USB Wave Volume are both set to maximum.
HOLM Acoustics HOLMFIR User Guide v0.4.4
Page 30
Control the DSPre - DSPre Mixer (Windows Vista) 26 of 65
6.3 DSPre Mixer (Windows Vista)
Write how to control the sound in Windows Vista
HOLM Acoustics HOLMFIR User Guide v0.4.4
Page 31

Control the DSPre - Playing Music via USB 27 of 65
6.4 Playing Music via USB
When the DSPre once has been configured you can use ANY computer to play sound via
USB without having to install HOLMFIR - that is any computer supporting the USB 1.1
audio standard.
The most commonly used operative systems support this standard as Plug’n’Play without
having to install any special drivers:
• Windows 2000, Windows ME, Windows XP, Windows Vista
• Mac OS X
• Linux (Ubuntu, Fedora, RedHat, SUSE, ...)
Best sound quality
It is possible to achieve an extremely high digital signal quality (the same as from a CDplayer), if some software requirements are fullfilled:
• The software USB - ’Speaker volume’ should be 100 % (maximum)
• The samplerate should be 44.100 kHz
- hence ’44.100kHz LOCK’ in the DSPre display
• No other applications than your music player should stream audio to the DSPre
Recording via USB
Any source can be recorded via the DSPre, but recording is of course most relevant when
using an analog source such as a turntable or a FM-tuner.
HOLM Acoustics HOLMFIR User Guide v0.4.4
Page 32
Control the DSPre - Analog Input Gain 28 of 65
6.5 Analog Input Gain
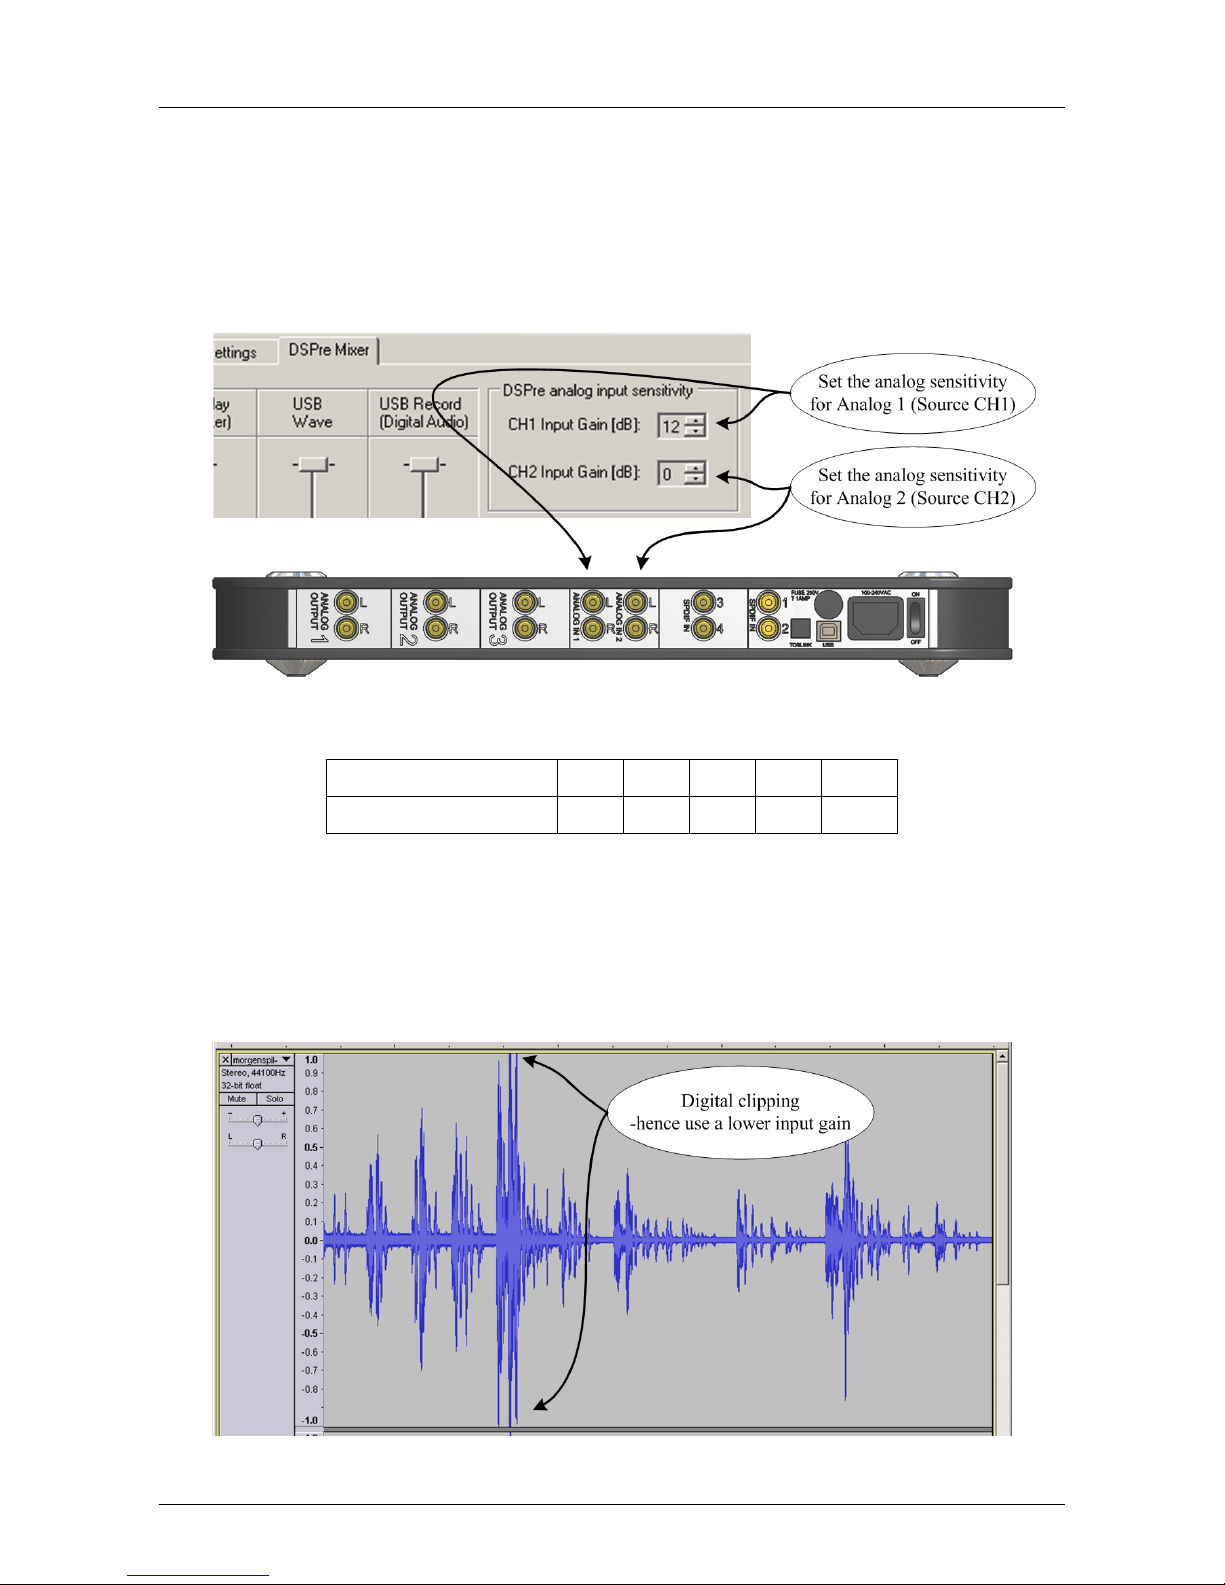
The DSPre has two analog inputs with variable sensitivity (gain). When using an analog
source such as a record player or a FM-tuner the rule of thumb is that the listening volume
should be the same as when listing to a digital source such as a CD-player or your computer.
Below table can be used if you know the output voltage of your analog source:
Input Gain 0 dB 3dB 6 dB 9 dB 12 dB
Voltage (Peak-to-Peak) 20 V 14 V 10 V 7 V 5 V
Technical Note
If you record the analog source from the DSPre via a computer while playing, you are able
to analyze the level simply by identifying clipping or a to low level.
Audacity is free software for recording and editing sounds. Audacity can be downloaded
here: http://audacity.sourceforge.net
HOLM Acoustics HOLMFIR User Guide v0.4.4
Page 33
Customization (Look and Feel) 29 of 65
Chapter 7
Customization (Lo ok a nd Feel)
This chapter inspire you how to customize the appearance of the information the way you
like it.
Note that the filters and configuration of the DSPre are NOT affected when changing
settings in the ’Options’ menu - hence just try out some options with no risk.
Tooltip Popups
The tooltip popups can be enabled or disabled by two menu entries:
’Options’ → ’Show tooltips’ or ’Help’ → ’Show tooltips’
7.1 Linewidth
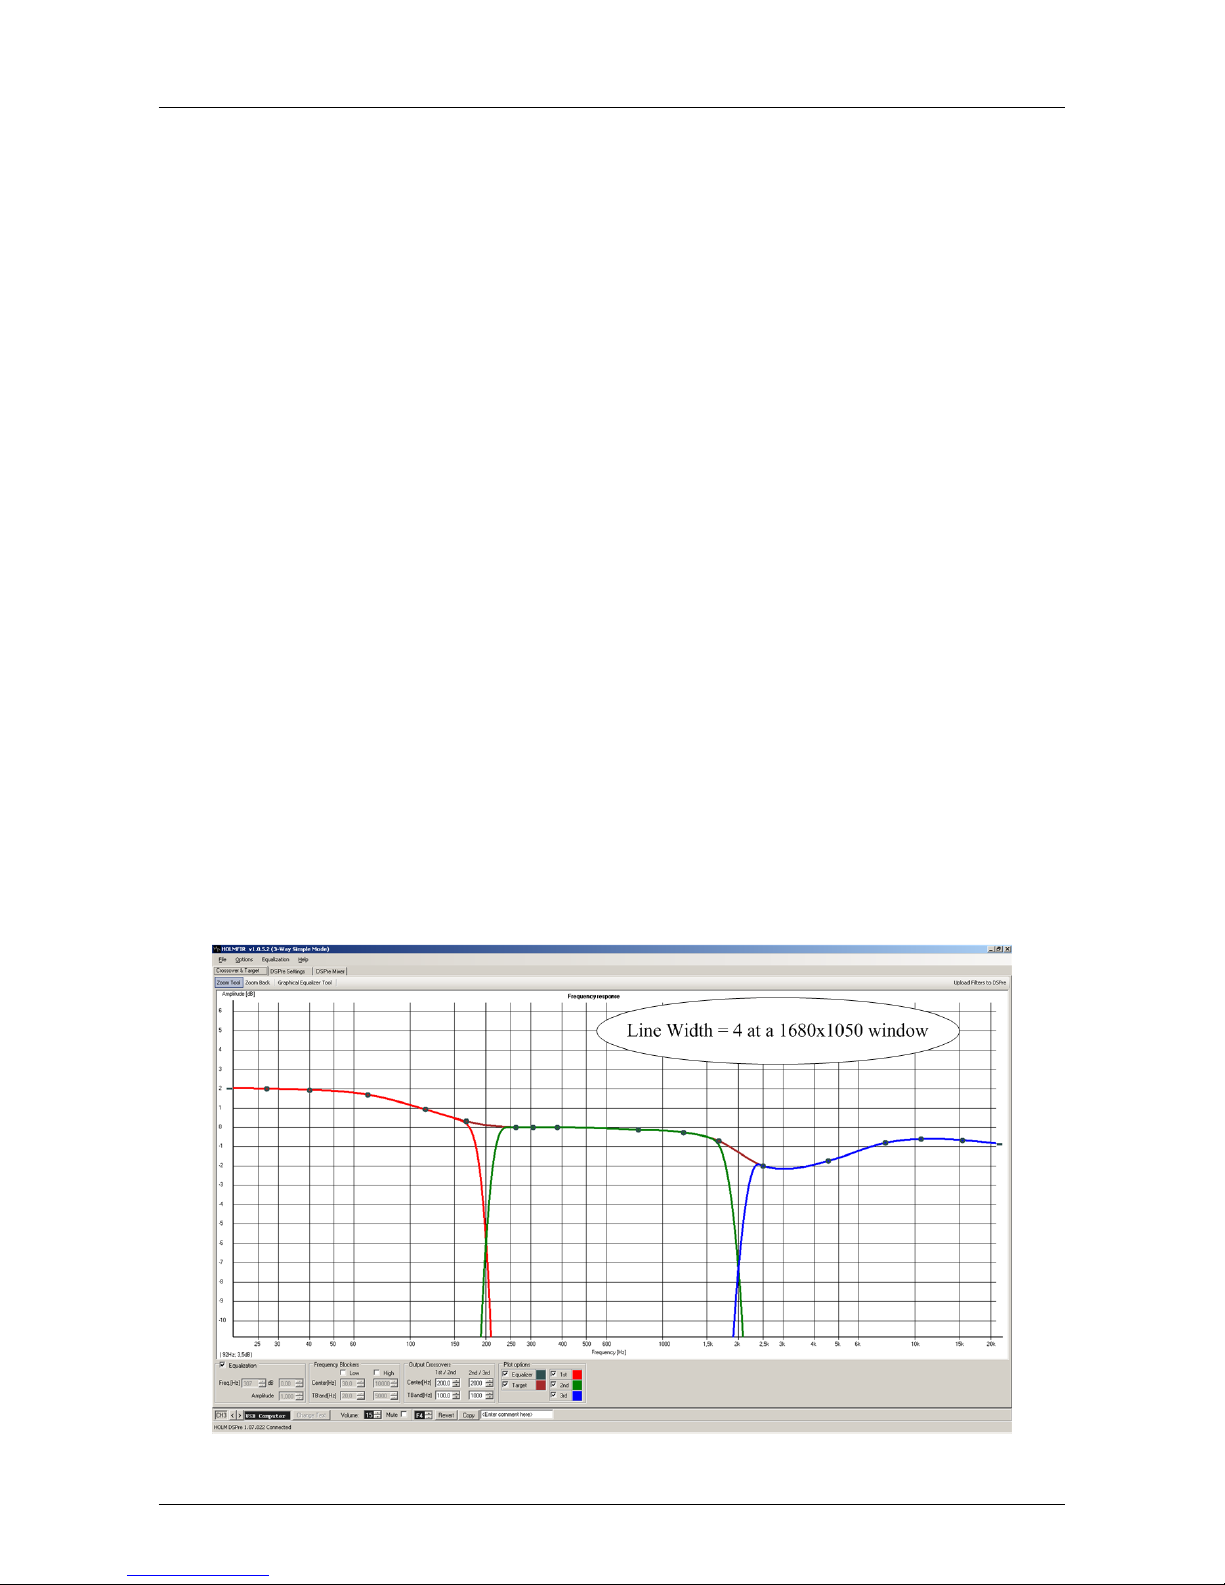
The linewidth can be adjusted from the menu: ’Options’ → ’Set General Linewidth’.
This option is relevant when HOLMFIR is maximized using high screen resolution:
HOLM Acoustics HOLMFIR User Guide v0.4.4
Page 34
Customization (Look and Feel) - Colors 30 of 65
7.2 Colors
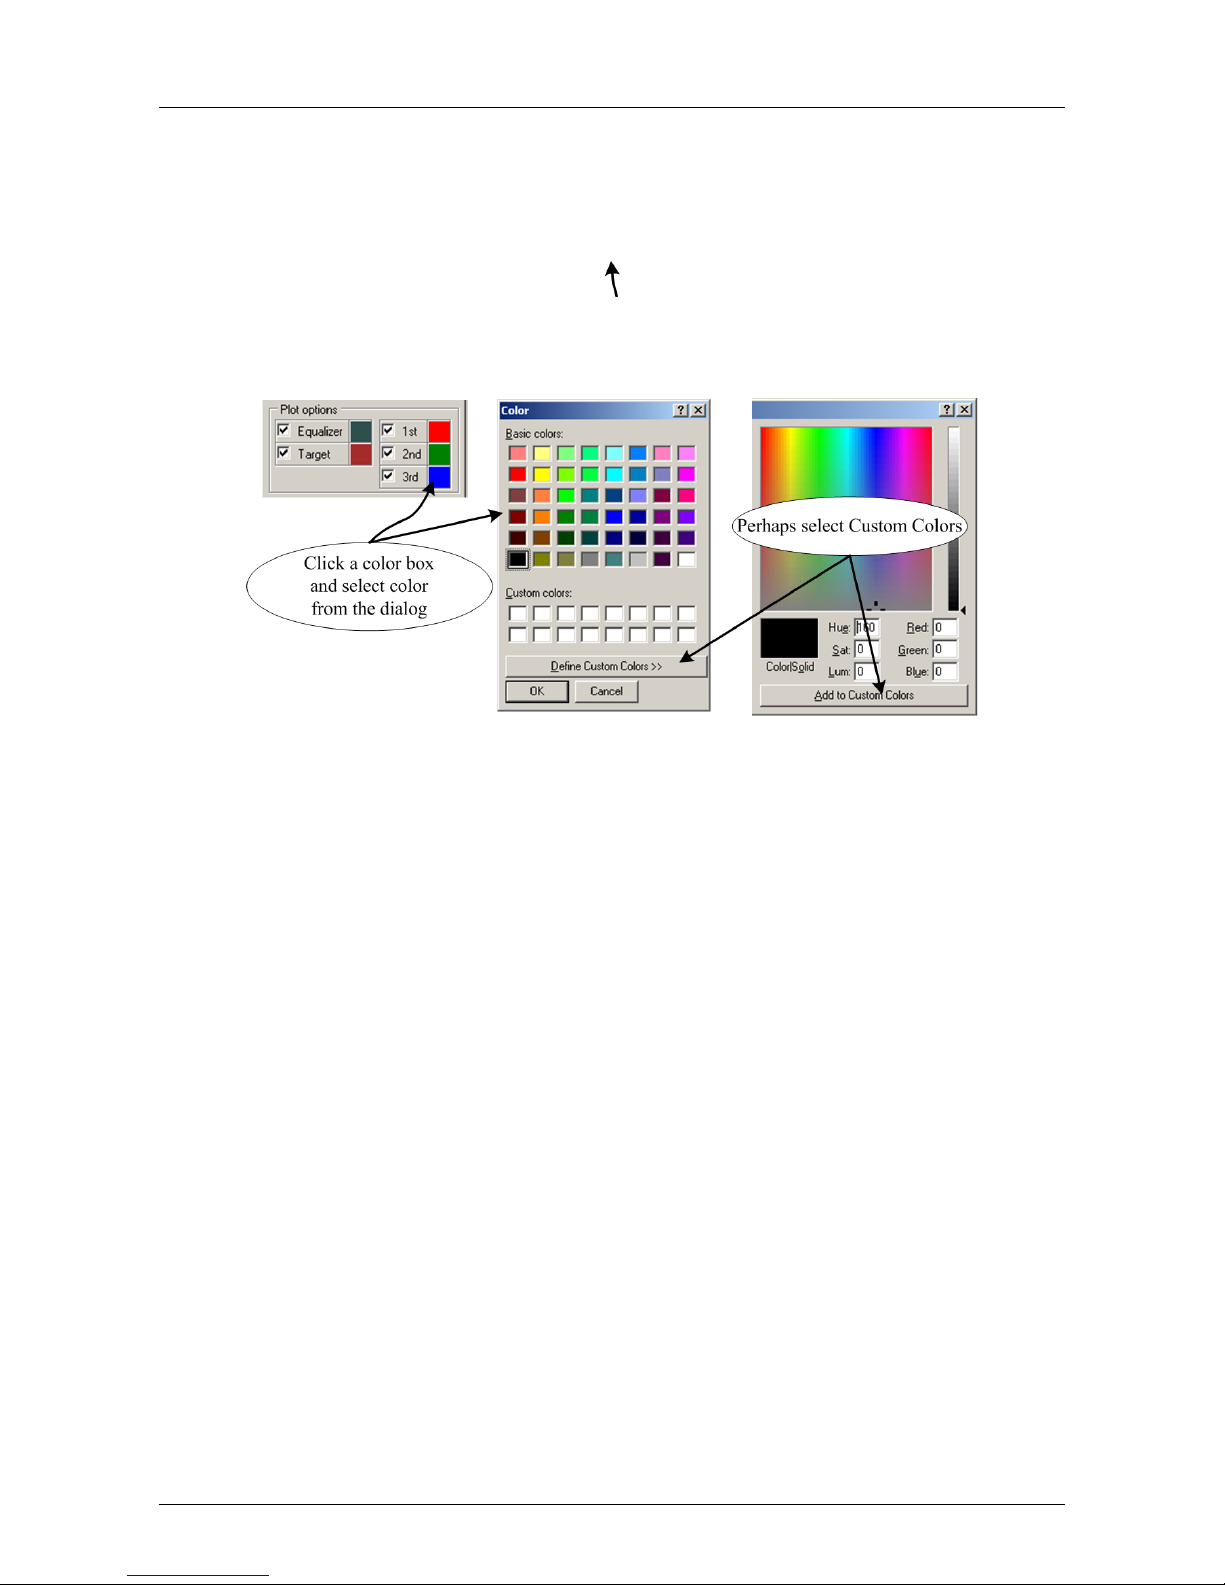
The colors of the components in the graphs can all be customized:
The ’Text & Grid Color’ and ’Background Color’ are reached from the ’Options’ menu
where as the other colors changed by clicking the Color box
Export Graphs as Bitmap Images
The graphs can be exported as bitmap graphics from the menu:
’File’ → ’Crossover & Target Image’
HOLM Acoustics HOLMFIR User Guide v0.4.4
Page 35

31 of 65
Part II
HOLMFIR in Advanced Mode
HOLM Acoustics HOLMFIR User Guide v0.4.4
Page 36

Introduction to Advanced Mode 32 of 65
Chapter 8
Introduction to Advanced Mo de
In ’Advanced Mode ’you have an outstanding opportunity to implement corrections and
fine tune your speakers.
The response of your system is measured with a calibrated microphone, and with a known
response you can to a far extend correct for the imperfectness in your system.
Switch to Advanced Mode
Switch to ’Advanced Mode ’from the options menu: ’Options’ → ’Advanced Mode’.
The changes/configurations made in ’Advanced Mode ’are still in effect (but hidden) when
switching back to ’Basic Mode ’.
8.1 Functionality
The functionality achieved in ’Advanced Mode ’is:
• Automatic gain-level adjustment
• Automatic time-align adjustment
• Linear frequency response (Amplitude vs. frequency)
• Correction of Q-Damping factor for the bass-driver
• Linear phase response
8.2 Configuring the DSPre with Full Correction
The chapters 10, 11 and 12 are increasing in complexity and concepts, but if you want the
fastest way of configuring the DSPre with full correction you should:
1. Correct each driver in the system (Chapter 12 ’Driver Correction’)
2. Align the drivers (Chapter 11 ’Automatic Driver Alignment’)
3. Verify the full setup (Chapter 10 ’Control Measurements’)
HOLM Acoustics HOLMFIR User Guide v0.4.4
Page 37
Get Ready to Measure 33 of 65
Chapter 9
Get Ready to Measure
Perhaps you are familier with the concepts when measuring the response of an audio
system, then you will find this chapter obvious, but relevant.
If you are not familier with audio-measurements you should definitely pay extra attention
to this chapter.
9.1 Microphone Connection
Any microphone can in principle be connected to the DSPre, but for simplicity it will be
assumed, that ’The Microphone’ is the HOLM Acoustics microphone Mic 1.
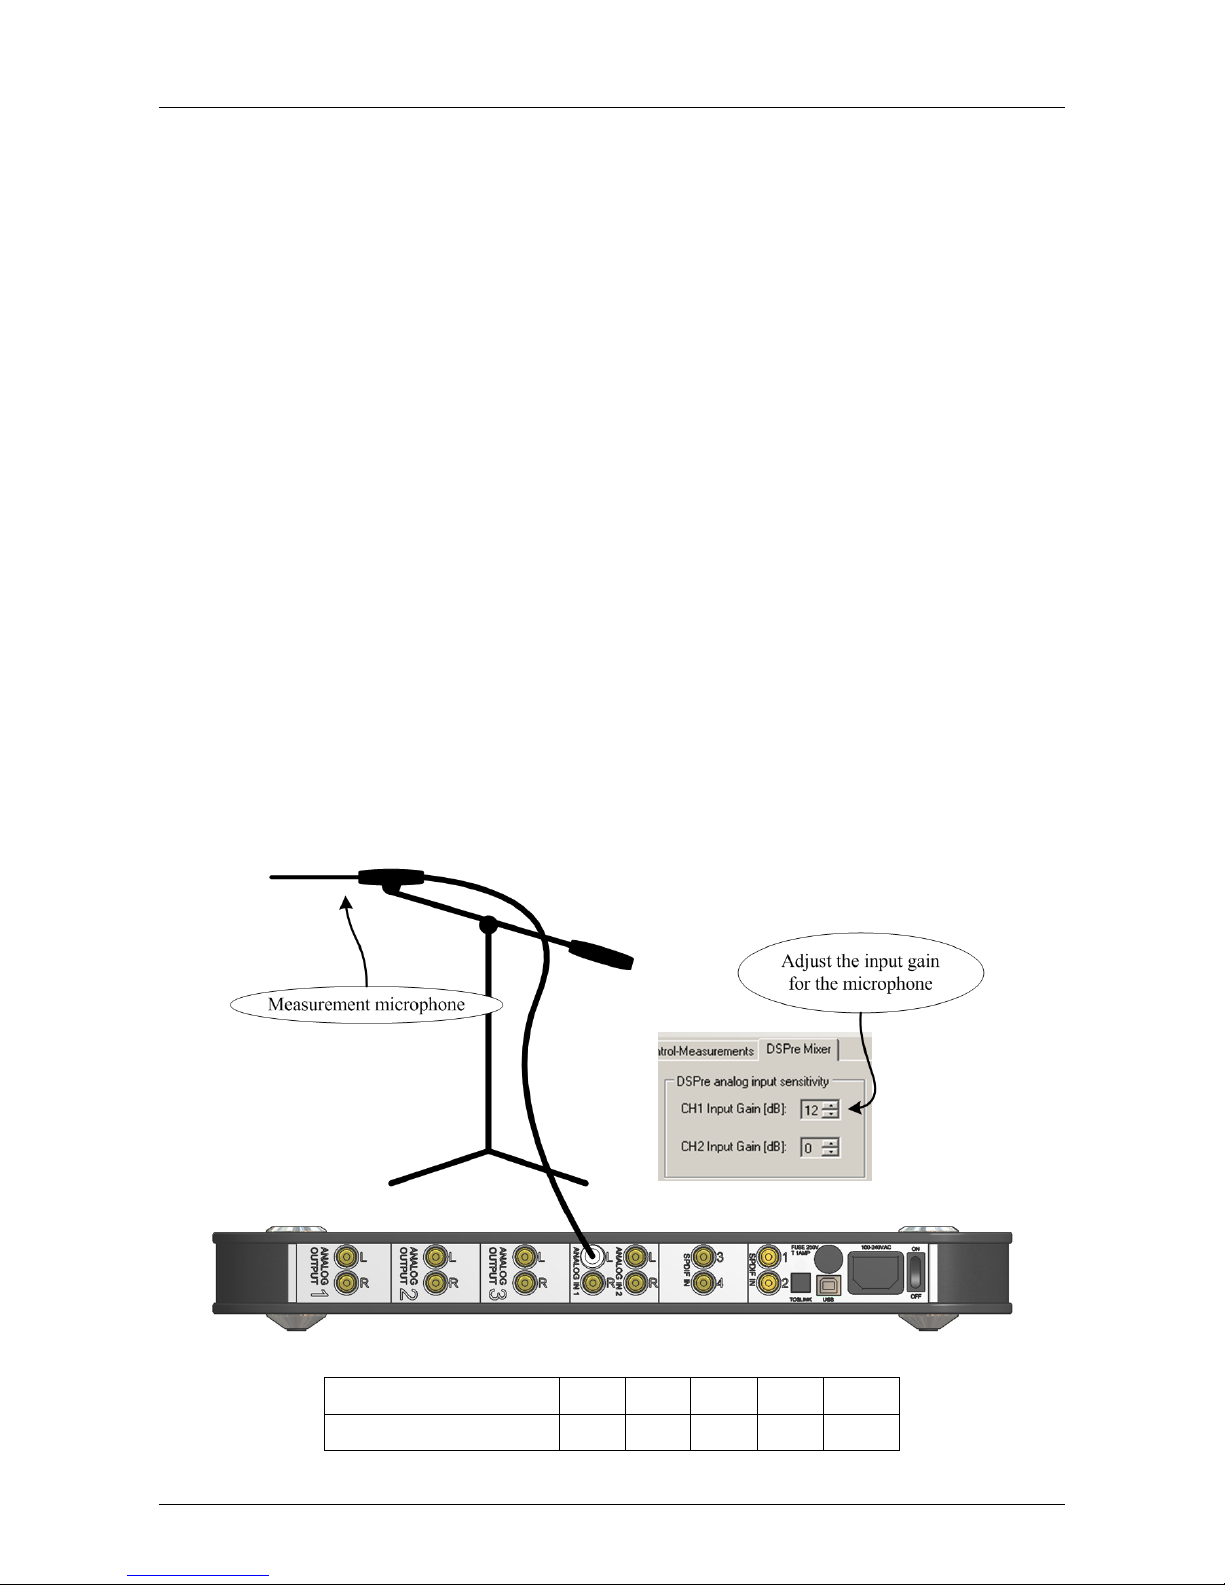
Connect the microphone to the DSPre analog 1 Left input on the DSPre and adjust the
analog input gain (12 dB for the Mic 1)
Microphone Input Gain 0 dB 3dB 6 dB 9 dB 12 dB
Voltage (Peak-to-Peak) 20 V 14 V 10 V 7 V 5 V
HOLM Acoustics HOLMFIR User Guide v0.4.4
Page 38
Get Ready to Measure - Microphone Calibration File 34 of 65
9.2 Microphone Calibration File
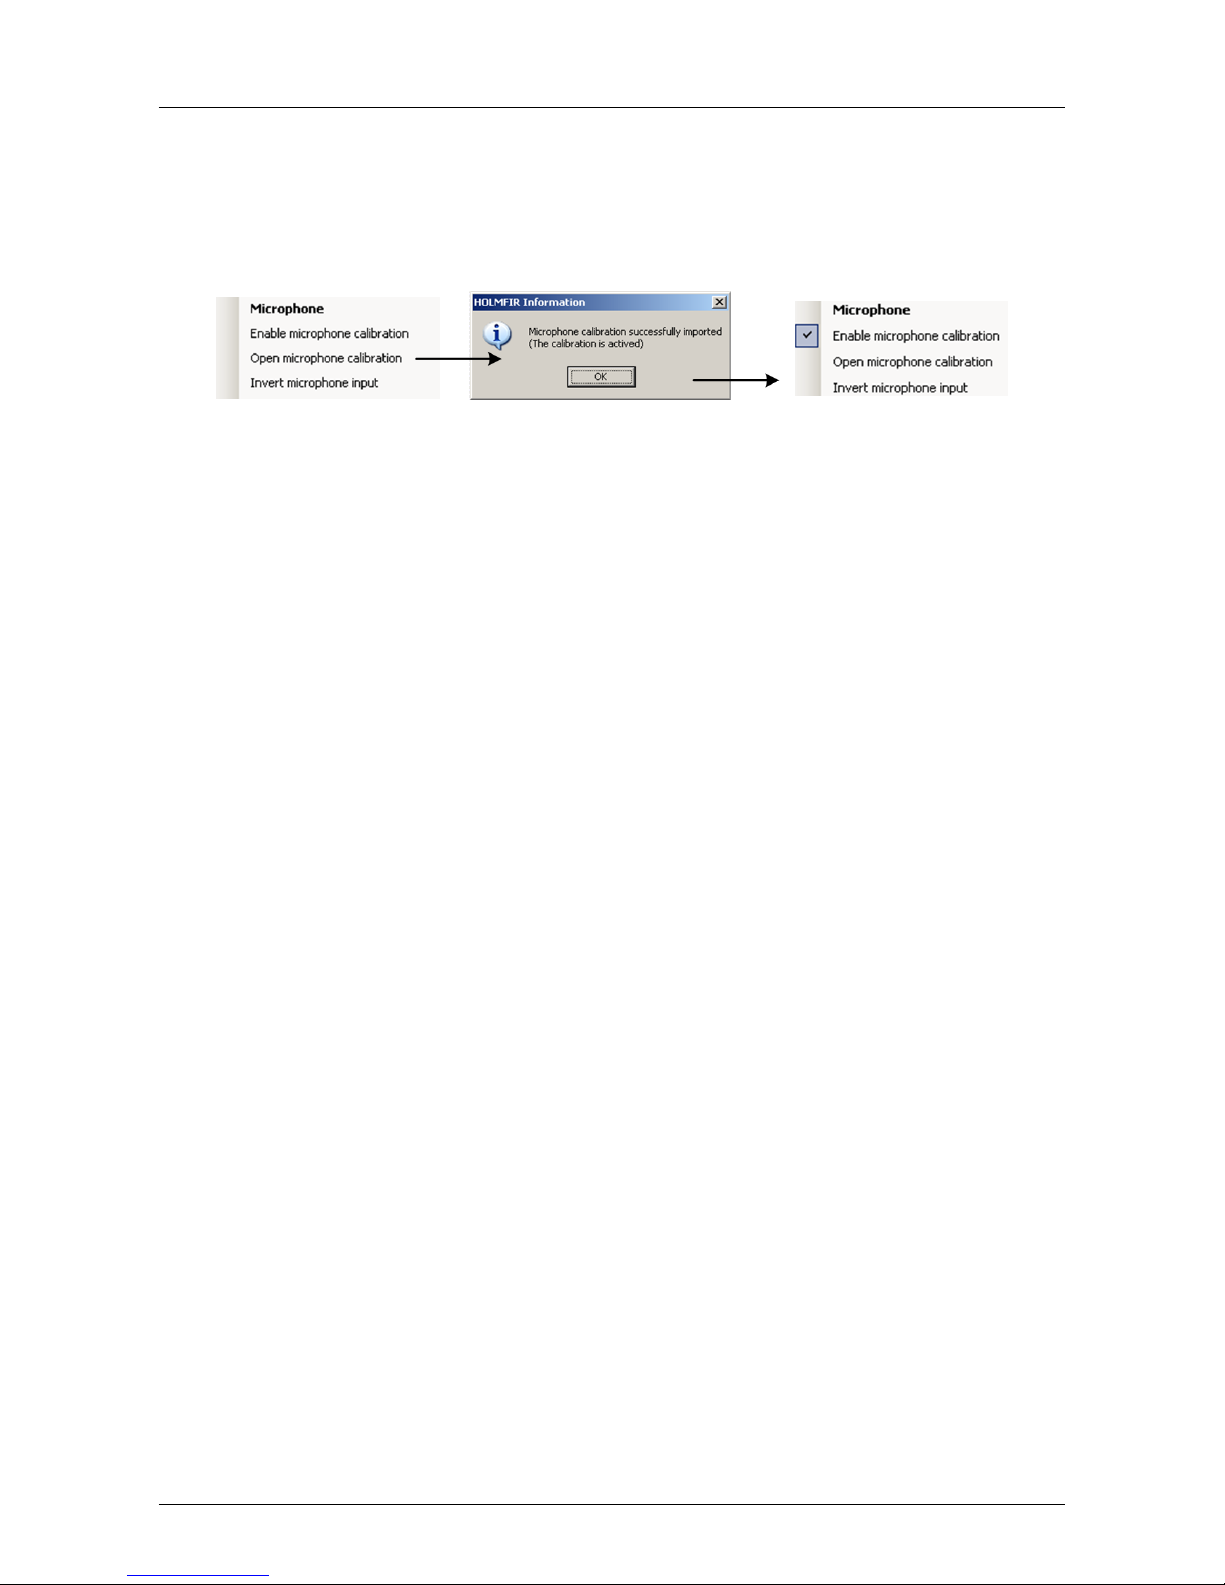
Microphone calibration is enabled from the menu:
’Measurements’ → ’Open microphone calibration’
The file format of the calibration file is pure ASCII-text, which is parsed according to the
following rules:
• Expects data in columns:
Frequency <separator> dB <separator> phase in degrees <eol>
• Accepts the following characters as <separator>: space, semicolon, tabular
• Ignores lines not starting with a number
• Accepts ’,’ and/or ’.’ as decimal point
An example of such a file could be:
#HOLM A c o u s t i c s Mic 1 C a l i b r a t e d
Fre q uency ; Gai n [dB ] ; Phas e [ d e g r e e s ]
0 ; − 8 .29504; 0
9. 4 2 0 78 ; − 8 . 2 9 5 0 4 ; 0
1 5 1 0 . 0 2 ; − 8 .2746; − 0 . 03606 3 7
1 5 4 7 . 7 ; − 8 .25409 ; − 0 .03594 1 5
1 5 8 6 . 7 3 ; − 8 . 23392 ; − 0 .03489 5 3
1 6 2 7 . 1 ; − 8 .21392 ; − 0 .03325 8 7
1 6 6 8 . 8 2 ; − 8 . 19389 ; − 0 .03103 9 3
1 7 1 1 . 8 9 ; − 8 .17369 ; − 0 .0279 0 8
1 7 5 6 . 3 ; − 8 .15318 ; − 0 .02325 9 5
1 8 0 0 . 7 1 ; − 8 . 13287 ; − 0 .01649 7 3
1 8 4 5 . 1 3 ; − 8 . 11274 ; − 0 . 006963 8 5
1 8 9 0 . 8 8 ; −8 . 0 9 2 2 1;0.0 0 6 2 5 8 6 5
1 9 3 6 . 6 4 ; −8 . 0 7 1 98;0. 0 2 3 0 6 7 2
1 9 8 3 . 7 5 ; −8 . 0 5 1 57;0. 0 4 3 7 4 6 6
2 0 3 2 . 2 ; −8 . 0 3 1 14;0. 0 6 7 6 5 0 1
2 0 8 1 . 9 9 ; −8 . 0 1 0 77;0. 0 9 3 5 4 8 5
.
.
.
HOLM Acoustics HOLMFIR User Guide v0.4.4
Page 39
Get Ready to Measure - The Measurement Chain 35 of 65
9.3 The Measurement Chain
Before a measurement, please make sure that the full measurement chain is in place:
1. A PC/Laptop running HOLMFIR is connected to the DSPre via a USB cable
2. The DSPre is powered on
3. The amplifier(s) are connected to the DSPre and powered on
4. The speakers are connected to the amplifiers
5. The microphone is connected to the DSPre and powered on
9.4 Protect Your Ears
When measuring, HOLMFIR uses a frequency-sweep, which goes from 10 to 22050 Hz at
full amplitude from the computer. It is therefore important that you protect your ears
while measuring, since the high tones from 4000 to 22050 Hz might not sound loud, but
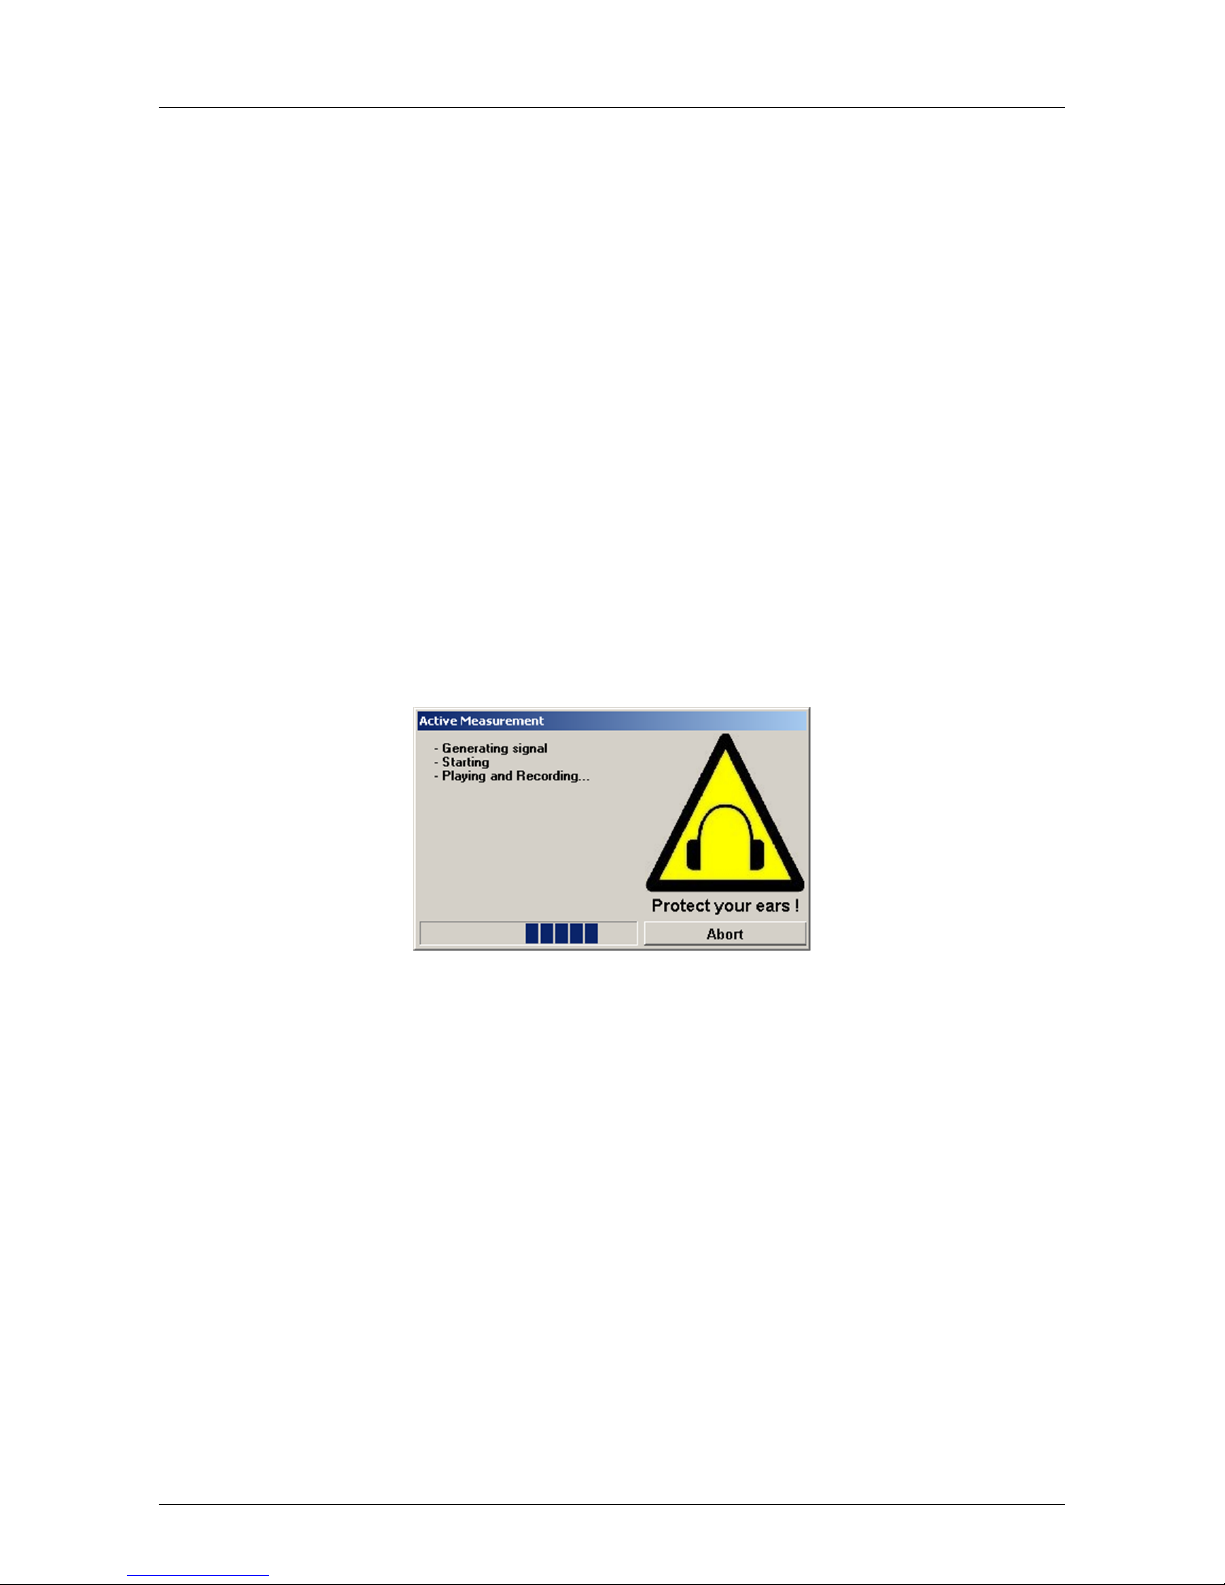
can damage your hearing, so please remember to protect your ears - hence the warning
pop-up when measuring:
9.5 DSPre Volume and Surroundings
Start with a DSPre volume at 15, then increase if record level is to low.
Some guidelines:
• Near field (less than 10cm) use low volume to avoid clipping
• Far field (further than 1m) use higher volume to get a better signal to noise ratio
• Close windows and doors to the outside
• Do not hesitate to make a new measurement, eg. if a large truck drove by or if your
neighbor slammed the door
HOLM Acoustics HOLMFIR User Guide v0.4.4
Page 40
Get Ready to Measure - What is Measured - and How? 36 of 65
9.6 What is Measured - and How?
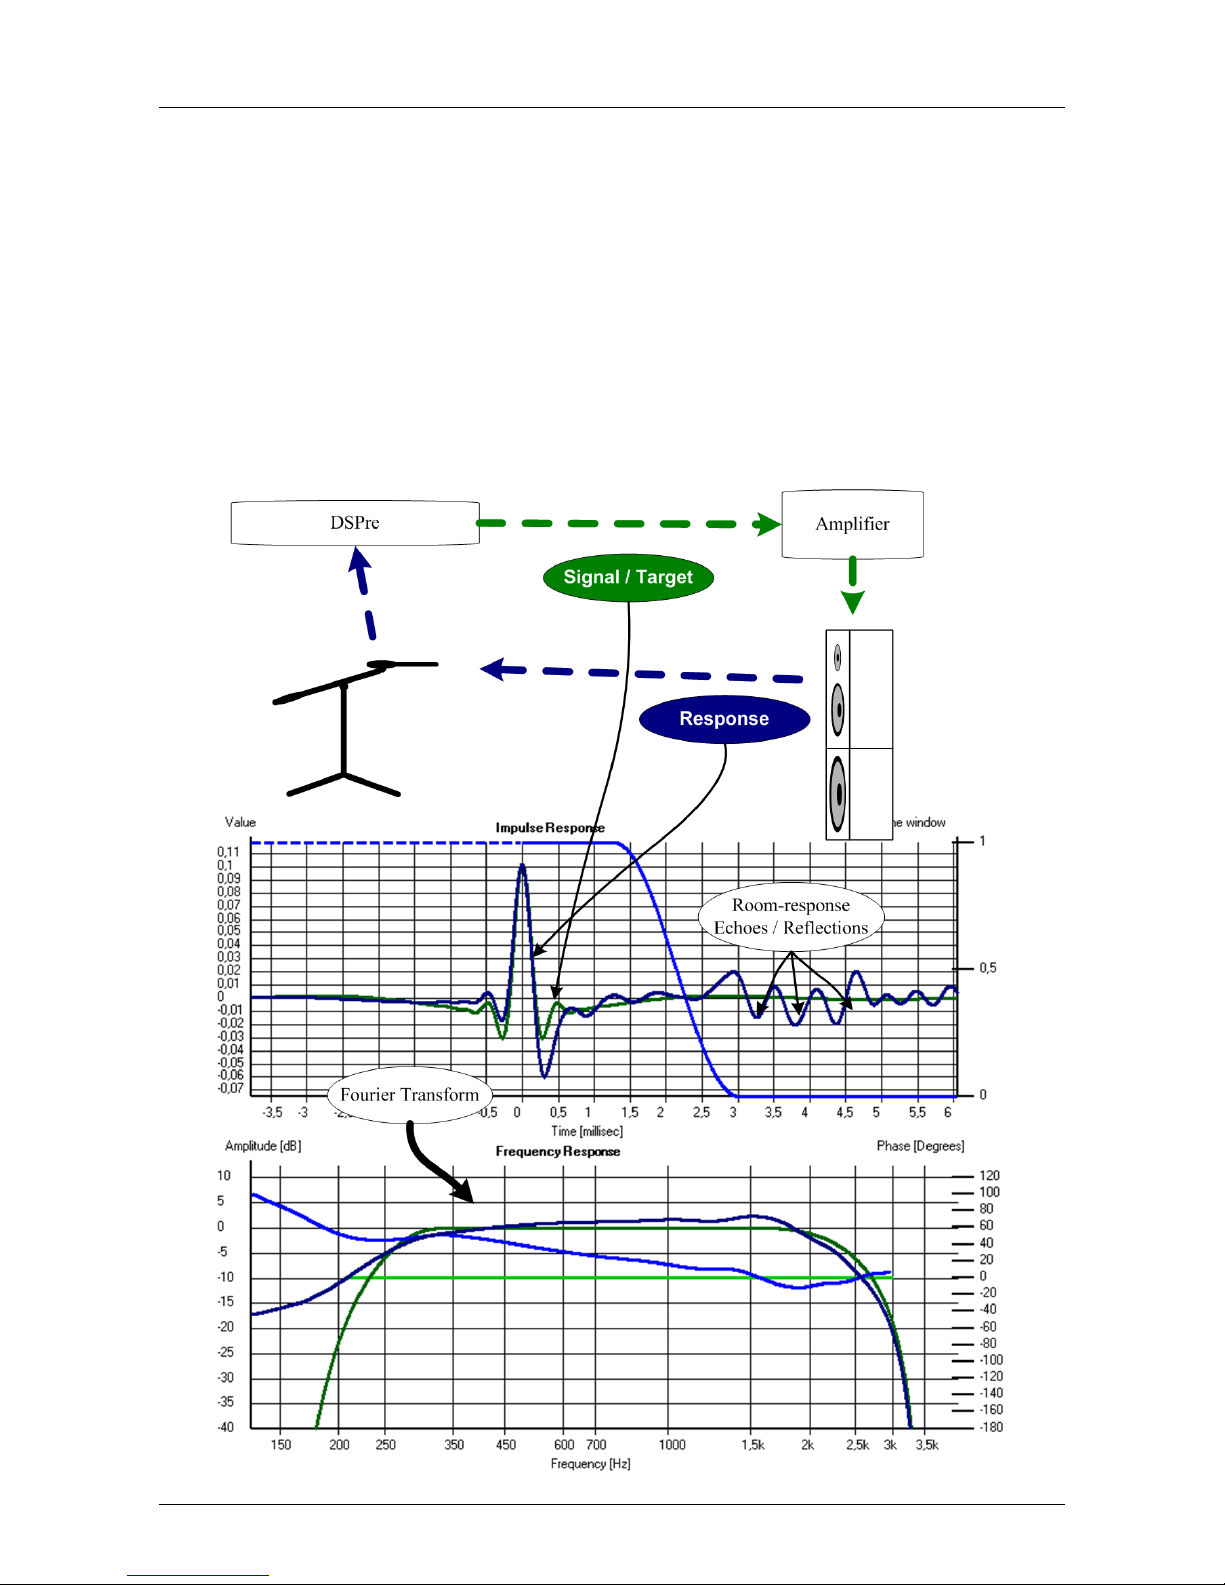
HOLMFIR measure the impulse response and thereby also the frequency response. If the
speaker/drivers where ideal they would play the electrical signal received, but this is not
the case.
Often only the amplitude is represented in plots of the frequency response, but HOLMFIR
goes further by measuring the phase. The phase response reflects the meachanical properties of the speaker. If the phase response is zero, then all tones at different frequencies
arrive to the ear at the same time. An uncorrected driver/speaker will typical have that
lower tones arrive later than the higher.
Below diagram illustrates this by the blue curve not being identically with the green curve
(for technical details refer to Appendix D).
HOLM Acoustics HOLMFIR User Guide v0.4.4
Page 41
Control Measurements 37 of 65
Chapter 10
Control Measurements
A cornerstone in the HOLM Acoustics filosofy is that you must have the oppertunity
to verify your setup. In the ’Control measurements’ tab you can verify your setup and
compare settings.
10.1 Target Frequency & Impulse Response
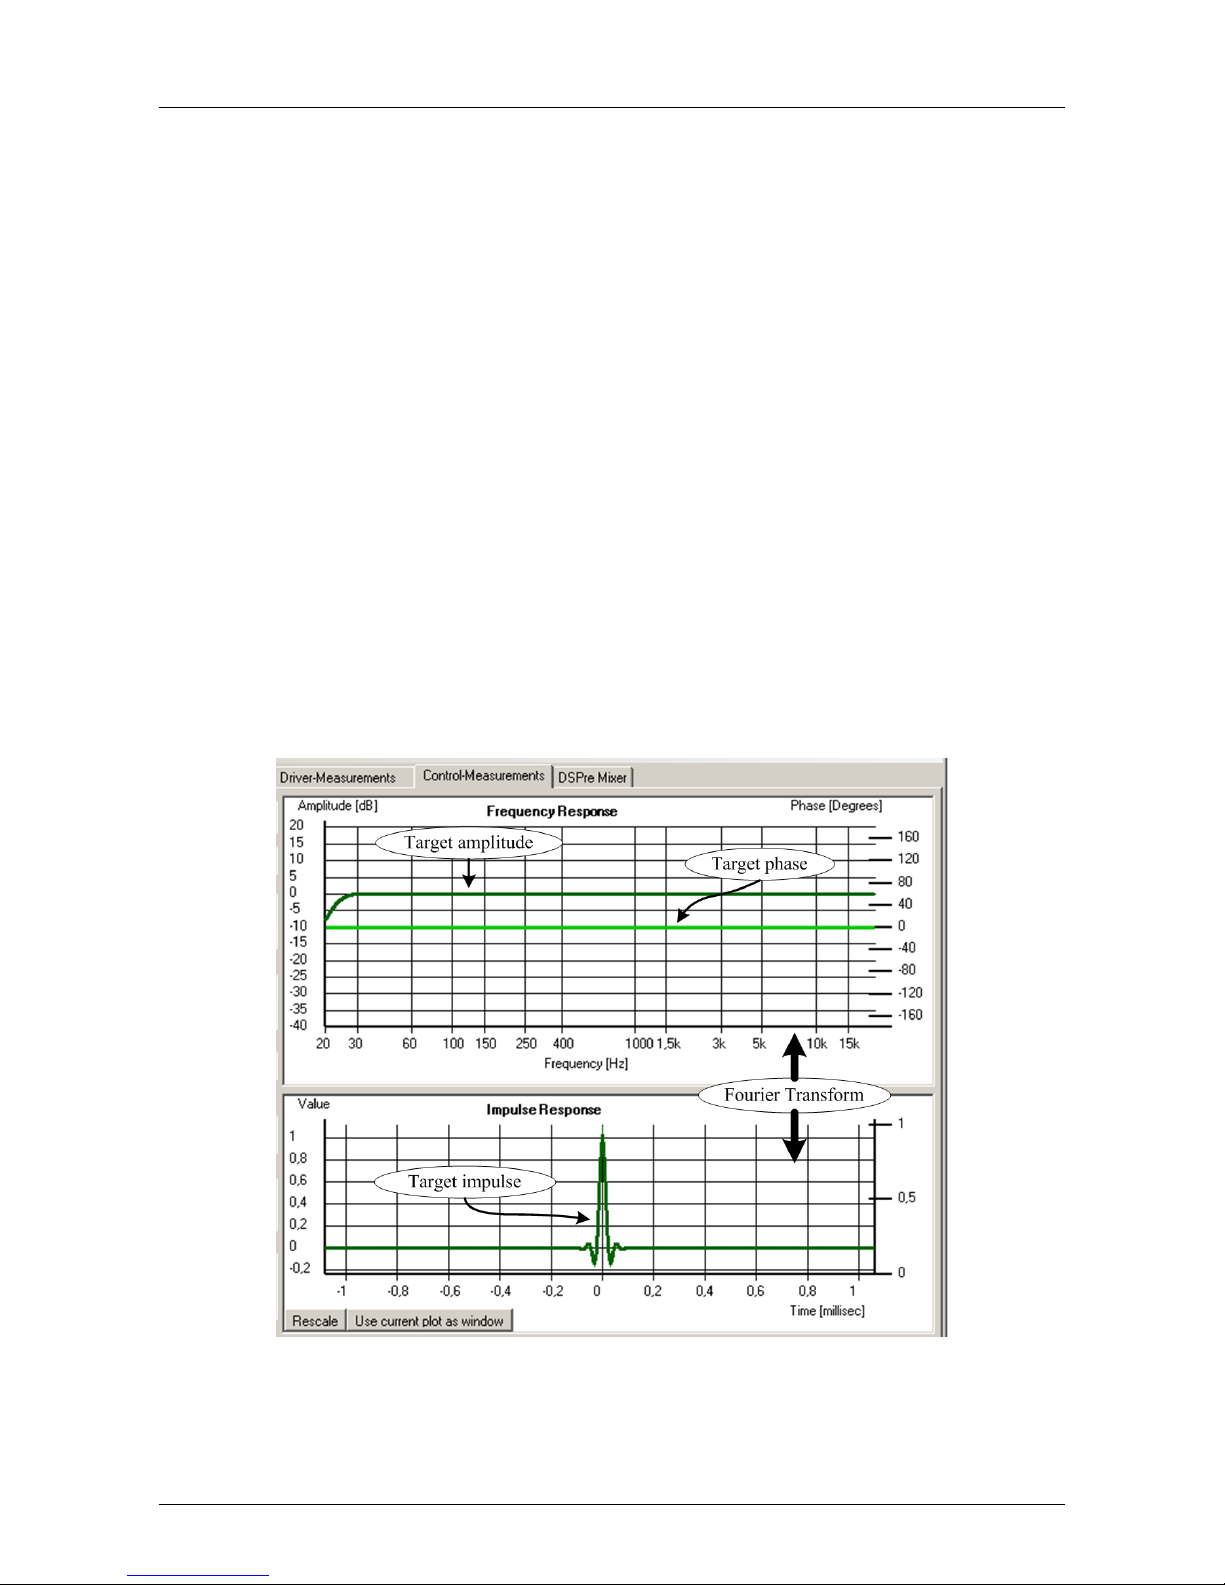
Without making a measurement HOLMFIR shows the target response as a frequency
response and impulse response:
If the amplifier, speaker, room and microphone was perfect you would measure this response
- hence the name ’target’.
HOLM Acoustics HOLMFIR User Guide v0.4.4
Page 42
Control Measurements - Making a measurement 38 of 65
10.2 Making a measurement
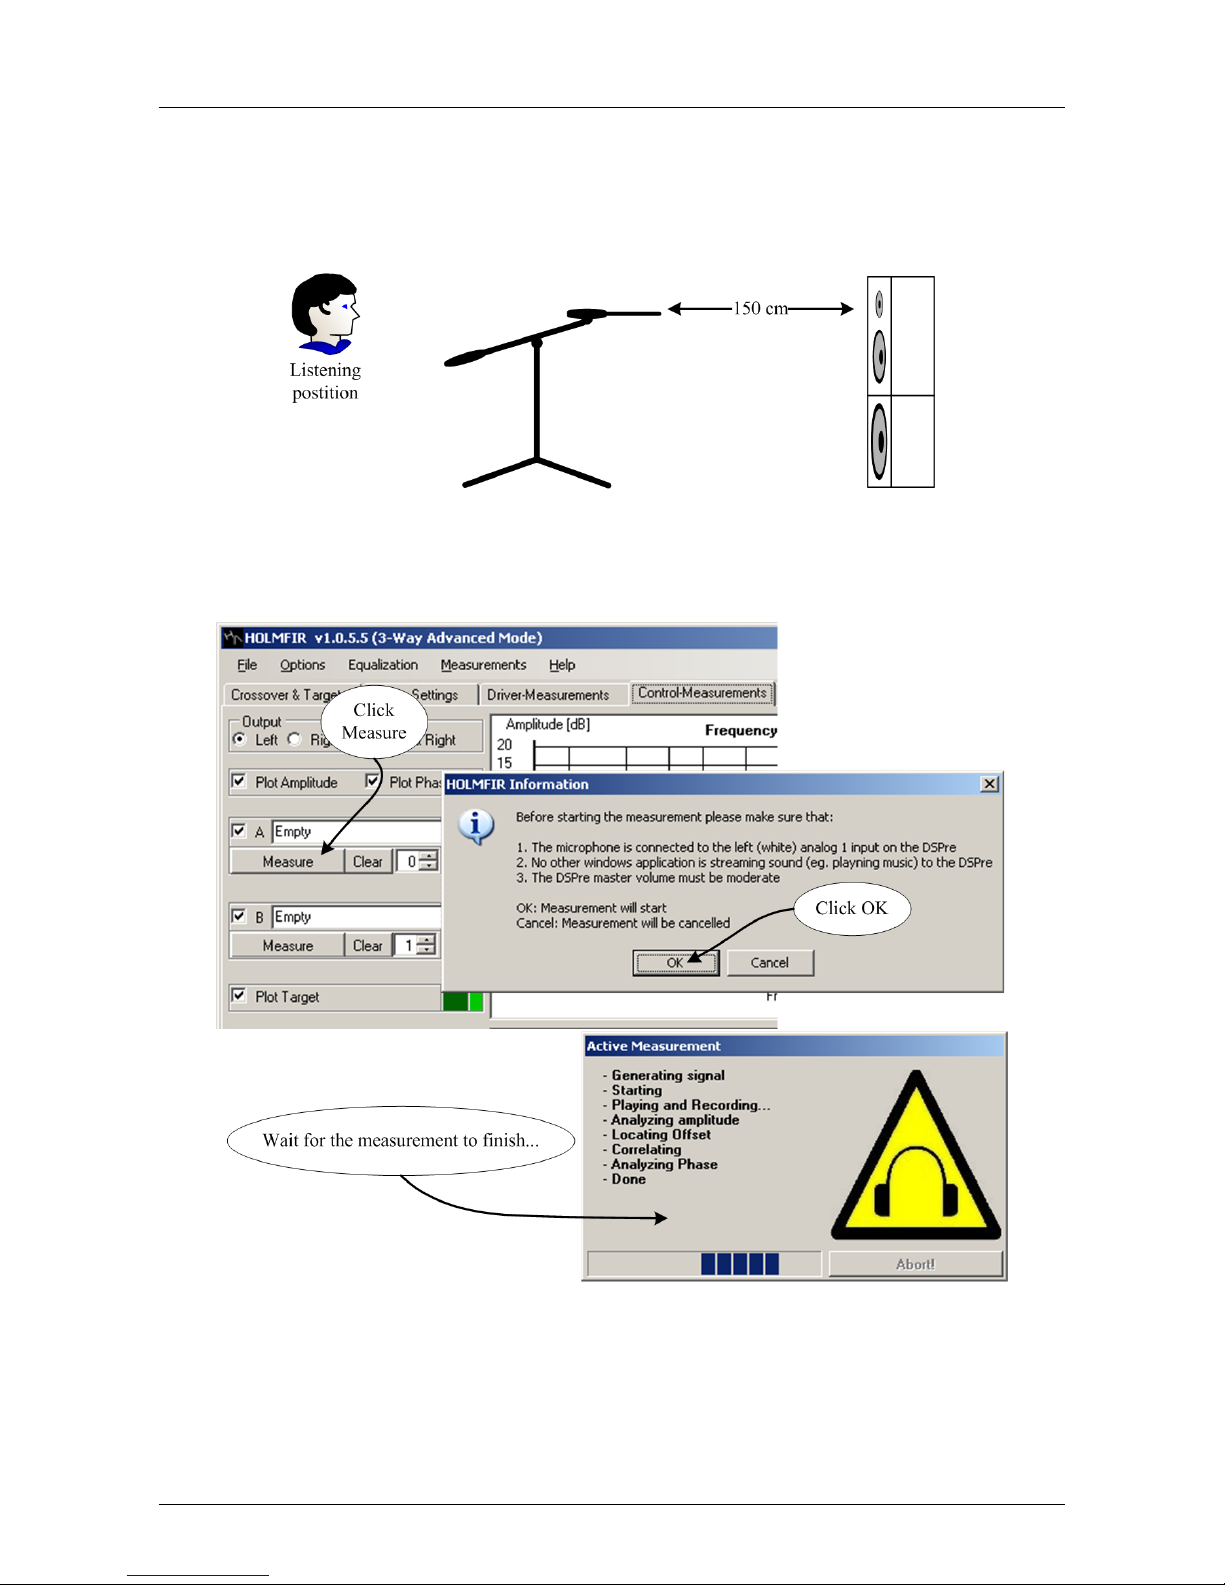
Place the microphone 150 cm away from the left speaker on the axis of the listening position
Note the 150 cm is just meant to be a guide - try out other distances for your personal
reference.
Now click the measure button to start the measurement:
HOLM Acoustics HOLMFIR User Guide v0.4.4
Page 43
Control Measurements - Making a measurement 39 of 65
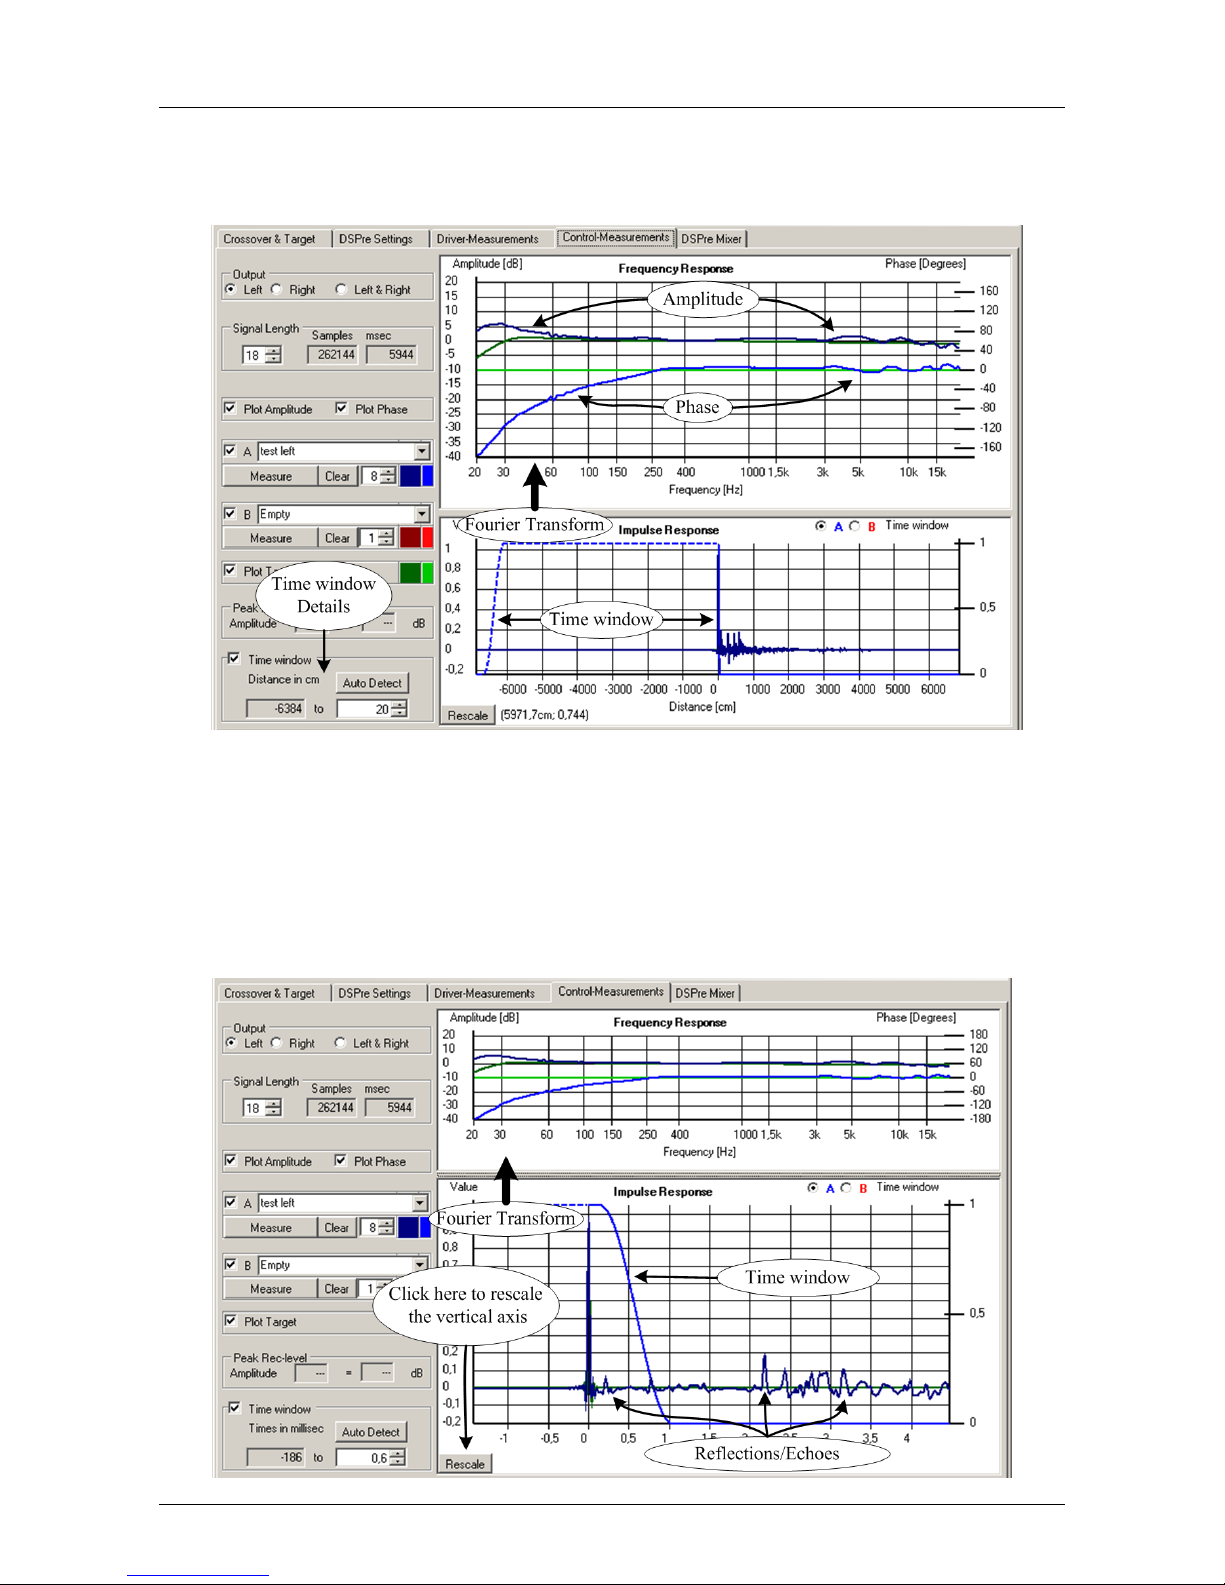
Thereafter the result is shown:
Now zoom in the impulse response window by defining a rectangle with the left mouse
button as described in Section 4.1. It is most convenient to zoom when adjusting the
window, and after zoom it is often appropriate to rescale the vertical axis by clicking
’Rescale’
Adjust the time window by dragging the right edge or click ’Auto Detect’ to let HOLMFIR
try and figure out where the echoes starts.
Note that per default the time-window is adjusted by HOLMFIR just after the measurement.
HOLM Acoustics HOLMFIR User Guide v0.4.4
Page 44
Control Measurements - Customization and Presentation Options 40 of 65
10.3 Customization and Presentation Options
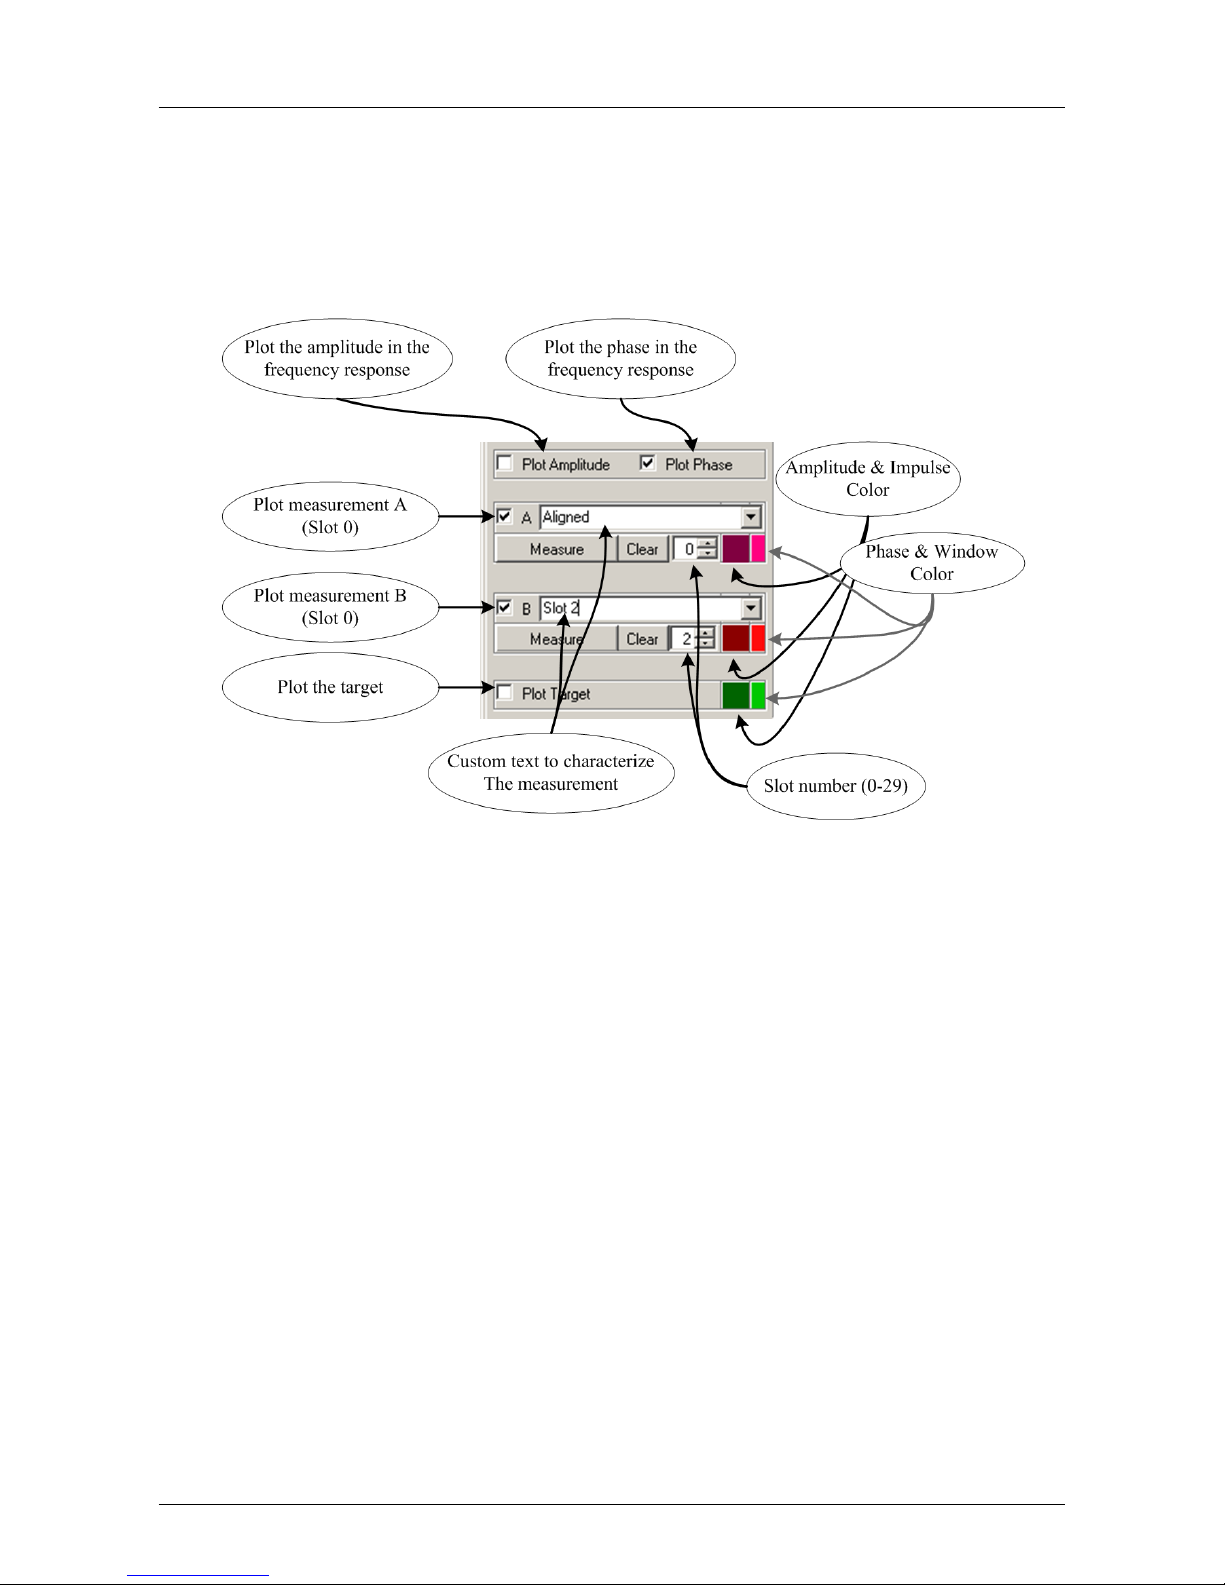
The general rule is that colors are changed by clicking the colorboxes and components are
plotted when the corresponding checkbox is marked.
You have 30 measurement slots (0-29) where measurements are stored.
10.3.1 Impulse Response Axis
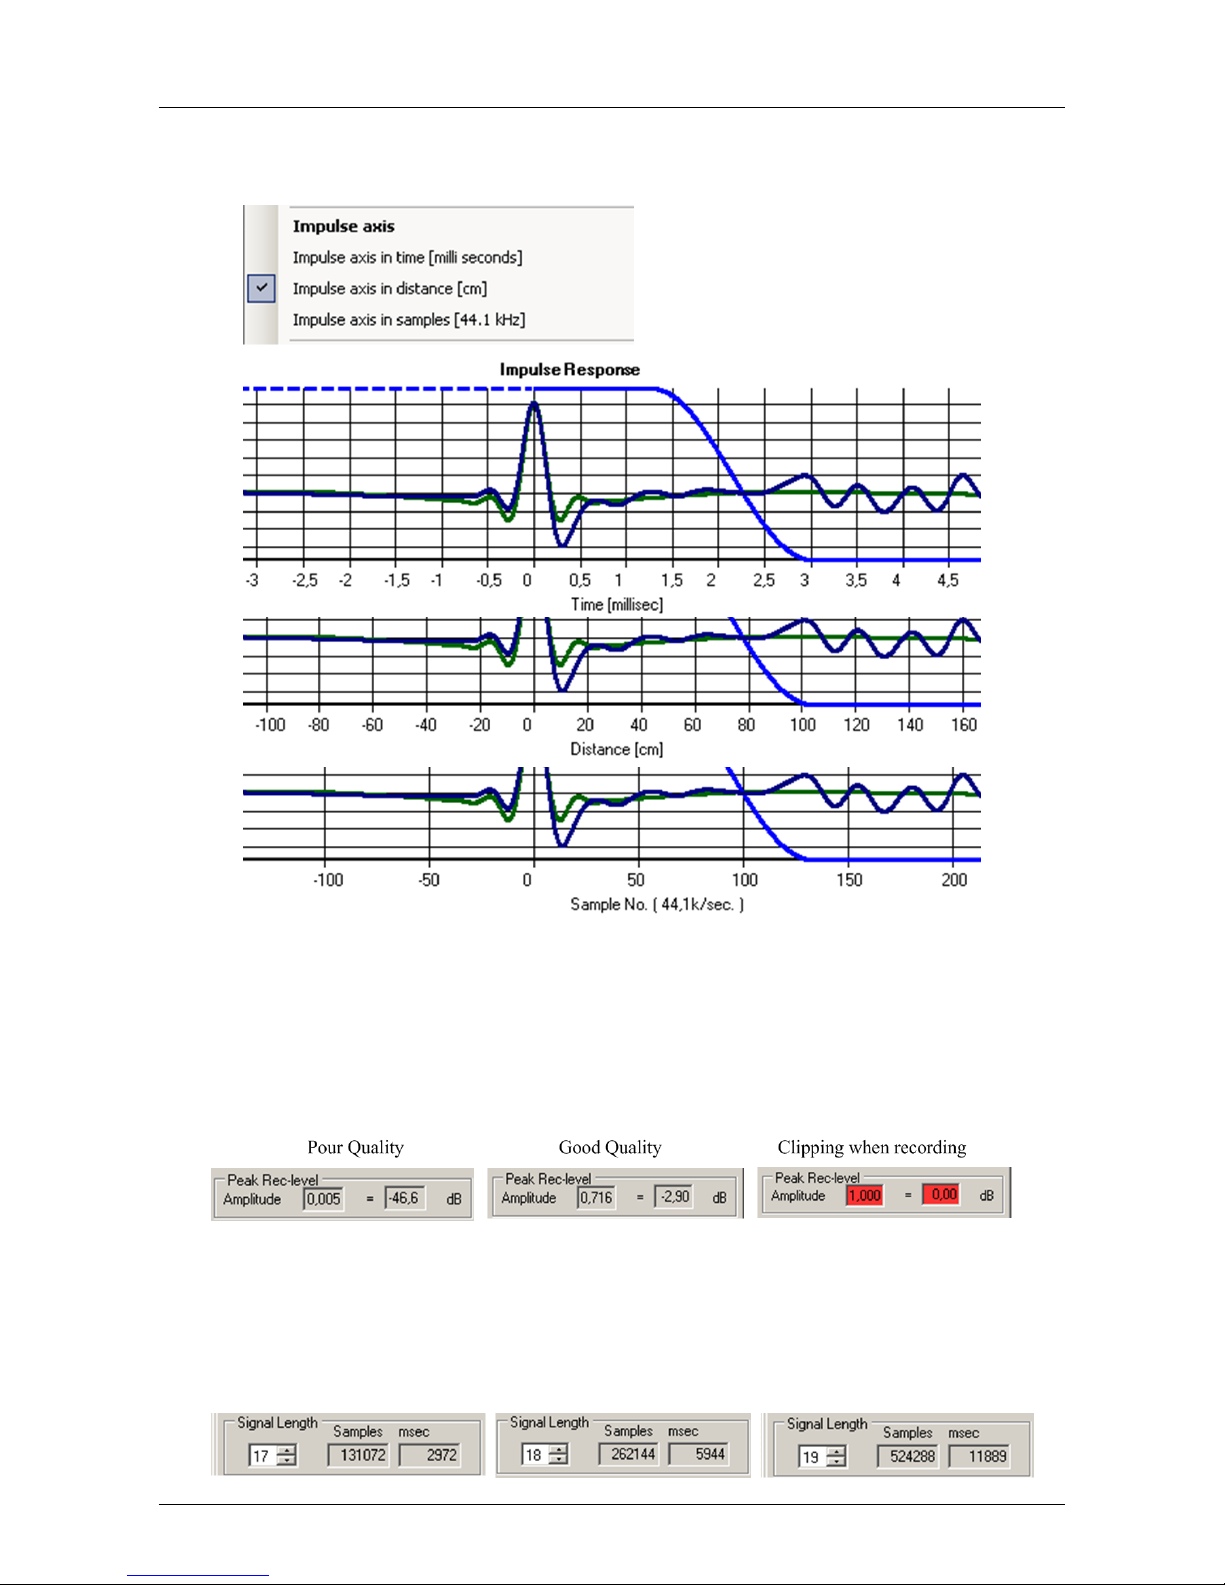
The horizontal axis for the impulse response has different representations
• Time in milliseconds
The unit on the axis for the impulse response is per default set to milliseconds, that
is the amplitude of the speaker as time goes by
• Distance in cm.
Instead of time you can consider the distance which the sound has moved in a certain
period of time. This is convenient when considering the reflections of your room or
speaker
• Number of samples at 44100 Hz
The CD format and the DSPre native samplerate is 44100 Hz, so you can also consider
how many samples that goes by in time
HOLM Acoustics HOLMFIR User Guide v0.4.4
Page 45
Control Measurements - Measurement Quality 41 of 65
This is configured from the ’Options’ menu:
10.4 Measurement Quality
If the sound level is to low you will obtain a lower quality of the measurement, but with
a to high sound level you might reach the clipping level for the recording, which is NOT
acceptable. A reasonable peak record level is from -30 to 0 dB
The default signal length is approximately 6 seconds, which is what gives the best result
for an average system. If your are making many measurements then try to set the signal
length to 17 which is 3 seconds to save time. If you want to eliminate noise from the
surroundings or measure at a low level you can try to increase to a signal length of 19
which is 12 seconds.
HOLM Acoustics HOLMFIR User Guide v0.4.4
Page 46
Control Measurements - Errors and Warnings 42 of 65
10.5 Errors and Warnings
- Explain Polarity Warning
- Record level to low error
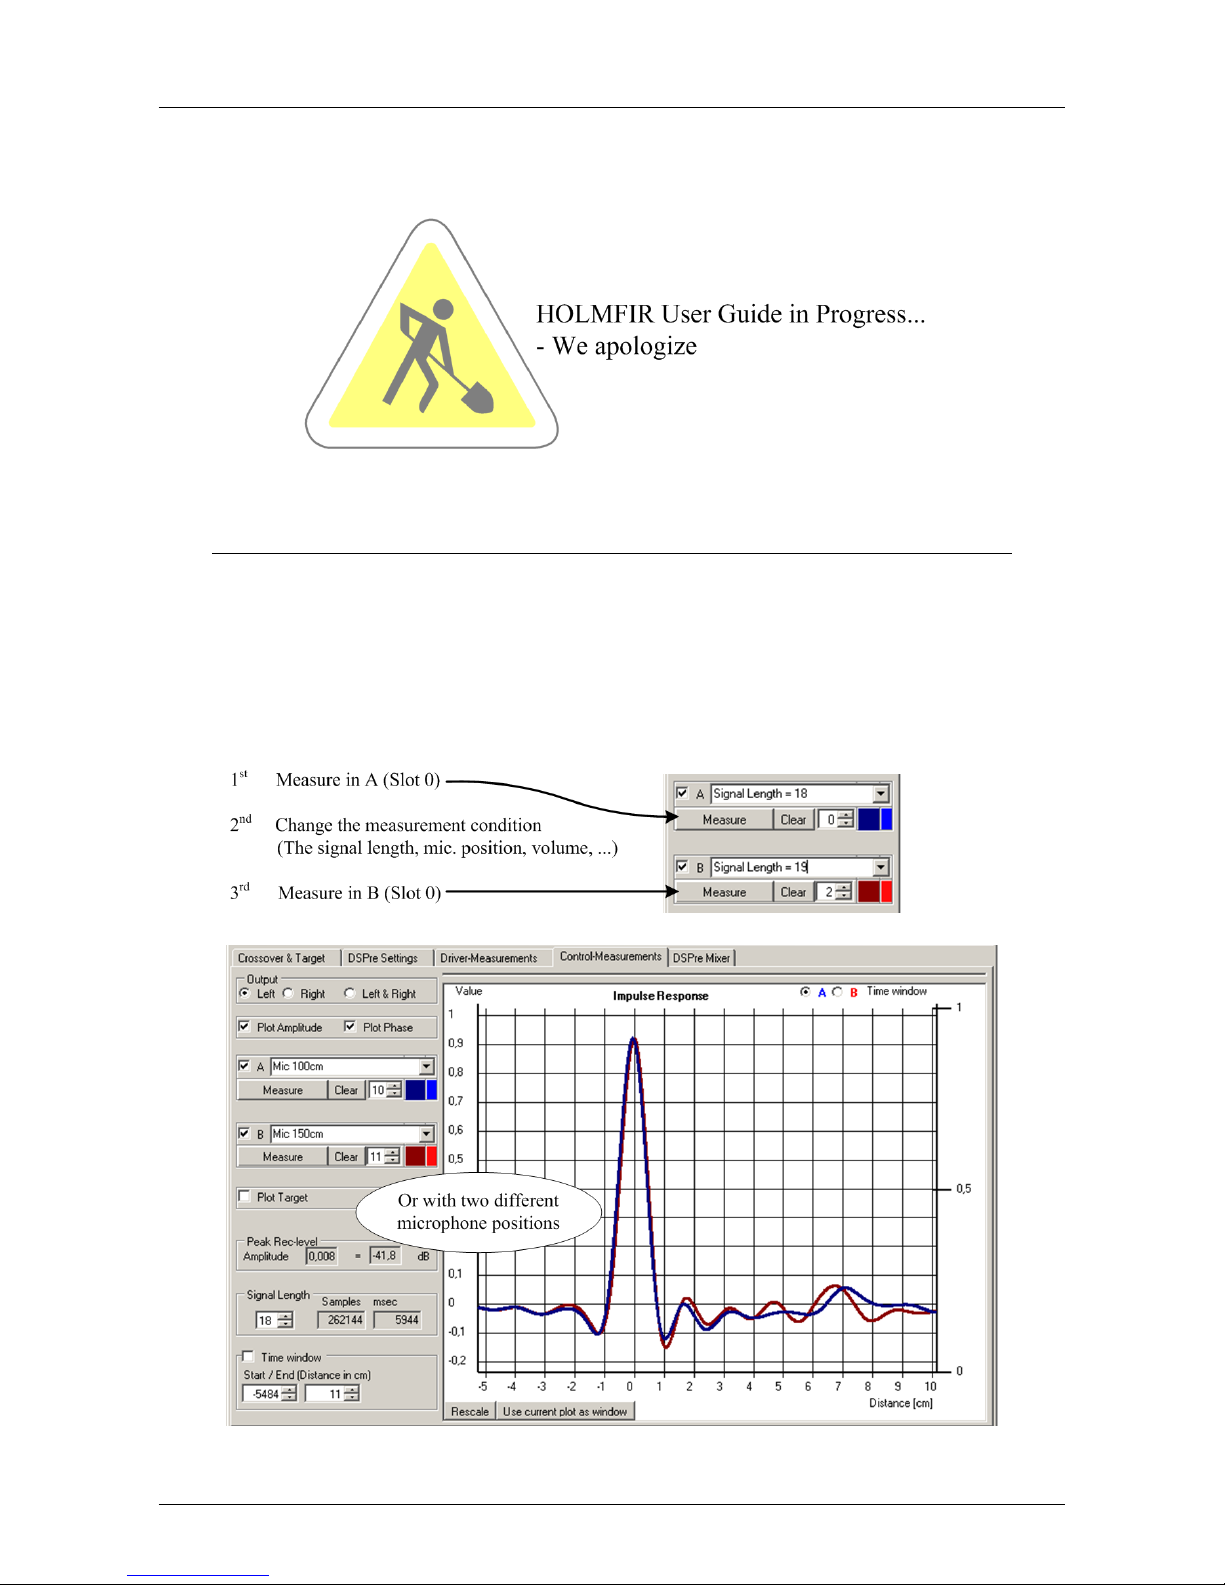
10.6 Compare Different Measurement Conditions
With a microphone connected to the DSPre you can easily produce and reproduce a lot
of measurements within a few minutes. So whenever you are in doubt about something
then do not hesitate to make another measurement - either to ensure reproducibility or to
inspect the difference of two measurement conditions
HOLM Acoustics HOLMFIR User Guide v0.4.4
Page 47
Automatic Driver Alignment 43 of 65
Chapter 11
Automatic Driver Alignment
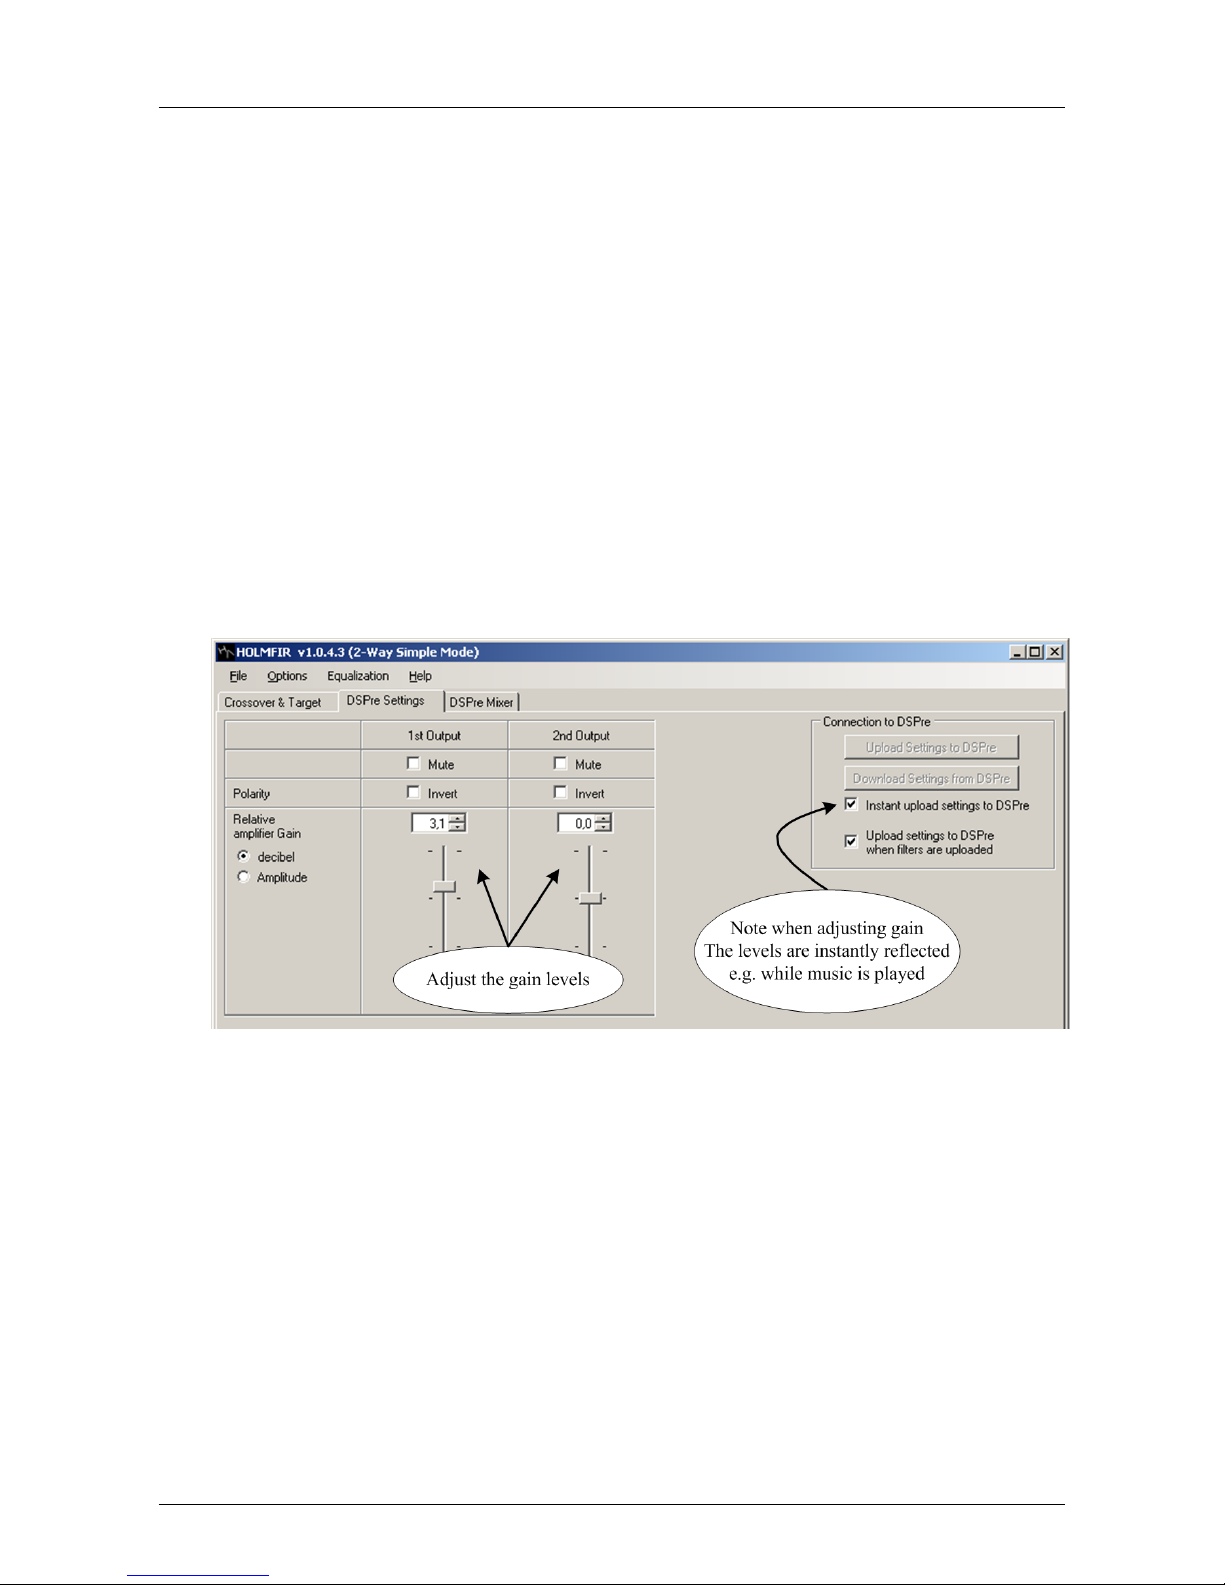
If the sensitivity of the amplifers or drivers are not the same - the gain levels must be
aligned. In ’Basic Mode ’without a microphone connected one has to adjust the levels by
hand while listening to music - eg. for a DSPre-2-way system:
This process is automated with a precision within 0,1 dB in HOLMFIR using a measurement signal.
In classical analog filters the process of gain alignment would be to adjust resistors/potentiometers in the analog crossovers.
HOLM Acoustics HOLMFIR User Guide v0.4.4
Page 48
Automatic Driver Alignment - Time Alignment 44 of 65
11.1 Time Alignment
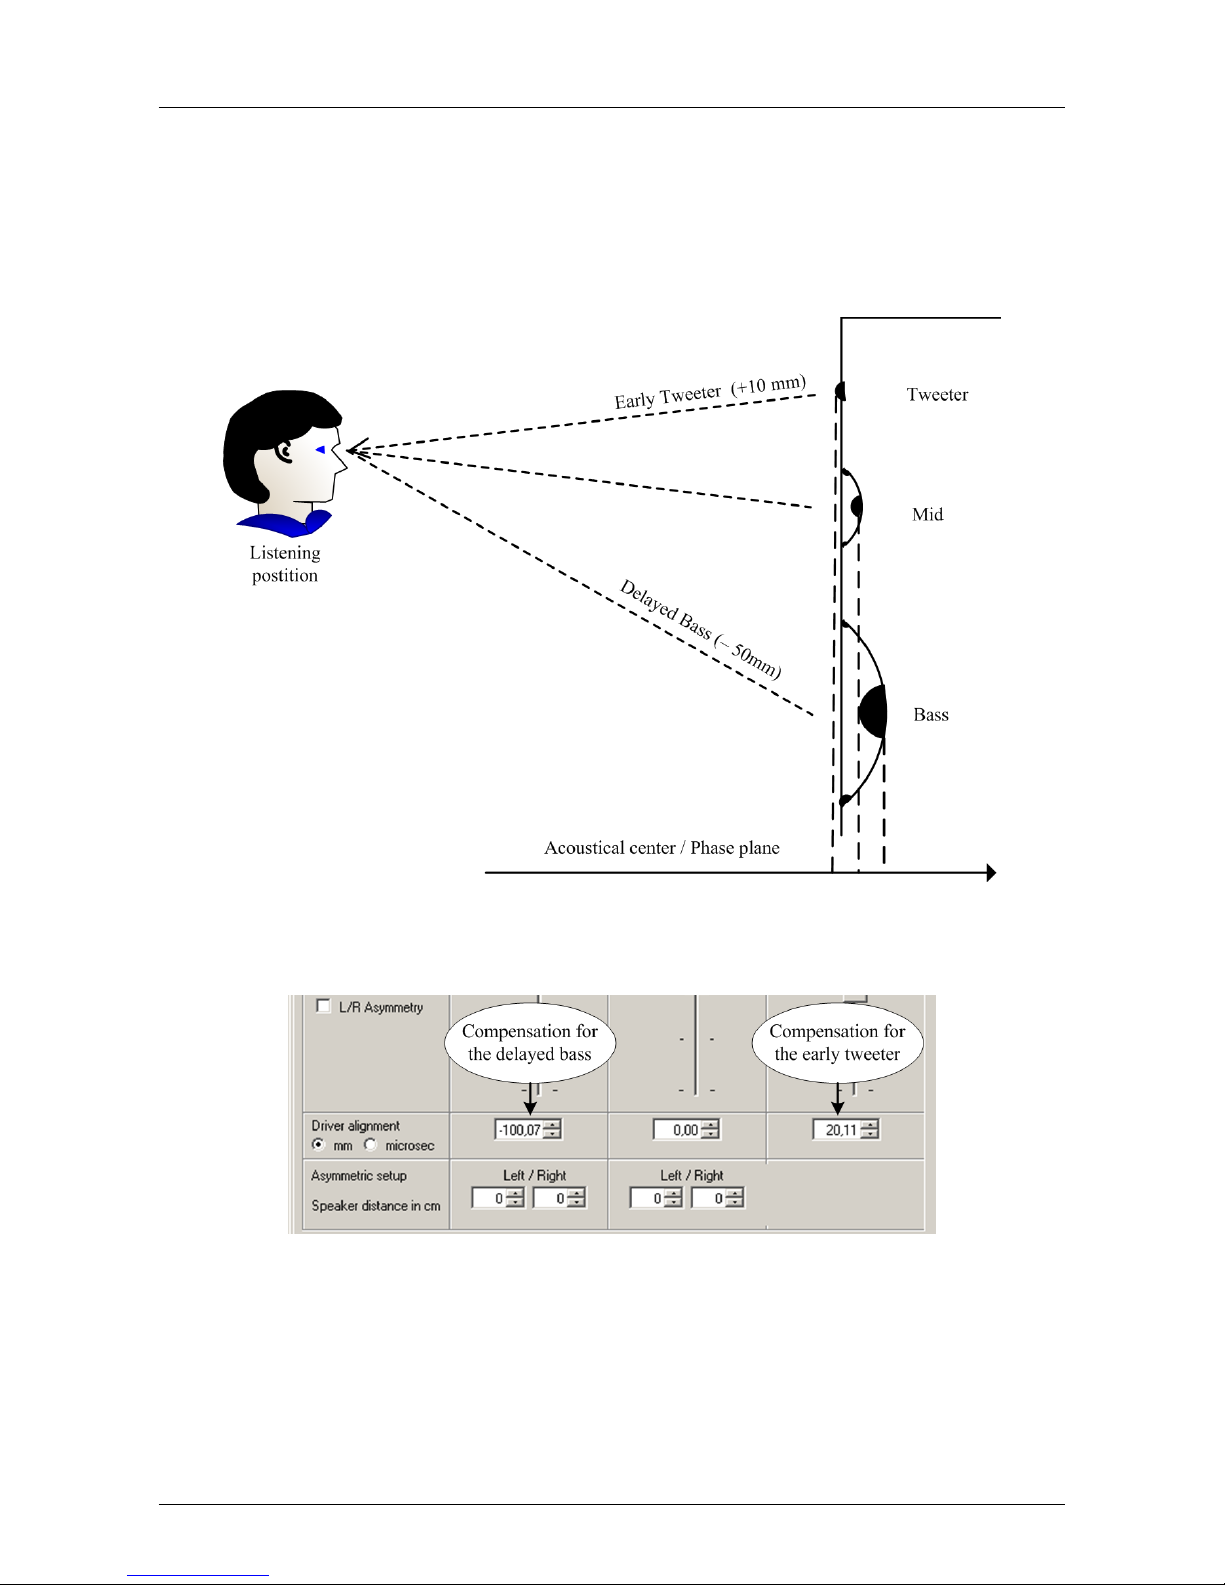
Time alignment of drivers is a feature only available in ’Advanced Mode ’, it gives you the
ability to align the drivers to be at the same phase plane. Below sketch illustartes this
using assuming ideal drivers:
Typical the bass is delayed and the tweeter is a little to early. This effect can be corrected
in the ’DSPre Settings’ tab.
Note that classical analog filters cannot correct for these delays.
HOLM Acoustics HOLMFIR User Guide v0.4.4
Page 49
Automatic Driver Alignment - DSPre-2-way Automatic Alignment 45 of 65
11.2 DSPre-2-way Automatic Alignment
Screenshots etc as in DSPre-3-way automatic Alignment
HOLM Acoustics HOLMFIR User Guide v0.4.4
Page 50
Automatic Driver Alignment - DSPre-3-way Automatic Alignment 46 of 65
11.3 DSPre-3-way Automatic Alignment
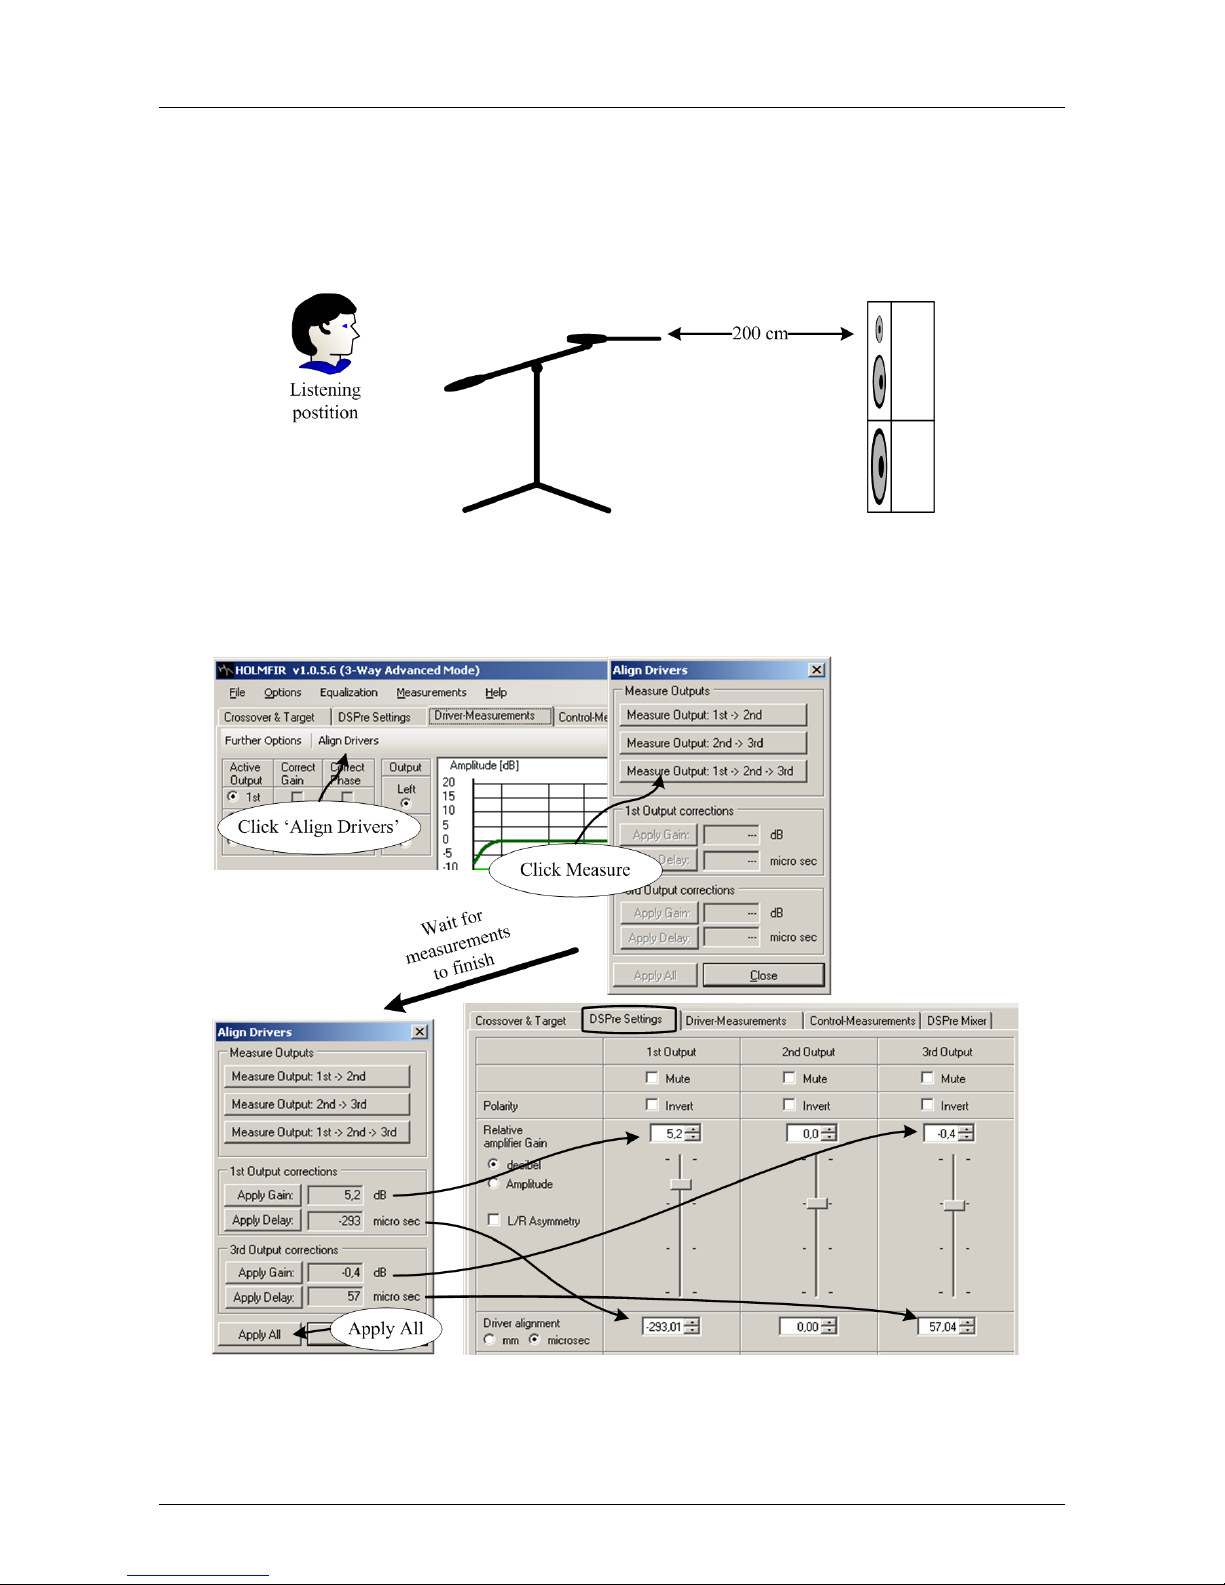
As a guideline it is suggested that the driver alignment is done 2 m away from the left
speaker to the axis of the listening position:
Ensure that the measurement chain (9.3) is in place and click ’Align Drivers’ under the
’Driver-Measurements’ tab
Now the DSPre has aligned the delays and amplitude, so the drivers are matched in the
crossover frequencies.
HOLM Acoustics HOLMFIR User Guide v0.4.4
Page 51
Automatic Driver Alignment - DSPre-3-way Automatic Alignment 47 of 65
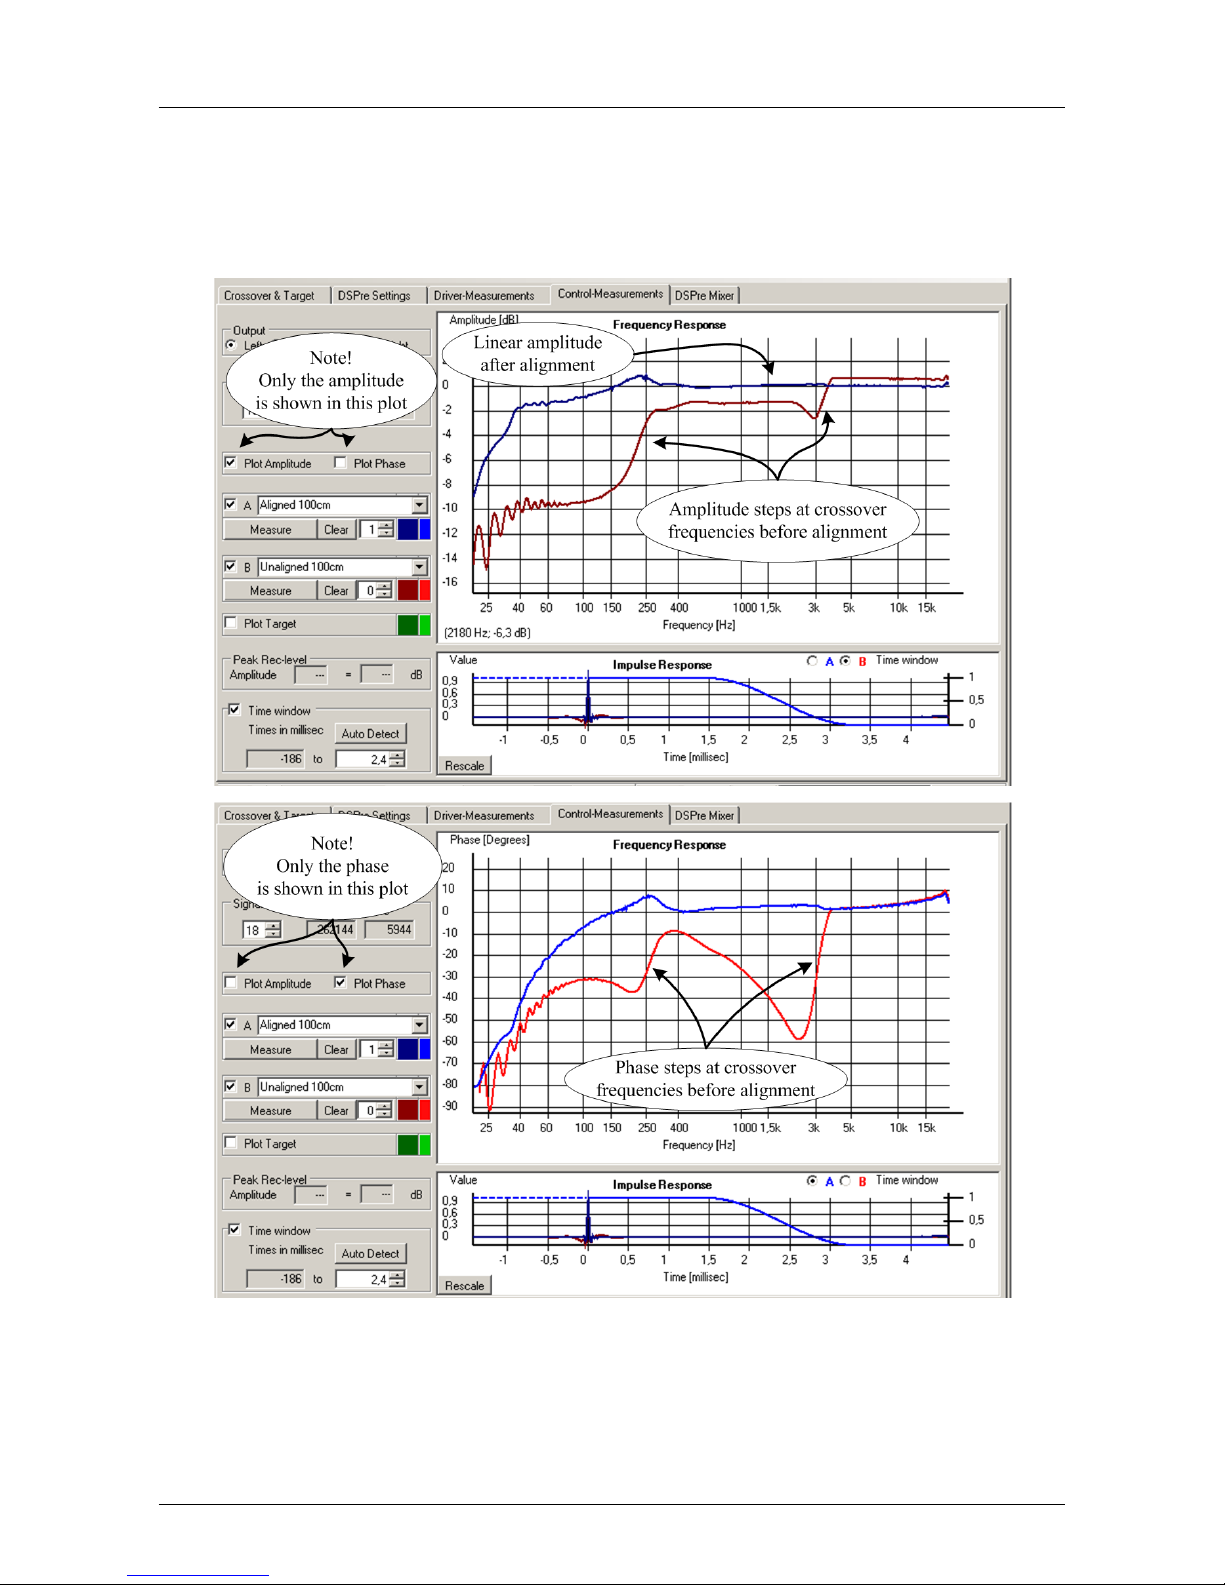
Verification by Control Measurements
By making a full-range measurement in the ’Control-Measurements’ tab you can verify
that the drivers are indeed aligned
HOLM Acoustics HOLMFIR User Guide v0.4.4
Page 52

Driver Correction 48 of 65
Chapter 12
Driver Correction
The DSPre is able to correct the frequency response in terms of amplitude and phase.
The HOLM Acoustics approch is to measure each driver section in an extended frequency
range. This characterization of the components creates the basis for a correction. The
driver correction is optionally and can be switched on/off for each component.
12.1 Extended Range
When characterizing the drivers it is necessary to have an extended range without equalization. The extended range let you measure a datasheet for each driver. Guideline for
frequency intervals:
Type Working Range Extended Range
Sub-Woofer −→ 100 Hz −→ 150 Hz
Woofer −→ 300 Hz −→ 500 Hz
Mid/Woofer −→ 2000 Hz −→ 3000 Hz
Mid 300 −→ 2500 Hz 100 −→ 4000 Hz
Tweeter 2000 Hz −→ 1500 Hz −→
Full Range All All
HOLM Acoustics HOLMFIR User Guide v0.4.4
Page 53
Driver Correction - Extended Range 49 of 65
12.1.1 DSPre-1-way Extended Range
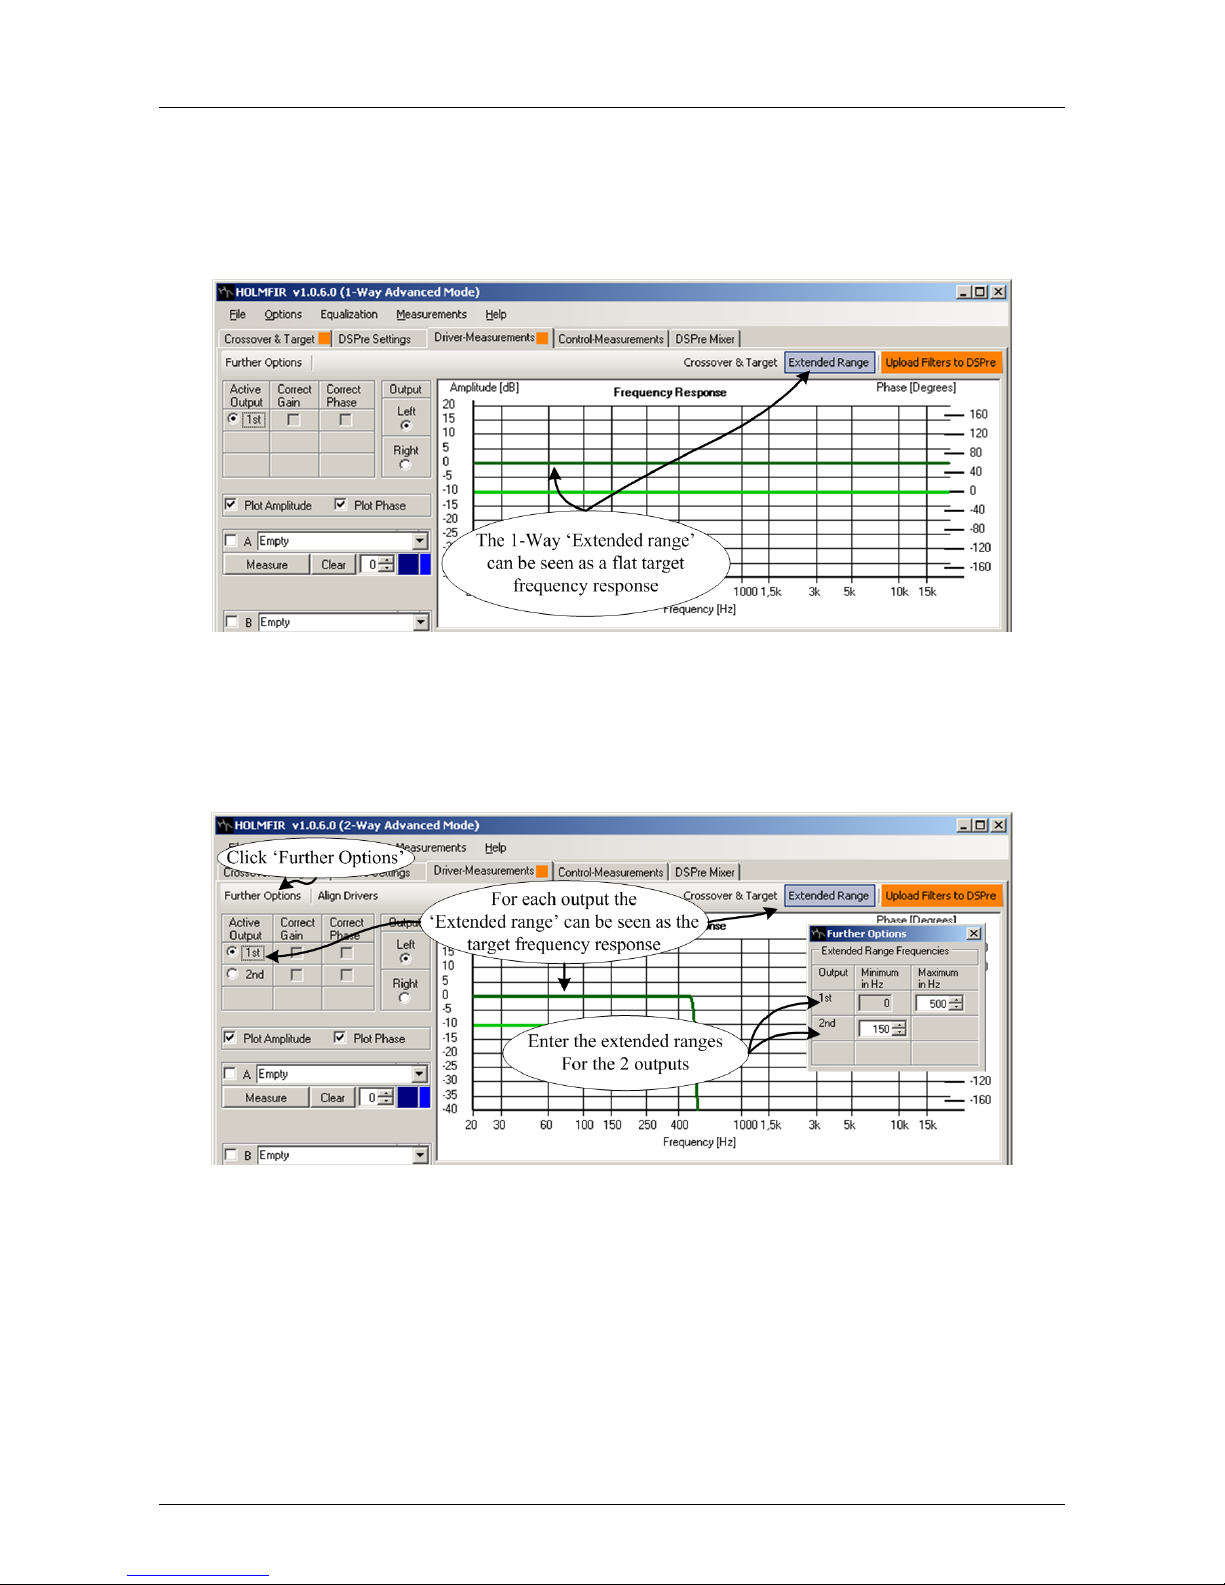
Select the ’Extended Range’ mode in the ’Driver Measurements’ tab. The 1-way extended
range is simply the fullrange frequency interval from 0 Hz −→
12.1.2 DSPre-2-way Extended Range
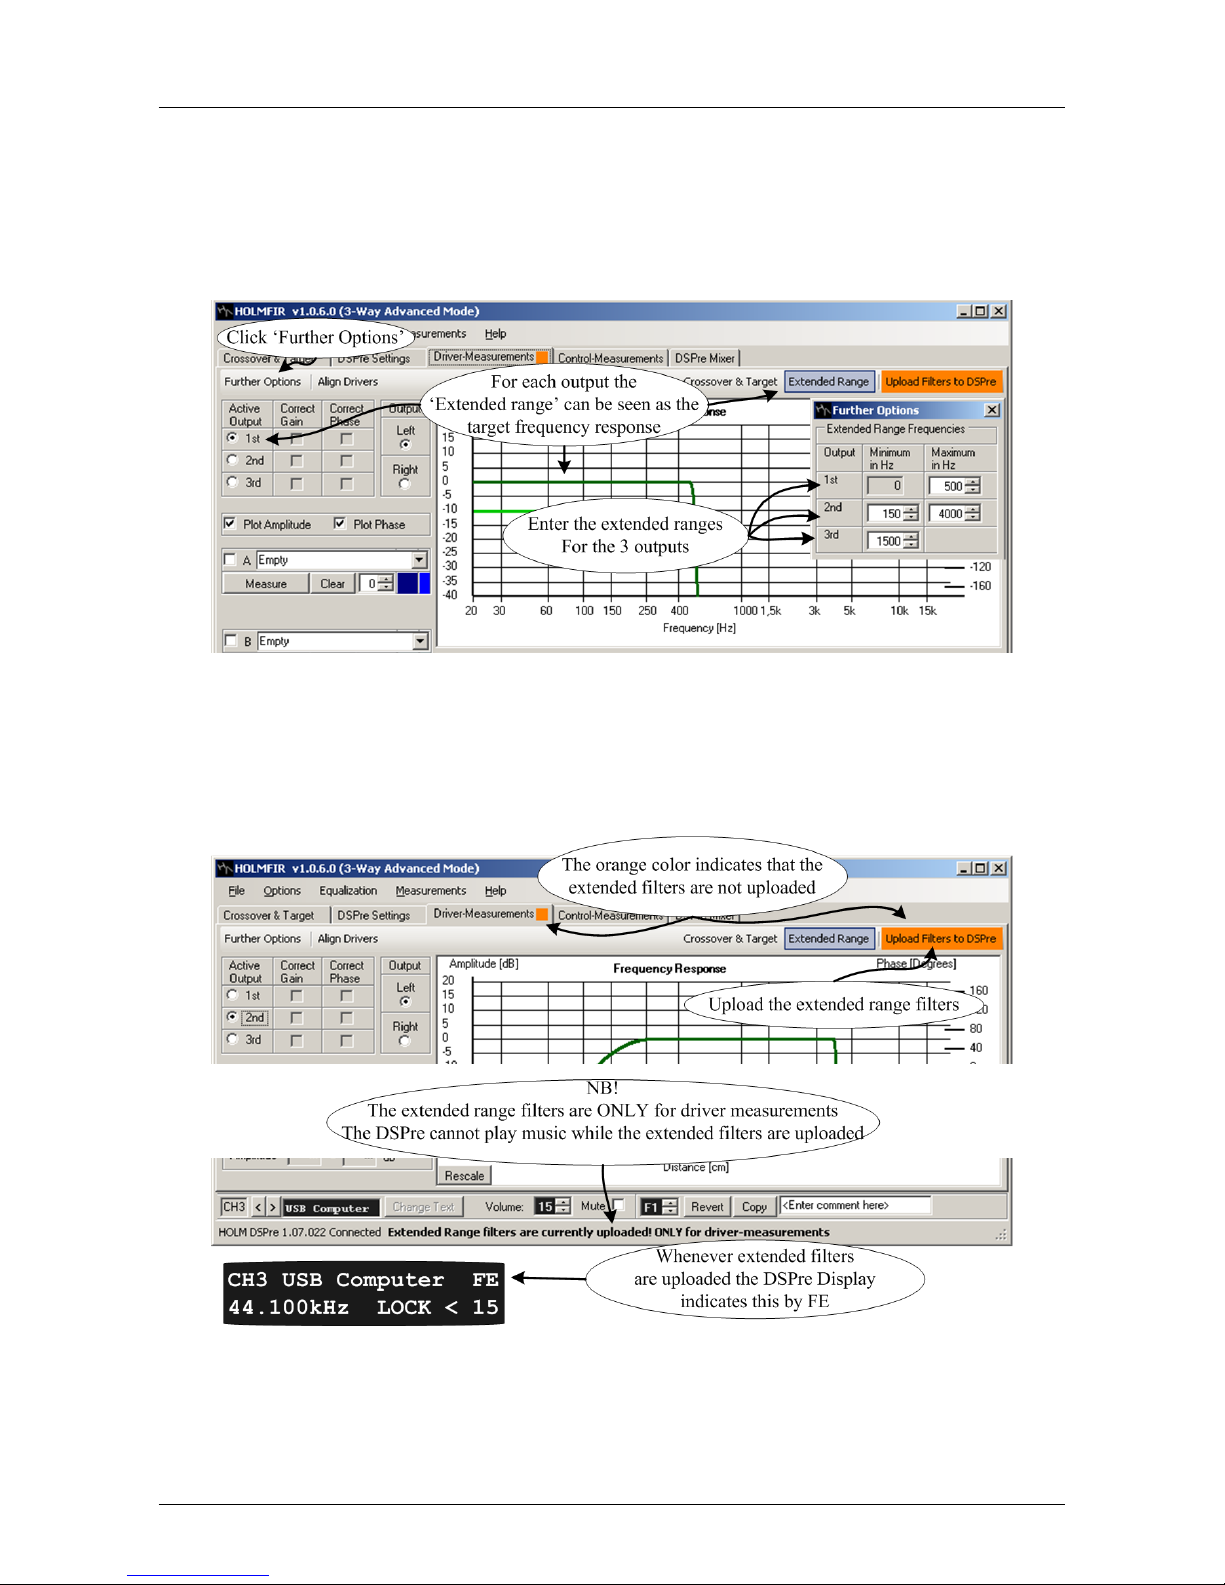
Select the ’Extended Range’ mode in the ’Driver Measurements’ tab and click ’Futher Options’,
then enter the extended range for the two outputs (drivers)
HOLM Acoustics HOLMFIR User Guide v0.4.4
Page 54
Driver Correction - Extended Range 50 of 65
12.1.3 DSPre-3-way Extended Range
Select the ’Extended Range’ mode in the ’Driver Measurements’ tab and click ’Futher Options’,
then enter the extended range for the three outputs (drivers)
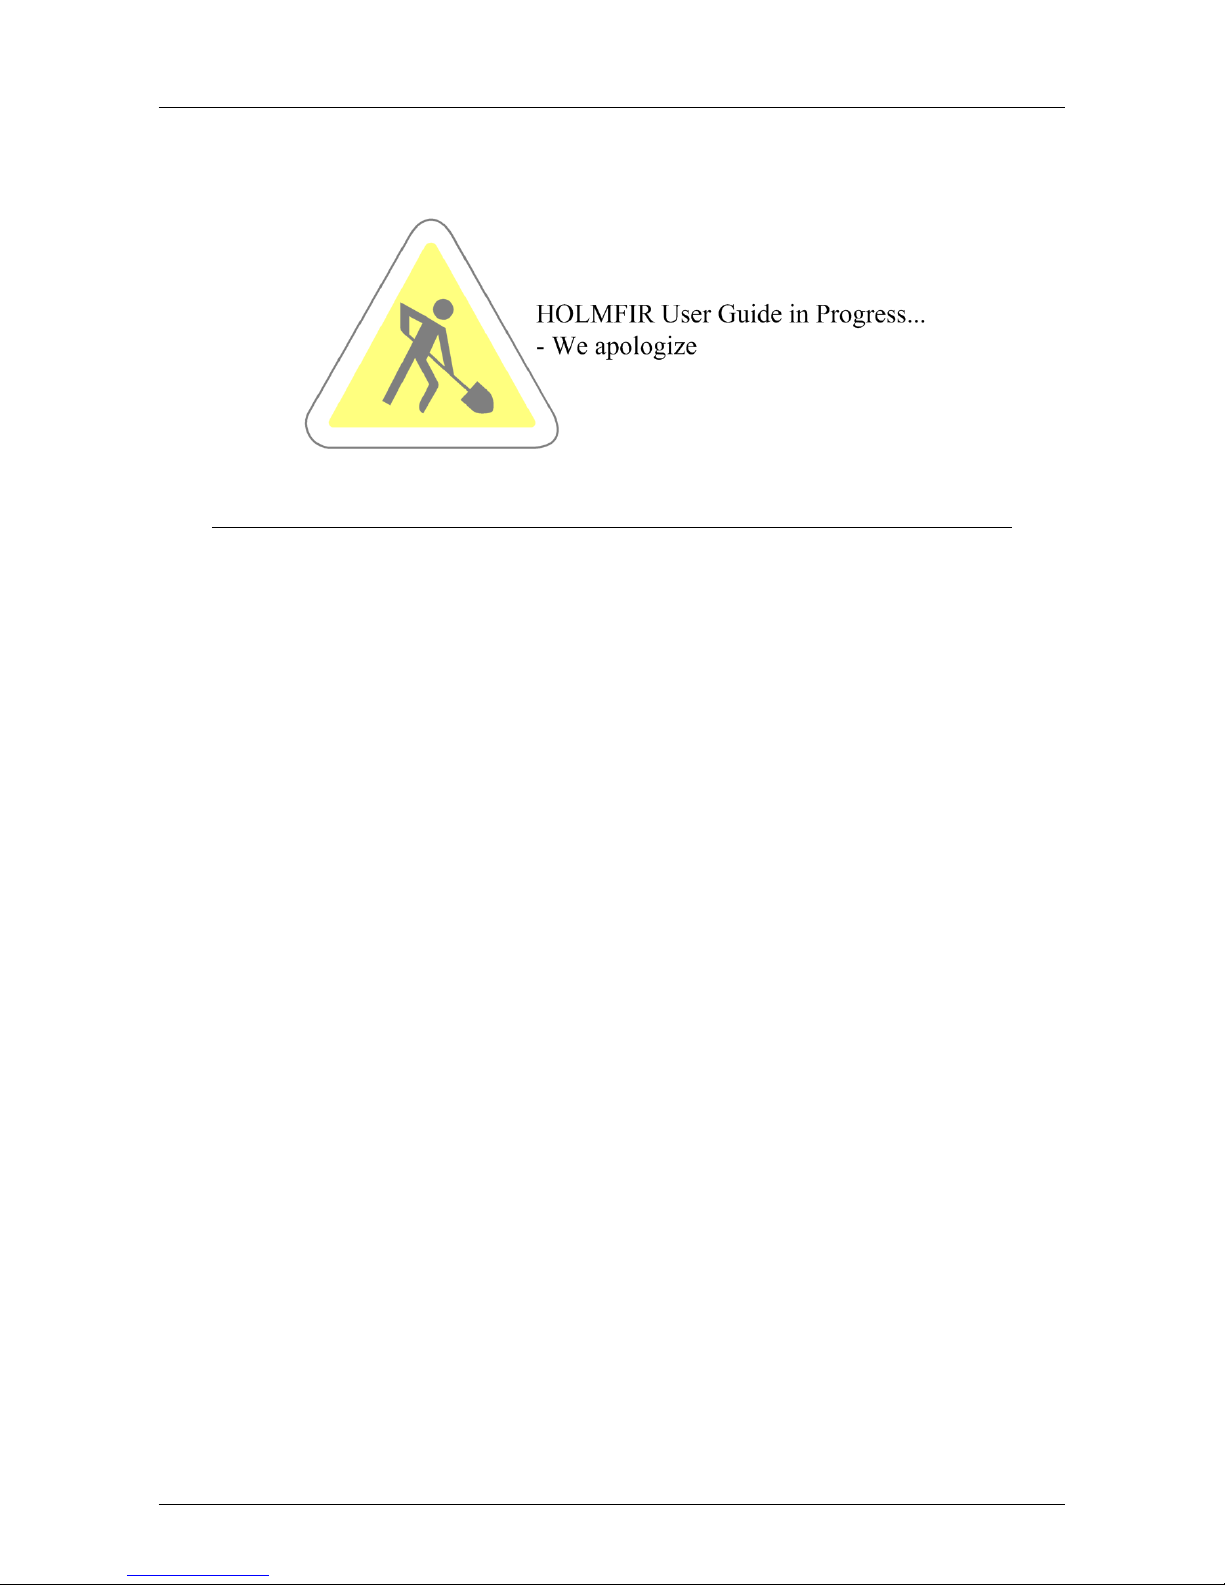
12.1.4 Uploading the Extended Range Filters
Before characterizing the drivers by extended range measurements you will have to upload
the extended range filters
HOLM Acoustics HOLMFIR User Guide v0.4.4
Page 55
Driver Correction - Customization and Presentation Options 51 of 65
12.2 Customization and Presentation Options
Explain the 3x10 measurement slots
HOLM Acoustics HOLMFIR User Guide v0.4.4
Page 56
Driver Correction - Correcting a Bass/Subwoofer (DSPre-2,3-way) 52 of 65
12.3 Correcting a Bass/Subwoofer (DSPre-2,3-way)
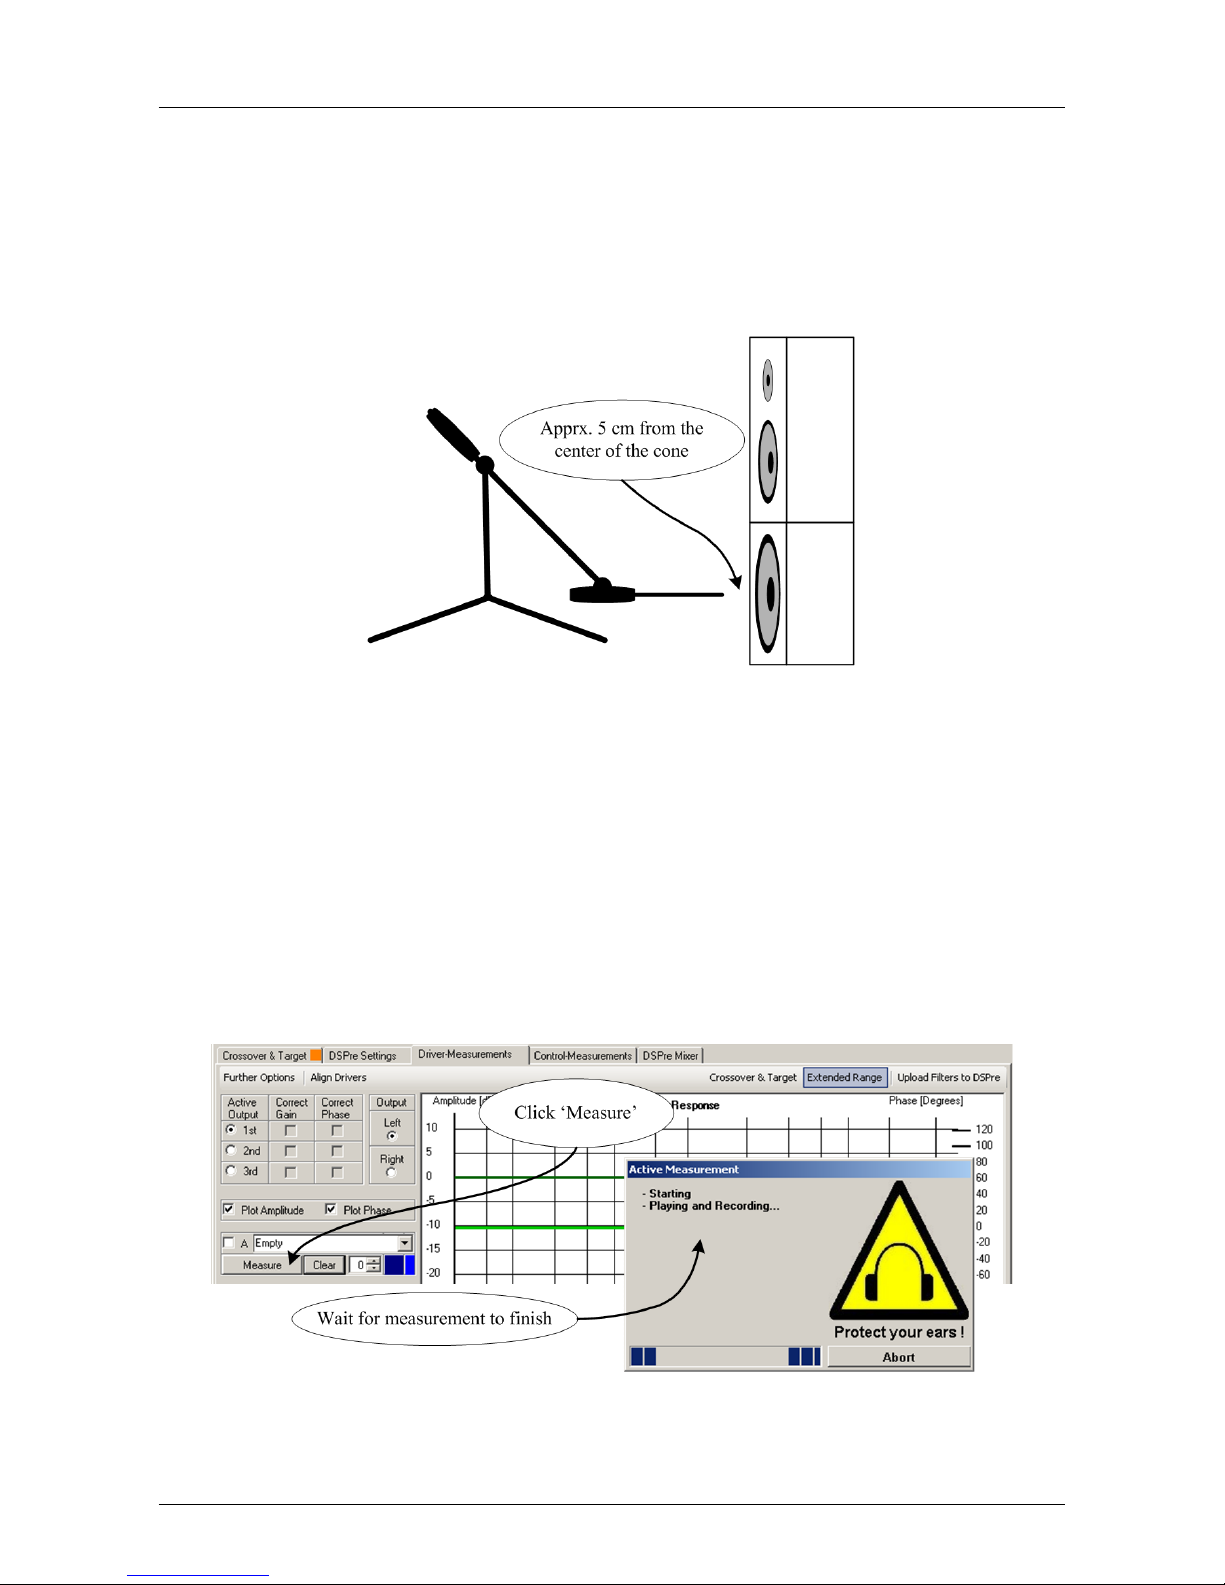
A bass/subwoofer typically has a frequency range from 30 Hz to 300 Hz, which corresponds
to wave lengths from 1m to 10m, which means that the echoes from the room will have a
huge effect. So when measuring these low frequencies you will do a near field measurement
- that is 5cm or closer:
Measurement Checklist
• The microphone is placed close to the left driver as shown in above picture
• The Measurement Chain (Section 9.3) is in place
• The extended filters are uploaded and adjusted (Section 12.1)
• The ’Active Output’ under ’Driver-Measurements’ is is set to 1st.
• The DSPre Volume is set to for a near-field measurement (Typical 10-20)
When ready click the ’Measure’ button:
HOLM Acoustics HOLMFIR User Guide v0.4.4
Page 57
Driver Correction - Correcting a Bass/Subwoofer (DSPre-2,3-way) 53 of 65
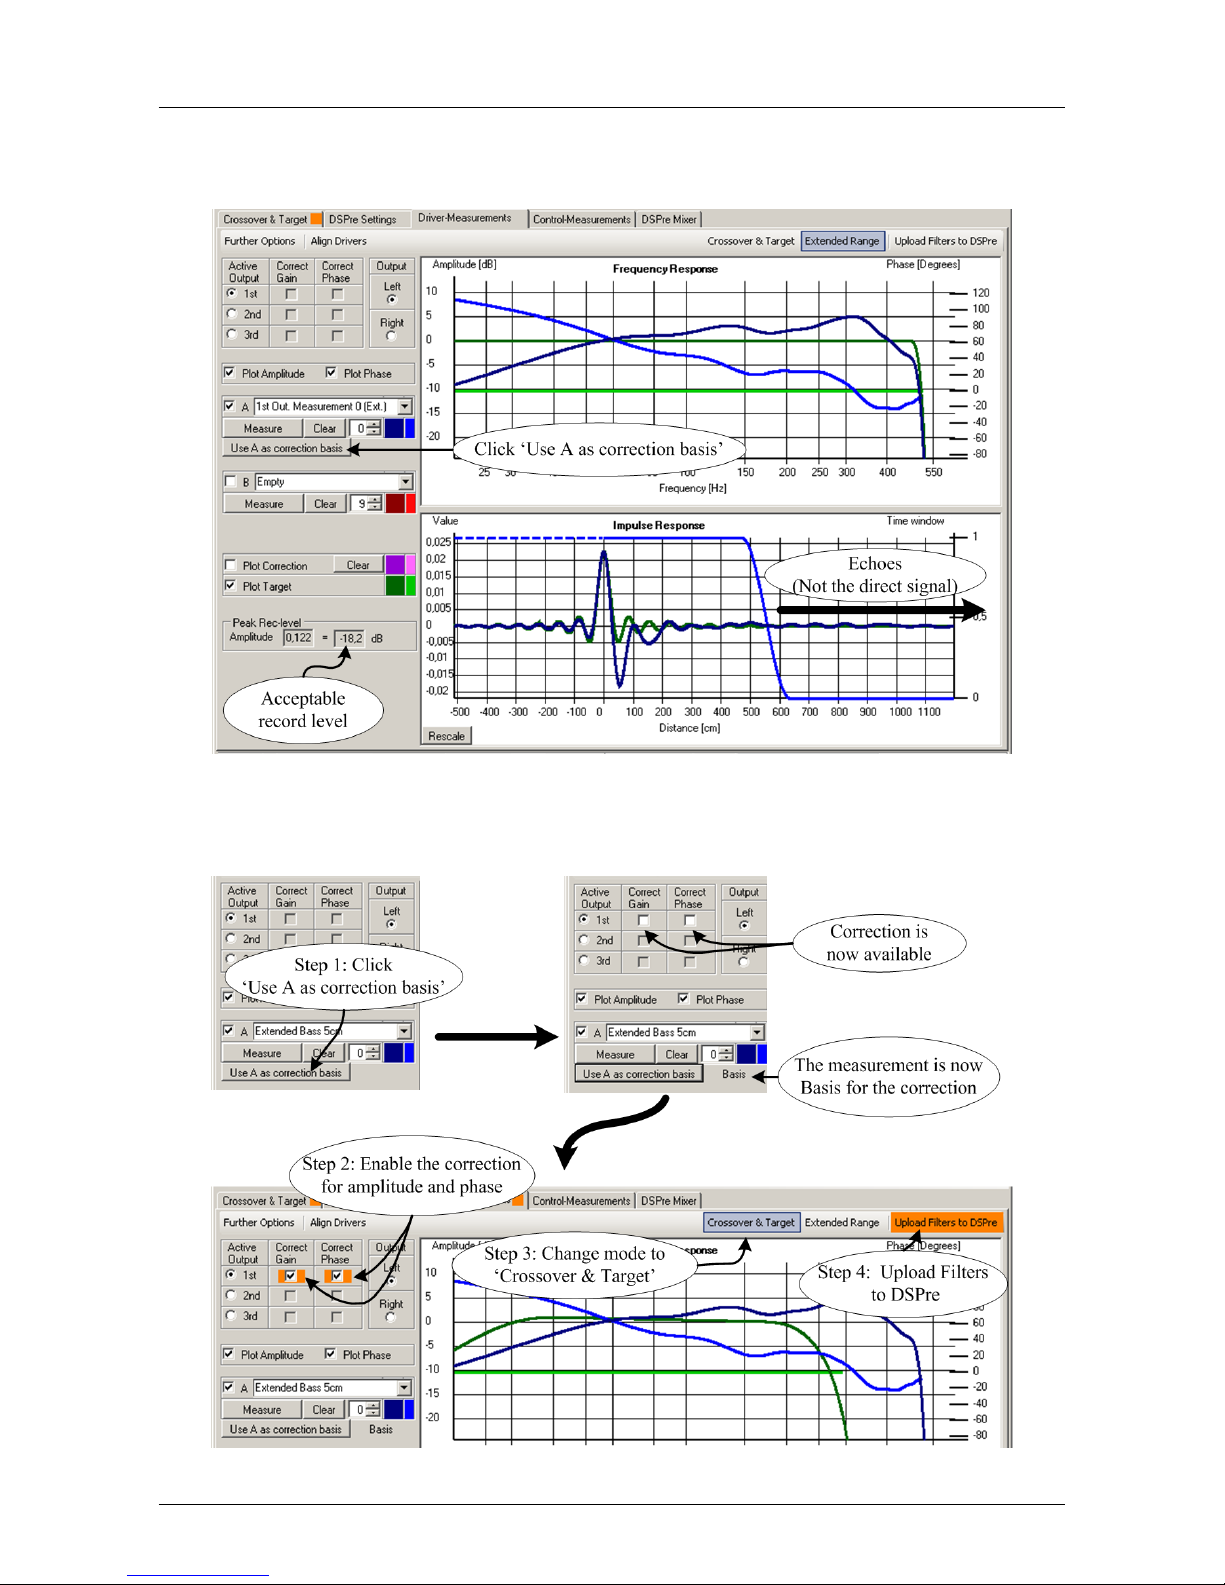
When the measurement is finished you will have an extended characterization of the driver:
If the measurement went well, then adjust the time window and use this extended measurement as a basis for the correction:
HOLM Acoustics HOLMFIR User Guide v0.4.4
Page 58
Driver Correction - Correcting a Bass/Subwoofer (DSPre-2,3-way) 54 of 65
Important Note
You can correct other drivers in your system, but alignment of the drivers (Chapter 11
Automatic Driver Alignment) is necessary after uploading corrected filters.
12.3.1 Verification
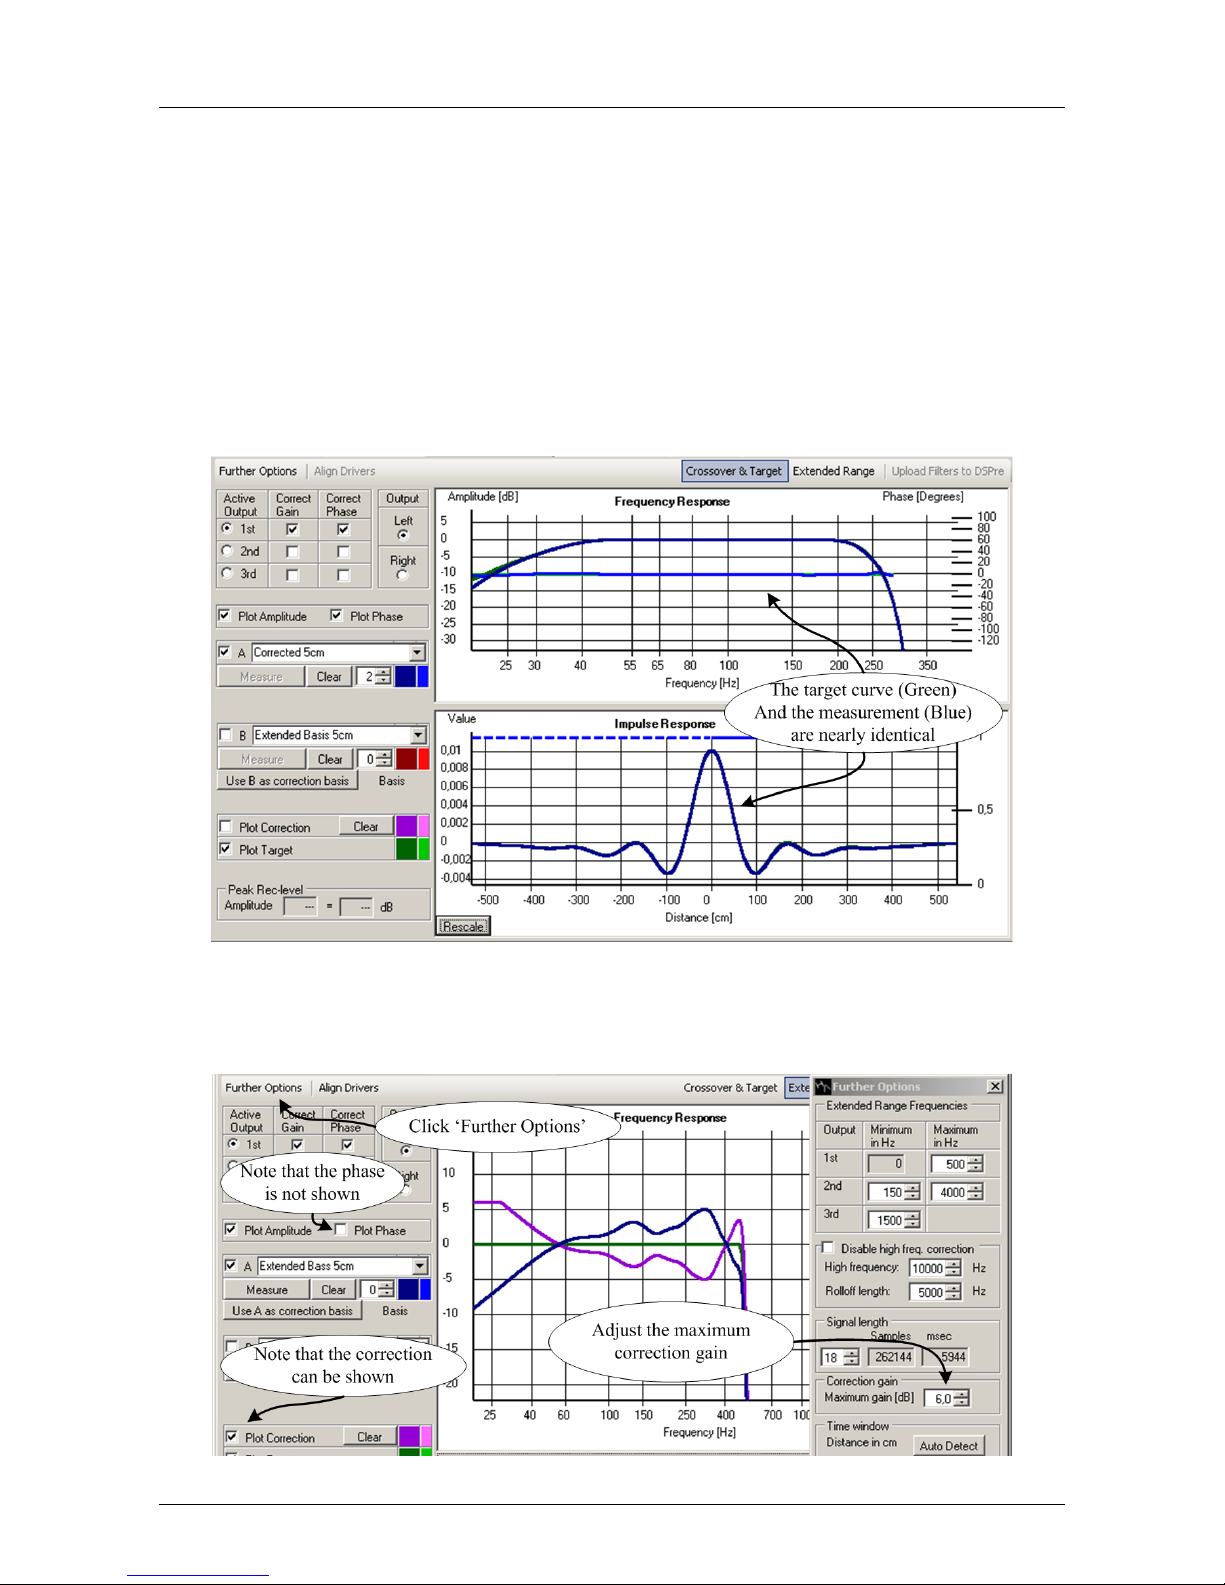
After uploading the filter with corrections you will have a DSPre, which corrects your driver
to have a perfect impulse response, which can be verified simply by making a measurement
without moving the microphone:
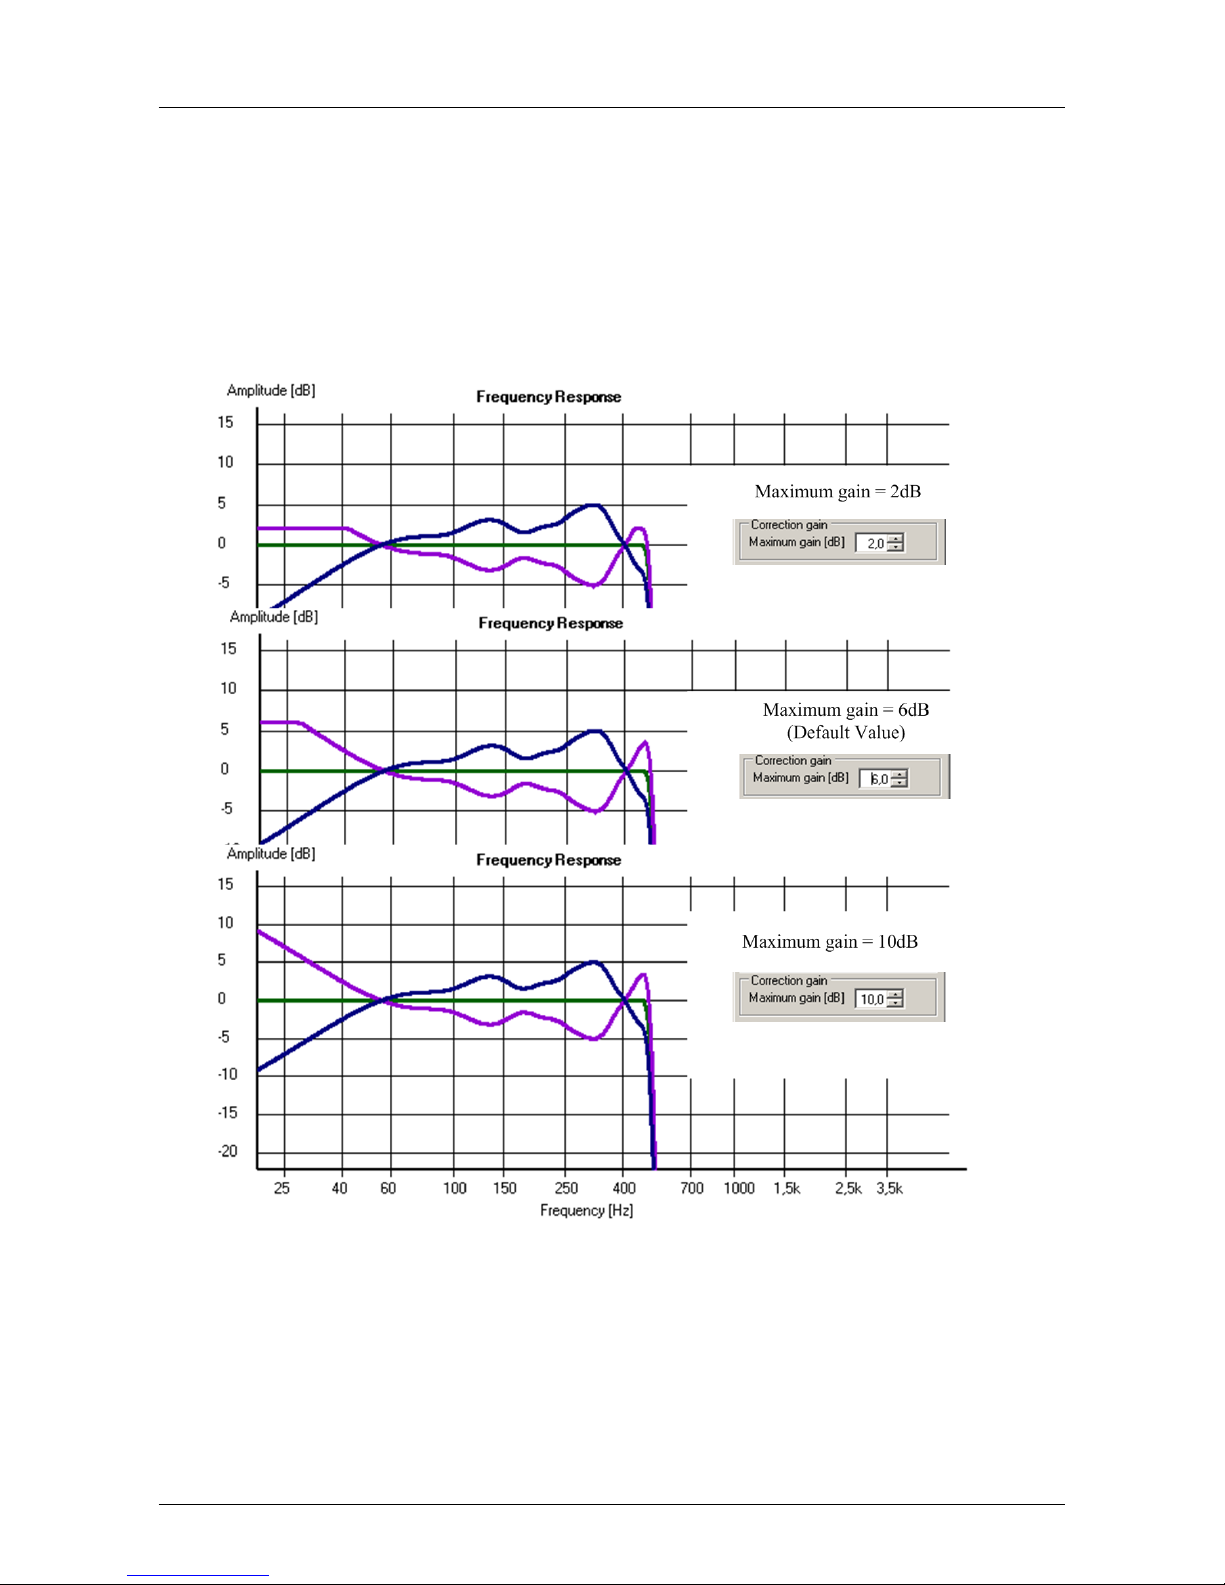
12.3.2 Limit the Maximum Gain
Under ’Futher Options’ the maximum gain can be adjusted
HOLM Acoustics HOLMFIR User Guide v0.4.4
Page 59
Driver Correction - Correcting a Bass/Subwoofer (DSPre-2,3-way) 55 of 65
This is usefull if you want to have full control over just how much extra gain the DSPre
will put into your system. The compromise is:
The more gain, the less dynamic range
The less gain, the less linearity
Several measurements on different systems have shown that a maximum gain of 6dB is a
good compromise, but your system can of course change the determining factors
HOLM Acoustics HOLMFIR User Guide v0.4.4
Page 60
Driver Correction - Correcting a Midtone Driver (DSPre-2,3-way) 56 of 65
12.4 Correcting a Midtone Driver (DSPre-2,3-way)
Step By Step Correcting a Midtone Driver
12.5 Correcting a Tweeter (DSPre-2,3-way)
Step By Step Correcting a tweeter
12.6 Correcting a Bookshelf Speaker (DSPre-1-way)
Step By Step Correcting a small speaker
HOLM Acoustics HOLMFIR User Guide v0.4.4
Page 61

57 of 65
Part III
App endices
HOLM Acoustics HOLMFIR User Guide v0.4.4
Page 62
Support 58 of 65
Appendix A
Supp ort
HOLM Acoustics is aware that the huge degree of freedom within DSPre and HOLMFIR
can be a challenge. HOLM Acoustics will advise you how to configure the DSPre to satisfy
your preference.
A.1 The Forum at www.holmacoustics.com
Using the forum at www.holmacoustics.com is a great way to interchange knowledge and
experiences. NB! Please help HOLM Acoustics and use this forum for communication
whenever possible.
A.2 Emails to [email protected]
HOLM Acoustics welcome emails send to [email protected] with a specific question or request, but please remember to include relevant information.
It is an advantage to initiate the email from HOLMFIR while the DSPre is connected and
powered on. This is done from the menu:
’Help’ → ’Email Support at HOLM Acoustics’
Windows will start the default email client with some prefilled data. Here an example with
Microsoft Outlook 2003 as email client:
HOLM Acoustics HOLMFIR User Guide v0.4.4
Page 63
Support - Remote Assistance 59 of 65
A.3 Remote Assistance
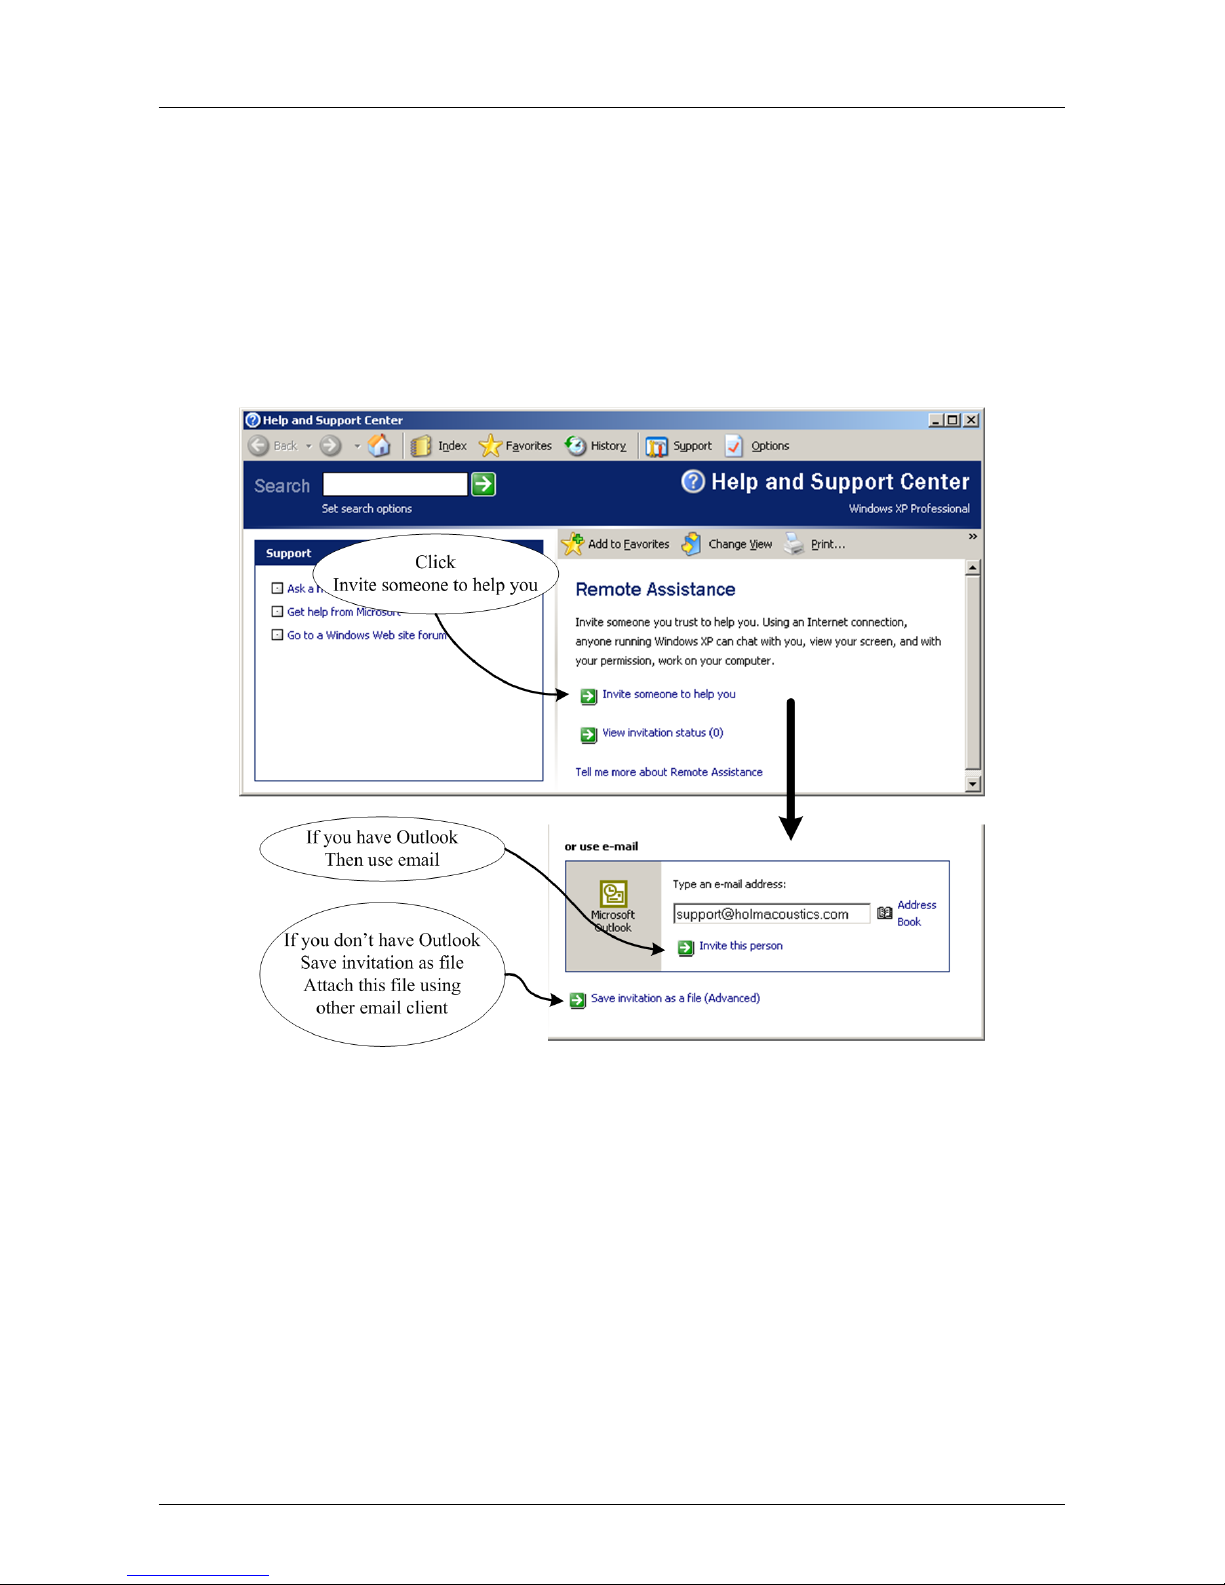
Windows Remote assistance will allow a supporter at HOLM Acoustics to control HOLMFIR on your computer while you see what is going on. Remote assistance can be started
from HOLMFIR:
’Help’ → ’Request Remote Assistance’
Please arrange a time with support at HOLM Acoustics before sending the request
HOLM Acoustics HOLMFIR User Guide v0.4.4
Page 64
Frequently Asked Questions 60 of 65
Appendix B
Frequently Asked Questions
Question Answer
Can the DSPre play without a computer connected? Yes
Can I connect the DSPre after HOLMFIR is started? Yes
Do I loose my current filter-configuration when
upgrading HOLMFIR?
No
HOLM Acoustics HOLMFIR User Guide v0.4.4
Page 65

Troubleshooting 61 of 65
Appendix C
Troubleshooting
Problem Solution
The status field in HOLMFIR says:
No compatible DSPre found
1. Make sure that a USB cable is connected between
the DSPre and the computer
2. Turn on the DSPre
3. Restart HOLMFIR
HOLMFIR cannot control the
DSPre volume and source
1. Disconnect the USB cable to the DSPre
2. Close the HOLMFIR application
3. Connect the USB cable to the DSPre
4. Start HOLMFIR
There was a powerfailure when I
was uploading filters to the DSPre,
which is not responding now.
1. Perform the upload again
The DSPre is powered on, but
there is no text in the display
1a. Turn off the DSPre and turn the DSPre on again
1b. Find the remote control and adjust the dimming
HOLM Acoustics HOLMFIR User Guide v0.4.4
Page 66
Technical Note - Measuring Response 62 of 65
Appendix D
Technical Note - Measuring Response
Motivations for using log-sweep as measuring signal
• Extremely good signal to noise ratio
• Filter all non-linearities away
• Same energy per octave - hence reflects the ear.
• Extreme reproducibility
D.1 Frequency Response
Write that HOLMFIR does not correct for distortion and other stuff
D.2 Nonlinearities
Write that HOLMFIR does not correct for distortion and other stuff
HOLM Acoustics HOLMFIR User Guide v0.4.4
Page 67
Technical Note - Fourier Transforms 63 of 65
Appendix E
Technical Note - Fourier Transforms
Write a short intro to Fourier Transforms
E.1 The Time Window
Write a short intro to the time window
HOLM Acoustics HOLMFIR User Guide v0.4.4
Page 68

INDEX 64 of 65
Index
Analog input, 28
Analog source, 28
Audacity, 28
Bitmap Images, 30
Clipping, 28
Colors, 30
Computer Requirements, 5
Control Measurements, 37
Control the DSPre, 24
Crossover & Target, 14
Crossovers, 14
Display, 24
Driver Alignment, 43
Driver Correction, 48
DSPre, 2
DSPre Mixer, 25
DSPre volume, 35
DSPre-1-way, 2
DSPre-1-way Extended Range, 49
DSPre-1-way Setup, 6
DSPre-2-way, 2
DSPre-2-way Automatic Alignment, 45
DSPre-2-way Extended Range, 49
DSPre-2-way Setup, 8
DSPre-3-way, 2
DSPre-3-way Automatic Alignment, 46
DSPre-3-way Extended Range, 50
DSPre-3-way Setup, 11
Emails to support at holmacoustics.com, 58
End-Levels, 19
Equalization, 17, 20
Equalization box, 19
Equalization files, 20
Equalization Mode, 17
Export Graphs, 30
Extended Range, 48
Filter Banks, 22
FIR, 14
Forum at www.holmacoustics.com, 58
Fourier Transforms, 63
Frequency Response, 62
Frequency Rolloff, 15, 16
Full-range measurement, 47
Graphical Equalizer, 19
Graphical Equalizer Tool, 19
High Frequency Rolloff, 16
HOLMFIR, 2
HOLMFIR digital crossover, 14
Impulse Response Axis, 40
Installing HOLMFIR, 4
Linewidth, 29
Linux, 27
Look and Feel, 29
Low Frequency Rolloff, 15
Mac OS X, 27
Measurement Chain, 35
Measurement Conditions, 42
Measurement Quality, 41
Measuring Response, 62
Microphone Calibration, 34
Microphone Connection, 33
Nonlinearities, 62
Output voltage, 28
Plug’n’Play, 27
Presets, 21
Protect Your Ears, 35
Record level, 41
Remote Assistance, 59
reproducibility, 42
Sensitivity, 43
Signal length, 41
Source Text, 24
Time Alignment, 44
HOLM Acoustics HOLMFIR User Guide v0.4.4
Page 69

INDEX - INDEX 65 of 65
Time Window, 63
Time window, 39
Tonal Balance, 17, 21
Tooltip, 29
Tooltip Popups, 29
USB 1.1 audio standard, 27
Verification by Control Measurements, 47
Zoom, 18
Zoom Back, 18
HOLM Acoustics HOLMFIR User Guide v0.4.4
 Loading...