

Page 1
INSTALLATION NOTES: dCrest-9
1. Caution and Safety Instructions
• Qualied personnel must install and/or service
this product in a manner consistent with its
intended use and in compliance with the
National Electrical Code, Canadian Electrical
Code, and/or all local and provincial codes.
• Follow all product label information and
installation instructions.
• Turn o power at the fuse or circuit breaker
before installation or servicing.
• The use of damaged components may cause an
unsafe condition and void the product warranty.
2. Product Information
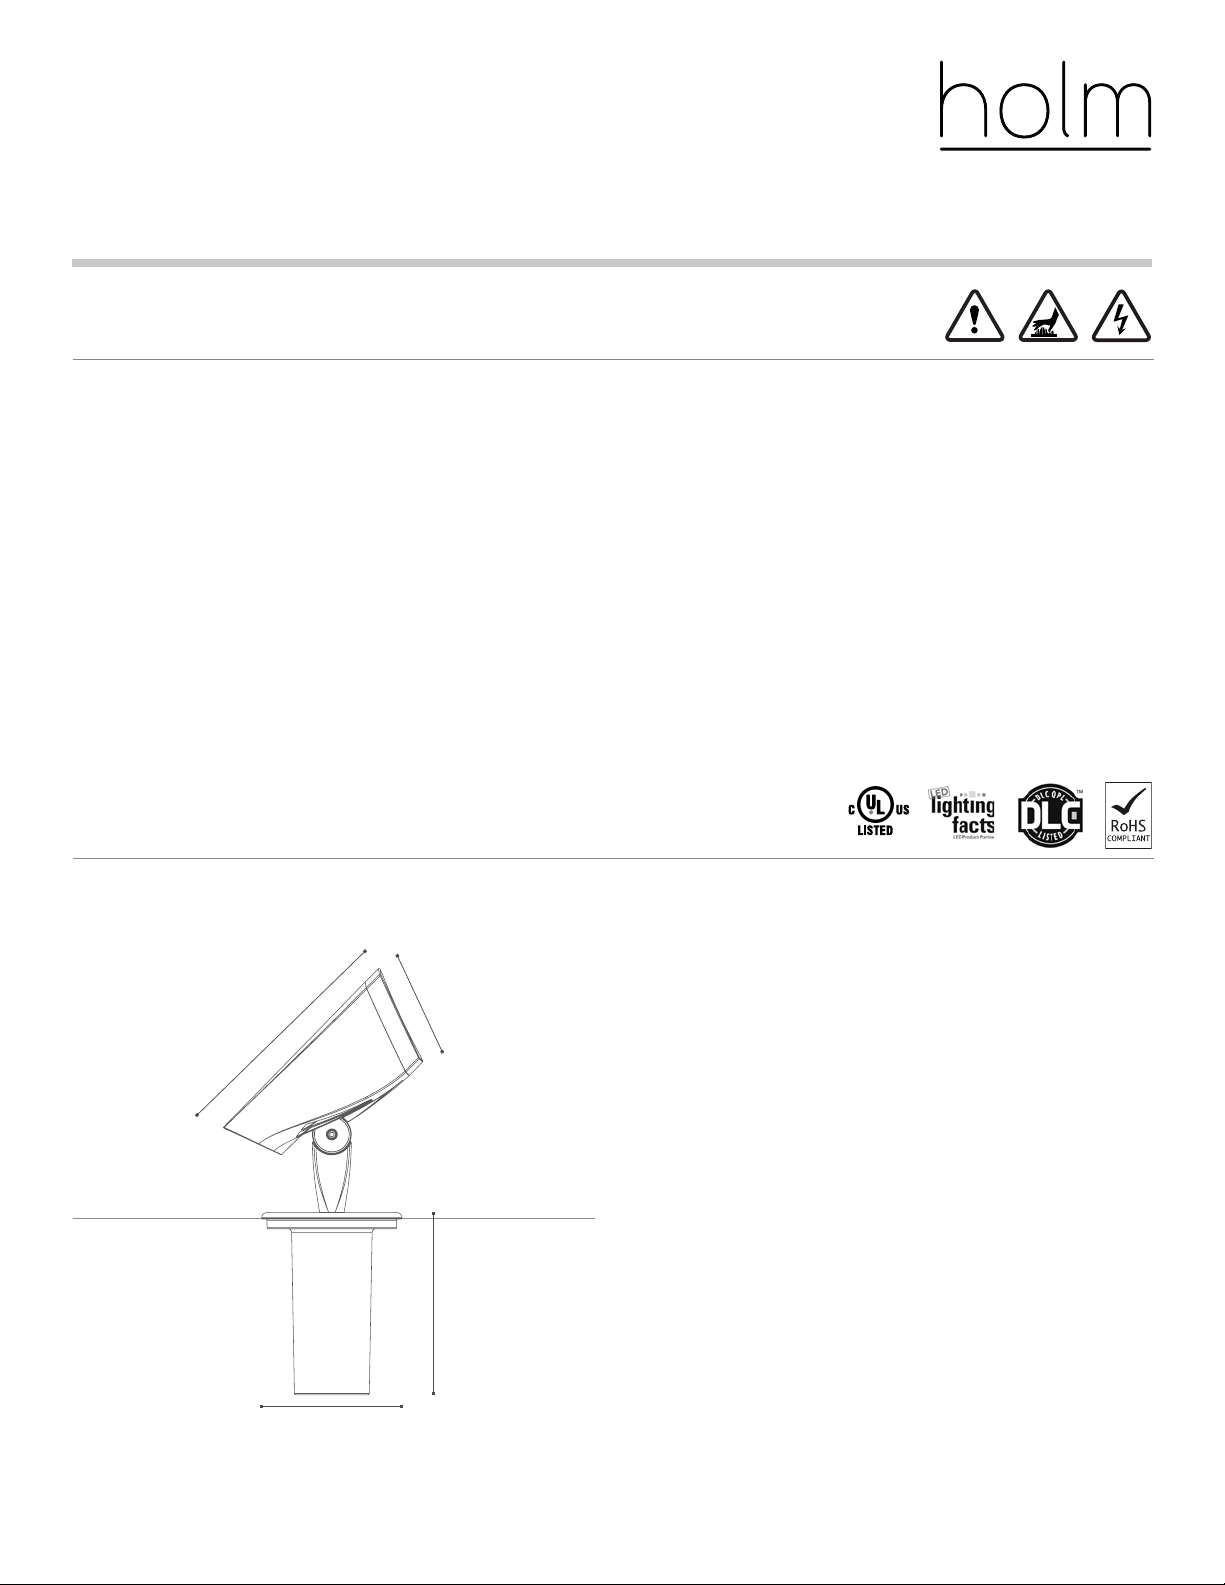
• This product is suitable for mounting at grade level.
4.0"/10.2 cm
• Do not block light emanating from this product
in whole or part.
• Never operate the luminaire with a missing or
damaged lens. Clean the lens on a regular basis.
• The entire luminaire may become extremely
hot. Do not touch the hot lens or luminaire body.
Do not touch the light source at any time.
• Keep all O-rings and sealing surfaces clean
during installation and servicing; failure to do
this may lead to premature failure of the
product.
3YJ8
8.5"/21.6 cm
Tools Needed:
• Installation: 7/8", 5/32", and 5/64" Allen wrenches
• Servicing: 7/64" Allen wrench and #1 Phillips screwdriver
6.75"/17.1cm
5.25"/13.3 cm
ARCHITECTURAL & LANDSCAPE LIGHTING | holmlighting.com A Hunter Industries Company
Page 2
INSTALLATION NOTES: dCrest-9
3. Product Installation
2
Diagrams
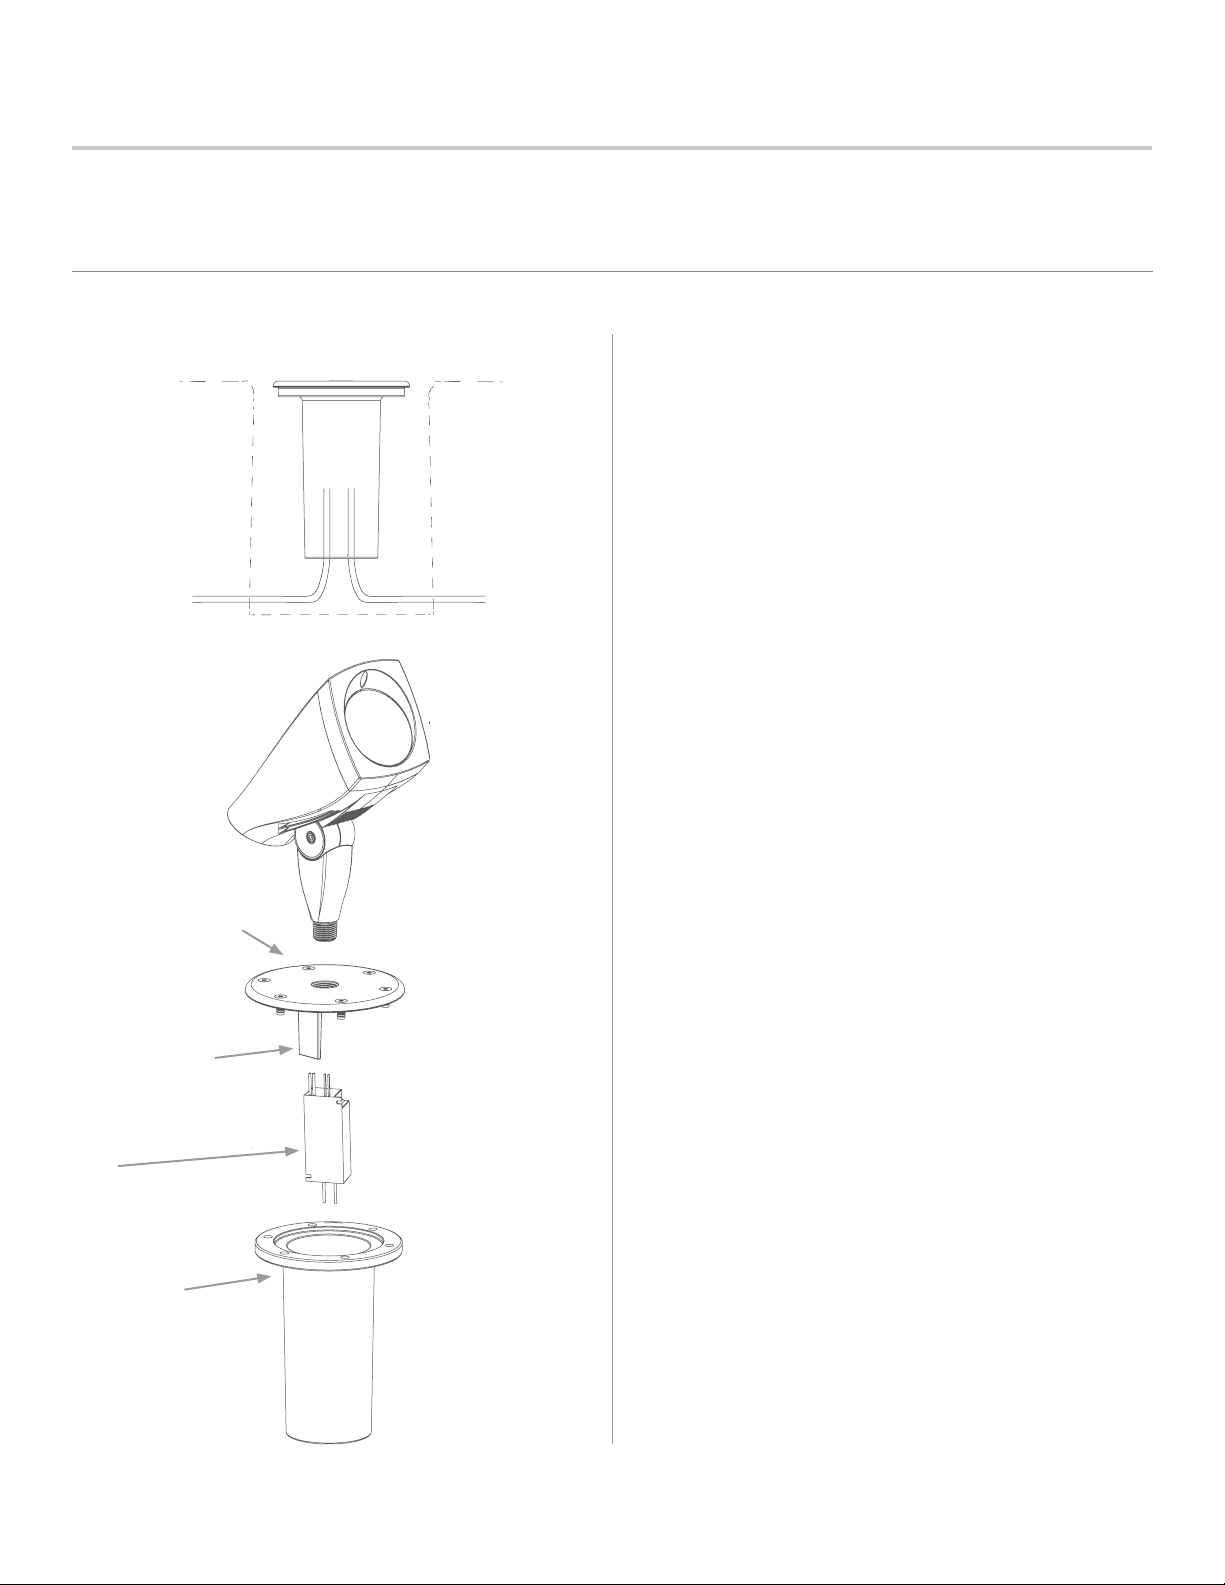
1. Secure the driver housing in-ground in
accordance with local codes and regulations.
2. Connect conduit or cable runs to the bottom of
the driver housing with couplings (⁄"-14 NPT –
provided by others). Use the provided ½"-14
NPT plug for unused conduit openings.
3. Add the installation cover onto the driver
housing with the provided fasteners to prevent
dirt and debris from entering the driver housing.
4. To complete the installation, attach the
luminaire to the driver housing faceplate.
Connect the driver wiring (provided with the
luminaire) to the luminaire using the wiring
diagram and approved wire connectors.
5. Use double-sided tape and a zip tie to secure
the driver to the driver mounting tab.
Driver Housing Faceplate
6. Tighten the 8-32 x ½" set-screw using a ⁄"
Allen wrench to lock the rotational position of
the luminaire to the driver housing faceplate.
Driver Mounting Tab
7. Seal the driver housing compartment using the
provided gasket and fasteners (10-24 x ½" screw)
with a ⁄" Allen wrench.
Driver
Driver Housing
ARCHITECTURAL & LANDSCAPE LIGHTING | holmlighting.com Customer Service 1-844-200-4656
Page 3
INSTALLATION NOTES: dCrest-9
3. Product Installation (continued)
3
Diagrams
5/32" Allen
Wrench
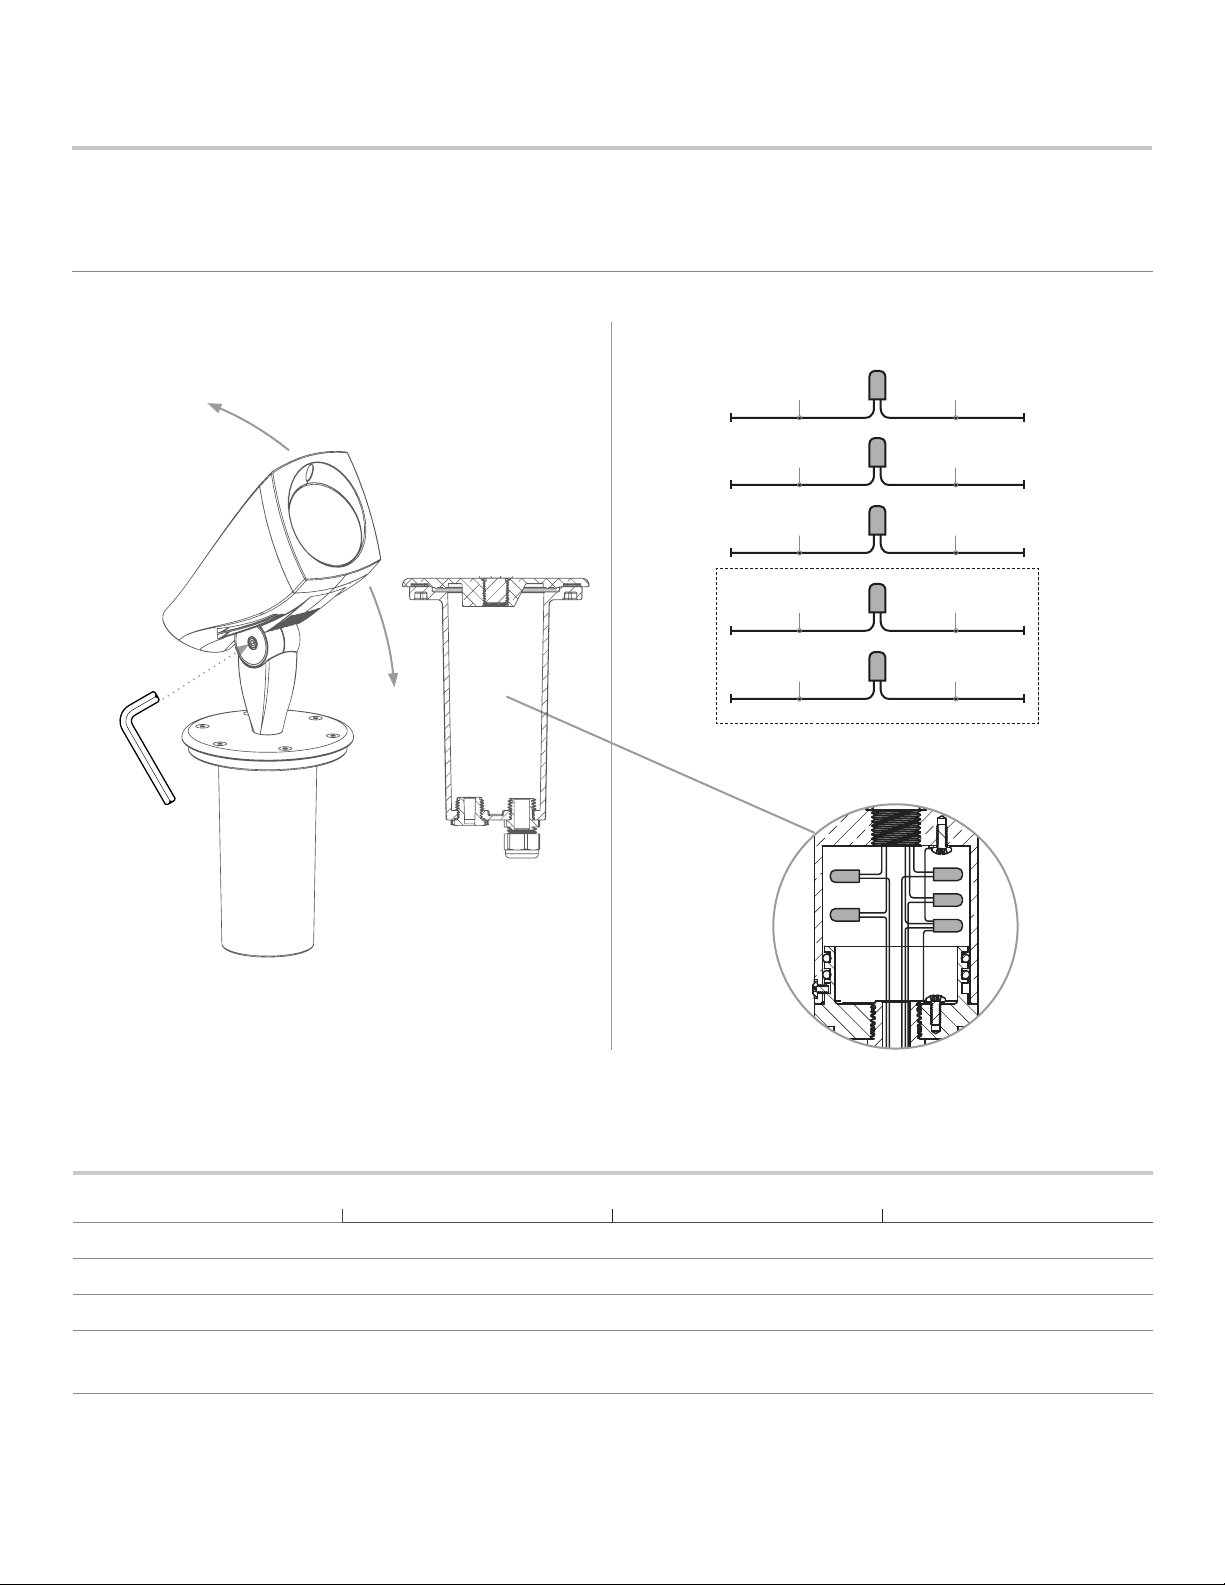
Wiring Chart
BUILDING
*For use with 0-10V driver only
Ground
Gray
Purple
BlackLine/Hot/Switching
WhiteCommon
Green (via stud or
green lead)
Gray*0-10V (-)
Purple*0-10V (+)
Black
White
Green
LUMINAIRE
Upon installation, use a 5/32" Allen wrench to adjust the angle of
the luminaire.
Power Requirements
Standard Voltage (SV) Universal Voltage (UV) High Voltage (HV)
Input Power 120V/60Hz 110V to 277V/60Hz 220V to 240V/50Hz
Dimming Phase 0-10V 0-10V
Number of Wires 3 5 5
Black, White, Green
ARCHITECTURAL & LANDSCAPE LIGHTING | holmlighting.com Customer Service 1-844-200-4656
Black, White, Green,
Purple, Gray
Brown, Blue, Green/Yellow,
Black, Gray
Page 4
INSTALLATION NOTES: dCrest-9
4. Repair/Replacement Instructions
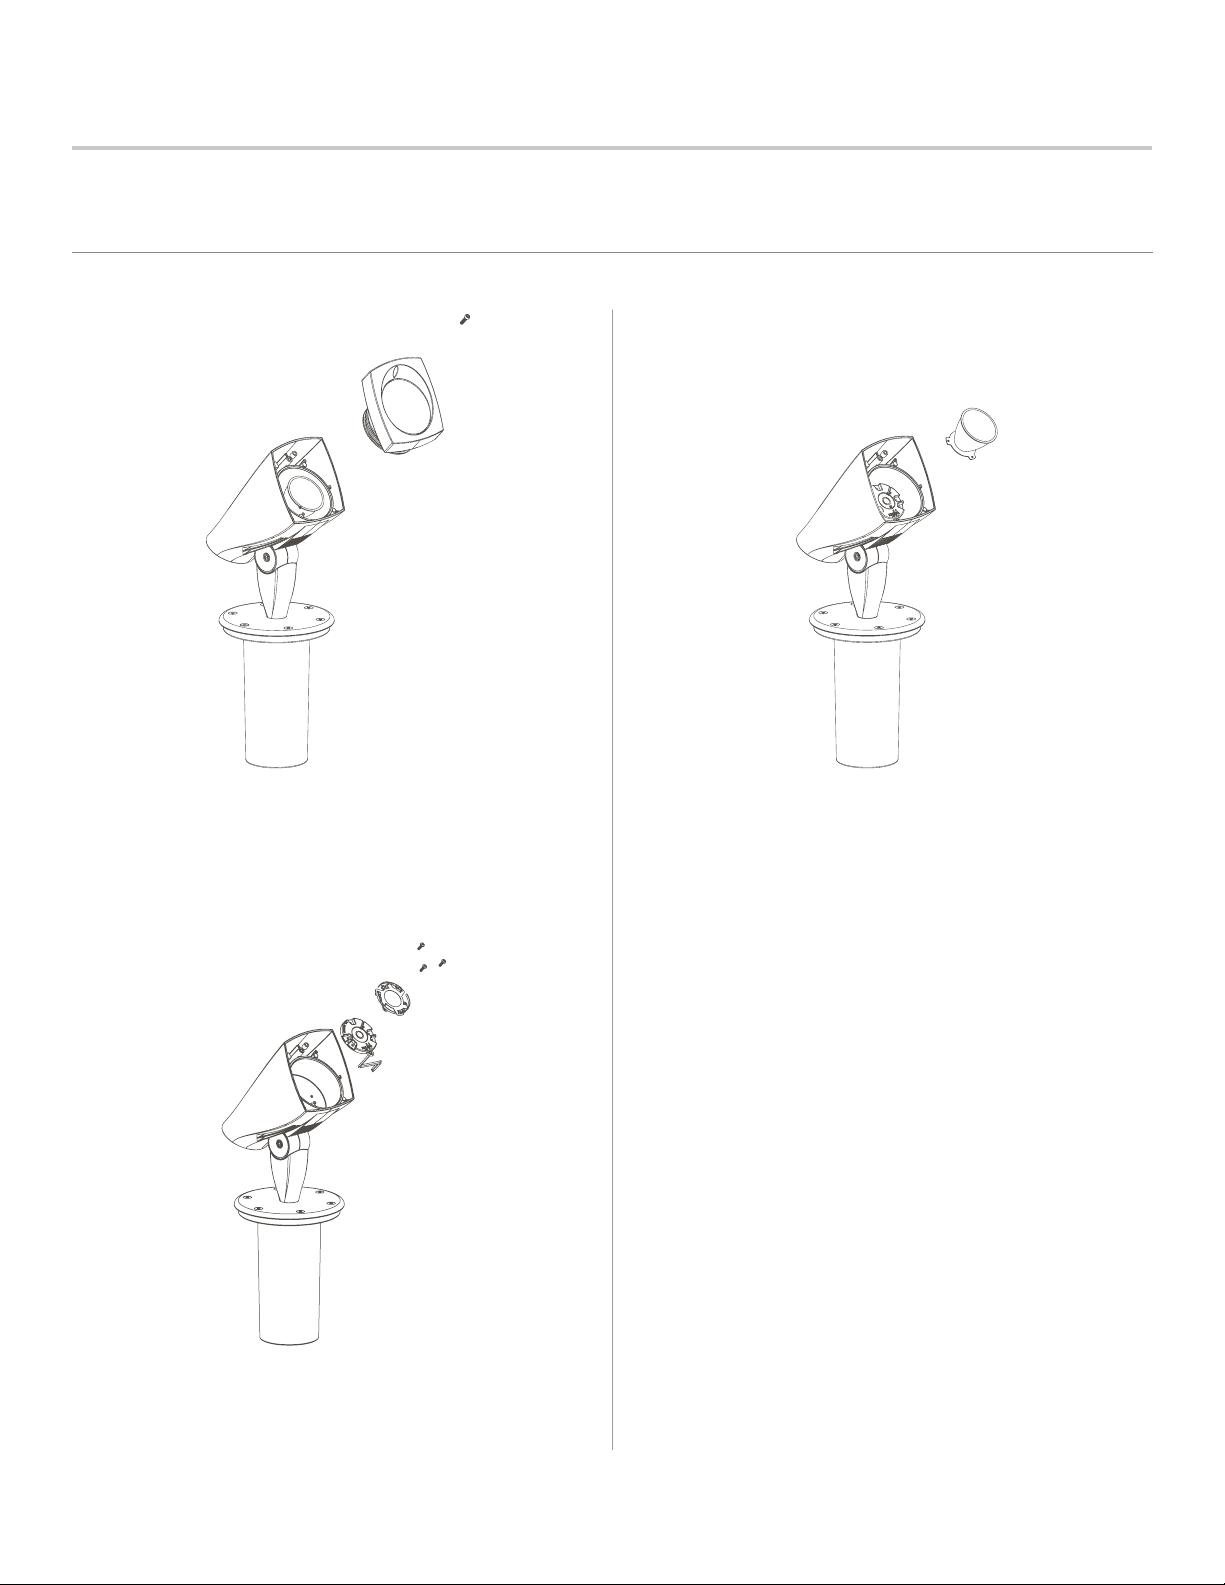
Standard Optics ( 20º, 40º, and 60º)
① ②
4
Remove the cap by unfastening the 6-32 x ⁄" screw
using a ⁄" Allen wrench. Remove the cap by liing
outward. Avoid using metal tools while liing the
cap to protect the power coat nish.
③
Unfasten the three LED module screws using a
Phillips #1 screwdriver. Remove the reector
adapter ring and LED module.
Twist the reector optic counterclockwise and pull
outward to remove.
ARCHITECTURAL & LANDSCAPE LIGHTING | holmlighting.com Customer Service 1-844-200-4656
Page 5

INSTALLATION NOTES: dCrest-9
5
4. Warranty
STATEMENT OF LIMITED WARRANTY
Hunter® Industries Incorporated (“Hunter”) warrants Holm lighting products to be free of defects in materials or workmanship
under normal use for a period of ve (5) years from the date of invoice. If a defect in a Holm product is discovered during the applicable
warranty period, Hunter will repair or replace, at its option, the product or the defective part. This limited warranty does not extend to
repairs, adjustments, or replacement of Holm products or parts resulting from misuse, negligence, alteration, modication, tampering,
or improper installation and/or maintenance of the product. This warranty extends only to the original installer of the product. If a
defect arises in a Holm product or part during the warranty period, contact the local authorized manufacturer’s representative. Hunter’s
obligation to repair or replace its products as set forth above is the sole and exclusive warranty set forth by Hunter. There are no other
warranties, expressed or implied, including warranties of merchantability and tness for a particular purpose. Hunter will not be liable to
distributor or any other party in strict liability, tort, contract, or any other manner for damages caused or claimed to be caused as a result
of any design or defect in Holm products, or for any special, incidental, consequential, or exemplary damages or any nature, including
without limitation lost business or prots. Notwithstanding the foregoing, if for any reason Hunter is found to be liable, in no event shall
Hunter’s liability exceed the price of the product which gives rise to the claim, loss, or damage.
If you have any questions concerning the warranty or its application, please write to: Customer Service Department -
Holm, 1940 Diamond Street, San Marcos, CA 92078, U.S.A.
ARCHITECTURAL & LANDSCAPE LIGHTING | holmlighting.com Customer Service 1-844-200-4656
HOLM-045-IN-dCrest US 09/17
 Loading...