

Installation Instructions
Bicycle Carriers
e
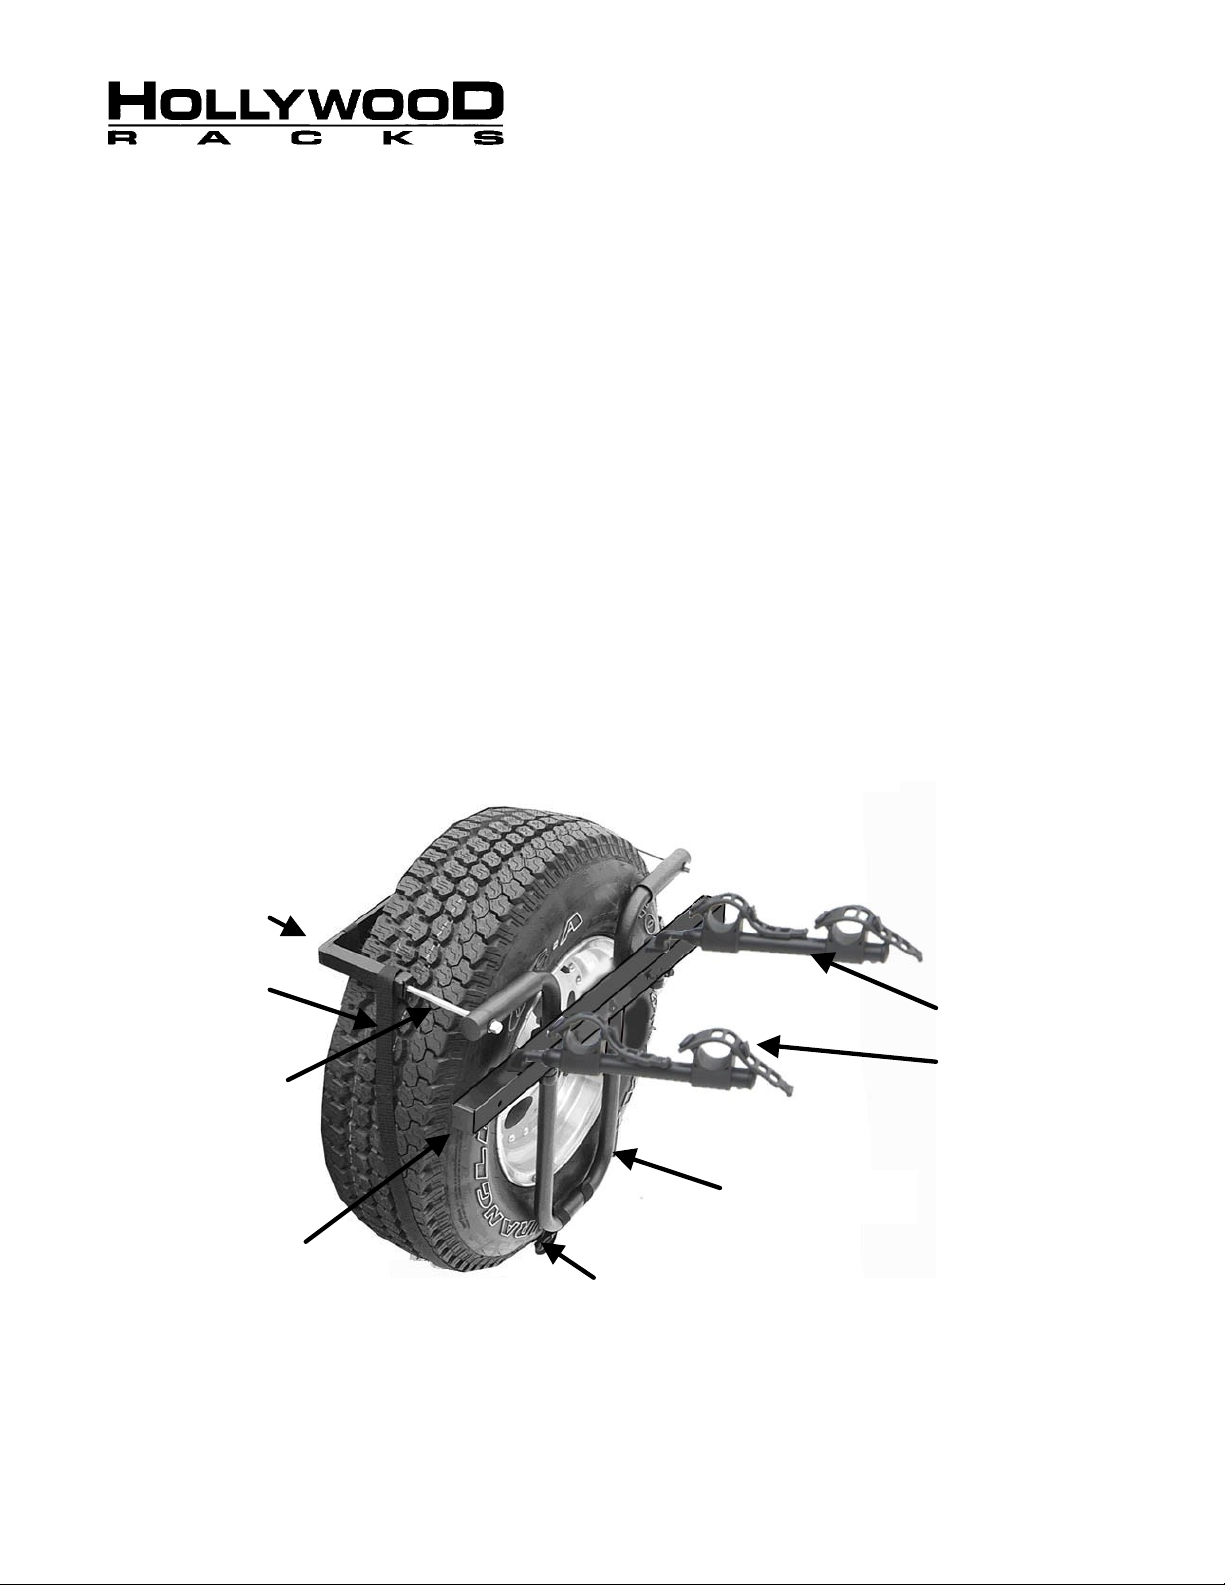
The Hollywood Spare Tire Rack comes fully assembles from the factory, and set up for “center mounted”
ep 7. The rack easily attaches to the spare
Support Arm
Rear Brace
Adjustment
Support
Rear Straps
The two “rear” straps pass behind the tire
Side Buckle
Main Frame
Rear Buckles
for Hollywood SR1 Spare Tire
When using the Hollywood SR1 Spare Tire rack, always remember the following points:
Never place more than two bikes or 75 lbs (35 KG) on the rack
Keep bicycle tires at least 1 ft (30cm) away from exhaust pipe
Tighten all straps before and after mounting bikes
Check the rack, bicycles and strap tightness/condition regularly during use
Drive slowly when used on bumpy or dirt roads
Caution: Be sure that the spare tire is properly mounted to the vehicle and that the mounting
bracket/apparatus is suitable and strong enough to support the entire weight of the spare tire, bike rack
and bicycle(s). Contact the vehicle manufacturer if there are any questions regarding the strength of th
tire mounting apparatus.
Tools Needed: 9/16” socket wrench or and adjustable wrench
spare tires. If your spare tire is side mounted, see assembly st
tire using an adjustable rear brace in conjunction with three nylon attachment straps.
(not shown)
Side Strap
Bolt
Bar
(not shown)
Bike Cradle
The “side” attachment strap goes around
Fig.1
the tire and prevents rotational movement.
and keeps the rack tight and secure
against the front of the spare tire.
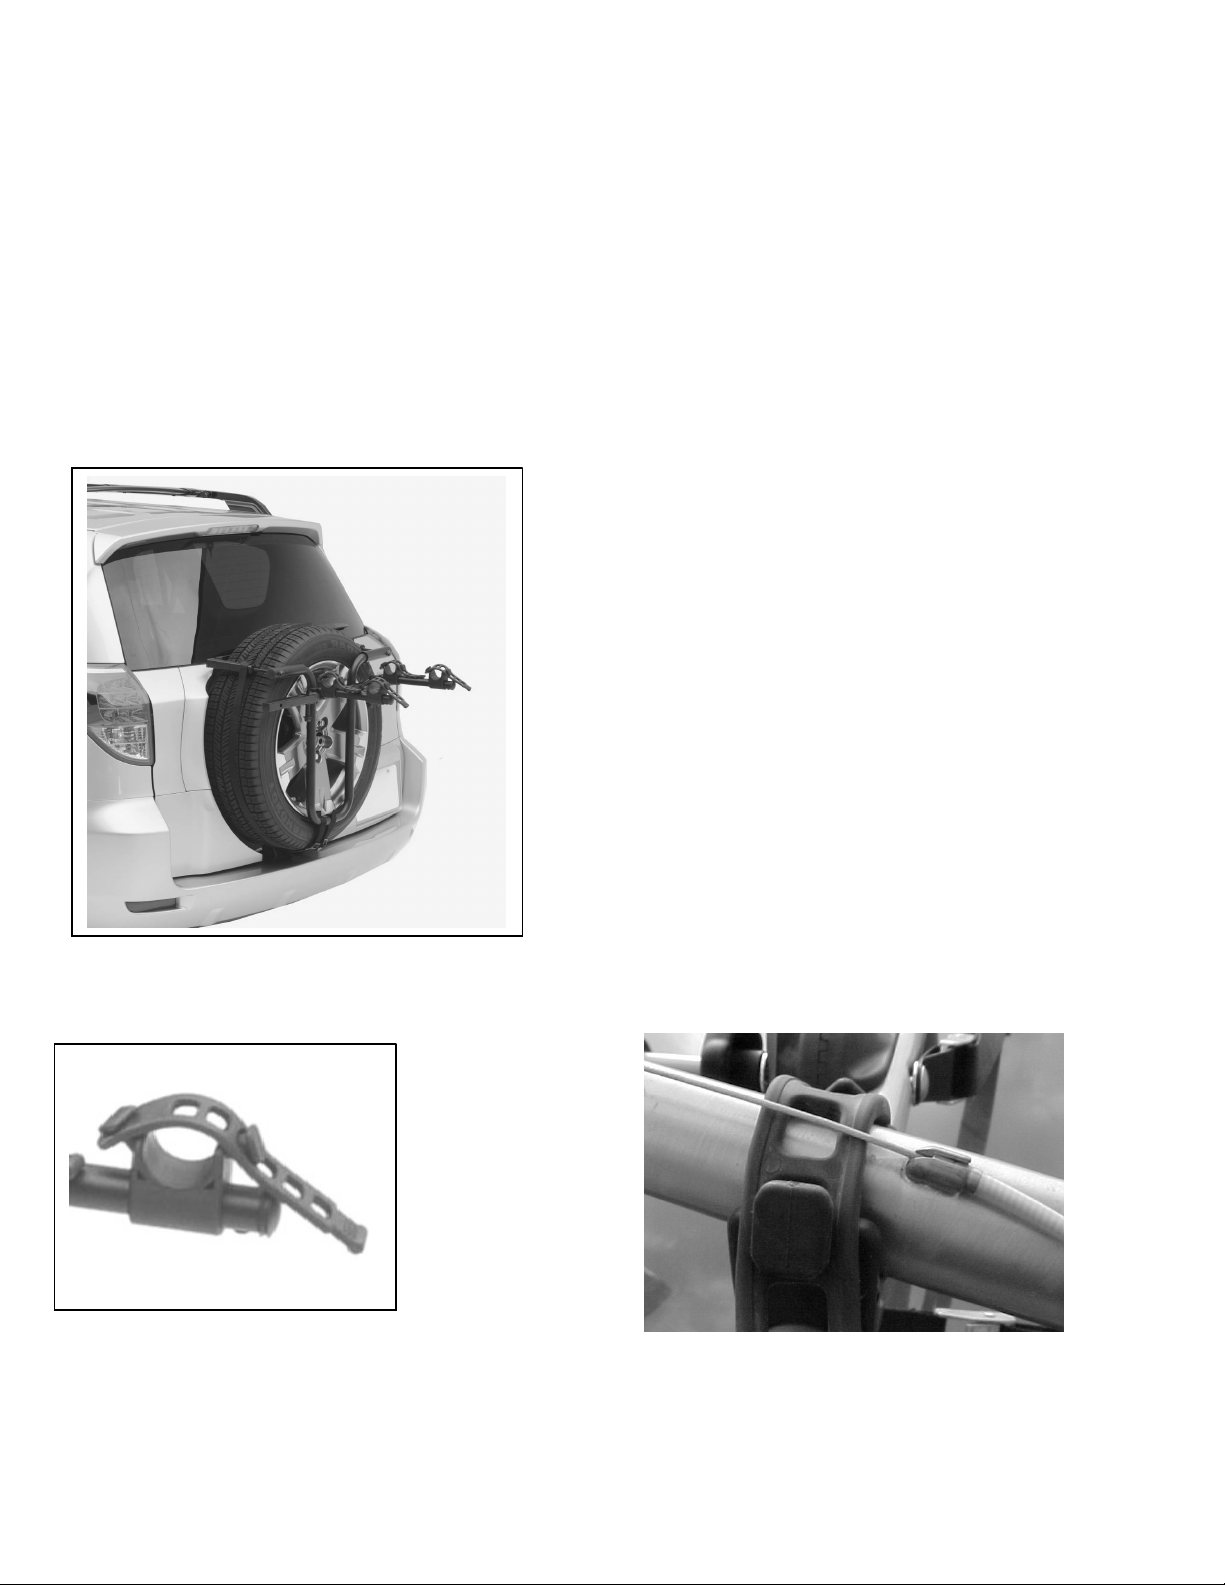
1. If the Spare tire on your vehicle is side mounted, go to instruction step 7
ng loaded bicycle support arm. Rotate the arms outward . Arms should drop into slot
Mounting Bikes to the rack:
The handlebars should be on the passenger’s side
strap through the bike’s frame and through the
rack.
2. Place the rear brace around the spare tire (loosen adjustment bolts if necessary), then snug the
adjustment bolts up using the wrench. Do not over-tighten!
3. Wrap the side strap around the bottom of the tire as shown in fig. 1 & 2 and attach to side buckle.
4. Thread the two rear straps around the back of the tire and attach to the two rear buckles located on the
bottom of the main frame.
5. Tighten all three straps and buckles securely.
6. Push up on the spri
in a locked position when carrying the bikes, and remain in a folded position when not in use.
7. Side Mounted Spare Tires: Locate the two bolts connecting the support bar to the main frame. Using
the attached hex key and adjustable wrench, loosen and remove the bolts from the rack. Re-position
support bar either left or right depending on your vehicle. Re-insert the bolts through the main frame and
support bar and tighten nuts securely. Return to step 1.
With the support arms in the outward locked
position, mount the first bicycle into the bike
cradles and pull the strap snugly over the frame.
of the car. Rotate the bike’s pedal arm so the
pedal will not be in contact with the car’s body or
tire. Be sure the wheels are at least 12”/30cm
from the exhaust pipe, and that the wheels can
clear a steep driveway. Mount the second bike
into the cradles and secure with rubber strap.
Handlebars should be on the driver’s side of the
car. Use the included safety/tie down strap to
secure the bike(s) to the rack by wrapping the
Fig. 3: Bike Cradle
Fig. 2
Fig. 4: Wrap rubber straps under cables

HOLLYWOOD PORTA BICICLETAS SR1
vehiculo,reinser
y que las llantas no topen en las suvidas enpinadas en el piso.montar la segunda bicicleta en las horquillas y amarrarlas con seguridad
vehículo, o vehículos que siguen detrás de ti. El fabricante de este producto no extenderá la garantía a ninguna por daños no
Cuando uses tu porta bicicletas sr1 para neumático de repuesto recuerda todo el tiempo los siguientes puntos
. Nunca poner mas de 2 bicicletas o 75 lbs (35 kg) en el porta bicicletas
. Mantener las llantas de las bicis minimo 1 pie ( 30 cm)lejos del tubo de escape
. Apretar las correas antes y después de montar las bicicletas
. Revisar el porta bici,y bicicletas que las correas esten apretadas regularmente durante el uso
. Manejar despacio cuando este en caminos de tierra o piedras
Precaucion estar seguro de que el porta bici esta perfectamente istalado en el vehiculo,y que el aparato de soporte es suficientemente
fuerte para soportar el pesor del neumático,porta bici ,y bicicletas si tienes preguntas sobre la fuerza
Que esta capacitado hablar a el fabricante de tu vehiculo.
Herramientas que nesecitas un cubo 9/16’’ o una llave ajustable.
La hollywood sr1 viene completamente ensamblada de fabrica y lista ‘montada al centro’si tu neumático esta a los lados mira los pasos
7.el porta bici es facil colocarla a tu neumático de repuesto con una barra para la parte trasera y sus correas
La correa de el lado ba alrededor del neumático ipidiendo el moviminto de rotacion
Las otras 2 en la parte de atrás del neumático,manteniendo fija y apretada asegurandola al frente del neumático
1.Si tu nehimatico de repusto esta montado a un lado del vehiculo ir al paso 7
2.Poner la barra trasera alrededor de el neumático(aflojar los tornillos si es necesario)entonses ajustar los tornillos apretandolos usando
una llave .no apretar demaciado.
3.Envuelba la correa alrededor del neumático como lo enseña en la fig.1 & 2 y amarrar a la evilla
4.Pasar las 2 cooreas por la parte trasera del neumático y ammararlos a las evillas colocadas en la prte de abajo del marco.
5.Amarrar las tres correas y evillas con seguridad.
6.Empugar el resorte de carga de los brazos hacia arriba ,rotando los brazos hacia fuera,los brazos deben descanzar sobre la ranura en
posición segura cuando carga las bicis.y recuerda mantenerlos doblados cuando no lo estas usando.
7.Nehumaticos a los lados.localiza los 2 tornillos que unen a la barra con el marco principal.usa la llave que ba adjunta y una llave
ajustable ,afloga y remueve los tornillos del porta bici buelve a colocar la barra sea a la izquierda o derecha dependiendo de tu
ta los tornillos sobre la barra y el marco principal.aprieta las tuercas con seguridad.
Regresa al paso 1
Colocar las bicis al porta bicis sr1
Con los brazos hacia fuera ,y en pocision segura montar la primera bicicleta,sobre las horquillas y halar la correa de hule sobre el
marco del bici los manerales deben estar al lado del pasajero del vehiculo rotar el pedal de la bici que no golpee la carrocería o el
neumático de repuesto del vehiculo,estar seguro que la llantas de la bici estan por lo menos 1’ /30 cm lejos del tubo de escape,
con las correas de hule ,los manerales deben de estar al lado del chofer del vehiculo.
Use la correa de nylon para asegurar las bicicletas al portabici amarrandolas alrededor y al marco principal del sr1.
¡Precaución! Este porta bicicleta se ha diseñado para la mayoría de los vehículos. Es la responsabilidad del usuario asegurar la
instalación segura y apropiada de este producto. la instalación incorrecta de este producto puede dar lugar a daños a tus bicis,
atribuidos a un defecto en materiales y la ejecución. La guía impresa en este manual se usa para referencia general solamente.
Si se cambia el diseño del vehículo, materiales y los afinados usados en los vehículos automotores de marca la responsabilidad
es del usuario de determinar el uso de este producto. ¡Comprobar por favor la guía apta en la página trasera antes de la instalación!
Si la marca y el modelo de tu coche se enumera como “ningún ajuste,” comprobar con tu distribuidor sobre ayuda de la instalación,
el intercambio para saber si hay otro modelo que quepa, o el reembolso. Esta guía no es completo debido a los cambios continuos
en diseño automotor. preguntas, llamar nuestro departamento de servicio de cliente al: 310-516-8600
lunes. viernes. de 7:00 AM-3: 00PM tiempo del pacífico.
Renuncia de responsabilidad. Reparar o renplazar productos defectosos o acreditar fondos es determinado por hollywood racks
Es un exclusivo recurso del comprador bajo esta garantia. Daños al vehiculo del comprador bicicletas de algun otro se e excluira.
Esta garantia se ofrece explícitamente en lugar de todas las demas garantias verbales o escritas. Hollywood no será responsable de
ningún daño directo,o indirecto, consecuente,del mal uso cualquier otro daño en relación con la compra, el uso o la manipulación de
este producto. Algunos estados no permiten la exclusión o limitación de daños emergentes o eventuales y la limitación anterior puede
no aplicarse a usted. Esta garantía le otorga derechos legales específicos y usted tenga otros derechos, los cuales varían de estado a
estado.

Instructions dinstallations pour le Hollywood SR1 pour roue de secours externe du type 4 X 4
Avant d’utiliser votre Hollywood SR1, s’assurer des points suivants:
et vélos. Contacter
6. Pousser vers le haut les bras de support avec ressort. Tourner les bras de support vers l’arriere du véhicule.
es bras de support au cadre principal. Déserrer
et enlever les boulons et écrous. Ajuster la barre de support vers la gauche ou la droite suivant votre véhicule.
monté proprement sur le véhicule et que les vélos soient proprement chargés sur le porte vélo comme décrit
Ne jamais mettre plus de 2 vélos ou 75 lbs (35kgs) sur le SR1
Les roues des velos doivent être au moins à 30 cm du pôt d’échappement.
Serrer toutes les sangles avant et après avoir montés les vélos sur le SR1.
Vérifier le SR1 et toutes les sangles pendant usage.
Conduire DOUCEMENT sur une chaussée en mauvais etat ou sans revêtement.
Attention: S’assurer que la roue de secours soit bien montée sur le véhicule et que les support de la roue de
secours soient suffisament solide pour supporter le poids de la roue de secours, porte-vélo
le fabricant du véhicule si vous avez des questions sur la solidité des supports de la roue de secours.
Outil à utiliser: Clef de 9/16” ou clef à molettes.
Le Hollywood SR1 est livré complètement assemblé pour la roue de secours centrée sur la porte arrière. Si
votre roue de secours est décentrée, lire le point 7. Le SR1s’attache facilement en utilisant la barre arrière
adjustable en conjonction avec les 3 sangles d’attaches en nylon.
1. Si votre roue de secours est décentrée, aller au point 7.
2. Mettre la barre arrière autour de la roue (pour large pneu, deserrer les boulons) comme sur Fig.1
Serrer les boulons en utilisant la clef jusqu’a que le SR1 soit serré contre la roue.
3. Mettre la boucle situee sur la barre arrière sur le côté de la roue (circonference). Mettre la sangle
la plus longue le long de la circonference de la roue Fig.2.
4. Enfiler les 2 sangles arrières er attachées les aux 2 boucles sur la partie inferieure du cadre
principal.
5. Serrer fermement les 3 sangkes.
Les bras doivent être dans l’encoche pour porter les vélos.
7. Roue décentrée: Trouver les 2 boulons connectant la barre d
Remettre les boulons et les écrous à travers le cadre principal et la barre de support. Serer FERMEMENT.
Retouner au point 2.
Monter les vélos sur le SR1:
1. Attacher les sangles de caoutchouc aux berceaux porteurs sur les bras de support à travers un trou round
sur la sangle avant de monter les vélos. Attachés les sangles du côté du véhicule.
2. Placer le vélo le plus lourd en premier (le plus proche du véhicule), en mettant le tube
supérieur du cadre sur les berceaux en caoutchouc. Le guidon doit être du côté du conducteur.
Attacher fermement les 2 sangles en caoutchouc
3. Répéter les mêmes instructions pour le prochain vélo en le mettant dans l’autre sens (guidon vers le
passager).
4. Après avoir mis les vélos, attacher la sangle d’attache de vélos à travers les roues
des vélos ET du cadre principal du SR1 et serrer fermement (longue sangle de 2m avec boucle a une
extrémité).
Attention:
Toujours vérifier les sangles après installation et après avoir installer les vélos.
Important:
Le fabriquant de ce produit n’est pas responsible des dommages causés par le mauvais
usage de ce produit. C’est la responsabilité de l’utilisateur de s’assurrer que le porte vélo est
dans ces instructions d’installation.
4

CAUTION!
your bicycles, vehicle, or vehicles following behind you. The manufacturer of this product will not extend the warranty to any
general reference only. On going changes in vehicle design, materials and finishes used on motor vehicles make it the user’s
n may
larguer totale. Ce qui pourrait devenair problématique à la charge d’un ou de plusieurs cycles. Plus loin, il faut Aussi prendre
This bicycle carrier has been designed to attach securely to your vehicle’s spare tire. It is the user’s responsibility to insure
the safe and proper installation of this product. Improper attachment or installation of this product may result in damages to
damages not attributable to a defect in materials and workmanship. The fit guide printed in this manual is intended as a
responsibility to determine the use of this product.
Limited Lifetime Warranty (effective January 1, 2008):
Hollywood Racks will warrant its car racks and accessories during the time that an original retail purchaser owns the
product subject to the exclusions and limitations of this warranty. Hollywood Racks will remedy defects in materials and
workmanship by repairing or replacing (at its option) a defective part or the complete rack without charge for labor or
parts. Hollywood Racks may elect (at its option) to issue a refund equal to the purchase price paid for the product.
This warranty does not cover problems caused by normal wear and tear including (but not limited to) weather,
scratches, dents, rust, accidents, unlawful vehicle operation, misuse, abuse, neglect, theft, unauthorized modifications,
or unauthorized repair. No warranty is given for defects resulting in incorrect assembly, incorrect installation onto the
vehicle, installation on a “no fit” vehicle, incorrect attachment of bicycles onto the rack, or overloading of the rack’s
weight restrictions. This warranty terminates if the original retail purchaser transfers the product to any other person.
If a product is believed to be defective, the original retail purchaser should contact either the original retailer or
Hollywood Racks directly at 800-747-4085 or at info@hollywoodracks.com
Disclaimer of Liability: Repair or replacement of a defective product or the issuance of a refund or credit (as
determined by Hollywood Racks) is a purchaser’s exclusive remedy under this warranty. Damage to a purchaser’s
vehicle, cargo, bicycles and or to any other person is excluded. This warranty is expressly made in lieu of any and all
other express warranties, whether oral or written.
Hollywood Racks shall not be liable for any direct, indirect, consequential, incidental, special, punitive or any other
damages in connection with the purchase, use or handling of this product.
Some states do not allow the exclusion or limitation of consequential or incidental damages and the above limitatio
not apply to you. This warranty gives you specific legal rights and you have other rights, which vary from state to state.
Wichtige Hinweise des Bundestamtes für Polizeiewesen Zur Benützung von Fahrrad-Hechträgern
Die Vorrichtung wird am Fahrzeug angebracht und stützt sich auf der stossslange, der Heckklappe und dem Heckfenster
ab. Dabiestehl das Fahrad quer zur Fahrtrichtung. Nach Art. 73 Abs. 2 der Verkehrszulassungsverordnung (VRV) darf bei
Motorwagen und Anhăngern die Ladung seitlich nict Uberagen. Dies dürfte beim Mitführen von einem oder mehreren
Fahrrädern mit genannter Vorrichtung je nach Fahrzeugbreite problematisch werden. Imweiteren ist auch Art. 89 des VTS,
verdecken der Beleuchtungsvorrichtungen und Kontrollschilder zu beachten.
Demzufolge kann nicht der Träger selbst für unzulässig einstuft werden, sondern nur die Verwendung desselben in
Verbindüng mit der Kombination Transportfahrzeugen und Fahrrad, lässet eine endgültige Beurteilung zu.
Fahreten mit montiertem Träger ohne Fahrräder sind zu unterlassen!
Directives importantes du Conseil Federal pour les offices de police concernant l’utilisation de porte-vélos arriére
L’appareil doit ėtré appuyé sur le véhicule de sorte à ce qu’il vienne se caler sur le pare-choc arriére, le coffer et la vitre
arriére. Cepdantle cycle se positionne perpendiculaire au véhicule. En conséquence, d’aprés l’article 73, paragraphe 2 du
décret sur le autorisalions du code de la route, la charge surles véhicules motorisés et remorques ne doit pas dépasser la
compte de l’article 89 VTS l’entrave aux éclairages arriéres et aux Plaques numériques.
Ainsila combinaison entre les véhicules motorisés et ce genre de porte-vélos ne doit etre utilizes uniquement por le
transport de bicyclettes. Les trajects avec les portes-vélos montes á vide sont interdits.
Hollywood Racks
12812 South Spring Street Los Angeles, CA 90061
(800) 747-4085 (310) 516-8600 Fax (310) 516-8955
Customer Service Hours: 8:00 AM- 3:00 PM Pacific Time
www.hollywoodracks.com info@hollywoodracks.com
Made in Taiwan 022008 c4
5
 Loading...