

Page 1
Revive 2-Bike Car Carrier Instruction Manual
When using the Revive
Car Rack always reme
mber the following points:
Step 1: Installing the rack on your
Rotate and position the rear brace of
or rear door and tighten the loose strap
Install the rack on structurally sound areas only.
Never install the upper hooks to plastic, glass or fiberglass.
Clean the surface of the trunk and bumper prior to installation.
Tighten all straps before and after mounting bicycles on the rack
Never place more than a total of 100 lbs. (45 kgs.) on the rack.
Keep the bicycle tires away from exhaust pipes (1 foot or 30cm) minimum.
Check the rack, bikes and strap tightness regularly during use.
Use caution and reduce speed on rough roads.
vehicle
This product comes fully pre-assembled,
no tools are required.
Parts included with the Revive Car Carrier:
1. Rack with six attachment straps
2. Anti-sway bar
3. Parts Bag including: two rubber tiedown straps for the bike holders; four
30” nylon straps for tying the bike to
the rack; one 86” nylon strap for extra
tie-down security.
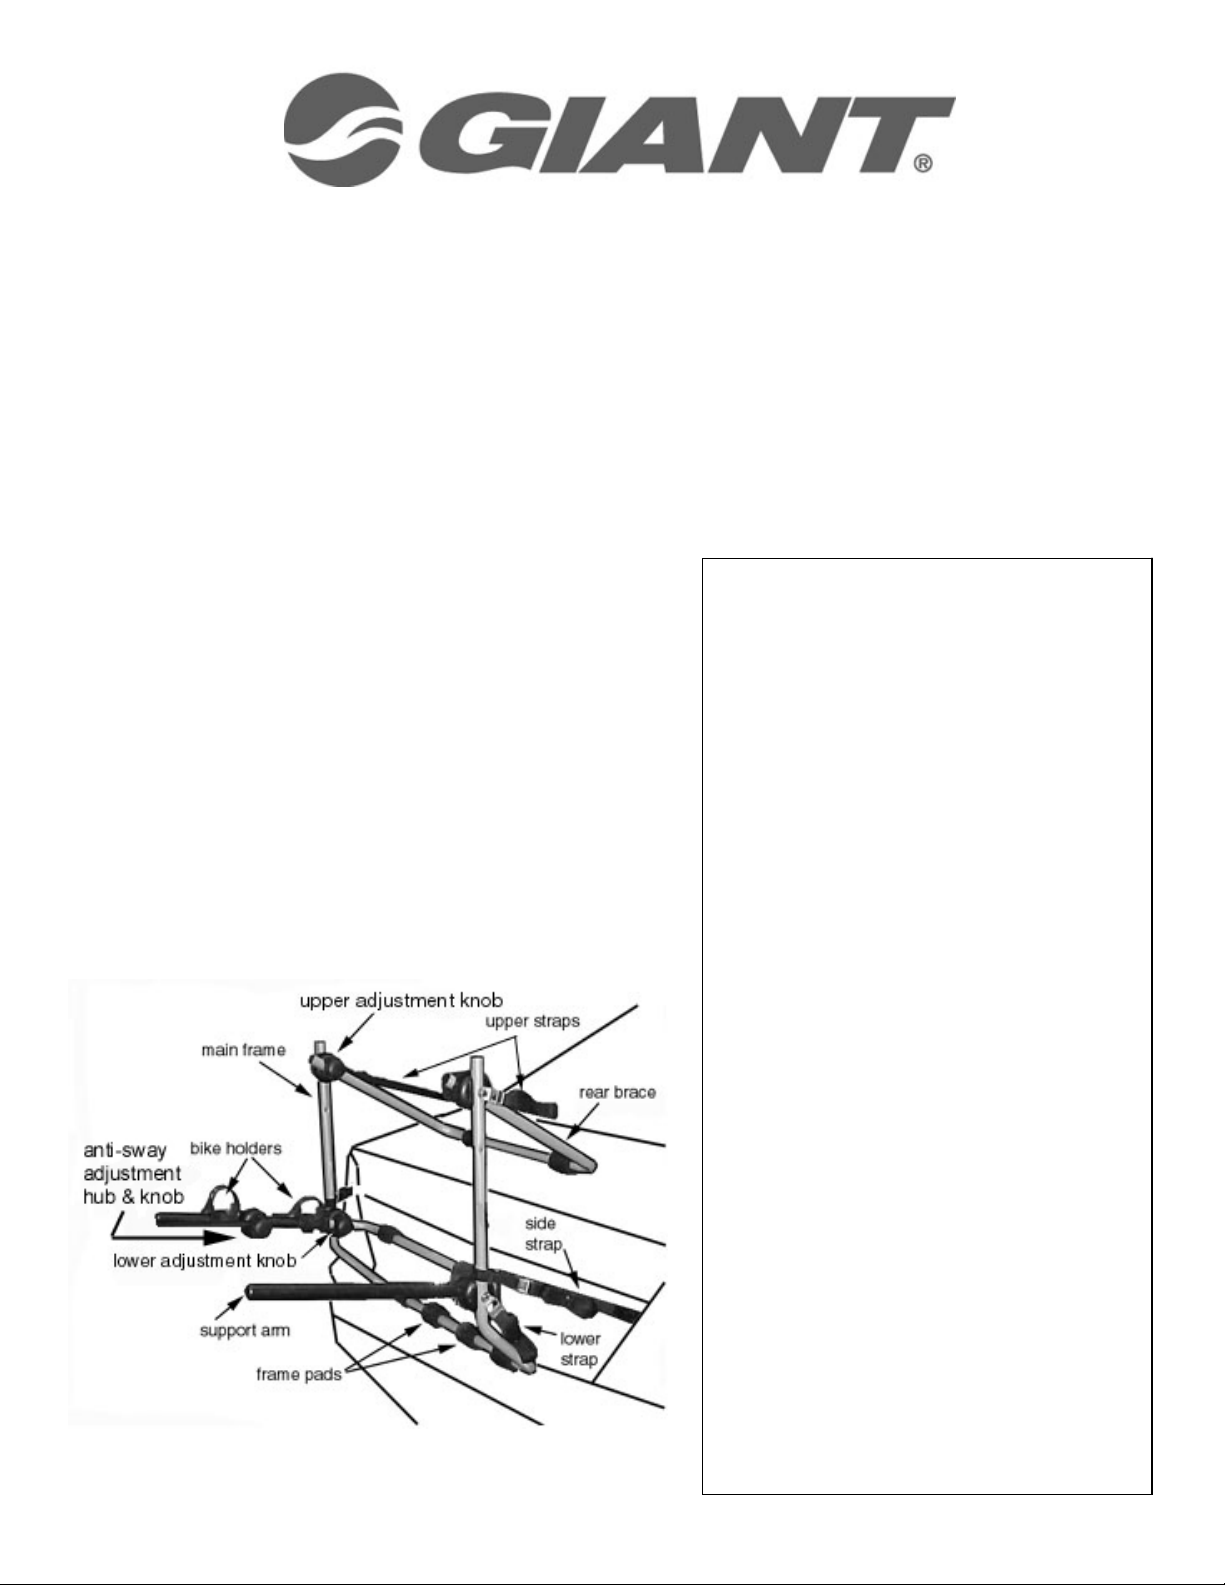
Fig. 1
Loosen the upper adjustment knobs.
Place the main frame on the vehicle’s
bumper so that the main frame is
perpendicular to the floor. The main
frame of the rack has four pads. All
four pads must rest on the bumper, so
if your bumper is curved, slide the
outer pads inwards.
the rack so it rests on the trunk / door.
The main frame should be in a
somewhat vertical position. Now
tighten the upper adjustment knobs.
Attach the upper hooks to the top of
the trunk, hatch or rear door. Pull the
loose strap end, and tighten the strap
securely. Next, loosen the lower
adjustment knobs and rotate the
support arm so it is parallel with the
ground.
Tighten lower adjustment knobs.
Place the lower straps under the
bumper or at the bottom of the rear
door. Pull down on the straps to
tighten. Install the side straps
horizontally from the rack to the trunk
ends.
Caution: Always re-check all straps
for correct tension after installation!
Page 2
Step
3
: Installing your bike(s) on the rack
with the seat on the driver’s side of the
rack, so if your bikes with accessories exceed
sway bar
side is
Carrying one Revive
bike
-
Placing it on the inside bike holder:
-
Be aware that the handlebars will rotate once the bike
Fig. 2
Step 2:
Installing
a
nti-sway bar:
On the Revive rack, the bikes are installed
vehicle. This is due to the recumbent style
geometry of the Revive bike. It is very
important not to carry over 100 lbs on this
Remove the anti-sway adjustment
knob from support arm. Place the
bar through the bolt and into the
hub. Re-install knob. Position the
bar parallel to the support arm.
Tighten knob. See fig. 3
Fig. 3
that limit, only carry one bike.
The support arm on the “driver’s” side of the
rack includes the two bike holders and the
adjustable “anti-sway” bar. The antikeeps the bikes stable and helps to prevent
them from moving around.
The support arm on the “passenger’s”
a straight plastic coated steel tube. This is to
easily fit the space between the bikes’ downtube and fork.
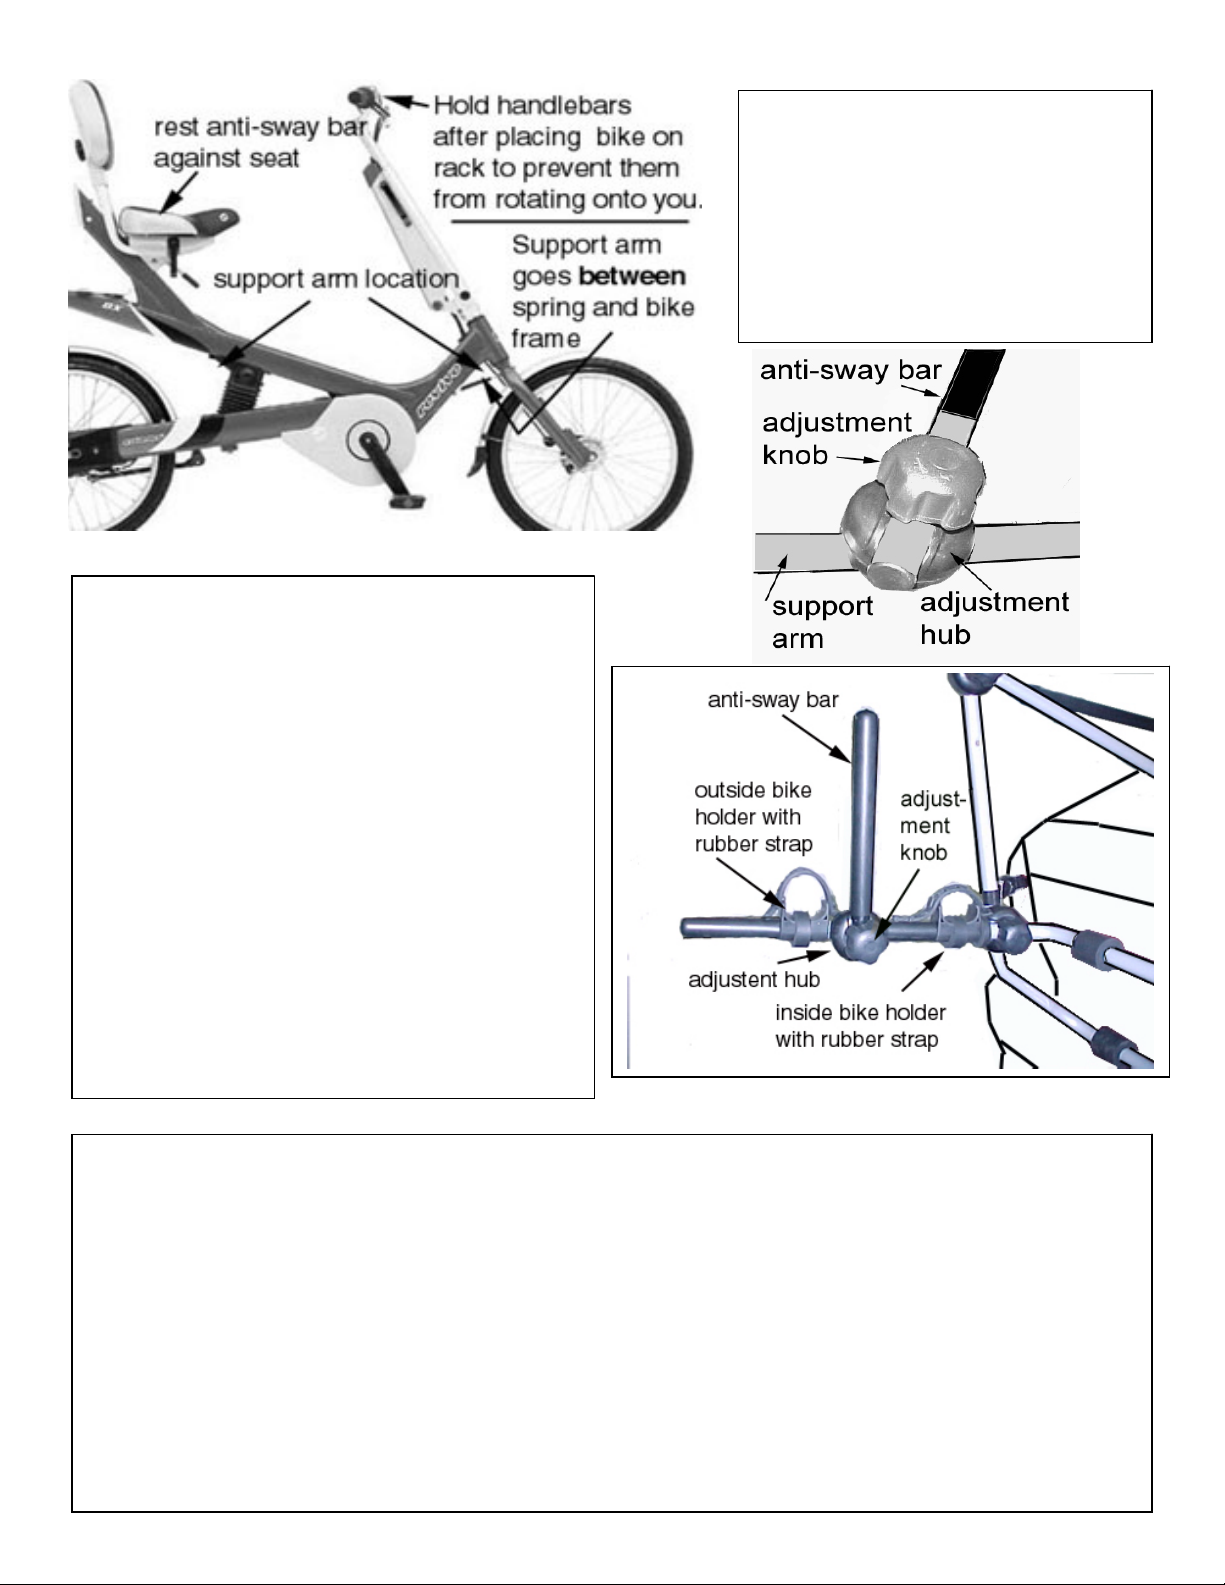
Fig. 4
Be sure that anti-sway bar is rotated forward and laying next to the support arm. Unhook the
rubber tie down strap. Take note if your Revive bike has a spring between the front fork and down
tube. If so, The passenger side support arm will have to go in between the spring and bike frame
as shown in fig. 5. Carefully lift the bike and place on the inside bike holder. Loosen the knob
and rotate the anti-sway bar so it rests against the seat. Tighten the adjustment knob. Loop the
rubber strap around the bike frame and attach it to the “hook” on the rubber block as shown in fig.
6. Do not over-stretch the rubber strap.
has been mounted to the rack, so take care to hold them or prevent them from rotating
while you are tying down the bike. Please see fig. 7
Secure the front wheel to the rack’s main frame with one of the four 30” nylon tie down straps
included. Use another of the 30” straps to secure the seat post to the anti-sway bar.
Page 3

Hold handlebars to prevent them from rotating
Carrying two Revive
bikes
-
Placing the
will have
for stabilizing the first bike. Use the other two
Finally, use the long 86” tie-down strap for extra holding security. Wrap this strap behind the
Important Note:
main frame then around the bike and wheels. Loop the strap end through buckle and tighten.
Be sure front wheel is not “flopping” around.
Fig. 6
Fig. 5
second bike on the outside bike holder:
When carrying two Revive bikes, the above
instructions apply except that the second bike
to “share” the anti-sway bar with the
first bike. You can also use the main frame
30” tie downs for the second bike, and be
sure to wrap the 86” long tie-down strap
around the main frame and both bikes. You
can also tie the two front wheels together to
prevent them from moving.
Above: Mounting bike to the “inside”
bike holder.
Fig. 7
onto you when tying down the bike(s)
Fig. 8
After the bikes are installed on the rack, go
back and retighten all six straps as they will
have loosened under tension. Always
check the rack, bikes and strap tightness
regularly during use.
Page 4

Removing the bikes and rack
To remove the bikes, carefully undo the tie down straps. Be careful with the rotation of the
sway bar so it is laying next
bicycles. Do not attempt to carry
This rack is not to be mounted
This rack is warranted for a period of one year against defects in materials and
workmanship, effective from the date of purchase to the original purchaser. The manufacturer will repair or replace
or workmanship. The manufacturer of this product shall not extend the warranty
to 1) Any failure or malfunction of the product do to any of or modifications to the product; or 2.) Damages not
ages resulting from improper installation on vehicle or
The manufacturer shall not be liable for
f this bike rack.
Some states do not allow the exclusion or limitation of consequential or incidental damages
and the above limitation may not apply to you. This warranty gives you specific legal rights and you have other
handlebars per fig. 7. To remove the rack, loosen and rotate the antito the support arm. Next, press the tab on the spring loaded buckles and loosen the straps.
Remove the rack from the car, then loosen both the adjustment knobs and fold the rack up for
easy storage.
Caution: This bicycle rack is designed to carry up to two Revive
motorcycles, scooters, mopeds, motorized wheelchairs, or other heavy objects. Always check
the condition of the straps and stitching and replace as necessary.
to any trailer or towed vehicle!
Carrying conventional bikes: This product has been specifically designed for the Revive bike
frame. Although the rack does have the carrying capacity for conventional bikes, the spacing of
the arms may prevent carrying of conventional bikes. Giant Bicycles and Hollywood Racks
do not guarantee that conventional bicycles will “fit” this rack.
Carrying other recumbent bikes: This product has been specifically designed for the Revive
bike frame. Some recumbent bikes may fit, others may be wider than your vehicle and beyond
the legal width limit of your particular state. Giant Bicycles and Hollywood Racks do not
guarantee that other brands of recumbent bicycles will “fit” this rack. Giant Bicycles and
Hollywood Racks take no responsibility for any consequences due to the use of a non Revive
bike.
Limited One Year Warranty:
any defective parts due to materials
attributable to a defect in materials or workmanship; or 3.) Dam
attachment of bicycles on rack. Consequential or Incidental Damages:
any consequential or incidental damages in connection with the purchase, use or handling o
Purchaser’s Rights:
rights, which vary from state to state.
This product is manufactured for Giant Bicycles by Hollywood Engineering, Inc.
For customer service, please contact Hollywood Racks, NOT Giant Bicycles.
Tel. 800-747-4085 email: info@hollywoodracks.com
Business Hours: Monday – Friday 8:00 AM to 3:00 PM PST
Product of Taiwan Manufactured Under License Part No. 25446
 Loading...