

Page 1
Installation Instructions for
Bicycle Carriers
frame when folding. Refer to figure 1.
Hollywood F1B and F4
When using the Hollywood F1B or F4, bicycle carrier, follow these instructions
INSTALL THIS RACK ON STRUCTURALLY SOUND TRUNKS ONLY. IF YOU OWN A MINI VAN or SPORT
UTILITY VEHICLE, READ THE SECTION AT THE BOTTOM OF THIS PAGE!
■ NEVER INSTALL UPPER HOOKS TO PLASTIC,
GLASS, ALUMINUM, CARBON FIBER or FIBERGLASS.
■ CLEAN SURFACE OF TRUNK PRIOR TO INSTALLATION.
■ CLEAN SURFACES OF THE PADS ON RACK, TIGHTEN
ALL STRAPS BEFORE & AFTER MOUNTING BIKES
■ NEVER PLACE MORE THAN 150 LBS (70 KG) ON THE F4,
OR 100 LBS (45 KG) ON THE F1B.
■ USE AT LEAST TWO TIE-DOWN STRAPS OR SHOCK
CORDS WHEN SECURING BIKES TO THE RACK, AND KEEP
BICYCLE TIRES AT LEAST 1 FOOT (30 CM) AWAY FROM
EXHAUST PIPE (s).
■ CHECK THE RACK, BIKES and STRAPS REGULARLY
DURING USE. DRIVE SLOWLY WHEN USED ON BUMPY OR
DIRT ROADS.
IF YOU HAVE ANY QUESTIONS or INSTALLATION
PROBLEMS, PLEASE SEE YOUR RETAILER or CALL us at
800-747-4085 or email us at info@hollywoodracks.com
If the make and model of your car is listed as a "No Fit," check with your retailer about installation assistance,
exchange for another model that will fit, or refund. This guide is not complete due to continuous changes in
automobile design. For questions about fit, please call the Hollywood Racks customer service department at (800)
747-4085, Monday-Friday between 7:00 AM and 3:00 PM Pacific Time.
IF YOU OWN A MINI-VAN OR SPORT UTILITY VEHICLE, PLEASE READ THE FOLLOWING: The rear cargo
door on many Mini-Vans and Sport Utility Vehicles may not be structurally strong enough to support the weight of
your rack and bicycles. These vehicles include: Ford Explorers, Windstars, Expeditions; Chevy Suburbans,
Astrovans, Luminas, Tahoes, Blazers, Dodge Caravans, Chrysler Town and Countrys, Plymouth Voyagers, Toyota
Privia and Sienna, Nissan Quest, etc. If you are installing Model F1B or F4 be sure to read section 1.5 carefully.
For F4 only, please read Section 3 first!
Section 1: Installing the Hollywood Rack on your vehicle:
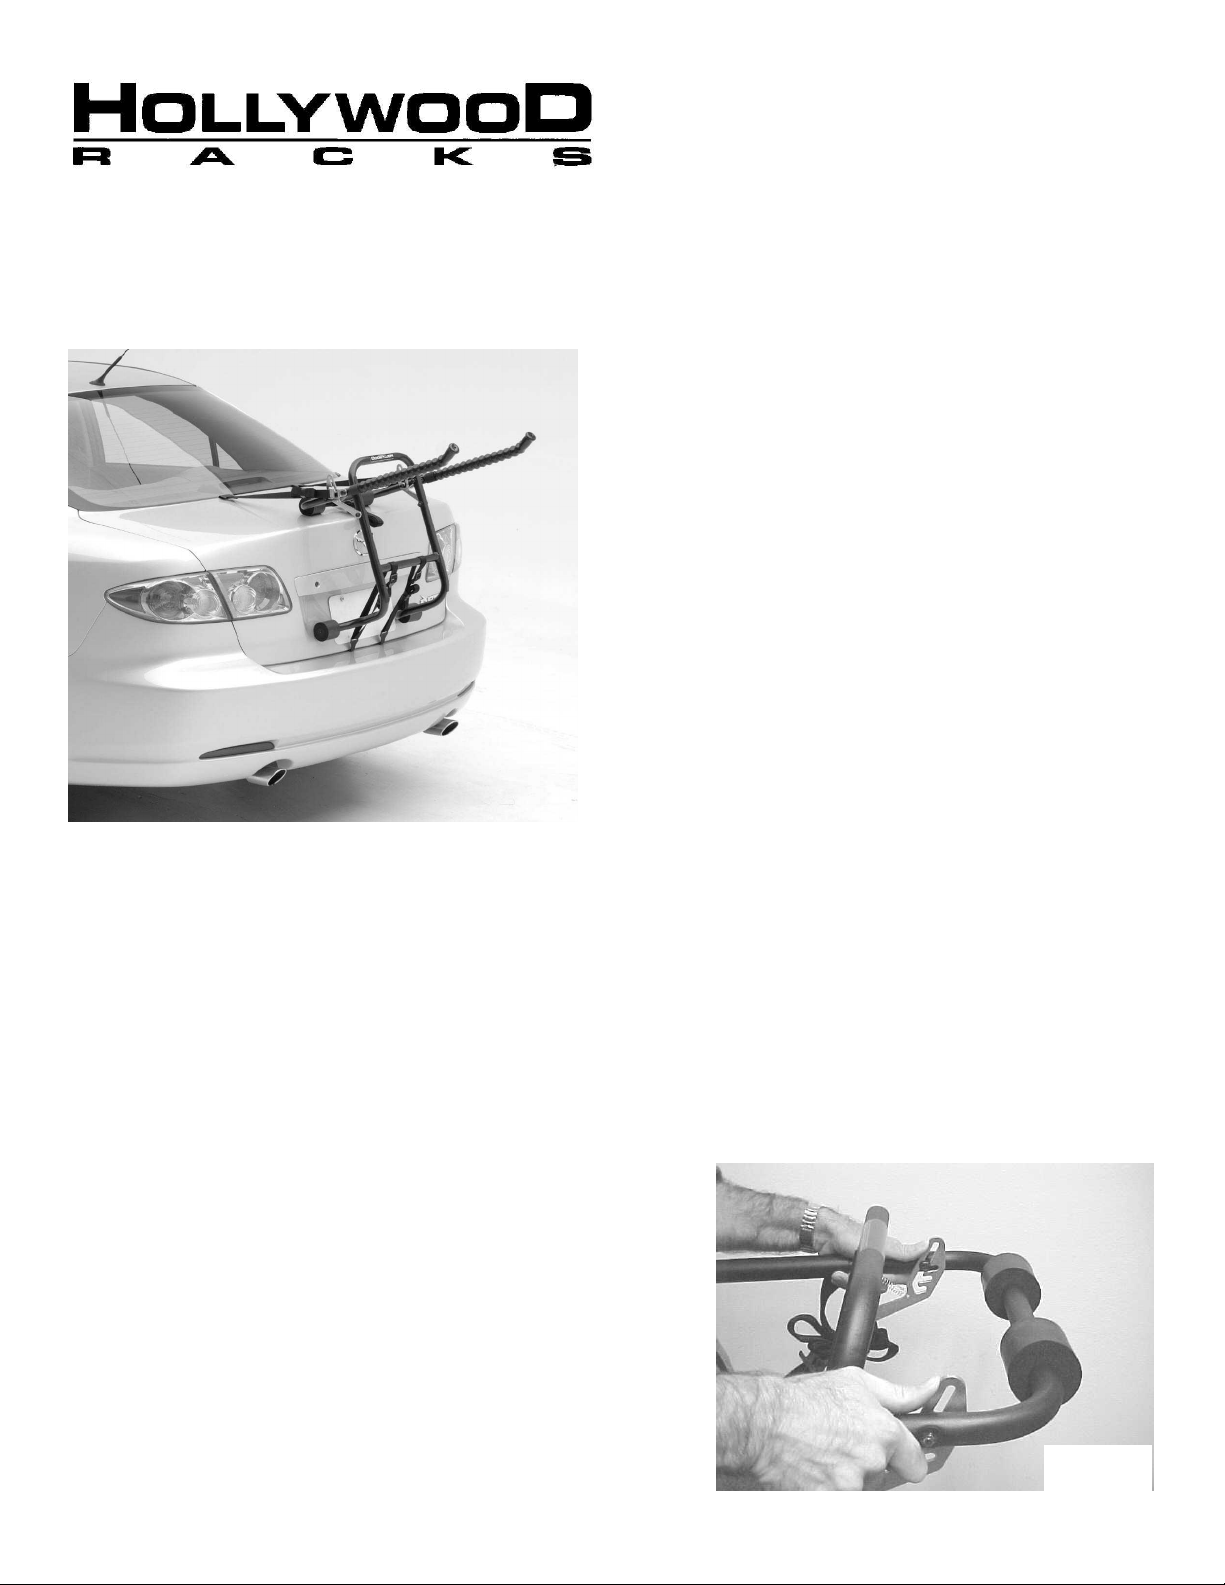
1.1) The Hollywood Racks features a patented
three-position thumb latch for folding and
positioning. To unfold the rack, move the
support arm all the way up, then down until
locked into one of the positions. To adjust the
rack into another position or to fold the rack,
raise the support arm up and push the thumb
latches back, then fold the support arm down.
Keep fingers out of the area between the latch
and main-
Fig. 1
1
Page 2
1.2) Position the rack on the vehicle's trunk or rear cargo door so that the support arms are parallel to the
ground or pointed slightly upwards. Lower pads should be resting against a solid surface, not against
glass, fiberglass, or the plastic valence. Refer to figures 2 & 3. If installing a trunk rack to a mini van or
sport utility vehicle, see section 1.5.
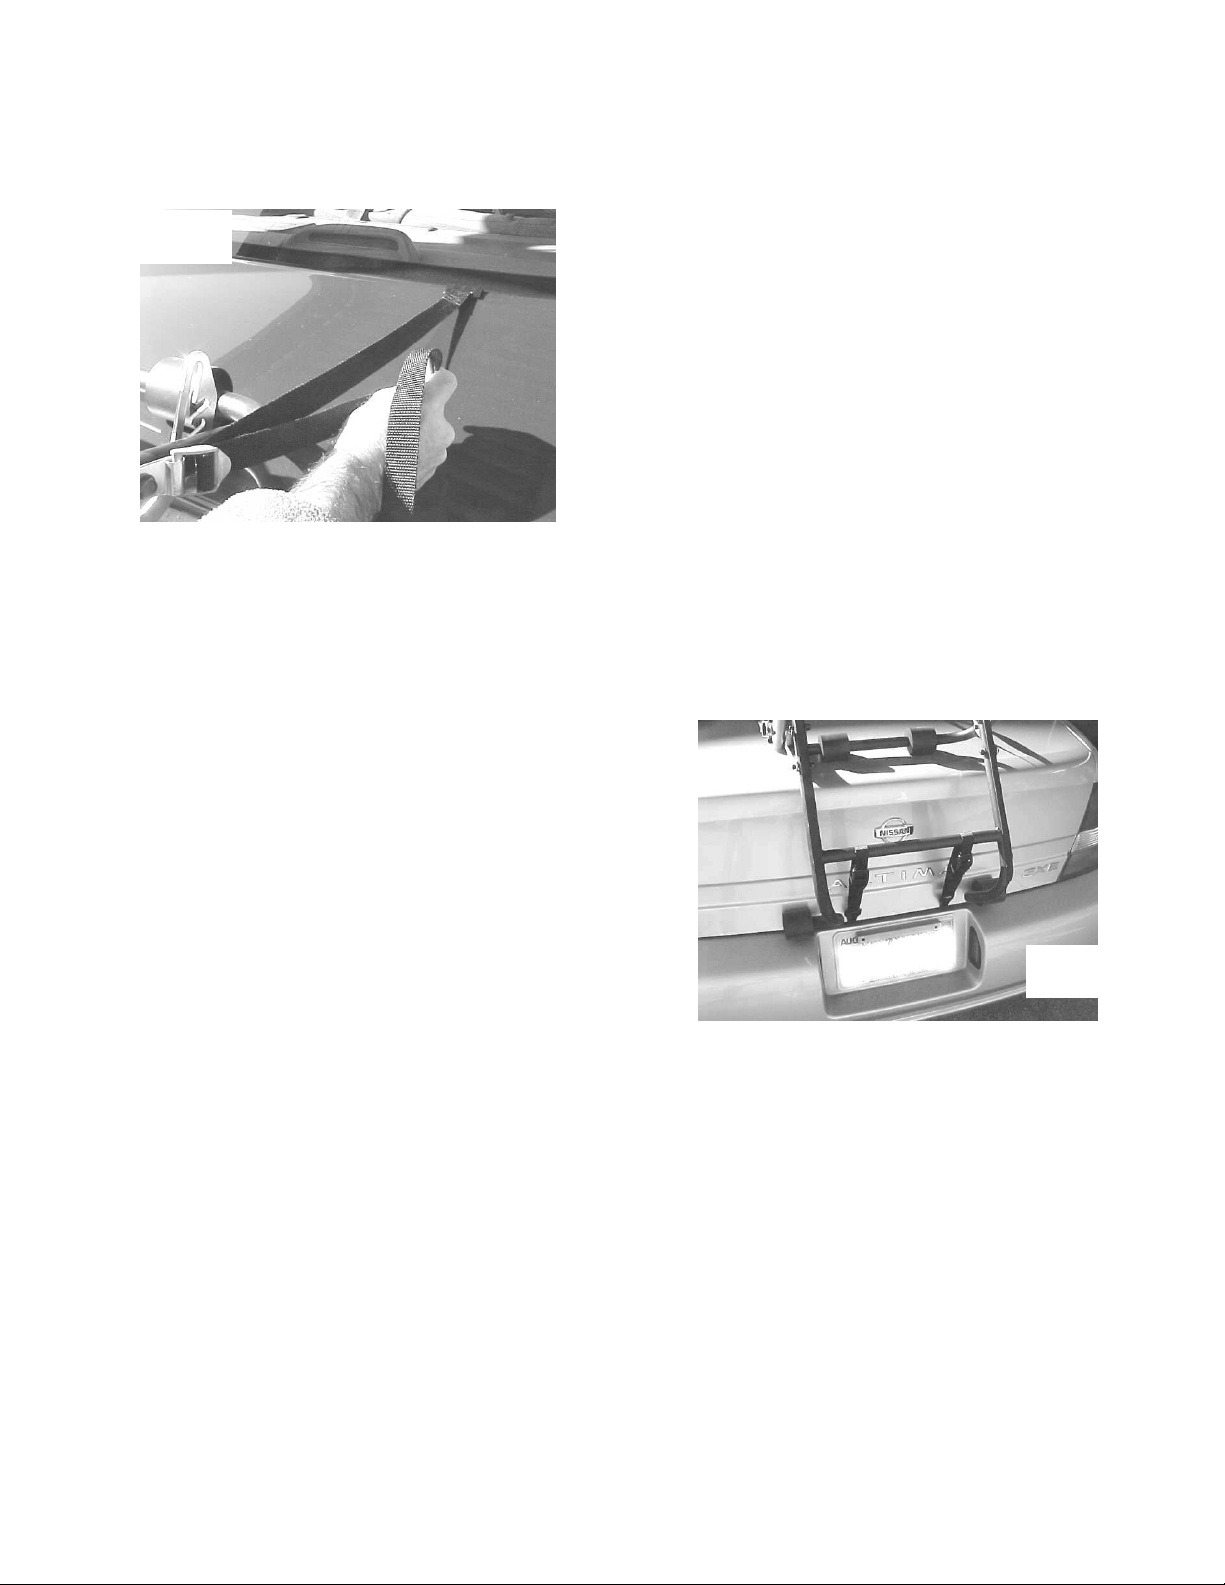
1.3) Attach the two top hooks to the upper edge of trunk
Fig. 2
1.4) Attach the lower hooks to the bottom edge of the trunk, bumper or steel section beneath bumper and
pull the end of the straps until all straps are tight. Re-tighten upper straps if necessary. Straps are shown
attached to the lower edge of the trunk lid in Fig. 3, but they may also be attached to the bottom edge of
the bumper, or loops beneath the bumper of the vehicle as appropriate to the vehicle.
or hatch lid (Do not install upper hooks onto plastic, glass
or fiberglass). Adjust and tighten the upper strap length
by simply pulling on the loose strap end on the tab side of
the buckle (Fig. 2). Note to users in the UK: The F1B will
have two additional side straps. Attach them laterally to
the trunk/boot lid, then tighten as required.
To loosen the strap, lift up on the buckle's tab. CAUTION:
Do not tie excess lengths of strap into a knot in the
section between the hook and buckles. This weakens
the strength of the straps and could lead to failure. If
necessary, tie the excess lengths to the rack or bicycles.
1.5) Installing a trunk rack to a mini van or sport utility vehicle.
NOTE: On minivans and SUVs, it is recommended
that the lower legs of the rack be positioned so they
rest on a crease or indent on the rear door/hatch.
This area is a reinforced part of the door / hatch and
will help prevent the rack from damaging your vehicle.
Use caution when selecting the mounting point of the
rack to prevent damage. Mount the Hollywood rack
to the vehicle. Do no install the bikes yet!
Pull down on the support arms and check the
panel where the lower pads rest. If the panel is flexing
under the pressure you are placing on the support
arms, the position of the rack will have to be changed.
If the rack is to be repositioned to the bumper, the
lower pads should rest on the bumper, as close to the body of the vehicle as possible. As the rack is now
lower to the ground, the bikes must be mounted onto the rack so that they will sit higher. This is
accomplished by placing the bicycle on the support arms, under the bicycle's down tube and behind the
seat tube. Use tie-down straps per instruction sheet. Bicycle wheel ground clearance must be at least
12". The distance between the wheels and exhaust should also be at least 12".
Fig. 3
Section 2: Installing Bicycles on your Hollywood rack:
2.1) Hang the first bicycle on the support arms, close to the main frame (the heaviest bike should be put
on first). Rotate the crank arm to a position so that it will not be in contact with the vehicle's body. Be
sure that the bicycle's wheels are at least 1 foot (30 cm) away from the exhaust, and that the wheels are
high enough off the ground to clear a steep driveway. Secure the bike with the two tie-down straps
included with the rack. If carrying a second bike, follow the above directions, then hang the second bike
on the support arms, with the bike's handlebars on the other side of the car per figure 4. Secure the bike
with tie-down straps. If carrying additional bikes, follow above directions with handlebars on either side of
the rack. Secure with tie-down straps.
TIP: Women's bicycles, some children's bicycles, and small frame sized bikes can be mounted on the
rack by resting the bicycle on the support arms under the down tube and behind the seat tube. This also
will make the bicycles ride higher on the rack and provide easier loading. Some bicycles may require use
of an artificial top tube such as the Hollywood “Boomer Bar” bike adapter.
2
Page 3

.
2.2) AFTER LOADING THE BICYCLE (S) ONTO
NOTE
: If you are unsure about mounting the rack,
lp with
Section 3: Model F4 Assembly
Insert bolts through the holes provided in the frames
.
of
3.2
Model F4 Assembly for use with sedans:
support
rack on the vehicle keep the bike’s wheels at least
Fig. 5
Fig. 6
Fig. 7
THE RACK, RE-TIGHTEN THE BOTTOM
STRAPS (50 ft-lbs max.).
2.3) To remove the rack from the car, simply
raise the tab of the lower buckles, release the
lower hooks from the bumper (or bottom ridge
of trunk) and remove the upper hooks. To fold
the Hollywood rack, raise the support arm up,
push the latches back with your thumbs, then
fold support arm down.
3.1) F4 for use with sport utility vehicles
or mini vans:
Rotate the lower frame so that its holes align with
the holes on the main U-Frame of the F4 rack.
and tighten wing nuts securely onto bolt ends. The
rack is now ready for installation. Note: Always
check wing nuts before use, making sure they are
tight! ¼-20 self-locking nuts can be substituted for
the wing nuts for permanent installation. See Fig. 5
After installing these bolts, return to Section One
this instruction sheet. The racks will set up on the
vehicles bumper. Use the side (lateral) straps for
additional stability, per fig. 6.
return to your bicycle retailer and ask for he
the installation. It is the user’s responsibility to
make sure the rack is properly installed and
secure for use. Please call our customer service
department if you have questions!
Fig. 4
Tools requires: two adjustable wrenches
Remove the nuts and bolts from the lower
frame. Next, remove the bolts that hold the lower
buckles. Reassemble per Fig. 7 using the upper
four holes. Be sure to use the longer bolts as
shown in figure 5 and to install the lower buckles.
Tighten hardware securely. When installing the
12” away from the exhaust pipe. Use the side
straps for additional stability.
3
Page 4

ISTALANDO EL PORTABICI- F1B
legar el portabicis subiendo el brazo de soporte asta el tope.y bajarlo asta la inmovilizacion de este ver fig.1
Colocar los ganchos superiores por encima de la tapa trasera o puerta del vehiculo.ajustar las correas a la longitud
Colocar las correas inferiores. colocar los ganchos por bajo del parachoques,en un lugar solido y no suave o en la parte
Colocar las bicis al portabicis y atarlas de tal manera que no se muevan durante el recorrido,las ruedas de las bicis
deben de estar a un nivel mas alto del parachoques y lejos del tubo de escape.por lo menos 12’’ para quitar el portabi
trasera antes de la instalación! Si la marca y el modelo de tu coche se enumera como “ningún ajuste,”
Reparar o renplazar productos defectosos o acreditar fondos es determinado por hollywood racks
hiculo del comprador bicicletas de algun otro se e excluira.
er otro daño en relación con la compra, el
Algunos estados no permiten la exclusión o limitación de daños emergentes o eventuales y la limitación anterior puede no
Por favor referirse a la primera pagina de este manual en ingles para las fotos de montaje.
1.desp
deseada.jalar las correas asta que estas estan apretadas,ver fig.2
baja de la tapa del vehiculo jalar las correas asta que esten apretadas ver fig.3 capacidad maxima de peso 45 kg.
del automóvil solamente hay que levantar el bajo de la hevillas inferiores y desatar los ganchos inferiores del
parachoques,después desatar los ganchos superiores.
Para desplegar el porta bici como en la fig.1 subir el brazo del soporte asta el tope.enpugar con los pulgares los
picaportes,y plegar hacia abajo el brazo del soporte.
SECCION 3: EMSAMBLANDO MODELO F4
3.1 PARA USO EN CAMIONETAS O MINIFURGONETAS
Rotar el marco de abajo asta que los agujeros esten en linea con los agujeros del marco principal del portabici
note.siempre revisar las mariposas antes de su uso,estar
seguro de que estan biem apretadas ¼-20 tuercas pueden sustituir las mariposas para su istalacion permanente
ver fig.5 despues de la istalacion de los tornillos volber al paso uno de este manual de istrucciones.el portabici
estara istalado sobre el parachoques.use las correas de los alados (laterales) para mayor estabilidad,ver fig.6
3.2 MODELO F4 EMSAMBLADO PARA EL UDO DE AUTOMOVILES.
Herramienta requerida: dos llaves ajustables
Remueva los tornillos y las tuercas del marco de abajo,después remueva los tornillos que sostienen las hevillas
,vuelba a ensamblar por la fig.7 use los cuatro agujeros de arriba.estar seguro de usar los tornillos largo como
enseña en la figura 5 y istalar las hevillas en la parte de abajo apriete los los tornillos con seguridad.cuando
istale el portabici al vehiculo mantenga las ruedas de las bicis por lo menos 12’’ lejos del tubo de escape.use
las correas de los lados para mayor estabilidad.
¡Precaución! Este porta bicicleta se ha diseñado para la mayoría de los vehículos. Es la responsabilidad del
usuario asegurar la instalación segura y apropiada de este producto. la instalación incorrecta de este producto
puede dar lugar a daños a tus bicis, vehículo, o vehículos que siguen detrás de ti. Si los cojines de este
portabici(o de cualquier otro) se están reclinando contra el cristal o un panel e suave, estar enterado que esto
puede causar daño a tu vehículo. El fabricante de este producto no extenderá la garantía a ninguna por daños
no atribuidos a un defecto en materiales y la ejecución. La guía impresa en este manual se usa para referencia
general solamente.Si se cambia el diseño del vehículo, materiales y los afinados usados en los vehículos
automotores de marca la responsabilidad es del usuario de determinar el uso de este producto. No unir los
ganchos al aluminio, cristal,fibra de vidrio, fibra de carbón. ¡Comprobar por favor la guía apta en la página
comprobar con tu distribuidor sobre ayuda de la instalación, el intercambio para saber si hay otro modelo que
quepa, o el reembolso. Esta guía no es completo debido a los cambios continuos en diseño automotor.
preguntas, llamar nuestro departamento de servicio de cliente al: 310-516-8600 lunes. viernes. de 7:00 AM-3:
00PM tiempo del pacífico
Renuncia de responsabilidad.
Es un exclusivo recurso del comprador bajo esta garantia. Daños al ve
Esta garantia se ofrece explícitamente en lugar de todas las demas garantias verbales o escritas. Hollywood no será
responsable de ningún daño directo,o indirecto, consecuente,del mal uso cualqui
uso o la manipulación de este producto.
aplicarse a
6
Page 5

Instructions d’i
nstallation pour le HOLLYWOOD F1B et F4
Quand vous installez le porte-vélo sur votre véhicule, rappeler vous des points suivants.
velo, les vélos, la tension des sangles et les mollettes regulièrement pendant l’utilisation.
jusqu’en
Pour plier le porte vélo, relever simplement le bras de support jusqu’en haut, pousser avec les pouces les
Le F4 a deux positions pour accomoder les voitures berlines et aussi les voitures breaks ou monospaces.
Deserrer et enlever les 2 boulons de chaque cote Fig.5. Repositioner le bras inferieur au milieu du cadre
Fig.7 en utilisant les quatre trous superieurs. S’assurrer d’avoir
1. Installer uniquement le porte-vélo sur un coffre arrière solide.
2. Ne jamais installer les crochets superieurs sur du plastique, du verre ou de la fibre de verre.
3. Nettoyer la surface du coffre où le porte-vélo va être installé.
4. Serrer toutes les sangles avant et après avoir monter les vélos sur le porte-vélo.
5. Ne Jamais dépasser 45 kg sur le porte-vélo.
6. Garder les pneus des vélos a plus de 30 cm du pôt d’échappement.
7. Vérifier le porte-
8. Conduiser avec prudence sur les routes dont le revêtement est mauvais.
Attention: Plaque Minéralogique et feux arrières doivent être toujours bien visible.
Toujours utiliser la longue sangle d’attache des vélos pour attacher tout les vélos au Porte-vélo.
Prière de se reporter à la première page du manuel en Anglais pour les photos d’installation.
Déplier le porte-vélo en montant le bras de support vers le haut, puis baisser jusqu’à immobilisation de celui ci dans
les crémaillères. (Si vous désirez changer de position ou de plier le porte-velo, relever simplement le bras de support
haut, pousser avec les pouces les crémaillères comme sur la Fig.1)
Attacher les crochets superieurs au dessus du coffre arrière. Assurez vous que les crochets soient toujours attachés
à de l’acier et non pas du plastique, fibre de verre, du verre ou de l’aluminium. Prendre un aimant si necessaire
pour vérifier que le coffre soit en acier. Ajuster les sangles à longueur desirée en tirant sur la l’extrémité de la sangle
Fig.2
Attacher les sangles inferieures sous le pare-choc ou au bas du coffre et serrer Fig.3
Attacher les sangles latérales sur les côté du coffer/hayon arrière et serrer.
Vérifier régulièrement l’état des sangles et les remplacer si necessaire. Capacite maximum 45 Kg
Attacher les vélos au porte vélo de façon à que rien ne bouge pendant le trajet. Les roues des vélos
doivent être plus hautes que le pare-choc et eloignées du pôt d’échappement d’au moins 30cm.
Après avoir chargés les vélos, passer la sangle d’attache des vélos à travers tous les vélos ET le
porte-vélo. Vérifier et reserrer toutes les sangles du porte-vélo
cremailleres comme sur la Fig.1
Important: Le fabriquant de ce produit n’est pas responsible des dommages causés par le mauvais
usage de ce produit. C’est la responsabilité de l’utilisateur de s’assurrer que le porte vélo est
monté proprement sur le véhicule et que les vélos soient proprement chargés sur le porte vélo
comme décrit dans ces instructions d’installation.
Hollywood F4. Instructions d’installations additionnelles.
Le F4 est livre en position pour les monospaces/breaks. Pivoter le bras inferieur et aligner les trous au
trous du cadre principal. Inserre les boulons et papillon comme sur Fig.4. Continuer avec les instructions
du F1B ci-dessus.
Si vous avez une berline
Outils Necessaires: Deux clés à molettes ou deux clés de 11mm.
1. Se rapporter à la figure 4.
principal, ensuite, enlever les boulons retenant les les boucles des sangles inferieures.Re-inserrer les
boulons, ecrous et papillons comme sur la
utiliser les boulons plus longs comme sur la Fig.7 et installer les les boucles inferieures.
Serrer tous les boulons et ecrous fermement. Continuer avec les instructions du F1B ci-dessus.
7
Page 6

CAUTION!
t will not extend the warranty to any damages not
attributable to a defect in materials and workmanship. The fit guide printed in this manual is intended as a
workmanship by repairing or replacing (at its option) the complete rack
limited to) weather, scratches,
onto the vehicle, installation on a
If a product is believed to be defective, the original retail purchaser should contact either the original retailer or Hollywood
duct or the issuance of a refund or credit (as determined
by Hollywood Racks) is a purchaser’s exclusive remedy under this warranty. Damage to a purchaser’s vehicle, cargo, bicycles
whether oral or written.
Some states do not allow the exclusion or limitation of consequential or incidental damages and the above limitation may
102907 C2
This bicycle carrier has been designed to attach securely to most vehicles. It is the user’s responsibility
to insure the safe and proper installation of this product. Improper attachment or installation of this
product may result in damages to your bicycles, vehicle, or vehicles following behind you. If the pads of
this rack (or any rack) are resting against glass or a structurally soft panel, be aware that this may cause
damage to your vehicle. The manufacturer of this produc
general reference only. On going changes in vehicle design, materials and finishes used on motor
vehicles make it the user’s responsibility to determine the use of this product. Do not attach hooks to
aluminum, glass, fiberglass, moldings, spoilers or carbon fiber parts. Please check the Fit Guide on the
back page prior to installation!
If the make and model of your cars is listed as a “No Fit,” check with your dealer about installation assistance,
exchange for another model that will fit, or refund. This guide is not complete due to continuous changes in
automotive design. For answers to questions, call our customer service department at: 800-747-4085
Mon.-Fri. from 7:00AM–3:00PM Pacific time OR Email us anytime at info@hollywoodracks.com
Limited Lifetime Warranty (effective January 1, 2008):
Hollywood Racks will warrant its car racks and accessories during the time that an original retail purchaser owns the
product subject to the exclusions and limitations of this warranty. Hollywood Racks will remedy defects in materials and
or a defective part without charge for labor or parts.
Hollywood Racks may elect (at its option) to issue a refund equal to the purchase price paid for the product.
This warranty does not cover problems caused by normal wear and tear including (but not
dents, rust, accidents, unlawful vehicle operation, misuse, abuse, neglect, theft, unauthorized modifications, or unauthorized
repair. No warranty is given for defects resulting in incorrect assembly, incorrect installation
“no fit” vehicle, incorrect attachment of bicycles onto the rack, or overloading of the rack’s weight restrictions. This warranty
terminates if the original retail purchaser transfers the product to any other person.
Racks directly at 800-747-4085 or at info@hollywoodracks.com
Disclaimer of Liability: Repair or replacement of a defective pro
and or to any other person is excluded. This warranty is expressly made in lieu of any and all other express warranties,
Hollywood Racks shall not be liable for any direct, indirect, consequential, incidental, special, punitive or
any other damages in connection with the purchase, use or handling of this product.
not apply to you. This warranty gives you specific legal rights and you have other rights, which vary from state to state.
Wichtige Hinweise des Bundestamtes für Polizeiewesen Zur Benützung von Fahrrad-Hechträgern
Die Vorrichtung wird am Fahrzeug angebracht und stützt sich auf der stossslange, der Heckklappe und dem Heckfenster
ab. Dabiestehl das Fahrad quer zur Fahrtrichtung. Nach Art. 73 Abs. 2 der Verkehrszulassungsverordnung (VRV) darf bei
Motorwagen und Anhăngern die Ladung seitlich nict Uberagen. Dies dürfte beim Mitführen von einem oder mehreren
Fahrrädern mit genannter Vorrichtung je nach Fahrzeugbreite problematisch werden. Imweiteren ist auch Art. 89 des VTS,
verdecken der Beleuchtungsvorrichtungen und Kontrollschilder zu beachten.
Demzufolge kann nicht der Träger selbst für unzulässig einstuft werden, sondern nur die Verwendung desselben in
Verbindüng mit der Kombination Transportfahrzeugen und Fahrrad, lässet eine endgültige Beurteilung zu.
Fahreten mit montiertem Träger ohne Fahrräder sind zu unterlassen!
Directives importantes du Conseil Federal pour les offices de police concernant l’utilisation de porte-vélos arriére
L’appareil doit ėtré appuyé sur le véhicule de sorte à ce qu’il vienne se caler sur le pare-choc arriére, le coffer et la vitre
arriére. Cepdantle cycle se positionne perpendiculaire au véhicule. En conséquence, d’aprés l’article 73, paragraphe 2 du
décret sur le autorisalions du code de la route, la charge surles véhicules motorisés et remorques ne doit pas dépasser la
larguer totale. Ce qui pourrait devenair problématique à la charge d’un ou de plusieurs cycles. Plus loin, il faut Aussi prendre
compte de l’article 89 VTS l’entrave aux éclairages arriéres et aux Plaques numériques.
Ainsila combinaison entre les véhicules motorisés et ce genre de porte-vélos ne doit etre utilizes uniquement por le
transport de bicyclettes. Les trajects avec les portes-vélos montes á vide sont interdits.
Hollywood Racks
12812 South Spring Street Los Angeles, CA 90061
(800) 747-4085 (310) 516-8600 Fax (310) 516-8955
Customer Service Hours: 8:00 AM- 3:00 PM Pacific Time
www.hollywoodracks.com info@hollywoodracks.com
Made in Taiwan
 Loading...