

Model F2 “Over
-
the-Top” Bike Carrier Installation
Guide
1.
Choosing the correct
On some vehicles, more than one top
Fig. 1
When installing the F2, please follow these important guidelines:
The F2 Over
-
the-Top rack has been specially designed to fit SUVs, mini
-
vans and hatch
-
backs equipped
without spoilers.
Comes Fully Assembled – Carries up to Two Bikes
with rear spoilers or wind deflectors. The rack uses an adjustable “spoiler clearance frame” to prevent the
top or uppermost straps of the rack from making contact with the spoiler. The F2 will also fit most vehicles
Install the F2 on structurally sound trunks, hatches, roof rack load
bars and roof rack raised side rails only.
Never attach hooks to plastic, glass, fiberglass or carbon fiber.
Clean the surface of the trunk or hatch before installation of the rack.
Tighten all six straps before AND after mounting bikes on the rack.
Maximum capacity is two bikes, 35 lbs/16kg per bike.
Always use the safety strap after loading and tying down bikes.
Keep bicycle tires min. 1ft/30cm away from vehicle exhaust pipe.
Check rack, bikes and straps regularly during use.
Drive slowly when used on bumpy or dirt surface roads.
For quick-start instructions, scan QR
Code or go to hollywoodracks.com/f2
top straps
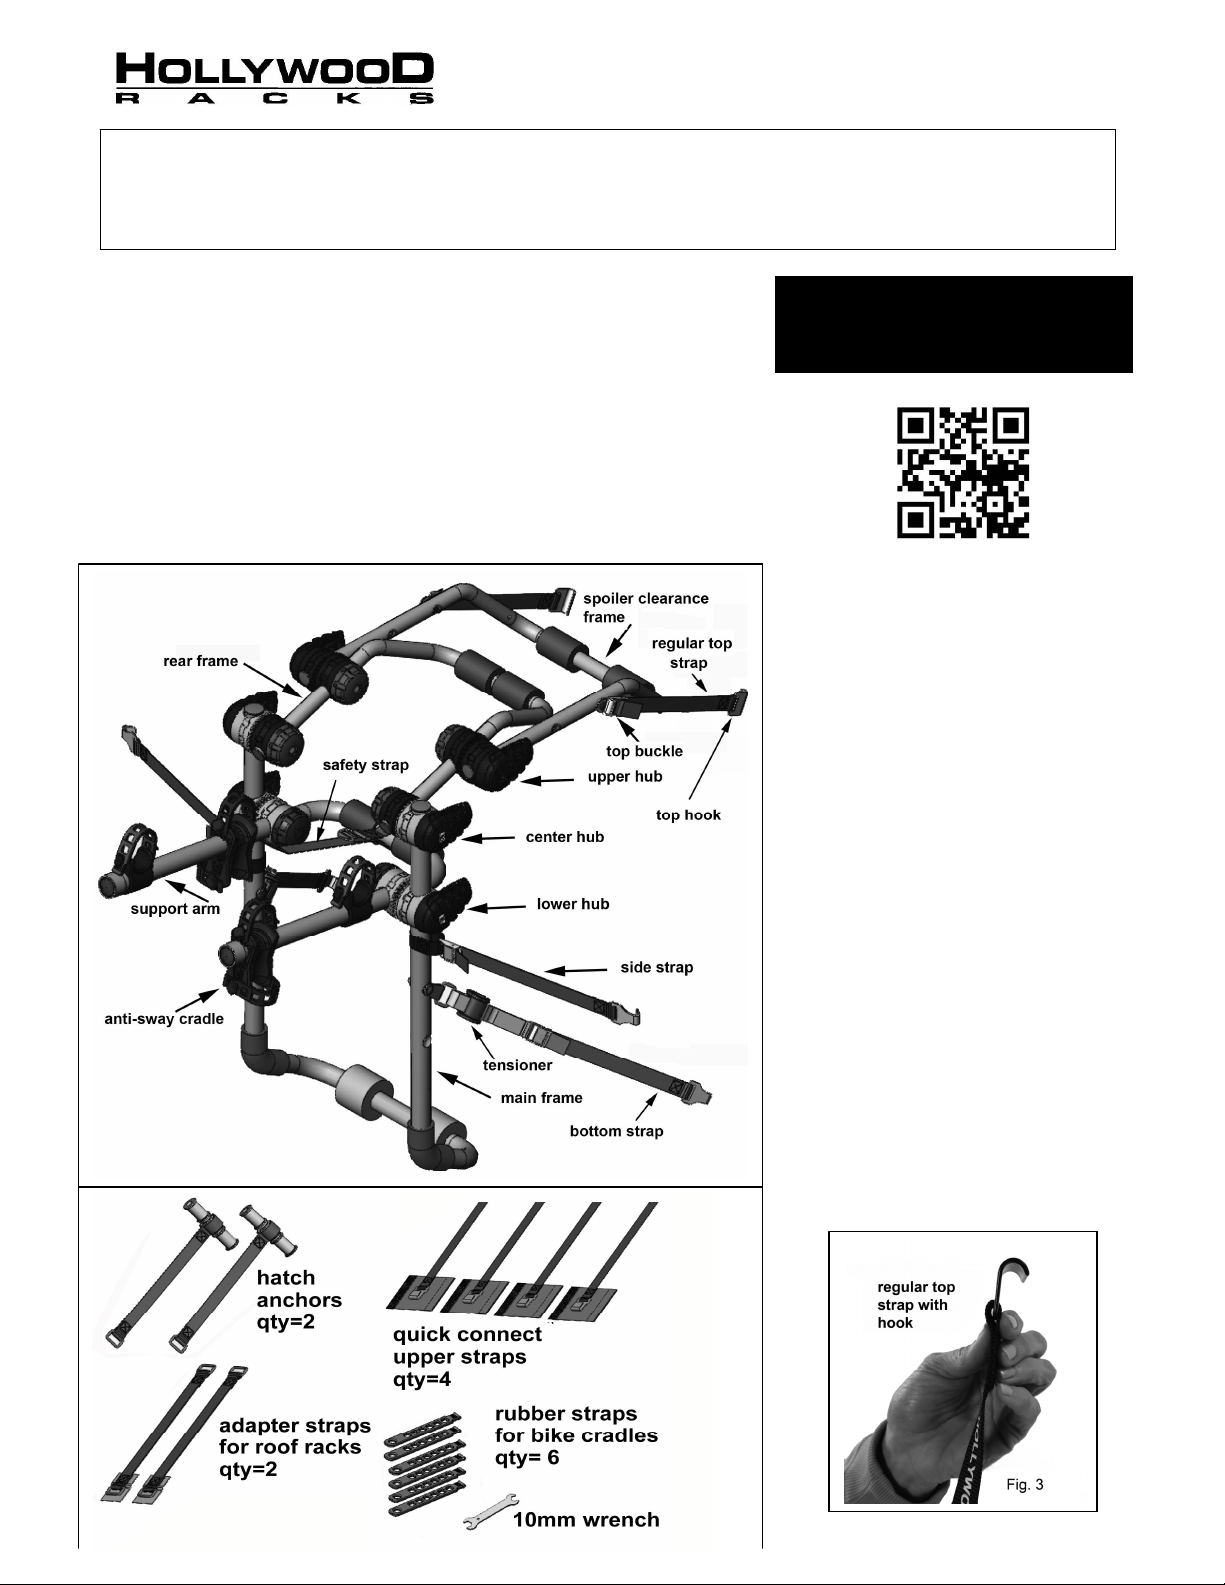
This rack includes three types of top
or upper strap attachment systems:
a) Regular Hollywood top straps
with trunk lid hooks (Fig. 3). These
are pre-assembled with the rack.
See section 2
b) Hatch anchors with quick connect
straps. See section 3
Fig. 2:
Parts
included
with
F2 Rack
c) Roof rack adapter straps with
quick connect straps.
See section 4
strap attachment system can be
used. Determining the best one may
require ruling out the other two.
Continued on page 2
1

2.
Installation Using Regular
Fig. 6
Fig. 8
2
Section 1 continued:
Fig. 4
c
)
Center
e
)
If these can be confirmed, then you can
Look at the gap or opening between the top of
the rear hatch and vehicle.
Note: depending on the tightness of the cups,
you may also need to unlock one or both of the
levers on the lower hubs.
d) Check and confirm the following:
I) The trunk or hatch lid made of steel. Use a
magnet and check fit guide.
II) There is room for
the hook to “drop”
into the gap.
III) The hook can
attach to the hatch lid.
gap
(The hatch doors on
some vehicles, like the 2013 Ford Escape, are too
thick for a hook to attach to).
IV) Open the vehicle’s rear hatch. There should
be no plastic molding that would interfere with the
hook. Note: The hook must not attach to the spoiler.
Do not use the standard upper strap if the vehicle’s
spoiler is made of plastic or fiberglass.
use the regular upper straps with hook.
If not, go to section 3 or 4.
b) Next, unlock the upper hubs and rotate the
spoiler clearance frame so it is positioned per
Fig. 8. Now lock the upper hubs.
Fig. 7
Place the rack on the car’s bumper and
unlock the center hubs per fig. 9. Rotate the
rear frame so it is resting on the car’s hatch door
or window per fig 10. (Avoid contact with rear
windshield wiper). Close the levers. Note:
depending on the tightness of the hubs, you
may need to unlock one or both of the levers
on the lower hubs.
Upper Straps
The F2 has three sets of adjustment hubs: Lower,
center and upper. The hubs are unlocked by opening
the lever. They are adjusted by tightening/loosening the
cup and lever. See Fig. 5
Fig. 5
a) Unlock the center hubs (Fig. 6) and rotate the
rear frame so it is vertical per Fig. 7.
hub
d) Attach the side hooks per Fig. 10. Pull the
strap end to tighten. The rack should now be self
supporting.
Fig. 9 Fig. 10
Unlock the upper hubs and rotate the clearance
frame so the upper buckle is well above the
spoiler per Fig. 11. Close the levers.
h
)
f
)
not
Fig.11
g
)
Attach the hooks to the hatch lid and pull the
Depending on the height of the vehicle, you may
be able to rotate the clearance frame high enough
above the spoiler for a correct “strap angle” (Fig. 12).
In that case, you can re-locate the upper buckles to get
the correct strap angle. There are additional buckle
hole positions located on the spoiler clearance frame.
Use the 10mm wrench included with the rack (or
equivalent) to relocate the buckles if necessary.
See Fig. 13
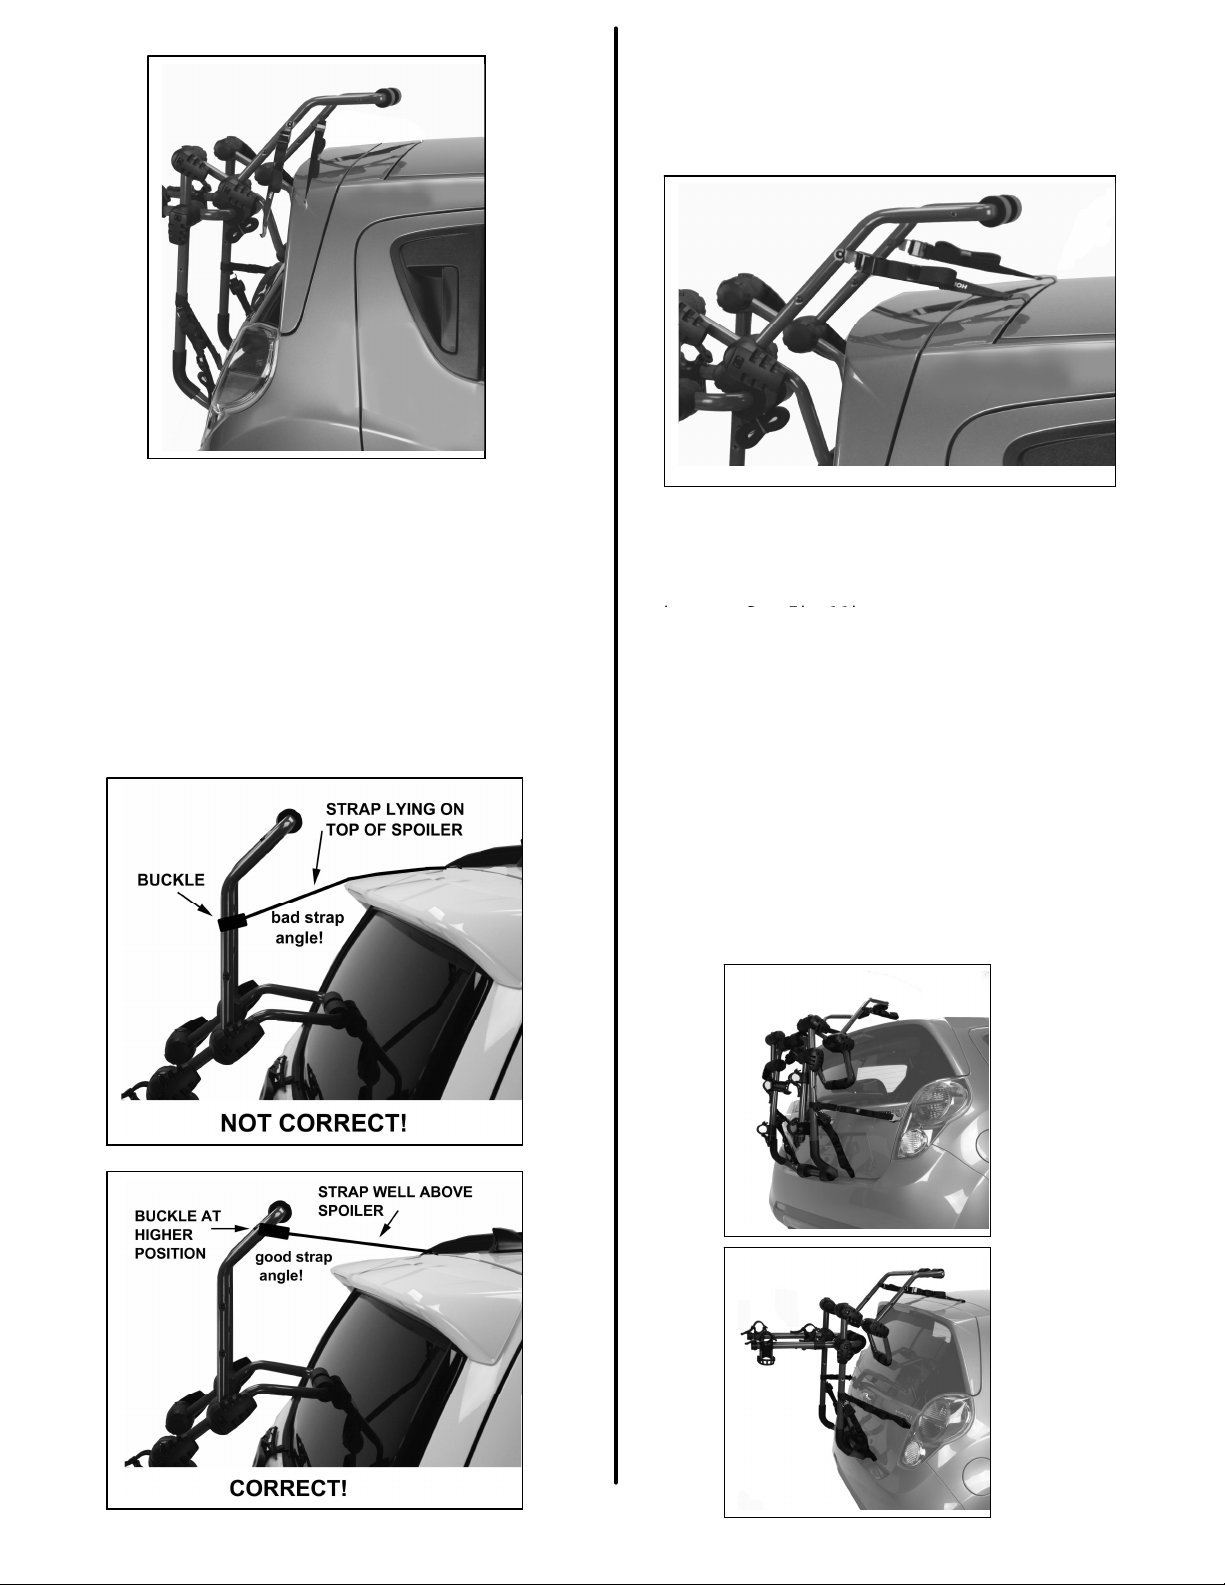
Fig. 12
The strap angle from the upper-most buckles to
the upper hooks must be high enough so that
the straps are not making any contact with the
spoiler!
Fig. 14
strap end snug. See Fig. 14. Lower pads should
remain seated against bumper.
Attach the hooks on the lower straps to the
bottom of the trunk or hatch lid and pull snug.
See Fig. 15a.
Note that the lower strap‘s buckle can be
relocated to the higher hole on the main
frame if required. Use the 10mm wrench
included with the rack. Recheck all straps
to make sure they are snug.
Fig. 13
i) Unlock the center hubs and rotate the support
arms so they are horizontal or pointing slightly
upwards, then lock hubs. See Fig. 15b.
Fig. 15a
Fig 15b
3

3.Installation
Using
Hatch Anchors
Fig. 1
7
Fig. 2
2
Fig. 2
3
e)
Position hook near the D
-
ring (Fig. 2
1),then
c
)
Close the rear hatch.
Pull the D
-
ring end
to
d) Please refer to above instructions
The hatch anchors included with the F2
(Fig. 16) fit between your rear hatch and
vehicle body. They are used when the hooks
on the regular straps can’t be used. If your
vehicle has a roof rack with load bars or raised
side rails, you may have to choose between the
hatch anchor or roof rack attachment system.
There are some vehicles (such as the Infiniti
J35) which will require the hatch anchors to be
used in either the side strap or bottom strap
position. Hatch anchors must be used with the
quick connect upper straps.
Fig. 16
Installation on vehicle
a) Remove the regularupper straps from the
upper-most buckles and replace with the quick
connect straps (Fig 17). Insert the strap
through the bottom of the buckle while
depressing the buckle’s spring loaded tab.
Hooks should be facing up.
Fig. 20
2a through 2f for positioning rack on
vehicle
connect D-ring to hook. (Fig. 22)
f) Tighten strap by pulling on strap end. Fold the
cover over the hook/D-ring and close up the
cover. (Fig. 23). Lower pads should remain
seated against bumper.
g) Attach the hooks on the lower straps to the
bottom of the trunk or hatch lid and pull snug.
See Fig. 15a. Note that the lower strap‘s buckle
can be relocated to the higher hole on the main
frame if required. Use the 10mm wrench
included with the rack. Recheck all straps to
make sure they are snug.
h) Unlock the center hubs and rotate the
support arms so they are horizontal or pointing
slightly upwards, then lock hubs. See Fig.15b.
Fig. 21
b) Open rear hatch and insert hatch anchor’s
strap with D-ring through the gap/opening. The
D ring is plastic coated and can lay on the car’s
roof. See Fig. 18 & 19.
Fig. 18
remove slack out of strap . See Fig 20.
Fig. 19
4

4. Installation
Using
Roof Rack
Adapter Straps
5
Fig. 24
Fig. 2
5
b
Fi
g. 2
8a
c)
Please refer to above instructions
frame if required. Use the 10mm wrench included
These padded straps provide a convenient location
for top strap attachment when regular upper straps
or hatch anchors can’t be used. They wrap around
the raised rails or load bar and must be used with
the quick connect upper straps. There are vehicles
(i.e. Infiniti J35/7) where hatch anchors are used for
the bottom or side straps and roof rack adapter
straps are used for the upper attachment system.
Installation on vehicle:
a) Rotate the “hook side” D-ring 90 degrees so it is
“length wise” in line with the strap per fig 25. Wrap
the D-ring strap around the load bar or raised rail.
Insert the hook side D-ring through the padded
side D-ring and pull so it is snug. Be sure the
pad is between the strap and load bar or raised rail
per fig. 26. Then rotate the hook side D-ring
back to its original position.
Fig. 27
2a through 2f for positioning rack on
vehicle
d) Position hook near the D-ring then connect
D-ring to hook. (Fig. 28a)
e) Tighten strap by pulling on strap end. Fold the
cover over the hook/D-ring and close up the
cover. (Fig. 28b). Lower pads should remain
seated against bumper.
f) Attach the hooks on the lower straps to the
bottom of the trunk or hatch lid and pull snug.
See Fig. 15a. Note that the lower strap‘s buckle
can be relocated to the higher hole on the main
with the rack. Recheck all straps to make sure
they are snug.
g) Unlock the center hubs and rotate the
support arms so they are horizontal or pointing
slightly upwards (Fig. 15b). Then lock hubs.
Fig. 26
b) Remove the regular upper straps from the upper-
most buckles and replace with the quick connect
straps (Fig 27). Insert the strap through the bottom
of the buckle while depressing the buckle’s spring
loaded tab. Hooks should be facing up.
Fig. 28

6
Fig.30
Fig. 33a
Included with the rack are 6 rubber straps (1 each for the reg
ular
Fig. 32
b
Not
C
orrect
5. Mounting bikes on rack
Fig. 29
cradles (Fig. 30) and 2 each for the anti-sway cradles (Fig. 31)) plus
one built in nylon safety strap with buckle.
Attach one end of the rubber straps to the rubber cradles (Fig. 30 &
31). Start with the round (end) hole of the strap stretched over the
diamond shaped anchor on the cradle.
Place the heaviest bike onto the rack first (closest to the vehicle),
putting the bike’s top tube (usually) into the rubber cradles on the
support arms. Be sure to note the location of the pedal, as you may
have to rotate the crank in order to keep the pedal from hitting the
vehicle.
Pull the rubber strap across the bike’s frame tube and attach it to
the anchor on the opposite side of the cradle for both right and left
cradles. Straps should be snug, but do not over-tighten the straps
since this may shorten the useful life of the strap.
Next, rotate the Anti-Sway cradle so that it rests against the bike’s
seat tube (this is the frame tube into which the seat post fits) Fig.
32a (preferred) or 32b (when frame clearance is an issue). Pull the
strap across the bike’s seat tube in a similar snug manner.
Fig. 31
Fig. 32a
Put the next bike on the rack with the handlebars on the other side
of the vehicle and attach the straps. Be sure not to route straps over
any cables (Fig. 33a), but rather under them (Fig. 33b). This will
protect the bike’s finish.
Once all the bikes are mounted and all the rubber straps are
pulled snug (but not over-stretched), route the attached safety
strap around all the bikes and re-attach to the buckle.
Remember to re-check all straps after the bicycles have been
mounted. Re-tighten straps as necessary.
SPECIAL NOTES: On a bike with a slanted top tube, place top
tube on rear cradle, and down tube on front cradle to keep bike as
“level” as possible. For “ladies” style and non-conventional frames, it
may not be possible to keep bike “level”. On a road bike with a level
top tube, place top tube on both cradles, with anti-sway on seat tube.
Fig. 33b

7
Fig. 38: Installation on Mazda Miata
. Rear frame and
6. Fit Gallery
Fig. 34
Fig. 35
Fig. 36
Fig. 34: Correct spoiler clearance frame position
on small square back with spoiler.
Fig. 35: Correct Spoiler clearance frame position
on Infiniti J35 using roof rack straps to side rails.
Hatch anchors are uses on bottom of hatch door.
Fig. 36: Correct Spoiler clearance frame position
on Lexus RX330 using roof rack straps to side
rails.
Fig. 37: Correct mounting on Dodge Caravan
using Hatch anchors
Fig. 37
Fig. 38
spoiler clearance frame are in-line. Spoiler frame
resting on vehicle’s trunk. Side straps not used on this
particular vehicle.

Limited Lif
etime Warranty (effective January 1, 2008):
Hollywood Racks
CAUTION:
nd proper installation of this product. Improper attachment or installation of this product may
This bicycle carrier has been designed to attach securely to most vehicles. It is the user’s responsibility to
insure the safe a
result in damages to your bicycles, vehicle, or vehicles following behind you. If the pads of this rack (or any
rack) are resting against glass or a structurally soft panel, be aware that this may cause damage to your
vehicle. The manufacturer of this product will not extend the warranty to any damages not attributable to a
defect in materials and workmanship. The fit guide printed in this manual is intended as a general reference
only. Ongoing changes in vehicle design, materials and finishes used on motor vehicles make it the user’s
responsibility to determine the use of this product. Do not attach hooks to aluminum, glass, fiberglass,
moldings, spoilers or carbon fiber parts. Please check the Fit Guide on the back page prior to installation! If
the make and model of your cars is listed as a “No Fit,” check with your dealer about installation assistance,
exchange for another model that will fit, or refund. This guide is not complete due to continuous changes in
automotive design. For answers to questions, call our customer service department at: 800-747-4085
Mon.-Fri. from 7:00 AM–3:00 PM Pacific time OR Email us anytime at info@hollywoodracks.com
Hollywood Racks will warranty its car racks and accessories during the time that an original retail
purchaser owns the product subject to the exclusions and limitations of this warranty. Hollywood Racks
will remedy defects in materials and workmanship by repairing or replacing (at its option) the complete
rack or a defective part without charge for labor or parts. Hollywood Racks may elect (at its option) to
issue a refund equal to the purchase price paid for the product.
This warranty does not cover problems caused by normal wear and tear including (but not limited to)
weather, scratches, dents, rust, accidents, unlawful vehicle operation, misuse, abuse, neglect, theft,
unauthorized modifications, or unauthorized repair. No warranty is given for defects resulting in incorrect
assembly, incorrect installation onto the vehicle, installation on a “no fit” vehicle, incorrect attachment of
bicycles onto the rack, or overloading of the rack’s weight restrictions. This warranty terminates if the
original retail purchaser transfers the product to any other person. If a product is believed to be
defective, the original retail purchaser should contact either the original retailer or Hollywood Racks
directly at 800-747-4085 or at info@hollywoodracks.com
Disclaimer of Liability: Repair or replacement of a defective product or the issuance of a refund or
credit (as determined by Hollywood Racks) is a purchaser’s exclusive remedy under this warranty.
Damage to a purchaser’s vehicle, cargo, bicycles and or to any other person is excluded. This warranty
is expressly made in lieu of any and all other express warranties, whether oral or written.
Hollywood Racks shall not be liable for any direct, indirect, consequential, incidental, special,
punitive or any other damages in connection with the purchase, use or handling of this product.
Some states do not allow the exclusion or limitation of consequential or incidental damages and
the above limitation may not apply to you. This warranty gives you specific legal rights and you
have other rights, which vary from state to state.
12812 South Spring Street Los Angeles, CA 90061
(800) 747-4085 (310) 516-8600 Fax (310) 516-8955
Customer Service Hours: 7:00 AM- 3:00 PM Pacific Time
www.hollywoodracks.com info@hollywoodracks.com
Made in Taiwan
Pat. Pending v6.2
8
 Loading...