

Installation Instructions for Hollywood
Racks
Baja Rack B2 (two bike) and B3 (three bike)
1
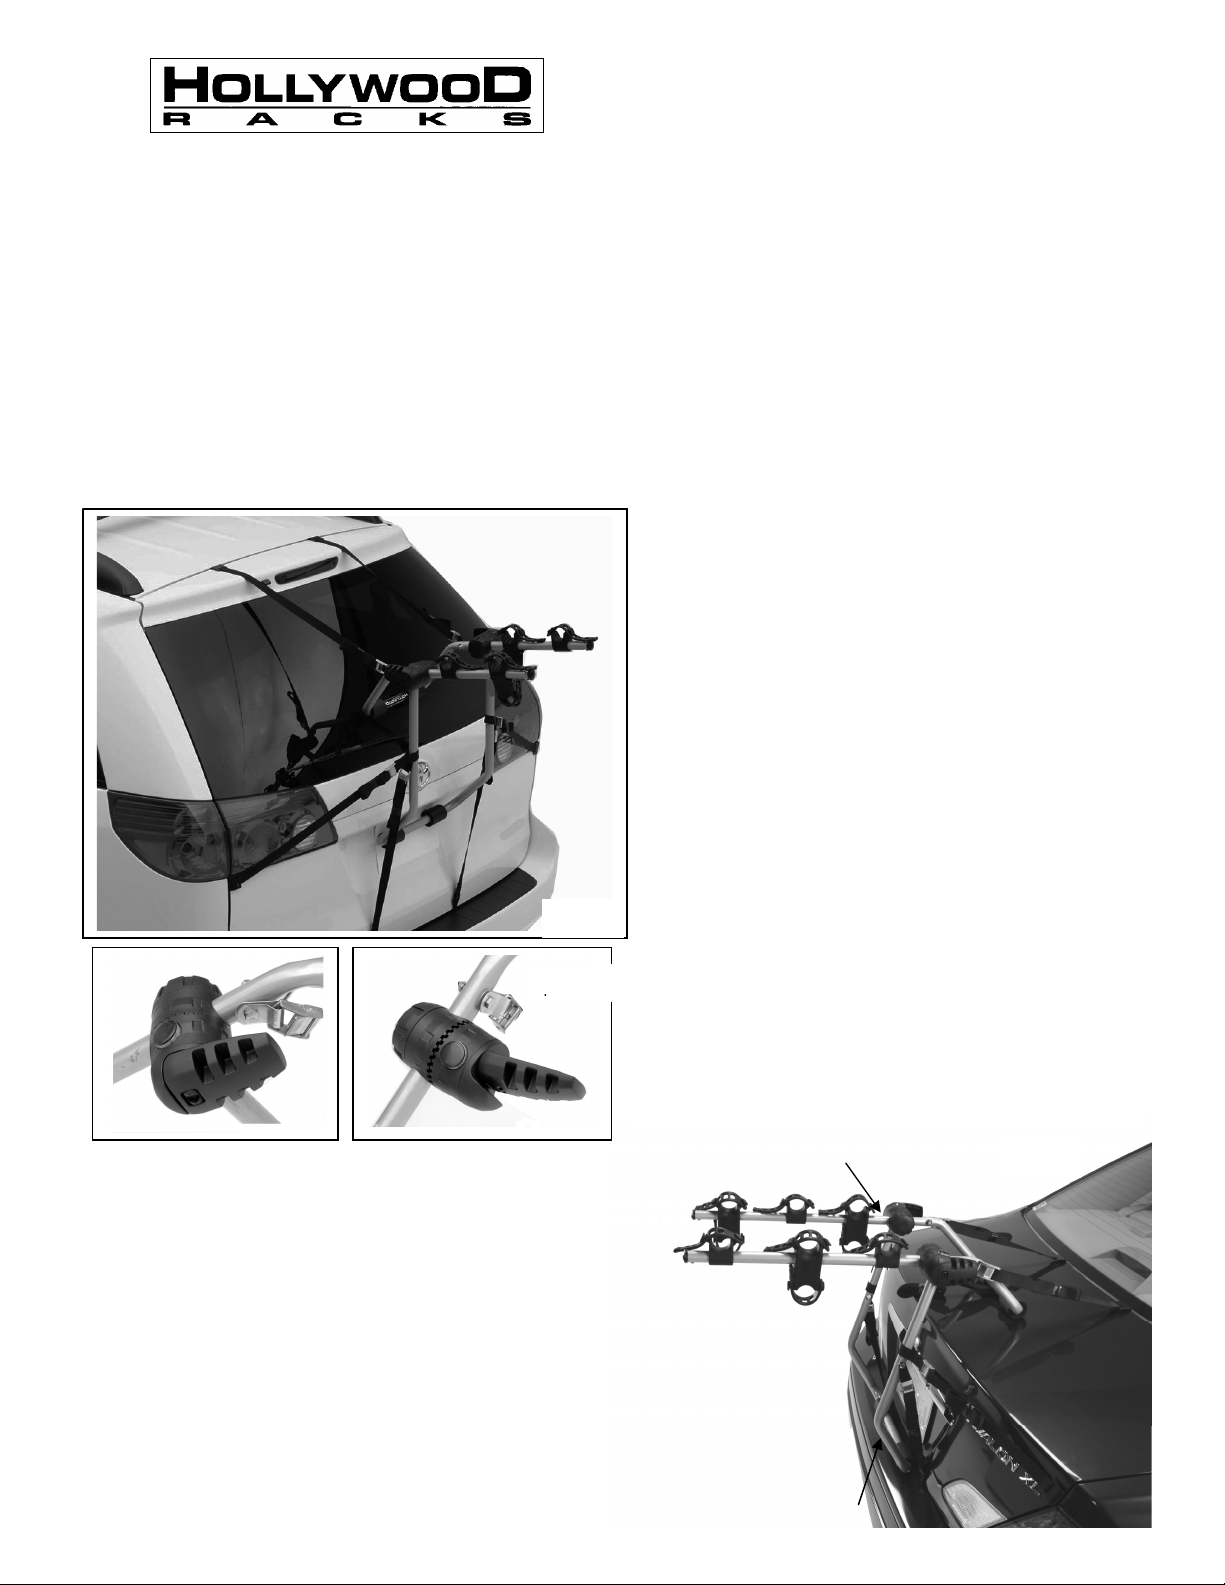
Mounting the Hollywood Baja Rack
Fig.
1
Fig.
2a
Fig.
3
bicycle carriers. Comes Fully Assembled
When using the Hollywood Expedition rack, please follow these important guidelines:
Install the Baja rack on structurally sound trunks and rear decks only.
Never attach hooks to aluminum, plastic, glass, fiberglass or carbon fiber.
Clean the surface of the trunk, rear door or deck lid before installation of the rack.
Tighten all six straps both before and after mounting bikes on the rack.
Never place more than 100 lbs. (45 KG) on either B2 or B3
Always use the attached tie-down safety strap after loading all of the bicycles onto the rack.
This final Safely Strap should be threaded through all of the bikes.
Keep the bicycle tires at least one foot (1’=30 cm approx.) away from the exhaust pipe(s).
Check the rack, bikes and straps regularly during use.
Drive slowly when used on bumpy or dirt surface roads.
on Your Vehicle:
After removing your Baja rack from the box, loosen
the black hubs by flipping the hub lever outward
(away from the rack). This will allow the two
sections of the rack frame to move relative to one
another for correct rack placement on your vehicle.
Note how the teeth on the hubs interlock into place.
See Fig. 2a & 2b showing the hub and lever in both
the closed and open positions.
Adjusting the rack frame: Position the Baja rack
on the vehicle such that the bicycle support arms
are parallel to the ground, or angled slightly upward
at the back of the rack. The upper pads should rest
on a steel trunk lid, or rear door. If necessary
Fig.2b
Once the proper rack position has been determined by adjusting
the Baja’s bicycle support arms and main frame, tighten the
hubs by flipping black levers in and locking them in place
against the rack; then rotate the lever and/or cup until the
hubs are snug and secure . Be sure that the teeth of the hubs are
interlocked evenly and that the support arms are parallel or pointing
slightly upwards .
Attaching the straps: Begin attaching straps with the upper (farthest
forward) pair, placing the hooks in the most forward trunk lid opening, and
then pulling on the end of the strap until the proper length is reached.
Once the upper straps have been attached, the side and bottom straps
can be attached in any order.
(particularly on vans, station wagons and SUV’s) the
upper pads may rest on glass. This is because the
weight of the rack and bicycles is support by the
upper straps, and the lower pads. Be careful not to
interfere with rear mounted wiper blade.
support
arms
main
frame
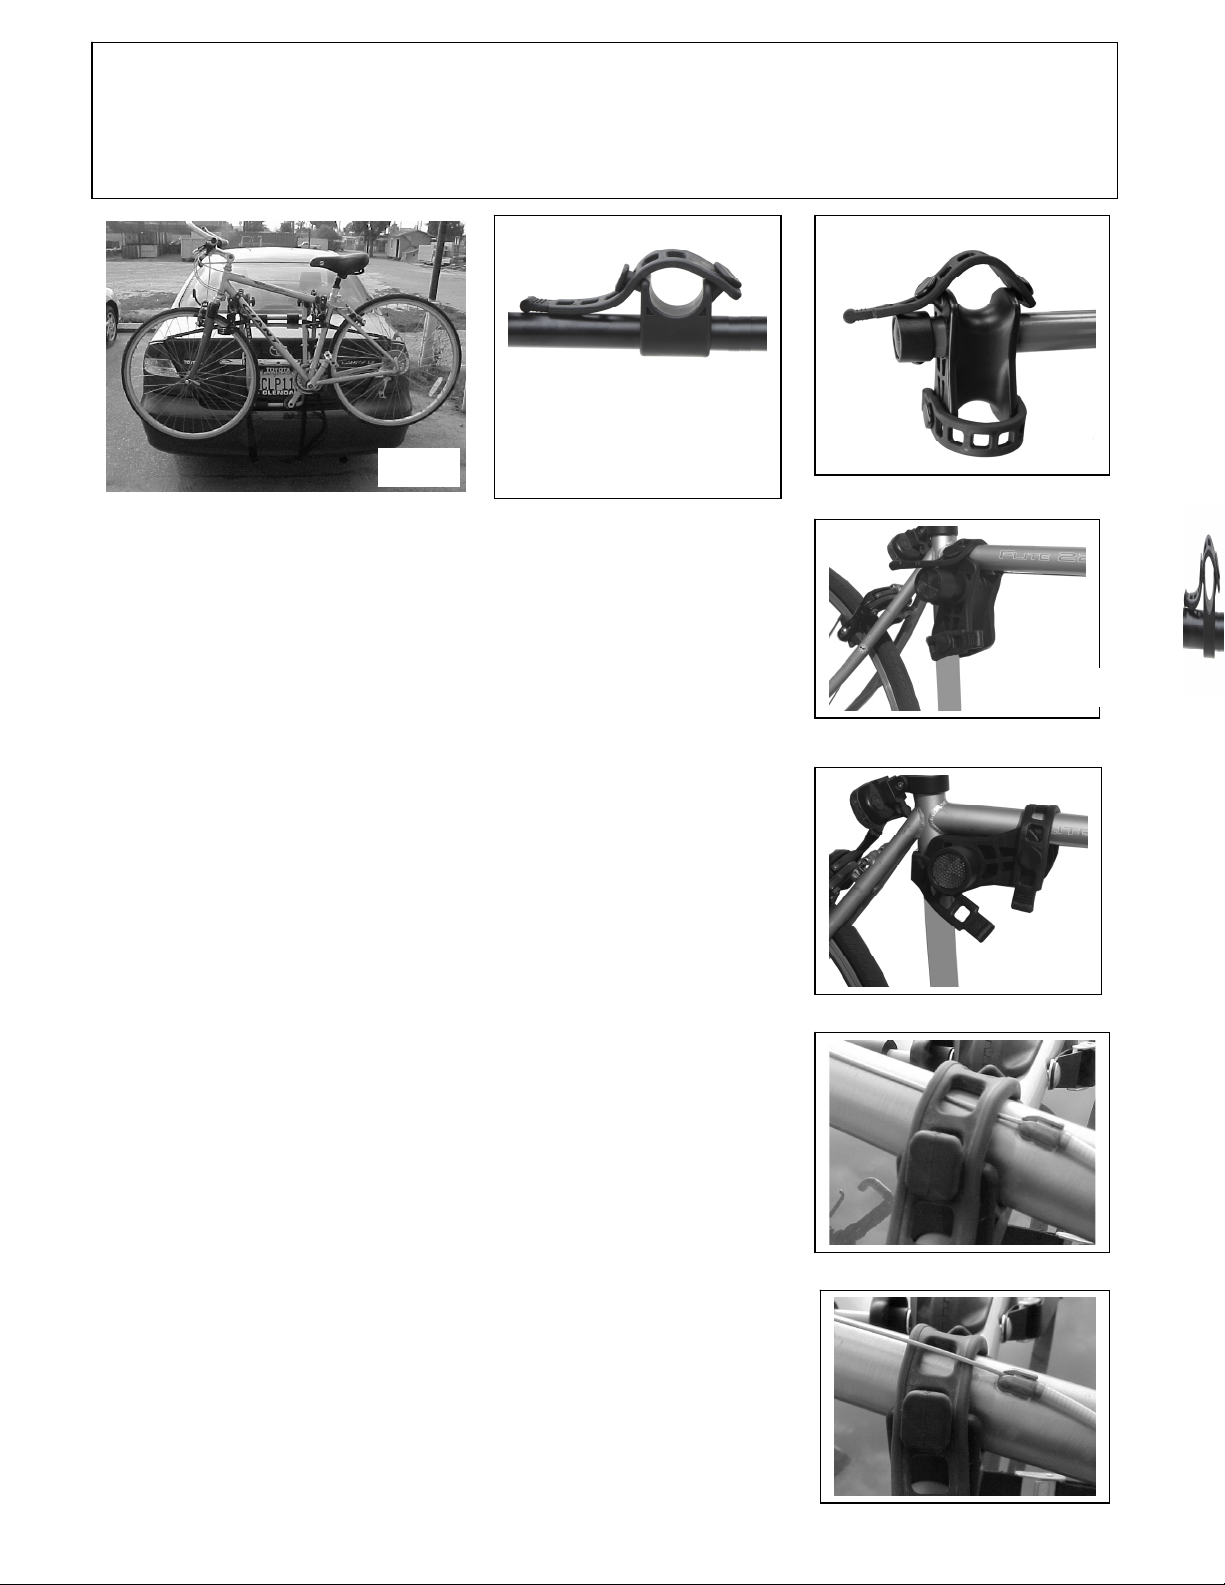
Mounting bikes on rack
If your vehicle has a “soft” plastic bumper, the lower straps may be attached to the lower edge of the trunk
Fig.
10
lid, or rear door opening instead of the bumper. When all six straps are attached, pull on each strap to make
sure that the hooks are properly seated, and that all straps are tight. After mounting the bikes, recheck and
retighten all straps since the weight of the bike(s) often adds tension to the upper straps, and removes and
equal amount of tension from the lower straps.
Fig.4
Fig.5
Included with the rack are either 6 rubber straps for the B-2 or 9
rubber straps for the B-3. (use 1 each for the regular cradles (Fig. 5) and
2 each for the anti-sway cradles (Fig. 6) plus one built in nylon safety
strap with buckle.
Attach one end of the rubber straps to the rubber cradles. Start
with the round (end) hole of the strap stretched over the diamond
shaped anchor on the cradle.
Place the heaviest bike onto the rack first (closest to the
vehicle), putting the bike’s top tube (usually) into the rubber cradles on
the support arms. Be sure to note the location of the pedal, as you may
have to rotate the crank in order to keep the pedal from hitting the
vehicle.
Pull the rubber strap across the bike’s frame tube and attach it to
the anchor on the opposite side of the cradle for both right and left
cradles. Straps should be snug, but do not over-tighten the straps since
this may shorten the useful life of the strap.
Next, rotate the Anti-Sway cradle so that it rests against the
bike’s seat tube (this is the frame tube into which the seat post fits) Fig. 7
or 8. Pull the strap across the bike’s seat tube in a similar snug manner.
Put the next bike on the rack with the handlebars on the other side of the
vehicle and attach the straps. Be sure not to route straps over any
cables (Fig. 9), but rather under them (Fig. 10). This will protect the
bike’s finish.
Once all the bikes are mounted and all the rubber straps are
pulled snug (but not over-stretched), route the attached safety strap
around all the bikes and re-attach to the buckle. Remember to
re-check all straps after the bicycles have been mounted.
Re-tighten straps as necessary.
Fig.6
Fig.7
Fig.8
Fig.9
SPECIAL NOTES: On a bike with a slanted top tube, place top tube on
rear cradle, and down tube on front cradle to keep bike as “level” as
possible. For “ladies” style and non-conventional frames, it may not be
possible to keep bike “level”. On a road bike with a level top tube, place
top tube on both cradles, with anti-sway on seat tube.
2

Esta hoja de instruccion es applicable para 2 y 3 bicicletas capacidades en este porta bicicletas por
favor Seguir las siguientes recomendaciones:
*Se istala el porta bicis.Baja en cubiertas metalicas solamente.
*Nunca poner los ganchos al aluminio plastico,cristal,fibra de vidrio,carbon
*Limpia la superficie de la puerta posterior o de la tapa de la cubierta antes de la istalacion del porta bici.
*Aprieta las seis correas antes y despues que montan las bicis en el portabici.
*Nunca poner mas de 100 libras.(45 kilogramos)en el Baja 2 o Baja 3
*Usa siempre la correa de 86’’ alrededor de todas las bicis,y del marco del portabicicletas.
*Revisar el portabici las bicis y las correas regularmente durante el uso.
*Impulsion del vehiculo lentamente cuando esta utilizando en los caminos superficiales desiguales o de roca.
Despues de sacar tu Baja porta bici de la caja
Aflogar cubos jalando la palanca del cubo asia afuera esto permitira que las dos secciones del porta bici
tengan movimiento.
Para colocasion correcta en el vehiculo ver como los dientes del cubo se enclavijan en su lugar ver fig.2a y 2b
Muestran en pocision cerrada y abierta los cubos y la palanca.
Ajuste del marco
Pocision del Baja porta bici en el vehiculo.los brasos paralelos al piso o en angulo levemente asia arriba de la
parte trasera del porta bici
Las espongas superiors deben reclinarse sobre la parte superior o puerta trasera ver fig.1 particularmente en
furgonetas y SUV’s las espongas
Superiores pueden reclinarse sobre el vidrio esto es porque el pesor del porta bici y las bicicletas estan
apoyadas en las correas superiors y en
Las espongas de abajo .tener cuidado de no estorbar el limpiados de vidrio trasero.
Cuando la pocision del porta bici a sido determinada apriete los cubos moviendo la palanca asia dentro del
porta bici asegurandolas en su lugar
Sobre el porta bici rotar la palanca asta que los cubos esten apretados y asegurados
Ver que los dientes de los cubos estan enclavijados correctamente de modo que los brasos sean paralelos
Colocar las correas .6 en total 2 para la parte de arriba 2 a los lados y 2 para abajo del bumper o orilla de la
cajuela si tu vehiculo tiene bumper
Plastico colocar las correas debajo en la parte baja de la cajuela .
Colocar las correas de goma en las cunas y blockes antimovimiento
Montar las bicis en tu porta bicicletas baja.
Montar la bicicleta mas pesada primero sobre las cunas pegadas al vehiculo estar seguro que el pedal de la
bici no golpea el vehiculo.
A lo major tengan que rotar el pedal .
Jalar la correa de goma sobre el tubo del marco de la bicicleta adjuntar al anclaje en el lado opuesto de la
cuna en anbos lados izquierdo y Derecho de las cunas las correas apretarlas lo suficiente pero demasiado
esto puede acortar la duración de la correa.
Siguiente rotar el blocke anti movimiento que repose en el poste del asiento ver figura 7 o 8 Jalar la correa
sobre el poste del asiento de una manera similar poner la siguiente bicicleta con el manillar en posición
opuesta a la primera bicicleta fijar las correas estar seguro que no estén sobre ningún cable ver figura (9)
pero puede pasarlo abajo del cable ver figura (10)esto protege el afinado de la bicicleta.
Cuando todas las bicicletas an sido montadas y todas las correas de goma están apretadas lo suficiente (
pero no demasiado estiradas ) colocar alrededor de las bicicletas la correa de seguridad que esta adjunta al
marco de la bicicleta y asegurar de colocar dentro de la hebilla y apretarla .recuerda de revisar todas las
correas cuando las bicicletas an sido montadas si es necesari volverlas apretar.
Nota especial:en una bicicleta con tubo superior inclinado,coloque el tubo en la parte superior trasera y asia
abajo en la parte delantera para mantenerla a ‘nivel’ la bicicleta lo mas posible.para bicicletas estilo para
damas y no convencionales marcos no es posible mantenerlas a ‘nivel’ en una bicicleta de carretera con un
tubo de nevel superior coloque el tubo en las cunas con el blocke antimovimiento en el poste del asiento.
Fig. 8
3

CAUTION!
¡Precaución!
Este porta bicicleta se ha diseñado para la mayoría de los vehículos. Es la responsabilidad
8
Made in Taiwan
2713 v3
del usuario asegurar la instalación segura y apropiada de este producto. la instalación incorrecta de este
producto puede dar lugar a daños a tus bicis, vehículo, o vehículos que siguen detrás de ti. Si los cojines
de este portabici (o de cualquier otro) se están reclinando contra el cristal o un panel e suave, estar
enterado que esto puede causar daño a tu vehículo. El fabricante de este producto no extenderá la
garantía a ninguna por daños no atribuidos a un defecto en materiales y la ejecución. La guía impresa en
este manual se usa para referencia general solamente. Si se cambia el diseño del vehículo, materiales y
los afinados usados en los vehículos automotores de marca la responsabilidad es del usuario de
determinar el uso de este producto. No unir los ganchos al aluminio, cristal, fibra de vidrio, fibra de
carbón. ¡Comprobar por favor la guía apta en la página trasera antes de la instalación! Si la marca y el
modelo de tu coche se enumera como “ningún ajuste,” comprobar con tu distribuidor sobre ayuda de la
instalación, el intercambio para saber si hay otro modelo que quepa, o el reembolso. Esta guía no es
completo debido a los cambios continuos en diseño automotor. preguntas, llamar nuestro departamento
de servicio de cliente al: 310-516-8600 lunes. viernes. de 7:00 AM-3: 00PM tiempo del pacífico.
This bicycle carrier has been designed to attach securely to most vehicles. It is the user’s responsibility to insure
the safe and proper installation of this product. Improper attachment or installation of this product may result in
damages to your bicycles, vehicle, or vehicles following behind you. If the pads of this rack (or any rack) are
resting against glass or a structurally soft panel, be aware that this may cause damage to your vehicle. The
manufacturer of this product will not extend the warranty to any damages not attributable to a defect in materials
and workmanship. The fit guide printed in this manual is intended as a general reference only. On-going changes
in vehicle design, materials and finishes used on motor vehicles make it the user’s responsibility to determine the
use of this product. Do not attach hooks to aluminum, glass, fiberglass, moldings, spoilers or carbon fiber parts.
Please check the Fit Guide on the back page prior to installation!
If the make and model of your cars is listed as a “No Fit,” check with your dealer about installation assistance,
exchange for another model that will fit, or refund. This guide is not complete due to continuous changes in
automotive design. For answers to questions, call our customer service department at: 800-747-4085
Mon.-Fri. from 7:00AM–3:00PM Pacific time OR Email us anytime at info@hollywoodracks.com
Limited Lifetime Warranty (effective January 1, 2008):
Hollywood Racks will warranty its car racks and accessories during the time that an original retail purchaser owns the
product subject to the exclusions and limitations of this warranty. Hollywood Racks will remedy defects in materials and
workmanship by repairing or replacing (at its option) the complete rack or a defective part without charge for labor or parts.
Hollywood Racks may elect (at its option) to issue a refund equal to the purchase price paid for the product.
This warranty does not cover problems caused by normal wear and tear including (but not limited to) weather, scratches,
dents, rust, accidents, unlawful vehicle operation, misuse, abuse, neglect, theft, unauthorized modifications, or unauthorized
repair. No warranty is given for defects resulting in incorrect assembly, incorrect installation onto the vehicle, installation on
a “no fit” vehicle, incorrect attachment of bicycles onto the rack, or overloading of the rack’s weight restrictions. This
warranty terminates if the original retail purchaser transfers the product to any other person.
If a product is believed to be defective, the original retail purchaser should contact either the original retailer or Hollywood
Racks directly at 800-747-4085 or at info@hollywoodracks.com
Disclaimer of Liability: Repair or replacement of a defective product or the issuance of a refund or credit (as determined by
Hollywood Racks) is a purchaser’s exclusive remedy under this warranty. Damage to a purchaser’s vehicle, cargo, bicycles
and or to any other person is excluded. This warranty is expressly made in lieu of any and all other express warranties,
whether oral or written. Hollywood Racks shall not be liable for any direct, indirect, consequential, incidental, special,
punitive or any other damages in connection with the purchase, use or handling of this product. Some states do not allow
the exclusion or limitation of consequential or incidental damages and the above limitation may not apply to you. This
warranty gives you specific legal rights and you have other rights, which vary from state to state.
Hollywood Racks
12812 South Spring Street Los Angeles, CA 90061
(800) 747-4085 (310) 516-8600 Fax (310) 516-8955
Customer Service Hours: 8:00 AM- 3:00 PM Pacific Time
www.hollywoodracks.com info@hollywoodracks.com
 Loading...