

Page 1
VR-652(A) 2008.3.6 5:32 PM 페이지 1
Page 2
2
1) Read these instructions.
2) Keep these instructions.
3) Heed all warnings.
4) Follow all instructions.
5) Do not use this apparatus near water.
6) Clean only with dry cloth.
7) Do not block any ventilation openings.
Install in accordance with the manufacturer's
instructions.
8) Do not install near any heat sources such as
radiators, heat registers, stoves, or other
apparatus (including amplifiers) that produce
heat.
9) Do not defeat the safety purpose of the polarized
or grounding-type plug. A polarized plug has two
blades with one wider than the other.
A grounding type plug has two blades and a third
grounding prong. The wide blade or the third
prong are provided for your safety. If the provided
plug does not fit into your outlet, consult an
electrician for replacement of the obsolete outlet.
10) Protect the power cord from being walked on or
pinched particularly at plugs, convenience
receptacles, and the point where they exit from
the apparatus.
11) Only use attachments/accessories specified by
the manufacturer.
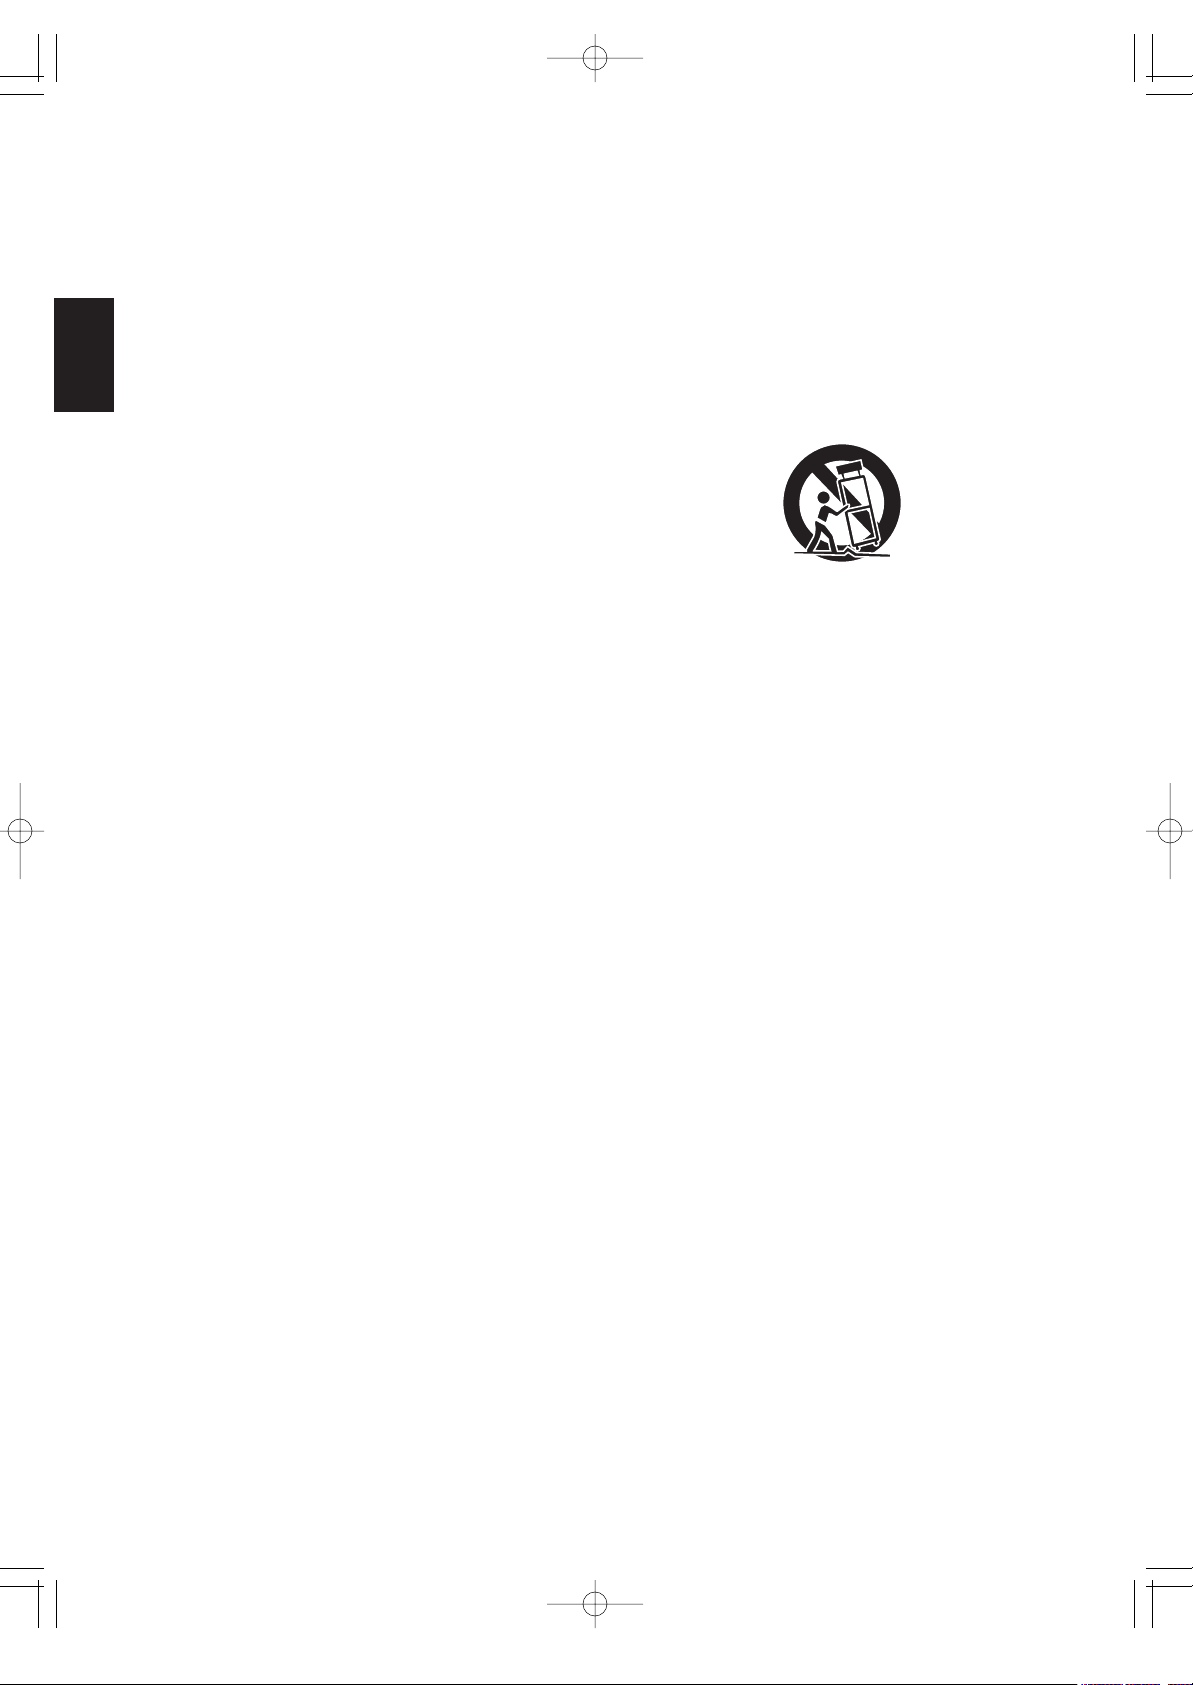
12) Use only with the cart, stand, tripod, bracket, or
table specified by the manufacturer, or sold with
the apparatus.
When a cart is used, use caution when moving
the cart/apparatus combination to avoid injury
from tip-over.
13) Unplug this apparatus during lightning storms or
when unused for long periods of time.
14) Refer all servicing to qualified service personnel.
Servicing is required when the apparatus has
been damaged in any way, such as powersupply cord or plug is damaged, liquid has been
spilled or objects have fallen into the apparatus,
the apparatus has been exposed to rain or
moisture, does not operate normally, or has
been dropped.
IMPORTANT SAFETY INSTRUCTIONS
ENGLISH
PORTABLE CART WARNING
VR-652(A) 2008.3.6 5:32 PM 페이지 2
Page 3
3
ENGLISH
Introduction
READ THIS BEFORE OPERATING YOUR UNIT
: TO REDUCE THE RISK OF ELECTRIC
SHOCK, DO NOT REMOVE COVER (OR
BACK). NO USER-SERVICEABLE PARTS
INSIDE. REFER SERVICING TO QUALIFIED
SERVICE PERSONNEL.
: TO REDUCE THE RISK OF FIRE OR ELECTRIC SHOCK,
DO NOT EXPOSE THIS APPLIANCE TO RAIN OR MOISTURE.
CAUTION
WARNING
This symbol is intended to alert the user to the
presence of uninsulated "dangerous voltage" within
the product's enclosure that may be of sufficient
magnitude to constitute a risk of electric shock to
persons.
This symbol is intended to alert the user to the
presence of important operating and maintenance
(servicing) instructions in the literature accompanying
the appliance.
Note to CATV System Installer :
This reminder is provided to call the CATV system installer’s attention to Article 820-40 of the NEC that provides guidelines
for proper grounding and, in particular, specifies that the cable ground shall be connected to the grounding system of the
building, as close to the point of cable entry as practical.
FCC INFORMATION
This equipment has been tested and found to comply with the limits for a Class B digital device, pursuant to Part 15 of the FCC
Rules. These limits are designed to provide reasonable protection against harmful interference in a residential installation. This
equipment generates, uses and can radiate radio frequency energy and, if not installed and used in accordance with the
instructions, may cause harmful interference to radio communications. However, there is no guarantee that interference will not
occur in a particular installation. If this equipment does cause harmful interference to radio or television reception, which can be
determined by turning the equipment off and on, the user is encouraged to try to correct the interference by one or more of the
following measures:
•
Reorient or relocate the receiving antenna.
•
Increase the separation between the equipment and receiver.
•
Connect the equipment into an outlet on a circuit different from that to which the receiver is connected.
•
Consult the dealer or an experienced radio/TV technician for help.
Caution : Any changes or modifications in construction of this device which are not expressly approved by the party responsible
for compliance could void the user’s authority to operate the equipment.
This Class B digital apparatus complies with Canadian ICES-003.
Cet appareil numérique de la Classe B est conforme à la norme NMB-003 du Canada.
CAUTION
Invisible laser radiation when the unit is open.
Do not stare into beam.
CAUTION : USE OF ANY CONTROLS, ADJUSTMENTS, OR PROCEDURES OTHER THAN THOSE
SPECIFIED HEREIN MAY RESULT IN HAZARDOUS RADIATION EXPOSURE.
CLASS 1
LASER PRODUCT
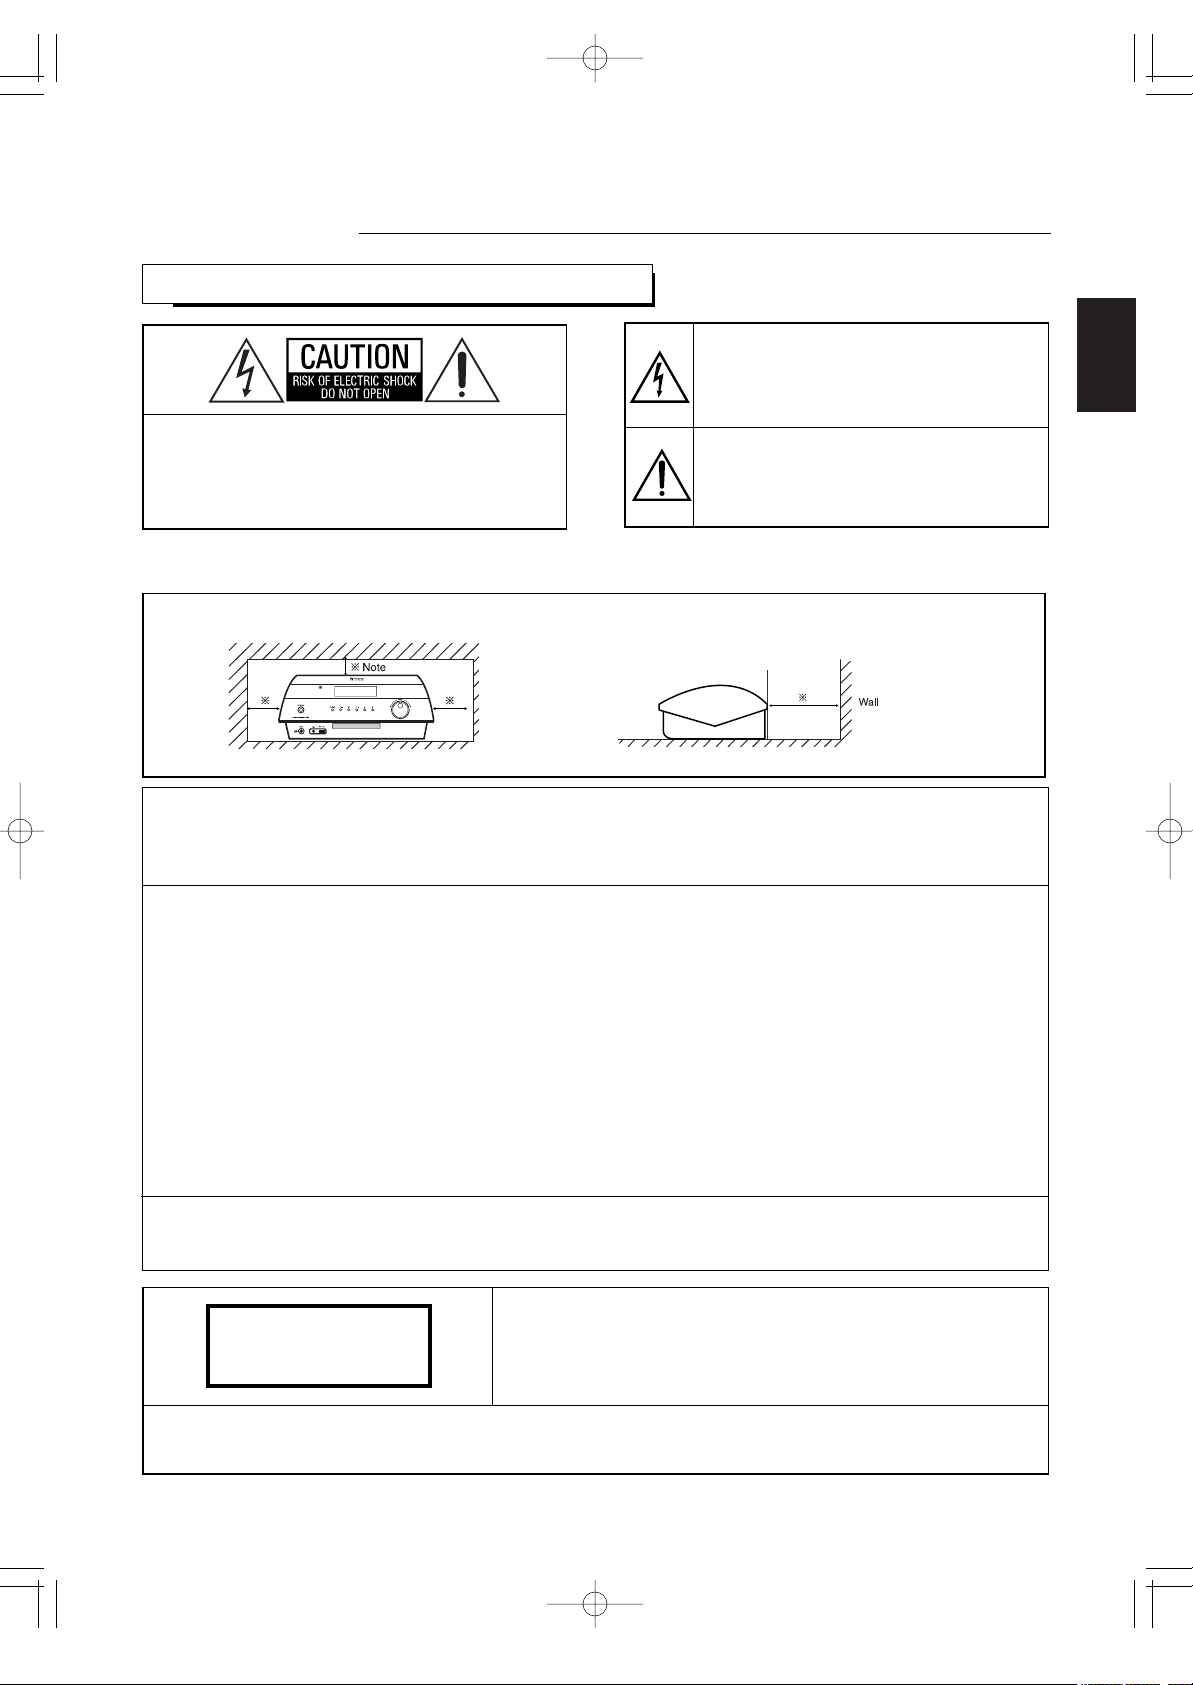
Caution regarding installation
Note : For heat dispersal, do not install this unit in a confined space such as a bookcase or similar enclosure.
Do not block ventilation openings or stack other equipment on the top.
VR-652(A) 2008.3.6 5:32 PM 페이지 3
Page 4
ENGLISH
4
PRECAUTIONS
■Moisture condensation
Moisture may form on the lens in the following conditions.
• Immediately after a heater has been turned on.
• In a steamy or very humid room.
• When this unit is moved from a cold place to a warm one.
If moisture forms inside this unit, it may not operate properly.
In this case, turn on the power and wait about one hour for the moisture to evaporate.
■If there is noise interference on the TV while a broadcast is being received.
Depending on the reception condition of the TV, interference may appear on the TV screen while you are watching a TV
broadcast and this unit is left on. This is not a malfunction of this unit or the TV. To watch a TV broadcast, turn off this unit.
■Do not transport this unit with discs left in it.
FOR YOUR SAFETY
Units shipped to the U.S.A and CANADA are designed for operation on 120 V AC only.
Safety precaution with use of a polarized AC plug.
However, some products may be supplied with a nonpolarized plug.
U.S.A
CANADA
120 V
•
Leave a space around the unit for sufficient ventilation.
•
Avoid installation in extremely hot or cold locations, or in an area that is exposed to direct sunlight or heating equipment.
•
Keep the unit free from moisture, water, and dust.
•
Do not let foreign objects in the unit.
•
The ventilation should not be impeded by covering the ventilation openings with items, such as newspapers, table-cloths,
curtains, etc.
•
No naked flame sources, such as lighted candles, should be placed on the unit.
•
Please be care the environmental aspects of battery disposal.
•
The unit shall not be exposed to dripping or splashing for use.
•
No objects filled with liquids, such as vases, shall be placed on the unit.
• Do not let insecticides, benzene, and thinner come in contact with the set
.
•
Never disassemble or modify the unit in any way.
■Notes on the AC power cord and the wall outlet.
•
The unit is not disconnected from the AC power source(mains) as long as it is connected to the wall outlet, even if the unit has
been turned off.
•
To completely disconnect this product from the mains, disconnect the plug from the wall socket outlet.
•
When setting up this product, make sure that the AC outlet you are using is easily acceptable.
•
Disconnect the plug from the wall outlet when not using the unit for long periods of time.
CAUTION
: To prevent electric shock, match wide blade of plug to wide slot, fully insert.
: Pour éviter chocs électriques, introduire la lame la plus large de la fiche dans
la borne correspondante de la prise et pousser jusqu’ au fond.
CAUTION
ATTENTION
VR-652(A) 2008.3.6 5:32 PM 페이지 4
Page 5
ENGLISH
5
• IMPORTANT SAFETY INSTRUCTIONS | 2
• Introduction
READ THIS BEFORE OPERATING YOUR UNIT | 3
• System Connections | 6
• Controls & Displays
FRONT PANEL CONTROLS | 10
UNIVERSAL REMOTE CONTROLS | 12
ENTERING A SETUP CODE | 13
OPERATING COMPONENTS WITH REMOTE CONTROL | 14
REMOTE CONTROL OPERATION RANGE | 14
LOADING BATTERIES | 14
• Basic Operation
LISTENING TO A PROGRAM SOURCE | 15
• Operation of DVD player
PRELIMINARY KNOWLEDGE ABOUT DISCS | 17
SYMBOL ABOUT INVALID OPERATION | 17
AUDIO AND VIDEO FILES | 18
CARE AND HANDLING OF DISCS | 18
DEFINITION OF TERMS | 19
BASIC PLAYBACK | 21
DISPLAYING DISC INFORMATION DURING PLAYBACK | 25
PLAYING A SPECIFIC ITEM | 26
REPEAT PLAYBACK | 27
RANDOM PLAYBACK | 28
PROGRAMMED PLAYBACK | 28
CHANGING THE AUDIO LANGUAGE | 33
CHANGING THE SUBTITLE LANGUAGE | 33
CHANGING THE CAMERA ANGLE | 34
ZOOMING IN/OUT A SCENE | 34
CHANGING THE VIDEO SIGNAL FORMAT | 35
CHANGING THE RESOLUTION OF COMPONENT VIDEO OUTPUT SIGNAL | 35
• Initial Settings | 36
SETTING THE LANGUAGE SETUP | 37
SETTING THE VIDEO SETUP | 38
SETTING THE AUDIO SETUP | 40
SETTING THE OTHER SETUP | 41
• Operation of Tuner
LISTENING TO RADIO BROADCASTS | 46
• Operation of Other Functions
RECORDING WITH VIDEO | 48
SETTING THE CLOCK | 49
OPERATING THE TIMER | 50
ADJUSTING THE BRIGHTNESS OF THE DISPLAY | 52
OPERATING THE SLEEP TIMER | 52
• Troubleshooting Guide | 53
• Specifications | 55
• Setup Code Table | 57
CONTENTS
VR-652(A) 2008.3.6 5:32 PM 페이지 5
Page 6
ENGLISH
6
System Connections
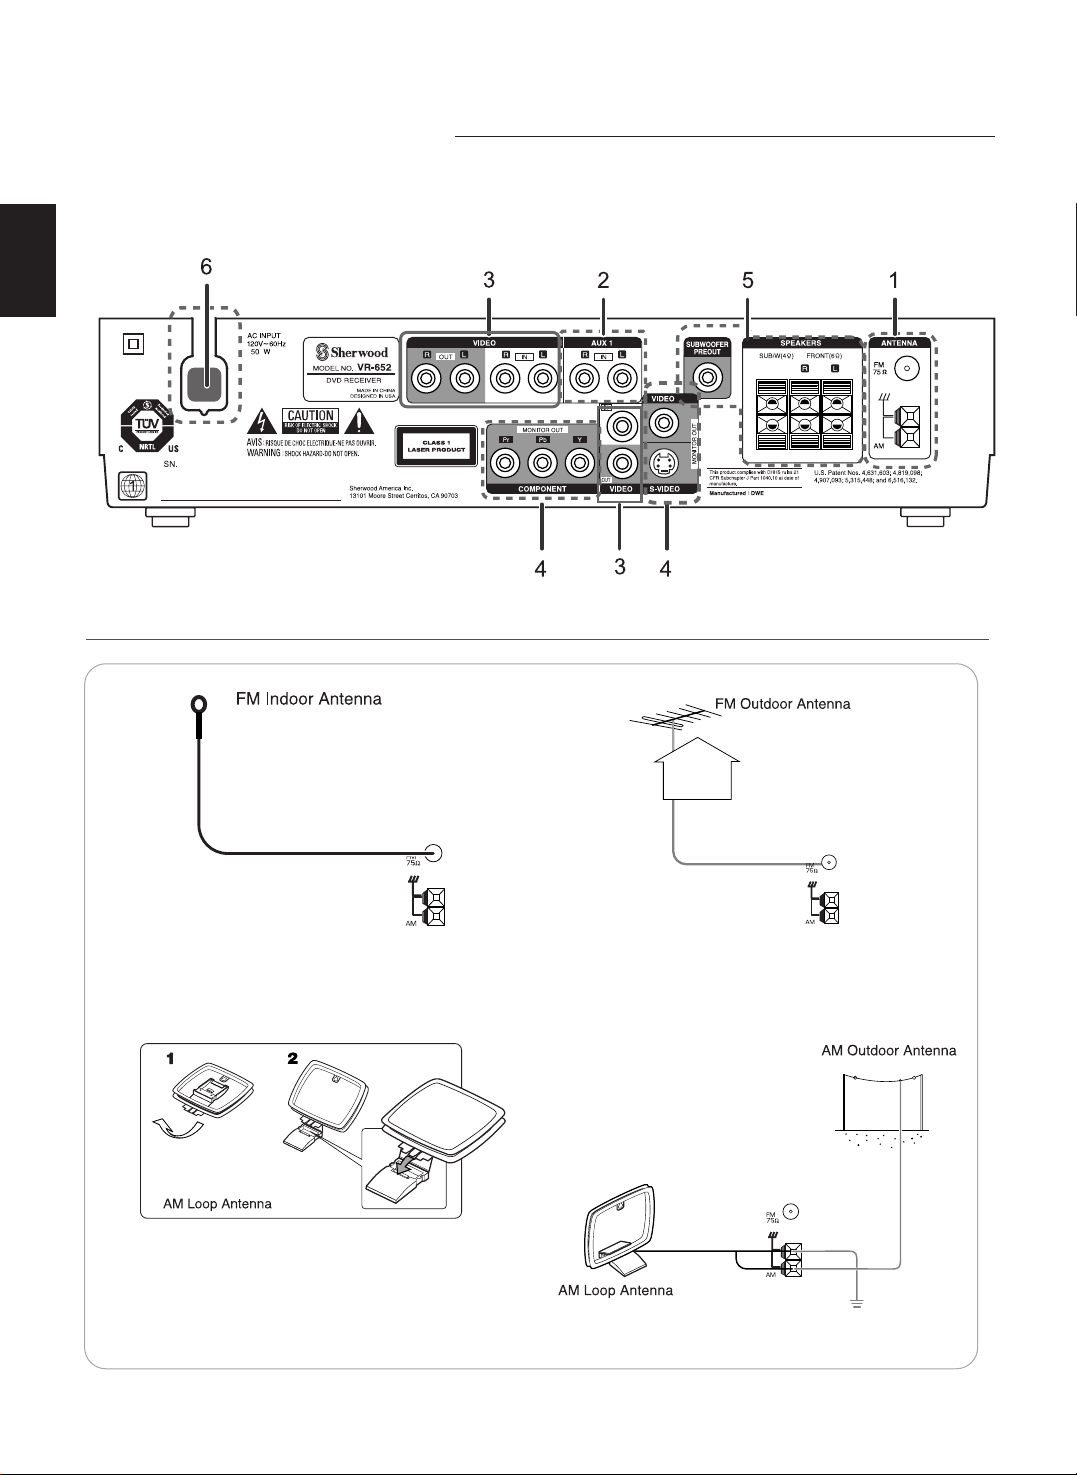
• Do not plug the AC input cord into the wall AC outlet until all connections are completed.
• Be sure to observe the color coding when connecting audio and video cords.
• Make connections firmly and correctly. If not, it can cause loss of sound, noise or damage to the unit.
• Change the position of the FM indoor antenna until you
get the best reception of your favorite FM stations.
• Place the AM loop antenna as far as possible from the
receiver, TV set, speaker cords and the AC input cord
and set it to a direction for the best reception.
• If the reception is poor with the AM loop antenna, an AM
outdoor antenna can be used in place of the AM loop
antenna.
• A 75Ω outdoor FM antenna may be used to further
improve the reception. Disconnect the indoor
antenna before replacing it with the outdoor one.
1.
CONNECTING ANTENNAS
Page 7
ENGLISH
7
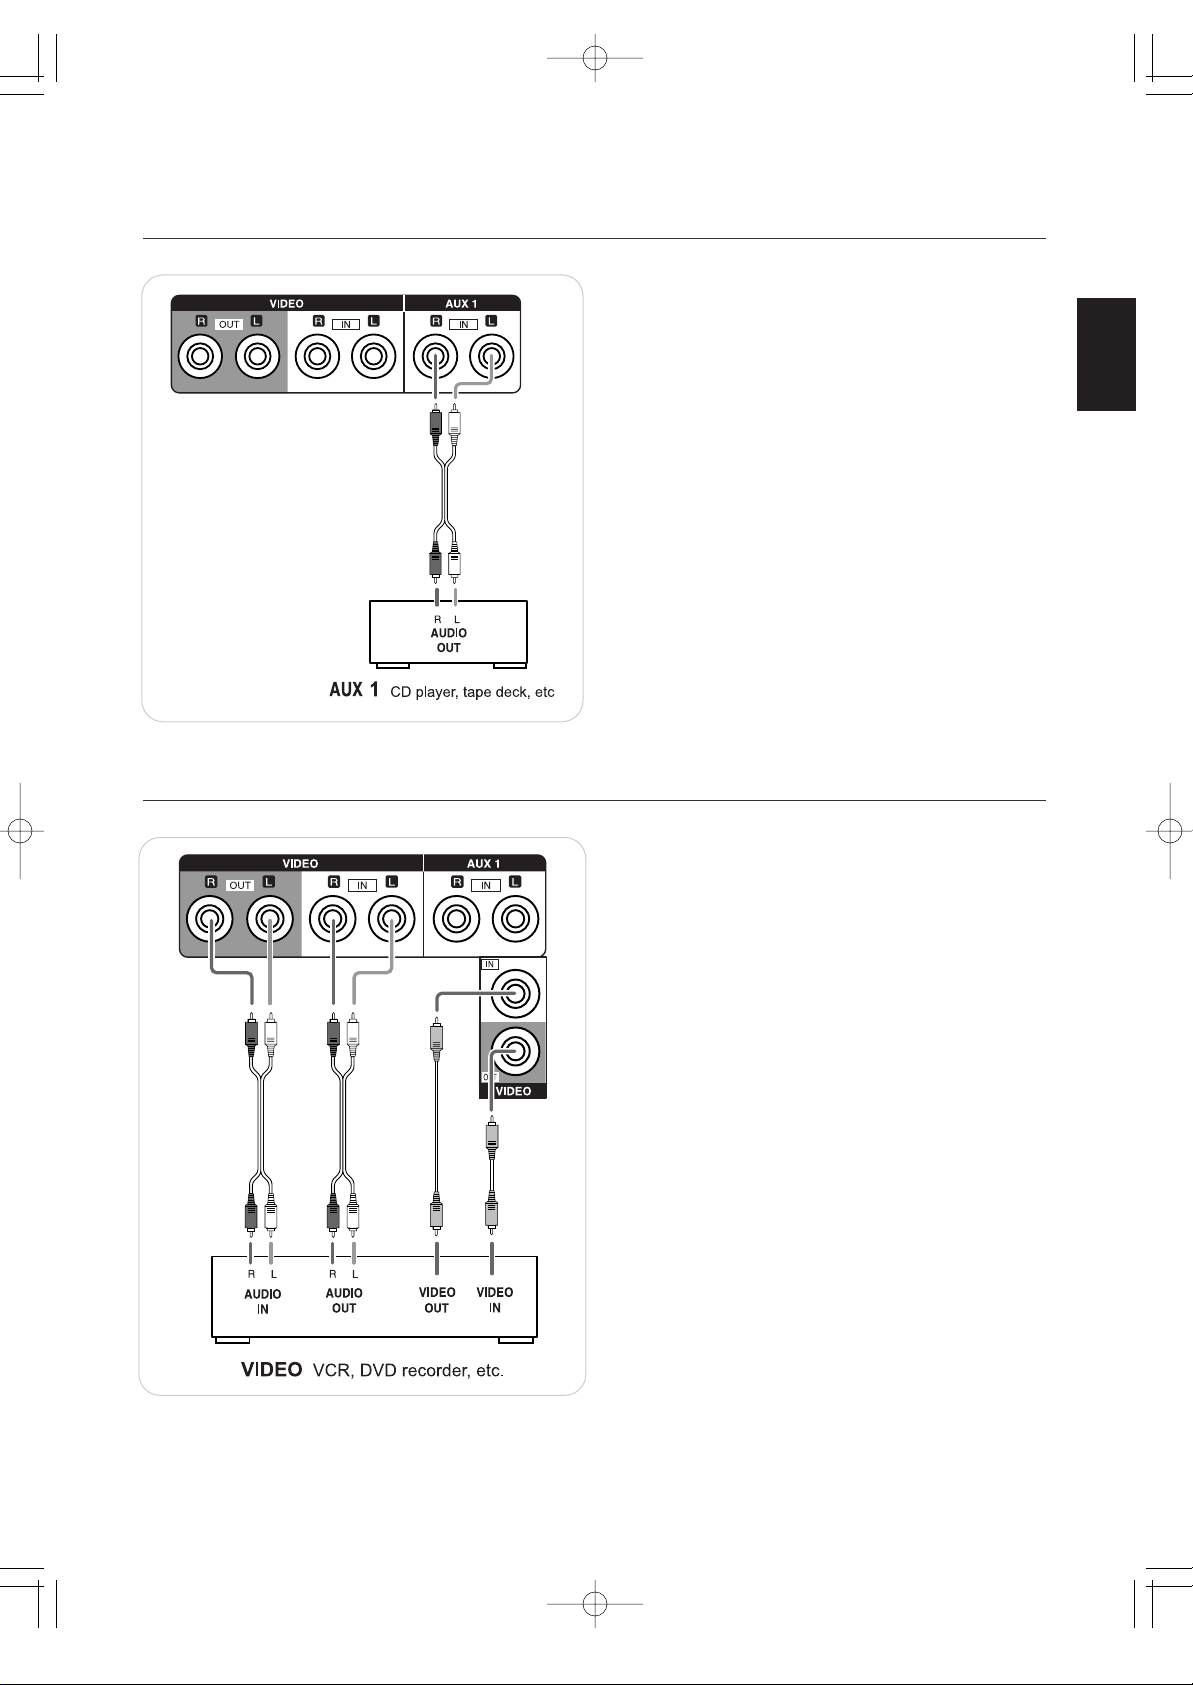
• The AUX 1 jacks can be connected to an audio
component such as a CD player, tape deck, etc.
2.CONNECTING AUDIO COMPONENT
• The analog audio IN/OUT jacks may also be
connected to audio recording equipment such as a
tape deck, an MD recorder, etc.
Note :
• Commercial DVD Video discs are copy-protected,
and any recordings made from these discs will be
distorted.
3.CONNECTING VIDEO COMPONENT
VR-652(A) 2008.3.6 5:32 PM 페이지 7
Page 8
8
YPbPr
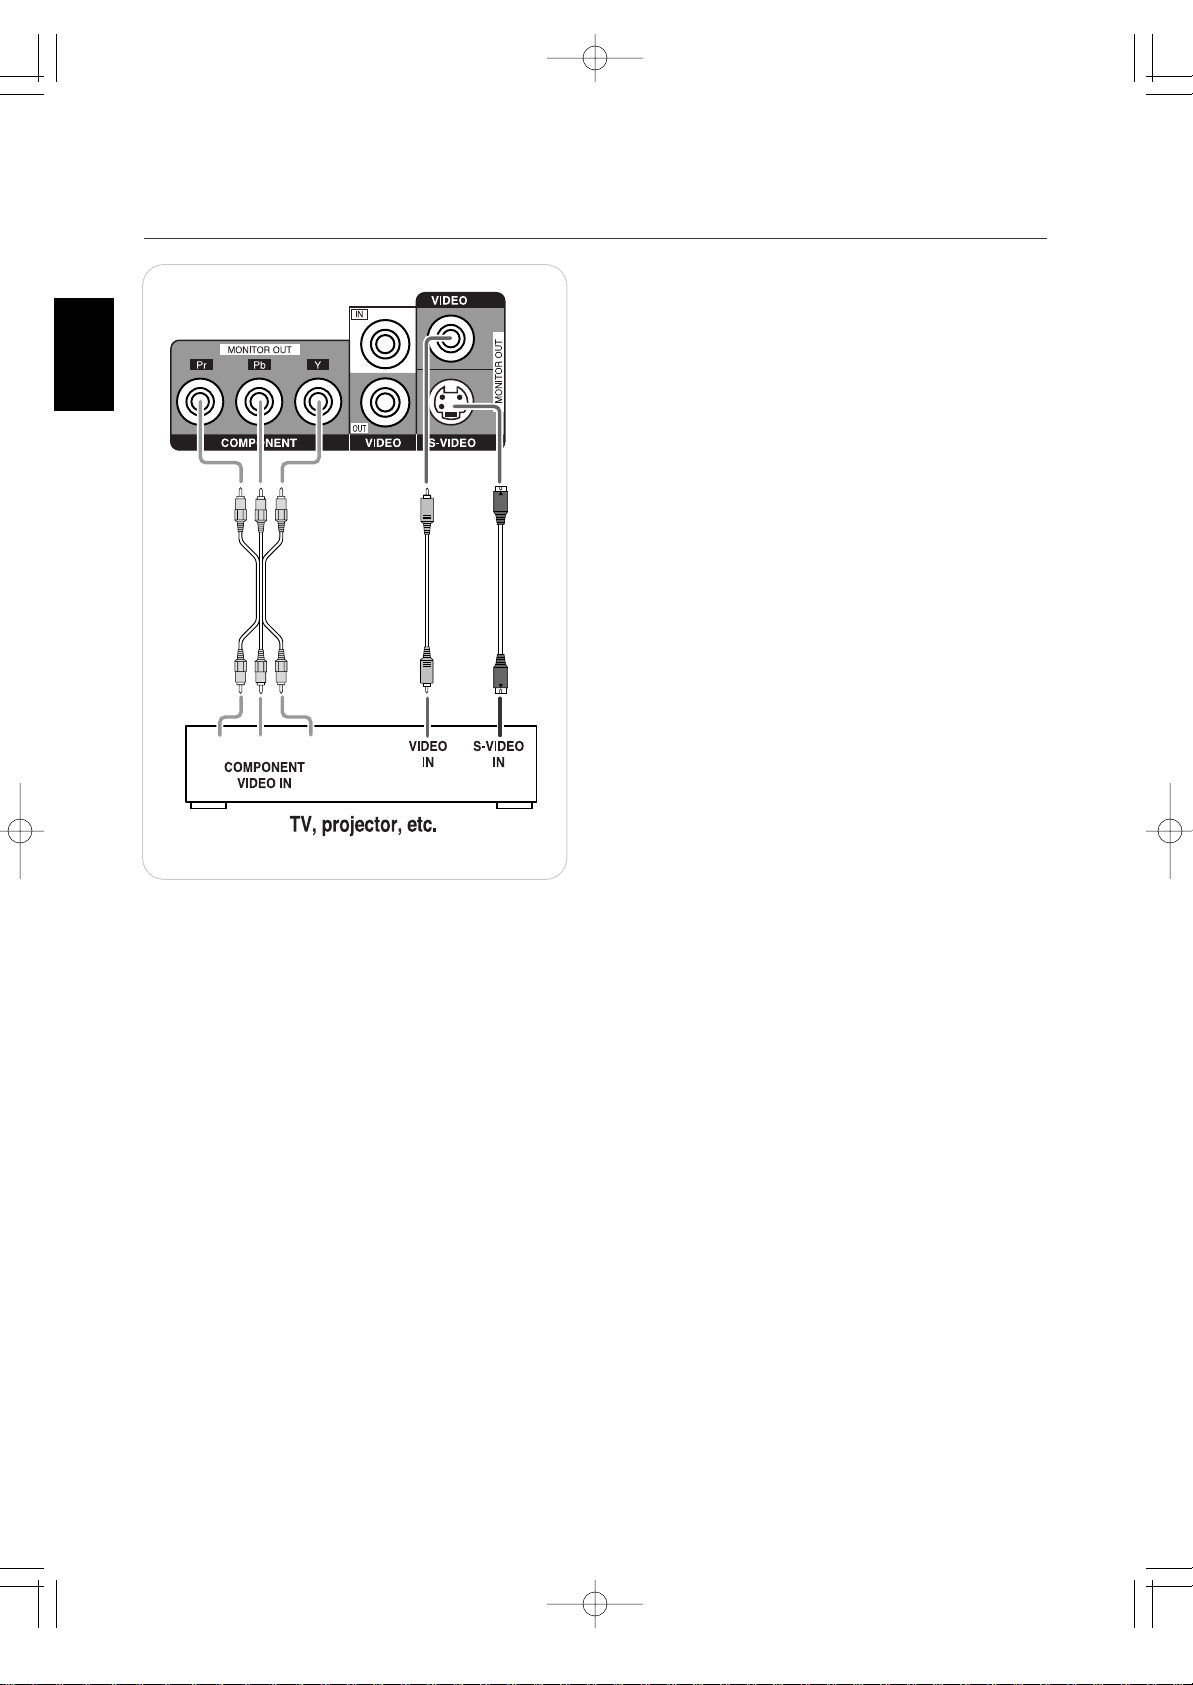
4.CONNECTING TV
• There are three types of MONITOR OUTs
(COMPONENT, S-VIDEO, ((composite) VIDEO).
Connect them to the corresponding video jacks of
your TV according to their capability.
• For your reference, the excellence in picture quality
is as follows :
"COMPONENT" > "S-VIDEO" > (composite)
"VIDEO").
• When making COMPONENT VIDEO connections,
connect "Y" to "Y", "P
b" to "P
b"(or "B-Y", "CB") and
"Pr" to "Pr"(or "R-Y", "CR").
• Depending on the type of the COMPONENT
VIDEO INs of your TV, be sure to set the SCAN
TYPE correctly. (Refer to "When selecting the
SCAN TYPE" on page 39.)
Notes :
• You don't need to make all kinds of video
connections between this unit and your TV.
• When you set the resolution to the mode other than
INTERLACED, the S-VIDEO and the (composite)
VIDEO MONITOR OUTs of this unit cannot output
the video signal, meaning the picture will not be
shown. (For details, refer to "When selecting the
SCAN TYPE" on page 39.)
• If the resolution of the video signals which are
output from the COMPONENT MONITOR OUTs
and your TV are not matched, the picture is not
clear, natural or displayed. In this case, change the
setting of the resolution to suit that of your TV.
• Do not connect the unit to the TV through a VCR.
Otherwise the picture may be disturbed due to the
copy protection function.
• CONSUMERS SHOULD NOTE THAT NOT ALL
HIGH DEFINITION TELEVISION SETS ARE
FULLY COMPATIBLE WITH THIS PRODUCT
AND MAY CAUSE ARTIFACTS TO BE
DISPLAYED IN THE PICTURE. IN CASE OF 525
OR 625 PROGRESSIVE SCAN PICTURE
PROBLEMS, IT IS RECOMMENDED THAT THE
USER SWITCH THE CONNECTION TO THE
"STANDARD DEFINITION" OUTPUT. IF THERE
ARE QUESTIONS REGARDING OUR TV SET
COMPATIBILITY WITH THIS MODEL 525p AND
625p DVD PLAYER, PLEASE CONTACT OUR
CUSTOMER SERVICE CENTER.
ENGLISH
VR-652(A) 2008.3.6 5:32 PM 페이지 8
Page 9
9
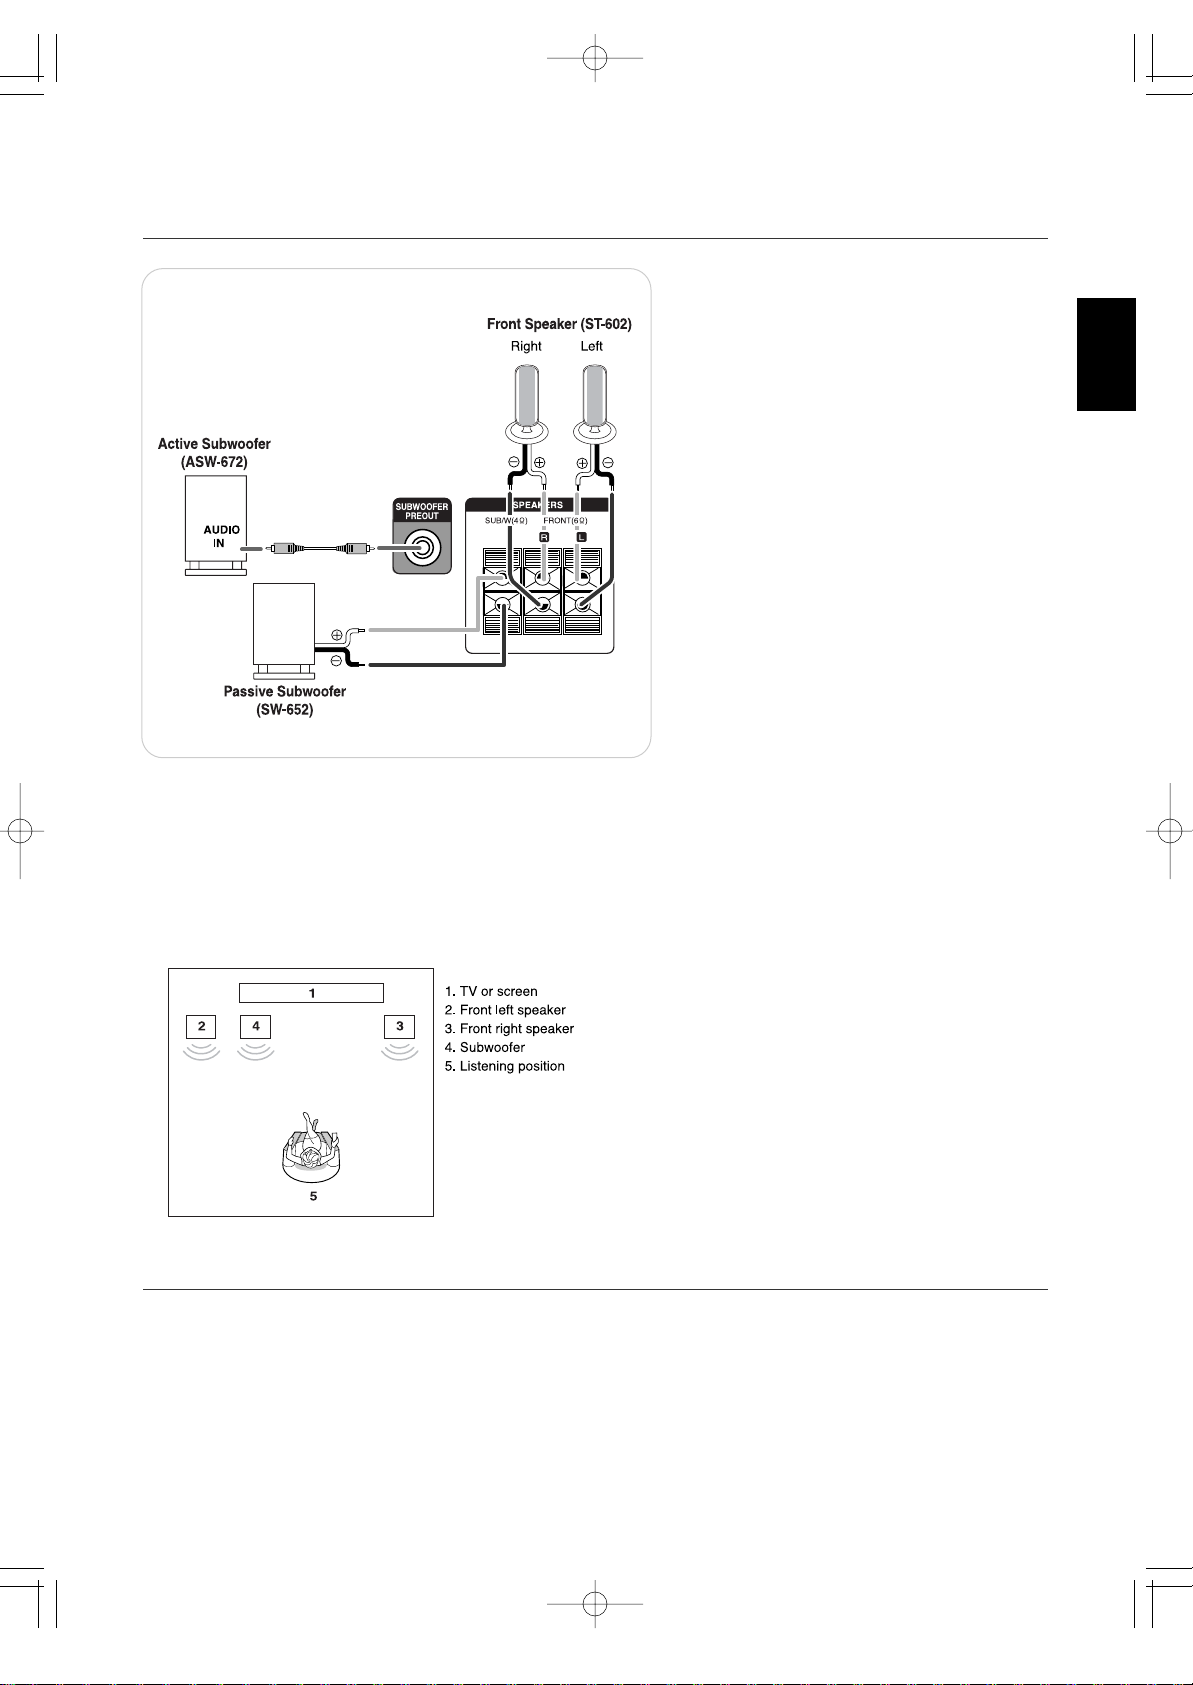
SPEAKER PLACEMENT
Place the speakers as follows :
• Front speakers: Place the front speakers with their
front surfaces as flush with TV or
monitor screen as possible.
• Subwoofer: Place the subwoofer any where in the
front as desired because the low
frequencies it reproduces are nondirectional.
or
5.CONNECTING SPEAKERS
Plug this cord into a wall AC outlet.
6.AC INPUT CORD
• Be sure to connect speakers firmly and
correctly according to the channel (left and
right) and the polarity (+ and -).
If the connections are faulty, no sound will
be heard from the speakers, and if the
polarity of the speaker connection is
incorrect, the sound will be unnatural and
lack bass.
• Depending on the type of your subwoofer,
connect it as follows.
• Connect the SUBWOOFER PREOUT jack
to the active (powered) subwoofer. (For
details on the operation of the subwoofer,
refer to "Operating instructions of your
active subwoofer" )
• Connect the SUBWOOFER terminals to the
passive subwoofer.(For details on the
operation of the subwoofer, refer to
"Operating instructions of your passive
subwoofer" )
Caution :
• Be sure to use the front speakers with the
impedance of 6 ohms or above and the
passive subwoofer with the impedance of 4
ohms or above.
• Do not let the bare speaker wires touch
each other or any metal part of this unit.
This could damage this unit and/or the
speakers
ENGLISH
VR-652(A) 2008.3.6 5:32 PM 페이지 9
Page 10
ENGLISH
10
Controls & DIsplays
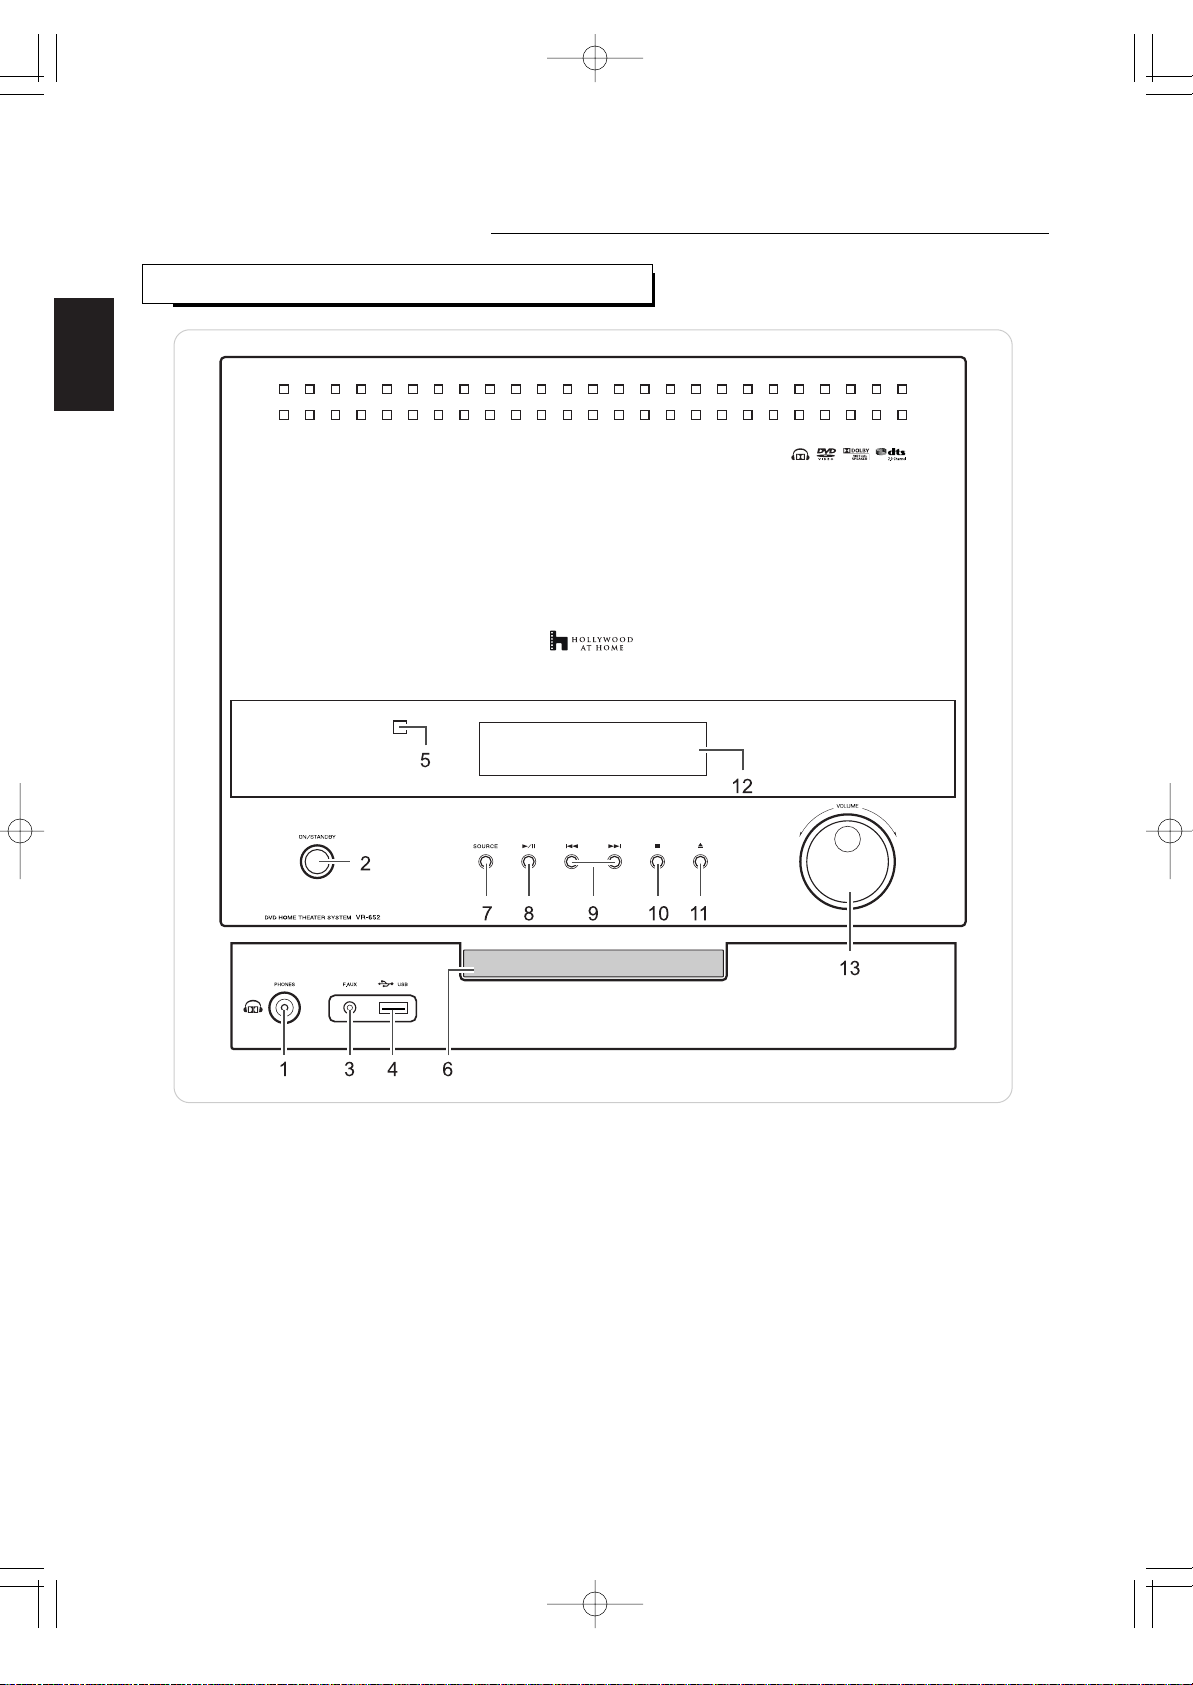
1. PHONES jack
2. POWER ON/STANDBY button/indicator
3. FRONT AUX jack
For details, see next page.
4. USB connector
For details, see next page.
5. REMOTE SENSOR
6. DISC TRAY
7. SOURCE SELECT button
8. PLAY/PAUSE(▶/
) button
9. PRESET TUNING UP/DOWN,
FORWARD/BACKWARD SKIP(▶▶
/
◀◀) buttons
10. STOP() button
11. OPEN/CLOSE(
▲
) button
12. FLUORESCENT DISPLAY
• For details, see next page.
13. VOLUME CONTROL knob
FRONT PANEL CONTROLS
VR-652(A) 2008.3.6 5:32 PM 페이지 10
Page 11
ENGLISH
11
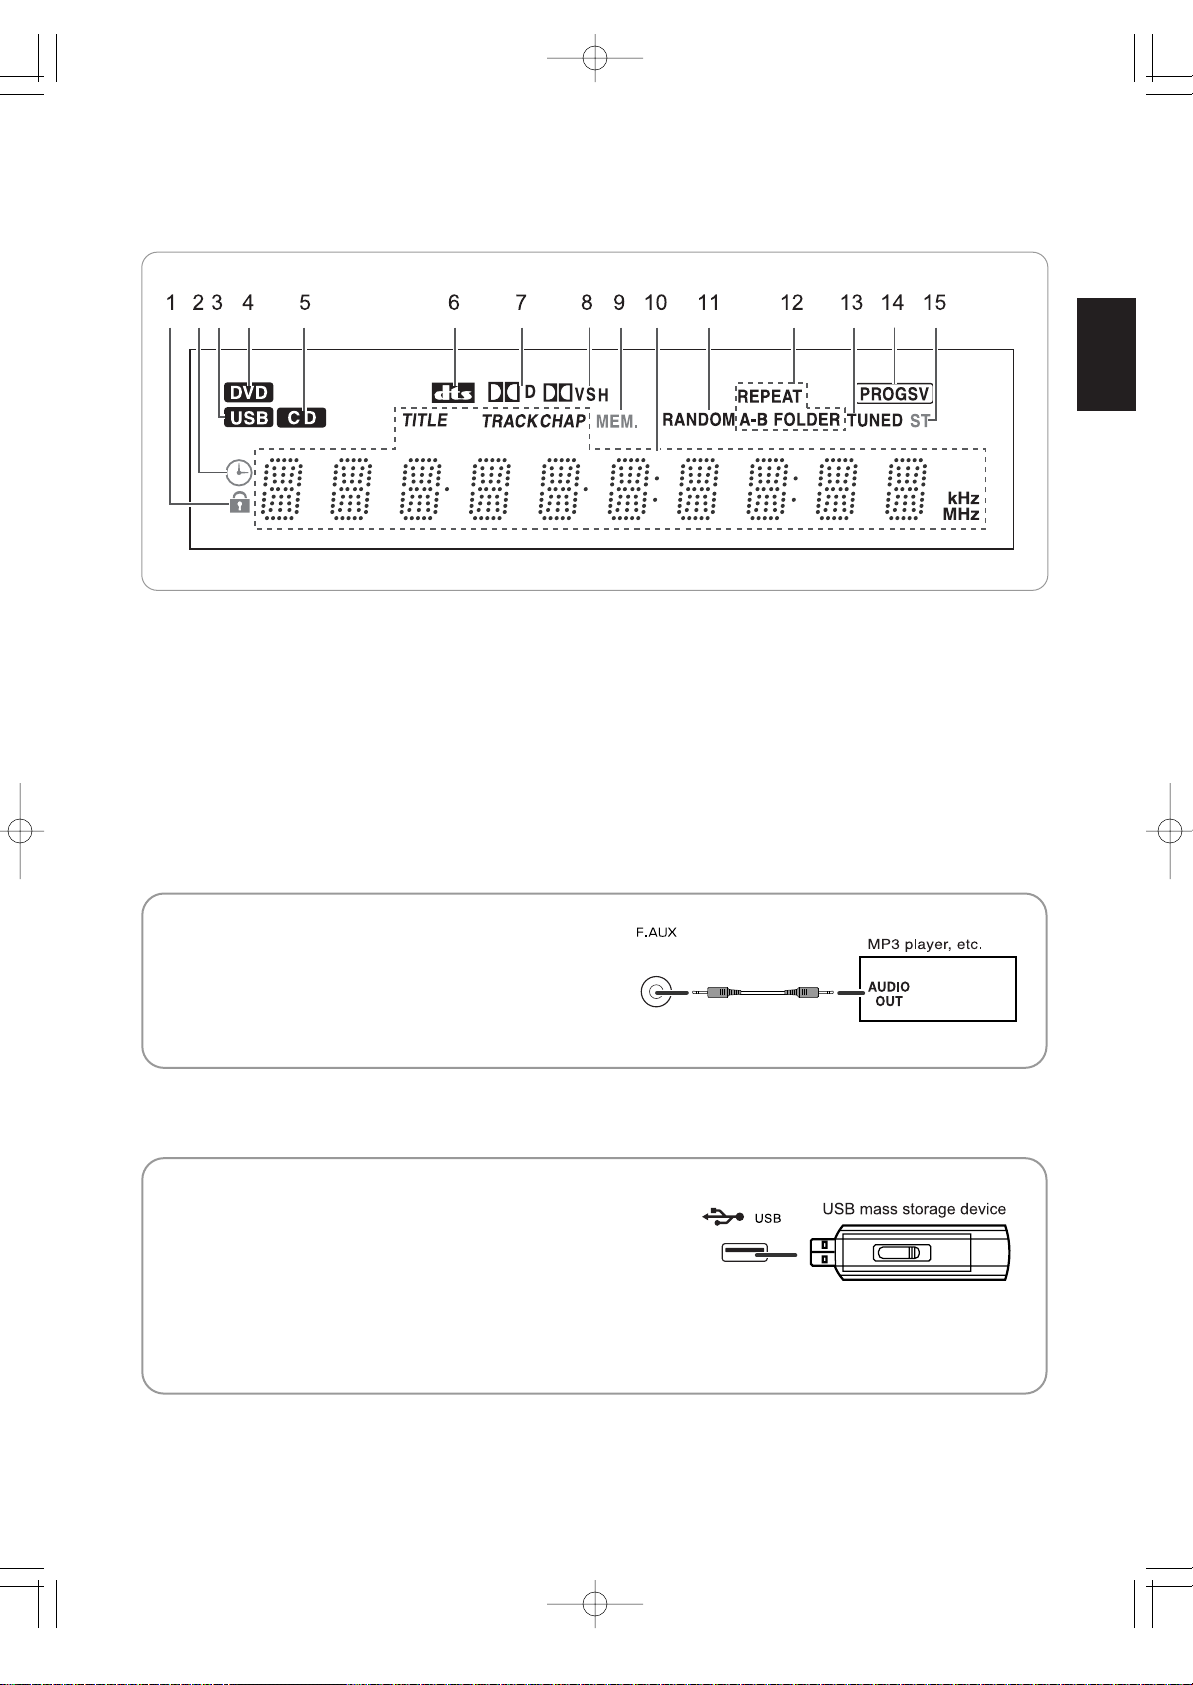
FLUORESCENT DISPLAY
1. PARENTAL CONTROL indicator
2. TIMER indicator
3. USB indicator
4. DVD indicator
5. CD indicator
6. DTS SIGNAL indicator
7. DOLBY DIGITAL SIGNAL indicator
8. SURROUND MODE indicators
9. MEMORY indicator
10. MULTI-INFORMATION display
11. RANDOM PLAY indicator
12. REPEAT indicators
13. TUNED indicator
14. PROGRESSIVE indicator
15. STEREO indicator
• The FRONT AUX jack can be connected to an
additional audio component such as an MP3 player,
etc.
Note :
• When connecting this jack to an MP3 player, etc., you
should use the stereo mini cord, not a mono mini cord.
FRONT AUX JACK
• The USB connector can be connected to a USB mass
storage device directly to enjoy MP3, WMA or JPEG
files stored on it through this unit.
(For details on the operation of USB device, refer to
"To play files from USB mass storage device" on
page 23.)
Note :
• After USB playback, remove the USB device in the stop
mode or the standby mode.
USB CONNECTOR
VR-652(A) 2008.3.6 5:32 PM 페이지 11
Page 12
ENGLISH
12
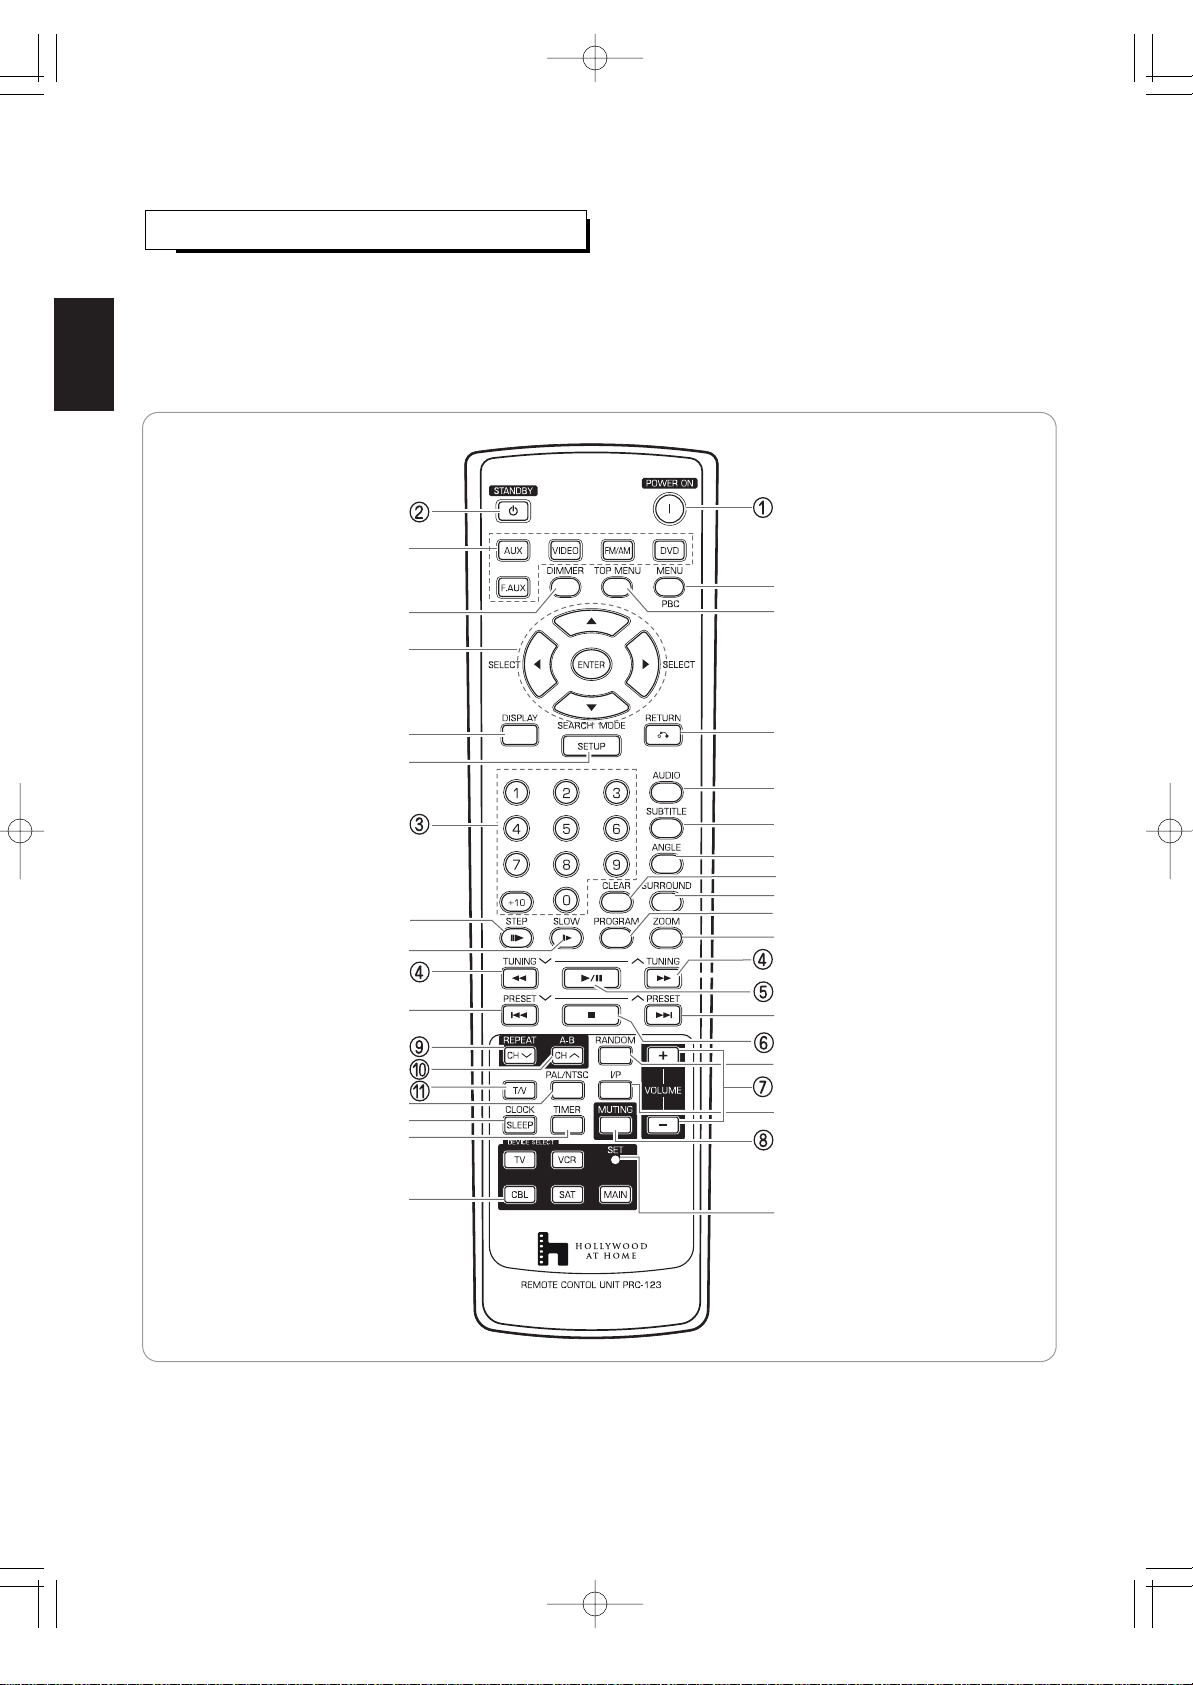
UNIVERSAL REMOTE CONTROLS
This universal remote control can operate not only this unit but also most popular brands of video components such as TVs,
VCRs, cable boxes, satellite receivers, etc.
• To operate 4 components other than this unit, you should enter the setup code for each component.
(For details, refer to "ENTERING A SETUP CODE" on page 13.)
• The numbered buttons on the remote control have different functions in other device modes.
For details, refer to "FUNCTION TABLE of the NUMBERED BUTTONS" on the next page.
Note :
• On the remote control, the PBC button is not available for this unit.
STANDBY button
DIMMER button
MENU button
TOP MENU button
CURSOR CONTROL(▲/▼/◀/▶),
ENTER buttons
DISPLAY button
POWER ON button
FUNCTION SELECT buttons
NUMERIC(0~9, +10) buttons
REPEAT button
STOP() button
REPEAT A-B button
PRESET TUNING DOWN(∨),
BACKWARD SKIP(
◀◀) button
PLAY/PAUSE(▶/
) button
TUNING DOWN(∨), BACKWARD
SEARCH(◀◀) button
PROGRAM button
ZOOM button
SLOW(
▶) button
STEP(
▶) button
CLEAR button
AUDIO button
RETURN button
SUBTITLE button
SETUP button
ANGLE button
VOLUME UP/DOWN(+/-) buttons
PAL/NTSC button
TIMER button
RANDOM PLAY button
CLOCK/SLEEP button
INTERLACED/PROGRESSIVE button
MUTING button
PRESET TUNING UP(∧),
FORWARD SKIP(▶▶
) button
TUNING UP(∧), FORWARD
SEARCH(▶▶) button
SET LED
DEVICE buttons
To operate the desired component with
this remote control, first select the
corresponding DEVICE button.
SURROUND MODE button
VR-652(A) 2008.3.6 5:32 PM 페이지 12
Page 13
ENGLISH
13
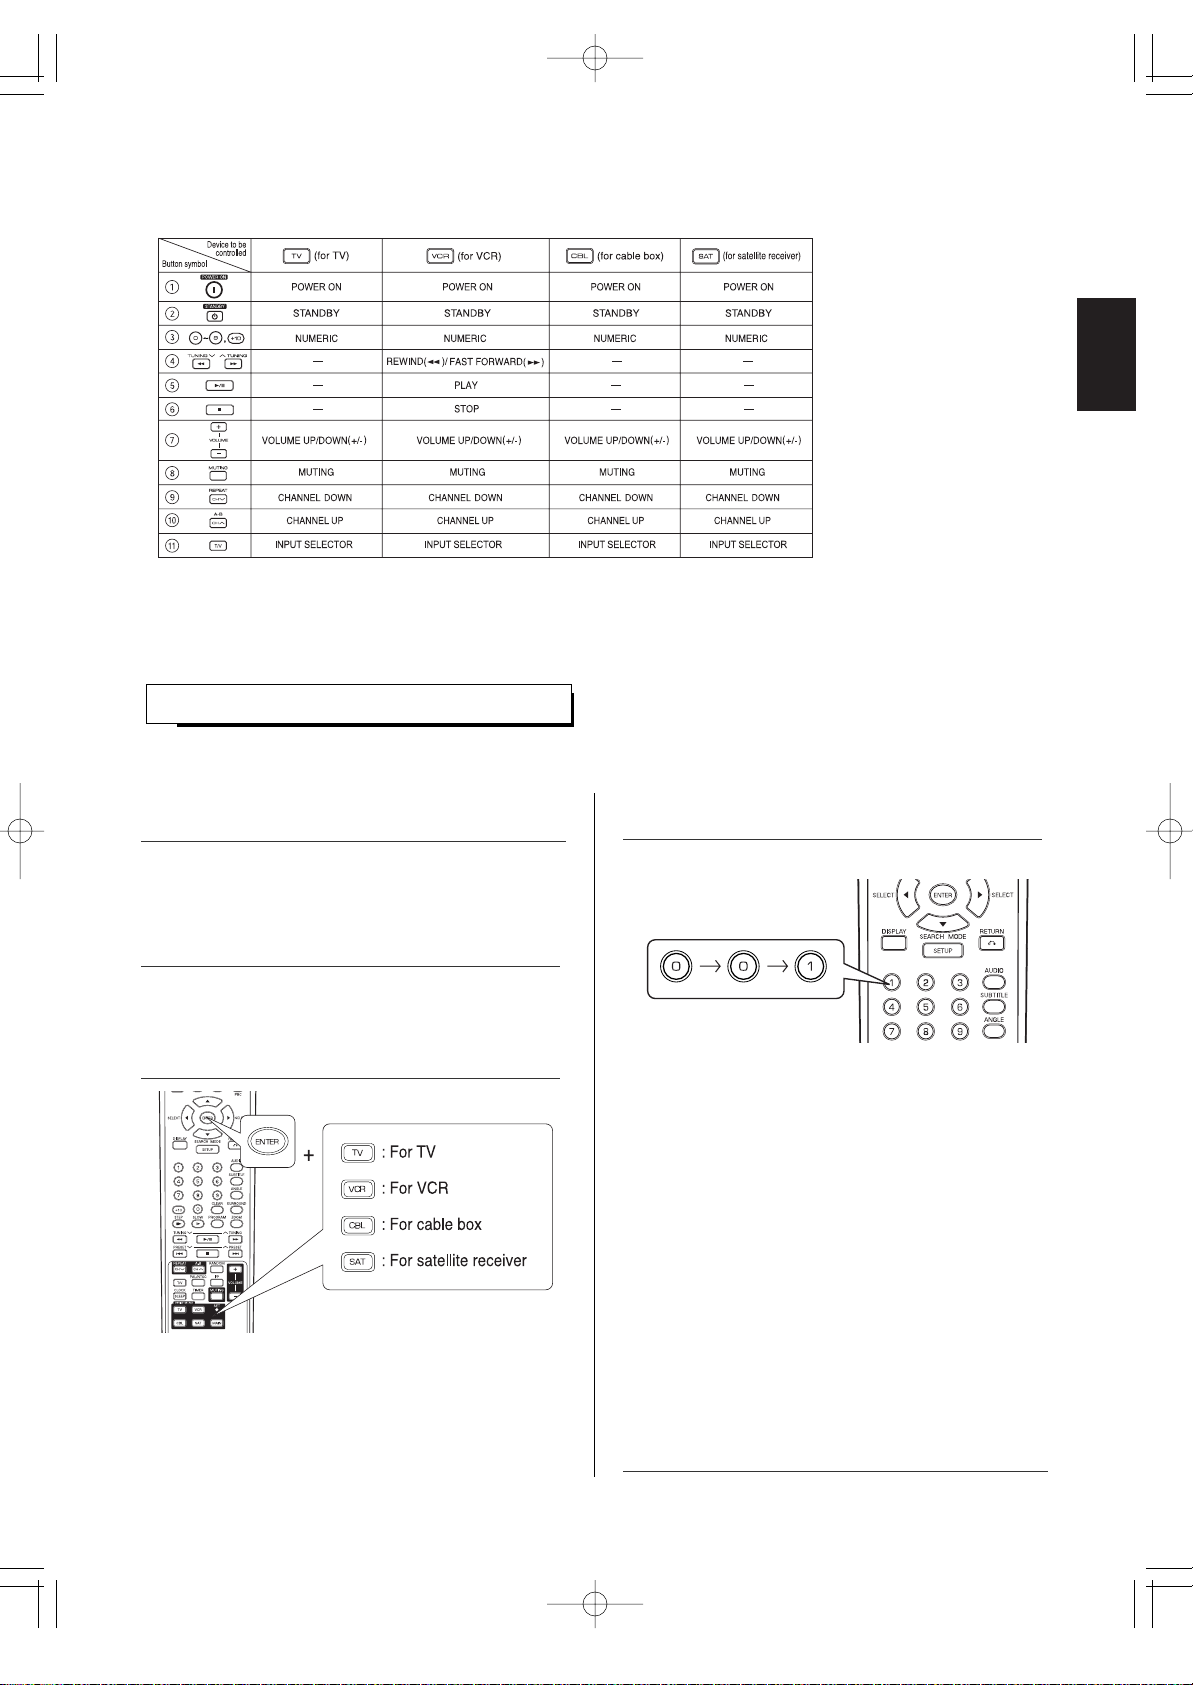
FUNCTION TABLE of the NUMBERED BUTTONS
• This remote control can control up to 4 different components.
• Before operating video components other than this unit with using this remote control, the setup code for each component
should be entered.
ENTERING A SETUP CODE
• The SET LED will flicker once.
Note :
• The MAIN button is unavailable for the components other
than this unit.
• If entering is performed successfully, the SET LED will
flicker twice.
• To be sure that the setup code is correct, press the
POWER ON(or STANDBY) button, aiming the remote
control at the remote sensor on the component. If your
component is turned off, the setup code is correct.
• When your component is not turned off, repeat the above
steps 2 to 4, trying each code for your component until
you find one that works.
Notes :
• If the SET LED did not flicker twice, then repeat the above
steps 3 to 4 and try entering the same code again.
• Manufacturers may use different setup codes for the
same product category. For that reason, it is important
that you check to see if the code you have entered
operates as many controls as possible. If only a few
functions operate, check to see if another code will work
with more buttons.
Notes :
• Some functions for each component may not be available or may work differently.
• Depending on other kinds of components that are available for each DEVICE button, some functions may not be available
or may work differently, too.
• For details about functions, refer to the operating instructions of each component.
1. Turn on the component you want to control.
5. Repeat the above steps 1 to 4 for each of your
components.
2. Find the setup code according to the type and
the brand name of your component, referring to
"Setup Code Table" on page 57.
4. Enter a 3 digit code.
3. Press and hold down both the ENTER button
and the DEVICE button you want for more than
1 second.
Example) When entering "001".
VR-652(A) 2008.3.6 5:32 PM 페이지 13
Page 14
ENGLISH
14
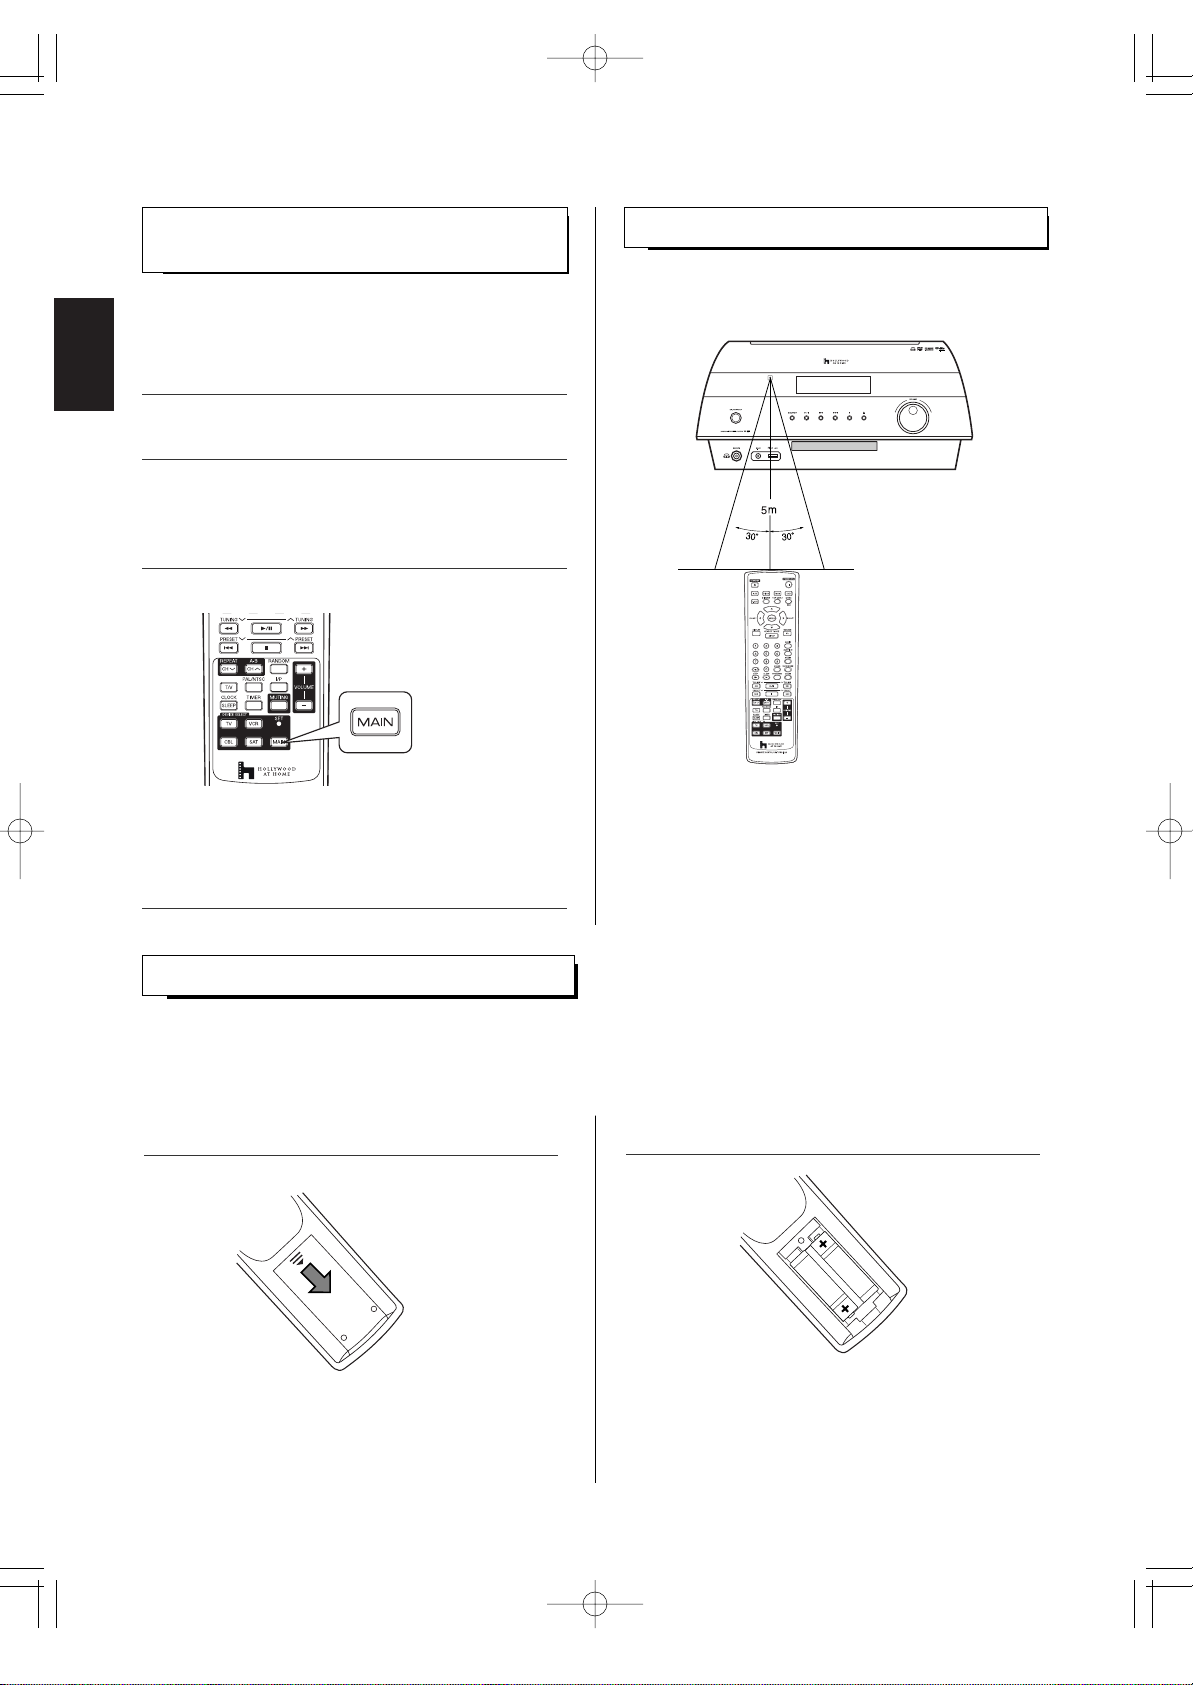
• Use the remote control unit within a range of about 5
meters (16 feet) and angles of up to 30 degrees aiming
at the remote sensor.
REMOTE CONTROL OPERA TION RANGE
OPERATING COMPONENTS WITH REMOTE
CONTROL
Example) When selecting "MAIN" to operate this unit.
1. Enter the setup code for each component other
than this unit you wish to control. (For details,
refer to "ENTERING A SETUP CODE" on page
13.)
2. Turn on the component you want to operate.
3. Press the DEVICE button on the remote control
corresponding to the component you wish to
operate.
4. Aim the remote control at the REMOTE
SENSOR of the component you wish to control
and press the button corresponding to the
operation you want.
LOADING BATTERIES
• Remove the batteries when they are not used for a
long time.
• Do not use the rechargeable batteries(Ni-Cd type).
• Be sure to use alkaline batteries.
• When the remote control does not operate, the old batteries should be replaced. In this case, load new batteries within
several minutes after removing old batteries.
• If the batteries are removed or have been exhausted for a longer period of time, memorized contents will be cleared.
Should this happen, you should memorize them again.
1. Remove the cover. 2. Load two batteries ("AAA" size) matching the polarity.
Note :
• Remote operation may become unreliable if the remote
sensor is exposed to strong light such as direct sunlight
or inverted fluorescent.
VR-652(A) 2008.3.6 5:32 PM 페이지 14
Page 15
ENGLISH
15
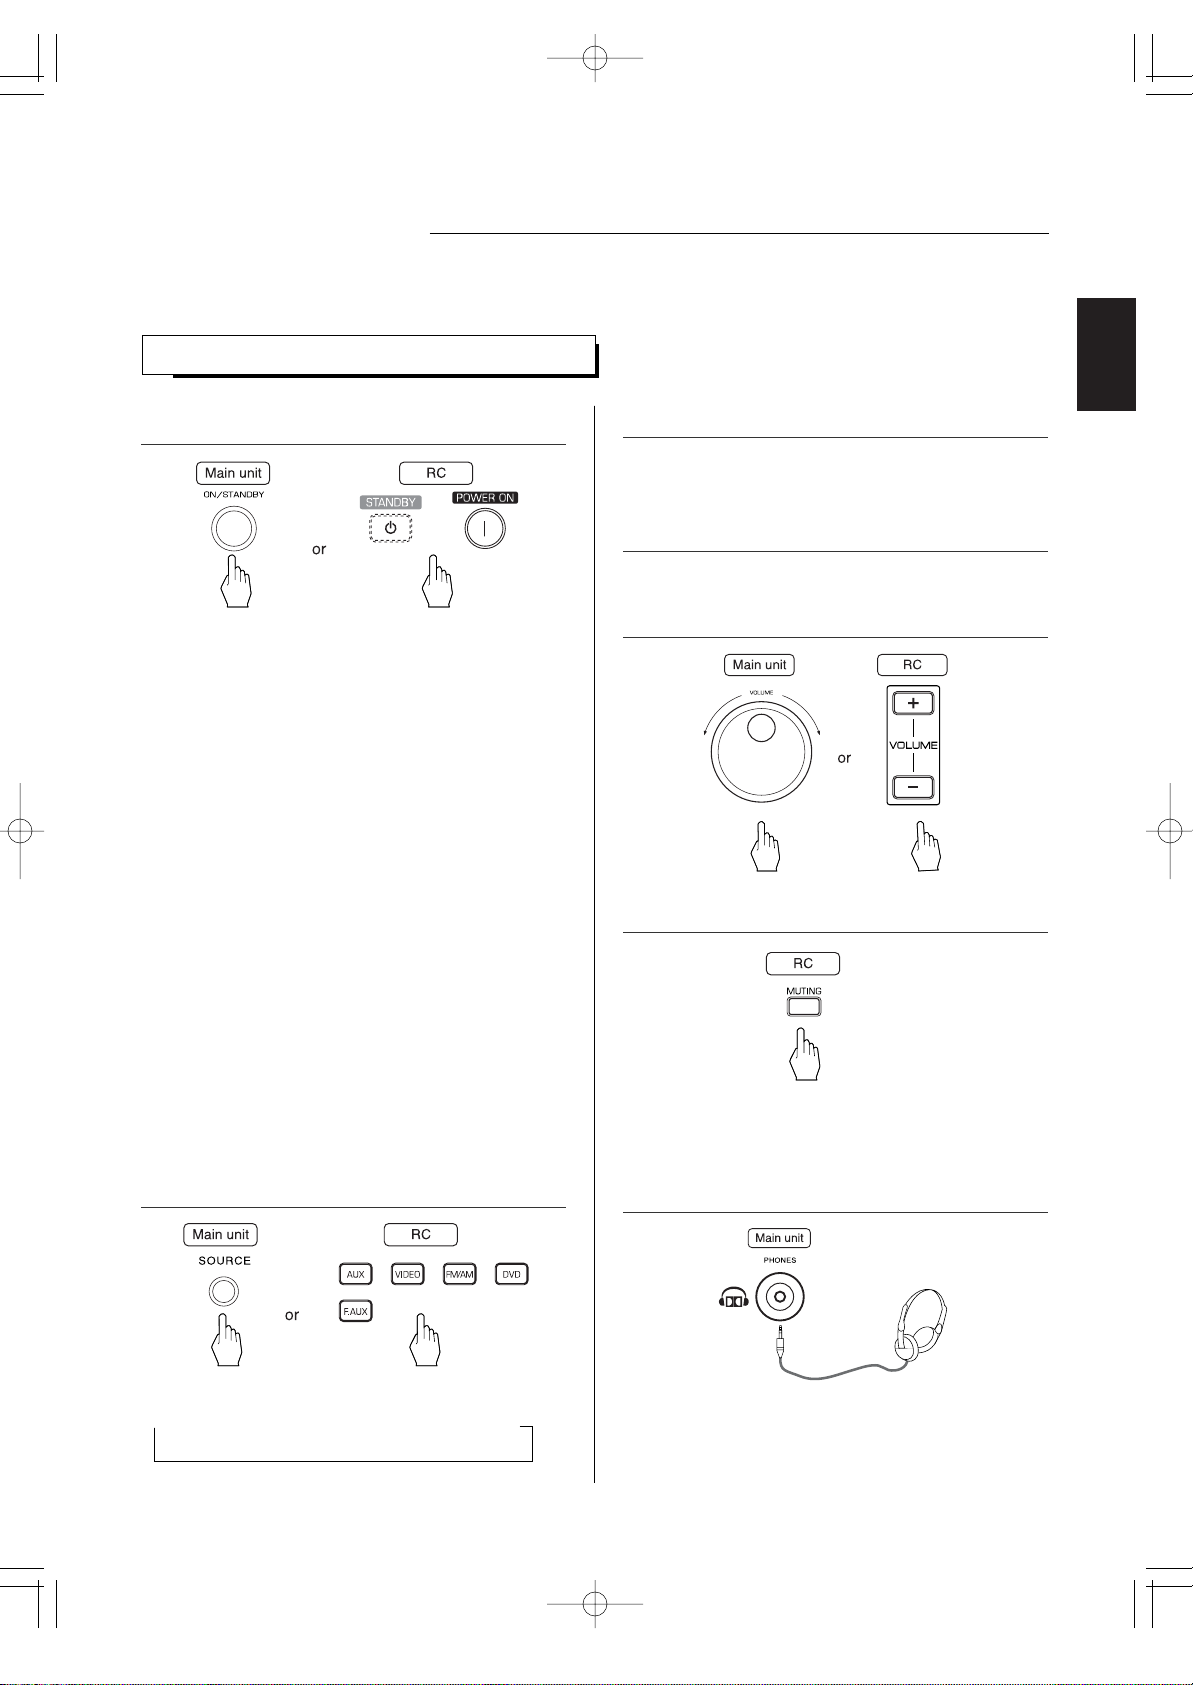
1. Turn the power on.
4. Operate the selected component for playback.
5. Adjust the(overall) volume to a comfortable
listening level.
6. To mute the sound.
7. To listen with the headphones.
3. Turn on the source component for playback.
2. Select the desired input source.
LISTENING TO A PROGRAM SOURCE
Basic Operation
Before operation
• Before operating this unit with the supplied remote control, refer to "UNIVERSAL REMOTE CONTROLS" on page 12 for details
about operation.
• Each time the POWER ON/STANDBY button is pressed,
the unit is turned on to enter the operating mode(the
POWER ON/STANDBY indicator lights up blue) or off to
enter the standby mode(the POWER ON/ STANDBY
indicator lights up amber).
• On the remote control, press the POWER ON button to
enter the operating mode or press the STANDBY button
to enter the standby mode.
• In the standby mode, if the SOURCE SELECT,
PLAY/PAUSE (▶/
) or OPEN/CLOSE(
▲
) button is
pressed, the unit can be also turned on.
Standby mode
This means that the unit is not disconnected from the AC
mains and a small amount of current is retained to support
the operation readiness.
Setting the power off mode
You can set the power off mode to either the standby
mode or the power saving mode and can save energy
more in the power saving mode than in the standby mode.
• Depending on whether the STANDBY button on the
remote control for more than 2 seconds either in the
standby mode or in the power saving mode, it is set to
the power saving mode(time display is turned off) or the
standby mode.
Note
• Depending on the power off mode setting, when the
power is turned off, it enters the mode you set.
• In case of connecting the active subwoofer, turn on the
active subwoofer.
• Each time the SOURCE SELECT button on the front
panel, the input source changes as follows :
FM AM AUX F. AUX VIDEO DVD
(frequency display)
• "MUTING" flickers.
• To resume the pervious sound level, press the
MUTING button again.
• Then the sound from the speakers is cut off.
Note
Be careful not to set the volume too high when using
headphones.
VR-652(A) 2008.3.6 5:32 PM 페이지 15
Page 16

ENGLISH
16
• While playing the selected input source
Selecting a surround mode
• The volume level of each channel can be adjusted as desired.
Adjusting the channel level(/setting the FM mode)
• Each time this button is pressed, the surround mode
changes as follows :
(Dolby VS REF Dolby VS WIDE) or <DOLBY HP>
STEREO
( ) : Possible only when listening via the speakers.
< > : Possible only when listening via the headphones.
Surround modes
• Dolby Virtual Speaker
This mode creates a virtual surround sound field using as few as two front speakers and subwoofer, allowing you to
experience listening from 5.1 channel speakers.
* Dolby Virtual Speaker Reference("Dolby VS REF")
The width of the front sound image is defined by the actual distance between front speakers.
* Dolby Virtual Speaker Wide("Dolby VS WIDE")
The width of the front sound image seems to extend beyond the front speakers.
• Dolby Headphone("DOLBY HP")
This mode simulates 5.1 channel surround sound, which allows you to enjoy 5.1 channel surround sound through 2 channel
headphones, just like listening from 5.1 channel speakers.
• Dolby Virtual Speaker and Dolby Headphone modes are effective not only for 5.1 channel sources but also for stereo (2
channel) sources.
8. Press and hold down the SETUP button for
more than 2 seconds.
10. Adjust the level of the selected channel or set
the FM mode as desired.
11. Repeat the above steps 9 and 10 to adjust
each channel level.
• Then "Lch" is displayed for several seconds.
• When the mode display ("Lch", etc.) disappears, press
the button again.
• The channel levels can be adjusted within the range
of -10 ~ +10 dB.
• In general, we recommend the level to be adjusted to
0 dB.
• The FM mode can be set to FM STEREO or FM
MONO.
• When FM stereo broadcasts are poor because of
weak broadcast signals, set it to FM MONO mode to
reduce the noise, then FM broadcasts are reproduced
in monaural sound.
9. While displaying "Lch", press the ENTER button
to select the desired mode.
• Each time this button is pressed, the mode is selected
as follows :
Lch Rch SW ( FM STEREO)
( ) : Possible only when listening to FM broadcasts.
VR-652(A) 2008.3.6 5:32 PM 페이지 16
Page 17
ENGLISH
SYMBOL ABOUT INVALID OPERATION
• When you press a button, if the unit does not accept its
operation, appears on the TV screen.
Operations are occasionally unacceptable even if is
not displayed.
※Invalid operation may occur as expected if :
• The region code number of the unit is different from that
of the DVD Video and playback will not be allowed.
• The rating level function works.
(For details, refer to "When selecting the PARENTAL
CONTROL" on page 42.)
• A disc is not playable or uses features that are not
supported by this unit.
17
• Please check the copyright laws in your country to
record from DVD Video, Audio CD, MP3, WMA and
JPEG discs, etc. Recording of copyrighted material may
infringe copyright laws.
• Commercial DVD Video discs are copy-protected, and
any recordings made from these discs will be distorted.
• This product incorporates copyright protection
technology that is protected by U.S. patents and other
intellectual property rights. Use of this copyright
protection technology must be authorized by
Macrovision, and is intended for home and other limited
viewing uses only unless otherwise authorized by
Macrovision. Reverse engineering or disassembly is
prohibited.
Operation of DVD player
PRELIMINARY KNOWLEDGE ABOUT DISCS
Notes on copyright
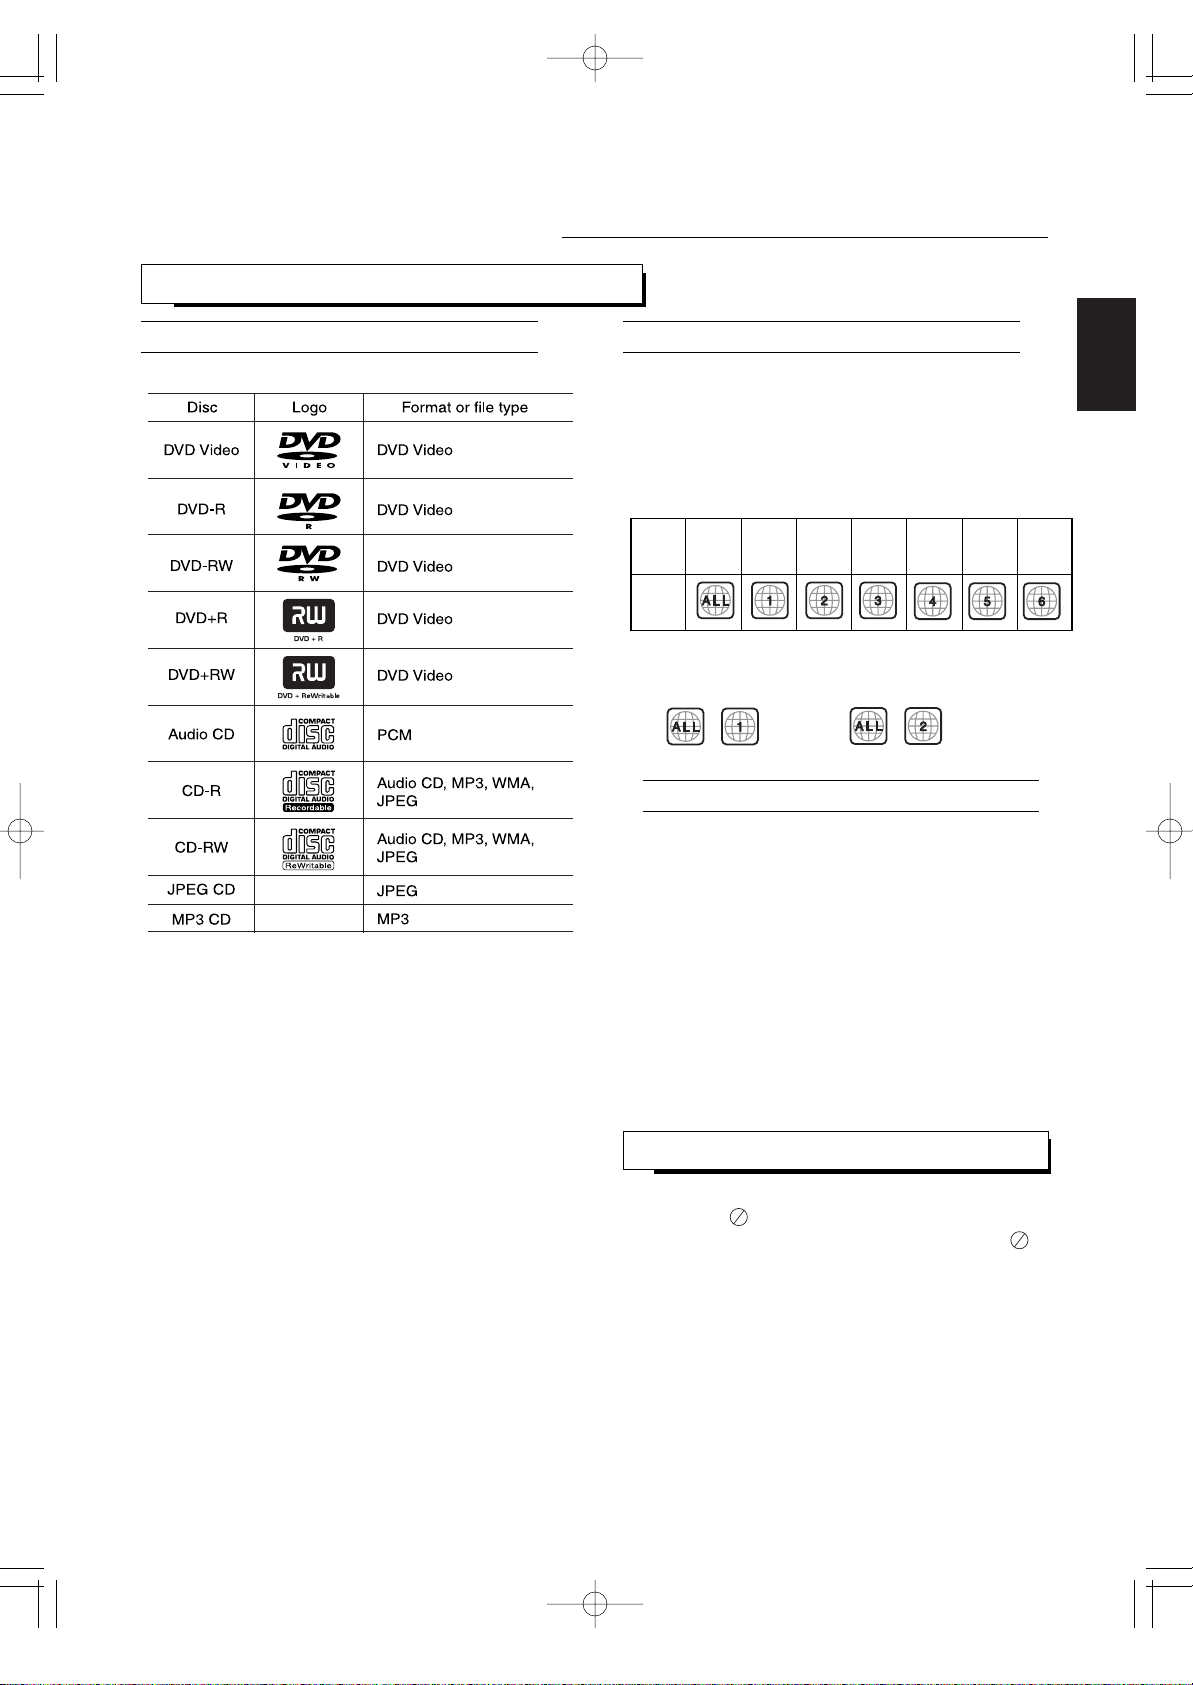
Playable disc types Region code
This unit supports the following discs.
• This unit supports CD-R and CD-RW discs recorded in
audio CD format or MP3/WMA/JPEG in accordance with
the ISO9660 format. It also supports DVD-R, DVD-RW,
DVD+R and DVD+RW discs recorded in DVD Video
format.
Unplayable discs
• Since this unit cannot support disc types, formats and file
types not listed above, do not play such discs.
• Some DVD+RWs/DVD+Rs, DVD-RWs/DVD-Rs or CDRs/CD-RWs cannot be played due to incomplete disc
finalization, recording quality or physical condition of the
disc, characteristics of recording device or authoring
software, etc.
See the operating instructions supplied with your recording
device for more information.
Color system format
• Depending on the countries, this unit conforms to either
the NTSC color system for U.S.A, Canada, etc. or the PAL
for Europe, Australia, China, etc.
• DVD players and DVD Videos have their own Region
Code numbers which are assigned to each country or
area as shown below. DVD players are set to your
Region Code number at the factory. As a result, if the
region code number of this DVD player is different from
that of the DVD Video, playback of the DVD Video will
not be allowed by the DVD player.
Examples of playable DVD Videos :
• In U.S.A . • In Europe
Major
countries
or area
Playable
Region
code
All
regions
North
America
Europe,
Japan,
Middle East
Southeast
Asia
Oceania,
South
America
Russia
China
VR-652(A) 2008.3.6 5:32 PM 페이지 17
Page 18
ENGLISH
18
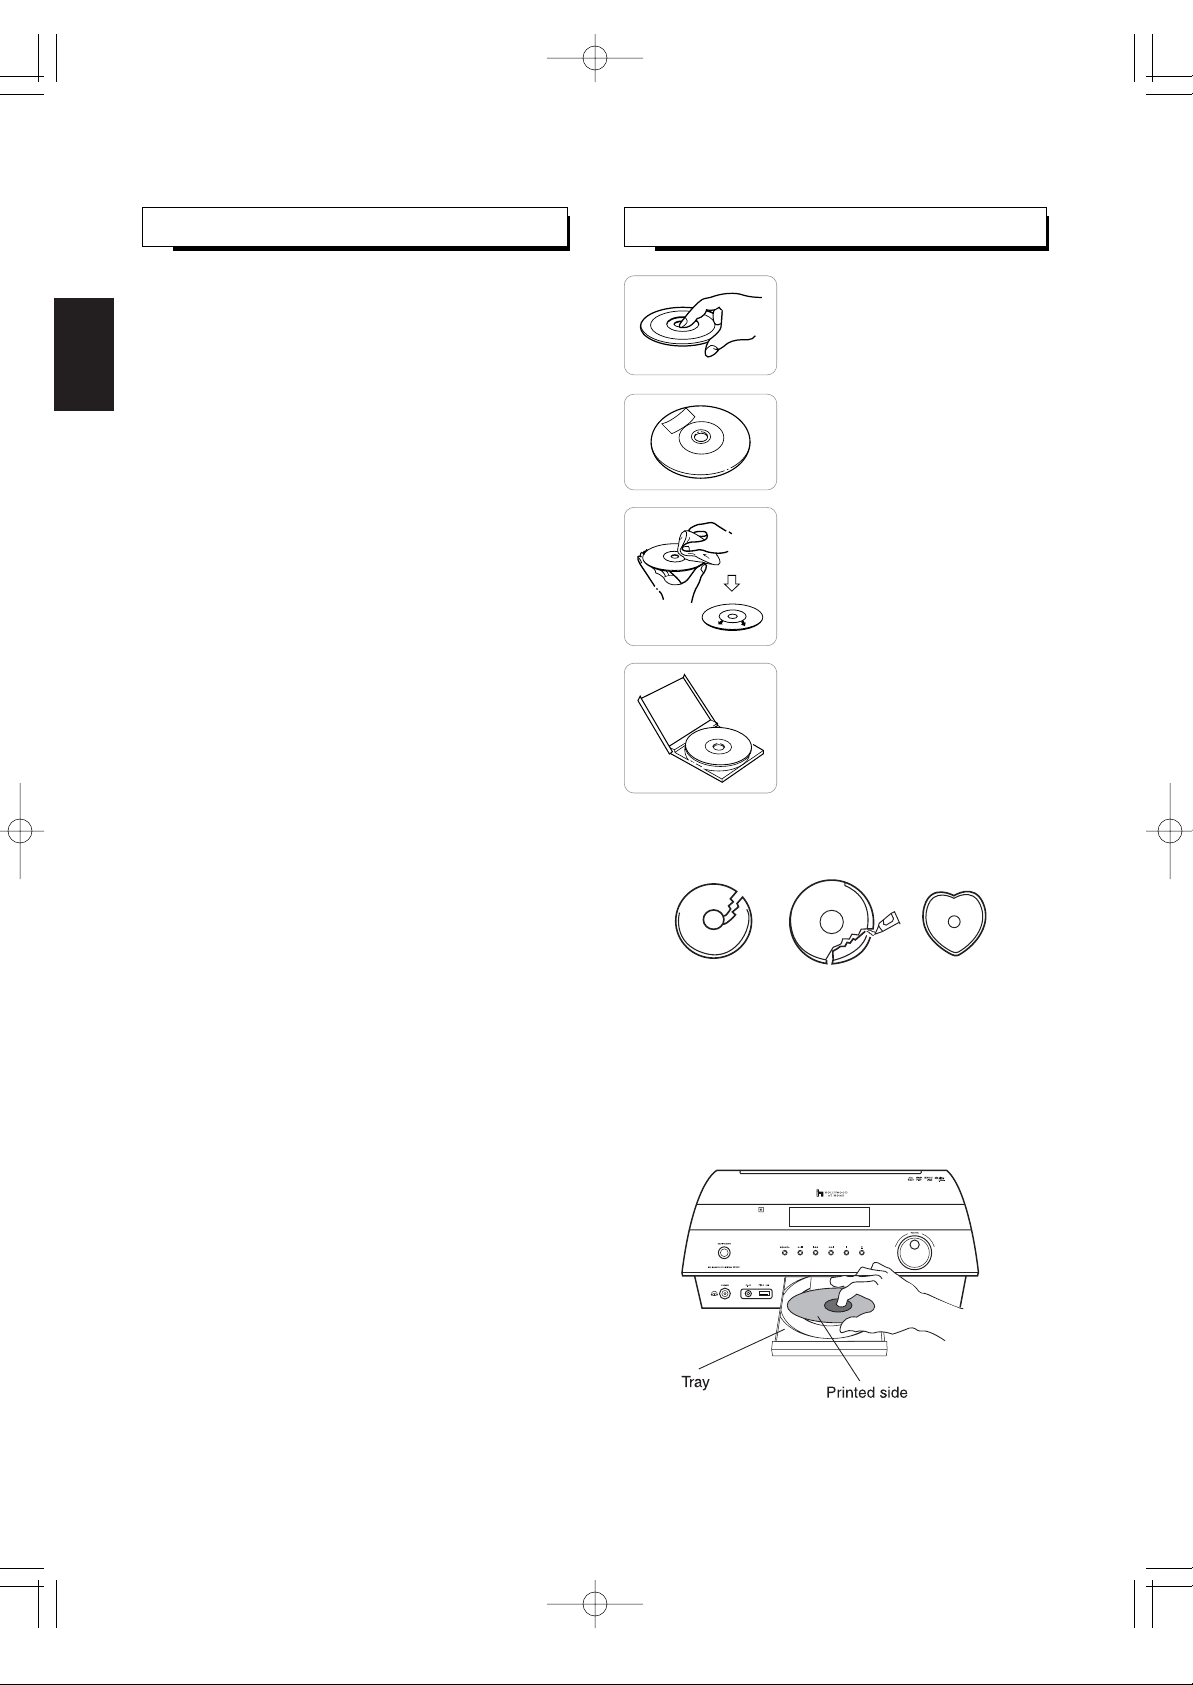
CARE AND HANDLING OF DISCSAUDIO AND VIDEO FILES
• Folder and file names are displayed up to 8 characters.
• A total of 512 folders and maximum of 2048 files can be
supported.
• Characters except "A~Z", "0~9", " - " may be not
displayed.
• The playback order of folders and files shown in the menu
may differ from the order shown in a PC.
• This unit supports multi-session discs. Some multi-session
discs may take a long time to load and some may not be
loaded at all.
Notes for making a private disc.
• Use "UDF format" as the disc format for DVD-R/DVD-RW,
DVD+R/DVD+RW.
• Use "ISO 9660" as the disc format for CD-R/CD-RW.
• Folders can be up to eight levels deep.
• Some disc may not play due to disc characteristics,
recording conditions, etc.
MP3
• MP3 files must have a ".mp3" or ".MP3" file name
extension.
• It is recommended that you record your material at a
44.1kHz sampling rate, using the 128 kbps data transfer
rate.
• Fixed bit-rate files are recommended. Variable bitrate(VBR) files are playable, but playing time may be
displayed incorrectly.
• ID3 Tag is not available.
• MP3i and MP3 Pro are not available.
JPEG
• JPEG files must have a ".jpg", ".JPG", ".jpeg" or ".JPEG"
file name extension.
• It is recommended that you record your material at a
640X480 pixel resolution.
• This unit cannot play a baseline JPEG file of more than
6000X4500 pixels and a progressive JPEG file of more
than 5120X3840 pixels.
WMA
• WMA files must have a ".wma" or ".WMA" file name
extension.
• It is recommended that you record your material at a bit
rate of 64 kbps or higher.
• WMA Tag is not available.
• This unit cannot play copyright protected files and files
recorded with a bit rate under 32 kbps.
• In handling a disc, hold it carefully
with edges.
• Do not stick paper or write
anything on the printed surface.
• Fingermarks and dust on the
recorded surface should be
carefully wiped off with a soft cloth.
Wipe straight from the inside to the
outside of the disc.
• Always keep the discs in their
cases after use to protect them
from dust and scratches.
• Do not use a cracked, deformed, or repaired disc.
These discs are easily broken and may cause serious
personal injury and apparatus malfunction.
Notes:
• Because the temperature inside this unit is very high, in
case of no further playback of disc, unload the disc to
prevent the high temperature from deforming the disc.
• Do not expose discs to direct sunlight, high humidity or
high temperature for a long time.
• When loading or unloading a disc in the disc tray, always
place it with the printed side up.
VR-652(A) 2008.3.6 5:32 PM 페이지 18
Page 19
ENGLISH
19
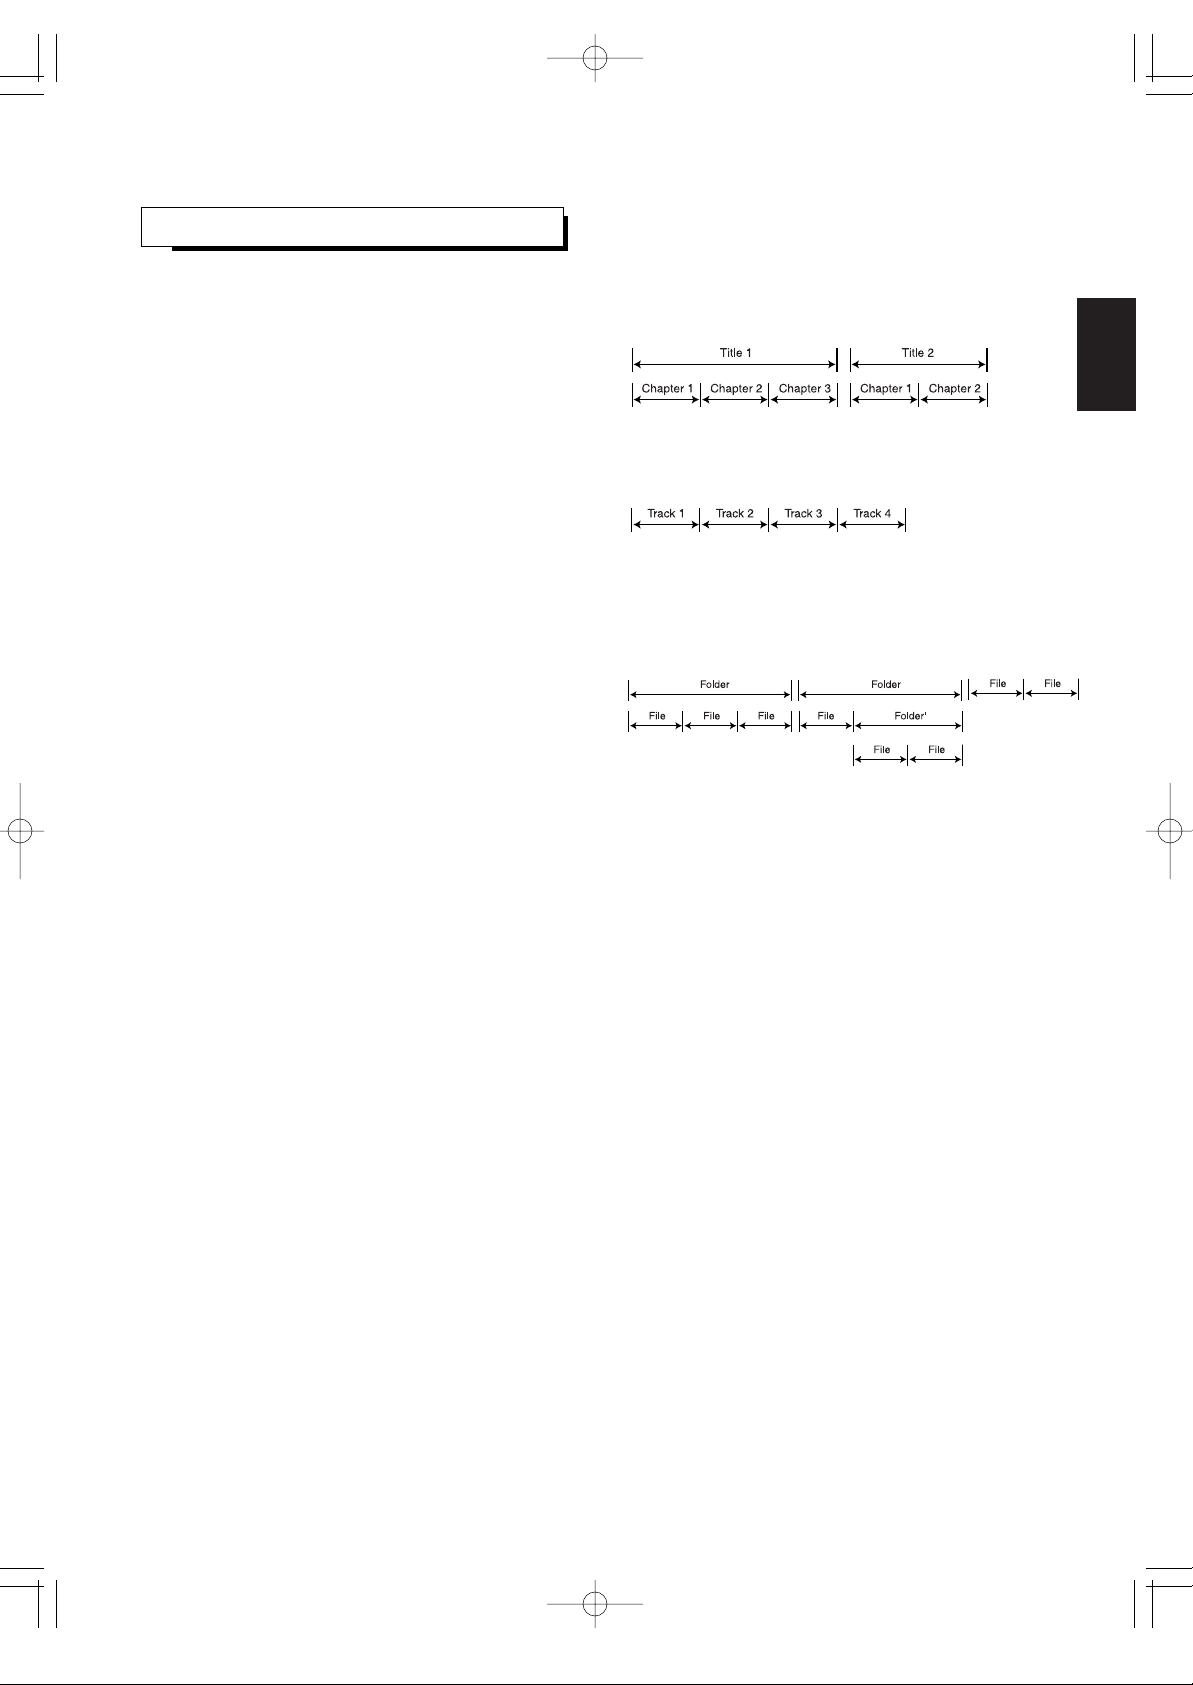
DVD Video structure
DVD Video discs typically contain one or more titles, which
may be subdivided into chapters.
Audio CD structure
Audio CDs contain tracks.
MP3/WMA/JPEG structure
On an MP3/WMA/JPEG disc, a folder can be a member of
another folder, creating hierarchical folder layers. If you are
familiar with a personal computer, you may easily
understand the hierarchical file/folder construction.
Aspect ratio (DVD Video)
The aspect ratio is the ratio between the vertical and
horizontal size of the picture displayed on a TV screen. The
aspect ratio of normal TV screen is 4:3 while that of the
wide-screen TV and HDTV screen is 16:9.
Subtitle (DVD Video)
Some DVD Videos contain the recording of more than one
subtitle languages. With these discs, this unit can select one
of the subtitle languages as desired during playback.
Angle (DVD Video)
Some DVD Videos contain scenes which have shot
simultaneously from multiple camera angles. With these
discs, the same scene can be viewed from each of these
different angles.
DVD Video
The format for storing MPEG-2 video on DVD, with
interactive menus, multiple soundtracks, subtitles, camera
angles, and so on.
MPEG(Moving Picture Expert Group)
It is regarded as an international standard for compressing
and restoring digital video and audio signal. "MPEG"
standards include MPEG-1, MPEG-2 and MPEG-4. Video
CD and MP3 are based on MPEG-1, while DVD Video is
based on MPEG-2.
MP3
MP3 is an audio data compression format, which stands for
MPEG-1 Audio Layer 3. Using MP3, you can achieve a data
reduction of about 1:10.
• MPEG Layer-3 audio coding technology licensed from
Fraunhofer IIS and Thomson.
WMA(Windows Media Audio)
WMA is an audio data compression format developed by
Microsoft Corporation. WMA file size is smaller than that of
MP3.
JPEG(Joint Photographic Experts Group)
JPEG is a papular file format for still image compression and
storage.
There are three sub-types of the JPEG format as follows.
• baseline JPEG : used for digital cameras, the web, etc.
• progressive JPEG : used for the web.
• lossless JPEG : an old type, rarely used now.
DEFINITION OF TERMS
VR-652(A) 2008.3.6 5:32 PM 페이지 19
Page 20
ENGLISH
20
Dolby Digital
Dolby Digital provides multichannel surround sound in
cinemas from 35 mm film and in the home from laser discs,
DVD Videos, and digital broadcast television, cable, and
satellite systems. It enables the transmission and storage
of up to five full-range audio channels, plus a low-frequency
effects channel(LFE), thus 5.1 channels, in less space than
is required for just one linear PCM-coded channel on a
compact disc.
Dolby and the double-D symbol are registered trademarks
of Dolby Laboratories.
DTS (Digital Theater Systems)
DTS is a newly-developed surround system which can
handle more amount of data, providing better audio quality.
Though the number of audio channels is 5.1 which is same
as Dolby Digital, discs bearing the " " provides fat
sound and better signal-to-noise ratio, thanks to the lower
audio compression ratio format. It also provides wide
dynamic range and better separation, resulting in
magnificent sound.
Manufactured under license under U.S. Patent #'s:
5,451,942; 5,956,674; 5,974,380; 5,978,762; 6,487,535 &
other U.S. and worldwide patents issued & pending. DTS is
a registered trademark and the DTS logos, Symbol and
DTS 2.0 Channel are trademarks of DTS, Inc. ⓒ 19962007 DTS, Inc. All Rights Reserved.
Interlaced scan
In the conventional video system, a picture is shown on the
screen in two halves. The interlaced scanning system places
lines of the second half of the picture in-between lines of the
first half of the picture.
Progressive scan
Progressive scanning displays all the horizontal lines of a
picture at one time, as a single frame.
Composite video
A single video signal commonly used in most consumer
video products that contains all luminance, color, and
synchronization information.
S-video
A video signal which improves picture quality over the
standard composite video signal.
Component video
Video signals with three channels of separate information
that makes up the picture. There are some types of
component video, such as Y/CB
(Pb)/CR(Pr) and R/G/B.
Bitstream
The digital signal form of multichannel audio data (e.g., 5.1
channel) before it is decoded into its various channels.
Linear PCM
PCM stands for Pulse Code Modulation. Linear PCM is the
usual digital method without compression, used for audio
playback of audio CDs, DVD Videos, etc.
VR-652(A) 2008.3.6 5:32 PM 페이지 20
Page 21
ENGLISH
21
BASIC PLAYBACK
• 8 cm (3 inch) discs can be loaded on the inside circle of
the tray, too.
• When DVD Video that doesn't contain any menu is loaded,
playback automatically starts.
Notes :
• Opening or closing the disc tray by force may damage its mechanism.
• Depending on the disc types or file types, etc. it may take times to read the loaded disc.
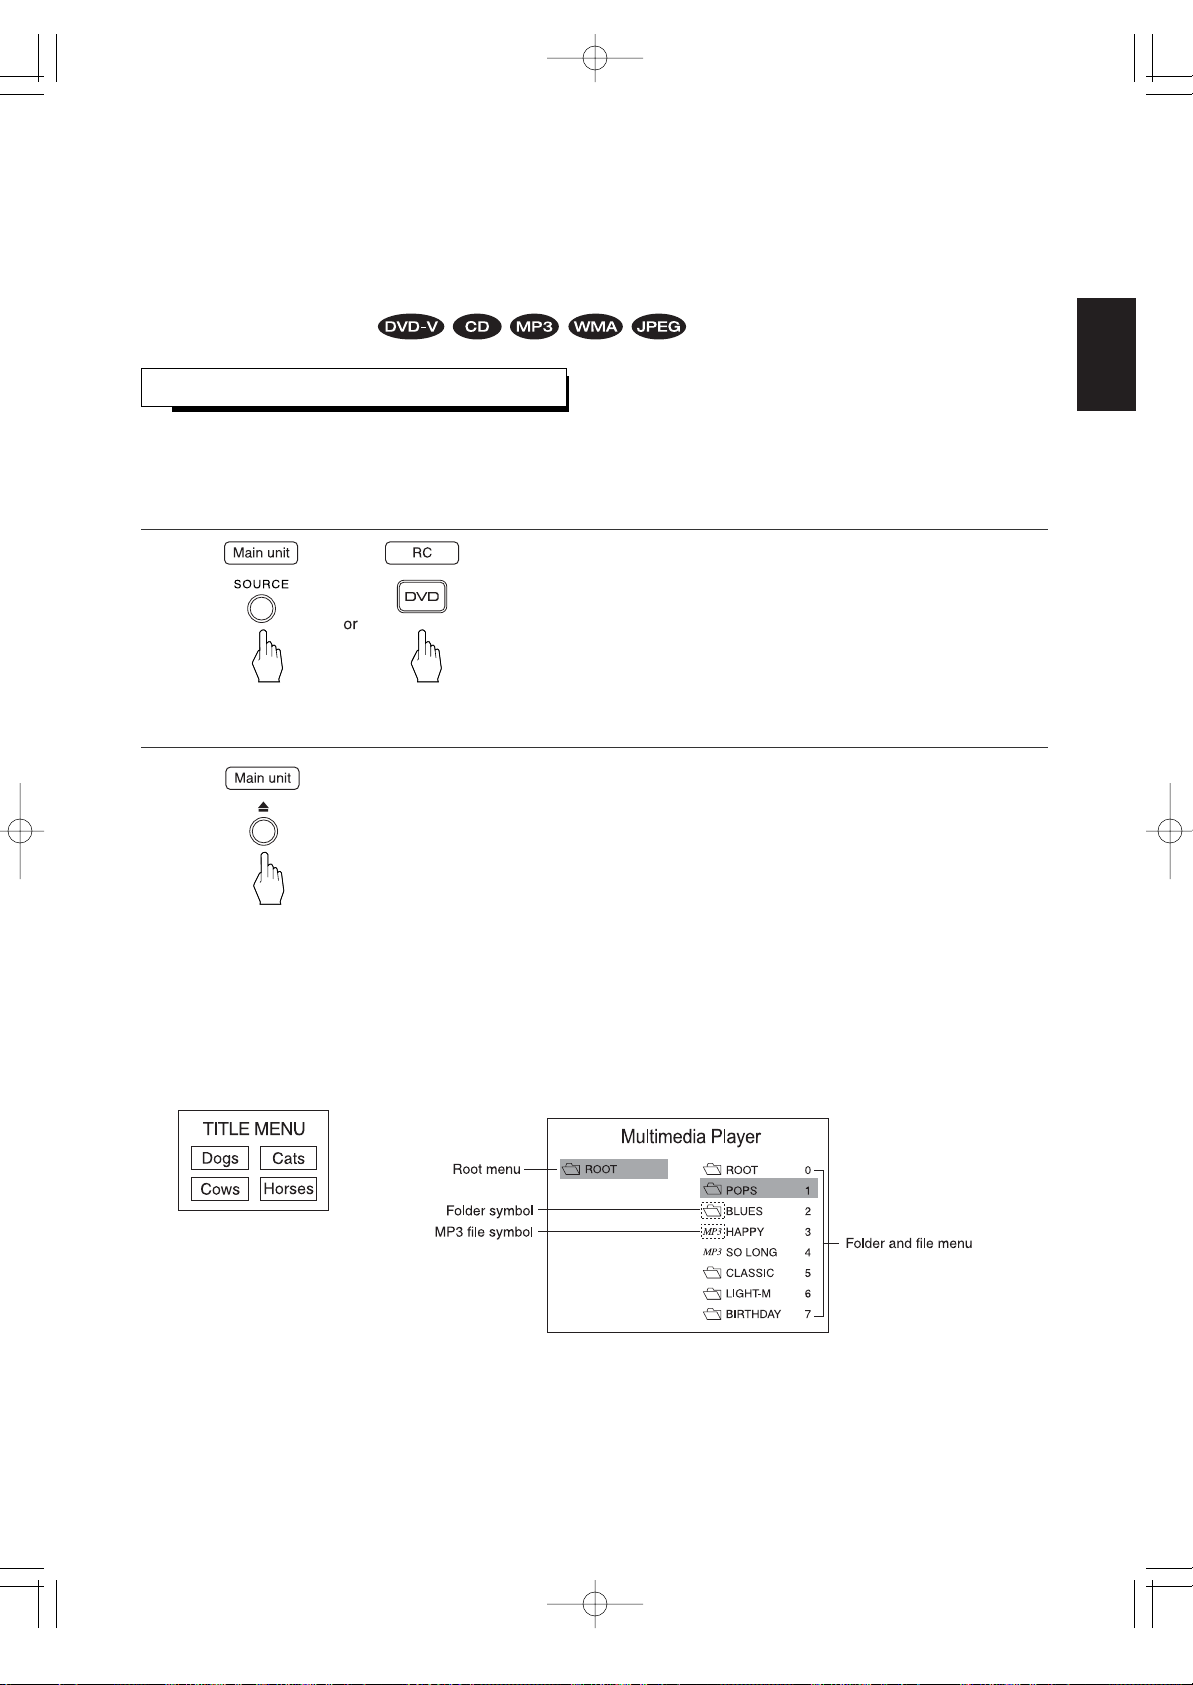
• When you load a MP3, WMA, JPEG disc or a DVD Video that contains a menu, the menu display may appear on the TV
screen. In this case, see "To start playback from the menu of DVD Video" or "To start playback from the menu of MP3, WMA
or JPEG disc" on the next page.
• Example of DVD Video • Example of MP3 disc
Preparations
• Turn on the TV and select the video input source connected to the unit.
1. Select DVD as input source.
2. Open the disc tray to load a disc with the printed side up, then close it.
Before starting playback
• Make the initial settings to suit your usage conditions the very first time this unit is turned on.(For details, refer to "Initial
Settings" on page 36.)
• For explanation purposes, this instructions explains the OSD(On-Screen Display) language displayed on TV in English.
• Usable discs for each operation/ function are referred to by the icons :
VR-652(A) 2008.3.6 5:32 PM 페이지 21
Page 22
ENGLISH
22
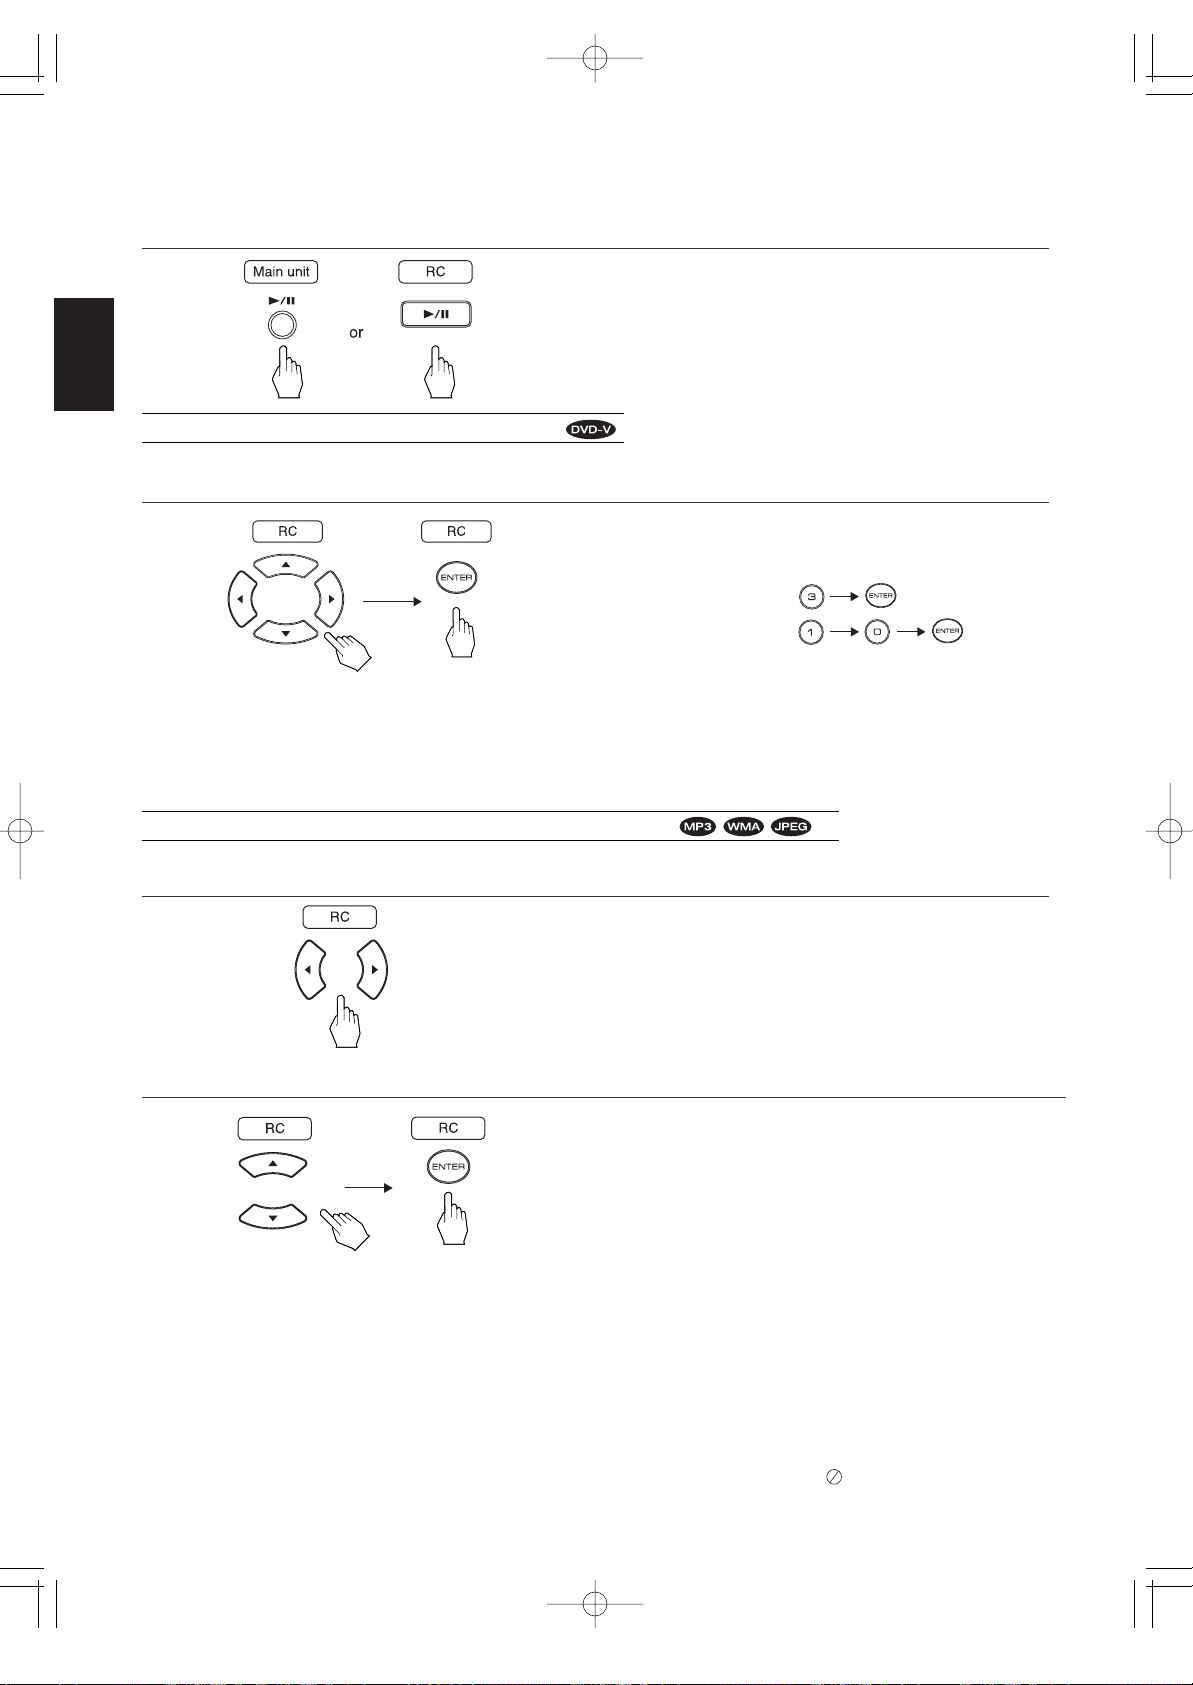
3. In case of CD, press the PLAY/PAUSE (▶/
) button to start play.
1. In the stop mode, press the CURSOR ◀/▶ buttons to select the folder and file menu.
2. Press the CURSOR ▲/▼ buttons to select the preferred folder or file then press the ENTER button.
• Playback of the selected item starts.
• Depending on the discs, the preferred item may not be selected with pressing the NUMERIC buttons.
• When the selected item contains the subitems, repeat the above step until the preferred item is selected.
To stop playback and return to the menu display
• Press the TOP MENU or MENU button on the remote control.(Which button is pressed differs depending on the discs.)
• Playback is suspended and the menu display appears.
Press the CURSOR ▲/▼/◀/▶ buttons to select the preferred item and press the ENTER button (or PLAY
/PAUSE (▶/
) button).
To start playback from the menu of DVD Video
In case of use of the NUMERIC buttons on the remote
control :
• When selecting "3" :
• When selecting "10" :
Notes:
• To play a MP3/WMA/JPEG disc with the various playback modes, select the desired playback mode.(For details, refer to
"Repeating a disc, title, chapter, folder, track or file" on page 27.)
• Some discs/files recorded in DVD Video, MP3, WMA or JPEG, etc. cannot be played due to incomplete disc finalization,
recording quality or physical condition of the disc, characteristics of recording device or authoring software, etc.
• The DVD Videos continue to rotate while the menu display appears. When no further selections are to be played, be sure to
press the STOP() button repeatedly to enter the stop mode and to clear the menu display.
• A TV screen may be burned out if a static picture is displayed for a long time in the stop mode. To prevent this, set the
SCREEN SAVER to ON (refer to "When selecting the SCREEN SAVER" on page 41). Then, the unit automatically activates
the screen saver function if a static picture, etc. is displayed for over 5 minutes.
Pressing any button will cancel the screen saver function and return to the previous display.
• When you press a button, if the corresponding operation is prohibited by the unit or the disc, appears on your TV screen.
• When selecting the preferred file, playback starts from the
selected file.
• When selecting the preferred folder, the file menu screen
of the selected folder is displayed. In this case, repeat this
step to select the preferred file in its file menu.
To start playback from the menu of MP3, WMA or JPEG disc
Continued
VR-652(A) 2008.3.6 5:32 PM 페이지 22
Page 23
ENGLISH
23
To play files from USB mass storage device
Compatible USB mass storage device :
• USB flash memory (USB 2.0 or USB 1.1)
• USB flash players (USB 2.0 or USB 1.1)
• Memory cards (requires an additional card reader to work
with this unit.)
Notes:
• It is not possible to connect this unit to a PC for USB playback.
• We cannot guarantee compatibility with all USB mass storage devices and assumes no responsibility for any loss of data that
may occur when connected to this unit.
• A total of 512 folders and maximum of 2048 files can be supported.
• During USB playback, do not remove the USB device. Should this happen, it may be result in malfunction or cause damage to
this unit and/or the USB device.
Supported formats :
• USB or memory file format FTA 16 or FTA 32.
• The method of playback for files stored on a USB device
is the same as for MP3, WMA or JPEG disc.
Note:
• When the USB device is connected into the USB
connector, this unit cannot play back a disc.
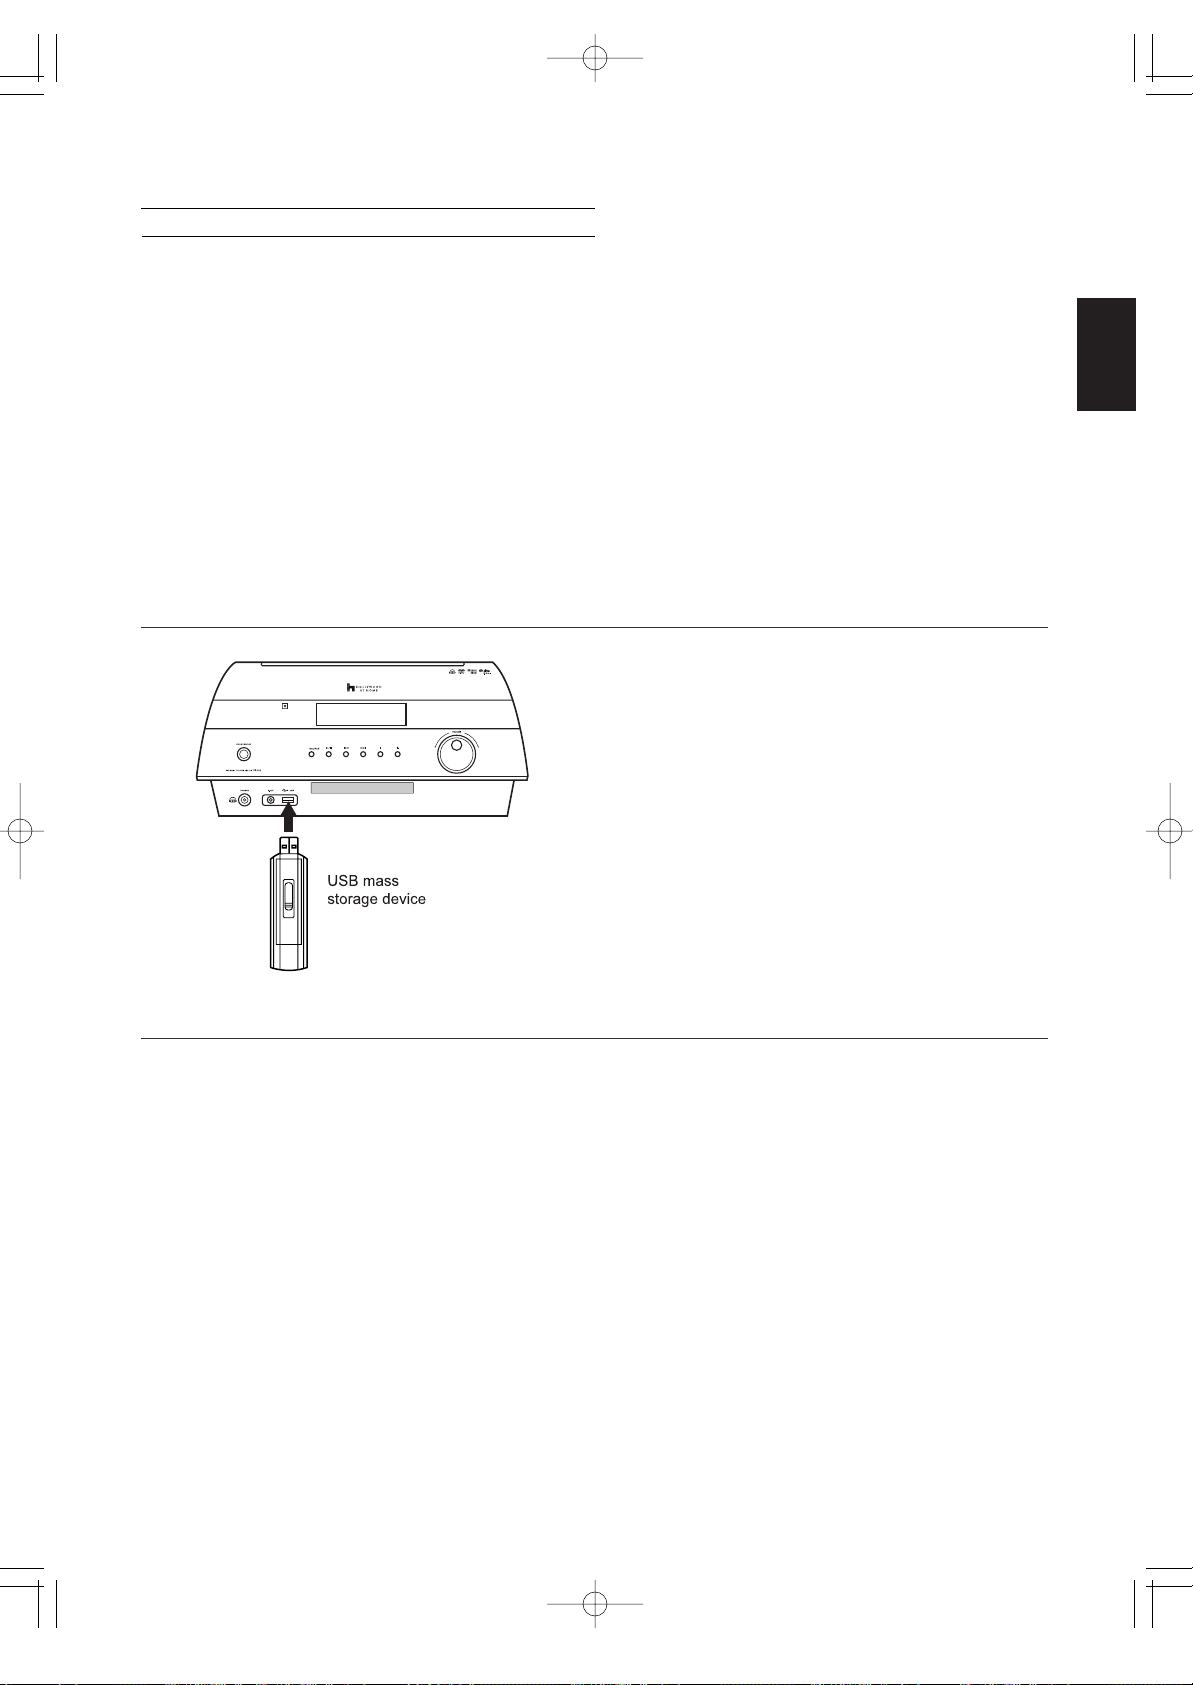
• When connecting a USB mass storage device to this unit, you can enjoy MP3, WMA or JPEG files stored on it through this
unit.
1. Connect the USB device into the USB connector on the front panel.
2. After USB playback, remove the USB device in the stop mode or the standby mode.
VR-652(A) 2008.3.6 5:32 PM 페이지 23
Page 24
ENGLISH
24
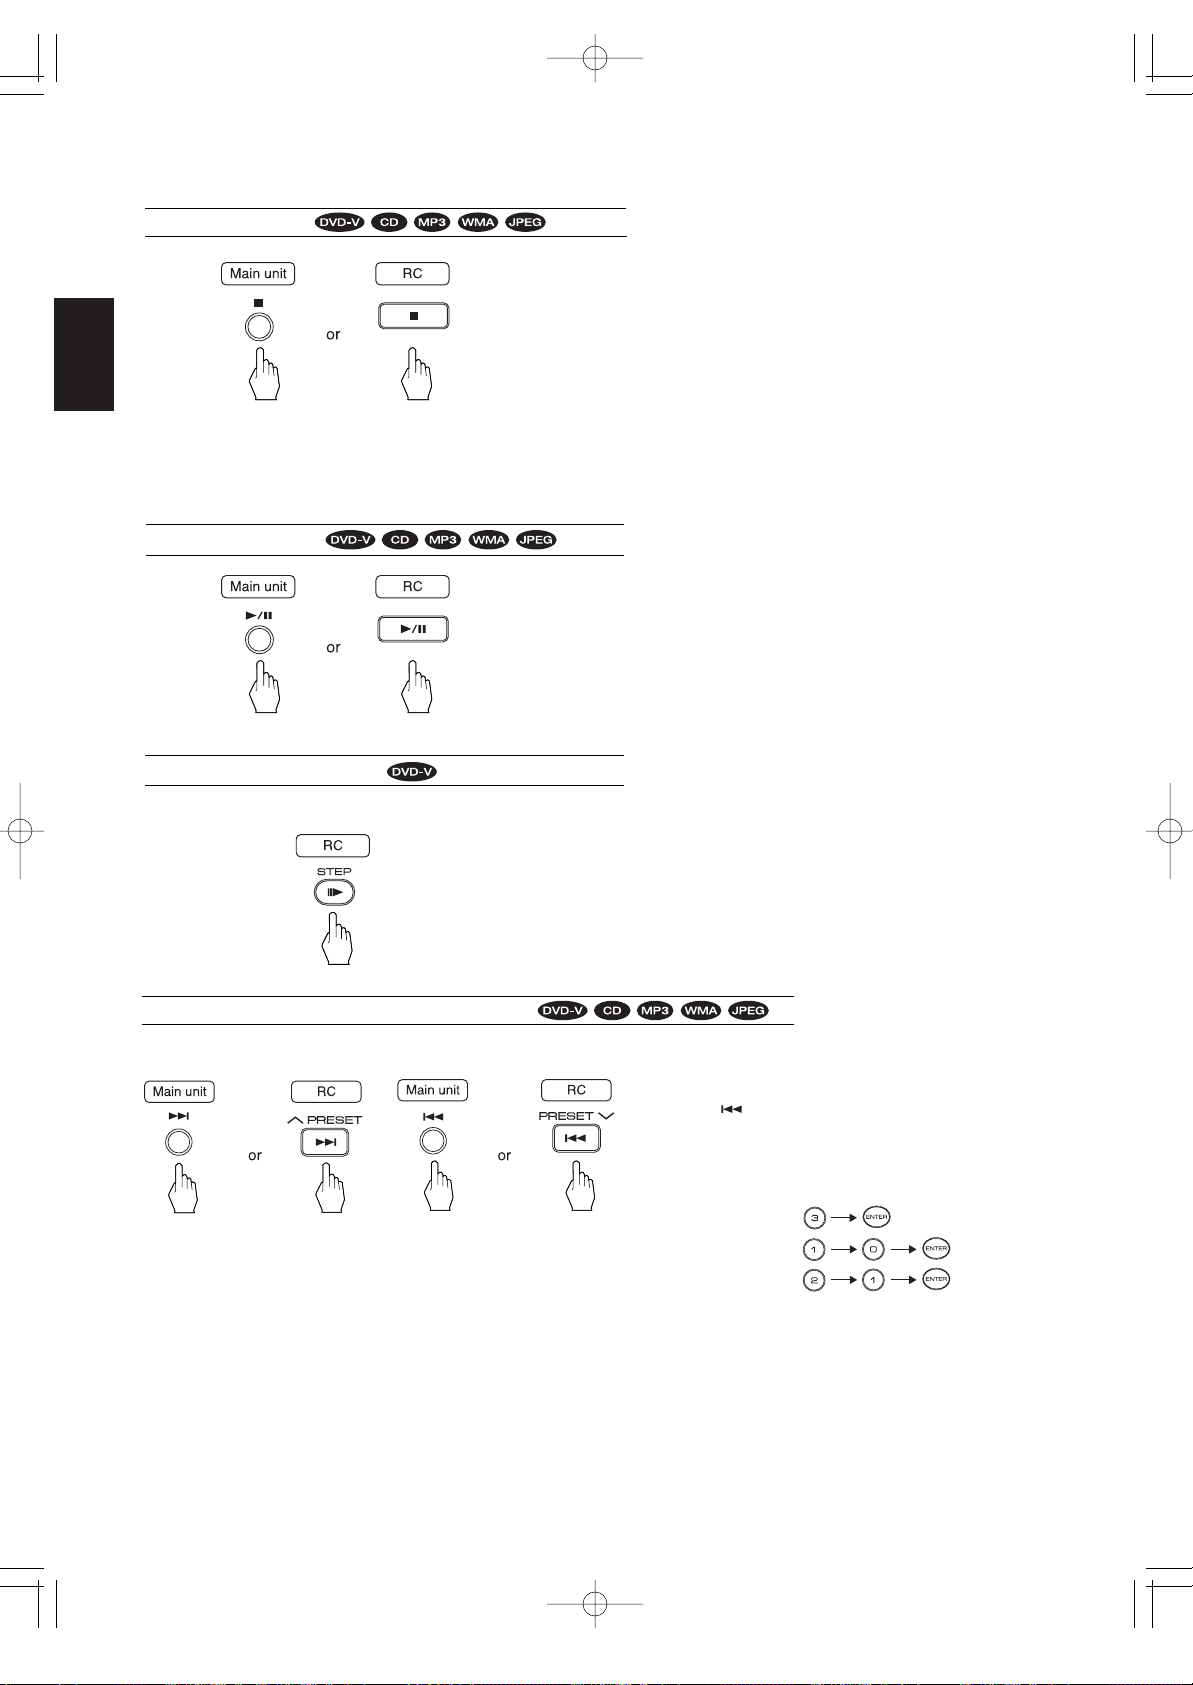
To stop playback
• When playback of a DVD Video is stopped, the unit
memorizes the point where the STOP() button was
pressed (RESUME function: DVD Video only).
("Press PLAY to continue" is displayed on the TV screen
for a moment when this function is activated.)
• Press the PLAY/PAUSE(▶/
) button again, and playback
will resume from this point. When the STOP() button is
pressed again, the RESUME function will be canceled and
it enters the stop mode.("Stop" is displayed for a moment.)
• During playback of a DVD Video, when the unit is turned
off and on with pressing the POWER ON/STANDBY
button, the resume function is activated, too.
• DVD Video :
The unit will be in the still picture mode.
• CD/MP3/WMA/JPEG disc :
The unit will be in the pause mode.
• To return to normal playback, press the PLAY/PAUSE
(▶/
) button.
• Each time the STEP(
▶) button is pressed, the disc is
advanced by one frame.
• To return to normal playback, press the PLAY/PAUSE
(▶/
) button.
To pause playback
• During playback or in the still picture mode.
Frame advance playback
To skip ahead or back during playback
• To skip ahead • To skip back
• Each time the button is pressed, a chapter/track/file is
skipped.
• When the " " button is pressed once midway through
a track, playback returns to the beginning of that track.
When it is pressed again, a track is skipped.
• You can select a chapter/track/file directly with pressing
the NUMERIC buttons on the remote control.
Examples) For "3" :
For "10" :
For "21" :
• In case of selecting a file, you can select a file in the
current folder only.
• Depending on the discs, the desired one may not be
selected.
VR-652(A) 2008.3.6 5:32 PM 페이지 24
Page 25
ENGLISH
25
Slow playback during playback
Rapid playback during playback
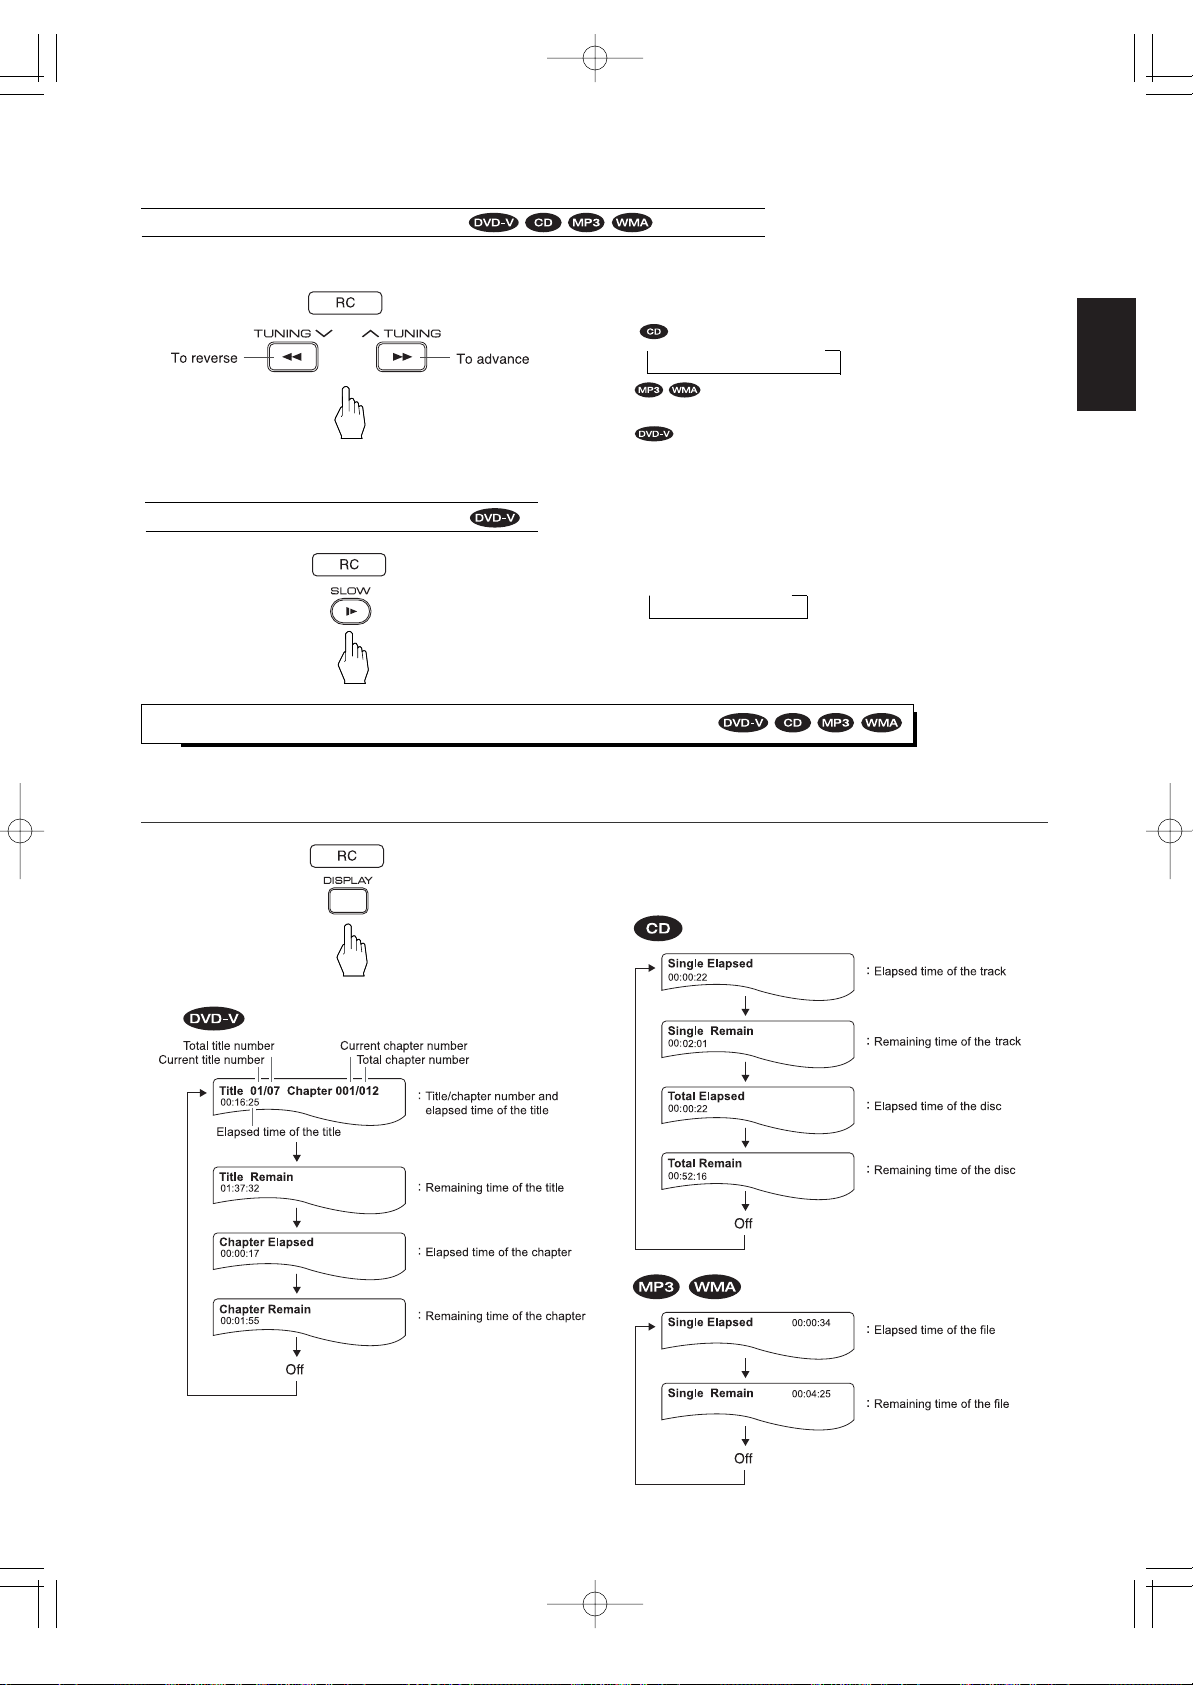
DISPLAYING DISC INFORMATION DURING PLAYBACK
• The unit features the on-screen display function showing disc information.
Press the DISPLAY button.
• Then the disc information is displayed on the TV screen.
• Each time this button is pressed, the disc information is
changed depending on the disc types as follows :
• Depending on the disc and some operation status as playback
of DVD Video using a title or DVD menu, etc., the disc
information may not be displayed.
• You can play back discs at various speeds.
• Each time the button is pressed, the disc is advanced or
reversed fast at up to 4 step speeds depending on the
disc types.
→ 2X → 4X → 6X → 8X
2X → 4X → 6X → 8X → Off
(normal playback)
2X → 4X → 8X → 16X → Off(normal playback)
• To return to normal playback, press the PLAY/PAUSE
(▶/
) button.
• Each time the button is pressed, the disc is advanced
slowly at 3 step speed.
→ 1/2 → 1/4 → 1/8
• To return to normal playback, press the PLAY/PAUSE
(▶/
) button.
VR-652(A) 2008.3.6 5:32 PM 페이지 25
Page 26
ENGLISH
26
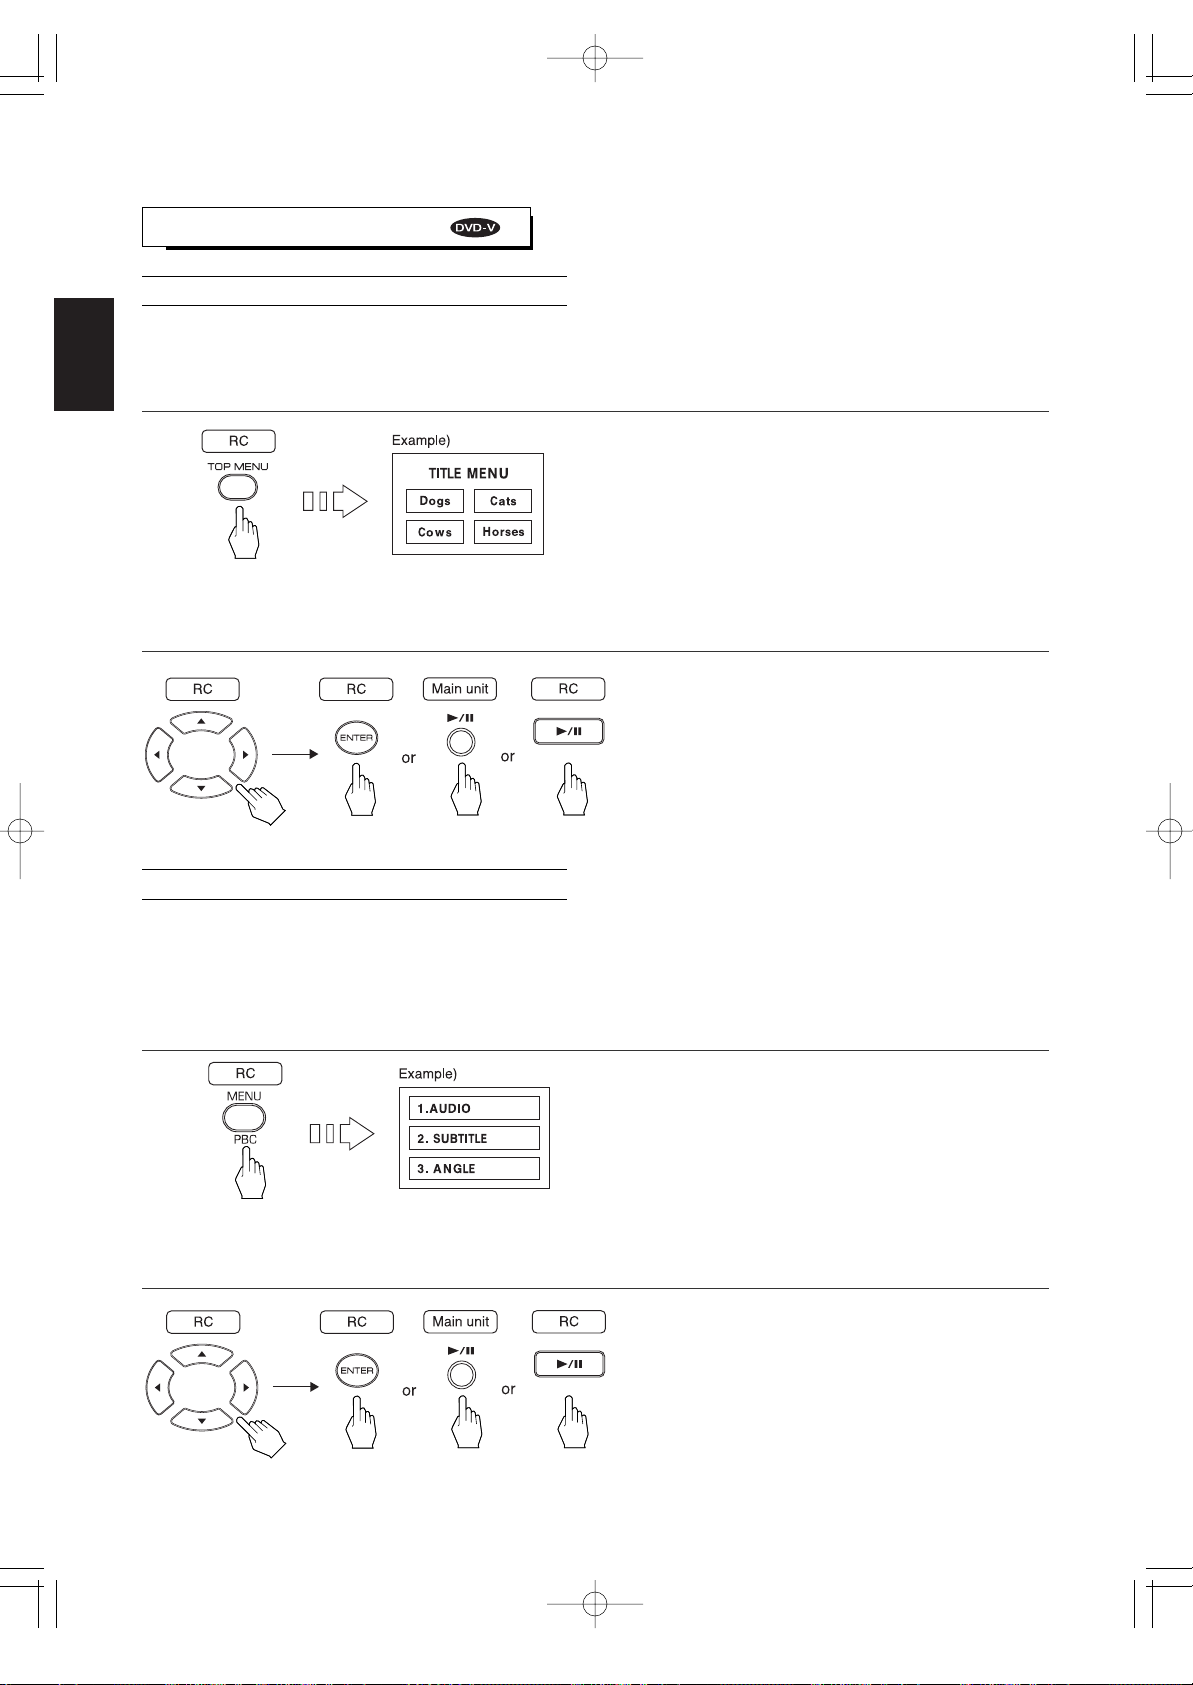
• Then the DVD menu available on the disc is displayed on
TV screen.
• If the disc does not have the DVD menu, this function
does not work.
• The unit starts playback of the selected item.
• When the menu continues onto another screen, repeat
this step until the desired item is selected.
• Then a list of titles on the disc is displayed on TV screen.
• If the disc does not have the menu such as a list of titles,
this function does not work.
• The unit starts playback of the selected title.
• When the menu continues onto another screen, repeat
this step until the desired title is selected.
When using a title menu
• If some DVD Videos which contain more than one title may have the menu like as a list of the titles, the TITLE button can be
used to select the desired title. (The details of operation differ depending on the disc used.)
PLAYING A SPECIFIC ITEM
When using a DVD menu
• Some DVD Videos have unique menu structures called DVD menus. For example, the discs programmed with complex
contents provide guide menus, and those recorded with various languages provide menus for audio and subtitle language.
Although the DVD menu’s contents and operation differ from disc to disc, the following explains basic operation when this
feature is used.
1. During playback, press the TOP MENU button.
1. During playback, press the MENU button.
2. Press the CURSOR ▲/▼/◀/▶ buttons to select the desired title, then press the ENTER or PLAY/ PAUSE
(▶/
) button.
2. Press the CURSOR ▲/▼/◀/▶ buttons to select the desired item, then press the ENTER or PLAY/PAUSE
(▶/
) button.
VR-652(A) 2008.3.6 5:32 PM 페이지 26
Page 27
ENGLISH
27
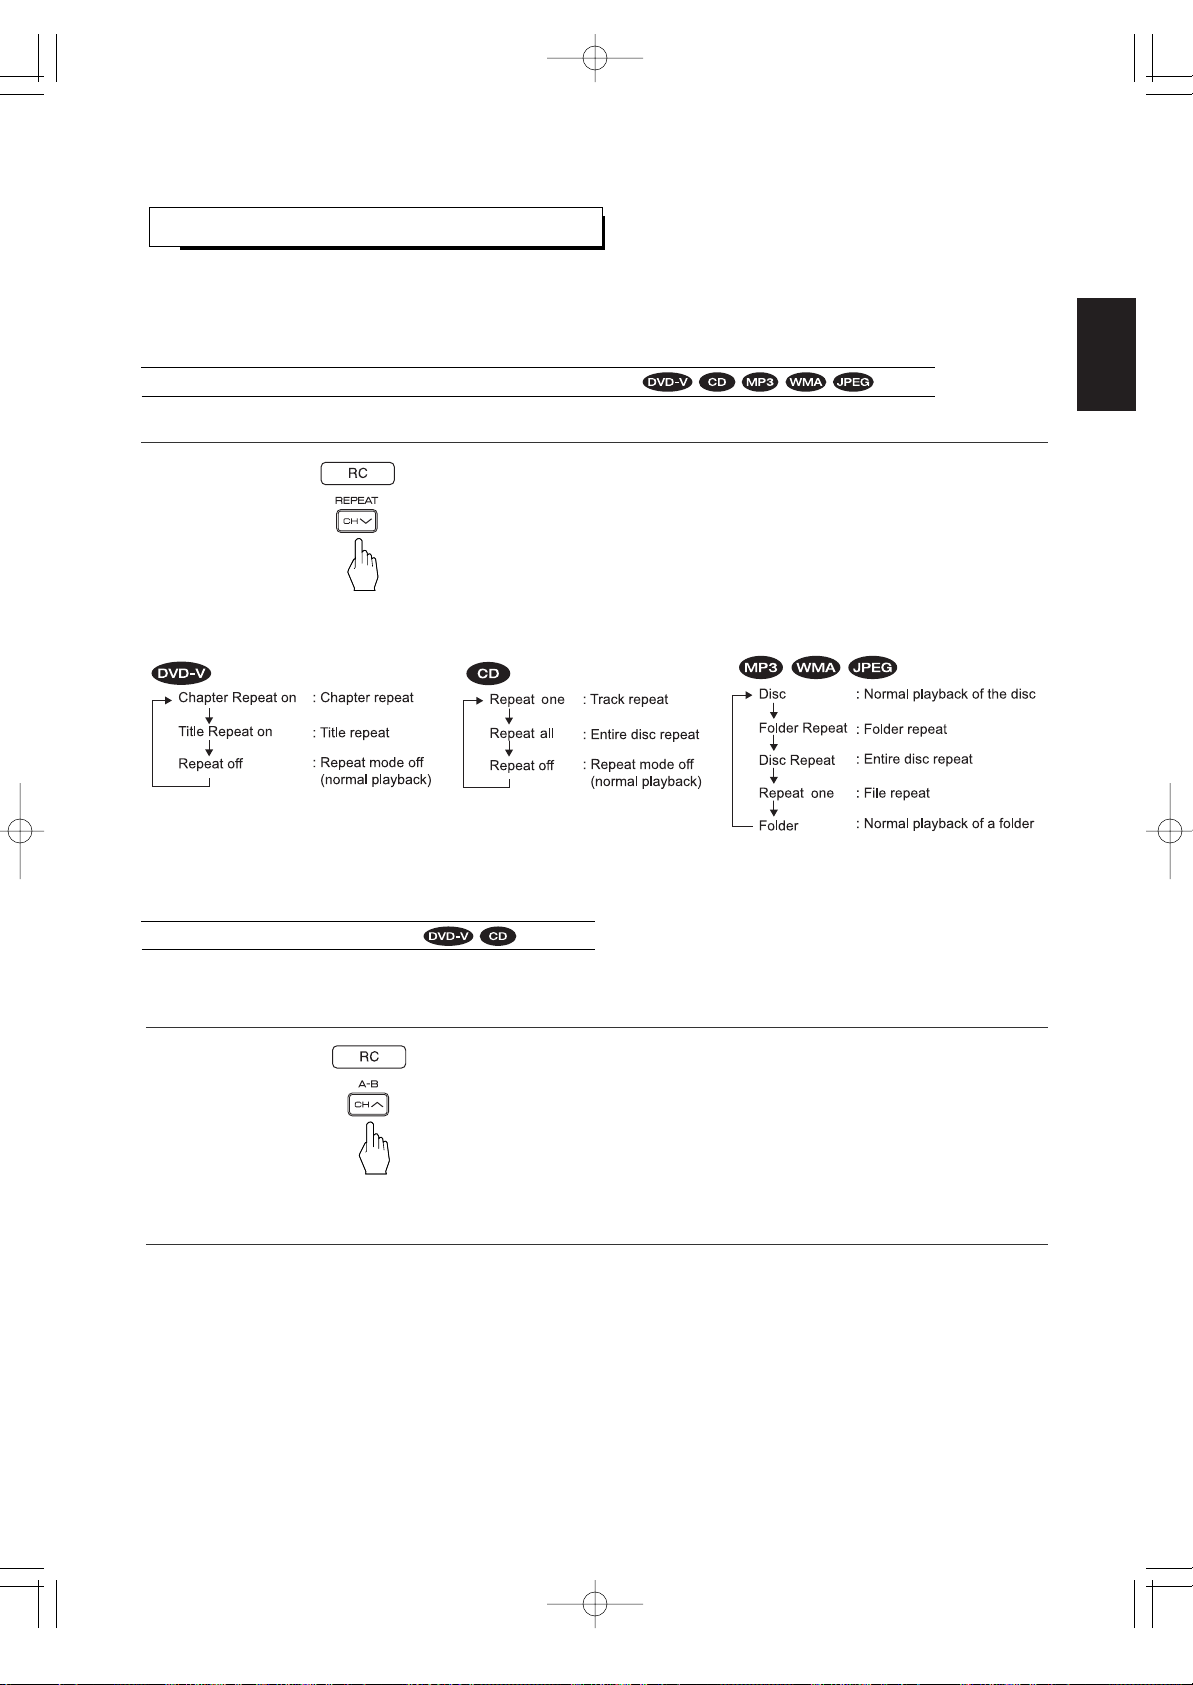
During playback of the desired title, chapter, folder, track or file, press the REPEAT button.
• Then the selected repeat mode is displayed on the TV
screen.
• Each time this button is pressed, the repeat mode changes depending on the disc types as follows :
• To return to normal playback, press the REPEAT button repeatedly to select the Repeat off, Disc or Folder.
REPEAT PLAYBACK
• You can play a current title, chapter, folder, track, file, disc or part repeatedly.
Note:
• Repeat playback may not work correctly with some discs.
Repeating the desired part
• Then "A To B Repeat on" or "A To B Set B" is displayed on the TV screen, and the part between points A and B is played
back repeatedly.
• To return to normal playback, press the REPEAT A-B button repeatedly until "A To B Cancelled" is displayed.
Notes:
• You may not use the repeat A-B playback of the part that includes multiple camera angles.
• Repeat A-B playback works only within a title or a track.
• Then "A To B Set A " is displayed on the TV screen.
Repeating a disc, title, chapter, folder, track or file
1. During playback at the beginning of the part you want to repeat, press the REPEAT A-B button.
2. At the end of the part, press the REPEAT A-B button again.
VR-652(A) 2008.3.6 5:32 PM 페이지 27
Page 28
ENGLISH
28
PROGRAMMED PLAYBACK
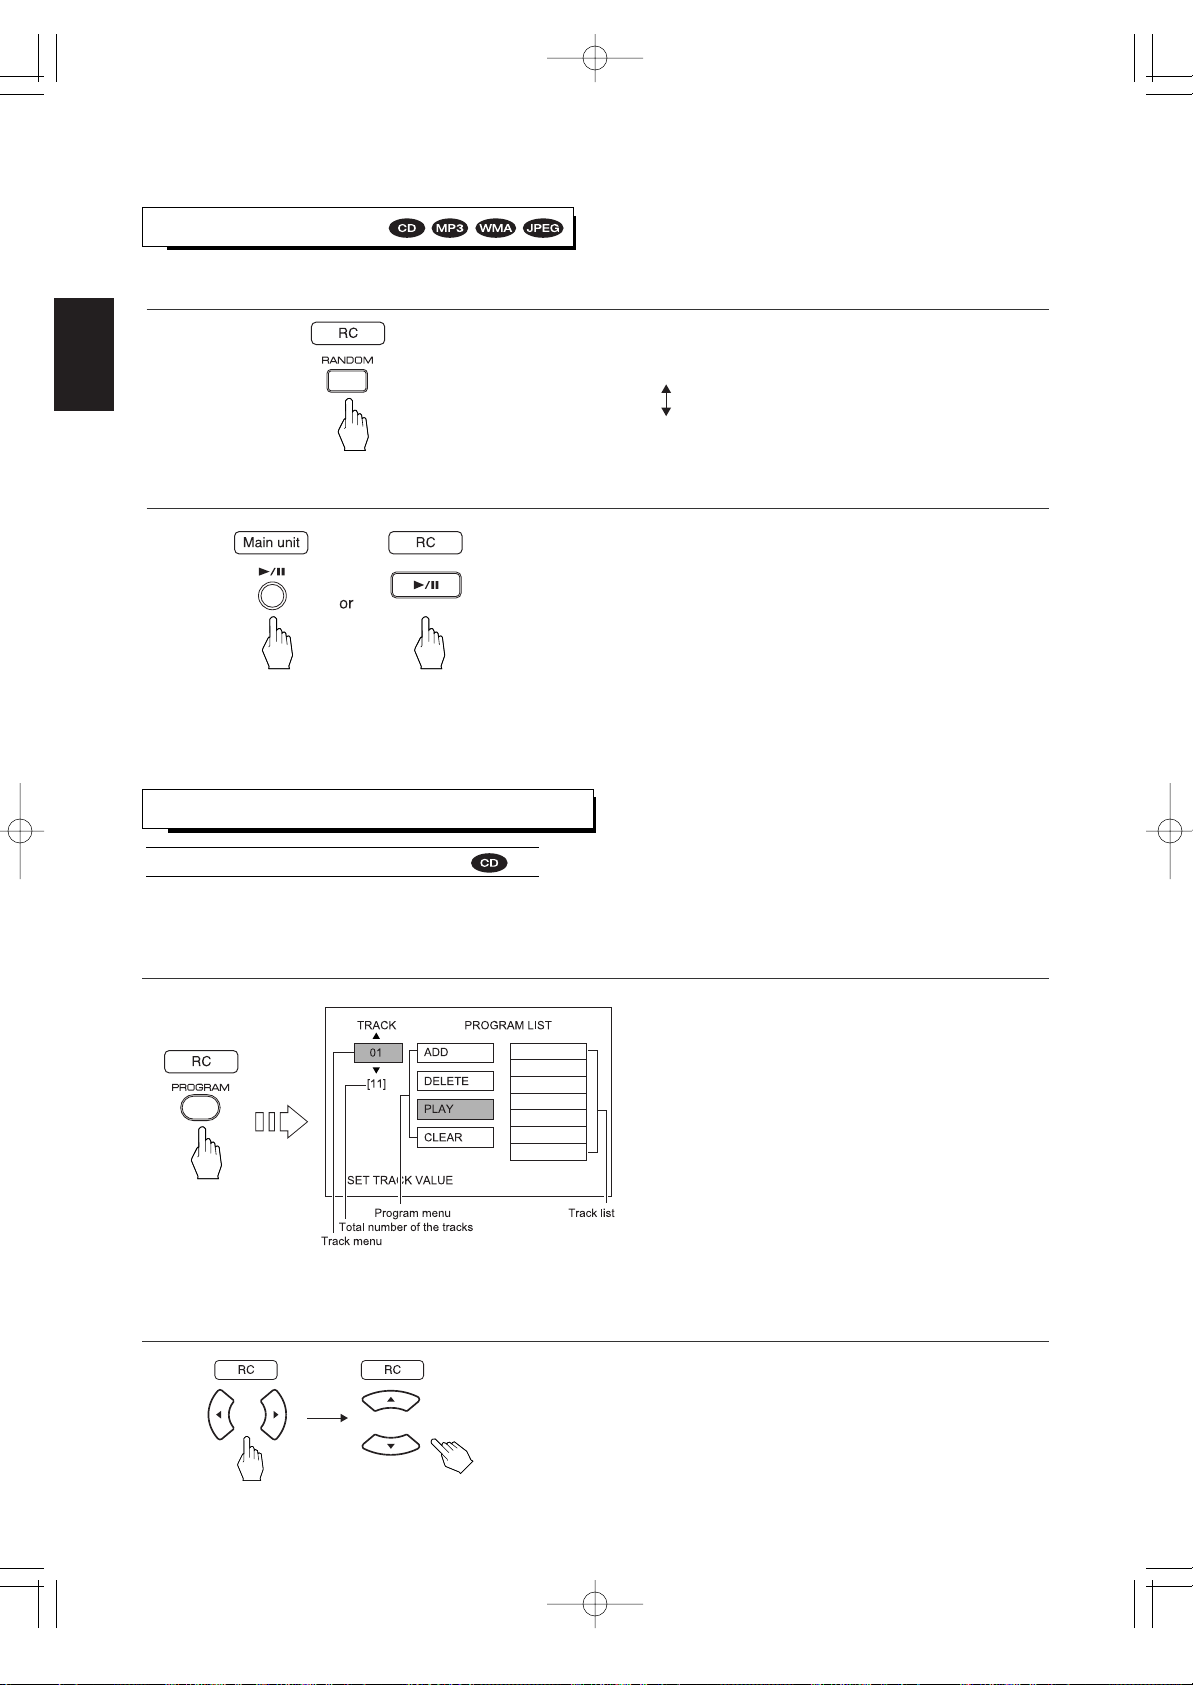
• Up to 21 tracks can be programmed to be played in any desired order.
• Then the program menu is displayed on the TV screen.
• Each time the PROGRAM button is pressed, the program
mode is canceled or the program menu is displayed.
• Each time the CURSOR ▶ or ◀ button is pressed, the
track menu or the program menu (or the track list) is
selected.
1. In the stop mode, press the PROGRAM button to enter the program mode.
2. Press the CURSOR ◀/▶ buttons to select the track menu, then press the CURSOR ▲/▼ buttons to select
the desired track.
1. In the stop mode, press the RANDOM PLAY button.
2. Start the random playback.
• Each time this button is pressed, the playback mode
changes as follows :
Random on : Random playback
Tracks on the disc or files in the current folder
are played back in random order.
Random off : Normal playback
• Then tracks on the disc or files in the current folder are
played back in random order.
• In case of MP3, WMA or JPEG disc, before starting the
random playback, select the desired folder and file with
using the CURSOR ▲/▼/◀/▶ buttons and press the
PLAY/PAUSE (▶/
) button or the ENTER button.
• After all the tracks or files have been played, it enters the
stop mode and the random playback mode is not
canceled.
• To return to normal playback, press the RANDOM PLAY
button in the stop mode, then "Random off" is displayed.
Note:
• Random playback may not work correctly with some discs.
Playing tracks in desired order
RANDOM PLAYBACK
VR-652(A) 2008.3.6 5:32 PM 페이지 28
Page 29
ENGLISH
29
Continued
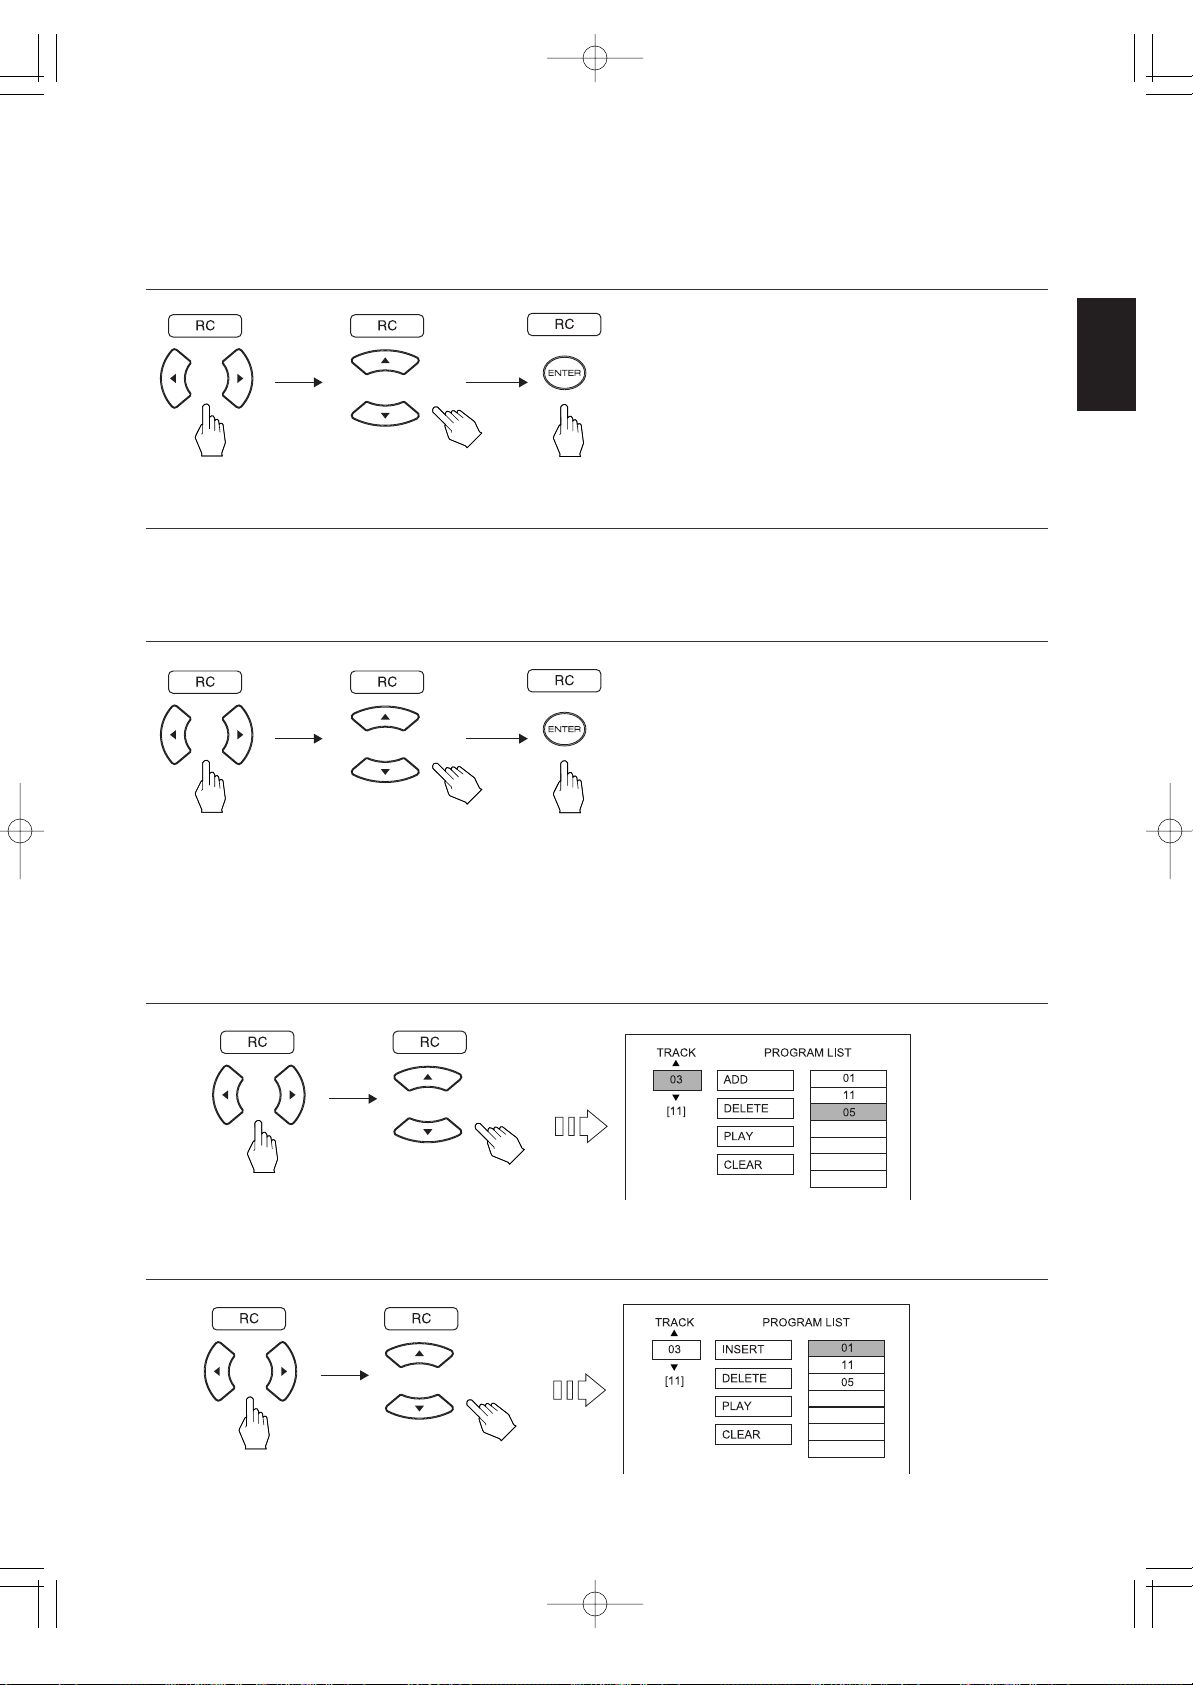
To add a track to the track list
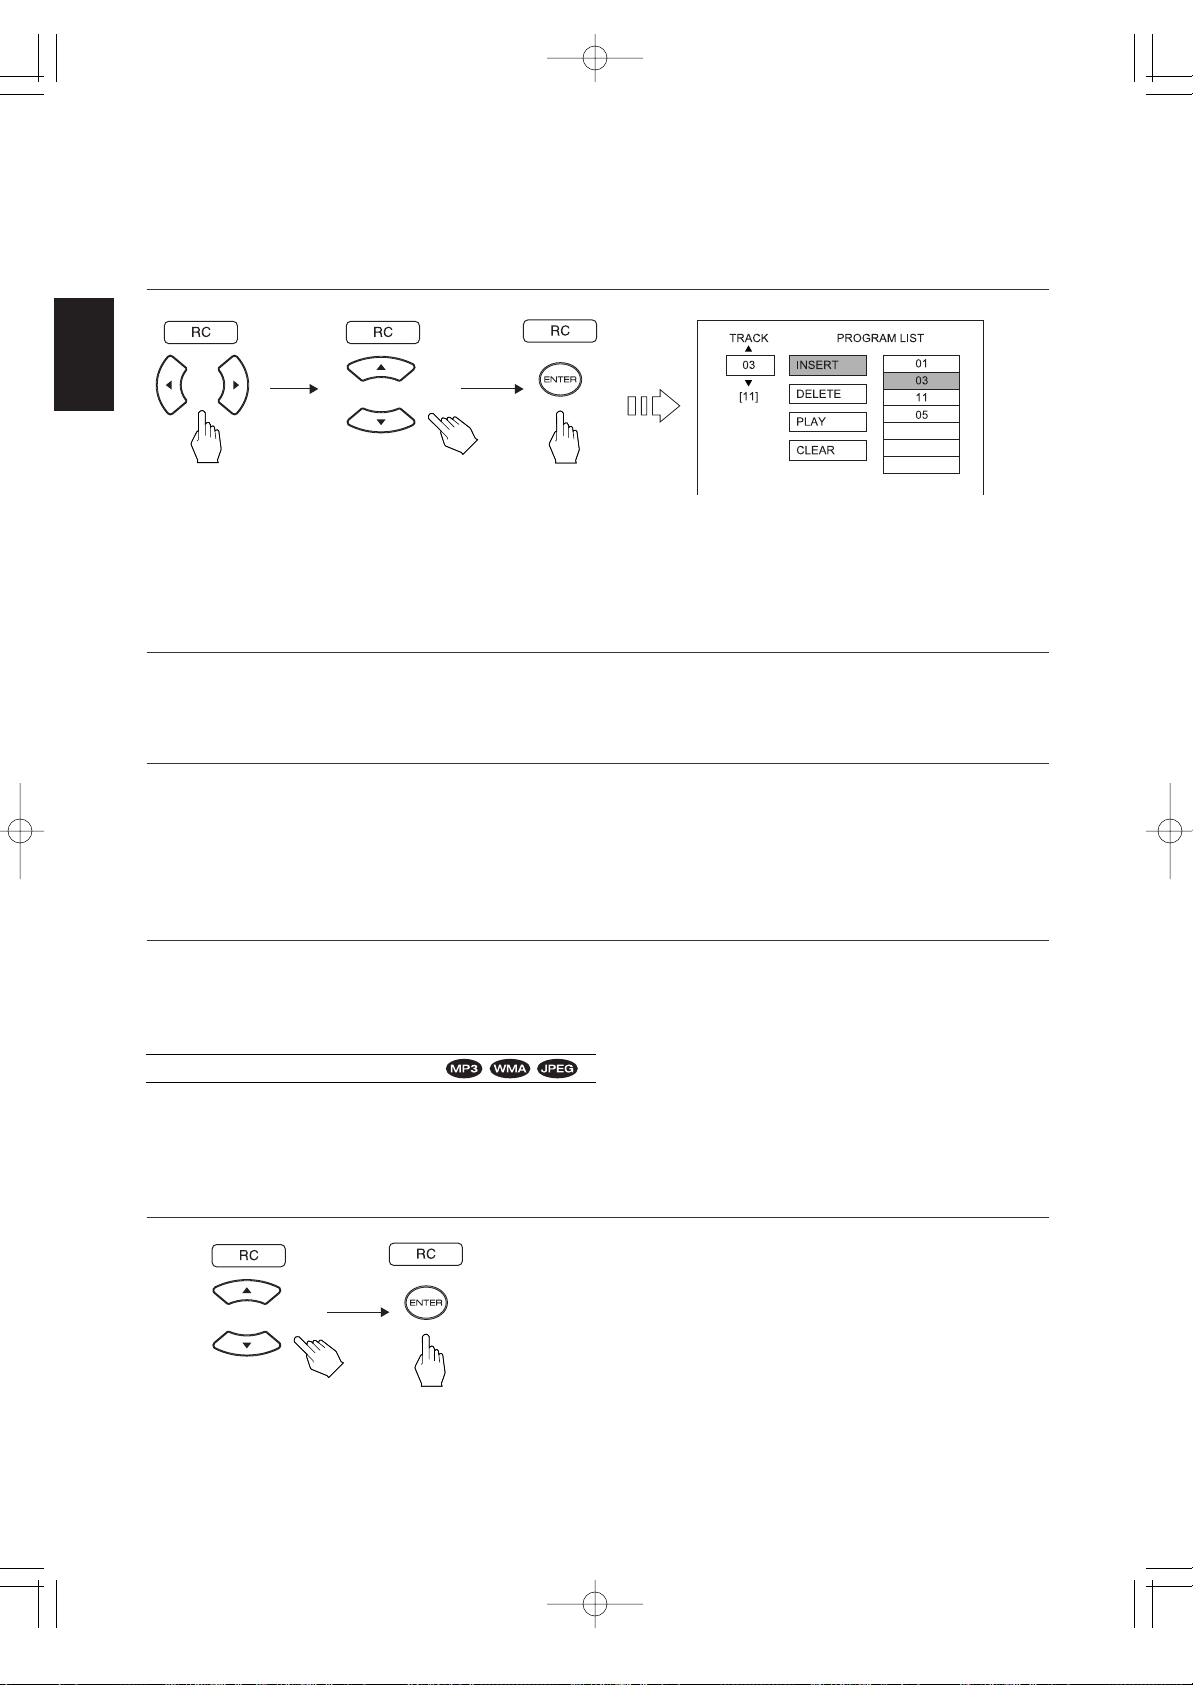
• You can insert a track between the specific tracks.
Example) When you insert track 3 between track 1 and track 11 which are programmed first and second.
• Then the selected track is programmed.
• Then the tracks are played back in the programmed
order.
• After all the programmed tracks have been played back, it
enters the stop mode and the program mode is canceled
without clearing the programmed tracks. In this case, if
the PROGRAM button is pressed, the programmed tracks
are displayed on the program menu.
3. Press the CURSOR ◀/▶ buttons to select the program menu and press the CURSOR ▲/▼ buttons to
select ADD, then press the ENTER button.
5. To start programmed playback, press the CURSOR ◀/▶ buttons to select the program menu and press the
CURSOR ▲/▼ buttons to select PLAY, then press the ENTER button.
1. When displaying the program menu, press the CURSOR ◀/▶ buttons to select the track menu, then press
the CURSOR ▲/▼ buttons to select track 3.
2. Press the CURSOR ◀/▶ buttons to select the track list, then press the CURSOR ▲/▼ buttons to select
track 1.
4. Repeat the above steps 2 and 3 until the desired tracks are programmed.
VR-652(A) 2008.3.6 5:32 PM 페이지 29
Page 30
ENGLISH
30
• Then the selected track is cleared.
• Then the programmed tracks are all cleared.
• When displaying the program menu, pressing the CLEAR button clears all programmed tracks.
• Opening the disc tray or turning the power off, etc. clears all programmed tracks.
Clearing the programmed tracks
[To clear one by one]
Continued
3. Press the CURSOR ◀/▶ buttons to select the program menu and press the CURSOR ▲/▼ buttons to
select INSERT, then press the ENTER button.
1. When displaying the program menu, press the CURSOR ◀/▶ buttons to select the track list, then press the
CURSOR ▲/▼ buttons to select the track to be cleared.
1. In the stop mode, press the CURSOR ▲/▼ buttons to select the desired folder in the folder and file menu,
then press the ENTER button.
[To clear all programmed tracks]
When displaying the program menu, press the CURSOR ◀/▶ buttons to select the program menu and press
the CURSOR ▲/▼ buttons to select CLEAR, then press the ENTER button.
2. Press the CURSOR ◀/▶ buttons to select the program menu and press the CURSOR ▲/▼ buttons to
select DELETE, then press the ENTER button.
• Up to 50 files can be programmed to be played in any desired order.
Playing files in desired order
VR-652(A) 2008.3.6 5:32 PM 페이지 30
Page 31
ENGLISH
31
Continued
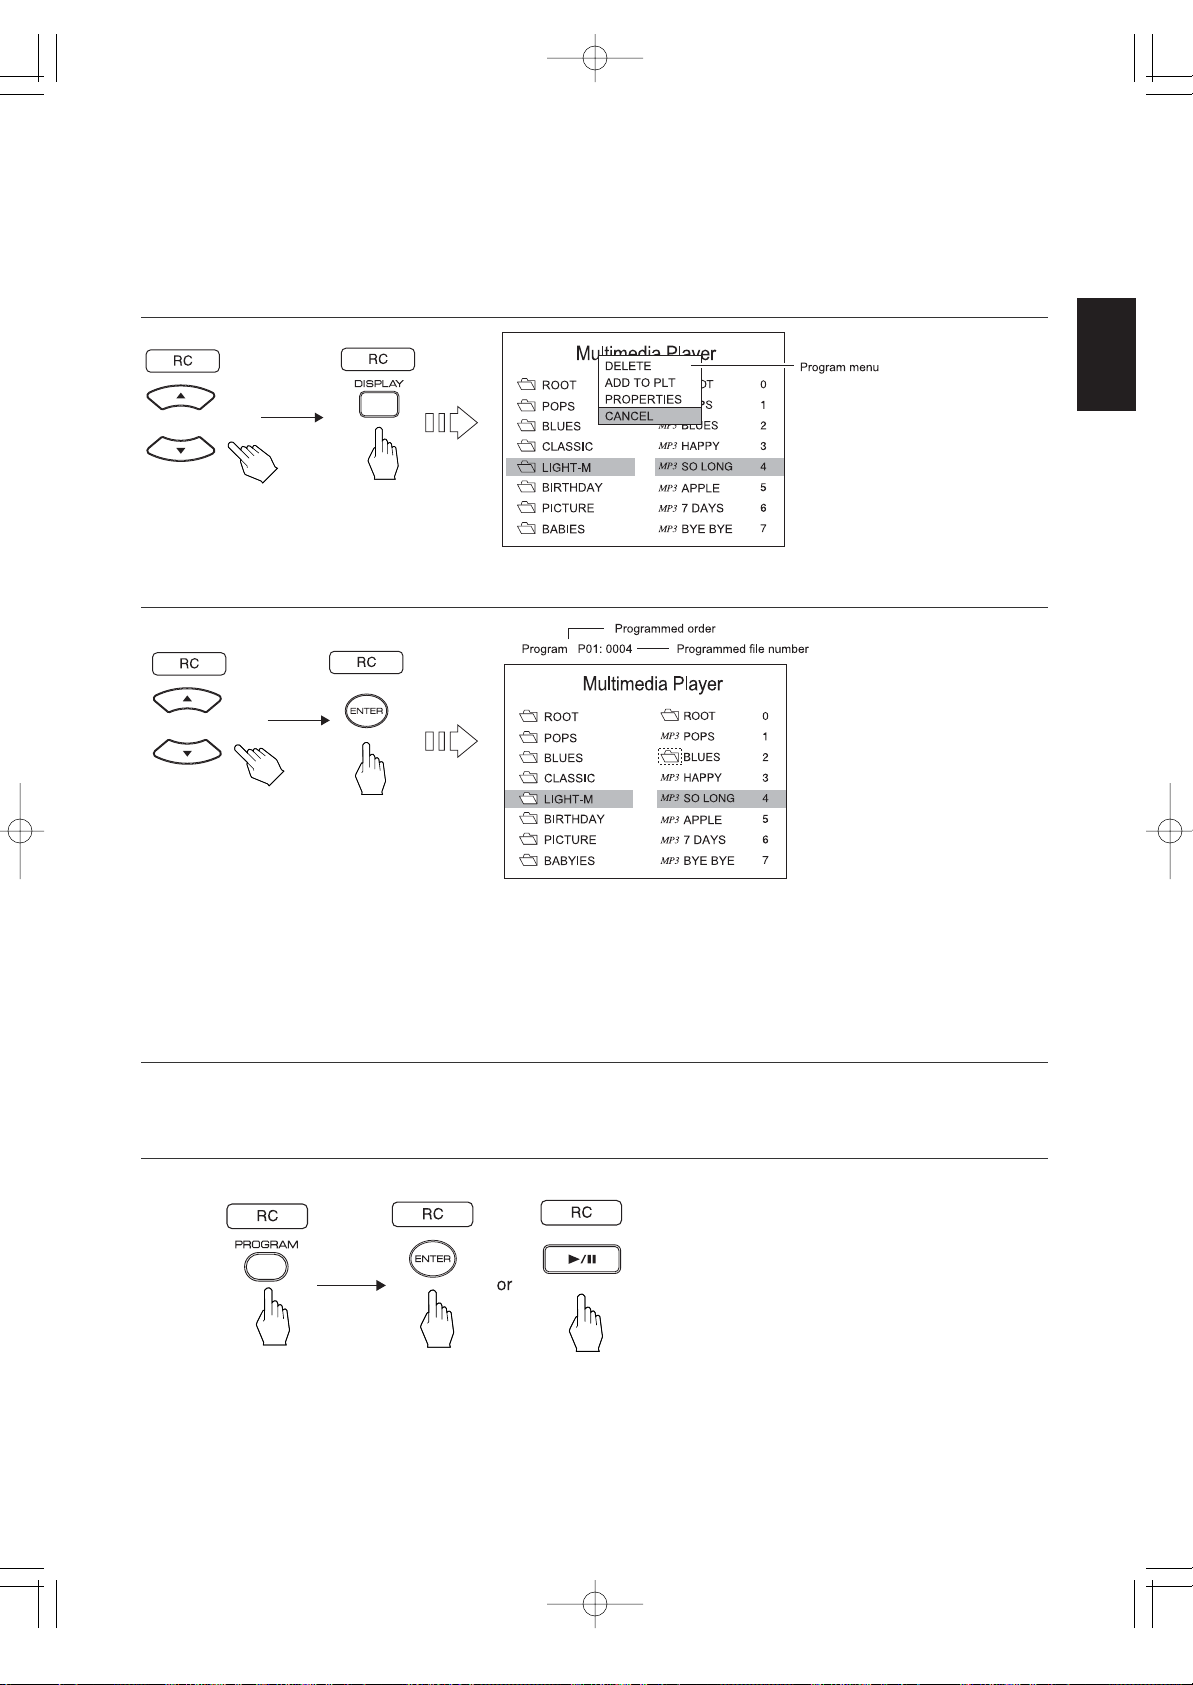
2. Press the CURSOR ▲/▼ buttons to select the desired file, then press the DISPLAY button to enter the
program mode.
• Then the program menu is
displayed.
• Each time the DISPLAY button is
pressed, the program mode is
canceled or the program menu is
displayed.
3. Press the CURSOR ▲/▼ buttons to select ADD TO PLT, then press the ENTER button.
4. Repeat the above steps 1~ 3 until the desired files are programmed.
5. Press the PROGRAM button to display PROGRAM LIST, then press the ENTER button or the PLAY/PAUSE
(▶/
) button.
• Then the selected file is
programmed.
When selecting PROPERTIES in the program menu.
• Then the information on the selected file such as file size, recording conditions, etc. is displayed.
• To turn off the information, press the ENTER button.
When selecting CANCEL
• Then the program mode is canceled.
• Then the files are played back in the programmed order.
• After all the programmed files have been played back, it enters the stop mode and the PROGRAM LIST is still displayed.
• Each time the PROGRAM button is pressed, the PROGRAM LIST is displayed or not.
In this case, even when the PROGRAM LIST disappears, the programmed files are not cleared.
VR-652(A) 2008.3.6 5:32 PM 페이지 31
Page 32
ENGLISH
32
Continued
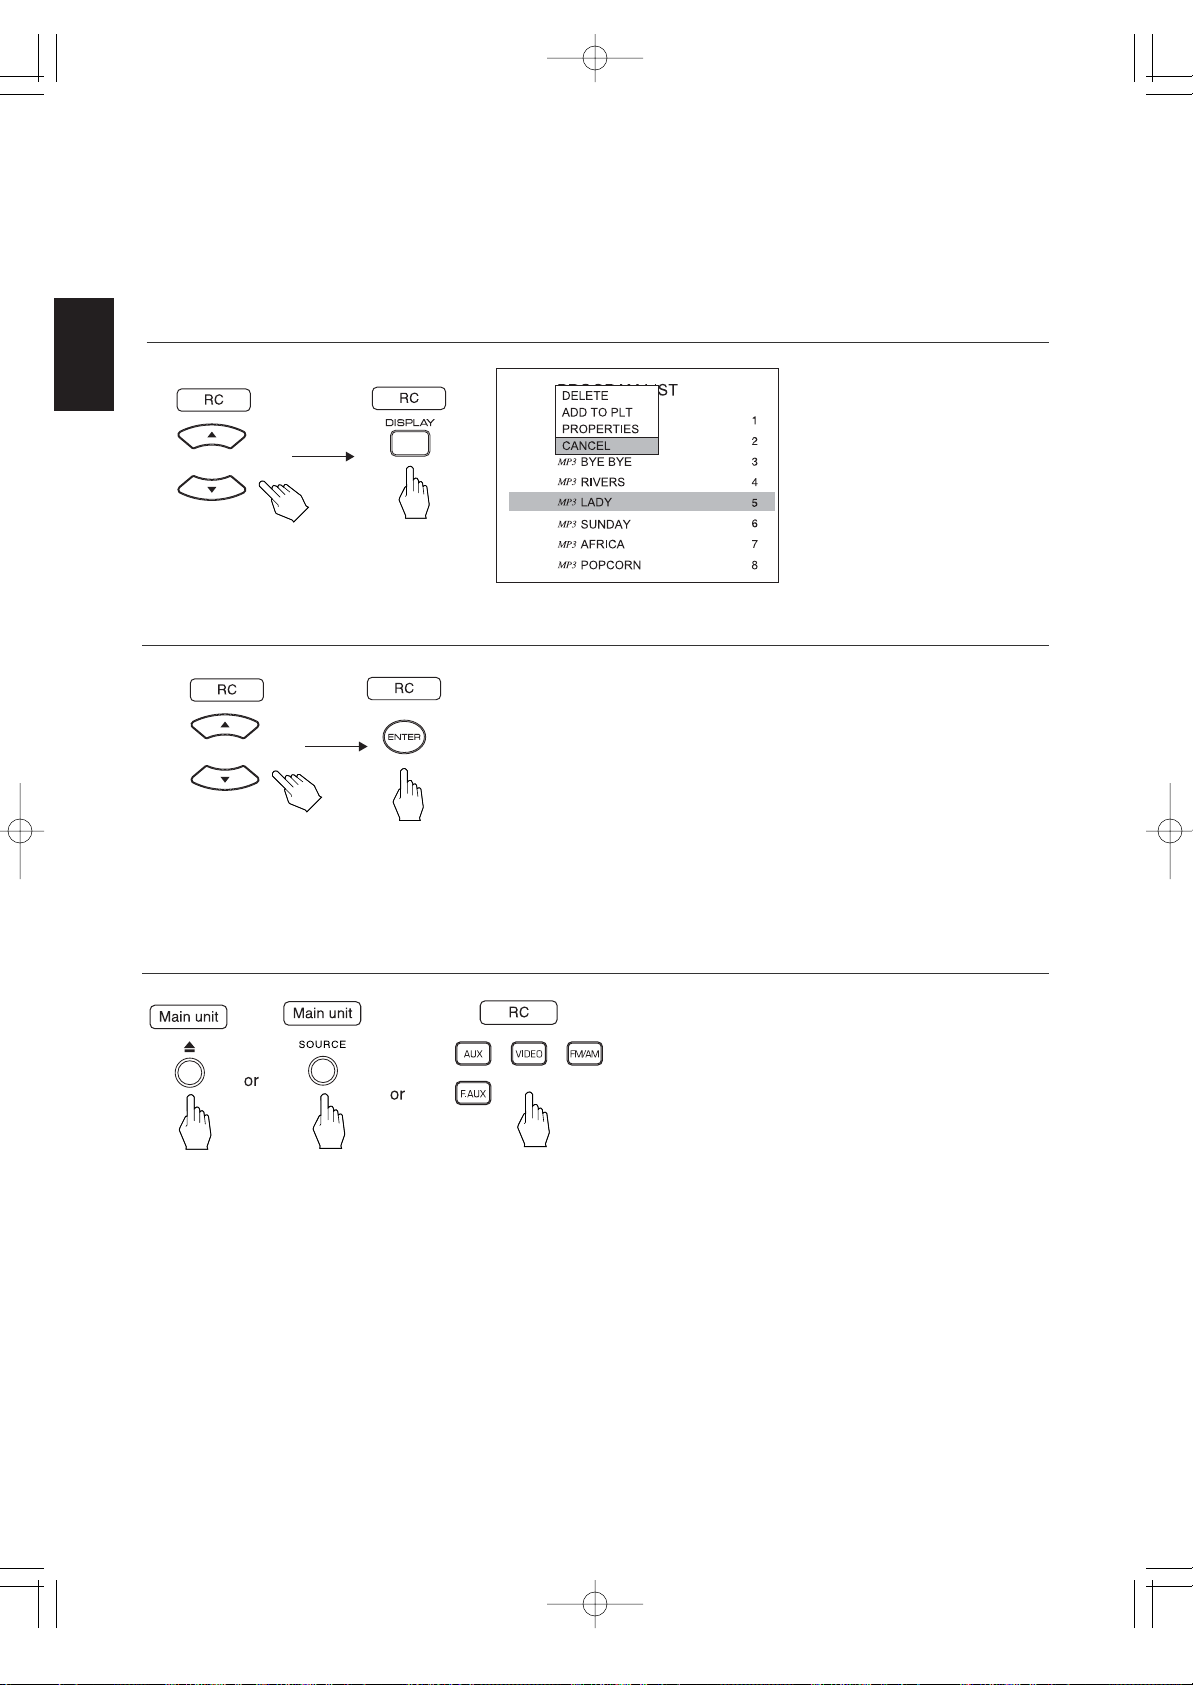
1. When displaying the PROGRAM LIST, press the CURSOR ▲/▼ buttons to select the file to be cleared, then
press the DISPLAY button to enter the program mode.
Clearing the programmed files
[To clear one by one]
Open the disc tray or select an input source except DVD.
[To clear all programmed files]
2. Press the CURSOR ▲/▼ buttons to select DELETE, then press the ENTER button.
• Then the program menu is
displayed.
• Then the selected file is cleared.
• Then the programmed files are all cleared.
VR-652(A) 2008.3.6 5:32 PM 페이지 32
Page 33
33
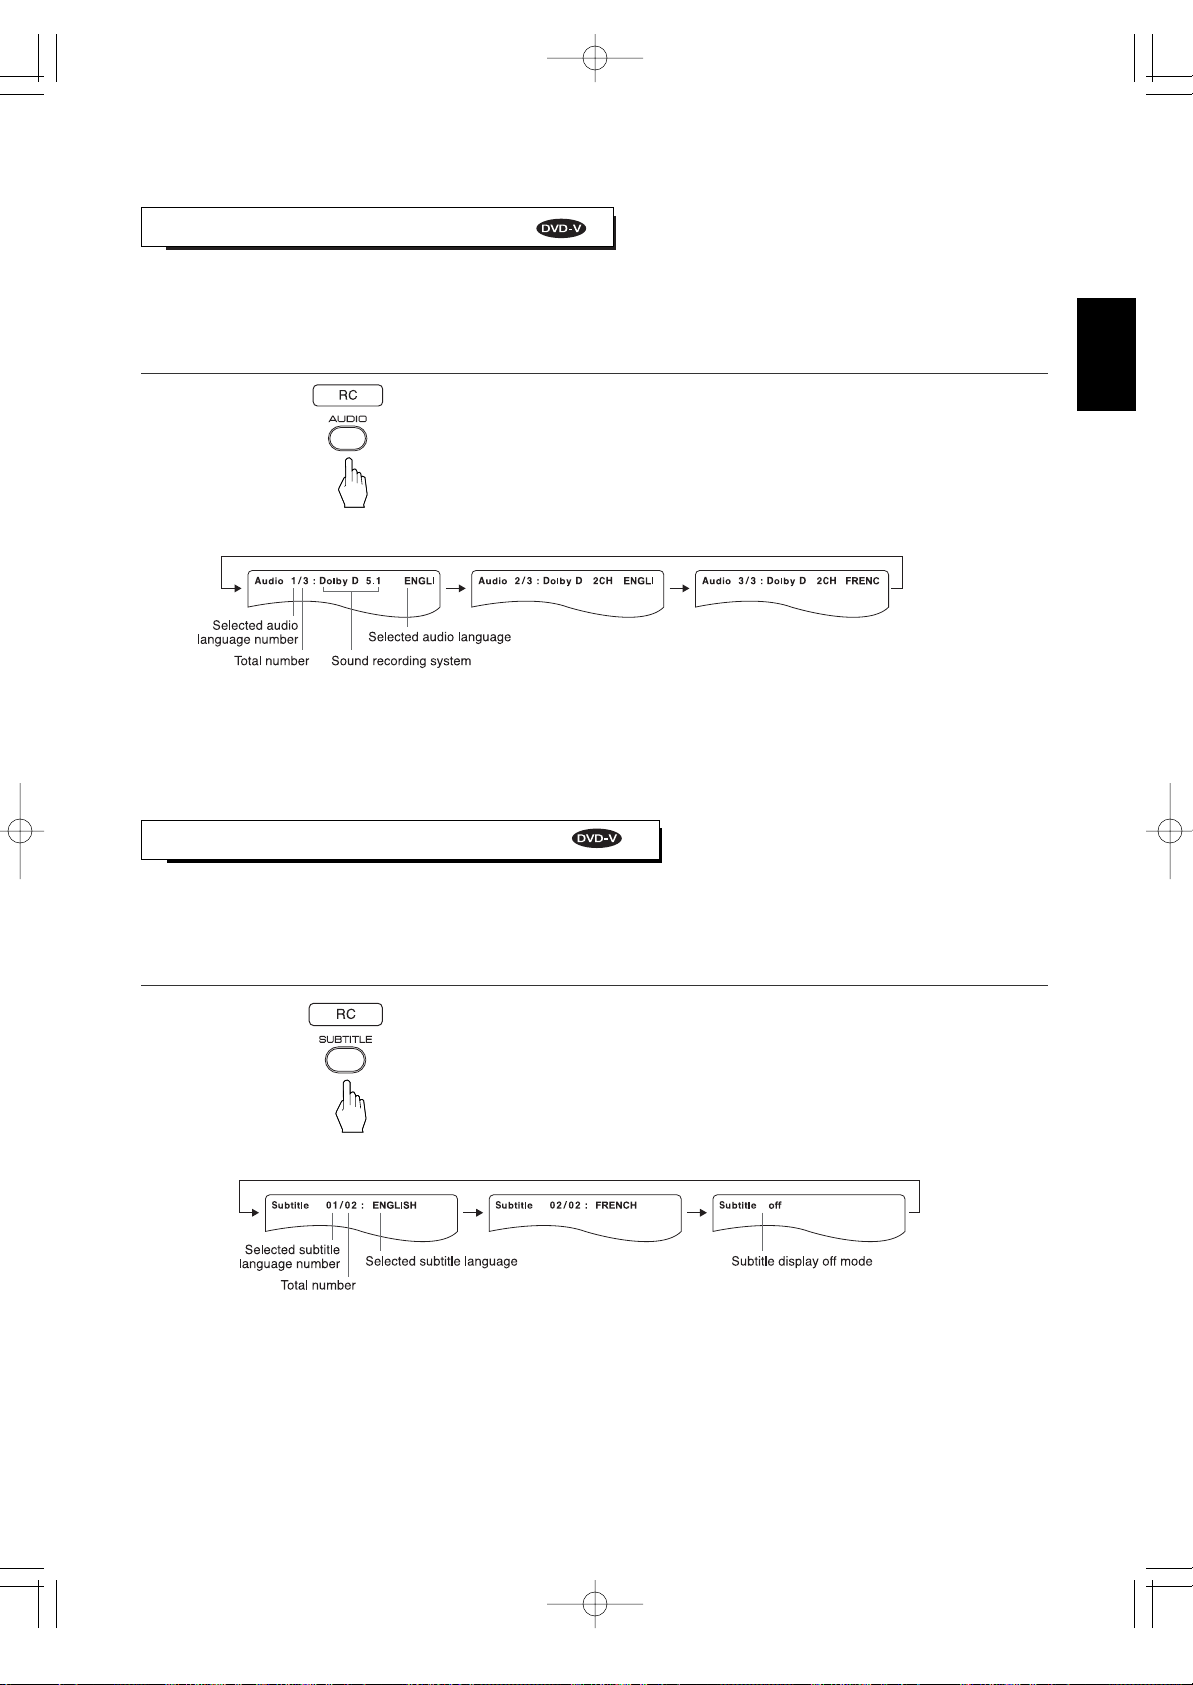
• It is possible to change the audio language to a different language from the one selected at the initial settings.
(For details, refer to "SETTING THE LANGUAGE SETUP" on page 37.)
This operation works only with DVD Videos on which multiple audio languages are recorded.
During playback, press the AUDIO button.
• Then the audio language menu is displayed on the TV
screen for several seconds.
• Each time this button is pressed, the audio language changes as follows:
Example)
Notes:
• You cannot select the preferred audio language when the disc contains only one.
• When the disc is changed, etc., the language heard is the one selected at the initial settings. If this is not recorded on the
disc, only the available language on the disc will be heard.
• On some discs, an audio language except the selected one at the initial settings may be heard.
• It is possible to change the subtitle language to a different language from the selected one at the initial settings.
(For details, refer to "SETTING THE LANGUAGE SETUP" on page 37.)
This operation works only with discs on which multiple subtitle languages are recorded.
During playback, press the SUBTITLE button.
• Then the subtitle language menu is displayed on the TV
screen for several seconds.
• Each time this button is pressed, the subtitle language changes as follows :
Example)
Notes :
• You cannot select the preferred subtitle language when the disc does not contain the available language.
• When the disc is changed,etc., the displayed language is the selected one at the initial settings. If this is not recorded on the
disc, the available language on the disc may be displayed.
• On some discs, a subtitle language except the selected one at the initial settings may be displayed.
CHANGING THE AUDIO LANGUAGE
CHANGING THE SUBTITLE LANGUAGE
ENGLISH
VR-652(A) 2008.3.6 5:32 PM 페이지 33
Page 34
ENGLISH
34
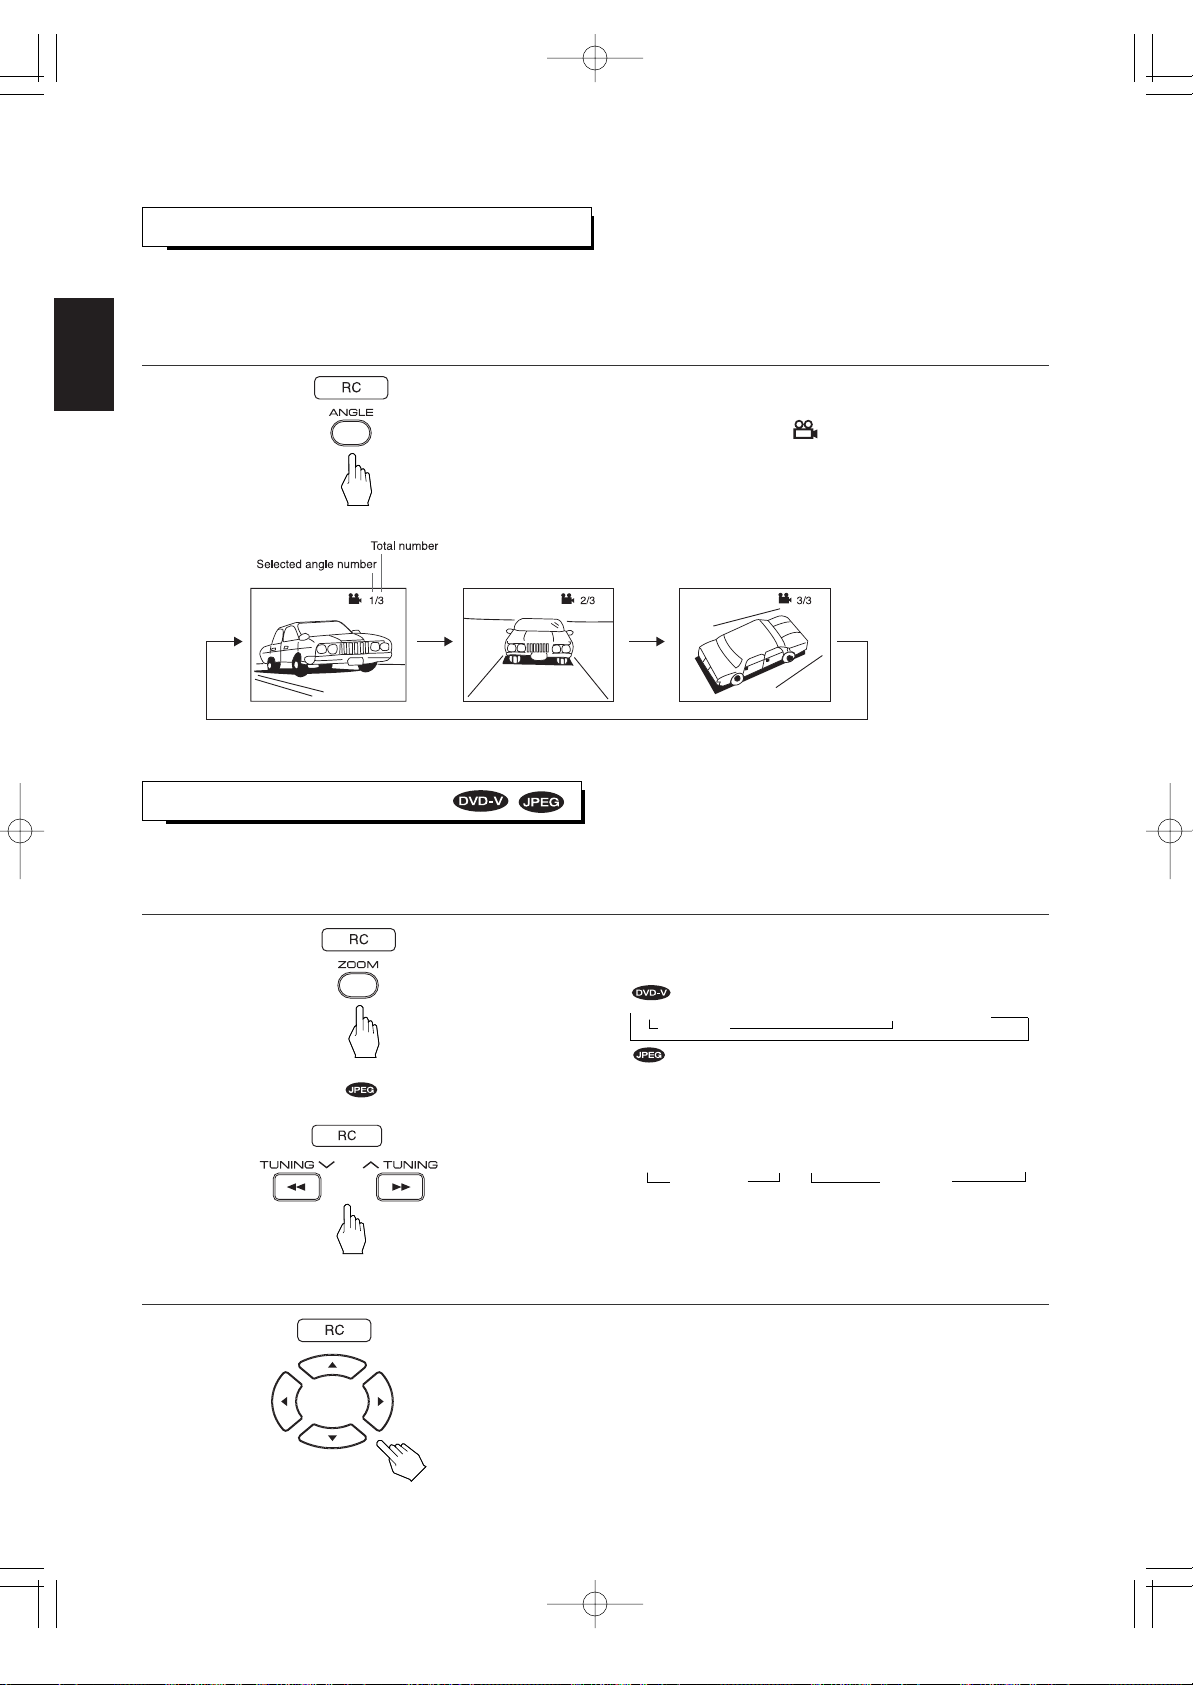
• Some DVD Videos contain scenes which have been shot simultaneously from multiple camera angles.
For these discs, the same scene can be viewed from each of these different angles.
• The recorded angles differ depending on the disc used.
During playback at the scene recorded from multiple camera angles, press the ANGLE button.
• During playback at the scene recorded from multiple camera
angles, the angle symbol( ) is displayed on the TV
screen only when the ANGLE MARK is set to ON.(Refer to
"When selecting the ANGLE MARK" on page 41.)
• Each time this button is pressed, the angle changes as follows:
Example)
Note :
• This function works only at scenes recorded from multiple angles.
ZOOMING IN/OUT A SCENE
• Each time this button is pressed, zoom scale or zoom
mode changes as follows:
• The unit zooms in to the center part of the scene.
Zoom x1.5 Zoom x2 Zoom x3 Zoom off
Zoom-in mode Zoom playback off mode
Zoom on Zoom off
• Each time the button is pressed, zoom scale changes as
follows:
025 Pct 050 Pct 150 Pct 200 Pct 300 Pct
Zoom-out mode Zoom-in mode
• In the zoom-in mode only, you can select and view any part of the scene close-up.
1. During playback or in the still picture mode or the pause mode, press the ZOOM button.
2. Only while zooming in a scene, press the CURSOR ▲/▼/◀/▶ buttons to select the desired part of the scene.
• To return to the previous operation status, press the
ZOOM button repeatedly until the zoom playback is
canceled.
Notes:
• The zoom function may not work with some discs or files.
• The zoom function may not work properly at some scenes.
• Zooming is not possible at a title or DVD menu, etc..
To select a zoom scale
• In the zoom on mode,
CHANGING THE CAMERA ANGLE
VR-652(A) 2008.3.6 5:32 PM 페이지 34
Page 35
35
CHANGING THE VIDEO SIGNAL FORMAT
• Depending on the countries, this unit conforms to either the NTSC color system for U.S.A, Canada, etc., or the PAL for Europe,
Australia, China, etc.
If the color system of this unit is different from that of your TV monitor and the discs to be played, the screen may be somewhat
hard to see or the picture quality may be poor.
Only in this case, change the video signal format to another.
(For details about the video signal format of your TV monitor or the discs, refer to the operating instruction of your TV or the
disc’s jacket.)
• You can set the video signal format to the desired at initial settings, too.
(For details, refer to "When selecting the TV SYSTEM" on page 38.)
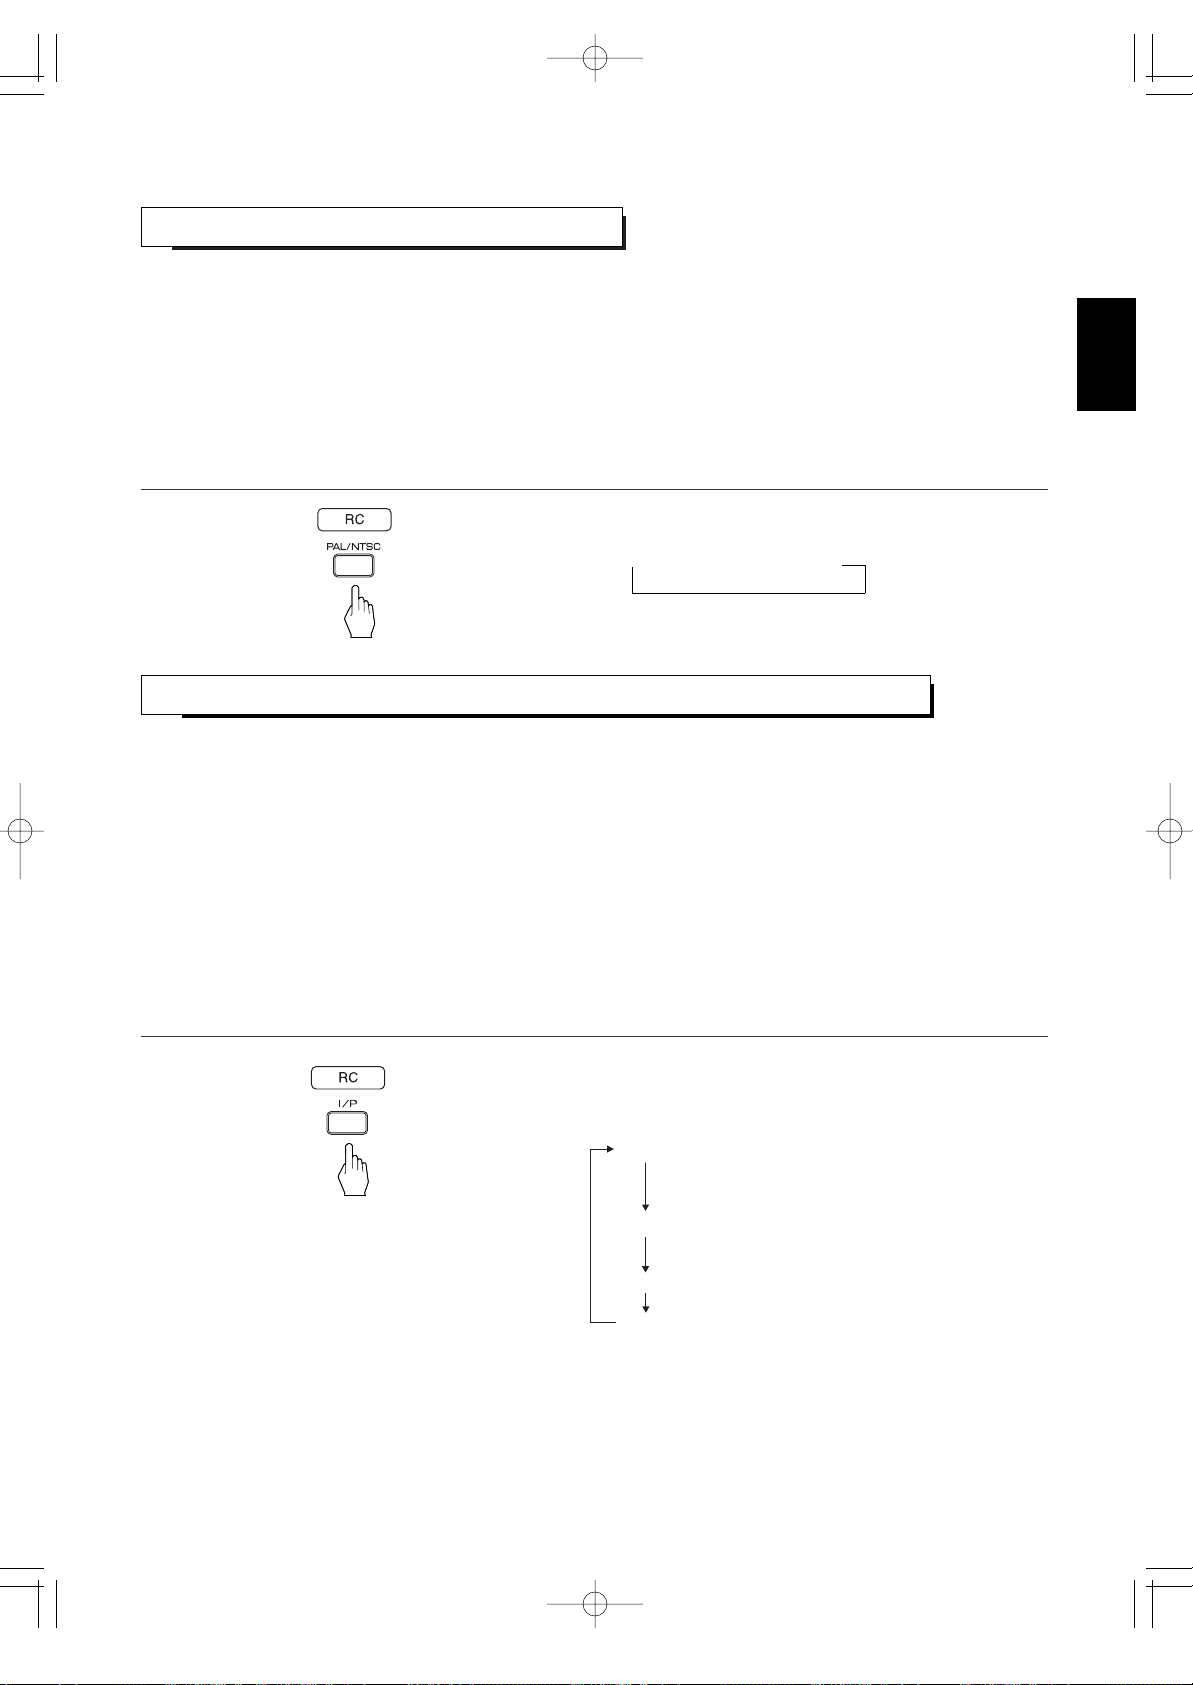
When the disc tray is opened in the DVD mode, press the PAL/NTSC button.
• Each time this button is pressed, the video signal format
changes as follows:
MULTI NTSC PAL
• The MULTI is compatible with both NTSC and PAL
formats.
CHANGING THE RESOLUTION OF COMPONENT VIDEO OUTPUT SIGNAL
• You can select the resolution of video signals to be output from the COMPONENT MONITOR OUTs depending on the TV
connected to this unit. (For details on the resolution compatible with your TV, refer to the operating instructions of that.)
• You can set the SCAN TYPE to the desired at initial settings, too.
(For details, refer to "When selecting the SCAN TYPE" on page 39.)
Notes:
• When you select the mode other than INTERLACED, the S-VIDEO and the (composite) VIDEO MONITOR OUTs of this unit
cannot output the video signals, meaning the picture will not be shown.
• If the resolutions of the video signals which are output from the COMPONENT MONITOR OUTs and your TV are not matched,
the picture is not clear, natural or displayed. In this case, change the setting of the resolution to suit that of your TV.
• Even though 720P or 1080I is selected, if playing a DVD Video which is copy-protected by Macrovision, INTERLACED is
automatically selected and picture may be not shown correctly.
In this case, you should connect the (composite) VIDEO IN or the S-VIDEO IN of your TV to this unit.
When the disc tray is opened in the DVD mode, press the INTERLACED/PROGRESSIVE button.
• Each time this button is pressed, the resolution of
component video output signal changes as follows :
INTERLACED : When outputting 720x480i (NTSC) (or
720x576i (PAL) (interlaced)) video
signals from the COMPONENT
MONITOR OUTs.
480P(576P) : When outputting 720x480p (NTSC)
(or 720x576p (PAL) (progressive)) video
signals.
720P : When outputting 1280x720p (progressive) video
signals.
1080I : When outputting 1920x1080i (interlaced) video
signals
ENGLISH
VR-652(A) 2008.3.6 5:32 PM 페이지 35
Page 36
ENGLISH
36
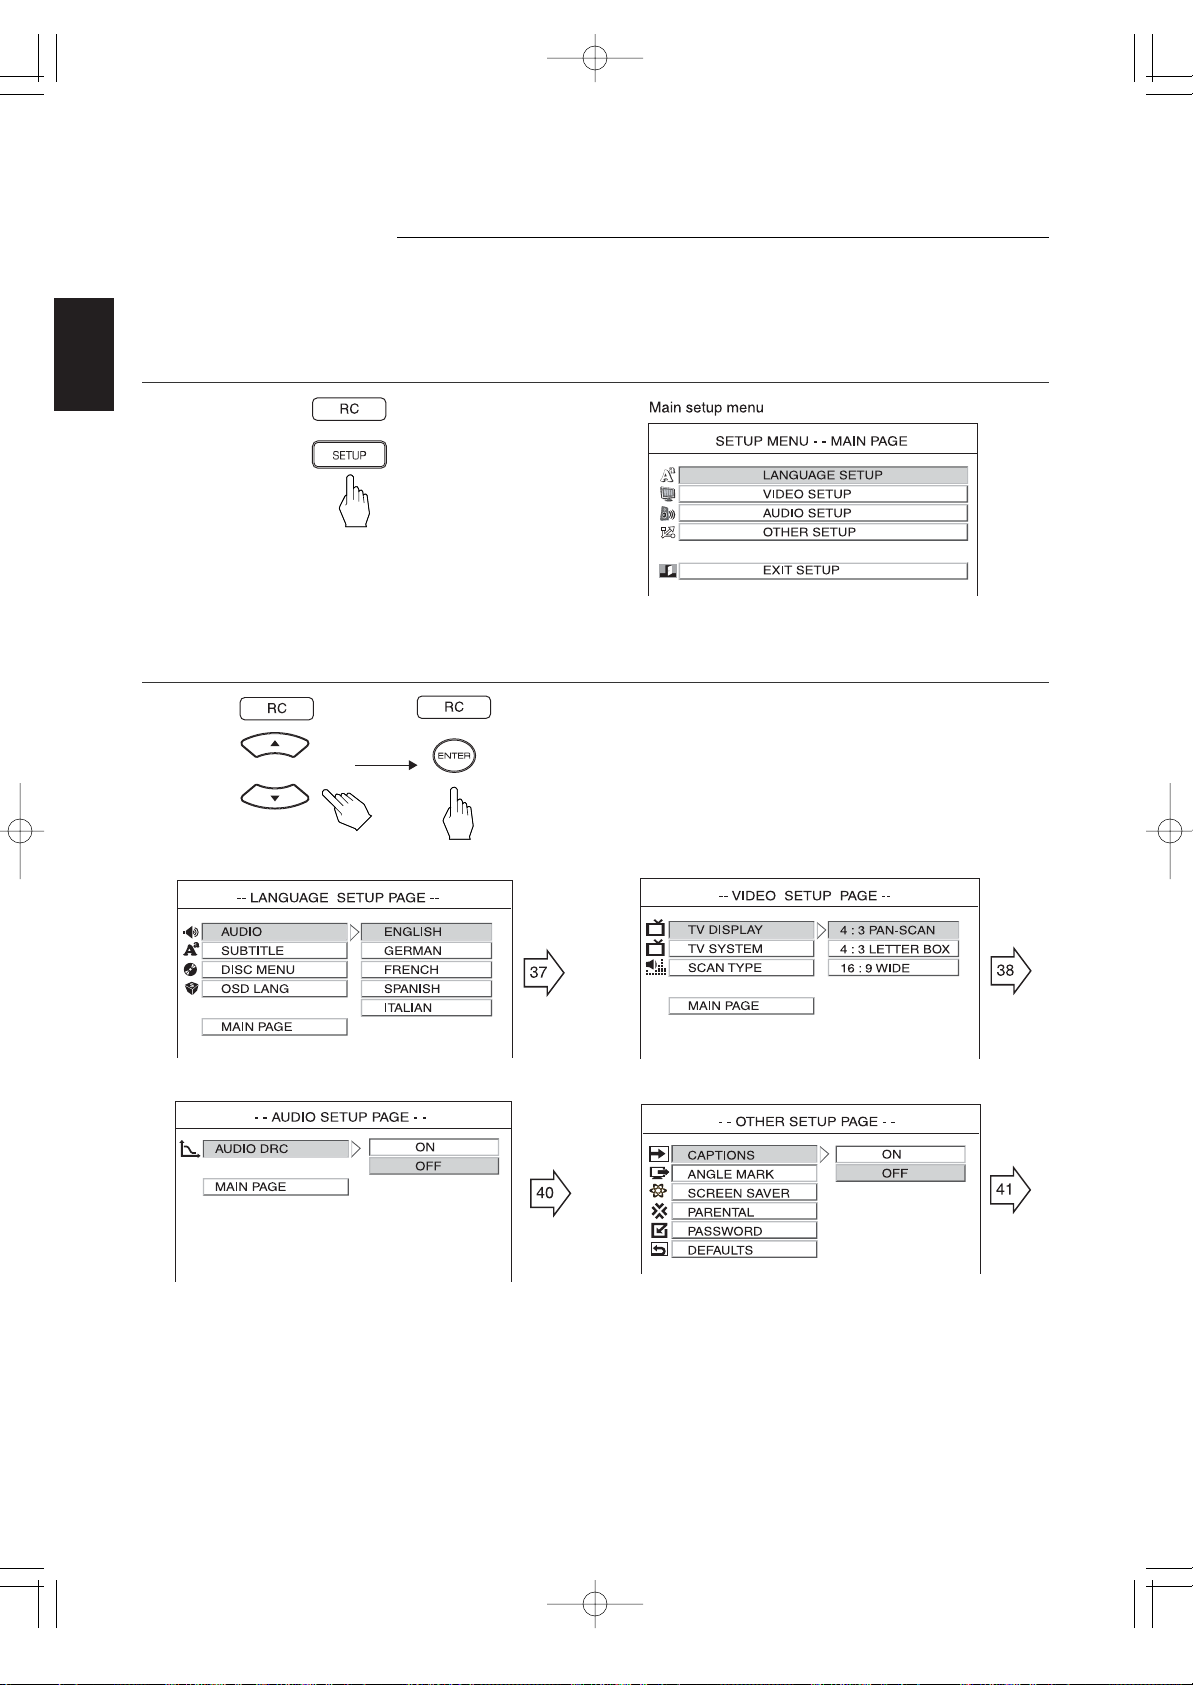
When selecting the LANGUAGE SETUP When selecting the VIDEO SETUP
When selecting the AUDIO SETUP When selecting the OTHER SETUP
The initial settings of the unit at the factory can be modified as desired later.
Even after the power of the unit is switched to the standby mode, the initial settings are stored in memory until it is
changed the next time.
Note :
• During setting operation, only the buttons required for setting of DVD operation buttons will function.
• To exit the setup mode, press the SETUP button, or press
the CURSOR ▲/▼ buttons to select "EXIT SETUP" on the
main setup menu and press the ENTER button.
• Then the selected category will provide you the setting
details using the succeeding screen.
Initial Settings
1. In the stop mode, press the SETUP button to enter the setup mode.
2. Press the CURSOR ▲/▼ buttons to select a setting category, then press the ENTER button to confirm your
selection.
VR-652(A) 2008.3.6 5:32 PM 페이지 36
Page 37
37
ENGLISH
SETTING THE LANGUAGE SETUP
• AUDIO : When selecting a preferred audio language to be heard
from those included on the DVD Video.
• SUBTITLE : When selecting a preferred subtitle language to be
displayed from those included on the DVD Video.
• DISC MENU : When selecting a preferred menu language to be
displayed from those included on the DVD Video.
• OSD LANGUAGE : When selecting a preferred OSD (On-Screen
Display) language to be displayed.
Note:
• If the selected language is not recorded in the DVD Video, one of the recorded languages is automatically selected.
• The selected language is colored.
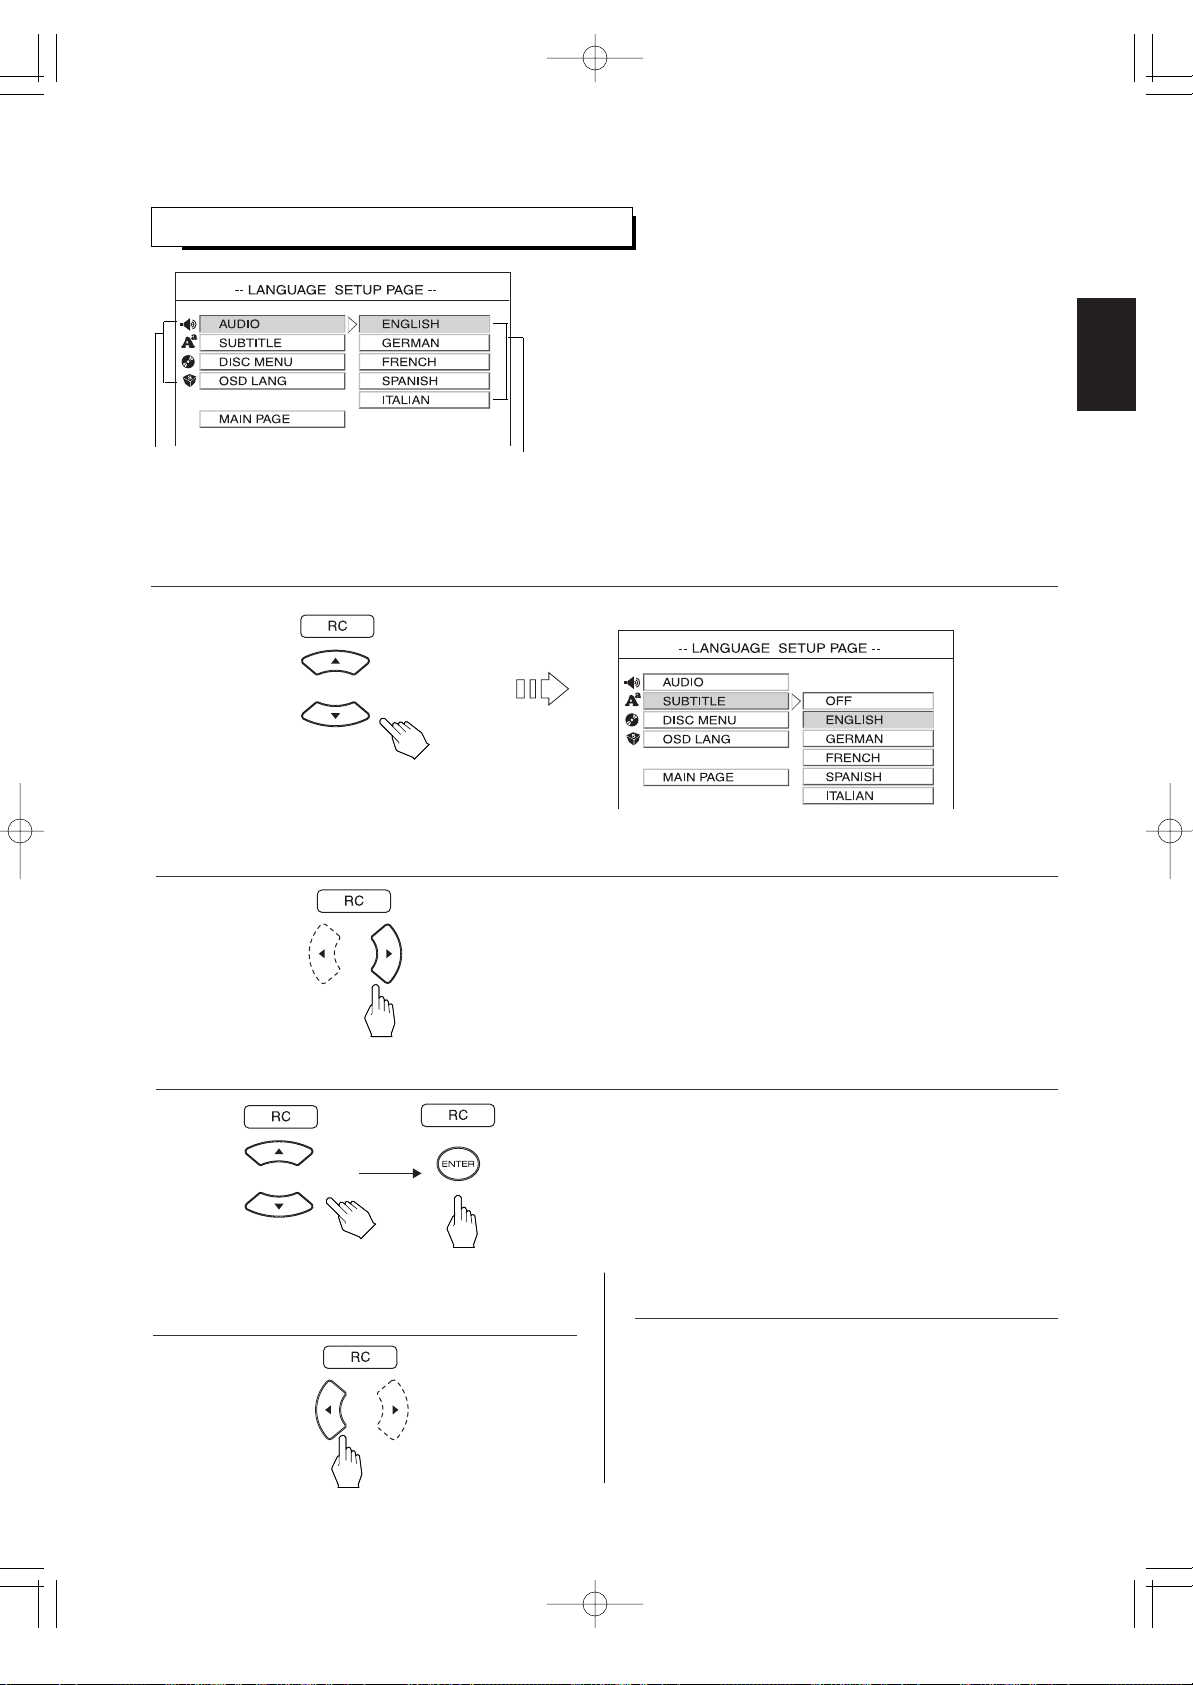
• You can select one of languages listed in the language
menu.
• To turn off the display of subtitle language, select "OFF" on
the subtitle language menu.
• Each time the CURSOR ▶ or ◀ button is pressed, the
language menu or the item menu is selected.
• Then the language menu of the selected item is displayed.
Example) When selecting the SUBTITLE
1. Press the CURSOR ▲/▼ buttons to select the preferred item.
2. Press the CURSOR ▶ button to select the language menu.
3. Press the CURSOR ▲/▼ buttons to select the preferred language, then press the ENTER button.
4. Press the CURSOR ◀ button to select the item
menu.
5. Set other setups to your preference.
To return to the main setup menu screen
• Press the CURSOR ◀ button to select the item menu,
press the CURSOR ▲/▼ buttons to select "MAIN
PAGE" and press the ENTER button.
Then the main setup menu screen will be displayed.
• When the RETURN button is pressed, the main setup
menu screen will be displayed, too.
Language menu
Item menu
VR-652(A) 2008.3.6 5:32 PM 페이지 37
Page 38
38
SETTING THE VIDEO SETUP
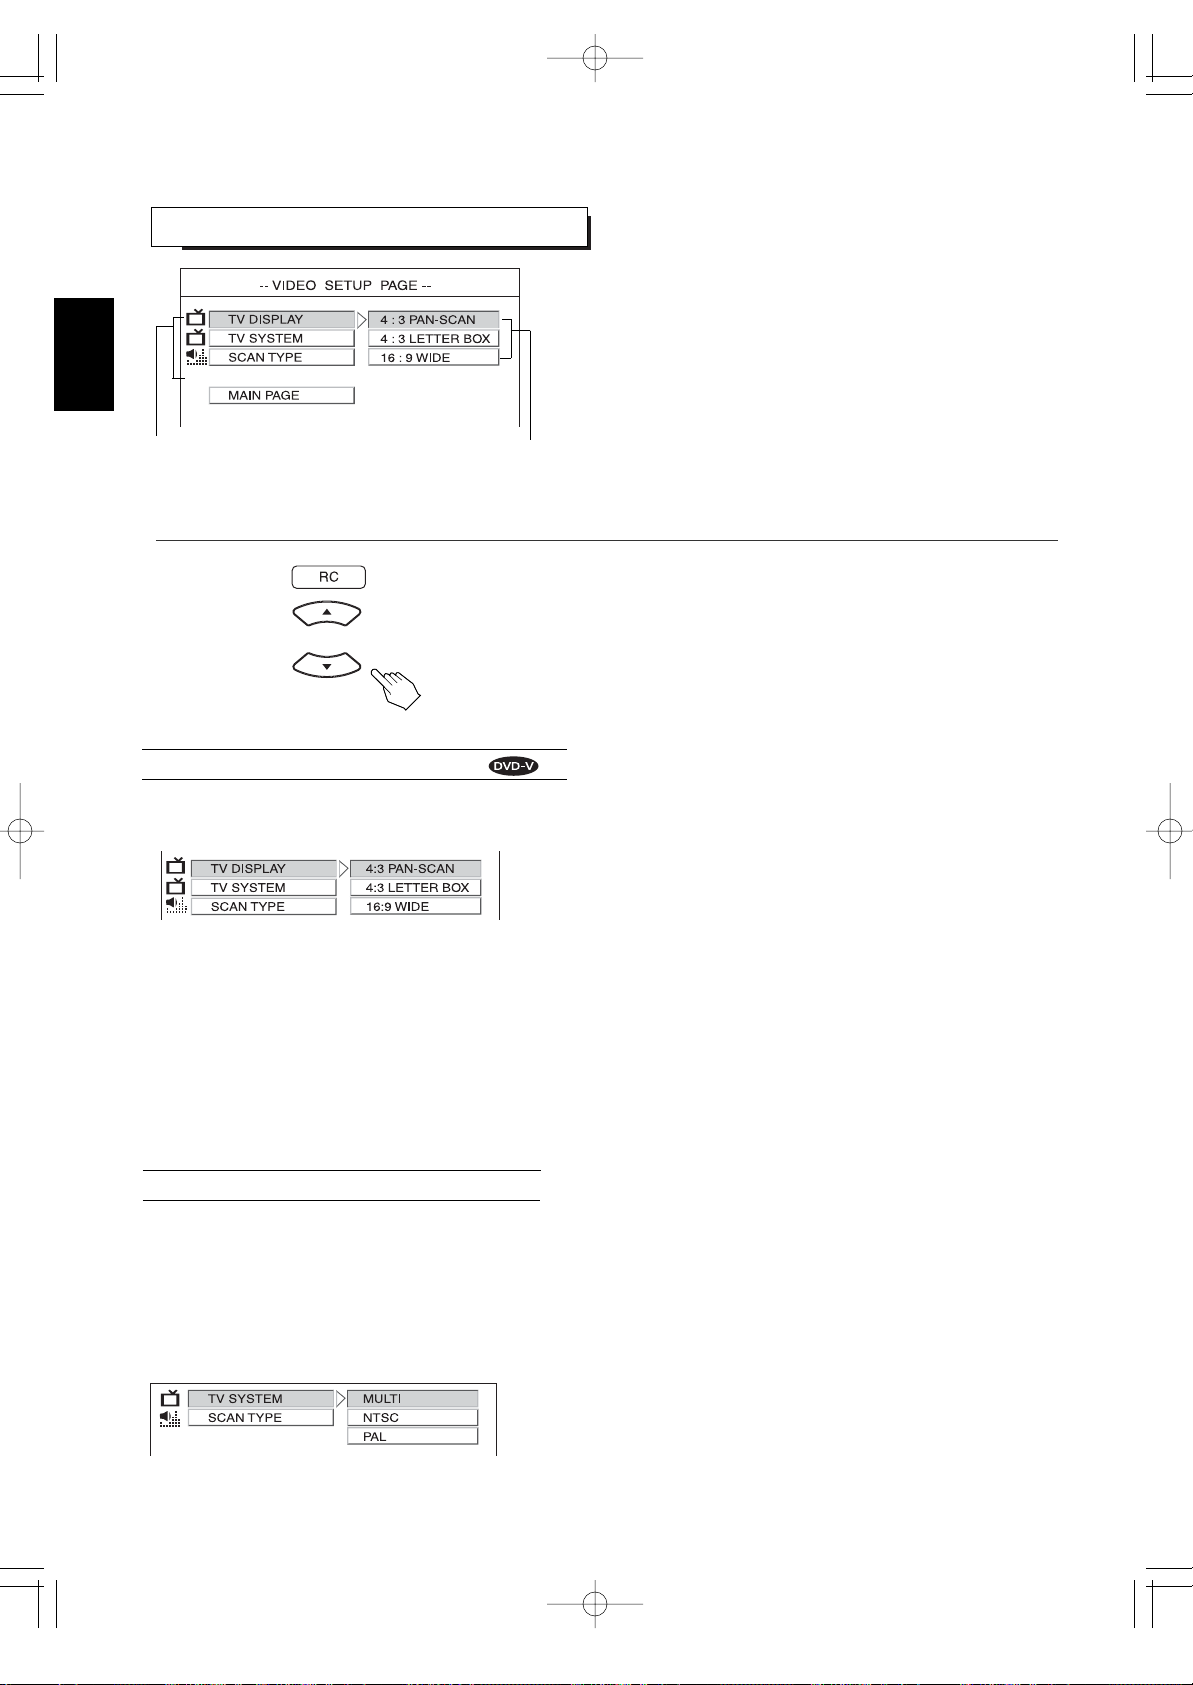
• TV DISPLAY : When selecting a picture size according to the
aspect ratio of your TV's screen.
• TV SYSTEM : When selecting the desired video signal format to
match that of your TV monitor and DVD Video to be
played.
• SCAN TYPE : When outputting the video signals in the desired
resolution from the unit's COMPONENT MONITOR
OUTs.
• Then the setting menu of the selected item is displayed.
1. Press the CURSOR ▲/▼ buttons to select the preferred item.
When selecting the TV DISPLAY
• 4:3 PAN-SCAN : DVD Videos recorded with the 16:9 aspect ratio and the
pan-scan specification are reproduced in the pan-scan
screen which automatically trims the left and right of
picture.
• 4:3 LETTER BOX : DVD Videos recorded with the 16:9 aspect ratio are
reproduced in the letter box screen which has black
bands on the top and bottom.
• 16:9 WIDE : DVD Videos recorded with the 16:9 screen are reproduced
by filling the TV screen.
Notes:
• Depending on some DVD Videos, the playback picture may not conform
to the TV aspect setting you select.
• When the SCAN TYPE is set to 720P or 1080I, the TV DISPLAY cannot
be selected because it is automatically set to 16:9 WIDE.(For details,
refer to "When selecting the SCAN TYPE" on page 39.)
• When you connect a normal TV with 4:3 aspect ratio to this unit, select either 4:3 PAN-SCAN or 4:3 LETTER BOX and
when you connect a wide TV with 16:9 aspect ratio, select 16:9 WIDE.
Setting menu
Item menu
ENGLISH
• Depending on the countries, this unit conforms to either the NTSC color system for U.S.A, Canada, etc., or the PAL for
Europe, Australia, China, etc.
If the color system of this unit is different from that of your TV monitor and the discs to be played, the screen may be
somewhat hard to see or the picture quality may be poor.
Only in this case, change the video signal format to another. (For details about the video signal format of your TV monitor or
the discs, refer to the operating instruction of your TV or disc’s jacket.)
• You can select the desired video signal format with pressing the PAL/NTSC button, too.
(For details, refer to "CHANGING THE VIDEO SIGNAL FORMAT" on page 35.)
When selecting the TV SYSTEM
• MULTI : When selecting the MULTI that is compatible with both
NTSC and PAL formats.
• NTSC : When selecting the NTSC format.
• PAL : When selecting the PAL format.
VR-652(A) 2008.3.6 5:32 PM 페이지 38
Page 39
39
ENGLISH
• You can select the resolution of video signals to be output from the COMPONENT MONITOR OUTs depending on the TV
connected to this unit. (For details on the resolution compatible with your TV, refer to the operating instructions of that.)
Notes:
• When you set the SCAN TYPE to the mode other than INTERLACED, the S-VIDEO and the (composite) VIDEO MONITOR
OUTs of this unit cannot output the video signal, meaning the picture will not be shown.
• If the resolution of the video signals which are output from the COMPONENT MONITOR OUTs and your TV are not matched,
the picture is not clear, natural or displayed. In this case, change the setting of the resolution to suit that of your TV.
• Even though the SCAN TYPE is set to 720P or 1080I, if playing a DVD Video which is copy-protected by Macrovision, the
SCAN TYPE is automatically set to INTERLACED and picture may be not shown correctly. In this case, you should connect
the (composite) VIDEO IN or the S-VIDEO IN of your TV to this unit.
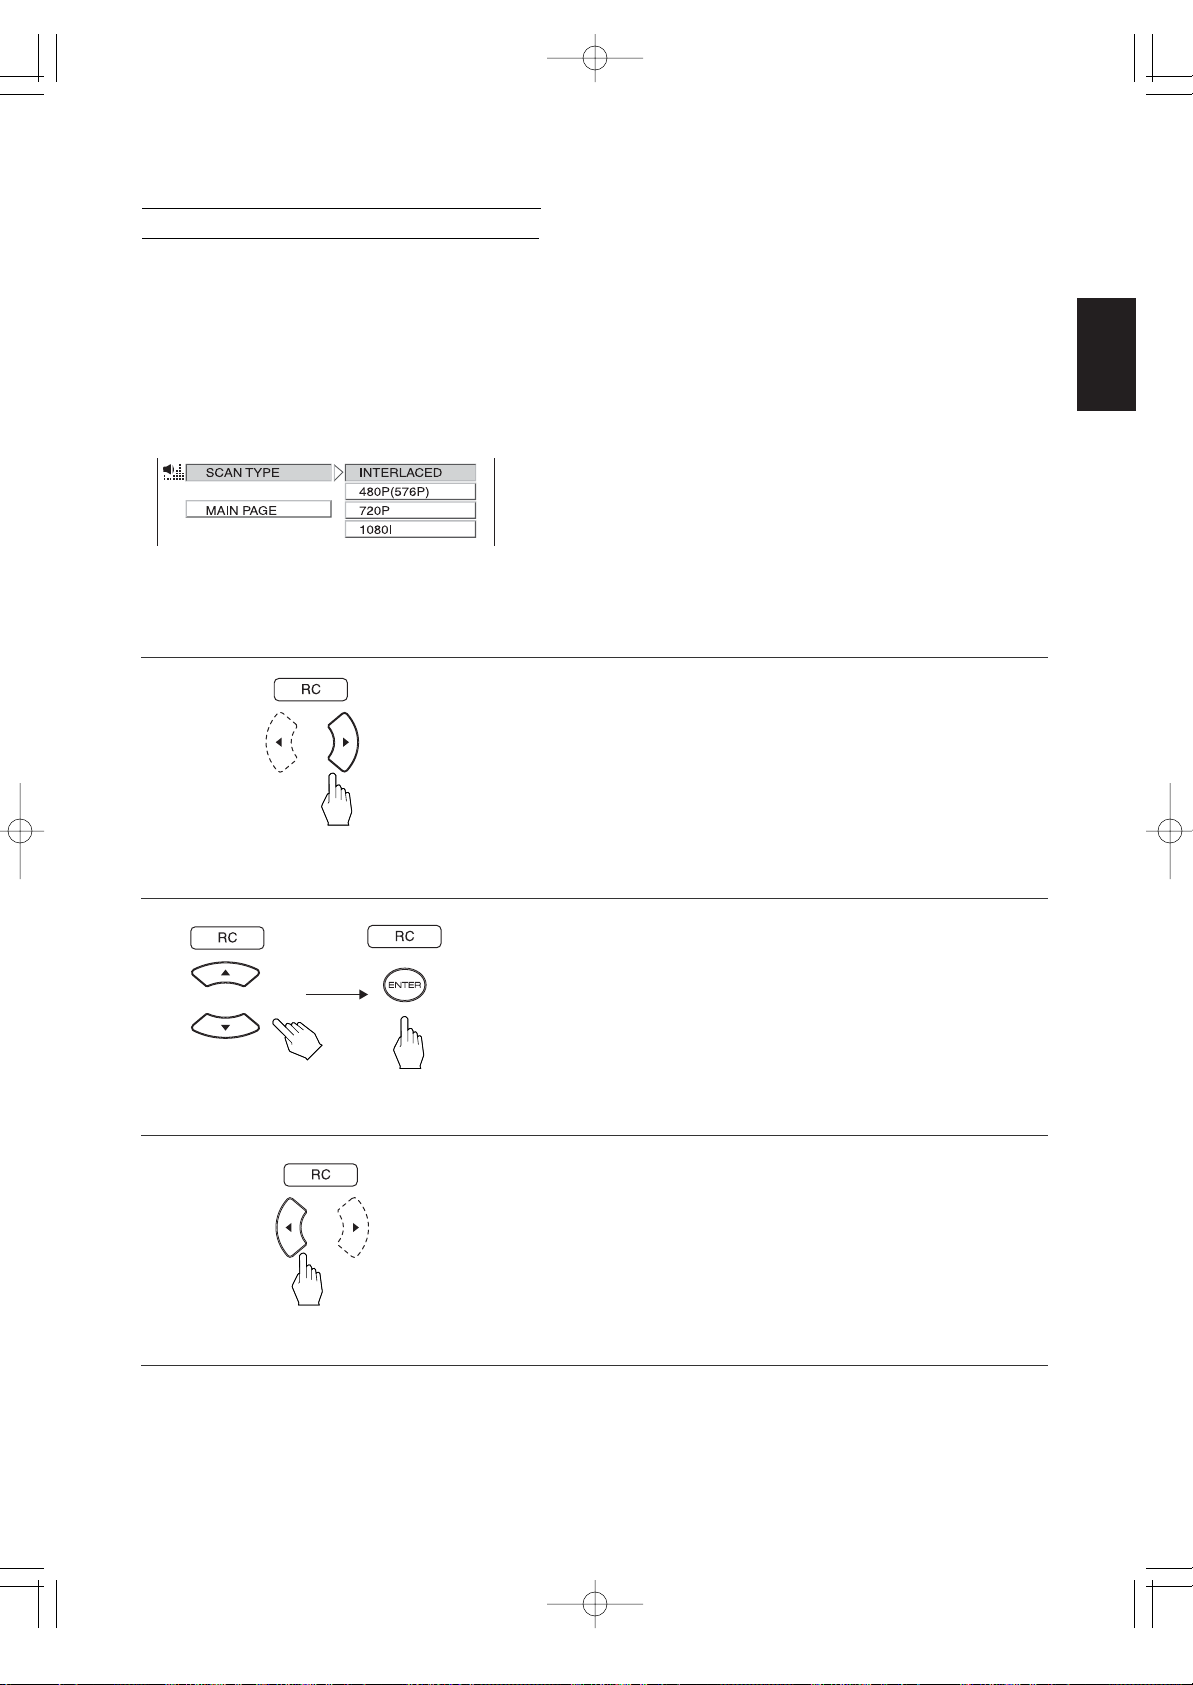
When selecting the SCAN TYPE
• INTERLACED : When outputting 720x480i (NTSC) (or 720x576i(PAL)
(interlaced)) video signals from the COMPONENT
MONITOR OUTs.
• 480P(576P) : When outputting 720x480p (NTSC) (or 720x576p (PAL)
(progressive)) video signals.
• 720P : When outputting 1280x720p (progressive) video signals.
• 1080I : When outputting 1920x1080i (interlaced) video signals.
Continued
• Each time the CURSOR ▶ or ◀ button is pressed, the
setting menu or the item menu is selected.
2. Press the CURSOR ▶ button to select the setting menu.
• The selected setting is colored.
3. Press the CURSOR ▲/▼ buttons to select the preferred setting, then press the ENTER button.
4. Press the CURSOR ◀ button to select the item menu.
5. Set other setups to your preference.
To return to the main setup menu screen
• Press the CURSOR ◀ button to select the item menu, press the CURSOR ▲/▼ buttons to select "MAIN PAGE" and press
the ENTER button.
Then the main setup menu screen will be displayed.
• When the RETURN button is pressed, the main setup menu screen will be displayed, too.
VR-652(A) 2008.3.6 5:32 PM 페이지 39
Page 40
ENGLISH
40
SETTING THE AUDIO SETUP
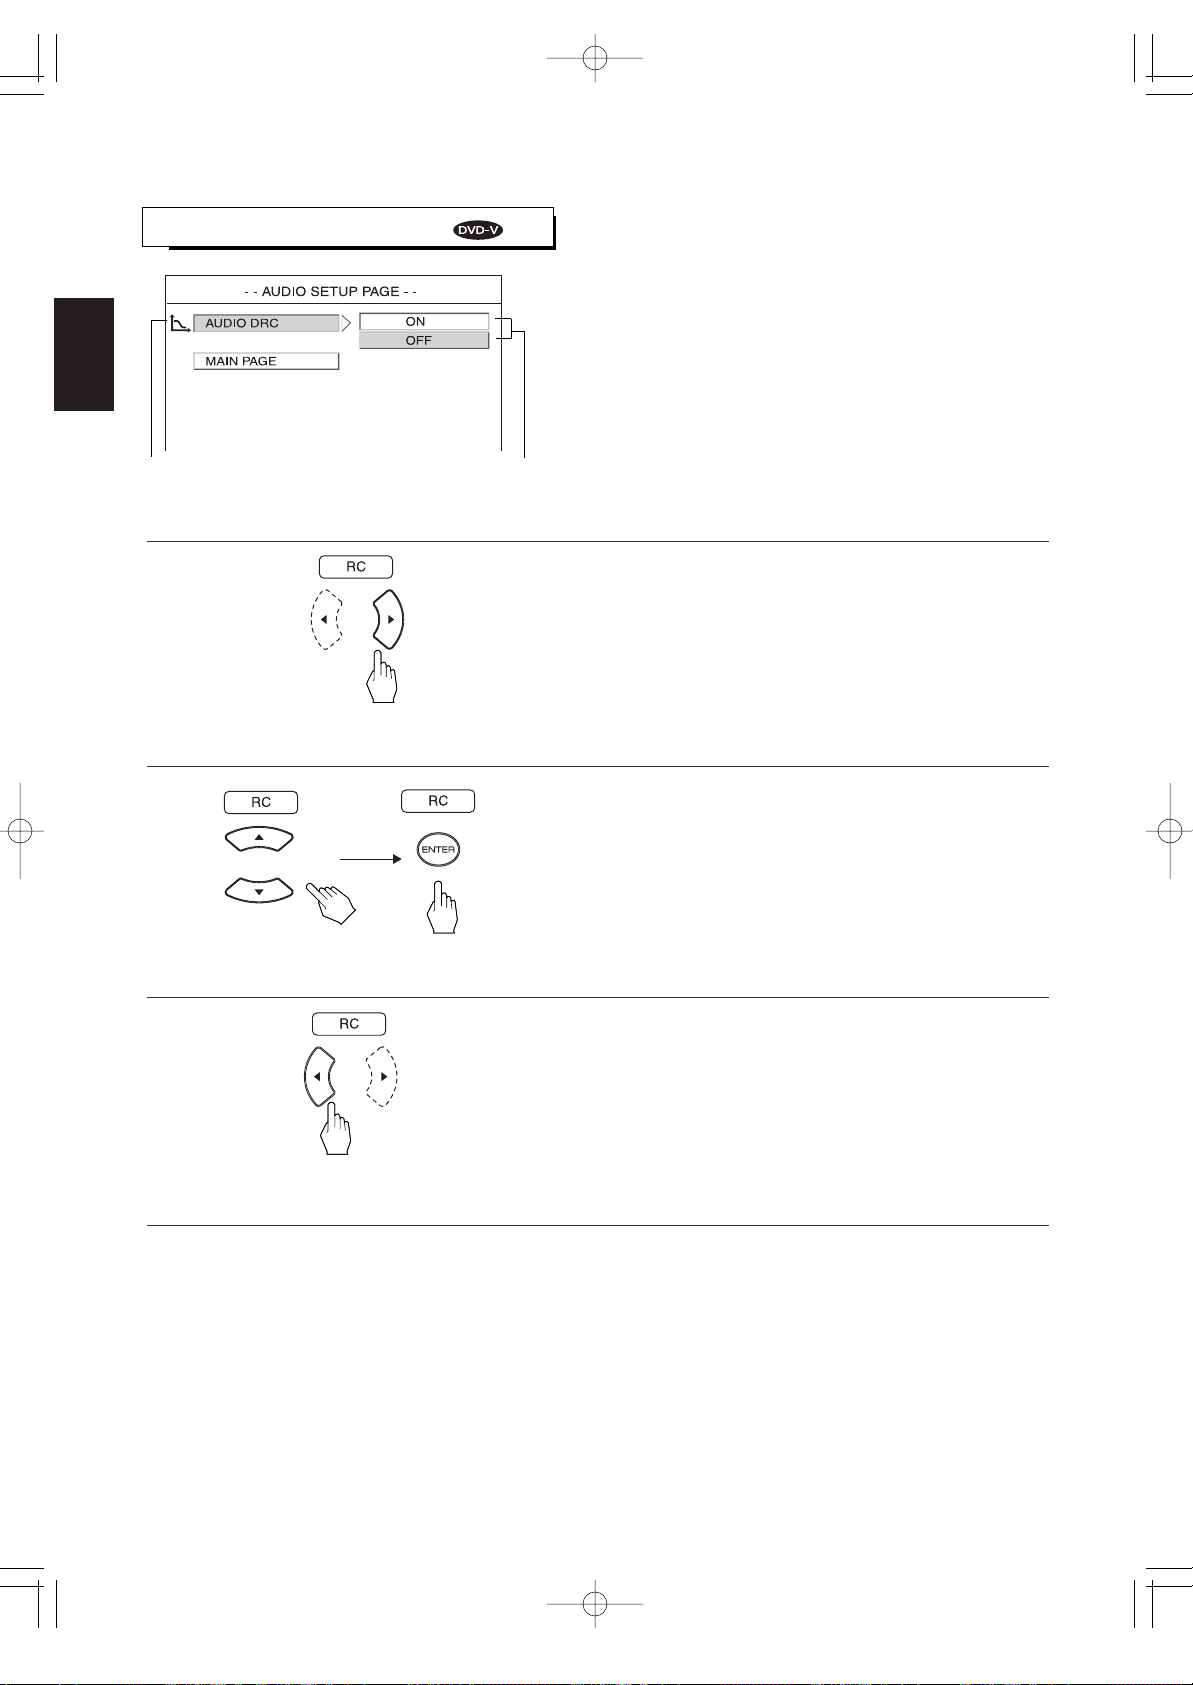
• Each time the CURSOR ▶ or ◀ button is pressed, the
setting menu or the item menu is selected.
1. Press the CURSOR ▶ button to select the setting menu.
2. Press the CURSOR ▲/▼ buttons to select the preferred setting, then press the ENTER button.
3. Press the CURSOR ◀ button to select the item menu.
4. Set other setups to your preference.
• You can adjust the dynamic range compression that makes faint
sound easier to hear at low volume levels.
• When playing the Dolby Digital program sources only, this setting
is valid.
• ON: When adjusting the dynamic range compression.
• OFF : When turning off the dynamic range compression.
Note:
• In some Dolby Digital softwares, this function cannot be available.
To return to the main setup menu screen
• Press the CURSOR ◀ button to select the item menu, press the CURSOR ▲/▼ buttons to select "MAIN PAGE" and press
the ENTER button.
Then the main setup menu screen will be displayed.
• When the RETURN button is pressed, the main setup menu screen will be displayed, too.
Setting menu
Item menu
VR-652(A) 2008.3.6 5:32 PM 페이지 40
Page 41
ENGLISH
41
• ON : When turing on the screen saver function.
• OFF : When turning it off.
• A TV screen may be burned out if a static picture is displayed for a long time in the stop mode.
To prevent this, set the SCREEN SAVER to ON. Then the unit automatically activates the screen saver function if a static
picture is displayed for over 5 minutes.
Note:
• The monitor screen of a projector or projection TV is easily burned out if a static picture is displayed for a long time.
Be careful not to allow the monitor screen to be burned out when the SCREEN SAVER is set to OFF.
SETTING THE OTHER SETUP
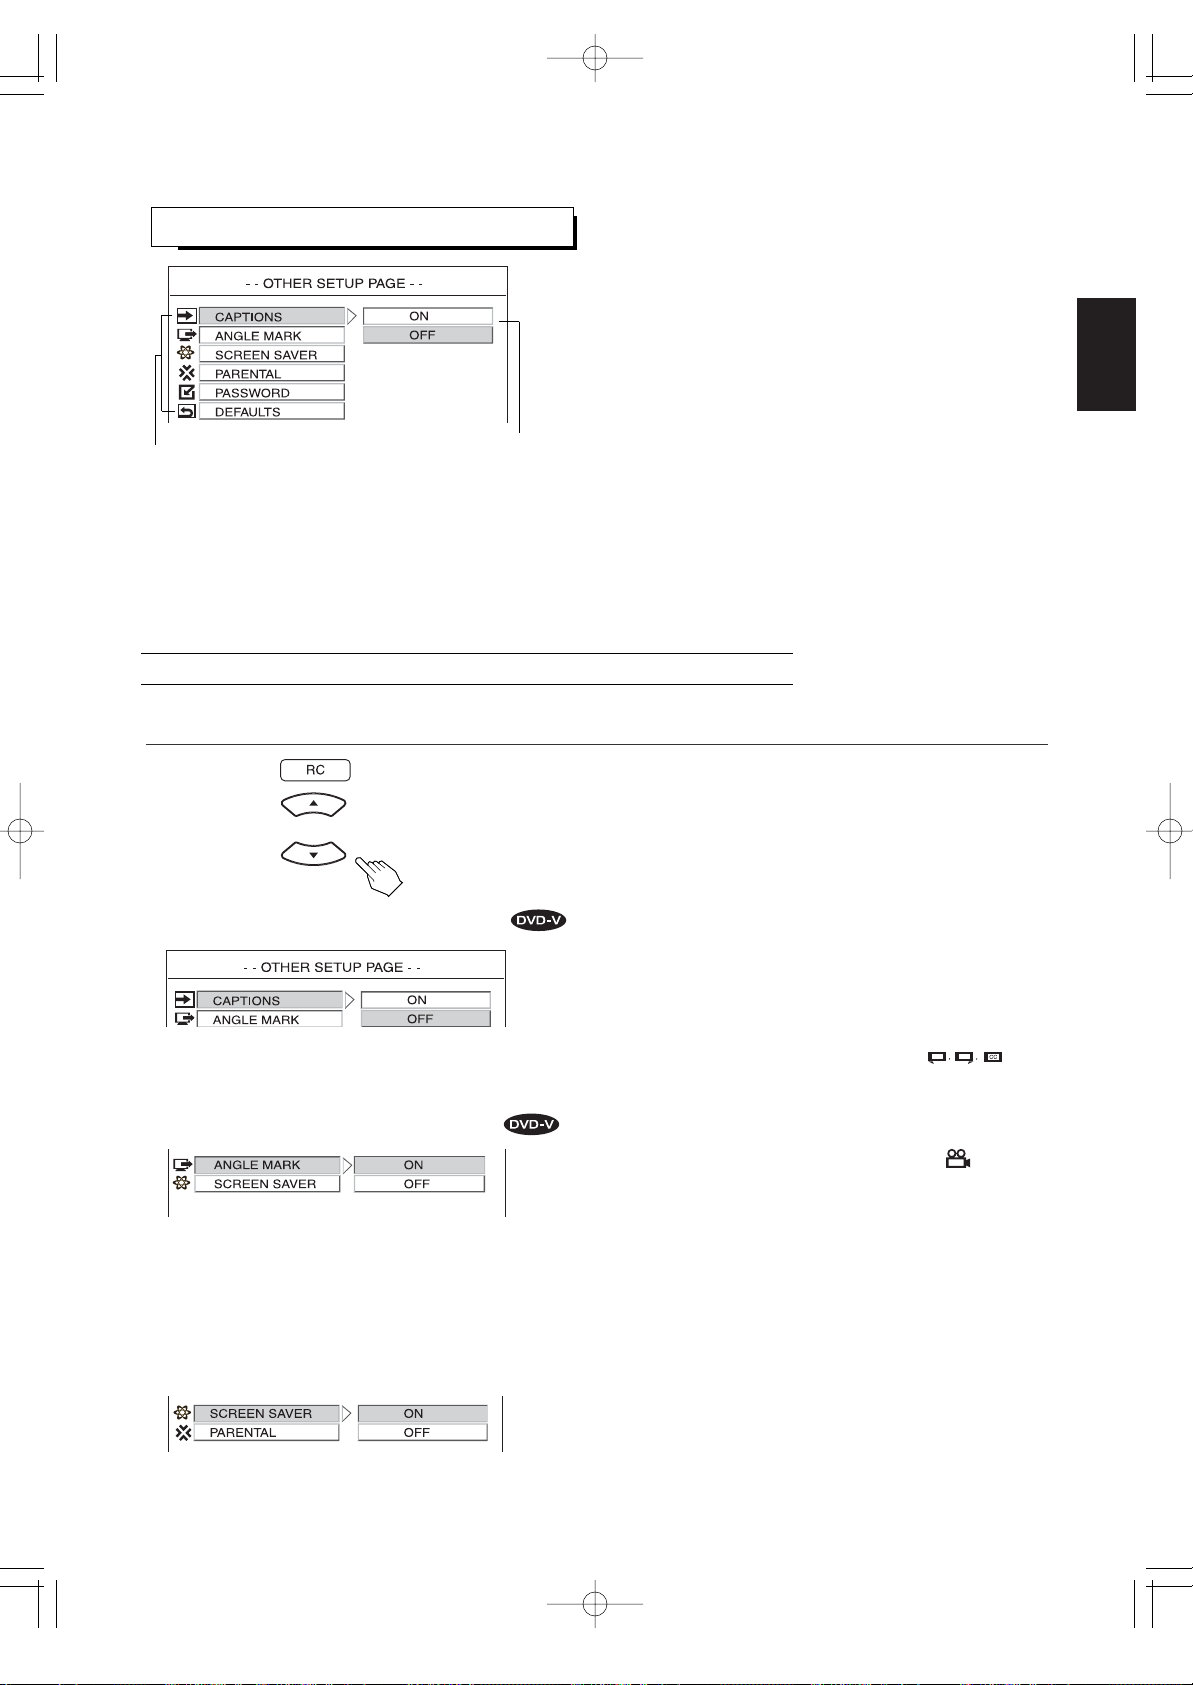
• CAPTIONS : When turning on or off the display of the closed
captions recorded on DVD Video.
• ANGLE MARK : When displaying the angle symbol on the TV
screen during playback at the scene recorded
from multiple camera angles.
• SCREEN SAVER : When turning on or off the screen saver
function.
• PARENTAL CONTROL :
When restricting playback of DVD Video which contains violent
and other scenes according to the level set by the user.
For example, if a movie which includes violent scenes supports the
parental lock feature, such scenes which you do not want to let
children view can be cut or replaced with other scenes.
• PASSWORD : When changing the password for parental lock.
The unit's password has been set to "3308" at the
factory.
• DEFAULTS : When resetting all the settings made in the setup
menu except the rating leve and the password to the
default settings.
Setting menu
Item menu
When selecting the CAPTIONS, ANGLE MARK, SCREEN SAVER
• ON : When turning on the display of the angle symbol ( ) on the
TV screen.
• OFF : When turning it off.
• Then the setting menu of the selected item is displayed.
1. Press the CURSOR ▲/▼ buttons to select the preferred item.
When selecting the ANGLE MARK
When selecting the SCREEN SAVER
• ON : When turning on the display of the closed captions recorded on
DVD Videos.
• OFF : When turning it off.
Notes :
• The caption decoder is required to display captions.
• DVD Videos with caption signals are indicated by the mark.
The captions cannot be displayed when playing DVD Videos which do
not contain caption signals.
When selecting the CAPTIONS
VR-652(A) 2008.3.6 5:32 PM 페이지 41
Page 42
ENGLISH
42
Continued
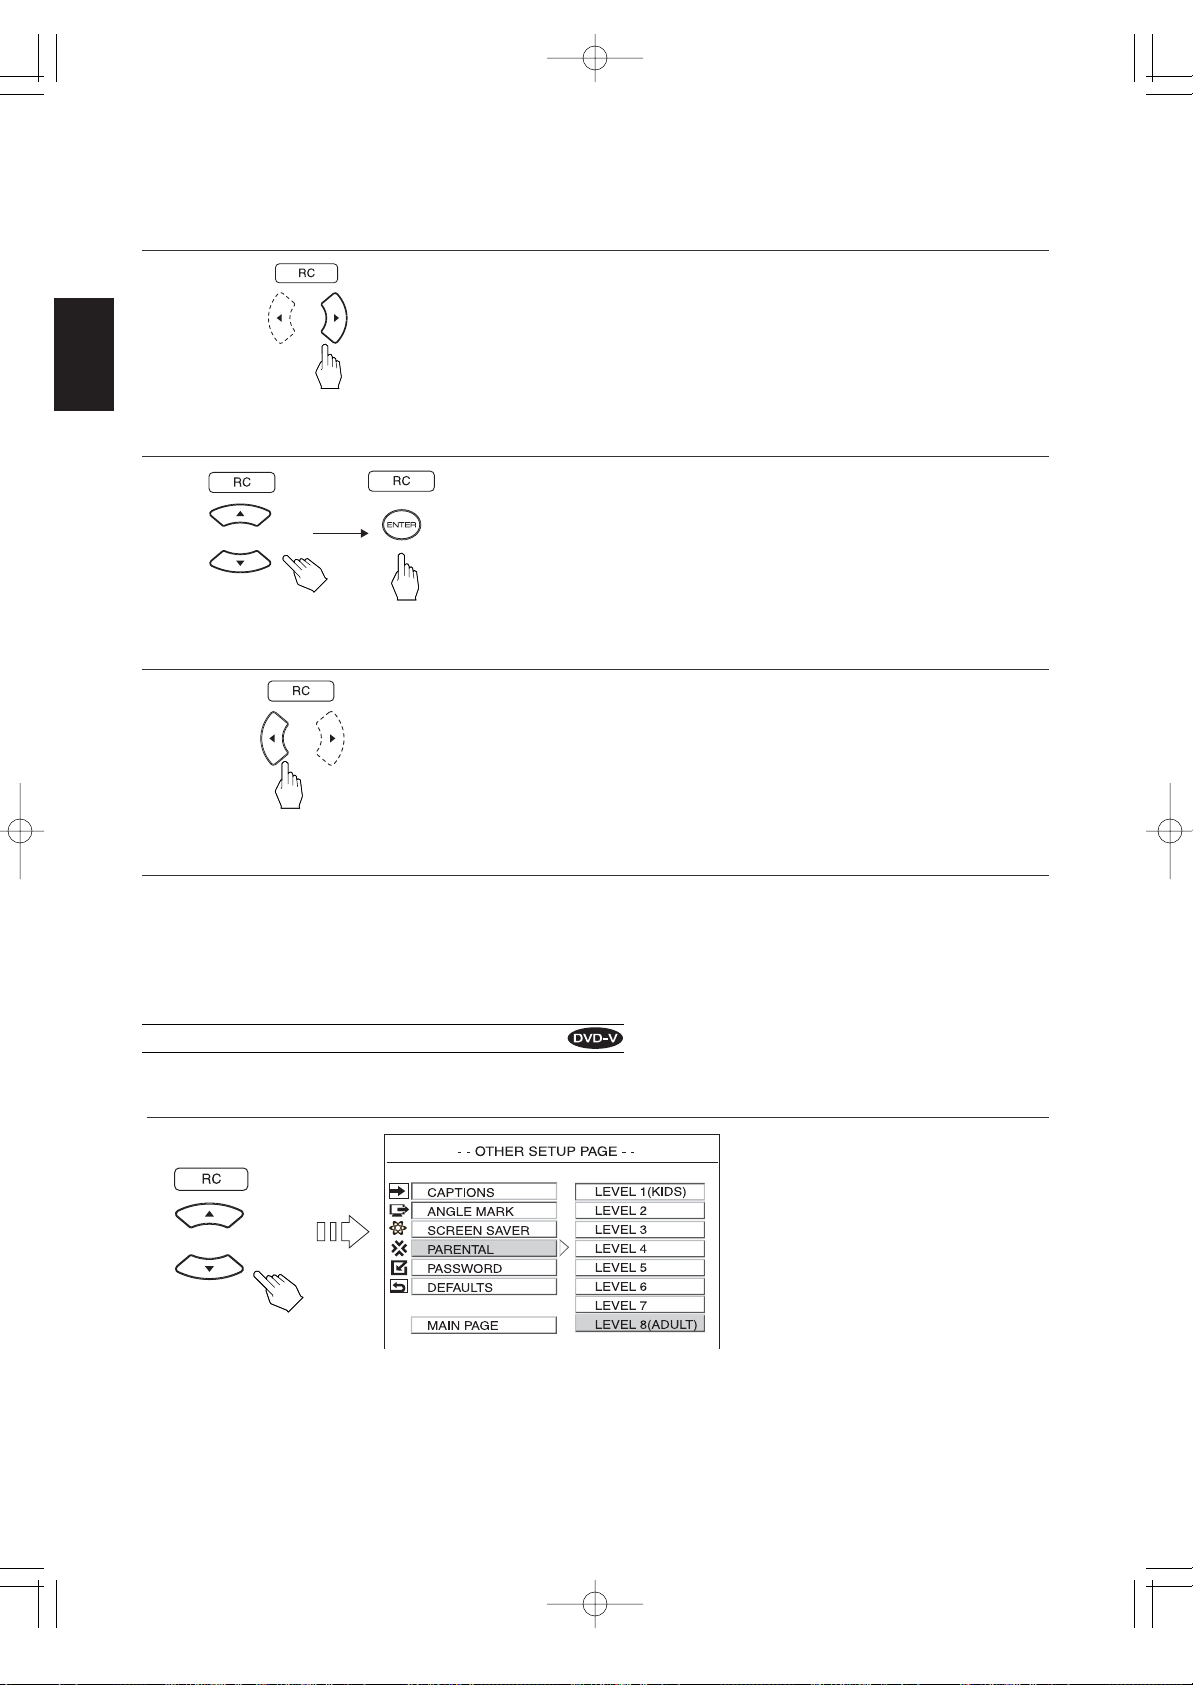
• The selected setting is colored.
3. Press the CURSOR ▲/▼ buttons to select the preferred setting, then press the ENTER button.
4. Press the CURSOR ◀ button to select the item menu.
5. Set other setups to your preference.
To return to the main setup menu screen
• Press the CURSOR ◀ button to select the item menu, press the CURSOR ▲/▼ buttons to select "MAIN PAGE" and press
the ENTER button.
Then the main setup menu screen will be displayed.
• When the RETURN button is pressed, the main setup menu screen will be displayed, too.
When selecting the PARENTAL CONTROL
1. Press the CURSOR ▲/▼ buttons to select the PARENTAL CONTROL.
Notes :
• When you set the rating level low, some discs may not be played at all. In this case, set the rating level higher or to "NO
PARENTAL".
• DVD Videos may or may not respond to the rating level setting. Make sure this function works with your DVD Videos.
• LEVEL 1(KIDS) :
Select this to play only DVD Videos for
children. Adult and general audience
DVD Videos cannot be played.
• LEVEL 2 ~ 7 :
Select this to play DVD Videos for
general audiences and children. Adult
DVD Videos cannot be played.
• LEVEL 8 (ADULT) :
Select this to play for general audiences,
children and adults.
• NO PARENTAL :
Select this to play all DVD Videos.
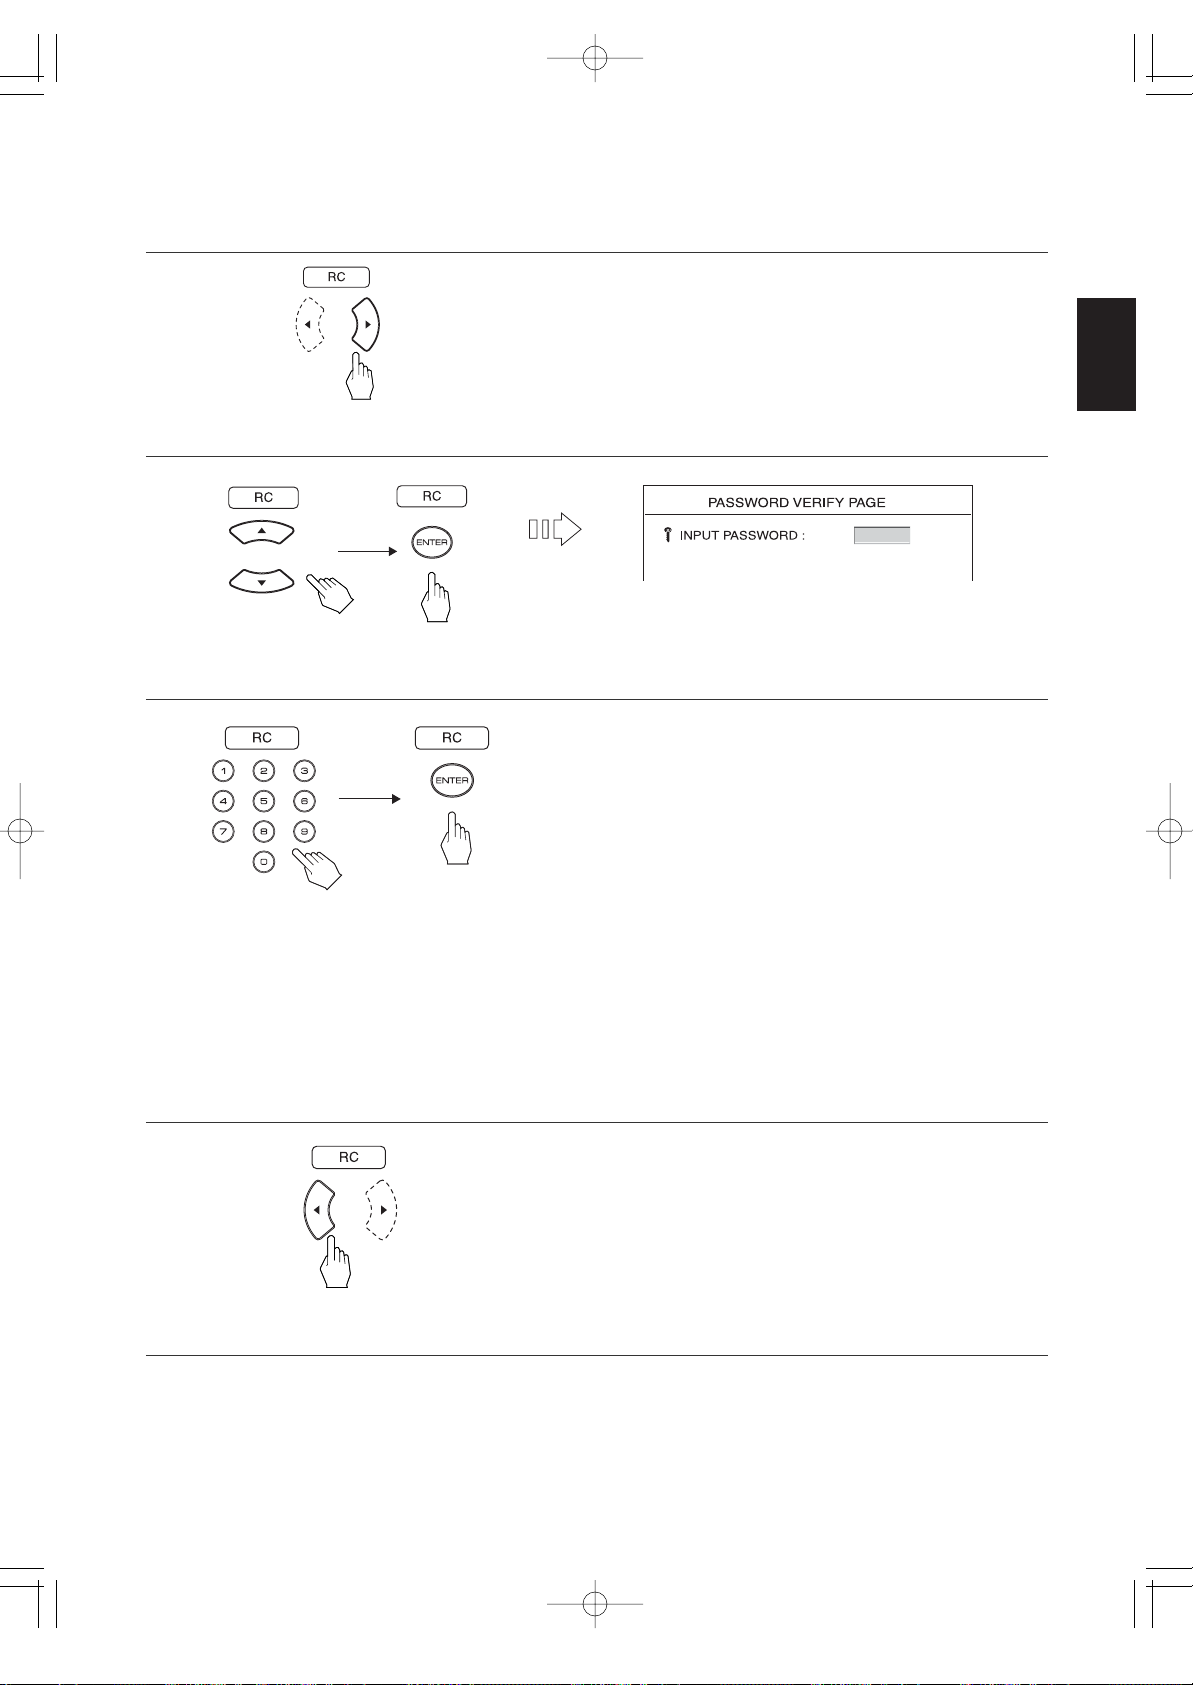
• Each time the CURSOR ▶ or ◀ button is pressed, the
setting menu or the item menu is selected.
2. Press the CURSOR ▶ button to select the setting menu.
VR-652(A) 2008.3.6 5:32 PM 페이지 42
Page 43
ENGLISH
43
• When the password is input correctly, the rating level is set to the preferred level and the previous menu screen is displayed.
• If you input a wrong password,"PASSWORD INCORRECT" is displayed. In this case, input the password again.
• While displaying the password verify page screen, when the RETURN button is pressed, the other setup menu screen will
be displayed.
Note :
• If you forgot your password, input "3308" that has been set to at factory.
4. Input a 4-digit password with pressing the NUMERIC buttons, then press the ENTER button.
5. Press the CURSOR ◀ button to select the item menu.
6. Set other setups to your preference.
To return to the main setup menu screen
• Press the CURSOR ◀ button to select the item menu, press the CURSOR ▲/▼ buttons to select "MAIN PAGE" and press
the ENTER button.
Then the main setup menu screen will be displayed.
• When the RETURN button is pressed, the main setup menu screen will be displayed, too.
Continued
3. Press the CURSOR ▲/▼ buttons to select the preferred level, then press the ENTER button.
2. Press the CURSOR ▶ button to select the level menu.
• Each time the CURSOR ▶ or ◀ button is pressed, the
level menu or the item menu is selected.
VR-652(A) 2008.3.6 5:32 PM 페이지 43
Page 44
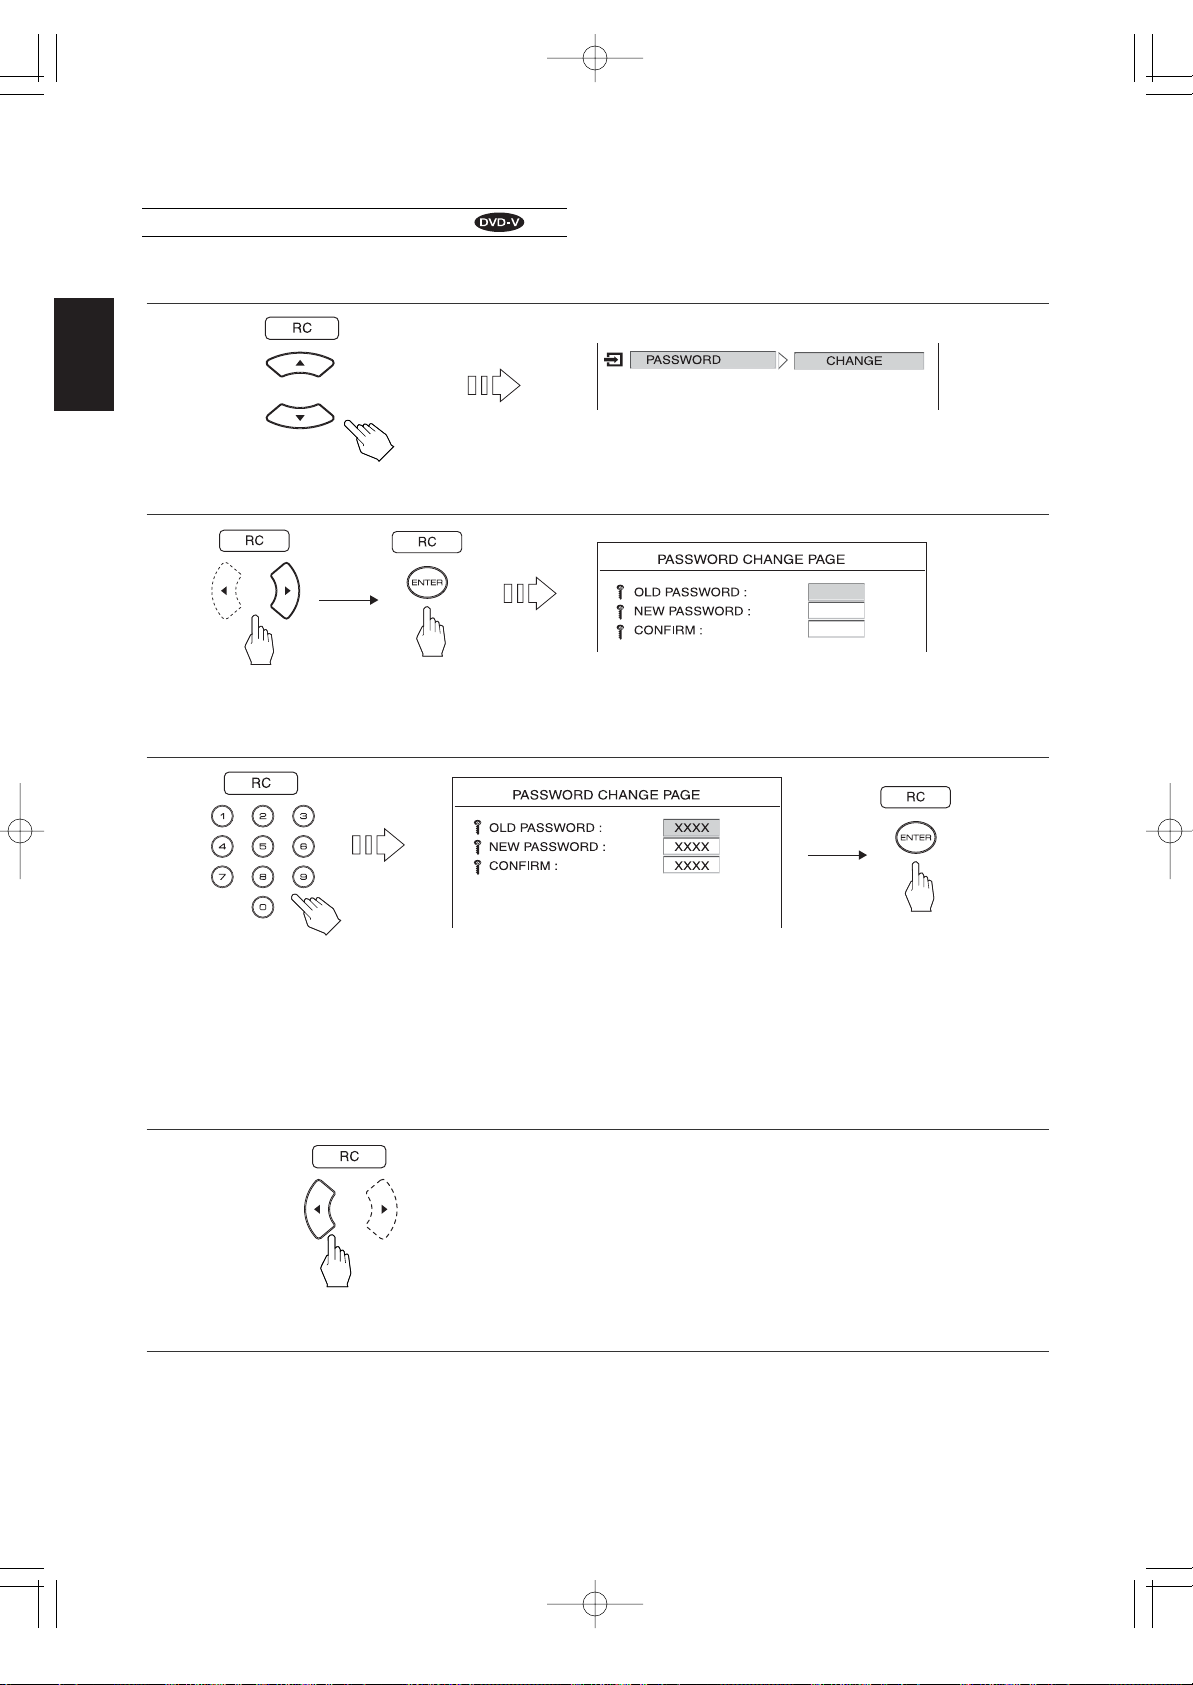
ENGLISH
44
Continued
When selecting the PASSWORD
1. Press the CURSOR ▲/▼ buttons to select the PASSWORD.
2. Press the CURSOR ▶ buttons to select the CHANGE, then press the ENTER button.
• When each password is input correctly, the previous menu screen is displayed.
• While displaying the password change page menu screen, when the RETURN button is pressed, the other setup menu
screen will be displayed.
Note :
• Do not forget the password. When you input the password first time or if you forgot your password, input "3308" that has
been set to at factory for the old password.
4. Press the CURSOR ◀ button to select the item menu.
5. Set other setups to your preference.
3. Input 4-digit passwords in sequence for old password, new password and confirmation, then press the
ENTER button.
To return to the main setup menu screen
• Press the CURSOR ◀ button to select the item menu, press the CURSOR ▲/▼ buttons to select "MAIN PAGE" and press
the ENTER button.
Then the main setup menu screen will be displayed.
• When the RETURN button is pressed, the main setup menu screen will be displayed, too.
VR-652(A) 2008.3.6 5:32 PM 페이지 44
Page 45
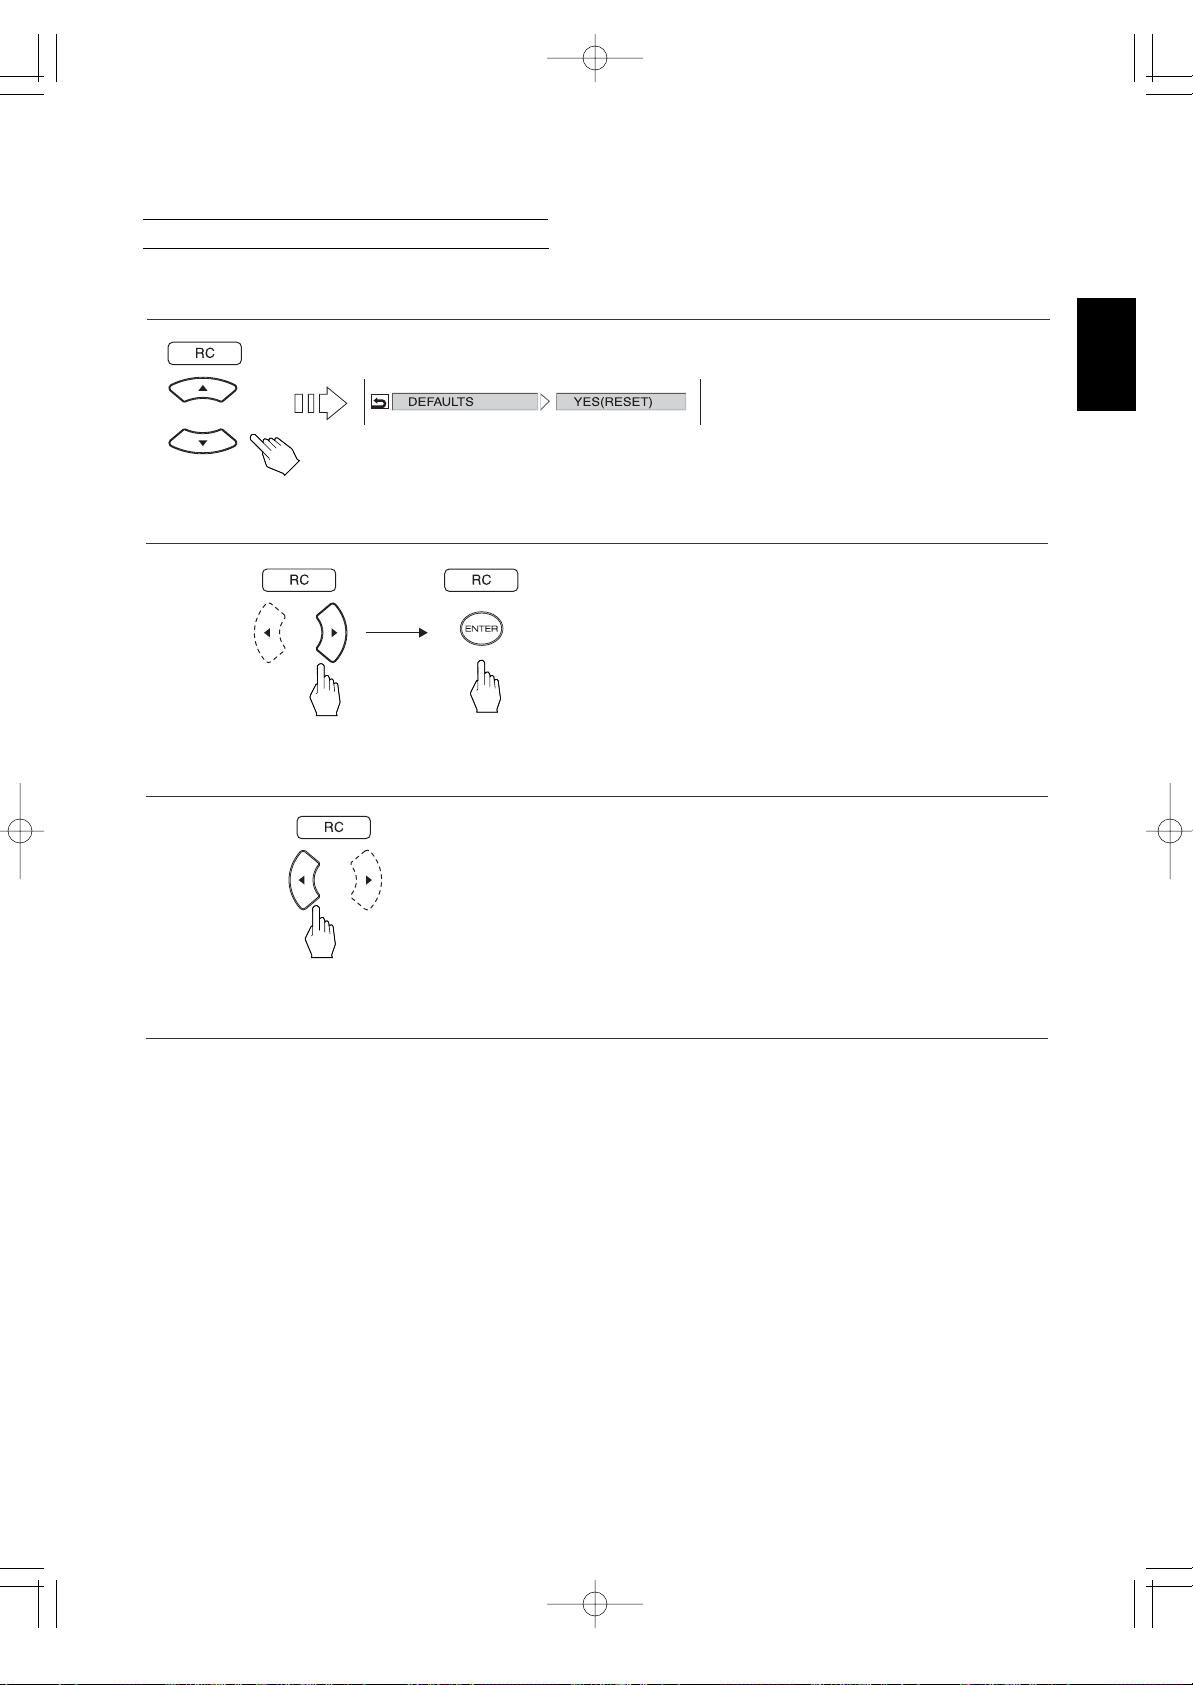
45
Continued
• Each time the CURSOR ▶ or ◀ button is pressed, the
setting menu or the item menu is selected.
• Then the settings are reset to initial settings.
2. Press the CURSOR ▶ button to select the setting menu, then press the ENTER button.
4. Set other setups to your preference.
3. Press the CURSOR ◀ button to select the item menu.
To return to the main setup menu screen
• Press the CURSOR ◀ button to select the item menu, press the CURSOR ▲/▼ buttons to select "MAIN PAGE" and press
the ENTER button.
Then the main setup menu screen will be displayed.
• When the RETURN button is pressed, the main setup menu screen will be displayed, too.
• YES(RESET) :
When resetting all the settings in the
setup menu except the rating level and
the password to the default settings.
When selecting the DEFAULTS
1. Press the CURSOR ▲/▼ buttons to select the DEFAULTS.
ENGLISH
VR-652(A) 2008.3.6 5:32 PM 페이지 45
Page 46
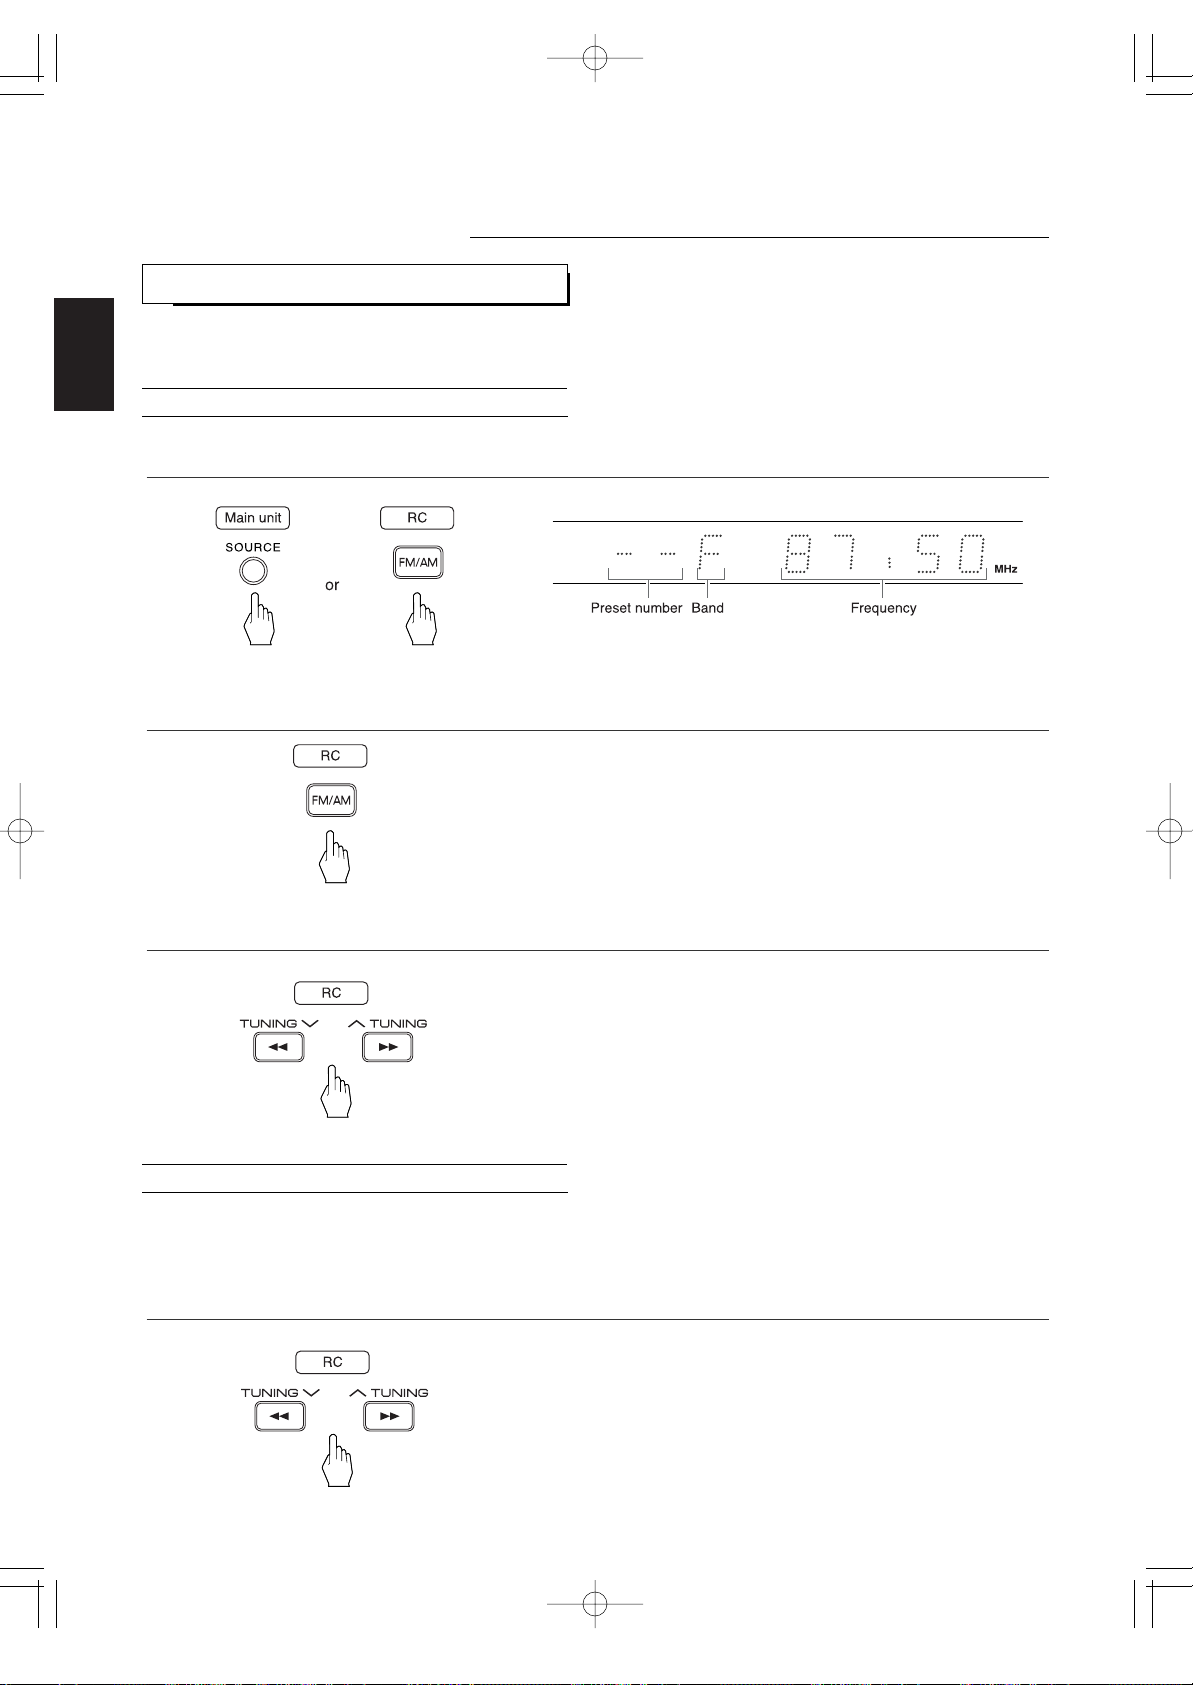
ENGLISH
46
LISTENING TO RADIO BROADCASTS
• The tuner will now search until a station of sufficient
strength has been found. The display shows the tuned
frequency and "TUNED" indicator lights up.
• If the station found is not the desired one, simply repeat
this operation.
• Weak stations are skipped during auto tuning.
Operation of Tuner
Auto tuning
Manual tuning
1. Select the tuner.
After selecting the tuner and the desired band, press the TUNING UP/DOWN (∧/∨) buttons repeatedly until the
right frequency has been reached.
3. Press the TUNING UP/DOWN(∧/∨) buttons for more than 0.5 second.
2. Select the desired band.
• Each time the FM/AM button on the remote control is
pressed, the band changes as follows :
"F" (FM) ↔ "A" (AM)
• Manual tuning is useful when you already know the frequency of the desired station.
Note :
• When selecting the FM, if FM stereo broadcasts are poor because of weak broadcast signals, you can set the FM mode to
FM MONO to reduce the noise. (For details, refer to "Adjusting the channel level(/setting the FM mode)" on page 16.)
VR-652(A) 2008.3.6 5:32 PM 페이지 46
Page 47
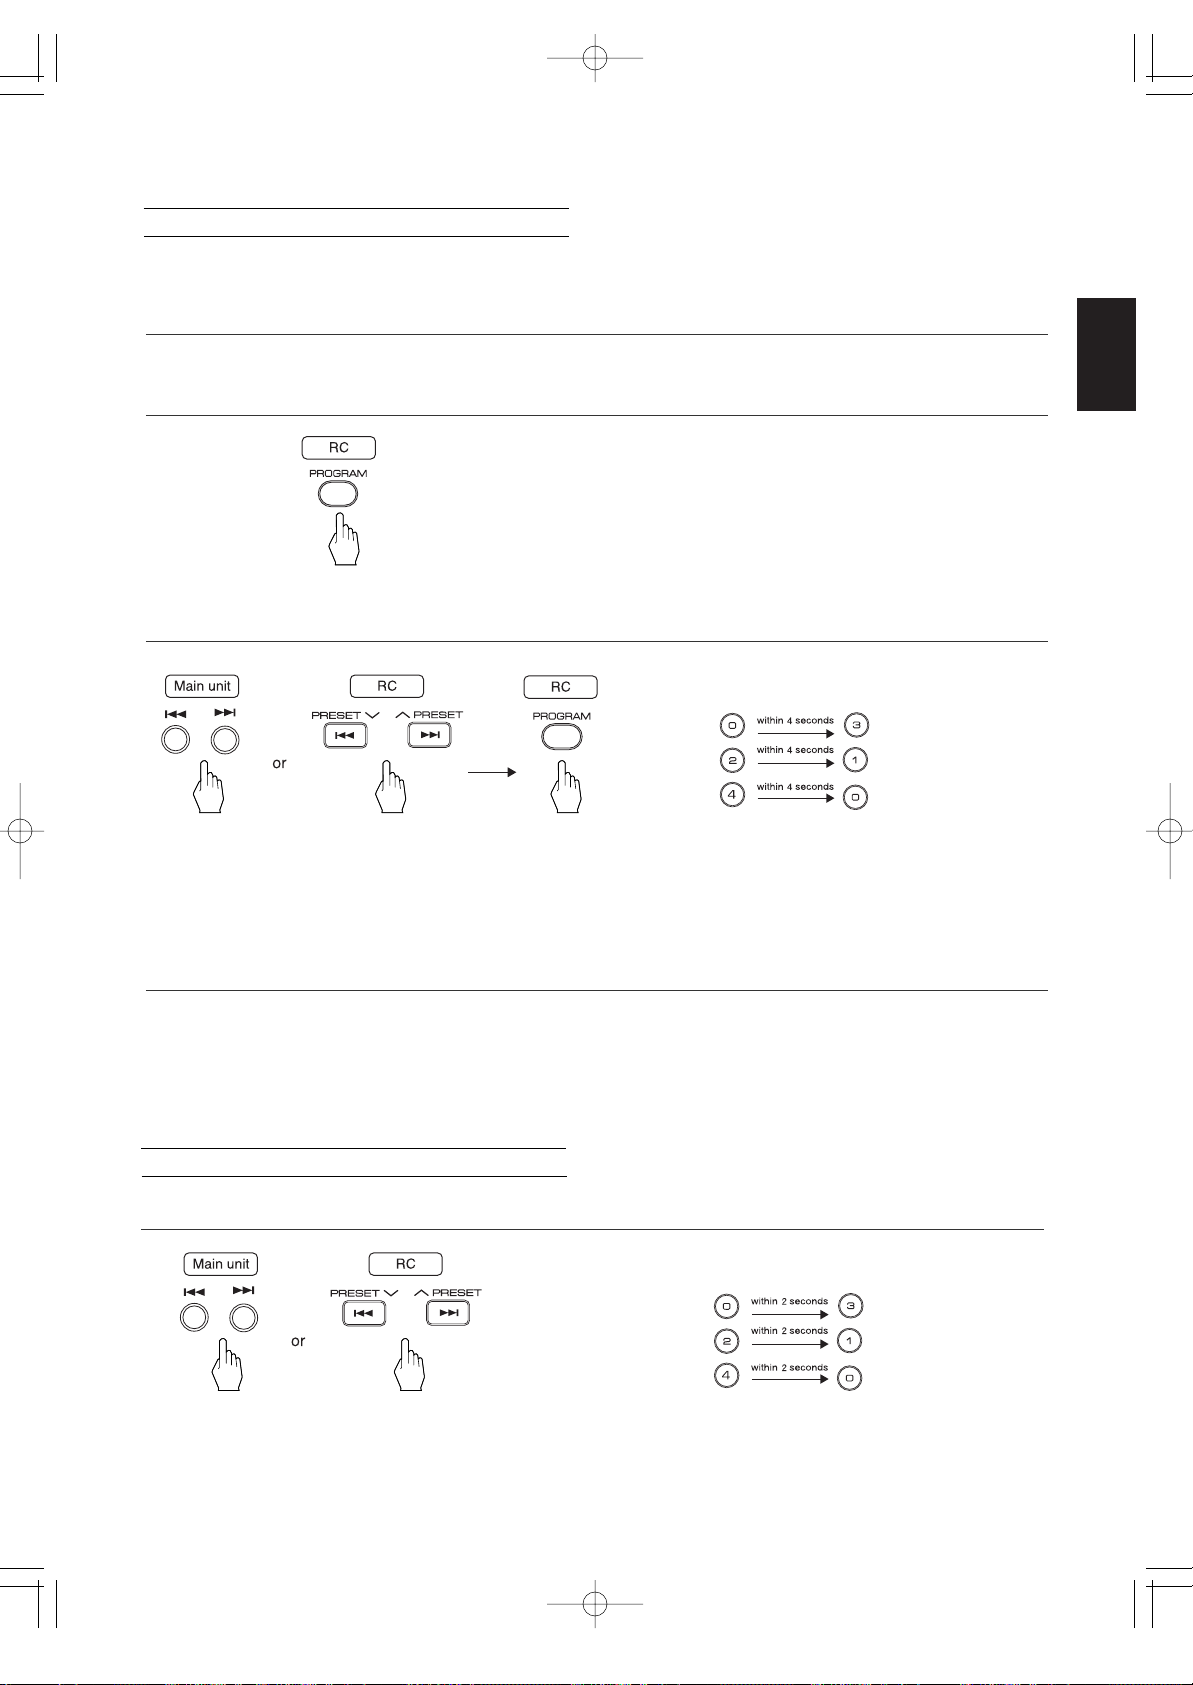
ENGLISH
47
• When using the NUMERIC buttons on the remote control.
Examples)
For "3" :
For "21" :
For "40" :
3. Select the desired preset number (01~40) and press the PROGRAM button.
4. Repeat the above steps 1 to 3 to memorize other stations.
MEMORY BACKUP FUNCTION
The following items, set before the receiver is turned off, are memorized.
• INPUT SELECTOR settings
• Preset stations, etc.
• Then "MEM" indicator lights up and the preset number
("01",etc.) is flickering for several seconds.
• If flickering the preset number stops, press the
PROGRAM button again.
2. Press the PROGRAM button.
Presetting radio stations
• You can store up to 40 preferred stations in the memory.
1. Tune in the desired station with auto or manual tuning.
• The station has now been stored in the memory.
• When using the NUMERIC buttons, the station is stored automatically without pressing the PROGRAM button.
• A stored frequency is erased from the memory by storing another frequency in its place.
• When using the NUMERIC buttons on the remote control.
Examples)
For "3" :
For "21" :
For "40" :
After selecting the tuner, select the desired preset number.
Tuning to preset stations
VR-652(A) 2008.3.6 5:32 PM 페이지 47
Page 48
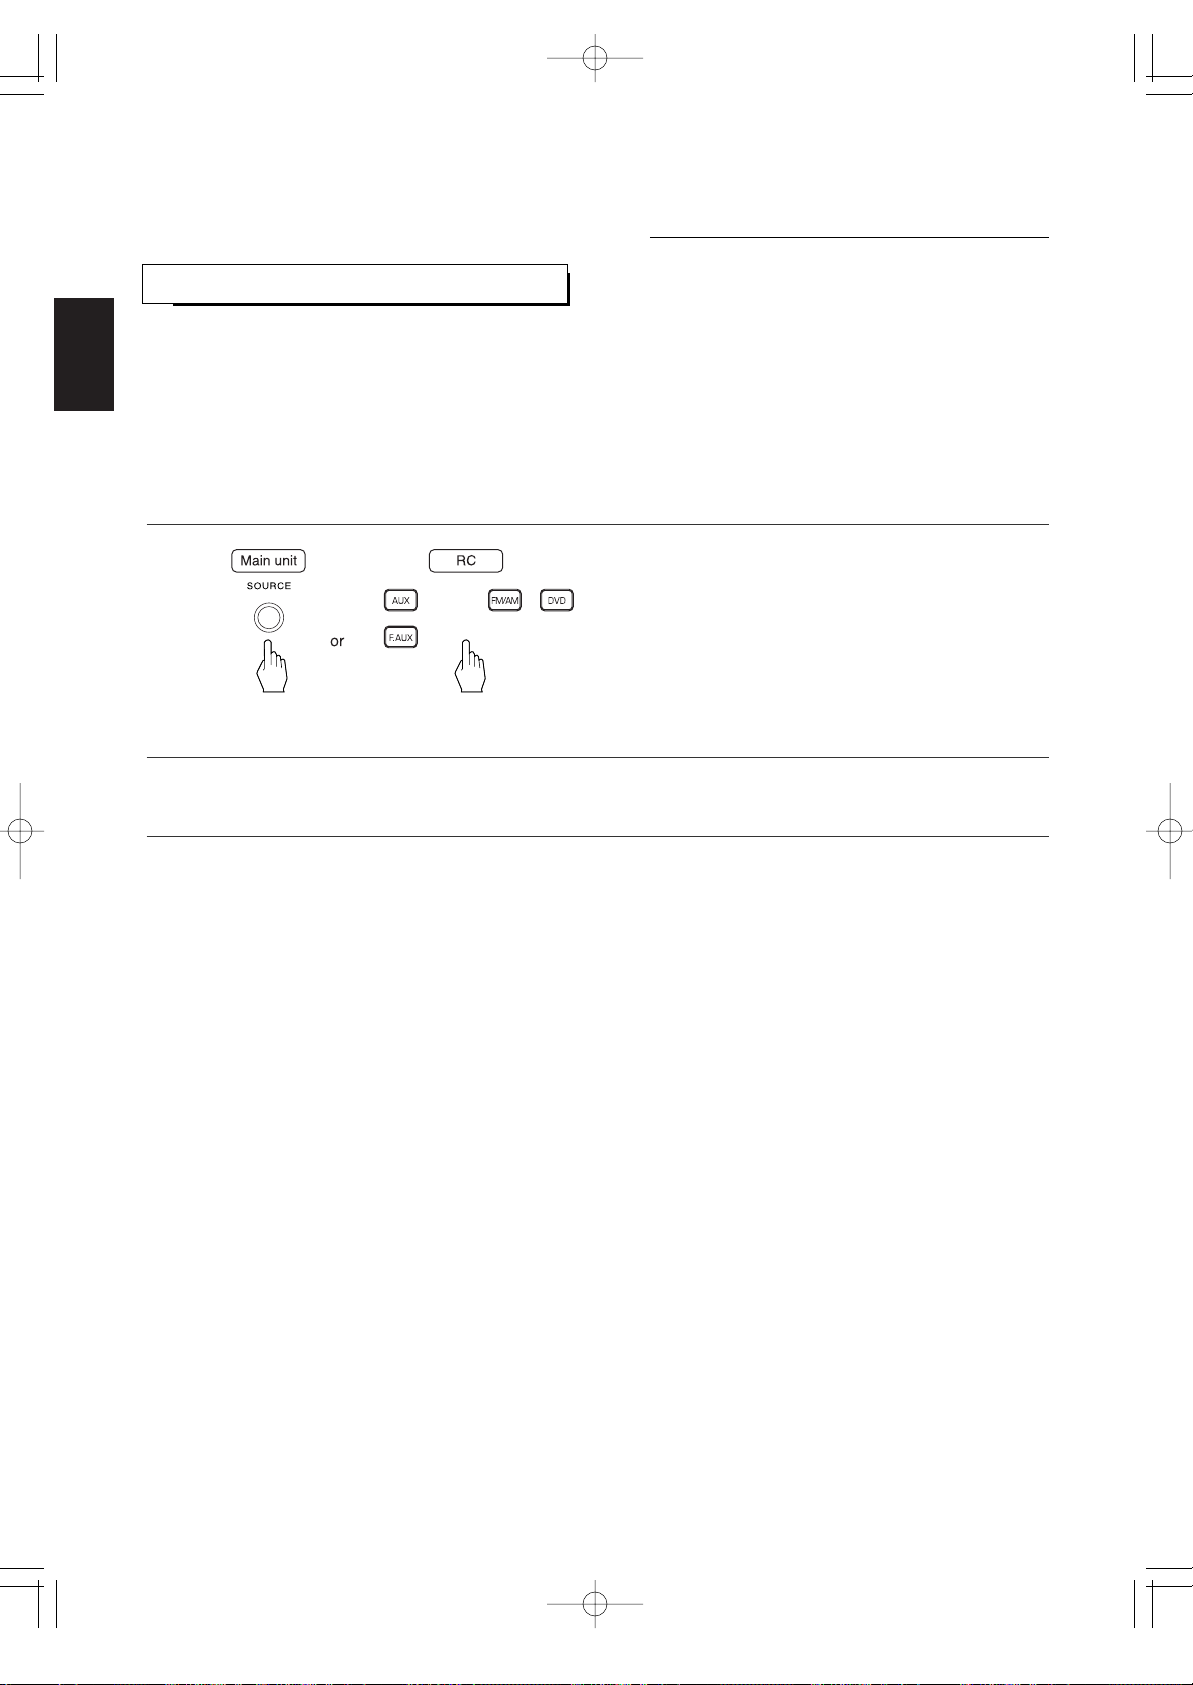
ENGLISH
48
RECORDING WITH VIDEO
Operation of Other Functions
• Depending on whether the video recording equipment or the audio recording equipment is connected to the VIDEO jacks,
you can record the video and audio signals or the audio signals only. (For details, refer to "CONNECTING VIDEO
COMPONENT" on page 7.)
Notes :
• The volume settings, etc. have no effect on the recording signals.
• Commercial DVD Video discs are copy-protected, and any recordings made from these discs will be distorted.
1. Select the desired input as recording source except VIDEO.
2. Start recording on the component connected to VIDEO.
3. Start play on the desired input.
VR-652(A) 2008.3.6 5:32 PM 페이지 48
Page 49
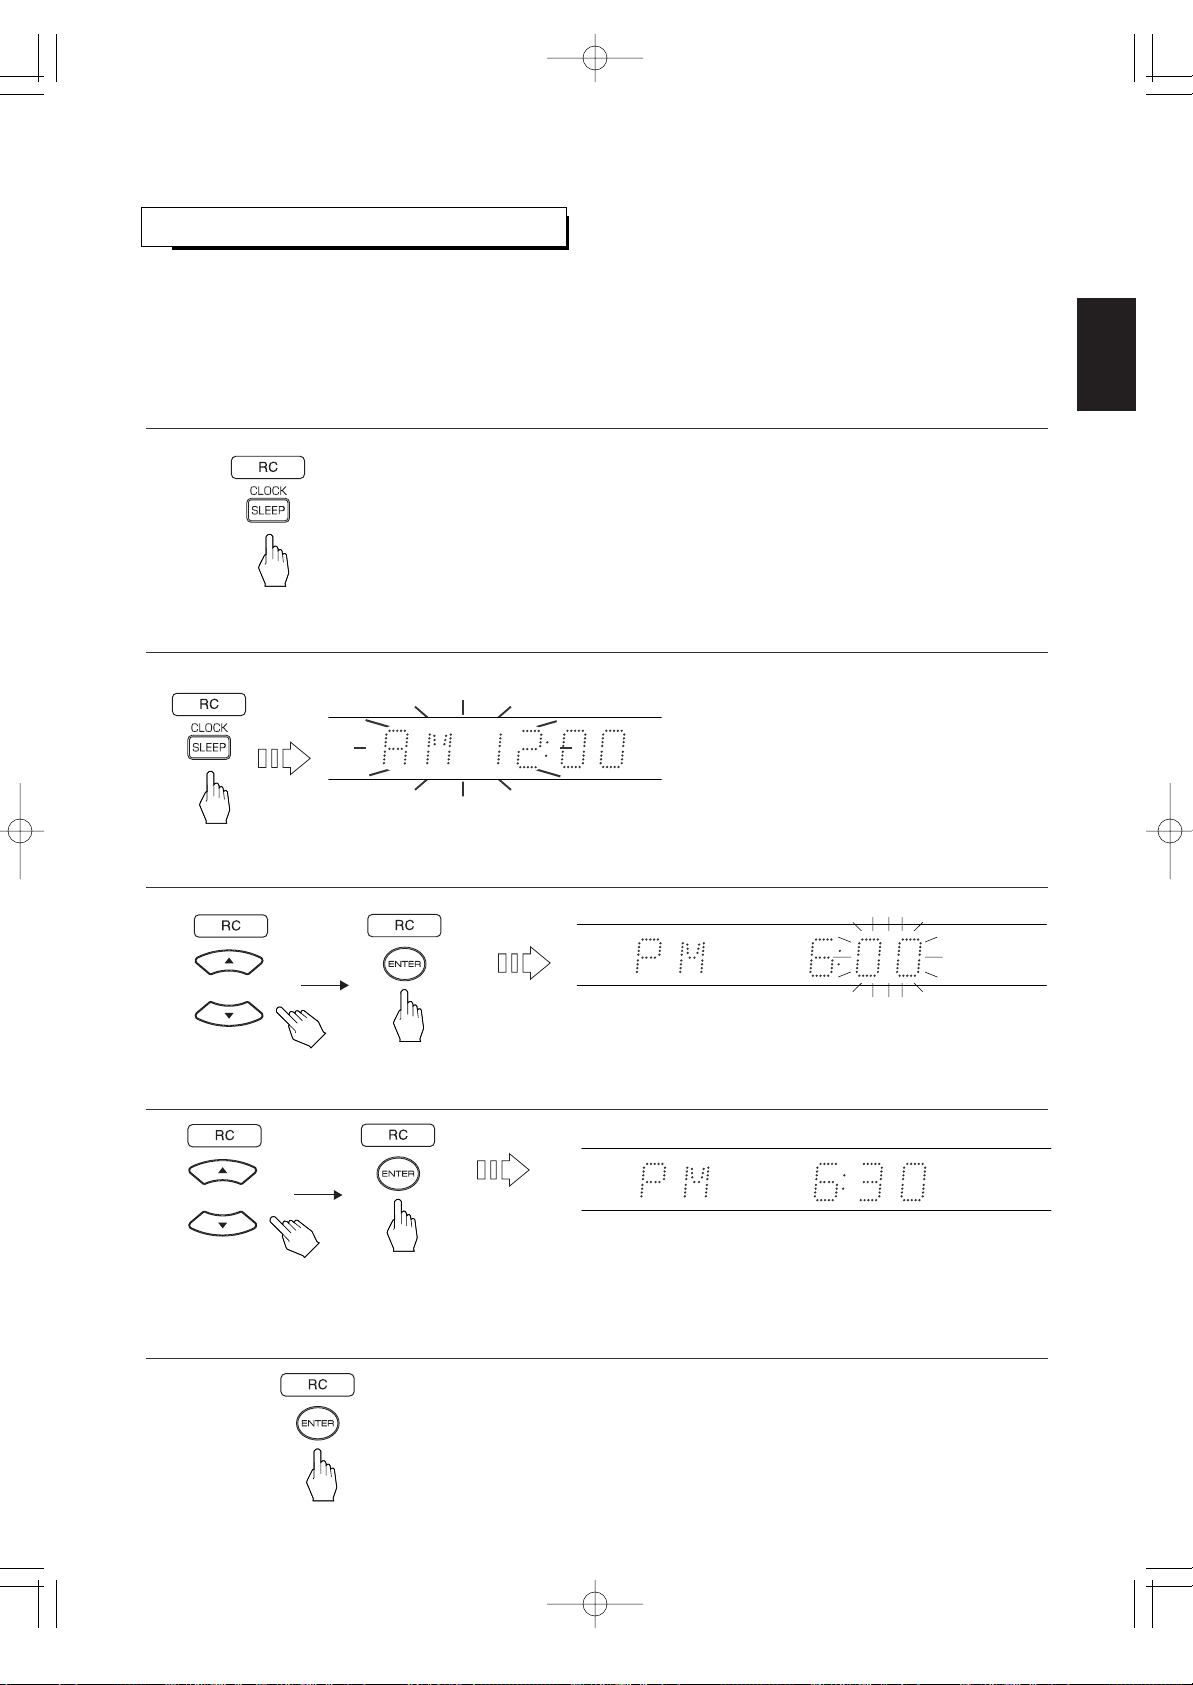
ENGLISH
49
SETTING THE CLOCK
• Then the hour digit is flickering for several seconds.
• Each time the ENTER button is pressed, the 12 hour
display mode or the 24 hour display mode is selected.
• Then the time is displayed for several seconds and the
current operation status is displayed.
• In the power saving mode, when the CLOCK/SLEEP
button is pressed, the time is displayed for several
seconds.
• Before the time display disappears, perform the step 2.
• In case of setting the clock for the first time, perform the setting procedure from the step 2.
• In the standby mode, you can set the clock, too. In this case, perform it from the step 2.
Note :
• If the electricity fails or the AC input cord is unplugged, the current time will be cleared. Should this happen, set the clock
again, performing it from the step 2.
• Then the time is displayed for several seconds.
2. Press the CLOCK/SLEEP button for more than 2 seconds.
1. To check the time, press the CLOCK/SLEEP button for more than 2 seconds.
3. Press the CURSOR UP/DOWN (▲/▼) buttons to set the hour and press the ENTER button.
4. Press the CURSOR UP/DOWN (▲/▼) buttons to set the minute and press the ENTER button.
5. Press the ENTER button to select the desired time display mode.
Example ) When setting to 6:30 PM.
• Then the minute digit is flickering for several seconds.
VR-652(A) 2008.3.6 5:32 PM 페이지 49
Page 50
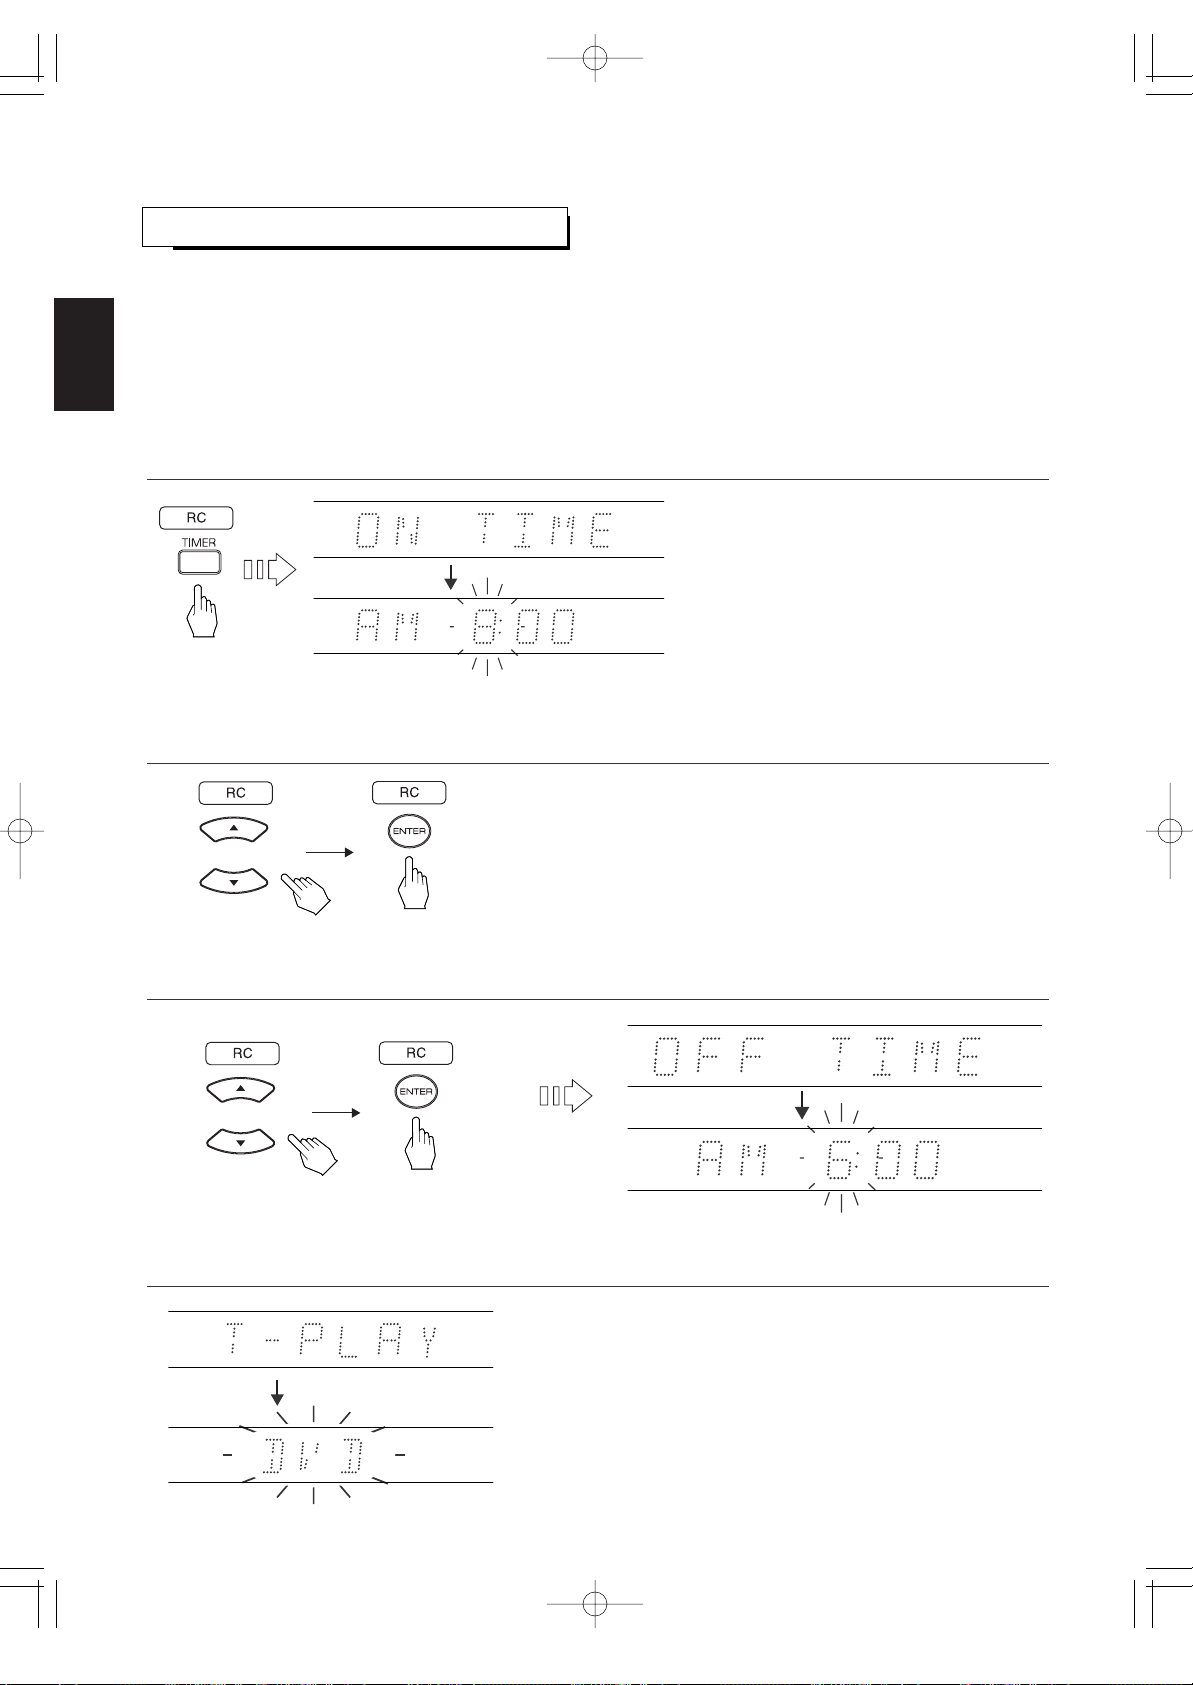
ENGLISH
50
OPERATING THE TIMER
• Then it enters the on time setting mode and the
hour digit is flickering for several seconds.
• In the standby mode, you can set the timer, too.
• In case of setting the timer for the first time, press
this button briefly to enter the timer setting mode.
Notes:
• If the timer setting mode display disappears, start
again from the step 1.
• In the power saving mode, you cannot set the
timer.
• Then it enters the input setting mode and the input source
is flickering for several seconds.
Note :
• If the on time and the off time are the same, when the
ENTER button is pressed, the off time will not be set. In
this case, set the off time different from the on time.
• Then the minute digit is flickering for several seconds.
• Then it enters the off time setting mode and the hour digit is flickering for several seconds.
• Once the timer is set to on, it will operate at the preset time once or everyday.
Before setting the timer
• Make sure the clock has been set correctly. If not, when the TIMER button is pressed, "CLOCK ADJust" message is
displayed and it will enter the clock setting mode.
In this case, first set the clock performing "SETTING THE CLOCK" procedure on page 49.
Note :
• If the electricity fails or the AC input cord is unplugged, the current time and the timer setting will be cleared. Should this
happen, set the clock and the timer again.
1. Press the TIMER button for more than 2 seconds to enter the timer setting mode.
2. While flickering the hour digit, press the CURSOR UP/DOWN (▲/▼) buttons to set the hour for on time and
press the ENTER button.
3. While flickering the minute digit, press the CURSOR UP/DOWN (▲/▼) buttons to set the minute for on time
and press the ENTER button.
4. Repeat the above steps 2 and 3 to set the off time.
VR-652(A) 2008.3.6 5:32 PM 페이지 50
Page 51
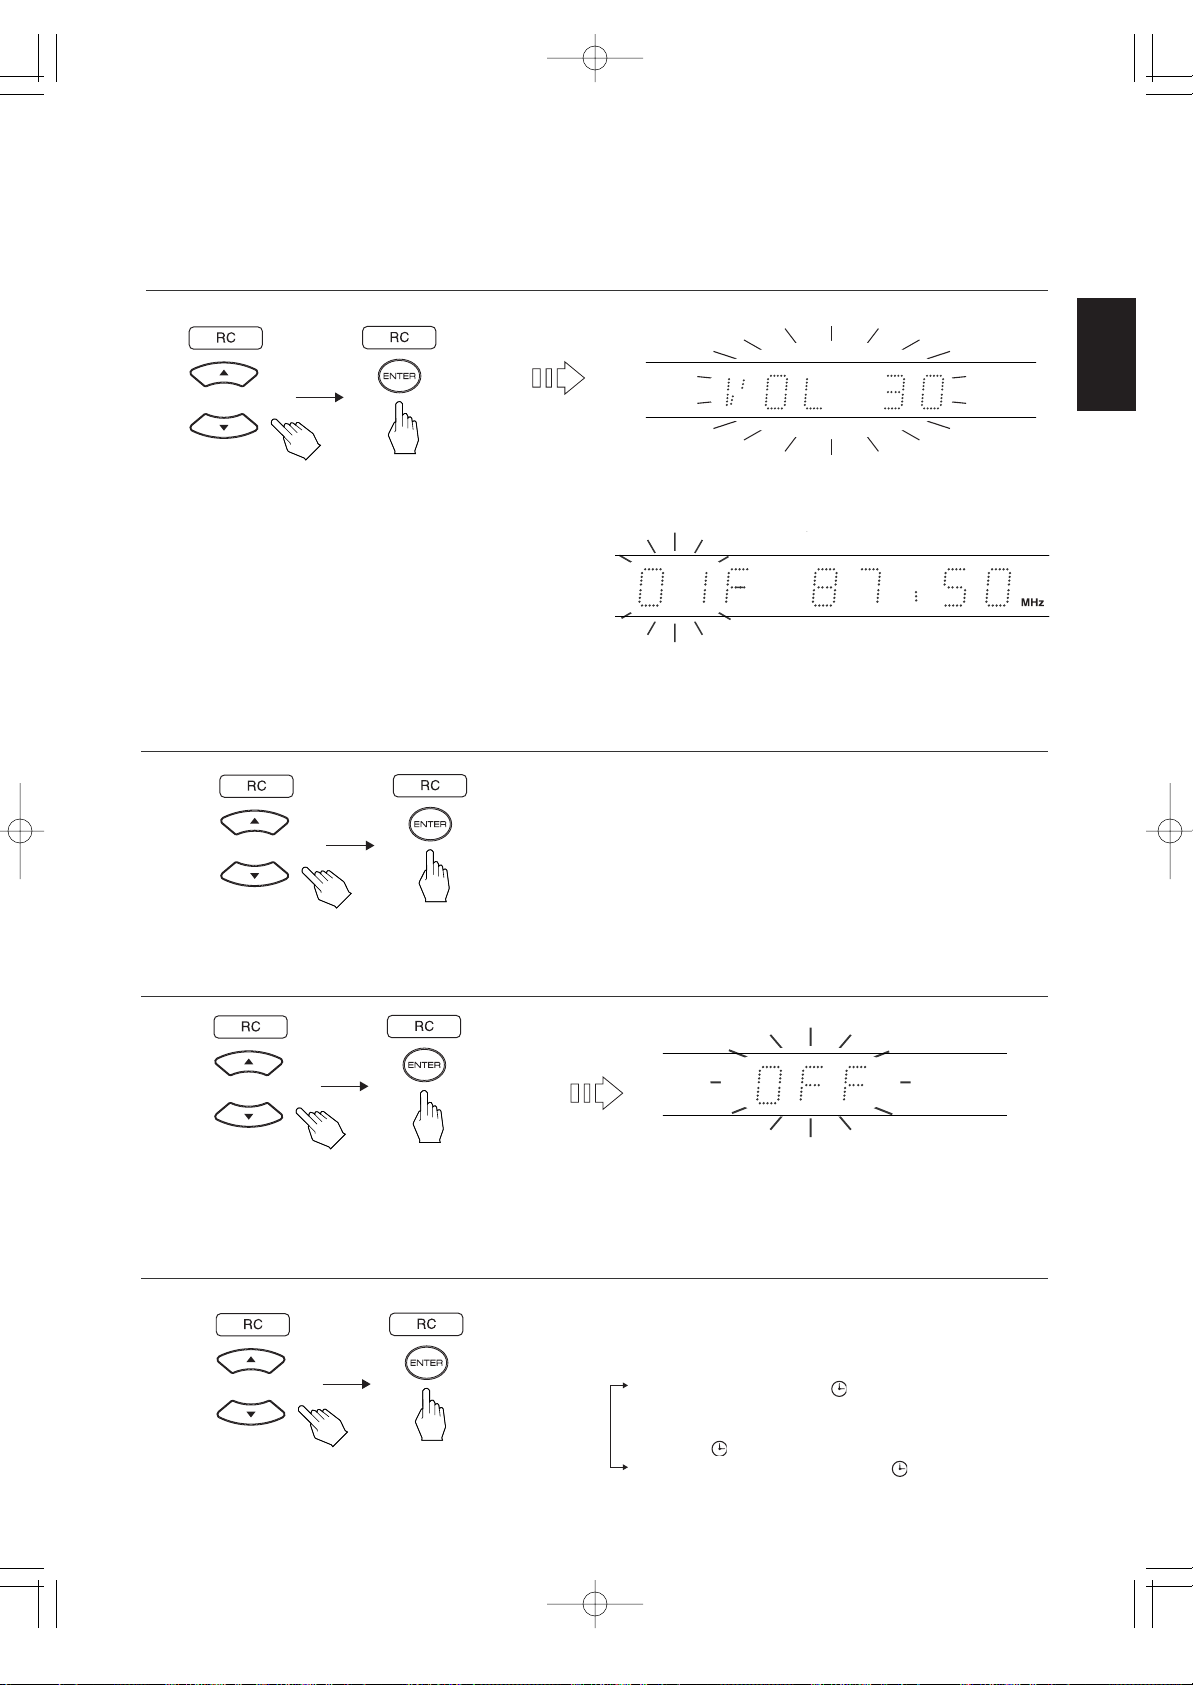
ENGLISH
Continued
• Each time the CURSOR UP/DOWN (▲/▼) buttons are
pressed, DVD or TUNER is selected.
• Depending on whether DVD or TUNER is selected, it
enters the volume setting mode or the preset station
setting mode and corresponding display is flickering for
several seconds.
• Then it enters the timer mode and the timer mode is flickering for several seconds.
• Then the timer settings are memorized and displayed in
order.
• Each time the CURSOR UP/DOWN (▲/▼) buttons are
pressed, the timer mode change as follows :
OFF : Turns off the timer. (" " goes off.)
↕
ONCE : Operates once according to the timer settings.
↕ (" " lights up.)
EVERYDAY : Operates everyday. (" " lights up.)
• Then it enters the volume setting mode.
51
Example ) When selecting DVD
or
Example ) When selecting TUNER
5. While flickering the input source, press the CURSOR UP/DOWN (▲/▼) buttons to select the desired input
source and press the ENTER button.
When selecting TUNER
While flickering the preset number, press the CURSOR UP/DOWN (▲/▼) buttons to select the desired preset
station and press the ENTER button.
6. While flickering the volume level, press the CURSOR UP/DOWN (▲/▼) buttons to adjust the volume level
as desired and press the ENTER button.
7. While flickering the timer mode, press the CURSOR UP/DOWN (▲/▼) buttons to select the desired mode
and press the ENTER button.
VR-652(A) 2008.3.6 5:32 PM 페이지 51
Page 52
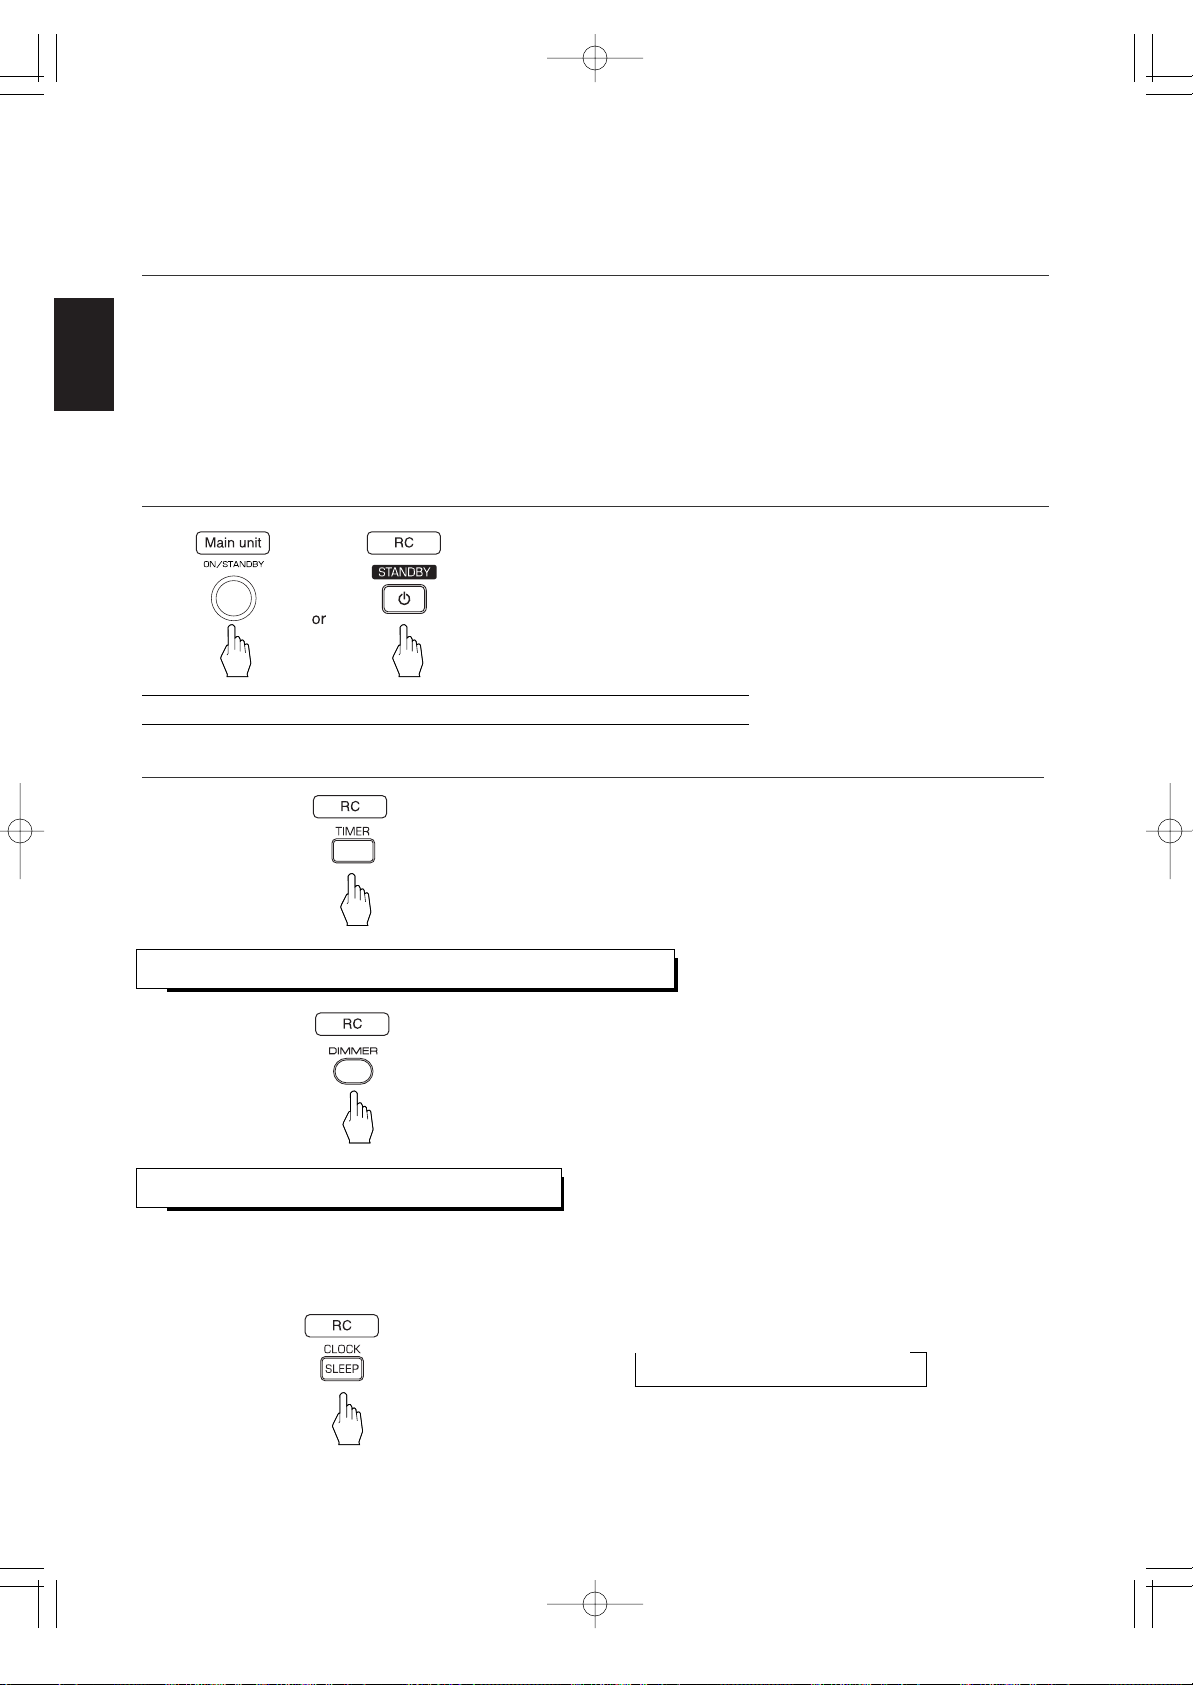
ENGLISH
52
Continued
8. (In case of DVD Video, at the scene to be played back,) turn the power off before on time.
• To operate the timer, you should turn the power off before
on-time.
• At on time, the power is turned on and the timer function
is performed automatically.
When selecting DVD as an input source
Make preparations for timer play.
① Load a DVD Video or a CD.
② In case of a DVD Video, start playback.
Notes :
• Timer function cannot play back MP3, WMA, JPEG disc or USB mass storage device.
• In case of DVD Videos, you should play back a DVD Video until the desired scene is reached to.
If not, it will not play back a DVD Video.
• When a disc is not loaded, the timer function will automatically tune in the preset station.
Press the TIMER button.
Checking the timer settings while displaying operation status
• Then the timer settings are displayed in order and the
current status is displayed.
• In the standby mode, you can check the timer settings or
select the desired timer mode, too.
• You can select the desired timer mode with pressing this
button repeatedly.
ADJUSTING THE BRIGHTNESS OF THE DISPLAY
• Each time the DIMMER button is pressed, the brightness
of the display changes as follows :
On ↔ dim
OPERATING THE SLEEP TIMER
• Each time this button is pressed, the sleep time changes
as follows:
→ 10 → 20 → 30 → 60 → 90 → OFF
Unit : minutes
• When the sleep time is selected, the display of the unit is
dimly lit.
• The sleep timer allows the system to continue to operate for a specified period of time before automatically
shutting off.
• To set the receiver to automatically turn off after the specified period of time.
VR-652(A) 2008.3.6 5:32 PM 페이지 52
Page 53
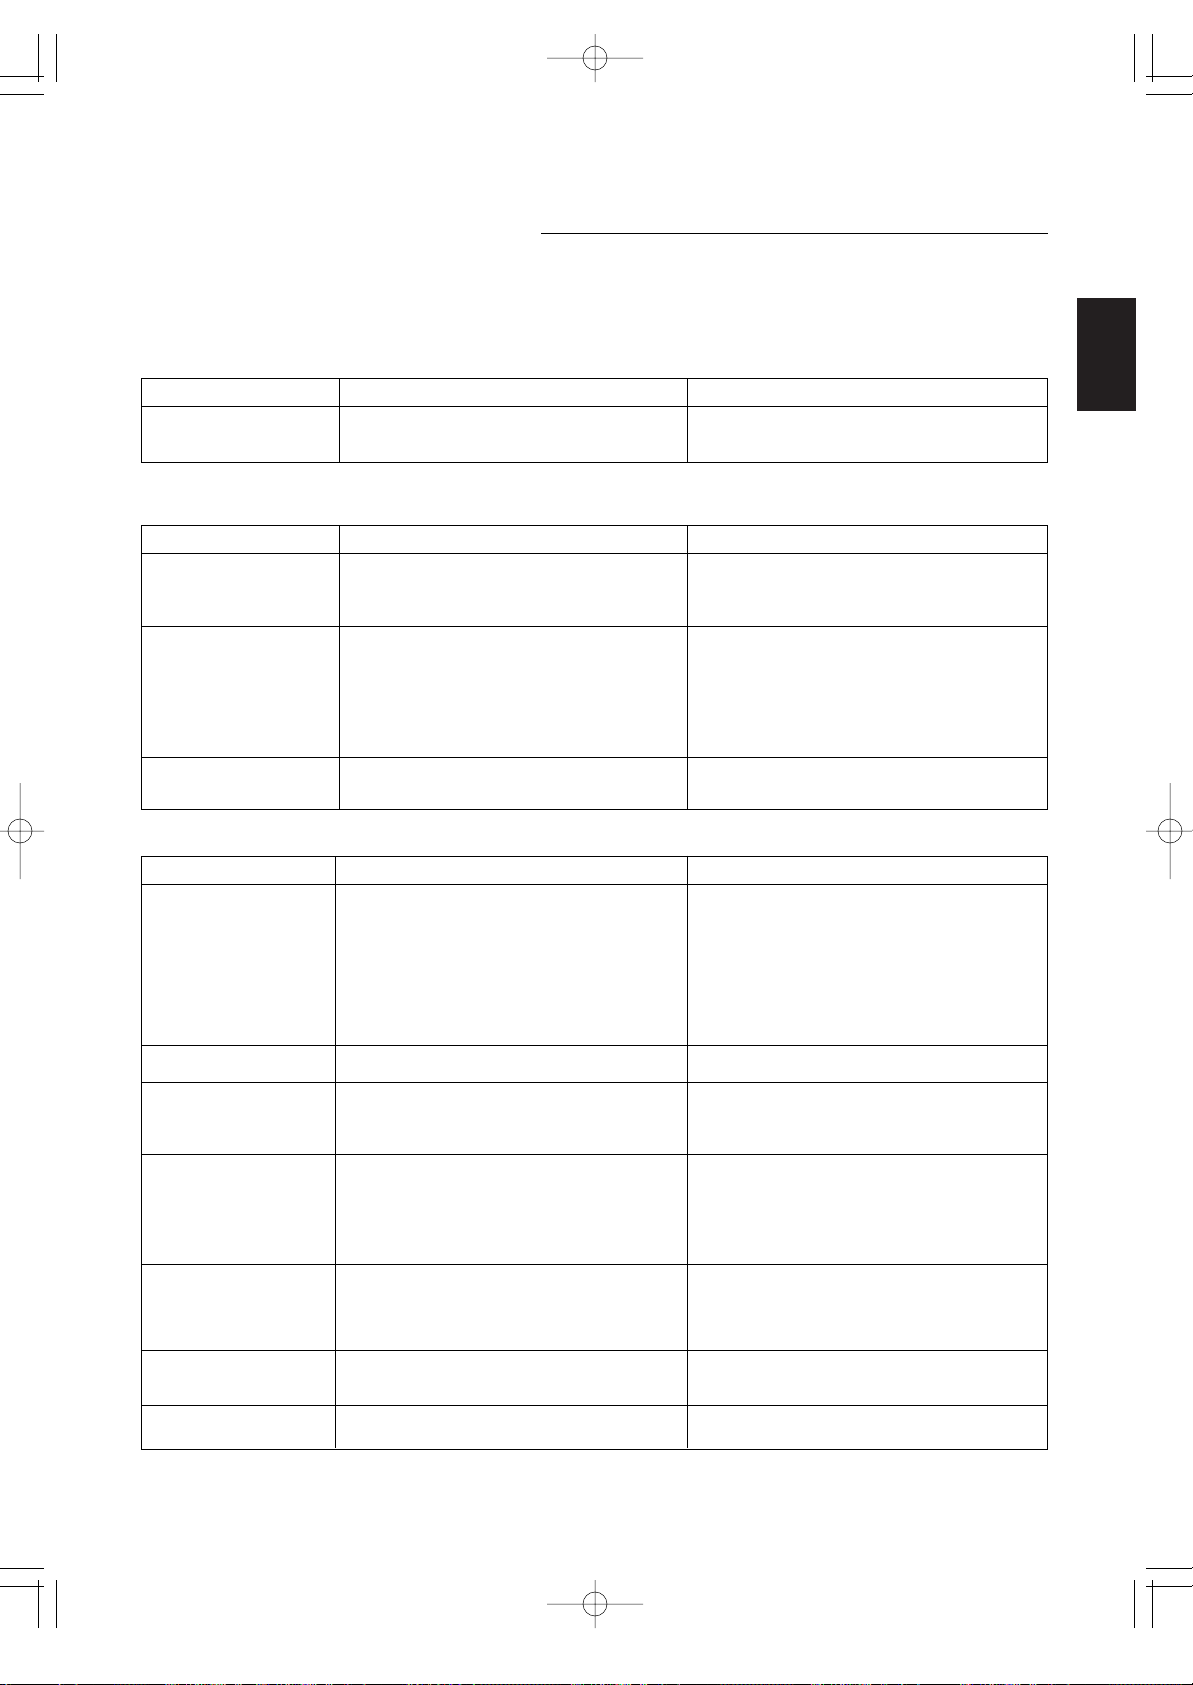
ENGLISH
53
Troubleshooting Guide
If a fault occurs, run through the table below before taking your system for repair.
If the fault persists, attempt to solve it by switching the unit off and on again. If this fails to resolve the situation,
consult your dealer. Under no circumstances should you attempt to repair the unit yourself. This could void the
warranty.
REMOTE CONTROL UNIT
PROBLEM POSSIBLE CAUSE REMEDY
No operation • Batteries are not loaded or exhausted.
• The remote sensor is obstructed.
• Replace the batteries.
• Remove the obstacle.
PROBLEM POSSIBLE CAUSE REMEDY
No power
No sound
Noise or distorted sound
• The AC input cord is disconnected.
• Poor connection at AC wall outlet or the outlet is
inactive.
• The speaker cords are disconnected.
• The volume is adjusted too low.
• The MUTING button on the remote control is
pressed to ON.
• Incorrect selection of the input source.
• Incorrect connections between the components.
• Poor connections.
• Connect the cord securely.
• Check the outlet using a lamp or another
appliance.
• Check the speaker connections.
• Adjust the volume.
• Press the MUTING button to cancel the muting
effect.
• Select the desired input source correctly.
• Make connections correctly.
• Check the connections and connect all cords
securely.
MAIN UNIT
[AMPLIFIER SECTION]
PROBLEM POSSIBLE CAUSE REMEDY
No playback
Malfunction
No picture
Noisy or distorted picture
Abnormal or no picture
Slight pause of picture
Noise or distorted sound
• The disc is loaded upside down.
• The disc is not playable.
• The disc is dirty.
• The rating level is not set correctly.
• The symbol about invalid operation is displayed.
• The disc is scratched or dirty badly.
• The video cords are disconnected.
• The incorrect selection of input source on the TV.
• The disc is not playable.
• The unit is connected to a VCR directly and the
copyguard function is activated.
• The disc is dirty.
• It is in rapid advance or reverse playback, or in
frame advance playback.
• The resolution of component video output signal
is not selected correctly.
• The layer transition occurs during playback of
DVD Videos recorded in dual-layer format.
• The disc is dirty.
• Reload the disc with the printed side up.
• Use a playable disc.
• Clean the disc.
• Set the rating level setting correctly.(Refer to
"When selecting the PARENTAL CONTROL" on
page 42.)
• Adjust the setting correctly.(Refer to "SYMBOL
ABOUT INVALID OPERATION" on page 17.)
• Wipe off the dirt or load another disc.
• Connect the cords correctly.
• Select the input source correctly.
• Use a playable disc.
• Connect the unit so that the picture signal is
transferred directly to the TV.
• Clean the disc.
• Sometimes a small amount of picture distortion
may appear. This is not malfunction.
• Select the resolution of component video output
signal correctly.
(Refer to "When selecting the SCAN TYPE" on
page 39.)
• Sometimes slight pause may occur.
This is not malfunction.
• Clean the disc
[DVD PLAYER SECTION]
VR-652(A) 2008.3.6 5:32 PM 페이지 53
Page 54
ENGLISH
54
PROBLEM POSSIBLE CAUSE REMEDY
Stations cannot be
received
Preset stations cannot be
received
Poor FM reception
• No antenna is connected.
• The desired station frequency is not tuned in.
• The antenna is in wrong position.
• An incorrect station frequency has been
memorized.
• The memorized stations are cleared.
• No antenna is connected.
• The antenna is not positioned for the best reception.
• Connect an antenna.
• Tune in the desired station frequency.
• Move the antenna and retry tuning.
• Memorize the correct station frequency.
• Memorize the stations again.
• Connect an antenna.
• Change the position of the antenna.
[TUNER SECTION]
VR-652(A) 2008.3.6 5:32 PM 페이지 54
Page 55
ENGLISH
55
[AMPLIFIER SECTION]
• Front power output, stereo mode, 6 Ω, THD 0.7 %, 20 Hz~20 kHz | 2×25 W
• Subwoofer power output, 4 Ω, THD 10 %, 20 Hz~200 Hz | 50 W
• Total harmonic distortion, 6 Ω, 25 W, 1 kHz | 0.09 %
• Intermodulation distortion
60 Hz : 7 kHz=4:1 SMPTE, 6 Ω, 25 W | 0.05 %
• Signal to noise ratio, IHF "A" weighted, DVD | 85 dB
• Frequency response
Line(AUX, VIDEO, DVD), 20 Hz~20 kHz | ±3 dB
• Output level
VIDEO OUT, 2.2 kΩ | 180 mV
SUBWOOFER PREOUT, 30 Hz | 1.5 V
[VIDEO SECTION]
• Output level, 75Ω
Video (Composite(normal)) | 1 Vp-p
S-Video (Luminance signal) | 1 Vp-p
(Chrominance signal) | 0.286 Vp-p
Component video (Pr signal) | 0.7 Vp-p
(Pb signal) | 0.7 Vp-p
(Y signal) | 1 Vp-p
[DVD PLAYER SECTION]
• Pickup | Semiconductor laser, wavelength 650/780 nm
• D/A conversion
Video | 10 bit, 54 MHz
Audio | 24 bit, 192 kHz
• Oversampling
Sampling frequency : 44.1, 48 kHz/96 kHz | 8 fs, 8 fs/4 fs
• Video format | NTSC/PAL
• Frequency response
Sampling frequency : 44.1 kHz | 10 Hz~20 kHz
Sampling frequency : 48 kHz | 10 Hz~22 kHz
Sampling frequency : 96 kHz | 10 Hz~44 kHz
• Signal to noise ratio, A weighted
CD | 95 dB
• Dynamic range
16/20/24 bit | Move than 99/108/108 dB
• Total harmonic distortion, 1 kHz
CD | Less than 0.03 %
• Wow and flutter | Unmeasurable(less than ±0.002 %)
[FM TUNER SECTION]
• Tuning frequency range | 87.5~108 MHz
• Usable sensitivity, THD 3 %, S/N 30 dB | 17.2 dBf
• Signal to noise ratio, 65 dBf, mono/stereo | 68/65 dB
• Total harmonic distortion, 65 dBf, 1 kHz, mono/stereo | 0.7/1.0 %
• Frequency response, 30 Hz~15 kHz |
+1, -3
dB
Specifications
VR-652(A) 2008.3.6 5:32 PM 페이지 55
Page 56
ENGLISH
56
[AM TUNER SECTION]
• Tuning frequency range | 520~1710 kHz
• Usable sensitivity | 562 µV/m
• Signal to noise ratio | 40 dB
• Selectivity | 25 dB
[GENERAL]
• Power supply | 120 V ~ 60 Hz
• Power consumption | 50 W
• Dimensions(W×H×D, including protruding parts) | 347×102×270 mm(13-5/8×4×10-5/8 inches)
• Weight(Net) | 3.1 kg(6.8 lbs)
Note: Design and specifications are subject to change without notice for improvements.
VR-652(A) 2008.3.6 5:32 PM 페이지 56
Page 57
ENGLISH
57
Setup Code Table
AOC 005 003
Admiral 041 031
Aiko 014
Akai 005
Alaron 026
Ambassador 024
America Action 027
Ampro 043
Anam 027 047 048 049
Audiovox 030 027 014 034
Baysonic 027
Belcor 003
Bell & Howell 019 001
Bradford 027
Brockwood 003
Broksonic 028 031
CXC 027
Candle 005 011
Carnivale 005
Carver 010
Celebrity 050
Cineral 030 014
Citizen 012 005 011 006 014
Concerto 011
Contec 027
Craig 027
Crosley 010
Crown 027 006
Curtis Mathes 007 010 019 008 030 041
012 005 016 011 001 006
022 032 038 040
Daewoo 030 003 006 014 034 035
Daytron 003
Denon 016
Dumont 002 003
Dwin 044 036
Electroband 050
Emerson 019 028 031 027 029 025
003 026 006 024 034 035
Envision 005
Fisher 019
Fujitsu 026
Funai 027 026 023
Futuretech 027
GE 007 008 030 041 029 025
004 015 038 040
Gibralter 002 005 003
TV
Goldstar 005 025 003 011
Gradiente 009 011
Grunpy 027 026
Hallmark 025
Harley Davidson 026
Harman/Kardon 010
Havard 027
Hitachi 016 011 018
Infinity 010
Inteq 002
JBL 010
JCB 050
JVC 009 046
KEC 027
KTV 027 005 006
Kenwood 005 003
LG 011
LXI 007 010 019 020 025
Logik 001
Luxman 011
MGA 017 005 025 003
MTC 012 005 003 011
Magnavox 010 005 026
Majestic 001
Marantz 010 005
Matsushita 042
Magatron 025 016
Memorex 019 042 031 017 025 011
001
Midland 007 002 008 006 015
Minutz 004
Mitsubishi 041 017 025 003
Motorola 041
Multitech 027
NAD 020 025 022
NEC 005 003 011
NTC 014
Nikko 005 025 014
Onwa 027
Optimus 019 042 022
Optonica 041 021
Orion 028 031 026
Panasonic 008 042
Penney 007 020 008 012 005 025
004 003 011 006 015 040
Pilco 010 031 005 016 003
Philips 010
VR-652(A) 2008.3.6 5:32 PM 페이지 57
Page 58
ENGLISH
58
Admiral 027 021
Adventura 000
Aiko 025
Aiwa 005 000
Akai 026
America Action 025
America High 004
Asha 023
Audiovox 005
Beaumark 023
Bell & Howell 017
Brocksonic 021
Broksonic 020 018 021 001
CCE 015 025
Calix 005
Canon 004
Carver 016
Cineral 025
Citizen 005 025
Colt 015
Craig 005 012 023 015 024
Curtis Mathes 013 004 026 028
Cybernex 023
Daewoo 010 025
Denon 008
Dynatech 000
Electrohome 005
Electrophonic 005
Emerex 002
Emerson 005 020 000 018 009 021
001 025
Fisher 012 017
Fuji 004 003
Funai 000
GE 013 004 027 023
Garrard 000
GoldStar 005 006
Gradiente 000
HI-Q 012
Harley Davidson 000
Harman/Kardon 016 006
Harwood 015
VCR
Pilot 005 003 006
Pioneer 022
Portland 003 006 014
Prism 008
Proscan 007
Proton 025 032
Pulsar 002 003
Quasar 008 042 021
RCA 007 008 041 003 013 015
037 038 039 040
Radio Shack 007 019 021 027 005 025
003 011 006
Realistic 019 021 027 005 025 003
011 006
Runco 002 005 033
SSS 027 003
Sampo 005 006
Samsung 012 005 025 003 011 045
Samsux 006
Sansei 030
Sansui 031
Sanyo 019
Scimitsu 003
Scotch 025
Scott 028 027 025 003 026
Sears 007 010 019 020 025 026
011 023
Semivox 027
Semp 020
Sharp 041 021 006
Sherwood 000
Shogun 003
Signature 001
Sony 050
Soundesign 027 025 026
Squareview 023
Starlite 027
Supreme 050
Sylvania 010 005
Symphonic 023
TMK 025 011 024
Tandy 041
Technics 008 042
Technoi Ace 026
Techwood 008 011
Teknika 010 027 017 012 003 026
011 001 006 014
Telefunken 011
Toshiba 019 020 012
Totevision 006
Vector Research 005
Victor 009
Vidikron 010
Vidtech 025 003
Wards 010 021 005 025 004 003
026 011 001
White Westinghouse
031 034 035
Yamaha 005 003
Zenith 002 031 001 014
VR-652(A) 2008.3.6 5:32 PM 페이지 58
Page 59
ENGLISH
59
Headquarter 011
Hitachi 000 008 026
JVC 014 026
Jensen 026
KEC 005 025
KLH 015
Kenwood 014 026 006
Kodak 004 005
LXI 005
Lloyd’s 000
Logik 015
MEI 004
MGA 023 009
MGN Technology 023
MTC 023 000
Magnasonic 025
Magnavox 004 007 016 000 019
Magnin 023
Marantz 004 016
Marta 005
Matsushita 004 028 029
Memorex 004 005 027 007 012 023
000 017 021 011 031 032
Minolta 008
Mitsubishi 027 014 009
Motorola 004 016
Multitech 000 015
NEC 017 014 026 006
Nikko 005
Noblex 023
Olympus 004
Opimus 005 027 017 028 029 030
031 032
Orion 020 021 001
Panasonic 004 028 022 029 031
Penny 004 005 023 008 006
Pentax 008
Philco 004 021
Philips 004 016
Pilot 005
Pioneer 014
Profitronic 023
Proscan 013
Protec 015
Pulsar 007
Quarter 011
Quartz 011
Quasar 004 028 029 031
RCA 013 004 027 023 008 019
Radio Shack 000
Radix 005
Randex 005
Realistic 004 005 027 012 000 017
011
Runco 007
STS 008
Samsung 023 010 033
Sanky 027 007
Sansui 000 014 021 026 024
Sanyo 012 023 017 011
Scott 020 010 018 009
Sears 004 005 012 000 008 017
011
Semp 010
Sharp 027
Shintom 015
Shogun 023
Singer 015
Sony 004 002 000 003
Syvania 004 016 000 009
Symphonic 000
TMK 023
Tatung 026
Teac 000 026
Technics 004 028
Teknika 004 005 000
Thomas 000
Toshiba 010 009
Totevision 005 023
Unitech 023
Vector 010
Vector Research 006
Video Concepts 010
Videosonic 023
Wards 013 004 027 012 016 023
000 008 015 019
White WestingHouse
021 025
XR-100 004 000 015
Yamaha 006
Zenith 007 000 021 003
Ameira High 004 (TV use 008)
Brocksonic 001
Colt 015
Cutis Mathes 004 (TV use 008)
Daewoo 025
Emerson 001
Funai 000
GE 004 (TV use 008) 013 (TV use 007)
027 (TV use 041) 023
Hitachi 004 (TV use 008) 000
VCR - TV/VCR
VR-652(A) 2008.3.6 5:32 PM 페이지 59
Page 60
60
HQ 000
Lloyds 000
MGA 023
Megavox 016 (TV use 010) 004 (TV use 008)
000
Magnin 023
Memorex 005 028 (TV use 042)
Mitsubishi 027 (TV use 041)
Orion 001
Panasonic 004 (TV use 008) 028 (TV use 042)
Penney 004 (TV use 008) 023
028 (TV use 042)
Quasar 004 (TV use 008) 028 (TV use 042)
RCA 013 (TV use 007) 004 (TV use 008)
027 (TV use 041)
Sansui 000
Sanyo 023
Sear 000 005
Sharp 027 (TV use 041)
Sony 002 (TV use 050)
Symphonic 000
Zenith 000
Comsat 085
Comtronics 014
Contec 011
Cox Digital 063 085
Digicable 105
Eagle 050 052 060
Eastern 001 076 081
Echostar 110
Electricord 054
Emerson 026
Everquest 010 014
Focus 022
Garrard 018
Gemini 010 041 073
General Electric 084
General Instrument
033 032 006 034 085 107
108
GNC 103
Golden Channel 052
GoldStar 017 014
Goodmind 026
Hamlin 012 020 004 013 068 069
074
Hitachi 006 107 074
Insight 085
Jasco 010 018 021
Jerrold 002 007 033 032 009 010
006 034 035 036 037 041
042 043 082 085 107
Magnavox 043 045 080 088 099 098
Massillon 085
Media One 111
Medicom 074
Memorex 000 071
Mitsubishi 106
Motorola 085 114 113 106
Movie Time 015 028 054
Moxi 106
Nctc 085
NSC 015 048 051 058 083
Oak 011 053 057 072
Optimus 031
Pace 063 085
Panasonic 000 016 031 064 067
Paragon 000 071
Philips 018 039 045 046 050 091
099
Pioneer 017 025 063 107 055 070
079 086 109
Popular Mechanics 022
Prucer 077
Pulsar 000 071
ABC 002 003 009 030 006 008
037 107 036 059 062 066
072
Adelphia 063 085
Allegro 018 021
Altrio 063
Americast 103
Archer 018 026 038 040 047
Armstrong 085
AT&T Broadband 085
Atlantic Broadband 063 085
Bell South 103
Bell&Howell 009
Blue Ridge 063 085
Bresnan 085
Bright House 063 114
Buckeye Comm 085
Cablevision 063 085 112
Centurion 096
Century 018 040
Charter 063 085
Citizen 018 021 040
Cogeco 085
Combano 089 090
Comcast 063 085 114
CBL
ENGLISH
VR-652(A) 2008.3.6 5:32 PM 페이지 60
Page 61
61
Quasar 000
RCA 031 067
Radio Shack 010 021 026 028
Recoton 022 102
Regal 012 020 068 069
Regency 001 076
Rembrandt 006
Rodgers 063
Runco 000
Samsung 017 014 052
Scientific Atlanta 003 023 030 027 063 044
036 061 062 065 066
Seren 063
Service Electric 085
Shaw 085
Sherwood 000
Sigecom 063
Signal 010 014
Signature 006
SL Marx 014
Sony 100 112
Sprucer 031 067 087
Starcom 002 010 035 037 041 042
Stargate 010 014 026 041 052 101
108
Starquest 010
Susquehanna 063 085
Teleview 014
Time Warner 063 085
Tocom 007 008 059 060 075
Toshiba 000 071
Tusa 010
TV86 015
Unika 018
United Cable 037 072
Universal 018 019 038 040 047 054
056
Videotron 063
Viewstar 015 045 048 049 092 093
094 095
Wide Open West 063 103
Zenith 000 024 071 078 097 104
Zentek 022
AlphaStar 008
Cablevision/voom 031
Chaparral 001
Directv 053
Echostar/dish 009 024 049 050
Expreevu 009
Expressvu 024
General Electric 033 021 032
General Instrument
016 015 018 031
Goi 024
Hitachi 011 028 029
HTS 009 024
Hughes 043 044 019 036 047 048
022 023
Hughes Net.Sys 007
JVC 009 024
Jerrold 016 015
LG 052
Magnavox 027
Megavox 006 005
Memorex 006
Mitsubishi 019 036
Motorola 031
Next Level 018 031
Panasonic 017 030 042
Pansat 027
Philips 006 005 034 035 038 019
036 027 022 023
Primestar 016 015
Proscan 033 021 032
Radio Shack 018 031
RCA 003 000 002 012
Realistic 014
RSA 033 021 032
Samsung 025 037 045 051 054
Sherwood 000
SKY 046
Sony 004 020
Star Choice 018 031
Toshiba 010 026 019 036 039 040
Uniden 006 005 014 027
Zenith 013 041
SAT
ENGLISH
VR-652(A) 2008.3.6 5:32 PM 페이지 61
Page 62
VR-652(A) 2008.3.6 5:32 PM 페이지 62
 Loading...