

Page 1
877-012/-112
Bedienungsanleitung
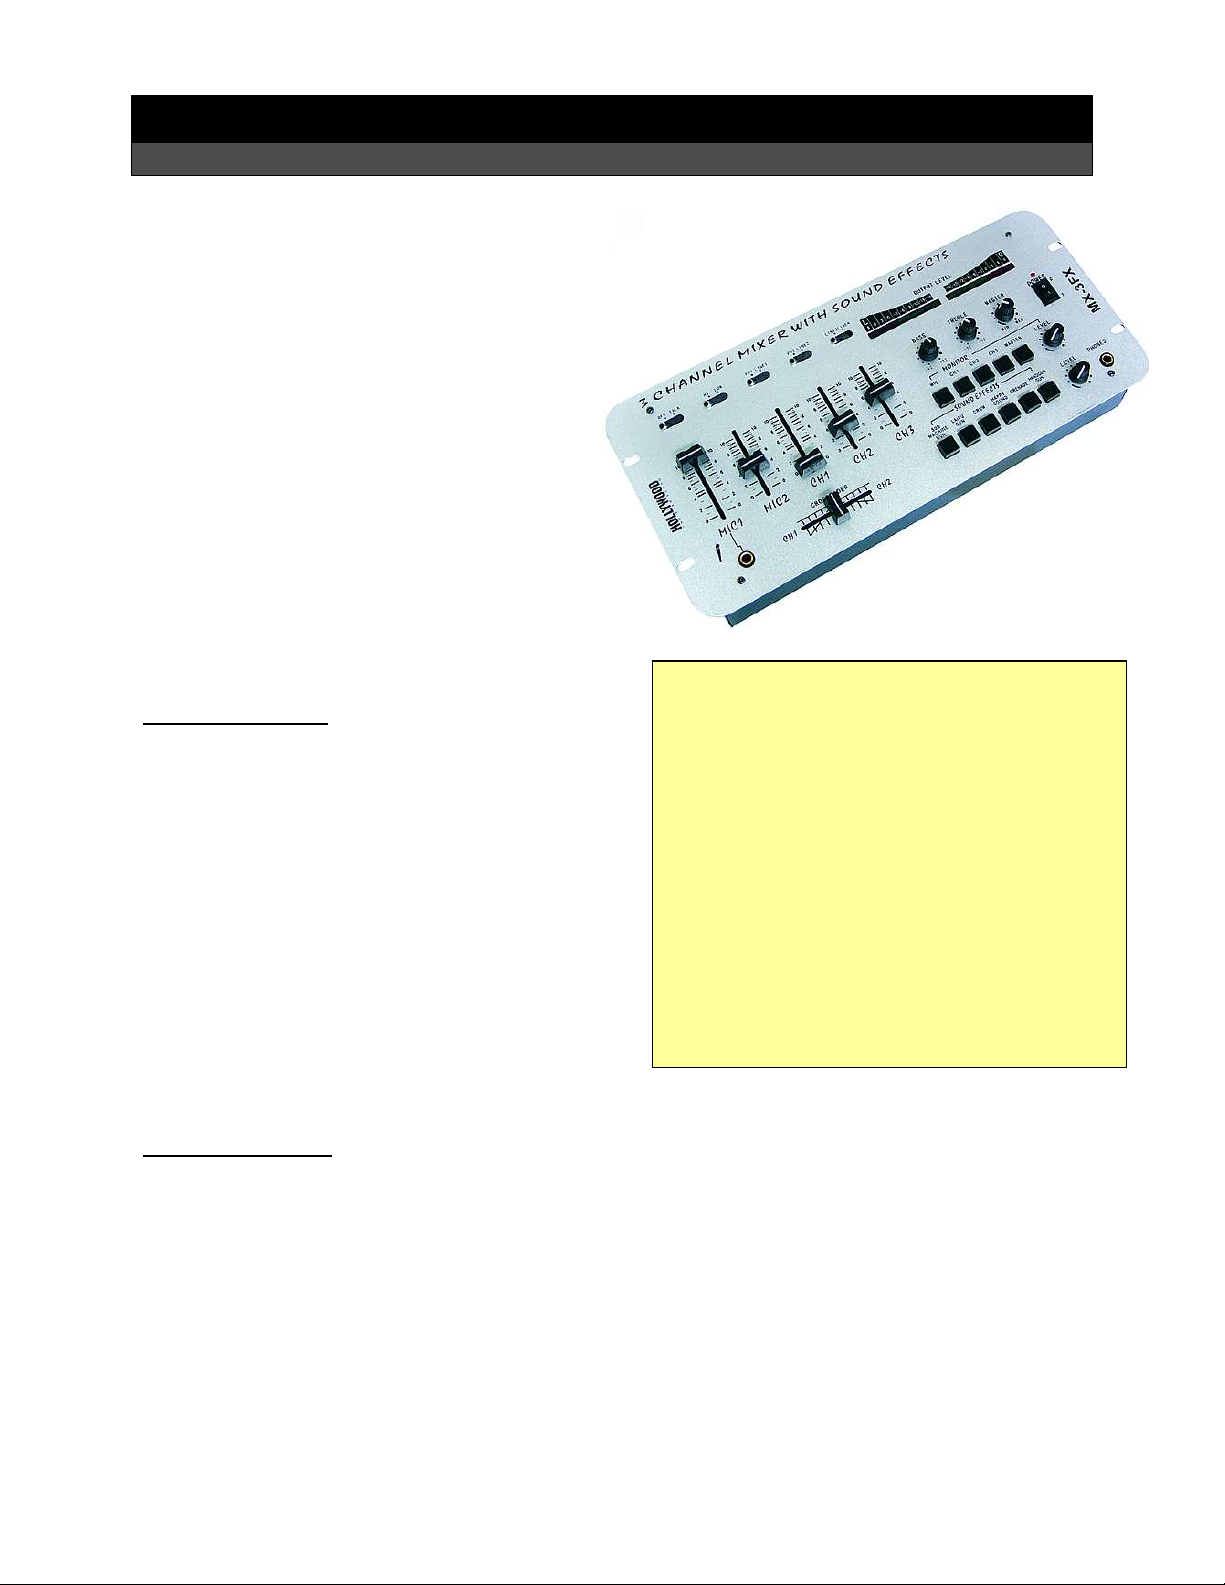
Mischpult HOLLYWOOD “MX-3 FX”
Einführung
Geehrter Kunde,
wir möchten Ihnen zum Erwerb Ihres
neuen Mischpultes gratulieren!
Mit dieser Wahl haben Sie sich für ein Produkt
entschieden, welches ansprechendes Design
und durchdachte technische Features gekonnt
vereint.
Lesen Sie bitte die folgenden Bedienhinweise
sorgfältig durch und befolgen Sie diese, um in
möglichst ungetrübten Genuss des Gerätes zu
kommen!
Leistungsmerkmale
• Das Mischpult führt Signale verschiedener
Tonquellen zusammen.
• Getrennte Klangregler für alle 4 Kanäle inklusive
separater Umschalter.
• Eingänge und Ausgänge über Cinchstecker.
• Betriebszustände werden durch Leuchtdioden
angezeigt.
• Das Mischpult hat Talkover- und Crossfader-
Funktion.
• Das Gerät besitzt vor Überlastung geschützte
Schaltkreise.
Sicherheitshinweise
• Überprüfen Sie vor Inbetriebnahme das Gerät auf Beschädigungen, sollte dies der Fall sein, bitte das
Gerät nicht in Betrieb nehmen!
• Ziehen Sie den Netzstecker, wenn Sie das Gerät längere Zeit nicht benutzen.
• Das Gerät keinen mechanischen Belastungungen oder Feuchtigkeit aussetzen.
• Das Gerät, wegen der Durchlüftung, nicht abdecken und vor direkter Sonneneinstahlung schützen.
• Reinigen Sie das Gerät mit einem weichen trockenen Tuch.
• Wichtig! Sollten das Gerät einmal beschädigt werden, lassen Sie es nur durch den Hersteller oder eine
Fachwerkstatt instandsetzen.
• Lassen Sie das Verpackungsmaterial nicht achtlos liegen, Plastikfolien / -tüten, Styroporteile, etc.,
könnten für Kinder zu einem gefährlichen Spielzeug werden.
• Das Gerät gehört nicht in Kinderhände. Es ist kein Spielzeug.
Technische Daten:
Maße (H*B*T): 175*385*95 mm
Betrieb: AC 230 V ~ 50 Hz
Kanäle: 3
Frequenzgang: 20 – 20000 Hz
Ausgangsspannung: max. 10 V ~ 600 Ω
Klangregelung: Filter +12~-26dB; Gain 0~20dB
Signal/Rausch-Verhältnis (S/N): < 80 dB
Talkover: 12 dB
Klirrfaktor: < 0.02%
Farbcode: 012 = silber; 112 = schwarz
P2008 © Firma WJG, Braunschweig. Nachdruck oder Vervielfältigung nur mit ausdrücklicher Genehmigung
Page 2
877-012/-112
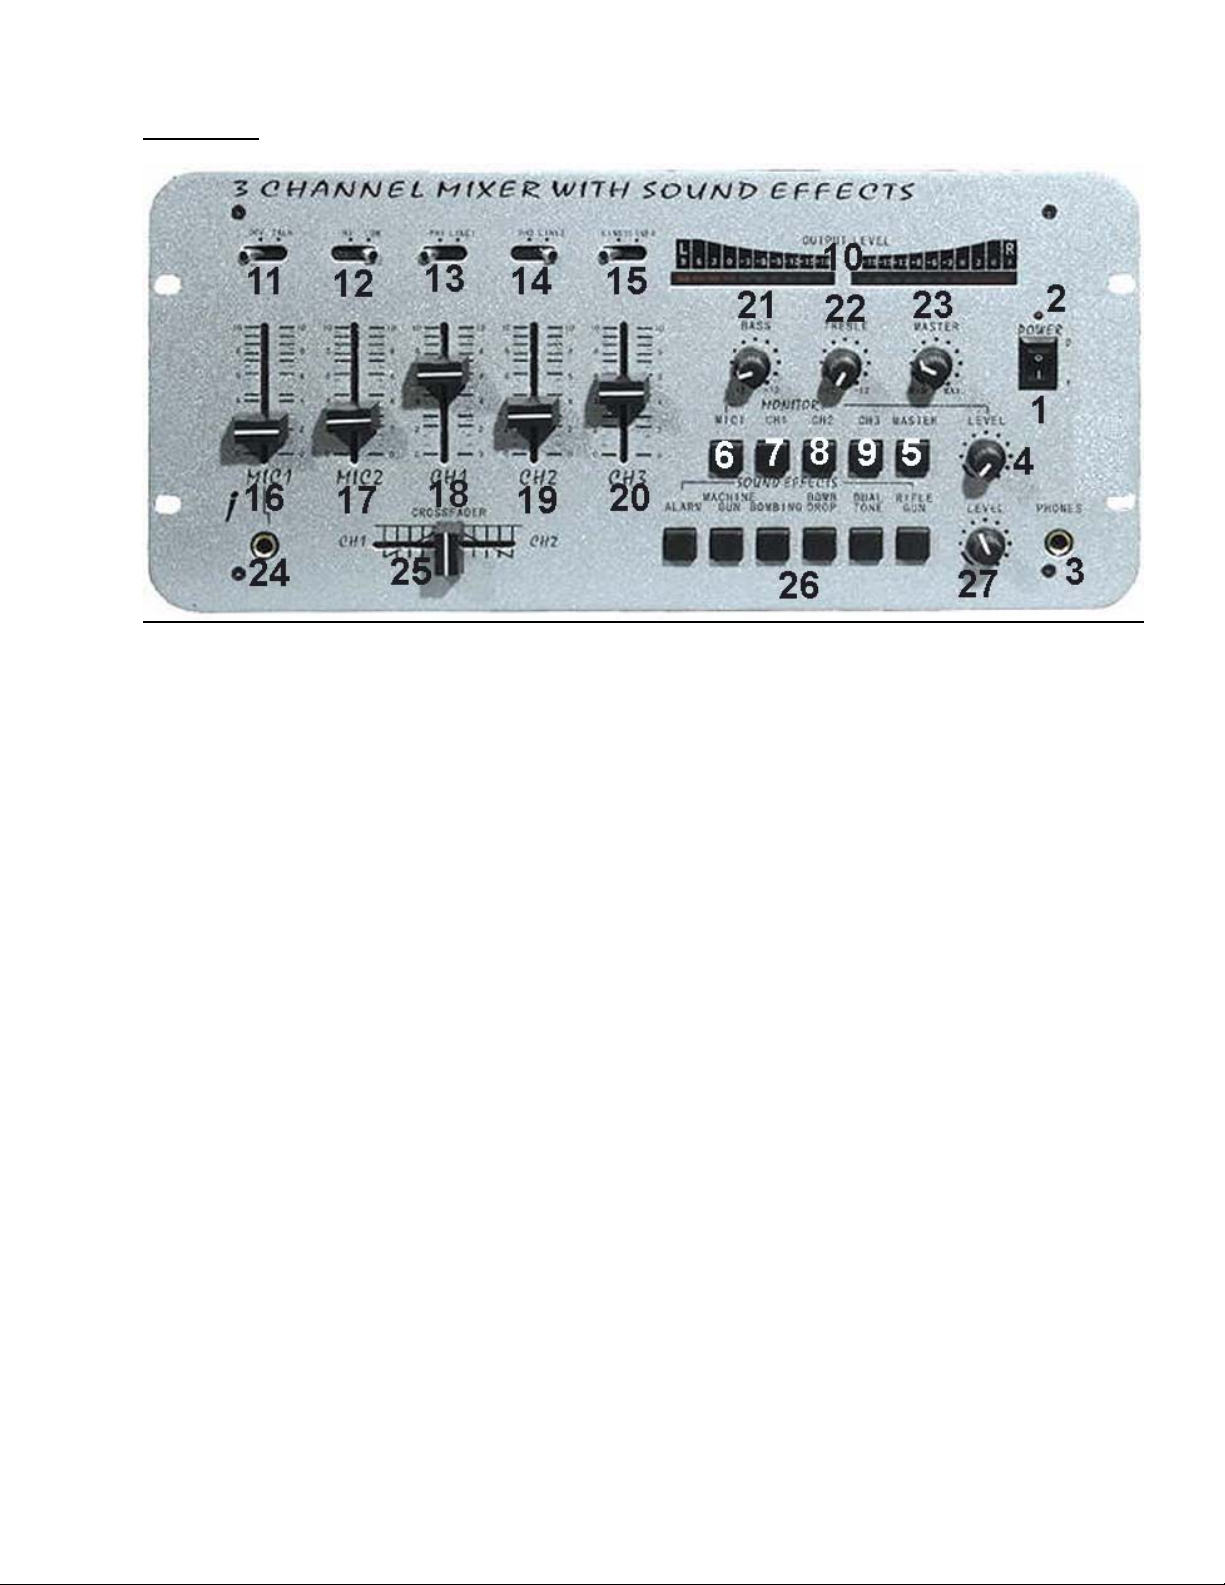
Vorderseite:
1. POWER: Ein-/Aus-Schalter.
2. Leuchtdiode der Betriebsanzeige.
3. PHONES: Klinkensteckeranschluss für einen Kopfhörer.
4. MONITOR LEVEL: Lautstärkenregler für den Kopfhörerausgangs [3].
5. MONITOR MASTER: Legt das komplette Ausgangssignal auf den Kopfhörerausgang [3].
6. MONITOR MIC: Legt das Signal der Mikrofone auf den Kopfhörerausgang [3].
7. MONITOR CH1: Legt das Signal von Kanal 1 auf den Kopfhörerausgang [3].
8. MONITOR CH2: Legt das Signal von Kanal 2 auf den Kopfhörerausgang [3].
9. MONITOR CH3: Legt das Signal von Kanal 3 auf den Kopfhörerausgang [3].
10. OUTPUT LEVEL: VU-Meter mit LEDs als Indikatoren für die Signalstärke des Ausgangs.
11. OFF/TALK: Ist dieser Schalter auf TALK gestellt, so werden alle Signalquellen, bis auf das MIC1 [24] auf 12
dB reduziert. (Ideal um zwischendurch Ansagen zu machen, ohne die Musik auszustellen)
12. HI/LOW: Ist an MIC2 [28] ein Mikrofon mit hoher Impedanz angeschlossen, muss dieser Schalter auf HI
gestellt werden.
13. PH1/LINE1: Wenn die Signalquelle auf Kanal 1 ein Plattenspieler ist, muss dieser Schalter auf PH1 gestellt
werden. Ansonsten auf LINE1.
14. PH2/LINE2: Wenn die Signalquelle auf Kanal 2 ein Plattenspieler ist, muss dieser Schalter auf PH2 gestellt
werden. Ansonsten auf LINE2.
15. LINE3/LINE4: Umschalter für die Signaleingänge von Kanal 3.
16. MIC1: Lautstärkenregler für dem Mikrofoneingang 1.
17. MIC2: Lautstärkenregler für den Mikrofineinang 2.
18. CH1: Lautstärkenregler für Kanal 1.
19. CH2: Lautstärkenregler für Kanal 2.
20. CH3: Lautstärkenregler für Kanal 3.
21. BASS: Regler der Tiefen am Signalausgang.
22. TREBLE: Regler der Höhen am Signalausgang.
23. MASTER: Lautstärkenregler des Signalausgangs.
24. Klinkensteckeranschluss für ein Mikrofon an MIC1.
25. CROSSFADER: Schieber zum stufenlosen Überblenden von Kanal 1 zu Kanal 2 oder umgekehrt.
26. SOUNDEFFECTS: Einmaliges Drücken erzeugt eine einzelne Sequenz des jeweiligen Effekts. Gedrückt halten
erzeugt einen permanenten Effekt. Es gibt folgende sechs verschiedene Effektgeräusche.
27. Lautstärkenregler der Effektgeräusche.
P2008 © Firma WJG, Braunschweig. Nachdruck oder Vervielfältigung nur mit ausdrücklicher Genehmigung
Page 3
877-012/-112
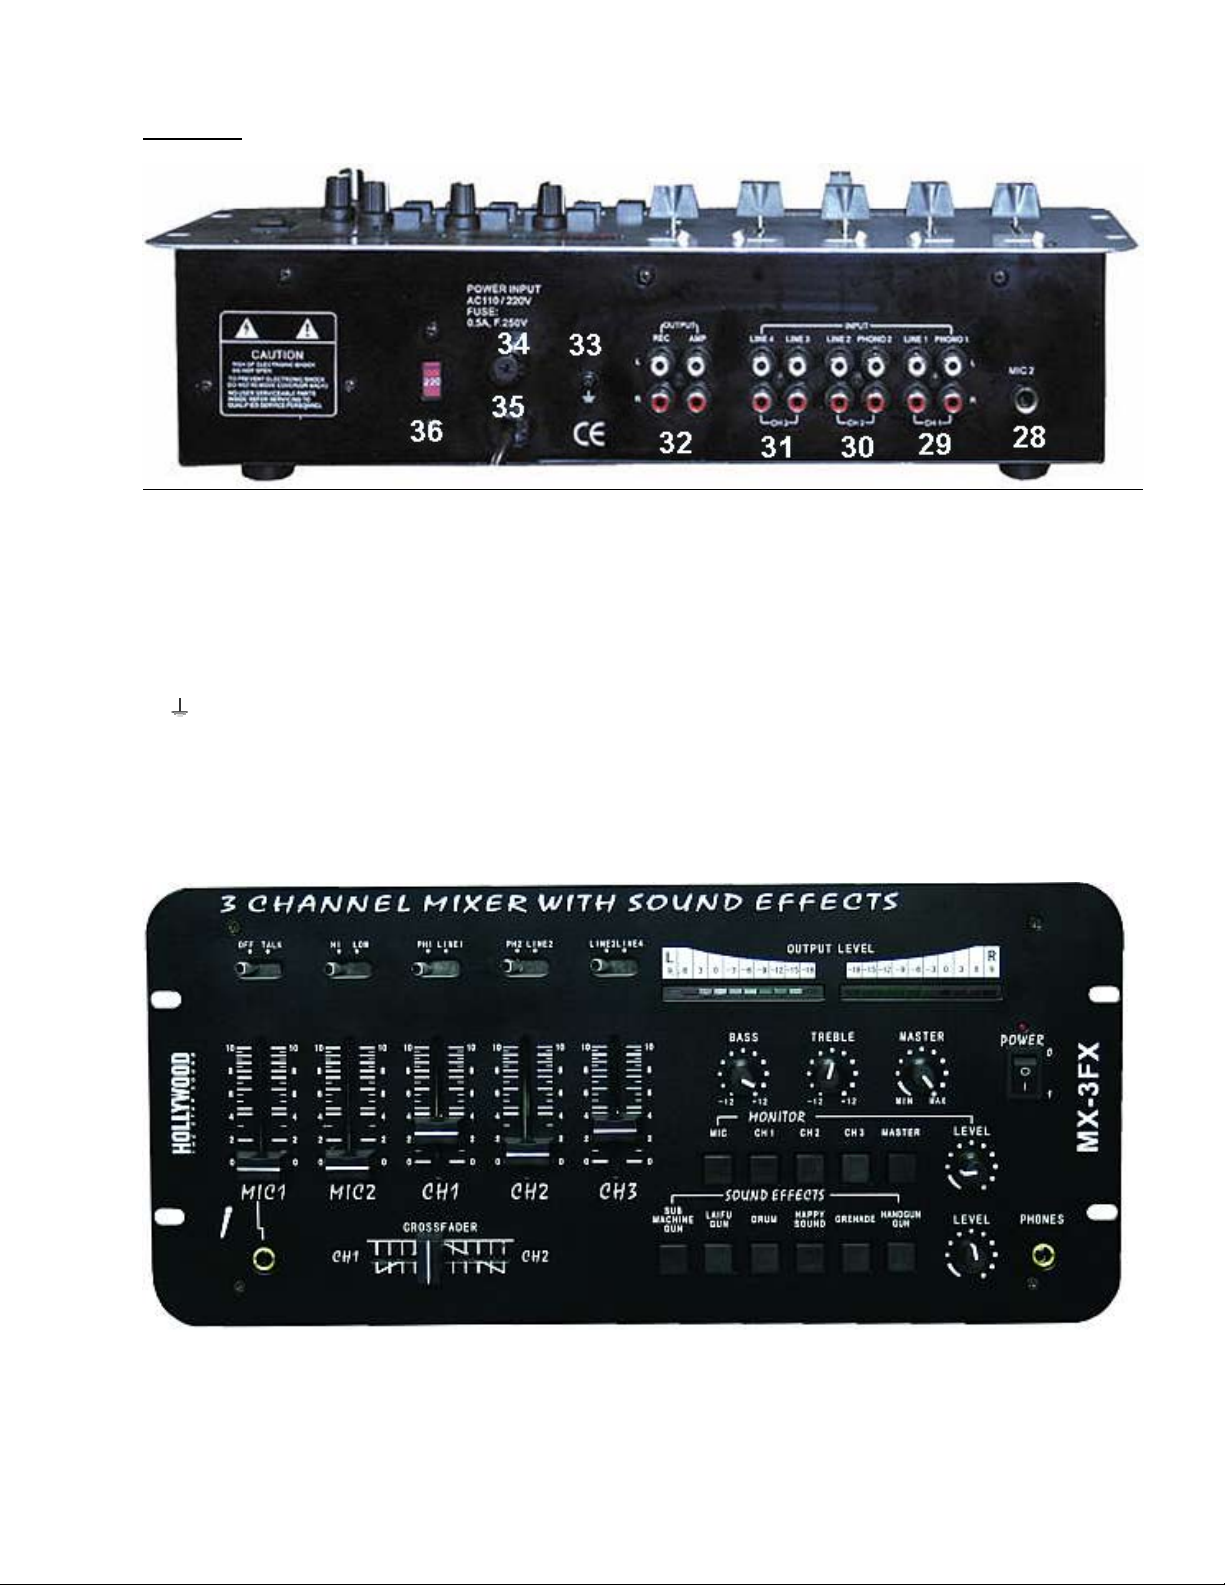
Rückseite:
28. Klinkensteckeranschluss für ein Mikrofon an MIC2.
29. INPUT CH1: Analoger Cinchanschluss für einen Plattenspieler (PHONO1) oder eine sonstige
Audiosignalquelle (LINE1) auf Kanal 1.
30. INPUT CH2: Analoger Cinchanschluss für einen Plattenspieler (PHONO2) oder eine sonstige Audiosignalquelle
(LINE2) auf Kanal 2.
31. INPUT CH3: Analoger Cinchanschluss für zwei Audiosignalquellen (LINE3 & LINE4) auf Kanal 3.
32. OUTPUT: Ausgang zum Verstärker des Hauptsoundsystems (AMP) und Ausgang zu einem
Aufzeichnungsgerät (REC), um das Ausgangssignal aufzunehmen.
: Erdung für die Plattenspieler.
33.
34. FUSE 0.5A: Sicherung.
35. POWER INPUT: Anschluss für Netzkabel.
36. Umschalter für die Eingangsspannung.
P2008 © Firma WJG, Braunschweig. Nachdruck oder Vervielfältigung nur mit ausdrücklicher Genehmigung
Page 4
877-012/-112
Reference Manual
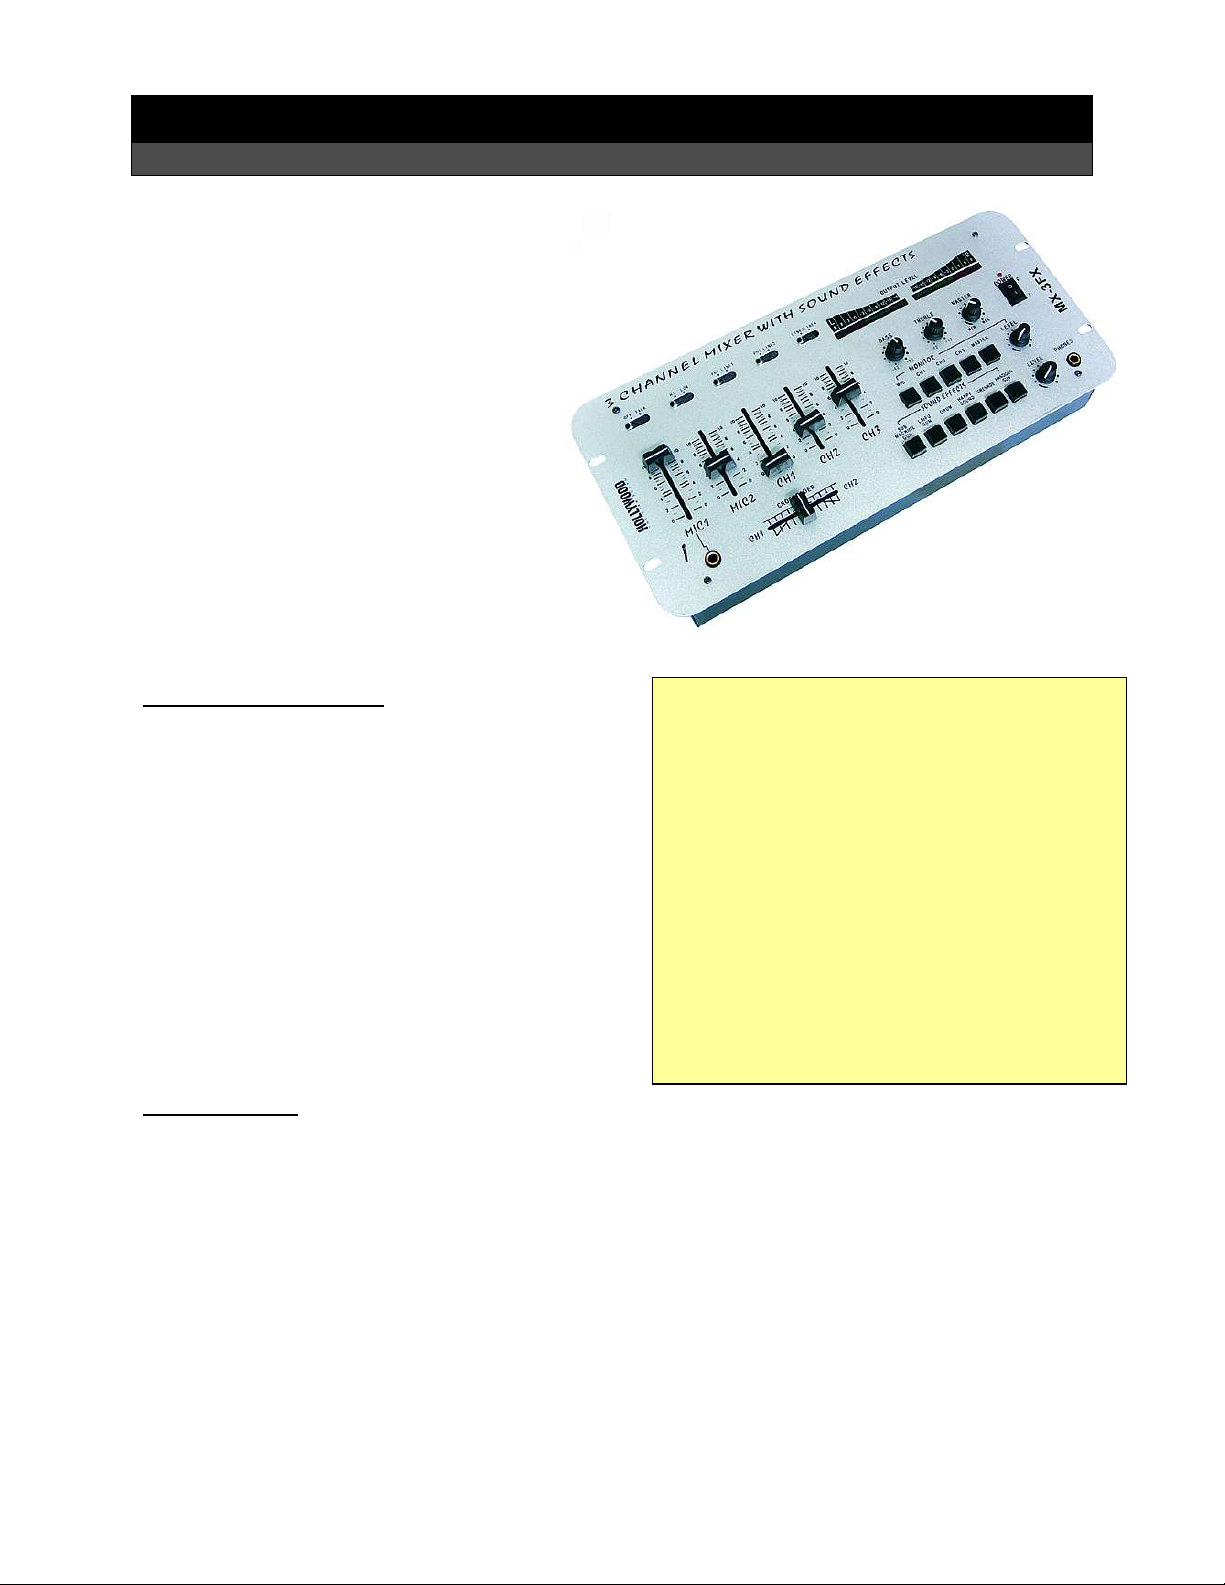
Mixer HOLLYWOOD „MX-3 FX“
Preface
Dear Customer,
we like to congratulate you on the
purchase of your new mixer!
You have chosen a product which
combines deliberate technical features
with an appealing design.
Please read this manual conscientiously
and carry out the given instructions before
and while you are using your new device.
Capability Characteristics
• The mixer combines and routes signals of different
sound sources.
• It has separated adjuster every channel as well as
separated toggles.
• Input and output terminals with cinch jacks.
• The operating state will be indicated bu LEDs.
• The mixer has cue-, crossfader- and talkover-
function.
• Circuit is protected of current overload.
Security Advices
• Before using the device, please check it for any possible damages. In case of damage do not operate it.
• Unplug the device if you do not use it for a certain time.
• The device may not become subject of mechanical stress and should not be exposed to humidity.
• To be considerate of the ventilation do not cover the device and protect it from direct solar radiation.
• Clean the device with a dry and soft cloth only.
• Caution! Should the device itself get damaged, please let the repair to the manufacturer or to a qualified
service agent.
• Please dispose packaging materials properly and do not let play children with it.
• The device itself is no toy either. Do not let children play with it too.
Technical Specifications:
Size (H*W*D): 175*385*95 mm
Operation: AC 230 V ~ 50 Hz
Channels: 3
Frequency Response: 20 – 20000 Hz
Output Voltage: max. 10 V ~ 600 Ω
Sound Control: Filter +12~-26dB; Gain 0~20dB
Signal-Noise-Ratio (S/N): < 80 dB
Talkover: 12 dB
Total Harmonic Distortion (THD): < 0.02%
Color Code: 012 = silver; 112 = black
P2008 © Firma WJG, Braunschweig. Nachdruck oder Vervielfältigung nur mit ausdrücklicher Genehmigung
Page 5
877-012/-112
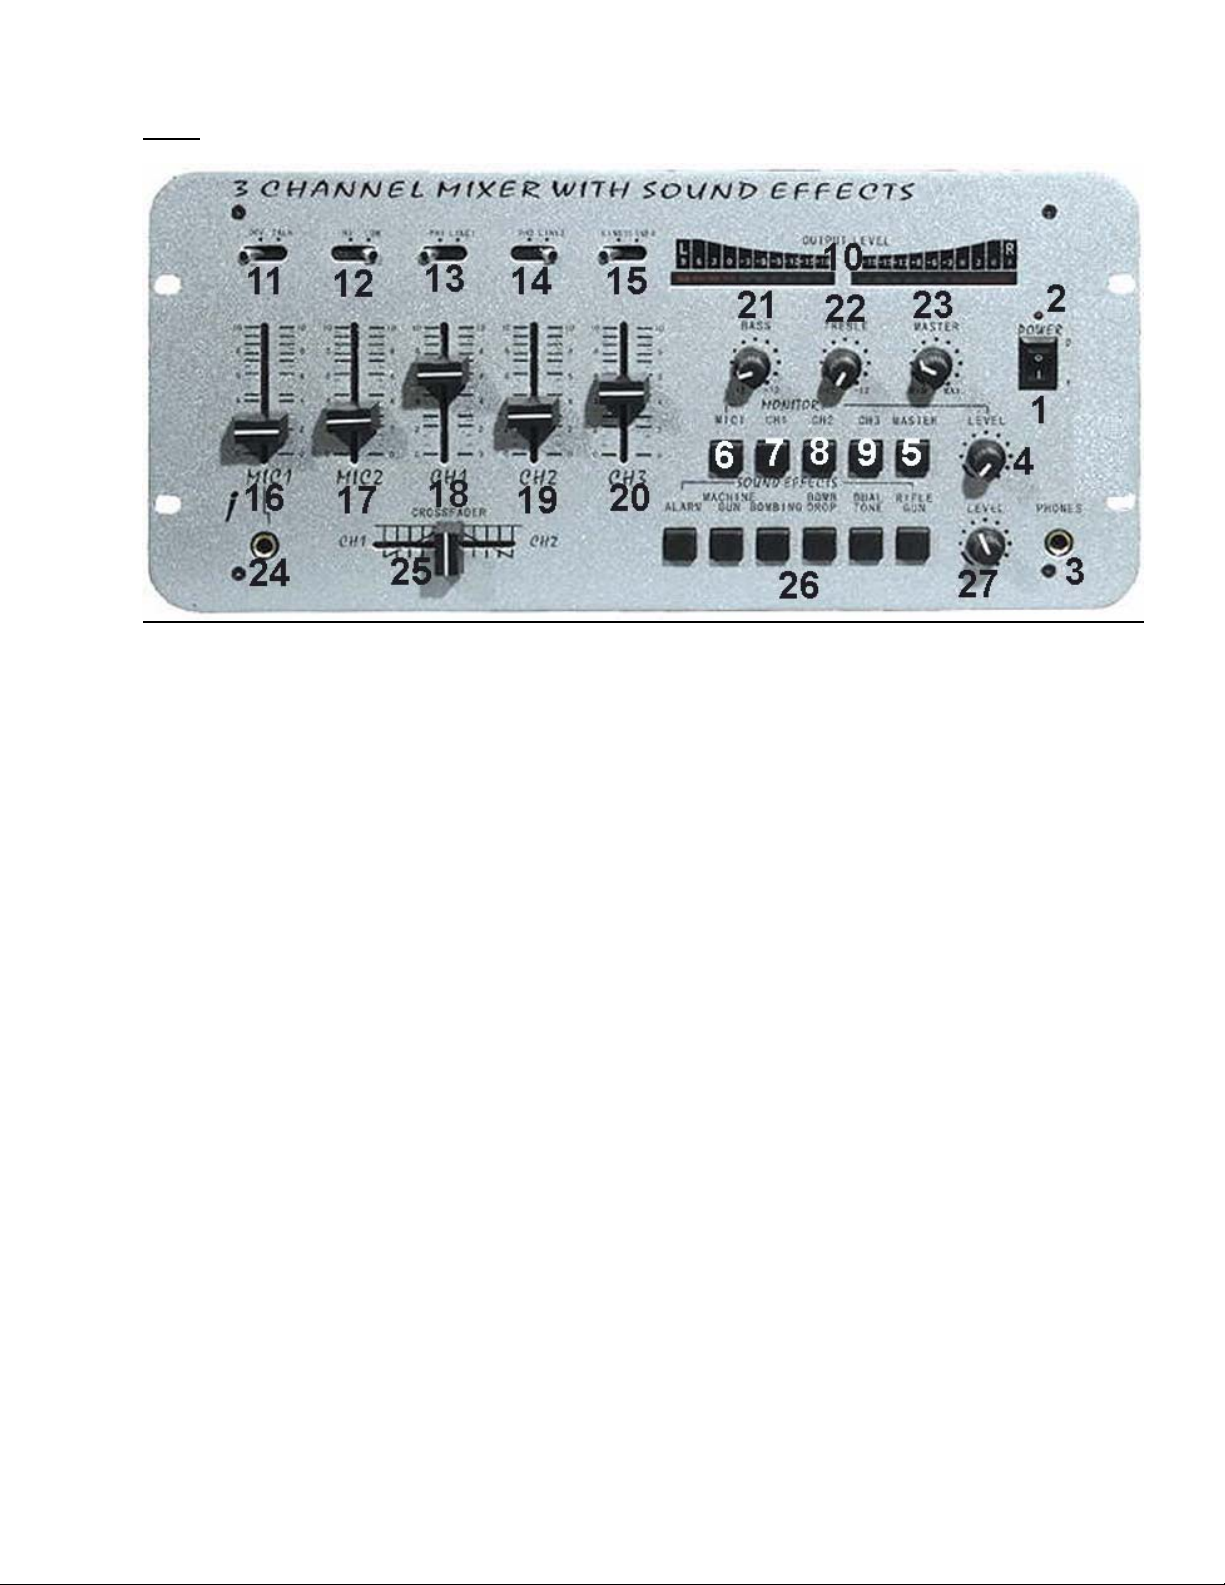
Front:
1. POWER: On-/Off-switch.
2. LED of the operation display.
3. PHONES: TRS-connector for headphones.
4. MONITOR LEVEL: Volume control for the headphone output [3].
5. MONITOR MASTER: Applies the whole output signal to the headphone output [3].
6. MONITOR MIC: Applies the microphone signal to the headphone outlet [3].
7. MONITOR CH1: Applies the signal from channel 1 to the headphone outlet [3].
8. MONITOR CH2: Applies the signal from channel 2 to the headphone outlet [3].
9. MONITOR CH3: Applies the signal from channel 3 to the headphone outlet [3].
10. OUTPUT LEVEL: VU-meter with LEDs indicates the signal strength at the signal output.
11. OFF/TALK: If this switch is put to TALK all signal source will be reduced to 12 dB except MIC1 [24]. (Ideal to
make talkover annoucments)
12. HI/LOW: Put this switch to HI if there is a microphone with high impedance connected to MIC2 [28].
13. PH1/LINE1: If the signal source of channel 1 is a turn table put this switch to PH1. Otherwise to LINE1.
14. PH2/LINE2: If the signal source of channel 2 is a turn table put this switch to PH1. Otherwise to LINE2.
15. LINE3/LINE4: Toggle for the signal inputs of channel 3.
16. MIC1: Volume control for the microphone on MIC1.
17. MIC2: Volume control for the microphone on MIC2.
18. CH1: Volume control of channel 1.
19. CH2: Volume control of channel 2.
20. CH3: Volume control of channel 3.
21. BASS: Controller for the low-pass filter at the signal output.
22. TREBLE: Controller for the high-pass filter at the signal output.
23. MASTER: Volume control of the signal output.
24. TRS-connector for the microphone on MIC1.
25. CROSSFADER: Slide switch for cross fade from channel 1 to channel 2 or vice versa.
26. SOUNDEFFECTS: If pressed one time it creates a single sequence of the particular effect. Hold the button
and get a permanent effect. There are sic different sound effects available.
27. Volume control of the sound effects.
P2008 © Firma WJG, Braunschweig. Nachdruck oder Vervielfältigung nur mit ausdrücklicher Genehmigung
Page 6
877-012/-112
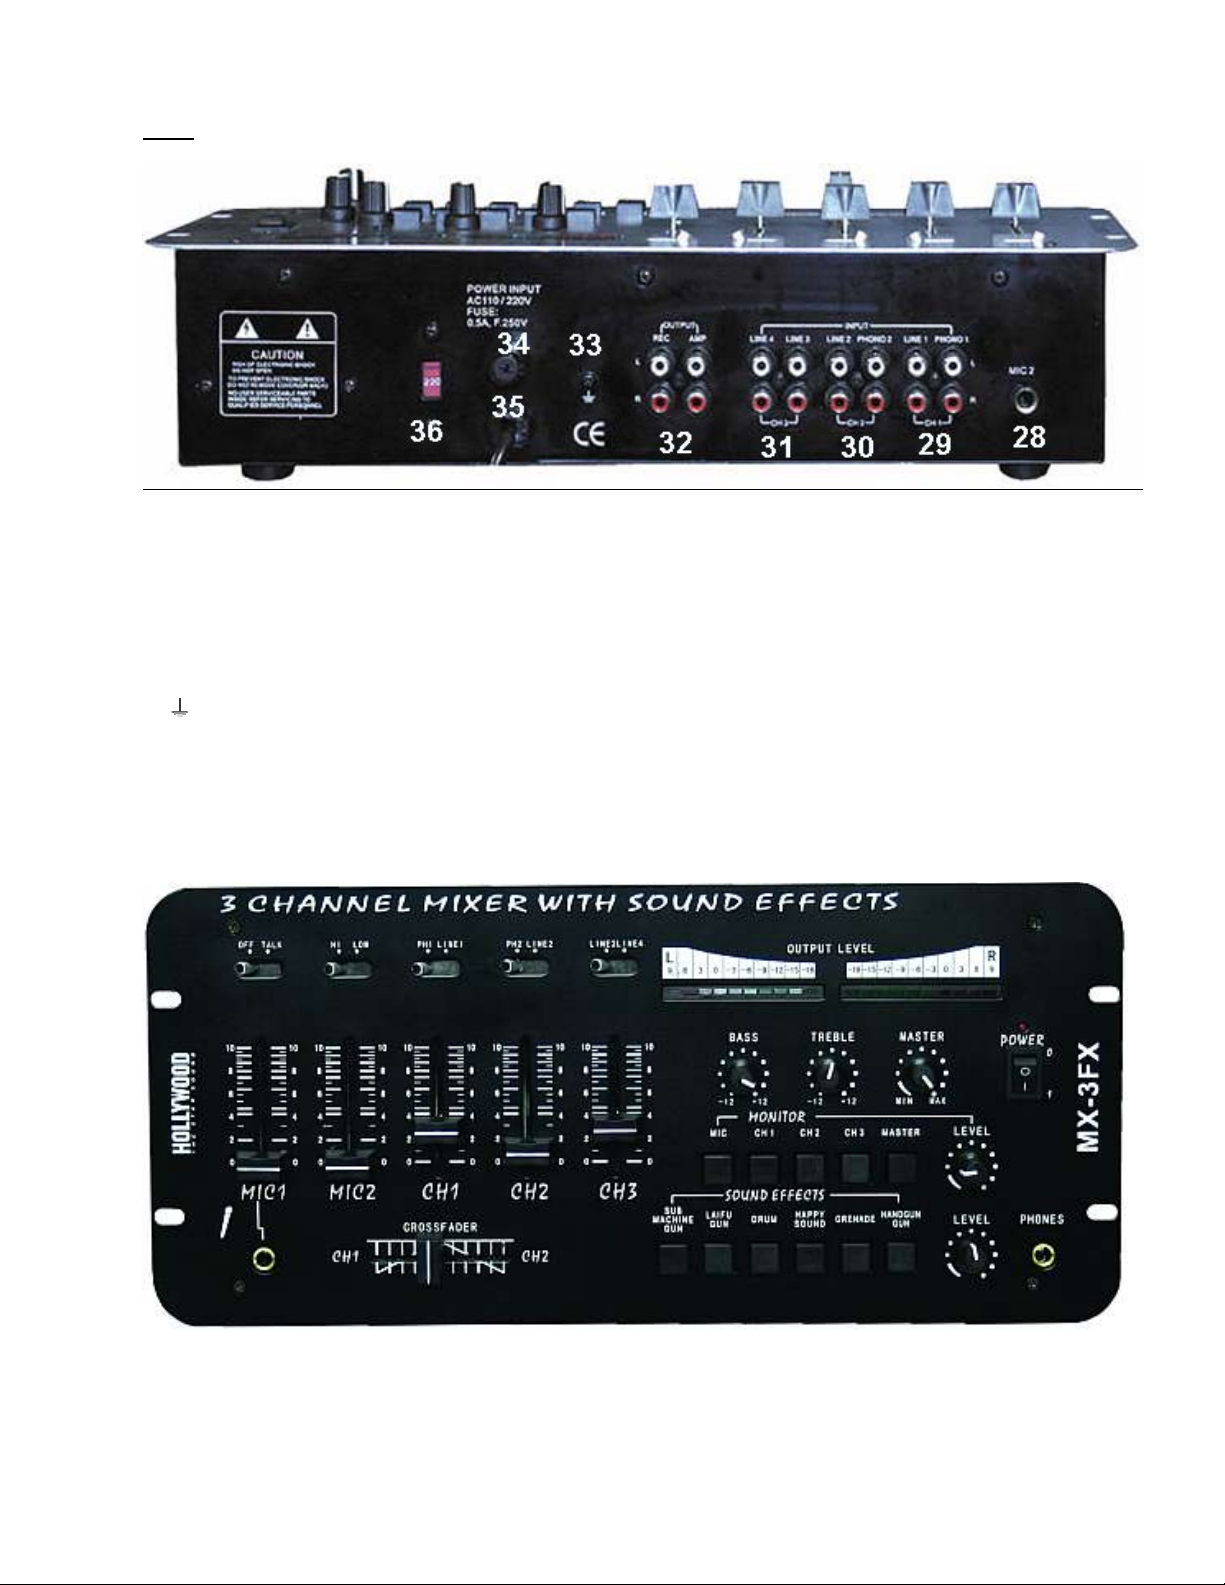
Rear:
28. TRS-connector for a microphone on MIC2.
29. INPUT CH1: Analogue cinch connector for a turn table (PHONO1) or a sundry audio signal source (LINE1) on
channel 1.
30. INPUT CH2: Analogue cinch connector for a turn table (PHONO2) or a sundry audio signal source (LINE2) on
channel 2.
31. INPUT CH3: Analogue cinch connector for two audio signal sources (LINE3 & LINE4) on channel 3.
32. OUTPUT: Signal output to the amplifier of the main sound system (AMP) and signal output to a recorder
(REC) to record the output signal.
: Grounding for a turn table.
33.
34. FUSE 0.5A: Fuse.
35. POWER INPUT: Connector for the power cable.
36. Toggle of the input voltage.
P2008 © Firma WJG, Braunschweig. Nachdruck oder Vervielfältigung nur mit ausdrücklicher Genehmigung
 Loading...