

Hollywog HWOGTENS11, HWOGTENS12 Users Manual
User Manual
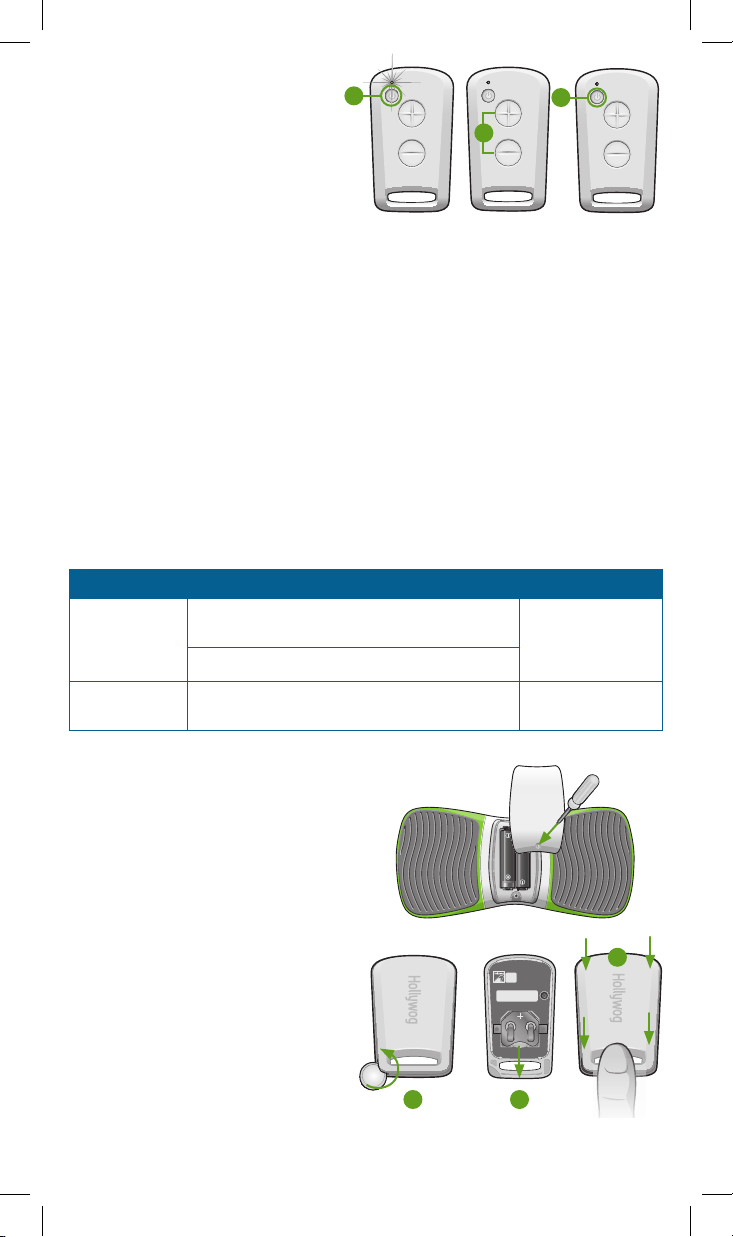
Before Using Your WiTouch Pro Device
Sync the Remote Control and the
WiTouch Pro Device
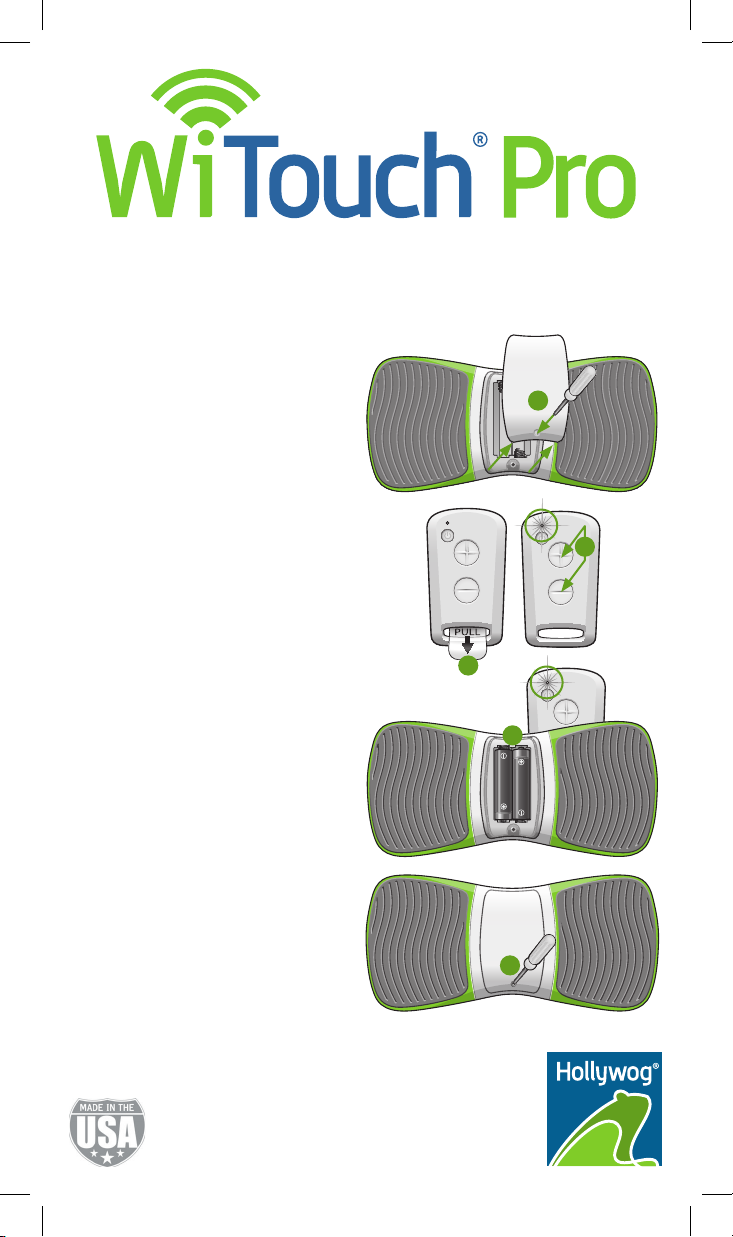
1. Using the provided screwdriver, remove
the back cover from the WiTouch Pro
device.
2. Remove the clear plastic tab from the
remote control.
3. On the remote control, press and hold
the (+) and (-) buttons simultaneously
until the LED appears solid green
(~ 10 seconds).
4. Quickly insert the batteries into the
WiTouch Pro device.
Note: The LED on the remote control
will ash several times indicating
syncing is complete.
5. Replace the back cover on the device.
Note: You may need to re-sync your
remote control and WiTouch Pro device
when you replace the battery in the
remote control. This will ensure communication between your remote control and
WiTouch Pro device. If your remote control
and WiTouch Pro device ever lose
communication, please repeat these
syncing instructions.
Hollywog
2830 Amnicola Hwy
Chattanooga, TN 37406 USA
+1 423 305 7778
info@hollywog.com
www.hollywog.com/witouchpro
® and © 2015 Hollwog, LLC. All rights reserved.
U.S. Patents 8,972,016, D712,052, D701,610,
D716,958. Other U.S. & Foreign Patents Pending
1
3
2
4
5
11S.1004J 09/30/2015
Introduction
Congratulations on your purchase of the WiTouch Pro device. WiTouch Pro is a unique wireless
remote controlled pain relief device incorporating TENS technology to specically target back
pain. The thin and exible design perfectly contours the back for maximum surface contact. The
advanced electronics design maximizes energy use, providing over 150 30-minute treatment
sessions per battery life.
This innovative device is safe, drug-free, easy to use, discreet and comfortable to wear, and most
importantly allows you to control your pain to maintain an active lifestyle.
Indications for Use: For the symptomatic relief and management of chronic intractable
back pain and relief of pain of the upper and lower back associated with arthritis. It is
also used for adjunctive treatment for post-surgical and post-trauma acute back pain.
Safety
CONTRAINDICATIONS
• Do not use this device if you have a cardiac pacemaker, implanted debrillator, or other
implanted metallic or electronic device. Such use could cause electric shock, burns, or
electrical interference or death.
WARNING!
• The device may cause rhythmic disturbances to the heart. Do not use the device across
or through your chest. If you are susceptible to rhythm disturbances of the heart, use of
the device must be done under the direction of a physician.
• Use of this device over your neck could cause muscle spasms resulting in airway
closure, difculty in breathing, adverse effects on heart rhythm or blood pressure.
Do not use this device over your neck
• Use of the device when you are in the care of a physician or have had medical or
physical treatment for your pain. Consult with your physician before using this device.
• Continued use of the device when pain does not improve, becomes more severe, or
lasts more than ve days may indicate a severe condition. Stop using the device and
consult with your physician.
• Use of the device on the following skin conditions may cause a condition to become
worse. Do not use the device over, or in proximity to, these skin conditions: abnormal
skin, skin that is not intact, uncleaned, unhealthy, open wounds, rashes, swollen, red,
infected, inamed areas, skin eruptions (e.g., phlebitis, thrombophlebitis, varicose veins),
or cancerous lesions.
• Electrical stimulation during common activities may increase the risk of injury. Do not
use the device when in the bath or shower, sleeping, driving, operating of machinery or
any activity in which electrical stimulation can put you at risk of injury.
• Using the device around electronic monitoring equipment (e.g., cardiac monitors, ECG
alarms) may cause equipment malfunction. Do not use this device around electronic
monitoring equipment.
• The effect, and safety, of using the device on children, during pregnancy, or use across
the head has not been evaluated or established and is unknown. Do not use the device
on children or let children handle the device. Do not use this device if you are pregnant,
or suspect that you are pregnant, unless under the direction of your physician. Do not
apply the device across your head.
PRECAUTION
• Using the device when you have suspected or diagnosed epilepsy or heart disease may
cause unexpected reactions. Always consult your physician before using the device.
• Modications not expressly approved by the manufacturer may void a user’s
authority to operate the device.
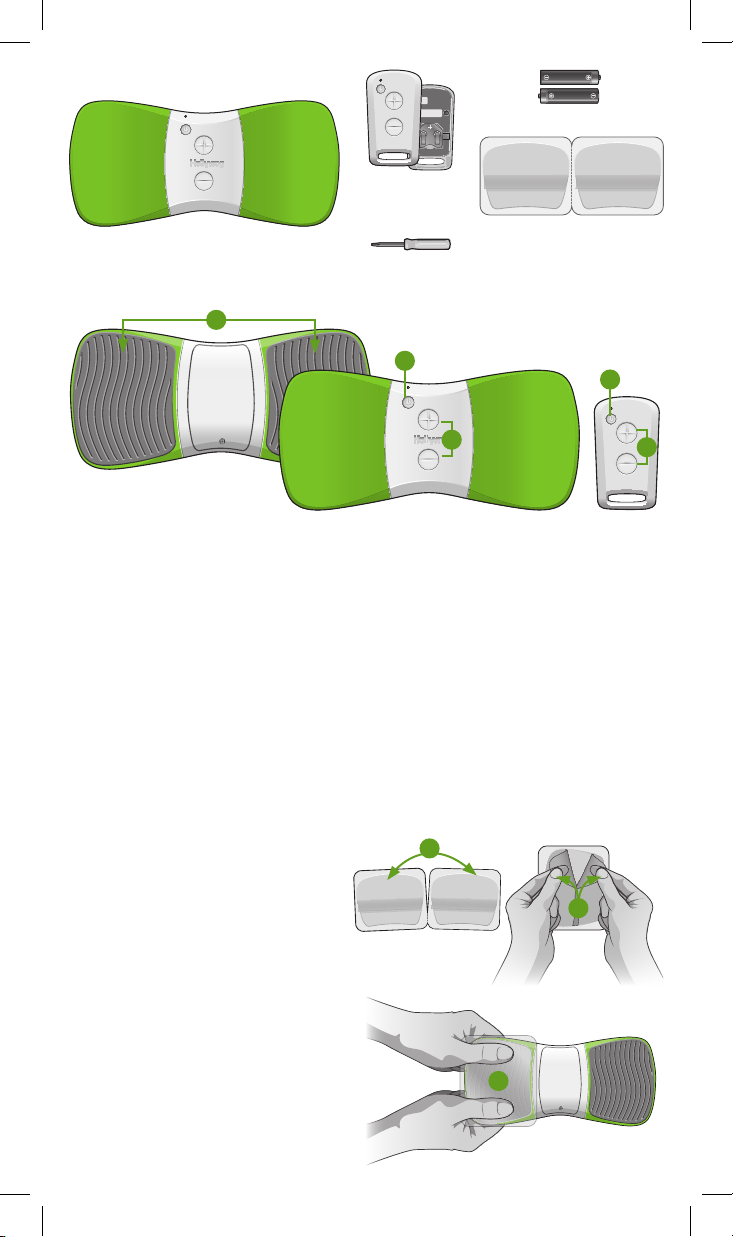
Contents
Not shown: User manual.
WiTouch Pro device (1)
Features and Functions
1
Remote control with
(1) CR2032 battery
(comes installed)
#0 Phillips head screwdriver (1)
AAA alkaline batteries (2)
Gel pads (1 pack)
2
3
4
4
1. Electrode Area: Surface where the gel pads are placed
2. On/Off Button: Press to turn the device On/Off
3. Start/Stop Button: Press to start or stop treatment
4. +/- Buttons: Press to increase or decrease stimulation intensity
Preparation for Use
Before using your WiTouch Pro you will need to sync the remote control, apply the gel pads
to the device, and prepare the device for a treatment.
Applying the Gel Pads to the WiTouch Pro Device
The gel pads are intended for single person use. They will last, depending on skin type, oils,
and pH levels, approximately two to ve applications. Replace the gel pads when they no
longer adhere completely. Follow these steps to apply the gel pads:
1. Separate two gel pads.
2. Remove the blue liner from the side
being applied to the electrode area. Do
not remove the green protective liner.
3. Align the shape of the rst gel pad with
the electrode area. Apply the gel pad
onto the electrode area and rmly
press across the entire surface to
ensure good adhesion.
4. Repeat steps 1 – 3 for the second
gel pad.
1
2
Skin Preparation
• Trim, not shave, excessive hair on
the treatment area.
• Wash the skin and dry completely.
3
Use
The WiTouch Pro exclusive, patent pending 3-stage waveform incorporates both clinical
theories of TENS to provide pain relief. The 30-minute stimulation treatment is delivered as
follows:
Stage 1: 5 minutes of high frequency stimulation that initiates a feeling of pain relief by
suppressing the transmission of pain signals in nerves. This stage provides a high sensory
sensation and allows you to establish a comfortable intensity setting for the entire treatment.
Stage 2: 20 minutes of low frequency stimulation that initiates an increased endorphin
release in the body to reduce the sensitivity to pain for an extended period of time following
the 30-minute treatment. This stage provides a low sensory sensation often described as a
gentle tapping sensation.
Stage 3: 5 minutes of high frequency stimulation, providing the same high sensory
sensation experienced in Stage 1. This stage allows you to maintain the feeling of pain relief
and complete the overall treatment with a comfortable high sensory sensation.
Treatment Recommendations
• You can leave the device in position for multiple treatments during the day. It will
automatically turn Off after two (2) hours of inactivity.
• It is recommended you wait a minimum of 30 minutes between treatments.
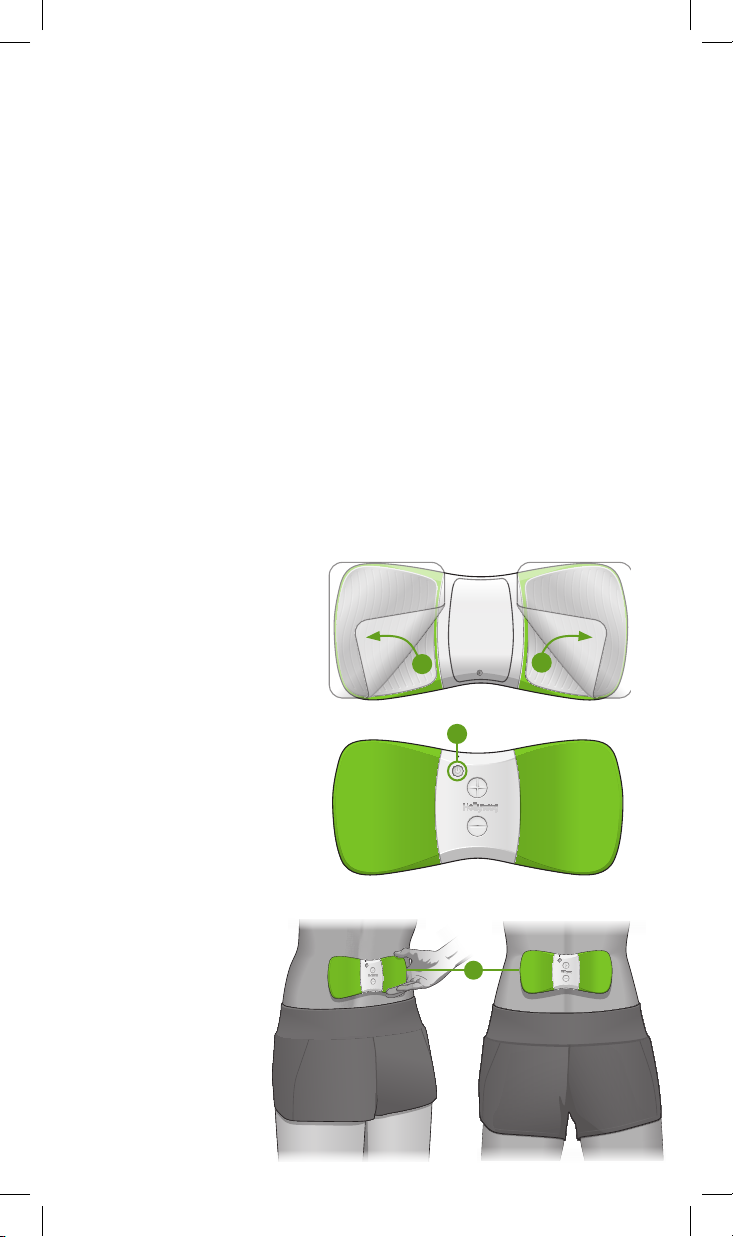
Conducting a Treatment
Always read the safety warnings before conducting a treatment. Follow these steps to
conduct a treatment:
1. Remove the green liners from
the gel pads by slowly peeling
the liner diagonally from an
inside corner to the opposite
outside corner. Important!
Avoid contact of the gel pad
with other objects. Contact
with other objects may affect
the pads adhesion properties.
Save the green liners for
storage of the device.
2. Press, and hold, the On/Off
button on the WiTouch Pro
device for one (1) second. The
LED will begin ashing
indicating the device is ready
for use. Note: The WiTouch
Pro device must always be
ON prior to application.
3. Align the center of the device
over the spine and place the
device on your back in the
area of pain. If you cannot
place the device properly,
ask another person for
assistance.
Important! Do not apply
the gel pads/electrodes
directly over the spine.
1
2
3
1
4. Press the Start/Stop button on the
remote control to begin the treatment.
4
6
Note: The LED on the WiTouch Pro
device will ash rapidly during treatment.
5
5. Press the (+/-) buttons to increase or de-
crease the intensity of the stimulation until
it is at a comfortable level. Note: The stim-
ulation intensity can be controlled on the
WiTouch Pro device with either the remote control or the buttons located on the device.
This allows for adjustment by either you or your healthcare professional.
6. Press the Start/Stop button on the remote control to stop the treatment at any time.
Treatment will automatically stop after 30 minutes. Note: If a treatment is stopped and
restarted the treatment will restart at the rst stage.
Removing the WiTouch Pro
Important! Do not remove the device until the treatment has stopped.
1. After treatment, or when you want to remove the device, grasp the edge of the device
and gel pad to ensure the gel pad does not stay on the skin. Slowly peel the device away
from the skin.
2. Align, and place the green protective liners back on the gel pads. Ensure the pads are
completely covered.
Battery Replacement
When battery replacement is needed the LED will ash as follows:
Item Description Battery
Wi To uch Pr o
device
LED ashes yellow every two (2) seconds when
the unit is On
(2) AAA alkaline
batteries
LED ashes yellow rapidly during treatment
Remote Control LED will ash yellow once when the Start/Stop
button is pressed or no LED ash at all.
Note: Fully depleted batteries will have no ashing LED.
(1) CR2032 lithium
battery
To replace the WiTouch Pro Device Batteries:
1. Using the included #0 Phillips head
screwdriver remove the cover.
2. Remove the old batteries, and place the
new batteries in the correct polarity.
3. Replace the battery compartment cover.
To replace the remote control battery:
1. Place the provided screwdriver, coin or
at tool in the groove on the side of the
remote control. Turn the coin and lift the
cover off.
2. Slide the old battery out, and slide a new
CR2032 battery into the slot. Note: The
(+) is facing upward.
3. Align the cover with the remote control
base. Holding the handle portion of the
remote control, snap the cover down
into place.
3
1 2
Note: Consult your local authorities for proper
battery disposal.
 Loading...