

Page 1

8200-1104-01 B0
Network Video Recorder
HOLNVR04100
HOLNVR04200
HOLNVR04400
Quick Start Guide
Page 2

2
Notice
Please read this manual thoroughly and save it for future use before attempting to connect or operate
this unit.
The information in this manual was current when published. The manufacturer reserves the right to
revise and improve its products. All specifications are therefore subject to change without notice.
Copyright
Under copyright laws, the contents of this manual may not be copied, photocopied, reproduced,
translated or reduced to any electronic medium or machine-readable form, in whole or in part, without
prior written consent of Tyco Security Products. © 2015 Tyco Security Products. All rights reserved.
Customer Service
Thank you for using Tyco Security Products. We support our products through an extensive worldwide
network of dealers. The dealer through whom you originally purchased this product is your point of
contact if you need service or support. Our dealers are empowered to provide the very best in
customer service and support. Dealers should contact Tyco Security Products at (800) 507-6268 or
(561) 912-6259 or on the Web at www.holisnvr.com
Trademarks
The trademarks, logos, and service marks displayed on this document are registered in the United
States [or other countries]. Any misuse of the trademarks is strictly prohibited and Tyco Security
Products. will aggressively enforce its intellectual property rights to the fullest extent of the law,
including pursuit of criminal prosecution wherever necessary. All trademarks not owned by Tyco
Security Products. are the property of their respective owners, and are used with permission or allowed
under applicable laws.
Product offerings and specifications are subject to change without notice. Actual products may vary
from photos. Not all products include all features. Availability varies by region; contact your sales
representative.
Sensormatic Electronics LLC
6600 Congress Avenue
Boca Raton,
FL33487
U.S.A.
Page 3

3
Table of Contents
Important Safeguard and Warning .......................................................................................................... 4
Front Panel .............................................................................................................................................. 6
Rear Panel .............................................................................................................................................. 7
Local Login .............................................................................................................................................. 8
Web ......................................................................................................................................................... 9
Appendix Toxic or Hazardous Materials or Elements ........................................................................... 10
Page 4
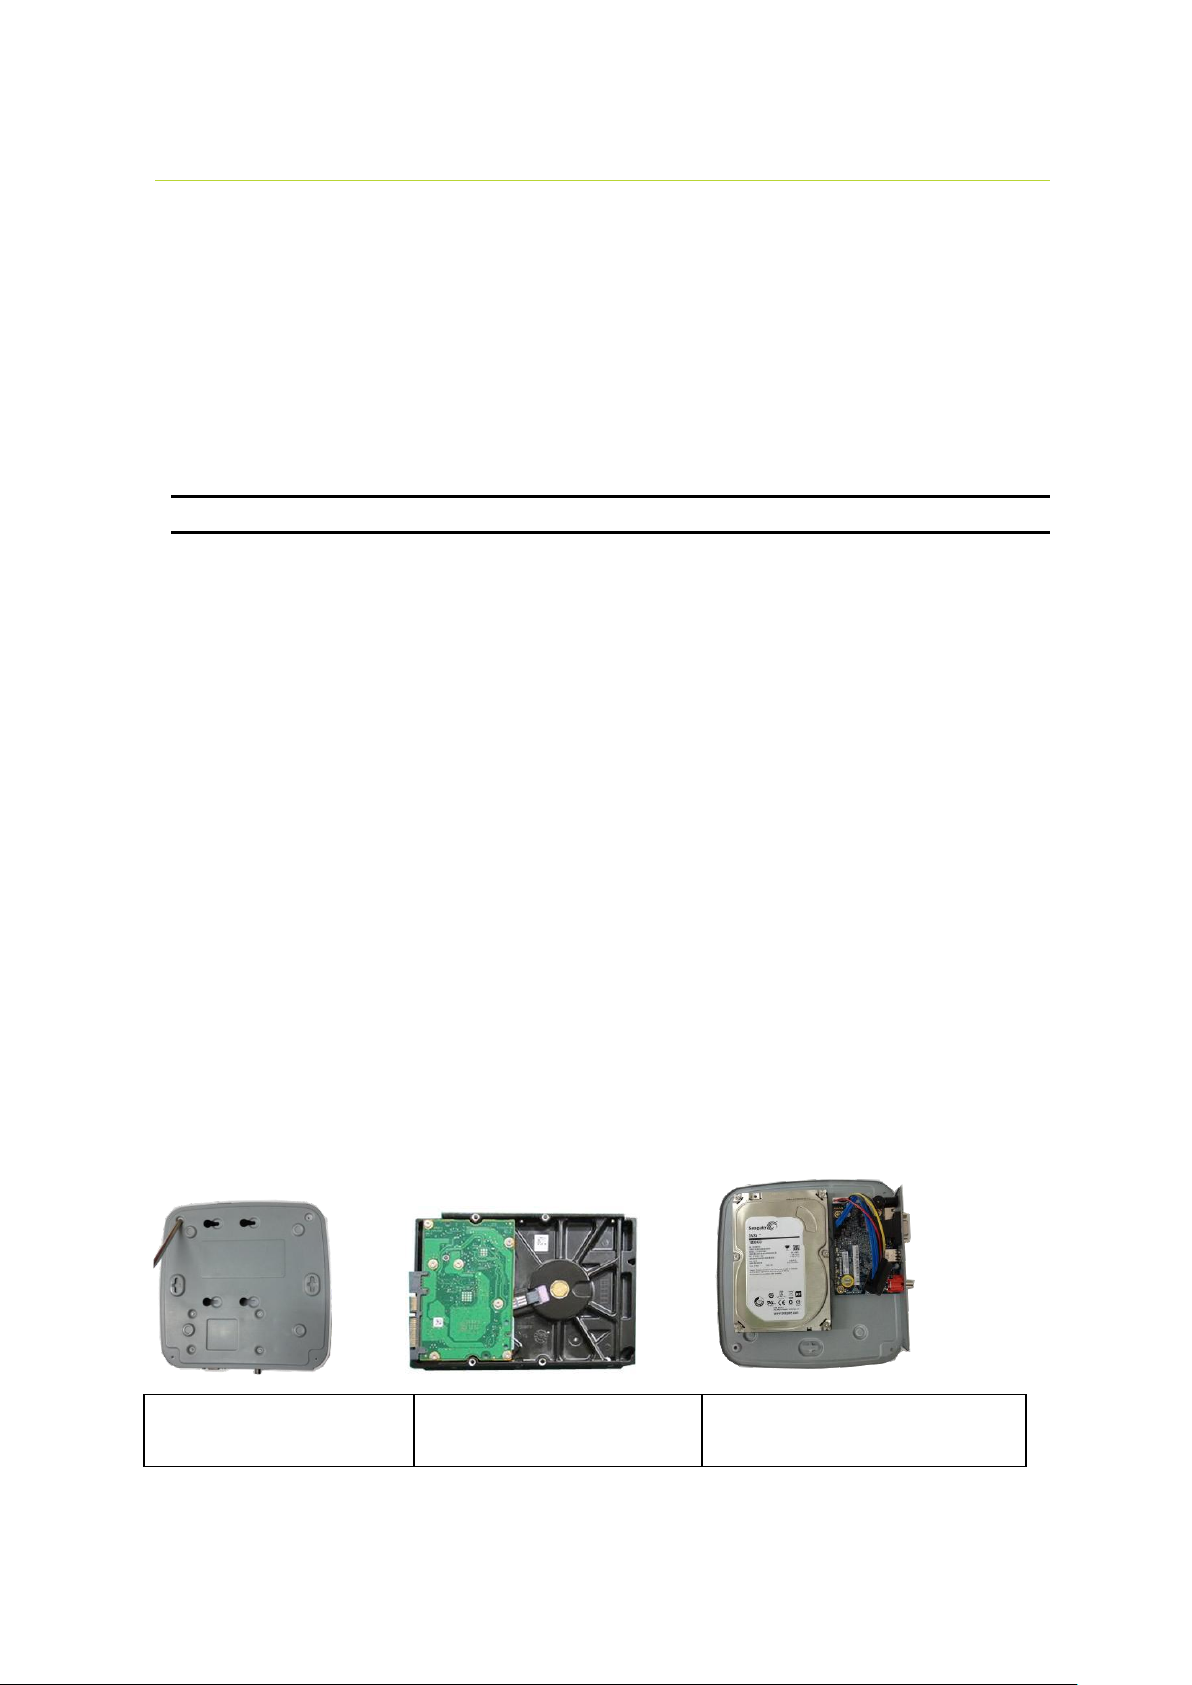
4
1. Loosen the screws of the
upper cover and side panel.
2. Fix four screws in the HDD
(Turn just three rounds).
3. Place the HDD in accordance with
the four holes in the bottom.
Important Safeguard and Warning
All installation and operation here should conform to your local electrical safety codes.
We assume no liability or responsibility for all the fires or electrical shock caused by improper
handling or installation.
We are not liable for any problems caused by unauthorized modifications or attempted repair.
Improper battery use may result in fire, explosion, or personal injury!
When replace the battery, please make sure you are using the same model!
Note
All the installation and operations here should conform to your local electric safety rules.
1. Check Unpacked NVR
When you receive the NVR from the forwarding agent, please check whether there is any visible
damage. The protective materials used for the package of the NVR can protect most accidental
clashes during transportation. Then you can open the box to check the accessories.
Please check the items in accordance with the list. (Remote control is optional). Finally you can
remove the protective film of the NVR.
2. About Front Panel and Rear Panel
For detailed information of the function keys in the front panel and the ports in the rear panel,
please refer to the User’s Manual included in the resource CD.
The model in the front panel is very important; please check according to your purchase order.
The label in the rear panel is very important too. Usually we need you to represent the serial
number when we provide the service after sales.
3. HDD Installation
This series NVR has only one SATA HDD. Please use HDD of 7200rpm or higher.
You can refer to the User’s Manual for recommended HDD brand.
Please follow the instructions below to install hard disk.
Page 5
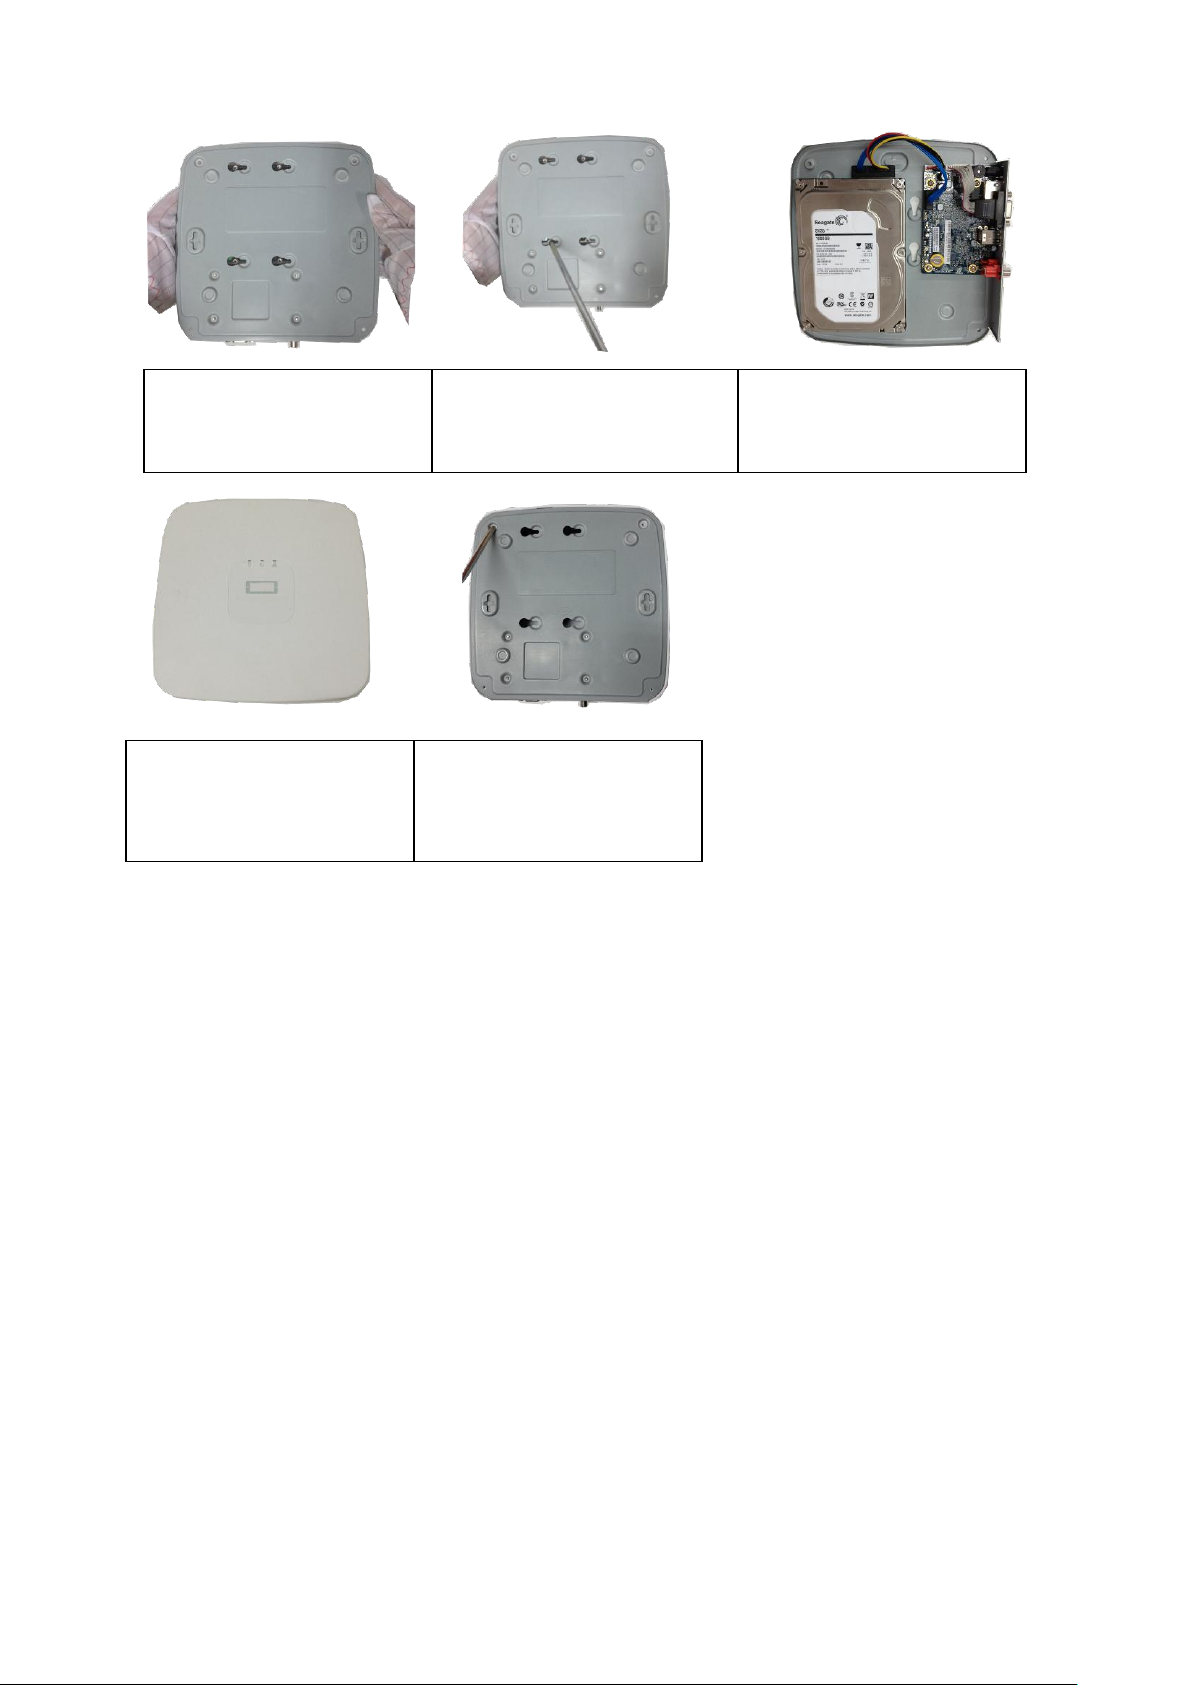
5
4. Turn the device upside down
and then turn the screws in
firmly.
5. Fix the HDD firmly.
6. Connect the HDD cable and
power cable.
7. Put the cover in accordance
with the clip and then place the
upper cover back.
8. Secure the screws in the
rear panel and the side panel.
Page 6
6
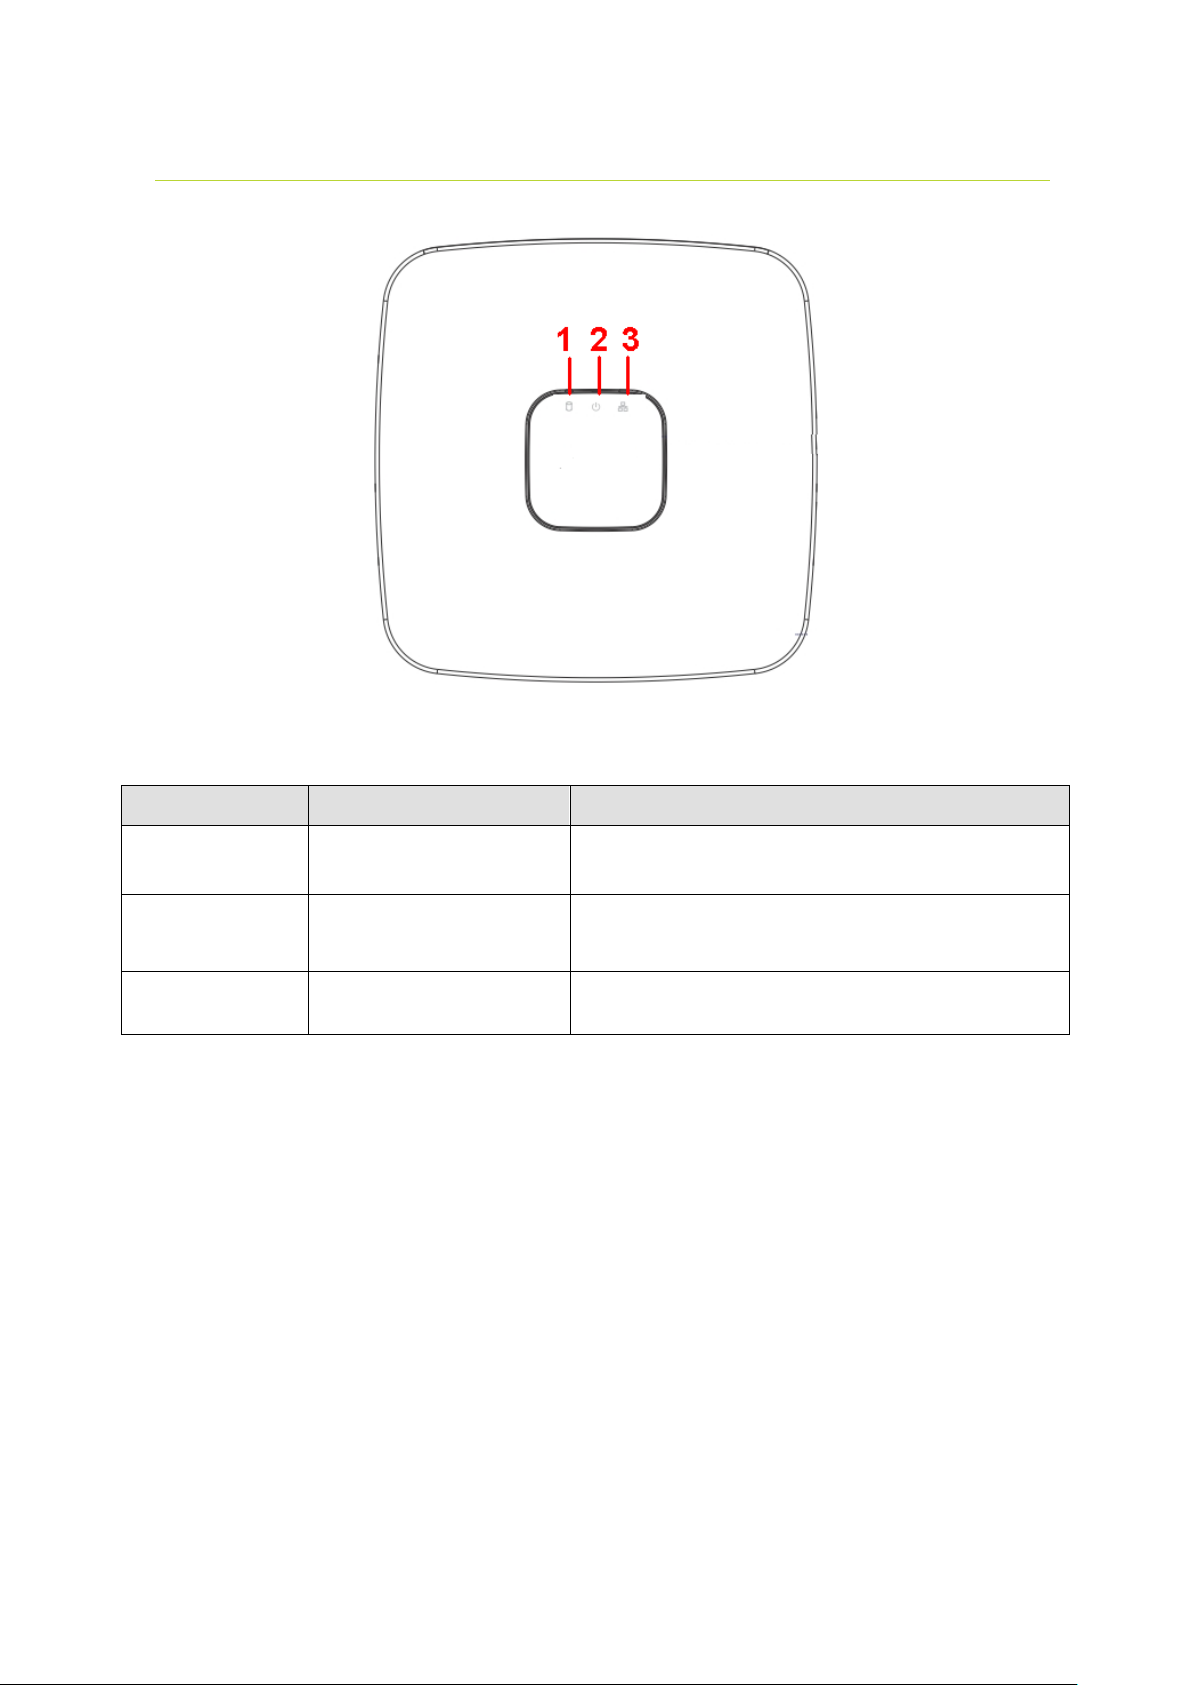
SN
Name
Function
1
HDD status indictor light
The red light becomes on when HDD is abnormal.
2
Power indicator light
The red light becomes on when the power connection
is OK.
3
Network status indicator
light
The red light becomes on when the network
connection is abnormal.
The front panel is shown as in Figure 1.
Front Panel
Figure 1
Please refer to the following sheet for detailed information.
Page 7
7
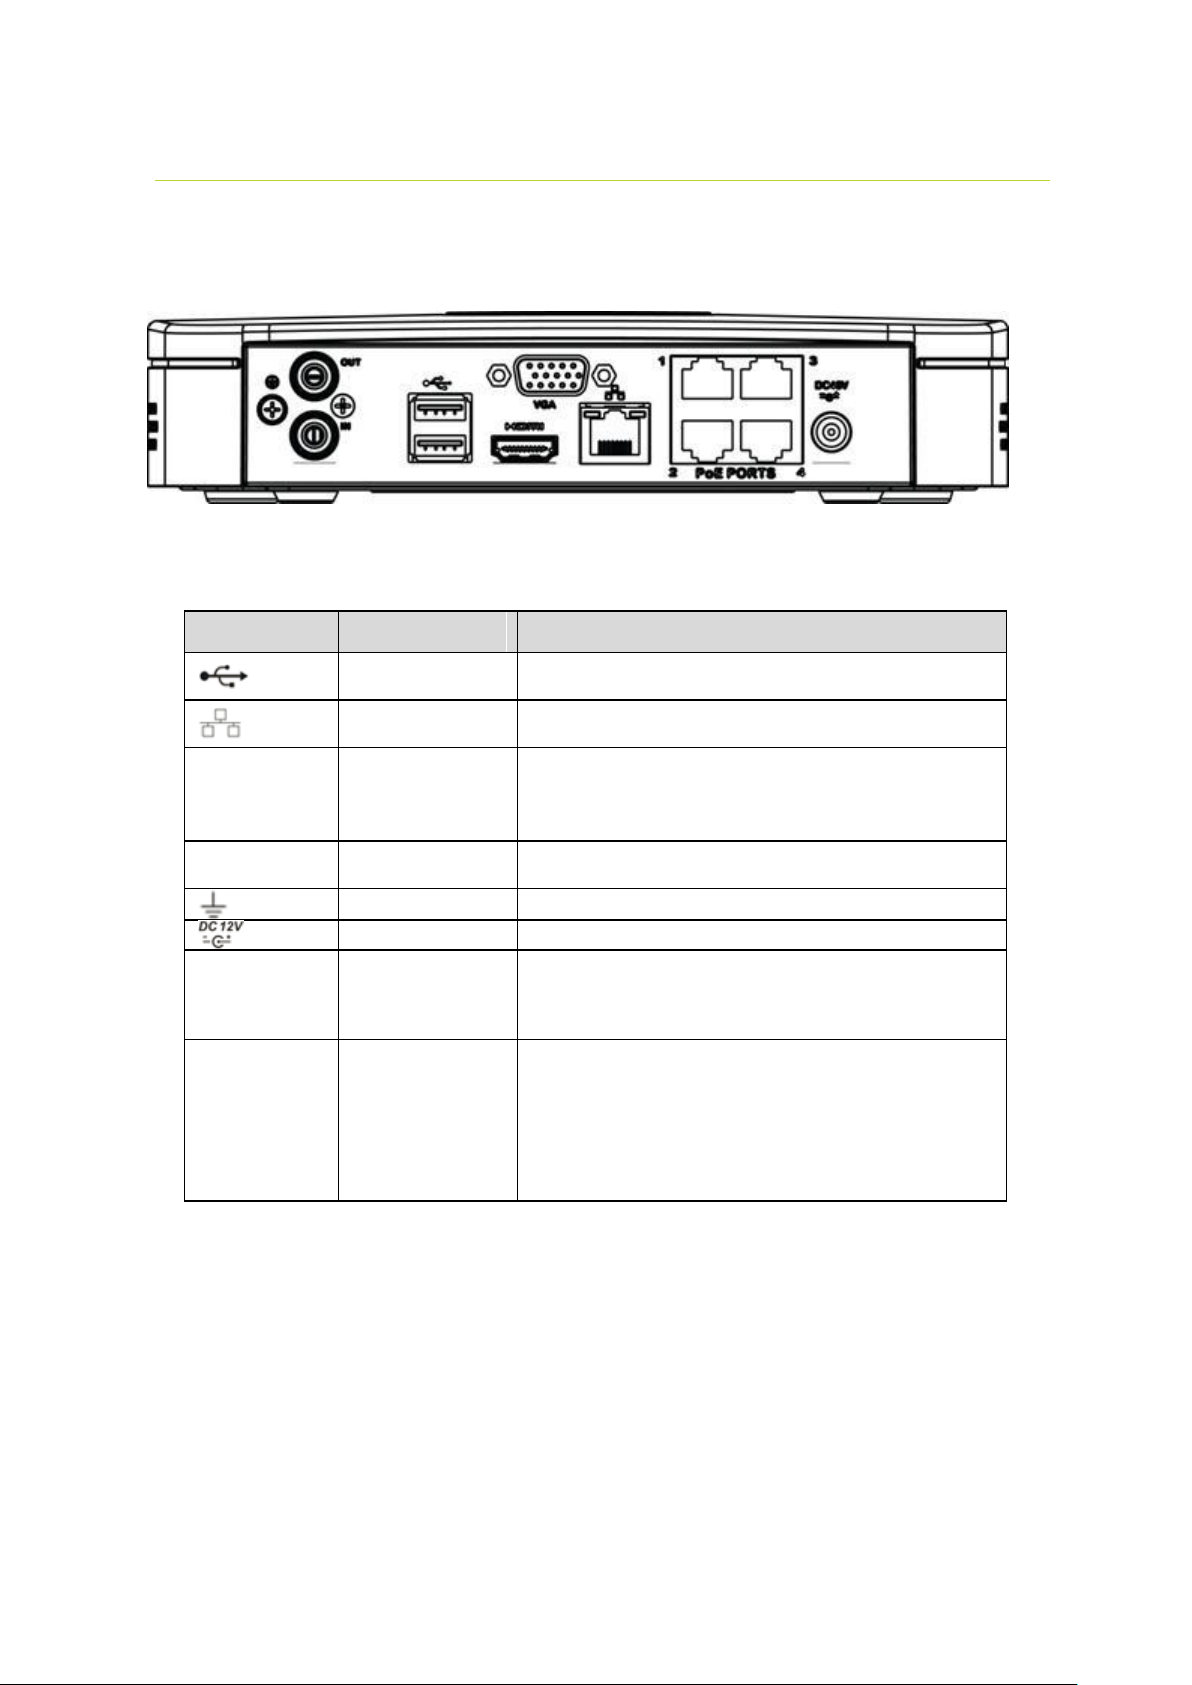
Port Name
Connection
Function
USB2.0 port
USB2.0 port. Connect to mouse, USB storage
device, USB burner and etc.
Network port
10M/100Mbps self-adaptive Ethernet port. Connect
to the network cable.
HDMI
High Definition
Media Interface
High definition audio and video signal output port. It
transmits uncompressed high definition video and
multiple-channel data to the HDMI port of the display
device. HDMI version is 1.4.
VGA
VGA video output
port
VGA video output port. Output analog video signal. It
can connect to the monitor to view analog video.
GND
Ground end
Power input port
Input DC 12V/2A.
MIC IN
Audio input port
Bidirectional talk input port. It is to receive the
analog audio signal output from the devices such as
mike phone, pickup.
MIC OUT
Audio output port
Audio output port. It is to output the analog audio
signal to the devices such as the sound box.
Bidirectional talk output.
Audio output on 1-window video monitor.
Audio output on 1-window video playback.
Rear Panel
For detailed operation instruction of other series product, please refer to the User’s Manual
included in the resources CD.
The product rear panel is shown as below. See Figure 2.
Figure 2
Please refer to the following sheet for detailed information.
Page 8
8
Local Login
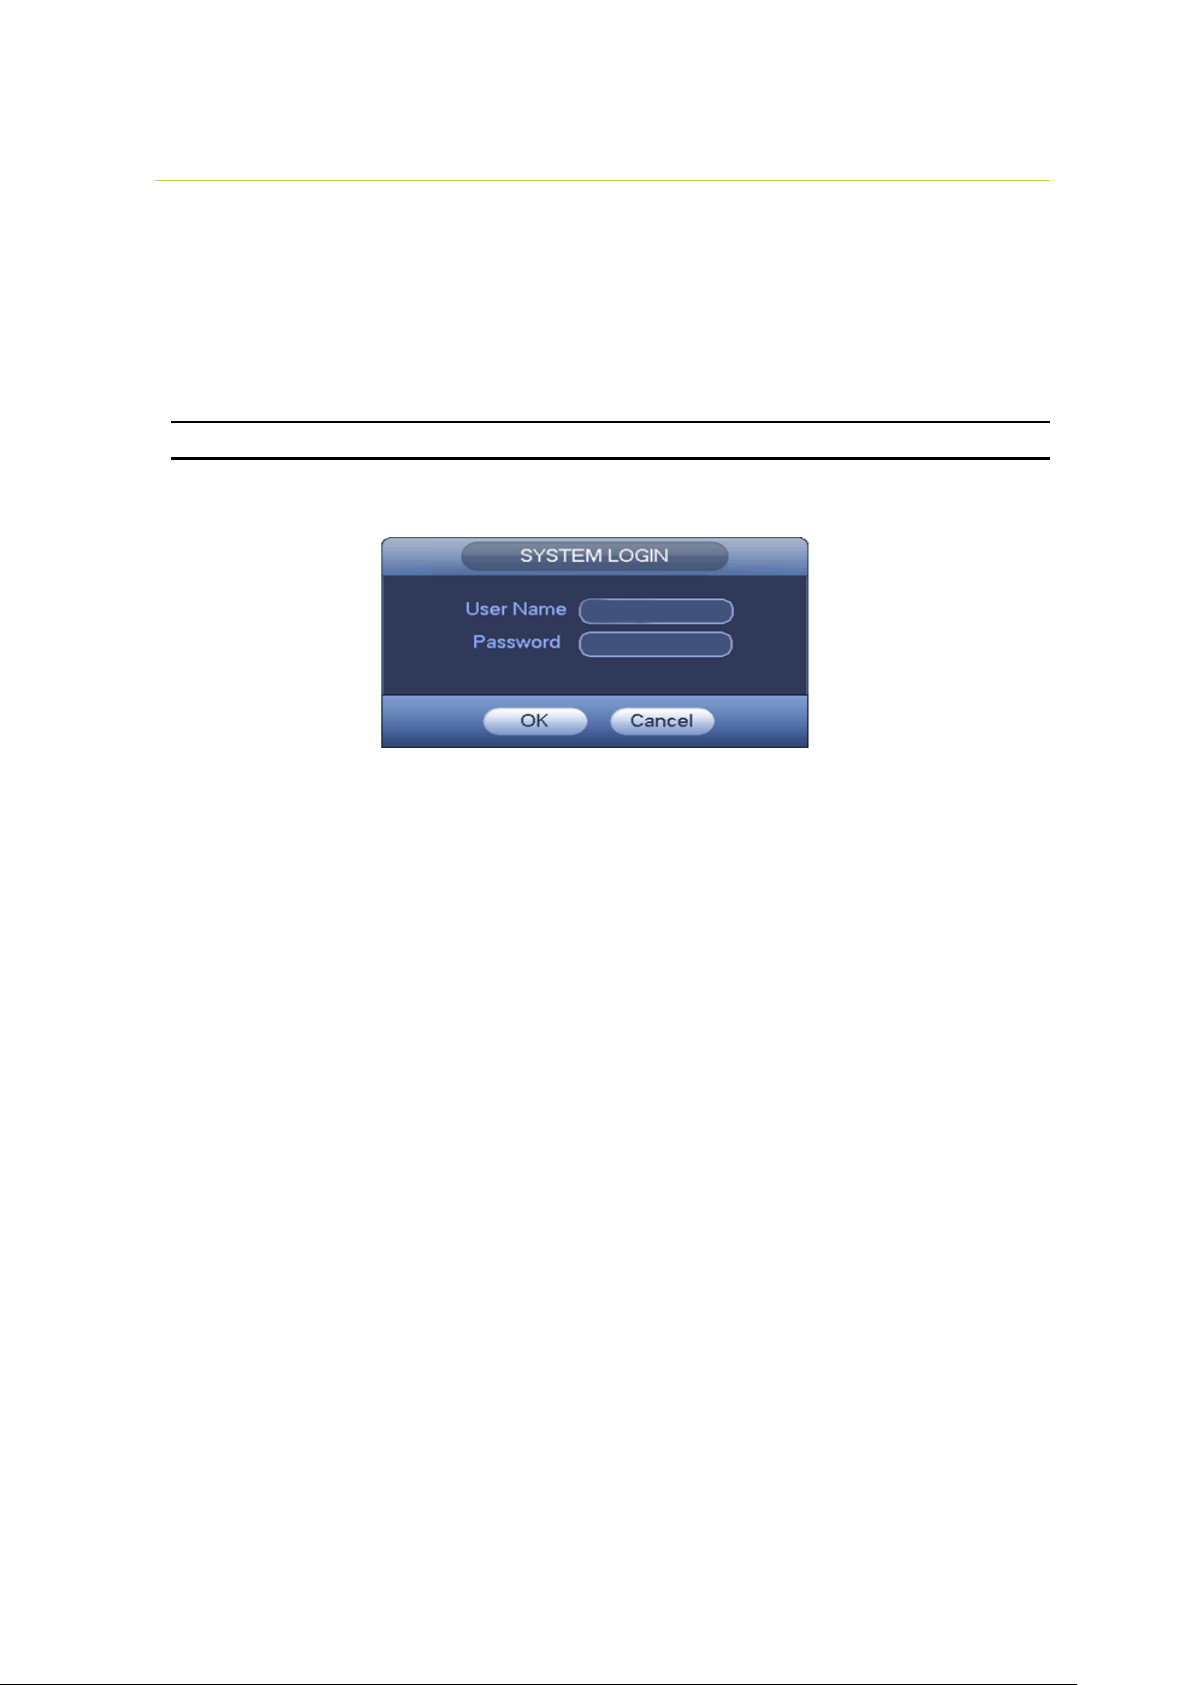
After system booted up, default video display is in multiple-window mode.
Click Enter or left click mouse, you can see the login interface. See Figure 3.
System consists of one account:
Username: admin. Password: admin. (administrator, local and network)
Note
For security reason, please modify password after you first login.
Within 30 minutes, three times login failure will result in system alarm and five times login failure
will result in account lock!
Figure 3
Page 9
9
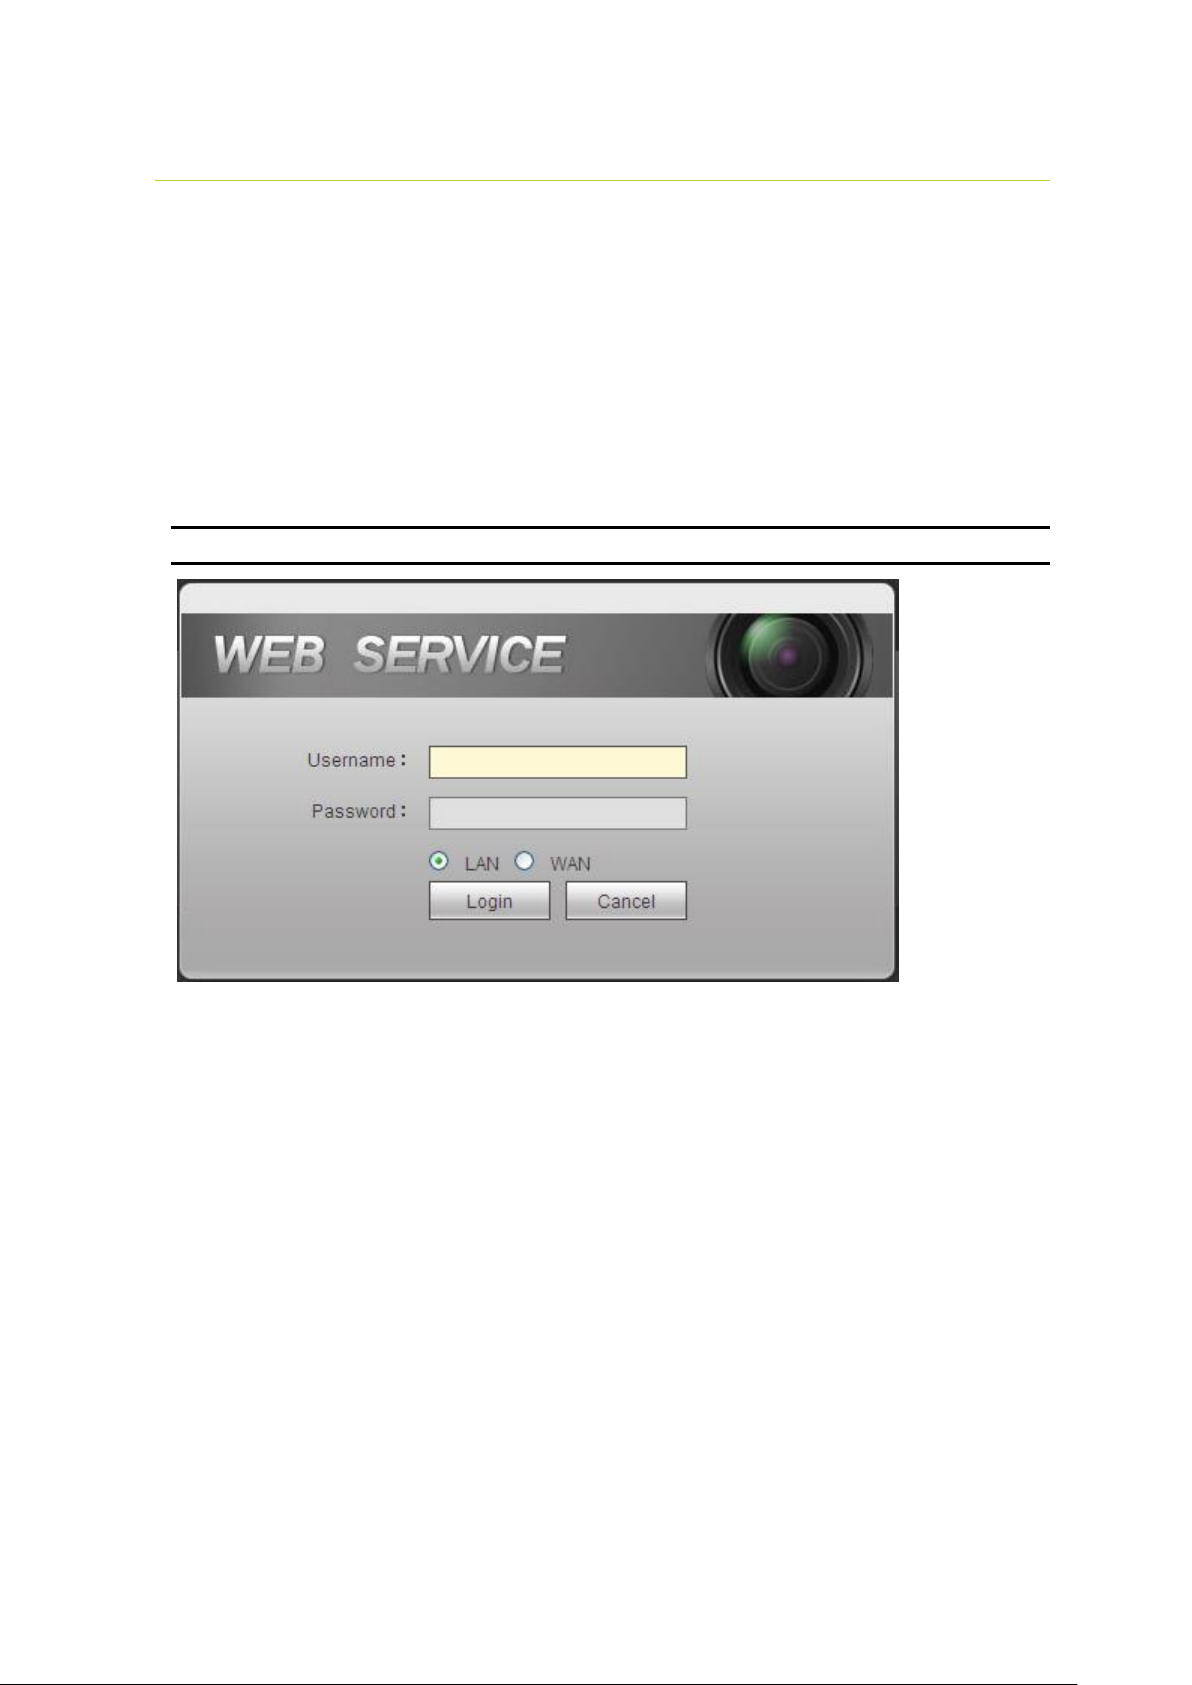
Open IE and input NVR address in the address column. For example, if your NVR IP is
10.10.3.16, then please input http:// 10.10.3.16 in IE address column.
System pops up warning information to ask you whether install control or not. Please click Install
button.
After installation, the interface is shown as below. See Figure 4.
Please input your user name and password.
Default factory name is admin and password is admin.
Note
For security reason, please modify password after you first login.
Web
Figure 4
For detailed operation information, please refer to the User Manual included in the resources CD.
Page 10
10
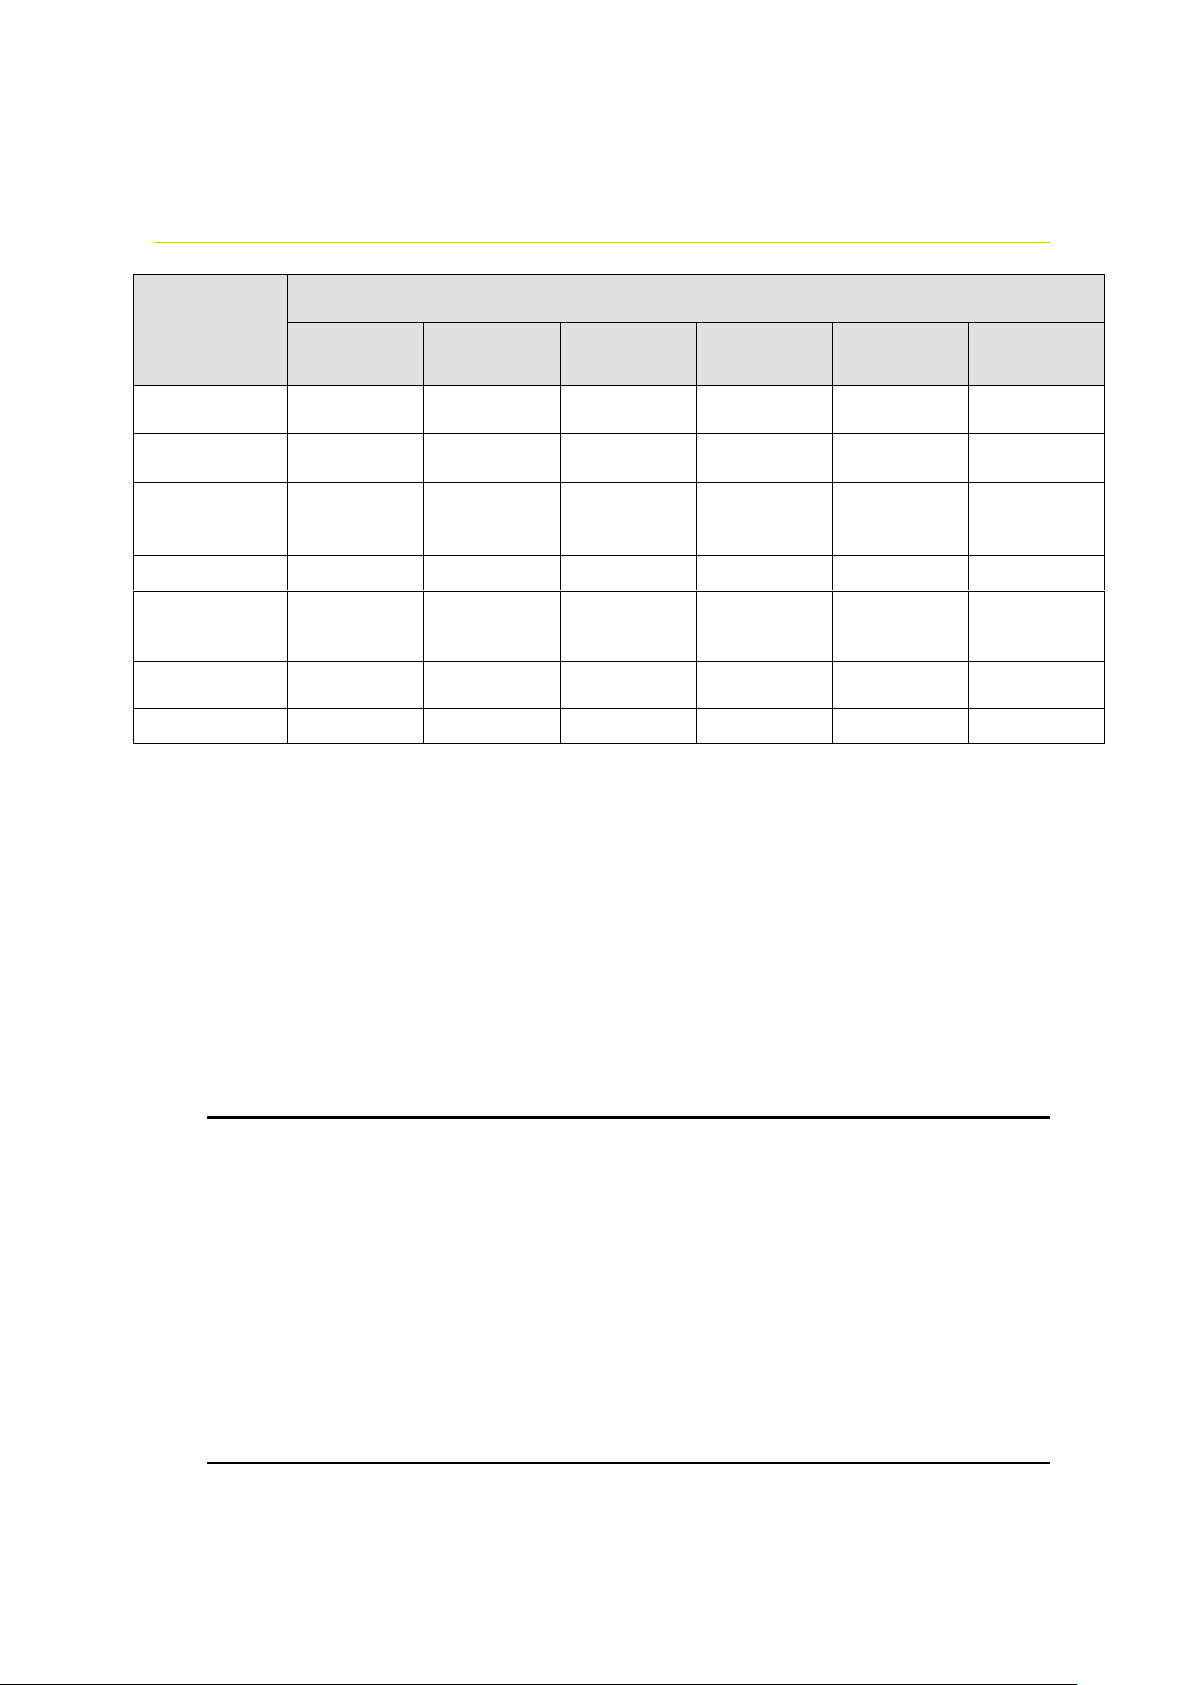
Component
Name
Toxic or Hazardous Materials or Elements
Pb
Hg
Cd
Cr VI
PBB
PBDE
Sheet
Metal(Case)
○ ○ ○ ○ ○
○
Plastic Parts
(Panel)
○ ○ ○ ○ ○
○
Circuit Board
○ ○ ○ ○ ○
○
Fastener
○ ○ ○ ○ ○
○
Wire and
Cable/AC
Adapter
○ ○ ○ ○ ○ ○ Packing
Material
○ ○ ○ ○ ○
○
Accessories
○ ○ ○ ○ ○
○
Toxic or Hazardous Materials or Elements
Appendix
O: Indicates that the concentration of the hazardous substance in all homogeneous materials in
the parts is below the relevant threshold of the SJ/T11363-2006 standard.
X: Indicates that the concentration of the hazardous substance of at least one of all homogeneous
materials in the parts is above the relevant threshold of the SJ/T11363-2006 standard. During the
environmental-friendly use period (EFUP) period, the toxic or hazardous substance or elements
contained in products will not leak or mutate so that the use of these (substances or elements) will
not result in any severe environmental pollution, any bodily injury or damage to any assets. The
consumer is not authorized to process such kind of substances or elements, please return to the
corresponding local authorities to process according to your local government statutes.
Note
For detailed operation introduction, please refer to our resource CD included in your
package for electronic version of the User’s Manual.
This quick start guide is for reference only. Slight difference may be found in the user
interface.
All the designs and software here are subject to change without prior written notice.
All trademarks and registered trademarks mentioned are the properties of their respective
owners.
If there is any uncertainty or controversy, please refer to the final explanation of us.
Please visit our website or contact your local service engineer for more information.
 Loading...