


MY18 TJ Trax
Owner’s Manual

GM Holden Ltd, ABN 84 006 893 232, Holden New Zealand Ltd., Company Number 1602 (hereinafter Holden)
Change of name, address or ownership
If you drive a pre-owned Holden, have moved house or changed any of your details, we’d like to hear from you!
Holden uses your details to keep your vehicle’s factory provided Roadside Assistance and Warranty details up to date.
It also helps us let you know if there is an existing safety recall or rework on your vehicle. To update your details, please
take a few minutes to ll in and mail the form at the back of the Service & Warranty Booklet or visit Holden’s website at:
www.holden.com.au/forms/change-of-owner-details
GM Holden Ltd (Holden) is collecting the new owner’s personal information in order to process the request for
transfer for the specied vehicle. We may disclose your personal information to our related companies and third
parties who provide us with (or help us provide) products and services, including to overseas locations such as the
USA, and other countries in Europe, Oceania and Asia.
Holden’s privacy policy (available at: www.holden.com.au/privacypolicy) states how you can seek to access or correct
any personal information Holden holds about you, how to complain about a privacy breach by Holden and how
Holden will deal with a privacy complaint.
You can contact Holden on 1800 033 349 or alternatively, you may prefer to email Holden at:
holdencustomercare@gm.com
Note: Please refer to the inside front cover of the Service & Warranty Booklet for the Vehicle Identication Certicate.
© 2017 GM Holden Ltd.
© 2017 Holden New Zealand Ltd.
Printed in Australia
Part No. 92509100 prohibited without written approval from
June 2017 GM Holden Ltd., ABN 84 006 893 232 (Australia) or
(MY18 TJ Trax. Print 1) Holden New Zealand Ltd., Company Number 1602 (New Zealand)
Reproduction in whole or part is

Contents 1
Introduction ..................................... 2
In brief............................................. 4
Keys, doors and windows
Storage
Seats, restraints............................ 38
Instruments and controls
Lighting
Infotainment system
Climate control............................ 137
Driving and operating
Vehicle care
Service and maintenance
Technical data............................. 222
Customer information
Index
......................................... 34
......................................... 90
................................ 175
........................................... 230
............. 16
.............. 57
..................... 96
................. 142
........... 220
................. 227

2 Introduction
Introduction
We thank you for choosing Holden and want to assure you
of our continuing interest in your driving pleasure and satisfaction.
This owner’s manual applies to the current Trax vehicle.
Therefore, due to different models and options, you may
nd reference in this manual to some equipment
not tted to your own vehicle.
Please note that all information, illustrations and
specications in this manual are based on the latest
production information available at the time of printing.
Holden reserves the right to make changes at any time
without notice and without incurring any obligation.

Introduction 3
Introduction
Your vehicle is a designed
combination of advanced technology,
safety, environmental friendliness and
economy.
This Owner’s Manual provides you
with all the necessary information
to enable you to drive your vehicle
safely and efciently.
Make sure your passengers are
aware of the possible risk of accident
and injury which may result from
improper use of the vehicle.
Using this manual
• This manual describes all options
and features available for this
model. Certain descriptions,
including those for display and
menu functions, may not apply
to your vehicle due to model
variant.
• The In brief section will give you
an initial overview.
• The table of contents at the
beginning of this manual and
within each chapter shows where
the information is located.
• The index will enable you to
search for specic information.
• Directional data, e.g. left or right,
or front or back, always relate to
the direction of travel.
• For a complete list of the
registered trademarks contained
in this manual:
Trademarks and licence
agreements 0 227
Symbols
Page references indicated with 0.
This indicates ‘see page’.
Danger, warnings
and cautions
Danger
Text marked Danger provides
information on risk of fatal injury.
Disregarding this information may
endanger life.
Warning
Text marked Warning
provides information on risk of
accident or injury. Disregarding
this information may lead to injury.
Caution
Text marked Caution provides
information on possible damage
to the vehicle. Disregarding this
information may lead to vehicle
damage.

4 In brief
In brief
Initial drive information ..........4
Locking/unlocking the vehicle ......4
Seat adjustment
Head restraint adjustment
Seat belts
Mirror adjustment
Steering wheel adjustment
Instrument panel overview
Exterior lighting
High/low beam
Hazard warning ashers
Turn and lane change signals
...........................................10
Horn
Washer and wiper systems
Climate control
Transmission
Getting started
Starting the engine
Parking
.......................................15
...........................5
............6
.....................................6
.........................6
...........7
...........8
............................9
.............................9
..............9
....10
........10
...........................12
..............................12
...........................14
.....................14
Initial drive
information
Locking/unlocking the
vehicle
Remote keyless entry
With ignition switch
With electronic key system
The key operates all doors and the
ignition.
• Press c to unlock the doors.
The hazard lamps ash twice.
• Press e to lock the doors.
The hazard lamps ash once.
Central locking system 0 21
Tailgate 0 26

In brief 5
Seat adjustment
Seat positioning
1. Move the seat forwards or
backwards by lifting the handle at
the front and sliding the seat.
2. Release the handle to engage
the latch.
Try to move the seat back and
forth to be sure it is locked in
place.
Seat position 0
Seat adjustment 0 40
40
Seat backrests
1. Recline the seatback by lifting
the lever.
2. Adjust the angle and release
the lever.
3. Allow the seat to engage.
Note
Do not lean on the seat when
adjusting.
Seat adjustment 0
40
Seat height
• To lower the seat cushion, push
the lever down several times.
• To raise the seat cushion, pull
the lever up several times.
Seat adjustment 0
40

6 In brief
Head restraint adjustment
• To raise the head restraint, pull
the head restraint upwards.
• To lower the head restraint, press
(1) and push the head restraint
downwards.
Head restraints 0
38
Seat belts
1. Withdraw the belt from the reel.
2. Pull the metal tongue across
your body into the buckle, until it
clicks into place.
3. Tension the lap belt regularly
while driving by tugging the
shoulder belt.
Seat belts 0
45
Mirror adjustment
Interior mirrors
To reduce headlamp glare from
following vehicles, pull the lever
towards the rear of the vehicle.
Interior mirrors 0
29

In brief 7
Exterior mirrors
L: Left side mirror selected
R: Right side mirror selected
O: No mirrors selected
To adjust an exterior rear view
mirror:
1. Rotate the switch to L or R.
2. Swivel the switch to adjust the
mirror.
Exterior mirrors 0
28
Steering wheel
adjustment
1. To unlock, move the lever down.
2. Adjust the steering wheel.
3. To lock, move the lever up.
4. Ensure the steering wheel is
locked in position before driving.
Steering wheel adjustment 0
58

8 In brief
Instrument panel overview
1. Side air vents 0 140
2. Central air vents 0 140
3. Infotainment system 0 96
4. Wiper and washer lever 0 59
5. Cruise control 0 159
6. Instrument cluster 0 64
7. Horn, driver’s airbag 0 58, 49
8. Steering wheel remote controls 0 100
9. Turn signals 0 92
10. Exterior lamp switch 0 90
11. Bonnet release lever 0 178
12. Ignition switch/lock 0 143
13. Steering wheel adjustment 0 58
14. Engine Start/Stop button 0 143
15. Hazard warning asher 0 92
16. Power outlet 0 62
17. Passenger seat belt light 0 68
18. Shift lever 0 149, 153
19. Parking brake 0 155
20. AUX, USB port 0 111
21. Climate control system 0 137
22. TSC/ESC/DCS switches 0 156
23. Glove box 0 34

In brief 9
Exterior lighting
(OFF): Rotate to turn all lamps
and lights off.
AUTO: Exterior lamps and
instrument panel lights turn on or
off automatically, depending on the
ambient light.
8 (Park lamps): Turns on the park
lamps, number plate lamps and
instrument panel lights.
9 (Headlamps): Turns on the
headlamps and all park lamps.
Exterior lighting 0
90
High/low beam
• To switch from low to high beam,
push the lever.
• To switch to low beam, push
again or pull the lever.
Headlamp high/low beam 0
91
Hazard warning ashers
Press ¨ to turn the hazard warning
ashers on or off, when the ignition
is in any position.
Hazard warning ashers 0
92

10 In brief
Turn and lane change
signals
• Push the lever in the direction
the steering wheel is turned.
• A green arrow on the instrument
cluster ashes when the lamps
are in operation.
Turn and lane change signals 0
92
Horn
Press j.
Washer and wiper
systems
Windscreen wiper
1x: Mist
OFF: Off
INT: Intermittent operation
LO: Continuous wipe, slow speed
HI: Continuous wipe, fast speed
For a single wipe when the
windscreen wipers are off, lightly
move the lever up and release it.
Windscreen wiper/washer 0
59

In brief 11
Windscreen washer
Pull the lever rearwards to wash the
windscreen.
Washer uid is sprayed onto the
windscreen and the wipers cycle
once.
Windscreen wiper/washer 0
Washer uid 0 185
59
Rear window wiper/washer
Wiper
INT: Intermittent wipes, push in at
the top of the button.
: Continuous wipes, push in at
ON
the bottom of the button.
: To turn the wipers off, place
OFF
the switch in the OFF position.
Rear window wiper/washer 0
61
Washer
Push the lever forwards.
Washer uid is sprayed onto the rear
window and the wiper swipes for a
few strokes.
Rear window wiper/washer 0
Washer uid 0 185
61
12 In brief
Climate control
Heated rear window
Press Ü.
Note
The engine must be running.
Heated rear window 0
31
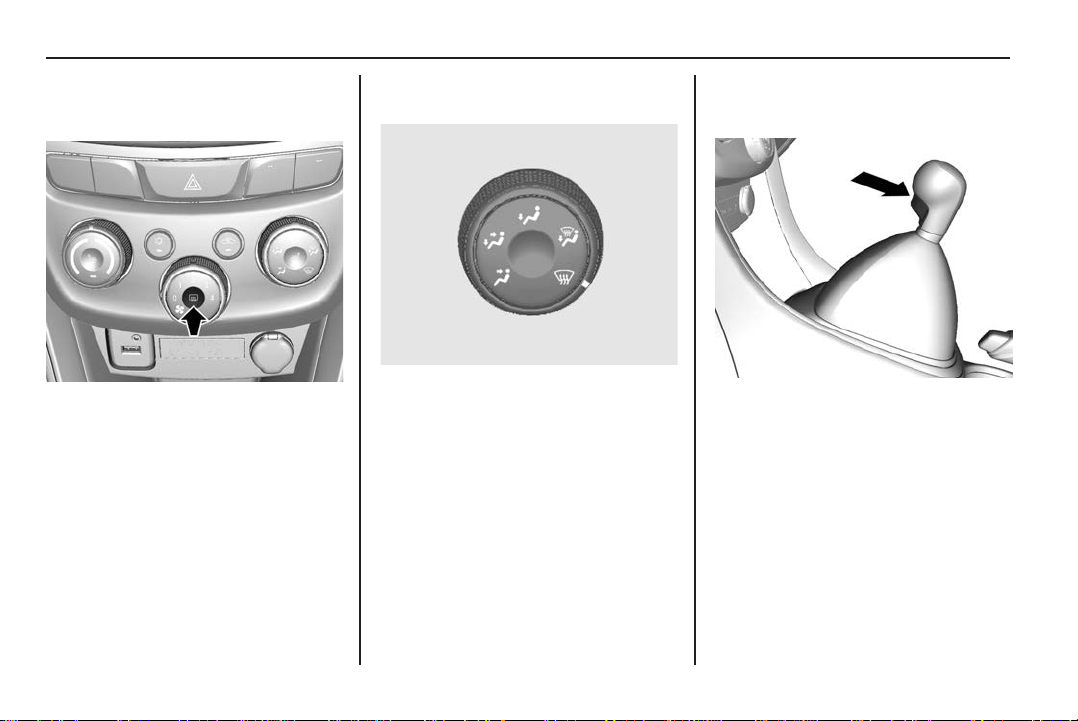
Demisting and defrosting
the windows
Rotate to select V.
Windscreen demister 0
138
Transmission
Manual transmission
Select reverse gear while the vehicle
is stationary:
1. Press the clutch pedal to the oor.
2. Wait 3 seconds.
3. Pull the button of the front of the
shift lever up.
4. Move the shift lever to position R.
If the gear does not engage:
1. Return the shift lever to neutral.
2. Release the clutch pedal.

In brief 13
3. Push the clutch pedal again and
repeat gear selection.
Manual transmission 0
153
Automatic transmission
P: (park) In park position, the front
wheels are locked. Select P only
when the vehicle is stationary
and the park brake is applied.
: (reverse) Place in reverse only
R
when the vehicle is stationary.
: (neutral).
N
D: (drive) Used for general driving.
Allows the transmission to be
shifted into any of the six
forward gears.
: (manual).
M
Movement between certain gear
positions requires pressing the
release button on the shift lever
and/or depressing the brake pedal.
Follow the descriptions as indicated
by the arrows when moving the
shift lever.
Press the release button to select
a gear.
Depress the brake pedal and press
the release button to select a gear.
Shift freely to select a gear.
Automatic transmission 0
149

14 In brief
Getting started
1. Check the windows, mirrors and
lamps are clean.
2. Visually check tyre ination.
Check tyre pressures weekly.
3. To ensure pedal travel is
uninhibited, there must be no
loose mats in the area of the
pedals. Floor mats 0
4. Close and secure all doors.
5. Position the seat for comfortable
driving.
6. Adjust rear view mirrors.
7. Fasten seat belts.
8. Check the warning indicators
illuminate when turning the
ignition on.
Warning lights, gauges and
indicators 0
Driving and operating 0 142
64
219
Starting the engine
Vehicles with ignition switch
Warning
Do not turn the engine off while
the vehicle is moving as there
will not be any power assist for
brakes or steering.
Never remove the key while the
vehicle is moving, as this will lock
the steering.
0: (LOCK) The key can only be
inserted and removed from this
position.
1: (ACC) When the key is in this
position, the audio system operates.
2: (ON) When the key is in this
position, the engine is ready to start
and all electrical systems are active.
Do not leave the switch in this
position for a long time, unless the
engine is running, otherwise the
vehicle’s battery will discharge.
3: (START) Turn the key to this
position and release when the
engine is running.
Ignition positions 0
143

In brief 15
Vehicles with electronic key
system
Warning
Do not turn the engine off while
the vehicle is moving as there
will not be any power assist for
brakes or steering.
1. Have the electronic key inside
the vehicle.
2. Depress the brake pedal.
3. Automatic transmission in P or N.
4. Do not operate the accelerator
pedal.
5. Press the Engine Start/Stop
button.
The engine starts after a short delay.
Starting the engine 0
145
Parking
1. Apply the park brake rmly
without pushing the release
button.
2. Automatic transmission: Select
position P.
Manual transmission: If facing
uphill or on at ground, select
1st gear. If facing downhill, select
reverse gear.
3. Shut all windows.
4. Turn the ignition off and remove
the key.
5. Press e on the key to lock all
doors.
Driving and operating 0
142

16 Keys, doors and windows
Keys, doors and
windows
Keys and locks .....................16
Keys ...........................................16
Foldaway/removable key blade
Radio remote control
Electronic key system
Memorised settings
Central locking system
Electronic key system
operation
Automatic door locks
....................................23
.................18
................20
....................21
...............21
..................24
Doors .....................................25
Manual door locks ......................25
Child security rear door locks
Tailgate
Vehicle security
Auto door unlock
Immobiliser
.......................................26
..........................27
........................27
.................................28
..17
.....25
Exterior mirrors ....................28
Convex mirror .............................28
Power mirrors
.............................28
Interior mirrors......................29
Rear view mirror .........................29
Windows ................................30
Power windows ..........................30
Heated rear window
Sun visors
..................................32
...................31
Roof .......................................32
Sunroof .......................................32
Keys and locks
Keys
Caution
Do not attach heavy or bulky
items to the ignition key.
With ignition switch

Keys, doors and windows 17
With electronic key system
The key operates all doors and the
ignition.
• Press c to unlock the doors and
tailgate.
The hazard lamps ash twice.
• Press e to lock the doors and
tailgate.
The hazard lamps ash once.
Central locking system 0 21
Tailgate 0 26
Foldaway/removable key
blade
With ignition switch
1. Press button to extend the key
blade.
2. To retract the key blade, press
the button and fold the blade into
the key.
With electronic key system
1. Press button to remove the key
blade.
2. Reinsert the key blade into the
key.

18 Keys, doors and windows
About the keys
• The remote control has a range
of up to 30 metres.
• The range depends on
the charge of the key battery,
on ambient conditions, the key’s
location and the area between
the key and the vehicle.
• Take care that no button
is pressed unintentionally,
especially when the vehicle is out
of sight.
• Protect from moisture and high
temperatures.
The key buttons may not work if:
• More than 30 metres from the
vehicle.
• Battery voltage is too low.
Battery replacement 0 18
• The key buttons are operated
repeatedly while not in range of
the vehicle.
• The central locking system is
operated at frequent intervals.
• The power supply is interrupted
for a short time.
• The vehicle is parked near strong
radio activity.
Replacement keys
If a key is lost, a replacement can be
ordered through a Holden Dealer.
Radio remote control
Battery replacement
As soon as the range of the remote
control reduces, replace the battery:
Note
• Batteries do not belong in
household waste. Dispose of
at an appropriate recycling
collection point.
• Avoid dropping the transmitter.
• Do not place heavy objects on
the transmitter.
• Keep the transmitter away from
water and direct sunlight.
If the transmitter gets wet, wipe it
with a soft cloth.
Caution
Avoid touching the at surfaces
of the battery, the circuit board
and other components inside the
remote control with bare ngers.
Handling will shorten battery life.

Keys, doors and windows 19
With ignition switch
Use CR2032 battery or equivalent.
1. Open the cover.
2. Remove the used battery.
Avoid touching the circuit board
to other components.
3. Install the new battery.
Place the negative side (-) down
towards the base.
4. Close the cover.
5. Check the key operation.
Remote control synchronisation
After replacing the battery, unlock
the door with the key in the driver’s
door lock and turn the ignition switch
to the ON position.
The remote control is synchronised
when the ignition is switched on.
With electronic key system
Use a CR2032 battery or equivalent.
1. Press button on the side of the
transmitter to remove the key
blade.
2. Reinsert the key blade
approximately 5 mm and rotate
the key blade to remove the back
cover, as shown.
Note:
Take care that no parts fall out.
3. Carefully lift the battery up using
a at tool.
4. Remove the battery.
5. Insert the new battery, positive
side toward the back cover.
6. Replace the back cover. Ensure
it clips in place securely.
7. Check key operation.
Electronic key synchronisation
The electronic key synchronises
itself automatically during every
starting procedure.

20 Keys, doors and windows
Electronic key system
Enables a keyless operation of the
following functions:
• Central Locking System 0 21
• Tailgate 0 26
• Starting the Engine 0 145
The electronic key simply needs to
be on the driver’s person.
Additionally the electronic key
includes the functionality of the
remote control 0
Handle with care, protect from
moisture and high temperatures and
avoid unnecessary operation.
18.
Note:
Do not put the electronic key in the
load compartment or in front of the
infotainment display.
Replacing battery in electronic
key
Replace the battery as soon as
the system no longer operates
properly or the range is reduced.
The need for battery replacement is
indicated by a message in the Driver
Information Centre.
Vehicle messages 0
Battery replacement 0 18
78
Electronic key synchronisation
The electronic key synchronises
itself automatically during every
starting procedure.
Fault
If the central locking cannot be
operated or the engine cannot be
started, the cause may be one of the
following:
• Fault in electronic key.
• Electronic key out of reception
range.
• Battery voltage too low.
• Overload of the central locking
system by operating at frequent
intervals, the power supply is
interrupted for a short time.
• Interference from higher-power
radio waves from other sources.
To rectify the cause of the fault,
change the position of the electronic
key.
Central locking system 0
To start the vehicle with a low
transmitter battery.
Starting the engine 0
21
145.

Keys, doors and windows 21
Memorised settings
Whenever the key is removed from
the ignition switch, or for vehicles
with electronic key system, after the
Engine Start/Stop button is pressed
off, the following settings may be
automatically memorised by the key:
• lighting
• infotainment system
• central locking system
• comfort settings
This can be set for each key used.
Central locking system
Doors may be locked and unlocked
by pushing buttons on:
• The driver’s or front passenger’s
door.
• The key from inside or outside
the vehicle.
Note
The driver’s door must be closed for
the driver’s door to lock.
Vehicle personalisation 0
86
Central locking button
Driver’s door
Front passenger’s door

22 Keys, doors and windows
Locks and unlocks all doors, the
tailgate and fuel ller door.
• Press e to lock.
• Press c to unlock.
If the driver’s door is open, the
driver’s door and fuel ller door
cannot be locked.
Settings can be changed in the
Vehicle settings menu in the
infotainment system.
Vehicle personalisation 0
86
Unlocking
• Press c.
All doors unlock.
The hazard lamps ash twice.
To unlock the driver’s door only or
to change the unlock feedback,
see Vehicle settings menu in the
infotainment system.
Vehicle personalisation 0
86
Locking
• Press button e.
All doors lock.
The hazard lamps ash once.
To change the lock feedback,
see Vehicle settings menu in the
infotainment system.
Vehicle personalisation 0
86

Keys, doors and windows 23
Electronic key system
operation
The electronic key must be outside
the vehicle, within a range of approx.
one metre of the relevant door side.
Unlocking
Press the button on the respective
door handle and pull the handle. The
doors, tailgate and fuel ller door are
unlocked.
The unlocking mode can be
set in the Settings menu in the
infotainment system.
Vehicle personalisation 0
86
Locking
Press the button on the respective
door handle. The doors, tailgate and
fuel ller door are locked.
The system only locks if:
• It has been more than 5 seconds
since unlocking, or
• The unlock button has been
pressed twice within 5 seconds, or
• Any door has been opened and
then all doors are closed.
If the driver’s door is not closed
properly or the electronic key
remains in the vehicle, locking will
not be permitted and a warning tone
sounds three times.
If there have been two or more
electronic keys in the vehicle and the
ignition was on once, the doors will
be locked even if just one electronic
key is taken out of the vehicle.
Unlocking and opening the
tailgate
The tailgate and the doors can be
unlocked by pushing the touchpad
on the tailgate when electronic key is
in range.
Tailgate 0
26

24 Keys, doors and windows
Delayed locking
The doors may be locked and
the anti-theft alarm system armed,
5 seconds after the last door is
closed, by pressing e on the central
locking button.
• ON: The doors will not lock until
5 seconds after the last door is
closed.
• OFF: The doors will lock
immediately when e is pressed.
The settings can be changed.
Vehicle personalisation 0
86
Automatic door locks
Automatic locking after driving
off
This security feature can be
congured to automatically lock all
doors, the tailgate and the fuel ller
door after driving off and exceeding
a certain speed.
When at a standstill after driving,
the vehicle will be unlocked
automatically as soon as the key is
removed from the ignition switch, or
with electronic key system, when the
ignition is turned off.
Automatic relock after
unlocking
This feature can be congured to
automatically lock all doors, the
tailgate and the fuel ller door after
unlocking with the remote control or
electronic key, provided no door has
been opened.
Passive locking
On vehicles with electronic key
system, this feature locks all doors,
the tailgate and the fuel ller door
automatically after several seconds
if an electronic key has been
recognised previously inside the
vehicle, all doors have then been
closed and the key does not remain
within the vehicle.
If the electronic key remains in the
vehicle or the ignition is still on,
passive locking will not be permitted.
If there have been two or more
electronic keys in the vehicle
and the ignition was on once, the
feature locks the vehicle if just one
electronic key is taken out of the
vehicle.
To temporarily disable passive
locking: With a door open, press and
hold c switch on the door for several
seconds until you hear a chime
sound.

Keys, doors and windows 25
Passive door locking will then
remain disabled until e switch is
pressed on the door or the ignition is
turned on.
Activation or deactivation of
automatic door lock features can
be set in the Settings menu in the
infotainment system,
The settings can be saved for the
key being used.
Vehicle personalisation 0
86
Doors
Manual door locks
1. Insert the key in the driver’s door.
2. Turn the key towards the rear of
the vehicle to lock the doors.
3. Turn the key towards the front
of the vehicle to unlock the
driver’s door.
Note
Tap the key slot or heat the key if the
door does not open in cold weather.
Child security rear door
locks
Warning
Use the child security door locks
whenever children are occupying
the rear seats.
Caution
Do not pull the inside door handle
while the child security door is
locked. Damage may occur.

26 Keys, doors and windows
The child security rear door locks
prevent the rear doors from being
opened from the inside.
Rotate the switch using a key or
suitable screwdriver.
To activate:
• Rotate the switch to the
horizontal position.
To open a door when the child
security rear door lock is activated:
• Open the door from the outside.
Tailgate
Warning
Do not drive with the tailgate
open or ajar, e.g. when
transporting bulky objects.
Dangerous exhaust fumes may
enter the vehicle.
To avoid injury and/or damage
to the vehicle, check each time,
before the tailgate is closed, the
contact area is unobstructed.
Caution
Before opening the tailgate,
check the area above and behind
for obstructions, to avoid damage
to the tailgate.
Note
Adding heavy accessories to the
tailgate may affect its ability to
remain open.
Unlocking:
1. Press c.
2. Push the touchpad on the
tailgate.
Locking:
1. Push down so it latches securely.
2. Press e.
Note
The tailgate can be opened when,
the engine is running, the shift lever
is in P (automatic transmission)
or the park brake is on (manual
transmission).

Keys, doors and windows 27
Vehicle security
Anti-theft alarm system
The system is activated:
• Thirty seconds after locking the
vehicle.
• Immediately, by pressing e a
second time.
The system is deactivated by:
• Pressing c on the key.
Status LED
The status LED is located on top of
the instrument panel.
During the rst 30 seconds of
system activation:
• LED illuminates (test,
arming delay).
• LED ashes quickly (doors or
bonnet are not completely closed
or there is a system fault.
When the system is armed:
• LED ashes slowly.
If a fault occurs, contact a Holden
Dealer.
Alarm
The alarm can be silenced by
pressing any button of the radio
remote control or by switching on
the ignition.
Auto door unlock
In the event of an accident, the
doors will automatically unlock if the
ignition is on.
Note
The doors may not unlock if damage
occurs to the door lock system or
battery.

28 Keys, doors and windows
Immobiliser
The immobiliser prevents
unauthorised engine starting.
• If an invalid key is inserted
into the ignition switch/lock,
an indicator on the instrument
cluster will ash.
The vehicle will not start.
• The engine is automatically
immobilised after the key is
turned to LOCK and has been
removed from the ignition switch,
or for vehicles with an electronic
key, the Engine Start/Stop button
is pressed off.
• Only valid ignition keys can be
used to start the engine.
Have the vehicle checked by a
Holden Dealer.
Exterior mirrors
Convex mirror
The convex exterior mirrors provide
a wider view of the road and trafc.
Note
Objects appear smaller than their
actual size.
Power mirrors
L: Left side mirror selected
R: Right side mirror selected
O: No mirrors selected
To adjust an exterior rear view
mirror:
1. Rotate the switch to L or R.
2. Swivel the switch to adjust the
mirror.

Keys, doors and windows 29
Folding mirrors
When the vehicle is parked, the
mirrors may be folded at against
the side of the vehicle.
Warning
Always extend mirrors outwards
for driving to increase visibility.
Do not drive while either exterior
mirror is folded against the
vehicle.
Heated mirrors
• Press Ü.
The heated rear window also
operates.
Heated rear window 0
31
Interior mirrors
Rear view mirror
To reduce headlamp glare from
following vehicles, pull the lever
towards the rear of the vehicle.
Note
The rear view clarity is reduced
when the mirror is set to the
anti-glare position.
Return the lever back to its original
position as soon as the glare has
disappeared.

30 Keys, doors and windows
Windows
Power windows
Warning
Before operating the power
windows, check they are free of
obstructions and that passengers
and pets are not in the proximity
of the moving window.
The power windows can be operated
when the ignition is turned on.
Danger
Do not leave keys or children
unattended in the vehicle.
Children may operate the
switches and become trapped in
the windows.
Serious injury or death may occur
from misuse of power windows.
Operation
Operate the switch for the respective
window by pushing or pulling to
close.
Driver’s door
The driver’s door window has an
auto up/down function.
• Pushing or pulling the switch
gently to the rst detent:
The window moves up or down
as long as the switch is operated.
• Pushing or pulling rmly to the
second detent then releasing:
The window moves up or down
automatically with the safety
function enabled.
To stop movement, operate the
switch once more in the same
direction.
Except driver’s door
The front passenger and rear door
windows have an auto down function.
• Pushing the switch gently to the
rst detent or pulling:
The window moves up or down
as long as the switch is operated.
• Pushing rmly to the second
detent then releasing:
The window moves down
automatically. To stop movement,
operate the switch once more in
the same direction.

Keys, doors and windows 31
Anti-pinch function
If the driver’s door window
encounters any resistance during
closing, it will stop immediately and
partially open again.
Child safety switch
Press z to activate/deactivate the
rear door power window switches.
Heated rear window
• Press Ü.
The heated rear window:
• Operates when the engine is
running.
• Switches off automatically after a
few minutes or by pressing
Ü again.
Caution
Do not use sharp objects or
abrasive window cleaners on the
rear window.
Do not scratch or damage the
wires.

32 Keys, doors and windows
Sun visors
• The sun visors can be folded
down or folded outwards over the
side window, to prevent glare.
• Close the mirror cover before
driving.
Warning
Do not place the sun visor in
such a position that it reduces
visibility of the roadway, trafc or
other objects.
• If the vehicle has illuminated
lamps, they turn on and off when
the cover is opened and closed.
Roof
Sunroof
The vehicle may have a sunroof.
Warning
Always observe the following
precautions:
Do not place ngers or objects
near the sunroof when operating.
Do not place heavy objects on or
around the sunroof.
Remove debris from the outside
of the sunroof.
When leaving the vehicle
unattended, close the sunroof
fully.
As at all other times, all occupants
must wear their seat belts whether
the sunroof is open or closed.
Failure to observe these
precautions may result in
personal injury or damage to your
vehicle.
Fitting an aftermarket sunroof
may void the New Vehicle
Voluntary Warranty on your
vehicle and could result in injury
to the vehicle occupants in the
event of an accident.
The sunroof:
• Will operate when the ignition is
turned on.
• Can be raised or can slide back
into the roof.
The sunroof switch is located
between the sun visors.

Keys, doors and windows 33
Open or close
• To open to a specic position,
press e (1) lightly and hold.
• Release the switch when the
required position has been
reached.
To close the sunroof:
• Press g (2) lightly and hold.
Tilt or close
To tilt the sunroof:
• Press f (3).
To close the sunroof:
• Press g (4).
Auto open or close
To open the sunroof automatically:
• Press e (1) rmly and release.
• To stop movement, press any of
the switches again.
To close the sunroof automatically:
• Press g (2) rmly and release.
• To stop movement, press any of
the switches again.
Safety function
If the sunroof encounters resistance
during automatic closing, it stops
immediately and opens again.
Caution
Obstruction detection only
operates when the sunroof is
closing. Before opening the
sunroof, ensure there are no
obstructions, e.g. a roof rack.
Sunblind
The sunblind can be operated
manually.
• Close or open the sunblind by
sliding.
• When the sunroof opens, the
sunblind opens automatically.

34 Storage
Storage
Storage compartments ........34
Instrument panel storage ...........34
Glove box
Cup holders
Sunglasses storage
Under seat storage
Loading information .............36
Roof rack system .................37
...................................34
................................35
....................35
.....................36
Storage
compartments
Instrument panel storage
A storage compartment is located
on the driver’s side of the instrument
panel.
• To open, lift the handle upwards.
Glove box
The glove box is located in the
instrument panel, in front of the
passenger’s seat.
• To open, pull the handle towards
you. To close, push the lid rmly
back into place.
Warning
To reduce the risk of injury,
always keep the glove box door
closed when driving.

Storage 35
Cup holders
Cup holders are located in the front
console and rear armrest.
Warning
To avoid scalding, never place
hot drinks in the cup holders.
Do not place uncovered
containers of liquid in the cup
holder while the vehicle is in
motion.
Sunglasses storage
The vehicle has a sunglasses holder
located in the roof on the driver’s
side.
• To open, fold downwards.
Note
Do not use for storing heavy objects.

36 Storage
Under seat storage
The vehicle may have under seat
storage beneath the passenger’s
seat.
• To open, pull up on the front of
the tray and pull towards the
front of the vehicle.
• To close, push the tray towards
the rear of the vehicle.
Loading information
Danger
Do not stack objects higher than
the front seats.
Do not allow passengers to sit
on the folded seatbacks while
the vehicle is in motion. Serious
injuries or death can result.
Rear seats 0 43
• Place all heavy objects in the
load compartment as far forward
as possible.
• Secure objects to prevent from
sliding.
Movement of heavy objects
in the load compartment may
change the handling of the
vehicle.
• Ensure the backrests are
securely engaged.
• Place heavier objects at the
bottom.
• Do not place any objects on the
load compartment cover or the
instrument panel.
• Do not place unsecured objects
in the interior.
• Do not drive with an open
tailgate.
• Driving with a roof load increases
the sensitivity of the vehicle
to cross-winds and has a
detrimental effect on vehicle
handling due to the vehicle’s
higher centre of gravity.
Distribute the load evenly and
secure it properly with retaining
straps. Adjust the tyre pressure
and vehicle speed according to
the load conditions. Check and
retighten the straps frequently.

Roof rack system
• Distribute the load evenly and
secure tightly with straps.
• When carrying loads on the
roof rack (elevated load), avoid
hard braking, abrupt swerving or
sharp steering.
Roof rack elevated loads alter
the handling of a vehicle.
Warning
The total elevated load, including
the weight of the cross bars,
must not exceed 75 kg. Distribute
the load evenly.
Note
The weight of the cross bars and
the load must be included when
calculating the total vehicle load.
Storage 37

38 Seats, restraints
Seats, restraints
Head restraints ....................38
Height adjustment ......................39
Rear head restraints
Front seats ............................40
Seat position ..............................40
Seat adjustment
Armrest
Heated front seats
.......................................43
Rear seats .............................43
Seat belts...............................45
Belt force limiters ........................46
Belt tensioners
Three point belt
Seat belt use during
pregnancy
Seat belt care
Replacing seat belts
after a crash
..................................48
...............................49
...................39
.........................40
......................43
...........................46
..........................47
.............................49
Airbag system .......................49
Front airbag system ...................50
Side airbag system
Curtain airbag system
.....................51
................52
Child restraints .....................53
Selecting the right system ..........54
Where to put the restraint
Top-tether child restraint
systems
......................................56
...........55
Head restraints
Warning
This safety feature is not
intended to rest the head upon.
It is solely for the reduction of
whiplash neck movement in an
accident involving your vehicle.
The centre of the head restraint
should be at eye level, never at
neck level.

Seats, restraints 39
Height adjustment
Front head restraints
• Pull the head restraint up.
• Press the locking button (1) and
push the head restraint down.
Rear head restraints
• Pull the head restraint up.
• Press the locking button (1) and
push the head restraint down.
To remove:
1. Pull the head restraint up.
2. Press the locking buttons (1) and
(2) at the same time.
3. Remove the head restraint.
The headrests are in a stowed,
non-use position, when at their
lowest position.

40 Seats, restraints
Front seats
Seat position
Warning
To avoid reducing the
effectiveness of seat belts,
seatbacks should only be upright
or at most semi-reclined when
the vehicle is moving.
• Sit centrally in the seat.
• Use the backrest and cushion for
support.
• Adjust the seat so that your legs
are slightly angled when against
the pedals.
• Adjust the backrest angle to
easily reach the steering wheel
with arms slightly bent.
Steering wheel adjustment
0 58.
• Maintain contact between
shoulders and the backrest when
turning the steering wheel.
• Adjust the head restraint.
Head restraints 0
• Slide the passenger’s seat as far
back as possible.
38.
Seat adjustment
Danger
Do not sit nearer than 25 cm from
the steering wheel, to allow safe
airbag deployment.
Warning
Do not adjust the driver’s seat
when the vehicle is moving as
the seat could move suddenly
causing the driver to lose control.

Danger
When folding the front
passenger’s seatback forward
to carry long items, ensure
the items are secured a safe
distance away from an inating
airbag. In a crash, an inating
airbag can force an object toward
a person resulting in severe
injury or death.
Secure or remove unsecured
items before driving.
1. Move the seat forwards or
backwards by lifting the handle at
the front and sliding the seat.
2. Release the handle to engage
the latch.
Try to move the seat back and
forth to be sure it is locked in
place.
Seats, restraints 41
1. Recline the seatback by lifting
the lever.
2. Adjust the angle and release
the lever.
3. Allow the seat to engage.
Note
Do not lean on the seat when
adjusting.

42 Seats, restraints
• To lower the seat cushion, push
the lever down several times.
• To raise the seat cushion, pull
the lever up several times.
Folding seatback
To fold the seatback:
1. Push the head restraint down.
2. Move the seat backwards by
lifting the handle at the front and
sliding the seat.
3. Lift the lever (1) up fully and fold
the seatback (2) forward until it is
locked.
To raise the seatback:
1. Lift the seatback and push to the
upright position.
2. Push at the top of the seatback
to latch into place.
3. Pull the seatback forward again
to ensure it is properly latched.
Warning
If the seatback is not locked, it
could move forward in a sudden
stop or crash causing personal
injury. Always push and pull
on the seatback to ensure it is
locked.

Seats, restraints 43
Armrest
The vehicle may have an armrest on
the driver’s seat. It can be raised or
lowered.
Heated front seats
The vehicle may have heated front
seats.
To warm the seat:
1. Start the engine.
2. Press ß or ß.
The light in the button illuminates.
To turn the heater off:
1. Press ß or ß again.
Note
Prolonged use of the heated seats
for people with sensitive skin is not
recommended.
Rear seats
Folding down rear seatbacks
Danger
Ensure the rear seatbacks are
latched securely in place.
Do not press the release button
on the top of the seatback while
the vehicle is moving. This could
cause damage or injuries to the
occupants.
Do not allow passengers to sit on
the folded seatbacks while the
vehicle is in motion. Unrestrained
luggage or passengers on a
folded seatback could be thrown
within or ejected from the vehicle
in a sudden stop or accident.

44 Seats, restraints
Caution
Do not trap the seat belt when
returning the seatback to the
upright position.
Folding a rear seat with the seat
belts still fastened may cause
damage to the seat or the seat
belts.
Always unbuckle the seat belts
and return them to their stowed
position before folding a rear seat.
To fold the rear seatbacks down:
1. Unbuckle the seat belts.
2. Push the head restraints down
by pressing the catch.
3. Slide the front seat forwards.
4. Adjust the front seatback to an
upright position.
Caution
Folding the rear seat backrest
before folding the cushion, may
cause damage to the rear seat.
Always fold the cushion before
folding the rear seat backrest.
5. Pull the straps under the seat
cushion to allow the seat cushion
to fall forward.
Note Do not place anything on
the oor. It may prevent the seat
from folding or cause damage to
the seat cushion.
6. Pull the release lever on top
of the rear seatback and fold it
forwards and down.
7. Fold the seatback forward
and down.

Seats, restraints 45
8. Place the seat belts into the belt
guides.
To return the seatback to the upright
position:
1. Pull the seat belt away from the
belt guide.
2. Lift the seatback upwards and
push rmly back into place.
Note
Ensure the seat belt is clear of
the latch.
3. Return the rear seat cushion to
its original position. Push the
front part of the cushion down
rmly until it latches.
Note
• Ensure the seat belt buckles are
not trapped.
• The centre rear seat belt may
lock when returning the seat
cushion. If this occurs, pull the
strap to release the seat cushion,
withdraw the belt slightly and
return the seat cushion.
Warning
When passengers are in the rear
seats ensure the rear seatbacks
are all the way back and locked
in position, before starting the
vehicle.
Do not pull the release levers
on top of the seatback while the
vehicle is moving. Damage to the
vehicle or injuries to occupants
may occur.
Seat belts
Warning
Seat belts are designed to bear
upon the bony structure of the
body, and should be worn low
across the front of the pelvis or
the pelvis, chest and shoulders,
as applicable; wearing the lap
section of the belt across the
abdominal area must be avoided.
Seat belts should be adjusted as
rmly as possible, consistent with
comfort, to provide the protection

46 Seats, restraints
for which they have been
designed. A slack belt will greatly
reduce the protection afforded to
the wearer.
Care should be taken to avoid
contamination of the webbing
with polishes, oils and chemicals,
and particularly battery acid.
Belts should not be worn with
straps twisted.
Each belt assembly must only
be used by one occupant. It is
dangerous to put a belt around
a child being carried on the
occupant’s lap.
No modications or additions
should be made by the user which
will either prevent the seat belt
adjusting devices from operating
to remove slack, or prevent the
seat belt assembly from being
adjusted to remove slack.
The belts lock during heavy
acceleration or deceleration for
the safety of the occupants.
Belt force limiters
In the front seats, stress on the body
is reduced by the gradual release of
the belt during a collision.
Belt tensioners
In the event of a front, side or rear
collision of a certain severity, the
driver’s and/or passengers safety
belts are tightened.
Warning
Incorrect handling (e.g. removal
or tting of belts or belt buckles)
can trigger the belt tensioners
with risk of injury.

Seats, restraints 47
• When the belt tensioners have
been deployed, v illuminates on
the instrument cluster.
Seat belt reminders 0 68
• Triggered belt tensioners must
be replaced.
• Belt tensioners are only triggered
once.
Warning
Do not attach or install objects
that may interfere with the
operation of the belt tensioners.
Do not make any modications to
belt tensioner components.
Three point belt
Fitting
The belt should not be twisted. It
should lie at and t rmly across
your hips.
1. Withdraw the belt from the reel.
2. Pull the metal tongue across
your body into the buckle, until it
clicks into place.
3. Tension the lap belt regularly
while driving by tugging the
shoulder belt.
Do not place objects such as
handbags or mobile phones between
the belt and your body.
Warning
The belt must not rest against
hard or fragile objects in the
pockets of your clothing.

48 Seats, restraints
Height adjustment
1. Press and hold the button.
2. Move up and down as required.
3. Release the button.
4. Ensure the anchor clicks into
position.
Warning
Do not adjust the height of the
belt while driving.
The belt must lie across the
shoulder. It must not lie across
the throat or upper arm.
Removing
1. Press the red button on the
buckle.
2. Allow the belt to retract.
3. Check it fully retracts without
twisting or turning.
Note
The three point belt for the
rear central seat can only be
withdrawn from the retractor if
the backrest is in the upright
position.
Seat belt use during
pregnancy
Warning
The lap belt must be positioned
as low as possible across the
pelvis to prevent pressure on the
abdomen.
Seat belts work for everyone,
including pregnant women. Like all
occupants, they are more likely to be
seriously injured if they do not wear
a seat belt.
A pregnant woman should wear a
three point belt with the lap portion
of the belt worn as low as possible
below the rounding of their stomach,
throughout the pregnancy.

Seats, restraints 49
Seat belt care
Warning
Care should be taken to avoid
contamination of the webbing
with polishes, oils and chemicals,
and particularly battery acid.
Cleaning may safely be carried
out using mild soap and water.
The belt should be replaced
if webbing becomes frayed,
contaminated or damaged.
Replacing seat belts
after a crash
Warning
It is essential to replace the
entire assembly after it has been
worn in a severe impact even if
damage to the assembly is not
obvious.
Airbag system
When triggered, airbags inate
within milliseconds. They also
deate so quickly that it is often
unnoticeable during the collision.
Danger
Do not make any modications to
the airbag system.
The driver should sit back as far
as possible while still maintaining
control of the vehicle. Sitting too
close to the airbag, can cause
death or serious injury when it
inates.
Always wear a seat belt.
Warning
WARNING – EXTREME HAZARD!
Do not use a rearward facing
child restraint on a seat protected
by an airbag in front of it!
The child could be seriously
injured if the airbag inates, as
the child’s head would be very
close to the inating airbag.
Remember that it is safest for
children to be seated in the rear
seats.
Child restraints 0 53
M

50 Seats, restraints
Warning
Airbags are part of the
supplemental restraint system
(SRS) as they assist, but do not
replace seat belts. Airbags do not
deploy in every accident. Various
factors dictate whether they
deploy including speed, angle of
collision and object hit. Airbags
are not designed to inate if the
vehicle is hit from the rear or is
involved in a rollover. Seat belts
must be worn by all passengers
whenever the vehicle is moving.
Airbags inate with great force. If
you are too close to an inating
airbag it may cause injury.
Seat belts help keep you in
position for airbag ination in the
event of a collision.
Airbag and belt tensioners light
0 68
Front airbag system
The front airbag system consists
of one airbag in the steering wheel
and one in the instrument panel on
the passenger’s side. These are
identied by the word AIRBAG.
Warning
The horn pad must not be
covered with adhesive or any
other material.
The driver should adjust the seat
as far rearward as possible while
still maintaining control of the
vehicle.
Warning
Do not place any objects on or
over the instrument panel or
between an airbag and yourself.
Do not hang anything from the
sun visor or mirror.
Passengers must not rest their
feet on the instrument panel.
Front airbags will inate in certain
severe frontal or near frontal
impacts. Front airbags are not
designed to inate if the vehicle
is struck from the side, rear or in
rollovers. Always wear a seat belt.

Seats, restraints 51
Side airbag system
Side airbags are stored in the sides
of the front seats.
They can be identied by the word
AIRBAG.
The side airbags deploy in most, but
not all severe side impacts.
The risk of injury to the upper body
and pelvis in the event of a side
impact is considerably reduced.
Warning
Do not t unauthorised seat
covers as they may impair the
deployment of the side airbags.
Do not position your body or any
object (including pillows) between
front seats and doors.
Do not lean on, or sleep against,
the door. Always sit centrally in
the seat.
Always wear a seat belt.

52 Seats, restraints
Curtain airbag system
Curtain airbags are stored in the roof
on each side of the vehicle.
They can be identied by the word
AIRBAG on the roof pillars.
The curtain airbags deploy in most,
but not all severe side impacts.
The risk of injury to the head
in the event of a side impact is
considerably reduced.
Warning
Do not position your body or any
object (including pillows) in the
area in which the airbag inates.
There must be no objects in the
area in which the airbag inates.
Refer to the illustration.
Use the hooks above the doors
only to hang up light articles of
clothing.
Do not place any objects in the
pockets of the hanging items.
Do not hold onto the assist grips
(above the doors) while seated in
the vehicle.
Do not lean on, or sleep against
the front or rear doors. Always sit
centrally in the seat.
Always wear a seat belt.

Seats, restraints 53
Replacing airbag system parts
after a crash
Note
After an accident where airbags
have deployed, the systems,
associated parts and hardware
must be checked and replaced as
required.
Seats, associated parts and
hardware must also be checked and
replaced as required.
The airbag system should also be
inspected after an accident if:
• The instrument panel area or
steering wheel is scratched,
cracked or damaged.
• The front seats and upholstery
are damaged.
• The headliner or trim panels are
damaged.
It is recommended that this work be
carried out by a Holden Dealer or
approved repairer.
Child restraints
Warning
WARNING – EXTREME HAZARD!
Do not use a rearward facing child
restraint on a seat protected by an
airbag in front of it!
The child could be seriously
injured if the airbag inates, as the
child’s head would be very close
to the inating airbag.
Remember that it is safest for
children to be seated in the rear
seats.
Never carry a child while travelling
in the vehicle.
M
Warning
This manual provides you with
general information concerning
child restraints only.
The driver is required by law to
ensure that passengers and pets
are suitably restrained. In most
States and Territories of Australia
and New Zealand, specic laws
may exist which require children
to be seated in approved child
restraints.
Holden strongly recommends
that you refer to your specic
State or Territory regulations to
determine which child restraint is
suitable for your child.

54 Seats, restraints
Warning
Always ensure the seat belt ts
rmly around the child restraint.
If a child cannot see out of the
window, do not raise him/her by
means of an ordinary cushion. It
will not stay in place in a collision
and the child can slip out of the
straps and become entangled.
Selecting the right
system
Infants
Rearward facing infant capsules
are designed so that in the event
of a collision, impact forces will be
evenly spread over the baby’s back,
with minimal jarring to the vulnerable
head and neck area.
Young children
Forward facing child seats are for
use when the child is able to sit and
easily hold their head upright.
Booster seats
Booster seats are for when children
outgrow a typical forward facing child
seat, but are still too small for three
point seat belts.
Older children
A child should use a normal three
point seat belt only when:
• They can sit against the back of
the rear seat with knees bent
comfortably at the edge of
the seat.
• The lap belt rests low and snug
across the hips, not across the
stomach.
• The sash belt is centred on the
shoulder and chest.
• They are able to stay seated like
this for the entire trip.

Seats, restraints 55
Where to put the restraint
Warning
Child restraint anchorages are
designed to withstand only those
loads imposed by correctly tted
child restraints. Under no
circumstances are they to
be used for adult seat belts,
harnesses, or for attaching
other items or equipment to
the vehicle.
Only child restraints that have
clips to attach to the vehicle’s
anchorage ttings are to be used.
Other types of child restraints
may not attach securely to this
type of anchor.
Use only Standards Australia
and New Zealand approved child
restraints and harnesses. Only
purchase a child restraint which
carries the appropriate Standards
Australia sticker of approval.
Where legally allowable, you
may install a forward-facing child
restraint in the front seat, but
always move the passenger’s
seat as far back as it will go.
The forward facing child restraint
must still be attached to the
passenger side child restraint
anchorage point, located behind
the rear seat.
Remember, it is safest for
children to be seated in the
rear seat.
Note
If unsure about installing a child
restraint, contact an approved
restraint tting station or a Holden
Dealer.
ISOFIX child restraint systems
Fasten vehicle-approved ISOFIX
child restraint systems to the ISOFIX
mounting brackets.
Note
Ensure the seat belt buckles are
placed out of the way of the child
seat.
ISOFIX mounting brackets are
indicated by a label on the seatback,
as shown. In addition to the ISOFIX
mounting, fasten the top-tether straps
to the top-tether anchorage points.
Top-tether child restraint systems
56
0

56 Seats, restraints
Top-tether child restraint
systems
A. Front of vehicle
The child restraint tether anchors
are located at the rear of the load
compartment, in line with the three
rear seating positions.
Note
Use the child restraint anchors for
their designed purpose only.
Child restraint installation
The vehicle has been designed to
accommodate child restraints on the
rear seat.
When using a child restraint, read
the installation instructions supplied
with the child restraint and follow the
directions for tment carefully.
The child restraint system should
be secured in conjunction with the
vehicle’s seat belt.
Secure the child in the restraint in
accordance with the manufacturer’s
instructions.
If unsure about installing a child
restraint anchor tting, contact an
approved restraint tting station or a
Holden Dealer.

Instruments and controls 57
Instruments and
controls
Controls .................................58
Steering wheel adjustment ...........58
Steering wheel remote controls
...........................................58
Horn
Windscreen wiper/washer
Rear window wiper/washer
.........................................62
Clock
Power outlets
.............................62
Warning lights, gauges and
indicators ..................................64
Overview ....................................64
Speedometer
Odometer
Tachometer
Fuel gauge
Service display
Transmission display
Turn signal
..............................65
...................................65
................................66
.................................66
...........................67
..................67
..................................67
..58
..........59
........61
Seat belt reminders
Airbag and belt tensioners light
Charging system light
Malfunction indicator light
Brake system warning light
Antilock Brake System
(ABS) warning light
Up-shift light
Descent Control System
(DCS) light
Power steering warning light
Operate pedal light
Park assist warning light
Electronic Stability Control
(ESC) light
Electronic Stability Control
(ESC) off light
Traction Control System
(TCS) off light
Bonnet ajar light
Engine temperature warning
light
Engine oil pressure light
..................................69
..................................70
.............................................71
....................68
.................68
...........68
.......69
....................69
...............................69
......69
.....................70
............70
.............................70
.............................70
.........................70
.............71
..68
Low fuel warning light
Immobiliser light
Reduced engine power light
High beam light
Front fog lamp light
Tail lamp light
Cruise control light
Door ajar light
Compass
.............................72
.............................72
....................................73
.................71
.........................71
.......72
..........................72
....................72
.....................72
Information displays ............73
Driver Information Centre
(DIC) ...........................................73
Vehicle messages
Warning chimes
Trip computer
......................78
..........................84
.............................84
Vehicle personalisation........86
Settings ......................................86

58 Instruments and controls
Controls
Steering wheel adjustment
Warning
Do not attempt to adjust the
steering wheel while driving.
1. To unlock, move the lever down.
2. Adjust the steering wheel.
3. To lock, move the lever up.
4. Ensure the steering wheel is
locked in position before driving.
Steering wheel remote
controls
The infotainment system and the
cruise control may be operated by
the controls on the steering wheel.
Infotainment system 0
Cruise control 0 159
96
Horn
Press j.

Instruments and controls 59
Windscreen wiper/washer
Windscreen wiper
To operate the windscreen wipers,
turn the ignition on and move the
windscreen wiper/washer lever
downwards.
Caution
Do not operate the wipers on dry
glass or when covered with snow
or ice, as this will damage the
rubber and scratch the glass.
1x: Misting function
OFF: Off
INT: Intermittent operation
LO: Continuous wipe, slow speed
HI: Continuous wipe, fast speed
Misting function
To operate the windscreen wipers
once during light rain or mist:
• Lightly lift the windscreen wiper/
washer lever up and release.
• The lever returns to its usual
position when released.
• The wipers cycle once.
Adjustable wiper interval
During intermittent operation, adjust
the frequency of the wiper intervals:
• For frequent intervals, rotate the
wheel downwards.
• For longer intervals, rotate the
wheel upwards.

60 Instruments and controls
Automatic wiper with rain
sensor
The vehicle may have rain sensing
windscreen wipers.
A sensor near the top centre of the
windscreen detects the amount
of water on the windscreen and
controls the frequency of the
windscreen wipers. Keep this area
clear of debris for best system
performance.
Caution
Switch off the rain sensor by
setting the lever to the OFF
position before entering a
car wash.
Replace the wiper blades as soon
as they do not completely remove
water from the windscreen. If
the blades are not replaced, the
wipers may continue to wipe even
though most of the screen is dry.
To prevent damage to the wiper
blades, make sure the windscreen
is fully defrosted before switching
on the rain sensor.
INT: The wipers cycle when water is
detected on the windscreen.
The wiper speed and
frequency are adjusted
automatically.
To manually adjust the sensitivity of
the rain sensing:
• Rotate the wheel downwards for
low sensitivity.
• Rotate the wheel upwards for
high sensitivity.
Windscreen washer
Pull the lever rearwards to wash the
windscreen.
Washer uid is sprayed onto
the windscreen and the wipers
cycle once.

Instruments and controls 61
Caution
Do not operate the windscreen
washer for more than a few
seconds or when the washer uid
reservoir is empty.
Warning
Do not spray washer uid on the
windscreen in freezing weather.
Rear window wiper/
washer
Wiper
To operate the rear window wiper,
push the switch at the end of the
lever.
: Intermittent wipes, push in at
INT
the top of the button.
: To turn the wipers off, place
OFF
the switch in the OFF position.
: Continuous wipes, push in at
ON
the bottom of the button.
Caution
Do not operate the wipers on dry
glass or when covered with snow
or ice, as this will damage the
rubber and scratch the glass.
Do not operate the windscreen
washer for more than a few
seconds, or when the washer
uid reservoir is empty.

62 Instruments and controls
Washer
Push the lever forwards.
Washer uid is sprayed onto the rear
window and the wiper swipes for a
few strokes.
Clock
Time and date are shown on the
infotainment display.
Adjust the settings for the time and
date in the Settings menu.
Settings 0
132
Power outlets
Warning
It is dangerous for the driver to
attach or remove accessories
from the power sockets while
driving. It may distract the driver’s
attention, putting the occupants
of the vehicle and other road
users at risk.
12V power outlet
A 12V power outlet is located in the
centre console.

Instruments and controls 63
The 12V power outlet operates
when the ignition is in Accessory
or ON positions. When the ignition
is turned off, the 12V power outlet
is deactivated when any door is
opened or after 10 minutes.
• The 12V power outlet does not
operate if the battery voltage
is low.
• Do not exceed the maximum
power consumption of 120 watts.
• Do not connect electrical
charging devices or batteries.
230V power outlet
A 230V power outlet is located at the
rear of the centre console.
The 230V power outlet operates
when the ignition is turned on and
is deactivated when the ignition is
turned off.
• The 230V power outlet does not
operate if the battery voltage
is low.
• Do not exceed the maximum
power consumption of 150 watts.
• Do not connect electrical
charging devices or batteries.
Warning
Sparks may occur when
connecting or disconnecting
devices.
Do not connect devices in the
vicinity of ammable or explosive
substances.
Disconnect any connected
devices before starting the
engine, to prevent damage.
The 230V inverter will not
operate most appliances
designed to produce heat, such
as hair dryers, irons, toasters,
heaters and coffee machines as
these items drain high amounts
of current in excess of 150 watts.

64 Instruments and controls
Warning lights, gauges and indicators
Overview
G Turn signal 0 92
B Service vehicle soon light
(Illuminates in the DIC) 0 65
> Seat belt reminders 0 68
9 Airbag and belt tensioners light
0 68
" Charging system light 0 68
* Malfunction indicator lamp
0 68
$ Brake warning light 0 69
! Antilock Brake System (ABS)
warning light 0 69
* Up-shift light 0 69
m Power steering warning light
0 69
r Park assist warning light 0 70
d Electronic Stability Control (ESC)
light 0 70
g Electronic Stability Control (ESC)
Off light 0 70
i Traction Control System (TCS)
Off light 0 70

Operate pedal light 0 70
#
i Bonnet ajar light 0 70
C Engine temperature warning light
0 71
: Engine oil pressure light 0 71
. Low fuel warning light 0 71
A Immobiliser light 0 71
w Reduced engine power light
0 72
$ High beam light 0 72
# Front fog lamp light 0 72
; Tail lamp light 0 72
m Cruise control light 0 72
U Door ajar light 0 72
Instruments and controls 65
Speedometer
Shows vehicle speed in kilometres
per hour (km/h).
Odometer
Type 1
Type 2

66 Instruments and controls
Shows distance travelled in
kilometres.
• The tripmeter measures the
distance travelled since the
tripmeter was reset.
• Press the reset button briey to
change between odometer and
tripmeter.
Tachometer
Shows engine speed in thousands of
revolutions per minute (RPM).
Drive at a low engine speed/range
for each gear, as much as possible.
Warning
Do not allow the needle to remain
in the warning/red zone.
Fuel gauge
Shows the level of fuel in the tank.
Movement of the fuel within the
fuel tank may cause the fuel gauge
indicator to move when braking,
accelerating or turning.
Danger
Before refuelling, stop the vehicle
and switch the engine off.

Instruments and controls 67
Service display
Control indicators
The vehicle may have the following
indicators.
Indicators illuminate for a short time
when the ignition is turned on to
show the light is working.
Red: danger, important reminder
Yellow: warning, information, fault
Green, blue, white: conrmation of
activation
Note
Depending on vehicle variant,
the instrument cluster appearance
may differ.
Transmission display
Indicates the selected gear or
transmission mode.
Turn signal
• Push the lever in the same
direction the steering wheel is
turned.
• O ashes.
O also ashes when the hazard
warning is activated.
• The turn signal will self cancel
from larger turns.
• If O ashes quickly a bulb may
need replacing.
Bulb replacement 0
• If the turn signals do not operate
check the fuses.
Fuses 0
Turn and lane change signals 0 92
193
188

68 Instruments and controls
Seat belt reminders
Illuminates in the instrument cluster:
X: Driver’s seat belt reminder
Illuminates in the centre panel:
: Front passenger’s seat belt
reminder (if occupied)
When the ignition is turned to the
ON position:
• X or C illuminates until the seat
belt is fastened.
When the engine is running:
• X or
then illuminates until the seat belt
is fastened.
ashes for 100 seconds
C
If the vehicle reaches a specic
distance or speed and the seat
belt is unfastened, X or C will
ash and the chime will sound for
100 seconds, or until the seat belt is
fastened.
Seat belts 0 45
Airbag and belt
tensioners light
The v warning light illuminates for a
short time when the ignition is turned
on to show the light is working.
If the v warning light does not
illuminate, does not extinguish after
few seconds or illuminates while
driving, there is a problem with the
airbag or belt tensioner system.
Warning
Have any fault in the airbag or
belt tensioner system repaired
immediately by a Holden Dealer.
Airbag system 0 49
Belt tensioners 0 46
Charging system light
The p warning light illuminates for a
short time when the ignition is turned
on to show the light is working.
If the p warning light illuminates
while the engine is running, there is
a problem with the charging system:
1. Stop and switch off the engine.
2. Contact a Holden Dealer.
Malfunction indicator
light
The Z warning light illuminates for a
short time when the ignition is turned
on to show the light is working.
If the Z warning light illuminates
while driving, there is a problem with
the emission monitoring system.
Contact a Holden Dealer.

Instruments and controls 69
SHIFT
Brake system warning
light
The R warning light illuminates for a
short time when the ignition is turned
on to show the light is working.
The R warning light illuminates when
the park brake is applied.
Park brake 0
Do not drive while the brake
system warning light is on.
If the R warning light does not
extinguish or illuminates while driving
and the park brake is released, there
is a problem with the brakes:
• Stop the vehicle as soon as it is
safe to do so.
• Check the brake uid level.
Brake/clutch uid 0 186
• Do not proceed until satised
that braking is possible or the
cause of the problem has been
rectied.
155
Warning
• If necessary contact a Holden
Dealer.
Antilock Brake System
(ABS) warning light
The u warning light illuminates for a
short time when the ignition is turned
on to show the light is working.
If the u warning light illuminates,
there is a problem in the ABS.
Note
The vehicle’s brake system remains
operational but without ABS
assistance.
Antilock Brake System (ABS) 0
Contact a Holden Dealer.
155
Up-shift light
illuminates to indicate when to
shift to the next higher gear for best
fuel economy.
Manual transmission 0
153
Descent Control System
(DCS) light
The indicator light illuminates
white when the system is on and
green when DCS is activated.
Descent Control System (DCS)
158
0
Power steering warning
light
The vehicle has electric power
steering.
The m warning light illuminates for a
short time when the ignition is turned
on to show the light is working.
If the m warning light does not
extinguish after a few seconds, or if
it illuminates while driving, there is a
fault in the power steering.
Contact a Holden Dealer.

70 Instruments and controls
Operate pedal light
# illuminates yellow.
Operate the clutch pedal (manual)
or brake pedal (auto) to start the
engine.
Park assist warning light
r illuminates for a short time when
the ignition is turned on to show the
light is working.
If the light does not extinguish or if
r illuminates when reverse gear is
selected:
• The sensors may be dirty.
• The sensors may be covered by
ice or snow.
• There may be ultrasonic wave
interference.
If the light does not extinguish,
contact a Holden Dealer.
Park Assist (PA) 0
160
Electronic Stability
Control (ESC) light
The indicator light illuminates for a
short time when the ignition is turned
on to show the light is working.
If the light ashes while driving, the
ESC is actively helping the vehicle
with road grip and stability.
If the light illuminates or does not
extinguish while driving, contact a
Holden Dealer immediately.
Electronic Stability
Control (ESC) off light
The indicator light illuminates for a
short time when the ignition is turned
on to show the light is working.
illuminates when the ESC is
deactivated.
Electronic Stability Control (ESC)
157
0
Traction Control System
(TCS) off light
The = indicator light illuminates for a
short time when the ignition is turned
on to show the light is working.
illuminates when the TC is
=
deactivated.
Bonnet ajar light
The i indicator light illuminates
for a short time when the ignition
is turned on to show the light is
working.
i illuminates when the bonnet is
not completely closed.

Instruments and controls 71
Engine temperature
warning light
The warning light illuminates for a
short time when the ignition is turned
on to show the light is working.
If the light illuminates while driving,
the engine coolant temperature is
excessively hot:
• Stop the vehicle as soon as it is
safe to do so.
• Let the engine idle for a few
minutes.
• If the light remains on, contact a
Holden Dealer.
Warning
Do not continue driving with the
temperature gauge needle in the
red area. The engine is too hot.
Continued operation of an
overheated engine will result in
severe engine damage.
Engine oil pressure light
The I warning light illuminates for a
short time when the ignition is turned
on to show the light is working.
If the I warning light illuminates
while the engine is running, the
engine oil pressure or level is low:
• Stop the vehicle as soon as it is
safe to do so.
• Turn the ignition off.
• Check the engine oil level.
Engine oil 0 182
• If necessary, contact a Holden
Dealer.
Caution
Engine damage may result if
you keep driving. Do not run the
engine. If the oil level is normal,
have the system checked by the
nearest Holden Dealer.
Low fuel warning light
The Y indicator light illuminates and
a chime sounds when the fuel level
is low.
Caution
To avoid damage to the catalytic
converter, ll the fuel tank above
the low fuel level.
Catalytic converter 0 148
Immobiliser light
The o indicator light illuminates
when there is a fault in the
immobiliser system.
The engine cannot be started.
Contact a Holden Dealer.

72 Instruments and controls
Reduced engine power
light
If w illuminates while driving, the
engine’s power is reduced.
1. Stop the vehicle as soon as it is
safe to do so.
2. Switch the ignition off then restart
after 10 seconds.
The vehicle may be driven at a
reduced speed.
3. Contact a Holden Dealer
immediately.
High beam light
The $ indicator light illuminates
when the headlamp high beam is on.
Headlamp high/low beam 0
91
Front fog lamp light
The vehicle may have front fog
lamps.
> illuminates when the front fog
lamps are on.
Front fog lamps 0
93
Tail lamp light
The 8 indicator light illuminates
when the tail lamps are on.
Exterior lamp control 0
90
Cruise control light
The m indicator light illuminates
white when the system is on
and green when cruise control is
activated.
Cruise control 0
159
Door ajar light
The N warning light illuminates when
any of the doors or the tailgate are
not completely closed.

Instruments and controls 73
Compass
The vehicle may be tted with
a compass which displays the
vehicle’s driving direction.
The compass may need to be
calibrated or set to the correct zone.
Driver Information Centre (DIC)
73
0
Information displays
Driver Information Centre
(DIC)
The Driver Information Centre (DIC)
is located in the instrument cluster.
The DIC may display functions such
as the trip computer, information,
warning messages and settings, etc.
Vehicle Information menu
To select the vehicle information
menu, press MENU.
The following options may be
available for selection:
Type 1 display:
• Remaining oil life.
Type 2 display:
• Remaining oil life.
• Compass settings.
Rotate the adjuster wheel to
select.

74 Instruments and controls
Remaining oil life
Type 1
Type 2
Displays an estimate of the oil’s
remaining useful life. This may only
be displayed while the vehicle is
stationary.
If, for example, : 98% is displayed,
it means 98% of the current oil life
remains.
When the remaining oil life is
low, the vehicle message : %
CHANGE will be displayed.
The engine oil should be changed as
soon as possible.
After an engine oil change, the
engine oil life system will be reset by
a Holden Dealer.
How to reset the engine oil life
system
Reset the system whenever the
engine oil is changed so the system
can calculate the next engine oil
change.
1. Turn the ignition On with the
engine not running.
2. Press the MENU button on the
turn signal lever, to select the
Remaining oil life display in the
Driver Information Centre (DIC).
3. Press the SET/CLR button to
reset the oil life to 100%.
4. Turn the ignition Off.
Take care not to reset the display
accidentally at any time other than
after the oil is changed.
If the vehicle message comes back
on when the vehicle is started, the
engine oil life system has not reset.
Repeat the procedure.

Instruments and controls 75
Compass settings
The compass zone can be reset and
the compass can be recalibrated if
needed.
1. To select the Compass Settings
screen, press MENU on the turn
signal lever.
If required, rotate the adjuster
wheel .
Zone
There are 15 zone options.
2. Press SET/CLR to display the
Compass Settings sub-menu.
Select a zone (area) based on
geographic zones (area 1-15).

76 Instruments and controls
1. Rotate the adjuster wheel to
highlight Zone.
2. Press SET/CLR.
3. Rotate the adjuster wheel to
change the zone number.
4. Press SET/CLR.
5. After a few seconds a
conrmation screen is displayed.
Recalibration
Warning
Recalibrating the compass
requires the vehicle to be driven
in circles.
Only perform this procedure in an
area clear of trafc, pedestrians
and obstacles and drive slowly
while maintaining a view of the
surrounding area.
1. Rotate the adjuster wheel to
highlight Recalibration.
2. Press SET/CLR.

Instruments and controls 77
3. A conrmation screen is
displayed.
4. Rotate the adjuster wheel to
highlight the desired option.
5. Press SET/CLR.
Selecting No will return to the
Compass Settings menu.
6. Selecting Yes will start the
recalibration. Please wait is
displayed while the system
is calibrating. This may take
approximately 10 seconds.
7. In an area clear of trafc,
pedestrians or obstacles, slowly
drive the vehicle in circles.
8. The system will continue with the
recalibration process.

78 Instruments and controls
9. Once recalibration is complete
the Compass Settings screen will
be displayed.
Vehicle messages
Messages are displayed on the
Driver Information Centre (DIC) in
the instrument cluster or audible as
a warning chime.
Not all messages are displayed on
all vehicles.
Messages displayed on the DIC
indicate the status of the vehicle or
some action that may be needed to
correct a condition.
The messages that do not
require immediate action can be
acknowledged and cleared by
pressing SET/CLR.
The messages that require
immediate action cannot be cleared
until that action is performed. All
messages should be taken seriously
and clearing the messages does not
correct the problem.
Type 1
On the Type 1 display, most vehicle
messages appear as code numbers.
Some of these codes may appear
along with the service vehicle soon
light and the owner’s manual symbol
in the DIC display.
No. Vehicle message
2 No remote detected, press
clutch to restart
4 A/C off due to high engine temp
5 Steering column is locked
7 Turn steering wheel, turn key
off, then on
9 Turn steering wheel, start
vehicle again
10 Brakes overheated
15 Check high mounted brake
lamp
16 Check brake lamps
17 Headlamp levelling malfunction
18 Left low beam failure
20 Right low beam failure

Instruments and controls 79
21 Check left position lamp
22 Check right position lamp
23 Reversing light failure
24 License plate light failure
25 Left front turn indicator failure
26 Left rear turn indicator failure
27 Right front turn indicator failure
28 Right rear turn indicator failure
35 Replace battery In remote key
52 Change timing belt
53 Tighten fuel cap
59 Open, then close driver’s
window
65 Theft attempted
66 Service theft alarm
67 Service steering column lock
68 Service power steering, drive
with care
79 Engine oil low – add oil
81 Service transmission
84 Engine power is reduced
88 Use Transmitter pocket to start
89 Service vehicle soon
91 No remote detected
92 No remote detected, press
brake to restart
93 Press button again to turn
engine off
94 Shift to park
95 Service airbag
174 Low battery
258 Park assist Off
Engine oil message
• : % Change
This message will be displayed
when the engine oil requires
changing.
Remaining oil life 0
74
Type 2
Multiple messages may display one
after the other.
The following are some of the
vehicle messages that may be
displayed.
Battery voltage and charging
messages
• Battery Saver Active
Displays when the vehicle has
detected the battery voltage is
dropping below a certain point.
The battery saver system starts
reducing features of the vehicle that
may be noticed. At the point that
features are disabled, this message
displays.
Turn off unnecessary accessories to
allow the battery to recharge.
• Low Battery
Displays when the battery voltage
is low.

80 Instruments and controls
• Service Battery Charging System
Displays when there is a fault in the
battery charging system.
Take the vehicle to a Holden Dealer
for service.
Brake system messages
• Brake Fluid Low
Displays when the brake uid level
is low.
Brake/clutch uid 0
• Release Parking Brake
Displays as a reminder the parking
brake is on. Release it before you
attempt to drive.
• Service Parking Brake
Displays when there is a problem
with the parking brake.
Take the vehicle to a Holden Dealer
for service.
186
Compass messages
Dashes may be displayed if
the vehicle temporarily loses
communication with the Global
Positioning System (GPS).
Cruise control messages
• Cruise Set To XXX
Displays when the cruise control is
set and shows the set speed.
Cruise control 0
Door ajar messages
• Driver Door Open
Displays when the driver’s door is
open.
Close the door completely.
• Hood Open
Displays when the bonnet is open.
Close the bonnet completely.
• Left Rear Door Open
Displays when the left-hand rear
door is open.
Close the door completely.
159
• Passenger Door Open
Displays when the front passenger’s
door is open.
Close the door completely.
• Right Rear Door Open
Displays when the right-hand rear
door is open.
Close the door completely.
• Trunk Open
Displays when the tailgate is open.
Close the tailgate completely.
Engine cooling system messages
• A/C Off Due To High Engine
Temp
Displays when the engine coolant
becomes hotter than the normal
operating temperature.
To avoid added strain on a hot
engine, the air conditioning
compressor automatically turns
off. When the coolant temperature
returns to normal, the air conditioning
compressor turns back on.

Instruments and controls 81
You can continue to drive the vehicle.
If this message continues to appear,
have the system repaired by a
Holden Dealer as soon as possible
to avoid damage to the engine.
• Engine Overheated – Idle Engine
Displays when the engine coolant
temperature is too hot. Stop and
allow the vehicle to idle until it cools
down.
• Engine Overheated – Stop
Engine
Displays and a continuous chime
sounds if the engine cooling system
reaches unsafe temperatures for
operation.
Stop and turn off the vehicle as soon
as it is safe to do so to avoid severe
damage.
This message clears when the
engine has cooled to a safe
operating temperature.
Engine oil messages
• Change Engine Oil Soon
Displays when the engine oil needs
to be changed.
Remaining oil life 0
• Engine Oil Hot, Idle Engine
Displays when the engine oil
temperature is too hot. Stop and
allow the vehicle to idle until it cools
down.
• Oil Pressure Low – Stop Engine
Displays if low oil pressure levels
occur.
Stop the vehicle as soon as safely
possible and do not operate it until
the cause of the low oil pressure
has been corrected. Check the oil
as soon as possible and have the
vehicle serviced by a Holden Dealer.
74
Engine power messages
• Engine Power is Reduced
Displays when the vehicle’s engine
power is reduced.
Reduced engine power can affect
the vehicle’s ability to accelerate.
If this message is on, but there is no
reduction in performance, proceed
to your destination. The performance
may be reduced the next time the
vehicle is driven.
The vehicle may be driven at a
reduced speed while this message
is on, but maximum acceleration and
speed may be reduced.
Anytime this message stays on,
or displays repeatedly, the vehicle
should be taken to a Holden Dealer
for service as soon as possible.

82 Instruments and controls
Fuel system messages
• Fuel Level Low
Displays when the vehicle is low on
fuel.
Refuel as soon as possible.
• Tighten Gas Cap
Displays when the fuel cap is not on
tight.
Tighten the fuel cap.
Key and lock messages
• No Remote Detected
Displays when the transmitter
battery is weak on vehicles with
electronic key system.
• Replace Battery In Remote Key
Displays when the battery in the
radio remote control needs to be
replaced.
• Use Transmitter Pocket To Start
Vehicles with electronic key system.
Displays when starting the vehicle
if an electronic key is not detected.
The key battery may also be weak.
Lamp messages
• Check XXXX Turn Signal Lamp
When one of the turn signals is out,
this message displays to show which
bulb needs to be replaced.
• Turn Signal On
Displays if the turn signal has been
left on.
Turn off the turn signal.
Object detection system
messages
• Park Assist Off
Displays when the park assist
system has been turned off or
when there is a temporary condition
causing the system to be disabled.
Park Assist (PA) 0
• Service Parking Assist
Displays if there is a problem with
the park assist system. Do not use
this system to help you park.
Park Assist (PA) 0
160
160
• Rear Cross Trafc Alert Off
Displays when the rear cross trafc
alert system has been turned off or
when there is a temporary condition
causing the system to be disabled.
Rear Cross Trafc Alert (RCTA) 0
• Side Blind Zone Alert Off
Displays when the side blind zone
alert system has been turned off or
when there is a temporary condition
causing the system to be disabled.
Side Blind Zone Alert (SBZA) 0
Ride control system messages
• Service Traction Control
Displays when there is a problem
with the Traction Control System
(TCS).
When this message is displayed,
the system will not limit wheel spin.
Adjust your driving accordingly.
See a Holden Dealer for service.
163
165

Instruments and controls 83
• Service ESC
Displays if there is a problem with
the Electronic Stability Control (ESC)
system.
If this message appears, try to reset
the system. Stop; turn off the engine
for at least 15 seconds; then start
the engine again.
If this message is still displayed,
there is a problem. See a Holden
Dealer for service.
The vehicle is safe to drive; however,
you do not have the benet of
Electronic Stability Control (ESC),
so reduce your speed and drive
accordingly.
Security messages
• Theft Attempted
Displays if the vehicle detects a
tamper condition.
Service vehicle messages
• Service AC System
Displays if there is a problem with
the air conditioning system. Take
the vehicle to a Holden Dealer for
service.
• Service Power Steering
Displays and a chime may sound
when there may be a problem with
the power steering system.
If this message displays and a
reduction in steering performance or
loss of power steering assistance is
noticed, see a Holden Dealer.
• Service Vehicle Soon
Displays if there is a problem with
the vehicle. Take the vehicle to a
Holden Dealer for service.
Transmission messages
• Service Transmission
Displays if there is a problem with
the transmission.
Take the vehicle to a Holden dealer
for service.
• Shift To Park
Displays when the transmission
needs to be shifted to P (Park).
This may display when attempting
to remove the key from the ignition
switch, or for vehicles with electronic
key system, when removing the key
from the vehicle, if the vehicle is not
in P (Park).
• Transmission Hot – Idle Engine
Displays and a chime sounds if the
transmission uid becomes too hot.
Driving with the transmission uid
temperature high can cause damage
to the vehicle.
Stop the vehicle and let it idle to
allow the transmission to cool.
This message clears when the uid
temperature reaches a safe level.

84 Instruments and controls
Vehicle reminder messages
• Ice Possible Drive With Care
Displays when ice conditions are
possible.
Window messages
• Open, Then Close Driver/
Passenger Window
Displays when the window needs to
be reprogrammed.
If the vehicle battery has been
discharged or disconnected, you
may need to program the driver’s
door window for the auto-up feature
to work.
Power windows 0
30.
Warning chimes
Warning chimes may be heard when
starting the engine or while driving,
for example:
• If a seat belt is not fastened.
• If a certain speed is exceeded
while the park brake is applied.
• If a warning code appears on the
instrument cluster.
Warning chimes may be heard when
the vehicle is parked and/or a door
is opened:
• When the key is in the ignition
switch/lock or the ignition is on.
• When the exterior lamps are on.
Trip computer
Type 1
Type 2

Instruments and controls 85
The vehicle has a trip computer
displayed on the Driver Information
Centre (DIC) in the instrument
cluster.
Depending on vehicle model, the trip
computer shows:
Type 1
• Trip odometer.
• Fuel range.
• Average vehicle speed.
• Instantaneous fuel consumption.
• Average fuel consumption.
Type 2
• Digital speedometer.
• Trip 1.
• Trip 2.
• Fuel range.
• Instantaneous fuel consumption.
• Average fuel consumption.
• Average vehicle speed.
To select the trip computer screens,
press MENU.
Rotate the adjuster wheel
select the menu items.
to
Digital speedometer (Type 2)
The digital speedometer displays the
current vehicle speed.
Trip odometer (Type 1) / Trip 1
and Trip 2 (Type 2)
This display shows the current
distance travelled since the last reset
for the trip odometer.
The trip odometer can be reset to
zero by pressing SET/CLR while the
trip odometer is displayed.
Fuel range
This display shows the approximate
distance the vehicle can be driven
without refuelling.
The fuel range estimate is based
on an average of the vehicle’s fuel
economy over recent driving history
and the amount of fuel remaining in
the fuel tank.
Average vehicle speed
This display shows the average
speed of the vehicle.
This average is calculated based on
the various vehicle speeds recorded
since the last reset of this value.
The average speed can be reset by
pressing SET/CLR while average
vehicle speed is displayed.

86 Instruments and controls
Instantaneous fuel
consumption
The instantaneous fuel economy
display shows the current fuel
economy.
This number reects only the
approximate current fuel economy of
the vehicle and changes frequently
as driving conditions change.
Average fuel consumption
This display shows the approximate
average fuel economy.
This number is calculated based on
the fuel use recorded since the last
time this menu item was reset.
This number reects only the
approximate average fuel economy
of the vehicle and will change as
driving conditions change.
The average fuel economy can be
reset by pressing SET/CLR while
average fuel economy is displayed.
Vehicle
personalisation
Settings can be personalised using
the infotainment system controls.
Note
Depending on the vehicle variant,
some of the following functions may
not be available.
Settings
Settings can be made with the
ignition on and the vehicle not
moving.
The following are all possible Vehicle
personalisation features and may
differ to your vehicle.
F (Home) : Press to access the
Home screen.
Touch to scroll through the
Q R
menus or setup items.
Touch to exit, or return to the
3
previous screen or menu.
Some items can be set to On or Off,
while others have several choices.
The On setting is displayed as:
The Off setting is displayed as:

Instruments and controls 87
Note
The following describes the functions
that may be available in the Vehicle
menu. For the other items in the
Settings menu; Settings 0 132
Vehicle
To access the menu on the
infotainment system:
1. Touch F.
2. Touch Settings.
3. Touch Vehicle.
4. Select the desired item.
Collision / Detection System
Select and the following may display:
• Park Assist
• Rear Cross Trafc Alert
• Side Blind Zone Alert
Park Assist:
This allows this park assist to be
turned on or off.
• Select On, Off or On with Towbar
Rear Cross Trafc Alert:
This allows this rear cross trafc
alert system to be turned on or off.
• Select On, Off
Side Blind Zone Alert:
This allows this side blind zone alert
system to be turned on or off.
• Select On, Off
Comfort and Convenience
Select and the following may display:
• Chime Volume
• Personalisation by Driver
• Auto Wipe in Reverse Gear
Chime Volume:
Allows selection of the chime volume
level.
• Select 24 to 38
Personalisation by Driver
Allows personalisation functions to
be turned on or off.
• Select On or Off
Auto Wipe in Reverse Gear:
Allows this feature to be turned on
or off. When on, and the front wipers
are on, the rear window wiper will
turn on automatically when the
vehicle is shifted into R (Reverse).
• Select On or Off
Lighting
Select and the following may display:
• Vehicle Locator Lights
• Exit Lighting

88 Instruments and controls
Vehicle Locator Lights:
This allows selection of the entry
lighting function. When on, the
exterior lights illuminate for a short
period when c is pressed.
• Select On or Off
Exit Lighting:
This allows selection of how long the
exterior lamps stay on when leaving
the vehicle and it is dark outside.
• Select Off, 30, 60 or 120
Seconds
Power Door Locks
Select and the following may display:
• Auto Door Lock
Auto Door Lock:
This allows selection for the doors
to automatically lock when the
transmission lever is shifted out of
park and unlock when placed in
park.
• Select On or Off
Remote Lock, Unlock, Start
Select and the following may display:
• Remote Unlock Light Feedback
• Remote Lock Feedback
• Remote Door Unlock
• Relock Remote Unlocked Doors
• Passive Door Unlock
• Passive Door Lock
• Remote Left in Vehicle Alert
Remote Unlock Light Feedback:
When on, the exterior lamps will
ash when unlocking the vehicle
with the remote control.
• Select Flash Lights or Off
Remote Lock Feedback:
This allows selection of what type of
feedback is given when pressing e
on the remote control.
• Select Lights Only, Lights &
Horn, Horn Only, or Off
Remote Door Unlock:
This allows selection of which doors
will unlock when pressing c on the
remote control.
When set to Driver Door, the driver’s
door will unlock the rst time c or
the front door exterior handle button
(vehicles with electronic key system)
is pressed. All doors will unlock
when the button is pressed a second
time.
When set to All Doors, all of the
doors will unlock at the rst press of
c or the front door exterior handle
button (vehicles with electronic key
system).
• Select All Doors or Driver Door
Relock Remote Unlocked Doors
Activates or deactivates the
automatic relock function after
unlocking without opening a door.
• Select On or Off

Passive Door Unlock:
This allows the selection of what
doors will unlock when using the
button on the driver’s door to unlock
the vehicle.
• Select All Doors or Driver Door
Passive Door Lock:
Activates or deactivates the passive
locking function. This feature locks
the vehicle automatically after
several seconds if all doors have
been closed and an electronic key
has been removed from the vehicle.
Select On, On with Horn Chirp or Off.
Remote Left in Vehicle Alert:
This feature sounds an alert when
the remote control is left in the
vehicle.
• Select On or Off
Instruments and controls 89

90 Lighting
Lighting
Exterior lighting ....................90
Exterior lamp control ..................90
Automatic lamp control
Headlamp high/low beam
Headlamp range adjustment
Daytime Running
Lamps (DRL)
Hazard warning ashers
Turn and lane change signals
Front fog lamps
Reversing lamps
Misted lamp covers
..............................92
Interior lighting .....................93
Instrument panel illumination .....93
Interior lamps
.............................94
Lighting features ..................95
Vehicle locator lights ..................95
Exit lighting
Battery power protection
.................................95
...............90
..........91
......91
............92
....92
..........................93
........................93
....................93
............95
Exterior lighting
Exterior lamp control
(OFF): Rotate to turn all lamps
and lights off.
AUTO: Exterior lamps and
instrument panel lights turn on or
off automatically, depending on the
ambient light.
8 (Park lamps): Turns on the park
lamps, number plate lamps and
instrument panel lights.
9 (Headlamps): Turns on the
headlamps and all park lamps.
Automatic lamp control
When the lamp control is in the
AUTO position, the exterior
lamps and instrument panel lights
automatically switch on according to
ambient light.
• To turn automatic lighting off,
rotate to .

Lighting 91
Headlamp high/low beam
To activate high beam:
1. Turn the headlamps on.
2. Push the lever forwards.
The high beam indicator lamp
$ illuminates on the instrument
cluster.
To return to low beam:
1. Push the lever again or pull the
lever rearward.
Warning
Always switch the headlamps
to low beam when vehicles are
approaching or when following
another vehicle.
To ash the high beam lamps:
1. Pull the lever towards the rear of
the vehicle and release.
The lamps stay on for as long as
the lever is held.
Headlamp range
adjustment
Adjust the headlamp range
according to vehicle load, to ensure
illumination of the road ahead.
Press 9 to withdraw the switch,
rotate to the recommended position
and then press it back in place:
0: Front seats occupied
: All seats occupied
1
2: All seats occupied and load
compartment laden
: Driver’s seat occupied and load
3
compartment laden

92 Lighting
Daytime Running
Lamps (DRL)
DRL increase the visibility of the
vehicle during daylight. The DRL
LEDs can operate in two different
intensities:
• Normal intensity for park lamps.
• High intensity for DRL function.
The DRL operate in high intensity
when the ignition is on or the engine
is running and the lamp control
switch is in AUTO position.
If the lamp control switch is turned to
8 or 9, the DRL operate in normal
intensity.
If the lamp control switch is turned
off the DRL do not operate.
Hazard warning ashers
Press ¨ to turn the hazard warning
asher on or off, when the ignition is
in any position.
All turn signals ash continuously.
Use the hazard warning asher if
the vehicle becomes a trafc hazard,
day or night.
Note
Using hazard warning ashers while
the vehicle is moving, is illegal in
some States and Countries.
Turn and lane change
signals
1. Push the lever in the direction
the steering wheel is turned.
A green arrow on the instrument
cluster ashes when the lamps
are in operation.
For three ashes, e.g. when
changing lanes:
1. Push the lever until the point of
resistance, then release.

Lighting 93
Front fog lamps
The vehicle may have front fog
lamps.
To turn the front fog lamps on:
• Press >.
> illuminates on the instrument
cluster.
To turn the front fog lamps off:
• Press > again.
Reversing lamps
The reversing lamps illuminate when
the ignition is on and reverse gear is
engaged.
Misted lamp covers
Caution
Condensation may temporarily
appear on the inside of exterior
lamp lenses after rain or washing
the vehicle. Condensation occurs
when there is a temperature
difference between the inside and
outside of the lamp allowing a
ne mist on the inside surface of
the lamp lens. This condensation
will disappear when the vehicle is
in a dry environment or the lamp
is on. If water does collect in the
lamp contact a Holden Dealer.
Interior lighting
Instrument panel
illumination
To adjust the instrument panel
lighting, press D to withdraw the
switch, rotate to the desired level
and then press it back in place.

94 Lighting
Interior lamps
Courtesy lamps
Front
Press the rocker switch:
( (Off): Remains off when doors are
opened or closed.
H: Automatically switches on when
a door is opened and turns off after
doors are closed.
' (On): Remains on when doors
are opened or closed.
Rear
Press the rocker switch:
( (Off): Remains off when doors are
opened or closed.
: Automatically switches on when
a door is opened and turns off after
doors are closed.
I (On): Remains on when doors are
opened or closed.
Note
To prevent the battery from
discharging, turn the lamp off when
the engine is not running.
Warning
Do not leave the courtesy lamp
on while driving in the dark.
Sun visor lamps
The vehicle may have lamps at
either side of the mirror.
The lamps turn on and off
automatically when the cover is
opened and closed.

Lighting 95
Lighting features
Vehicle locator lights
To facilitate retrieving the vehicle
when it is dark, lights such as the
headlamps and tail lamps illuminate
for a short period when c is pressed.
Set the headlamps to Auto mode.
This setting can be changed in the
Vehicle settings.
Vehicle personalisation 0
86
Exit lighting
Set the headlamps, side lamps and
tail lamps to illuminate the way, after
leaving the vehicle.
Activation, deactivation and duration
of lighting can be changed in the
vehicle settings menu.
Vehicle personalisation 0
Set the headlamps to Auto mode.
1. Switch the ignition off.
2. Remove the ignition key or open
the driver’s door.
If activated, the lighting remains on
for the set duration.
86
Battery power protection
To prevent the battery from
discharging, lamps are switched off
automatically 10 minutes after the
ignition is turned off.

96 Infotainment system
Infotainment
system
Introduction ...........................96
Safety information ......................96
General information
Theft-deterrent feature
Overview
Operation
....................................99
.................................101
Audio ...................................105
AM-FM radio ............................105
DAB radio
Antennas
USB port
Auxiliary devices
Bluetooth music
.................................108
..................................110
................................... 111
Gallery .................................122
Gallery (pictures) ......................122
Gallery (movies)
....................97
...............98
.....................118
........................119
.......................123
Phone ..................................125
Bluetooth .................................125
Hands-free phone
...................128
Smartphone applications ...130
Android Auto, Apple CarPlay ....130
Settings ...............................132
General operation of the
settings menu ...........................132
Introduction
Safety information
The lightning ash with the
arrowhead symbol within an
equilateral triangle is intended to
alert the user about the presence
of uninsulated dangerous voltage
within the system’s enclosure that
may be of sufcient magnitude to
constitute a risk of electric shock to
persons.

Infotainment system 97
The exclamation point within an
equilateral triangle is intended
to alert the user to the presence
of important operating and
maintenance (servicing) instructions
in the literature accompanying the
system.
• Always operate the vehicle in
a safe manner. Do not become
distracted by the vehicle while
driving and always be fully aware
of all driving conditions. Do not
change settings or any functions.
Pull over in a safe and legal
manner before attempting such
operations. To promote safety,
certain functions are disabled
unless the parking brake is on.
• To reduce the risk of electric
shock, do not remove the cover
or back of this system. There are
no user-serviceable parts inside.
Refer servicing to qualied
service personnel.
• To reduce the risk of re or
electric shock, do not expose this
system to water, rain, or moisture
and do not place another electric
device on LCD touch display.
• When driving, keep the volume
of the unit low enough to allow
you to hear sounds from outside
the vehicle, such as emergency
services, etc.
• Do not drop it and avoid heavy
impacts at anytime.
Warning
The infotainment system must
be used so the vehicle can be
driven safely at all times. Stop
the vehicle in a safe location and
operate the infotainment system
while the vehicle is stationary.
For your safety, some features
are disabled while the vehicle is
in motion.
General information
The infotainment system provides
infotainment in your car, using the
latest technology.
See a Holden dealer to have the
system or software updated and
upgraded.
The radio can be easily used by
registering up to 25 FM or AM
stations with the Preset function.
A DAB radio tuner may also be
included.

98 Infotainment system
The infotainment system can play
USB storage device or iPod/iPhone
devices.
Using the phone projection function,
you can operate specic applications
on your smartphone via the
infotainment system.
The Bluetooth phone connection
function allows for the use of
wireless hands-free phone calls, as
well as a phone music player.
Connect a portable music player to
the auxiliary sound input to enjoy
the rich sound of the infotainment
system.
• The 'Overview' section provides
a simple overview of the
infotainment system’s functions
and summary of all regulatory
devices.
• The 'Operation' section explains
the basic controls for the
infotainment system.
• Design and specications are
subject to change without notice.
• Some of the radio features may
be limited when ignition is off.
'Made for iPod' and 'Made for
iPhone' refers to an electronic
accessory has been designed
to connect specically to iPod or
iPhone respectively, and has been
certied by the developer to meet
Apple performance standards. Apple
is not responsible for the operation
of this device or its compliance with
safety and regulatory standards.
Please note the use of this
accessory with iPod, iPhone may
affect wireless performance.
Theft-deterrent feature
The infotainment system has an
electronic security system to prevent
theft.
Therefore, the infotainment system
will only function in the vehicle in
which it was rst installed, and
cannot be used in another vehicle.
 Loading...