

Page 1
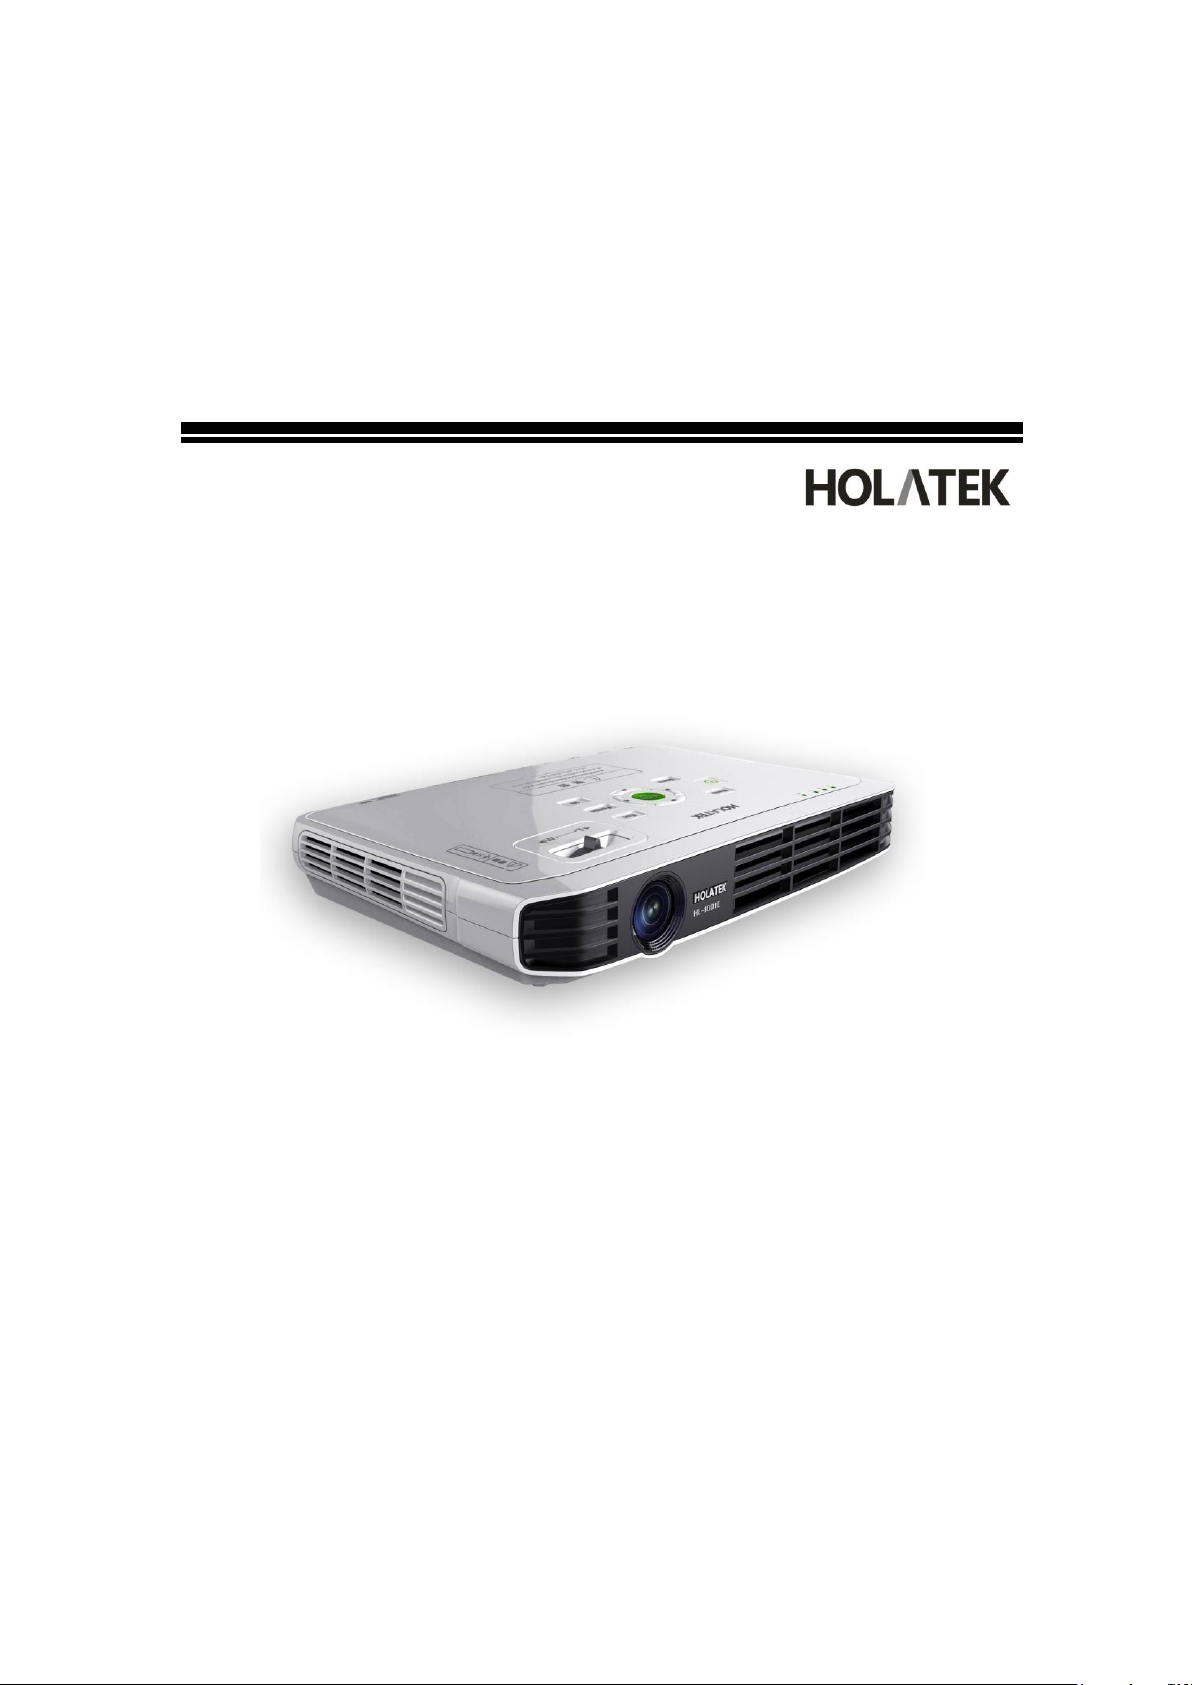
HOLATEK – A3
3D LED Smart Projector & TV
User Manual
Page 2

Contents
SAFETY INSTRUCTIONS ................................................................................................. 4
THE SAFETY SIGNS ........................................................................................................... 4
NOTICE FOR USE ............................................................................................................... 4
BATTERY INSTRUCTION .................................................................................................. 10
OPERATION INSTRUCTIONS ....................................................................................... 11
THE LIGHT SOURCE ................................................................................................. 11
OTHER INSTRUSTIONS ............................................................................................. 12
SUMMARY ......................................................................................................................... 14
PACKING LIST ............................................................................................................... 14
SYSTEM UPGRADE .......................................................................................................... 15
THE LOCATION AND FUNCTION OF CONTROL ........................................................ 16
EXTERNAL VIEW ........................................................................................................... 16
CONTROL AREA ............................................................................................................ 17
REAR VIEW ................................................................................................................... 18
BOTTOM VIEW ................................................................................................................ 19
FUNCTION OF REMOTE CONTROL .................................................................................... 20
PROJECTED IMAGES ..................................................................................................... 22
INSTALLATION OF THE PROJECTOR ................................................................................ 22
METHODS OF PROJECTION ............................................................................................ 24
BASIC OPERATIONS ...................................................................................................... 27
TURN ON AND TURN OFF THE PROJECTOR ...................................................................... 27
OPTION OF INFORMATION LANGUAGE ........................................................................... 29
OPTION OF INPUT SOURCE ............................................................................................. 29
KEYSTONE CORRECTION ............................................................................................... 29
USEAGE OF 3D FUNCTION............................................................................................. 30
USAGE OF SETTING OPTIONS ....................................................................................... 31
MAINTENANCE .............................................................................................................. 33
THE UNIT OF LIGHT SOURCE .......................................................................................... 33
INDICATOR ..................................................................................................................... 34
TROUBLESHOTTING ....................................................................................................... 34
SPECIFICATIONS .............................................................................................................. 35
3
Page 3
Safety Instructions
Please immediately stop using the machine (continuing using it will
lead to dangers of causing fire and electric shock) if there is smoke,
smell or any other abnormal situations, and please take the following
measures:
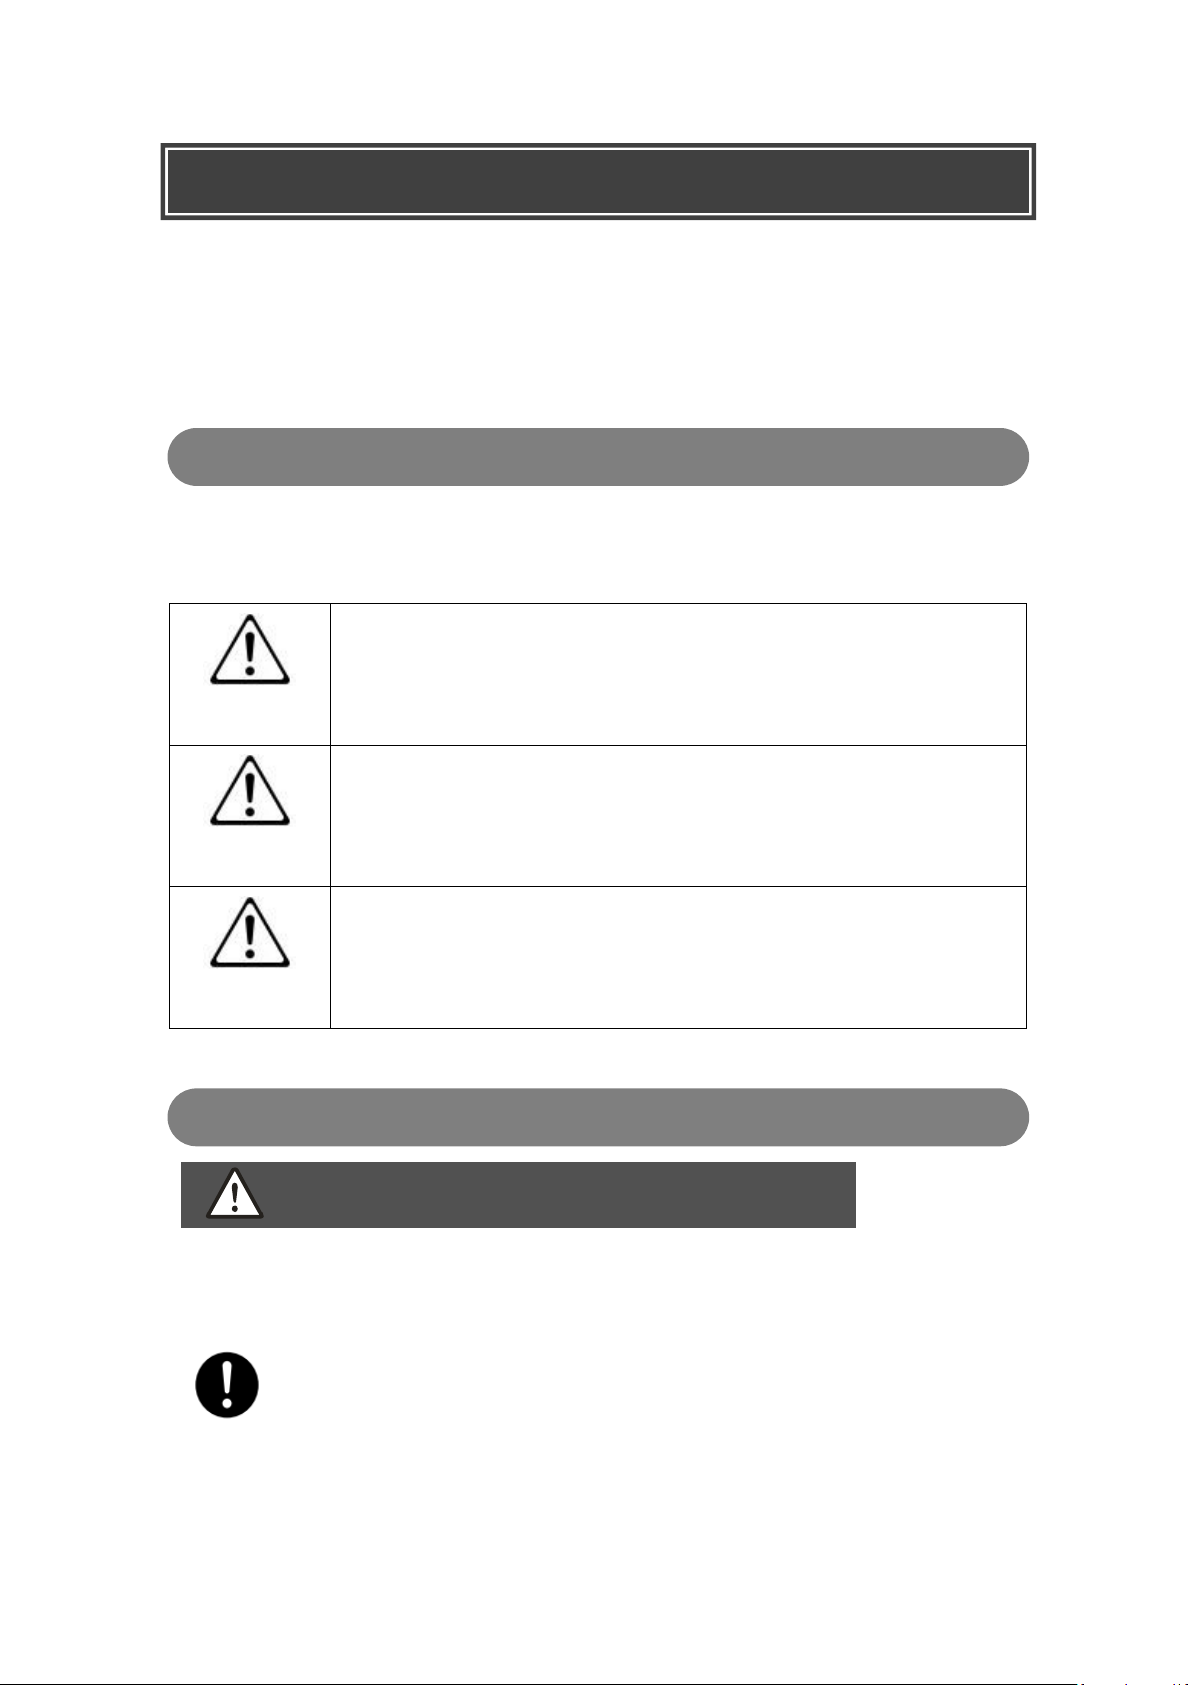
Danger
This sign indicates that ignoring the sign and wrong operations
will lead to death or serious injury.
Caution
This sign indicates that ignoring the sign and wrong operations
will lead to the potential dangers of injury.
Attention
This sign indicates that ignoring the sign and wrong operations
will lead to potential dangers of death or serious injury.
Thank you for purchasing the HOLATEK Projector. You need to read carefully
the “safety instructions” before using it. After reading the User Manual, please keep it
for future reference.
The safety signs
To ensure the safety of you and others and keep the items from damages, the
User Manual applies a variety of signs whose meanings are as follows:
Notice for use
Caution
● Smoking, peculiar smell, hot temperature and other abnormal situations
1. Turn off the power of the machine;
4
Page 4
2. Unplug the power plug of the machine;
Please immediately stop using the machine (continuing using it will
lead to dangers of causing fire and electric shock) if the picture display
is abnormal or has any other abnormal phenomenon under correct
operations, and please take the following measures:
Improper use of power cord may lead to dangers of causing fire and
electric shock, the user must observe the following precautions:
The impaired power cord will lead to dangers of causing fire and electric
shock, the user must observe the following precautions:
Do not touch the power cord or the plug with wet hands or there will be
danger of electric shock
3. Contact your dealer or the HOLATEK authorized service center.
● Fault
1. Turn off the power of the machine;
2. Unplug the power plug of the machine;
3. Contact your dealer or the HOLATEK authorized service center.
● Power cord
The output voltage must be equal to rated AC voltage of the machines;
A plethora of devices can not be inserted into the power socket to avoid
overload
Do not place heavy objects on the power cord or heat the power cord;
Do not place the power cord between the wall and the table where the
machine is placed;
Do not cover the power cord with cushion or other items;
Do not try to transform the power cord as it will be damaged or excessively
bended;
Do not twist or pull the power cord
5
Page 5
When using this machine in the in the country where it is purchased, please
use the attached power cord; when using this machine in other countries,
you must purchase and use a power cord which meets the national power
supply requirements and pay attention to the safety standards of that
country.
Do not place vase or any container filled with water or other liquid on the
machine or splash water or other liquid on the machine, otherwise it will
lead to dangers of causing fire and electric shock
Machine with foreign matters (such as metal, etc )will lead to dangers of
causing fire and electric shock, the user must immediately take the
following operations:
Do not dismantle or reconstruct the machine in any way as the machine
contains a lot of high-voltage components which may lead to dangers of
electric shock and burn. Please note that problems caused by the
disassembly or reconstruction of the machine are beyond the scope of the
warranty, and HOLATEK will not provide free maintenance. All internal
inspections, debugging and maintenance must be entrusted to your dealer or
the HOLATEK authorized service center.
● Water and foreign matters
1. Turn off the power of the machine;
2. Unplug the power plug of the machine;
3. Contact your dealer or the HOLATEK authorized service center.
● Dismantling and reconstruction
6
Page 6
● Drop and impact
Continuous use may lead to dangers of causing fire and electric shock if the
machine is damaged due to drop or other reasons. In this case, please
immediately take the following measures:
Do not discard the machine by incineration, or it will lead to dangers of
explosion, fire and personal injury.
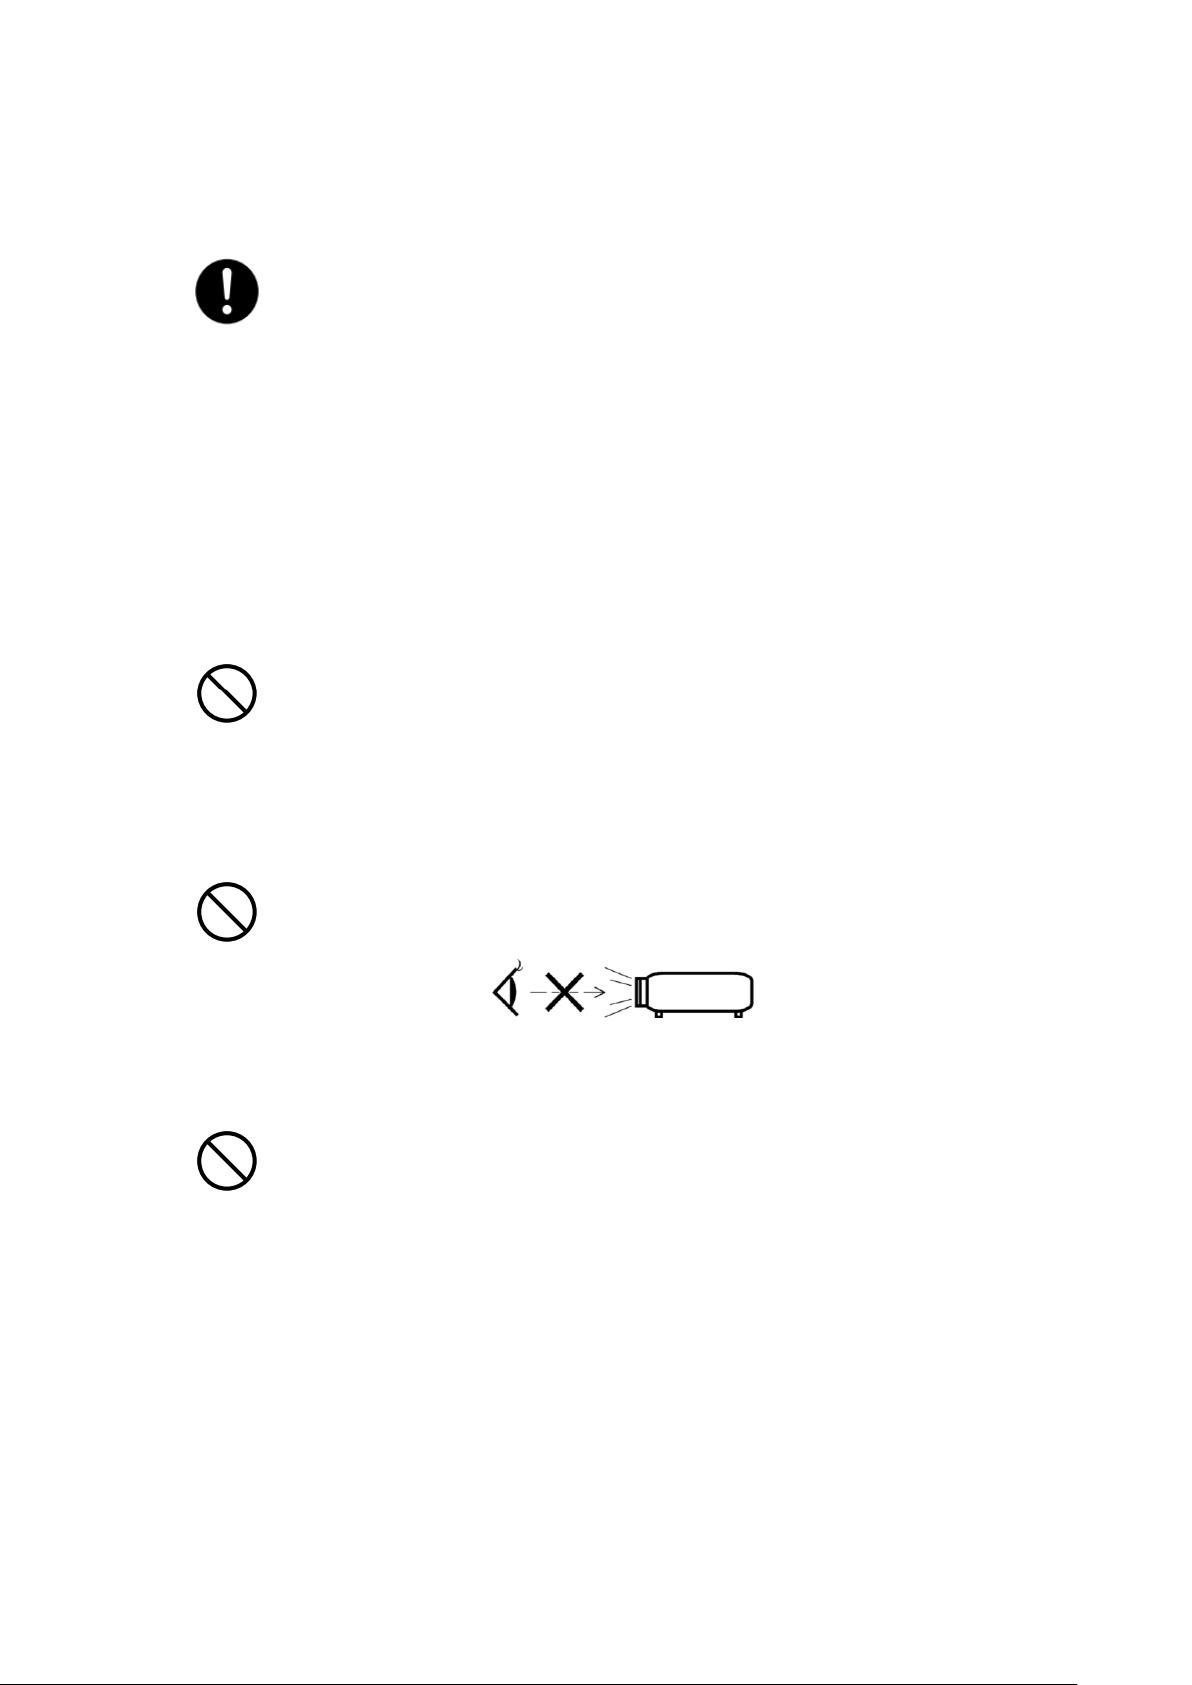
Do not look straight into lens or vents when the light source unit is lit as the
glare from the bare engine may harm your eyes
Do not shield the air inlet or outlet, otherwise it will lead to internal heat
accumulation, which may lead to dangers of causing fire and burning up the
machine. Touching the hot machine may be burned, users must strictly
observe the following precautions:
1. Turn off the power of the machine;
2. Unplug the power plug of the machine;
3. Contact your dealer or the HOLATEK authorized service center.
● Incineration
● Look straight into lens or vents when the light source unit is lit
● Shielding the vent
The space between wall and the machine must be larger than 30 cm;
Do not place the machine in an environment of poor air circulation;
Do not cover the machine with blankets or any similar articles;
Always place the machine on a stable and horizontal surface during the
operation; do not place the machine on carpets, blankets, towels, cushions or
other soft surface during the operation;
7
Page 7
Do not erect the machine during the operation
Do not touch the power plug of the machine when thunderstorm and
lightning occur
Do not dismantle or reconstruct the remote control in any way as it may
lead to dangers of electric shock, burn and other personal injury. All internal
inspections, debugging and maintenance must be entrusted to your dealer or
the HOLATEK authorized service center
Do not wet the remote control. Keep it from water or other liquids as it may
lead to dangers of causing fire and electric shock
Do not operate the machine on a plane, within medical facilities or in
any other places which such a device is prohibited. The radio waves
will influence electronic devices and medical equipments, resulting in
accidents
Do not operate the machine near electronic instrument of high precision
or electronic devices which are poor in dealing with weak radio signals
as the radio waves will have an impact on such devices, resulting in
accidents
● Lightning
● Remote control
● The radio waves emitted by the wireless module
8
Page 8
If you are using a cardiac pacemaker or any other electronic medical
devices, please consult doctors or the manufacturers of such devices before
operating the product.
Improper use of power cord may result in dangers of causing fire and
electronic shock, users must strictly observe the following precautions:
Keep a backup of all data in the machine memory to avoid the loss of data
due to failure, maintenance and other reasons
Attention
● Power cord
Dot not place the power cord by the fire;
Seize the plug when you unplug the power cord and never pull it;
Plug fully in the socket;
Please unplug the power cord from the socket after the operation of the
machine;
Please unplug the power cord from the socket if the machine will not be used
for an extended period of time;
Unplug the plug from the socket at least once per year and clean the plug
tube feet with dry cloth or vacuum cleaner;
Do not clean the power cord especially the power plug and socket with
cleanser;
Turn off the power and unplug the power cord from socket before moving the
machine.
● Backup of important data
9
Page 9
● Refraction effect
There shall be no fishbowl or other items which may produce refraction
effect in front of the machine when the light source unit is lit as it may lead
to dangers of causing fire
Do not touch the lens with hands
The dirty machine inner with accumulated dusts may result in dangers
of causing fire and breakdowns;
Please contact the dealer or the HOLATEK authorized service center
once per year to have the machine’s internal cleaned. Note that, such
cleaning services are not free
Improper use of batteries may cause leakage of battery liquid, polluting the
surrounding components or resulting in explosion, thereby leading to
dangers of causing fire and personal injury, users must strictly observe the
following precautions:
● Lens
● Clean
Battery Instruction
Caution
Never attempt to disassemble the battery or have it short-circuited;
Never place the batteries in a high-temperature environment or into fire;
Do not charge non-rechargeable batteries;
10
Page 10
Make sure the batteries are in the correct direction when inserting them;
Depleted batteries must be removed from the remote control as soon as
possible;
Remove the batteries if the remote control will not be used for an
extended period of time
Dispose the used batteries according the local laws and regulations
Batteries specified by remote control only
● Depleted batteries
● Batteries disposal
Operation Instructions
The light source
Light source unit of the machine applies LED
The designed life of the light source unit is about 20,000 hours. The actual life
depends on the operation condition, the set on setting menu and different light
source units;
The warranty period of the light source unit is the term recorded in the Warranty
or 6,000 hours, the shorter term prevails;
If light source unit is not bright or become obviously dark, it indicates that the
said light source has reached its life span. Please contact your dealer or the
HOLATEK authorized service center for replacement
11
Page 11
Other Instrustions
This machine is composed of precision parts and failure to comply with the
following instructions may result in failure to correctly save data and risk of
breakdowns:
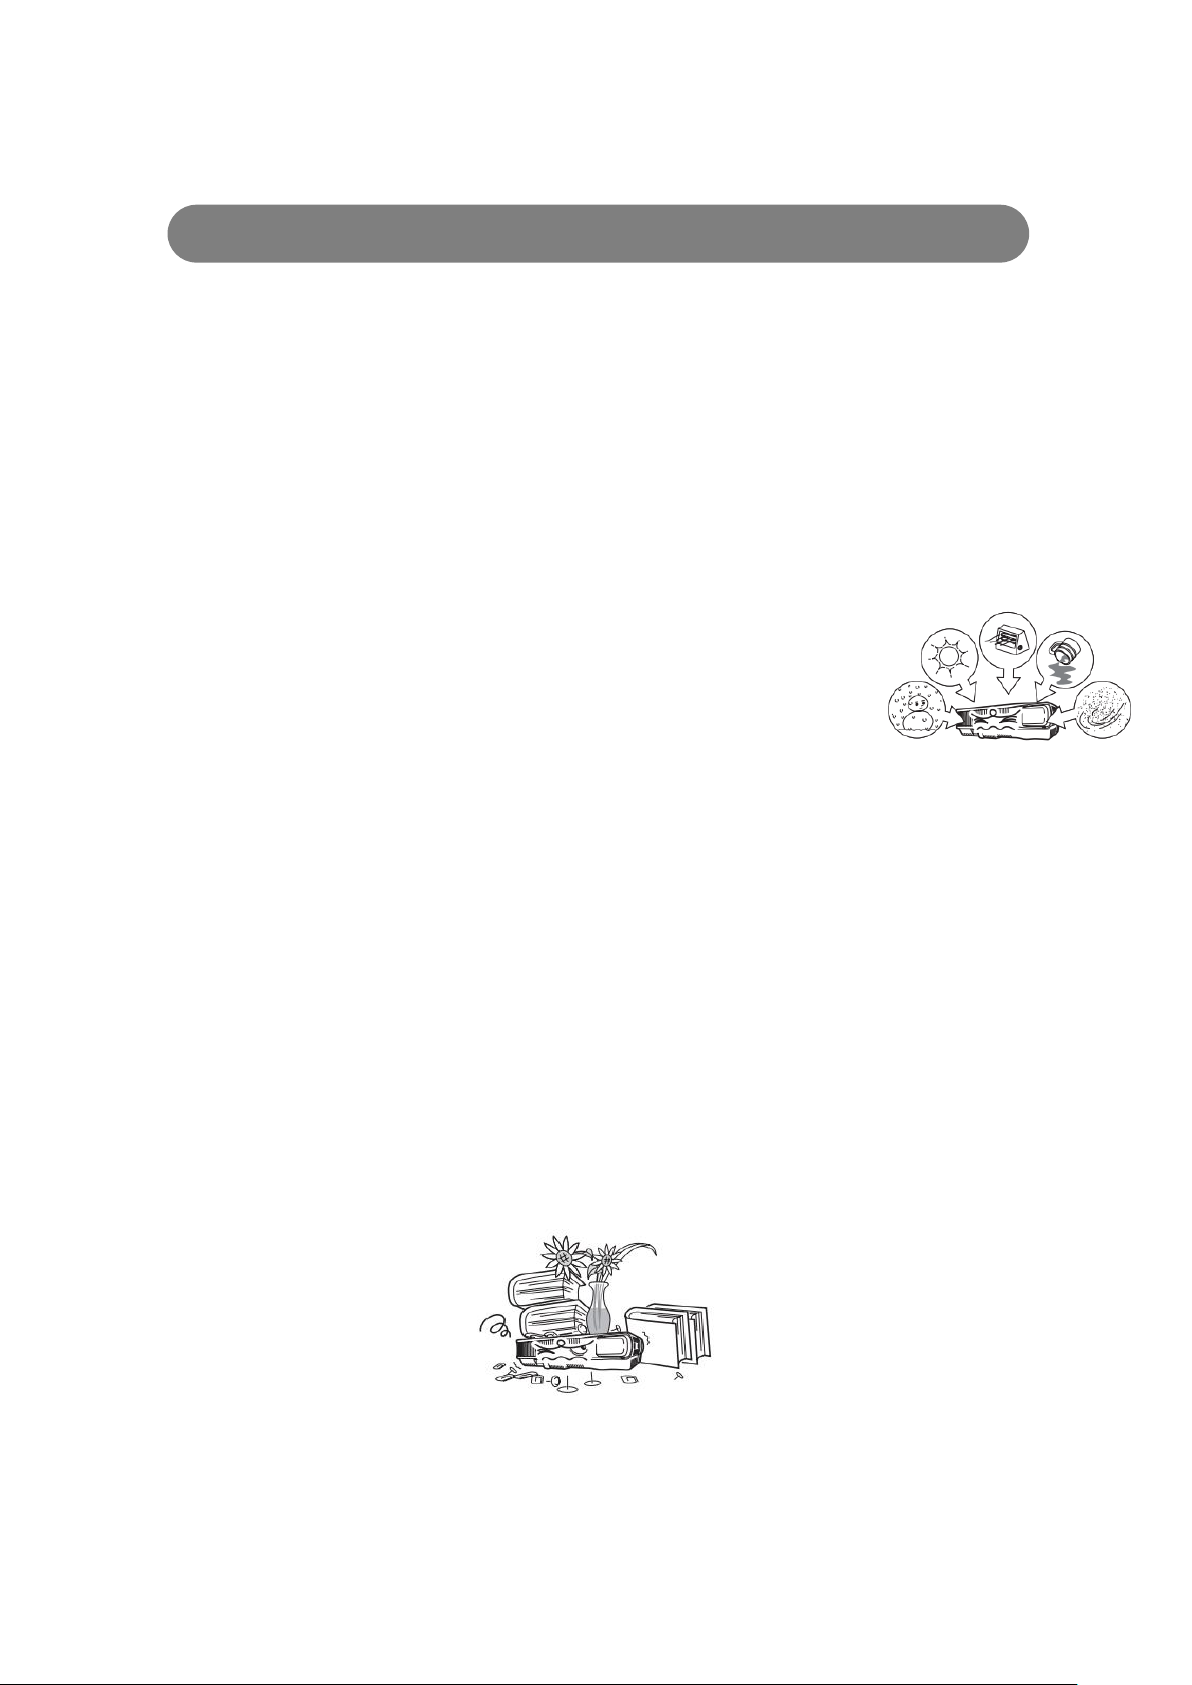
Do not operate or place the projector in any of the following environments as
it may lead to breakdowns and damage to the machine
Locations which generate static electricity easily;
Locations with excessive temperature;
Locations with excessive humidity;
Locations where the temperature may change suddenly;
Locations with excessive dust;
Locations which are shaking, leaning and uneven;
Locations which may be wetted
● Avoid using the projector in the following conditions; otherwise it will cause
the projector malfunction and damage.
Location which is of extremely low temperature (normal operating
temperature ranges from 5 ℃ to 35 ℃);
Don’t place heavy objects on the projector;
Foreign objects are not allowed to insert into or fall into the projector;
Don’t place vase or any container with water or other liquids on the projector.
● Don’t remain exhausted battery in the remote control
Exhausted battery will run out of battery fluid, causing malfunction and
damage of the remote control.
12
Page 12
● Clean with a soft dry cloth
The projector is dirty; please clean it with a soft dry cloth soaked in the water
and neutral detergent diluents. Wring the cloth till dry before wiping; diluents,
benzene and any other volatile chemical are not allowed to clean the projector,
otherwise the printing would be wiped and dirty the projector.
● Display screen pixel does not work
Although the projector is made using the most advanced digital technology,
some pixels on the display screen may still don’t work, which are normal, instead of
malfunction.
● Avoid strong impact during projection
If the projector accidently suffers a strong impact, the projected image may
disappear for a while, and then the image will appear again, but color
anomaly or error messages may occur;
If any color anomaly of the projected image, please reselect the input source;
If the projected image color is still abnormal, according to the operation steps
of "Turn on and Turn off the Projector" in page 25, turn off the power, and
then reboot.
● Note after using
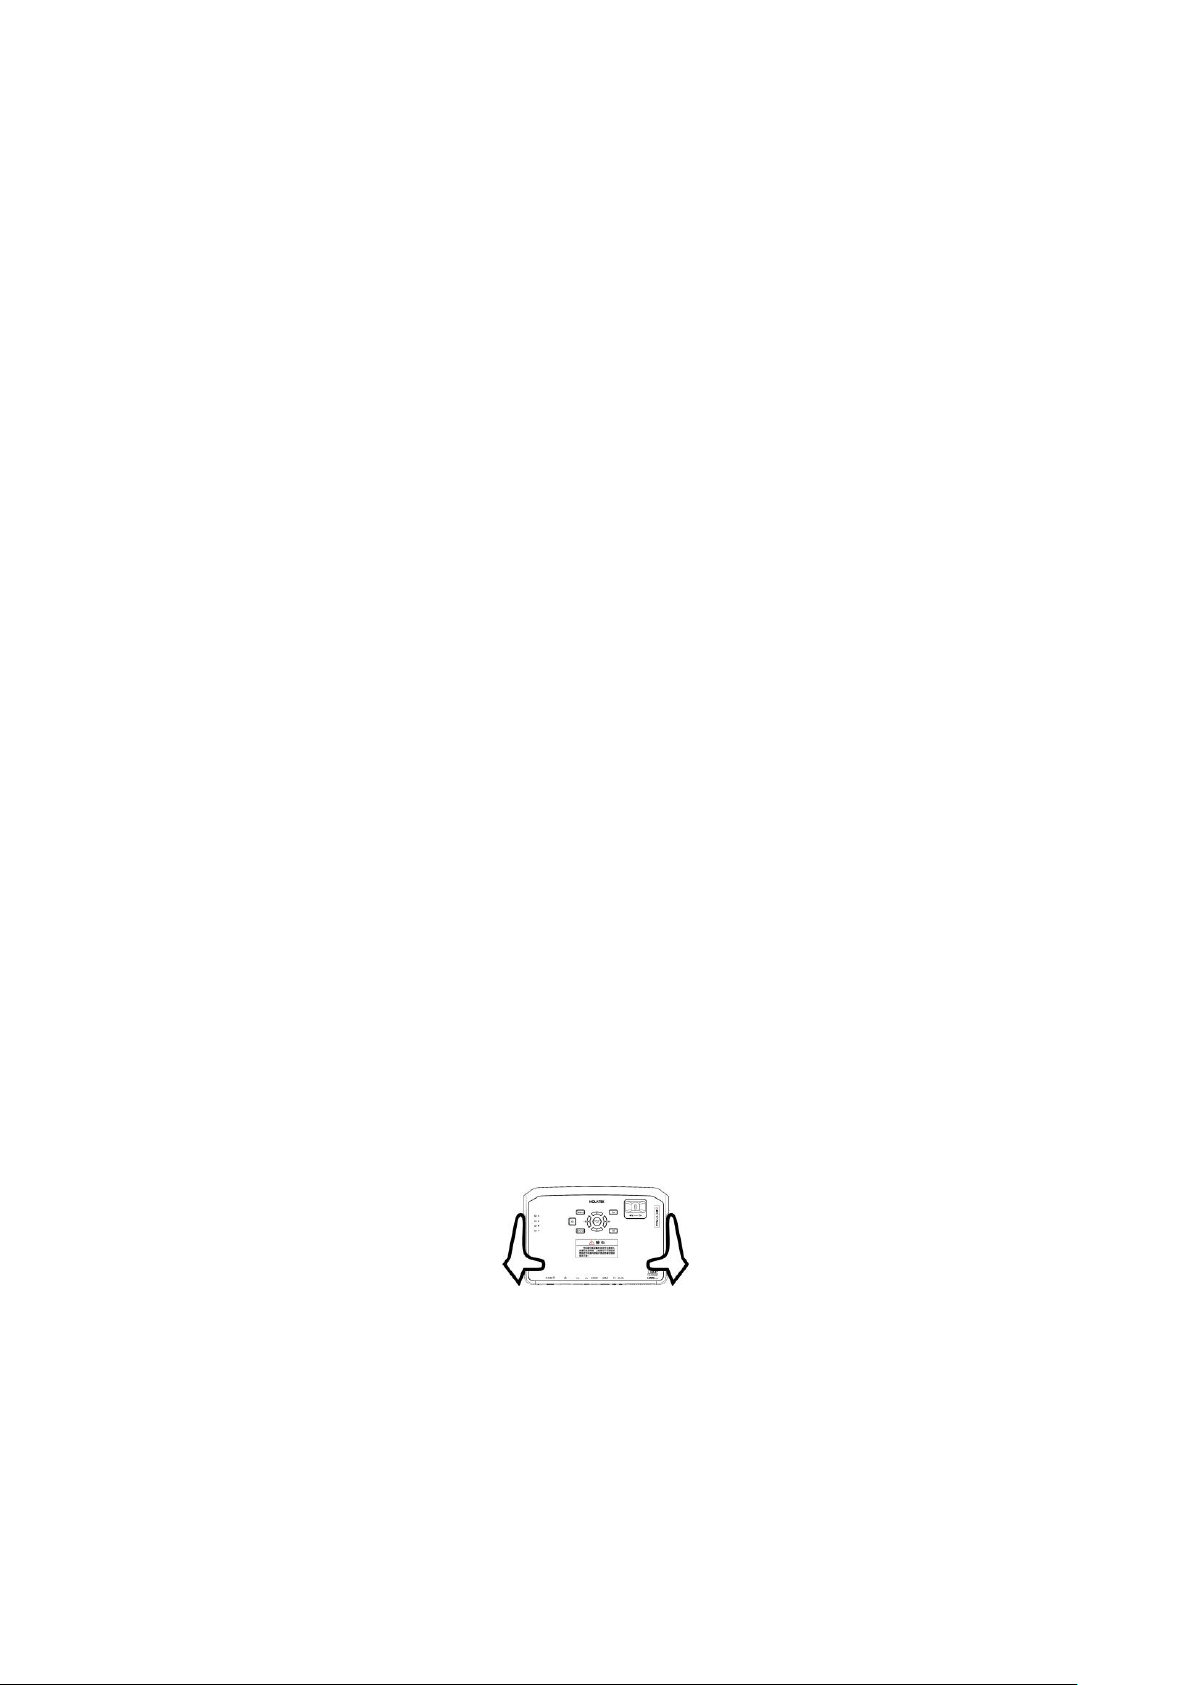
The air outlet and its surrounding will be extremely hot in using and still very
hot after shutdown. Therefore, seize two sides of the projector when moving.
● How to put the projector into portable package
Make sure the projector isn’t hot before encasing.
13
Page 13
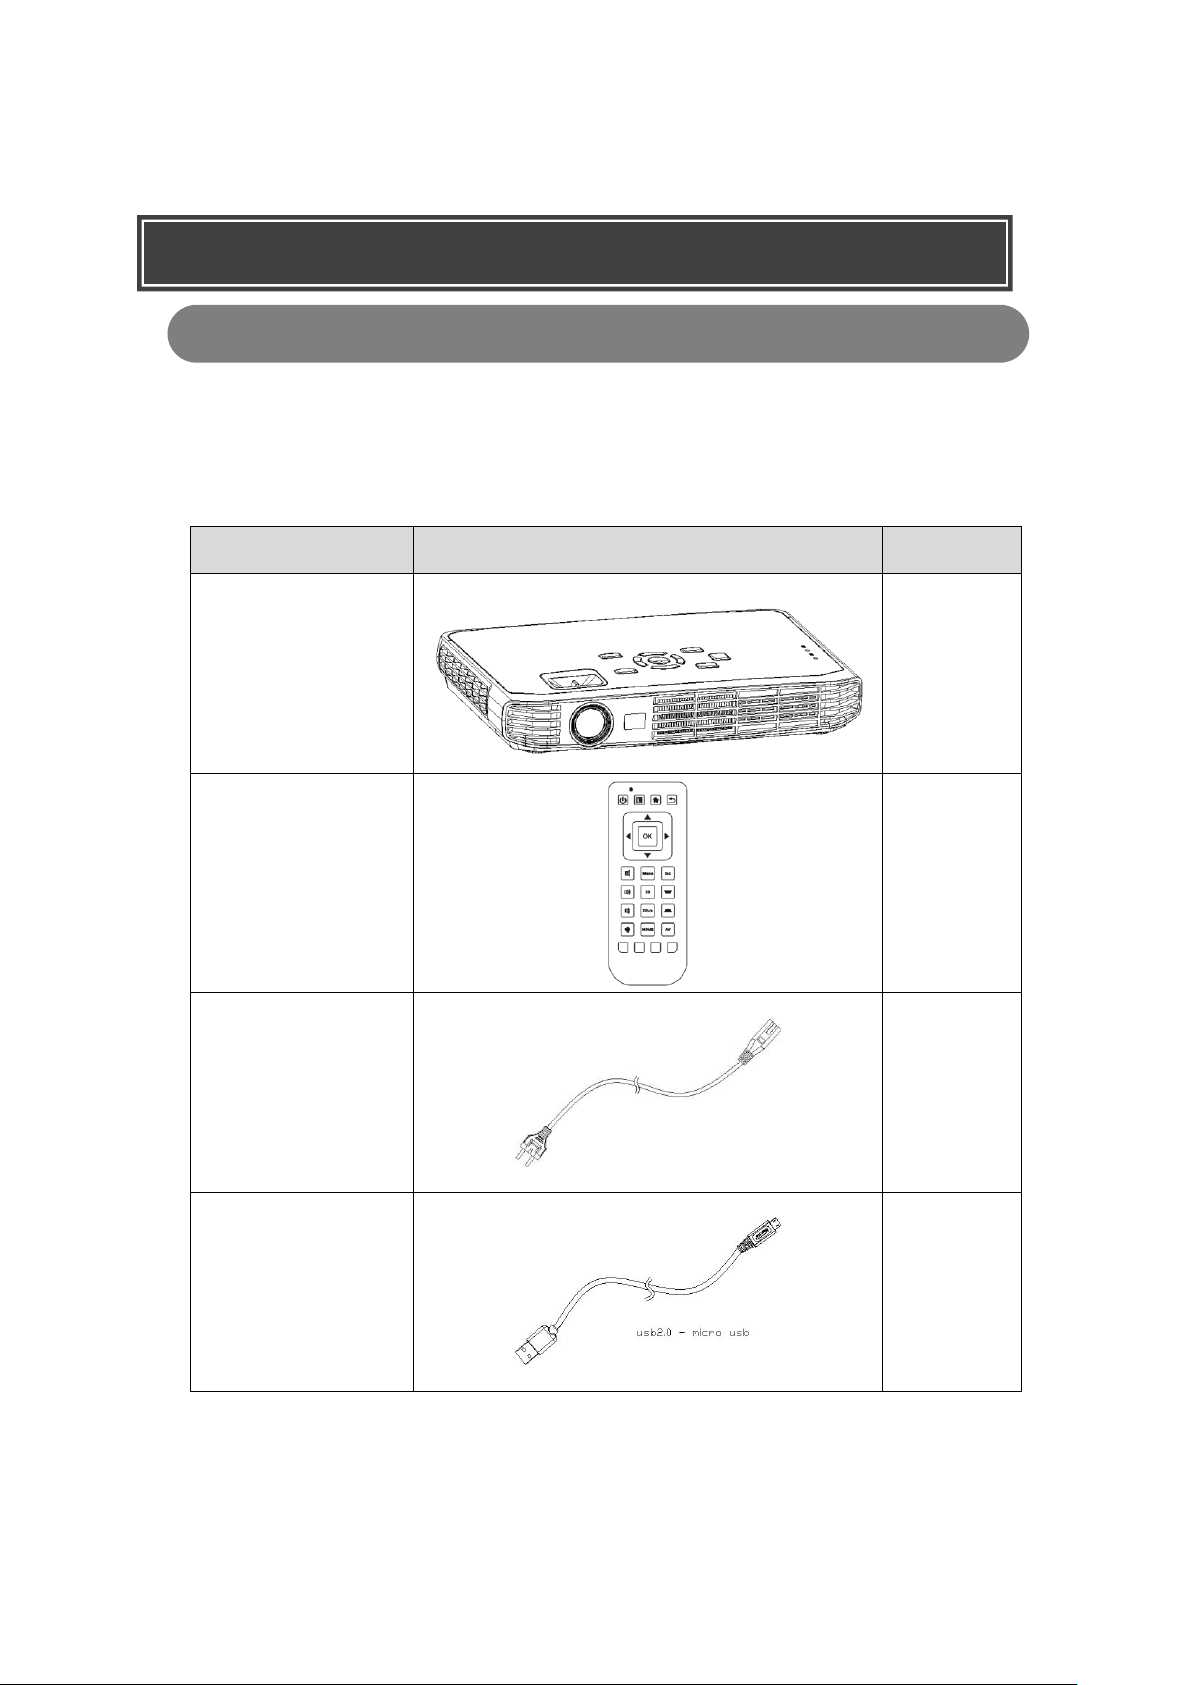
Packing list
Graphic
Amount
HOLATEK-A3
intelligent
projector
*1
Remote
controller
*1
AC power cord
*1
USB line
*1
summary
Packing list
● Carefully open the package and check whether the projector includes the
following items:
14
Page 14
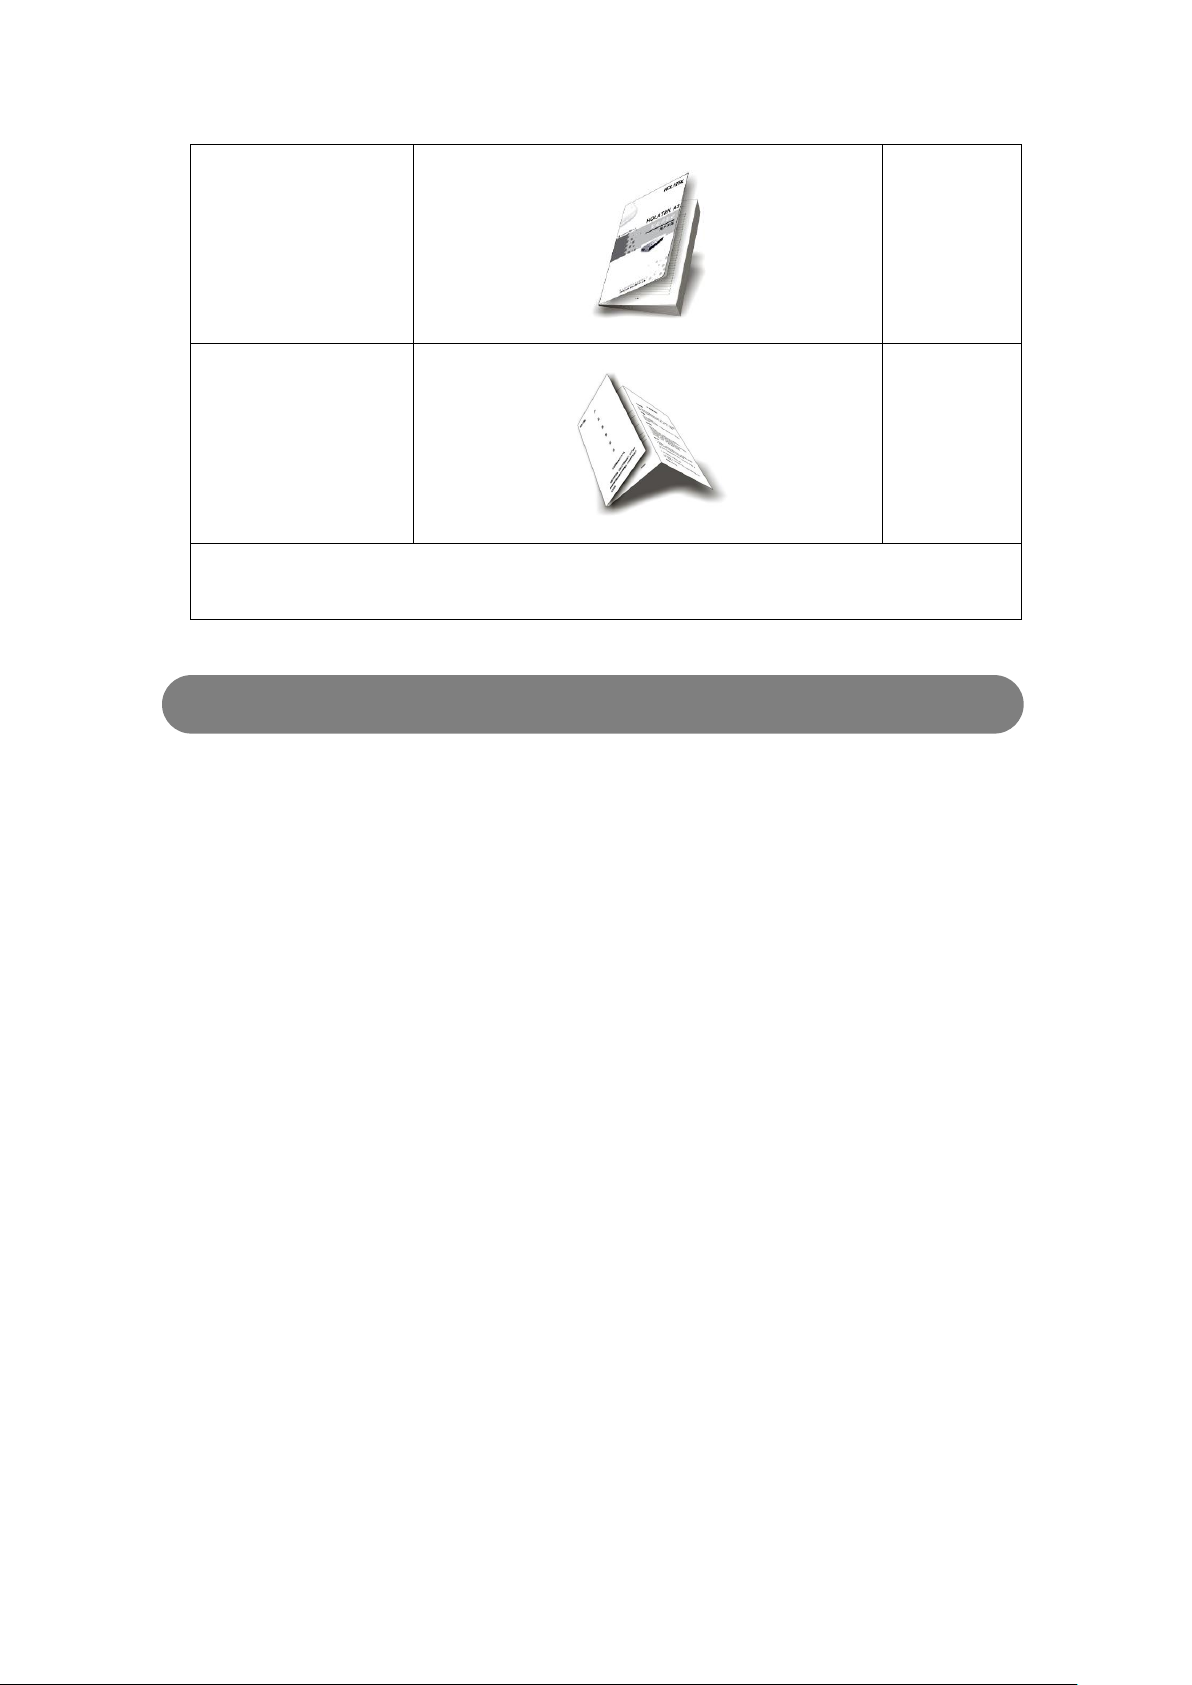
User manual
*1
Warranty card
*1
Note: if any missing items or damage or device does not work, please
contact the distributor immediately.
System upgrade
● Android software upgrade process is as follows:
1. First of all, you need a Windows PC with access to the internet;
2. Download the firmware upgrade software in the official website;
3. Install the firmware upgrade software in PC;
4. Download the firmware upgrade package in the official website;
5. Start the firmware upgrade software and select the downloaded firmware
package in file selector of < Recovery >;
6. Disconnect power of projection;
7. Keep pressing the update button behind the projector;
8. Connect the OTG of projector with PC by the attached OTG-USB line;
9. Wait for the prompts of “start update” by the upgrade software on PC and
release the update button;
10. Update according to the prompts of upgrade software;
11. After upgrade, disconnect the OTG-USB cable, connect the power supply,
and start the projector.
15
Page 15
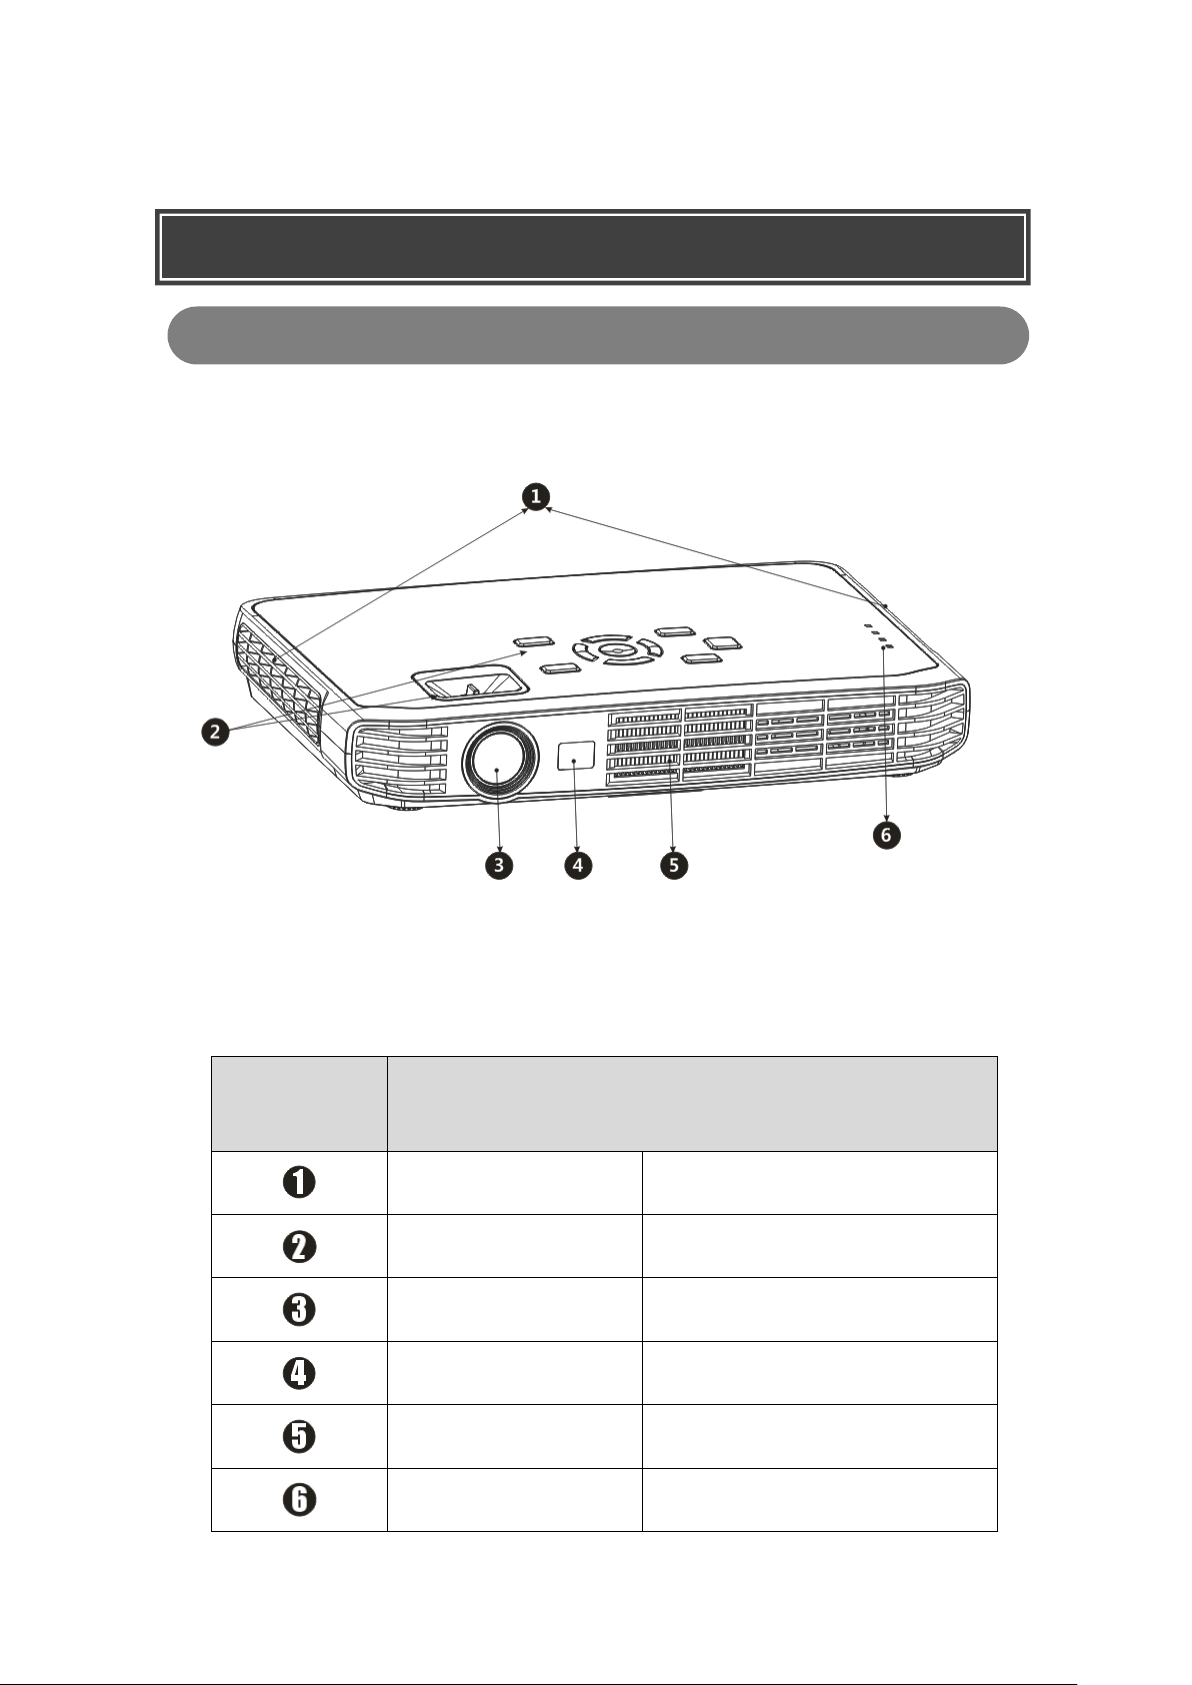
Corresponding
number
Definition instruction
Air Inlet
Air Inlet
Controlling
Controlling(detailed in “control
area”)
LED LENS
LED LENS
IR Receiver
IR Receiver
Air Outlet
Air Outlet
Indicator
Indicator (see details in P30
“Indicator”)
The location and function of control
External view
16
Page 16
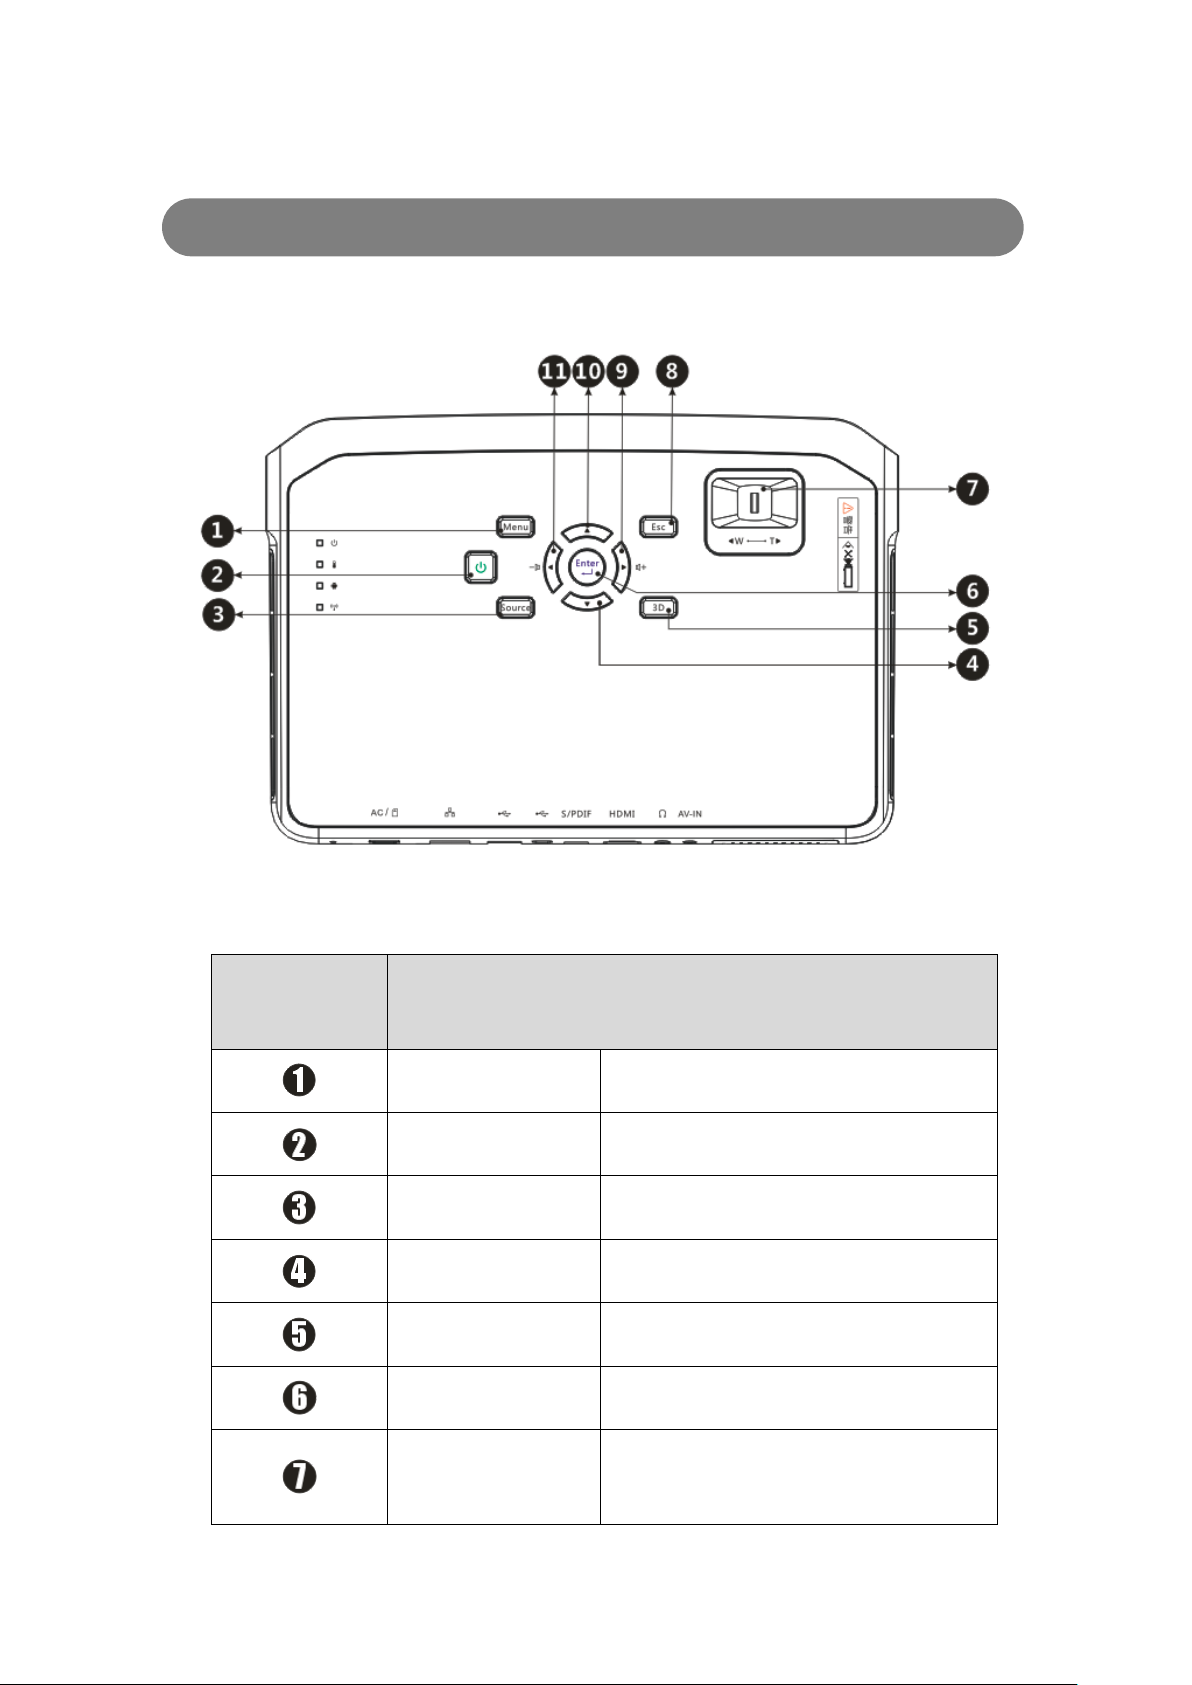
Corresponding
number
Definition instruction
Menu
Menu
Power
Power
Source
Source
Down
↓
3D
3D Enter
OK
W-T
W-T(W stands for the wide section
in zoom lens, T stands for the long
period)
Control area
17
Page 17
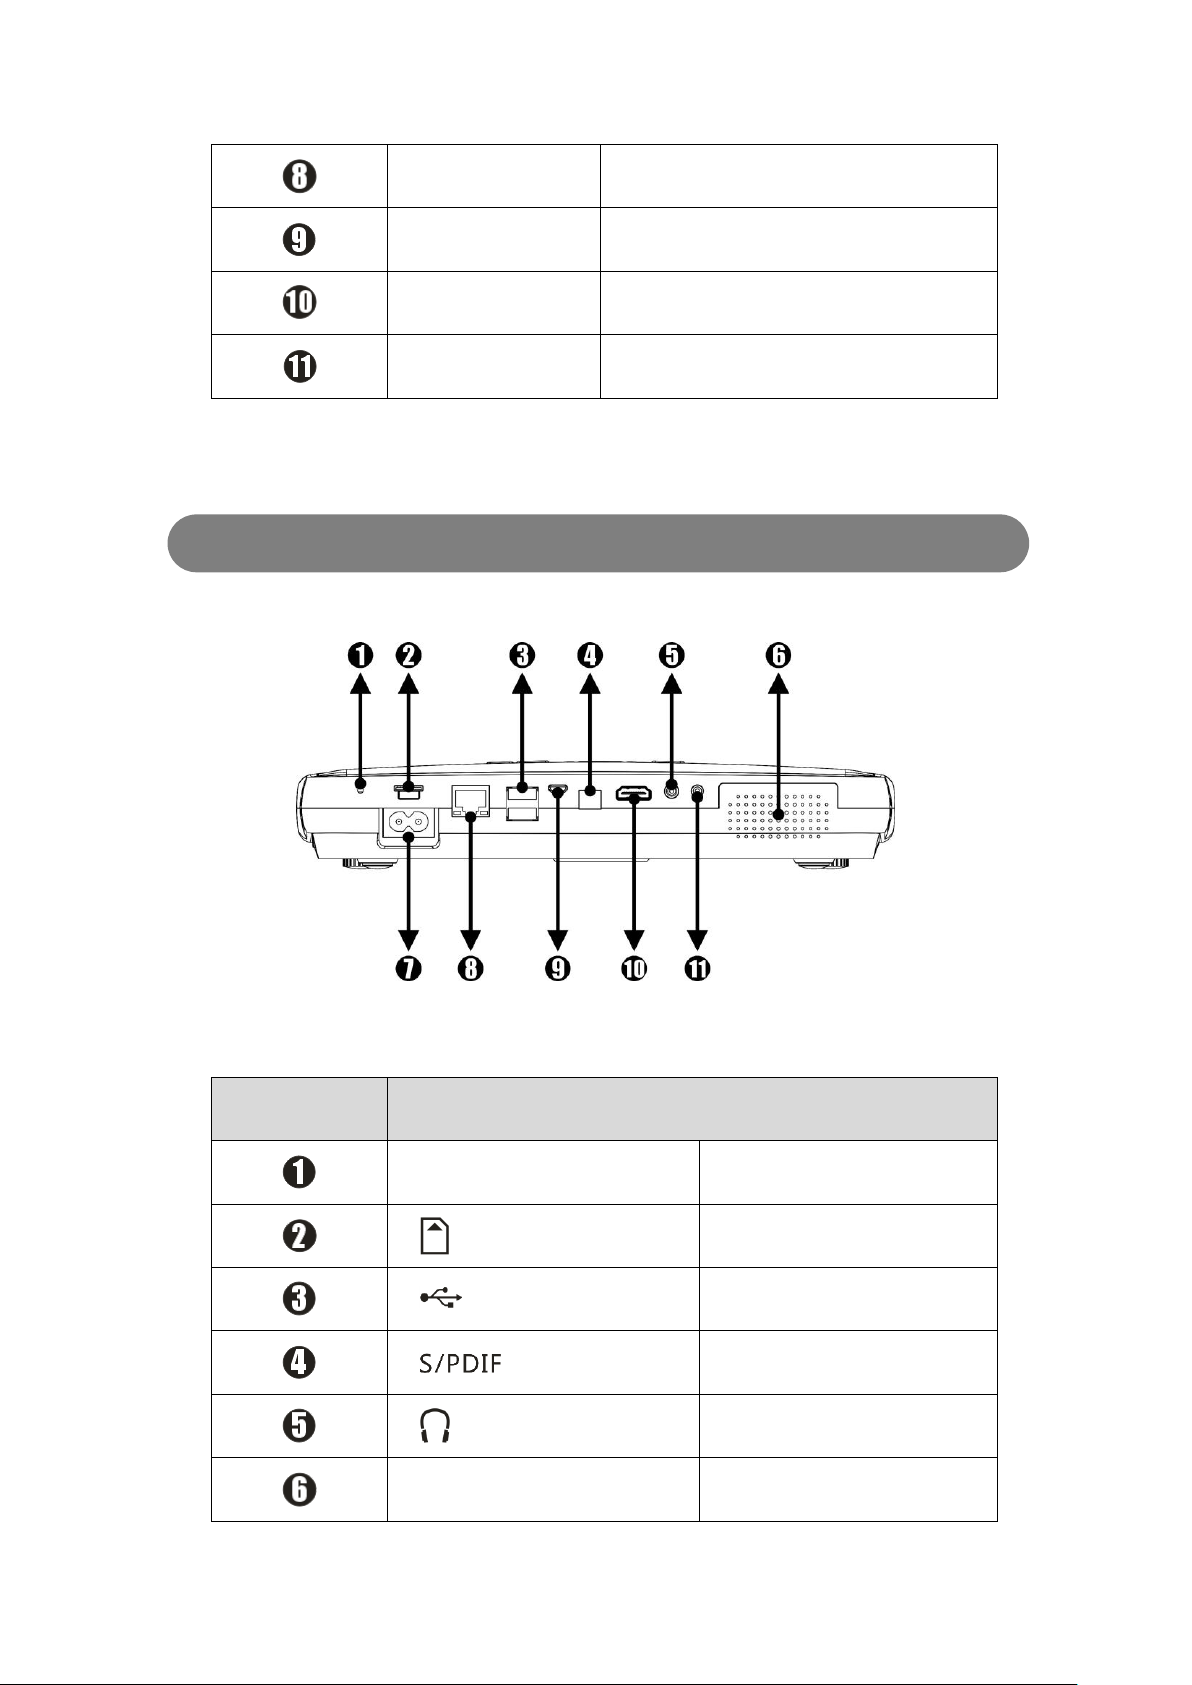
DLP Esc
DLP Esc
Volume+
Volume+
Up
↑ Volume-
Volume-
Corresponding
number
Definition instruction
Update
Update
TF-card slot
*2
USB2.0 interface
Audio optical interface
Headphones, speakers
output
Speaker
Speaker (non-interface)
Rear view
18
Page 18
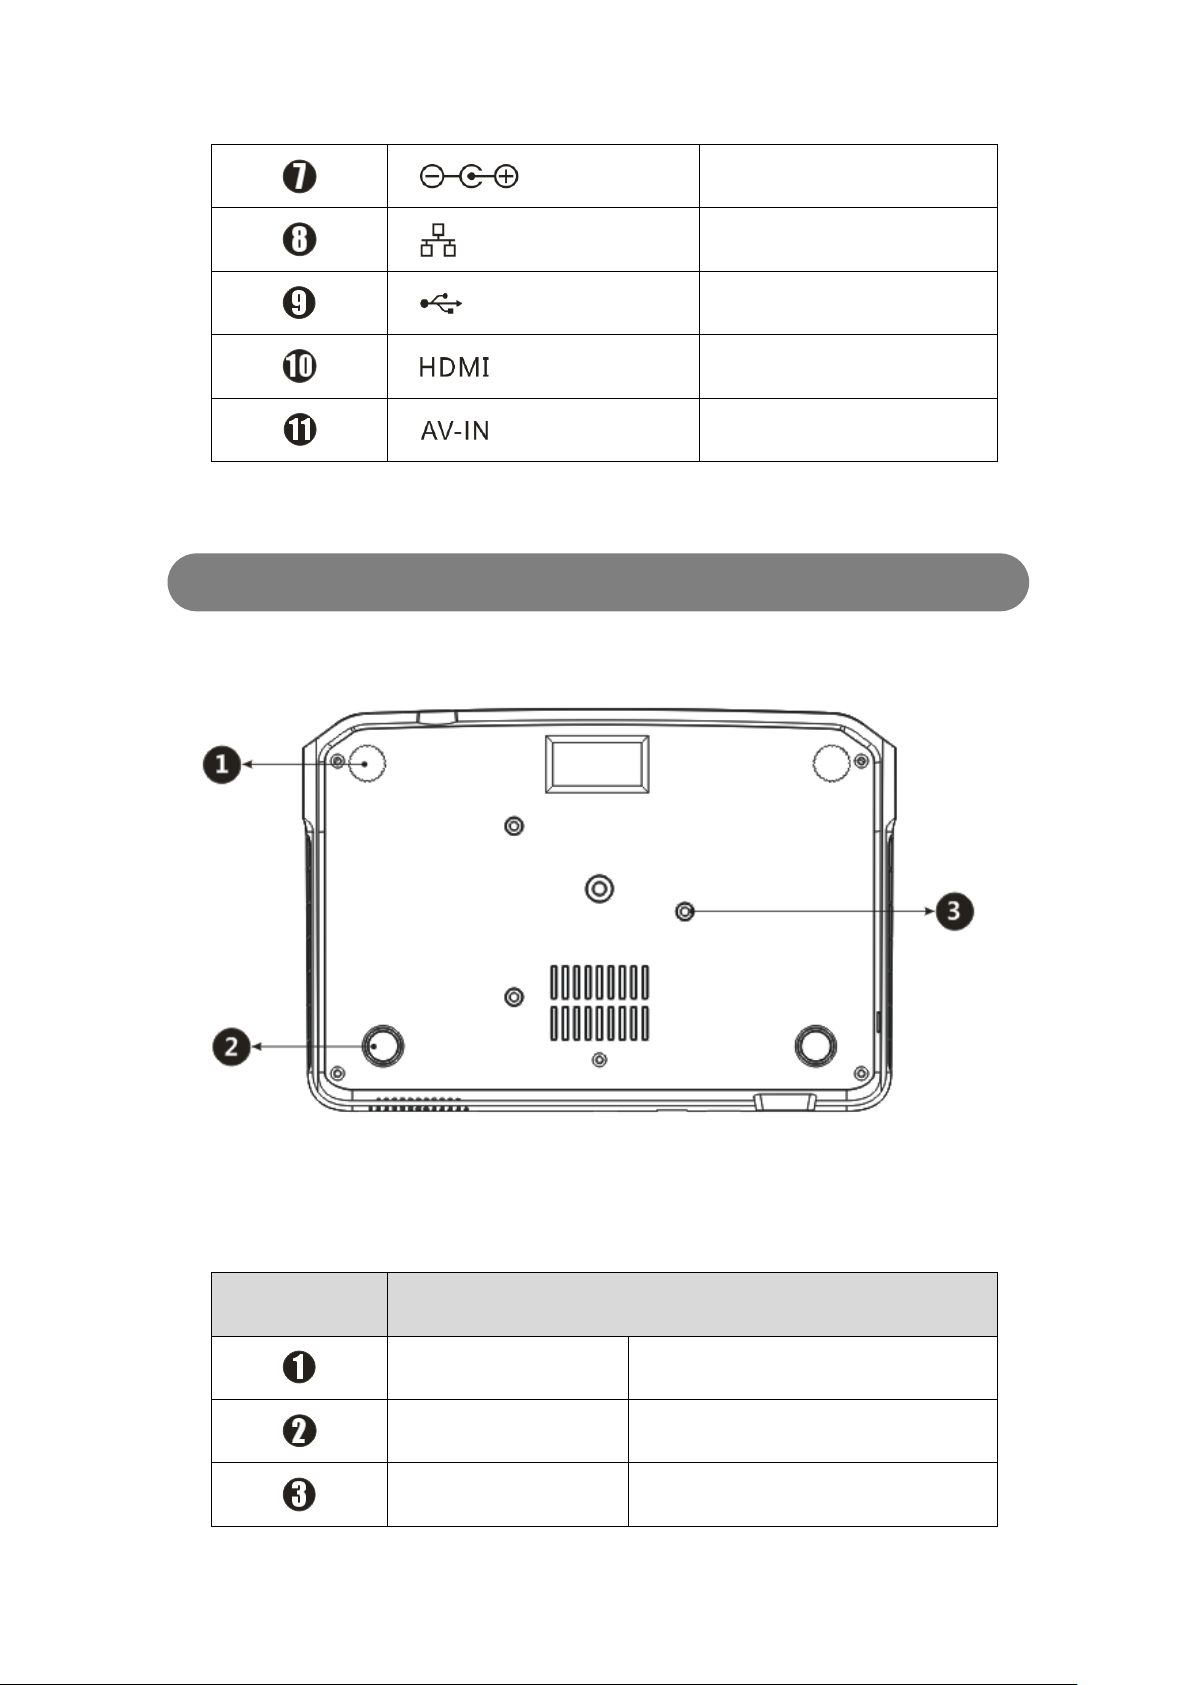
AC power line interface
RJ-45 network interface
OTG-USB interface
HDMI interface (input)
AV interface (input)
Corresponding
number
Definition instruction
Front floor mat *2
Rotate, rise and adjust
projection angle
Rear floor mat *2
Anti-skidding
Positioning hole *4
For installing hanger/bracket
Bottom view
19
Page 19
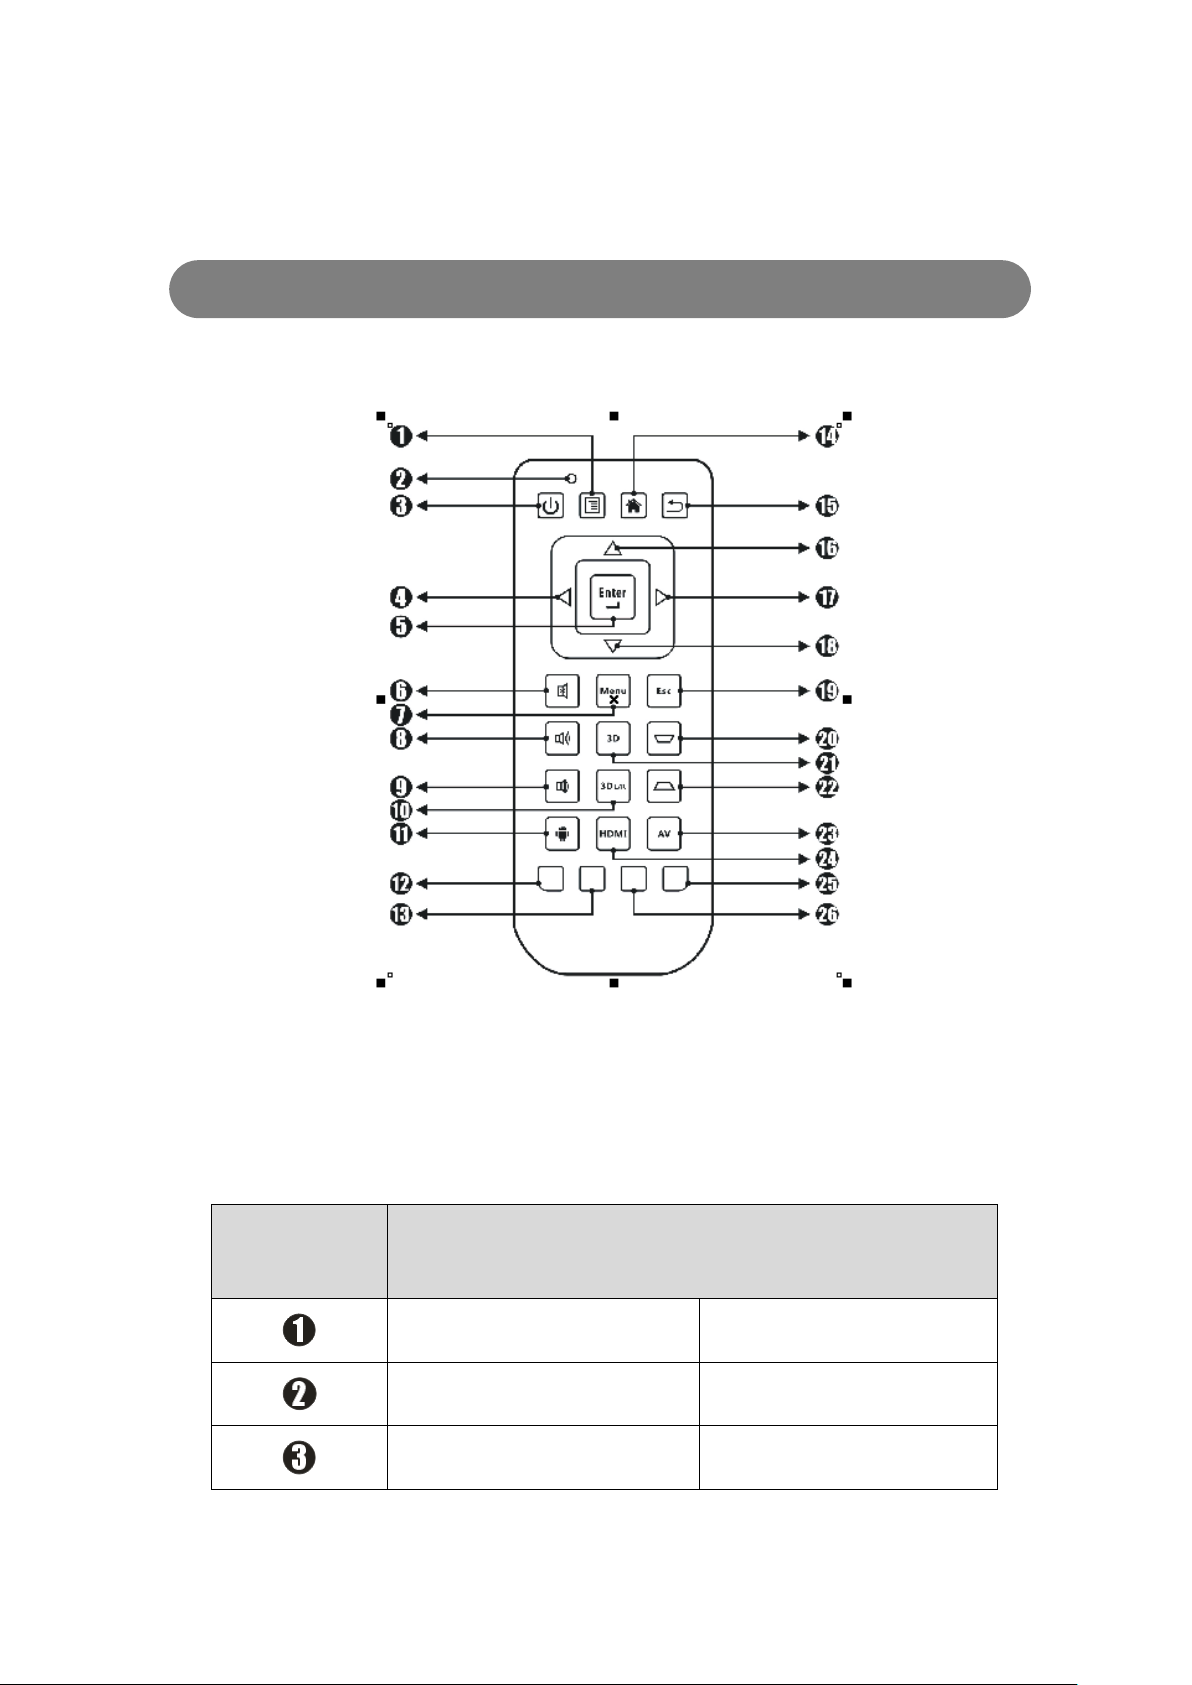
Corresponding
number
Definition instruction
Menu
Menu
Key response
Key response
Power
Power
Function of remote control
20
Page 20
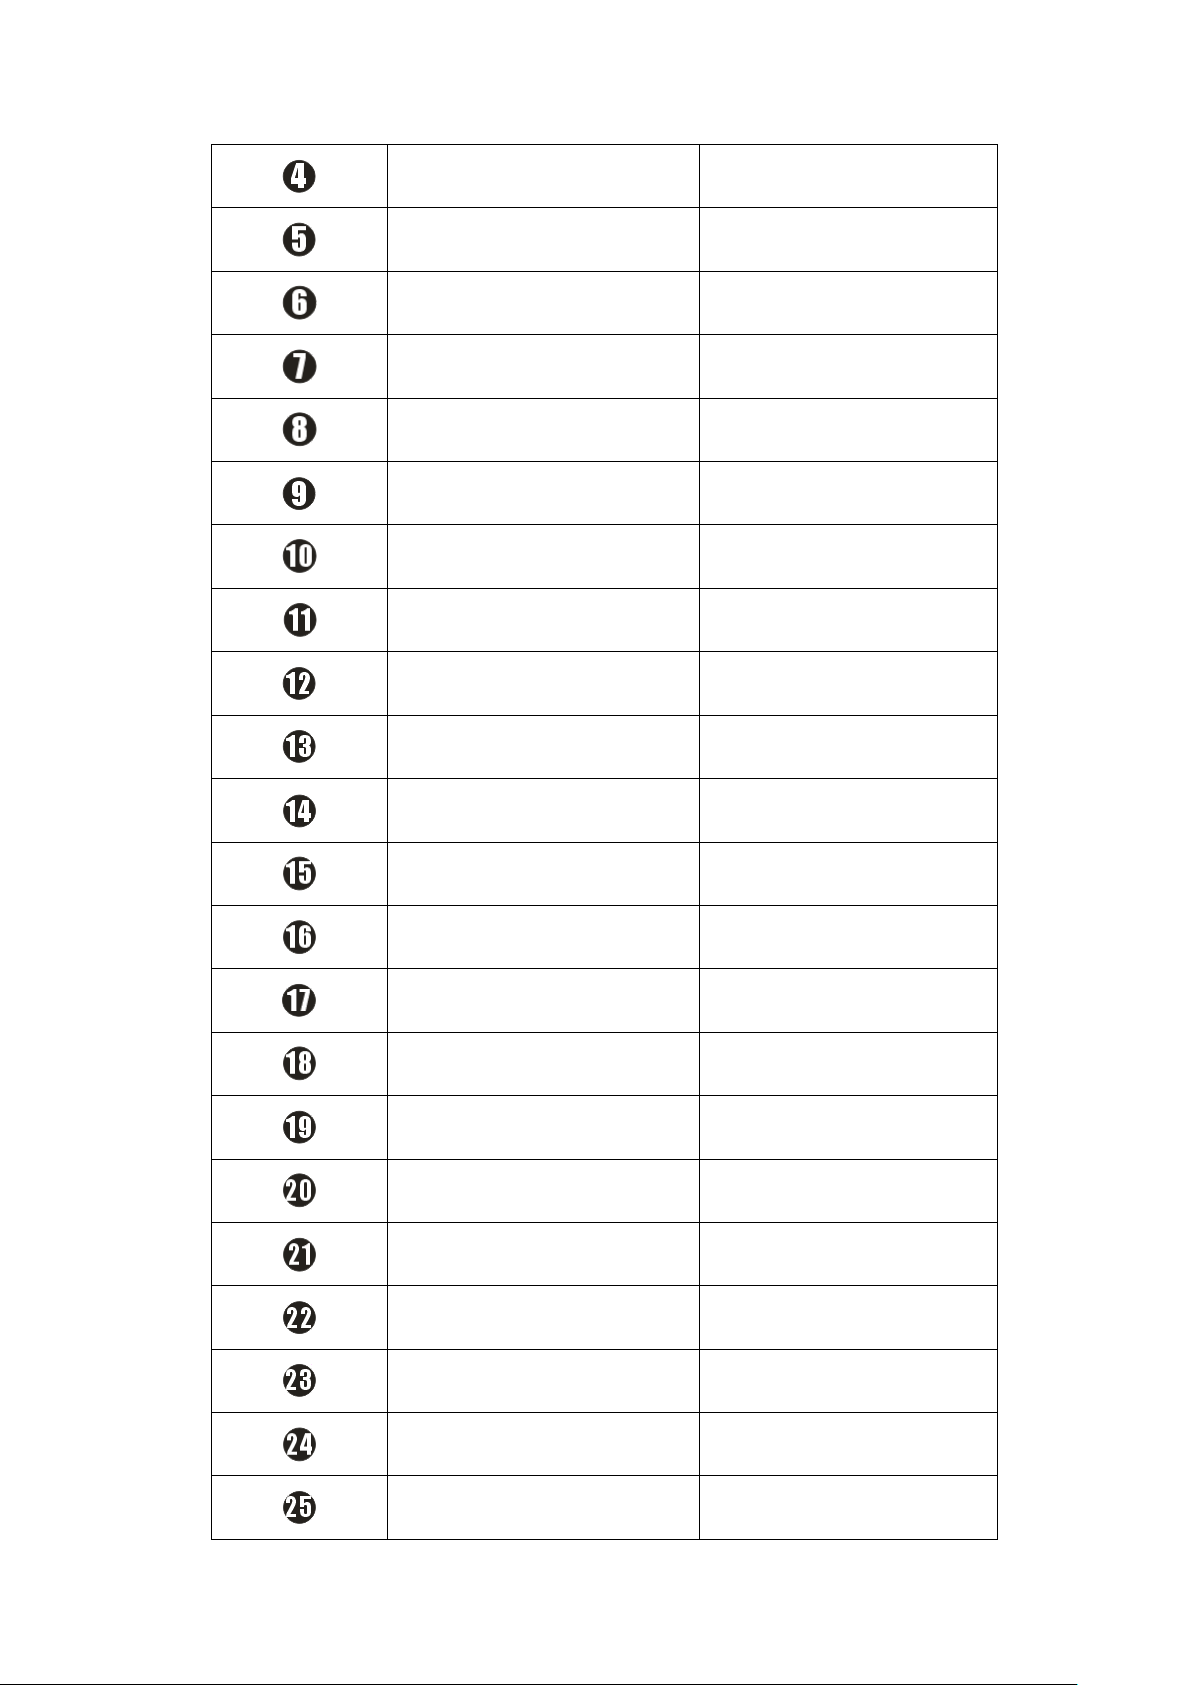
Left
←
Enter
OK
Mute
Mute
DLP Menu
DLP Menu
Volume+
Volume+
Volume-
Volume-
3D L/R
3D L/R
Local input
Local input
Reserve (Red)
Reserve (Red)
Reserve (Green)
Reserve (Green)
Home
Home
Back
Back
Up
↑ Right
→ Down
↓ DLP Esc
DLP Esc
Keystone+
Keystone correction+
3D
3D
Keystone-
Keystone-
AV input
AV input
HDMI input
HDMI input
Reserve (White)
Reserve (White)
21
Page 21
Reserve (Blue)
Reserve (Blue)
Important!
Avoid excessive heat and humidity of the remote controller;
Don't place the remote controller on where it may be pressed
accidentally to avoid exhausting the battery;
Never dispose of batteries in a fire because they may explode;
If the battery is exhausted or not being used for a long time, please
remove the battery to avoid the danger of liquid leakage and damage
of the remote controller.
● Effective range of remote control
With infrared (IR) remote sensor in the front of the projector;
The remote control must remain orthogonal angle of 30 degrees with the
infrared remote control sensor, so that it will function normally;
The distance between the remote controller and sensor is no more than 8 m
(about 26 feet);
No obstacle blocks off the infrared beam between remote control and infrared
sensor on the projector.
Projected Images
Installation of the projector
● Adjust the size of projection
With the increasing of the distance of home cinema projection between the
22
Page 22
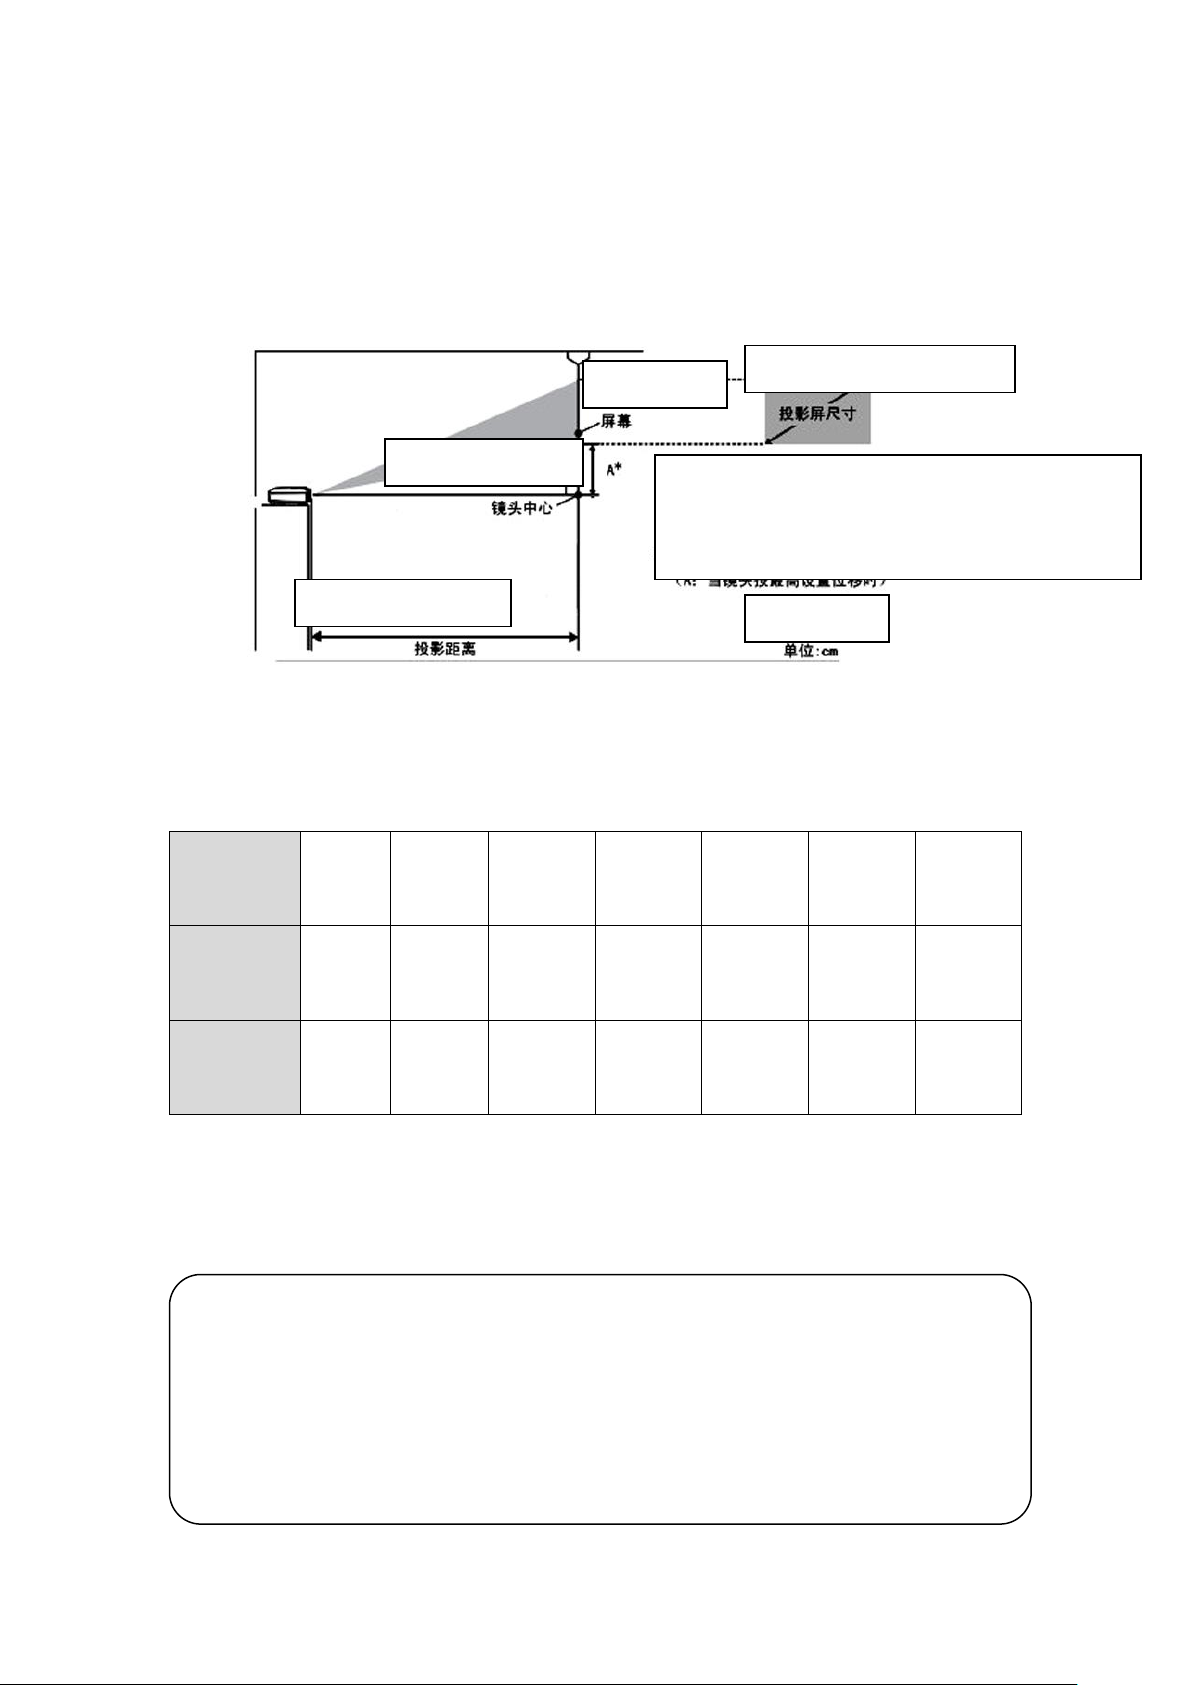
screen and wall, the size of the projection image will grow accordingly;
Screen
size
40
80
100
150
200
250
300
Minimum
distance
1.2
2.3
2.9
4.4
5.9
7.3
8.8
Maximum
distance
1.4
2.8
3.6
5.4
7.2
9.0
10.7
Important!
The orientation of projector can form a certain angle; the lens can be
upward at a tilt of 40 degrees (+40degrees) to the maximum, is
downward at a tilt of 40 degrees (-40 degrees) to the maximum;
Screen
Projection screen size
The lens center
Projection distance
This is the height from the lens center to projected
image’s bottom. (A: When the lens is displaced at the
highest position )
Unit :cm
Refer to the following table when installing the projector, so that the optimal
size images are projected onto the screen.
● Projection distance
Unit:m
Note: The design value shown in the table above may be slightly different from the
actual value.
23
Page 23

Air outlet
Methods of projection
Caution
● If the projector is installed in the ceiling, it shall be installed by qualified
technical personnel with approved installation equipment. If not installed
correctly, the projector may fall, thus leading to personal injury or accident.
Please contact your dealer to properly install this projector.
● In order to prevent the screw from loosening, an adhesive may be used in the
lifting seat, or lubricants, grease and the like products on the projector, which
may result in the burst of the projector outer covering, cause the projector off
from the lifting seat and even lead to serious injury of the person underneath or
damage to the projector. Therefore, when installing or adjusting the lifting seat,
don’t use adhesive to prevent screw from loosening, or lubricants, grease and the
like products.
Attention
● The operating conditions have a great impact on the effectiveness of the projector,
so it must be used in the following conditions:
Please use near and convenient power socket, so as to be able to unplug the
power cord of the projector whenever necessary;
Don’t place any object within the dotted line; the distance between the air
inlet and air outlet of all surroundings and the projector must be more than 30
centimeters;
24
Page 24
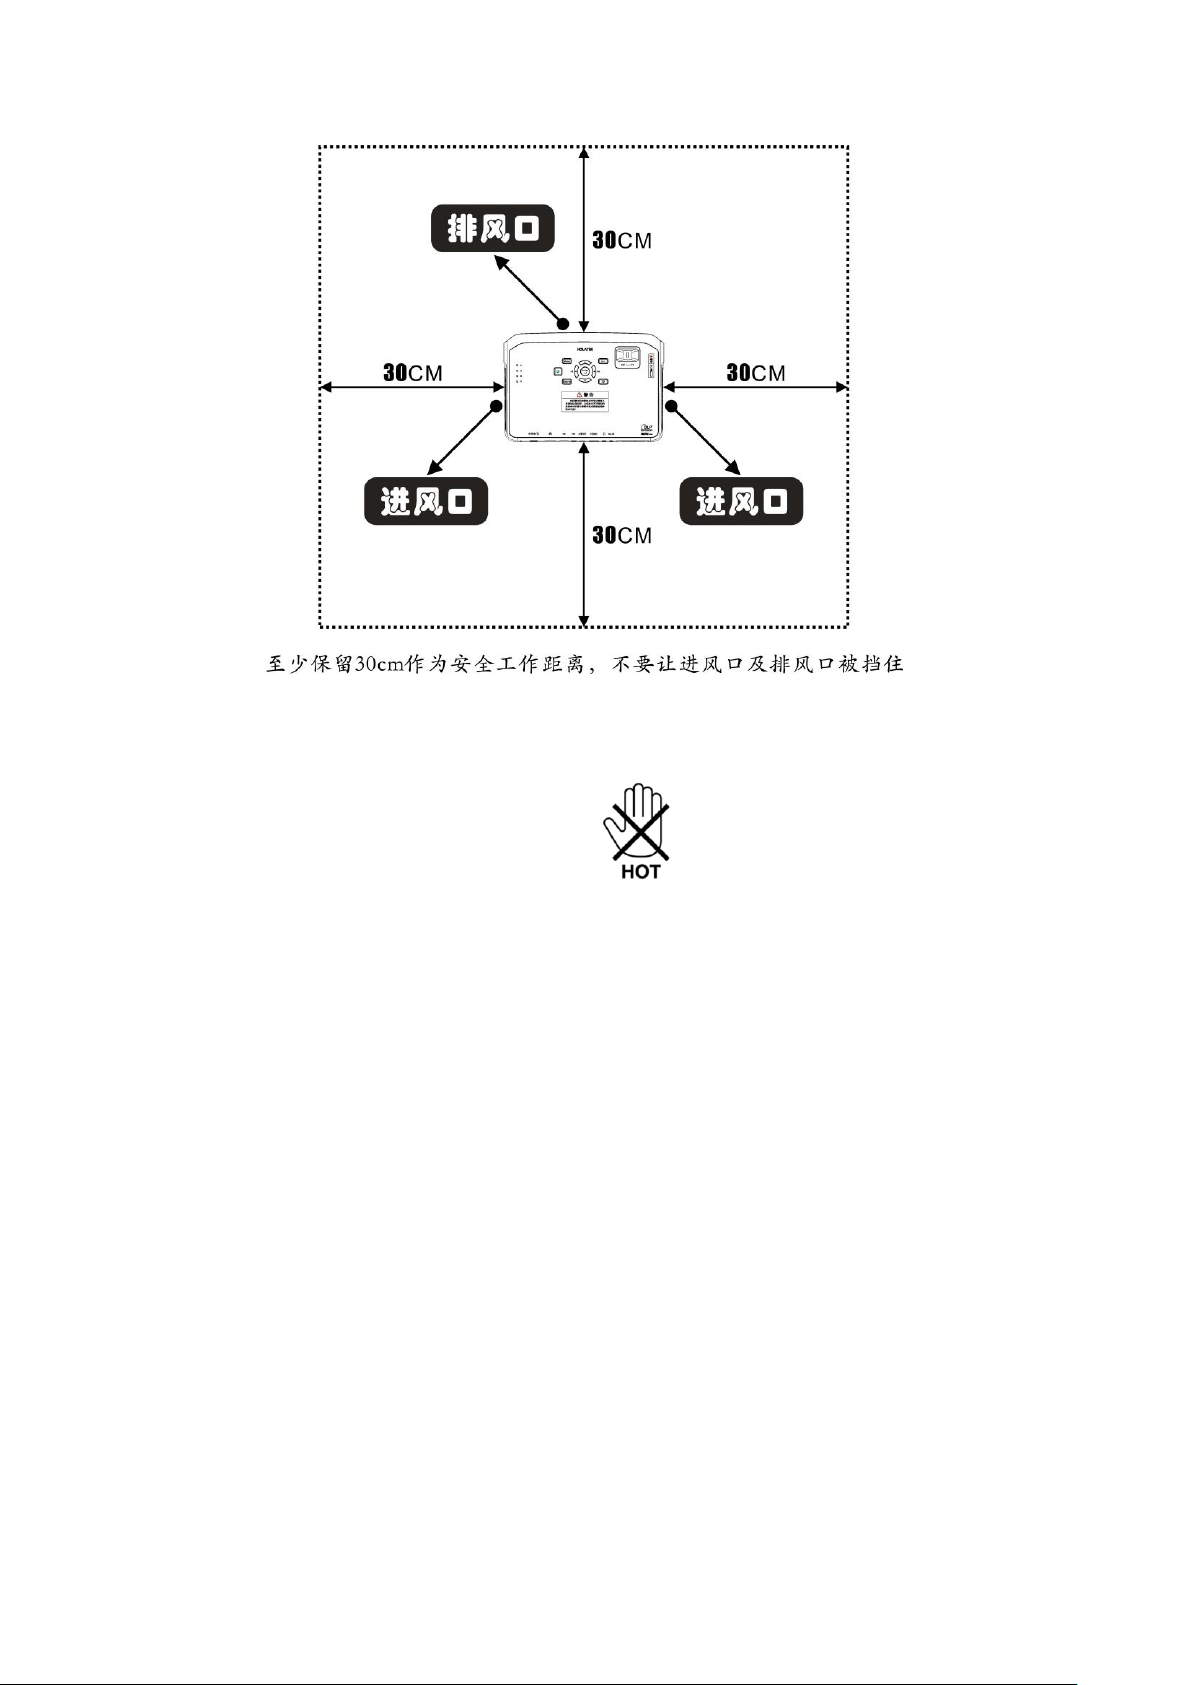
Don’t touch the vents and the air outlet which would be extremely hot when
the projector is being used;
Avoid placing plastic products or other heat sensitive items next to or below
the projector to avoid the risk of deformation and discoloration;
Avoid placing the projector on the unstable and vibrating surface;
Avoid placing the projector on carpets, blankets, towels and other soft goods;
Avoid placing the projector in the places with direct sunlight;
Avoid placing the projector in dusty and highly humid areas;
Avoid placing the projector near speaker, TV, radio and other devices
producing magnetic force and heaters;
After long-term use, dust and dirt will gather in and around the air inlet with
fans, thus causing the projector malfunction. Therefore, please check whether
the air inlet accumulates dust before each use. If any, please clean it with soft
dry cloth;
Avoid the air inlet being blocked when placing the projector, or it may
25
Page 25
shorten the lifespan of the light source unit;
The air discharged from the air conditioner will blow the heat discharged
from the projector lens, causing the heat wave in projection. If this case
happens, please adjust the air from the air conditioner or move the projector;
Please place the projector in a horizontal position. Don’t tilt or place the
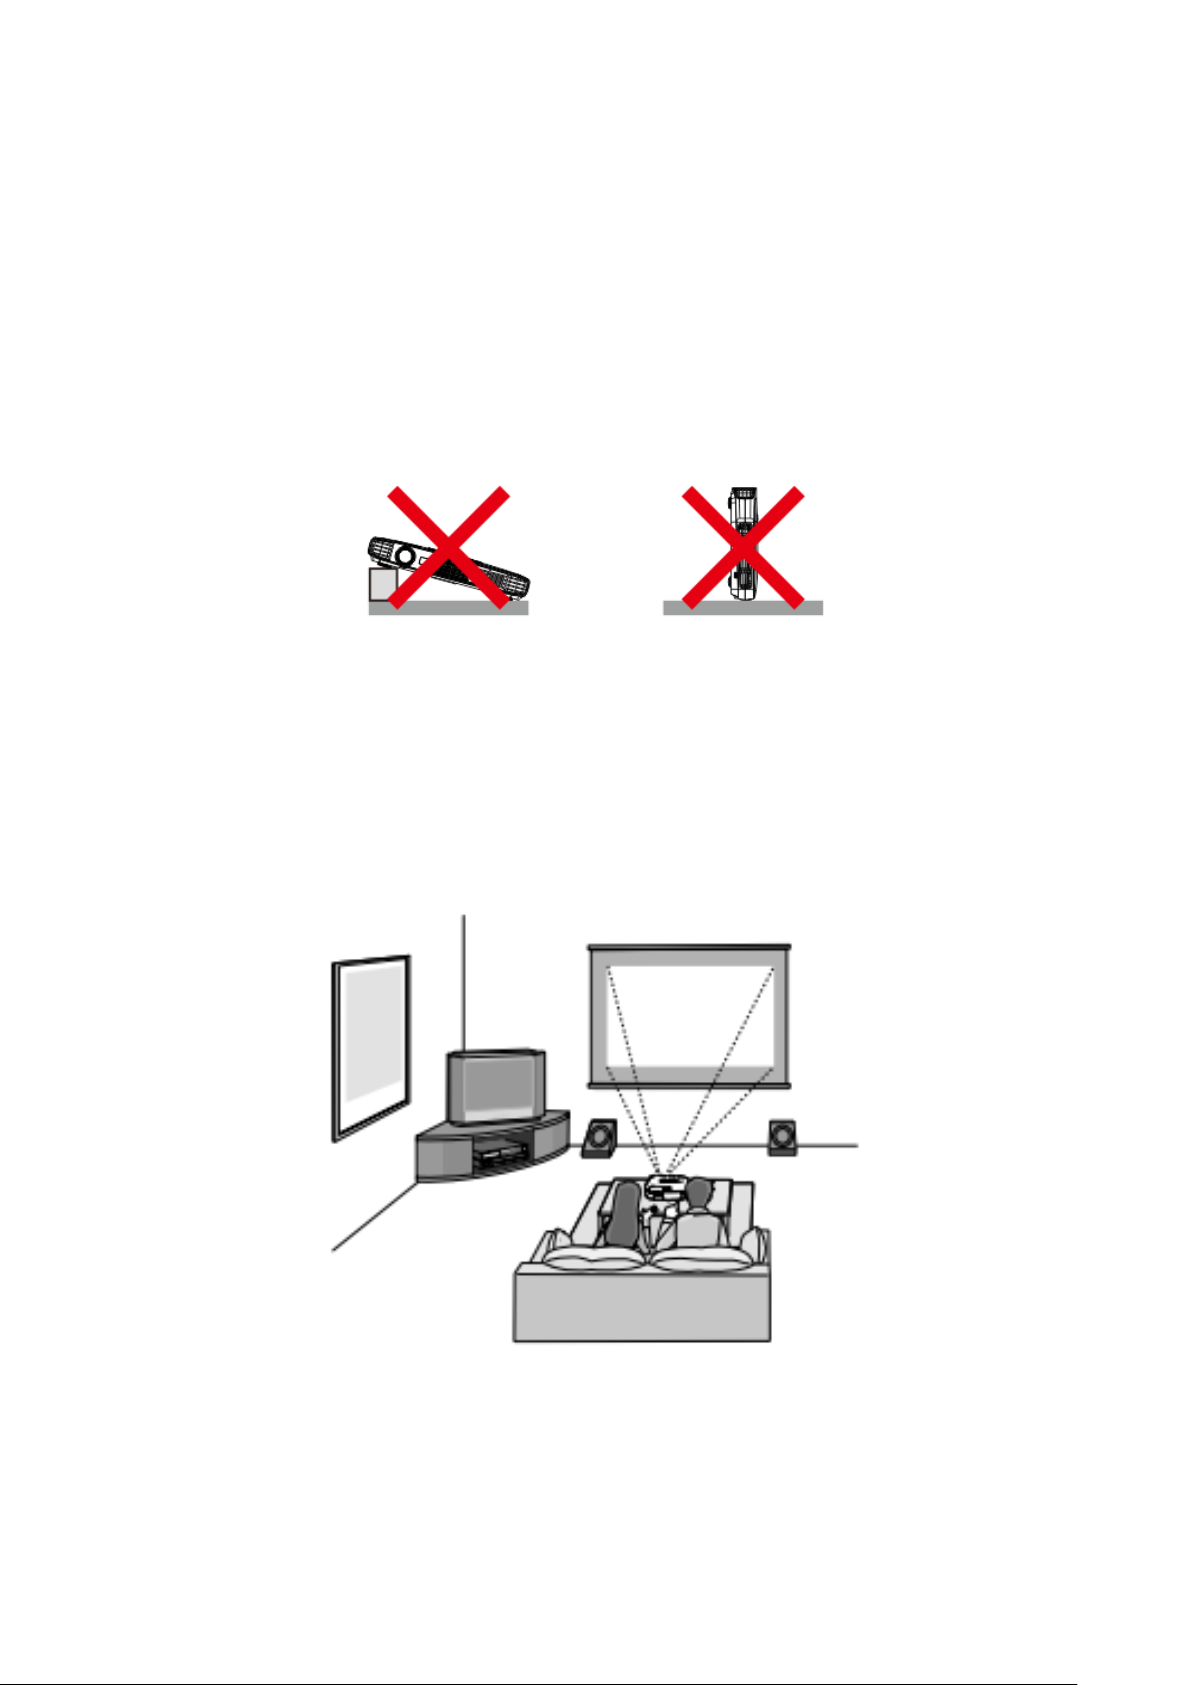
projector sideways when using, or it may cause malfunction.
● The condition of front desk projection
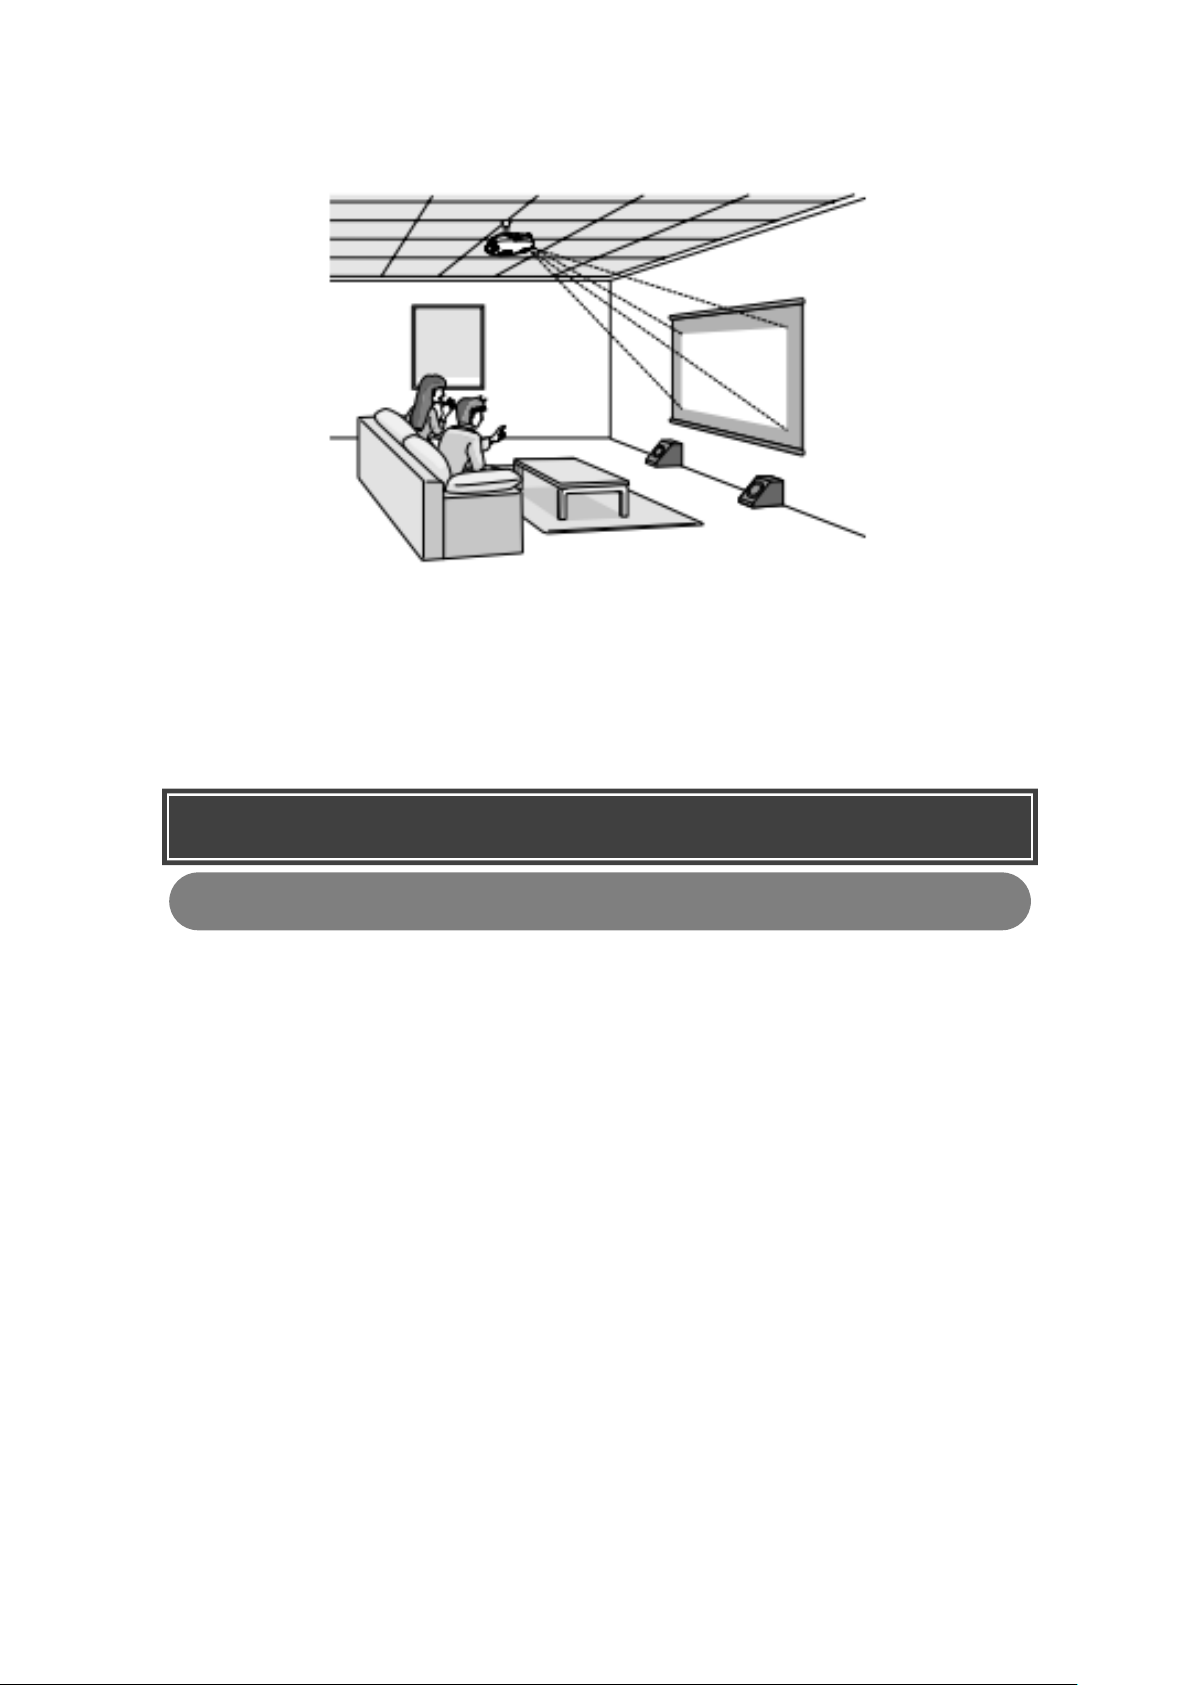
● The condition of ceiling projection
26
Page 26
Basic Operations
Turn on and turn off the projector
● Notice for AC power
Use AC power cord attached with the projector;
Use AC power whose output voltage accords with the rated voltage of the
projector;
Don't share a power supply socket with other devices;
If using extension line, make sure the rated current of the extension line is
adapted for the power of the projector;
Don’t use bundled power cord;
Don’t place articles on the power cord or step on it;
Don’t pull the power cord and take the plug when pull off;
Please use near and convenient power socket, so as to be able to unplug the
power cord of the projector whenever necessary.
27
Page 27
1. Connect the projector and the power socket with attached AC power cord;
2. When power cord is inserted into the power socket, the power button at the
top of the projector will become orange, which means the projector is
powered on and bootable.
● Turn on the projector
1. Press the (power) button on the top of the projector or on the remote
controller to turn on the projector, and then the color of the (power)
button will change from orange to blue;
2. When the Android system starts, the system status indicator ( ) will become
blue.
● Turn off the projector
1. Press the (power) button on the top of the projector or on the remote
control to turn off the projector;
2. After press the (power) button on the top of the projector or on the
remote control, the confirmation message of “Shutdown, Forced shutdown” will
appear in the centre of the screen.
If you don’t shut down the power, the confirmation message will
automatically disappear in 5 seconds or you can press the “Esc” button
to close the confirmation message;
The message of “Shutdown” means the Android system will be turned
off normally;
The message of “Forced shutdown” means the Android system is
powered off without conducting the normal process of shutdown, which
may result in system damage or file missing;
3. Check and make sure that the color of (power) button on the top of the
projector changes to orange and after the Android system status indicator ( )
28
Page 28

goes out, and then unplug the AC power cord from the outlet.
Option of information language
When the projector is turned on for the first time, the default language is Chinese.
If you need to change the language, you will be subjected to the following steps (the
operating steps of projector and remote control are consistent):
1. Press “Menu” button;
2. Press“▲” or “▲” button to select the “Machine setting 1”, and then
press “Menu” button;
3. Select your desired language and press “Menu” button to confirm.
Option of input source
When you start the projector, the input source used before the last shutdown will
be the first choice and you can operate the following steps to select other input
sources:
1. Press “Source” button;
2. Press “▲” or “▼” button to select the name of input source you want,
and then press “Enter” button to confirm.
Keystone correction
When there is a certain angle between the projector and the screen or white wall,
the top and bottom lengths of projected image are different. This phenomenon is
known as “keystone”. This projector is equipped with manual keystone correction
function so that the shape of projected image is tidy. As follows:
29
Page 29
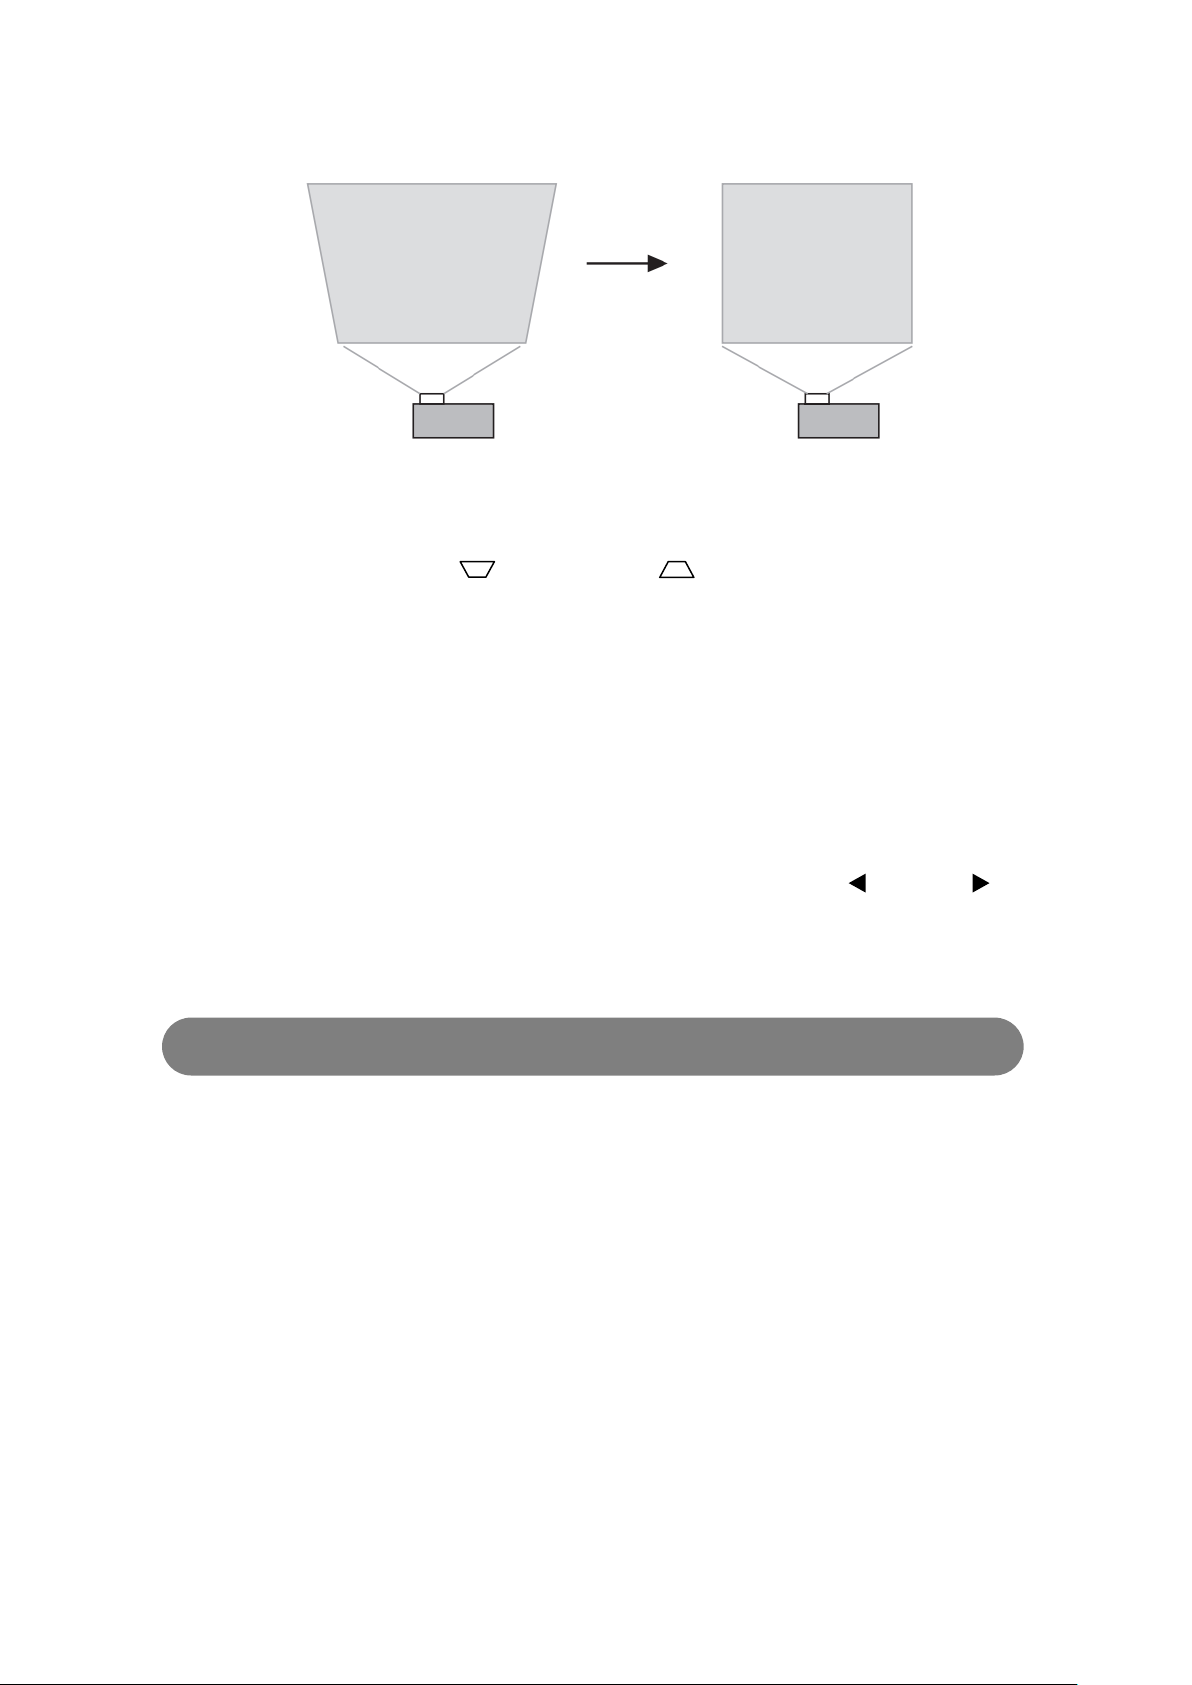
● Operation on the remote control:
Press “Keystone+” ( ) or “Keystone” ( ) buttons to correct the
keystone.
● Operation on the projector:
1. Press “Menu” button;
2. Press “▲” or “▼” button, select the “Picture setting” and press “Enter”
button;
3. Select the “keystone” and press the button of “ ” or “ ” to correct;
4. After the correction, press “Menu” button to exit the operation.
Useage of 3D function
● Start the 3D function
After starting the 3D film source, operate with a remote control. Press “3D”
button, select the appropriate film source mode of “left-right mode” or “top-down
mode”, and then press “Enter” button to start the 3D function
● 2D TO 3D
After starting the 2D film source, press “3D” button with remote control to select
“2D TO 3D”, and then press “Enter” button to start 2D TO 3D function
● Transition of 3D left/right eye
30
Page 30
If you feel discomfort or the picture is without a 3D effect, you can operate with
Main menu
Submenu
Image adjustment 1
Brightness
Contrast
Color balance
Recovery menu defaults
Image adjustment 2
Vertical position
Horizontal position
Adjust clock frequency
Phase
Recovery menu defaults
Volume adjustment
Volume
Recovery menu defaults
Picture setting
Keystone
Projection method
a remote control. Press “3D L/R” button to adjust
● Close the 3D function
Press “3D” button with a remote control, select “2D”, and then press “Enter”
button to close 3D or 2D TO 3D function.
Usage of setting options
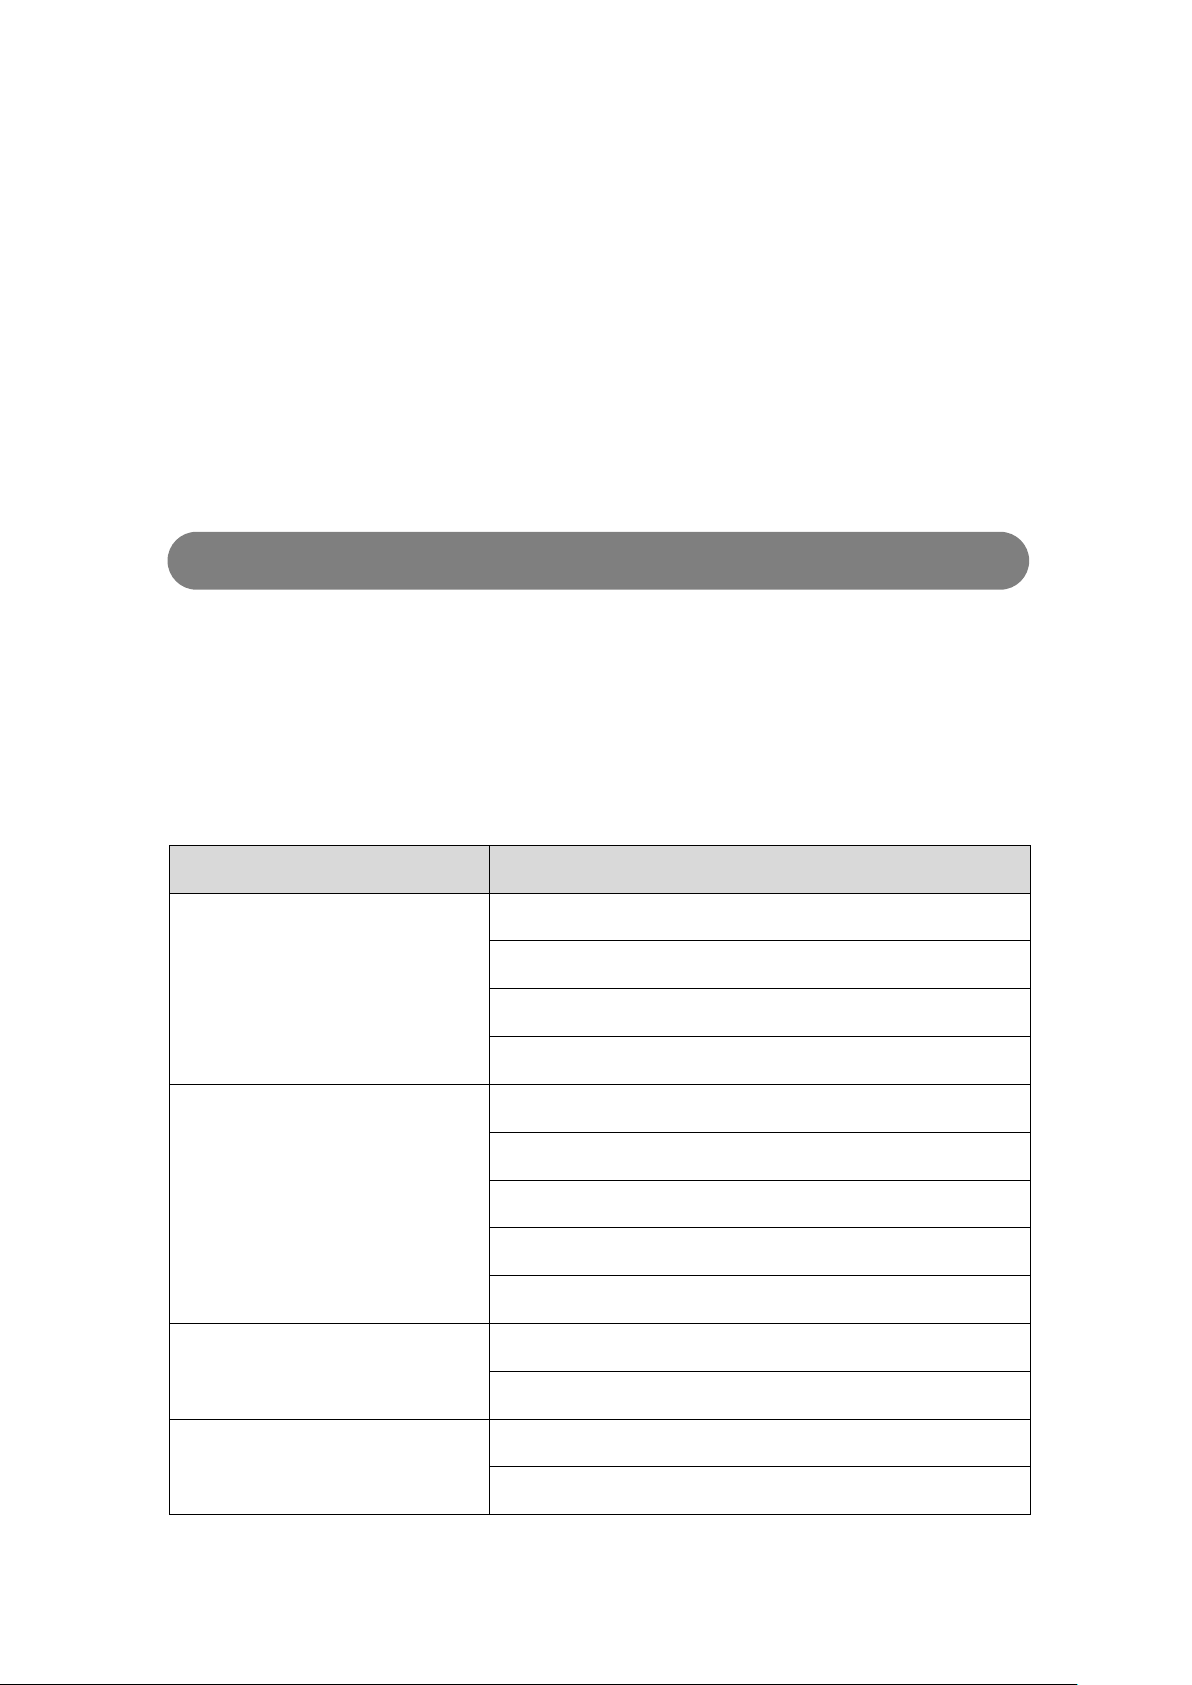
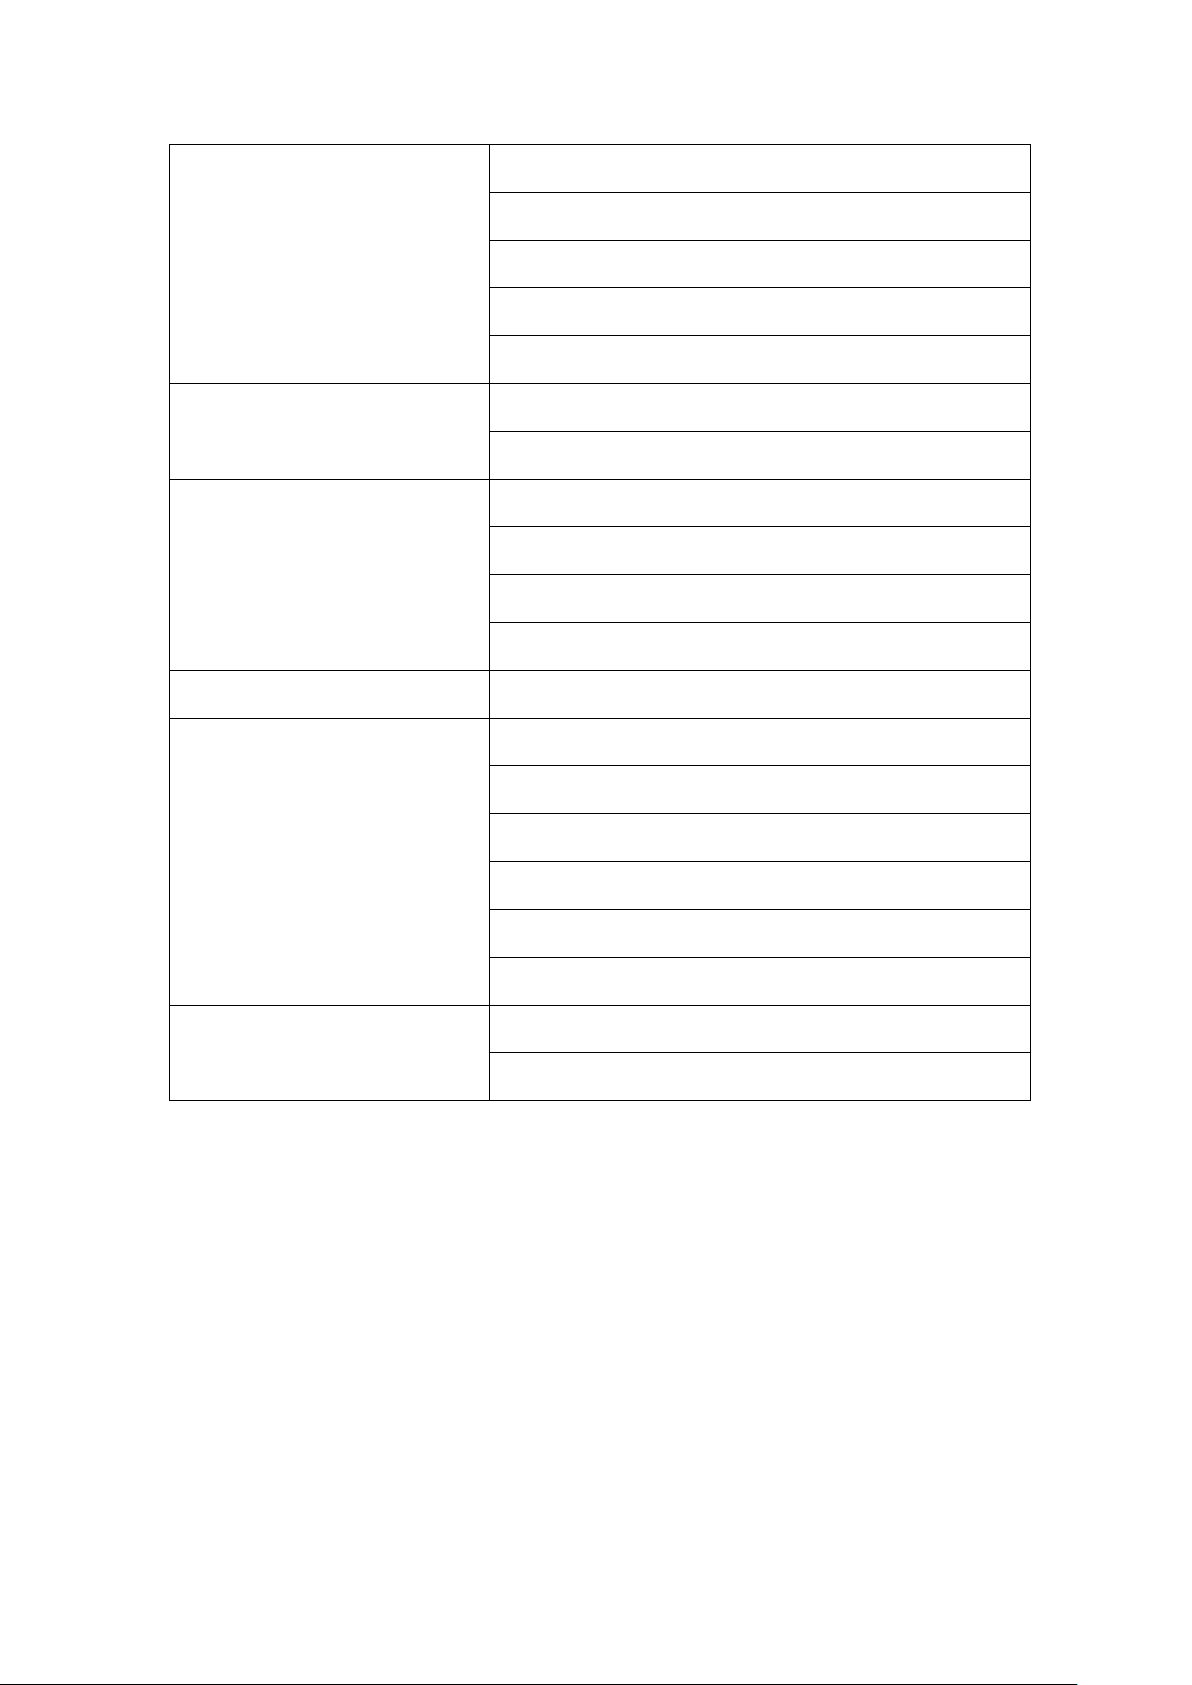
During the image projection, press “Menu” button and the setting options will be
displayed on the screen. The setting options can be used to match various settings of
projectors. The specific list is as follows:
● List of setting options
31
Page 31
Ceiling projection
Start picture
Aspect ratio
Blank picture
Recovery menu defaults
Input setting
Signal name indicator
Recovery menu defaults
Machine setting 1
Eco mode
Auto shutdown
Language
Recovery menu defaults
Machine setting 2
Focusing
Operation information
Input signal
Signal name
Horizontal frequency
Vertical frequency
Scanning system
Using hours of light
Fully recovery defaults
Software version
Fully recovery defaults
32
Page 32
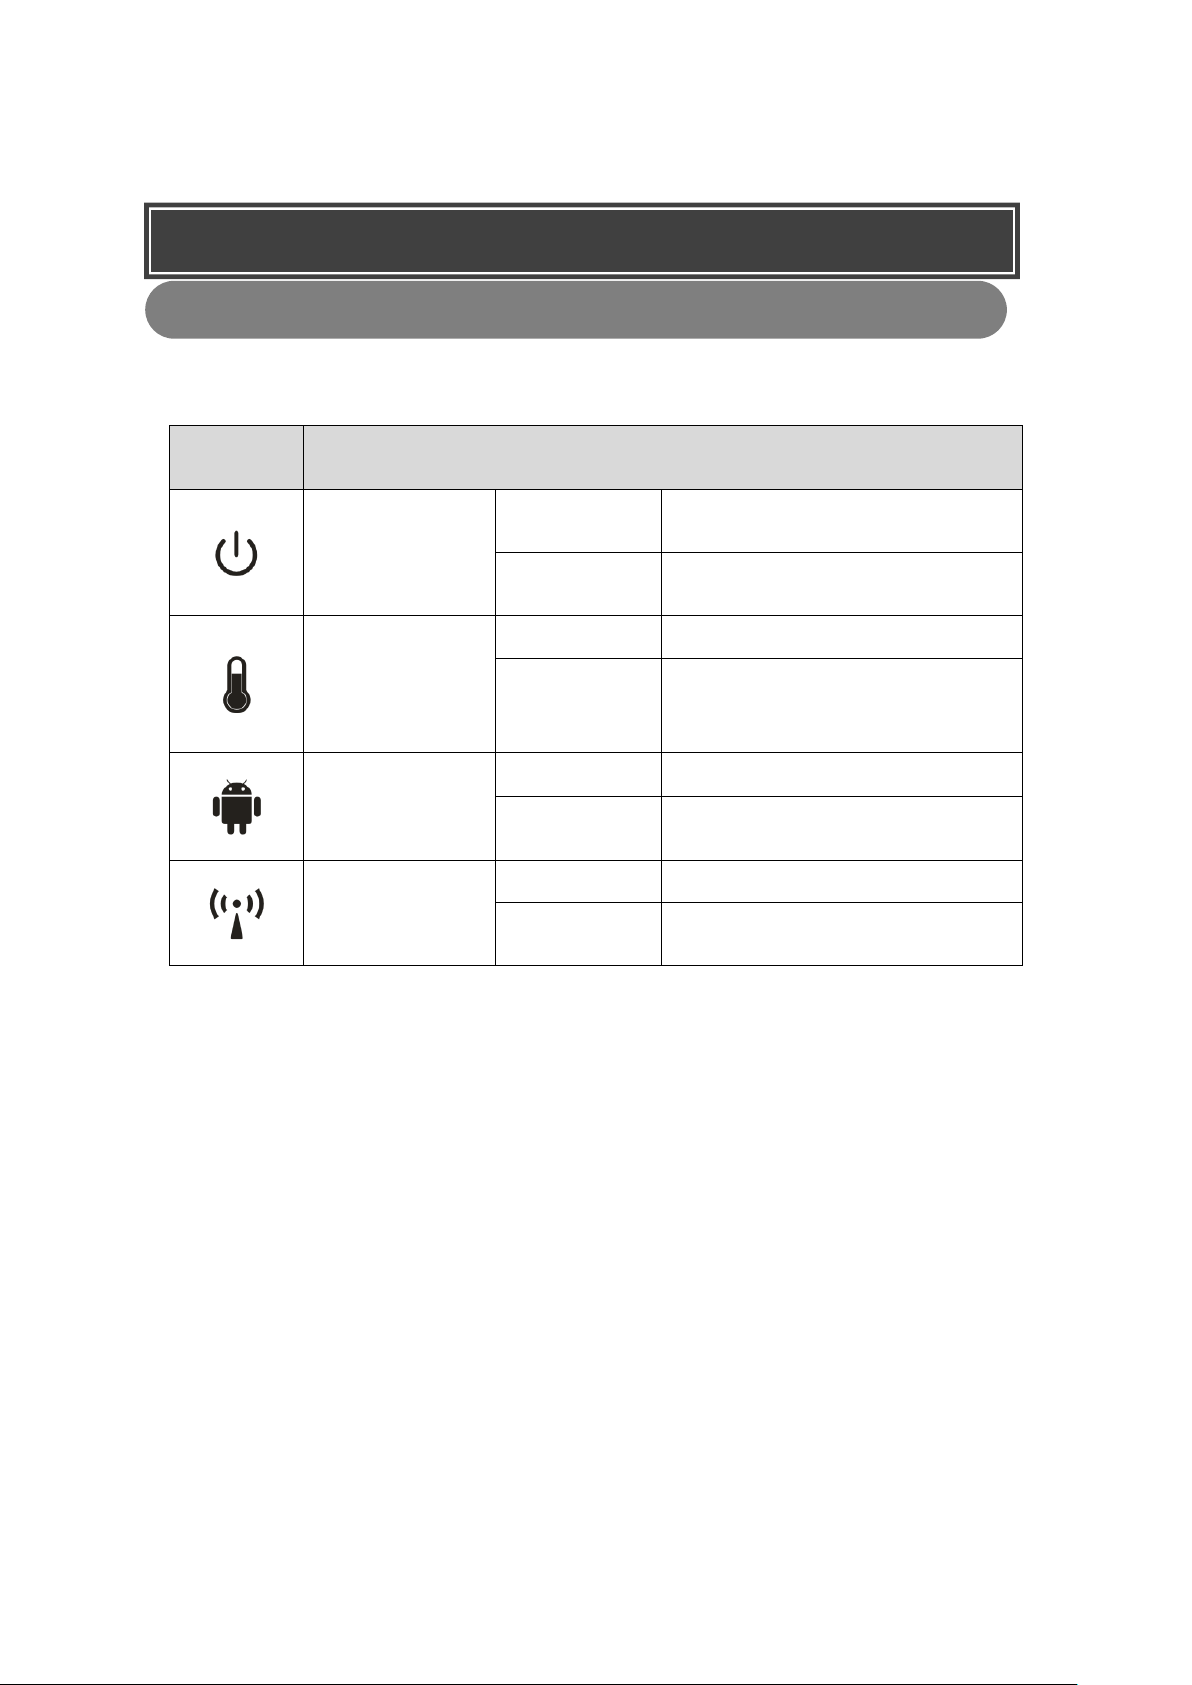
Indicator
Definition description
Power
Orange
Power adapter is plugged for
starting up
Blue
The projector is started and
available
Over-temperature
Warning
Off
Temperature of projector is normal
Red
Temperature of projector is
abnormal and turned off
automatically
System status
Off
Android system is not started
Blue
Android system is started and
available
Wifi status
Off
Wireless network is out of service
Blue
Wireless network is on and
available
Maintenance
The unit of light source
If the light source point is off, you must contact your dealer or HOLATEK
authorized service centre and commission them to replace it. However, please note
that due to the problems caused by disassembling or transforming projector arbitrarily
are not included in the scope of warranty and HOLATEK does not provided free
repair.
33
Page 33
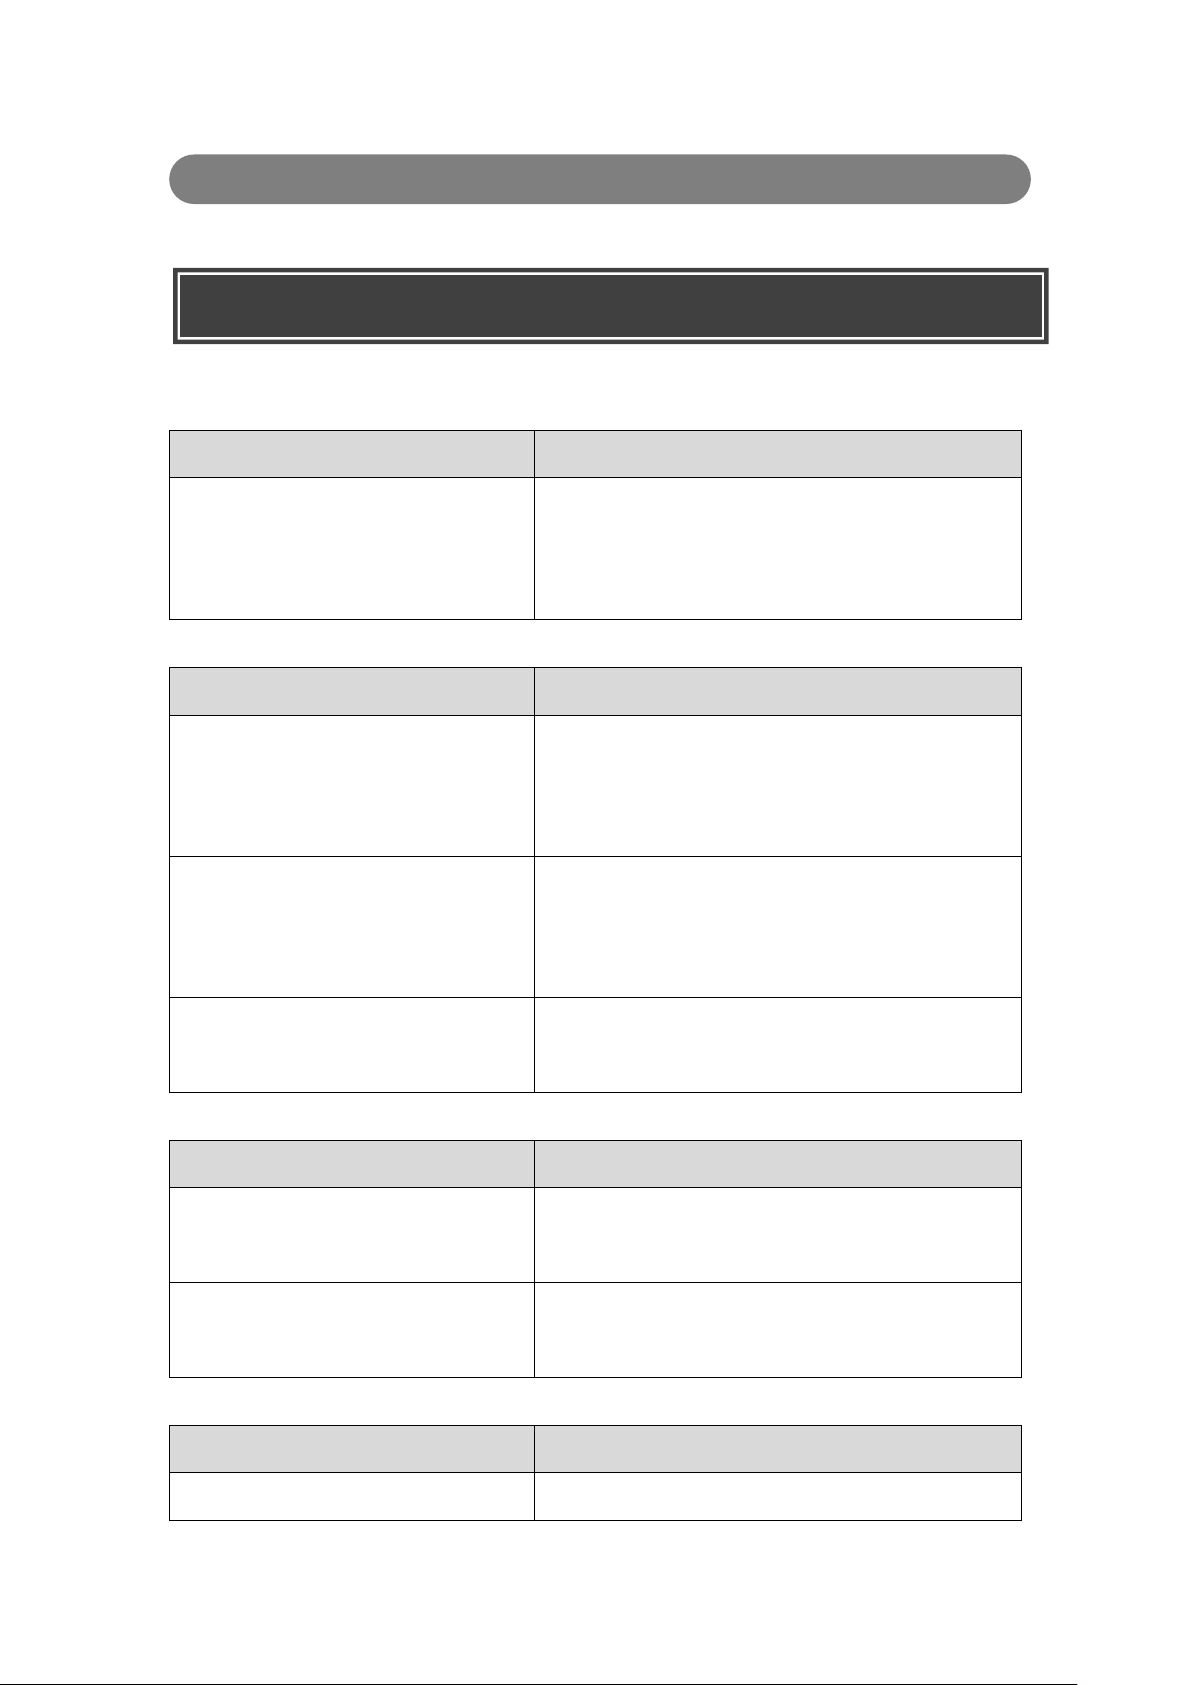
Indicator
Cause
Solution
The power cord is not plugged
Plug one end of the AC power cord into the
power connector and the other end into an outlet
( if there is a switch, make sure it is on)
Cause
Solution
Incorrectly select input signal
Select the input signal correctly through
“Source” button on the projector or on the
remote control
The projector doesn’t connect with
the equipment of input signal
correctly
Check the connection
The signal source of video is off or
is connected wrong
Turn on the signal source of video and check
whether the signal line is connected correctly
Cause
Solution
The lens is not focused correctly
Adjust the focal length of shot through the
regulating stem on the top of the lens
Projector and screen are not
aligned
Adjust the angle and direction of projecting. If
necessary, adjust the height of projector
Cause
Solution
Low battery
Replace the battery
Troubleshotting
If there are any problems with the projector, please check the followings:
● Projector fails to boot up
● No pictures
● Image blur
● Remote control failure
34
Page 34
There is a barrier between remote
control and projector
Remove the barrier
The remote control is too far away
from projector
The distance from remote control to projector is
not exceeding 8 meters (26 feet)
Attention!
Please try the following operations and maybe the projector will return
to normal:
Pull out AC cord and wait for at least 10 minutes;
Plug AC cord and turn on the power again.
If the projector still fail in retuning normal, please send it to the dealer
or HOLATEK authorized service centre.
Specifications
All specifications are subjected to change without notice
35
Page 35
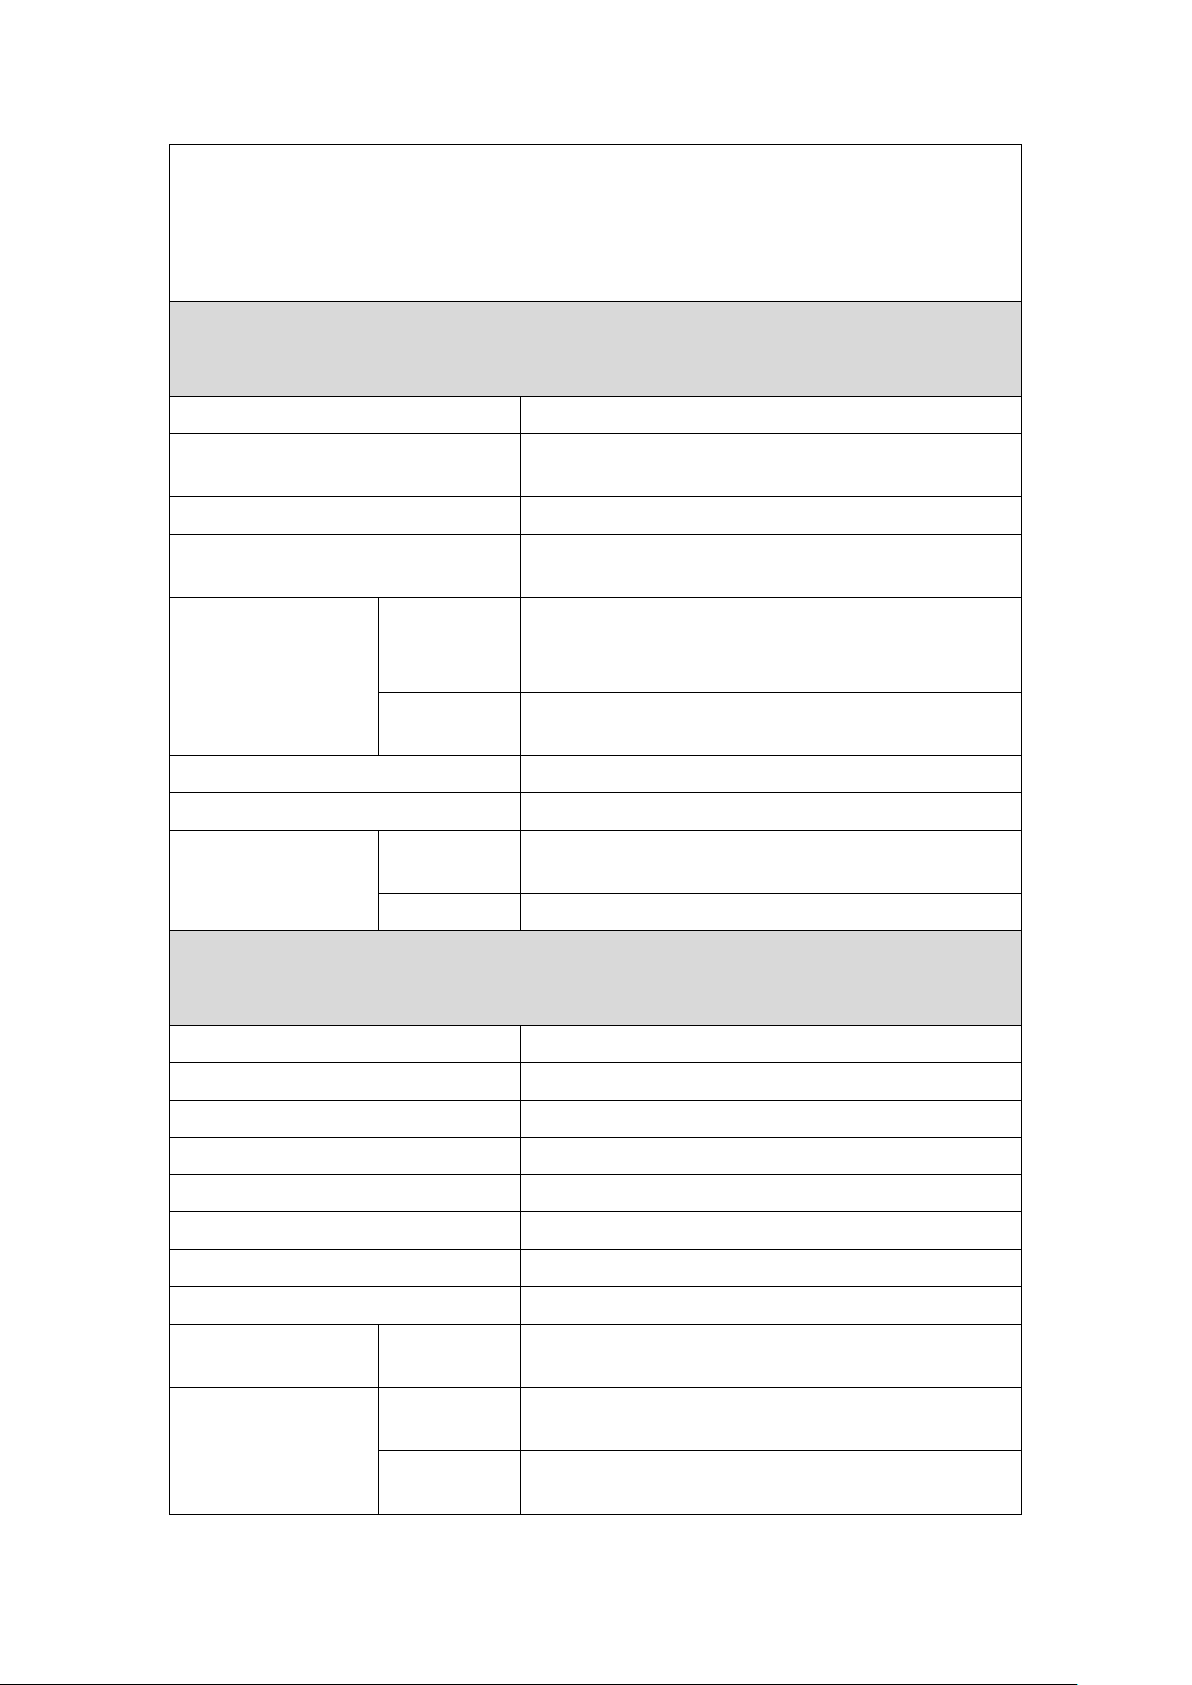
HOLATEK-A3 3D LED Smart Projector & TV
(LED portable projector, recreational projector, household projector)
● Optical parameter
Projection technology
DLP
Displayed chip
Digital Light Procession Projection Technology
of Texas Instrument of America
Lightness
1000 Lumen
Contract ratio
2500:1
2500:1
Resolution
Recommen
ded
resolution
1280*720
Maximum
1920*1080P
Type of light resource
LED
LED power
30W
LED life
Normal
mode
20,000 hours
Eco mode
30,000 hours
● Projection parameter
Methods of zooming
Manual zooming
Effective focal length
14mm
Projection distance
0.5m to infinite
Projection ratio
1.2
Projection size
17-300 inches (38”@1m)
Projection methods
Front projection, back projection and ceiling
Screen proportion
16:10 16:9 4:3
Color amount
1.07 billion colors
Trapezoid
correction
Vertical
±40 degree
Scanning
frequency
Horizontal
31-99KHz
31-99KHz
Vertical
48-120Hz
48-120Hz
36
Page 36
Computer compatibility
480i,480p,576i,576p,720p,1080i,1080p
Video compatibility
NTSC,PAL,SECAM
Loudspeaker
2W(double loudspeakers)*2
● Android parameter
Android
V4.2
CPU
Dual-Core
GPU
Mali400MP2 *2
RAM
1GB DDR3
Hard disk
8GB ROM
Audio function
Multichannel high-fidelity audio
Ethernet
WLAN
Bluetooth
● Interface parameter
Power interface
Input terminal
Output terminal
Audio Jack *1
USB
USB2.0 *2
OTG
OTG *1
● Electrical specifications
Product noise
Normal
mode
35dB
Eco mode
26dB
Power
Normal
mode
50W
Eco mode
<1W
Power performance
DC12V,5A
Product weight
1.3kg
● Random accessories
Packing list
3D LED Smart Projector & TV *1
RJ-45
Support 802.11b/g/n
Support 802.11b/g/n
Bluetooth TM v4.0
DC Jack(12V/5A) *1
HDMI *1
37
Page 37
Remote control *1
Alternating current power line *1
USB line *1
User manual *1
Guarantee card *1
Warranty
information
Warranty
policy
Enjoy nationwide quality assurance and the three
guarantees service
Term of
quality
guarantee
1 year
Service
hotline
400-662-0138
Monday to Friday: 9:00-18:00
Company name: Holatek Science and Technology Development Co., Ltd
Company address: Room 1001, Unit 4, Building B, Kexing Science Park, Keyuan
Road, Central Area of High-tech Park, Nanshan District, Shenzhen City
Disclaimer
If the configuration of the projector is modified, the latest official configuration shall
prevail.
38
Page 38

Warranty and copyright information
● Warranty
HOLATEK warrants the product against any defects in material and workmanship
under normal usage and storage.
Proof of purchase date will be required with any warranty claim. In the event the
product is found to be defective within the warranty period, HOLATEK will assume
the obligation to replace any defective parts (labor cost included) for you. If any
defects are found, to obtain warranty service, you shall immediately notify the dealer
from whom you purchased the machine.
Important notes:
The above warranty shall be void if the customer fails to operate the product in
accordance with the instructions of the User Manual of HOLATEK, especially the
provisions that ambient humidity must be in-between 20% and 80%, altitude shall be
lower than 3,000 m, and avoiding operating the projector in a dusty environment. This
Warranty gives you specific legal rights, and you may have other rights which vary
from country to country.
● Copyright
Copyright © 2013 by HOLATEK Development Co., Ltd (HOLATEK). All rights
reserved. No part of the User Manual may be reproduced, transmitted, transcribed and
stored in a retrieval system or translated into any language or computer language in
any form or by any means, including electronic, mechanical, magnetic, optical,
chemical, manual means or otherwise, without the prior written permission of
HOLATEK
● Disclaimer
HOLATEK makes no representations or warranties, either expressed or implied, with
respect to the contents hereof, specifically disclaims any warranties, merchantability
or fitness for any particular purpose. Moreover, HOLATEK reserves the right to
revise and alter the User Manual from time to time with regard to the contents hereof
without notifying any person.
* DLP is the trademark of Texas Instruments. Others are copyrights of their respective companies
or organizations.
39
Page 39

FCC Information and Copyright
This equipment has been tested and found to comply with the limits for a Class B digital device,
pursuant to part 15 of the FCC Rules.
These limits are designed to provide reasonable protection against harmful interference in a residential
installation. This equipment generates,
uses and can radiate radio frequency energy and, if not installed and used in accordance with the
instructions, may cause harmful interference
to radio communications. However, there is no guarantee that interference will not occur in a particular
installation. If this equipment does
cause harmful interference to radio or televi si on rece pt i on , whi ch can be determined by turning the
equipment off and on, the user is
encouraged to try to correct the interference by one or more of the following measures:
—Reorient or relocate the receiving antenna.
—Increase the separation between the equipment and receiver.
—Connect the equipment into an outlet on a circuit different from that to which the receiver is
connected.
—Consult the dealer or an experienced radio/TV technician for help.
This device complies with part 15 of the FCC Rules. Operation is subject to the
following two conditions:
(1)This device may not cause harmful interference, and
(2) this device must accept any interference received, including interference that may
cause undesired operation.
changes or modifications not expressly approved by the party responsible for compliance could
void the user's authority to operate the equipment.
This equipment complies with FCC radiation exposure limits set forth for an uncontrolled
environment .This equipment should be installed and operated with minimum distance 20cm
between the radiator& your body. This transmitter must not be co-located or operating in
conjunction with any other antenna or transmitter.
 Loading...