

Page 1
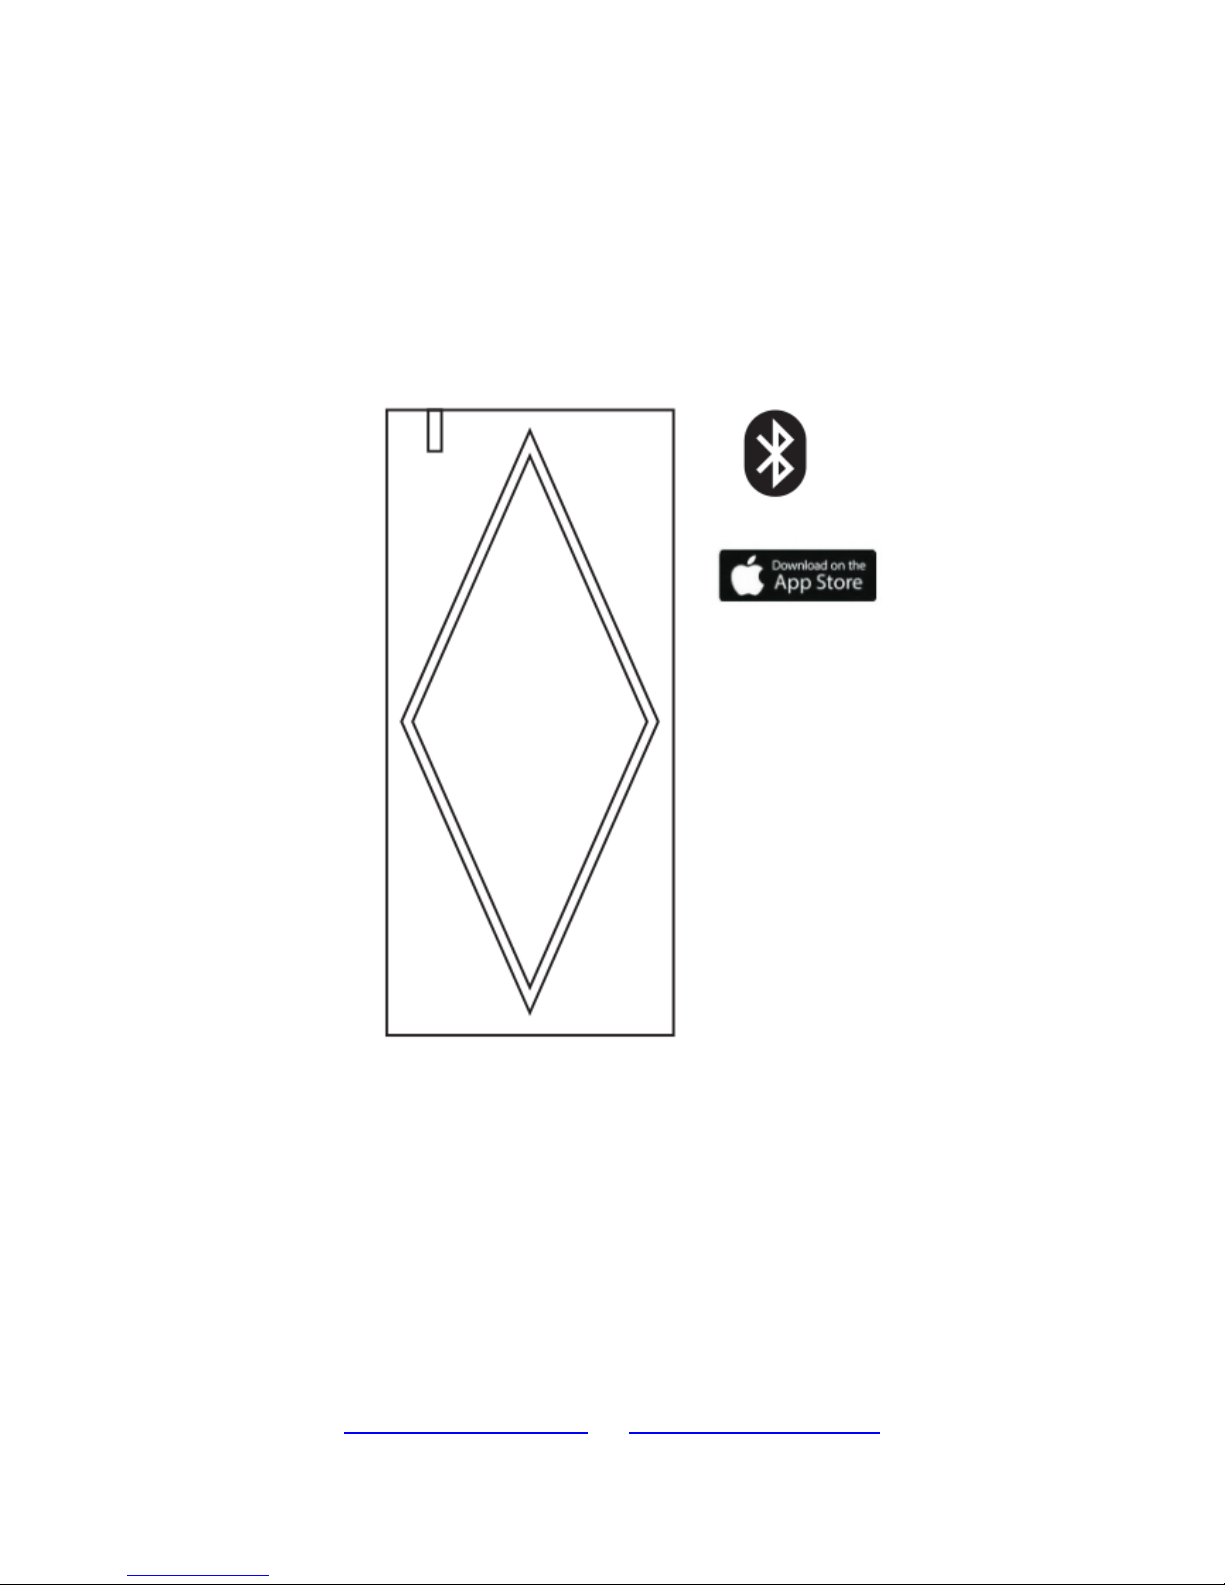
BT1-Bluetooth (For iOS)
Bluetooth Standalone Access Control
User Manual
www.holars.se – www.holars.no
Page 2

Introduction
The BT1-Bluetooth is a metal case anti-vandal standalone access control that can be mounted both
indoor and outdoor. The unique feature is it can be operated by mobile phone through Bluetooth or
13.56MHz Mifare or 125KHz EM Card. The operation is very smart and convenient.
Two versions optional:
IC Version:13.56MHz Mifare Card <---- Standard modell.
ID Version:125KHz EM Card
Features:
Vandal resistance enclosure
Waterproof, conform to IP66
One programming relay output
10,000 users(including Mifare and mobile phone user)
Two ways to open the door: Mifare Mobile phone.
Support opening the door through Bluetooth(version: 4.0 above),
APP supports iOS7.0 above
Support sending Remote E-key to others (the Administrator can control access time)
Latch mode to hold door or gate open
Multi-color LED status display
Specification:
User Capacity
Card
Mobile
10,000
13.56MHz Mifare Card
IOS7.0 above
Operating Voltage
Idle current
Active current
12V DC
≤35mA
≤90mA
Proximity Card Reader
Radio Technology
Card Read range
Mifare Card
13.56MHz
2~6cm
Bluetooth
Range
Reaction
Bluetooth Version:4.0 Above
<20m(relate to environment)
<2seconds
Relay
Lock Output Load
One(NO, NC, COM)
2 Amp Maximum
Environment
Operating Temperature
Operating Humidity
Meets IP66
-20C~+60C
0%~98%
Page 3
Physical
Dimension
Net Weight
Shipment Weight
Zinc-Alloy Enclosure
L103 X W48 X H19 (mm)
260g
300g
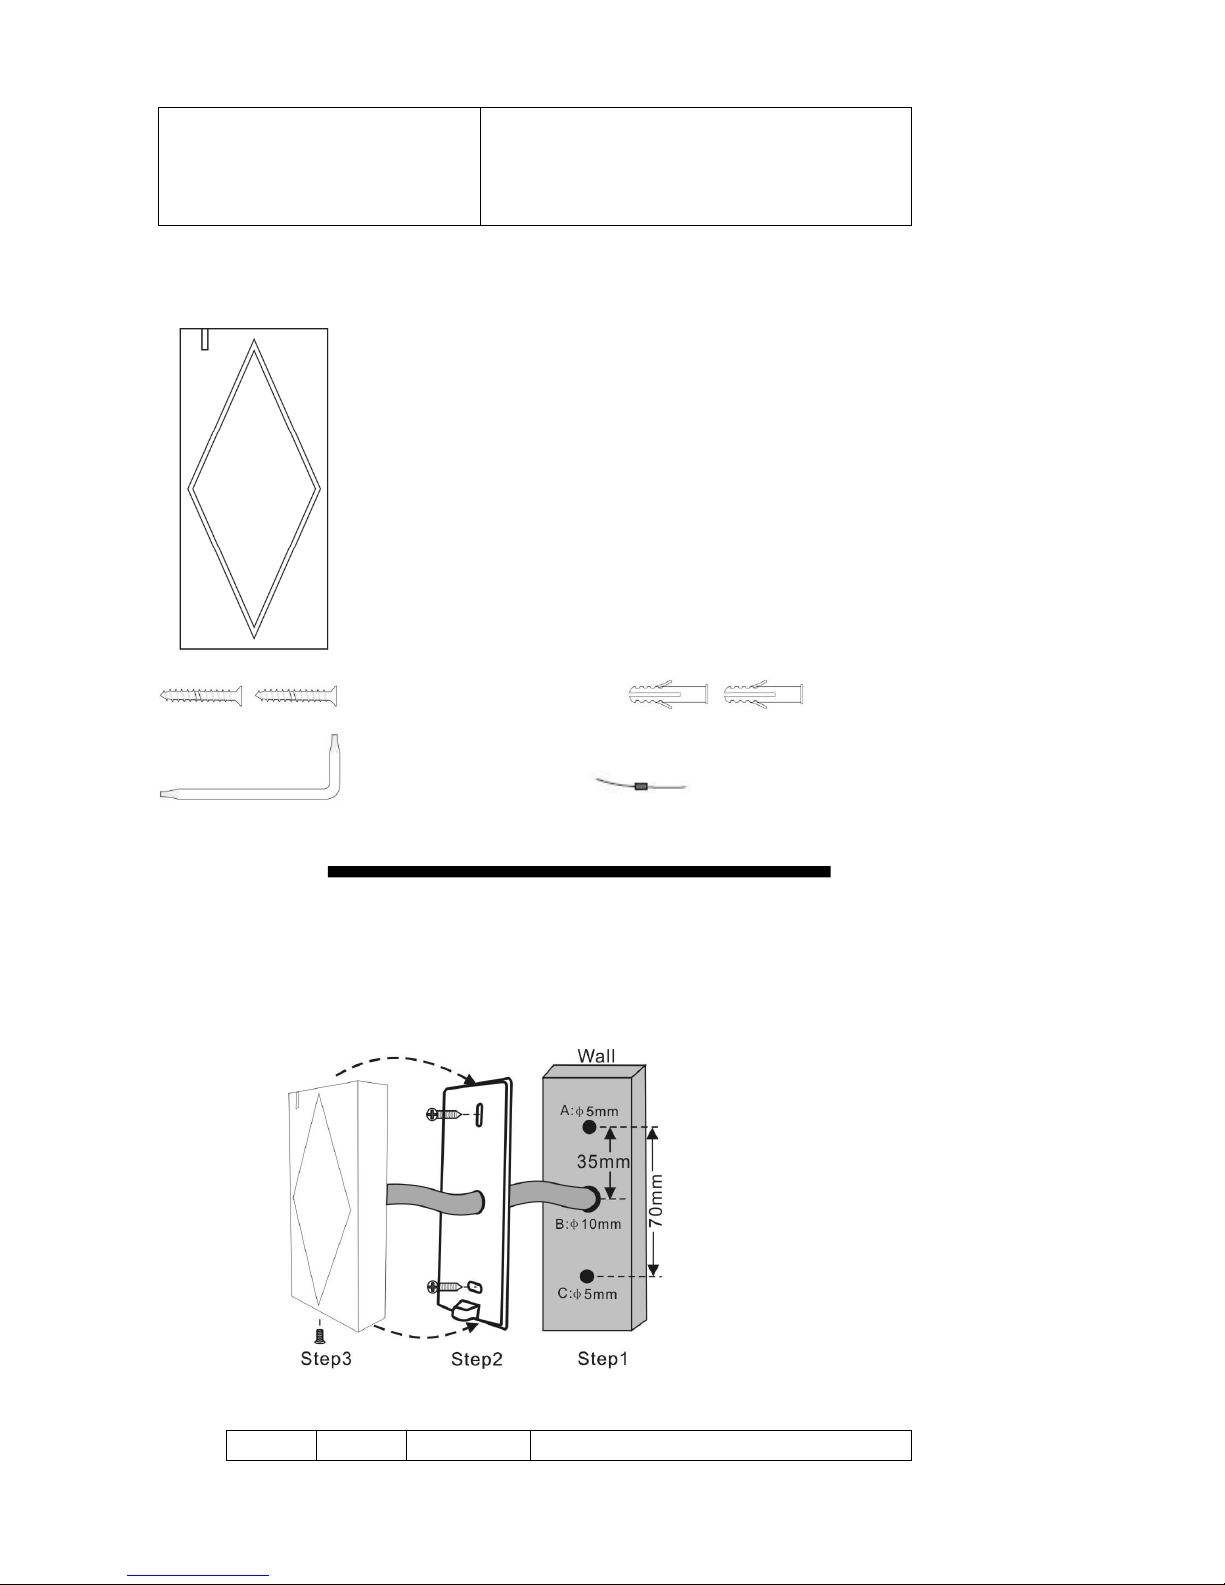
Carton Inventory
Self Tapping Screws Wall Anchors
Screw Driver Diode 1N4004 (For relay circuit protection)
Installation
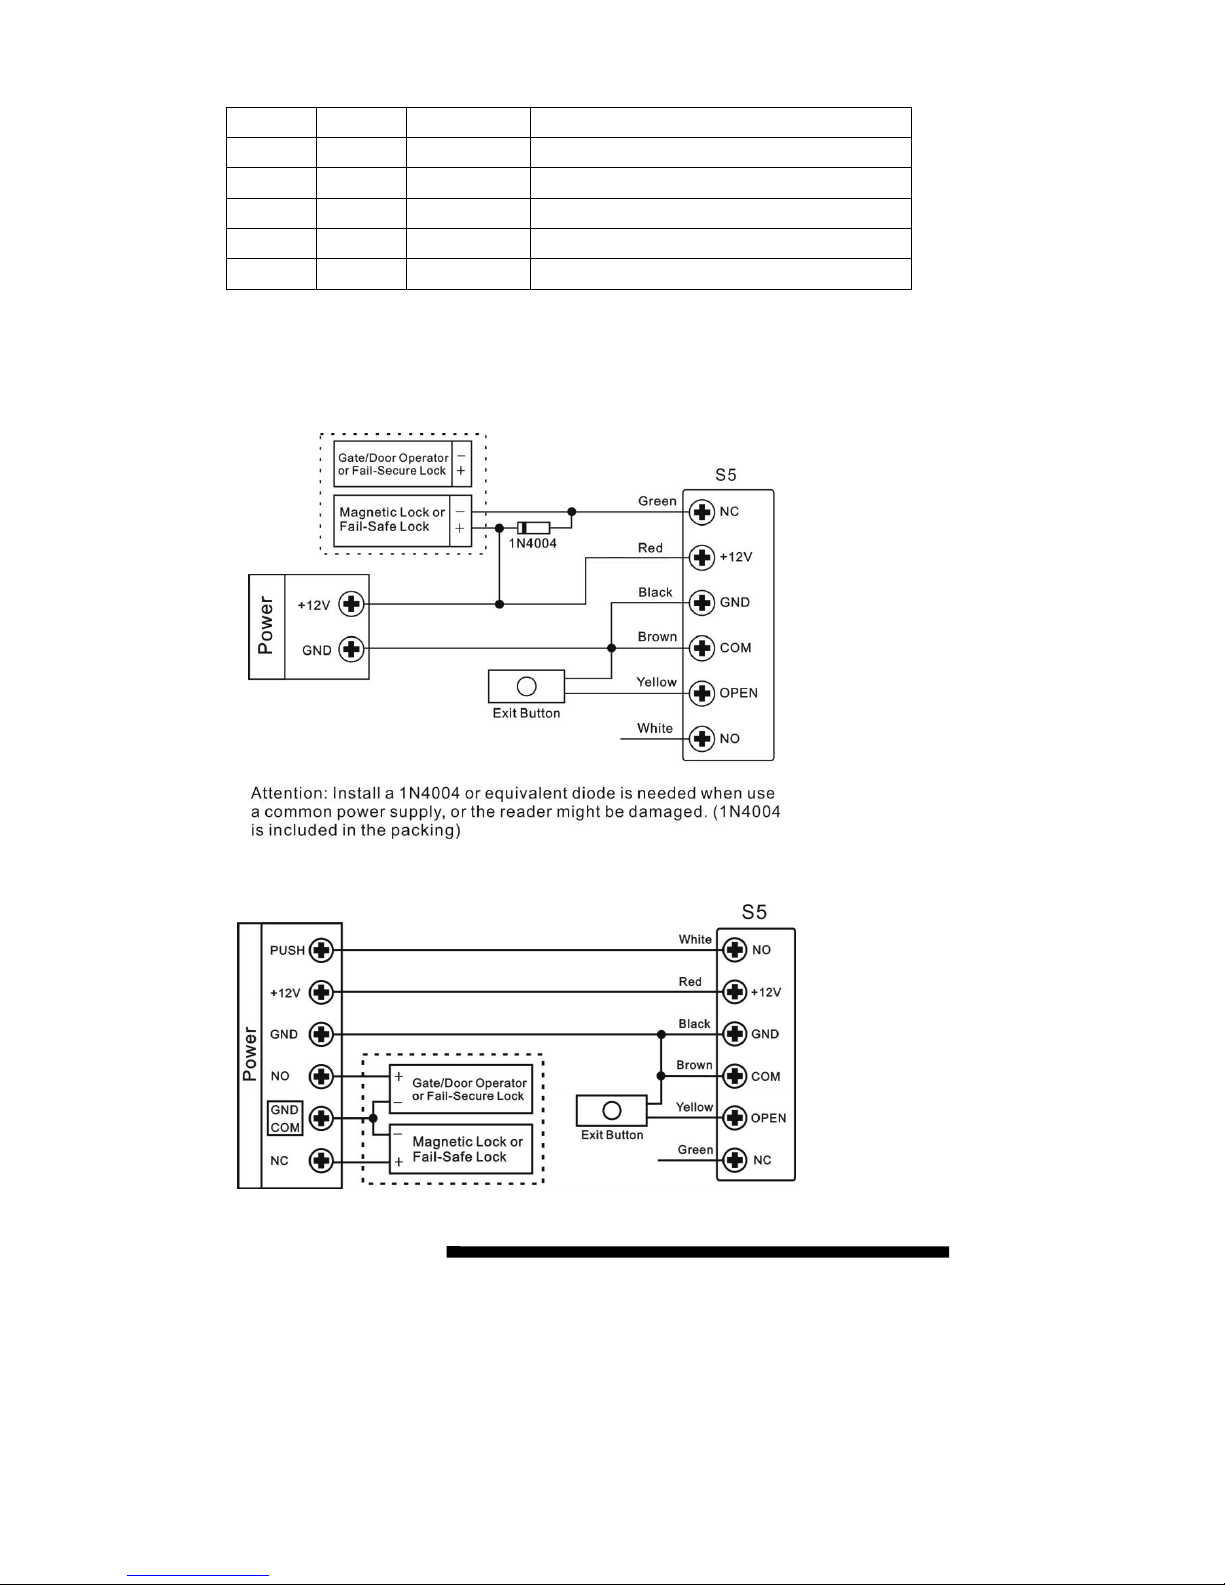
Drill 2 holes(A,C) on the wall for the screws and one hole for the cable, thread the cable
through the cable hole(B)
Knock the rubber bungs to the screw holes(A,C), fix the back cover firmly on the wall with 4
flat head screws
Attach the unit to the back cover.
Wiring
No.
Color
Function
Notes
Page 4
1
Green
NC
Normally Closed Relay Output
2
Brown
COM
Common Connection for Relay Output
3
White
NO
Normally Open Relay output
4
Black
GND
Negative Pole
5
Red
+12V
Regulated Power Input
6
Yellow
OPEN
Request to Exit input(REX)
Connection Diagram:
Common Power Supply:
Access Control Power Supply:
APP Operation
Here are just a few steps to get you started:
1) Make sure your iPhone / iPad connects to the network, and the Bluetooth is turn on
2) Free download APP
Page 5
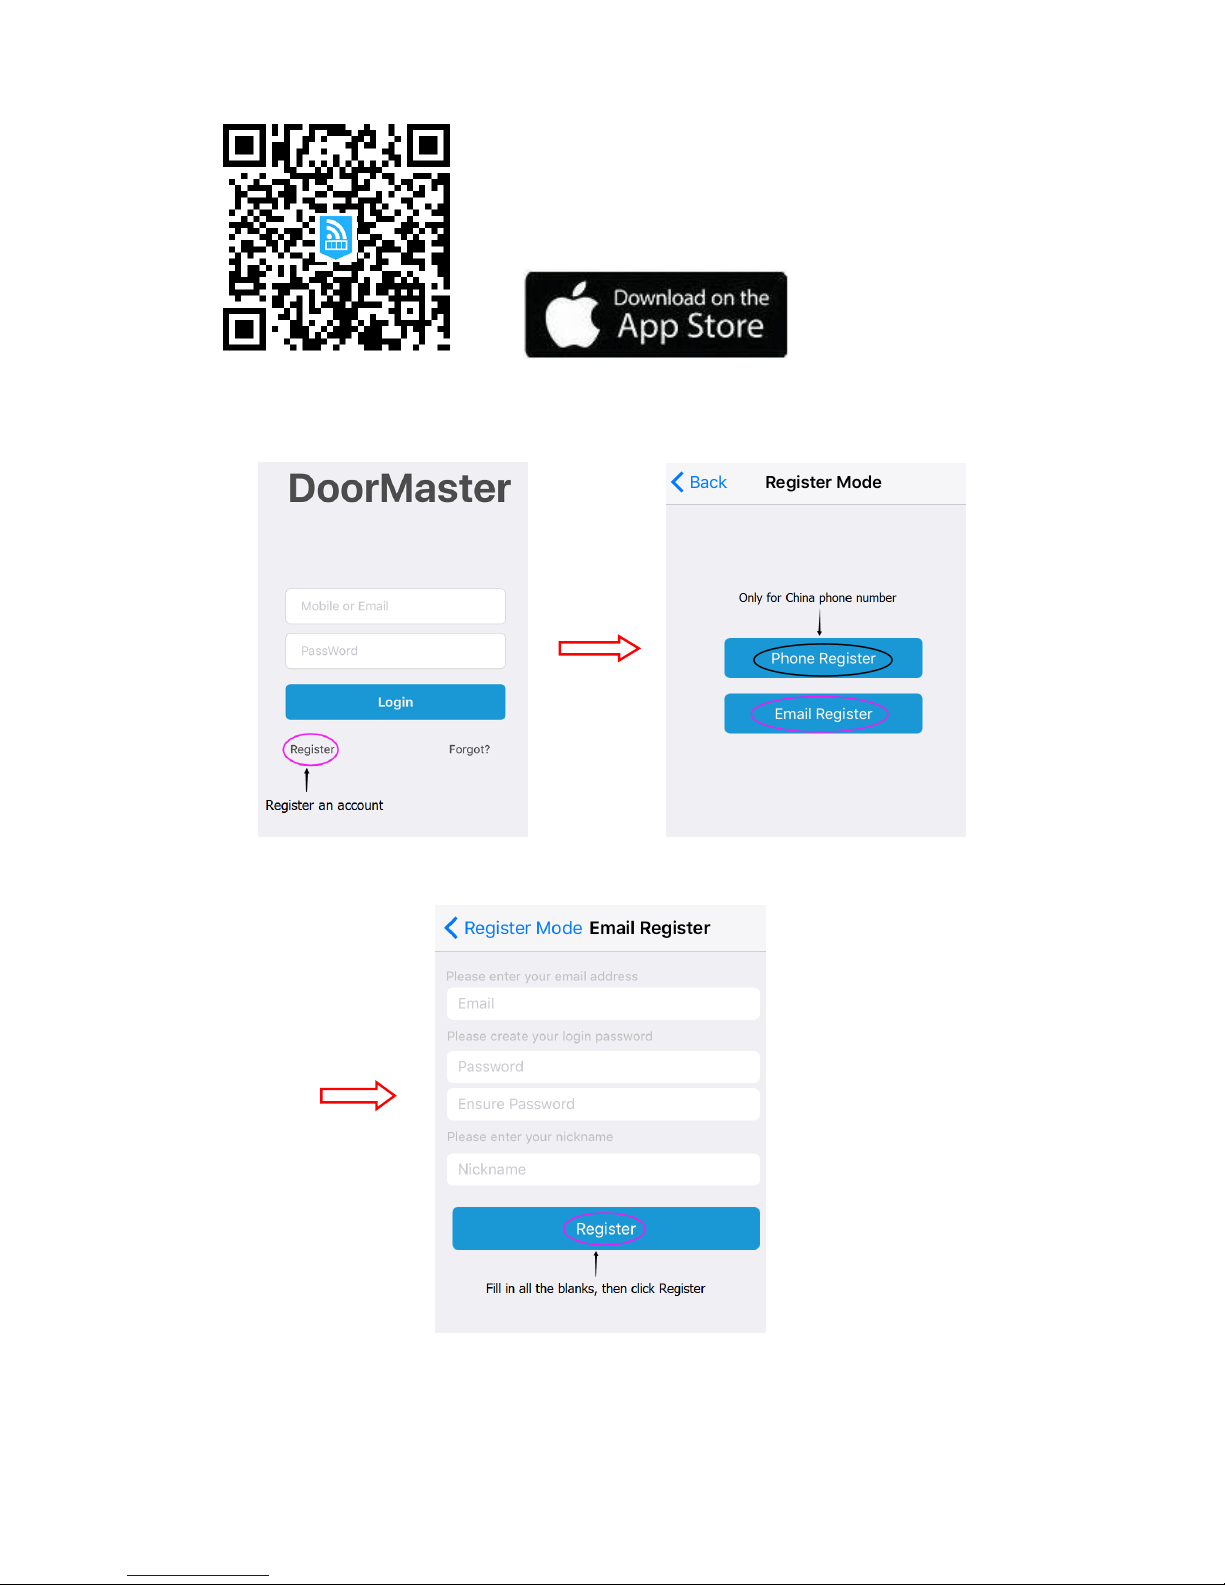
(Searching doormaster)
1. Register
Pic 01 Pic 02
Pic 03
You will get an email from DoorMaster
Page 6
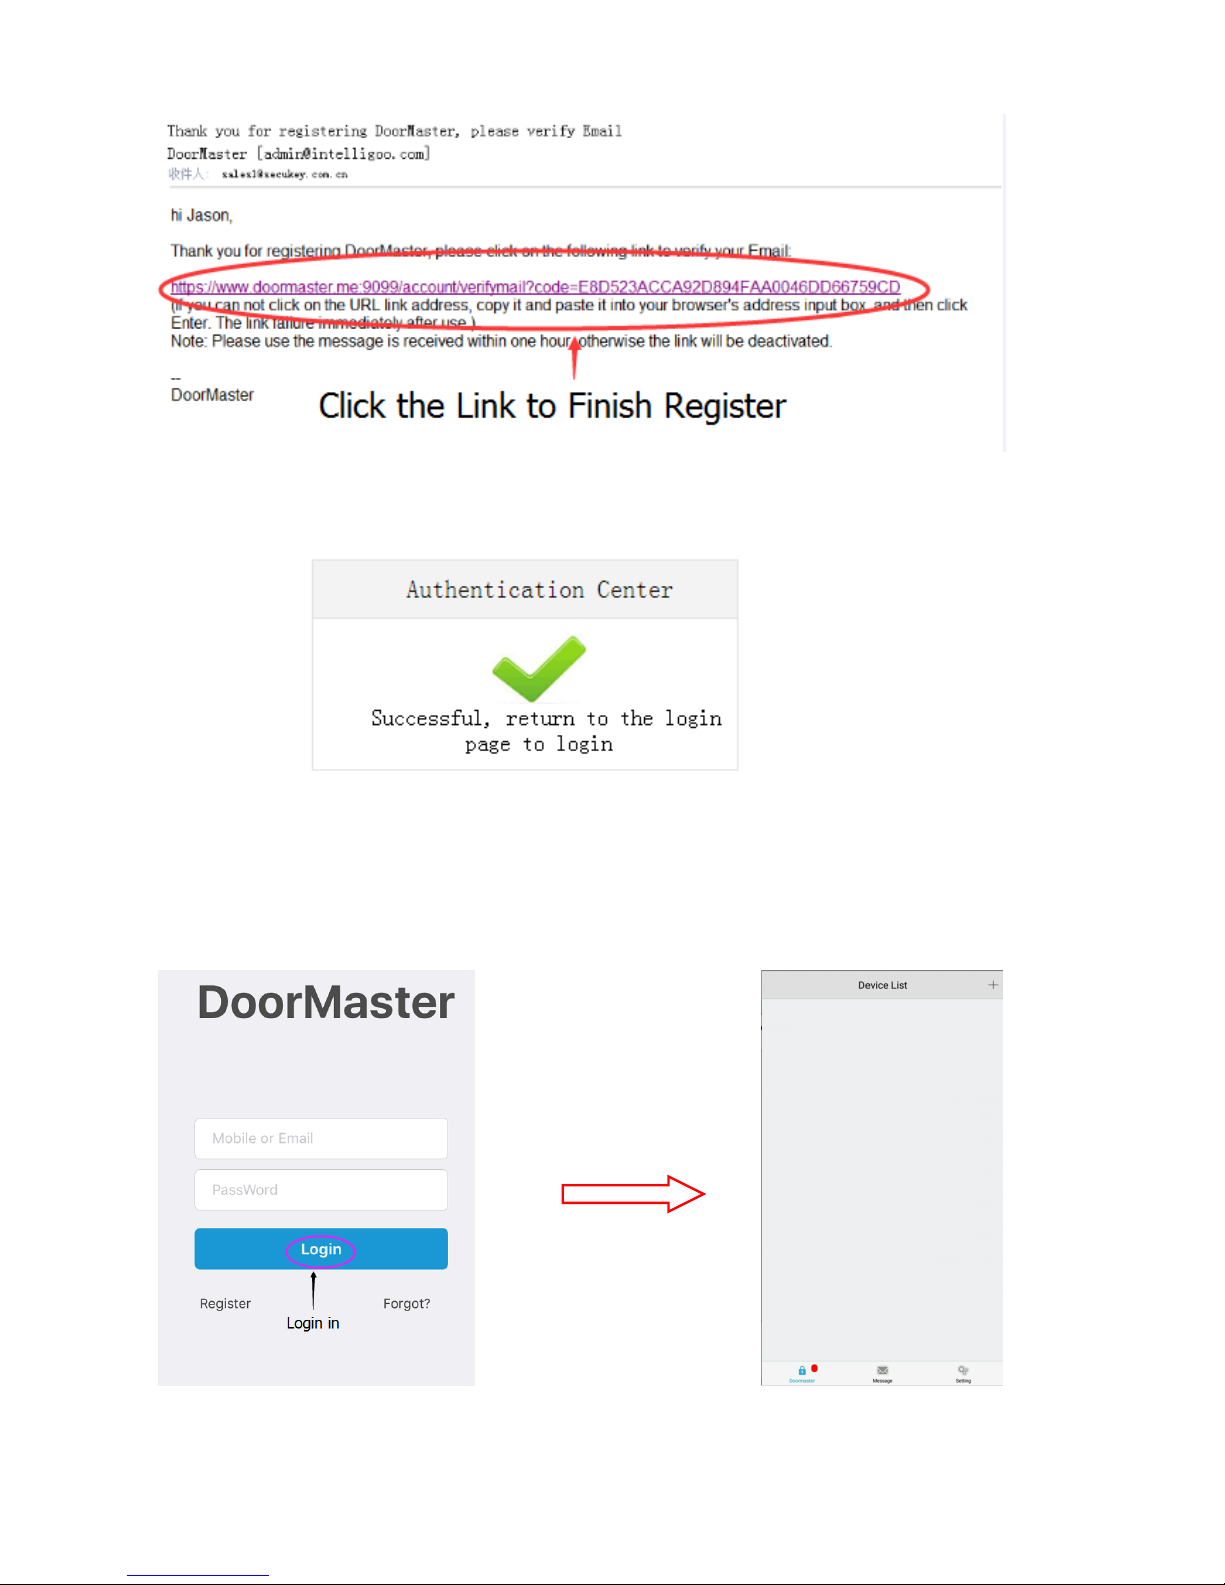
Pic 04
Then Register Successfully.
Pic 05
2. Add Device & Set Master Users
Below steps are only available for Masters. Each device has 1 Super Master and 10 Master Users
(The 1st user to add device is the Super Master, the 2nd~11th users to add device are Master Users)
. Login the App with your email address and password
Pic 06-1 Pic 06-2
Page 7
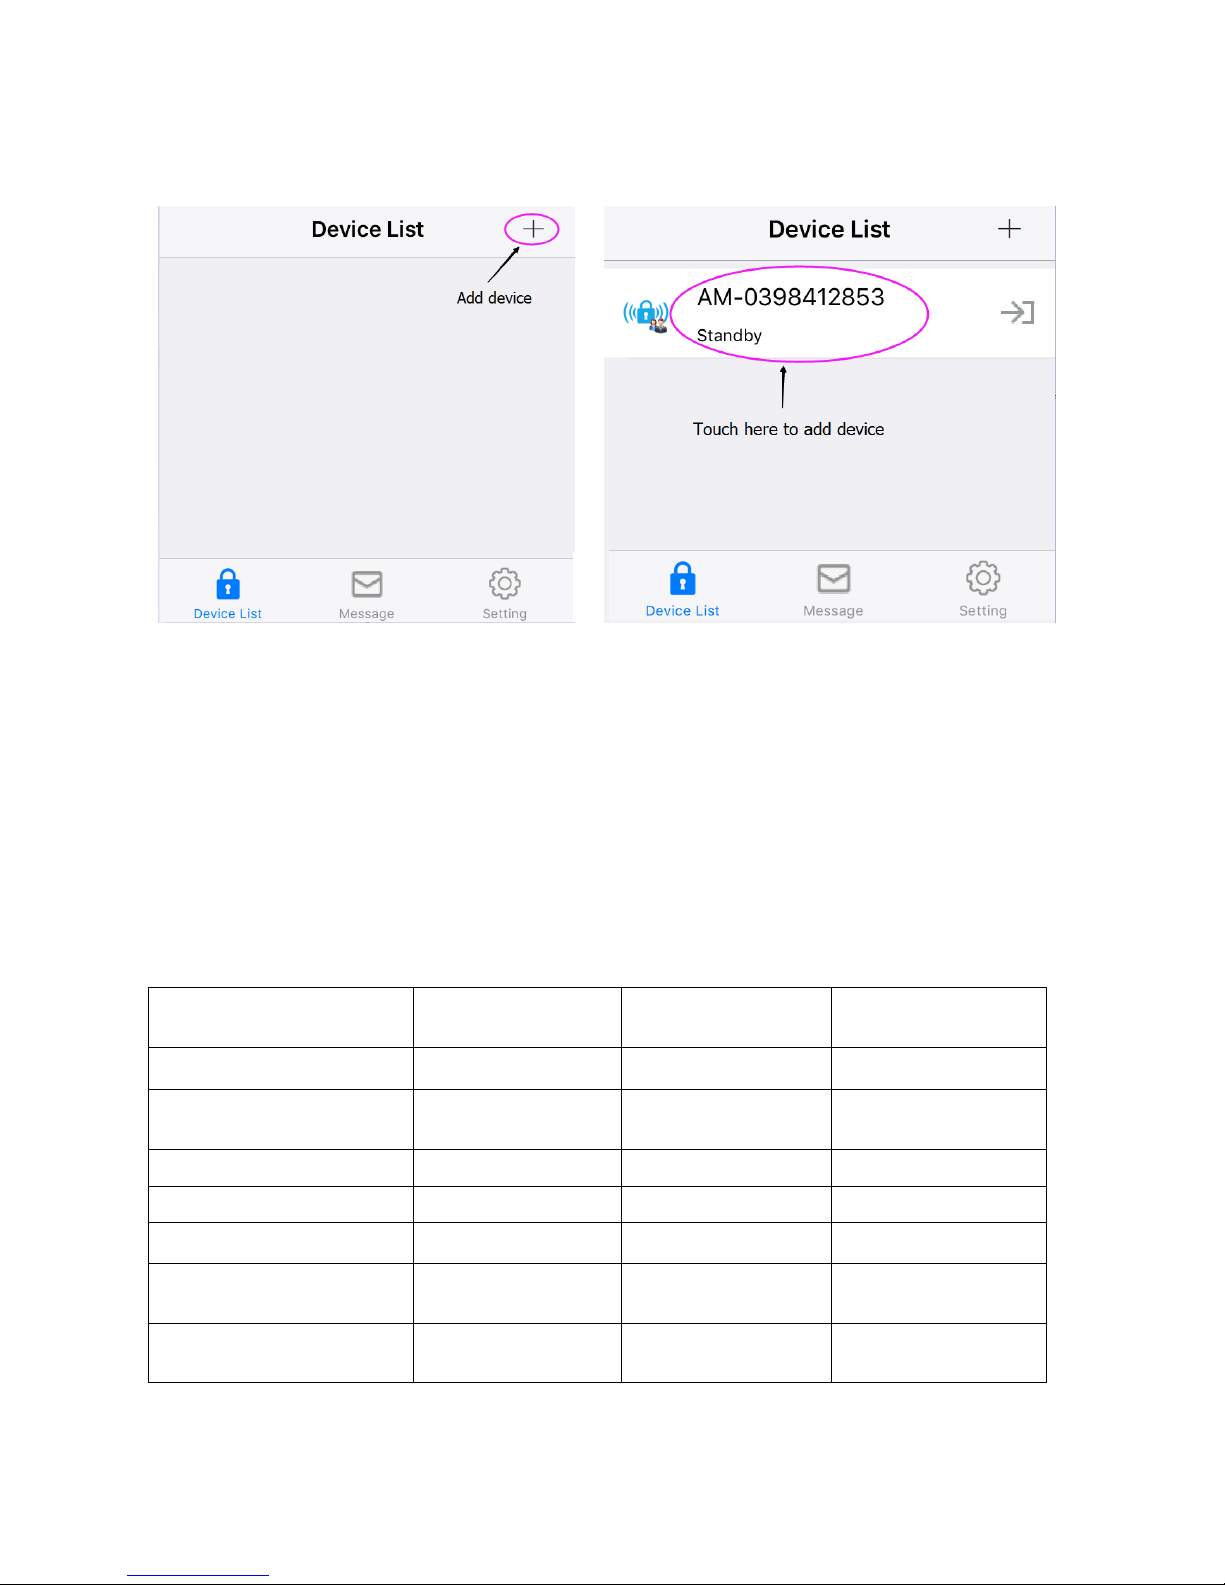
. Slowly press exit button for three times, when Red light shines, operate like below:
(Remark: If the Red light doesn’t shine, it means the Super Master has been added, please erase all
users firstly—refer to page14)
Pic 07 Pic 08
. When hear one “Beep”, means add device successfully.
(Remark: The Super Master and Masters should add device at one time, otherwise, the Super
Master need to send E-Key to other users and set them as Masters---Refer to page 11)
3. Add Common Users
Register an account, then ask the Super Master or Masters send E-Key
Below is Authority for Different Users
Authority
Super Master
User
Master Users
Common Users
Open Door
√ √ √
Change Device
Name
√ × ×
Add Card
√ √ ×
Delete Card
√ √ ×
Send E-Key
√ √ ×
Set Relay
Configuration
√ × ×
Set Common Users
as Master User
√ × ×
Page 8
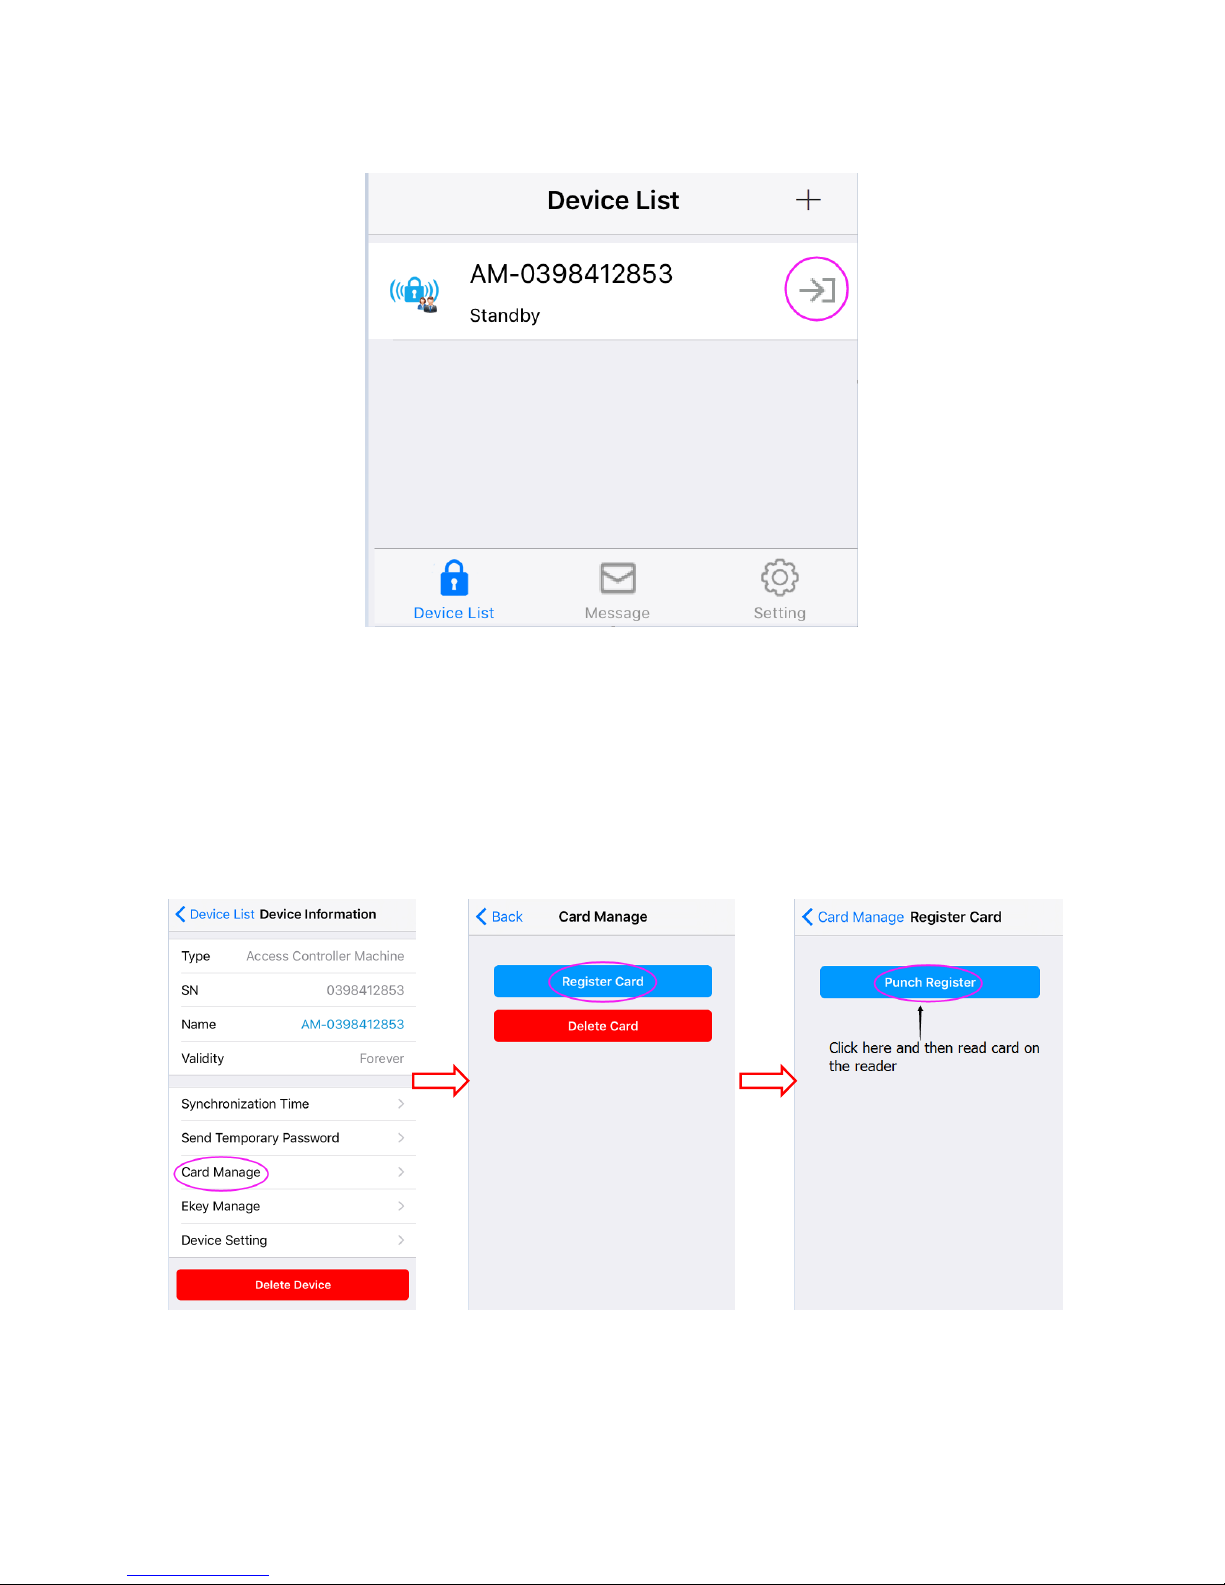
Press the key next to device name to enter configure setting menu (change device password setting
is not valid for the moment).
Pic 09
4. Add and Delete Card Users by App
Add Card Users
When hear one “Beep”, the Red LED shines once per second, the APP shows “Punch Register”,
click it, then read card on BT1 (Cards can be added continuously)
Pic 10 Pic 11 Pic 12
After one beep, it means the card is added successfully, press “Exit” to back to menu
Page 9
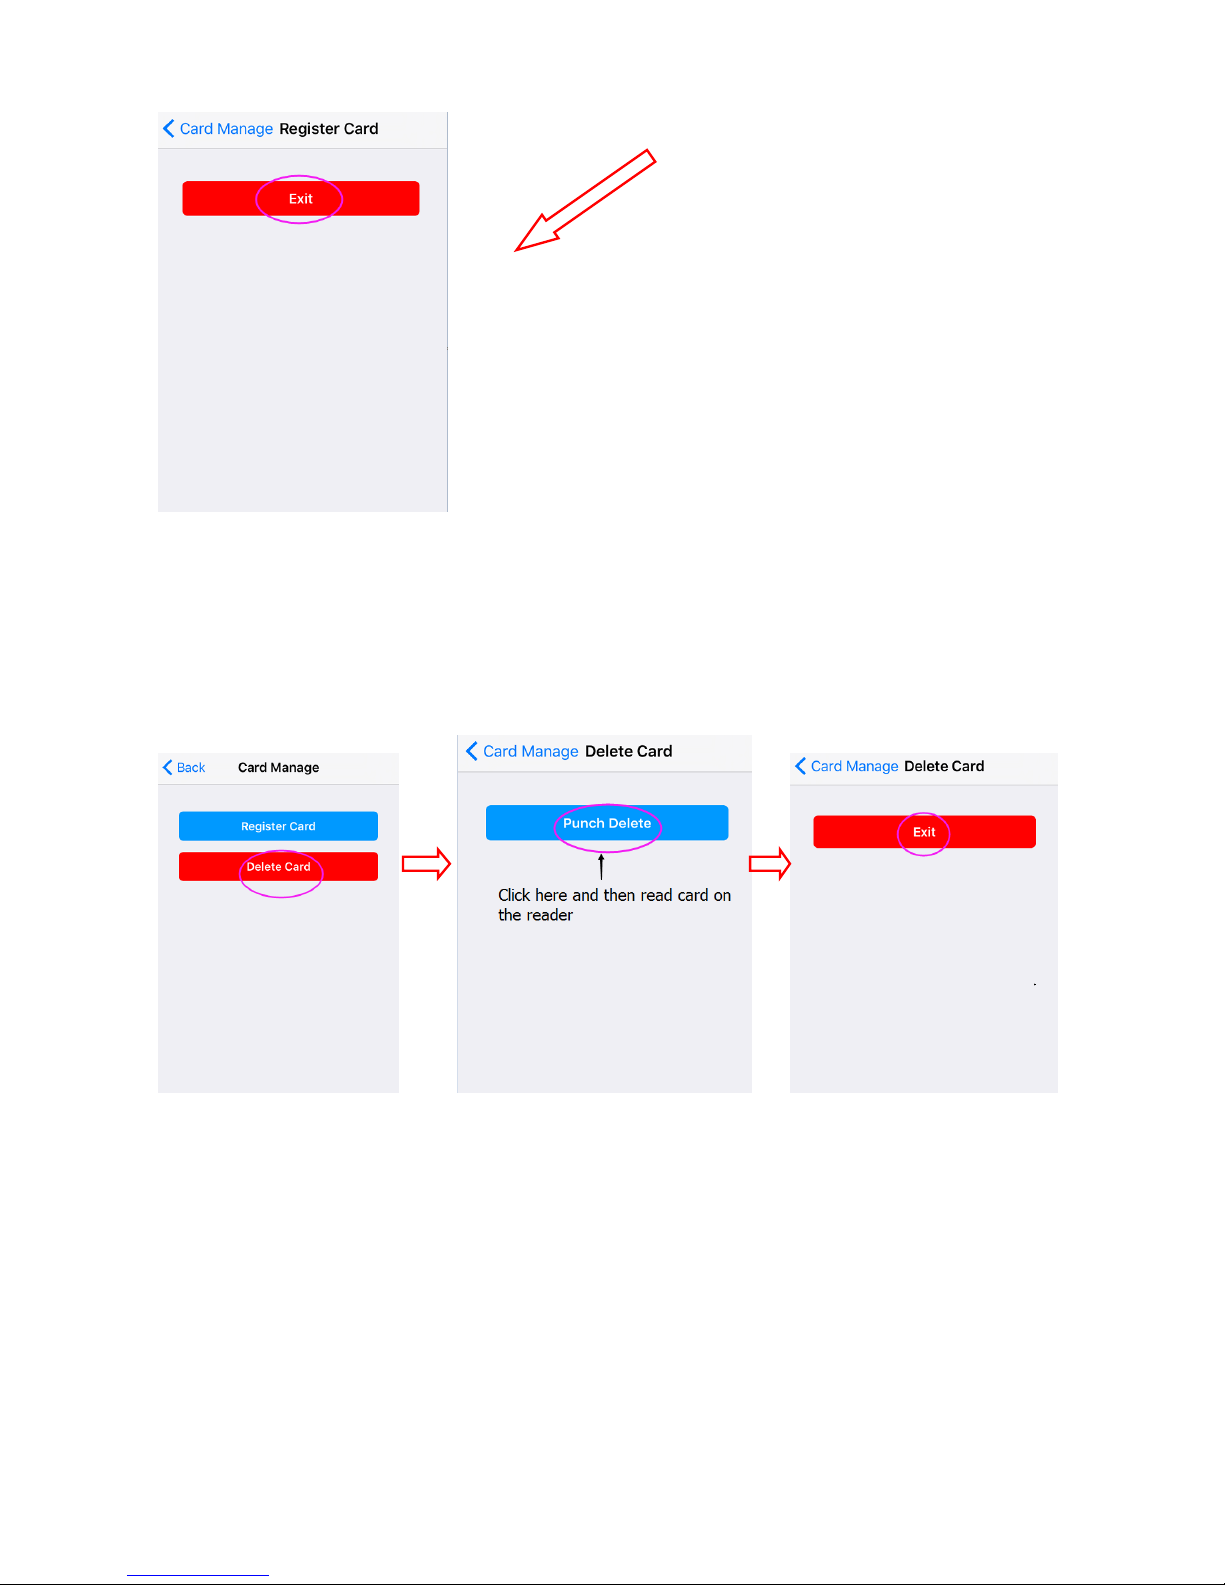
Pic 13
Delete Card Users
When hear one “Beep”, the Red LED shines once per second, the APP shows “Punch Delete”, click
it, then read card on BT1 (Cards can be deleted continuously), after one beep, it means the card is
deleted successfully, press “Exit” to back to menu.
Pic 14 Pic 15 Pic 16
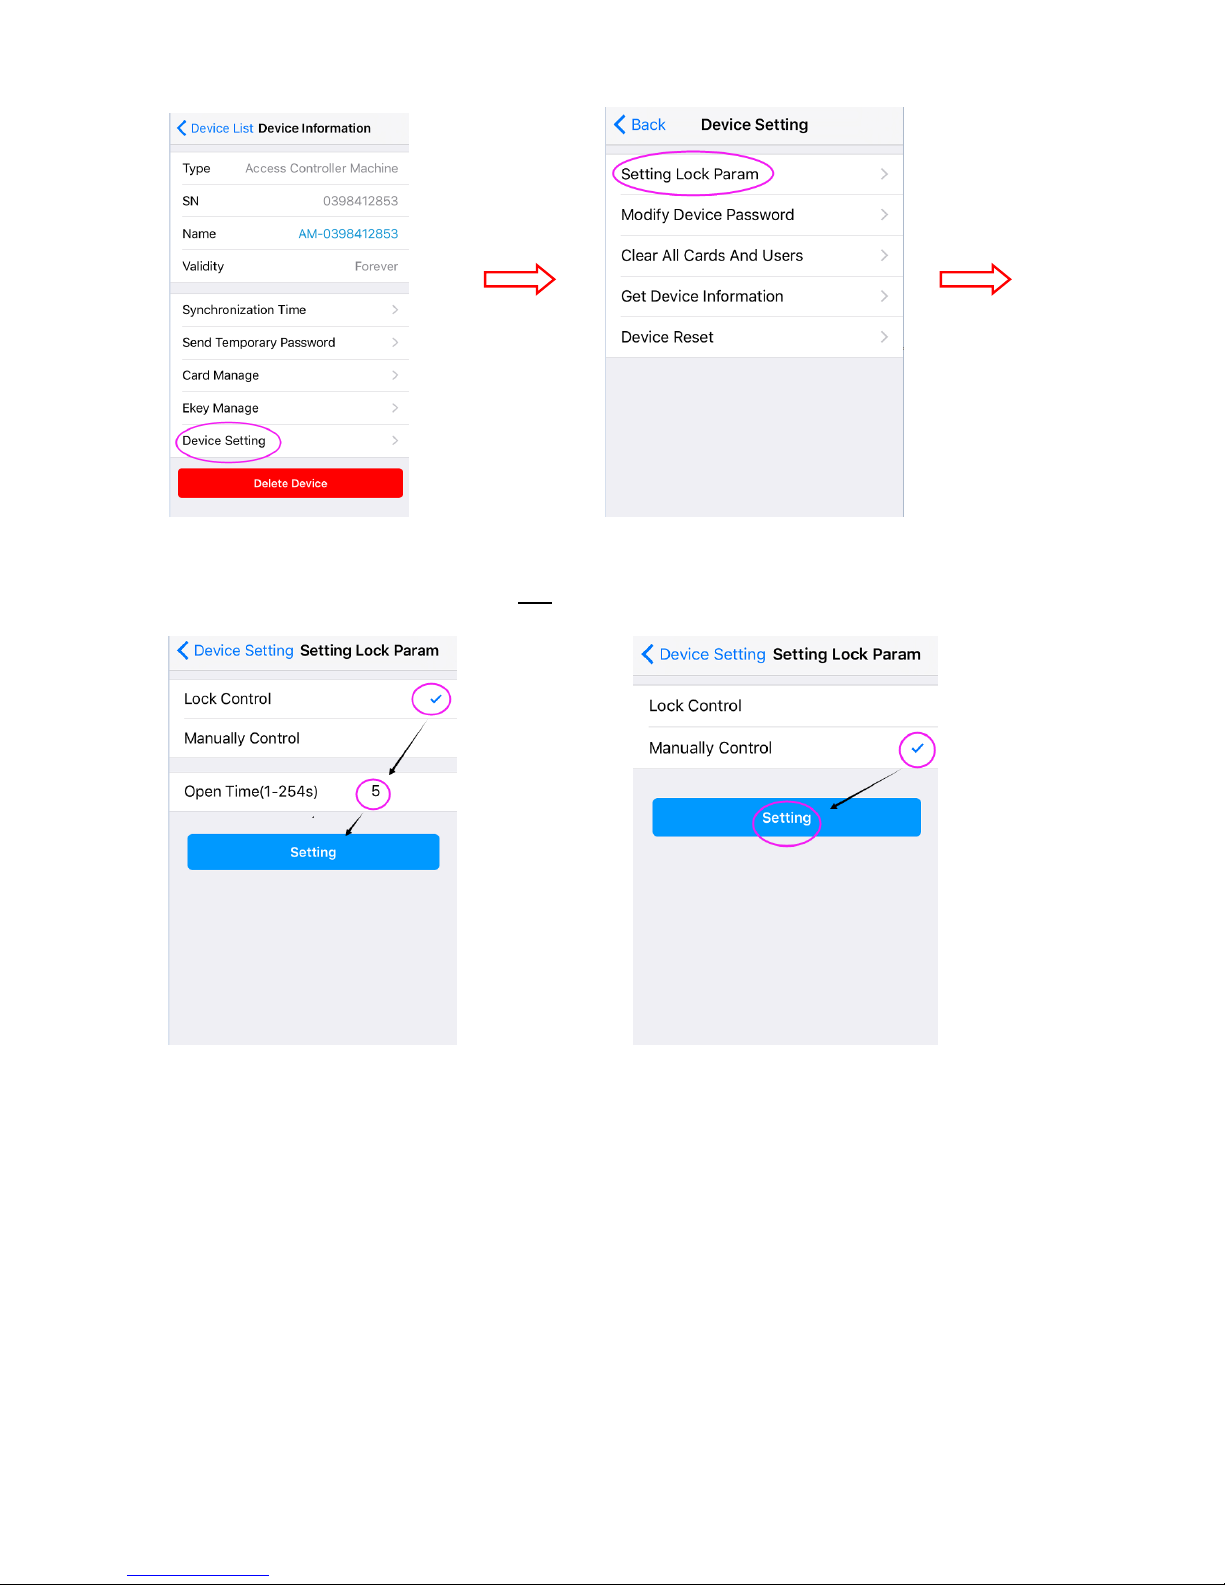
5. Set Relay Configuration
Lock Control: Set the door open time (Factory Default: 5 seconds)
Manually Control: Set the relay to ON/OFF mode (Latch mode)
Page 10
Pic 17 Pic 18
Lock Control Mode OR Manually Control Mode (Latch Mode)
Pic 19 Pic 20
6. Open door
1. Read the valid user card
2. Open the door by “Shaking” your mobile (Remark: This function is valid only after login
in App)
(Factory default is OFF)
Turn ON the “Shake open”: Login in >> Setting>>>Shake open ‘ON’
3. Open the door by App: login in the App, and touch the device to open the door
Page 11
Pic 21
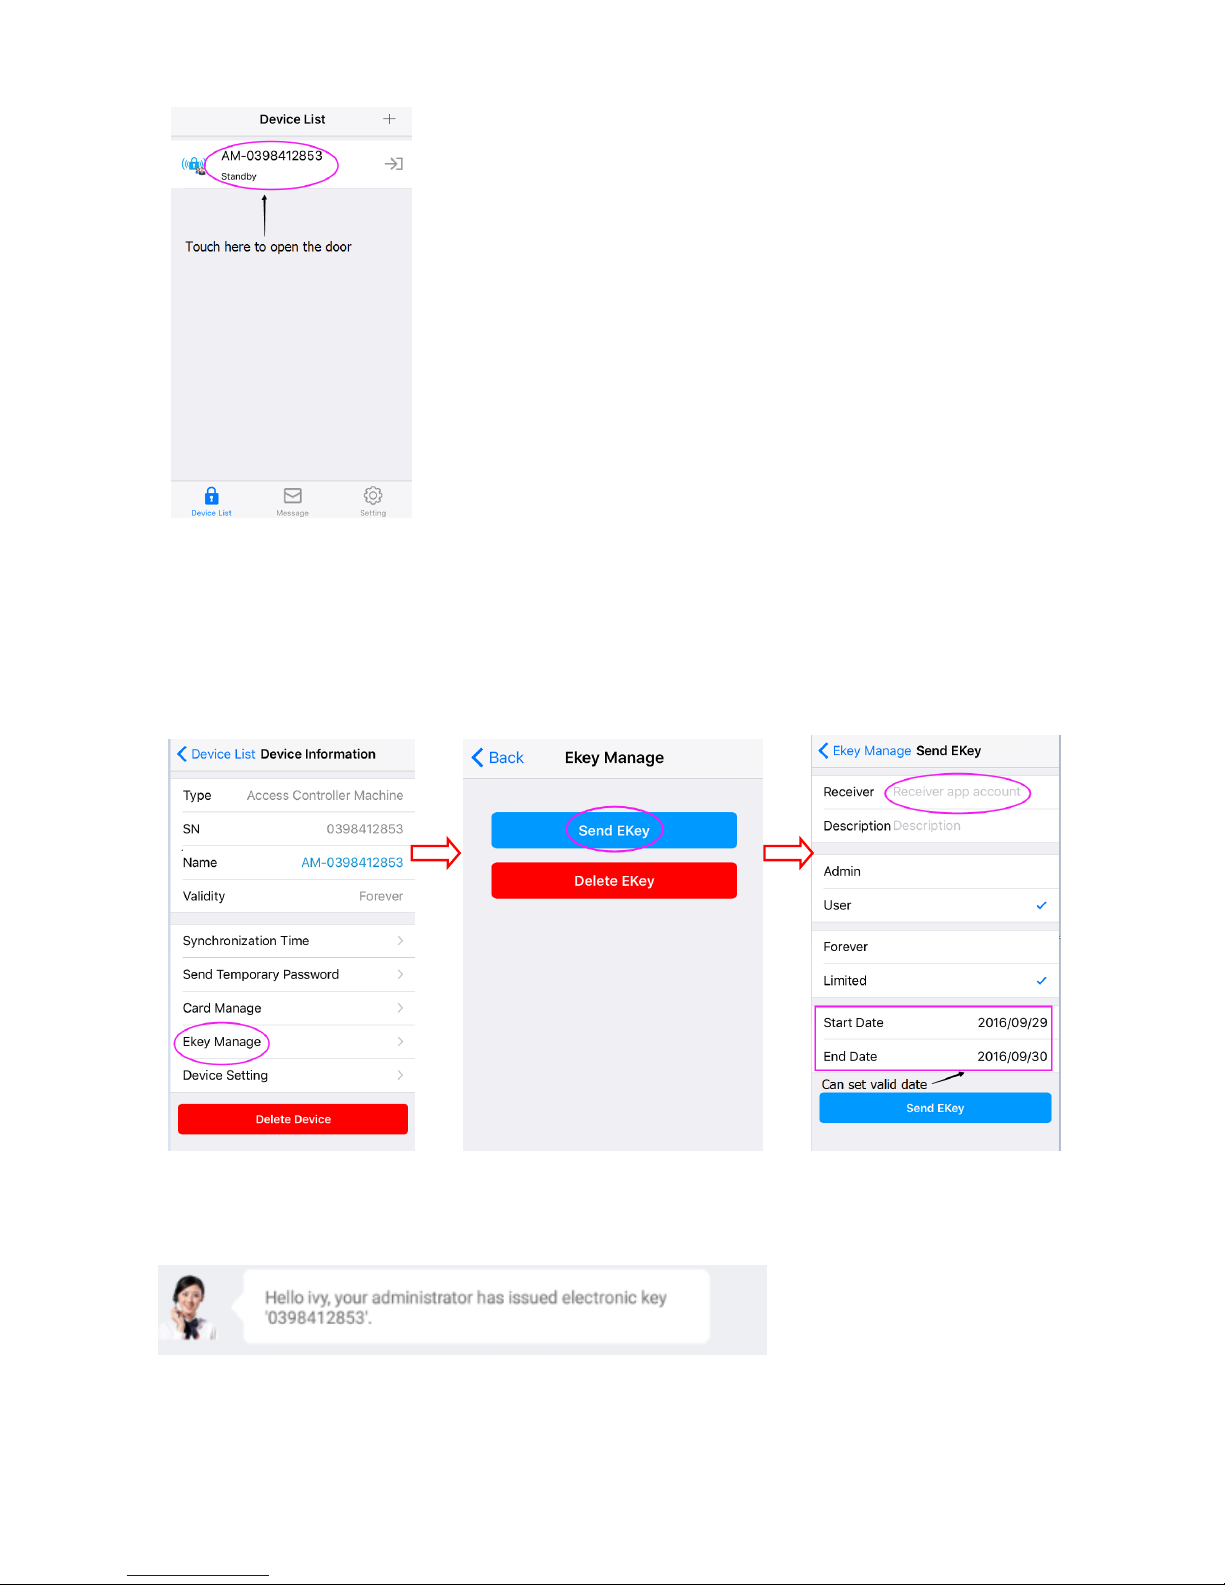
7. Send E-Key
E-Key receivers can be set as Admin or Common User, and the authority can be Forever or
Limited.
(Remark: E-Key receivers must have registered in App firstly)
Pic 22 Pic 23 Pic 24
The E-Key receiver will receive a message when log in.
Pic 25
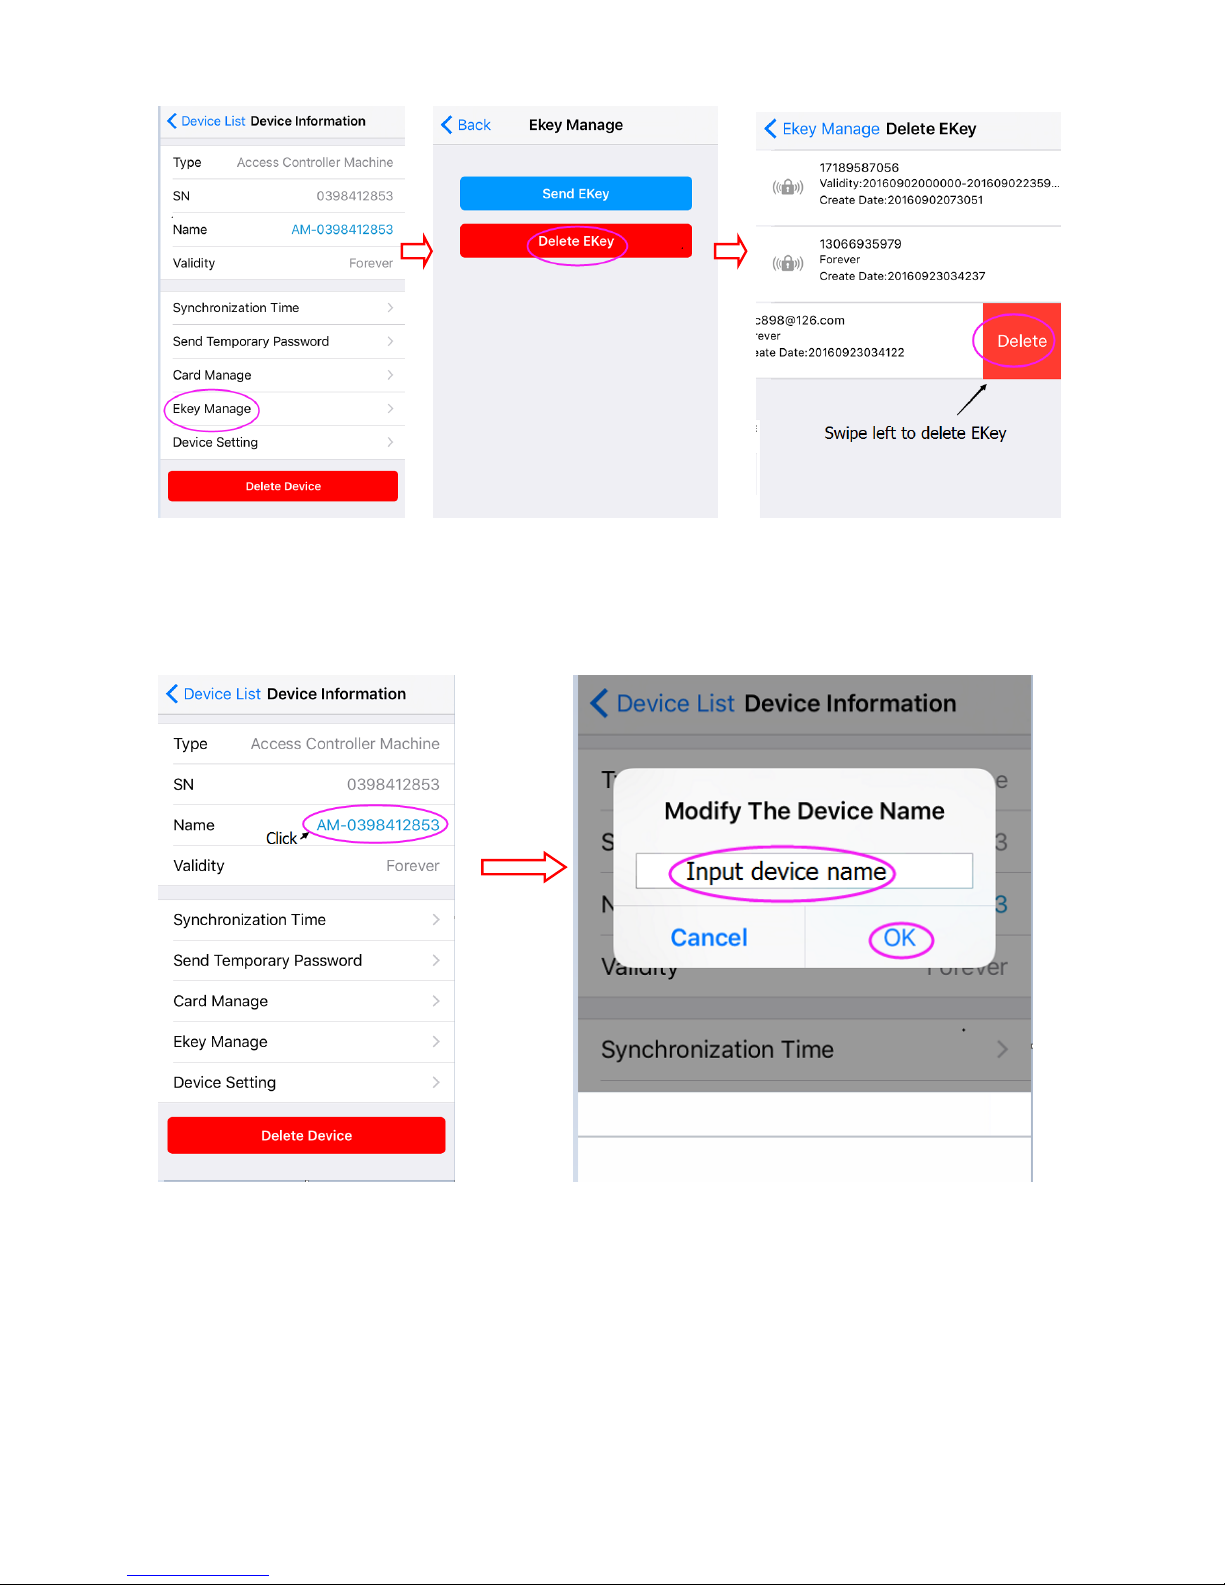
8. Delete E-Key
Page 12
Pic 26 Pic 27 Pic 28
9. Modify Device Name
Pic 29 Pic 30
10. Modify Account Password
Page 13
Pic 31 Pic32 Pic 33
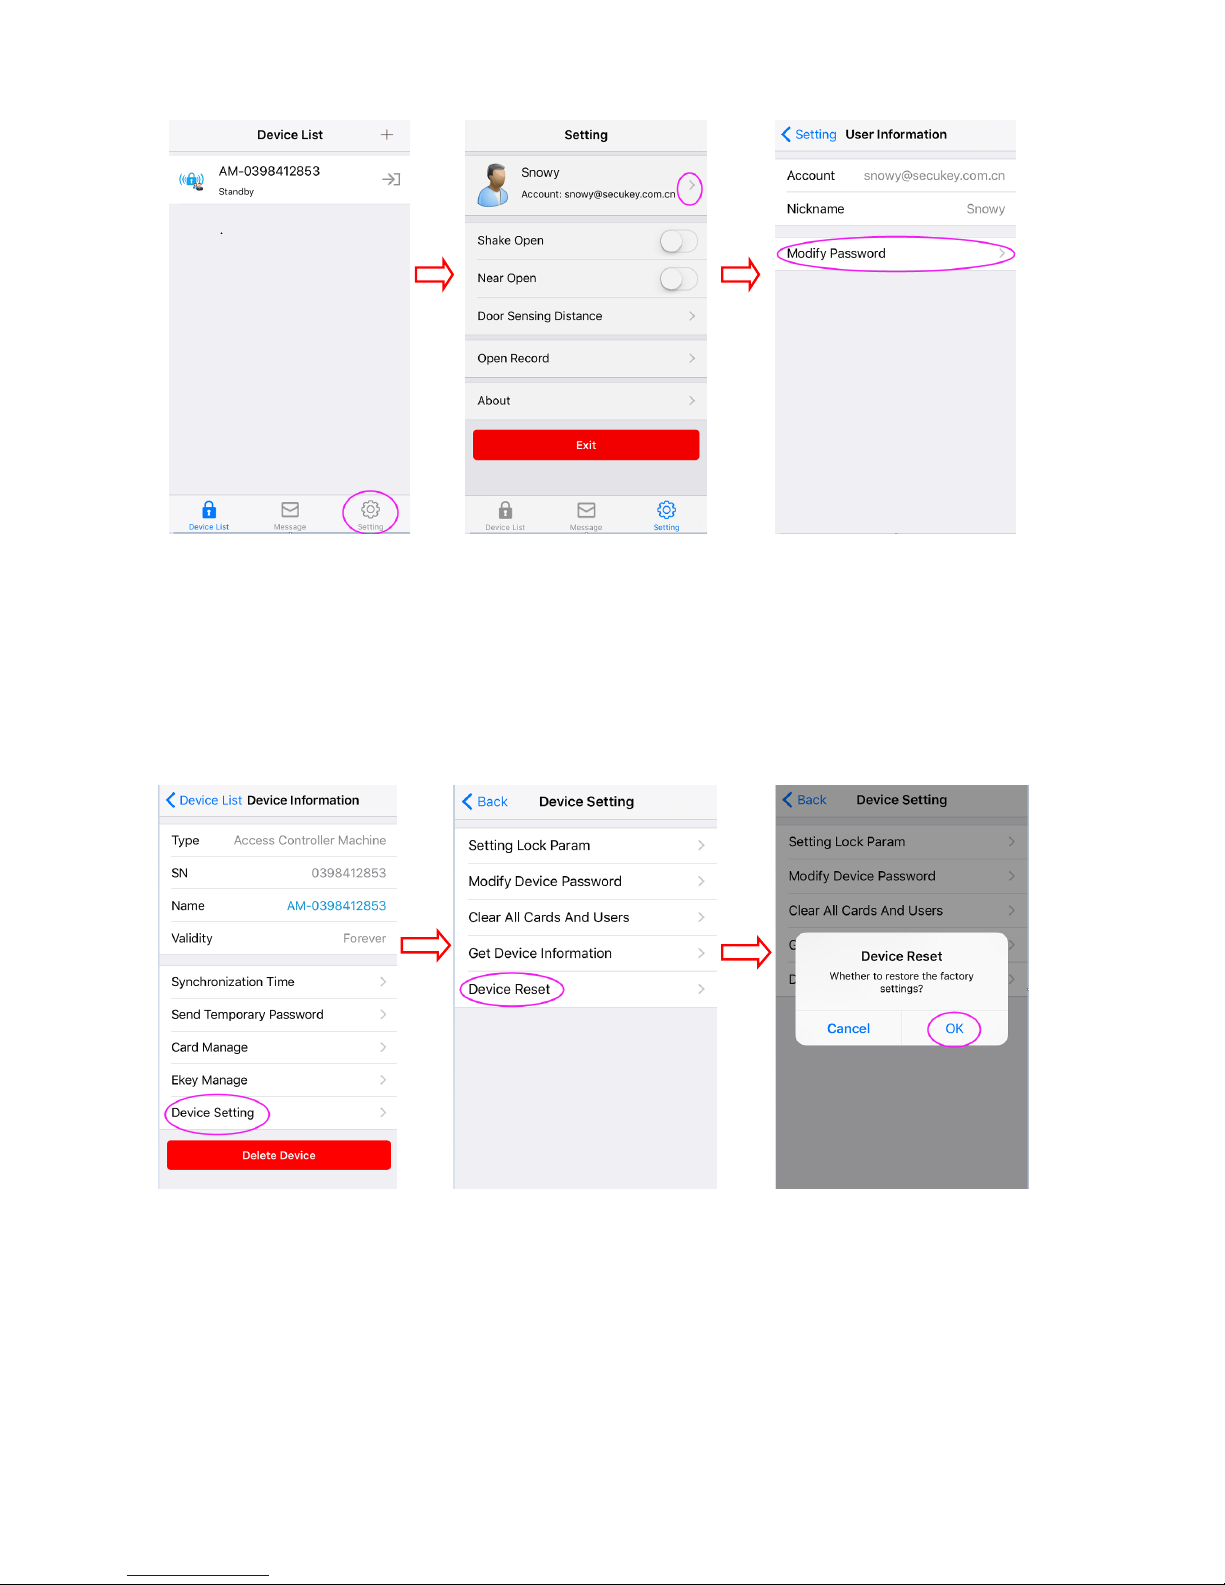
11. Device Reset (Method 1)
(Please refer to title OTHERS for Method 2)
This operation only reset the door open time to 5 seconds.
Pic34 Pic 35 Pic 36
12. Erase ALL Users (Method 1)
(Please refer to title OTHERS for Method 2)
Remark: This operation will be also reset the door open time to 5 seconds.
Page 14
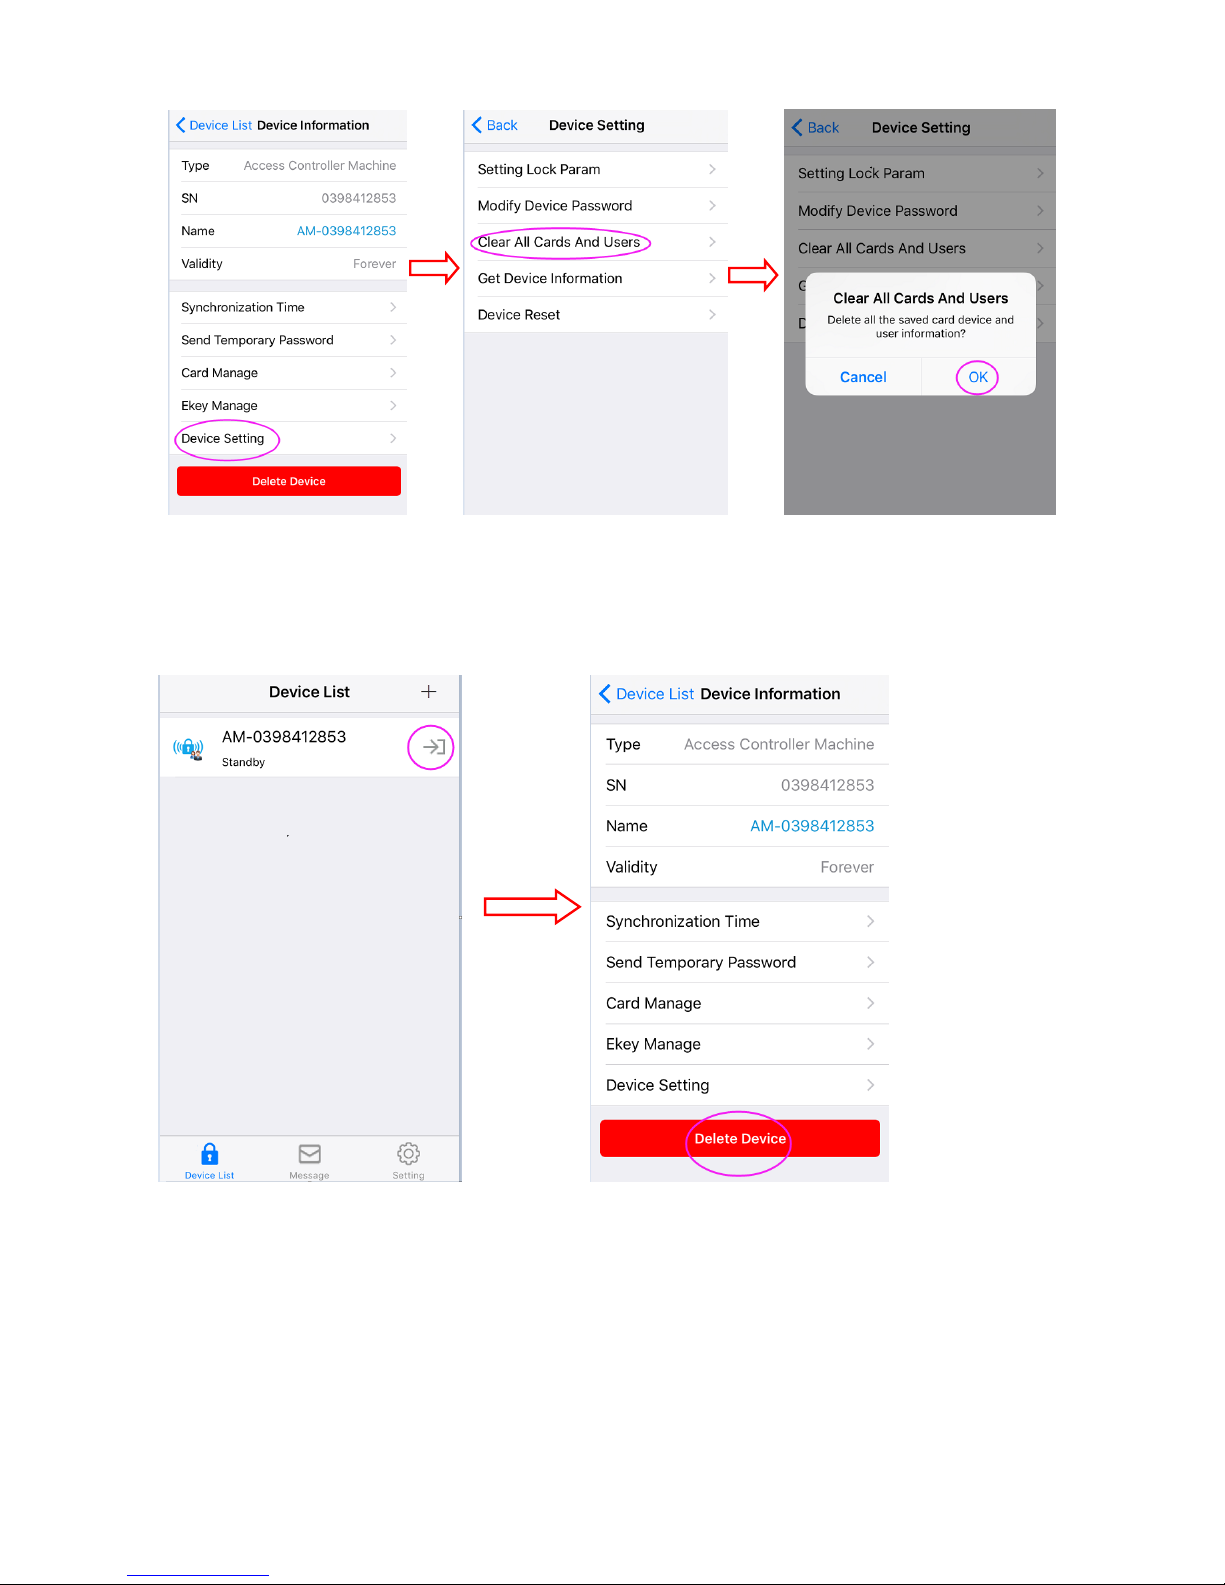
Pic 37 Pic 38 Pic 39
13. Delete Device
Pic 40 Pic 41
Page 15

OTHERS
To Reset to Factory Default (Method 2)
To reset to factory default, power off and press exit button, hold it and power on (hold it for 10 seconds),
release it until hear one beep and the LED in Red, means reset to default successfully.
Remarks: Reset to factory default, the users’ information is still retained.
Erase ALL Users (Method 2)
After resetting to factory default, 1s later, press exit button, hold it for 10 seconds, release it until hear
three beeps and the LED in a short Green then turns in Red, means clear data successfully.
Sound and Light Indication
Status
Light color
Buzzer
Standby
Red
-
Enter Programming
Red Shine Slowly
Beep-
Operation error and clear device
-
3 Beeps
Open lock
Green
Beep-
 Loading...