

HG5 PRO
3AXIS HANDHELD STABILIZING GIMBAL
Please confirm the camera has been installed well before power on the gimbal.
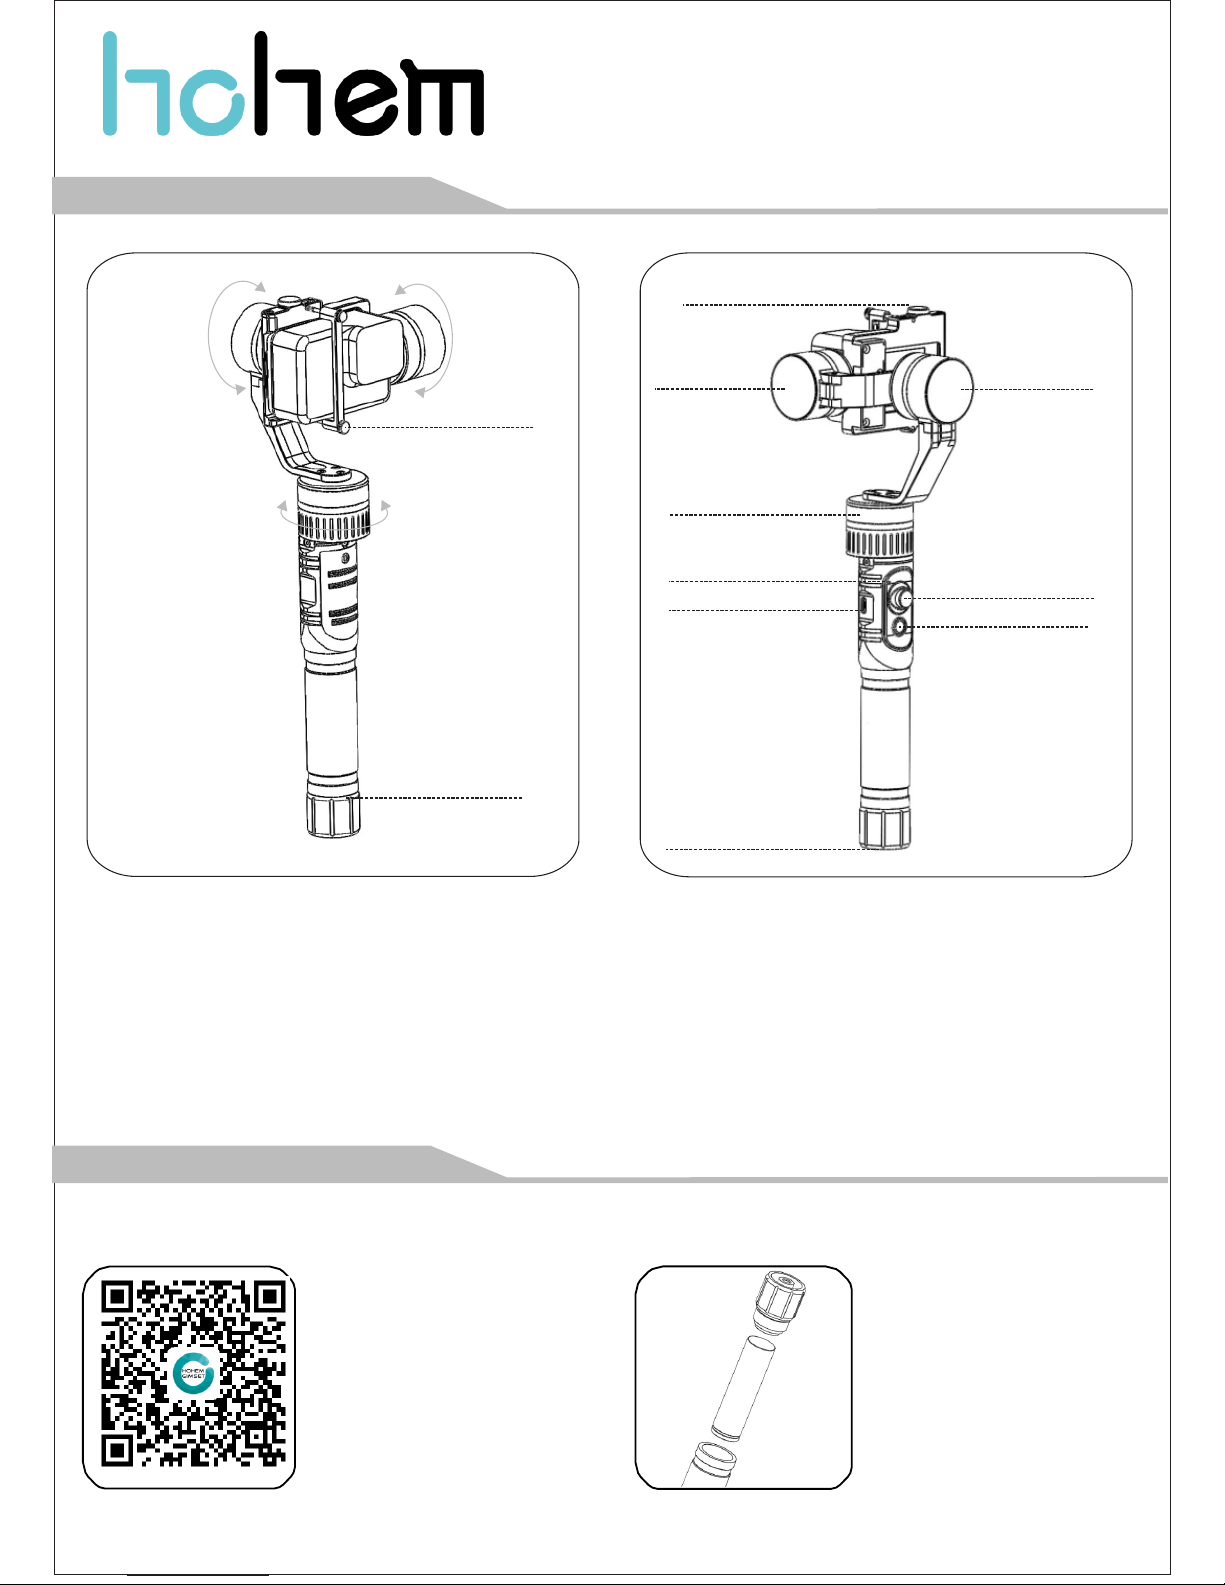
② Prepare the battery
Fully charge the battery before
using it for the first time.
* Please insert the battery as below
shown.
* Charging: Using the standard
USB CABLE Connecting to the
gimbal charging port (or other
power sources).
① Install Hohem GimSet
Search for ‘Hohem Studio’ in the
App Store or Google Play, and
install the app on your mobile
phone.
*‘Hohem GimSet’ supports iOS
8.0and Android 4.4 or above.
Attention!
V1.01
Accessories
*Optional
① Telescopic
② Tripod
③ Bike mount
*Standard
① 18650 Rechargeable Battery*1
② Micro USB Cable*1
③ User Manual*1
④ Warranty Card*1
Hohem Technology Co.,Ltd
TEL:+86 755 86573216
Email:service@hohem-tech.com
①
②
Rolling 360°
1. Product Overview
Tilting 360°
M2*25 knurled
Thumb screw
Panning 360°
Battery cover
Adjustable knob
Tilting axis
Rolling axis
Panning axis
Indication light
USB port
5-way joystick
Multifunction
button
1/4inch screw hole
2. User Guide
⑤ Mode switch
You can switch to different
working mode by pressing
the 5-way joystick. Please
refer to the following
introduction.
④ Power on
Power on the Gimbal. Press
the function button until the
indicator flashing twice.
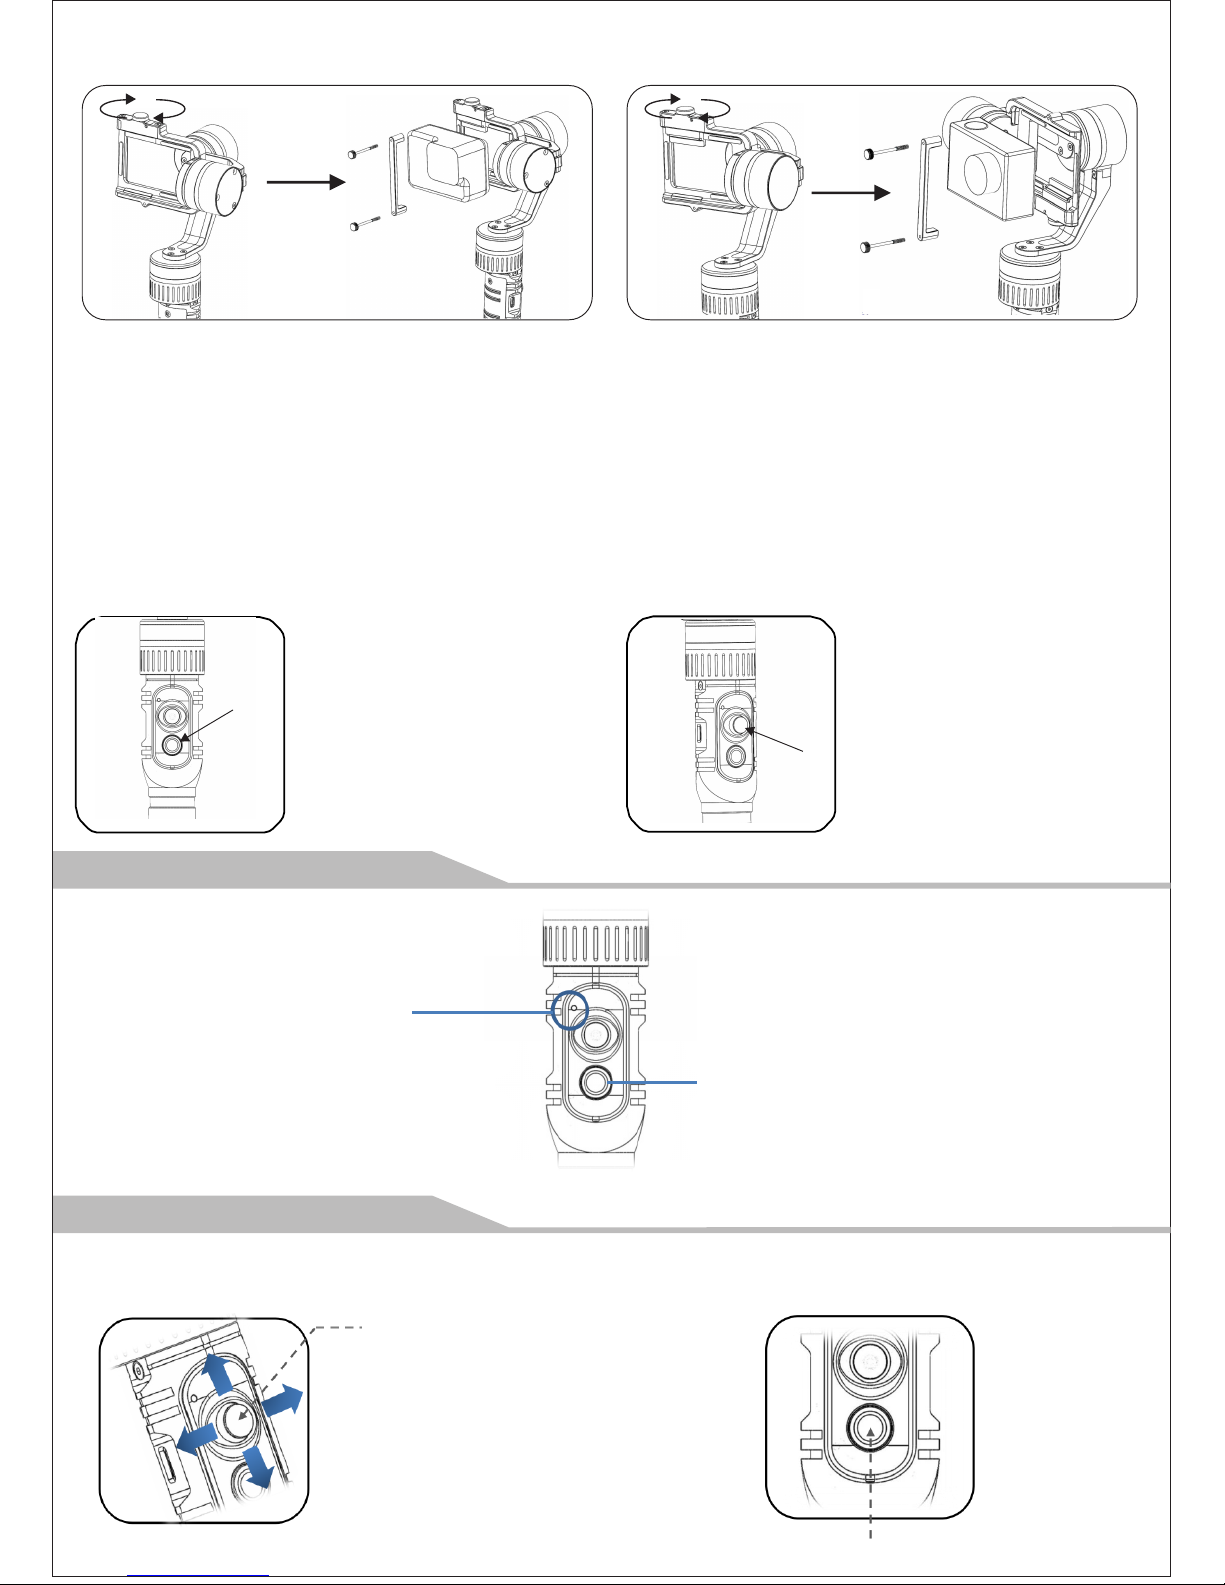
A. GoPro Hero 5
Step 1: Put the pitch motor to the RIGHT side, and
rotating the adjustable knob by clockwise direction
(Tighten if by opposite direction)
Step 2: Place GoPro Hero5 closely to the back clip as
picture and tighten the knob to secure its position. Double
tighten by the 2 long screws against violent movement.
B. GoPro Hero 4/3/YI CAM/SJCAM
Step 1: Put the pitch motor to the LEFT side and
rotating the adjustable knob by clockwise direction
(Tighten if by opposite direction)
Step 2: Place Hero4/3/YI/SJCAM etc closely to
the clip as picture show and tighten the knob to
secure its position. Double tighten by the 2 long
screws against violent movement.
etc.
Function Button
Long Press: Power on/off
5-Way Joystick
④
⑤
A
B
Signal Indicator Light
●● Flashes twice: Power on/off
Turn off: Bluetooth is not connected
●
●
●
●
Flashes once: Panning mode
Flashes twice: Panning and pitching mode
Flashes for three times: Lock mode
Keeps flashing: Low battery
Status Indicator Light
Charging status: If the status indicator light is flashing,
means charging. If the light constants on, means
charging is complete.
Middle button: Switch the working mode
Single Press: Panning Mode Following
Double Press: Panning and Pitching Mode
Following
Triple Press: Lock Mode Following
Long press for 6 seconds: Enter the
initialization
Left/Right: Panning angle adjustment
●
●
●
●
●
3. Light Instruction
4. Controlling instruction
③ Mount and Balance the Action Camera

Please visit the official website http://www.hohem-tech.com, and visit the SUPPORT to download the USB driver
software, the software of HG5 Pro firmware upgrade, the latest firmware and operation manual to
Upgrade the firmware.
We provide various kinds of optional accessories for our gimbals. Please contact us for more information.
Email: service@hohem-tech.com.
If the gimbal has the following situations, please calibrate it:
①The pitch angle is not leveled with the horizontal surface.
②The roll angle is not parallel to the horizontal surface.
③Under the lock mode, the panning angle drifting.
Calibration Operation Instruction:
Method 1:Off-line Calibration
(1)Power on the gimbal(around 3 seconds),long press the middle button of the joystick over 6 seconds till the
status indicator light is solid.
(2)Lay the gimbal as following picture on a static flat surface, make sure it has no shaking. Calibration is
finish when the status indicator light is continuously flashing for 3 times.
(3)Power off the gimbal and restart it, if the calibration is unsuccessful, you can repeat step(1)(2)to
reinitialize.
Method 2: On-line Calibration
Please visit our official website http://www.hohem-tech.com, and visit the SUPPORT to download the
calibration software of HG5 Pro and operation introduction to calibrate the gimbal.
*Confirming the smartphone has connected the gimbal with bluetooth.
APP Instruction
Hohem GimSet
B. One click calibrating
A. Joystick controlling
C. Setting: Follow Speed, Lock Speed, Rocker Speed, Blind Angle, Rocker Direction.
D. Firmware Upgrate
*More functions will upgrate, please expecting.
Working Voltage
Overload Current Protection
Tilt Speed
8.4V
Package Size
Weight
360°
2°/s~100°/s
1A
270*193*63 mm
289g(Without action camera and batteries)
2°/s~150°/s
360°
360°
Handle Size
Adaption
Battery Life
Lengh: 101mm
Outer Diameter: 25mm
2000mAh/4 Hours
GoPro Hero5/4/3, YI CAM/SJCAM/AEE etc
and other action cameras of the similar size.
Material
CNC Aluminum Alloy
Pan Angle
Tilt Angle
Roll Angle
Pan Speed
6. Calibration
5. Product Parameters
7. Firmware Upgrate

①Please install and use the product according to the manual!
②Please use the standard battery charger!
③Please reconfirm the gimbal and the smartphone are well installed before power on!
④Keep the battery away from fire and heat source!
⑤Prohibit any user for any illegal purpose. Users will be responsible for all behavior of
purchasing and using the products.
⑥For any unknown sources or usage, we will not provide any service.
⑦ If there is any question, please contact the technician of Hohem Tech, we won’t be
responsible for any wrong operations by users.
⑧Hohem Tech reserves the right for final explanation.
Hohem Technology Co.,Ltd
Http://www.hohem-tech.com
Email: service@hohem-tech.com
8. Disclaimer
 Loading...