

Page 1
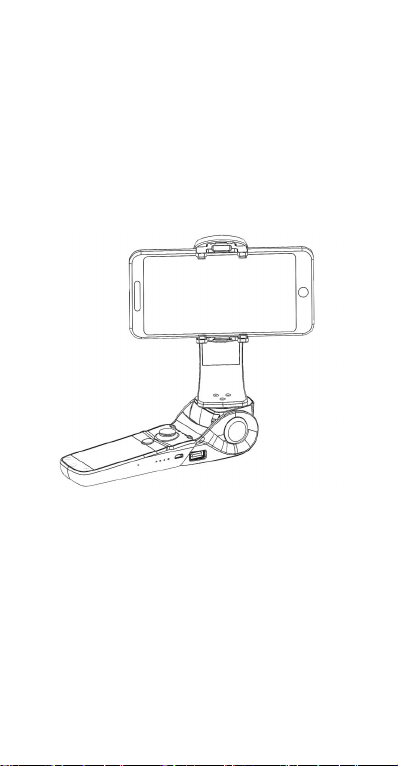
D1
Foldable Stabilizer for Smartphone
Hohem Technology Co., Ltd
Page 2

Safety instructions
Read the operating instructions carefully and especially observe the safety
information. If you do not follow the safety instructions and information
on proper handling in theses operating instructions, we assume no liability
for any resulting personal injury or damage to property. Such cases will
invalidate the warranty/guarantee.
• The device is not a toy. Keep it out of the reach of children and pets.
• Do not leave packaging material lying around carelessly. These may
become dangerous playing material for children.
• Protect the product from extreme temperatures, direct sunlight, strong
jolts, high humidity, moisture, ammable gases, vapours and solvents.
• Do not place the product under any mechanical stress.
• If it is no longer possible to operate the product safely, take it out of
operation and protect it from any accidental use. Safe operation can no
longer be guaranteed if the product:
» is visibly damaged,
» is no longer working properly,
» has been stored for extended periods in poor ambient conditions or
» has been subjected to any serious transport-related stresses.
• Please handle the product carefully. Jolts, impacts or a fall even from a
low height can damage the product.
• Also observe the safety and operating instructions of any other devices
which are connected to the product.
• Never leave the product unattended during use.
• Never use the product immediately after it has been brought from a cold
room into a warm one. The condensation generated could destroy the
product. Allow the device to reach room temperature before connecting
and using it. This may take several hours.
• The housing of the power bank gets warm during use. Ensure sufcient
ventilation. Never cover the product!
• Make sure the cable connected to the power bank does not get jammed,
bent or damaged by sharp edges.
• Do not use force to connect USB plugs. USB plugs can be plugged into
a USB socket only one way.
• Do not and store the product in environments with strong electrostatic
charges or strong magnetic elds.
• The rechargeable battery is permanently built into the product and
cannot be replaced.
• Never damage the rechargeable battery. Damaging the casing of the
rechargeable battery might cause an explosion or a re!
• Never short-circuit the contacts of the rechargeable battery. Do not throw
the rechargeable battery or the product into re. There is a danger of re
and explosion!
• Charge the rechargeable battery regularly, even if you are not using the
product. Due to the rechargeable battery technology being used, you do
not need to discharge the rechargeable battery rst.
• Never charge the rechargeable battery of the product unattended.
• When charging, place the product on a surface that is not heat-sensitive.
It is normal that a certain amount of heat is generated during charging.
• Consult a professional if you require assistance with product operation,
safety or connection.
• Maintenance work, adjustments and repairs may be carried out only by a
professional or at a specialist workshop.
• If you have questions which remain unanswered by these operating
instructions, contact our technical support service or other technical
personnel.
Page 3
Production Introduction
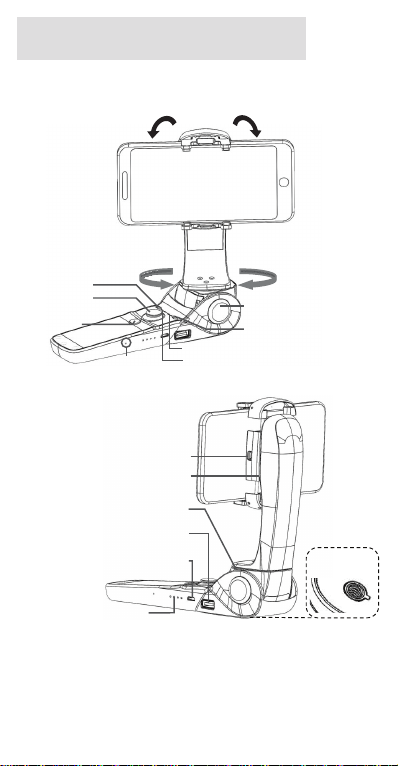
1. Product Overview
Rolling 320 °
Mode Switch button
4-way joystick
Photo / Video
switch button
Reset Hole Working Modes Indicator
Mobile Phone
Charging Port 2
Pan / Tilt Axis
Mobile Phone
Charging Port 1
Battery Charging &
Upgrade Port
Battery Capacity Indicator
Bluetooth Indicator
Roll Axis
Panning / Tilting 360°
Roll axis
unlocking ButtonP1P2
Power on / off Button
1/4 inch
Screen Hole
{
2. Accessories List
Standard Accessories
USB Cable
Carry Bag
Manual
Gimbal Unit
Page 4
Installation Introduction
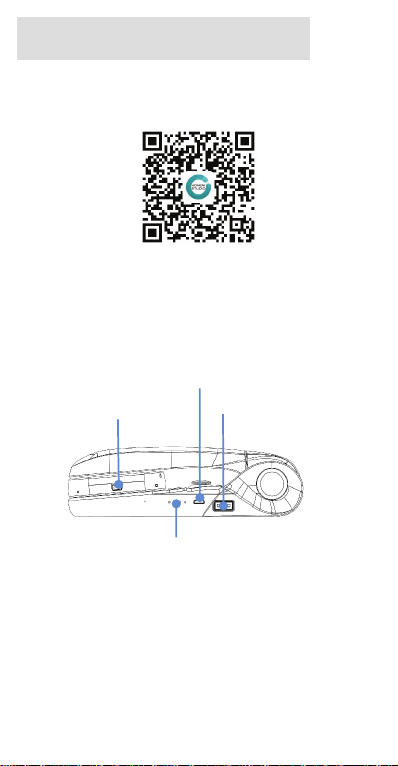
1. Install the ‘Hohem Studio’App
Search for ‘Hohem Studio’ in the App Store or Google Play and install the
app on your mobile phone.
*‘Hohem Studio’ supports iOS 8.0 andAndroid 4.4 or above
2. Stabilizer Charging & Smartphone Charging
Fully charge the stabilizer before using it for the rst time using the
standard USB cable connecting to the stabilizer charging port (or other
power sources).
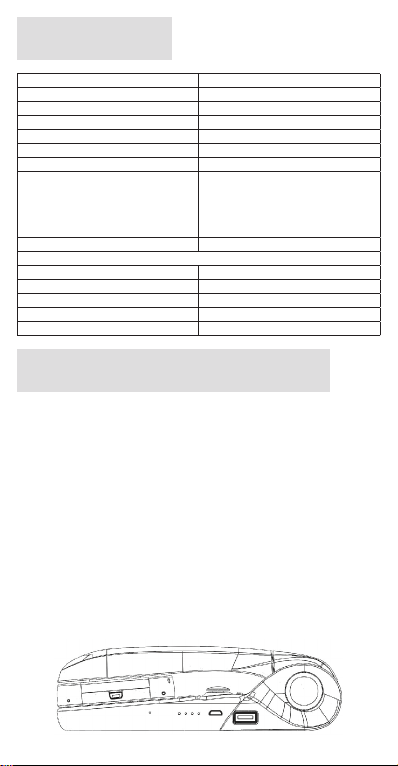
Input Charging Port:
Charging port 2:
Charging the mobile phone
Charging the stabilizer
Charging port 1:
Charging the mobile phone
a. 4 Led lights indicators
4 Led lights on means power is 100 %
3 Led lights on means power is 75 %
2 Led lights on means power is 50 %
b. Indicator Light Fast Flashing: Charging status
c. Indicator Light Normal: Fully charged status
* The charging time is about 4 hours while directly charging from the wall
charger.
Power Indicator
Page 5
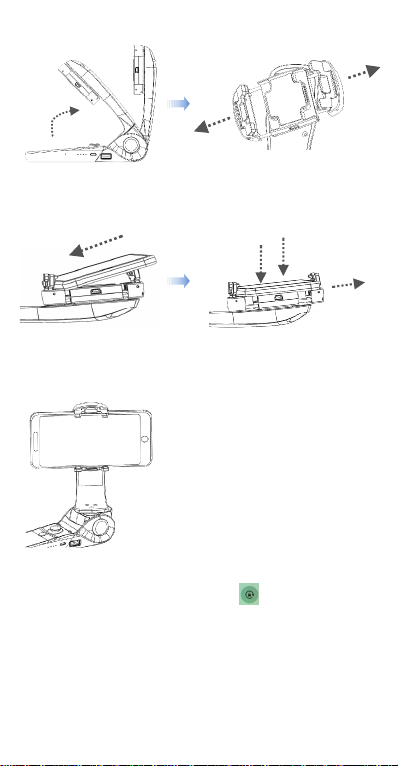
3. Mount and Balance the mobile phone
a. Open the Roll Axis. b. Pull the mobile phone clip to the
c. Put one side of the
mobile phone rst.
4. Connect “Hohem Studio” APP
a. Open the bluetooth on the mobile phone:
For iPhone, please off “Portrait Orientation ”
For Android Phone, please on “auto-rotate screen”
b. Open APP, choose the product model then conrm into Bluetooth
connection.
c. Power on: Long press power button until M1&M2 lights quick ashing
for twice
(Power off: Long press power button until M1&M2 lights quick ashing
for twice)
d. Click the device and then start pairing.
max and make sure the charging
port 2 and smartphone charging
port are at the same side.
d. Then put another side of the
mobile phone into the clip and
make sure they are t together
with each other.
e. Balance the mobile phone
With the stabilizer power off,
make sure the mobile phone
remains level when released.
Page 6
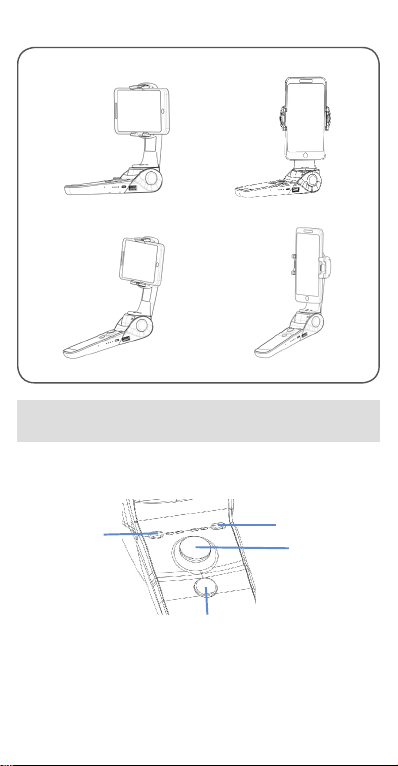
5. Four Main Usages Status
P1: placement mode
P2: hand-held mode
Operation Instruction & Working Mode
1. Operation Instruction
Mode Switch Button
Single Click:
M1 / M2 working mode
Multi-functional button
• Single press: Photo
• Double press: Video
Power on / off : Long press
4-way Joystick
Functional Button
Up / Down: Zoom
in / out
Left/Right:
Pan / Tilt Angle
adjustment
Page 7
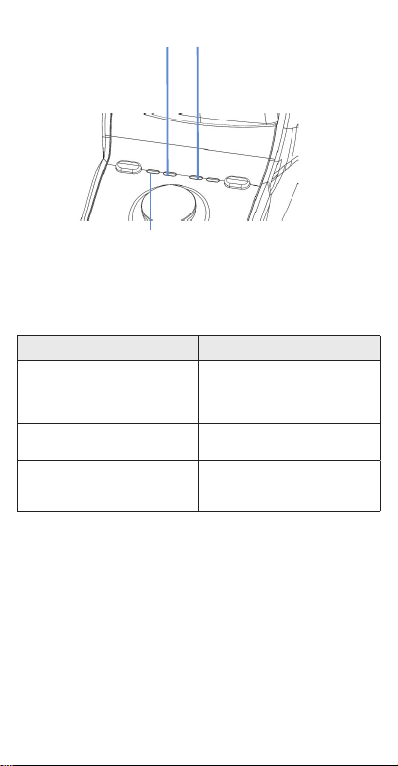
2. Indicator Instruction
M2 light normal on:
Lock working mode
M1 Light normal on: Pan / Tilt Working Mode
(M1 & M2 quick ashing simultaneously for twice:
Power on / off)
3. Working Mode Instruction
Working Modes:
Working Mode Instruction
M1: Following Mode The default setting is following
M2: Locking Mode The Pan Axis and Tilt Axis are
Setting & Locking Rolling Angle
by Hand
Smart Shooting Mode
Open the APP ‘Hohem Studio’ and connect the stabilizer via Bluetooth
• Smart auto-tracking shooting: Auto-Face-tracking shooting
• Single Click for 180° / 360° panorama
* It will add more new functions in the ‘Hohem Studio’ App, such as
‘Motion Time-lapse’, ‘Single Click for Calibration’ and so on.
Bluetooth light ON means
Bluetooth Connected.
Bluetooth light OFF means
Bluetooth not Connected.
mode, the Pan / Tilt axis
will follow by hand holding
movement
both xed
Position the smart phone by hand
for 2 seconds, the roll angle will
be xed
Object tracking shooting
Page 8
Parameters
Material ABS+PC
Gimbal Size (Folding Status) 175 * 50 * 52 mm
Weight (Including Battery) 329 g
Working Time 10 Hours for stabilizer
Angle Vibration Range ± 0.01°
Controllable Vibration Range Pan / Tilt 360° ; Roll 320°
Max Controllable Rotating Speed 150°/S
Compatible Smartphone Size Compatible with iPhone X,
Bluetooth BLE4.0
Battery
Type Lithium Battery
Capacity 3600 mAh
Voltage 3.7 V
Charging Temperature 5 - 25°
Operating Temperature 0 - 50°
iphone 8 Plus / 7 Plus / 6s
Plus / 6 Plus, iPhone 8 / 7 / 6s / 6,
iPhone 5s / 5 / SE, and Android
smartphones up to 6.0 inch
Calibration (Initialization)
If the stabilizer has the following situations, please calibrate it:
The title angle is not leveled with the vertical surface.
Under the lock mode, the panning angle drifting.
Calibration Operation Instruction:
Method 1: Off-line Calibration
1. Power on the stabilizer (around 3 seconds), long press the mode switch
button over 6 seconds till the M1 & M2 light constant on.
2. Lay the stabilizer on a static at surface; make sure it has no shaking.
Calibration is nish when the M1&M2 light is continuously ashing
for 3 times.
3. Power off the stabilizer and restart it, please repeat step (1) (2) or go to
method 2 to reinitialize if failed.
Method 2: On-line Calibration
Please visit our ofcial website http://www.hohem-tech.com, and visit
the SUPPORT to download the calibration software of D1 and operation
introduction to calibrate the stabilizer.
Page 9

Firmware upgrade
Please visit our ofcial website http://www.hohem-tech.com, and visit
the SUPPORT to download the USB driver software, the software of
D1 rmware upgrade, the latest Firmware and operation manual to upgrade
the rmware.
We provide various kinds of optional accessories. Please contact us for
more information. Email: [email protected]
DISCLAIMER
j Please install and use the product according to the manual.
k Please use the standard battery charger.
l Please reconrm the gimbal and the smartphone are well installed
before power on.
m Keep the battery away from re and heat source.
n Prohibit any user for any illegal purpose. Users will be responsible for
all behavior of purchasing and using the products.
For any unknown sources or usage, we will not provide any service.
o If there is any question, please contact the technician of Hohem Tech,
we won’t be responsible for any wrong operations by users.
p If there is any question, please contact the technician of Hohem Tech,
we won’t be responsible for any wrong operations by users.
q Hohem Tech reserves the right for nal explanation.
Please scan the QR code to get
more functions introduction
Hohem Technology Co.,Ltd
http://www.hohem-tech.com
Email: [email protected]
 Loading...