

Hoggi Bingo OT User Manual
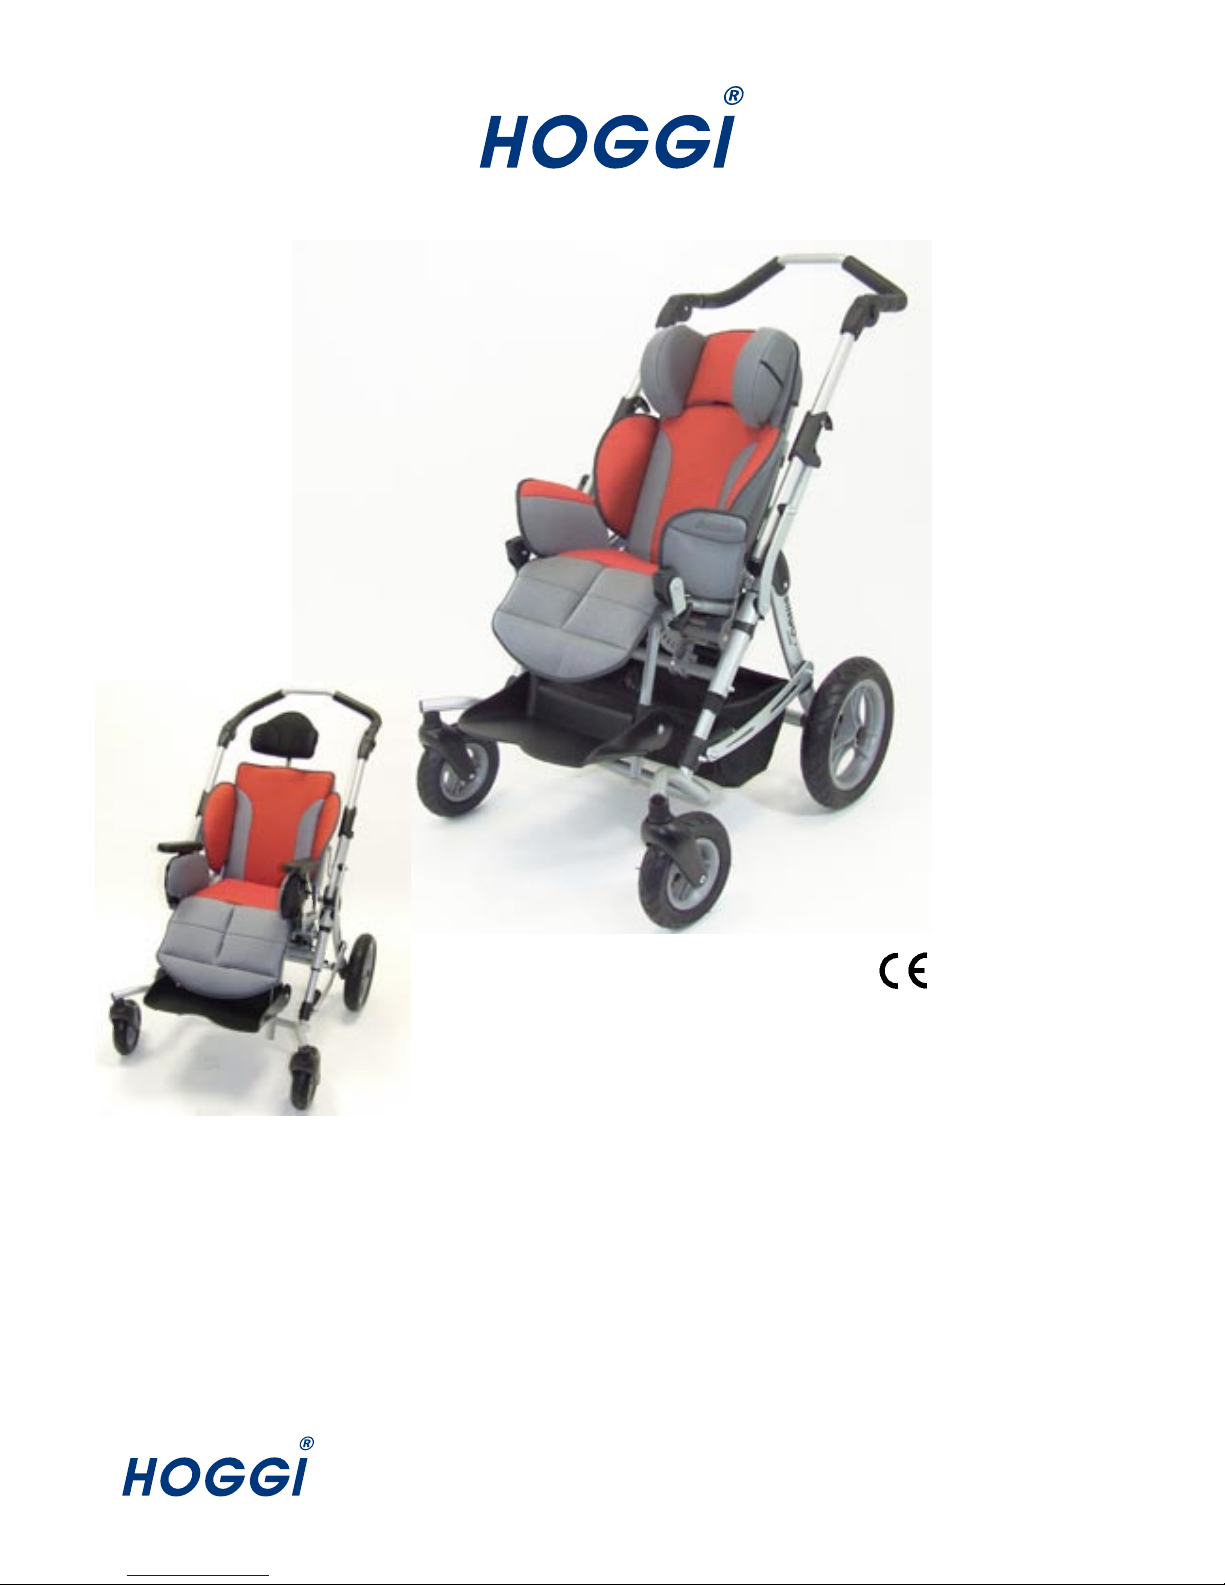
BINGO Rehab Pushchair
- Partnering together to mobilise kids
BINGO OT
user manual

1
User Manual for BINGO Rehab Pushchair
Contents Page
1 Common Information
1.1 Preface ________________________________________________________________________________ 2
1.2 Application ______________________________________________________________________________ 2
1.3 Declaration of conformity ___________________________________________________________________ 2
1.4 Terms of warranty ________________________________________________________________________ 2
1.5 Servicing and repairs ______________________________________________________________________ 2
2 Safety Instructions ____________________________________________________________________________ 3
2.1 Meaning of symbols _______________________________________________________________________ 3
2.2 Common safety instructions _______________________________________________________________3-5
3 Delivery and preparing for use __________________________________________________________________ 6
4 Adjusting and adaptation possibilities __________________________________________________________ 10
4.1 Wheel lock _____________________________________________________________________________ 13
4.2 Height adjustment of push handle ___________________________________________________________ 13
4.3 Seat depth and seat width _________________________________________________________________ 13
4.4 Hip pads _______________________________________________________________________________ 14
4.5 Armrests with hip pads ___________________________________________________________________ 14
4.6 Back height ____________________________________________________________________________ 14
4.7 Recline ________________________________________________________________________________ 15
4.8 Knee angle _____________________________________________________________________________ 15
4.9 Lower leg length ________________________________________________________________________ 15
4.10 Footrest angle adjustment _________________________________________________________________ 15
4.11 Footrest lock (optional) ___________________________________________________________________ 16
4.12 Detaching and attaching the seat unit ________________________________________________________ 16
4.13 Use of seat unit against driving direction ___________________________________________________ 16+17
4.14 Tilt in space ____________________________________________________________________________ 17
4.14 Detaching wheels with quickrelease _________________________________________________________ 18
4.16 Suspension ____________________________________________________________________________ 18
4.17 Pneumatic tyres _________________________________________________________________________ 18
5 Accessories _______________________________________________________________________________19-35
5.1 Swivel lock _____________________________________________________________________________ 19
5.2 Soft accessories bag size 2 (max. 3 kg) ___________________________________________________ 19+20
5.3 Accessories bag size 2 (model 2009, max. 8 kg) ____________________________________________ 20+21
5.4 Headrest pads __________________________________________________________________________ 21
5.5 Head rest with occiput upholstery, mounting in connection with universal headrest bracket, only (BINGO OT) 21+22
5.6 Thorax pads _________________________________________________________________________ 22+23
5.7 Pelvic stirrup ___________________________________________________________________________ 23
5.8 Lap belt ____________________________________________________________________________ 23+24
5.9 4-point lap belt __________________________________________________________________________ 24
5.10 Five-point harness _____________________________________________________________________24-26
5.11 Foot straps _____________________________________________________________________________ 26
5.12 Ankle hugger ___________________________________________________________________________ 26
5.13 Frame padding __________________________________________________________________________ 26
5.14 Sling seat ______________________________________________________________________________ 27
5.15 Fixation jacket __________________________________________________________________________ 28
5.16 Chest-shoulder harness ___________________________________________________________________ 29
5.17 Abduction block ______________________________________________________________________ 29+30
5.18 Grab rail with upholstery __________________________________________________________________ 30
5.19 Therapy tray _________________________________________________________________________ 30+31
5.20 Winter Warmer __________________________________________________________________________ 31
5.21 Sheep skin insert ________________________________________________________________________ 31
5.22 Rain cape ______________________________________________________________________________ 32
5.23 Canopy incl. adapter and rain cover _________________________________________________________ 32
5.24 Attendant brake ______________________________________________________________________ 32+33
5.25 Dynamic kit _________________________________________________________________________ 33+34
5.26 Calf upholstery __________________________________________________________________________ 34
5.27 Buggy board / kiddy board _________________________________________________________________ 34
5.28 Sun shade _____________________________________________________________________________ 34
5.29 Accessories and diaper bag _______________________________________________________________ 35
5.30 Headrest speakers, for headrest pads ________________________________________________________ 35
6 Transportation _______________________________________________________________________________ 35
6.1 In the Trunk of a car ______________________________________________________________________ 35
6.2 Using BINGO rehab pushchair for bus transport _______________________________________________ 36
7 Maintenance _____________________________________________________________________________ 36+37
8 Technical Data _______________________________________________________________________________ 38
2
1 Common Information
1.1 Preface
Thank you for selecting the BINGO Rehab Pushchair. We have designed this high-quality product to make
your life safer and easier, and we’ve included this manual to help you use and care for it.
Please read the following instructions to make sure you use this product as recommended. If
you have any further questions, or if you have any problems, please contact your healthcare provider.
We hope that BINGO meets your expectations.
The design, as described in these Instructions for use, are subject to technical alterations without notice.
1.2 Application
Rehab pushchairs, paediatric postural positioning systems or strollers are appropriate for individuals
requiring mobility assistance.
Assistance may be required due to:
• atypical muscle tone
• loss of limbs
• joint instability
1.3 Declaration of Conformity
HOGGI® GmbH as manufacturer with sole responsibility declares that the BINGO Rehab Pushchair
conforms to the requirements of the 93/42/EEC Guidelines.
1.4 Terms of Warranty
Warranty applies only when the product is used according to the specified conditions and for the
intended purposes, following all manufacturer’s recommendations.
1.5 Service and Repairs
Service and repairs on the BINGO should only be carried out by authorized HOGGI dealers. Should any
problems arise, please contact the dealer who supplied your BINGO. Authorized dealers only fit original
HOGGI spare parts.
For repair and service, the following tools are required:
Allen wrench, sizes 3 mm, 4 mm, 5 mm and 6 mm;
wrench, sizes 10 mm, 13 mm, 19 mm, 24 mm
Your authorized HOGGI dealer:
• joint contractures
• joint defects
• general weakness

3
2 Safety instructions
2.1 Meaning of symbols
Caution!
Warning of possible danger of accident and injury. Warning of possible technical damage.
Information!
about use of product.
Information!
for service-personnel.
Attention!
Read manual before use!
2.2 Common safety instructions
Read manual completely before use!
Familiarize yourself with handling and functions of the product before use and practice the
various functions.
You are responsible for the safety of your child. The safety of your child could be
affected if you do not follow the instructions of this manual. Nevertheless not all possible
circumstances and unpredictable situations can be covered by this manual. Reason, care
and circumspection are not features of the product, they are required of persons, who use
the product. The person, who is using the product and its accessories should understand
all instructions and should explain them to every person using the product and its
accessories.
If instructions are not clear and further explanations become necessary, or if you have
further questions please contact your HOGGI dealer.
Strap your child at all times, when they are in the wheelchair.
HOGGI points out, that any use beside the typical use can be dangerous. The pushchair
is not suitable for jogging, running, skating or similar activities. Swivelling front wheels tend
to wobble at higher speed, which can cause a sudden stop and tip over of the pushchair.
Use the pushchair only at regular walking speed.
Under no circumstances leave the handle bar while pushing and never push the chair
away.
The pushchair should only be used on solid level ground.
Use your pushchair as intended by the manufacturer. For instance, do not drive into
obstacles (including steps, curbs) without braking.
To clear obstacles such as steps and curbs, tilt the pushchair onto the rear wheels (pull it
backwards to go up; to descend, slowly lower it forward).
Do not go up or down stairs without the assistance of another person. If devices such
as ramps or elevators are available, please use them. If they are not available, then the
pushchair should be carried over the obstacle by two persons.
4
Pay particular attention when on slopes and inclines to prevent
- the child from falling out of the pushchair;
- the pushchair from tipping over;
- the pushchair from rolling away.
If you have to park on a slope, face the pushchair uphill with the brakes engaged and
ensure that the seat is in the upright position. There is a risk that the pushchair might tip
over backwards if the seat is the reclined position.
Before leaving the pushchair and before getting into and out of it, always lock the wheel
locks.
Do not stand on the footplate when getting into or out of the pushchair
Only lift the pushchair by parts that are solidly attached:
- front frame tube above the front wheels;
- rear axle;
- push handles / pushbar.
When your child reaches for objects in front, to the side or behind the pushchair, be sure
that he/she does not lean out of the pushchair too far since the shift in the center of gravity
might cause the pushchair to tilt or tip over.
The handling of the pushchair is strongly influenced by tyre pressure. Correctly inflate tyres
considerably improve its maneuverability. The air pressure should be at least 2 bar
(200 kPa resp. 29 PSI).
Please be aware that with certain footrest settings the footrest can collide with the caster
wheels.
Please keep packaging material away from children. Plastic packaging presents the
danger of suffocation.
Never leave your child unattended in the pushchair even when they are strapped in and
the brakes engaged.
Before using the pushchair, both folding guards and the seat must be firmly locked in
place.
Static stability is at 18° inclination.
Attaching heavy bags or other weight to the push handles can adversely affect stability.
The maximum weight that can be carried in the storage bags is 3 kg (“Model soft”) or rather
8 kg (“Model 2009”).
Trays must not be loaded with objects heavier than 5 kg.
In the dark, the user should wear light clothing or clothing with reflectors in order to improvevisibility. Ensure that the reflectors if installed are easily visible. We also recommend
installing active illumination.

5
The pushchair is only intended to carry one child at a time.
The maximum load for the BINGO street frame is 50 kg.
The maximum load for the BINGO seat unit is 35 kg.
Accessories and add-ons reduce the maximum load proportionately.
Attention!
We recommend that, wherever and whenever possible, users transfer to the seats installed
in the motor vehicle and use the corresponding vehicle restraint systems, because this is
the only way to ensure optimum protection of the passengers in case of an accident.
Your BINGO Rehab Pushchair was successfully tested in accordance with ANSI/RESNA
WC/19 and ISO 7176/19 (Crash Test).
It is, however, possible to use your BINGO Rehab Pushchair as a seat in a motor vehicle, if
our “Tie down Kit” (article 3201-7300) as well as appropriate restraint systems are used.
This Rehab Pushchair is equipped with back angle and seat tilt adjustment. Before starting
you must tilt the backrest until the lock pin (A) locks into the hole (B) in the back plate.
Tighten the lever (C) well after this adjustment. Using the seat tilt adjustment you must
bring the backrest into almost upright position (max. 20°). Observe the specifications
under 4.6 and 4.13 in this user manual.
Caution!
Excess strap ends on accessories may be trapped between the two parts of the seat
mounting interface and prevent a full engagement of the lock pin. In such a case the seat
could fall off the mobility base. Shorten excess strap ends on accessories so that they can
not be trapped.
Check by pulling the seat sharply forward that the seat unit is properly engaged. Check
that the lock pin is completely engaged. Push in completely, if necessary.
Whenever you change any settings on the BINGO rehab pushchair, make sure that you
firmly tighten any screws that have been loosened.
6
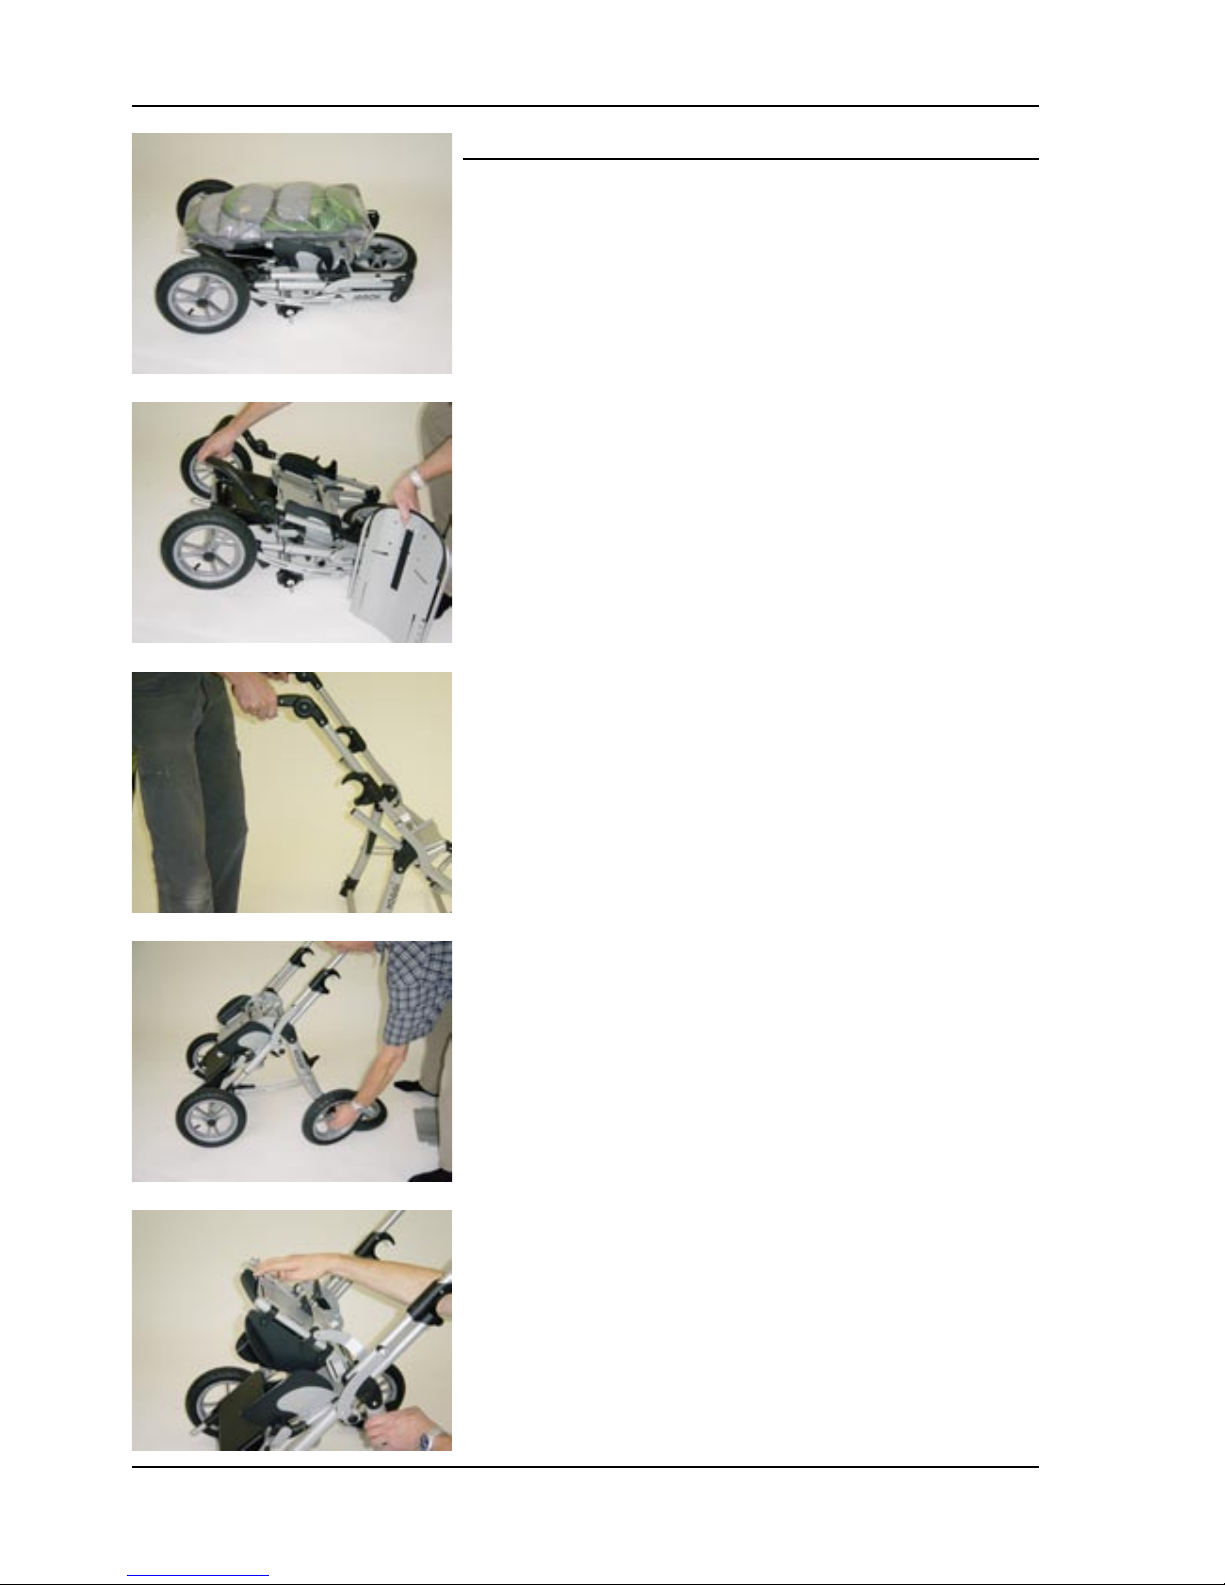
3 Delivery and Preparing for Use
The original package contains the following components:
• outdoor mobility base, folded;
• seating unit, folded;
• back insert
• seat, back, hip and lateral padding;
• instructions for use and list of tools required;
• accessories as ordered.
Carefully remove the transport safety items and packaging material.
To unfold the Pushchair please proceed as follows:
• Lift the pushchair using the black handle grip on the pushbar and
unfold it until you can set it on its wheels.
• Press the pushbar backward until the folding guards engage.
• Check both folding guards and engage them if necessary.
• Push the rear wheels (with perforated brake disk!) on the rear axle
stub until the quick release engages. Ensure that the wheels are
safely fixed on the axle stub by pulling in the opposite direction.
If you have a pushchair with rigid front wheels proceed in the same
way.
• Release the clamping lever on the backrest and turn the backrest
to about 90° against the seat surface.
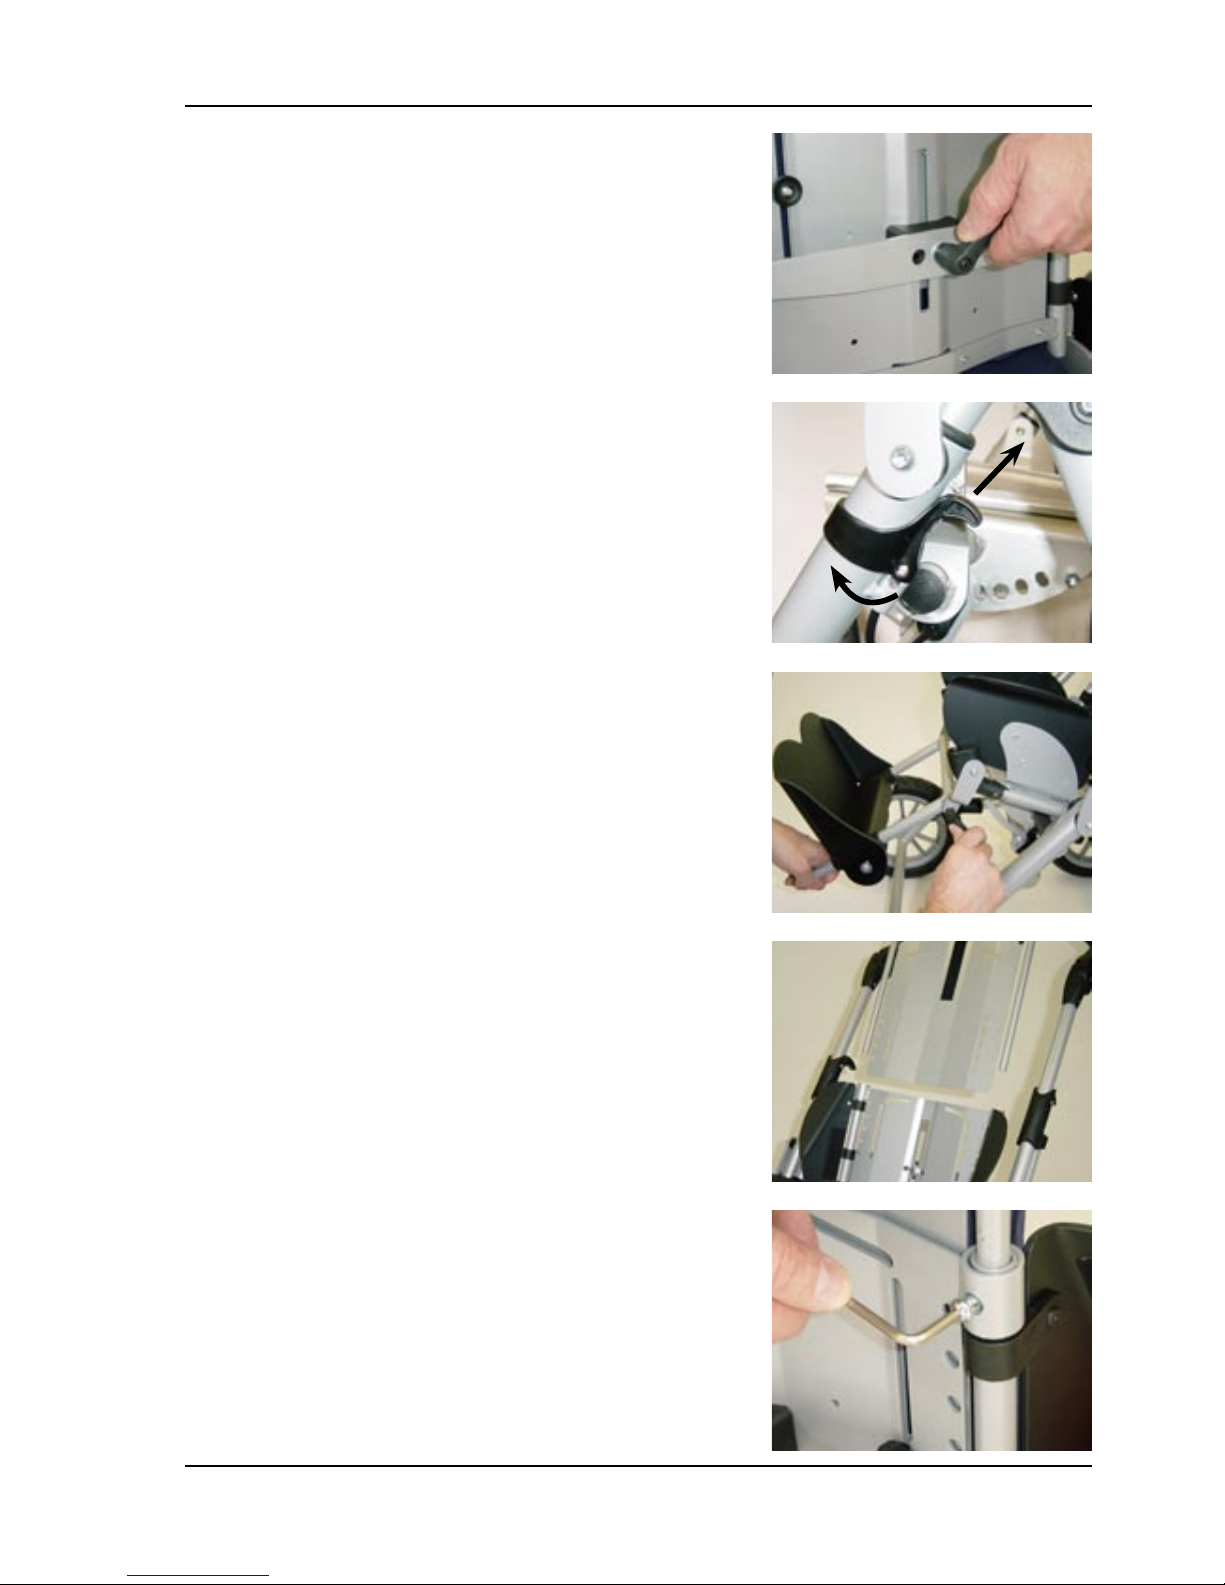
7
• After setting the backrest to the desired position clamp it firmly
with the clamping lever. By pulling the handle of the clamping lever
backwards you can rotate it freely and find a optimal position to
operate it.
• To overcome the child protection pull the trigger outside first.
• Pull then the trigger upward until the locking device opens the tilt
mechanism and swing the seat unit to the desired position.
• Disengage the trigger and swing the seat unit until the locking
device locks with a audible click.
• Swing the knee angle assembly with the footrest to the desired
position and fix it with the clamping lever
• Put the back insert into the back base of the backrest and adjust to
the desired height by tightening the clamping bolts. If your BINGO
is delivered with a canopy accessory , put the adapter fittings
on the tubes with the back insert in place. Refer to chapter 5
accessories 5.17 canopy.
8
• The Allen wrench (size 4 mm) for this and for most other
adjustments you can find mounted in the joint slider of the backrest
• In addition to the clamping bolts, the back insert is fixed and
secured by two carriage bolts with knurled nuts, which also limit
the maximum back height.
• It is recommended to adjust the seat unit to the desired settings
before you put on the upholstery parts. See therefore chapter 4
„Adjusting and Adaptation possibilities“
• Put the seat upholstery on the seat so that the corresponding hook
& loop straps on seat and upholstery are connected. The rear part
of the upholstery should line up with the rear seat edge.
• Put the hip upholsteries on the hip brackets and connect the
corresponding hook & loop straps
9
• Put the lateral upholsteries on the lateral brackets and connect the
corresponding hook & loop straps.
• Pull the back upholstery with the cap onto the back insert.
• Connect the corresponding hook & loop straps to the back
insert so that the shoulder belt slots line up with the upper edge
(shoulder) of the back upholstery.
• Push the lower end of the back upholstery through the gap
between back and seat and attach the back upholstery to the rear
seat edge by the corresponding hook & loop straps.
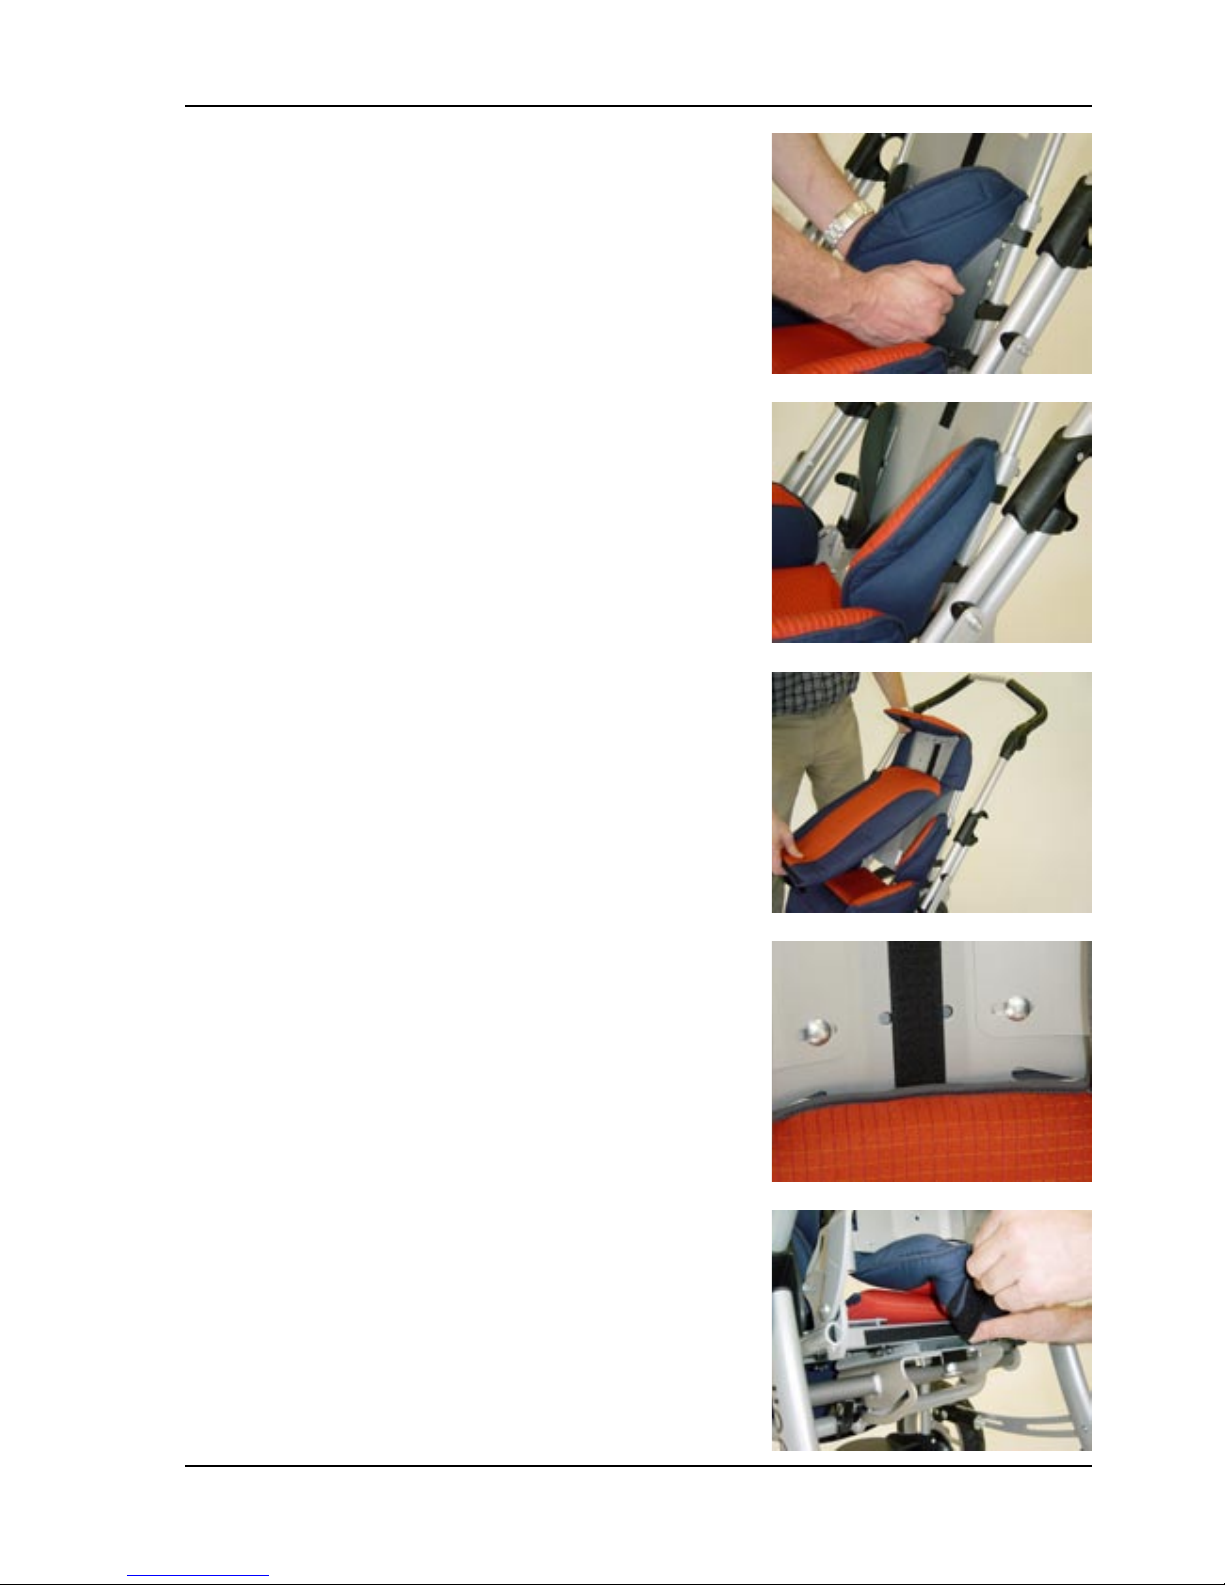
10
If your BINGO seat unit is supplied with a short backrest
(BINGO OT) please proceed as follows:
• Loose and remove just one of the mounted knurled nuts and
the belt guides at the back of the backrest. Hold the screw in its
position or plug the screw into the alternative position.
• Fix the backrest upholstery (with the Velcro fasteners) onto the
backrest.
• Pull the corresponding strap which is fixed on the backrest above
the backrest plate and plug the end of the strap onto the screw.
• Plug the belt guide and seize the knurled nut.
• Proceed in the same way on the other side.
• Plug the backrest upholstery between backrest and seat unit and
fix the backrest upholstery onto the back edge of the seat.
For transportation the armrests of the BINGO OT has been
detached.
• Loose the fasteners of the premounted armrests.

10
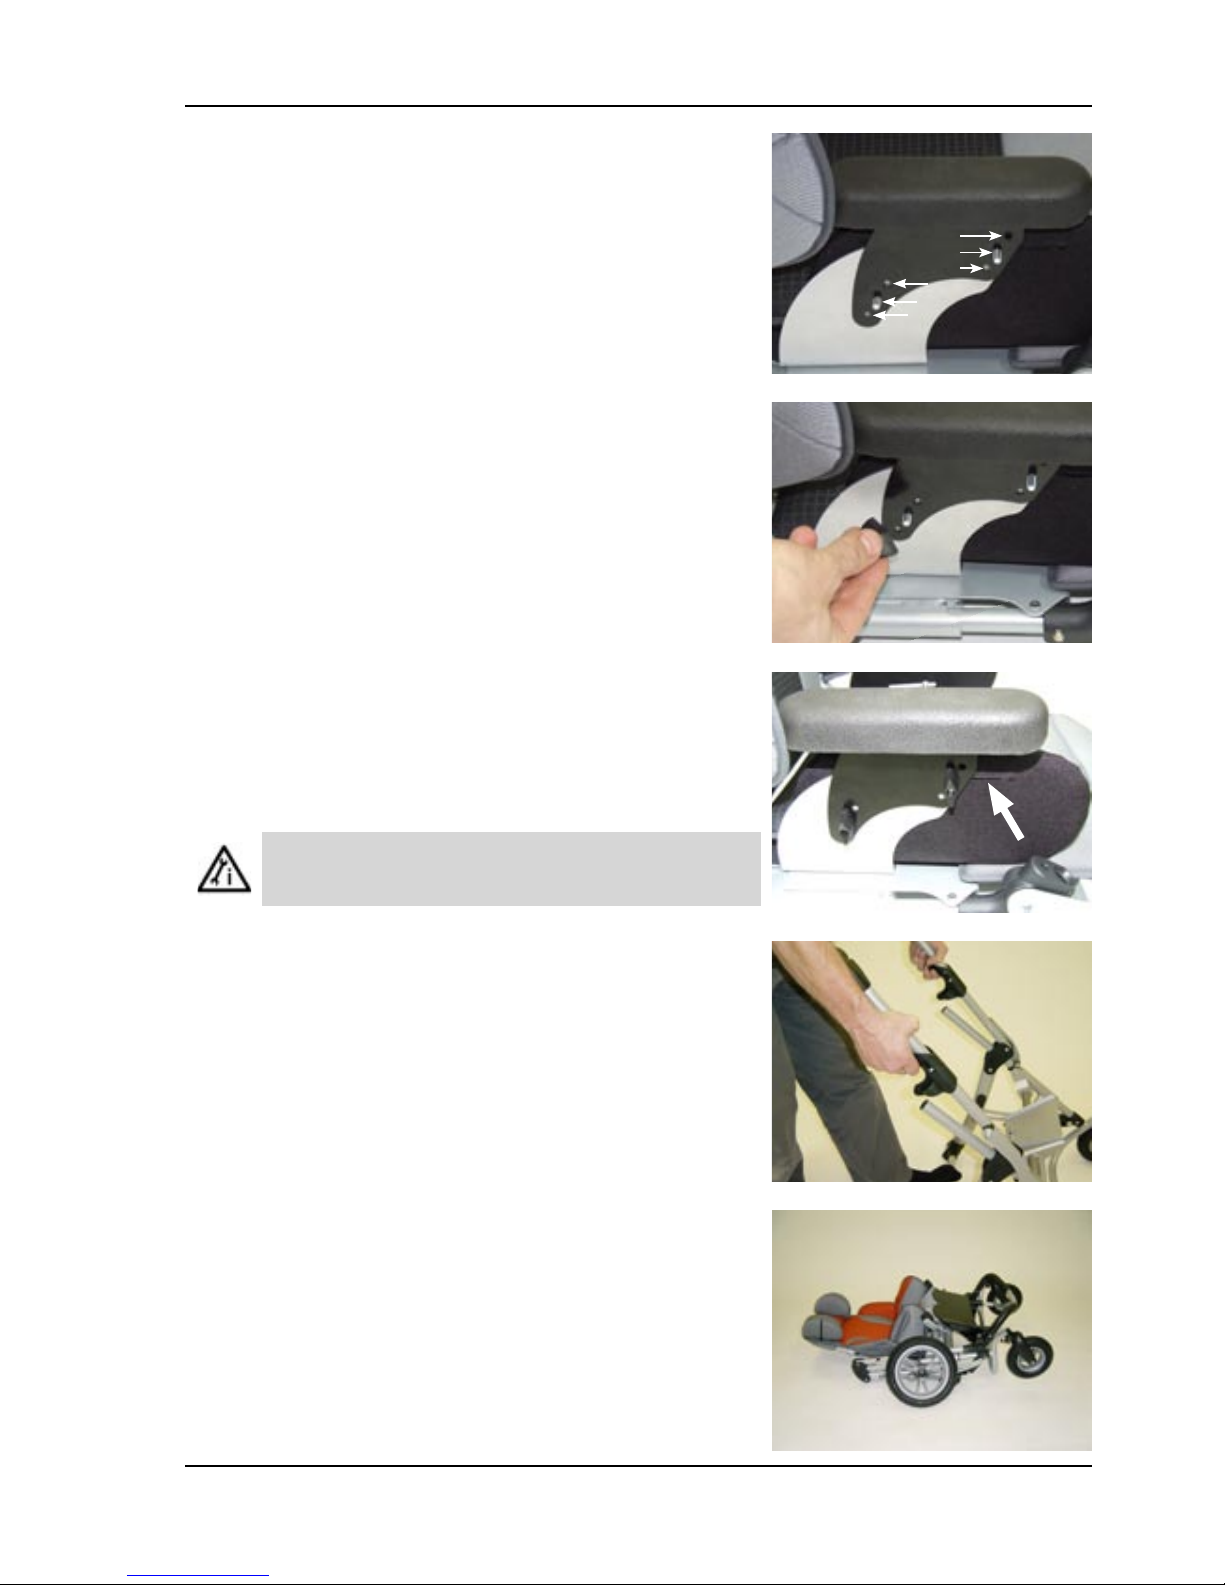
If your BINGO seat unit is supplied with a short backrest
(BINGO OT) please proceed as follows:
• Loose and remove just one of the mounted knurled nuts and
the belt guides at the back of the backrest. Hold the screw in its
position or plug the screw into the alternative position.
• Fix the backrest upholstery (with the Velcro fasteners) onto the
backrest.
• Pull the corresponding strap which is fixed on the backrest above
the backrest plate and plug the end of the strap onto the screw.
• Plug the belt guide and seize the knurled nut.
• Proceed in the same way on the other side.
• Plug the backrest upholstery between backrest and seat unit and
fix the backrest upholstery onto the back edge of the seat.
For transportation the armrests of the BINGO OT has been
detached.
• Loose the fasteners of the premounted armrests.
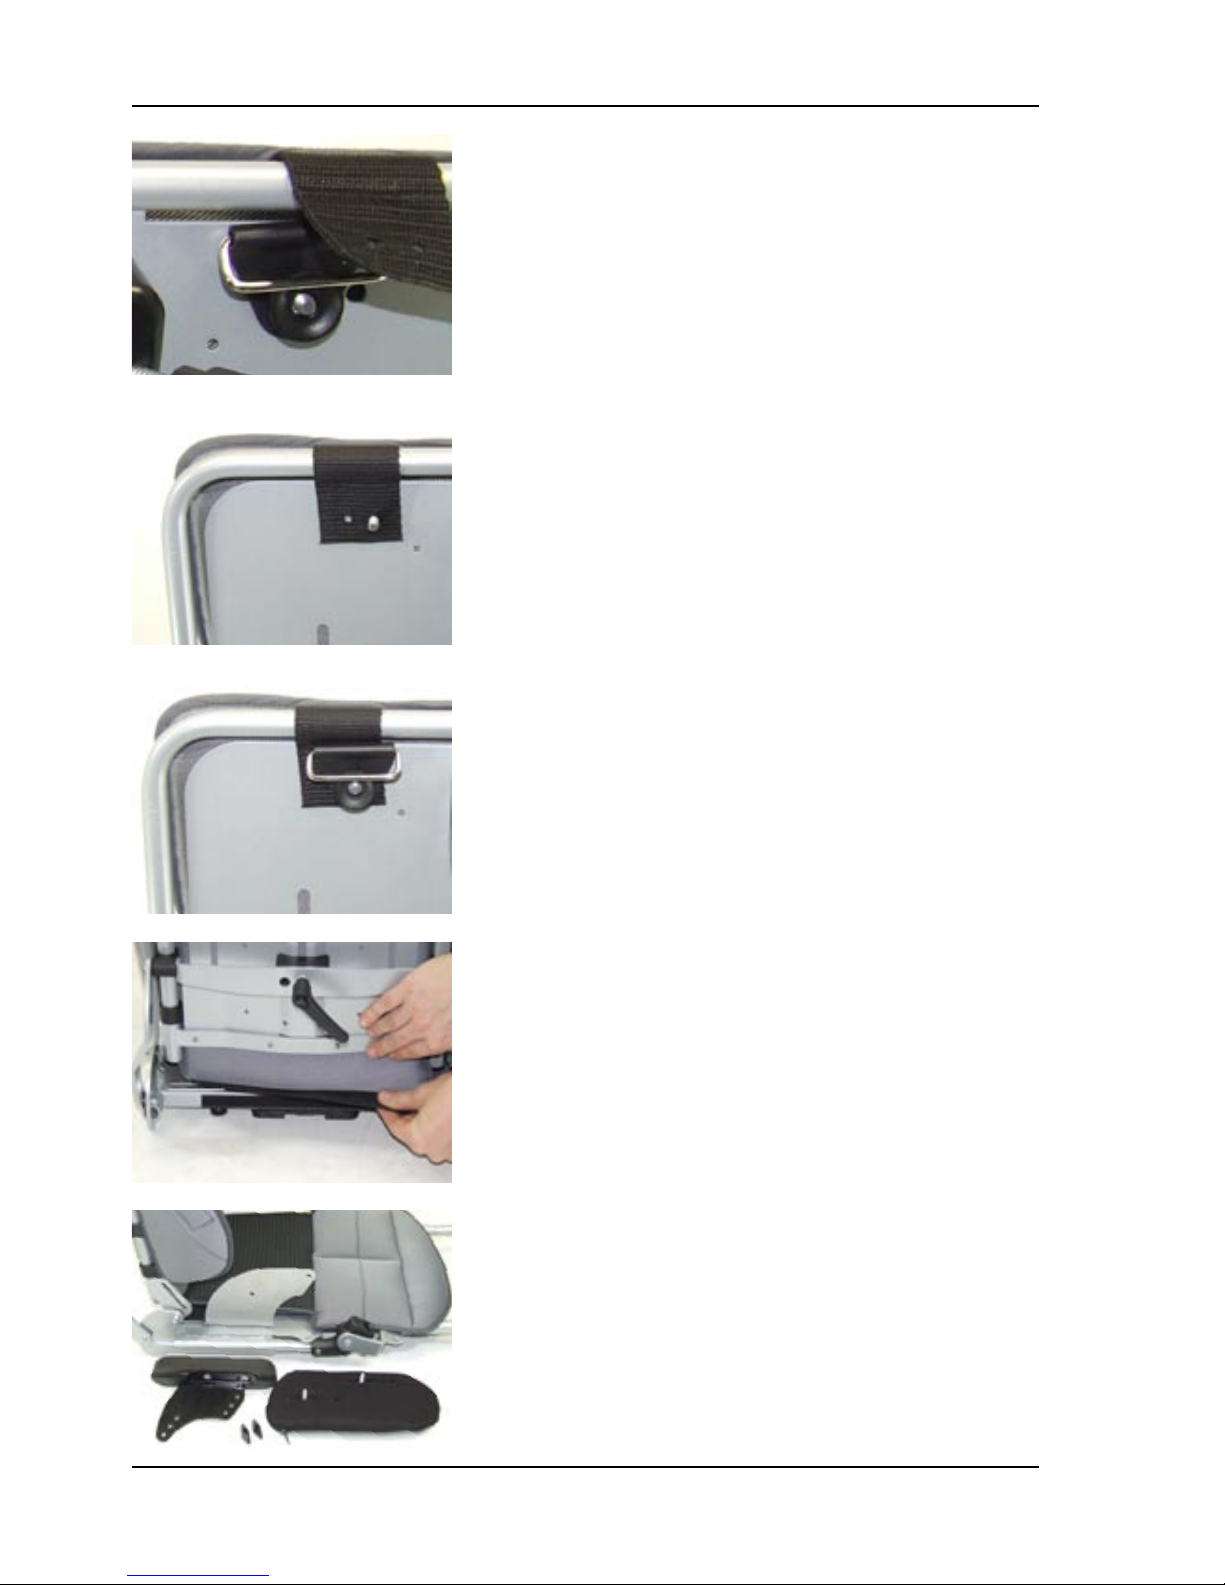
11
• Plug the hip support including the screws from the inside through
the boreholes.
• Loose the wing nut.
• The hip supports can be adjusted (concerning the depth) as long
as the wing nuts aren´t firmly tightened.
Whenever you change any settings on the BINGO rehab
pushchair, make sure that you firmly tighten any screws
that have been loosened.
To fold the BINGO rehab pushchair proceed as follows:
• Stand behind the push bar. Pull both folding guards and push the
push bar forward.
• After disengaging the folding guards hold the upper part of the
push handle and fold it forward until it touches the front frame and
the pushchair is lying on the floor
A
A
 Loading...