

Page 1
User‘s Manual
Respiratory Therapy Device
CPAP - AutoCPAP - BILEVEL ST20
as of device software 3.300
Page 2
SERIAL NUMBER
Every HOFFRICHTER GmbH device is supplied with a
serial number for traceability purposes.
Please enter your device‘s serial number here. You will
fi nd the serial number on the rating plate on the back
of the device.
...............................................
Please always quote the serial number for all queries
and complaints.
CONFORMITY
The device complies with the requirements of Directive
93/42/EEC.
2 Info
Page 3

CONTENTS
Scope of delivery ................................................... 7
General .................................................................. 8
Information on this user‘s manual ........................ 8
Symbols used in this manual ............................... 9
Symbols on the rating plate ............................... 11
Safety Information ................................................ 12
General safety instructions ................................ 12
Electrical safety ................................................. 14
Installation requirements and transport .............. 15
Before commissioning ....................................... 17
Using oxygen .................................................... 18
Intended use ..................................................... 19
Contraindications .............................................. 21
Side effects ....................................................... 22
Device description ............................................... 23
How the device works .......................................... 24
General ............................................................. 24
Power supply .................................................... 25
Therapy modes .................................................... 27
CPAP ................................................................ 28
APAP ............................................................... 28
BILEVEL S, T and ST ....................................... 33
Contents 3
Page 4

Using the device .................................................. 37
Commissioning ................................................. 37
Turning on and off in battery mode .................... 39
Standby mode .................................................. 39
Automatic zero point correction .......................... 40
Power failure ..................................................... 42
Using oxygen .................................................... 42
Device functions .................................................. 44
Parameters in point 2 CPAP .............................. 47
Parameters in point 2 AutoCPAP ....................... 48
Parameter in point 2 BILEVEL ST20 .................. 50
Language ......................................................... 52
P-Unit ............................................................... 52
Operating times ................................................ 53
Date ................................................................. 54
Time ................................................................. 55
Wake up time .................................................... 56
Mode ............................................................... 57
Pressure ........................................................... 58
IPAP ................................................................. 60
EPAP ................................................................ 61
I-Slope .............................................................. 61
E-Slope ............................................................ 62
Frequency ......................................................... 64
I:E ..................................................................... 65
4 Contents
Page 5

Delay Time ........................................................ 65
Backup freq ...................................................... 66
P-Min ................................................................ 67
P-Max ............................................................... 68
P-Start .............................................................. 68
I-FLEX ............................................................... 69
E-FLEX ............................................................. 70
Calibration ........................................................ 71
Ramp ............................................................... 73
Mask Test ......................................................... 75
Automatic ......................................................... 76
Display Vt ......................................................... 77
Bact.Filter ......................................................... 79
Brightness ........................................................ 80
Parameter settings ............................................ 81
Alarm functions of the device ............................... 83
Mask alarm ....................................................... 83
Pressure alarm .................................................. 83
Wake up alarm .................................................. 84
Important display messages ................................. 85
Using an SD card ................................................. 87
General information ........................................... 87
Inserting the SD card ........................................ 88
Removing the SD card ...................................... 89
What is saved on the SD card ........................... 90
Contents 5
Page 6

Error messages ................................................. 92
Changing the fi lter, cleaning.................................. 94
Cleaning the mask ............................................ 96
Cleaning the therapy tube ................................. 96
Cleaning the device ........................................... 97
Cleaning the headgear ...................................... 98
Cleaning the humidifi er ...................................... 98
Preparing the device for a patient change ............. 99
Using bacterial fi lters .......................................... 100
Troubleshooting ................................................. 101
Maintenance ...................................................... 103
Disposal............................................................. 104
Device ............................................................ 104
Packaging ....................................................... 104
Accessories .................................................... 104
Accessories ....................................................... 105
Technical data .................................................... 107
Manufacturer’s declaration on electromagnetic
compatibility ...................................................... 111
Disclaimer .......................................................... 116
6 Contents
Page 7
SCOPE OF DELIVERY
1
2
6
7
5
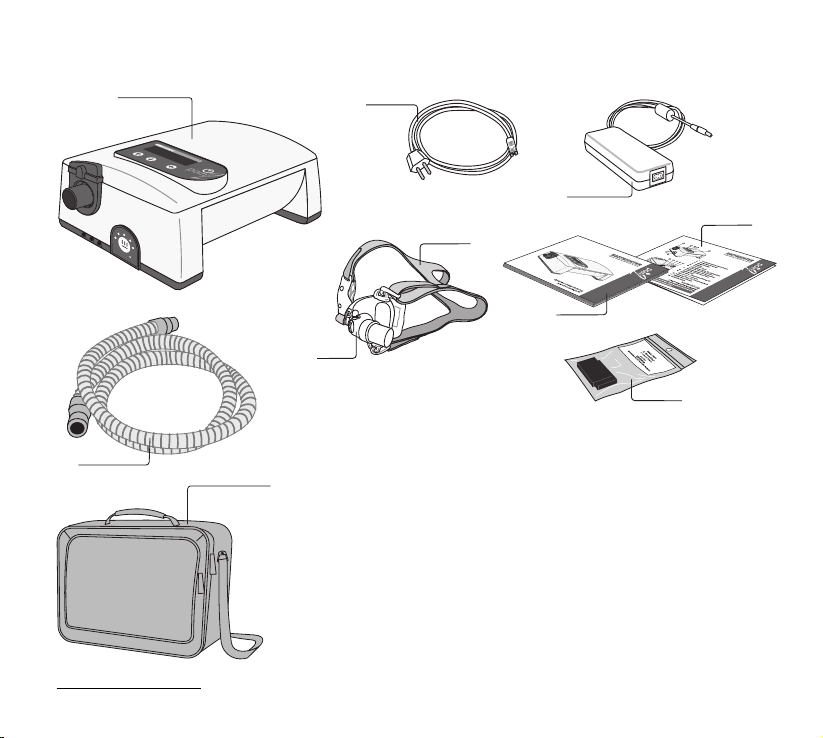
1 Respiratory therapy device point 2
4
2 Mains cable
3 Power supply
10
4 Therapy tube (ID = 22 mm, length = 1.80 m)
5 Ventilation mask (optional) with exhalation valve
Different sorts of mask systems are available.
6 Headgear
7 User‘s manual
8 Brief instructions
9 Spare fi lter (2 pack)
1
10 Carrying case
3
8
9
1
1 1 optional equipment variant for use with humidifi er
Scope of delivery 7
Page 8

GENERAL
INFORMATION ON THIS USER‘S MANUAL
Read this user‘s manual through carefully before using
your therapy device for the fi rst time.
Follow the safety and cleaning instructions in particular.
Keep the manual in a safe place close to the device so
that you can refer to it immediately if necessary.
8 General
Page 9
SYMBOLS USED IN THIS MANUAL
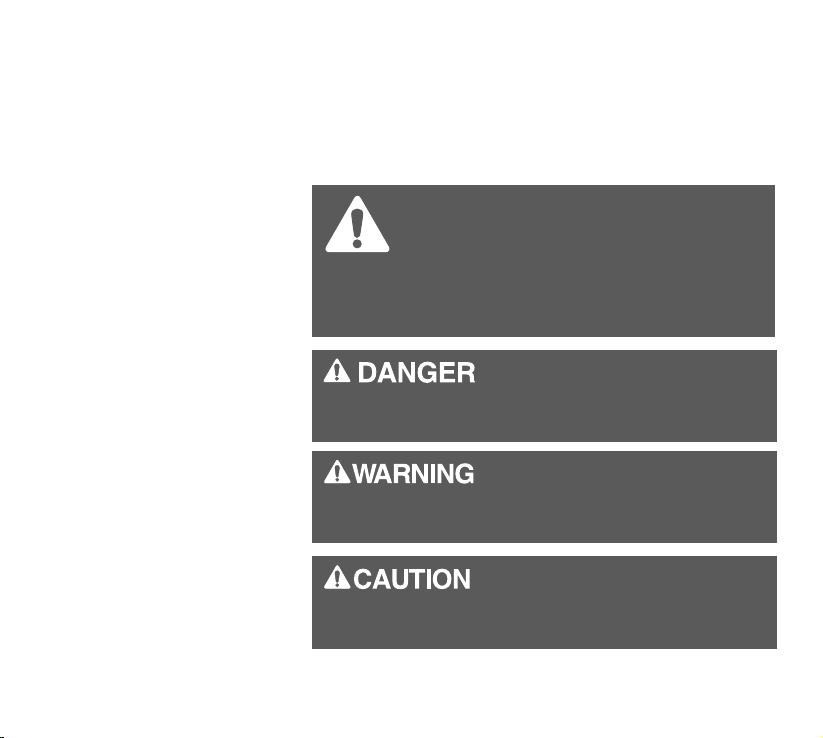
Important information is denoted by symbols in this
user‘s manual. Be sure to follow these instructions in
order to avoid accidents, personal injury and material damage.
This symbol denotes general safety instructions.
Follow these instructions to avoid accidents, personal injury or material damage.
This symbol denotes hazardous situations that
lead to serious injuries or death.
This symbol denotes hazardous situations that
may lead to serious injuries or death.
This symbol denotes hazardous situations that
may lead to moderately severe injuries.
General 9
Page 10
This symbol denotes situations that may lead to
material damage or damage to the device.
This symbol denotes information, tips and instructions for effi cient, error-free use of the device.
In addition, the local accident prevention regulations
and general safety regulations in force in the area of
use must be observed.
10 General
Page 11
SYMBOLS ON THE RATING PLATE
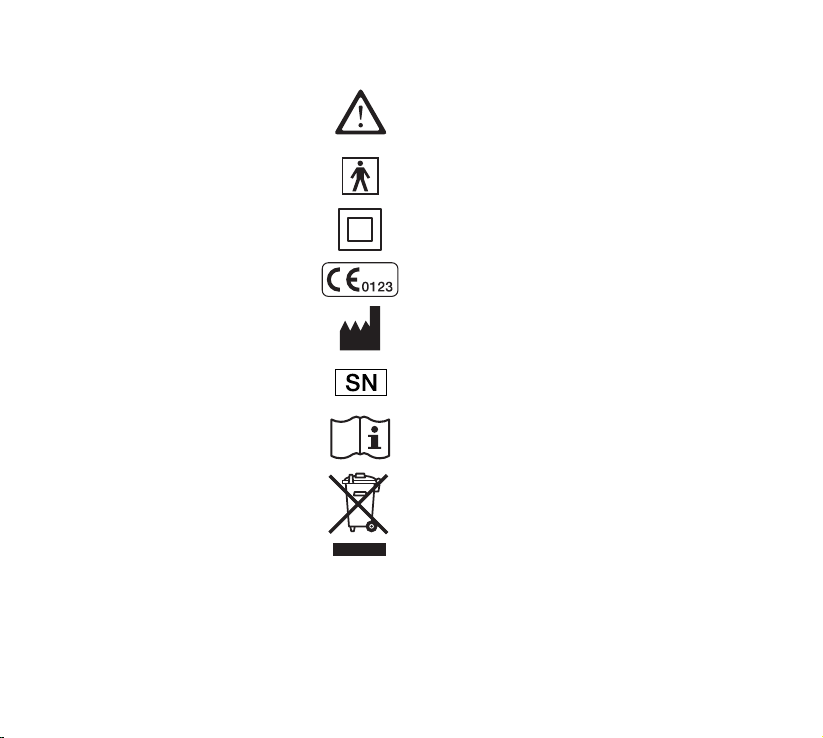
Observe the warning and safety instructions in the user‘s manual.
BF application part
Protection class II (protective insulation)
CE conformity declaration
Manufacturer
Serial number
Follow the user‘s manual.
Do not dispose of the device in the household waste. Please contact the relevant customer services department to fi nd out how
to dispose of the device properly.
General 11
Page 12

SAFETY INFORMATION
GENERAL SAFETY INSTRUCTIONS
•
Only use the device for your own
CPAP therapy prescribed by the
physician.
Only use accessories and spare
•
parts approved by us for use with
the device.
• Only use the mask and therapy tube
for your own therapy.
•
Observe the mask manufacturer‘s
usage instructions.
•
Check that the exhalation opening in
the mask is not obstructed.
•
Make sure you use an exhalation valve
if the mask has no exhalation opening.
•
Inform your specialist dealer immediately if the device is not working
properly.
12 Safety Information
Page 13

•
Please see your physician immediately if dryness of the mucous membranes in the nose and throat, sinus
discomfort, ear ache, runny nose,
over sensitive reactions of the skin,
irritabilities, loss of voice, orientation
or memory impairment occur when
using the device.
Safety Information 13
Page 14

ELECTRICAL SAFETY
• Do not use the device if its housing,
cables or power supply are damaged.
•
Do not open the device housing
under any circumstances. Inform
your specialist dealer if the device
develops a fault.
•
During therapy, do not connect any
other line-powered devices via the
RS232 interface at the rear of the
device.
•
Protect the device from water and
dampness.
•
Always unplug the device from the
mains before cleaning.
•
Empty and thoroughly clean any
optional humidifi er if you do not plan
to use it for a lengthy period of time.
14 Safety Information
Page 15

INSTALLATION REQUIREMENTS AND
TRANSPORT
•
Place the device near your bed on
a fi rm and level surface. A bedside
cabinet is ideally suited for this.
• During therapy, the device must not
be operated in a drawer, on a closet
shelf or behind a partition.
It must be ensured that the air inlet at
•
the rear of the device is accessible at
all times and not obstructed. Drapes,
curtains, paper or other objects must
not be located behind the device.
• Do not place the device on the fl oor
or under the bed in order to maintain
low dust exposure levels.
•
Do not put the device close to a
source of heat.
•
Avoid setting up the device at locations where it will be exposed to direct
sunlight.
Safety Information 15
Page 16

•
Make sure you operate the device
at a suffi cient distance from other
equipment which could emit electromagnetic waves such as diathermy
devices, cell phones, remote-controlled toys and microwave appliances.
•
Empty the humidifi er (optional acces-
sory) before packing it away in the
carrying case.
16 Safety Information
Page 17
BEFORE COMMISSIONING
• Do not switch the device on if it has
previously been in a very cold environment. Wait for about one hour for the
temperature to balance out.
•
Check for proper setup and proper
condition of the device.
•
Check the condition of the breathing
tube, mask, humidifi er and air fi lter.
Special attention should be paid to
the maintenance instructions.
Safety Information 17
Page 18

USING OXYGEN
•
Oxygen supports combustion. Therefore, observe the fi re protection regu-
lations applicable for using oxygen.
Ensure that there is no grease on the
•
oxygen fi ttings. Do not smoke and
do not handle naked fl ames.
•
Before using any oxygen equipment
for the fi rst time, you must receive
instruction from your specialist dealer
in your home environment.
•
Be sure to observe the user‘s manual
of the manufacturer or distributor
from whom you obtain the oxygen.
•
Have your distributor advise you
about the use of oxygen.
• In any case, follow your physician‘s
instructions.
18 Safety Information
Page 19

INTENDED USE
The point 2 is a respiratory therapy device designed
for the treatment of sleep-related breathing disorders
in patients weighing 30 kg or more. With increased
demand of pressure and/or forms of respiratory insuffi ciency, the point 2 BILEVEL ST20 offers the classical
non-invasive ST-Bilevel therapy. The device is designed
for non-dependent ventilated patients in the home
therapy, who need a respiratory support with backup
frequency.
The point 2 CPAP (CPAP = Continuous Positive Airway
Pressure) is a respiratory therapy device, which applies
a continuous positive airway pressure to the patient.
The point 2 AutoCPAP (AutoCPAP = Automatically
Adjusting Continuous Positive Airway Pressure) is a
respiratory therapy device, which provides an eventdriven therapy pressure adjustment within preset pressure limits.
The 2 BILEVEL ST20 (ST = Spontaneous, Timed) is a
respiratory therapy device, which enables two independently adjustable pressure levels depending of inspiration and expiration.
The device generates positive airway pressure which
keeps the patient‘s airways open whilst asleep. The
Safety Information 19
Page 20

therapy pressure is administered via a respiratory mask
(nasal, nasal cushion or full-face mask), which must
be fi tted with an exhalation valve to ensure that the
exhaled air is discharged.
The point 2 is designed for use at home, in hospitals
and for portable operation.
The device is not suitable for use with patients in need
of artifi cial respiration.
This therapy device is no life-support system.
20 Safety Information
Page 21

CONTRAINDICATIONS
Respiratory therapy may be contraindicated for
certain pre-existing conditions. Therefore, always
talk to your treating physician before starting the
therapy.
Contraindicating pre-existing conditions include:
• bullous lung diseases
• pneumothorax
• very low blood pressure
•
pneumocephalus after open craniocerebral injury
or other head injuries
Infl ammation of the paranasal sinuses or the middle
ear may be an indication to stop the treatment. Please
speak to your physician about this.
Safety Information 21
Page 22

SIDE EFFECTS
There is the possibility of undesirable side effects occur-
ring with respiratory therapy. Reasons for side effects
occurring could be unsuitable therapy settings, not
using the device properly or not following the cleaning
instructions. Normally the side effects disappear when
their causes have been eliminated.
You will fi nd suitable counter measures for some side
effects in the section „Troubleshooting“ from page 101.
The following side effects may occur during therapy:
• Pain in the nose, paranasal sinuses and ears
• Dryness and irritation in the nose and throat
• Nose bleeds, runny nose, sneezing, colds
• Irritated or dry eyes
•
Reddening of the skin, swelling of the skin and
pressure points in the mask area
• Diffi culty in breathing, claustrophobia
•
Stomach problems caused by air accumulating
in the stomach
If you experience side-effects continuously, contact
your treating physician to clarify the causes.
22 Safety Information
Page 23
DEVICE DESCRIPTION
1 optional equipment variant for use with humidifi er
How the device works 23
JAB122020
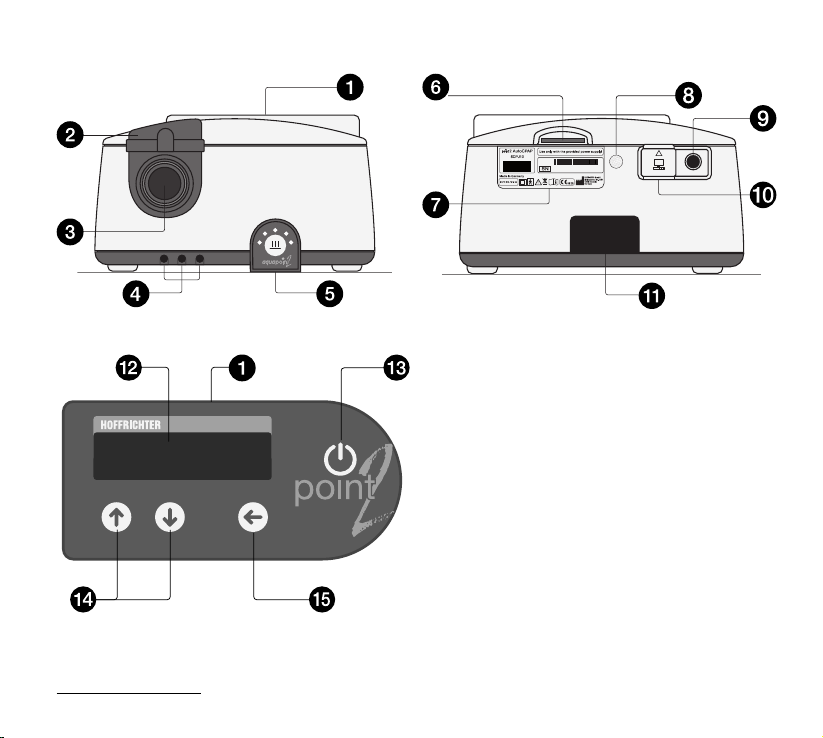
1 Control panel and display
2 Humidifi er lock
3 Therapy tube connection
4 Contact socket for humidifi er
5 Control panel for humidifi er
1
6 SD card slot
7 Rating plate
8 Air inlet for baro sensor
9 DC power connection
10 RS232 interface
11
Filter or connection port for the
fi ltersystempoint 2
12 Display
13 ON/OFF key
14 Selection keys
15 Enter key
1
Page 24
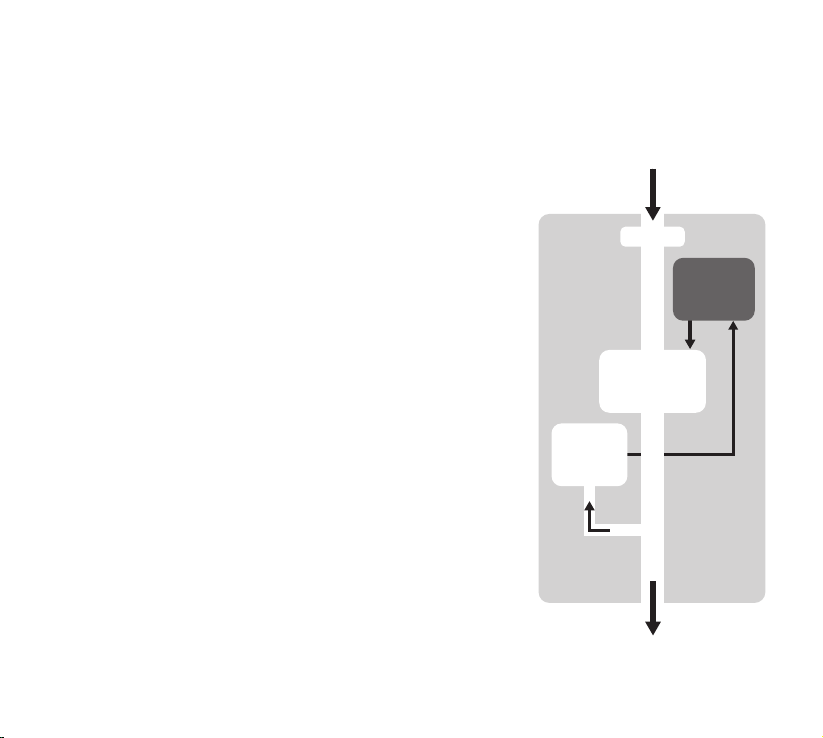
HOW THE DEVICE WORKS
GENERAL
The point 2 has an electronically controlled blower to
create the air pressure. In order to keep impositions
to the patient at a minimum, the blower has been fi t-
ted with high power reserve capacity and a rapid control response.
The point 2 has an inbuilt microcontroller to control all
its functions. An integrated quartz alarm clock increases
the comfort level when using the device. Further comfort
functions include a soft start ramp, automatic start / stop
and adjustable display brightness.
Air going through the device is warmed slightly and
therefore gains a higher water absorption capacity.
The mucous membranes in the mouth and nose can
dry out, particularly in winter when the ambient air is
dry. This is unpleasant and in some cases may also
lead to infections. Therefore, a respiratory air humidifi er may be necessary in conjunction with a treatment.
The plug-in aquapoint 2 humidifi er is available as an
accessory to humidify respiratory air.
For more information on the humidifi er read the aqua-
point 2 user‘s manual or contact your specialist dealer.
Air inlet
Filter
Control
unit
Blower
Pressure
sensor
Internal pressure measuring tube
Air outlet
24 How the device works
Page 25

POWER SUPPLY
The point 2‘s power can be supplied from one of three
sources:
External switched-mode power supply (included
1
in scope of delivery)
2 DC vehicle cable (optional)
3 powerpackpoint 2 battery pack (optional)
External switched-mode power supply
For mains operation the point has an external switching
power supply with a wide input range of 100 - 240 V
alternating current (AC), 50 - 60 Hz. Thus it is possible
to connect it to an energy supply anywhere in the world.
How the device works 25
Page 26
DC vehicle cable
For mobile use of the point 2, e.g., in a truck or a caravan, it is possible to operate it with a 24 V direct current (DC). For this you will need the optionally available
DC vehicle cable.
Only use the optional DC vehicle cable to connect
the device to a DC power supply.
Battery pack
To use point 2 while travelling and when mains cur-
rent fails, the device can be operated with the
optionally available powerpackpoint 2 battery pack.
With the battery pack, point 2 CPAP and point 2
Auto CPAP can be used at least 8 hours (at 10 hPa,
12 bpm, 500 ml tidal volume). With the point 2 BILEVEL
ST20 an operating time at least 7 hours is possible (at
IPAP = 12 hPa, EPAP = 6 hPa, 12 bpm, 300 ml tidal volume, I:E = 40% : 60%, T mode).
Before using the battery pack, ensure that you
have read the powerpackpoint 2 user‘s manual.
26 How the device works
Page 27
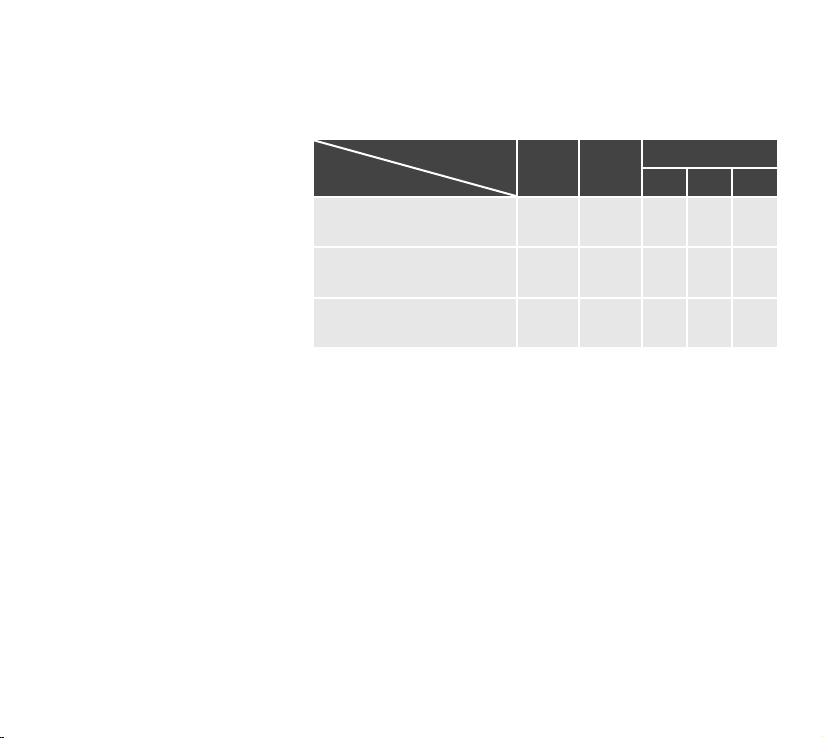
THERAPY MODES
The point 2 is equipped with the following therapy modes
depending on the type of device:
Mode
Device type
point 2 CPAP
(type 5CPJ00)
point 2 AutoCPAP
(type 5CPJ10)
point 2 BILEVEL ST20
(Typ 5CPJ30)
Therapy modes 27
CPAP APAP BILEVEL
STST
• - ---
• • ---
•-•••
Page 28
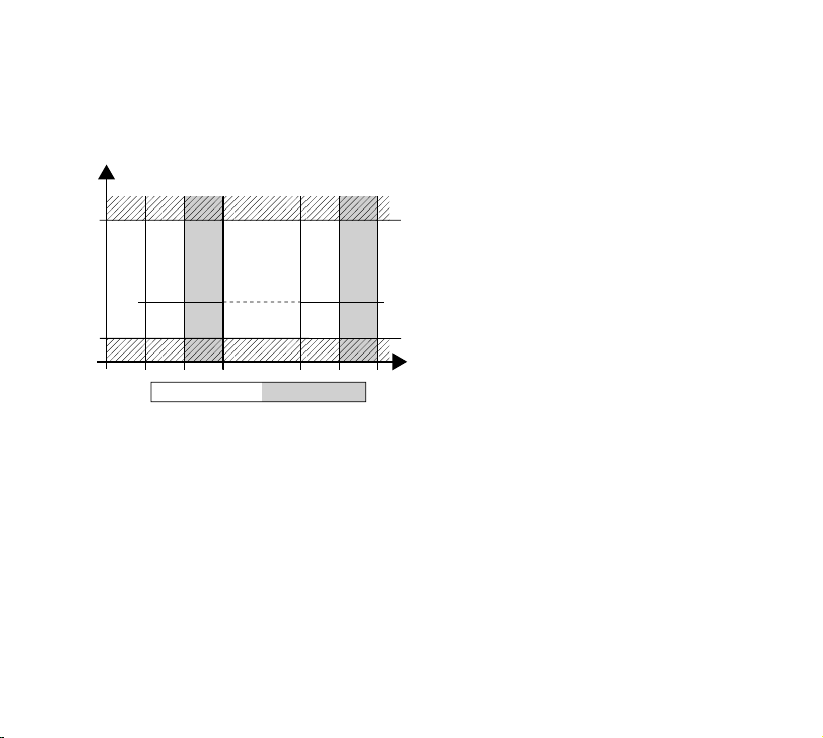
CPAP
In CPAP mode (Continuous Positive Airway Pressure),
the point 2 supplies continuous positive pressure.
Pressure
[hPa]
I
20
CPAP
pressure
4
I= Inspiration E= Expiration
CPAP
EEI
Time
APAP
(only point 2 AutoCPAP)
In APAP mode (Automatic Positive Airway Pressure), the
point 2 automatically controls the therapy pressure in
relation to the respiratory events occurring. The device
is equipped with a special sensor system that can reliably distinguish between obstructive apnea (airways
are closed) and central sleep apnea (respiratory arrest
with open airways). Obstructive apnea can be corrected with an automatic increase in pressure. Central
sleep apnea automatically results in a drop in pressure.
28 Therapy modes
Page 29
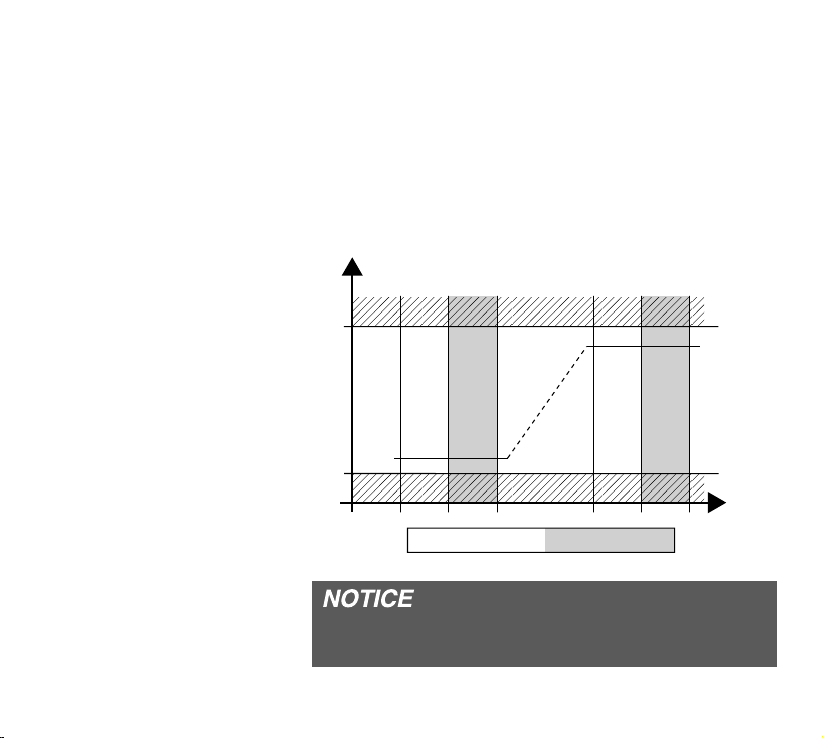
Hypopnea (fl ow reduction, snoring) results in a rise in
pressure with a lower speed. Normal respiration results
in a slow drop in pressure.
The maximum values to which the pressure level may
rise or fall are specifi ed by the selection of settings. The
device commences therapy once switched on with the
starting pressure, which is likewise adjustable.
Pressure
[hPa]
20
APAP with P-Min and P-Max limits
I
EEI
P-Max
4
I= Inspiration E= Expiration
P-Min
Time
The speed of pressure increase can be set to one
of fi ve levels via the PC software TRENDset.
Therapy modes 29
Page 30

FLEX settings
Breathing compressed air results in an increased burden for the respiratory muscles. FLEX controls ease
this burden on the respiratory muscles by reducing the
effect of the fl ow resistance in the airway. To this end,
the therapy pressure needs to be increased during
inspiration and reduced during expiration. The degree
of pressure control can be individually selected for inspiration and expiration at four levels (0, 1, 2, 3). The level
selected is identical to the airway resistance value in
hPa/(l/s) by which the effort for the patient‘s respiratory
muscles is relieved. The specifi ed curves of the FLEX
transfer characteristics correspond to the prevailing
pressure and fl ow behavior of the airways. Changes in
pressure are only possible within the adjustable pressure range of the point 2 and are additionally limited
to ± 3 hPa. FLEX settings are not activated until after
the third breathing period, as the point 2 takes a short
period of time to calculate the leakage fl ow.
30 Therapy modes
Page 31
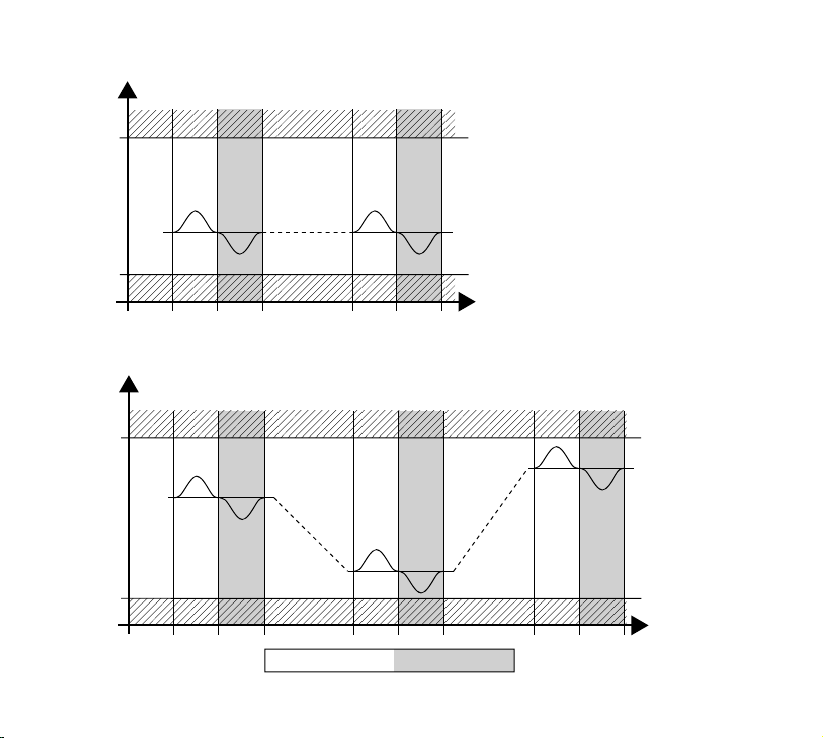
Pressure
20
CPAP
pressure
Pressure
20
4
[hPa]
4
[hPa]
CPAP with I-FLEX and E-FLEX
I
EEI
APAP with I-FLEX and E-FLEX
I
EEI
P-Min
Time
EI
P-Max
Time
I= Inspiration E= Expiration
Therapy modes 31
Page 32
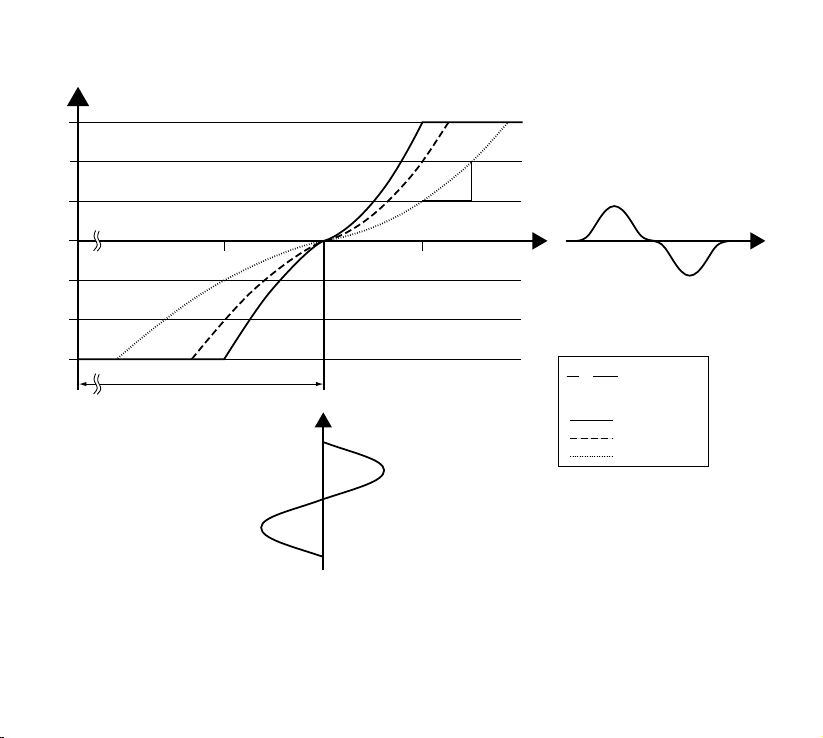
Pressure
[hPa]
13
12
11
10
9
8
FLEX settings
0
a
b
1-1
Flow [l/s]
Pressure curve
7
Leakage flow
32 Therapy modes
Respiration flow curve
abhPa
==
l/s
3 hPa/ (l/s)
2 hPa/ (l/s)
1 hPa/ (l/s)
Flow
resistance
Page 33

BILEVEL S, T AND ST
(only point 2 BILEVEL ST20)
General
In BILEVEL S, T and ST you can independently set
the pressure during inspration (IPAP) and expiration
(EPAP). Selecting an an optimal slope can facilitate
patients therapy compliance. A precise adjustment
may further convey the feeling of natural respiration
without any delay.
BILEVEL S
In BILEVEL S the transition from inspiration pressure
(IPAP) to expiration pressure (EPAP) is triggered once
the patient starts to breath. When the inspiration fl ow
ends, the pressure drops to the EPAP. In addition, a
backup frequency (Backup freq) can be activated. In
the event of an apnea patients ventilation will be continuously restored at fi xed parameters:
• IPAP, EPAP
• I-Slope, E-Slope
• Backup frequency
The parameters will be set by the physician.
Therapy modes 33
Page 34
During the expiration phase a negative pressure
(vacuum) will not be created.
Pressure [hPa]
I
20
IPAP
EPAP
4
Spontaneous breathing Spontaneous breathing
34 Therapy modes
BILEVEL S
EEIEIIEEIIE EII
= 15 s
Backup
freq. =
10 s
35% (2.1s)
65% (3.9s)
Delay time
Total
time lag Backup T mode
I= Inspiration E= Expiration
Time
Page 35
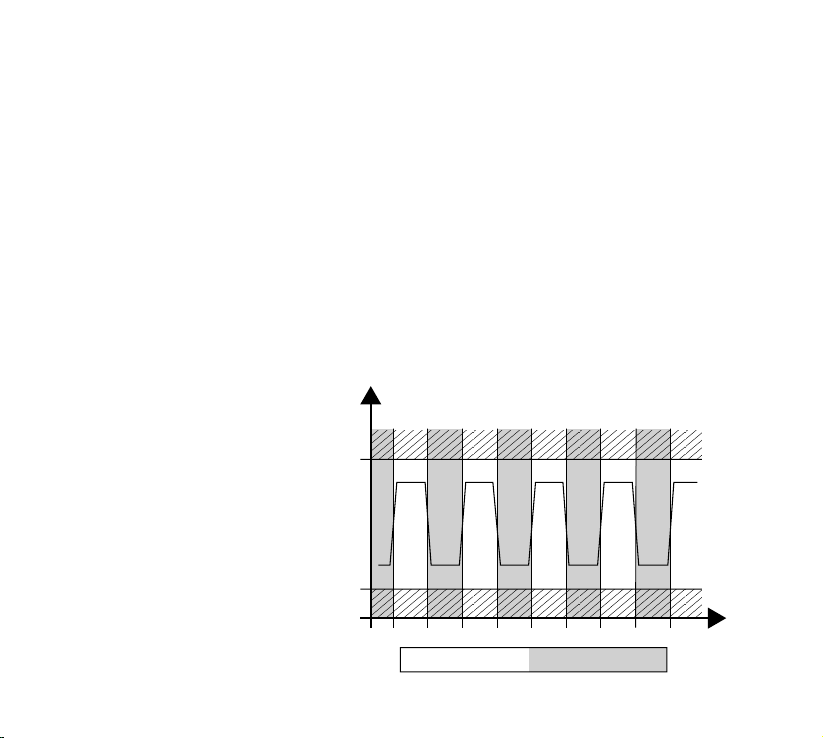
BILEVEL T
In contrast to BILEVLE S, at BILEVEL T spontanous
breating efforts will not be considered. Based on fi xied
preset ventilation parameters
• IPAP, EPAP,
• I-Slope, E-Slope,
• I:E ratio and
• frequency
the machine performs a periodic timed mandatory
pressure transition.
The parameters will be set by the physician.
Pressure [hPa]
I
20
IPAP
EPAP
4
I= Inspiration E= Expiration
Therapy modes 35
BILEVEL T
EEIEIEI
Time
Page 36
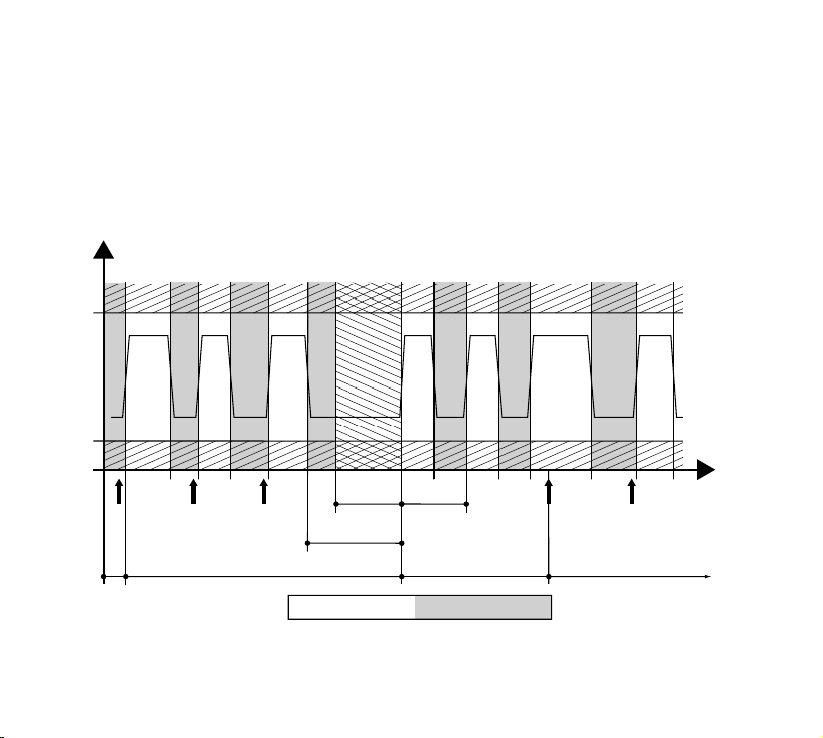
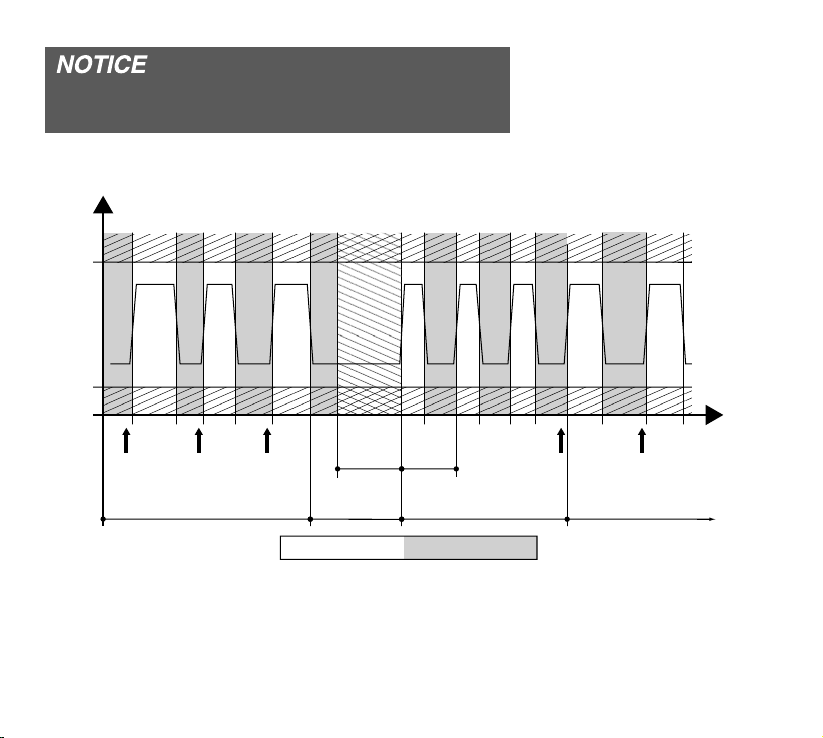
BILEVEL ST
As long as the patient is breathing spontaneously the
device is operating in the S mode. If the patient stops
breathing, the device automatically switches to the T
mode. Once a total time lag (expiration time + delay
time) has elapsed the device switches into the T mode.
Pressure [hPa]
I
EEEIEIIEEIIEI
20
IPAP
EPAP
4
Spontaneous breathing Spontaneous breathing
T
36 Therapy modes
S mode
BILEVEL ST
Delay
time
Total
time lag
I:E
T mode
I= Inspiration E= Expiration
Time
S mode
Page 37
2
USING THE DEVICE
JAB122020
COMMISSIONING
Before commissioning the device, read section
„Safety Information“ (starting from page 12).
5a
1.
Set up the device according to the installation
requirements (see page 15).
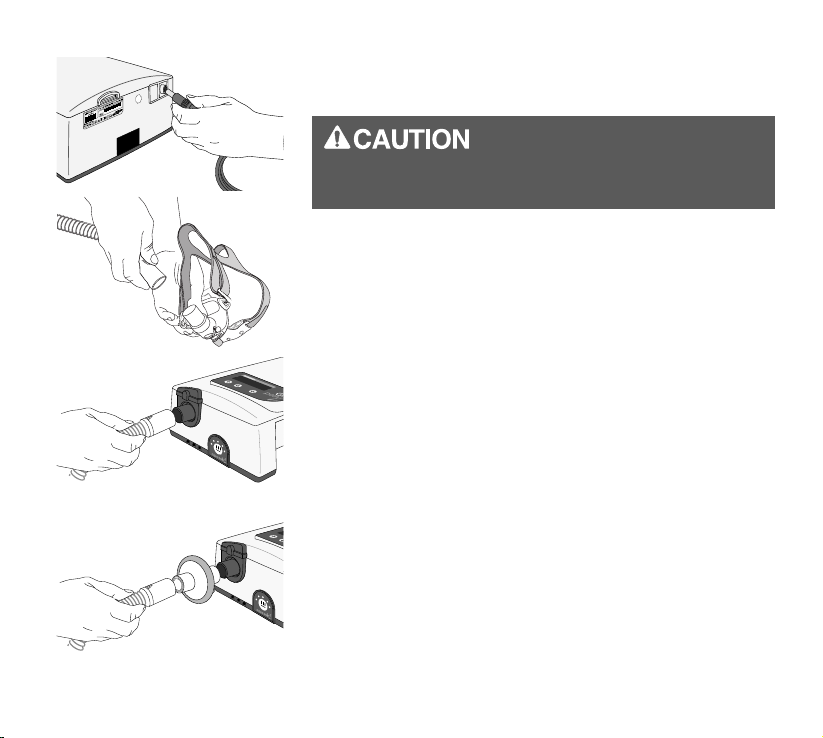
2. Connect the power supply to the device.
3. Connect the mains cable to the power supply and
its plug to a power socket.
5b
4.
The device starts up and successively displays a
welcome text, the device type, its software version
and the current number of therapy hours and then
switches to the date and time display (standby
mode).
5.
Connect the therapy tube to the mask (5a) and the
5c
unattached end of the tube to the air outlet (5b).
If you are using a bacterial fi lter, fi t it between the
tube and air outlet (5c).
6.
Calibrate the device as described in the chapter
„Calibration“ from page 71.
Using the device 37
Page 38
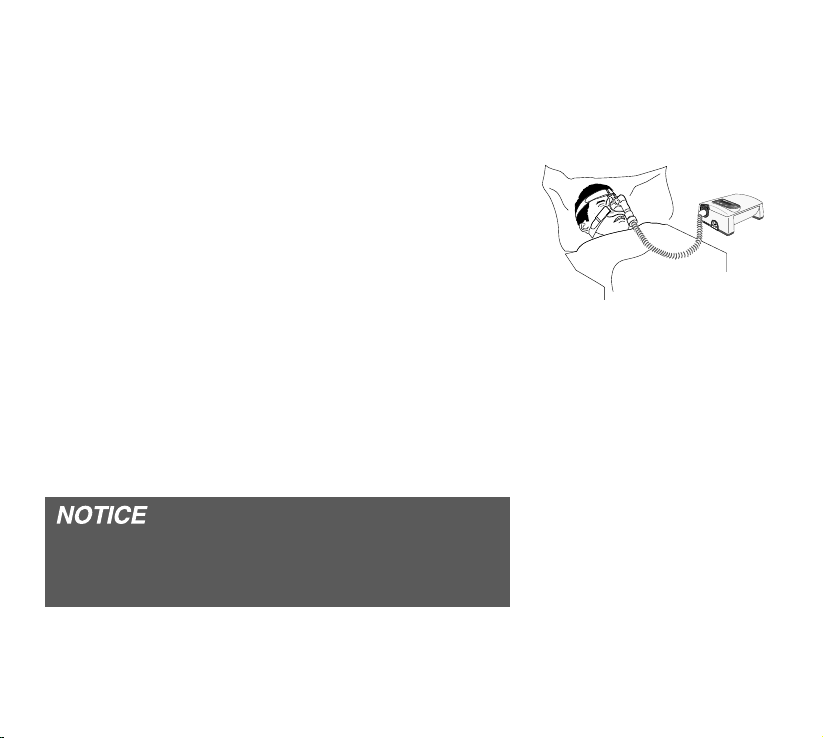
7.
Put the mask on. If automatic mode has been
selected (see page 76), the device is turned on by
the patient‘s breathing. If automatic mode has
been set to „OFF“, the device is started by pressing the ON/OFF key.
8. The device fi rst of all runs (for the time selected by
you for the mask test) at the prescribed pressure.
You should now ensure the mask‘s correct posi-
tioning to avoid potential leakages.
9. Place the tube in such a way that it does not exert
any strain on the mask when you lie down.
10.
Now breath deeply and calmly, just through your
nose. If the soft start function (Ramp) has been
selected (see page 73), the device reduces air pressure after the mask test has been performed. It
then increases pressure automatically gradually up
to the prescribed value while you can go to sleep
under reduced pressure.
Read how you can adapt the time settings for mask
test and ramp to suit your personal requirements
in section „Device functions“ (starting page 44).
8 + 9
38 Using the device
Page 39

TURNING ON AND OFF IN BATTERY MODE
If the device is powered by the optionally available
powerpackpoint 2, press the ON/OFF key to switch it
on. To switch the device off, press and hold the ON/
OFF key for more than 3 seconds.
In standby mode the device automatically switches
itself off after 1 minute.
STANDBY MODE
If the blower is switched off, the device switches to
standby mode (discernible on the lit display with date
and time).
The point 2 can be kept in standby mode permanently.
This does not harm it.
E .9'!*H
.!00EH
=@ *<=
=@ % ;D
<<L?@
<<L?@
If the powerpackpoint 2 is fi tted on the device, the
batteries are charged in standby mode. The charging process is indicated by a fl ashing battery symbol
on the display.
Using the device 39
Page 40

AUTOMATIC ZERO POINT CORRECTION
OF PRESSURE SENSOR
Automatic zero point correction ensures the uniformly
high precision of the pressure measurements and takes
account of aging effects. Therefore the electric and
electronic components are maintenance-free.
Sensors are normally temperature-compensated before
being installed in CPAP devices. This process requires
certain compensation tools, which are used solely by
trained staff. Unfortunately, the selected values are not
permanent as they vary over time due to aging, vibrations or constant changes in climate. This means that
these values need to be checked for correctness at
prolonged intervals and possibly readjusted.
HOFFRICHTER‘s technicians have however developed
a new method in which the necessary compensation
tools are, so to speak, permanently „on board“ the
point 2. It is thus no longer necessary to check measurement accuracy.
To allow this method to function, the point 2 has to be
put on standby from time to time. Here it is suffi cient
to run the device in this mode for just a few seconds
before and after each starting up of the blower to allow
the software to collect and apply the necessary data.
40 Using the device
Page 41

We also recommend running the device on standby for
a longer period, e.g. for a day, once a month.
In order to determine an applicable correction factor, the device requires a certain amount of time
in standby mode. We therefore recommend that
the device is left in standby mode at least once a
month between nightly therapies.
The zero-point correction is particularly recommended
if the device is used in a new location (e.g., when travelling) or if there are signifi cant temperature fl uctua-
tions in the room.
For the patient the automatic zero-point correction system means that the device is always optimally adjusted,
leading to even better therapy.
Using the device 41
Page 42
POWER FAILURE
After a power failure during therapy, the motor re-starts
automatically and you will see a message on the display about the power failure and the blower re-start.
If you are using the optionally available
powerpackpoint 2, the batteries provide the power
for the device in the event of a power failure.
USING OXYGEN
Before using oxygen, it is essential to read the
safety information on page 18.
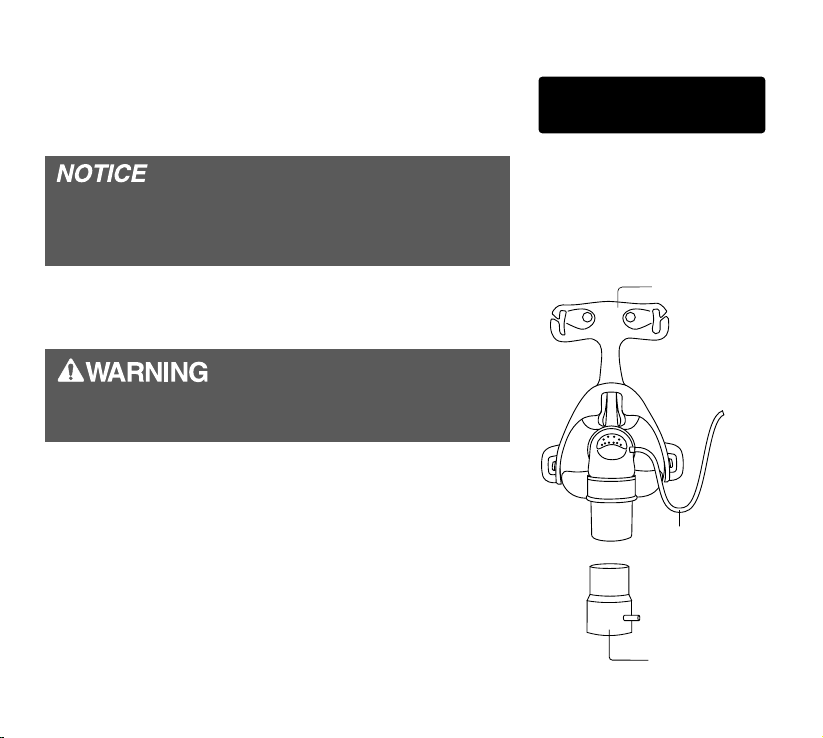
When feeding oxygen directly into the mask, please
use a kink-resistant tube made of a medically approved
material. Oxygen can also be fed in via an adapter fi t-
ted onto the air outlet.
+3!.%( 1.!
!0/./(+3!.
Mask
Tube
Adapter
42 Using the device
Page 43
Proceed as follows when using oxygen:
If the device is in standby mode or switched off,
the oxygen supply must always be switched off.
1. Before starting the treatment, check that the
tube connections are fi tted correctly.
2. Switch the device on fi rst and then start the oxy-
gen supply.
3. Check whether the automatic mode is set to
„Auto OFF“. If not, program it as described on
page 77.
4. Switch off the oxygen supply before switching off
the device.
Using oxygen infl uences the therapy pressure.
Therefore we recommend to inclose oxygen in
the therapy pressure determination / titration process, for every patient who‘s therapy is intended
to include an oxygen supply.
Using the device 43
Page 44
DEVICE FUNCTIONS
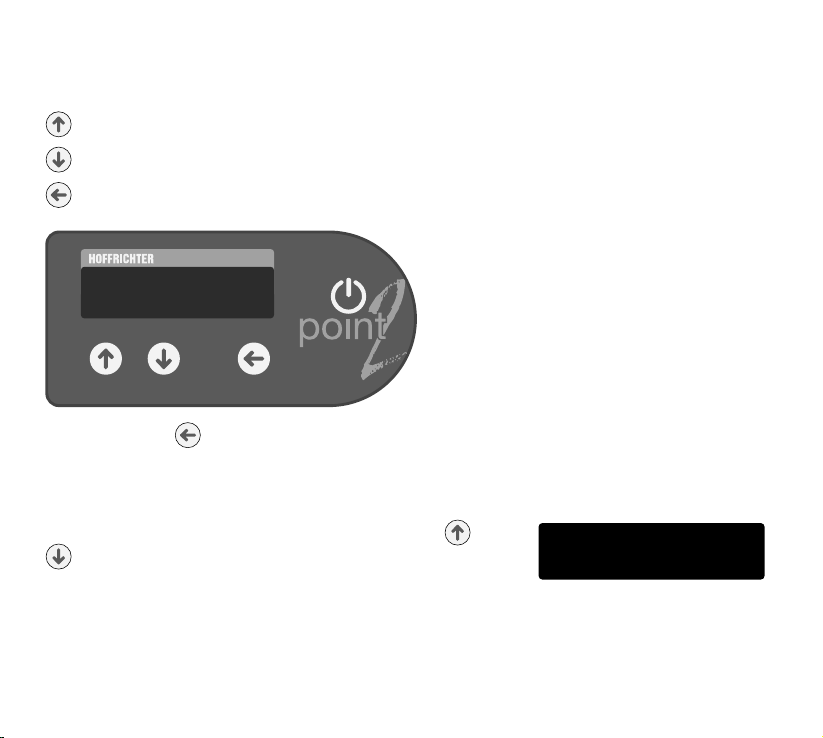
There are three keys for programming point 2‘s functions:
= Selection key
= Selection key
= Enter key
If the enter key is pressed for a prolonged time, you
enter the programming mode and the menu appears
on the display.
The device display has two lines. By pressing and
you can select the top or bottom row. A triangle
symbol in front of a row means that this row has
been selected.
44 Device functions
Q'!%)!MM ;B L ;;
4%/!*1
Example: Wake Time
Page 45
The point 2 has two different menus:
• Standard
menu
• Complete menu
The standard menu contains the menu items relevant
to patients. The complete menu contains all menu
items of the standard menu as well as all menu items
required for setting the therapy. This menu is primarily intended for physicians and trained medical staff.
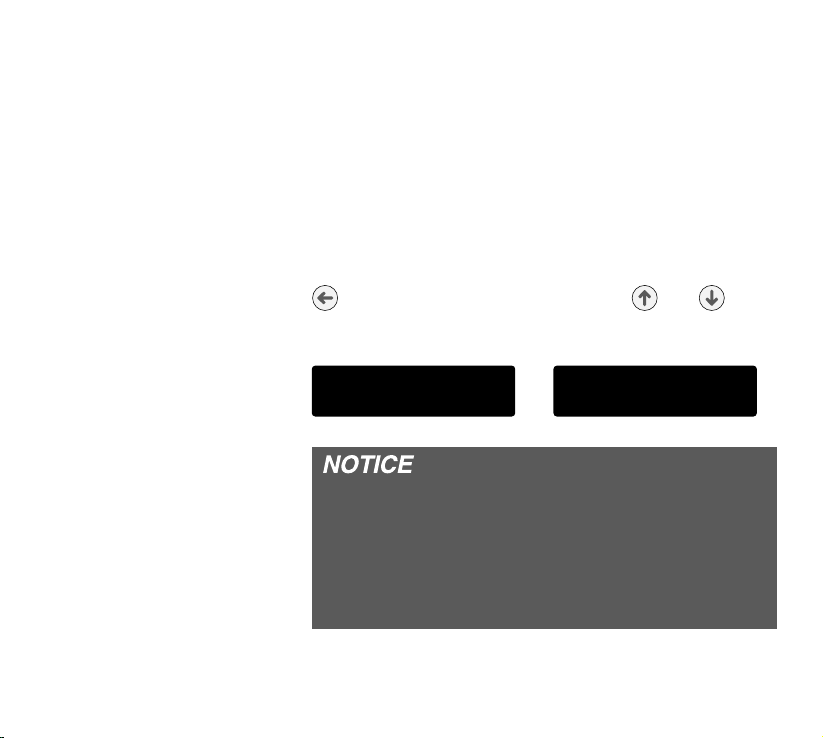
To switch between the menus, fi rst press the enter key
. Then hold both the selection keys and down
at the same time for a prolonged period. The display
shows the message:
+),( !/!!*1
or
/% 2!
/* . !*1
/% 2!
If during programing you have not pressed a key
for 30 seconds, the standard or complete menu
exits automatically for security reasons. If a modifi ed value is not confi rmed by pressing the enter
key and the standard or complete menu has exited,
the original value is retained.
Device functions 45
Page 46
To access a menu, hold down the enter key for longer
than 1 s. You can access the menu items within menus
by pressing the selection keys or . To activate
a parameter, press the enter key .
Some parameters may only be set by physicians or
trained medical staff. These parameters are protected
by a PIN code.
Please do not try to crack the PIN code. Speak
to your physician if you doubt the correctness of
the pressure prescription.
46 Device functions
Q + !G ;;;;
4%/!*1
Page 47
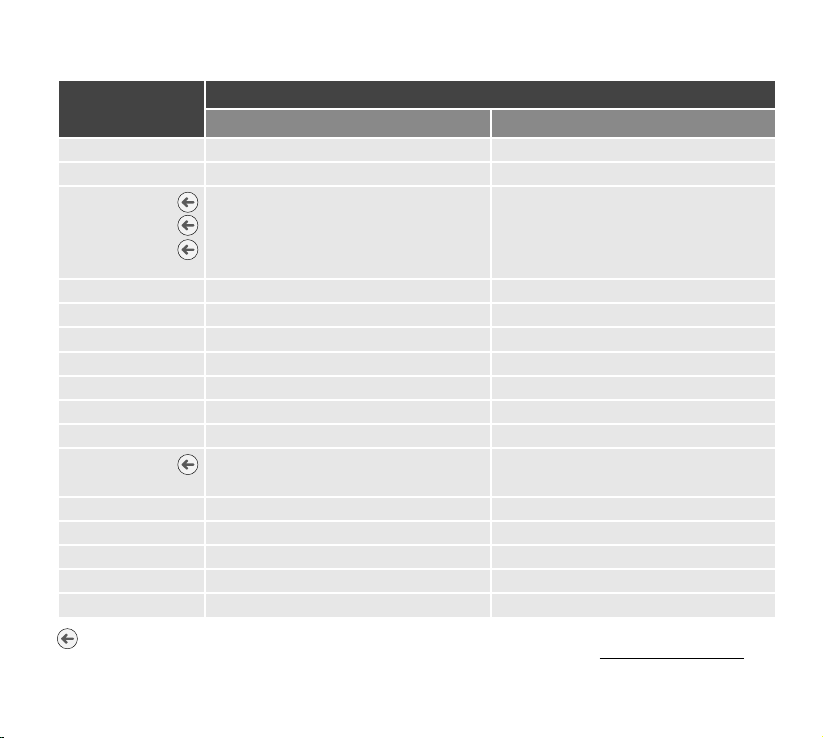
PARAMETERS IN point 2 CPAP
point 2 CPAP
Parameter
Language - •
P-Unit - •
Power
Blower
Filter
Therapy
Date • •
Time • •
Wake Time • •
1
Press.
1
I-FLEX
1
E-FLEX
Calibration • •
Ramp
P-Ramp
Mask Test - •
Auto - •
Display Vt • •
Bact.Filter - •
Brightness - •
next parameter is displayed by pressing the enter key
• present, - not present
Standard menu Complete menu
-•
-•
-•
-•
-•
1 PIN code protected
Device functions 47
Page 48
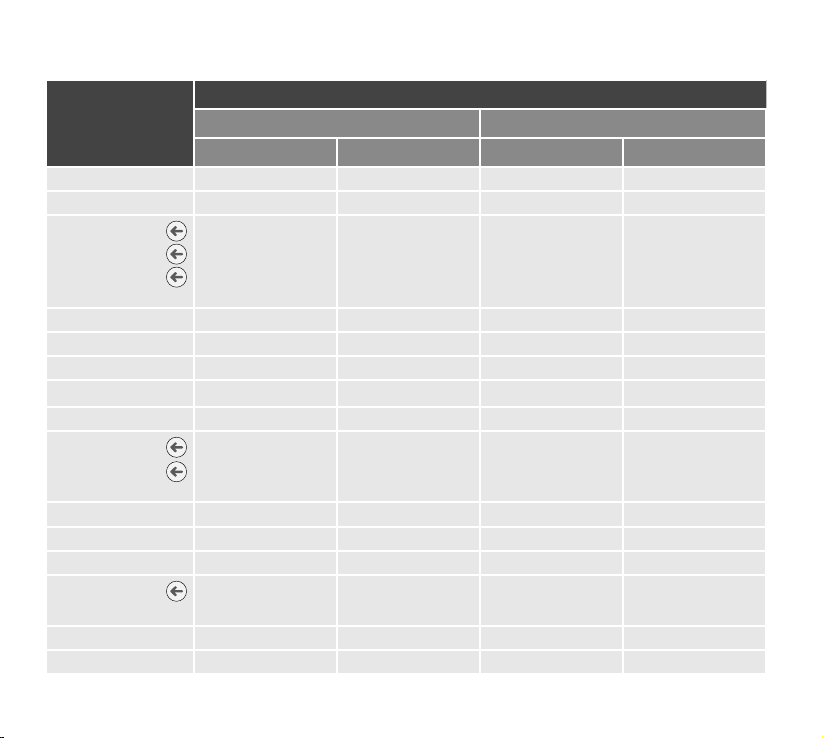
PARAMETERS IN point 2 AutoCPAP
point 2 AutoCPAP
Standard menu Complete menu
Parameter
Language - - • •
P-Unit - - • •
Power
Blower
Filter
Therapy
Date ••••
Time ••••
Wake Time ••••
1
Mode
1
Press.
1
P-Min
P-Max
P-Start
1
I-FLEX
1
E-FLEX
Calibration ••••
Ramp
P-Ramp
Mask Test - - • •
Auto - - • •
CPAP APAP CPAP APAP
--••
-••
--•-
---•
--••
--••
--••
48 Device functions
Page 49
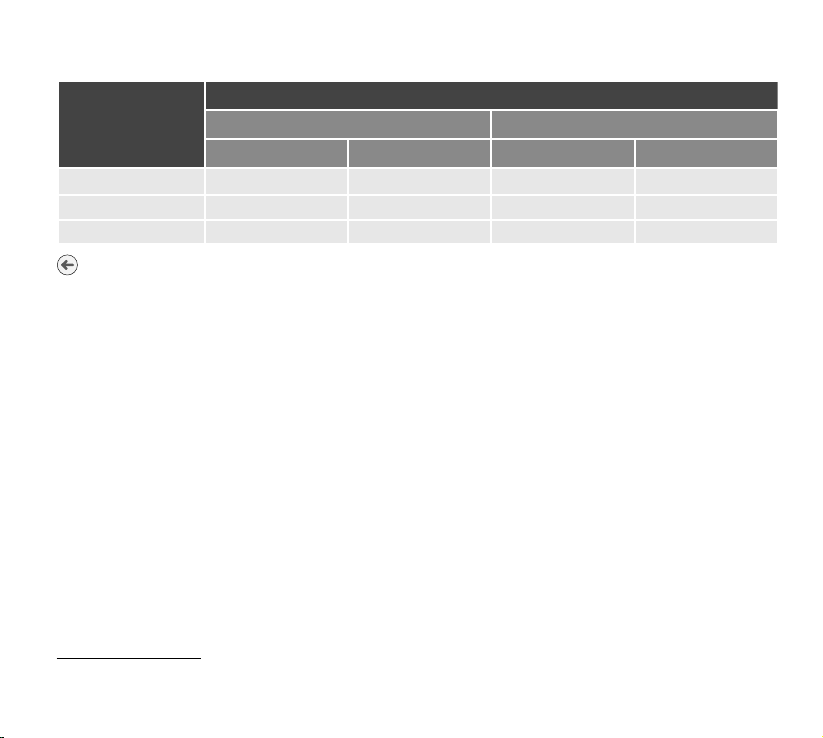
point 2 AutoCPAP
Standard menu Complete menu
Parameter
CPAP APAP CPAP APAP
Display Vt ••••
Bact.Filter - - • •
Brightness - - • •
next parameter is displayed by pressing the enter key
• present, - not present
1
1 PIN code protected
Device functions 49
Page 50
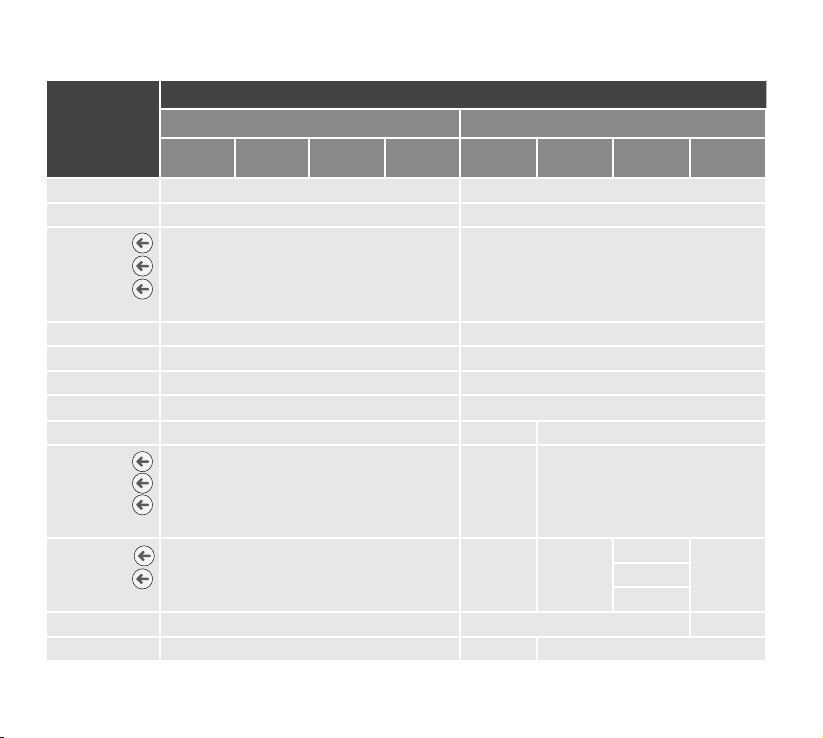
PARAMETER IN point 2 BILEVEL ST20
point 2 BILEVEL ST20
Standard menu Complete menu
Parameter
Language - •
P-Unit - •
Power
Blower
Filter
Therapy
Date • •
Time • •
Wake Time • •
1
Mode
1
Press.
1
IPAP
EPAP
I-Slope
E-Slope
Frequency
I:E
Delay Time
Bckup Freq.
1
I-FLEX
CPAP BILEVEL STBILEVEL TBILEVEL SCPAP BILEVEL STBILEVEL TBILEVEL
-•
-•
-•-
--•
1
--••-
1
--•
-•-
S
•
-
50 Device functions
Page 51
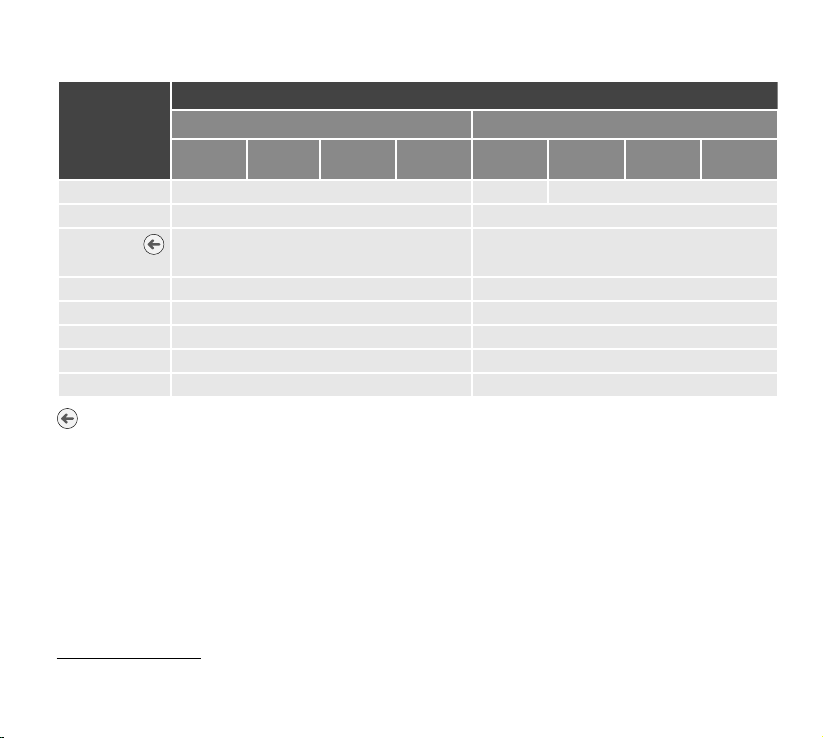
point 2 BILEVEL ST20
Standard menu Complete menu
Parameter
1
E-FLEX
CPAP BILEVEL STBILEVEL TBILEVEL SCPAP BILEVEL STBILEVEL TBILEVEL
-•-
Calibration • •
Ramp
P-Ramp
-•
Mask Test - •
Auto - •
Display Vt • •
Bact.Filter - •
Brightness - •
next parameter is displayed by pressing the enter key
• present, - not present
1
1 PIN code protected
Device functions 51
S
Page 52
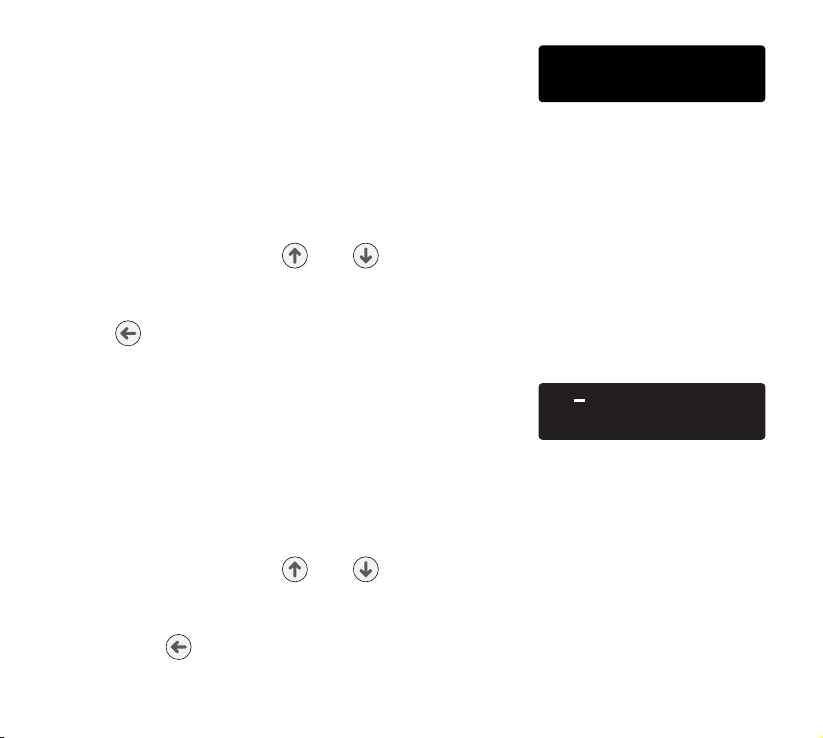
LANGUAGE
The device can display messages in German (DEU),
English (ENG), Greek (ELL), Spanish (SPA), French
(FRA), Italian (ITA), Dutch (NLD), Turkish (TUR), Polish
(PLK), Portuguese (POR) and Czech (CZE).
Setting the language
1. Select the complete menu (see page 45).
2. Use the selection keys
and to select
Language.
3. Set the desired language by pressing the enter
key .
Q *#1#!MMMMMMMM
4%/!*1
P-UNIT
The device can show the pressure in the pressure units
hectopascal (hPa), millibar (mbar), and centimeters of
water (cm = cmH2O).
Setting the pressure unit
1. Select the complete menu (see page 45).
2. Use the selection keys and to select
P-Unit.
3. Set the desired pressure unit by pressing the
enter key .
52 Device functions
Q * % /MMMMMMMMMM ) .
4%/!*1
Page 53

Q +3!.MMMMMMMMMMMM = @ ; $
4%/!*1
OPERATING TIMES
Under this menu item you will fi nd the total operating
time including standby mode of the device, the blower
running time, the operating time of the fi lter and the
therapy time.
Checking the device‘s operating times
1. Select the complete menu (see page 45).
2. Use the selection keys
Power. The total operating time including
and to select
standby is now displayed.
3. Press the enter key . The total running time of
the blower is now displayed.
4. Press the enter key again. The operating time
of the fi lter is now displayed.
5. Press the enter key again. The therapy time
is now displayed.
Device functions 53
Page 54
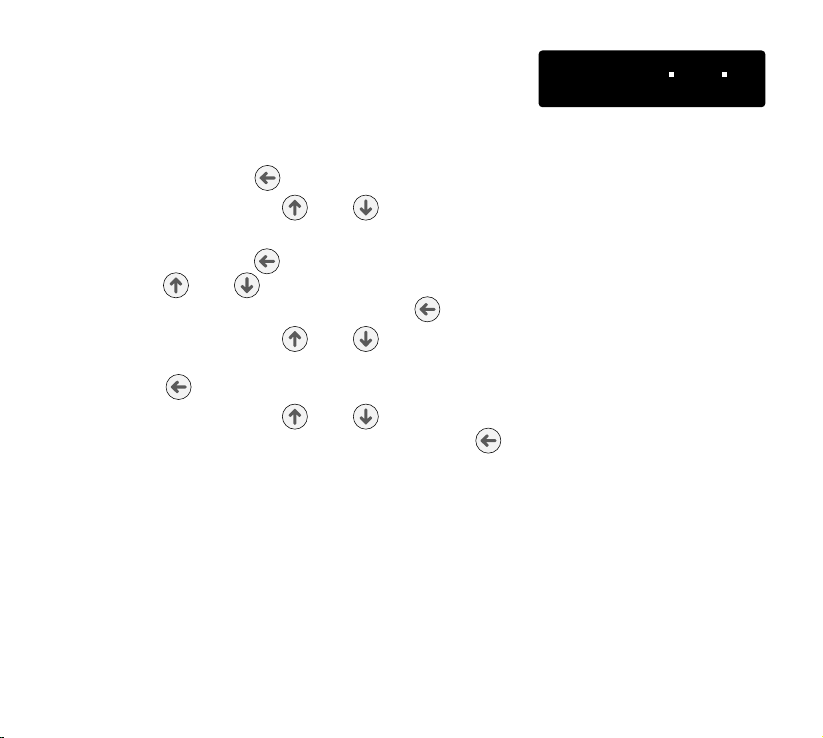
DATE
The day (1 - 31), the month (Jan. - Dec.) and the year
(00 - 99) can be set.
Setting the date
1. Press the enter key for 1 second.
2. Use the selection keys
Date.
and to select
3. Press the enter key and then use the selection keys and to set the year. Confi rm
your setting by pressing the enter key .
4. Use the selection keys and to set the
month. Confi rm your setting by pressing the
enter key .
5. Use the selection keys and to set the day.
Confi rm your setting by pressing the enter key .
Q / !MMMM = @ * < =
4%/!*1
54 Device functions
Page 55
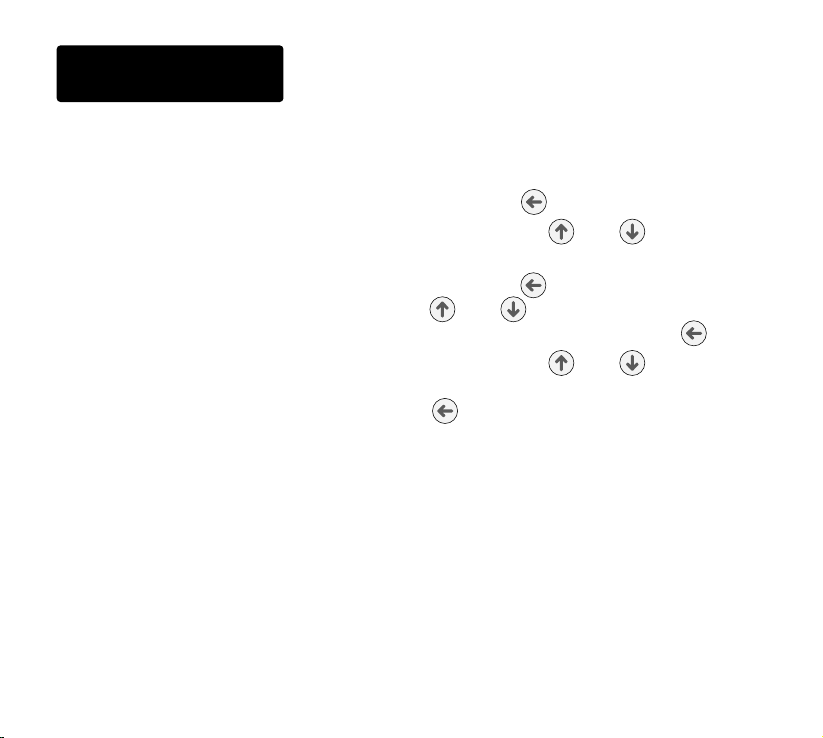
Q%)!MMMMMMMMMMMM < > L ; ;
4%/!*1
TIME
The device has an internal clock. In the event of a power
failure, the clock operates on inbuilt battery power. The
hour (00 - 24) and minutes (00 - 59) can be set.
Setting the time
1. Press the enter key
for 1 second.
2. Use the selection keys and to select
Time.
3. Press the enter key and then use the selection keys and to set the hour. Confi rm
your setting by pressing the enter key .
4. Use the selection keys and to set the
minutes. Confi rm your setting by pressing the
enter key .
Device functions 55
Page 56
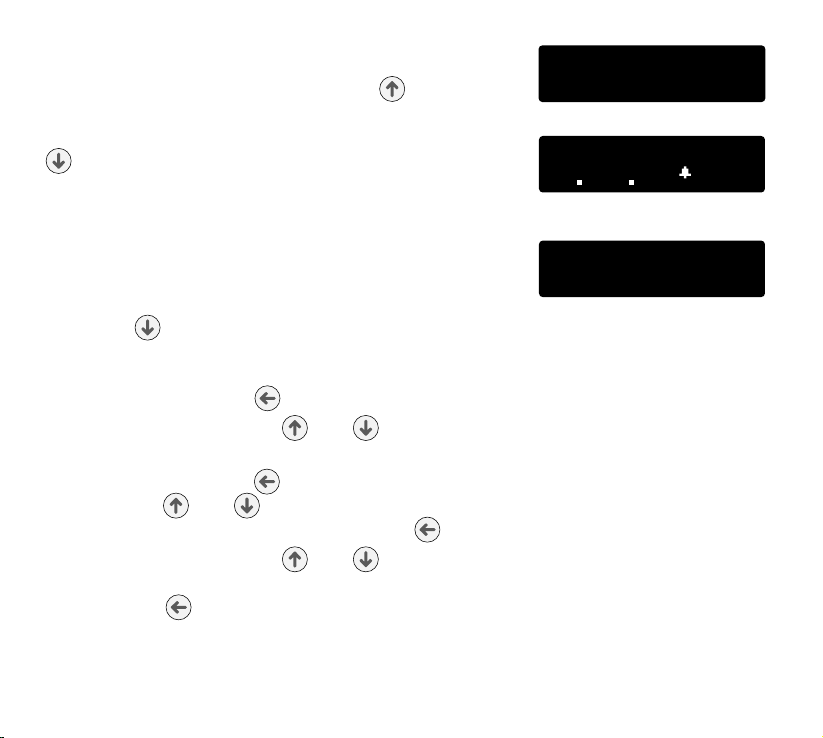
WAKE UP TIME
To activate the wake up alarm, press . For check-
ing purposes, the programmed wake up time is displayed for a short time. To deactivate the alarm, press
. The activated alarm is indicated by a bell symbol
on the display.
When the wake up alarm sounds, there are two options:
1. Press the ON/OFF key once to stop the alarm for
the next 5 minutes (Slumber mode) and twice to
deactivate it completely.
2. Press to end the alarm.
Setting the wake up time
1. Press the enter key for 1 second.
2. Use the selection keys and to select
Wake Time.
3. Press the enter key and then use the selection keys and to set the hour. Confi rm
your setting by pressing the enter key .
4. Use the selection keys and to set the
minutes. Confi rm your setting by pressing the
enter key .
Q'!%)!MM ; BL ;;
4%/!*1
.!00EH
=@ *<=
.!00EH
(1)!.MMMMMMMMMM ?L ? @
<=L =;
56 Device functions
Page 57
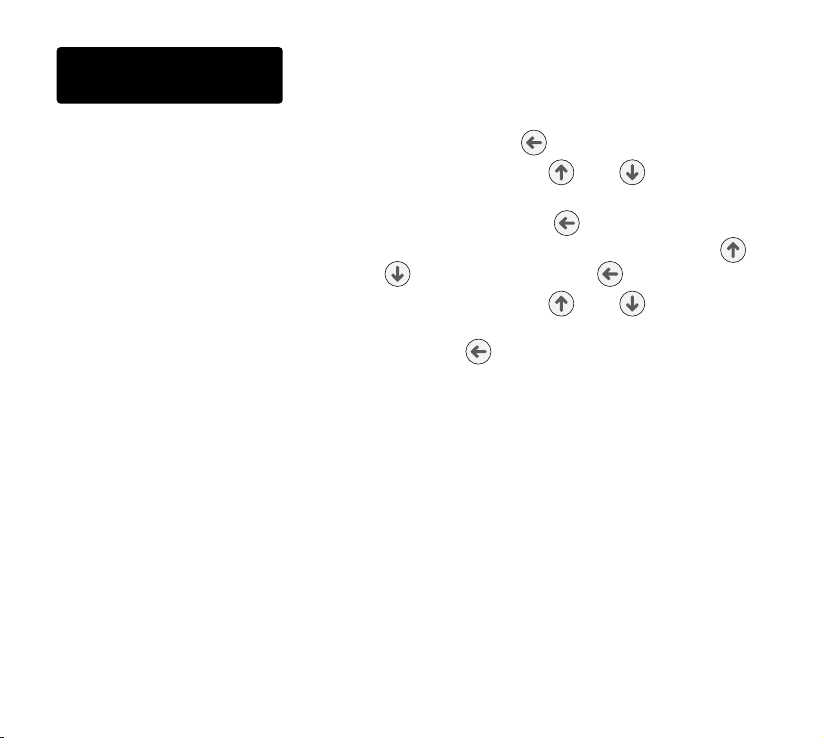
Q+ !MMMMMMMMMMMMMM
4%/!*1
MODE
(only point 2 AutoCPAP and point 2 BILEVEL ST20)
Selection of mode by the physician
1. Press the enter key for 1 second.
2. Use the selection keys
Mode.
and to select
3. Press the the enter key and if necessary,
input the PIN code with the selection keys
and . Press the enter key after every digit.
4. Use the selection keys and to select the
desired mode. Confi rm your setting by pressing
the enter key .
Device functions 57
Page 58
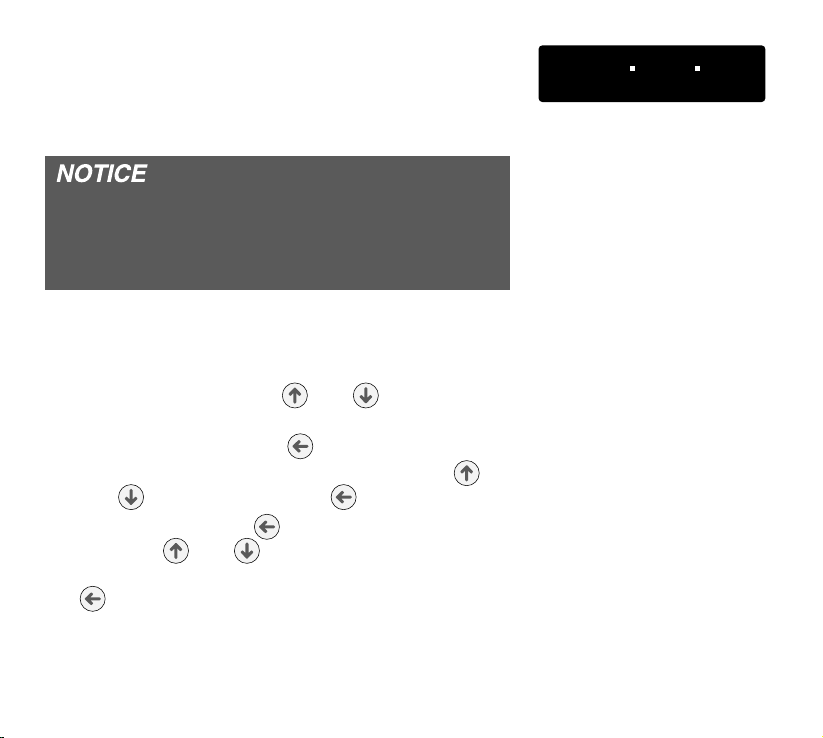
PRESSURE
(only point 2 CPAP and point 2 AutoCPAP and point 2
BILEVEL ST20 in CPAP mode)
Selection of pressure by the physician
When the pressure parameter is changed during
therapy/titration, the device adapts to the new
setting slowly (25 Pa/s). This pressure ramp can
be deactivated using the TRENDset PC software.
point 2 CPAP:
1. Select the complete menu (see page 45).
2. Use the selection keys
Press..
and to select
3. Press the the enter key and if necessary,
input the PIN code with the selection keys
and . Press the enter key after every digit.
4. Press the enter key and then use the selection keys and to set the desired value.
Confi rm your setting by pressing the enter key
.
Q .!00MMMMMMB @$
4%/!*1
58 Device functions
Page 59

point 2 AutoCPAP and point 2 BILEVEL ST20:
1. Select the complete menu (see page 45).
2. Use the selection keys
Mode.
3. Press the the enter key
and to select
and if necessary,
input the PIN code with the selection keys
and . Press the enter key after every digit.
4. Use the selection keys and to select
the CPAP mode.
5. Press the selection key . The menu item
Press. is now displayed.
6. Press the enter key and then use the selection keys and to set the desired value.
Confi rm your setting by pressing the enter key
.
Device functions 59
Page 60
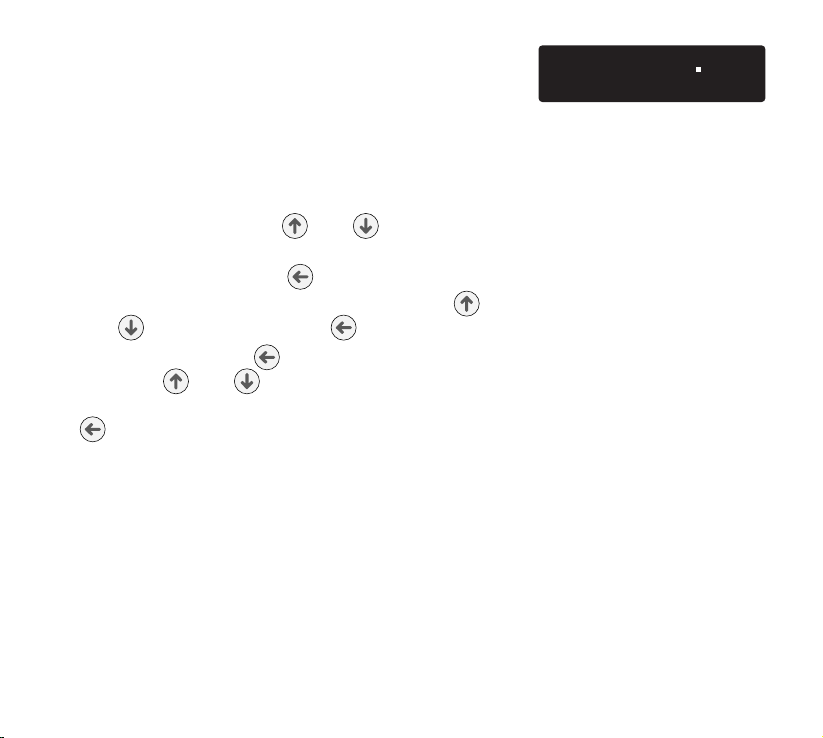
IPAP
(only point 2 BILEVEL ST20 in modes BILEVEL S, T
and ST)
Selection of inspiration pressure (IPAP) by the
physician
1. Select the complete menu (see page 45).
2. Use the selection keys and to select
IPAP.
3. Press the the enter key and if necessary,
input the PIN code with the selection keys
and . Press the enter key after every digit.
4. Press the enter key and then use the selection keys and to set the desired value.
Confi rm your setting by pressing the enter key
.
The parameter EPAP is set next.
Q MMMMMMMM < ; ; $
4%/!*1
60 Device functions
Page 61

QMMMMMMMMMM A ; $
4%/!*1
EPAP
(only point 2 BILEVEL ST20 in modes BILEVEL S, T
and ST)
Selection of expiration pressure (EPAP) by the
physician
1. First set IPAP.
2. Use the selection keys and to set the
desired value. Confi rm your setting by pressing
the enter key .
The parameter I-Slope is set next.
Q(+,!MMMMMMMMMMMMMM =
4%/!*1
I-SLOPE
(only point 2 BILEVEL ST20 in modes BILEVEL S, T
and ST)
The I-Slope determines the time of pressure increase
from EPAP to IPAP.
• Level 1 = 10 hPa/s
• Level 2 = 20 hPa/s
• Level 3 = 40 hPa/s
Selection of I-Slope by the physician
1. First set IPAP and EPAP
Device functions 61
Page 62

2. Use the selection keys and to set the
desired value. Confi rm your setting by pressing
the enter key .
The parameter E-Slope is set next.
Calculation of the I-Slope time:
Settings:
IPAP = 10 hPa I-Slope = 2 Frequency = 12 bpm
EPAP = 6 hPa E-Slope = 2
I-Slope time =
I-Slope time =
IPAP – EPAP
I-Slope
10 hPa – 6 hPa
20 hPa/s
= 0.2 s
E-SLOPE
(only point 2 BILEVEL ST20 in modes BILEVEL S, T
and ST)
The E-Slope determines the time of pressure decrease
from IPAP to EPAP.
• Level 1 = 10 hPa/s
• Level 2 = 20 hPa/s
• Level 3 = 40 hPa/s
62 Device functions
Q(+,!MMMMMMMMMMMMMM =
4%/!*1
Page 63
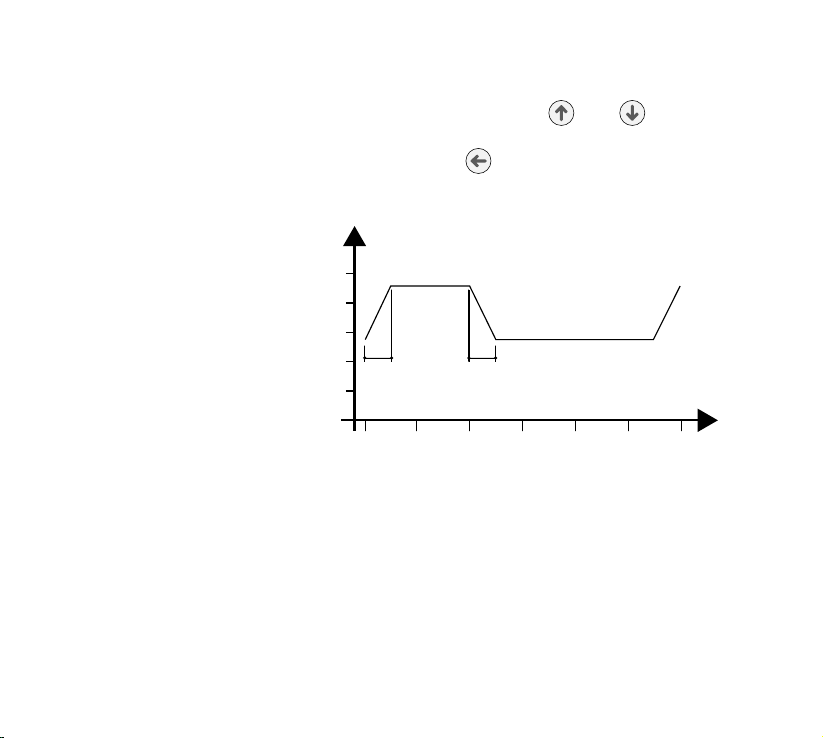
Selection of E-Slope by the physician
1. First set IPAP, EPAP and I-Slope.
2. Use the selection keys
and to set the
desired value. Confi rm your setting by pressing
the enter key .
Pressure
[hPa]
10
8
6
4
2
IPAP
EPAP
E-SlopeI-Slope
Time
0
1
3
2
4
56
The E-Slope time is calculated as the I-Slope time (see
page 62).
Device functions 63
Page 64
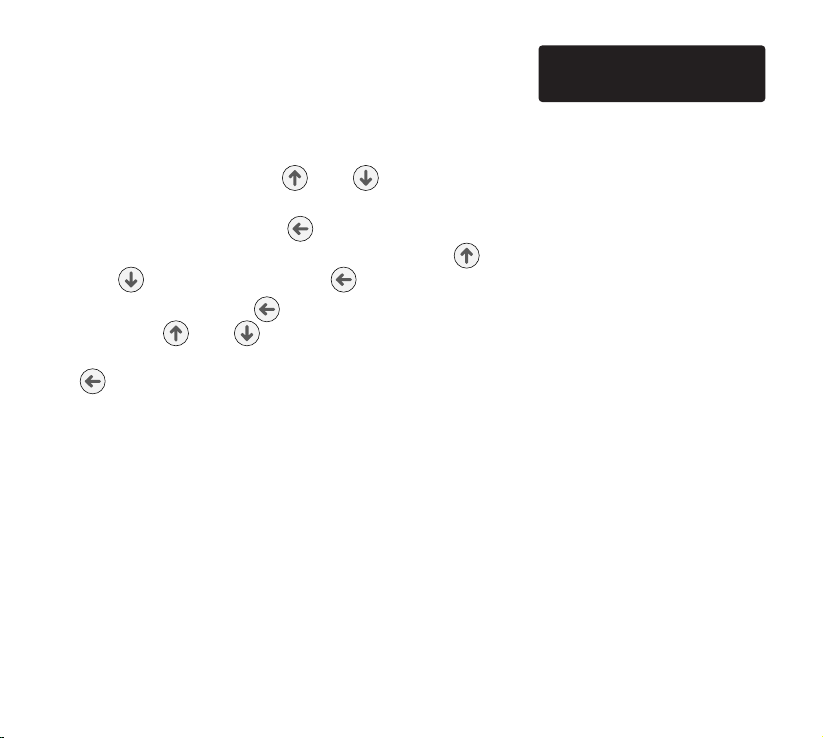
FREQUENCY
(only point 2 BILEVEL ST20 in modes BILEVEL T and ST)
Selection of Frequency by the physician
1. Select the complete menu (see page 45).
2. Use the selection keys and to select
Frequency.
3. Press the the enter key and if necessary,
input the PIN code with the selection keys
and . Press the enter key after every digit.
4. Press the enter key and then use the selection keys and to set the desired value.
Confi rm your setting by pressing the enter key
.
The parameter I:E is set next.
Q .!-1!*5MM< =,)
4%/!*1
64 Device functions
Page 65
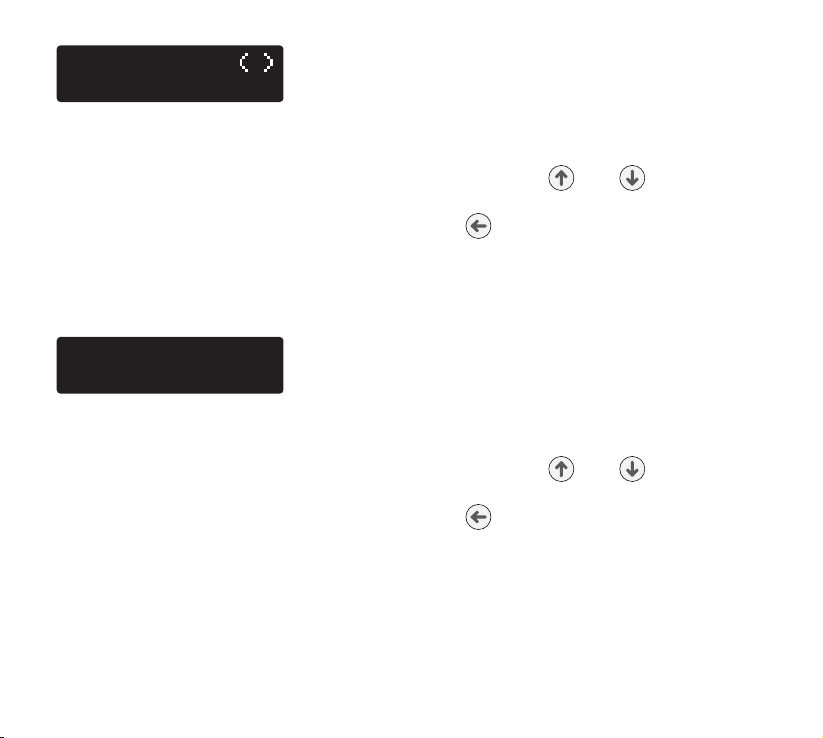
Q L MMMMMMMM ? ;L A ;N
4%/!*1
I:E
(only point 2 BILEVEL ST20 in modes BILEVEL T and ST)
Selection of I:E by the physician
1. First set Frequency.
2. Use the selection keys and to set the
desired value. Confi rm your setting by pressing
the enter key
.
The parameter Delay Time is set next (only point 2
BILEVEL ST20 in BILEVEL ST mode).
Q!(5%)!MMMMMM > 0
4%/!*1
DELAY TIME
(only point 2 BILEVEL ST20 in BILEVEL ST mode)
Selection of Delay Time by the physician
1. First set Frequency and I:E.
2. Use the selection keys and to set the
desired value. Confi rm your setting by pressing
the enter key .
Device functions 65
Page 66
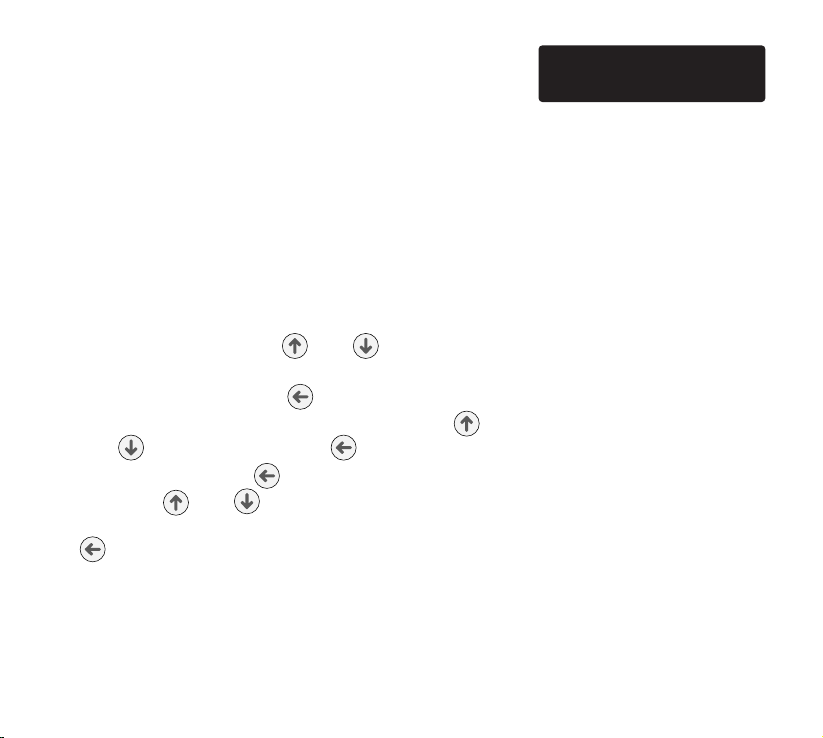
BACKUP FREQ
(only point 2 BILEVEL ST20 in BILEVEL S mode)
By activating the backup frequency ventilation will be
automatically restored if patient suffers from a persistent apnea (> 15 s). Evolving mandatory ventilation is
characterized by following fi xed parameters:
• f = 10 bpm
• I:E = 35:65 %.
Selection of backup frequency the physician
1. Select the complete menu (see page 45).
2. Use the selection keys
Backup freq.
and to select
3. Press the the enter key and if necessary,
input the PIN code with the selection keys
and . Press the enter key after every digit.
4. Press the enter key and then use the selection keys and to select ON or OFF.
Confi rm your setting by pressing the enter key
.
Q'1,".!-MMMM
4%/!*1
66 Device functions
Page 67
Q
%
*MMMMMMMM @ ;$
4%/!*1
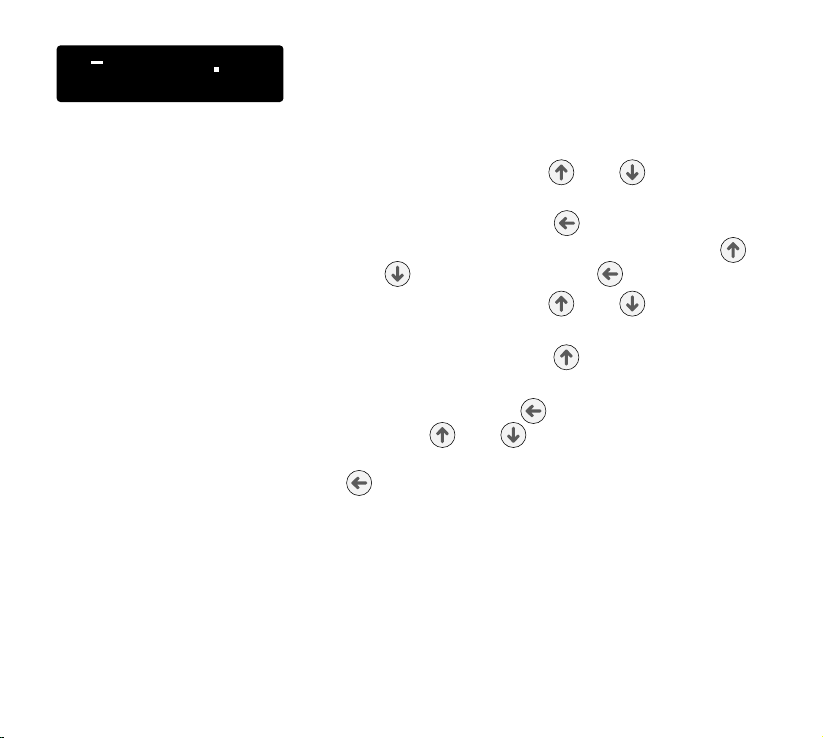
P-Min
(only point 2 AutoCPAP in APAP mode)
Selection of P-Min by the physician
1. Select the complete menu (see page 45).
2. Use the selection keys
Mode.
and to select
3. Press the the enter key and if necessary,
input the PIN code with the selection keys
and . Press the enter key after every digit.
4. Use the selection keys and to select
the APAP mode.
5. Press the selection key . The menu item
P-Min is now displayed.
6. Press the enter key and then use the selection keys and to set the desired value.
Confi rm your setting by pressing the enter key
.
The parameter P-Max is set next.
Device functions 67
Page 68
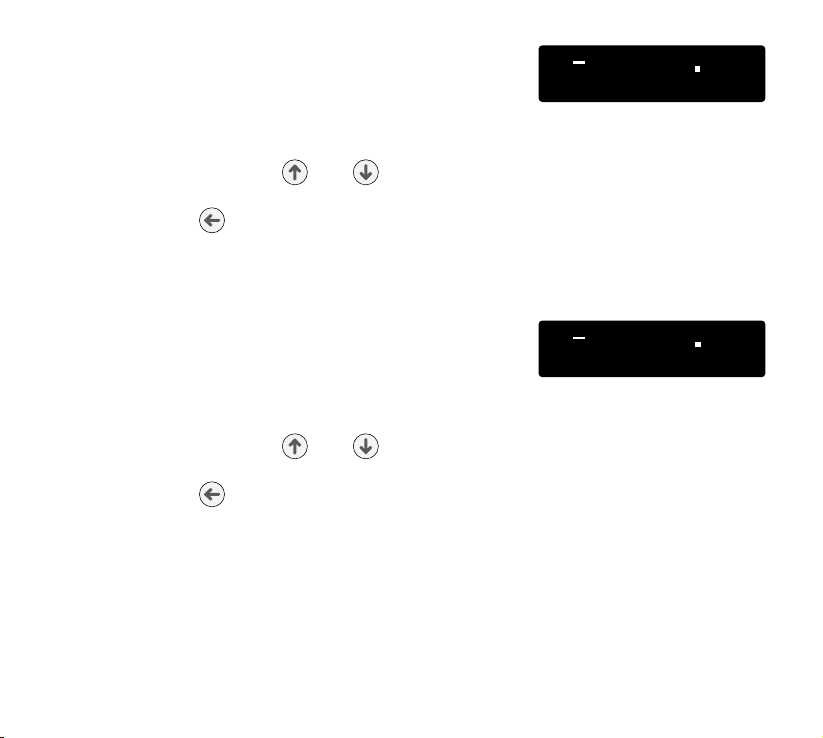
P-Max
(only point 2 AutoCPAP in APAP mode)
Selection of P-Max by the physician
1. First set P-Min.
2. Use the selection keys
and to set the
desired value. Confi rm your setting by pressing
the enter key
.
The parameter P-Start is set next.
Q 4MMMMMM < ; ; $
4%/!*1
P-Start
(only point 2 AutoCPAP in APAP mode)
Selection of P-Start by the physician
1. First set P-Min and P-Max.
2. Use the selection keys and to set the
desired value. Confi rm your setting by pressing
the enter key .
68 Device functions
Q /./MMMM B @$
4%/!*1
Page 69
QMMMMMMMMMMMMMMMM >
4%/!*1
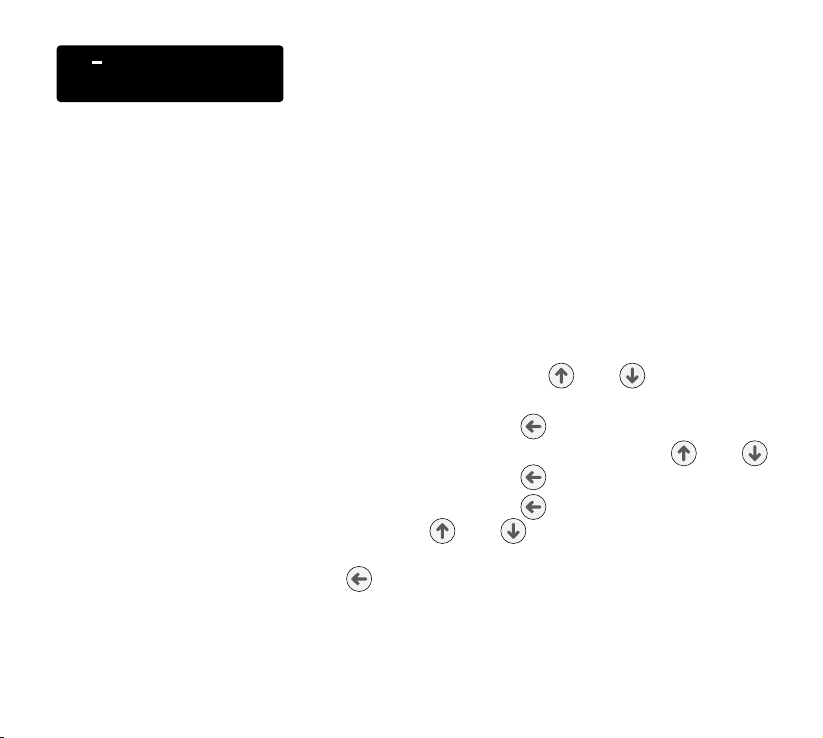
I-FLEX
(only in modes CPAP and APAP)
Inhaling under therapy pressure is always more diffi -
cult as the lungs are already partly fi lled and thus also
pre stressed. Such additional stress from therapy can
be reduced by means of a personalized I-FLEX setting.
FLEX settings will only work if spontaneous respiration
is actually present. FLEXLINE is not a form of artifi cial
respiration, but merely a way of supporting the respiratory effort of the patient.
Selection of I-FLEX by the physician
1. Select the complete menu (see page 45).
2. Use the selection keys
I-FLEX.
and to select
3. Press the enter key and if necessary, input
the PIN code with the selection keys and .
Press the enter key after every digit.
4. Press the enter key and then use the selection keys and to set the desired value.
Confi rm your setting by pressing the enter key
.
Device functions 69
Page 70
E-FLEX
(only in modes CPAP and APAP)
Although the point 2 is equipped with an excellent pressure control system, an E-FLEX setting can help make
expiration easier. This should however be adjusted individually for each patient. Once again, FLEX settings will
only work if actual respiratory effort is present.
Selection of E-FLEX by the physician
1. Select the complete menu (see page 45).
2. Use the selection keys
E-FLEX.
and to select
3. Press the enter key and if necessary, input
the PIN code with the selection keys and .
Press the enter key after every digit.
4. Press the enter key and then use the selection keys and to set the desired value.
Confi rm your setting by pressing the enter key
.
Q MMMMMMMMMMMMMMMM >
4%/!*1
70 Device functions
Page 71

Q(%./%+*
4%/!*1
CALIBRATION
Calibration guarantees optimum performance of
the automatic function and mask test. It must be
performed when:
• the device is used initially,
• the mask has changed,
there is a change from operation without a
•
bacterial fi lter to with a bacterial fi lter, or vice
versa, or
•
there is a change from operation without a
humidifi er to with a humidifi er, or vice versa.
Calibration is only possible during mains operation and not in battery mode.
Calibrating the device
1. Connect the mask, the therapy tube and, if
applicable, the humidifi er or bacterial fi lter to the
device.
Ensure that the air and exhalation openings in
the mask are clear and the tube is not kinked.
Do not put the mask on.
Device functions 71
Page 72
2. Press the enter key for 1 second.
3. Use the selection keys
Calibration.
4. Press the enter key
Start appears on the display. Press the enter
5.
key
. If you do not press the key within 5 s,
and to select
.
the display jumps back (see point 3).
6. The blower starts and calibration begins.
Calibration active appears on the display.
Calibration takes 20 - 70 s. The blower switches
off after calibration is fi nished.
7. If calibration has been successful, Successful
appears on the display and if it has failed,
Failed appears on the display.
8. In both cases press the enter key .
The old values will be retained if calibration
has failed. Start calibration again.
72 Device functions
Page 73

Q),MMMMMMMMMMMM = ; )% *
4%/!*1
Q ) ,MMMMMM ? @$
4%/!*1
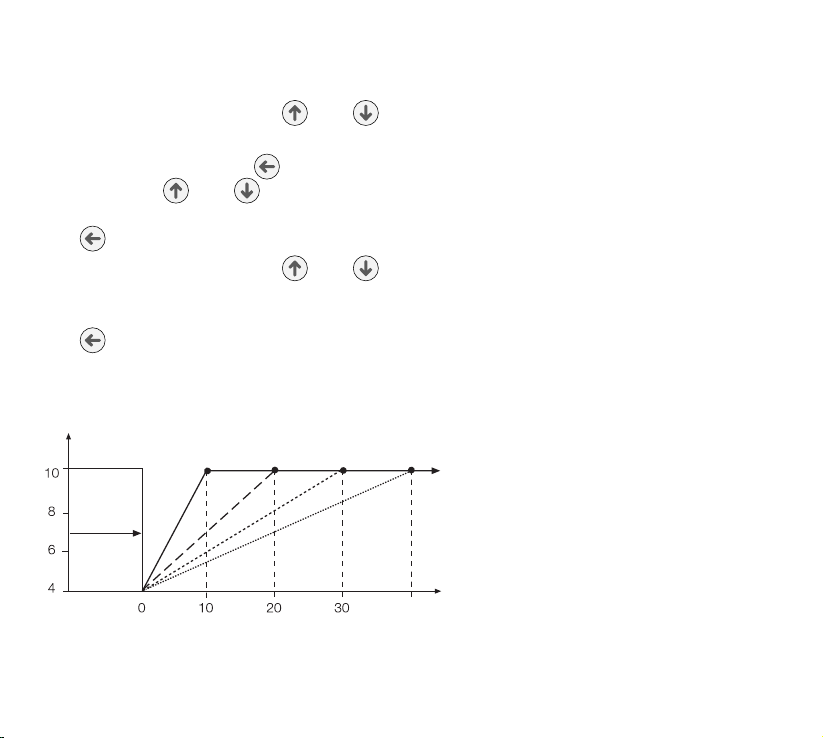
RAMP
After every blower start, the device‘s microcontroller
checks whether a soft start ramp has been programmed.
The soft start function slowly increases the pressure
over the time programmed by you, starting with a programmable initial ramp pressure (P-Ramp) up to the
prescribed pressure (point 2 CPAP) or P-Start (point 2
AutoCPAP) in order to make it easier for you to get to
sleep. The soft start can bring relief particularly if you
are not quite used to the respiratory therapy yet.
The device offers delay time settings from zero (pre-
scribed therapy pressure starts immediately) to 30 minutes (prescribed therapy pressure is built up gradually
within 30 minutes). The initial ramp pressure (P-Ramp)
can be set between 4 hPa and the prescribed pressure.
Device functions 73
Page 74
Setting the ramp
1. Select the complete menu (see page 45).
2. Use the selection keys
Ramp.
3. Press the enter key
and to select
and then use the selection keys and to set the minutes (Ramp).
Confi rm your setting by pressing the enter key
.
4. Use the selection keys and to set the
desired value for the initial pressure (P-Ramp).
Confi rm your setting by pressing the enter key
.
Prescribed pressure: 10 hPa (mbar)
Pressure
[hPa]
0 - 90 s
Mask test Programmed soft start (0 - 45 min)
The pressure is increased gradually to
the prescribed therapy pressure (point 2
CPAP) or P-Start (point 2 AutoCPAP)
Time [min]
45
74 Device functions
Page 75
Q 0 ' !0 /MMMMMM > ;0
4%/!*1
MASK TEST
This ensures that the mask is airtight, not only during
the slow pressure increase during the soft start ramp,
but also at higher pressures. The mask test can be
programmed to last from 5 to 90 seconds in 5 second increments. The mask test is performed before the
ramp starts and tests the tightness under maximum
therapy pressure.
Setting the mask test
1. Select the complete menu (see page 45).
2. Use the selection keys
and to select
Mask Test.
3. Press the enter key and then use the selection keys and to set the seconds. Confi rm
your setting by pressing the enter key .
Device functions 75
Page 76

AUTOMATIC
The automatic mode has three settings:
OFF, Start/Stop, Start
1. Auto OFF (with mask alarm)
With the „Auto OFF“ setting, you must switch the
device on with the ON/OFF key when therapy starts
and off with the same key when therapy ends. Should
the mask slip from your face or should a leak occur
that cannot be compensated for, you will be given
an acoustic and visual warning.
2. Auto Start/Stop
With the „Auto Start/Stop“ setting, you only have
to put the mask on. As soon as you begin breathing, the point 2 blower switches on. When you take
the mask off, the blower switches off automatically
after a 5 second delay. The blower also switches
off when the mask slips off your face or a leak that
cannot be compensated for occurs.
3. Auto Start (with mask alarm)
With the „Auto Start“ setting, you only have to put
the mask on. As soon as you begin breathing, the
point 2 blower switches on. If you take the mask
off or the mask slips off your face or a leak occurs
which cannot be compensated for, the blower does
Q 1 / +MMMMMMMMMMMMMMMM
4%/!*1
0'(.)MMMMMM < ; 0
$!'0'H
Q 1/+MM/./E/+,
4%/!*1
Q 1 / +MMMMMMMMMMMM / . /
4%/!*1
76 Device functions
Page 77

0'(.)MMMMMM < ; 0
$!'0'H
not switch off but you receive an acoustic and visual
warning. The blower can only be switched off by
pressing the ON/OFF key.
Setting automatic mode
1. Select the complete menu (see page 45).
2. Use the selection keys
Auto.
and to select
3. Press the enter key to set the desired automatic mode.
The device can be switched on or off in any automatic
mode by pressing the ON/OFF key.
Q % 0 , ( 5 /MMMMMM
4%/!*1
DISPLAY VT
When the function „Display Vt“ is activated, the tidal
volume is displayed in ml during therapy. The value
displayed is the arithmetic mean of the inspired air volume from the last four breathing periods. The value is
recalculated after each breathing period and shown on
the display. The leakage air fl ow must be calculated
before display is possible. This is generally the case
after about three breathing periods.
Device functions 77
Page 78
Activating/deactivating the display of the tidal
volume
1. Press the enter key
2. Use the selection keys
for 1 second.
and to select
Display Vt.
3. Press the enter key
to set „ON“ or „OFF“.
During the therapy the display of the tidal volume
replaces the display of the date.
Possible displays states
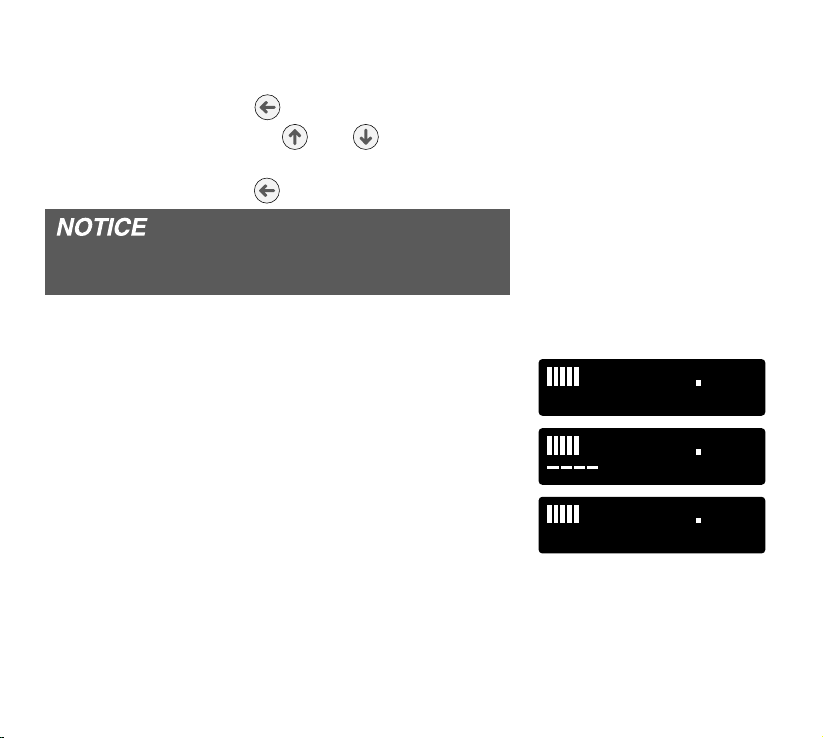
Display of tidal volume in ml.
A?=
)(
C@$
;@L >;
No valid value for the tidal volume is available yet.
If the display shows the value 0 ml for the tidal volume,
an apnea has occurred.
78 Device functions
C@$
)( ;@L >;
C@$
;
)(
;@L >;
Page 79
Q/%(/!.MM ! 0
4%/!*1
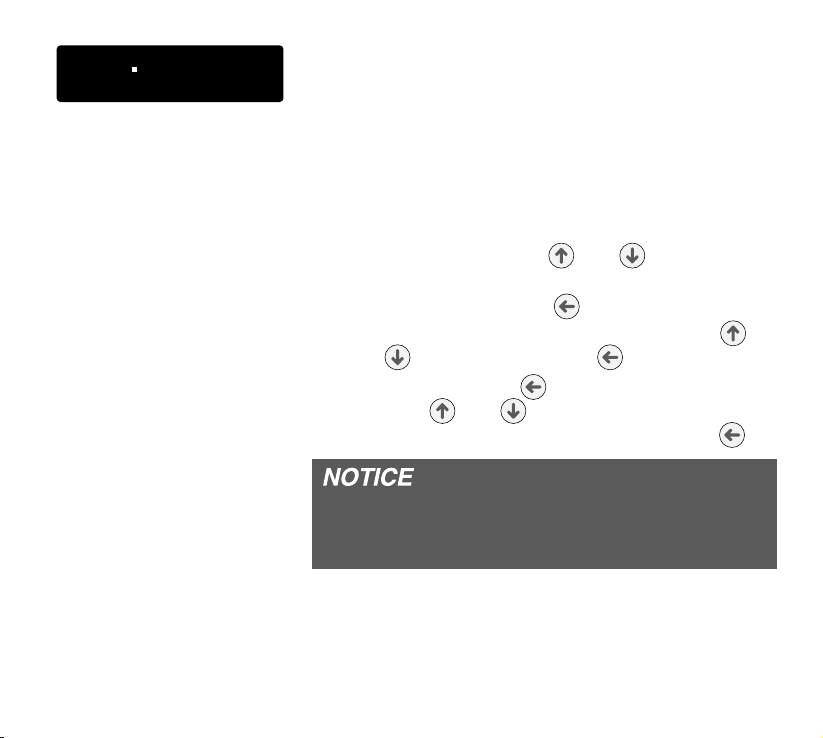
BACT.FILTER
As pressure measurement is infl uenced by the connec-
tion of a bacterial fi lter, it must be specifi ed on the device
whether or not a bacterial fi lter has been connected.
Select whether a bacterial fi lter is connected (by
the physician)
1. Select the complete menu (see page 45).
2. Use the selection keys
Bact.Filter.
and to select
3. Press the the enter key and if necessary,
input the PIN code with the selection keys
and . Press the enter key after every digit.
4. Press the enter key and then use the selection keys and to set Yes or No. Confi rm your setting by pressing the enter key .
Whenever a bacterial fi lter is connected to or
removed from the device, it is necessary to calibrate the device (see page 71).
Device functions 79
Page 80
BRIGHTNESS
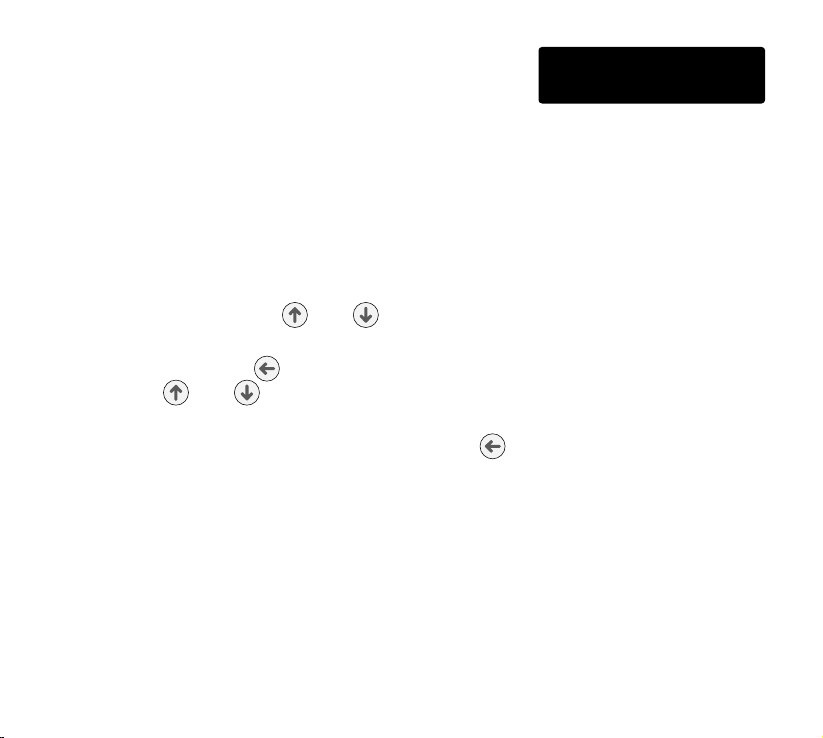
You can set the brightness of the display from 0 % to
100 %.
This value determines the brightness of the display 30
seconds after the last key was pressed. When a key is
pressed, the display brightness is always 100 % (50%
during battery operation).
Setting the brightness
1. Select the complete menu (see page 45).
2. Use the selection keys
Brightness.
and to select
3. Press the enter key and then use the selection keys and to set the desired brightness.
4. Confi rm your setting by pressing the enter key .
Q.%#$/*!00MM<;;N
4%/!*1
80 Device functions
Page 81

PARAMETER SETTINGS
Parameter Settings range Dependency Setting steps
Language
P-Unit hPa, mbar, cmH
1
Press.
2
IPAP
2
EPAP
2
I-Slope
E-Slope
Frequency
I:E
2
3
3
Delay Time
Backup freq
6
P-Min
6
P-Max
6
P-Start
I-FLEX 0 – 3 hPa/ (l/s) - 1 hPa/ (l/s)
E-FLEX 0 – 3 hPa/ (l/s) - 1 hPa/ (l/s)
DEU, ENG, ELL, SPA, FRA, ITA,
NLD, TUR, PLK, POR, CZE
O--
2
--
4 – 20 hPa - 0.5 hPa
EPAP – 20 hPa EPAP, 20 hPa 0.5 hPa
4 hPa – IPAP 4 hPa, IPAP 0.5 hPa
1 – 3
IPAP, EPAP,
Frequency, I:E
1 – 3
IPAP, EPAP,
Frequency, I:E
5 – 30 bpm - 1 bpm
20 – 80 % - 1%
4
0 – 20 s - 1 s
5
ON, OFF - -
4 – 20 hPa P-Start 0.5 hPa
4 – 20 hPa P-Start 0.5 hPa
4 – 20 hPa P-Min,
P-Max
1 Level
1 Level
0.5 hPa
Device functions 81
Page 82

Parameter Settings range Dependency Setting steps
Ramp 0 – 45 min - 5 min
P-Ramp 4 hPa – 20 hPa CPAP: Press.
APAP
6
: P-Start
0.5 hPa
Mask Test 0 – 90 s - 5 s
Auto OFF, Start/Stop, Start - -
Display Vt ON, OFF - -
Bact.Filter Yes, No - -
Brightness 0 – 100 % - 10 %
1 only point 2 CPAP and point 2 AutoCPAP and point 2 BILEVEL ST20 in modes CPAP
2 only point 2 BILEVEL ST20
3 only point 2 BILEVEL ST20 in modes BILEVEL T and ST
4 only point 2 BILEVEL ST20 in BILEVEL ST mode
5 only point 2 BILEVEL ST20 in BILEVEL S mode
6 only point 2 AutoCPAP
82 Device functions
Page 83

ALARM FUNCTIONS OF THE DEVICE
0'(.)MMMMMM < ; 0
$!'0'H
.!00/++ $%#$
=@ *<=
=<L >>
MASK ALARM
If the mask slips off your face, the tube is pulled out or
any other leak occurs that cannot be compensated for,
the device does not switch off automatically but emits
an acoustic and visual alarm.
The mask alarm is only active in the „Auto OFF“ and
„Auto Start“ automatic modes.
Testing the mask alarm
Start the device in „Auto OFF“ mode. The mask should
be open, not on the face. After a short time an acoustic signal sounds.
PRESSURE ALARM
Should an excessively high pressure occur during the
treatment due to a hardware error or other circumstance, the device emits an alarm sound and switches
the blower off. The alarm is turned off by pressing the
ON/OFF key.
Alarm functions of the device 83
Page 84

WAKE UP ALARM
The device has an integrated alarm clock. You can
activate or deactivate it at any time with the selection keys and . Pressing the ON/OFF key once
mutes the alarm for the next 5 minutes and pressing
it twice stops it completely.
@;$
'!(.);BL;;
84 Alarm functions of the device
Page 85

IMPORTANT DISPLAY MESSAGES
The most important display messages are listed below. All
further messages will be clarifi ed from the given context.
The values shown here are examples.
C@$
0'!0/MMMMMMMM < @ 0
C@$
),MMMMMMMMMMMMMMMM C L ?;
C@$
A?=
)(
0'(.)MMMMMM < ; 0
$!'0'H
(.)
( .)( +'
( .)( +'
;@L >;
C@$
;BL ;;
C@$
C@$
You still have 15 seconds to ensure that the mask is
fi tted correctly. When the time is up, the device starts
the soft start function or the therapy.
There are still 8 minutes and 40 seconds until full therapy pressure is reached.
You have activated the display of the tidal volume as
well as the wake up alarm.
The mask has slipped off your face or a leak that cannot be compensated for has occurred or you have
not put the mask on in the „Auto OFF“ or „Auto Start“
automatic modes while the blower is running.
In normal mode you have pressed the selection key
and get the message that you will be woken up at 7 a.m.
In normal mode you have pressed the selection key
and get the message that the alarm clock has now
been switched off.
Important display messages 85
Page 86
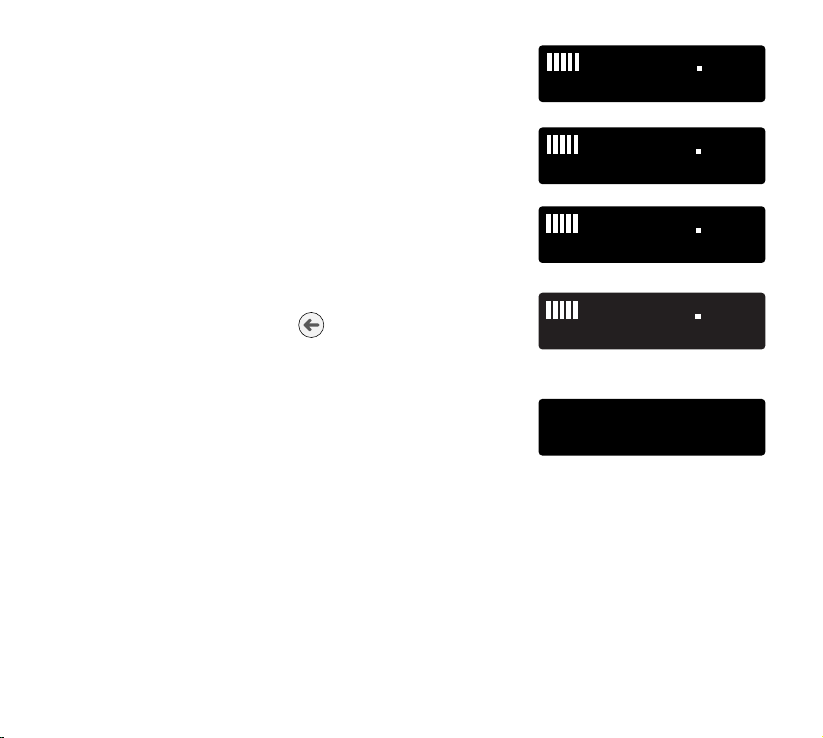
The wake alarm has been triggered. Press the ON/OFF
key once to initiate the slumber phase. Press the key
once again to turn off the alarm completely.
@;$
'!(.);BL ;;
You still have 1 min and 18 s until the alarm clock will
sound again.
You have pressed the ON/OFF key and ended the
slumber phase.
The fi lter must be changed (see page 94). To reset the
message, hold the enter key down and, while you
are doing this, insert the DC power supply plug into
the device‘s DC power connection.
After the mains voltage is restored, the blower re-starts
automatically.
86 Important display messages
@;$
(1)!.MMMMMMMMMM < L < C
@;$
'!(.)
@;$
$*#!%( / !.
+3!.%( 1.!
!0/./(+3!.
Page 87

USING AN SD CARD
GENERAL INFORMATION
The use of an SD card during therapy enables the
most important therapy data to be saved long-term
and detailed. The physician can readout and evaluate this data via the TRENDset PC software. Furthermore, the physician may set up new therapy parameters using TRENDset and send them to the patient
to update its therapy requirements. As soon as the
SD card is inserted, the device imports the modifi ed
therapy parameters.
Only SD cards with the specifi cation 1.x 2 GB
can be used. The SD card must be formatted with
TRENDset before use.
Using an SD card 87
Page 88
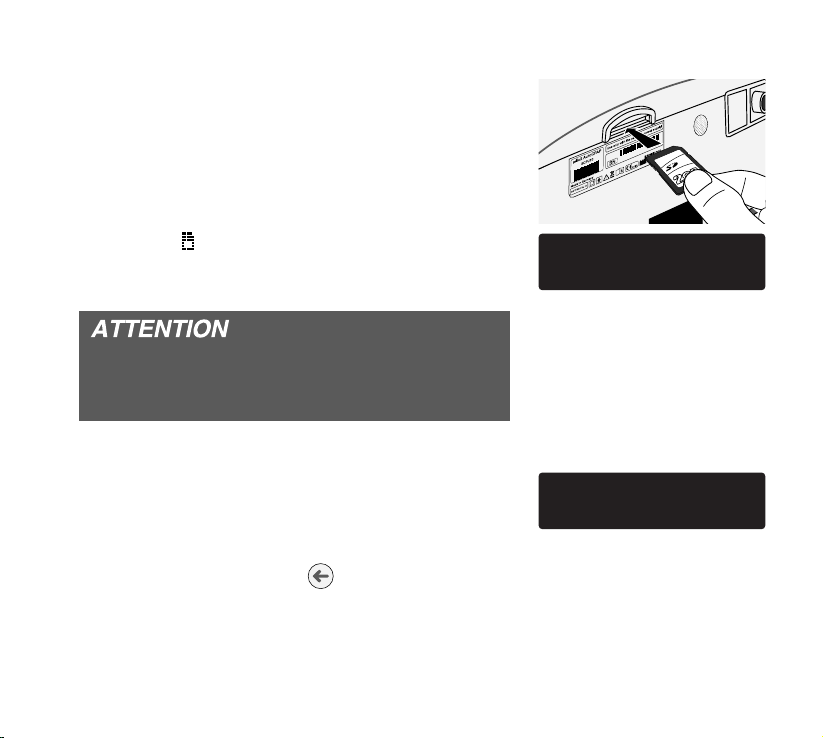
INSERTING THE SD CARD
1. Ensure that the device is in standby mode (see
page 39.
2. Insert the SD card into the SD card slot (see picture).
3. The device starts initializing while the message
“Do not remove the SD card” is displayed. Finally
the symbol
is shown at the display. The time
required for initialization depends on the device
settings.
During the initialization process do not remove
the SD card at any time! This could lead to loss
of data or damage the SD card.
4. After successful initialization, the message disappears. If the SD card contains valid new therapy
parameters, the device is going to import them.
Finally “New Parameters were accepted” indicates initialization to be successful.
5. By pressing the enter key or after 10 s the
message will be disappear automatically.
JAB122020
+ *+/ .!)+2!
/$! .
!3 .)!/!.0
3!.! !,/!
88 Using an SD card
Page 89
After the takeover of the parameters enter the InfoMenu and validate the displayed parameters with
the values of your prescription.
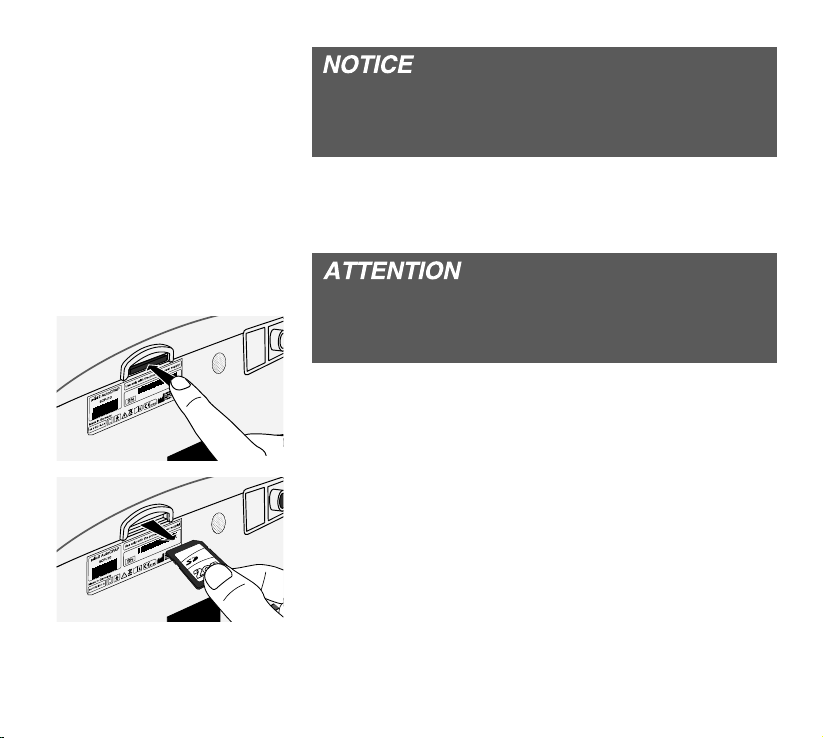
REMOVING THE SD CARD
Only remove the SD card in standby mode. Otherwise data may be lost or the SD card might be
damaged.
JAB122020
JAB122020
1. Ensure that the device is in standby mode (see
page 39.
2. Carefully push the SD card into the card slot.
3. Remove the SD card.
Using an SD card 89
Page 90

WHAT IS SAVED ON THE SD CARD
The last 100 device events are saved on the SD card.
Events are changes of parameters such as therapy
settings, resetting counters (e.g., fi lter counters) etc.
The parameters changes are saved with the date and
time they were changed, as well as the old and new
value. All alarms that occurred are also being saved
with date and time.
The SD card can only be readout using the TREND-
set PC software.
The device internal storage is limited to 30 days1. The
SD card offers a capacity of more than one year 1, 2.
The following table shows which therapy data is stored
internally at the device and which extra data is stored
on the SD card.
1 depending on the operating time and number of events
2 when using a 2 GB SD card
90 Using an SD card
Page 91
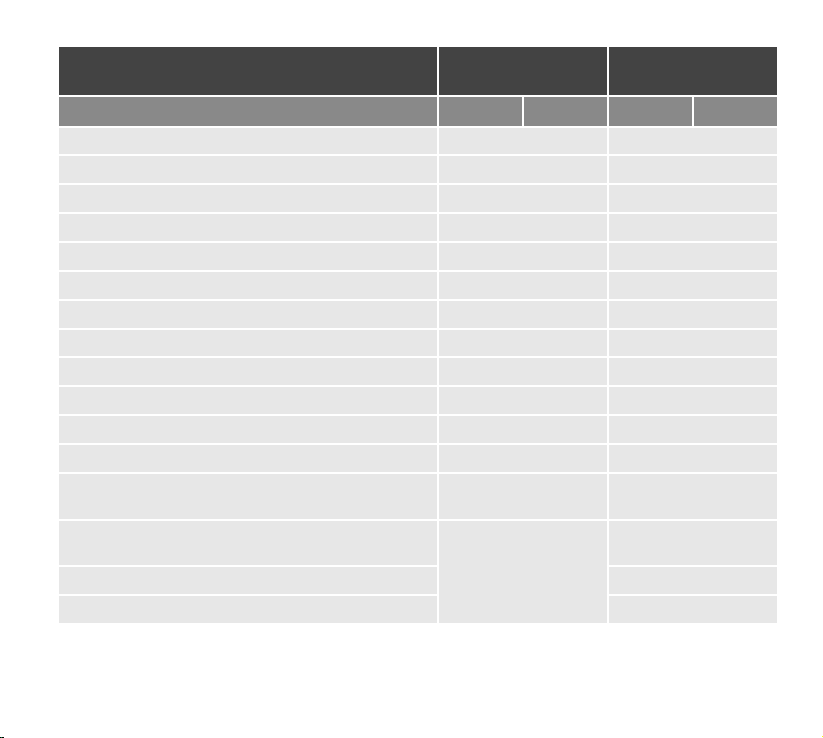
Therapy data Internally of the
SD card
device
CPAP APAP
CPAP APAP
Central Sleep Apnea • •
Obstruktive Sleep Apnea • •
Mixed Sleep Apnea • •
Hypopnea • •
Airway Constriction • •
Snoring • •
Mode • •
Adjustment • •
Leakage • •
Hyperventilation • •
Average System Flow • •
Base Pressure •• ••
Therapy Pressure
no FLEX pressure changes visible
Therapy Pressure
FLEX pressure changes visible
Respiratory Flow •
(low resolution)
(high resolution)
•-
-
Relative Respiratory Volume •
- not saved
• saved
•• only saved, when I-FLEX or E-FLEX are selected, but not active
Using an SD card 91
•
Page 92
ERROR MESSAGES
Two different types of error can be distinguished: errors
with data loss and errors without data loss.
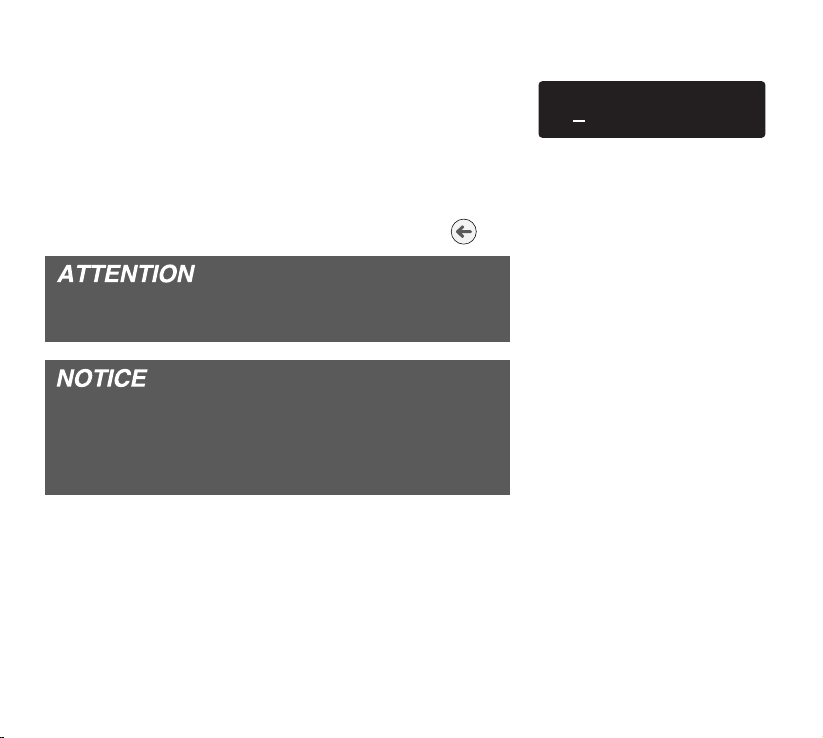
The display “Exx” denotes errors in which data may
have been lost. The display “Wxx” denotes errors in
which data has not been lost.
To hide an error message, press the enter key .
If error messages occur frequently, we recommend
that the device is examined by a service technician.
If you carry out the therapy without recording the
therapy data, we recommend not to use an SD
card in the device, in order to avoid unnecessary
error messages.
The following table shows all error codes that can
occur in connection with the use of the SD card.
.!00EH
..+. ;=
92 Using an SD card
Page 93

Error code Meaning Remedy
E00
E01 The SD card is faulty. Obtain a new SD card from your phy-
E02
E03
E04
E05 The SD card was removed. Insert the SD card again.
E06 The SD card or the device is faulty.
W00
W05/06 see error code E05/E06 see error code E05/E06
Writing data has failed. Possible
causes are power failure, removal of
card during writing or a faulty SD card.
File system or folder structure is faulty
or cannot be read.
New fi les cannot be created or the
SD card is full.
The device cannot adopt the ther-
apy data.
The SD card has fallen out of the card
slot.
The device is attempting to repair the
SD card. But you have inserted a new
SD card into the device.
The SD card is probably faulty. Remove
the SD card and then insert it into
the device again. If the error continues to occur, send the card back to
the physician.
sician or specialist dealer.
The SD card must be formatted by
the physician using TRENDset.
The SD card must be formatted by
the physician using TRENDset.
The SD card must be returned to the
physician to check the therapy.
If this occurs frequently, the device
should be examined by a service
technician.
Change SD card. If this occurs frequently, the device should be examined by a service technician.
Confi rm with key. The old SD card is
defective. Continue to use the new
SD card.
Using an SD card 93
Page 94

CHANGING THE FILTER, CLEANING
The fi lter prevents dust, insects and airborne particles
from entering the device. Over time such substances
would cause heavy soiling of the ducts inside the device
and the blower parts. As a result, the device would no
longer satisfy the hygiene requirements. In extreme
cases, unpleasant odors might result after a while. To
ensure that the fi lter remains permeable to air, it needs
to be cleaned or replaced at certain intervals.
The standard fi lter is only designed to offer a certain
level of protection from bacteria and allergens. Here,
we recommend using the optional fi ltersystempoint 2,
an attachable fi lter cassette with replaceable fi lter lay-
ers. The large fi lter area means that a much denser fi l-
ter material can be used here without there being any
signifi cant pressure loss.
When the fi lter is soiled or the display reads
94 Changing the filter, cleaning
, the fi lter must be either replaced or rinsed out.
@;$
$*#!%( / !.
Page 95
JAB122020
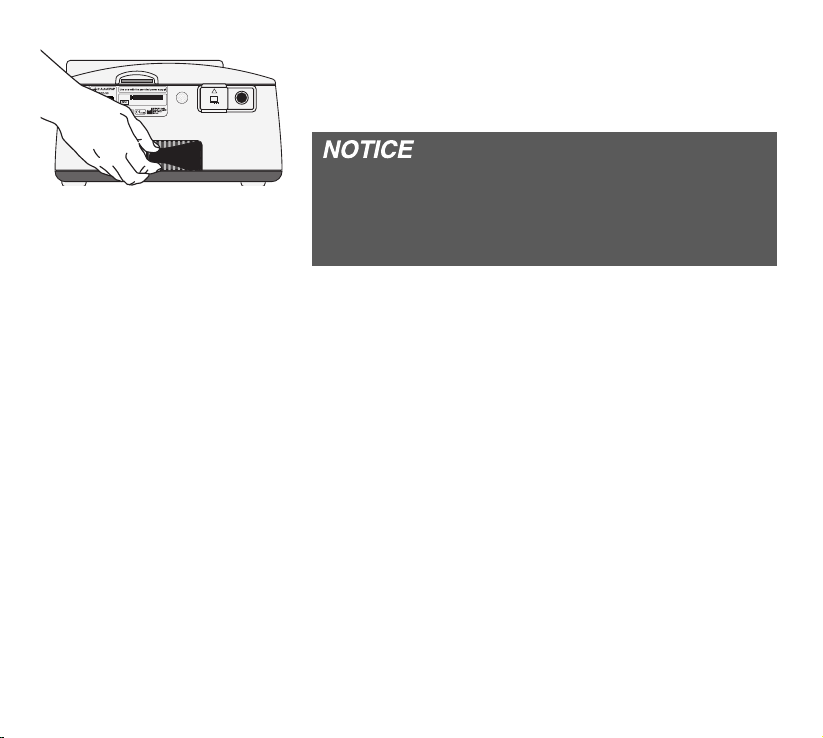
Removing the fi lter
Changing the fi lter
Pull out the fi lter on the back of the device and replace
it with a new or cleaned one.
Always use the device with the fi lter element inserted
and clean the fi lter element regularly. If the fi lter
element is heavily soiled or not inserted, this may
damage the device and result in unpleasant odors.
Cleaning the fi lter
1. Clean the fi lter with mild soapy water. Do not use
any other agents!
2. Rinse the fi lter thoroughly with clear water.
3. Let the fi lter dry completely.
4. Insert the cleaned fi lter into the device.
If the device is run with the optionally available
fi ltersystempoint 2 according to the cleaning instruc-
tions in the fi lter system user‘s manual.
Changing the filter, cleaning 95
Page 96

Resetting the display message
1. Disconnect the DC power supply plug from the
device.
2. Hold the enter key
down and, while you are
doing this, reconnect the DC power supply plug
to the device‘s DC power connection.
Filter Counter Reset appears on the display.
3.
Press the enter key to confi rm.
4. Filter Counter deleted appears on the display.
CLEANING THE MASK
For hygienic reasons, clean the mask every day. To do
so, proceed as follows:
1. Disconnect the mask from the therapy tube.
2. Clean the mask with mild soapy water. Do not
use any other agents!
3. Rinse the mask thoroughly with clear water.
4. Let the mask dry completely.
CLEANING THE THERAPY TUBE
For hygienic reasons, clean the therapy tube weekly.
To do this, proceed as follows:
96 Changing the filter, cleaning
Page 97

1. Disconnect the therapy tube from the mask and
the device.
2. Clean the therapy tube with mild soapy water.
Do not use any other agents!
3. Rinse the therapy tube thoroughly with clear
water.
4. Let the vertically suspended therapy tube dry
completely.
CLEANING THE DEVICE
Clean the device once a week. To do this, proceed
as follows:
1. Unplug the mains plug.
2. Wipe the device with a cloth slightly dampened
with soapy water.
3. Rub the device dry with a cloth.
Chemical cleaning products or solvents should not
be used to clean the surface of the device under
any circumstances. They might damage the high
gloss fi nish of the device.
Changing the filter, cleaning 97
Page 98

CLEANING THE HEADGEAR
You only need to clean the headgear if it is necessary.
To do this, proceed as follows:
1. Remove the headgear from the mask.
2. Clean the headgear according to the manufacturer‘s instructions.
CLEANING THE HUMIDIFIER
When using a humidifi er, the cleaning instructions
in its user‘s manual must be observed.
98 Changing the filter, cleaning
Page 99

PREPARING THE DEVICE FOR A PATIENT
CHANGE
If the device is to be used by another patient, it
must prior be prepared hygienically.
When being given to another patient, the device must
be prepared hygienically by the specialist dealer or the
manufacturer. If reuse of the mask and the therapy tube
is planned, they must also be prepared by the specialist dealer or the manufacturer.
The preparation procedure is described in detail in the
corresponding hygiene plan.
Preparing the device for a patient change 99
Page 100
USING BACTERIAL FILTERS
If the device is intended for use by more than one patient
(e.g., operation in clinics), a suitable bacterial fi lter (e.g.,
MEDISIZE BARR-VENT S) must continuously be used to
protect the device from contamination by human pathogens.
Change the bacterial fi lter daily and follow the man-
ufacturer’s user’s manual.
If the optionally available humidifi er aquapoint 2 is used
with the device, a bacterial fi lter must not be used.
On a change of patient, carry out the following steps:
• Replace the bacterial fi lter.
• Disinfect all the parts of the housing and the connections with a suitable agent, e.g., Mikrozid® Liquid.
•
Change the fi lter or if you are using the optionally avail-
able fi ltersystempoint 2, either change its coarse and
fi ne fi lter and disinfect the surface of the fi lter system
or replace the entire fi lter system with a new one.
If there is any doubt, it should be assumed that the
device is contaminated and it should be hygienically
prepared according to the hygiene concept.
100 Using bacterial filters
 Loading...