

Page 1
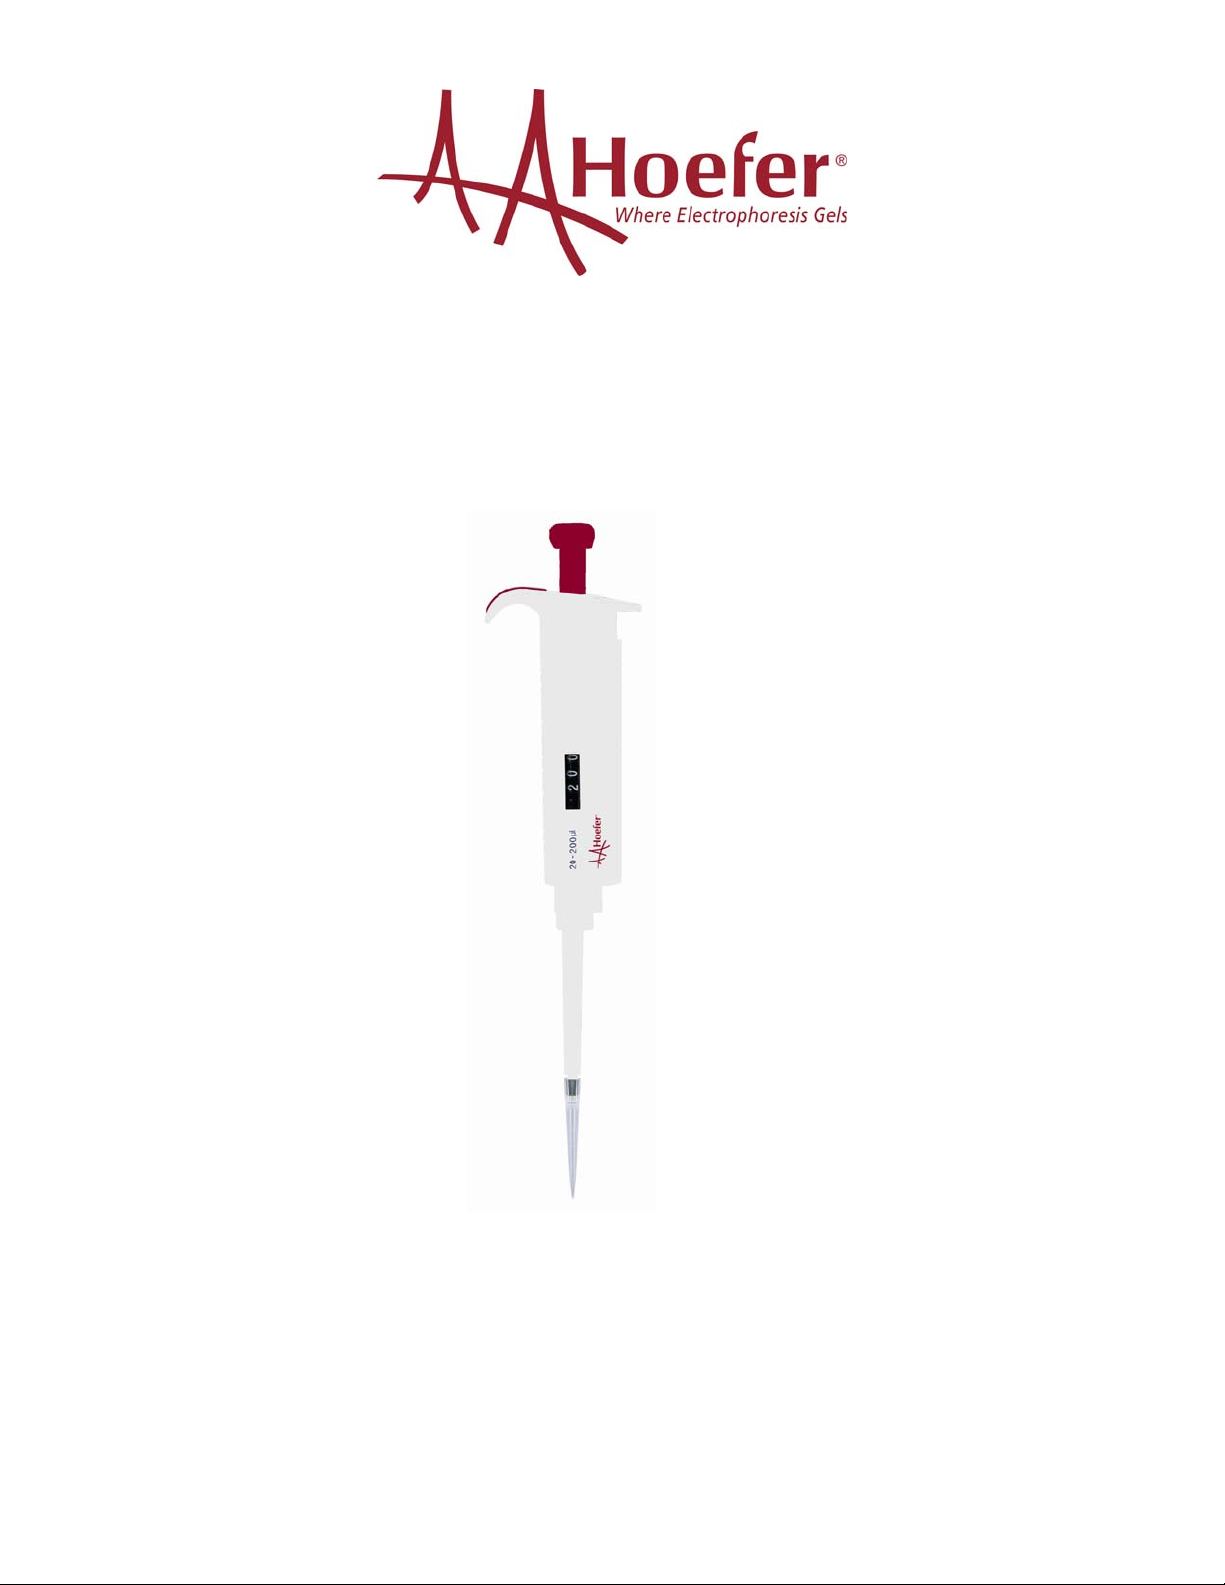
Single Channel Variable Pipette
Instruction Manual
Hoefer, Inc. October Hill Road ston 746 A
Toll Free 1-800-227-4750 ● Phone 1-508-893-8999 ● Fax 1-508-429-5732
● 84 ● Holli ● MA ● 01 ● US
www.hoeferinc.com
Page 2

Table of Contents
1. PIPETTE SPECIFICATIONS 3
2. PACKING LIST 3
3. INSTALLING PIPETTE HOLDER 3
4. PIPETTE DIAGRAM 4
5. PIPETTE OPERATION 4
5.1 Volume Selection 4
5.2 Sealing/Ejecting Pipette Tips 4
6. CALIBRATION 5
6.1 Confirming Calibration 5
6.2 Recalibration Procedure 6
7. MAINTENANCE 6
8. TROUBLESHOOTING GUIDE 7
9. WARRANTY 8
- 2 -
Page 3
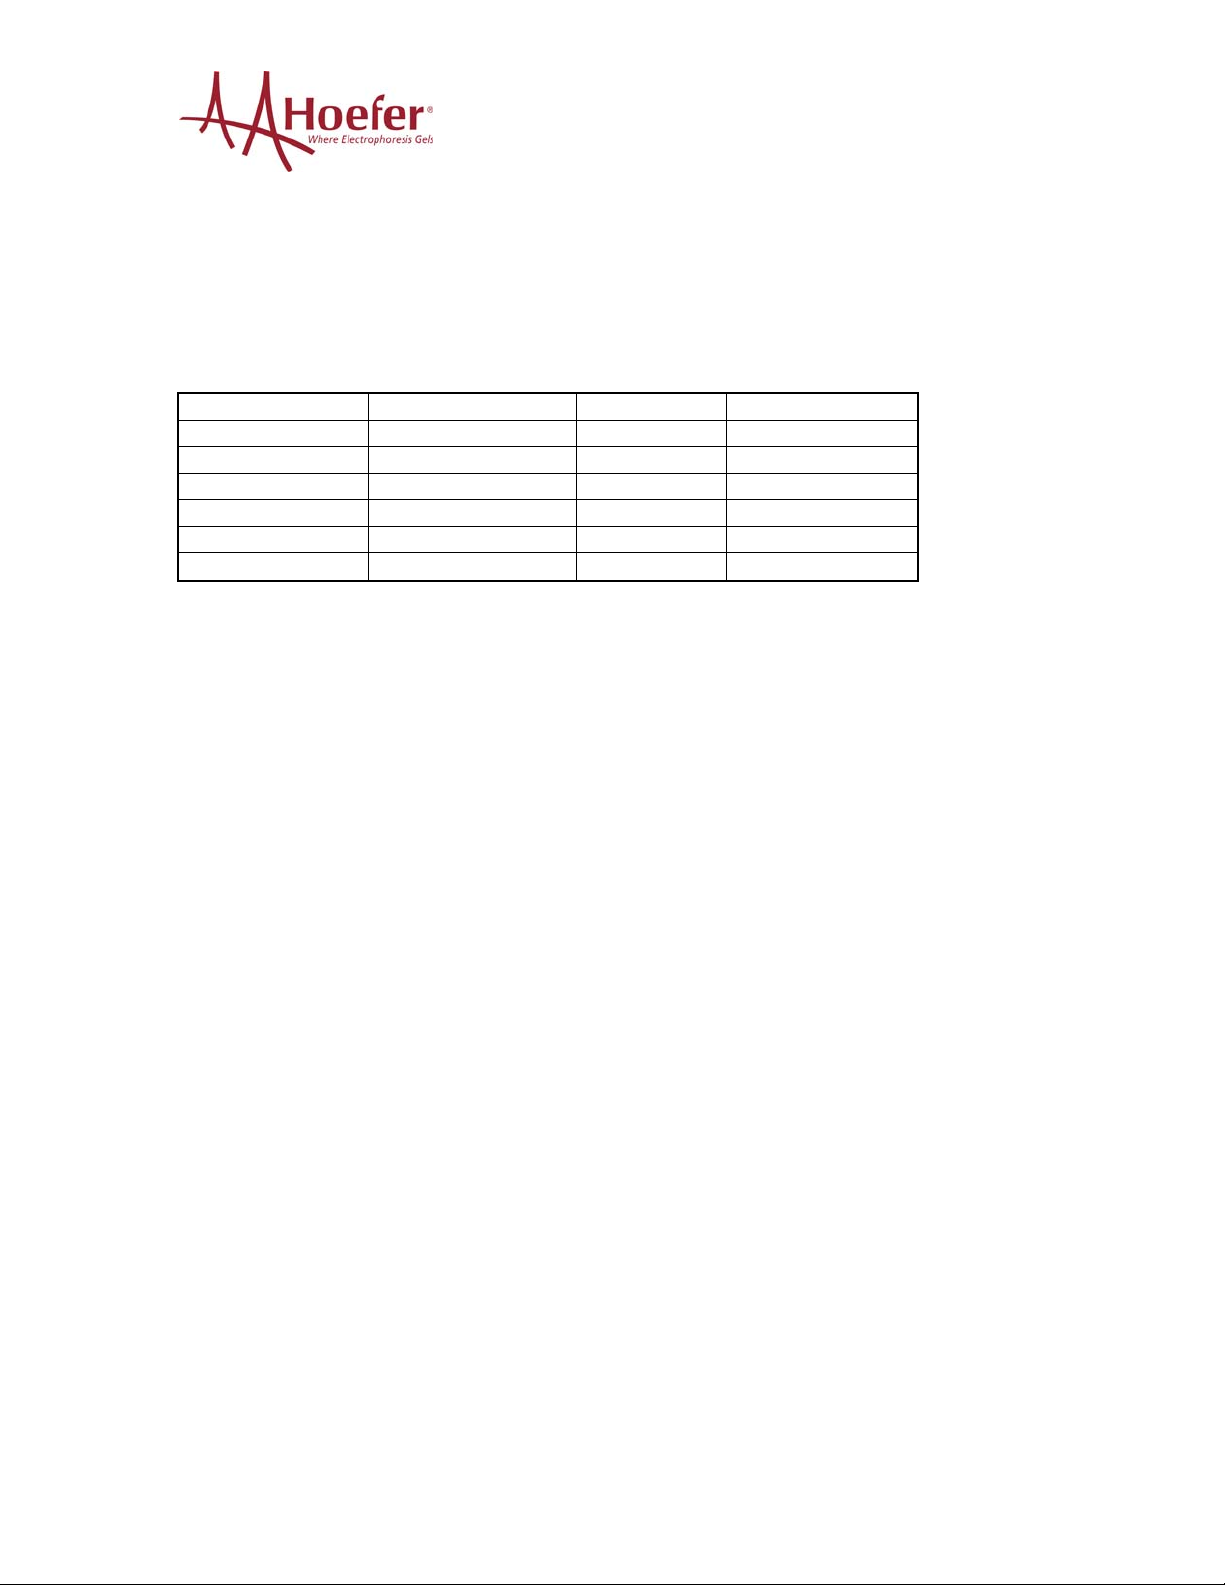
1. PIPETTE SPECIFICATIONS
The Hoefer pipette is for general laboratory liquid dispensing. Accurate and precise
liquid dispensing is certified according to ISO8655/Din 12650. All pipettes have been
certified using gravimetric testing with distilled water at 22°C. Hoefer offers a complete
line of variable single channel pipettes with volumes from 0.5µl to 5 ml.
Hoefer Catalog # Volume Range Increment Tip Size
LH-010010 0.5 to 10µl 0.1µl 10µl
LH-010020 2 to 20µl 0.5µl 200, 300µl
LH-010200 10 to 100µl 1µl 200, 300µl
LH-011000 20 to 200µl 1µ 200, 300µl
LH-010010 100 to 1000µl 5µl 1000µl
LH-010100 1000 to 5000µl 50µl 5000µl
2. PACKING LIST
Each Hoefer Pipette box contains the following items:
Pipette
Calibration tool
Pipette Lubricant
Pipette Holder
Instruction Manual
Performance Certificate
3. INSTALLING THE PIPETTE HOLDER
1. Clean the shelf with 70% Ethanol to remove any dirt.
2. Remove one side of protective paper from the adhesive tape.
3. Press the tape on to the shelf and remove the remaining protective paper.
4. Press the flat end of the pipette holder with the cutout facing about 2 inches
from shelf onto the adhesive tape.
5. Mount the pipette on the holder.
- 3 -
Page 4

4. PIPETTE DIAGRAM
Push Button Rod
Grip Cover
Tip Cone Tip Ejector Collar Display Handle Tip Ejector Cap Push
Button
Tip Ejector (Thumb Button)
5. PIPETTE OPERATION
Note: Pipettes should be checked prior to use to ensure the tip of the cone is clear of
debris.
5.1 Volume Selection
The volume of the pipette is shown in the display window located on the handle.
The volume can be set by turning the Thumb Button clockwise or counter
clockwise. When setting the desired volume be sure that:
1. There is a clicking sound when set.
2. The digits are completely visible.
3. The selected volume is within the pipettes specified range.
5.2 Sealing/Ejecting Pipette Tips
Press the appropriate pipette tip firmly onto the shaft of the pipette. When the
seal is tight, a visible ring forms between the tip and the shaft. Each Hoefer
pipette has a tip ejector. The tip ejector must be firmly pressed downwards to
ensure contact of the ejector with the top of the pipette tip.
- 4 -
Page 5

X
X
6. CALIBRATION
Each Hoefer pipette has been factory calibrated and certified according to ISO 8655/Din
12650. A calibration certificate is included with each pipette.
6.1 Confirming Calibration
Note: A scale with the ability to be set to 2 digits beyond the decimal point is
needed for pipette calibration. The room temperature should be 20 to 25ºC
without drafts.
1. Set the desired pipette volume. Hoefer recommends three different set
volumes: maximum volume, 50% of the maximum volume and 10%
of the maximum volume.
2. Firmly place the tip on the shaft of the pipette.
3. Pre-rinse the pipette tip with distilled water 5 times.
4. Carefully aspirate the liquid ensuring that the pipette is vertical.
5. Pipette the distilled water into a tarred container and record the weight
in milligrams. Repeat at least 5 times recording each result.
6. To calculate the volume dispensed, divide each measured weight by
the density of distilled water (1.0032).
7. Calculate accuracy:
a. Calculate the mean volume dispensed
)(
X
∑
=
X
Where:
= the calculated volume for each measurement
n
= the number of measurements
b. Use the mean volume to determine accuracy
Accuracy % =
8. Calculate precision:
a. Calculate Standard Deviation of volume dispensed
n
⎛
−
⎜
⎜
⎝
volumesetX
volumeset
⎞
)(
⎟
100*
⎟
⎠
2)^(−−
∑
S
=
Where:
Xi
= individual volume
= mean volume
n
= number of measurements
b. Use the Standard Deviation and mean volume to determine
precision
Precision % =
- 5 -
XXi
1
n
⎛
⎜
⎝
S
⎞
*100
⎟
X
⎠
Page 6
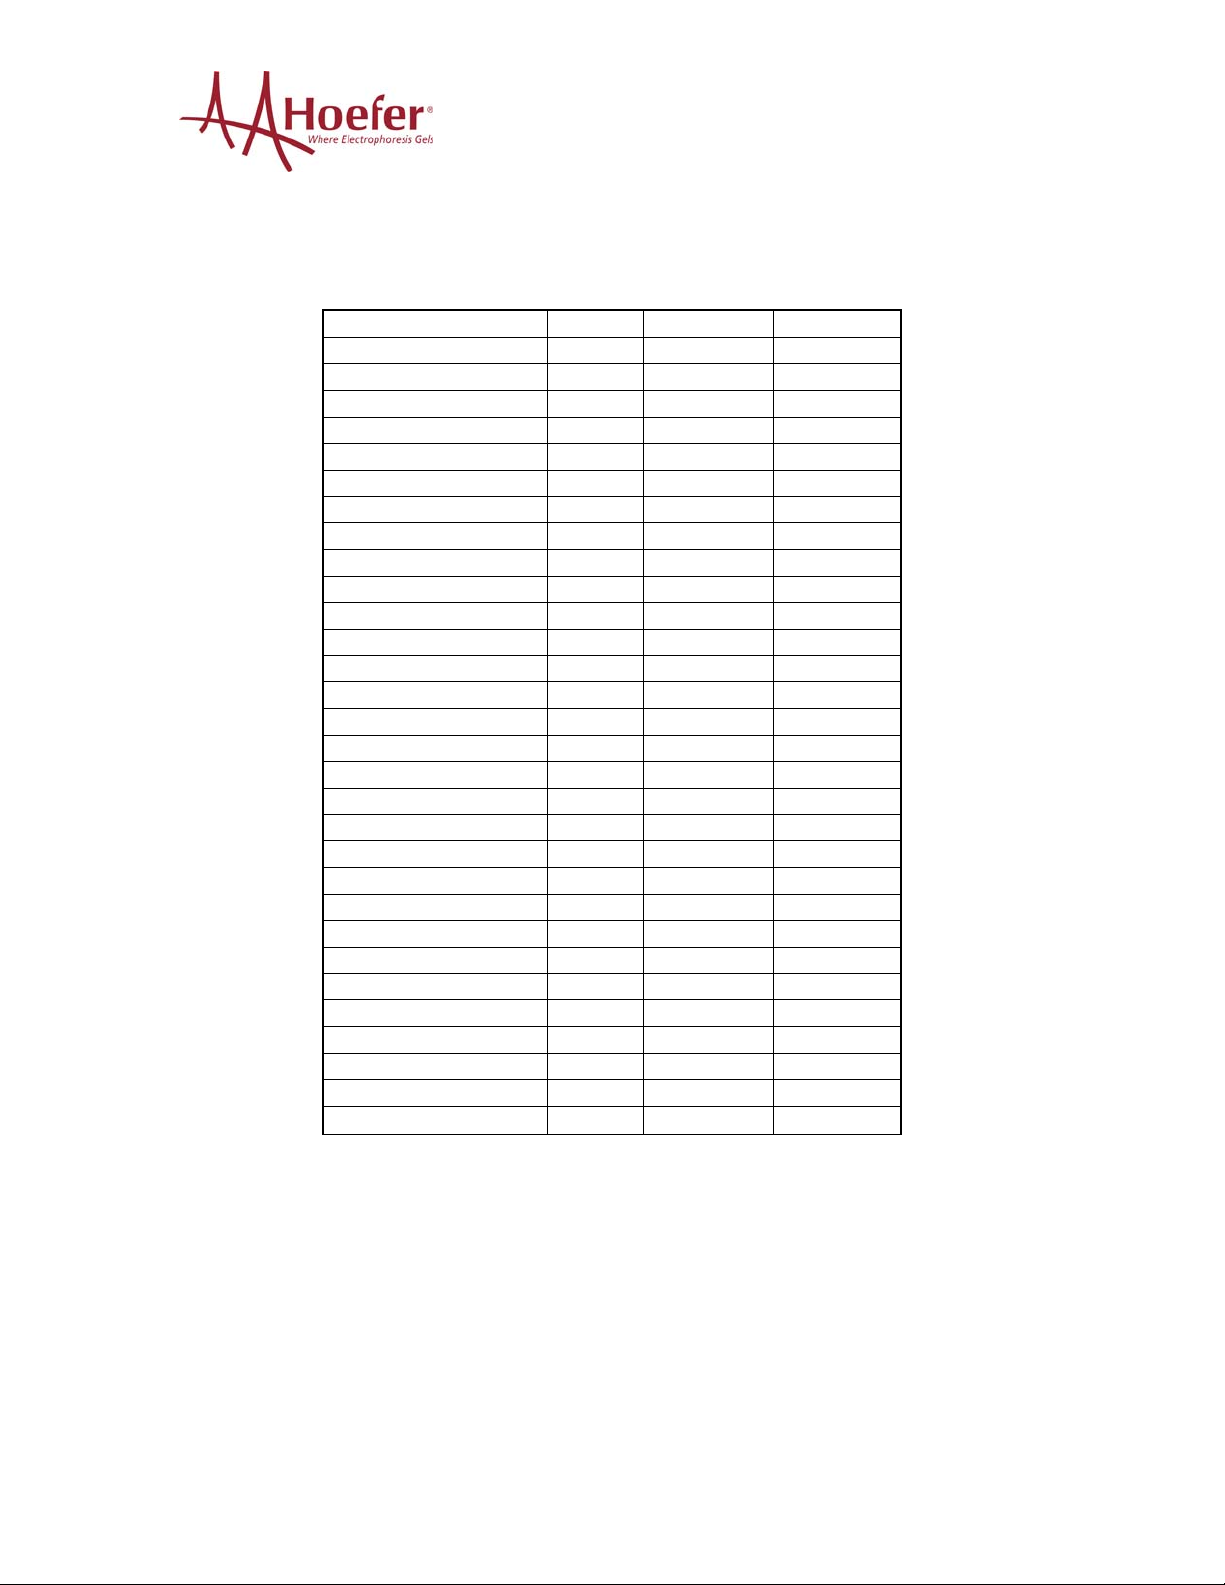
9. Compare the calculated Accuracy % and the Precision % values to the
specifications table below. If the result is not within the specifications
the pipette should be recalibrated.
Pipette Volume Range Volume Accuracy ± Precision ±
0.1-2.5µl 2.5µl 2.50% 2.00%
1.25µl 3.00% 3.00%
0.25µl 12.0% 6.00%
0.5-10µ 10µl 1.00% 0.80%
5µl 1.50% 1.50%
1µl 2.50% 1.50%
2-20µl 20µl 0.90% 0.40%
10µl 1.20% 1.00%
2µl 3.00% 2.00%
5-50µl 50µl 0.60% 0.30%
25µl 0.90% 0.60%
5µl 2.00% 2.00%
10-100µl 100µl 0.80% 0.15%
50µl 1.00% 0.40%
10µl 3.00% 1.50%
20-200µl 200µl 0.60% 0.15%
100µl 0.80% 0.30%
20µl 3.00% 1.00%
50-200µl 200µl 0.60% 0.15%
100µl 0.80% 0.30%
50µl 1.00% 0.40%
100-1000µl 1000µl 0.60% 0.20%
500µl 0.70% 0.25%
100µl 2.00% 0.70%
200-1000µl 1000µl 0.60% 0.20%
500µl 0.70% 0.25%
200µl 0.90% 0.30%
1-5 ml 5 ml 0.50% 0.15%
2.5 ml 0.60% 0.30%
1 ml 0.70% 0.30%
6.2 Recalibration Procedure
1. Place the calibration tool on the calibration adjustment lock under the
thumb button of the pipette.
2. Turn the adjustment lock counterclockwise to decrease volume and
clockwise to increase volume.
3. Recheck the calibration using the above procedure.
4. Readjust the pipette until the calibration is correct.
- 6 -
Page 7

7. MAINTENANCE
Use 70% ethanol and a soft cloth or lint free tissue to wipe the external pipette surfaces
clean.
To clean in the interior of the pipette:
1. Hold down the tip ejector.
2. Place the pronged end of the wrench between the tip ejector and the tip ejector
collar to release the locking mechanism.
3. Carefully release the tip ejector and remove the collar.
4. Using the wrench, turn the tip cone counter clockwise to remove the cone.
5. Wipe the piston, O-ring and the tip cone with 70% ethanol. Note: Pipettes with
volumes of 10 µl or less have a fixed O-ring and cannot be accessed.
6. Grease the piston with a light coating of silicone.
7. Reassemble the pipette and then depress the thumb button several times to
lubricate the piston to make sure it does not bind.
8. Check calibration.
8. TROUBLESHOOTING GUIDE
Problem Possible Cause Solution
Liquid left inside the tip
Leakage or pipette volume
too small
Push button jammed or
off center
Pipette not aspirating
Tip ejector jammed
Tip incompatibility Try a different brand of tip
Plastic tip not uniform Attach a new tip
Tip incorrectly attached Reattach tip
Tip cone fouled Clean tip cone
Pipette has material inside
cone
O-ring not positioned
correctly or damaged
Calibration incorrect Recalibrate pipette
Piston damage Clean and grease O-ring
Solvent contamination Clean and grease O-ring
Calibration incorrect Recalibrate pipette
Material blocking cone tip Clean and grease O-ring
Ejector collar has debris Clean tip cone and ejector
Clean and grease O-ring
and piston; clean tip cone
Replace O-ring
and piston; clean tip cone
and piston; clean tip cone
and piston; clean tip cone
collar
- 7 -
Page 8

9. WARRANTY
Hoefer, Inc. warrants that this product will be free from defects in material and
workmanship for a period of three (3) years from date of purchase. If a defect is present,
Hoefer, Inc. will, at its option, repair, replace, or refund the purchase price of this product
at no charge to you, provided it is returned during the warranty period. This warranty
does not apply if the product has been damaged by accident, abuse, misuse, or
misapplication, or from ordinary wear and tear.
For your protection, items being returned must be insured against possible damage or
loss.
- 8 -
 Loading...