

Page 1
user manual
Hoefer SE615
and SE675
Multiple gel casters
um SE615-IM/Rev.C0/08-12
Page 2

Page finder
Safety warnings and precautions ...........................viii
Introduction .......................................................... 1
Setting up the caster ............................................. 5
Casting with divider plates .....................................7
Pouring standard homogeneous gels ........................9
Pouring standard gradient gels ..............................11
Pouring stacking gels ...........................................15
Removing polymerized gels ...................................17
Troubleshooting ...................................................18
Care and maintenance .........................................20
Appendix A: Gel identification numbers ................. 21
Appendix B: References .......................................21
Ordering information ............................................ 22
pi
•
Page 3

Important! Most organic solvents
including methanol, isobutanol,
isopropanol, and even n-butanol
will craze or cloud the acrylic
plastic with prolonged exposure.
Only use small amounts to
overlay the gels.
Safety warnings and precautions
• Acrylamide is a neurotoxin.
• Wear gloves when handling acrylamide or
polyacrylamide.
• Wear a dust mask when weighing acrylamide
or preparing acrylamide solutions.
Protecting your equipment
To keep your instrument in excellent condition,
please take the following important steps:
• Use water-saturated n-butanol for overlayering
resolution gels during polymerization.
• Avoid using small metal spatulas to separate
the plates. Spatulas may chip the edges of glass
plates and prevent them from sealing.
• After casting, you may need to use a wedge
to separate one glass-and-gel sandwich from
another. Slip a Wonder Wedge in between
adjacent sandwiches to separate them.
pii
•
Page 4

Introduction
Gel sizes
The Hoefer® SE615 and SE675 Multiple Gel
Casters are designed for casting vertical slab
acrylamide gels of homogenous or gradient
concentration.
Use the casters with 16 × 18 cm glass plates and
2 cm-wide spacers to cast 16 × 14 cm gels. Use
1-cm wide spacers to cast 16 × 16 cm gels for
two-dimensional electrophoresis. The resulting
gels are compatible with Hoefer SE400, SE600
and SE600 Chroma Vertical Slab Gel Electrophoresis Units.
Homogeneous and gradient gels
The SE615 and SE675 can be used for casting
both homogeneous and gradient gels. Gradient
gels are cast through the port at the bottom of
the caster. When casting homogeneous gels, the
results are most consistent when the gels are cast
from the bottom. The V-shaped region at the
bottom of the casting unit allows the gel solution to rise evenly, producing identical gels.
p1
•
Page 5

Standard casting
In the standard casting procedure, a gel is cast
between two glass plates held apart by a pair of
spacers. (See Fig 2 on page 5.) The result can be
pictured as a “sandwich,” with the gel between
two glass plates. When you set up a vertical slab
gel electrophoresis unit, you place the glass and
gel sandwich in the electrophoresis unit.
The maximum number of gels you can cast
simultaneously using the standard casting procedure is shown in Table 1.
Table 1. Maximum number of
standard gels cast
0.75-mm 1.0-mm 1.5-mm
spacers spacers spacers
SE615 11 10 10
SE675 4 4 4
p2
•
Page 6

Casting with divider plates
You may find it useful to double the number of
gels run simultaneously in one electrophoresis
unit. This can be accomplished by casting a
“club sandwich.” A club sandwich contains a
notched glass divider plate and a second pair
of spacers between the standard plates, and
thus forms two layers of gel between three glass
plates (see Fig 3 on page 8.) Divider plates are
available for the SE400 and SE600.
The maximum number of gels you can cast
simultaneously, using divider plates (two gels
per sandwich), is shown in Table 2.
Table 2. Maximum number of gels
cast with divider plates
0.75-mm 1.0-mm 1.5-mm
spacers spacers spacers
SE615 14 14 12
SE675 6 6 4
See Fig 1 on page 4 to identify the components
of the multiple gel casters. For information on
parts, accessories and related equipment, see
page 22.
Pouring second-dimension slab gels
When preparing second-dimension slab gels in
the multiple casters, it is important to pour the
slabs to the correct height.
If you are using IPG strips, you do not need a
stacking gel. Pour the second-dimension gel to
0.5–1.0 cm below the top of the sandwich for
standard casting, or 1 cm below the notch if
you are casting with divider plates. This allows
ample room to hold the IPG strips between the
two glass plates. Use 1.0- or 1.5-mm spacers
with IPG strips.
•
p3
Page 7
1
5 6
2
3 4
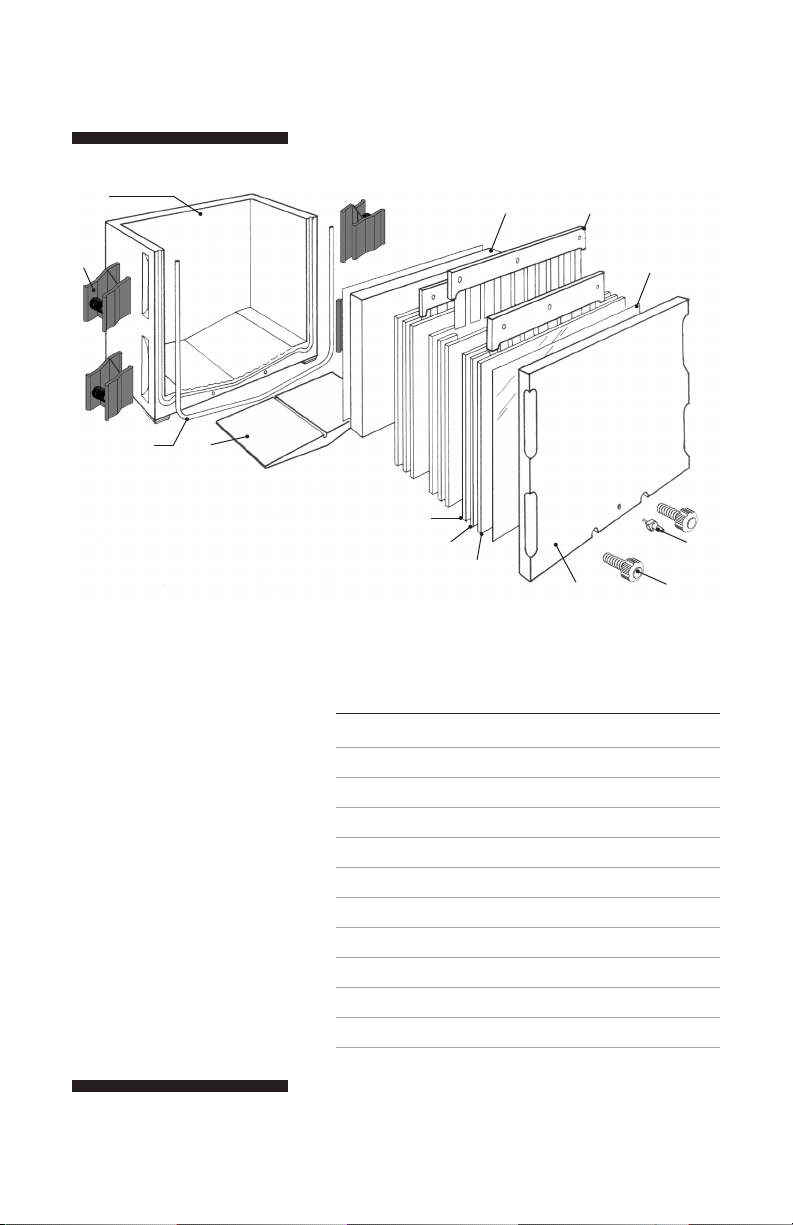
Fig 1. Components of the SE615
and SE675 Multiple Gel Casters.
7
8
9
0
8
1
!
SE615 and SE675 components
no. description
1 Caster body, includes faceplate
2 Spring clamp (4)
3 Foam cord gasket
4 Silicone displacement block*
5 Acrylic spacer block
6 Comb
7 Polycarbonate filler sheet
8 Glass plate
9 Spacer
10 Inlet port
11 Nylon thumb screw
* A small silicone displacement block is also available for the SE675.
p4
•
Page 8
Setting up the caster
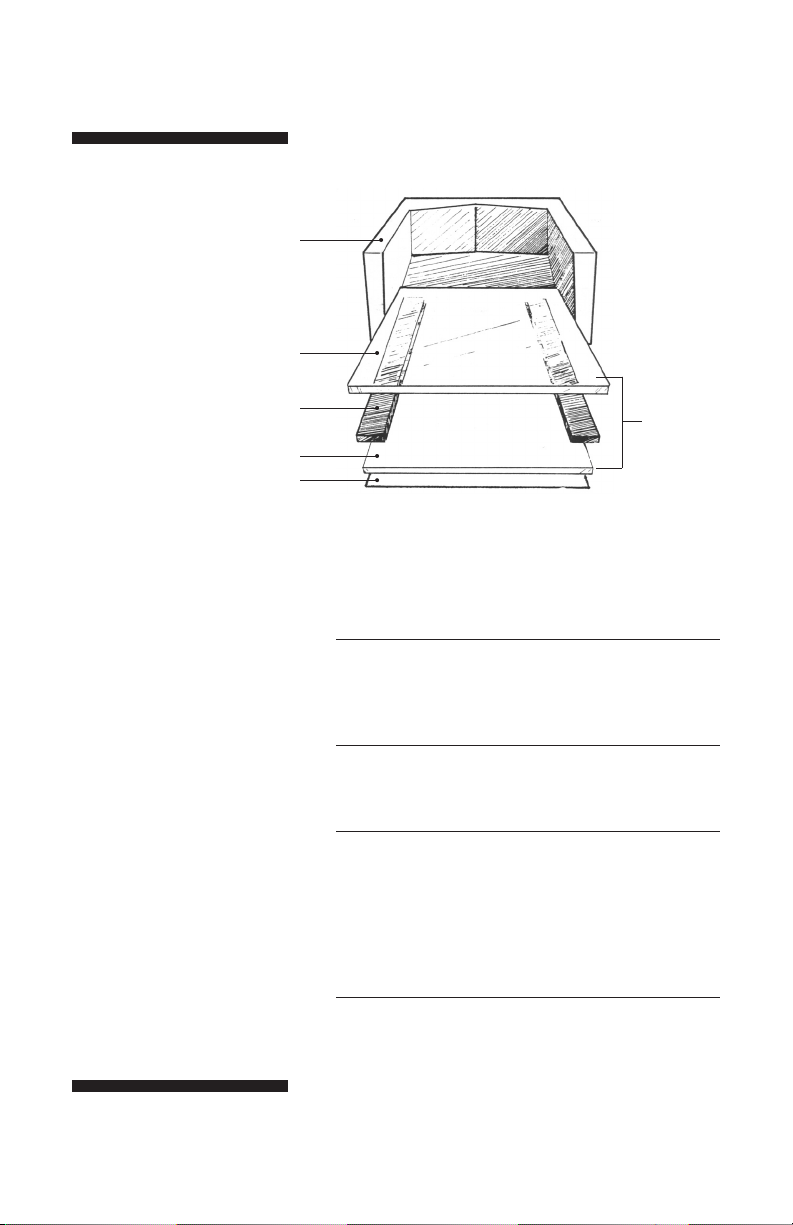
Fig 2. Building a
glass sandwich for
standard casting.
glass plate
glass plate
wax paper or
polycarbonate sheet
Note: Do not block the red
inlet port at the bottom of
the faceplate.
caster
spacer
one sandwich
Preparing the caster
1
If the faceplate is attached to the caster, remove it.
Remove the four side clamps, loosen the two thumb
screws, and slide off the faceplate.
2
Remove the foam cord gasket. Apply a light coat of
Gel Seal lubricant and replace the gasket.
3
When casting gradient gels, attach the tubing from the
gradient maker to the inlet port at the bottom of the
faceplate. Homogeneous gels may also be cast through
this port. If casting homogeneous gels from the top,
insert the appropriate displacement block in the open,
V-shaped region at the bottom of the chamber.
4
Place the open caster in a horizontal position with its
back on the bench top.
p5
•
Page 9

Building the stack
Note: To make separation of
polymerized gel sandwiches
easier, place wax paper sheets
in the caster between each set
of glass sandwiches.
Note: When analyzing a large
number of gels, you may
find it useful to include gel
identification numbers into the
polymerized gel.
See the appendix on page 21
for directions on making gel
identification tags. Lightly wet
and place the tags in the lower
corner of the gel sandwich
during stack assembly.
Note: If you use polycarbonate
sheets instead of wax paper
between each sandwich, the
caster holds fewer sandwiches.
1
Place a polycarbonate sheet in the caster so that 1/3
of the sheet extends out of the top.
You can use this sheet as a lever when inserting filler
sheets after all sandwiches are in place. All remaining
components fit flush against the bottom and sides.
2
Place a sheet of wax paper on the polycarbonate
sheet. Build the first sandwich into the caster.
3
Place a sheet of wax paper on top of the sandwich
and build the next sandwich.
4
Repeat step 3, alternating wax paper and gel sandwiches. Over the final sandwich, lay a polycarbonate
sheet instead of wax paper so that the gel solution
level is visible through the faceplate.
5
Place the faceplate on the caster and make sure the
stack fits snugly, about 0.5 mm above the edge of the
caster. If necessary, adjust the number of extra polycarbonate sheets, acrylic spacer blocks, glass plates
and sandwiches to obtain a snug fit.
6
Make sure the spacers are straight and along the
edges of the glass plates. Use the Spacer Mate to
correct the alignment if necessary.
If necessary, take the faceplate off and make sure all
edges of the stack components are flush. Press on
those that are sticking out until all edges are flush
and replace the faceplate on the caster.
7
Secure the faceplate with the four spring clamps and
tighten the bottom thumb screws.
p6
•
Page 10

Casting with divider plates
To double the number of gels run simultaneously
on the SE600 and related units, place a notched
glass divider plate and another pair of spacers
between the standard glass plates. The result is a
“club sandwich,” with two layers of gel formed
by the three glass plates.
To use divider plates, follow the directions in
“Pouring standard homogeneous gels” on
page 9 or “Pouring standard gradient gels”
on page 11. When calculating solution volumes,
use the formula on page 9. When stacking glass
sandwiches, use the following procedure.
1
Stack glass sandwiches in the caster, using one club
sandwich for each two gels you will cast. Fill extra
space with acrylic blocks, glass plates and polycarbonate sheets.
2
Slide in one polycarbonate sheet against the back.
3
Slide in a glass club sandwich. (See Fig 3.)
To construct a club sandwich, slide in one rectangular
glass plate and place spacers along each of the two
side edges. Slide in a notched divider glass plate and
place spacers along each of the side edges. Finally,
slide in a second rectangular glass plate.
p7
•
Page 11

Note: For optimum visibility,
place a polycarbonate sheet
against the faceplate.
Fig 3. Constructing a “club
sandwich” for casting with
divider plates.
glass plate
spacer
notched divider plate
spacer
glass plate
wax paper or
polycarbonate sheet
4
Place a polycarbonate sheet or wax paper on top of
the club sandwich.
Repeat step 3, alternating wax paper and club
sandwiches.
5
After the last club sandwich, add acrylic spacer blocks
and extra polycarbonate sheets until the entire stack is
approximately 0.5 mm above the rim of the box.
one club
sandwich
additional club
sandwiches
p8
•
Page 12

Warning! Acrylamide is a
neurotoxin. Wear gloves
when handling acrylamide or
polyacrylamide. Wear a dust
mask when weighing acrylamide
or preparing acrylamide stocks.
Pouring standard homogeneous gels
Table 3. Gel casters and volume required
gel caster required volume gradient maker
(ml) size*
SE615 190 –500 SG500
SE675 60 –150 SG100 or
SG500
*Actual size depends on calculated volume.
1
Prepare and degas enough monomer solution to fill all
sandwiches to the level of the notched plate.
The following formula allows extra solution to fill the
space between the sandwich and the chamber:
Note: The 1.1 multiplier in this
formula assures enough solution
to fill dead volume.
Monomer vol. = height × width × spacer × total number of × 1.1
(ml) (cm) (cm) thickness (cm) gel sandwiches
No stacking gel. Fill solution to just below the top of
the notched plate. If air pockets form, remove with a
pipette or syringe. Introduce a comb, at a slight angle,
into each sandwich, taking care not to trap air under
the teeth.
Stacking gel. Fill solution to 4 cm below the top of the
rectangular glass plate. This height allows 1 cm of
stacking gel below the wells. Pour the gel and apply
an overlay. After the gel is set, prepare the stacking
gel as described on page 15.
2-D electrophoresis. Fill solution to about 1.0 cm
below the top of the rectangular glass plate. This
height allows 4 to 5 mm of space for the IPG strip
and an agarose seal. Overlay the separating gel as
described in step 3.
p9
•
Page 13

Caution! Isobutanol crazes
or clouds the acrylic caster
walls, making it difficult to see
the gels.
2
Add initiator and catalyst, and pour the solution into
the glass sandwiches from the top.
The solution flows from one sandwich to another
through the groove at the bottom of the caster and
rises to the same level in all sandwiches. Pour slowly
to avoid overfilling.
3
After reaching the final level, overlay each gel
sandwich with 300 µl of water-saturated n-butanol
or buffer.
Use the same amount of overlay on each gel sandwich
to assure that all the gels polymerize to the same
heights. Pour the liquid gently, taking care not to
disrupt the gel surface.
After polymerization is complete, remove the
n-butanol and replace it with buffer or add stacking
gel. Water-saturated n-butanol will cloud acrylic parts
if used in large amounts or for long periods.
4
Allow the gels to polymerize for at least an hour. To
remove the polymerized gels, see “Removing polymerized gels” on page 17. To add a stacking gel, see
“Pouring stacking gels” on page 15.
•
p10
Page 14

Pouring standard gradient gels
See Fig 1 on page 4 for a diagram of the caster
components. See “Setting up the caster” on
page 5 for recommended solution volumes.
Setting up the gradient maker
1
Prepare a 50% glycerol displacement solution
containing a small amount of bromophenol blue:
approximately 75 ml for the SE615 and 35 ml for the
SE675.
2
Calculate the amount of gradient solution you will
need by referring to the formula on page 9.
For one-dimensional gels: Use a 12-cm separation
gel with a 4-cm stacking gel.
For two-dimensional gels using IPG strips: Calculate
the amount of solution needed to fill the sandwiches
to approximately 0.5 –1.0 cm below the top of
the plates.
3
Set up the peristaltic pump. Using a graduated
cylinder and water, adjust the flow rate so that the
volume of the gradient separation solution plus the
volume of the glycerol solution will be completely
delivered in 10 –15 minutes.
4
Choose a gradient maker that holds no more than
four times the total volume of gradient solution to
be poured. Check that the gradient maker is clean
and that the outlet and mixing port are free of
polymerized acrylamide.
•
p11
Page 15

Fig 5. Gradient making system
connections.
5
Assemble the gradient components. (See Fig 5.)
a. Close all gradient maker valves and place a stir
bar in the mixing chamber, the one with the tube
connector port.
b. Attach one end of a piece of tubing to the outlet of
the gradient maker.
c. Run the other end of the tubing through the peri-
staltic pump and attach it to a tubing connector.
d. Use a second piece of tubing to attach the tubing
connector to the red inlet port at the bottom of
the caster.
mixing
chamber
multiple gel
caster
reservoir chamber
gradient maker
peristaltic pump magnetic stirrer
•
p12
Page 16

Pouring gradient separation gels
Warning! Acrylamide is a
neurotoxin. Wear gloves
when handling acrylamide or
polyacrylamide. Wear a dust
mask when weighing acrylamide
or preparing acrylamide stocks.
1
Prepare and degas the two monomer solutions for the
gradient maker.
Add glycerol or sucrose to the solution of higher
acrylamide concentration to stabilize the gradient as
the solution is pumped in. Decrease the concentration
of initiator so that polymerization occurs from top to
bottom. This minimizes convective mixing due to the
heat generated by polymerization.
2
Close both the mixing port and outlet port, if
appropriate, on the gradient maker. Clamp the tubing
from the outlet when using the SG500.
3
Add initiator and catalyst, and immediately pour the
light (low concentration) acrylamide solution into the
mixing chamber—the chamber with the outlet port.
Open the mixing valve slightly to allow the connecting
channel to fill and force out air bubbles.
Close the valve again and pour the heavy (high concentration) acrylamide solution into the reservoir chamber.
4
Start the magnetic stirrer and unclamp or open the
outlet valve. Start the pump and open the mixing valve.
•
p13
Page 17

5
When almost all the acrylamide solution is drained
from the gradient maker, stop the pump and close
the mixing valve. Tilt the gradient maker towards the
outlet side and remove the last few milliliters of mix.
Do not allow any air bubbles to enter the tubing.
6
Add the glycerol displacement solution to the mixing
chamber and start the pump. Make sure no bubbles
are introduced. Pump until the bottom of the caster
is filled with displacement solution to just below the
glass plates, then turn off the pump. Clamp off the
tubing to the red inlet port of the caster.
Note: Isobutanol clouds the
acrylic, making it difficult to see
the gels.
7
Overlay each separate sandwich with 300 µl of watersaturated n-butanol or buffer.
Use the same amount of overlay on each gel to
assure that all the gels polymerize to the same height.
Carefully and gently pipette the liquid, taking care not
to disrupt the gel surface.
After polymerization, remove the n-butanol. Replace
it with buffer or add a stacking gel.
8
Allow the gels to polymerize for at least an hour.
To remove the polymerized gels, see “Removing
polymerized gels” on page 17. To add a stacking gel,
see “Pouring stacking gels” on page 15.
•
p14
Page 18

Pouring stacking gels
You may add stacking gels to the entire set of
polymerized gels —homogeneous or gradient—
while the sandwiches are still in the casting box,
or you may add stacking gel to individual gels
immediately prior to use.
For optimal resolution, add the stacking gel at
the last minute to prevent diffusion of buffers
between the two gel layers.
1
If you are pouring stacking gels later, skip to step 1
under “Removing polymerized gels” on page 17.
If you are pouring stacking gels now, calculate the
volume of stacking gel monomer solution needed by
referring to the following formula:
Monomer vol. = height × width × thickness × total number of
(ml) (cm) (cm) (cm) stacking gels
Where:
• Height is the distance between the separating gel
and the top of the plates.
• Width is the distance between the spacers.
2
Rinse off the water-saturated n-butanol overlay with
distilled water or Tris buffer and invert the caster to
drain it. Repeat this 2–3 times.
3
Degas the stacking gel monomer solution and add
catalyst and initiator.
•
p15
Page 19

Note: Oxygen inhibits gel
polymerization. Do not trap
air bubbles underneath the
comb teeth.
Note: Use gels with stacking
gels immediately. Do not store.
4
Replace the caster in a vertical position. Make sure
the surface of the separating gel is free of liquid.
Use a pipette to fill each sandwich individually with
stacking-gel monomer solution.
5
Hold a comb, attached to a comb back, at a 45°
angle and centered within the sandwich. Insert one
end into the gel so that the end tooth is almost
completely inserted. Slowly lower the remaining comb
teeth in one by one, rotating the comb gradually
downward until it is in a horizontal position.
Refer to Fig 1 on page 4 for the final position of the
comb. Repeat this for each sandwich.
6
Allow the stacking gels to polymerize for at least one
hour. To remove the polymerized gels, see “Removing
polymerized gels” on page 17.
•
p16
Page 20

Note: The SDS buffer makes
the glass plates slippery.
Note: Do not use metal
spatulas to separate the
sandwiches. Narrow metal
spatulas often chip the edges of
glass plates, making the plate
ineffective for sealing into the
electrophoresis tank.
Note: Separate the sandwiches
from one another before placing
the gels in the refrigerator.
Removing polymerized gels
1
After the gels have polymerized, place the caster in a
horizontal position. If you poured stacking gels, leave
the combs in place. Remove the faceplate.
2
Tip the caster to pour off the glycerol solution.
3
Slide the stack of sandwiches, acrylic blocks, and
polycarbonate sheets out of the caster. Remove the
acrylic blocks and polycarbonate sheets from the top
of the stack.
4
Carefully remove individual glass and gel sandwiches
from the stack. If necessary, insert a Wonder Wedge
between adjacent sandwiches to separate them.
Work slowly and cautiously when prying apart adjacent
sandwiches after polymerization.
5
Rinse the caster and polycarbonate sheets, as
described in “Care and maintenance” on page 20.
To store gels for future use
Rinse the individual sandwiches with distilled water.
Fill cassettes with gel storage buffer. Wrap gel sandwiches you are not using at this time in plastic wrap
and store them in the refrigerator.
To use gels immediately
1
Gently remove the combs by pulling them upward and
out of the gel sandwich.
2
Fill the wells with SDS Electrophoresis buffer.
3
Load samples and complete assembly. Refer to the
user manuals that come with SE600 or SE400 Series
electrophoresis systems.
p17
•
Page 21

Troubleshooting
symptom possible cause recommended action
1. Gels adhere to glass plates Dirt, grease or Soak plates in a strong laboratory detergent;
when opening sandwich. fingerprints on plates. rinse well in distilled water. Handle with
2. Gels cast simultaneously Different amounts of Use the same amount of overlay on all
are different sizes. overlay were used on separation gels. Add the overlay as rapidly
the separation gels as possible.
before polymerization.
3. Caster leaks. Gasket leaks. Apply a light film of Gel Seal to the gasket
each time the unit is used.
Gasket damaged. Check the foam gasket for nicks or wear and
replace if necessary.
Stack too tall. Remove filler plates or gel sandwiches until
4. Gel heights uneven. Bubbles trapped Pour the monomer solution into one sandwich
under gel sandwiches. and allow the groove in the plug to evenly
distribute the solution.
Polymerized gel Make sure the groove in the triangular plug is
in groove. clean and clear of material.
Insufficient time for Wait one minute before overlaying the gels.
gel levels to stabilize. Add the same amount of overlay to each
5. Sample wells damaged Air bubbles under Remove air pockets before inserting combs.
or leak. comb teeth. Slide comb into solution at an angle. If comb
must be removed, add more monomer
solution before reinserting the comb.
Insufficient Allow the gel to set for a minimum of 1 hour.
polymerization.
Comb removed Slowly remove the comb at a slight angle to
too abruptly. prevent damaging the gel.
Poor polymerization. Degas stacking gel solution.
6. Gel sandwiches No wax paper Place wax paper between sandwiches
difficult to separate. between glass plates. in the stack.
7. Uneven gradient gels. Uneven layering. Add sucrose or glycerol to the heavy
Decrease the pump rate.
gloves only.
the stack top is just below the level of the
caster wall.
sandwich.
Increase catalysts up to 0.1% v/v TEMED,
0.1% v/v APS.
monomer solution. Add a small amount of
bromophenol blue to the heavy solution to
track gradient formation.
•
p18
Page 22

symptom possible cause recommended action
8. No polymerization of Insufficient APS Increase both APS and TEMED by 30–50%
SDS gel (or incomplete or TEMED. APS solution is old. Make up fresh APS
polymerization.) each day.
APS stack is wet. APS is hygroscopic. Open a fresh bottle.
02 in gel solution. Degas at least 10 minutes.
Solutions at low Make sure all solutions are at room
temperature. temperature (20–30 °C).
TEMED is old. Use new TEMED.
9. Gel too soft. Not enough crosslinker. Crosslinker should be 2.6% C for standard
10. Gel is brittle. Too much bis. See #9 above.
11. Gel is white. Too much bis. Check concentrations of solutions.
12. Gel contains swirls, Too much catalyst: Reduce both APS and TEMED by 25%.
polymerization artifacts. gel polymerized in
< 10 min.
Not enough catalyst: Increase both APS and TEMED by 50%.
gel polymerized Also see #8.
in > 50 min.
Solutions not mixed. Mix thoroughly after adding TEMED.
13. Bands are diffuse or broad. Sample doesn’t contain Use the same buffer for the sample
same buffer as as for the stacking gel.
stacking gel.
Too much TEMED Reduce concentrations by 25%.
or APS.
SDS or Use fresh solutions.
sample buffer is old.
Poor interface between Remove all liquid from the surface of the
separation gel and separation gel before adding the stacking
stacking gel. gel solutions.
14. Protein mobilities Incomplete See #8.
not consistent. polymerization.
Aged gels or acrylamide. Do not store liquid acrylamide more than
Gas in gel. Degas gel solutions at least 10 minutes.
15. Heavy background Acrylamide or bis Use reagents specified as electrophoresis purity.
during silver staining. contain acrylic acid.
Water is impure. Use only double-distilled water.
SDS gels where
%C =
See #9 above.
3 months. Use gels within 1–2 weeks of
casting. Use gels with stackers immediately.
g bis
(g monomer + g bis)
× 100
•
p19
Page 23

Care and maintenance
• Do not autoclave or heat any part above 45 °C.
• Do not expose the caster or its parts to
organic solvents.
Cleaning
Rinse the caster, faceplate, silicone plugs and
polycarbonate sheets in dilute detergent and
rinse with distilled water. Allow the unit to air
dry completely.
•
p20
Page 24

Appendix A: Gel identification
numbers
For positive identification of gels, label each slab
by incorporating a small label printed on thin
filter paper in the bottom corner of the gel. Use
a carbon typewriter ribbon, photocopier or laser
printer to make these labels, since many liquidbased inks are electrophoresed off paper during
an SDS electrophoresis run.
A variety of numbering schemes are possible.
In our experience the easiest uses three parts
as follows:
• An upper-case letter to identify the investigator
or an extended gel series.
• A two- or three-digit serial number to identify
the slab gel batch.
• A lower-case letter to identify a gel in the
batch. Since a maximum of 14 gels can be
made in a batch, use the letters a–n.
The resulting numbers, in the format A63a,
A63b...., etc., provide a useful system for keep-
ing track of and cross-indexing experiments and
gel production.
Appendix B: References
Laemmli, U.K. 1979. Nature (London) 227:
680–685.
SDS-PAGE and IEF Handbook.
•
p21
Page 25

Ordering information
product quantity code number
SE615 Multiple Gel Caster Kit, 10 gels 1 SE615
Includes 20 glass plates, space-saver plate, 5 filler sheets,
100 sheets of wax paper, and Spacer-Mate alignment
template. (Order combs and spacers separately.)
SE675 Multiple Gel Caster Kit, 4 gels 1 SE675
Includes 8 glass plates, 3 space-saver plates, 5 filler sheets,
100 sheets of wax paper, and Spacer-Mate alignment
template and filler plugs. (Order combs and spacers separately.)
Foam cord gasket, 61 cm × 4.5 mm OD 1 SE208
Red inlet port 4 XP010
Red spring clamps 4 SE253
Glass plates, 18 × 16 cm 2 SE6102
Notched divider glass plates, 18 × 16 cm 1 SE6102D
Acrylic block, 11 mm thick, 18 × 16 cm 1 SE612
Polycarbonate filler sheets 5 SE613
Wax paper, precut sheets, 18 × 16 cm 100 SE614
Spacer-Mate template for aligning spacers 3 SE6119SM
Nylon thumb screws 12 SE6003U-2
Silicone filler plug, SE615 1 SE618
Silicone filler plug set, SE675. Includes 1 large and 1 small plug. 1 SE678
Gel Seal, ¼ oz. tube 1 SE6070
Related products
SE100 PlateMate, plate washer and storage unit 1 SE100
SG100 Gradient Maker, 100 ml total volume 1 SG100
SG500 Gradient maker, 500 ml total volume 1 SG500
Wonder Wedge 1 SE1514
Spacers
length (cm) thickness (mm) width (cm)
16 0.75 2 2 SE6119-2-.75
16 1.0 2 2 SE6119-2-1.0
16 1.5 2 2 SE6119-2-1.5
16 1.0 1 2 SE6118-2-1.0
16 1.5 1 2 SE6118-2-1.5
p22
•
Page 26

Combs
number thickness width
of wells (mm) (mm) quantity code number
10 0.75 8.3 1 SE511-10-.75
10 1.00 8.3 1 SE511-10-1.0
10 1.50 8.3 1 SE511-10-1.5
12 0.75 7.6 1 SE511-12-.75
12 1.00 7.6 1 SE511-12-1.0
12 1.50 7.6 1 SE511-12-1.5
15 0.75 5.7 1 SE511-15-.75
15 1.00 5.7 1 SE511-15-1.0
15 1.50 5.7 1 SE511-15-1.5
20 0.75 4.1 1 SE511-20-.75
20 1.00 4.1 1 SE511-20-1.0
20 1.50 4.1 1 SE511-20-1.5
28a 0.75 2.7 1 SE511-28-.75
28a 1.00 2.7 1 SE511-28-1.0
28a 1.50 2.7 1 SE511-28-1.5
a
Comb depth 15 mm; all others 25 mm.
Preparative combs
These combs are 25 mm deep, adjustable to 10 or 15 mm.
no. of wells thickness width (mm)
prep/ref (mm) prep/ref quantity code number
1/1 0.75 121/6 1 SE511-R-.75
1/1 1.00 121/6 1 SE511-R-1.0
1/1 1.50 121/6 1 SE511-R-1.5
1/2 0.75 113/6 1 SE511-DR-.75
1/2 1.00 113/6 1 SE511-DR-1.0
1/2 1.50 113/6 1 SE511-DR-1.5
Adjustable comb back 1 SE511-BKA
Required to convert any 25-mm deep comb to 10 or 15 mm depth.
•
p23
Page 27

Hoefer, Inc.
84 October Hill Road
Holliston, MA 01746
Toll Free: 1-800-227-4750
Phone: 1-508-893-8999
Fax: 1-508-893-0176
E-mail: support@hoeferinc.com
Web: www.hoeferinc.com
Hoefer is a registered trademark
of Hoefer, Inc.
© 2012 Hoefer, Inc. —
All rights reserved.
Printed in the USA.
 Loading...