

Page 1
user manual
SE245
Dual Gel Caster
um SE245-IM/Rev.I0/08-12
Page 2

Page finder
Dual Gel Caster function and description .................1
Unpacking ........................................................ 1
Prepare the gel caster ........................................2
Construct the gel sandwich stack and
place it into the caster .......................................2
Pour the gel ...................................................... 5
Stacking gel preparation .................................... 6
After polymerization ...........................................7
Troubleshooting .....................................................8
Care and maintenance ...........................................8
Ordering information ..............................................9
pi
pi
•
•
Page 3
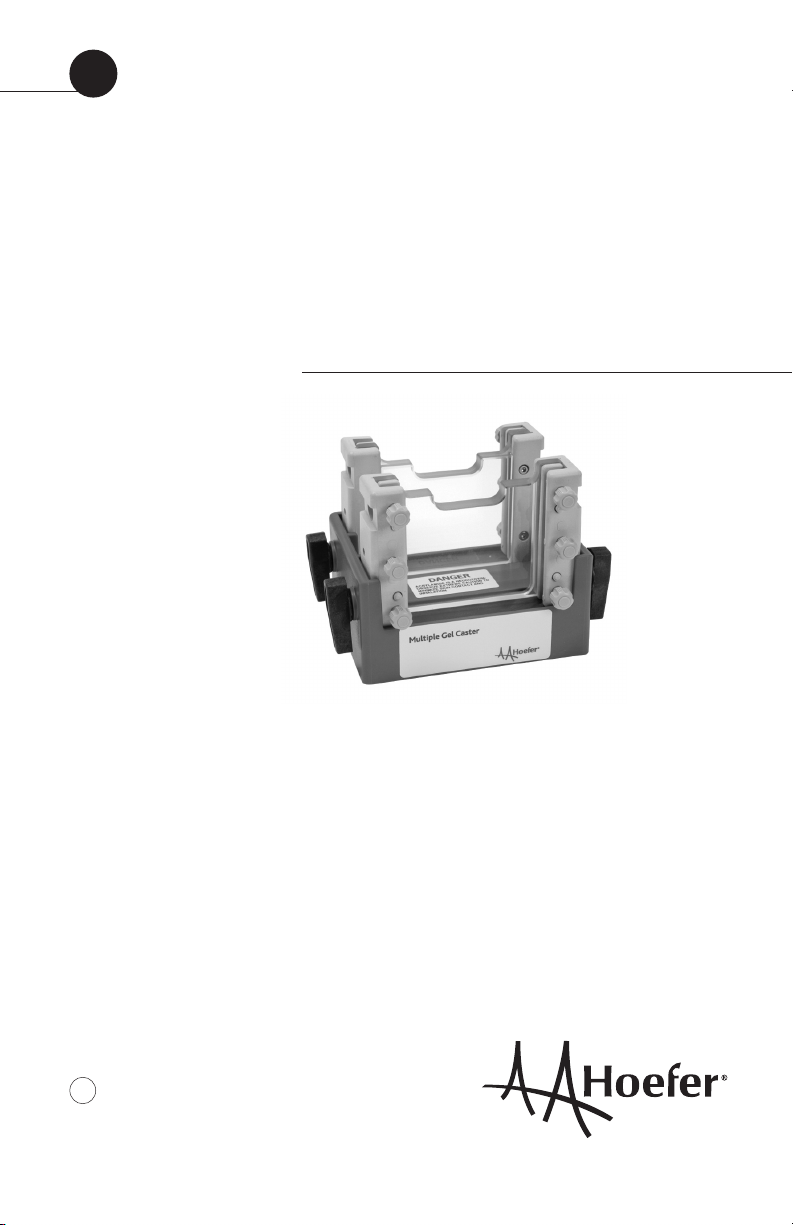
Dual Gel Caster function and description
The SE245 Dual Gel Caster holds one or two
glass or glass/alumina plate gel sandwiches for
casting acrylamide gels. A cam seals the bottom
of the sandwich against a rubber gasket. Once
the gel is formed, sandwiches are transferred to
a Hoefer mini-vertical unit for electrophoresis.
Unpacking
Unwrap all packages carefully and compare
contents with the packing list, making sure all
items arrived. If any part is missing, contact
your local sales office. Inspect all components
for damage that may have occurred while the
unit was in transit. If any part appears damaged,
contact the carrier immediately. Be sure to keep
all packing material for damage claims or to use
should it become necessary to return the unit.
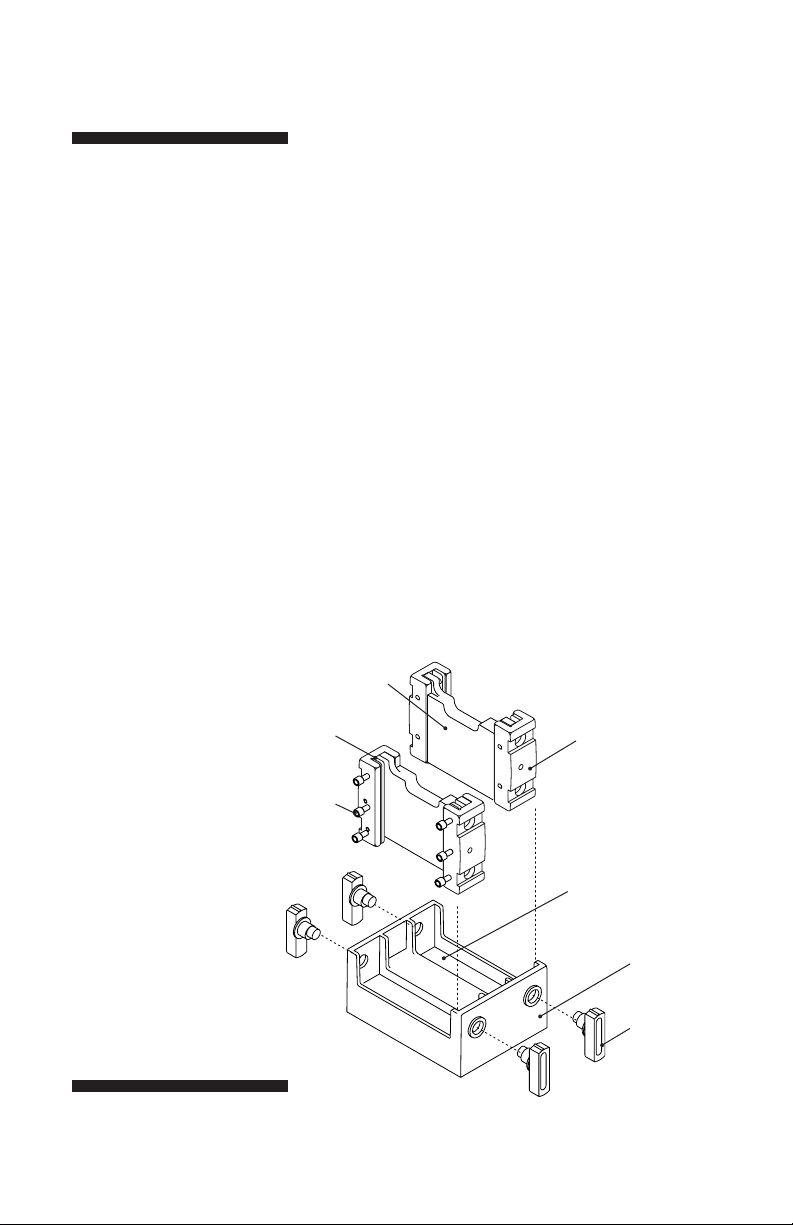
Fig 1. Dual Gel Caster.
The gel sandwich is held
together by the casting
clamp assembly.
Pressure
bar
Clamp
screw
Back
block
Casting clamp
assembly (2)
Silicone rubber gaskets
(2 on each side; 1 white
under-gasket and 1 black
over-gasket)
Casting
cradle
Cams (4)
Pull cams out to
disassemble the
caster
•
p1
Page 4
Prepare the gel caster
1
Disassemble the caster: Pull out both pairs of black
cams at the side of the casting cradle and lift out
both casting clamp assemblies. Remove the black
silicone rubber gasket from the bottom of the cradle
and also the white foam gasket underneath it.
2
Wash all gel caster components, glass and alumina
plates and spacers with a mild detergent. Rinse
thoroughly with deionized water.
Construct the gel sandwich stack and place it into the caster
1
Loosen all 6 screws on the casting clamp assembly
and lay it upright on a flat surface. Slide both plastic
pressure bars away from the back block.
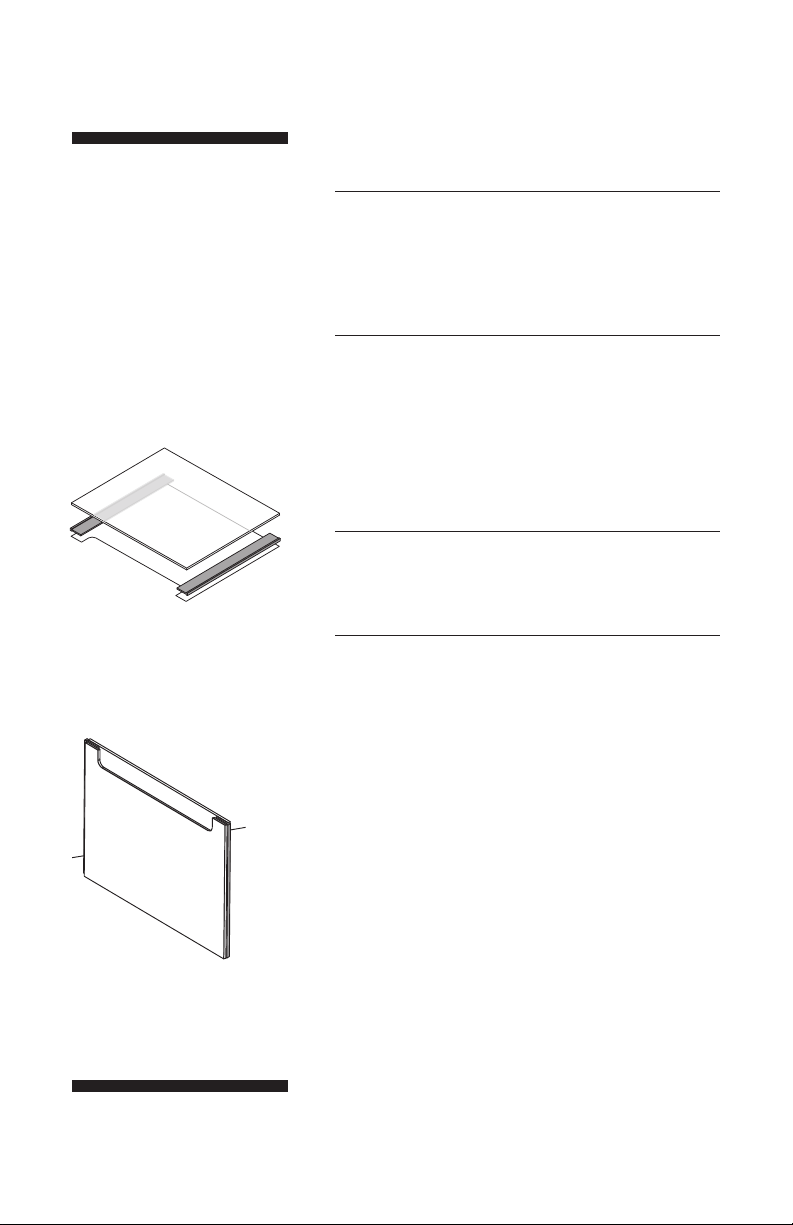
Fig 2. Location of T-shaped spacers
on notched plate.
Fig 3. Align bottom edges of plates
and spacers carefully.
p2
•
2
Construct each gel sandwich: For each sandwich,
choose one notched alumina or glass plate, one
rectangular glass plate and two spacers. Use only
unchipped plates.
Lay the notched plate on a flat surface, place one
spacer along each edge so that it aligns with the
notch. Fit a glass plate onto the spacers as shown.
The long flat side of the T-shaped spacers fits
between both plates. The top of the T rests along the
sides of the plates (Fig 2).
Alternatively, assemble the sandwich while it is in a
standing position: align the plate bottoms on a flat
surface and align the spacers with the sides of the
plates (Fig 3).
Page 5

3
Slide the sandwich into the casting clamp assembly, notched plate facing the back block, and plate
bottoms flush with the flat surface.
4
While holding the sandwich in place, secure it by
tightening all 6 screws until they are finger-tight.
(To prevent breaking plates, do not over tighten.)
Note: Wear gloves to keep
the caster and plates free of
finger marks.
5
Inspect plate and spacer alignment. To prevent leaking, the bottom of the plates and spacers must be
aligned and the sandwich should protrude slightly
below the back block. Adjust if necessary.
6
Place the white foam gasket into the bottom of the
casting slot and lay the black gasket over it.
7
Place the clamp assembly in the casting cradle, screw
side facing out. In this position the gel will be visible
through the rectangular glass plate.
8
Insert a cam into each hole on both sides of the
casting cradle with the arrow (short end) pointing up.
Seal the sandwich by turning both cams 180° so that
the arrow points down.
p3
•
Page 6

Fig 4. 10 × 10.5 cm gel plates
clamped properly for gel casting.
If the plates are longer
than 8 cm, use spring
clamps to secure the top
section of the plates.
The notched plate faces
the back block.
The screws face outward.
Seal the sandwich by
turning both cams so
that the short end of
the cam (the arrow)
points down.
Important! The plate and spacer
bottoms must be aligned for a
proper seal.
p4
•
Page 7

Caution! Acrylamide is a
neurotoxin. Always wear gloves
and observe all laboratory safety
procedures.
Pour the gel
1
Prepare the required amount of monomer solution.
Deaerate and add the initiator and catalyst just prior
to pouring the gel. Use a pipet to deliver the solution
into one corner of the plate, taking care not to introduce any air pockets. See below for the appropriate
solution level according to the application.
No stacking gel
Fill solution to just below the top of the notched
plate. If air pockets form, remove with a pipet or
syringe. Introduce a comb (at a slight angle) into each
sandwich, taking care not to trap air bubbles under
the teeth.
Stacking gel
Fill solution to 3 cm below the top of the rectangular
glass plate. This height allows 1 cm of stacking gel
below the wells. Pour the gel and apply an overlay.
After the gel is polymerized, prepare the stacking gel
as described below.
2-D electrophoresis
Fill solution to about 1.5 cm below the top of the
rectangular glass plate and apply an overlay. This
height allows 4–5 mm of space for the IPG strip and
an agarose seal.
2
Overlay each gel with a thin layer of water-saturated
n-butanol, water, or diluted gel buffer to minimize
exposure of the top surface of the gel solution to
oxygen. Deliver the overlay solution slowly from a
glass syringe fitted with a 22-gauge needle. Apply the
solution near the spacer and allow it to flow across
the surface unaided.
3
Allow the gel to polymerize for a minimum of
one hour.
p5
•
Page 8

Stacking gel preparation
Pour a stacking gel either while the sandwich is
still in the gel caster or after it is transferred to
the electrophoresis unit (see instrument instructions). Resolution is optimal when the stacking
gel is poured just before electrophoresis. To pour
a stacking gel in the dual gel caster:
1
Remove the overlay by rinsing the top of the gel
several times with distilled water. Invert the caster to
drain. To ensure a seamless contact between the
separating and stacking gels, remove residual liquid
by blotting one corner with a lint-free tissue.
2
Calculate the volume of stacking gel monomer solution required. Prepare the stacking gel monomer
solution, deaerate it, and add catalyst and initiator.
3
Pour the stacking gel onto the resolving gel with a
Pasteur pipet.
4
Introduce a comb (at a slight angle) into the sandwich, taking care not to trap air under the teeth.
Allow the gel to polymerize.
p6
•
Page 9

After polymerization
1
To remove combs (if necessary): cover the top of the
gel with 1X separating or stacking gel buffer, then
work each comb out slowly by gently rocking it side to
side while pulling it out.
2
Remove the gel sandwich from the casting cradle by
loosening the pressure bar screws, tilting the sandwich forward, and lifting it out.
3
Rinse the sandwich with distilled water to remove the
buffer and extra gel, then blot the sandwich with a
lint-free tissue.
4
To run gels: Follow the instructions accompanying the
electrophoresis unit.
To store gels: Wrap individual gels in plastic wrap
after adding approx. 5 ml of 1X separating gel buffer
to the top of each sandwich. Alternatively, lay a batch
of gels in 1X separating buffer. Store gels at 4 °C for
up to one week.
p7
•
Page 10

Important! Decontaminate
instrument of all radioactivity
and/or infectious agents
before returning item! Include
documentation to verify that this
has been done.
Troubleshooting
Gel sandwich leaks
• Replace any chipped plates.
• Check plate and spacer alignment and realign
if necessary.
• Check the black gasket for cuts or cracks and
replace if necessary.
• Apply a light film of Gel Seal to the bottom
outside corner of each spacer.
Sample wells damaged or irregular
• Remove air pockets and bubbles before inserting
combs. Slide comb into solution at an angle. If
bubbles persist, remove comb, add more monomer
solution and reinsert the comb.
• Allow a minimum of 1 hour for polymerization of
acrylamide gels.
• Remove the comb at a slight angle and very slowly
to prevent damage to the gel.
Care and maintenance
• Thoroughly wash and rinse all caster components
immediately after use.
• Do not autoclave or heat any part above 45 °C.
• Do not use organic solvents, abrasives, strong
cleaning solutions, or strong acids or bases to
clean any plastic part.
• Do not soak the gaskets. Clean with a mild detergent and allow to air dry.
Clean glass plates and spacers with a dilute solution
of a laboratory detergent such as RBS-35™ (Pierce
Chemical Co.), then rinse thoroughly with tap and
distilled water. Glass plates can also be treated with
(but not stored in) acid cleaning solutions.
p8
•
Page 11

Ordering information
product quantity code no.
Gel Caster and replacement parts
SE245 Dual Gel Caster, complete 1 SE245
For 1 or 2 gels, 10 × 8, 10.5
Sealing gasket set 2 SE246
Casting clamp assembly 1 SE249
Cams, black 4 SE6005L
Clamps, red 4 SE252
Gel Seal, 1/4 oz. 1 SE6070
Glass and alumina plates
10 × 8 cm, for SE250
Notched alumina plate 1 SE202N
Notched alumina plates 10 SE202N-10
Rectangular glass plates 10 SE202P-10
10 × 10.5 cm, for SE260 and miniVE
Notched alumina plates 5 SE262N-5
Notched glass plates 5 SE262GN-5
Rectangular glass plates 5 SE262P-5
p9
•
Page 12

Spacers
thickness length
(mm) (cm) quantity code no.
For SE250 0.75 8 2 SE2119T-2-.75
1.00 8 2 SE2119T-2-1.0
1.50 8 2 SE2119T-2-1.5
For SE260 and miniVE 0.75 10.5 2 SE2619T-2-.75
1.00 10.5 2 SE2619T-2-1.0
1.50 10.5 2 SE2619T-2-1.5
Combs
no. of wells thickness (mm) width (mm)
5 0.75 13.0 1 SE211A-5-.75
5 1.00 13.0 1 SE211A-5-1.0
5 1.50 13.0 1 SE211A-5-1.5
9a 1.00 5.8 1 SE211A-9-1.0
10 0.75 4.8 1 SE211A-10-.75
10 1.00 4.8 1 SE211A-10-1.0
10 1.50 4.8 1 SE211A-10-1.5
12 1.00 4.75 1 SE211A-12-1.0
15 0.75 2.9 1 SE211A-15-.75
15 1.00 2.9 1 SE211A-15-1.0
15 1.50 2.9 1 SE211A-15-1.5
18a 1.00 2.9 1 SE211A-18-1.0
1/1b 0.75 68/5 1 SE211A-R-.75
1/1b 1.00 68/5 1 SE211A-R-1.0
1/1b 1.50 68/5 1 SE211A-R-1.5
a
Microtiter spacing, bPreparative/reference well
•
p10
Page 13

Hoefer, Inc.
84 October Hill Road
Holliston, MA 01746
Toll Free: 1-800-227-4750
Phone: 1-508-893-8999
Fax: 1-508-893-0176
E-mail: support@hoeferinc.com
Web: www.hoeferinc.com
Hoefer is a registered trademark
of Hoefer, Inc.
RBS-35 is a trademark of Pierce
Chemical Co.
© 2012 Hoefer, Inc. —
All rights reserved.
Printed in the USA.
•
p11
 Loading...