

Page 1
user manual
Hoefer PR150
Incubation manifold
um PR150-IM /Rev.E0/08-12
Page 2

Page finder
Introduction .........................................................1
Operating instructions ...........................................3
Care and maintenance ..........................................6
Ordering information .............................................6
pi
•
Page 3
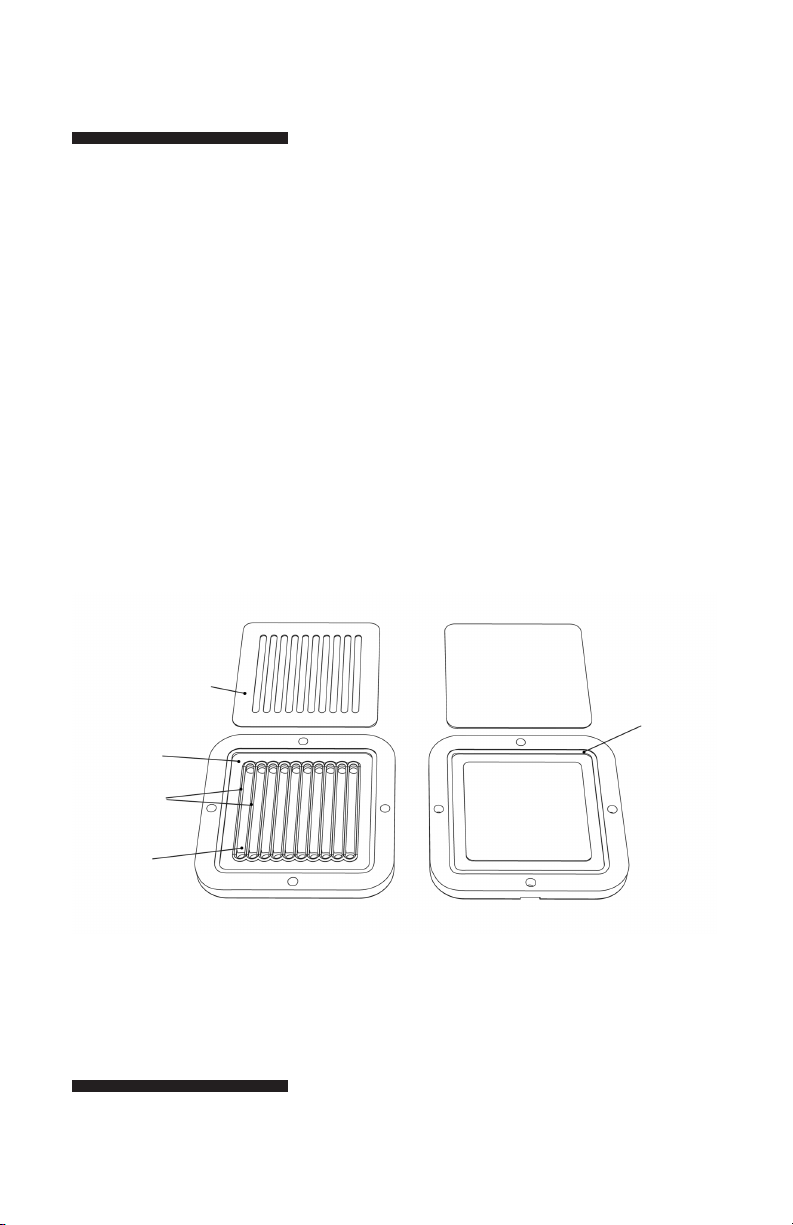
Fig 1. Components of the PR150.
sample gasket
gasket
seating lip
Introduction
Transfer of proteins or nucleic acids, fractionated by gel electrophoresis, to an immobilizing
membrane surface increases the sensitivity of
a wide range of detection methods, reduces
time of analysis and makes sequential probing
possible. In particular it has made possible use
of immunological procedures that are not practical to carry out in a gel. To assay material on a
sheet of membrane with different probes simultaneously commonly requires first cutting the
membrane into a number of parallel strips. This
procedure however destroys the correspondence
between different lanes or positions on a gel.
Pressure gasket
gasket
seating lip
sealing ridge
sample
chamber
Pressure plateSample plate
p1
•
Page 4

The Hoefer® PR150 has been designed specifically to preserve this correspondence while minimizing the volume of reaction mixtures needed
for individual assays. Two sturdy acrylic plates,
each 1 cm thick and 13 × 13 cm square, clamp
an 8.8 × 8.8 cm transfer membrane between two
silicone gaskets. Ten parallel troughs cut into
one side of the upper plate become individual
incubation chambers when the unit is assembled.
The gaskets ensure that the liquid samples and
probes do not leak into the adjacent chambers.
All incubation steps may be carried out on the
intact membrane without taking the unit apart.
Since the membrane is firmly held between the
two plates, it cannot float to the surface of the
reaction mixture or trap bubbles underneath.
Gentle rocking of the unit fully exposes the
membrane surface to small volumes of reagents,
thus preventing artifacts caused by incomplete
exposure or mixing. Since reaction chambers are
fully enclosed, hazardous materials may be safely
contained.
The PR150 has two principal applications:
1. Up to ten probes or antisera may be tested
against a single sample of protein or nucleic
acids. The sample is loaded onto a slab gel in
a single, full-width well. When clamped in the
PR150, ten different probes or antisera may
be tested against the same separated materials.
2. It is appropriate for efficient use of precious
or small volumes of probes or antisera that
need to be tested against several samples.
p2
•
Page 5

Operating instructions
The parts of the PR150 are shown in Fig 1.
(page 1) The product includes two machined
plastic plates and two silicone gaskets, one slotted and one solid. The unit is assembled and
clamped with four nylon screws.
1
To test a single sample with multiple probes or
antisera, separate the sample on a “preparative” mini
format (8.8 × 8.8 cm) gel. This can be done either
with a full-width comb or simply by applying the
sample directly to the top of a gel cast with no wells.
2
If you are analyzing multiple samples on a Hoefer
miniVE or Hoefer SE260 vertical unit, use the
compatible ten well comb (see ordering information)
to form sample wells in the gel. The spacing of the
teeth of this comb correspond the spacing of the
individual chambers in the PR150.
3
After electrophoresis, transfer the protein or nucleic acid
separated on the gel to an 8.8 × 8.8 cm sheet of an
appropriate membrane. The orientation of the membrane
should be marked with a pencil prior to beginning the
transfer. The gel should not be pre-equilibrated prior to
transfer as it tends to shrink the gel.
4
Open the PR150. Place both the sample plate and
the sealing plate with their machined sides facing
upward on a flat surface.
5
Lay the slotted sealing gasket over the sample
chambers so that the edges of the gasket fit exactly
into the shallow gasket seating lip in the plate.
The gasket slots should be aligned with incubation
chambers in the sample plate. This is most easily
done by holding the slotted gasket loosely by one edge
at the end of the slots. Lower the gasket until the
edge falls into place at the edge of the sample plate.
p3
•
Page 6

Note: The size of the membrane
is important. It must lie
completely within the gasket
region of the PR150 — it must
not extend beyond the edges of
the slotted sample gasket and
it must cover all of the slots
beyond the sealing ridges to
assure that there are no leaks
when the membrane is clamped
in place.
Note: Mark the orientation of
the transfer membrane prior
to blotting by tracing the teeth
of the ten well comb with a
pencil near the very top of the
membrane. The marking should
be performed prior to wetting
the membrane. Place the
unmarked side of the membrane
on the top of the gel. Align the
pencil tracing carefully to match
the position of the sample wells
in the gel.
Gradually lower the rest of the gasket so that the
strips of the gasket material align themselves on the
sealing ridges between the chambers.
6
The membrane removed from the gel transfer should
be placed with the gel contact face down against the
sealing gasket. The membrane should remain wet
during the procedure. (A dry membrane will tend to
wick the incubation solution out of teh chambers.)
The direction of electrophoresis should be parallel
to the long direction of the slots. All edges of the
membrane must lie inside the edges of the sealing
gasket but they must also cover the edges of all slots.
7
If your samples have been separated in individual
lanes, adjust the alignment of the membrane so that
the lanes are above open slots. The pencil tracing
marking the lanes should be on the upper side of the
membrane at this point.
8
Place the solid pressure gasket over the transfer
membrane. Ensure that all edges are aligned with
the slotted gasket and that they are within the milled
indentation of the acrylic plate.
Fig 2. Assembling the components
of the PR150 incubation manifold.
p4
•
9
Cover the pressure gasket with the pressure plate (Fig 2).
pressure plate
pressure gasket
membrane
sample gasket
sample plate
Page 7

access
ports
Fig 3. PR150 in loading /
incubation position.
Note: Small molecules will
gradually diffuse out of the
incubation chambers through
the membrane. This wicking
effect is usually not significant
over a few hours provided the
membrane was wet to start with.
However, the PR150 is not
recommended for procedures
extending over a period of days.
Turn the assembly over so the incubation chambers
are above the transfer membrane. The access ports to
the chambers will then be on top (Fig 3).
!
Insert the nylon screws and tighten them one-quarter
turn past snug. Do not overtighten.
@
Each chamber holds up to 2 ml. With adequate
mixing, as little as 0.5 ml or less may be used in
each incubation step. Add reagents to the chambers
through the access ports. If you wish to close off the
chambers, place a piece of tape on the topside of the
upper plate.
#
Place the entire unit on a rocker so that the reaction
mixture in each chamber flows back and forth from
one end of the chamber to the other.
$
After a particular incubation step has been completed,
remove the tape from the holes and withdraw the
solution from each chamber with a Pasteur pipette.
Any number of sequential reactions may be carried
out without taking the unit apart.
%
When all reaction and wash steps have been
completed, disassemble the unit and air dry the
membrane. If an immunological reaction coupled with
an enzymatic generation of a colored product has
been used, the bands of interest should already be
visible. If a radioimmune assay has been employed,
the dry membrane is now ready for autoradiography.
p5
•
Page 8

Care and maintenance
• After each use, wash the PR150, including the
sample gasket, with a mild detergent. Rinse
with tap water and then with distilled water.
• Do not use strong acids or bases, or organic
solvents of any kind, with the PR150. Do not
rinse with alcohol, as it will craze the plastic.
Ordering information
product code no.
Hoefer PR150 Incubation Manifold PR150
Nylon screws (package of 4) PR153
Sample gasket PR152
Pressure gasket PR151
10-well combs
Comb, 0.75 mm thick SE211A-10-.75
Comb, 1.0 mm thick SE211A-10-1.0
Comb, 1.5 mm thick SE211A-10-1.5
p6
•
Page 9

Hoefer, Inc.
84 October Hill Road
Holliston, MA 01746
Toll Free: 1-800-227-4750
Phone: 1-508-893-8999
Fax: 1-508-893-0176
E-mail: support@hoeferinc.com
Web: www.hoeferinc.com
Hoefer is a registered trademark
of Hoefer, Inc.
© 2012 Hoefer, Inc. —
All rights reserved.
Printed in the USA.
 Loading...