

EN
DE
FR
IT
User Manual
Benutzerhandbuch
Manuel de l’utilisateur
Manuale utente
We move you


EN
User Manual
English
We move you

EN
EN
The content of the User Manual, including all figures and drawings, is copyrightprotected information belonging to Hocoma and/or third parties, and is provided
solely for the purpose of operating and maintaining the device. Using the content
for other purposes or copying the content is prohibited, unless prior written consent
has been obtained from Hocoma.
This manual applies to Valedo
Manufacturer
Hocoma AG
Industriestrasse 4
CH-8604 Volketswil
Switzerland
Tel. +41 (43) 4442200
Fax +41 (43) 4442201
info@hocoma.com
www.hocoma.com
Subject to technical modifications.
Copyright Hocoma AG
Last revision: 2014-07-04
®

EN
Introduction ......................................................................... 4
A Little Background Info… .................................................... 4
Chapter 1: Overview and Safety ....................................... 5
Getting to Know Valedo® ...................................................... 5
The Sensors ........................................................................................... 5
The Cable ............................................................................................... 6
The Belt (optional) .................................................................................. 6
The Computing Device .......................................................................... 7
The Valedo Case ................................................................................... 7
The Valedo Application .......................................................................... 7
Safety Regulations ............................................................... 7
Intended Use ................................................................ .......................... 8
Indications .............................................................................................. 8
Contraindications ................................................................................... 8
Risk Factors ........................................................................................... 9
Adverse Effects ...................................................................................... 10
Maintenance ......................................................................... 10
Firmware Updates .................................................................................. 10
Reporting Adverse Events .................................................... 10
Chapter 2: Training Setup .................................................. 11
Initial Training Session ......................................................... 11
Preparing the Training Space ................................................................ 11
Putting on the Sensors .......................................................................... 11
Using the Belt ......................................................................................... 12
Training ................................................................................. 12
Chapter 3: Valedo Application .......................................... 13
Getting Started ...................................................................... 13
First Time Installation ............................................................................. 13
Home Screen ......................................................................................... 13
Profile Management ............................................................................... 14
Setting Range of Motion (ROM) ............................................................ 15
Playing the Exercises ........................................................... 15
Chapter 4: Technical Specifications ................................ 18
The Sensors ........................................................................................... 18
The Cable ............................................................................................... 18
The Double-Sided Tape......................................................................... 18
The Belt (optional) .................................................................................. 19
General Operating Conditions .............................................. 19
Electromagnetic Compatibility .............................................. 19
FCC and IC Statements ....................................................... 20
Risk Management ................................................................. 20
Chapter 5: Troubleshooting .............................................. 21
Troubleshooting .................................................................... 21
Problems with the Sensors .................................................................... 21
Problems While Preparing for a Training Session ............................... 21
Problems During the Training Session ................................................. 22
Alerts....................................................................................................... 23
Chapter 6: Legal Matter ..................................................... 24
Explanation of Symbols Used ............................................................... 24
Symbols on Packaging .......................................................................... 24
Disclaimer ............................................................................. 25
Warranty Terms .................................................................... 25

EN
EN
Introduction
Welcome and thank you for purchasing Valedo!
If you’re reading this, that means you’re one of millions around the world who suffer
from lower back pain. The good news for you is that you’ve taken an important first
step in treating this lingering epidemic.
Many people don’t know that it literally only takes minutes a day to combat lower
back pain. Keep Valedo around for a quick workout before work, during your lunch
break or even while you travel!
For business or pleasure, you’ll find that Valedo is easy to use, engaging and
entertaining.
So what are you waiting for? Let’s get moving!
A Little Background Info…
At Hocoma we’re known for our large physical rehabilitation products such as
Lokomat®, Armeo® and Erigo®, but we are also a pioneering company in the field of
implementing sensor technology into functional therapy for lower back pain. That’s
where Valedo® and its clinical sister products Valedo®Motion and Valedo®Shape
come in.
Find more information on all of our clinical products at www.hocoma.com and more
information on Valedo® at www.valedotherapy.com.
This user manual describes the safe and correct use of Valedo. Follow the safety
information and instructions in the user manual and general safety and hygiene
norms.
When you are training with Valedo you are medically considered a patient. For all
other activities with Valedo, you are considered the operator.
Keep this manual handy for quick reference, and read through again from time to
time.
In the interest of ease of reading, we use the male form (he, him, his) when
referring to both male and female.
Introduction
V_UM1.1_en_1407
4
EN
Chapter 1: Overview and Safety
Getting to Know Valedo®
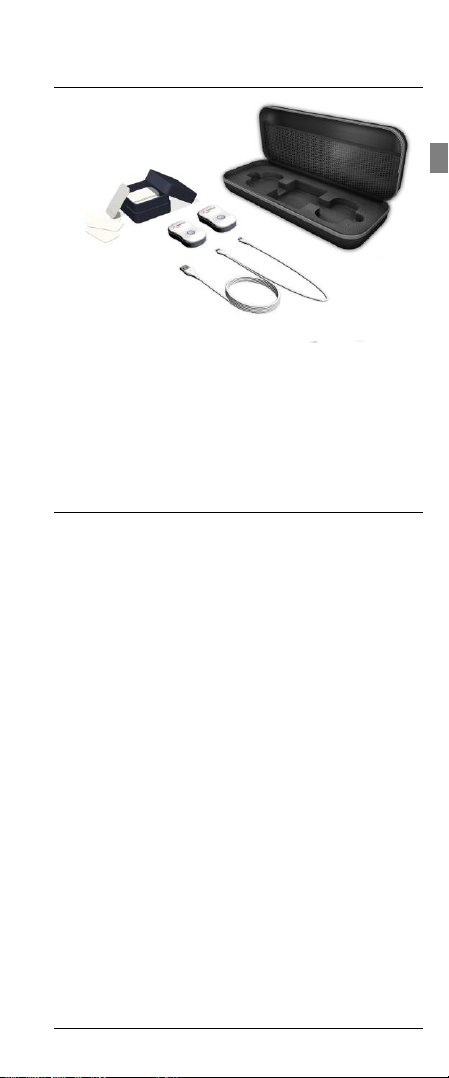
Valedo is understood to mean the following components:
Sensors
Double-sided medical tape
Cable for charging or firmware updates
Valedo case for transport and storage
The Valedo System is understood to mean all components with the computing
device.
The Sensors
The two sensors that come with Valedo are lightweight and easy to operate. They
are equipped with one button, one LED and one micro-USB port for charging and
firmware updates.
The LED is only visible when illuminated.
If used on a regular basis, awaking the sensors from standby mode is as easy as
gently shaking them. If the sensors are in standby mode for more than 48 hours,
they will enter deep sleep mode.
If the sensors are in standby mode, gently shake them to wake them up.
If the sensors are in deep sleep mode, push the button to wake them up.
To enter deep sleep mode manually, press and hold the button for 4
seconds.
Sensors will enter standby mode after 30 seconds if they do not detect a
computing device to pair to.
Sensors will enter deep sleep mode after approximately 5 minutes when
they cannot connect to your computing device but they sense continual
movement; this is important during transport to save battery power.
Once awake, the sensors will indicate with their LEDs that they are searching for a
Bluetooth® connection (see table below); when Bluetooth has appropriately been
enabled on the computing device, you can pair the sensors to it (see The
Computing Device below).
1. Plug the micro-USB ends of the charging cable into the sensors .
2. Plug the regular USB end of the charging cable into your personal computer
OR into an IEC 60950 approved USB charger.
You may have a charger already; many new mobile phones and other
mobile products come with an IEC 60950 compliant USB charger.
Charge the sensors for at least 90 minutes for a full charge.
While the sensors are charging it is impossible to train.
Figure 1: Overview of Valedo
Turning the sensors on and off
Charging the sensors
Chapter 1: Overview and Safety
5
V_UM1.1_en_1407
EN
EN
LED mode
Sensor
status
Mode explanation
On
Charging—
fully charged
The sensors are plugged in and are
fully charged.
Inverted pulse:
Long on - short
off
Charging—
not fully
charged
The sensors are plugged in but are
not yet fully charged.
Off
Standby
The sensors are not actively
searching for a Bluetooth signal.
Shake to turn sensors back on.
Off
Deep Sleep
The sensors have turned themselves
off. This happens after 48 hours in
standby mode. Press button to turn
sensors back on.
Pulse: Short on –
Long off
Awaiting
connection
The sensor is on and waiting for the
Bluetooth connection with the
computing device.
Slow flash (1
second on, 1
second off)
Connected
The sensor is on and correctly
connected via Bluetooth with the
computing device.
Fast flash (~0.5
second on,~0.5
second off)
Connected—
alert
The sensor is on and connected with
the computing device, but there is a
warning message.*
Triple flash (3x
per second)
Battery low
The sensor is running low on battery
and needs to be charged.*
1
The sensors are equipped with an LED that blinks and flashes to communicate
what it’s doing or if it needs charging. Below is a table with the different LED modes
and their explanations.
* Warning messages and low battery alerts will also appear on the computing device.
Do not soak or submerge the sensors in any liquid. Use a damp cloth to
wipe surfaces.
The Cable
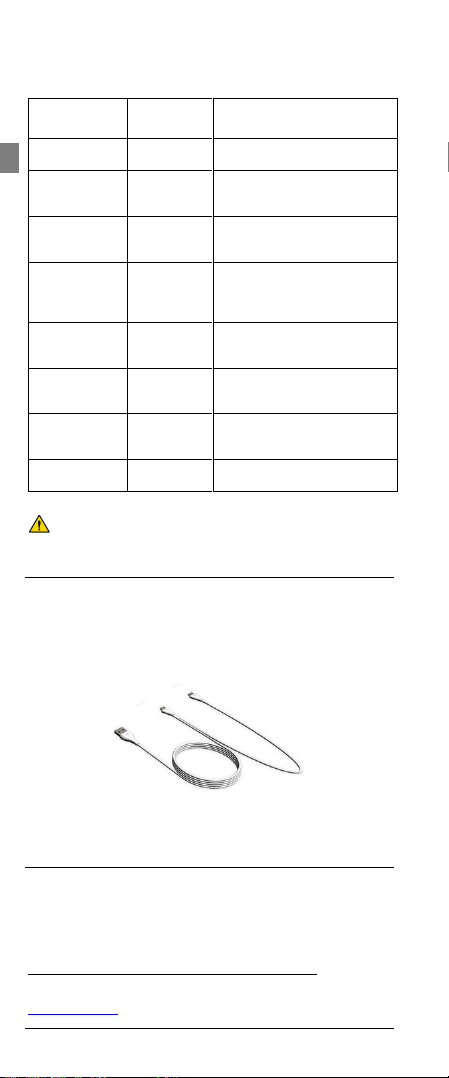
The cable that ships with Valedo is a standard USB to dual micro-USB cable. Use
this cable for both charging and firmware updates of the sensors.
Both micro-USB connectors can be used to charge, but only one can be used for
firmware updates. Simply put, you can charge both sensors simultaneously, but
you can only update one sensor at a time. For information on updating the sensors,
see the Maintenance section below.
Figure 2: USB head on the left, two micro-USB heads on the right. Micro-USB head in the middle
can be used for both charging and firmware updates.
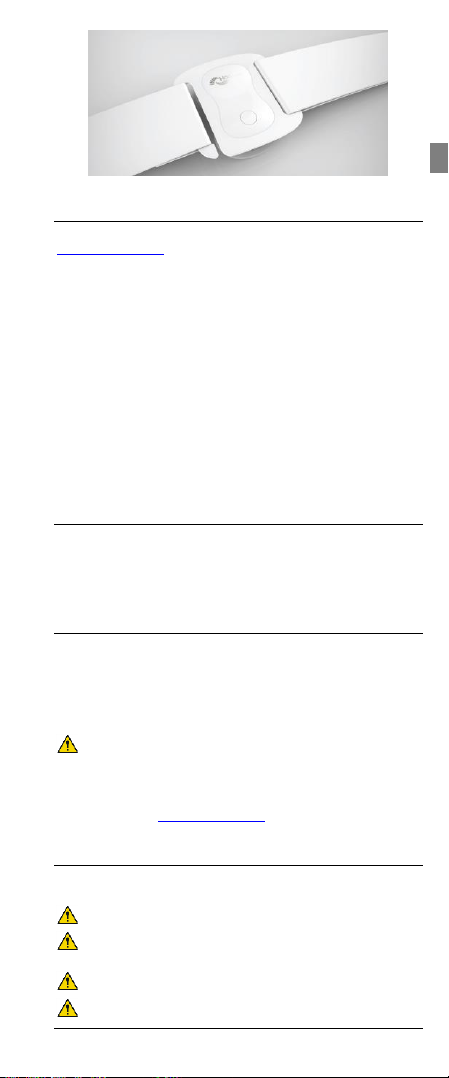
The Belt (optional)1
If you wish to train without using the double-sided medical tape, consider our
specially designed belt. The sensor simply snaps into the belt buckle. Easily adjust
the size by pulling the loose cord.
The belt is an optional accessory available for purchase from Hocoma. Go to
www.valedotherapy.com for details.
Chapter 1: Overview and Safety
V_UM1.1_en_1407
6
EN
Figure 3: Training belt. Hand wash and hang dry.
The Computing Device
All training requires a computing device. For a list of supported devices, consult
www.valedotherapy.com. Take care of your computing device by regularly updating
your operating system.
On the computing device you will need to download and install the Valedo
application (see Chapter 3).
Pairing sensors and computing device via Bluetooth
1. Enable Bluetooth on your computing device (usually in “settings” or
“configuration”).
2. Turn on sensors.
3. Open the Valedo application.
4. Create new profile making sure to indicate that you have sensors. See
Chapter 3 for more information on creating a profile.
5. Connect sensors in the Sensor Management screen.
For initial operation you must go through steps 1-5; for subsequent use, the
Bluetooth connection will automatically pair the sensors to the computing device
upon opening the Valedo application.
The Valedo Case
The case Valedo came in did not just keep it safe during its journey to you; the
case will also keep Valedo safe when you store or transport it. See case in Figure 1
above.
We recommend always keeping the Valedo sensors in the case between training
sessions.
The Valedo Application
The standard Valedo application for lower back therapy is available for free
download. Additional features or applications may be made available for purchase.
The computing device you have will dictate where you need to go to download the
Valedo application; when there, search for “Valedo”. For example: iPad users can
go to the App Store.
For complete details on the Valedo software application, see Chapter 3.
Protect your computing device from viruses.
The Valedo application stores only a minimum amount of information
including the profile information given for each user and their performance
on the exercises they have done.
Regularly check www.valedotherapy.com to see if there are available
updates for the Valedo application.
Safety Regulations
You must comply with the security precautions listed below and those found
throughout the manual to ensure safe use of Valedo.
Every and all warning messages must be observed without fail.
Valedo sensors are not toys and can present choking hazards. Keep out of
reach of children and pets.
Do not use Valedo if any of the components are damaged or modified.
Take note of indications, contraindications and risk factors before use.
Chapter 1: Overview and Safety
7
V_UM1.1_en_1407

EN
EN
When using tape, use medical tape only.
You must wipe the sensors off before and after use. We recommend a soft
damp cloth.
Intended Use
Valedo is a personal therapy system that aims to improve back health and aid in
the prevention of non-specific lower back pain. Valedo offers mobilization,
stretching, strength, stabilization, balance and movement awareness exercises for
patients to do in the comfort of their own home. In general we recommend training
20 minutes daily.
Trunk and pelvis movements are measured from two wireless sensors attached to
your body and transferred to a personal computing device (such as a tablet). These
movement signals are analyzed and provide accurate real-time functional feedback
in a game setting (Augmented Performance Feedback) of how you are moving and
if you are moving correctly. Augmented Performance Feedback gives you a
motivating and safe way to do movement training. The system monitors your
movement performance and guides you through exercises specifically designed for
general lower back pain therapy.
Indications
Non-specific low back pain
Affections of the iliosacral joint (e.g. pelvic girdle pain, blocking)
Fibromyalgia (persistent, widespread pain and tenderness, sleep problems,
and fatigue)
Benign hypermobility syndrome (joint or limb pain, joint subluxation, joint
dislocation, etc.)
Spondylolisthesis (forward displacement of a vertebra) (grade I without
neurological signs)
Requiring stability training of trunk and spinal musculature
Requiring mobility training of spinal column and pelvic girdle
Requiring improved training of body balance and posture
Stroke or neurological patients requiring improved trunk stability and body
perception (with little or no apraxia (inability to execute learned purposeful
movements))
If you are unsure if you have an indication, consult with your medical expert (this
may be a doctor, physical therapist, chiropractor or physician). Valedo can be used
with patients with the following conditions, but only in consultation and under
supervision of your medical expert.
Herniated disk, including post-operative state
Spinal stenosis (narrowing of the spinal canal), including post-operative state
Stable vertebral fractures
Ankylosing spondylitis (type of arthritis that may lead to stiffness or fusion of
the vertebrae in the spine (previously: Bechterew’s disease) with painful
limitation of spinal movement
Osteoporosis (bone loss) light or middling level with pain consequences
Multiple Sclerosis (central nervous system disease) (non-progressive stage)
with disturbed body perception
Parkinson's disease (progressive nervous system disorder) with disturbed
body balance and posture
Stroke or neurological patients less than three months after last incidence,
requiring improved trunk stability and body perception (with little or no
apraxia)
Contraindications
Functional training with Valedo is not possible or indicated in every case. In
general, Valedo must not be used in the following cases to avoid causing you any
harm. The following contraindications must therefore be observed, in particular:
Bone cancer, including spinal tumors or vertebral metastasis
Chapter 1: Overview and Safety
V_UM1.1_en_1407
8

EN
Instability of the spine, such as unstable vertebral fractures or in
spondylolisthesis (forward displacement of a vertebra) (grade II or higher),
particularly with neurological signs
Acute rheumatoid arthritis or acute spondyloarthritis (acute inflammation of
bones or joints)
Infection of bones or joints
Acute sacral, lumbar or thoracic nerve root entrapments leading
to sensorimotor function deficits
Severe level of osteoporosis (bone loss) or osteomalacia (bone softening)
with latent risk of fracture
Implanted ferromagnetic materials or active devices within the body
Spinal fusions within the first three months postoperative
Skin disease or lesions in the vicinity of sensor placement (including skin
cut, broken skin, eczema, etc.)
Patients who have been subjected to long-term bed rest
The above list does not claim to be exhaustive. If you are unsure if you have a
contraindication, consult with your medical expert. If you have a contraindication,
but feel like you still want to train with Valedo, you must first check with your
medical expert. The decision whether a particular treatment is suitable in cases of
contraindications always lies within the competence of your medical expert. He is
required to evaluate the possible risks and side effects of the treatment against the
benefit gained from it in each individual case. Your individual situation and the
general risk assessment for specific patient groups are of equal importance in this
regard.
Increased development of osteoporosis in chronic patients also has to be taken
into account. As severe osteoporosis is a contraindication, it is your responsibility
to stay within the recommendations of your competent medical expert and follow
the treatment plan as laid out by him.
If you are a chronic patient or have been immobile for a long period of time, short
training sessions are recommended to begin with. A tendency to overtrain at the
beginning is common and can lead to muscle fatigue, soreness or joint discomfort if
initial training sessions are too long.
Just like with any other training program, small steps at the beginning are critical in
order to avoid overtraining and consequent injuries. With time your body will adapt
to the training and you will be able to train longer and do more strenuous exercises.
Do not continue training if you are feeling fatigued. Training when you are
tired may lead to overcompensated or incorrect movements.
Examine yourself regularly for any possible skin irritations or signs of allergic
reactions. If a skin complication from the medical tape arises, discontinue
training and consult a dermatologist.
Risk Factors
Valedo is not meant to replace the expertise or experience of your medical expert.
If you are unsure if you are at risk, consult with your medical expert. Valedo is one
therapy tool that can help treat lower back pain and improve trunk stability, mobility
and overall balance. Please observe the following risk factors.
Recent serious accidents (e.g. whiplash, spinal contusion) without prior
consultation with a medical expert
Acute spinal disc hernia (e.g. disc herniation)
Severe cardiovascular or cerebrovascular event, like a myocardial infarction
(heart attack), aortic aneurysm (enlargement of the aorta) or stroke, within
three months of last incidence
Severe neurological disability, including compression of the spinal cord or
cauda equina (bundle of nerves in the lower back), nerve root compression,
etc.
Severe balance deficits with increased fall risk
Cognitive deficits which prevent comprehension of exercises
Pregnancy
Epileptic seizure within the past two years which are not controlled
medically, or patients who are photosensitive
Retinal disease which may be exacerbated by watching video games
Chapter 1: Overview and Safety
9
V_UM1.1_en_1407

EN
EN
After an adverse event the product may only be used again following approval
and release by Hocoma AG.
Adverse Effects
Hocoma AG has exercised great diligence in selecting the materials that are in
contact with our clients in the clinic or at home. These materials have been
assessed for their biological compatibility and are continuously monitored by the
manufacturers. Nevertheless, there is always a small chance that some materials
may lead to allergic reactions in individuals under exceptional circumstances.
Maintenance
Maintenance of Valedo is straightforward. Wipe the sensors with a damp cloth
before and after training and store them in the Valedo case between trainings to
protect them from excessive lint, dust, humidity or sunlight. Take care to remove
any residual adhesive should there be any. Before use, make sure the sensors are
charged.
Firmware Updates
The USB to micro-USB cable supplied is used not only for charging but also for
sensor firmware update.
The sensor firmware can be updated by inserting the data transfer micro USB plug
into the sensor (see Figure 2) and connect the USB end into a computer. Check
www.valedotherapy.com for firmware updates; follow the instructions on the
screen. Please do NOT unplug the sensor from your computer while updating the
firmware.
Reporting Adverse Events
Adverse events with products of Hocoma which led or could have led to serious
injuries to persons (life-threatening or serious injuries or death) and or damage to
objects must be reported immediately after the adverse event to Hocoma AG by
going to www.valedotherapy.com or by telephone.
Chapter 1: Overview and Safety
V_UM1.1_en_1407
10
EN
Chapter 2: Training Setup
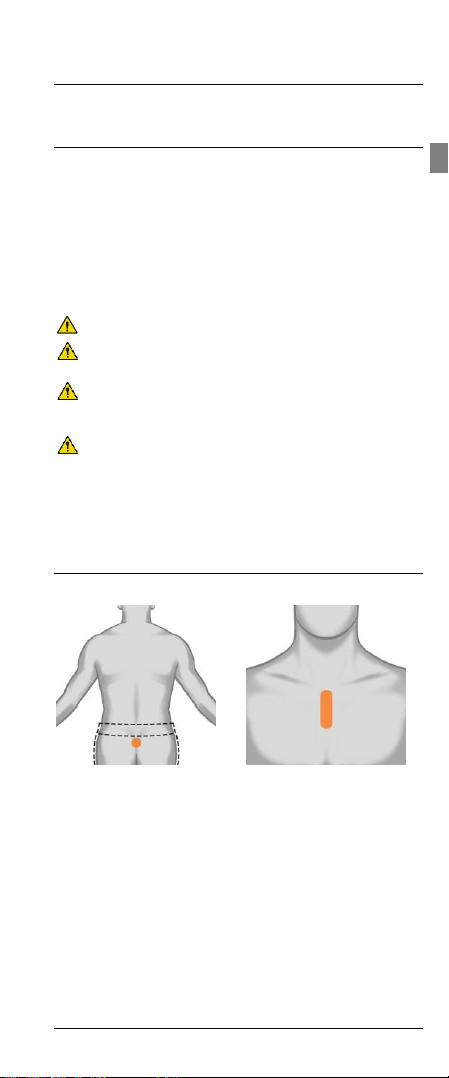
Placing the lower back sensor
Placing the chest sensor
Figure 4: Correct placement of lower back
sensor
Figure 5: Correct placement range of the chest
sensor
1. Wipe the sensors with a damp cloth.
2. Place a piece of double-sided tape on the back of the sensor.
3. Remove the backing of the double-sided tape.
4. Place the sensor. (Make sure micro USB port is pointing down.)
Initial Training Session
Turn on your sensors and pair them to your computing device. Now let’s prepare
the training space and learn where to put the sensors.
Preparing the Training Space
Make sure you have plenty of space around you to safely train. You have the
option of training while holding the computing device or with it standing on a table
in front of you.
Many tablet computing devices have covers that also function as stands.
With some computing devices it is possible to connect it to your television or
computer monitor. Consult the user manual of your computing device for
information.
If you do connect your computing device to your television or computer
monitor, remember to keep the computing device nearby as the sensors are
connected to it and you will have to tap buttons on the screen.
Unplug your computing device from its charging cable for training.
Clear the space around your feet from any cables or other items you may
trip on during training.
Be careful if you train on a rug; the rug might bunch and become a tripping
hazard. We recommend either choosing a new training space or moving the
rug for training.
Make sure the sensors are kept at least 1 m (39 inches) away from any
electromagnetic, ferromagnetic (such as large speakers or appliances) or
metallic objects.
Mobile phones, watches, power adaptors (for a laptop), or other devices
containing magnetic elements can distort sensor signals. Keep these items
an appropriate distance away from the sensors. Walls and floors may also
contain electrical cables, metal pipes or reinforced frames.
Putting on the Sensors
Wearing a belt for your pants could cause the sensor to fall off or could lead
to sensor signal distortion.
It may be easier the first few times to place the chest sensor without a shirt
and in front of a mirror.
Always unplug sensors from charging cable before placing them on yourself.
We recommend wiping the backside of both sensors and the areas of your
body where the sensors go with a damp cloth and then drying. This will help
the double-sided tape to stick better to the sensor and to your skin.
Chapter 2: Training Setup
11
V_UM1.1_en_1407

EN
EN
Both sensors are interchangeable and can be used either on the chest or the
lower back.
Take care to place the sensors correctly. If the sensors are placed
incorrectly it may cause different visual feedback and may lead to
exaggerated movements on the screen.
Using the Belt
1. Click sensor into the belt (see Chapter 1).
2. Pull belt around your chest or pelvis.
3. Hook buckle into loop.
4. Pull loose end of belt to tighten.
5. Move until sensor is in the correct position, either chest or pelvis (See above
6. Tighten again until sensors do not shift position while you move.
Placing sensor in the belt and putting belt on
for sensor position).
Training
Once you have put on the sensors, training can begin. Training involves various
exercises in a game environment; each exercise is designed for you to execute
specific movements.
Training is done through the Valedo application on your computing device. Tap the
icon to enter the application.
Start training
Figure 6: Icon on computing device (example from iPad, icon may look slightly different across
All training exercises are designed to target a specific lower back movement; each
movement will be demonstrated before starting the exercise. Take care to mimic
the movement exactly; this will minimize the risk of improper movements and
injuries stemming therefrom.
Take care not to overtrain, especially during your first sessions with Valedo.
While motivation in training is always positive, prolonged or overtraining can
result in muscle fatigue, which may cause further injury when undertaking
daily tasks.
If the exercise requires a movement that is outside of your capabilities, do
not “push” to make the correct movement. The best way to avoid this
situation is to redo the Range of Motion settings to reestablish the limits of
your personal movement range.
1. Close the software application on your computing device.
2. Remove the sensors.
3. Remove the double-sided tape (from you or the sensors).
4. Dispose of the double-sided tape.
5. Wipe the sensor with a damp cloth.
6. Store the sensors in the Valedo case.
Chapter 2: Training Setup
V_UM1.1_en_1407
Ending the training session
computing devices).
12
EN
Chapter 3: Valedo Application
In the top left-hand corner of the Home Screen you’ll see this
ribbon with the name you entered in your profile. This does not
only indicate who’s playing, it’s also a button! This is a shortcut
to the Profile Management section (see below).
Getting Started
Start up the Valedo application by tapping the icon .
Understand “Tap” as tap or click depending on your computing device.
For a list of supported computing devices, go to www.valedotherapy.com
First Time Installation
Before you can begin training you’ll need to set up Valedo. Tap on the start screen
and if your sensors aren’t on yet, the software will ask you to turn them on and
create your profile. Enter your name, date of birth and sex. You can also import
your information from Facebook, tap the Facebook icon and follow the instructions
on screen.
You can always come back and edit your information or add new profiles—which
gives you the chance to share Valedo with others on the same computing device.
After you’ve entered your information, the Valedo application will guide you through
the first sensor calibration and the Range of Motion (ROM) measurements.
Calibration is easy: with your sensors in place, stand still and then bow when
indicated to continue.
Measuring your range of motion is also easy: in the ROM screens you will be
instructed to mimic the pose in the example. Accurately assessing your range of
motion is important because the application must know the limits of your ability to
move in order to precisely recreate your movements on the screen. For more info
on ROM setting, see Setting Range of Motion (ROM) below.
If you need additional assistance visit www.valedotherapy.com to learn more about
the movements and ROM.
After the initial setup you’ll be directed to the Home Screen; from there you’re free
to explore the Village!
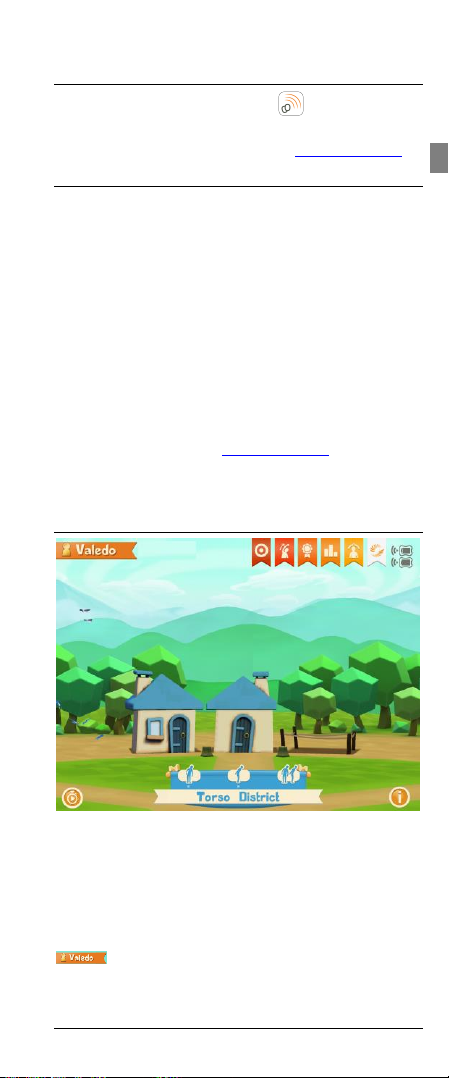
Home Screen
Here you are on the home screen. There’s not much yet because the villagers are
waiting for your help!
Visit the different neighbors to see what exercises they’re working on.
Swipe left or right to move through the neighborhood.
Figure 7: Home Screen
On the screen:
Chapter 3: Valedo Application
13
V_UM1.1_en_1407
EN
EN
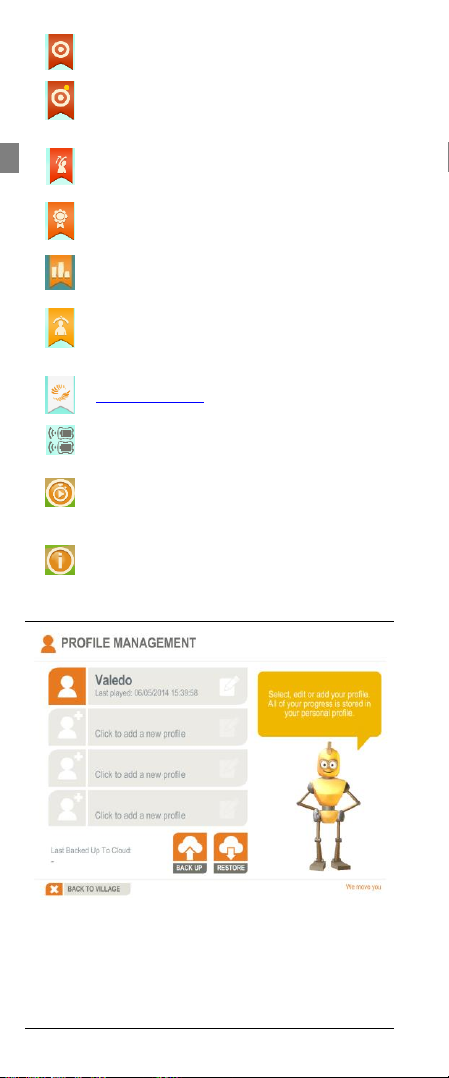
Exercise Goal (not set): Tap here to set and monitor your
training goal.
Exercise Goal (set): Once you’ve set a goal, a dot will appear
on the target. The color of the dot indicates your progress: red
means goal not reached; yellow means you’re in progress; and
green means you’ve reached your goal.
Stretching: This is an unlockable section of the Valedo
application. Here you will learn and be instructed on how to do
different stretching exercises.
Badges: As you play and progress through the various
exercises, you will earn badges. Here you can see what you’ve
earned and what’s still missing!
Reporting: Curious as to your progress? Here you can see
how long you’ve played, the number of pick-ups collected and
more.
Range of Motion: Re-establish your ROM here. The screen is
identical to what you had to do for your initial setup—though it
might be a good idea to revisit this section as you progress in
the game. You might find yourself able to go a bit farther!
Valedo Button: Tap this button to go to
www.valedotherapy.com or to send an email to Valedo.
Sensor Button: Indicates battery level and sensor connection
strength. It is also a shortcut button to the Sensor Management
screen.
Quick Therapy: Tap here to simplify the exercise selection
and have Valedo randomly select exercises for you. Unlock
five houses to activate this functionality; only exercises you’ve
unlocked can be selected for you as the random exercises.
Information: Clicking this will bring up information regarding
Valedo. On the Home Screen the Info button is in the bottom
right-hand corner.
Profile Management
Figure 8: Profile Management Screen. Notice the Back Up and Restore buttons.
In the Profile Management section you can add, edit or delete profiles. It is also
here where you can back up and restore all profiles you’ve uploaded to iCloud.
You must have iCloud installed on your device.
Tap [Back Up] to upload all profiles to iCloud and tap [Restore] to download your
last uploaded profiles to your current device.
Chapter 3: Valedo Application
V_UM1.1_en_1407
14
EN
This means you can train across devices that have Valedo and your iCloud
account installed without missing a step!
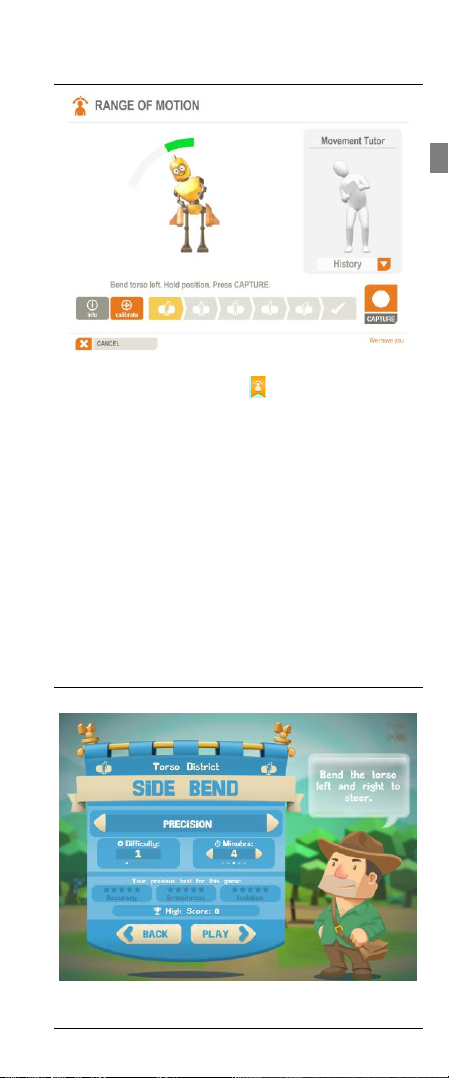
Setting Range of Motion (ROM)
Figure 9: Example range of motion screen.
During the initial installation or if you tap the button on the Home screen you
can set, update and track your range of motion (ROM). Setting the correct ROM is
important for accurate gameplay and safe training.
The purpose of establishing your individual ROM is simple: with the ROM values
the software can adjust the exercises to your personal movement ability so they’re
not too difficult or too easy. If the games are too difficult it can stint motivation or
increase chance of injury due to overcompensated movements. If the games are
too easy, they quickly become boring.
How it’s done
The software will show you a pose to mimic; you must hold that pose briefly and
tap [Capture], the software then calculates your range of motion for that specific
movement. The range of motion bar must be green (see Figure 9); this is to ensure
the range of motion is sufficiently large for sensible exercise movement and game
playability. If it is red, you will not be able to tap [Capture] and move on to the next
movement. There are multiple poses but setting the range of motion should not
take more than a minute.
In the ROM screens, the figure is doing a MIRROR image pose of the one
you must do. Imagine the movement tutor is a little mirror.
Playing the Exercises
Tap one of the buildings in a district to get started.
Figure 10: Example of a training introduction screen.
Chapter 3: Valedo Application
15
V_UM1.1_en_1407
EN
EN
In the introduction screen you’ll have the chance to toggle the exercise mode. In
general, the exercise modes are as follows:
Precision: how precisely you control the movements of both sensors
Isolated Precision: how precisely you control the movement of one sensor
while holding the other still
Stabilization: how well you hold a position
Isolated Stabilization: how well you hold a position concentrating on one
sensor while maintaining the other still
Free Mode: do squats at your own pace, not according to the timing bar as
in Precision and Stabilization
Not all modes are available for all exercises.
Exercise modes are explained in the application.
Difficulty level is determined by the number of times you’ve done an
exercise.
You can also change the duration of the exercise and you can see your previous
bests.
Accuracy rates how precise your movements were toward the exercise goal.
Smoothness rates how smooth your movements were.
Isolation (only for isolation modes) rates how well you moved one sensor
while keeping the other still.
As you can see, the Village is pretty empty save a few build sites in the various
districts. Help build up the houses at the sites by completing exercises.
For example, you are at the Torso district. The one house on the left represents the
first exercise you can do. Unlock other houses in that district and others buy
completing exercises.
Build up houses and unlock new districts by training regularly, but watch out,
your houses will shrink if you don’t train regularly!
For each exercise take the robot out to gather gems. When you’ve returned you’ll
have the resources to build up the house and unlock new movements and districts!
Take note of the white dots under the movement icon (see Figure 7). These
indicate how close you are to building the next level of the house. You get a white
dot when you complete an exercise; when you have enough, the house will grow.
Tapping [Play] will bring you right into the exercise. There will be a quick calibration
and then a brief introduction of the movement. After that, away you go!
Do the movements as demonstrated to correctly move the robot—and if you’re not
moving correctly, it’ll let you know! Some exercises require you to follow a path,
some to fly through hoops and some have completely different goals. Make sure to
read the instructions at the start of each exercise so you know what you’re to do!
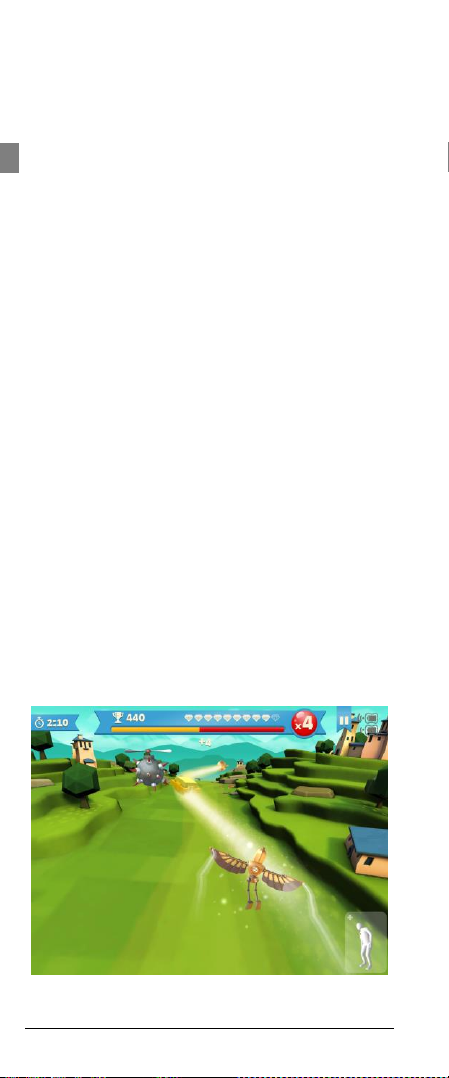
Figure 11: Example of in-game screen.
Chapter 3: Valedo Application
V_UM1.1_en_1407
16

EN
On the screen:
Time until level is over
Points earned
Point multiplier
Energy bar: Shows how much energy you have.
Get energy by following the path, jumping through
hoops, and more!
Pause button: (in game) Allows you to calibrate,
quit the exercise or simply take a breather!
Movement tutor button: (in game) Tapping this
icon in the bottom right-hand corner during
gameplay will expand an in-game hint on how to
properly execute the move for the game. It will
shrink back down after two seconds.
Invert left/right and up/down: (Hip District
only) tapping [Pause] during any Hip District
exercises will allow you to toggle the hip
movement control.
Chapter 3: Valedo Application
17
V_UM1.1_en_1407

EN
General
Dimensions (L × W × H)
42 mm × 32 mm × 16 mm (1.65 in × 1.26 in x
0.6 in)
Weight
18 grams (each)
Expected service life
3 years
Electronics
Power supply
Integrated Recharging Solution (polymer Liion, 3.7V, 160mAh)
Wireless Transmission Frequency
2.4 GHz band (Bluetooth Low Energy)
Radiated Output Power
Max. 1 mW
Accuracy
Gyroscope Range
Max. 2,000 degrees per second
Accelerator Speed
Max. ± 16 g
Digital Compass
1 to 2 degrees accuracy
Orientation
± 360 degrees on all axes
Operating Range
20 meters with a clear line of sight to the
computing device.
However, precise operating range of sensors
depends on training environment.
General
Main cable dimensions (L)
900 mm (35.4 in)
Extension dimensions (L)
300 mm (11.8 in)
Weight
30 grams
Revision
USB revision 2
Expected service life
3 years
General
Dimensions (two pieces) (L x W)
39 x 38 mm (1.53 x 1.49 in)
Expected service life
3 years when stored at temperatures of 10 to
27°C (50 to 80°F) and a relative humidity of
40 to 60%.
Chapter 4: Technical Specifications
The Sensors
The Valedo application will not recognize non Hocoma sensors.
Do not attempt to use third party sensors with Valedo.
Further complications of trying to use non Hocoma sensors may include but are not
limited to corruption of your saved info within the Valedo application, corruption of
information on your computing device outside of the Valedo application
environment, damage to the third party sensors and personal injury.
The Cable
The Double-Sided Tape
Chapter 4: Technical Specifications
V_UM1.1_en_1407
18

EN
The Belt (optional)2
General
Dimensions (L)
~60 to 120 cm (23.6 to 47.2 in)
(exact dimensions on website)
Weight
~50 grams
Expected service life
3 years
Operating Environment
Temperature
15 ºC to 35 ºC / 59 ºF to 95 ºF
Air humidity
30 % to 75 %
Air pressure
700 to 1060 hPa
Packaging and Transportation
Temperature
-20 ºC to 45 ºC / -4 ºF to 113 ºF (1 month
maximum)
Air humidity
45 % to 85 %, no condensation
Air pressure
700 to 1060 hPa
Storage
Temperature
-20 ºC to 35 °C / -4 ºF to 95 ºF (6 months
maximum)
45 °C / 104 ºF (1 month maximum)
Air humidity
45 % - 85 %, no condensation
Air pressure
700 - 1060 hPa
2
General Operating Conditions
The device must only be used in clean, dry rooms with level floors. Make sure you
have plenty of space around you while you train, and keep large ferromagnetic
equipment (e.g. stereo system or large speakers) or devices at least 2 meters (6
feet) from you. We recommend that the device be used indoors.
Valedo must only be stored inside buildings.
For the technical specifications of the computing device, consult its user
manual.
Electromagnetic Compatibility
Medical electrical devices are subject to special precautions with regard to
electromagnetic compatibility (EMC), and must be installed and operated only
according to the information specified in this document. Wireless communications
equipment such as wireless home network devices, mobile phones, cordless
phones and their base stations, walkie-talkies may interfere with Valedo. Only
converters and c ables supplied by or obtained from the manufacturer as spare
parts may be used. Other cables and accessories not provided by the
manufacturer may affect EMC performance and result in increased emissions or
decreased immunity of Valedo. Only the following parts are compliant with Valedo:
Sensor, part number 30814
Cable, part number 30813
Keep mobile phones and other devices containing wireless or magnetic
components more than 1 m (39 inches) from the Valedo sensors.
The belt is an optional accessory available f or purchase from Hocoma. Go to www.valedotherapy.com for details.
Chapter 4: Technical Specifications
19
V_UM1.1_en_1407

EN
FCC and IC Statements
Statement according to Part 15.105
This equipment has been tested and found to comp ly with the limits for a Class B
digital device, pursuant to Part 15 of the FCC Rules. These limits are designed to
provide reasonable protection against harmful interference in a residential
installation. This equipment generates, uses and can radiate radio frequency
energy and, if not installed and used in accordance with the instructions, may
cause harmful interference to radio communications. However, there is no
guarantee that interference will not occur in a particular installation. If this
equipment does cause harmful interference to radio or television reception, which
can be determined by turning the equipment off and on, the user is encouraged to
try to correct the interference by one or more of the following measures:
Reorient or relocate the receiving antenna.
Increase the separation between the equipment and receiver.
Connect the equipment into an outlet on a circuit different from that to which
the receiver is connected.
Consult the dealer or an experienced radio/TV technician for help.
Statement according to Part 15.19 and RSS-210
Part 15 of the FCC Rules and with Industry Canada license-exempt RSS
standard(s).
Operation is subject to the following two conditions:
1. this device may not cause harmful interference, and
2. this device must accept any interference received, including interference that
may cause undesired operation.
Statement according to Part 15.21
Changes or modifications made to this equipment not expressly approved by
Hocoma may void the FCC authorization to operate this equipment.
RF Exposure Information according to 2.1091 / 2.1093 / OET bulletin 65
Radiofrequency radiation exposure Information
The radiated output power of the dev ice is far below the FCC radio frequency
exposure limits.
Risk Management
Connection of Valedo to a computer network that includes other equipment could
result in previously unidentified RISKS; identify, analyze, and control such RISKS
(refer to IEC 60601-1:2005)
Subsequent changes to a computer network could introduce new RISKS and
require new analysis.
Changes to the computer network include:
Changes in computer or data network configuration
Connection of additional items to computer network
Disconnecting items from computer network
Update of equipment connected to computer network
Upgrade of equipment connected to computer network
The term computer network used here corresponds to the term network/data
coupling in IEC 60601-1:2005.
Chapter 4: Technical Specifications
V_UM1.1_en_1407
20

EN
Chapter 5: Troubleshooting
Issue
Action
The sensors are not
turning on.
Gently shake the sensor to turn it on.
If that does not work, push the button to turn
on.
If both actions above do not work, that means
the batteries are depleted and must be
charged.
If you suspect sensor failure check on
www.valedotherapy.com for sensor diagnostics
and procedures for replacement under
warranty.
Issue
Action
The computing device
does not start.
Make sure the computing device has been
charged or is plugged in.
For further troubleshooting tips for the
computing device, please consult its user
manual.
Valedo sensors are not
connecting to the
computing device.
Make sure your computing device is running
the latest version of its operating system.
Make sure the sensors are charged before
connecting to the computing device software.
Make sure the sensors are not connected to a
power source via the USB cable
Make sure Bluetooth is enabled on your
computing device.
Make sure you are close enough to the
computing device (sensor icon on computing
device will indicate if sensors and computing
device are connected).
Turn sensors off and on again.
Restart computing device.
Restart Valedo application.
Troubleshooting
If you are experiencing difficulties with the system please refer to the following
website:
www.valedotherapy.com
This section enables Valedo users to check against the technical problems listed
below and take relevant measures.
If you have any queries or need further clarification of issues for which we have not
provided a satisfactory solution, first contact your local Hocoma service center. See
copyright page at beginning of manual for contact information.
Problems with the Sensors
Problems While Preparing for a Training Session
Chapter 5: Troubleshooting
21
V_UM1.1_en_1407

EN
Issue
Action
The sensor(s) fall(s)
off.
Clean the back of the sensor with a soft damp
cloth before placing a new strip of double-sided
tape.
Wipe the areas of the skin where you will attach
the sensor(s) with a soft damp cloth before
reattaching.
Dry your skin and sensor before attaching the
tape and mounting the sensor to your body
Reattach the sensor and press firmly for 5
seconds to make sure sensor sticks to your
skin.
If all of the above suggestions do not work, then
you may have to consider acquiring the training
belt from Hocoma.
The avatar in the range
of motion (ROM)
settings screens does
not show the correct
movement.
Make sure that the sensors are still
communicating with the computing device.
Redo the ROM settings making sure to stand
very still while the sensors calibrate and only
bow to confirm and proceed when indicated to
do so.
During training
exercises, the avatar
moves about rapidly.
Stop the exercise and redo the range of motion
(ROM) settings. Having a very small ROM will
make for an exaggeratedly sensitive avatar
movement during gameplay.
Turn sensors off and on again.
Restart computing device.
Restart Valedo App.
The avatar does not
move when doing the
exercises.
Make sure that the sensors are still on and
communicating with the computing device.
Turn sensors off and on again.
Restart computing device.
Restart Valedo App.
The indicator LEDs
show they are
connected (see
Chapter 1 for LED
modes) but avatar
does not move.
Make sure that the sensors are still
communicating with the computing device.
Turn sensors off and on again.
Restart computing device.
Restart Valedo App.
The movement
required in the game is
larger than what you
can do.
Reset Exercise ROM values.
Setting up correct and accurate ranges of
motion during the Exercise ROM is critical;
therefore, do not compensate or overexert
when setting up these parameters. This will
ensure that the in-game movements required
do not exceed what you are physically capable
of doing. See Chapter 3 for info on setting the
ROM.
After training, you see
reddening or irritation
under where the
sensors were attached
to the skin.
This might indicate an allergic reaction to the
double-sided tape. Stop training immediately
and consult with your dermatologist before
continuing Valedo training.
Problems During the Training Session
Chapter 5: Troubleshooting
V_UM1.1_en_1407
22

EN
Alerts
Alert
Action
In the top right-hand corner you will see the
sensor signal and battery icons.
As you can see here a sensor is not
communicating properly with the computing
device and the battery is depleted.
Remove the depleted sensor from your body
and recharge (see Chapter 1 for charging
information)
If the sensor is charged and still indicates that
there is no signal with the computing device,
turn sensor off and then back on again with
the application still running.
The following alerts may appear on the screen during exercises. If so, follow the
instructions below.
Chapter 5: Troubleshooting
23
V_UM1.1_en_1407
EN
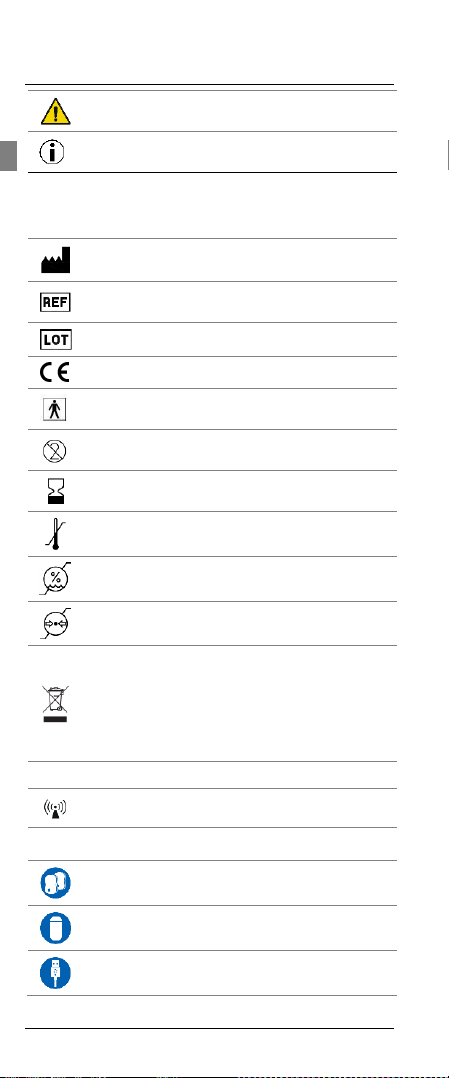
Indicates potentially dangerous situations or actions. Symbol in
accordance with ISO 7010-W001.
Highlights useful tips, recommendations and information needed to
operate the device correctly and efficiently.
1.
2.
3.
Step-by-step explanation of tasks for proper use of the product.
Manufacturer and year of manufacture.
Symbol indicates the manufacturer’s reference number of the
device.
Symbol indicates manufacturer’s batch number of the device.
Complies with MDD93/42/EEC Requirements.
Type BF applied parts.
Double-sided medical tape is only for single use. It cannot be used
for a second time.
Use-by date for the double-sided medical tape.
Symbol indicates temperature limits for operation, transport and
storage.
Symbol indicates humidity limits for operation, transport and
storage.
Symbol indicates atmospheric pressure limits for operation,
transport and storage.
Protect the environment. When disposing of this unit, or the
batteries it uses, do so in an environmentally friendly way.
The unit must not be disposed of in normal household waste.
Dispose of old products in accordance with pertinent local
regulations at an appropriate collection point. If you have any
questions, contact your local competent waste management
authority.
IP22
The IEC Ingress Protection Rating.
Symbol for nonionizing radiation.
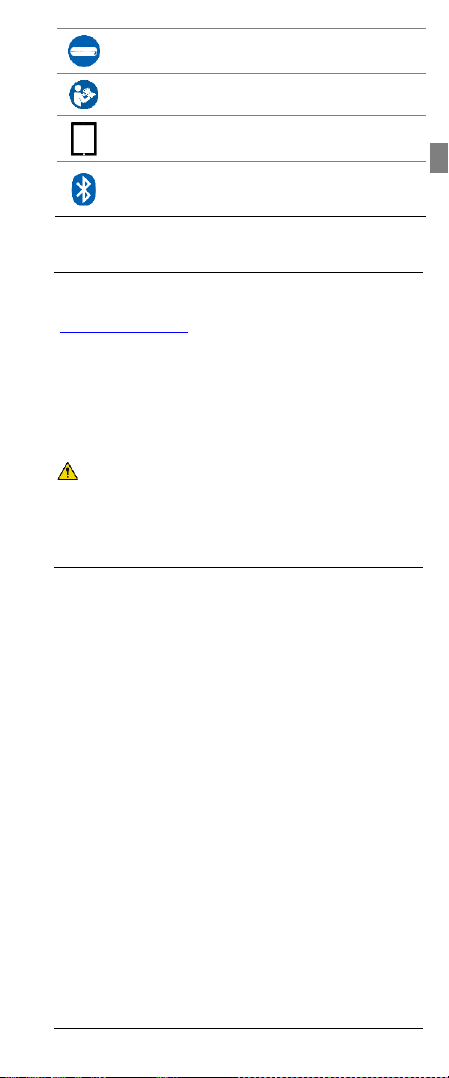
Symbols on Packaging
2 Sensors
100 pieces of medical tape
1 USB cable
Chapter 6: Legal Matter
Explanation of Symbols Used
Chapter 6: Legal Matter
V_UM1.1_en_1407
24
EN
1 Case
Follow user manual and quick user guide.
Computing device (not included)
Bluetooth® compatible. The Bluetooth® word mark and logos are
registered trademarks owned by Bluetooth SIG, Inc. and any use of
such marks by Hocoma AG is under license.
Disclaimer
All Hocoma products are medical devices and must be used in strict adherence to
the User Manual; failure to do so may result in serious personal injury. It is strongly
recommended that you regularly consult Hocoma’s website
(www.hocoma.com/legalnotes) for the latest available information. Please contact
Hocoma should you have any questions.
Certain Hocoma products are marketed for home use and must be strictly used in
accordance with the User Manual. If you have any doubts how to use the product
correctly, you should ask your medical care provider who is knowledgeable about
your specific needs. Failure to follow the User Manual and/or the recommendations
of your medical care provider may result in serious personal injury.
None of this information shall be interpreted as a warranty of product
characteristics.
Failure to comply with the safety regulations and the instructions for using
the device can result in serious injuries and damage to property. Valedo
shall not be operated for any indications or in combination with devices or
software that are not expressly certified and set out in the user manual by
Hocoma AG.
Warranty Terms
Valedo is warranted to be free from defects in workmanship and materials within 24
months of the purchase date when used in accordance with the present user
manual. The warranty extends only to the end user. Hocoma will at its own
discretion refurbish or replace Valedo covered by the warranty free of charge.
Repair, modification or replacement lies solely within the competence of Hocoma
AG. Hocoma AG does not warrant or guarantee any therapeutic result or success
when using Valedo.
25
Chapter 6: Legal Matter
V_UM1.1_en_1407


DE
Benutzerhandbuch
Deutsch
We move you

DE
Der Inhalt des Benutzerhandbuchs, einschließlich aller Abbildungen und
Zeichnungen, besteht aus urheberrechtlichen Informationen, die sich im Besitz von
Hocoma und/oder Drittparteien befinden, und wird ausschließlich zum Zweck der
Bedienung und Wartung des Geräts bereitgestellt. Die Verwendung des Inhalts für
andere Zwecke oder das Kopieren des Inhalts ist verboten, sofern keine vorherige
schriftliche Einwilligung von Hocoma eingeholt wurde.
Dieses Handbuch gilt für Valedo
Hersteller
Hocoma AG
Industriestrasse 4
CH-8604 Volketswil
Schweiz
Tel.: +41 (43) 4442200
Fax: +41 (43) 4442201
info@hocoma.com
www.hocoma.com
Technische Änderungen vorbehalten.
Copyright Hocoma AG
Letzte Überarbeitung: 2014-07-04
®

DE
Einleitung ............................................................................. 4
Einige Hintergrundinformationen… ...................................... 4
Kapitel 1: Übersicht und Sicherheit ................................. 5
Überblick über den Valedo® ................................................. 5
Die Sensoren.......................................................................................... 5
Das Kabel ............................................................................................... 6
Der Gurt (optional) ................................................................................. 7
Das Computergerät................................................................................ 7
Das Valedo Etui ..................................................................................... 7
Die Valedo Anwendung ......................................................................... 7
Sicherheitsbestimmungen .................................................... 8
Verwendungszweck ............................................................................... 8
Indikationen ............................................................................................ 8
Kontraindikationen ................................................................................. 9
Risikofaktoren ........................................................................................ 10
Nebenwirkungen .................................................................................... 10
Instandhaltung ...................................................................... 10
Firmware-Updates ................................................................................. 10
Vorkommnisse melden ......................................................... 11
Kapitel 2: Vorbereitung des Trainings ............................. 12
Erste Trainingssitzung .......................................................... 12
Vorbereitung der Trainingsumgebung .................................................. 12
Anlegen der Sensoren ........................................................................... 12
Verwenden des Gurtes .......................................................................... 13
Training ................................................................................. 13
Kapitel 3: Valedo Anwendung ........................................... 14
Erste Schritte ........................................................................ 14
Erstmalige Installation ............................................................................ 14
Startbildschirm ....................................................................................... 14
Profilverwaltung (Profile Management) ................................................. 16
Einstellen des Bewegungsumfangs (ROM) .......................................... 16
Spielen der Übungen ............................................................ 17
Kapitel 4: Technische Daten ............................................. 20
Die Sensoren.......................................................................................... 20
Das Kabel ............................................................................................... 20
Das doppelseitige Klebeband ................................................................ 20
Der Gurt (optional) ................................................................................. 21
Allgemeine Betriebsbedingungen ........................................ 21
Elektromagnetische Verträglichkeit ...................................... 21
FCC und IC-Erklärungen ...................................................... 22
Risikomanagement ............................................................... 22
Kapitel 5: Fehlerbehebung ................................................ 23
Fehlerbehebung .................................................................... 23
Probleme mit den Sensoren ................................................................ .. 23
Probleme bei der Vorbereitung einer Trainingssitzung ........................ 23
Probleme während der Trainingssitzung .............................................. 24
Alarmsymbole ........................................................................................ 25
Kapitel 6: Rechtliche Informationen ................................. 26
Erläuterung der verwendeten Symbole ................................................ 26
Symbole auf der Verpackung ................................................................ 26
Haftungsausschluss ............................................................. 27
Garantiebedingungen ........................................................... 27

DE
Einleitung
Willkommen und vielen Dank für den Kauf eines Valedo Geräts!
Wenn Sie dies lesen, gehören Sie sicher zu den Millionen Menschen, die an
Schmerzen im unteren Rücken leiden. Sie haben aber schon einen enorm
wichtigen Schritt zur Behandlung dieses weit verbreiteten Leidens getan.
Viele Menschen wissen nicht, dass es nur weniger Minuten am Tag bedarf, um
Schmerzen im unteren Rücken entgegenzuwirken. Halten Sie den Valedo stets
griffbereit, um vor der Arbeit, in der Mittagspause und sogar auf Reisen Ihre
Übungen durchzuführen!
Ganz gleich, ob Sie geschäftlich oder privat unterwegs sind – Valedo ist einfach zu
verwenden, wirkt motivierend und macht auch noch Spaß.
Worauf warten Sie noch? Legen wir los!
Einige Hintergrundinformationen…
Wir bei Hocoma sind bekannt für unsere großen Produkte zur körperlichen
Rehabilitation wie Lokomat®, Armeo® und Erigo®, aber wir sind auch bei der
Integration von Sensortechnologien in unsere Funktionstherapie für Schmerzen im
unteren Rücken weltweit führend. An diesem Punkt setzen Valedo® und seine
klinischen Schwesterprodukte Valedo®Motion und Valedo®Shape an.
Weitere Informationen über alle unsere klinischen Produkte finden Sie unter
www.hocoma.com, und weitere Informationen über Valedo® finden Sie unter
www.valedotherapy.com.
Dieses Benutzerhandbuch beschreibt den sicheren und korrekten Gebrauch des
Valedo Geräts. Beachten Sie die Sicherheitsinformationen und Anweisungen im
Benutzerhandbuch und die allgemeinen geltenden Sicherheits- und
Hygienestandards.
Wenn Sie mit dem Valedo trainieren, werden Sie aus medizinischer Sicht als
Patient betrachtet. Bei allen anderen am Valedo ausgeführten Tätigkeiten werden
Sie als Bediener betrachtet.
Halten Sie dieses Handbuch zum schnellen Nachschlagen stets griffbereit, und
lesen Sie es von Zeit zu Zeit noch einmal durch.
Aus Gründen der besseren Lesbarkeit benutzen wir in diesem Handbuch nur die
männliche Form; diese schließt jedoch die weibliche Form mit ein.
Einleitung
V_UM1.1_de_1407
4

DE
Kapitel 1: Übersicht und Sicherheit
Überblick über den Valedo®
Mit Valedo sind die folgenden Komponenten gemeint:
Sensoren
Doppelseitiges medizinisches Klebeband
Kabel zum Laden oder für Firmware-Updates
Valedo Etui für Transport und Lagerung
Das Valedo System umfasst alle Komponenten mit dem Computergerät.
Die Sensoren
Die zwei mit dem Valedo mitgelieferten Sensoren sind leicht und lassen sich
problemlos einsetzen. Sie sind mit einer Taste, einer LED und einem Micro-USBPort zum Laden und für die Firmware-Updates ausgestattet.
Die LED ist nur zu sehen, wenn sie leuchtet.
Bei regelmäßigem Gebrauch lassen sich die Sensoren durch leichtes Schütteln
aus dem Bereitschaftsmodus aufwecken. Wenn sich die Sensoren länger als 48
Stunden im Bereitschaftsmodus befinden, gehen sie in den Tiefschlafmodus über:
Wenn sich die Sensoren im Bereitschaftsmodus befinden, schütteln Sie sie
leicht, um sie aufzuwecken.
Wenn die Sensoren im Tiefschlafmodus sind, drücken Sie die Taste, um sie
aufzuwecken.
Um den Tiefschlafmodus manuell einzuschalten, drücken und halten Sie die
Taste 4 Sekunden lang gedrückt.
Die Sensoren gehen nach 30 Sekunden in den Bereitschaftsmodus, wenn
sie kein Computergerät erkennen, mit dem sie gekoppelt werden können.
Die Sensoren gehen in den Tiefschlafmodus über, wenn nach etwa 5
Minuten keine Verbindung mit Ihrem Computergerät hergestellt wurde,
jedoch eine kontinuierliche Bewegung erkannt wird; dies ist insbesondere
während des Transports wichtig, um Batteriestrom einzusparen.
Nachdem Sie aufgeweckt wurden, geben die Sensoren mithilfe ihrer LEDs zu
erkennen, dass sie eine Bluetooth®-Verbindung suchen (siehe Tabelle unten);
wenn Bluetooth ordnungsgemäß auf dem Computergerät aktiviert wurde, können
Sie die Sensoren damit koppeln (siehe Das Computergerät unten).
Abbildung 1: Der Valedo im Überblick
Ein- und Ausschalten der Sensoren
Kapitel 1: Übersicht und Sicherheit
5
V_UM1.1_de_1407

DE
LED-Modus
Sensorstatus
Erklärung des Modus
Ein
Ladevorgang
läuft – voll
geladen
Die Sensoren sind angeschlossen
und voll geladen.
Invertierter
Impuls: lang: Ein;
kurz: Aus
Ladevorgang
läuft – nicht
voll geladen
Die Sensoren sind angeschlossen,
jedoch noch nicht voll geladen.
Aus
Bereitschaft
Die Sensoren suchen nicht aktiv
nach einem Bluetooth-Signal.
Schütteln Sie die Sensoren, um sie
wieder einzuschalten.
Aus
Tiefschlaf
Die Sensoren haben sich selbst
ausgeschaltet. Dies geschieht, wenn
sie sich 48 Stunden lang im
Bereitschaftsmodus befanden.
Drücken Sie eine Taste, um die
Sensoren wieder einzuschalten.
Impuls: kurz: Ein;
lang: Aus
Wartet auf
Verbindung
Der Sensor ist eingeschaltet und
wartet auf die Bluetooth-Verbindung
mit dem Computergerät.
Langsames
Blinken (1
Sekunde ein, 1
Sekunde aus)
Verbunden
Der Sensor ist eingeschaltet und
korrekt über Bluetooth mit dem
Computergerät verbunden.
Schnelles Blinken
(~0,5 Sekunde
ein, ~0,5
Sekunde aus)
Verbunden –
Alarm
Der Sensor ist eingeschaltet und mit
dem Computergerät verbunden; es
wird jedoch eine Warnmeldung
angezeigt.*
Dreifaches
Blinken
(3 Mal pro
Sekunde)
Niedriger
Batteriestand
Der Batteriestand des Sensors ist
niedrig; Batterie muss geladen
werden.*
1. Schließen Sie die Micro-USB-Enden des Ladekabels an den Sensoren an.
2. Schließen Sie das reguläre USB-Ende des Ladekabels an Ihrem PC ODER
an einem nach Richtlinie IEC 60950 zugelassenem USB-Ladegerät an.
Möglicherweise besitzen Sie bereits ein Ladegerät; viele neue Mobiltelefone
und andere mobile Produkte werden mit einem IEC 60950-kompatiblen
USB-Ladegerät geliefert.
Laden Sie die Sensoren mindestens 90 Minuten lang vollständig auf.
Während die Sensoren geladen werden, kann kein Training durchgeführt
werden.
Die Sensoren sind mit einer LED ausgestattet, die blinkt und aufleuchtet, um
darüber zu informieren, welche Vorgänge ausgeführt werden oder wenn die
Sensoren geladen werden müssen. Die folgende Tabelle enthält eine Liste der
verschiedenen LED-Modi und ihrer Erklärungen.
Laden der Sensoren
* Ebenso werden Warnmeldungen und Meldungen über niedrigen Batteriestand auf dem
Computergerät angezeigt.
Weichen oder tauchen Sie die Sensoren nicht in irgendwelche Flüssigkeiten
ein. Wischen Sie die Oberflächen mit einem feuchten Tuch ab.
Das Kabel
Das mit dem Valedo mitgelieferte Kabel ist ein standardmäßiges USB-zu-DualMicro-USB-Kabel. Verwenden Sie dieses Kabel sowohl zum Laden als auch für die
Firmware-Updates der Sensoren.
Beide Micro-USB-Anschlüsse können zum Laden verwendet werden, aber nur
einer kann für Firmware-Updates verwendet werden. Einfach ausgedrückt: Sie
können beide Sensoren gleichzeitig laden, aber nur jeweils einen Sensor
aktualisieren. Informationen zum Aktualisieren der Sensoren finden Sie im
Instandhaltung „Instandhaltung“ unten.
Kapitel 1: Übersicht und Sicherheit
V_UM1.1_de_1407
6

DE
1
Abbildung 2: USB-Kopf auf der linken Seite, zwei Micro-USB-Köpfe auf der rechten Seite. Der
Micro-USB-Kopf in der Mitte kann sowohl zum Laden als auch für Firmware-Updates
verwendet werden.
Der Gurt (optional)1
Falls Sie die Übungen ohne Verwendung des doppelseitigen medizinischen
Klebebands durchführen möchten, sollten Sie unseren speziell konzipierten Gurt in
Erwägung ziehen. Der Sensor schnappt einfach in die Gurtschnalle ein. Die Länge
lässt sich durch Ziehen am losen Band problemlos verstellen.
Abbildung 3: Trainingsgurt. Von Hand waschen und zum Trocknen aufhängen.
Das Computergerät
Für das gesamte Training ist ein Computergerät erforderlich. Eine Liste der
unterstützten Geräte finden Sie unter www.valedotherapy.com Geben Sie auf Ihr
Computersystem Acht, und führen Sie regelmäßige Aktualisierungen des
Betriebssystems durch.
Sie müssen die Valedo Anwendung auf das Computergerät herunterladen und
installieren (siehe Kapitel 3).
Koppeln der Sensoren mit dem Computergerät via Bluetooth
1. Aktivieren Sie Bluetooth auf Ihrem Computergerät (gewöhnlich unter
„Einstellungen“ oder „Konfiguration“).
2. Schalten Sie die Sensoren ein.
3. Öffnen Sie die Valedo Anwendung.
4. Erstellen Sie ein neues Profil; achten Sie darauf anzugeben, dass Sie über
Sensoren verfügen. Weitere Informationen zum Erstellen eines Profils finden
Sie in Kapitel 3.
5. Verbinden Sie die Sensoren auf dem Sensorverwaltungsbildschirm.
Bei der erstmaligen Inbetriebnahme müssen Sie die Schritte 1-5 durchführen; bei
der nachfolgenden Verwendung sorgt die Bluetooth-Verbindung dafür, dass die
Sensoren beim Öffnen der Valedo Anwendung automatisch mit dem
Computergerät gekoppelt sind.
Das Valedo Etui
Das Etui, in dem der Valedo geliefert wurde, dient nicht nur zum Versandschutz,
sondern ist auch für den sicheren Transport und die sichere Aufbewahrung
vorgesehen. Er ist in Abbildung oben dargestellt.
Wir empfehlen, die Valedo Sensoren zwischen den Trainingssitzungen im
Aufbewahrungsetui zu lagern.
Die Valedo Anwendung
Die standardmäßige Valedo Anwendung für die Therapie für den unteren Rücken
kann kostenlos heruntergeladen werden. Weitere Funktionen oder Anwendungen
Der Gurt ist ein optionales Zubehör, das von Hocoma käuflich erworben werden kann.
Einzelheiten finden Sie auf www.valedotherapy.com.
Kapitel 1: Übersicht und Sicherheit
7
V_UM1.1_de_1407

DE
können evtl. käuflich erworben werden. Das von Ihnen verwendete Computergerät
bestimmt, von welcher Website Sie die Valedo Anwendung herunterladen müssen;
führen Sie auf der jeweiligen Website eine Suche nach „Valedo“ durch. Beispiel:
iPad-Benutzer können zum App Store gehen.
Vollständige Details über die Valedo Softwareanwendung finden Sie in Kapitel 3.
Schützen Sie das Computergerät vor Viren.
Die Valedo Anwendung speichert nur eine minimale Menge an
Informationen, darunter die Profilinformationen für jeden Benutzer und seine
Leistung bei den durchgeführten Übungen.
Besuchen Sie regelmäßig die Website www.valedotherapy.com, um nach
verfügbaren Updates für die Valedo Anwendung zu suchen.
Sicherheitsbestimmungen
Zur Gewährleistung des sicheren Gebrauchs des Valedo müssen Sie die unten
und im gesamten Handbuch aufgeführten Sicherheitshinweise beachten.
Alle Warnhinweise müssen unbe dingt befolgt werden.
Die Valedo Sensoren sind kein Spielzeug und können eine
Erstickungsgefahr darstellen. Von Kindern und Haustieren fernhalten.
Verwenden Sie den Valedo nicht, wenn irgendwelche Komponenten
beschädigt sind oder modifiziert wurden.
Achten Sie vor dem Gebrauch auf Indikationen, Kontraindikationen und
Risikofaktoren.
Bei Verwendung von Klebeband nur medizinisches Klebeband verwenden.
Die Sensoren müssen vor und nach dem Gebrauch abgewischt werden. Wir
empfehlen ein weiches, feuchtes Tuch.
Verwendungszweck
Der Valedo ist ein persönliches Therapiesystem zur Verbesserung der Gesundheit
des Rückens und zur Vorbeugung gegen unspezifische Schmerzen im unteren
Rücken. Der Valedo enthält Übungen, welche die Mobilisierung, Dehnung,
Stabilisierung, Balance und das Bewegungsbewusstsein des Patienten fördern und
bequem zu Hause durchgeführt werden können. Im Allgemeinen empfehlen wir,
täglich 20 Minuten lang zu trainieren.
Rumpf- und Beckenbewegungen werden mit zwei drahtlosen Sensoren, die an
Ihrem Körper angebracht werden, gemessen und auf ein persönliches
Computergerät (z. B. ein Tablet) übertragen. Diese Bewegungssignale werden
analysiert und liefern in einem spielerischen Umfeld präzises, funktionelles
Echtzeit-Feedback (Augmented Performance Feedback) darüber, wie Sie sich
bewegen und ob Sie sich richtig bewegen. Das Augmented Performance Feedback
ermöglicht Ihnen eine motivierende und sichere Form der Bewegungstherapie. Das
System überwacht Ihre Bewegungsleistung und führt Sie durch die Übungen, die
speziell für die Therapie von Schmerzen im unteren Rücken entwickelt wurden.
Indikationen
Unspezifische Schmerzen im unteren Rücken
Beeinträchtigungen des Iliosacralgelenks (z. B. Beckengürtelschmerzen,
Blockierung)
Fibromyalgie (anhaltende, weit gestreute Schmerzen und
Druckempfindlichkeit, Schlafstörungen und Müdigkeit)
Gutartiges Hypermobilitätssyndrom (Gelenk- oder Gliederschmerzen,
Gelenksubluxation, Gelenkverrenkung usw.)
Spondylolisthesis (Vorverlagerung eines Wirbels) (Grad I ohne
neurologische Symprome)
Erfordernis von Stabilitätstraining der Rumpf- und Wirbelsäulenmuskulatur
Erfordernis von Mobilitätstraining für Wirbelsäule und Beckengürtel
Erfordernis eines verbesserten Trainings für Körperbalance und -haltung
Schlaganfall- oder Neurologiepatienten, deren Rumpfstabilität und
Körperwahrnehmung verbessert werden müssen (ohne oder mit geringer
Apraxie [Unfähigkeit zur Ausführung erlernter, zielgerichteter Bewegungen])
Falls Sie nicht sicher sind, ob bei Ihnen eine Indikation vorliegt, lassen Sie sich von
einer medizinischen Fachkraft (z. B. Arzt, Physiotherapeut, Chiropraktiker) beraten.
Kapitel 1: Übersicht und Sicherheit
V_UM1.1_de_1407
8

DE
Der Valedo kann für Patienten mit den folgenden Leiden verwendet werden, jedoch
nur nach Konsultation einer medizinischen Fachkraft und unter dessen Aufsicht.
Hernien, einschließlich postoperativer Hernien
Spinale Stenose (Verengung des Rückenmarkkanals), einschließlich
postoperativer Zustand
Stabile Wirbelkörperfrakturen
Spondylitis ankylopoetica (eine Form von Arthritis, die zur Versteifung oder
Fusion des Wirbels in der Wirbelsäule (frühere Bezeichnung: Morbus
Bechterew) mit schmerzhaft beschränkten Bewegungen der Wirbelsäule
führen kann)
Osteoporose (Knochenverlust), leicht oder mäßig, mit schmerzhaften Folgen
Multiple Sklerose (Erkrankung des zentralen Nervensystems) (nicht
progressives Stadium) mit gestörter Körperwahrnehmung
Parkinson-Krankheit (fortschreitende Erkrankung des zentralen
Nervensystems) mit gestörter Körperbalance und -haltung
Schlaganfall- oder neurologische Patienten, weniger als 3 Monate nach dem
letzten Ereignis, Erfordernis einer verbesserten Rumpfstabilität und
Körperwahrnehmung (ohne oder mit geringer Apraxie)
Kontraindikationen
Nicht in jedem Fall ist ein funktionelles Training mit dem Valedo möglich oder
indiziert. Generell darf der Valedo zur Vermeidung ungünstiger Effekte in den
folgenden Fällen nicht angewendet werden: Daher sind insbesondere die
folgenden Kontraindikationen zwingend:
Knochenkrebs, einschließlich Tumoren der Wirbelsäule oder Metastasen in
den Wirbeln
Instabilität der Wirbelsäule, z. B. instabile Wirbelfrakturen, oder bei
Spondylolisthesis (Vorverlagerung eines Wirbels) (Grad II oder höher),
insbesondere mit neurologischen Symptomen
Akute rheumatische Arthritis oder akute Spondylarthritis (akute Entzündung
der Knochen oder Gelenke)
Infektion von Knochen oder Gelenken
Akute Einklemmungen von Sakral-, Lenden- oder Thoraxnervenwurzeln, die
zum Ausfall der Erregungsleitung an der Nervenwurzel geführt haben
Schwere Osteoporose (Knochenverlust) oder Osteomalazie
(Knochenerweichung) mit latentem Frakturrisiko
Implantierte ferromagnetische Materialien oder aktive Geräte im Körper
Wirbelsäulenfusionen innerhalb der ersten drei Monate nach der Operation
Hauterkrankungen oder -läsionen im Bereich der Sensorplatzierung
(einschließlich Hauteinschnitten, -rissen, Ekzemen usw.)
Bettlägerige Patienten.
Die obige Liste erhebt keinen Anspruch auf Vollständigkeit. Falls Sie nicht sicher
sind, ob bei Ihnen eine Kontraindikation vorliegt, lassen Sie sich von einer
medizinischen Fachkraft beraten. Falls bei Ihnen eine Kontraindikation vorliegt, Sie
aber dennoch mit dem Valedo trainieren möchten, müssen Sie zuerst eine
medizinische Fachkraft konsultieren. Die Entscheidung darüber, ob ein Patient in
Fällen von Kontraindikationen für diese Behandlung geeignet ist, unterliegt stets
der Zuständigkeit der medizinischen Fachkraft. Dieser ist dafür verantwortlich, die
möglichen Risiken und Nebenwirkungen der Behandlung gegen den Nutzen, der
mit der Behandlung erzielt werden kann, abzuwägen. Zusätzlich spielt die
individuelle Situation des Patienten eine ebenso wichtige Rolle wie die
grundsätzliche Risikobewertung für spezifische Patientengruppen.
Auch die vermehrte Osteoporoseausbildung bei chronischen Patienten ist zu
beachten. Da eine schwere Osteoporose eine Kontraindikation darstellt, liegt es
in Ihrer Verantwortung, innerhalb der Empfehlungen einer kompetenten
medizinischen Fachkraft zu trainieren und den von dieser Fachkraft aufgestellten
Behandlungsplan einzuhalten.
Bei chronischen Patienten oder Patienten nach einer langen Immobilität werden zu
Beginn kurze Trainingseinheiten empfohlen. Oft neigen Patienten anfänglich zum
Übertrainieren, was zu Muskelermüdung, Schmerzen oder Gelenkbeschwerden
führen kann, wenn die ersten Trainingssitzungen zu lang sind.
Kapitel 1: Übersicht und Sicherheit
9
V_UM1.1_de_1407

DE
Wie bei jedem anderen Trainingsprogramm sind kleine Schritte zu Beginn wichtig,
um ein Übertrainieren und mögliche Verletzungen zu vermeiden. Mit der Zeit wird
sich Ihr Körper an das Training gewöhnen und Sie werden in der Lage sein,
längere und anstrengendere Übungen durchzuführen.
Setzen Sie das Training nicht fort, wenn Sie sich müde fühlen. Training bei
Ermüdung kann zu Überkompensation oder falschen Bewegungen führen.
Untersuchen Sie sich regelmäßig auf mögliche Hautreizungen oder
Anzeichen von allergischen Reaktionen. Falls das medizinische Klebeband
Hautreizungen verursacht, brechen Sie das Training ab und konsultieren Sie
einen Hautarzt.
Risikofaktoren
Der Valedo ist nicht dafür vorgesehen, die Kompetenz oder Erfahrung einer
medizinischen Fachkraft zu ersetzen. Falls Sie nicht sicher sind, ob bei Ihnen ein
Risiko vorliegt, lassen Sie sich von einer medizinischen Fachkraft beraten. Der
Valedo ist lediglich ein Therapiegerät zur Linderung von Schmerzen im unteren
Rücken sowie zur Verbesserung der Rumpfstabilität und -mobilität sowie des
allgemeinen Gleichgewichts. Bitte beachten Sie die folgenden Risikofaktoren.
Kürzlich erfolgte schwerwiegende Unfälle (z. B. Schleudertrauma,
Wirbelsäulenprellung) ohne vorherige Rücksprache mit einer medizinischen
Fachkraft
Akute Hernien (einschließlich spinaler Hernien)
Schweres kardiovaskuläres oder zerebrovaskuläres Ereignis, z. B.
Myokardinfarkt (Herzinfarkt), Aortenaneurysma (Vergrößerung der Aorta)
oder Schlaganfall, innerhalb von drei Monaten nach dem letzten Ereignis
Schwere neurologische Behinderung, einschließlich Kompression des
Rückenmarks oder der Cauda equina (Nervenbündel im unteren
Rückenbereich), Nervenwurzelkompression usw.
Schwere Gleichgewichtsdefizite mit erhöhtem Sturzrisiko
Kognitive Defizite, die das Verstehen von Übungen verhindern
Schwangerschaft
Epileptische Anfälle innerhalb der vergangenen zwei Jahre, die nicht
medizinisch kontrolliert sind, oder photosensible Patienten
Erkrankung der Retina, die durch das Anschauen von Videospielen überreizt
werden kann
Nebenwirkungen
Hocoma AG hat die Materialien, die in der Klinik oder zu Hause mit unseren
Kunden in Kontakt kommen, mit gebührender Sorgfalt ausgewählt. Diese
Materialien wurden auf ihre biologische Verträglichkeit beurteilt und werden
kontinuierlich von den Herstellern überwacht. Dennoch besteht weiterhin ein
kleines Risiko, dass manche Materialien unter außergewöhnlichen Umständen bei
bestimmten Personen allergische Reaktionen hervorrufen.
Instandhaltung
Die Instandhaltung des Valedo ist völlig unkompliziert. Wischen Sie die Sensoren
vor und nach dem Training mit einem feuchten Tuch ab, und bewahren Sie sie
zwischen den Trainingssitzungen im Valedo Etui auf um sie vor Fusseln, Staub
und Sonnenlicht zu schützen. Achten Sie darauf, alle möglicherweise vorhandenen
Klebstoffrückstände zu entfernen. Vor dem Gebrauch der Sensoren ist
sicherzustellen, dass sie aufgeladen sind.
Firmware-Updates
Das mitgelieferte USB-zu-Micro-USB-Kabel wird nicht nur zum Laden, sondern
auch für das Firmware-Update der Sensoren verwendet.
Die Sensor-Firmware kann aktualisiert werden, indem der Micro-USB-Stecker für
die Datenübertragung am Sensor (siehe Abbildung 2) und das USB-Ende an
einem Computer angeschlossen wird. Gehen Sie zur Website
www.valedotherapy.com, um nach Firmware-Updates zu suchen; befolgen Sie die
Anweisungen auf dem Bildschirm. Ziehen Sie den Sensor NICHT vom Computer
ab, während die Firmware aktualisiert wird.
Kapitel 1: Übersicht und Sicherheit
V_UM1.1_de_1407
10

DE
Vorkommnisse melden
Nach dem Eintritt des Vorkommnisses darf das Produkt erst nach Freigabe
durch Hocoma AG wider in Betrieb genommen und genutzt werden.
Schwerwiegende Ereignisse mit Produkten der Hocoma AG, die zu
schwerwiegenden Schäden an Personen (lebensbedrohende oder
schwerwiegenden Verletzungen und Todesfälle) und Sachen führten oder hätten
führen können, sind unmittelbar nach dem Ereignis auf www.valedotherapy.com
oder vorab telefonisch zu melden.
11
Kapitel 1: Übersicht und Sicherheit
V_UM1.1_de_1407

DE
Anlegen des Sensors am unteren
Rücken
Anlegen des Sensors an der Brust
Abbildung 4: Korrekte Platzierung
des Sensors am unteren Rücken
Abbildung 5: Korrekter
Platzierungsbereich des Sensors an der
Brust
1. Wischen Sie die Sensoren mit einem feuchten Tuch ab.
2. Kleben Sie ein Stück des Valedo doppelseitigen Klebebandes auf die
Rückseite des Sensors.
3. Ziehen Sie die Schutzfolie vom doppelseitigen Klebeband ab.
4. Legen Sie den Sensor an. (Achten Sie darauf, dass der Micro-USB-Port
nach unten zeigt.)
Kapitel 2: Vorbereitung des Trainings
Erste Trainingssitzung
Schalten Sie Ihre Sensoren ein, und koppeln Sie sie mit dem Computergerät. Sie
werden nun die Trainingsumgebung vorbereiten und erfahren, wo die Sensoren
angebracht werden müssen.
Vorbereitung der Trainingsumgebung
Achten Sie darauf, dass Sie über genügend Platz zum sicheren Trainieren
verfügen. Sie haben die Möglichkeit, das Computergerät während des Trainings zu
halten oder vor sich auf einen Tisch zu stellen.
Viele Tablet-Computergeräte verfügen über Abdeckungen, die auch als
Ständer fungieren.
Manche Computergeräte können an einen Fernseher oder
Computerbildschirm angeschlossen werden. Informationen über das
Computergerät sind dessen Benutzerhandbuch zu entnehmen.
Wenn Sie Ihr Computergerät an Ihren Fernseher oder Computerbildschirm
anschließen, denken Sie daran, das Computergerät in der Nähe zu
belassen, da die Sensoren daran angeschlossen sind und weil Sie
Schaltflächen auf dessen Bildschirm antippen müssen.
Ziehen Sie für das Training das Ladek abel vom Computergerät ab.
Entfernen Sie mögliche Kabel oder andere Gegenstände in Ihrer Nähe, die
während des Trainings eine Stolpergefahr darstellen können.
Achten Sie beim Trainieren auf einem Teppich darauf, dass sich der Teppich
wölben und damit eine Stolpergefahr darstellen kann. Wir empfehlen,
entweder eine andere Trainingsumgebung auszuwählen oder den Teppich
für das Training wegzuräumen.
Achten Sie darauf, dass sich die Sensoren mindestens 1 m von
elektromagnetischen, ferromagnetischen (z. B. große Lautsprecher oder
Haushaltsgeräte) oder metallischen Gegenständen entfernt befinden.
Mobiltelefone, Uhren, Stromadapter (für einen Laptop) oder andere Geräte
mit magnetischen Elementen können die Sensorsignale verzerren. Halten
Sie solche Gegenstände wie oben erläutert in angemessener Entfernung
von den Sensoren. Wände und Böden können auch elektrische Kabel,
Metallrohre oder Rahmenverstärkungen enthalten.
Anlegen der Sensoren
Das Tragen eines Hosengürtels kann dazu führen, dass der Sensor
herunterfällt oder Verzerrungen des Sensorsignals verursacht.
Kapitel 2: Vorbereitung des Trainings
V_UM1.1_de_1407
12

DE
Möglicherweise ist es einfacher, für die ersten Trainingssitzungen den
Brustsensor ohne Hemd und vor einem Spiegel anzulegen.
Trennen Sie die Sensoren immer vom Ladekabel, bevor Sie sie an Ihrem
Körper anlegen.
Wir empfehlen, die Rückseite der Sensoren und die
Sensoranbringungsstellen an Ihrem Körper mit einem feuchten Tuch
abzuwischen und trocknen zu lassen. Dadurch klebt das doppelseitige
Klebeband besser am Sensor und an Ihrer Haut.
Beide Sensoren sind austauschbar und können entweder für die Brust oder
den unteren Rücken verwendet werden.
Achten Sie darauf, die Sensoren korrekt anzulegen. Ein falsches Anlegen
der Sensoren kann ein anderes visuelles Feedback erzeugen und zu
übertriebenen Bewegungen auf dem Bildschirm führen.
Verwenden des Gurtes
Anbringen des Sensors im Gurt und Anlegen des Gurtes
1. Klicken Sie den Sensor im Gurt ein (siehe Kapitel 1).
2. Ziehen Sie den Gurt um Brust oder Becken.
3. Haken Sie die Schnalle in die Schlaufe.
4. Ziehen Sie zum Festziehen am losen Ende des Gurtes.
5. Bringen Sie den Sensor an die korrekte Position, entweder auf der Brust
oder auf dem Becken (für Sensorposition siehe oben).
6. Ziehen Sie den Gurt erneut fest, bis die Sensoren nicht verschoben werden,
wenn Sie sich bewegen.
Training
Wenn Sie die Sensoren angelegt haben, kann das Training beginnen. Das Training
besteht aus verschiedenen Übungen in einem spielerischen Umfeld; bei jeder
Übung müssen Sie bestimmte Bewegungen durchführen.
Das Training erfolgt über die Valedo Anwendung auf Ihrem Computergerät. Tippen
Sie auf das Symbol, um die Anwendung einzuschalten.
Beginn des Trainings
Abbildung 6: Symbol auf dem Computergerät (iPad-Beispiel; Symbol kann bei anderen
Alle Trainingsübungen zielen auf eine bestimmte Bewegung des unteren Rückens
ab; jede Bewegung wird vor Beginn der Übung demonstriert. Achten Sie darauf,
die Bewegung genau nachzuahmen; dadurch wird das Risiko falscher
Bewegungen und damit das Verletzungsrisiko reduziert.
Vermeiden Sie insbesondere während Ihrer ersten Trainingssitzungen mit
dem Valedo ein Übertrainieren. Zwar ist eine gesunde Motivation beim
Training immer eine positive Sache, aber ein zu langes oder zu intensives
Training kann zur Ermüdung der Muskeln und dadurch zu Verletzungen bei
der Ausübung alltäglicher Aufgaben führen.
Wenn die Übung eine Bewegung erfordert, die außerhalb Ihrer Fähigkeiten
liegt, überschreiten Sie nicht Ihre Grenzen, um die korrekte Bewegung
durchzuführen. Solche Situationen lassen sich am besten vermeiden, indem
Sie die Einstellungen für den Bewegungsumfang justieren, um neue
Grenzen für Ihren persönlichen Bewegungsumfang festzulegen.
1. Schließen Sie die Softwareanwendung auf Ihrem Computergerät.
2. Entfernen Sie die Sensoren von Ihrem Körper.
3. Entfernen Sie das doppelseitige Klebeband (vom Körper oder den
Sensoren).
4. Entsorgen Sie das doppelseitige Klebeband.
5. Wischen Sie den Sensor mit einem feuchten Tuch ab.
6. Verwahren Sie die Sensoren im Valedo Etui.
Computergeräten etwas anders aussehen).
Trainingssitzung beenden
Kapitel 2: Vorbereitung des Trainings
13
V_UM1.1_de_1407

DE
Kapitel 3: Valedo Anwendung
Erste Schritte
Starten Sie die Valedo Softwareanwendung durch Tippen auf das Symbol .
Mit „Tippen“ meinen wir antippen oder anklicken – je nach Computergerät.
Eine Liste der unterstützten Computergeräte finden Sie unter
www.valedotherapy.com.
Erstmalige Installation
Bevor Sie mit dem Training beginnen können, müssen Sie den Valedo einrichten.
Tippen Sie auf den Startbildschirm; wenn die Sensoren noch nicht eingeschaltet
sind, werden Sie von der Software aufgefordert, sie einzuschalten und Ihr Profil zu
erstellen. Geben Sie Ihren Namen, Ihr Geburtsdatum und Ihr Geschlecht ein. Sie
können Ihre Daten auch aus Facebook importieren. Tippen Sie dazu auf das
Facebook-Symbol, und folgen Sie den Anweisungen auf dem Bildschirm.
Sie können jederzeit zurückkehren und Ihre Informationen bearbeiten oder neue
Profile hinzufügen; dadurch haben Sie die Möglichkeit, den Valedo gemeinsam mit
weiteren Personen auf demselben Computergerät zu verwenden.
Nachdem Sie Ihre Informationen eingegeben haben, werden Sie von der Valedo
Anwendung durch die Kalibrierung des ersten Sensors und die Messungen des
Bewegungsumfangs (ROM) geleitet.
Die Kalibrierung ist einfach: Stellen Sie sich mit angelegten Sensoren ruhig hin,
und wenn Sie aufgefordert werden fortzufahren, beugen Sie sich.
Auch das Messen des Bewegungsumfangs ist einfach: Sie werden auf den ROMBildschirmen aufgefordert, die im Beispiel gezeigte Stellung nachzuahmen. Das
genaue Messen Ihres Bewegungsumfangs ist wichtig, da die Anwendung die
Grenzen Ihrer Beweglichkeit kennen muss, um Ihre Bewegungen präzise auf dem
Bildschirm nachzumachen. Weitere Informationen über die ROM-Einstellung finden
Sie unter Einstellen des Bewegungsumfangs (ROM) unten.
Wenn Sie weitere Hilfe benötigen, gehen Sie bitte zur Website
www.valedotherapy.com, um mehr über die Bewegungen und den ROM zu
erfahren.
Nach dem erstmaligen Einrichten gelangen Sie zum Startbildschirm; von dort
können Sie das Dorf erkunden!
Startbildschirm
Hier befinden Sie sich auf dem Startbildschirm. Es gibt dort noch nicht viel zu tun,
weil die Dorfbewohner auf Ihre Hilfe warten!
Besuchen Sie die verschiedenen Nachbarn, um zu sehen, an welchen Übungen
diese gerade arbeiten.
Wischen Sie nach links oder rechts, um sich durch die Nachbarschaft zu
bewegen.
Kapitel 3: Valedo Anwendung
V_UM1.1_de_1407
Abbildung 7: Startbildschirm.
14

DE
Auf dem Bildschirm:
Links oben auf dem Startbildschirm sehen Sie dieses Band mit
dem Namen, den Sie in Ihr Profil eingegeben haben. Dieses
Band zeigt nicht nur den Namen des Spielers an, sondern es
ist auch eine Schaltfläche! Wenn Sie darauf klicken, gelangen
Sie zum Abschnitt „Profilverwaltung“ (siehe unten).
Trainingsziel (nicht festgelegt): Tippen Sie hier, um Ihr
Trainingsziel festzulegen und zu überwachen.
Trainingsziel (festgelegt): Nachdem Sie ein Ziel festgelegt
haben, erscheint ein Punkt auf der Zielscheibe. Die Farbe des
Punktes gibt Ihren Fortschritt an. Rot bedeutet: Ziel nicht
erreicht; gelb bedeutet: wird derzeit versucht; grün bedeutet:
Sie haben Ihr Ziel erreicht.
Dehnen: Dies ist ein nicht sperrbarer Abschnitt der ValedoAnwendung. Hier können verschiedene Dehnungsübungen
unter Anleitung durchgeführt werden.
Abzeichen: Während Sie spielen und mit den verschiedenen
Übungen im Spiel weiterkommen, verdienen Sie Abzeichen.
Hier können Sie sehen, was Sie verdient haben und was noch
fehlt!
Protokolle: Sie möchten Ihre Fortschritte sehen? Hier können
Sie sehen, wie lange Sie gespielt haben, wie viele Objekte Sie
gesammelt haben und mehr.
Bewegungsumfang: Stellen Sie hier Ihren ROM ein. Der
Bildschirm entspricht dem der erstmaligen Vorbereitung; es
kann jedoch nützlich sein, diesen Abschnitt im weiteren
Spielverlauf erneut aufzusuchen. Vielleicht stellen Sie fest,
dass Sie es ein bisschen weiter schaffen!
Valedo-Schaltfläche: Tippen Sie auf diese Schaltfläche, um
zu www.valedotherapy.com zu gehen oder eine E-Mail an
Valedo zu senden.
Sensor-Schaltfläche: Weist auf den Batteriestand und die
Stärke der Sensorverbindung hin. Ist ebenso eine ShortcutSchaltfläche, die Sie zum Bildschirm „Sensorverwaltung“
bringt.
Schnelltherapie: Tippen Sie hier, um die Auswahl der Übung
zu erleichtern und sich von Valedo willkürlich Übungen
auswählen zu lassen. Schalten Sie fünf Häuser frei, um diese
Funktionalität zu aktivieren; Valedo kann nur solche Übungen
für Sie auswählen, die Sie bereits freigeschaltet haben.
Informationen: Wenn Sie hierauf klicken, werden
Informationen über den Valedo angezeigt, auf dem Sie sich
gerade befinden. Auf dem Startbildschirm befindet sich die
Schaltfläche „Info“ rechts unten.
15
Kapitel 3: Valedo Anwendung
V_UM1.1_de_1407

DE
Profilverwaltung (Profile Management)
Abbildung 8: Bildschirm „Profilverwaltung“ (Profile Management). Achten Sie auf die
In Abschnitt „Profilverwaltung“ (Profile Management) können Sie Profile
hinzufügen, bearbeiten oder löschen. Außerdem können Sie dort alle Profile durch
Hochladen zur iCloud sichern und die hochgeladenen Profile wiederherstellen.
Schaltflächen „Sichern“ (Back Up) und „Wiederherstellen“ (Restore).
Dazu muss iCloud auf Ihrem Gerät installiert sein.
Tippen Sie auf „Sichern“ (Back Up), um alle Profile zur iCloud hochzuladen, und
tippen Sie auf „Wiederherstellen“ (Restore), um Ihre zuletzt hochgeladenen Profile
auf Ihr aktuelles Gerät herunterzuladen.
Dies bedeutet, dass Sie verschiedene Geräte für Ihr Training verwenden können,
solange Valedo und Ihr iCloud-Konto darauf installiert sind!
Einstellen des Bewegungsumfangs (ROM)
Während der erstmaligen Installation oder wenn Sie im Startbildschirm die
Abbildung 9: Beispiel eines Bewegungsbereich-Bildschirms.
Schaltfläche antippen, können Sie Ihren Bewegungsumfang (ROM) einstellen,
aktualisieren und zurückverfolgen. Das Einstellen des korrekten
Bewegungsumfangs (ROM) ist wichtig, um eine präzise Spielweise und ein
gefahrloses Training zu gewährleisten.
Mit dem Festlegen Ihres eigenen ROM ist ein einfacher Zweck verbunden: Die
Software kann mithilfe der ROM-Werte die Übungen an Ihre persönliche
Bewegungsfähigkeit anpassen, damit sie weder zu schwierig noch zu leicht sind.
Wenn die Spiele zu schwierig sind, wird möglicherweise die Motivation
beeinträchtigt oder das Verletzungsrisiko steigt aufgrund von überkompensierten
Bewegungen. Wenn die Spiele zu leicht sind, wird es schnell langweilig.
Kapitel 3: Valedo Anwendung
V_UM1.1_de_1407
16

DE
Anleitung
Die Software zeigt Ihnen eine Stellung, die Sie nachahmen müssen; Sie müssen
diese Stellung kurz halten und „Erfassen“ (Capture) antippen, worauf die Software
Ihren Bewegungsbereich für die spezifische Bewegung berechnet. Die Leiste für
den Bewegungsbereich muss grün sein (siehe Abbildung 9); damit wird
sichergestellt, dass der Bewegungsbereich groß genug für wahrnehmbare
Übungsbewegungen und die Spielbarkeit ist. Wenn sie rot ist, können Sie nicht auf
„Erfassen“ (Capture) klicken und mit der nächsten Bewegung fortfahren. Es gibt
viele Körperstellungen, aber das Einstellen des Bewegungsumfangs sollte nicht
mehr als eine Minute dauern.
Auf den ROM-Bildschirmen zeigt die Figur das Spiegelbild einer Stellung,
die Sie nachahmen müssen. Stellen Sie sich vor, der Bewegungstutor wäre
ein kleiner Spiegel.
Spielen der Übungen
Tippen Sie auf eines der Gebäude in einem Ortsteil, um loszulegen.
Auf dem Einführungsbildschirm haben Sie die Möglichkeit, den Übungsmodus
umzuschalten: Generell gibt es folgende Übungsmodi:
Abbildung 10: Beispiel eines Trainingseinführungsbildschirms.
Präzision: Wie präzise Sie die Bewegungen beider Sensoren kontrollieren
Isolierte Präzision: Wie präzise Sie die Bewegung eines Sensors
kontrollieren, während der andere Sensor ruhig gehalten wird
Stabilisierung: Wie gut Sie in einer Position verharren
Isolierte Stabilisierung: Wie gut Sie in einer Position verharren und sich auf
einen Sensor konzentrieren, während der andere ruhig gehalten wird
Freier Modus: Kniebeugen im eigenen Tempo durchführen, nicht unter
Beachtung der Timing-Leiste wie bei Präzision und Stabilisierung
Nicht alle Modi sind für alle Übungen verfügbar.
Die Übungsmodi werden in der Anwendung erläutert.
Die Schwierigkeitsstufe ist abhängig davon, wie oft Sie eine Übung
durchgeführt haben.
Außerdem können Sie die Dauer der Übung ändern und Ihre vorherigen
Bestleistungen anzeigen.
Mit „Accuracy“ (Genauigkeit) wird beurteilt, wie präzise Ihre Bewegungen in
Bezug auf das Bewegungsziel durchgeführt wurden.
Mit „Smoothness“ (Gleichmäßigkeit) wird beurteilt, wie gleichmäßig Ihre
Bewegungen waren.
Mit „Isolation“ (nur für Isolationsmodi) wird beurteilt, wie gut Sie einen
Sensor bewegten, während Sie den anderen Sensor unbewegt ließen.
Das Dorf ist zu Beginn bis auf einige Baustellen in verschiedenen Ortsteilen recht
leer. Helfen Sie beim Errichten der Häuser auf den Baustellen, indem Sie die
Übungen durchführen.
17
Kapitel 3: Valedo Anwendung
V_UM1.1_de_1407

DE
Zeit bis Abschluss der Stufe
Gesammelte Punkte
Punkte-Multiplikator
Energieleiste: Zeigt, wie viel Energie Sie haben.
Sie erhalten mehr Energie, wenn Sie dem Pfad
folgen, durch Ringe springen und mehr!
Pause-Schaltfläche: (im Spiel) Gibt Ihnen die
Möglichkeit zu kalibrieren, die Übung
abzubrechen oder eine kurze Atempause
einzulegen!
Ein Beispiel: Sie befinden Sie sich im Ortsteil „Oberkörperbezirk“. Das eine Haus
auf der linken Seite steht für die erste Übung, die Sie durchführen können.
Entsperren Sie weitere Häuser in diesem Ortsteil und in anderen, indem Sie
Übungen durchführen.
Errichten Sie Häuser und spielen Sie neue Ortsteile frei, indem Sie
regelmäßig trainieren. Aber passen Sie auf: Ihre Häuser schrumpfen, wenn
Sie nicht regelmäßig trainieren!
Verwenden Sie für jede Übung den Roboter, um Schmucksteine zu sammeln.
Wenn Sie zurückgekehrt sind, verfügen Sie über die Ressourcen, um die Häuser
zu errichten und weitere Bewegungen und Ortsteile freizuspielen.
Achten Sie auf die weißen Punkte unter dem Bewegungssymbol (siehe Abbildung
7). Diese Punkte geben an, wie nahe Sie Ihrem Ziel sind, die nächste Etage des
Hauses zu bauen. Sie erhalten einen weißen Punkt, wenn Sie eine Übung
beenden; wenn Sie genug Punkte haben, wächst das Haus.
Tippen auf [Wiedergabe] bringt Sie direkt zur Übung. Es findet eine kurze
Kalibrierung und dann eine kurze Einführung in die Bewegung statt. Danach sind
Sie an der Reihe!
Führen Sie die Bewegungen so durch, wie sie demonstriert wurden, um den
Roboter korrekt zu bewegen; falls Sie dies nicht tun, wird er es Ihnen sagen! Bei
einigen Übungen müssen Sie einem Pfad folgen, bei einigen müssen Sie durch
Ringe fliegen, und andere wiederum haben vollkommen andere Ziele. Achten Sie
auf die Anweisungen zu Beginn jeder Übung, damit Sie alles richtig machen!
Abbildung 11: Beispiel eines Bildschirms während des Spiels.
Auf dem Bildschirm:
Kapitel 3: Valedo Anwendung
V_UM1.1_de_1407
18

DE
Bewegungstutor-Schaltfläche: (im Spiel) Wenn
Sie dieses Symbol rechts unten während des
Spiels antippen, erscheint der Bewegungstutor
groß. Nach zwei Sekunden erscheint er wieder
klein.
Links/rechts und auf/ab invertieren: (nur im
„Hüftenbezirk“) durch Tippen auf [Pause]
während einer beliebigen Übung im „Hüftenbezirk“
können Sie die Steuerung der Hüftbewegung
umschalten.
Kapitel 3: Valedo Anwendung
19
V_UM1.1_de_1407

DE
Allgemeines
Abmessungen (L × B × H)
42 mm × 32 mm × 16 mm
Gewicht
18 g (je Sensor)
Erwartete Nutzungsdauer
3 Jahre
Elektronik
Stromversorgung
Enthaltene Ladelösung
(Polymer-Li-ion, 3,7 V, 160 mAh)
Funkübertragungsfrequenz
2,4-GHz-Band (Bluetooth Low Energy)
Abgestrahlte Sendeleistung
Max. 1 mW
Genauigkeit
Kreiselinstrument-Bereich
Max. 2.000 Grad pro Sekunde
Beschleuniger-Drehzahl
Max. ± 16 g
Ausrichtung
± 360 Grad auf allen Achsen
Digitalkompass
1 bis 2 Grad Genauigkeit
Betriebsbereich
20 Meter bei unbehindertem Blick auf das
Computergerät.
Allerdings ist der präzise Betriebsbereich von
Sensoren abhängig von der
Trainingsumgebung.
Allgemeines
Abmessungen des Hauptkabels (L)
900 mm
Abmessungen des
Verlängerungskabels (L)
300 mm
Gewicht
30 g
Version
USB-Version 2
Erwartete Nutzungsdauer
3 Jahre
Allgemeines
Abmessungen (zwei Teile) (L x B)
39 x 38 mm
Erwartete Nutzungsdauer
3 Jahre, sofern die Lagerung bei
Temperaturen zwischen 10 und 27 °C und
einer relativen Luftfeuchtigkeit von 40 bis 60
% erfolgt.
Kapitel 4: Technische Daten
Die Sensoren
Die Valedo Anwendung erkennt keine Sensoren, die nicht von Hocoma stammen.
Versuchen Sie nicht, Sensoren von Drittanbietern am Valedo anzuschließen.
Weitere Komplikationen, die sich aus einer versuchten Verwendung von nicht von
Hocoma stammenden Sensoren ergeben können, sind u. a. die Beschädigung der
in der Valedo Anwendung gespeicherten Informationen, Beschädigung von
Informationen auf Ihrem Computergerät außerhalb der Valedo
Anwendungsumgebung, Beschädigung der Sensoren Dritter und Verletzungen.
Das Kabel
Das doppelseitige Klebeband
Kapitel 4: Technische Daten
V_UM1.1_de_1407
20

DE
Der Gurt (optional)2
Allgemeines
Abmessungen (L)
~60 bis 120 cm (die genauen Abmessungen
sind der Website zu entnehmen)
Gewicht
~50 g
Erwartete Nutzungsdauer
3 Jahre
Betriebsumgebung
Temperatur
15 bis 35 ºC
Luftfeuchtigkeit
30 bis 75 %
Luftdruck
700 bis 1060 hPa
Verpacken und Transport
Temperatur
-20 bis 45 ºC (maximal 1 Monat)
Luftfeuchtigkeit
45 bis 85 %, keine Kondensation
Luftdruck
700 bis 1060 hPa
Lagerung
Temperatur
-20 bis 35 ºC (maximal 6 Monate)
45 °C (maximal 1 Monat)
Luftfeuchtigkeit
45 bis 85 %, keine Kondensation
Luftdruck
700 bis 1060 hPa
2
Allgemeine Betriebsbedingungen
Das Gerät darf nur in sauberen, trockenen Räumen mit ebenen Fußböden
verwendet werden. Achten Sie darauf, dass Sie über genügend Platz zum sicheren
Trainieren verfügen, und halten Sie große ferromagnetische Anlagen (z. B.
Stereoanlagen oder große Lautsprecher) oder Geräte mindestens 2 Meter von
Ihnen entfernt. Wir empfehlen, das Gerät nur innerhalb von Gebäuden zu
verwenden.
Der Valedo darf nur innerhalb von Gebäuden gelagert werden.
Die technischen Daten des Computergeräts sind dessen Benutzerhandbuch
zu entnehmen.
Elektromagnetische Verträglichkeit
Für elektrische Medizinprodukte gelten bestimmte Vorsichtsmaßnahmen
hinsichtlich der elektromagnetischen Verträglichkeit (EMV) und sie müssen gemäß
den Angaben in diesem Dokument installiert und betrieben werden. Drahtlose
Kommunikationsgeräte wie z. B. drahtlose Heimnetzwerkgeräte, Mobiltelefone,
schnurlose Telefone und deren Basisstationen, Walkie-Talkies, können die
Funktion des Valedo beeinträchtigen. Nur die vom Hersteller gelieferten oder
bezogenen Wandler und Kabel als Ersatzteile verwenden. Andere Kabel und
Zubehörteile, die nicht vom Hersteller geliefert wurden, können die EMV-Leistung
beeinträchtigen und zu einer erhöhten Aussendung oder einer reduzierten
Störfestigkeit des Valedo führen. Nur die folgenden Teile sind mit dem Valedo
kompatibel:
Sensor, Teilenummer 30814
Kabel, Teilenummer 30813
Halten Sie einen Abstand von mehr als 1 m zwischen Mobiltelefonen und
anderen Geräten mit drahtlosen oder magnetischen Komponenten und den
Valedo Sensoren ein.
Der Gurt ist ein optionales Zubehör, das von Hocoma käuflich erworben werden kann.
Einzelheiten finden Sie auf www.valedotherapy.com.
21
Kapitel 4: Technische Daten
V_UM1.1_de_1407

DE
FCC und IC-Erklärungen
Erklärung gemäß Teil 15.105
Dieses Gerät wurde getestet und entspricht den Grenzwerten für ein digitales
Gerät der Klasse B, entsprechend Teil 15 der FCC-Bestimmungen. Diese
Grenzwerte dienen dem angemessenen Schutz vor schädlichen Störungen in
Wohnanlagen. Dieses Gerät erzeugt und benutzt Funkfrequenzenergie und kann
solche abstrahlen. Wenn es nicht gemäß den Anweisungen installiert und benutzt
wird, kann es Störungen im Funkverkehr verursachen. Es gibt allerdings keine
Garantie dafür, dass es bei einer bestimmten Installation zu k einer Störung kommt.
Falls dieses Gerät Funkstörungen im Radio- oder Fernsehempfang verursacht,
was durch Ein- und Ausschalten des Geräts überprüft werden kann, wird
empfohlen, die Störung durch eine oder mehrere der folgenden Maßnahmen zu
beheben:
Verändern der Ausrichtung oder des Standortes der Empfangsantenne.
Vergrößern des Abstands zwischen Gerät und Empfänger.
Anschließen des Geräts an einer Steckdose eines anderen Stromkreises als
dem, mit dem der Empfänger verbunden ist.
Hinzuziehen des Händlers oder eines erfahrenen Radio-/Fernsehtechnikers.
Erklärung gemäß Teil 15.19 und RSS-210
Teil 15 der FCC-Bestimmungen und mit Freistellung vom Standard RSS von
Industry Canada.
Der Betrieb unterliegt den beiden folgenden Bedingungen:
1. Dieses Gerät darf keine Störungen verursachen, und
2. dieses Gerät muss Störungen aufnehmen können, einschließlich Störungen,
die zu unbeabsichtigtem Betrieb führen können.
Erklärung gemäß Teil 15.21
Jegliche Änderungen und Modifikationen an diesem Gerät, die nicht ausdrücklich
von Hocoma genehmigt wurden, können die Befugnis zum Verwenden des Geräts
gemäß den FCC-Vorschriften erlöschen lassen.
HF-Expositionshinweis gemäß 2.1091 / 2.1093 / OET Bulletin 65
Expositionshinweis zu Hochfrequenzstrahlung
Die von diesem Gerät ausgestrahlten Signale liegen weit unter den HFExpositionsgrenzwerten der FCC.
Risikomanagement
Das Anschließen des Valedo an ein Computernetzwerk, das andere Geräte
enthält, kann zu zuvor unerkannten RISIKEN führen; solche RISIKEN müssen
identifiziert, analysiert und eingedämmt werden (siehe IEC 60601-1:2005)
Nachträglich vorgenommene Veränderungen an Computernetzwerken können
neue RISIKEN verursachen und eine erneute Analyse erforderlich machen.
Veränderungen an Computernetzwerken sind u. a.:
Veränderungen der Computer- oder Datennetzwerk-Konfiguration
Anschließen weiterer Geräte am Computernetzwerk
Trennen von Geräten vom Computernetzwerk
Aktualisieren der mit dem Computernetzwerk verbundenen Geräte
Hochrüsten von mit dem Computernetzwerk verbundenen Geräten
Der hier verwendete Begriff „Computernetzwerk“ entspricht dem Begriff „Netzwerk/Datenkopplung“ in IEC 60601-1:2005.
Kapitel 4: Technische Daten
V_UM1.1_de_1407
22

DE
Kapitel 5: Fehlerbehebung
Problem
Maßnahme
Die Sensoren lassen
sich nicht einschalten.
Den Sensoren leicht schütteln, um ihn
einzuschalten.
Falls dies nicht gelingt, drücken Sie die Taste,
um ihn einzuschalten.
Wenn die Sensoren mit diesen beiden
Methoden nicht eingeschaltet werden können,
bedeutet dies, dass die Batterien leer sind und
aufgeladen werden müssen.
Falls Sie einen Sensorfehler vermuten, lesen
Sie die Informationen zur Sensordiagnostik
und die Verfahren für den Ersatz unter
Garantie auf der Website
www.valedotherapy.com.
Problem
Maßnahme
Das Computergerät
startet nicht.
Stellen Sie sicher, dass das Computergerät
geladen wurde und eingesteckt ist.
Weitere Empfehlungen zur Fehlerbehebung für
das Computergerät sind dessen
Benutzerhandbuch zu entnehmen.
Es kann keine
Verbindung zwischen
den Valedo Sensoren
und dem
Computergerät
hergestellt werden.
Achten Sie darauf, dass auf dem
Computergerät die neueste Version des
Betriebssystems ausgeführt wird.
Achten Sie darauf, dass die Sensoren
aufgeladen sind, bevor sie mit der Software
des Computergeräts verbunden werden.
Achten Sie darauf, dass die Sensoren nicht
über das USB-Kabel mit einer Stromquelle
verbunden sind.
Achten Sie darauf, dass Bluetooth auf Ihrem
Computergerät aktiviert ist.
Achten Sie darauf, dass Sie sich nahe genug
am Computergerät befinden (Sensorsymbol
auf dem Computergerät gibt an, wenn die
Sensoren und das Computergerät
angeschlossen sind).
Schalten Sie die Sensoren aus und wieder ein.
Starten Sie das Computergerät neu.
Starten Sie die Valedo Anwendung neu.
Fehlerbehebung
Bei Problemen mit dem System besuchen Sie bitte die folgende Website:
www.valedotherapy.com
Dieser Abschnitt bietet Valedo Benutzern die Möglichkeit, eventuelle Fehler mit
den unten aufgeführten Problemen zu vergleichen und entsprechende
Abhilfemaßnahmen zu ergreifen.
Falls Sie Fragen haben oder eine weitergehende Klärung von Problemen
benötigen, für die wir noch keine zufriedenstellende Lösung geboten haben,
wenden Sie sich zuerst an Ihr Hocoma Service Center. Kontaktinformationen sind
der Copyright-Seite am Anfang des Handbuchs zu entnehmen.
Probleme mit den Sensoren
Probleme bei der Vorbereitung einer Trainingssitzung
Kapitel 5: Fehlerbehebung
23
V_UM1.1_de_1407

DE
Problem
Maßnahme
Der/die Sensor(en)
fällt/fallen ab.
Reinigen Sie die Rückseite des Sensors mit
einem feuchten Tuch, bevor Sie einen neuen
Streifen doppelseitiges Klebeband anlegen.-
Wischen Sie die Hautbereiche, an denen Sie
den/die Sensor(en) anlegen werden, mit einem
weichen, feuchten Tuch ab, bevor Sie die
Sensoren erneut anlegen.
Trocknen Sie die Haut und den Sensor, bevor
Sie das Klebeband anbringen und den Sensor
an Ihrem Körper befestigen.
Bringen Sie den Sensor wieder an, und
drücken Sie ihn 5 Sekunden lang fest an, um
sicherzustellen, dass er an der Haut haften
bleibt.
Wenn alle obigen Vorschläge fehlschlagen,
sollten Sie den Kauf des Trainingsgurtes von
Hocoma in Erwägung ziehen.
Der Avatar auf den
Bildschirmen zum
Einstellen des
Bewegungsumfangs
(ROM) zeigt nicht die
korrekte Bewegung an.
Achten Sie darauf, dass alle Sensoren
weiterhin mit dem Computergerät
kommunizieren.
Stellen Sie den ROM nochmals ein und achten
Sie darauf, dass Sie still stehen, während die
Sensoren kalibriert werden, und beugen Sie
sich zum Bestätigen und Fortfahren nur dann,
wenn Sie dazu aufgefordert werden.
Der Avatar bewegt sich
während der
Trainingsübungen sehr
schnell.
Stoppen Sie die Übung und stellen Sie den
Bewegungsumfang (ROM) nochmals ein. Ein
sehr kleiner ROM führt zu übermäßig stark
ansprechenden Avatar-Bewegungen während
des Spiels.
Schalten Sie die Sensoren aus und wieder ein.
Starten Sie das Computergerät neu.
Starten Sie die Valedo Anwendung neu.
Der Avatar bewegt sich
nicht, während Sie die
Übungen durchführen.
Achten Sie darauf, dass alle Sensoren noch
eingeschaltet sind und mit dem Computergerät
kommunizieren.
Schalten Sie die Sensoren aus und wieder ein.
Starten Sie das Computergerät neu.
Starten Sie die Valedo Anwendung neu.
Die Anzeige-LEDs
zeigen, dass sie
angeschlossen sind
(siehe Kapitel 1 für
LED-Modi), aber der
Avatar bewegt sich
nicht.
Achten Sie darauf, dass alle Sensoren
weiterhin mit dem Computergerät
kommunizieren.
Schalten Sie die Sensoren aus und wieder ein.
Starten Sie das Computergerät neu.
Starten Sie die Valedo Anwendung neu.
Probleme während der Trainingssitzung
Kapitel 5: Fehlerbehebung
V_UM1.1_de_1407
24

DE
Problem
Maßnahme
Die im Spiel
erforderliche
Bewegung übersteigt
Ihren
Bewegungsumfang.
Legen Sie neue ROM-Werte für die Übungen
fest.
Das Einstellen der richtigen
Bewegungsumfänge während des ÜbungsROM ist wichtig; daher dürfen Sie beim
Einstellen dieser Parameter nicht
kompensieren oder sich überfordern. Dadurch
wird sichergestellt, dass die während des
Spiels erforderlichen Bewegungen Ihre
körperlichen Grenzen nicht übersteigen.
Informationen zum Einstellen des ROM finden
Sie in Kapitel 3.
Nach dem Training
sind die Hautstellen, an
denen die Sensoren
befestigt waren,
gerötet oder gereizt.
Dies kann auf eine allergische Reaktion auf
das doppelseitige Klebeband hinweisen.Beenden Sie das Training umgehend und
konsultieren Sie einen Hautarzt, bevor Sie das
Valedo Training fortsetzen.
Alarmsymbol
Maßnahme
Rechts oben sehen Sie das Sensorsignal und die
Batteriesymbole.
Wie Sie hier sehen, kommuniziert ein Sensor
nicht korrekt mit dem Computergerät, und die
Batterie ist leer.
Entfernen Sie den entladenen Sensor von
Ihrem Körper und laden Sie ihn auf. (Für
Informationen zum Aufladen siehe Kapitel 1.)
Wenn der Sensor geladen ist und weiterhin
anzeigt, dass am Computergerät kein Signal
eingeht, schalten Sie den Sensor aus und
wieder ein, während die Anwendung
weiterläuft.
Alarmsymbole
Die folgenden Alarmsymbole können während der Übungen auf dem Bildschirm
erscheinen. In diesem Fall sind die folgenden Anweisungen zu befolgen.
Kapitel 5: Fehlerbehebung
25
V_UM1.1_de_1407

DE
Kennzeichnet möglicherweise gefährliche Situationen oder
Handlungen. Symbol gemäß ISO 7010-W001.
Hebt nützliche Tipps, Empfehlungen und Informationen hervor, die
für den korrekten und effizienten Betrieb des Geräts erforderlich
sind.
1.
2.
3.
Schrittweise Erklärung der Aufgaben für die korrekte Verwendung
des Hocoma-Produkts.
Hersteller und Herstellungsjahr.
Dieses Symbol gibt die vom Hersteller festgelegte
Referenznummer des Geräts an.
Dieses Symbol gibt den vom Hersteller festgelegte Chargencode
des Geräts an.
Erfüllt die Anforderungen der Richtlinie MDD93/42/EEG.
Anwendungsteile des Typs BF.
Das doppelseitige medizinische Klebeband ist nur für den
einmaligen Gebrauch bestimmt. Es darf nicht wiederverwendet
werden.
Das doppelseitige medizinische Klebeband nicht mehr nach
diesem Datum verwenden.
Dieses Symbol gibt die Temperaturgrenzwerte für Betrieb,
Lagerung und Transport an.
Dieses Symbol gibt die Luftfeuchtigkeitsgrenzwerte für Betrieb,
Lagerung und Transport an.
Dieses Symbol gibt die Atmosphärendruck-Grenzwerte für Betrieb,
Lagerung und Transport an.
Schützen Sie die Umwelt. Bitte entsorgen Sie dieses Gerät oder
die darin verwendeten Batterien auf umweltverträgliche Weise.
Das Gerät darf nicht im normalen Hausmüll entsorgt werden.
Altgeräte sind gemäß geltenden örtlichen Bestimmungen an einer
entsprechenden Sammelstelle zu entsorgen. Bei Fragen wenden
Sie sich bitte an Ihre Abfallbehörde vor Ort.
IP22
Die IEC-Art des Schutzes gegen Eindringen.
Symbol für nichtionisierende Strahlung.
Symbole auf der Verpackung
2 Sensoren
100 Klebestreifen
1 USB Kabel
Kapitel 6: Rechtliche Informationen
Erläuterung der verwendeten Symbole
Kapitel 6: Rechtliche Informationen
V_UM1.1_de_1407
26

DE
1 Etui
Bedienungsanleitung und Kurzanleitung beachten
Computergerät (nicht im Lieferumfang enthalten)
Bluetooth®-kompatibel. Die Wortmarke Bluetooth® und die Logos
sind eingetragene Marken im Besitz von Bluetooth SIG, Inc., und
jeglicher Gebrauch dieser Marken durch die Hocoma AG erfolgt
unter Lizenz.
Haftungsausschluss
Sämtliche Hocoma Produkte sind Medizinprodukte und dürfen nur unter strikter
Einhaltung der Angaben im Benutzerhandbuch angewendet werden; die
Nichteinhaltung kann zu schweren Verletzungen führen. Es wird nachdrücklich
empfohlen, dass Sie regelmäßig die Hocoma Webseite
(www.hocoma.com/legalnotes) für die aktuellsten verfügbaren Informationen
konsultieren. Wenn Sie Fragen haben, kontaktieren Sie Hocoma.
Gewisse Hocoma Produkte werden für den Heimgebrauch angeboten und dürfen
nur unter strikter Einhaltung der Anweisungen des Benutzerhandbuchs eingesetzt
werden. Falls Sie irgendwelche Zweifel im Zusammenhang mit der korrekten
Verwendung des Produkts haben, sollten Sie sich an Ihren medizinischen
Versorger wenden, der Ihre besondere Anamnese kennt. Die Nichtbeachtung des
Benutzerhandbuchs und/oder der Empfehlungen Ihres medizinischen Versorgers
kann zu schweren Verletzungen führen.
Kein Teil dieser Informationen darf als Garantie der Produkteigenschaften
ausgelegt werden.
Die Nichtbeachtung der Sicherheitsbestimmungen und Anweisungen zur
Verwendung des Geräts kann zu schweren Verletzungen und Sachschäden
führen. Der Valedo darf nicht für Indikationen oder in Kombination mit
Geräten oder Software verwendet werden, die nicht ausdrücklich
zugelassen und im Benutzerhandbuch von Hocoma AG aufgeführt sind.
Garantiebedingungen
Sofern der Valedo gemäß vorliegendem Benutzerhandbuch verwendet wird, ist er
mindestens 24 Monate lang ab Kaufdatum garantiert frei von Material- und
Verarbeitungsfehlern. Die Garantie gilt nur für den Endbenutzer Hocoma
verpflichtet sich, den von der Garantie abgedeckten Valedo im eigenen Ermessen
kostenlos zu überholen oder zu ersetzen. Reparatur, Modifikation oder Ersatz liegt
im alleinigen Ermessen der Hocoma AG. Hocoma AG garantiert keine
therapeutischen Resultate oder Erfolge aufgrund der Verwendung des Valedo.
Bei unterschiedlicher Auslegung der Übersetzung dieses Benutzerhandbuchs ist
der englische Wortlaut maßgebend.
27
Kapitel 6: Rechtliche Informationen
V_UM1.1_de_1407


FR
Manuel de l'utilisateur
Français
We move you

FR
Le contenu de ce manuel de l'utilisateur, y compris toutes les figures et
illustrations, est la propriété intellectuelle d'Hocoma et/ou de tierces parties et est
protégé par droit d'auteur. Il est fourni seulement pour permettre l'utilisation et la
maintenance de l'appareil. L'utilisation du contenu à d'autres fins ou la copie du
contenu est interdite, sauf consentement écrit préalable d'Hocoma.
Ce manuel s'applique à Valedo.
Fabricant
Hocoma AG
Industriestrasse 4
CH-8604 Volketswil
Suisse
Tél. +41 (43) 4442200
Fax +41 (43) 4442201
info@hocoma.com
www.hocoma.com
Sous réserve de modifications techniques
Copyright Hocoma AG
Dernière révision : 2014-07-04
®

FR
Introduction ......................................................................... 4
Un peu d'histoire… ............................................................... 4
Chapitre 1 : Présentation et sécurité ............................... 5
Familiarisation avec Valedo® ................................................ 5
Capteurs ................................................................................................ . 5
Câble ...................................................................................................... 6
Ceinture (facultative) .............................................................................. 7
Ordinateur .............................................................................................. 7
Étui Valedo ............................................................................................. 7
Application Valedo ................................................................................. 7
Consignes de sécurité .......................................................... 8
Utilisation prévue ................................................................................... 8
Indications .............................................................................................. 8
Contre-indications .................................................................................. 9
Facteurs de risque ................................................................................. 10
Effets indésirables .................................................................................. 10
Maintenance ......................................................................... 10
Mises à jour du micrologiciel ................................................................. 10
Déclaration d’incident ........................................................... 10
Chapitre 2 : Préparation à l'entraînement ........................... 11
Séance d'entraînement initiale ............................................. 11
Préparation de l'espace d'entraînement ............................................... 11
Mise en place des capteurs ................................................................... 11
Utilisation de la ceinture......................................................................... 12
Entraînement ........................................................................ 12
Chapitre 3 : Application Valedo ........................................ 13
Mise en route ........................................................................ 13
Première installation .............................................................................. 13
Écran d'accueil ................................ ....................................................... 13
Gestion des profils ................................................................................. 15
Définition de l'amplitude de mouvement ................................ ............... 15
Pratique des exercices ......................................................... 16
Chapitre 4 : Caractéristiques techniques ........................ 18
Capteurs ................................................................................................. 18
Câble ...................................................................................................... 18
Adhésif double face ............................................................................... 18
Ceinture (facultative) .............................................................................. 19
Conditions générales d'utilisation ......................................... 19
Compatibilité électromagnétique .......................................... 19
Déclarations FCC et IC......................................................... 20
Gestion des risques .............................................................. 20
Chapitre 5 : Dépannage ..................................................... 21
Dépannage ........................................................................... 21
Problèmes de capteurs .......................................................................... 21
Problèmes de préparation à une séance d'entraînement .................... 21
Problèmes durant la séance d'entraînement ................................ ........ 22
Alertes .................................................................................................... 23
Chapitre 6 : Mention légale................................................ 24
Explication des symboles utilisés .......................................................... 24
Symboles sur l'emballage ...................................................................... 24
Décharge de responsabilité .................................................. 25
Garantie ................................................................................ 25

FR
Introduction
Bienvenue et merci d'avoir acheté Valedo !
Si vous lisez ceci, cela signifie que vous êtes une des millions de personnes du
monde entier qui souffrez de douleur lombaire. La bonne nouvelle pour vous est
que vous avez pris une décision importante - faire le premier pas pour traiter ce
mal tenace qui fait figure d'épidémie.
Nombreux sont ceux qui ne savent pas que quelques minutes par jour suffisent à
combattre la douleur lombaire. Ayez votre Valedo à portée de main pour une
séance d'exercices avant le travail, durant la pause-déjeuner ou même en voyage !
Pour les affaires ou les loisirs, vous trouverez Valedo pratique, intéressant et
amusant.
Alors, qu'attendez-vous ? Allons-y !
Un peu d'histoire…
Hocoma est connue pour ses produits de rééducation physique, tels que
Lokomat®, Armeo® et Erigo®, mais il fait aussi figure de pionnier dans l'utilisation
des capteurs dans notre thérapie fonctionnelle pour les douleurs lombaires. C'est
là que Valedo® et ses homologues cliniques Valedo®Motion et Valedo®Shape
entrent en jeu.
Pour en savoir plus sur tous nos produits cliniques, allez sur www.hocoma.com et
pour en savoir plus sur Valedo®, consultez www.valedotherapy.com.
Ce manuel de l'utilisateur décrit une utilisation sûre et correcte de Valedo. Suivez
les consignes de sécurité et les instructions du manuel de l'utilisateur, de même
que les normes générales de sécurité et d'hygiène.
Lorsque vous vous entraînez avec Valedo, vous êtes considéré d'un point de vue
médical comme un patient. Pour toutes les autres activités avec Valedo, vous êtes
considéré comme l'opérateur.
Gardez ce manuel sous la main pour pouvoir vous y référer rapidement et le relire
de temps à autre.
Pour faciliter la lecture, nous utilisons le masculin (il, le, lui) pour désigner les
personnes des deux sexes.
Introduction
V_UM1.1_fr_1407
4

FR
Chapitre 1 : Présentation et sécurité
Familiarisation avec Valedo®
Valedo comprend les composants suivants :
2 capteurs
Adhésif double face
Câble pour recharges ou mises à jour du micrologiciel
Étui de rangement et de transport de Valedo
Le Système Valedo comprend tous les composants suivants plus l'ordinateur.
Capteurs
Les deux capteurs Valedo sont légers et faciles à utiliser. Ils sont équipés d'un
bouton, d'un voyant et d'un port micro-USB pour les recharges et les mises à jour
du micrologiciel.
Le voyant est uniquement visible lorsqu'il est allumé.
S'ils sont régulièrement utilisés, les capteurs en Veille peuvent être simplement
activés en les secouant. Si les capteurs sont en Veille pendant plus de 48 heures,
ils passent en mode Veille profonde.
Si les capteurs sont en Veille, secouez-les légèrement pour les « réveiller ».
Si les capteurs sont en mode Veille profonde, appuyez sur le bouton pour
les réveiller.
Pour passer manuellement en mode Veille profonde, appuyez sur le bouton
pendant 4 secondes.
Les capteurs actifs passeront en mode Veille après 30 secondes s'ils ne
détectent pas d'ordinateur avec lequel se connecter.
Les capteurs passeront en mode Veille profonde au bout de 5 minutes
environ s'ils ne peuvent pas se connecter à votre ordinateur mais qu'ils
détectent un mouvement continu ; ceci est important en cours de transport
pour économiser la batterie.
Une fois réveillés, les capteurs indiquent par leur voyant qu'ils recherchent une
connexion Bluetooth® (voir tableau ci-dessous) ; une fois Bluetooth correctement
activé sur l'ordinateur, vous pouvez connecter les capteurs avec (voir Ordinateur
ci-dessous).
Figure 1 : Présentation de Valedo
Activation et désactivation des capteurs
Chapitre 1 : Présentation et sécurité
5
V_UM1.1_fr_1407

FR
Comportements
des voyants
Statut du
capteur
Explication
Allumé
Recharge—
entièrement
chargé
Les capteurs sont branchés et
entièrement chargés.
Pulsation inversée :
allumé longtemps -
éteint brièvement
Recharge—
partiellement
chargé
Les capteurs sont branchés, mais
partiellement chargés.
Éteint
Veille
Les capteurs ne recherchent pas
activement un signal Bluetooth.
Secouez-les pour les réactiver.
Éteint
Veille
profonde
Les capteurs se sont mis hors
tension. Ceci se produit après 48
heures d'inactivité. Appuyez sur le
bouton pour réactiver les capteurs.
Pulsation : allumé
brièvement – éteint
longtemps
En attente
de
connexion
Le capteur est sous tension et en
attente de connexion Bluetooth
avec l'ordinateur.
Clignotement lent
(allumé 1 seconde,
éteint 1 seconde)
Connecté
Le capteur est sous tension et
correctement connecté via
Bluetooth à l'ordinateur.
Clignotement rapide
(allumé ~0,5
seconde, éteint ~0,5
seconde)
Connecté—
alerte
Le capteur est sous tension et
connecté à l'ordinateur, mais un
signal d'alerte s'affiche.*
Triple clignotement
(3x par seconde)
Batterie
faible
La batterie du capteur est faible et
doit être rechargée.*
1. Branchez les connecteurs micro-U SB du câble de recharge sur les capteurs.
2. Branchez le connecteur USB standard du câble de recharge sur votre
ordinateur OU sur un chargeur USB approuvé CEI 60950.
Il est possible que vous ayez déjà un chargeur ; de nombreux téléphones
portables et autres produits mobiles sont fournis avec un chargeur de ce
type.
Pour une recharge complète, chargez les capteurs pendant 90 minutes
minimum.
Quand les capteurs sont en cours de recharge, un entraînement est
impossible.
Les capteurs sont équipés d'un voyant qui clignote pour communiquer ce qu'il fait
ou indiquer qu'il nécessite une recharge. Vous trouverez ci-dessous un table
récapitulant les différents comportements des voyants.
Recharge des capteurs
* Les messages et les alertes de batterie faible s'afficheront également sur l'ordinateur.
Ne trempez ou n'immergez les capteurs dans aucun liquide. Utilisez un
chiffon humide pour nettoyer les surfaces.
Câble
Le câble expédié avec Valedo est un câble à connecteurs USB standard/double
micro-USB. Utilisez-le pour les recharges et les mises à jour du micrologiciel des
capteurs.
Les deux connecteurs micro-USB peuvent servir à la recharge, mais un seul peut
être utilisé pour les mises à jour du micrologiciel. Plus simplement, vous pouvez
recharger simultanément les deux capteurs, mais vous pouvez seulement mettre à
jour un capteur à la fois. Pour des informations sur la mise à jour des capteurs,
reportez-vous à la section Maintenance ci-dessous.
Chapitre 1 : Présentation et sécurité
V_UM1.1_fr_1407
6

FR
1
Figure 2 : connecteur USB à gauche, deux connecteurs micro-USB à droite. Le connecteur micro-
USB au milieu peut s'utiliser à la fois pour les recharges et les mises à jour du micrologiciel.
Ceinture (facultative)1
Si vous voulez vous entraîner sans utiliser l'adhésif double face, utilisez notre
ceinture spéciale. Le capteur s'insère simplement dans la boucle de la ceinture. La
ceinture se règle facilement en tirant sur le cordon.
Figure 3 : Ceinture d'entraînement. Lavez à la main et faites sécher sur un fil.
Ordinateur
Tout entraînement exige un ordinateur. Pour la liste des appareils pris en charge,
veuillez consulter www.valedotherapy.com. Mettez régulièrement à jour le système
d'exploitation de votre ordinateur.
Sur l'ordinateur, vous devrez télécharger et installer l'application Valedo (voir le
chapitre 3).
Connexion des capteurs et de l'ordinateur via Bluetooth
1. Activez Bluetooth sur votre ordinateur (généralement sous Paramètres ou
Configuration).
2. Activez les capteurs.
3. Ouvrez l'application Valedo.
4. Créez un profil en veillant à indiquer que vous avez des capteurs. Pour en
savoir plus sur la création d'un profil, voir le chapitre 3.
5. Connectez les capteurs dans l'écran Gestion des capteurs.
Pour la première utilisation, vous devez suivre les étapes 1 à 5 ; ensuite, Bluetooth
connecte automatiquement les capteurs et l'appareil d'affichage à l'ouverture de
l'application Valedo.
Étui Valedo
Utilisez l'étui dans lequel Valedo vous a été livré pour le ranger et le transporter.
Voir l'étui dans la Figure 1 ci-dessus.
Nous recommandons de laisser les capteurs Valedo dans l'étui entre deux
séances d'entraînement.
Application Valedo
L'application Valedo standard pour le traitement standard de la lombalgie est
disponible en téléchargement gratuit. Des fonctions ou applications
supplémentaires peuvent être disponibles à l'achat. Votre ordinateur indiquera
comment télécharger l'application Valedo ; une fois là, recherchez simplement
« Valedo ». Par exemple : les utilisateurs d'iPad iront à l'App Store.
La ceinture est un accessoire proposé à l'achat par Hocoma. Pour des détails, allez à
www.valedotherapy.com.
7
Chapitre 1 : Présentation et sécurité
V_UM1.1_fr_1407

FR
Pour des détails complets sur l'application Valedo, reportez-vous au chapitre 3.
Protégez votre ordinateur des virus.
L'application Valedo stocke seulement un minimum d'informations, dont le
profil de chaque utilisateur et sa performance pour les exercices effectués.
Consultez régulièrement le site www.valedotherapy.com pour voir si des
mises à jour sont disponibles pour l'application Valedo .
Consignes de sécurité
Vous devez vous conformer aux consignes de sécurité ci-dessous et à celles se
trouvant dans ce manuel pour garantir une utilisation sûre de Valedo.
Respectez impérativement tous les messages d'avertissement.
Les capteurs Valedo ne sont pas des jouets et peuvent poser un risque
d'étouffement. Gardez-les hors de portée des enfants et des animaux
domestiques.
N'utilisez pas Valedo si un des composants est abîmé ou modifié.
Prenez connaissance des indications, contre-indications et facteurs de
risque avant utilisation.
Lorsque vous utilisez un adhésif, utilisez uniquement du sparadrap.
Vous devez essuyer les capteurs avant et après utilisation. Nous
recommandons l'utilisation d'un chiffon humide doux.
Utilisation prévue
Valedo est un système de thérapie personnelle qui a pour objet d'améliorer la
santé du dos et de prévenir une lombalgie non spécifique. Valedo propose des
exercices de mobilisation, d'étirement, de force, de stabilisation, d'équilibre et
d'éveil au mouvement que les patients effectuent dans le confort, à domicile. En
général, nous recommandons un entraînement quotidien de 20 minutes.
Les mouvements du tronc et du bassin sont mesurés à partir de deux capteurs
sans fil attachés à votre corps et transférés à un ordinateur (tablette, par ex.). Les
signaux de ces mouvements sont analysés pour vous fournir sur votre ordinateur
une information de performance augmentée visuelle précise concernant la manière
dont vous bougez. Cette information de performance augmentée vous offre une
manière motivante et sûre de vous entraîner à bouger. Le système suit votre
performance de mouvement et vous guide tout au long d'exercices spécialement
conçus pour un traitement général de la lombalgie.
Indications
Lombalgie non spécifique
Affections de l'articulation sacro-iliaque (par ex. douleur au bassin, barrage)
Fibromyalgie (douleur généralisée persistante et douleur au toucher,
insomnie et fatigue)
Syndrome d'hypermobilité articulaire bénigne (douleur aux articulations ou
aux membres, subluxation, luxation, etc.)
Spondylolisthésis (déplacement vers l'avant d'une vertèbre) (grade I, sans
signes neurologiques)
Exigeant un entraînement de stabilité de la musculature du tronc et du
rachis
Exigeant un entraînement de mobilité de la colonne rachidienne et du bassin
Exigeant un meilleur entraînement de l'équilibre et de la posture du corps
Accident vasculaire cérébral ou patients neurologiques exigeant une plus
grande stabilité du tronc et une meilleure perception du corps [peu voire pas
d'apraxie (impossibilité d'exécuter des mouvements délibérés appris)]
En cas de doute sur une indication, consultez votre expert médical (médecin,
physiothérapeute ou kinésithérapeute). Valedo avec des patients présentant les
pathologies suivantes, mais seulement en consultation et sous la supervision d'un
physiothérapeute ou de votre expert médical :
Hernie discale, y compris état post-opératoire
Sténose rachidienne (rétrécissement du canal rachidien), y compris état
post-opératoire
Chapitre 1 : Présentation et sécurité
V_UM1.1_fr_1407
8

FR
Fractures vertébrales stables
Spondylarthrite ankylosante [type d'arthrite pouvant causer une rigidité ou
une fusion des vertèbres (ex-maladie de Bechterew) associée à une
limitation douloureuse du mouvement vertébral]
Ostéoporose (perte osseuse) niveau léger à moyen aux conséquences
douloureuses
Sclérose en plaques (maladie du système nerveux central) (stade non
progressif) avec trouble de la perception du corps
Maladie de Parkinson (trouble évolutif du système nerveux) avec trouble de
l'équilibre et de la posture du corps
Accident vasculaire cérébral ou patients neurologiques moins de 3 mois
après la dernière incidence, exigeant une plus grande stabilité du tronc et
une meilleure perception du corps (peu voire pas d'apraxie)
Contre-indications
Un entraînement fonctionnel avec Valedo n'est pas possible ni indiqué dans tous
les cas. En général, Valedo ne doit pas être utilisé dans les cas ci-dessous pour
éviter de vous blesser. Les contre-indications suivantes doivent par conséquent
être respectées, en particulier :
Cancer des os, y compris tumeurs rachidiennes ou métastase vertébrale
Instabilité du rachis, notamment fractures vertébrales instables ou
spondylolisthésis (déplacement avant d'une vertèbre) (grade II ou
supérieur), en particulier avec signes neurologiques
Polyarthrite rhumatoïde aiguë ou spondylarthrite aiguë (inflammation aiguë
des os ou des articulations)
Infection des os ou des articulations
Compression aiguë des racines nerveuses sacrées, lombaires ou
thoraciques causant des déficits de la fonction sensorimotrice
Niveau sévère d'ostéoporose (perte osseuse) ou ostéomalacie
(ramollissement des os) avec risque latent de fracture
Matériaux ferromagnétiques implantés ou appareils activés dans le corps
Fusion des vertèbres au cours des trois premiers mois après opération
Maladie de peau ou lésions cutanées à proximité des positions de capteur (y
compris coupure, peau abîmée, eczéma, etc.)
Patients qui ont été soumis à un alitement de long durée.
La liste ci-dessus est non exhaustive. En cas de doute sur une contre-indication,
consultez votre expert médical. Si vous avez une contre-indication, mais que vous
voulez toujours vous entraîner avec Valedo, commencez par consulter votre expert
médical. En présence de contre-indications, seul votre expert médical est habilité
à décider si un traitement particulier vous convient. Il doit peser au cas par cas les
risques et les effets secondaires du traitement et les bénéfices tirés. Votre cas
particulier et l'évaluation des risques généraux pour des groupes de patients
spécifiques sont d'égale importance à cet égard.
Le développement d'une ostéoporose chez des patients chroniques doit aussi être
pris en considération. Une ostéoporose sévère est une contre-indication ; il vous
incombe de suivre les recommandations de votre expert médical et le plan
thérapeutique qu'il a défini.
Si vous êtes un patient chronique ou que vous avez été immobile pendant
longtemps, de courtes séances d'entraînement constituent un bon point de départ.
Une tendance au surentraînement au début est courante et peut déboucher sur
une fatigue musculaire, une douleur ou une gêne articulaire si les séances initiales
sont trop longues.
Tout comme n'importe quel programme d'entraînement, il est critique de
commencer doucement pour éviter un surentraînement et les blessures qui
s'ensuivent. Avec le temps, votre corps s'adaptera à l'entraînement et vous pourrez
vous entraîner plus longtemps et faire des exercices plus difficiles.
Arrêtez l'entraînement si vous vous sentez fatigué. Un entraînement lorsque
vous êtes fatigué risque d'aboutir à une surcompensation ou à des
mouvements incorrects.
Examinez-vous régulièrement pour surveiller l'apparition d'une irritation
cutanée possible ou les signes de réactions allergiques. En cas de
Chapitre 1 : Présentation et sécurité
9
V_UM1.1_fr_1407

FR
Si un incident s’est produit ou a faille se produire, le produit ne doit être utilisé
qu’après l’approbation d’Hocoma AG !
complication cutanée causée par l'adhésif, arrêtez l'entraînement et
consultez un dermatologue.
Facteurs de risque
Valedo n'est pas destiné à remplacer les compétences ou l'expérience de votre
expert médical. En cas de doute sur un risque, consultez votre expert médical.
Valedo est un outil thérapeutique qui permet de traiter la lombalgie et améliore la
stabilité du tronc, la mobilité et l'équilibre global. Observez les facteurs de risque
suivants :
Accidents graves récents (par ex. coup du lapin, contusion rachidienne)
sans consultation préalable d'un expert médical
Hernie discale rachidienne aiguë (par ex., hernie discale)
Événement cardiovasculaire ou cérébrovasculaire sévère, comme un
infarctus du myocarde (crise cardiaque), anévrysme aortique (élargissement
de l'aorte) ou accident vasculaire cérébral, dans les trois mois suivant la
dernière incidence
Incapacité neurologique sévère, y compris compression de la moelle
épinière ou cauda equina (faisceau de nerfs en bas du dos), compression
des racines nerveuses, etc.
Déficits sévères de l'équilibre associés à un risque accru de chute
Déficits cognitifs empêchant la compréhension des exercices
Grossesse
Crise d'épilepsie non régulée médicalement au cours des deux dernières
années, ou patients photosensibles
Maladie rétinienne pouvant être exacerbée par le visionnage de jeux vidéo
Effets indésirables
Hocoma AG a fait preuve de grande diligence en sélectionnant les matériaux en
contact avec ses clients pour un usage en clinique ou à leur domicile. Ces
matériaux ont été évalués pour leur compatibilité biologique et sont
continuellement suivis par leur fabricant. Néanmoins, il est toujours possible même si une telle éventualité est infime - que certains matériaux causent des
réactions allergiques dans des circonstances exceptionnelles.
Maintenance
La maintenance de Valedo est simple. Passez un chiffon humide sur les capteurs
avant et après l'entraînement, puis rangez-les dans l'étui Valedo jusqu'à
l'entraînement suivant pour les protéger de la poussière, de l’humidité et du soleil.
Veillez à enlever tous les résidus d'adhésif, le cas échéant. Avant utilisation,
assurez -vous que les capteurs sont chargés.
Mises à jour du micrologiciel
Le câble USB/micro-USB fourni sert non seulement à la recharge, mais aussi aux
mises à jour du micrologiciel.
Le micrologiciel des capteurs peut être mis à jour en insérant le connecteur microUSB de transfert des données dans le capteur (voir Figure 2) et en branchant le
connecteur USB sur un ordinateur. Ensuite, trouvez la mise à jour du micrologiciel
à télécharger sur www.valedotherapy.com et suivez les instructions qui s'affichent.
NE DÉBRANCHEZ PAS le capteur de votre ordinateur durant la mise à jour du
micrologiciel.
Déclaration d’incident
Les événements graves survenus avec des produits de Hocoma AG ayant
entraîné, ou susceptibles d’entraîner, de graves lésions corporelles (mise en
danger de la vie d’autrui ou blessures graves et décès) et dégâts matériels doivent
être signalés à Hocoma AG sur www.valedotherapy.com ou par téléphone.
Chapitre 1 : Présentation et sécurité
V_UM1.1_fr_1407
10

FR
Chapitre 2 : Préparation à
Mise en place du capteur en bas
du dos
Mise en place du capteur sur la
poitrine
Figure 4 : Mise en place correcte du
capteur en bas du dos
Figure 5 : Plage de positionnement correcte du
capteur sur la poitrine
1. Essuyez les capteurs avec un chiffon humide.
2. Placez un bout d'adhésif double face au dos du capteur.
3. Enlevez le support papier de l'adhésif double face.
4. Mettez le capteur en place. (Assurez-vous que le port micro-USB pointe
vers le bas.)
l'entraînement
Séance d'entraînement initiale
Activez vos capteurs et connectez-les à votre ordinateur. Maintenant, préparons
l'espace d'entraînement et apprenons à placer les capteurs.
Préparation de l'espace d'entraînement
Assurez-vous d'avoir assez de place pour vous entraîner en toute sécurité. Vous
pouvez vous entraîner en tenant l'ordinateur ou en le posant debout sur une table
devant vous.
De nombreuses tablettes ont une surface de protection qui fait aussi fonction
de support.
Avec certains ordinateurs, une connexion à votre télévision ou votre écran
de PC est possible. Consultez le manuel de l'utilisateur de votre ordinateur
pour en savoir plus.
Si vous connectez votre ordinateur à votre télévision ou votre écran de PC,
rappelez-vous de garder l'ordinateur à proximité dans la mesure où les
capteurs y sont connectés et où vous devrez appuyer sur les boutons de
l'écran.
Débranchez votre ordinateur de son câble de recharge pour votre
entraînement.
Dégagez l'espace autour de vos pieds pour qu'il n'y ait ni câbles, ni autres
objets sur lesquels vous pourrez trébucher en cours d'entraînement.
Faites attention si vous vous entraînez sur un tapis, car il peut se boudiner
et poser un risque de trébuchement. Nous vous recommandons de choisir
un nouvel espace d'entraînement ou de bouger votre tapis avant votre
entraînement.
Veillez à maintenir les capteurs à 1 m minimum de tout objet
électromagnétique, ferromagnétique (tel que de grands haut-parleurs ou
appareils ménagers) ou métallique :
téléphones mobiles, adaptateurs secteur (pour un ordinateur portable) ou
d'autres appareils contenant des éléments magnétiques susceptibles de
déformer les signaux des capteurs. Tenez ces objets à une distance
appropriée des capteurs. Il est possible que les murs et les sols renferment
des câbles électriques, des tuyaux métalliques ou des armatures renforcées.
Mise en place des capteurs
Le port d'une ceinture de pantalon peut causer la chute du capteur ou
entraîner la distorsion du signal du capteur.
Chapitre 2 : Préparation à l'entraînement
11
V_UM1.1_fr_1407

FR
Les premières fois, il pourra être plus facile de placer le capteur sur la
poitrine dénudée et devant un miroir.
Débranchez toujours les capteurs du câble de recharge avant de les mettre
en place sur votre corps.
Nous vous recommandons de passer un chiffon humide au dos des deux
capteurs et sur les points du corps où les capteurs seront appliqués, puis de
laisser sécher. Ceci permettra à l'adhésif double face de mieux coller aux
capteurs et à votre peau.
Les deux capteurs sont interchangeables et peuvent être placés sur la
poitrine ou en bas du dos.
Veillez à placer correctement les capteurs. Si les capteurs sont mal placés,
ils risquent de causer un feedback visuel différent pouvant donner lieu à des
mouvements exagérés sur l'écran.
Utilisation de la ceinture
Mise en place du capteur dans la ceinture et de la ceinture
1. Insérez le capteur dans la boucle de la ceinture (voir le chapitre 1).
2. Placez la ceinture autour de la poitrine ou du bassin.
3. Accrochez la boucle au passant.
4. Tirez sur l'extrémité libre de la ceinture pour resserrer.
5. Déplacez la ceinture jusqu'à ce que le capteur (poitrine ou bassin) soit en
position correcte (pour la position des capteurs, voir plus haut).
6. Resserrez encore jusqu'à ce que les capteurs restent en place quand vous
bougez.
Entraînement
Une fois les capteurs en place, l'entraînement peut commencer. L'entraînement
implique différents exercices dans un environnement ludique ; chaque exercice est
conçu pour vous permettre d'exécuter des mouvements spécifiques.
L'entraînement s'effectue via l'application Valedo sur l'ordinateur. Appuyez sur
l'icône pour ouvrir l'application.
Démarrage de l'entraînement
Figure 6 : Icône sur l'ordinateur (exemple sur un iPad ; l'icône pourra avoir l'air légèrement
Tous les exercices d'entraînement sont conçus pour cibler un mouvement lombaire
spécifique ; la démonstration de chaque mouvement sera faite avant de débuter
l'exercice. Veillez à reproduire le mouvement exactement ; ceci minimisera le
risque de mouvements incorrects et des blessures qui en découlent.
Veillez à ne pas vous surentraîner, surtout lors de vos premières séances
Valedo. Même si la motivation à s'entraîner est toujours un point positif, un
entraînement prolongé ou un surentraînement peut produire une fatigue
musculaire qui peut causer des blessures supplémentaires lors de tâches
quotidiennes.
Si l'exercice exige un mouvement en dehors de vos capacités, ne
« poussez » pas pour faire le mouvement correct. La meilleure manière
d'éviter cette situation consiste à régler une nouvelle fois l'amplitude de
mouvement pour rétablir les limites de votre amplitude de mouvement
personnelle.
1. Fermez l'application logicielle sur votre ordinateur.
2. Enlevez les capteurs.
3. Enlevez l'adhésif double face (de votre corps ou des capteurs).
4. Jetez l'adhésif double face.
5. Passez un chiffon humide sur le capteur.
6. Rangez les capteurs dans l’étui.
Chapitre 2 : Préparation à l'entraînement
V_UM1.1_fr_1407
différente sur un ordinateur).
Fin de la séance d'entraînement
12

FR
Chapitre 3 : Application Valedo
Mise en route
Démarrez l'application Valedo en appuyant sur l'icône .
Par « appuyer », on entend toucher ou cliquer, selon l'ordinateur.
Pour la liste des ordinateurs pris en charge, veuillez consulter
www.valedotherapy.com.
Première installation
Avant de commencer l'entraînement, vous devrez configurer Valedo. Appuyez sur
l'écran de démarrage et si vos capteurs ne sont pas encore activés, le logiciel vous
demandera de les mettre sous tension et de créer votre profil. Entrez votre nom,
votre date de naissance et votre sexe. Vous pouvez aussi importer vos
informations à partir de Facebook - appuyez sur l'icône Facebook et suivez les
instructions qui s'affichent.
Vous pouvez toujours revenir en arrière et modifier vos informations ou ajouter de
nouveaux profils—ce qui vous donne l'occasion de partager Valedo avec d'autres
personnes sur le même ordinateur.
Une fois vos informations entrées, l'application Valedo vous expliquera comment
étalonner les capteurs et mesurer votre amplitude de mouvement.
L'étalonnage est facile : avec les capteurs en place, tenez-vous immobile, puis
penchez-vous en avant au moment indiqué pour continuer.
La mesure de votre amplitude de mouvement est tout aussi simple : dans les
écrans d'amplitude de mouvement, vous serez invité à reproduire la pose de
l'exemple. L'évaluation précise de votre amplitude de mouvement est importante,
car l'application doit connaître les limites de votre aptitude à bouger pour recréer
précisément vos mouvements sur l'écran. Pour en savoir plus sur la définition de
l'amplitude de mouvement, voir la section Définition de l'amplitude de mouvement
ci-dessous.
Pour toute assistance supplémentaire, veuillez consulter www.valedotherapy.com
pour en savoir plus sur les mouvements et l'amplitude de mouvement.
Après la configuration initiale, vous êtes amené à l'écran d'accueil ; à partir de là,
vous êtes libre d'explorer le Village !
Écran d'accueil
Vous êtes sur l'écran d'accueil. Pour l'instant, il n'y a pas grand-chose car les
villageois attendent votre aide !
Allez rendre visite à tous vos voisins pour voir sur quels exercices ils travaillent.
Glissez le doigt à gauche ou à droite pour parcourir les quartiers avoisinants.
Figure 7 : Écran d'accuei
13
Chapitre 3 : Application Valedo
V_UM1.1_fr_1407

FR
En haut à gauche de l'écran d'accueil, vous verrez ce ruban
associé au nom que vous avez entré dans votre profil. Ceci
indique non seulement qui joue, mais c’est aussi un bouton !
C'est un raccourci à la section Gestion des profils (voir cidessous).
Objectif de l'exercice (non défini) : appuyez ici pour définir et
suivre votre objectif d'entraînement.
Objectif de l'exercice (défini) : une fois un objectif défini, un
point apparaîtra sur la cible. La couleur du point indique vos
progrès : rouge signifie « objectif non atteint » ; jaune, « en
progrès » ; et vert, « objectif atteint ».
Étirements : c'est une section déverrouillable de l'application
Valedo. Vous apprendrez comment faire différents exercices
d'étirement.
Badges : en jouant et en avançant au fil des divers exercices,
vous gagnerez des badges. C'est là que vous pouvez voir ce
que vous avez gagné et ce qui manque encore !
Rapports : curieux d'en savoir plus sur vos progrès ? C'est là
que vous pouvez voir votre durée de jeu, le nombre d'objets
ramassés et plus encore.
Amplitude de mouvement : rétablissez ici votre amplitude de
mouvement. L'écran est identique à l'écran de configuration
initiale—même s'il est peut-être judicieux de revisiter cette
section au fur et à mesure de vos progrès dans le jeu. Vous
vous sentirez peut-être capable d'aller un peu plus loin !
Bouton Valedo : appuyez sur ce bouton pour aller sur
www.valedotherapy.com ou pour envoyer un e-mail à Valedo.
Bouton du capteur : indique le niveau de charge de la
batterie et la puissance de connexion du capteur. C'est aussi
un bouton qui constitue un raccourci à l'écran Gestion des
capteurs.
Thérapie rapide : appuyez ici pour simplifier le choix de
l'exercice et laisser Valedo sélectionner pour vous des
exercices au hasard. Déverrouillez cinq maisons pour activer
cette fonction ; seuls les exercices déverrouillés peuvent être
sélectionnés au hasard.
Informations : un clic sur ce bouton affiche des informations
concernant Valedo. Sur l'écran d'accueil, ce bouton se trouve
en bas à droite.
Sur l'écran :
Chapitre 3 : Application Valedo
V_UM1.1_fr_1407
14

FR
Gestion des profils
Figure 8: Écran Gestion des profils. Remarquez les boutons Sauvegarder et Restaurer.
Dans la section Gestion des profils, vous pouvez ajouter, modifier ou supprimer
des profils. À cet endroit, vous pouvez aussi sauvegarder et restaurer tous les
profils que vous avez téléchargés sur iCloud.
iCloud doit être installé sur votre appareil.
Appuyez sur [Sauvegarder] pour télécharger tous les profils vers iCloud ou sur
[Restaurer] pour rapatrier vos derniers profils téléchargés vers iCloud sur votre
appareil actuel.
Cela signifie que vous pouvez vous entraîner sur des appareils où Valedo et votre
compte iCloud sont installés, sans rater la moindre étape !
Définition de l'amplitude de mouvement
Figure 9: Exemple d'écran d'amplitude de mouvement.
Durant l'installation initiale ou si vous appuyez sur le bouton de l'écran
d'accueil, vous pouvez définir, mettre à jour et suivre votre amplitude de
mouvement. Il est important de définir l'amplitude de mouvement correcte pour
jouer précisément et s'entraîner sans danger.
L'objectif de la définition de l'amplitude de mouvement est simple : avec les valeurs
d'amplitude de mouvement, le logiciel peut ajuster les exercices en fonction de vos
aptitudes personnelles de mouvement pour qu'ils ne soient ni trop difficiles ni trop
faciles. Des jeux trop difficiles peuvent démotiver ou augmenter le risque de
blessure en raison d'une surcompensation des mouvements. Des jeux trop faciles
peuvent vite devenir ennuyeux.
15
Chapitre 3 : Application Valedo
V_UM1.1_fr_1407

FR
En quoi cela consiste
Le logiciel vous montrera une pose à copier ; vous devez maintenir brièvement
cette pose et appuyer sur « capture » - le logiciel calcule ensuite votre amplitude
de mouvement pour ce mouvement spécifique. La barre d'amplitude de
mouvement doit être verte (Figure 9) ; ceci permet de s'assurer que l'amplitude de
mouvement est suffisante pour permettre l'exécution des mouvements des
exercices et des jeux. Si elle est rouge, vous ne pourrez pas appuyer sur [Capture]
et passer au mouvement suivant. Il y a plusieurs poses, mais la définition de
l'amplitude de mouvement ne devrait pas prendre plus d'une minute.
Dans les écrans d'amplitude de mouvement, la silhouette prend la pose
EXACTE que vous devez prendre. Imaginez que l'instructeur de mouvement
est un petit miroir.
Pratique des exercices
Appuyez sur une des bâtisses d'un quartier pour démarrer.
Dans l'écran de présentation, vous aurez l'occasion de basculer en mode Exercice.
En général, les modes d'exercice sont les suivants :
Figure 10 : Exemple d'écran de présentation d'entraînement.
Précision : degré de précision de maîtrise du mouvement des deux capteurs
Précision isolée : degré de précision de maîtrise du mouvement d'un capteur
tout en gardant l'autre immobile
Stabilisation : degré de maintien d'une position
Stabilisation isolée : degré de maintien d'une position en se concentrant sur
un capteur tout en gardant l'autre immobile
Mode libre : faites des accroupissements à votre rythme, sans vous soucier
de la barre de temps comme en mode Précision ou Stabilisation
Les modes ne sont pas tous disponibles pour tous les exercices.
Les modes d'exercice sont expliqués dans l'application.
Le niveau de difficulté est fonction du nombre de fois qu'un exercice a été
réalisé.
Vous pouvez aussi modifier la durée de l'exercice et voir vos meilleures
performances.
« Précision » note la précision de vos mouvements par rapport à l'objectif
visé pour l'exercice.
« Fluidité » note la fluidité de vos mouvements.
« Isolement » (uniquement pour les modes Isolement) note avec quelle
habileté vous avez bougé un capteur tout en maintenant l'autre immobile.
Comme vous pouvez le voir, le Village est assez vide mis à part quelques
chantiers de constructions dans les différents quartiers. Aidez à construire les
maisons sur les chantiers en réalisant les exercices.
Par exemple, vous vous trouvez dans le Quartier Torse. La maison de gauche
représente le premier exercice que vous pouvez faire. Déverrouillez les autres
maisons de ce quartier et d'autres quartiers en réalisant les exercices.
Chapitre 3 : Application Valedo
V_UM1.1_fr_1407
16

FR
Construisez des maisons et déverrouillez de nouveaux quartiers en vous
Temps restant
Points gagnés
Multiplicateur de points
Barre d'énergie : indique la quantité d'énergie
que vous avez. Gagnez de l'énergie en suivant le
chemin, en sautant à travers des cerceaux, et
plus encore !
Bouton Pause : (dans le jeu) vous permet
d'étalonner, d'arrêter l'exercice ou simplement de
faire une pause !
Bouton Instructeur de mouvement : (dans le
jeu) appuyez sur cette icône en bas à droite en
cours de jeu pour profiter de conseils sur la
manière d'exécuter correctement le mouvement.
Elle reprend sa taille initiale au bout de deux
secondes.
Inversion gauche/droite et haut/bas : (Quartier
Hanche seulement) la sélection de [Pause]
durant tout exercice Quartier Hanche vous
permettra de basculer la commande de
mouvement de la hanche.
entraînant régulièrement, mais attention, vos maisons rétréciront si vous
restez trop longtemps sans vous entraîner !
Pour chaque exercice, sortez le robot pour ramasser des pierres précieuses. À
votre retour, vous disposerez des ressources pour construire ma maison et
déverrouiller de nouveaux mouvements et quartiers !
Les points blancs sous l'icône de mouvement (Figure 7) indiquent à quel stade
vous en êtes de la construction de la maison. Vous gagnez un point blanc quand
vous effectuez un exercice ; quand vous en avez assez, la maison grandit
Il vous suffit d'appuyer [Commencer] pour commencer l'exercice. Il y aura un
étalonnage rapide, suivi d'une brève présentation du mouvement. Ensuite,
l'exercice proprement dit commencera !
Faites les mouvements tels qu'indiqués pour déplacer correctement le robot—et si
vous ne le déplacez pas correctement, il vous le fera savoir ! Certains exercices
exigent que vous suiviez un chemin, d'autres vous font passer dans des cerceaux
et d'autres encore ont des buts complètement différents. Veillez à lire les
instructions au début de chaque exercice pour savoir ce que vous devez faire !
Sur l'écran :
Figure 11 : Exemple de l'écran en cours de jeu.
Chapitre 3 : Application Valedo
17
V_UM1.1_fr_1407

FR
Générales
Dimensions (L × l × H)
42 mm × 32 mm × 16 mm
Poids
18 g (chacun)
Estimation de la durée de service
3 ans
Électronique
Alimentation
Solution de recharge intégrée
(Li-ion polymère, 3,7 V, 160 mAh)
Fréquence de transmission sans fil
Bande 2,4 GHz (Bluetooth Low Energy)
Puissance rayonnée en sortie
Max. 1 mW
Précision
Plage de gyroscope
2 000 degrés max. par seconde
Vitesse d'accélérateur
Max. ± 16 g
Boussole numérique
Précision de 1 à 2 degrés
Orientation
± 360 degrés sur tous les axes
Portée de fonctionnement
20 m en ligne de vue directe avec
l'ordinateur.
Toutefois, la portée de fonctionnement
précise des capteurs dépend de
l'environnement d'entraînement.
Générales
Dimensions du câble principal (L)
900 mm
Dimensions de la rallonge (L)
300 mm
Poids
30 g
Révision
USB révision 2
Estimation de la durée de service
3 ans
Générales
Dimensions (deux pièces) (L x l)
39 mm x 38 mm
Estimation de la durée de service
3 ans lors d'un stockage entre 10 et 27 °C et
à une humidité relative comprise entre 40 et
60 %.
Chapitre 4 : Caractéristiques
techniques
Capteurs
L'application Valedo ne reconnaîtra pas les capteurs d'une autre marque que
Hocoma.
N'essayez pas d'utiliser des capteurs d'une autre marque avec Valedo.
Les autres complications liées à la tentative d'utilisation de capteurs non certifiés
par Hocoma peuvent inclure, entre autres, la corruption de vos données
enregistrées dans l'application Valedo, la corruption des informations sur votre
ordinateur en dehors de l'application Valedo, l'endommagement des capteurs tiers
et des blessures personnelles.
Câble
Adhésif double face
Chapitre 4 : Caractéristiques techniques
V_UM1.1_fr_1407
18

FR
Ceinture (facultative)2
Générales
Dimensions (L)
~60 à 120 cm
(dimensions exactes sur le site web)
Poids
~50 g
Estimation de la durée de service
3 ans
Conditions de fonctionnement
Température
15 à 35 ºC
Humidité dans l'air
30 à 75 %
Pression de l'air
700 à 1 060 hPa
Emballage et transport
Température
-20 à 45 ºC (un mois maximum)
Humidité dans l'air
45 à 85 %, sans condensation
Pression de l'air
700 à 1 060 hPa
Stockage
Température
-20 à 35 °C (6 mois maximum)
45 °C (1 mois maximum)
Humidité dans l'air
45 à 85 %, sans condensation
Pression de l'air
700 à 1 060 hPa
2
Conditions générales d'utilisation
L'appareil doit uniquement être utilisé dans un espace dégagé sur un sol sec et
régulier. Assurez-vous d'avoir assez de place pour vous entraîner et tenez-vous au
minimum à 2 m des grands appareils ferromagnétiques (par ex. stéréos ou hautparleurs). Nous vous recommandons d'utiliser l'appareil à l'intérieur.
Valedo doit seulement être stocké à l'intérieur.
Pour les caractéristiques techniques de votre ordinateur, consultez son
manuel de l'utilisateur.
Compatibilité électromagnétique
Les appareils électriques médicaux sont soumis à des précautions particulières en
matière de compatibilité électromagnétique (CEM) et doivent être uniquement
installés et utilisés conformément aux informations spécifiées dans ce document.
Les appareils de communication sans fil tels que les routeurs de réseau
domestiques sans fil, les téléphones mobiles, les téléphones sans fil et leur socle
et les walkie-talkies risquent d'interférer avec Valedo. Seuls les convertisseurs et
les câbles fournis par ou obtenus auprès du fabricant peuvent être utilisés comme
pièces détachées. L'utilisation d'autres câbles et accessoires non fournis par le
fabricant risque d'affecter la performance CEM et de provoquer une augmentation
des émissions ou une diminution d'immunité de Valedo. Seules les pièces
suivantes sont compatibles avec Valedo :
Capteur, no de réf. 30814
Câble, no de réf. 30813
La ceinture est un accessoire proposé à l'achat par Hocoma. Pour des détails, allez à www.valedot herapy.com.
Chapitre 4 : Caractéristiques techniques
19
V_UM1.1_fr_1407

FR
Tenez les téléphones mobiles et autres appareils contenant des composants
sans fil ou magnétiques à plus de 1 m des capteurs Valedo.
Déclarations FCC et IC
Déclaration de conformité à la partie 15.105
Cet appareil a été testé et s'est avéré co nforme aux limites d'un appareil
numérique de classe B en accord avec la partie 15 du règlement de la FCC. Ces
limites ont pour but de fournir une protection raisonnable contre les interférences
nuisibles dans une installation résidentielle. Cet appareil g énère, utilise et peut
rayonner une énergie radioélectrique (RF) et, s'il n'est pas installé et utilisé
conformément aux instructions, il risque de brouiller les communications radio.
Toutefois, il n'est pas garanti que des interférences ne se produiront p as dans une
installation particulière. Si cet appareil cause des interférences nuisibles à la
réception des signaux de radio ou de télévision, ce qui peut être déterminé en le
mettant hors tension, puis en le rallumant, l'utilisateur est encouragé à essayer de
corriger les interférences en prenant au minimum une des mesures suivantes :
Réorientez ou déplacez l'antenne réceptrice.
Éloignez l'appareil du récepteur.
Branchez l'appareil sur une prise correspondant à un autre circuit que celui
sur lequel le récepteur est branché.
Consultez le revendeur ou un technicien radio/TV pour assistance.
Déclaration de conformité à la partie 15.19 et à RSS-210
Le présent appareil est conforme aux CNR d'Industrie Canada applicables aux
appareils radio exempts de licence. L'exploitation est autorisée aux deux
conditions suivantes :
1. l'appareil ne doit pas produire de brouillage, et
2. l'utilisateur de l'appareil doit accepter tout brouillage radioélectrique subi,
même si le brouillage est susceptible d'en compromettre le
fonctionnement.
Déclaration de conformité à la partie 15.21
Les modifications apportées à cet appareil non expressément approuvées par
Hocoma risquent d'annuler l'autorisation d'utilisation de l'appareil délivrée par la
FCC.
Informations relatives à l'exposition RF conformément à 2.1091 / 2.1093 / OET
bulletin 65
Informations relatives à l'exposition au rayonnement radioélectrique (RF)
La puissance produite rayonnée par l'appareil est bien inférieure aux limites
d'exposition à l'énergie radioélectrique (RF) de la FCC.
Gestion des risques
La connexion de Valedo à un réseau informatique incluant d'autres appareils
risque de poser des RISQUES encore non identifiés ; identifiez, analysez et
contrôlez ces RISQUES (voir CEI 60601-1:2005).
Les modifications suivantes apportées à un réseau informatique peuvent introduire
de nouveaux RISQUES et exiger une nouvelle analyse.
Ces modifications incluent :
Modifications de la configuration du réseau informatique ou de données
Connexion d'éléments supplémentaires du réseau informatique
Déconnexion d'éléments du réseau informatique
Mise à jour d'équipements connectés au réseau informatique
Mise à niveau d'équipements connectés au réseau informatique
L'expression « réseau informatique » utilisée ici correspond à l'accouplement
réseau/données dans CEI 60601-1:2005.
Chapitre 4 : Caractéristiques techniques
V_UM1.1_fr_1407
20

FR
Chapitre 5 : Dépannage
Problème
Solution
Les capteurs ne
s'activent pas.
Secouez doucement le capteur pour l'activer.
Si cela est sans effet, appuyez sur le bouton
pour l'activer.
Si ces deux actions sont sans effet, la batterie
est déchargée et doit être rechargée.
Si vous suspectez une panne de capteur,
consultez www.valedotherapy.com pour les
diagnostics et procédures de remplacement de
capteur sous garantie.
Problème
Solution
L'ordinateur ne
démarre pas.
Assurez-vous que l'ordinateur est chargé ou
branché sur secteur.
Pour d'autres conseils de dépannage de
l'ordinateur, consultez son manuel de
l'utilisateur.
Les capteurs Valedo
ne se connectent pas à
l'ordinateur.
Assurez-vous que l'ordinateur utilise la
dernière version de son système d'exploitation
Assurez-vous que les capteurs sont chargés
avant de les connecter au logiciel de
l'ordinateur.
Assurez-vous que les capteurs ne sont pas
connectés à une source d’énergie via le câble
micro-USB.
Assurez-vous que Bluetooth est activé sur
votre ordinateur.
Assurez-vous que vous êtes assez près de
l'ordinateur (l'icône de capteur sur l'ordinateur
indique si les capteurs et l'ordinateur
communiquent).
Désactivez les capteurs et réactivez-les.
Redémarrez l'ordinateur.
Redémarrez l'application Valedo.
Dépannage
En cas de difficultés avec le système, consultez le site web suivant :
www.valedotherapy.com
Cette section permet aux utilisateurs de Valedo de consulter les problèmes
techniques listés ci-dessous et de prendre les mesures nécessaires.
Pour toute question ou clarification supplémentaire de problèmes pour lesquels
nous n'avons pas fourni de solution satisfaisante, contactez tout d'abord le service
après-vente de Hocoma. Pour les coordonnées, reportez-vous à la page de
copyright au début de ce manuel.
Problèmes de capteurs
Problèmes de préparation à une séance d'entraînement
Chapitre 5 : Dépannage
21
V_UM1.1_fr_1407

FR
Problème
Solution
Le(s) capteur(s) se
détache(nt).
Nettoyez l'arrière du capteur avec un chiffon
doux humecté avant d'appliquer un nouvel
adhésif double -face.
Essuyez les zones de la peau où vous
appliquerez le(s) capteur(s) avec un chiffon
doux avant réapplication.
Essuyez la peau et le capteur avant
d'appliquer l'adhésif et de fixer le capteur sur
votre corps.
Rattachez le capteur et appuyez fermement
pendant 5 secondes pour vous assurer qu'il
adhère bien à la peau.
Si toutes les suggestions ci-dessus sont sans
effet, envisagez l'achat de la ceinture
d'entraînement auprès de Hocoma.
L'avatar sur les écrans
de paramètres
d'amplitude de
mouvement n'indique
pas le mouvement
correct.
Assurez-vous que les capteurs communiquent
toujours avec l'ordinateur.
Redéfinissez les paramètres d'amplitude de
mouvement en veillant à rester immobile
pendant l'étalonnage des capteurs et en vous
inclinant seulement pour confirmer, puis
continuez quand vous y êtes invité.
Durant les exercices
d'entraînement, l'avatar
bouge rapidement sur
l'écran.
Arrêtez l'exercice et redéfinissez les
paramètres d'amplitude de mouvement. Une
très faible amplitude de mouvement
engendrera un mouvement exagérément
sensible de l'avatar en cours de jeu.
Désactivez les capteurs et réactivez-les.
Redémarrez l'ordinateur.
Redémarrez l'application Valedo.
L'avatar ne bouge pas
lorsque je fais les
exercices.
Assurez-vous que les capteurs sont toujours
activés et qu'ils communiquent avec
l'ordinateur.
Désactivez les capteurs et réactivez-les.
Redémarrez l'ordinateur.
Redémarrez l'application Valedo.
Les voyants indiquent
qu'ils sont connectés
(pour le comportement
des voyants, voir le
chapitre 1), mais
l'avatar ne bouge pas.
Assurez-vous que les capteurs communiquent
toujours avec l'ordinateur.
Désactivez les capteurs et réactivez-les.
Redémarrez l'ordinateur.
Redémarrez l'application Valedo.
Le mouvement requis
dans le jeu est
supérieur à mes
capacités.
Redéfinissez les valeurs d'amplitude de
mouvement d'exercice.
Il est critique de définir une amplitude de
mouvement correcte et précise pour les
exercices ; par conséquent, ne compensez
pas ou n'exagérez pas votre effort au moment
de définir ces paramètres. Ainsi, vous aurez
l'assurance que les mouvements requis en
cours de jeu ne vont pas au-delà de ce dont
vous êtes physiquement capable. Pour la
définition de l'amplitude de mouvement, voir le
chapitre 3.
Problèmes durant la séance d'entraînement
Chapitre 5 : Dépannage
V_UM1.1_fr_1407
22

FR
Problème
Solution
Après l'entraînement,
j'observe un
rougissement ou une
irritation au niveau de
la zone d'application
des capteurs.
Ceci peut indiquer une réaction allergique à
l'adhésif double face. Arrêtez immédiatement
l'entraînement et consultez un spécialiste
avant de reprendre l'entraînement Valedo.
Alertes
Alerte
Solution
En haut à droite, vous verrez les icônes de signal
de capteur et de batterie,
Comme vous pouvez le voir ici, un capteur ne
communique pas correctement avec l'ordinateur
et la batterie est déchargée.
Détachez le capteur en question du corps et
rechargez-le (pour la procédure de recharge,
voir le chapitre 1).
Si le capteur est chargé et indique toujours
l'absence de communication avec l'ordinateur,
désactivez le capteur et réactivez-le sans
fermer l'application.
Les alertes suivantes peuvent apparaître sur l'écran durant les exercices. Dans ce
cas, suivez les instructions ci-dessous.
Chapitre 5 : Dépannage
23
V_UM1.1_fr_1407

FR
Indique des situations ou des actions potentiellement dangereuses.
Symbole conformément à ISO 7010-W001.
Signale des conseils, des recommandations et des informations
utiles au bon fonctionnement du système.
1.
2.
3.
Explication détaillée des tâches pour l'utilisation correcte du produit
Hocoma.
Fabricant et année de fabrication.
Symbole indiquant le numéro de référence fabricant de l'appareil.
Symbole indiquant le numéro de lot fabricant de l'appareil.
Conforme aux exigences MDD93/42/CEE.
Pièces appliquées de type BF.
L'adhésif double face est uniquement à usage unique. Ne le réutilisez pas.
Date limite d’utilisation de l’adhésif double face.
Symbole indiquant les limites de températures pour l'utilisation, le
stockage et le transport.
Symbole indiquant les limites d'humidité pour l'utilisation, le
stockage et le transport.
Symbole indiquant les limites de pression atmosphérique pour
l'utilisation, le stockage et le transport.
Protégez l'environnement. La mise au rebut de cet appareil ou des
batteries qu'il utilise doit se faire de manière écologique.
L'appareil ne doit pas être jeté parmi les ordures ménagères. Jetez
les produits usagés conformément aux réglementations locales
pertinentes à un point de ramassage approprié. Pour toute
question, contactez le service de recyclage local compétent.
IP22
Indice de protection contre l'entrée de liquides CEI.
Symbole de rayonnement non ionisant.
Symboles sur l'emballage
2 capteurs
100 bandes adhésives
1 câble USB
1 étui
Chapitre 6 : Mention légale
Explication des symboles utilisés
Chapitre 6 : Mention légale
V_UM1.1_fr_1407
24

FR
Suivez les instructions du manuel de l’utilisateur et du guide
d’utilisation rapide.
Ordinateur (pas inclus)
Compatible avec Bluetooth®. La marque et le logo Bluetooth® sont
des marques déposées de Bluetooth SIG, Inc. et toute utilisation
de ces marques par Hocoma AG est faite sous licence.
Décharge de responsabilité
Tous les produits Hocoma sont des appareils médicaux qui doivent être utilisés de
manière strictement conforme au Manuel de l'utilisateur sous peine de blessures
graves. Pour les dernières informations disponibles, il est vivement recommandé
de consulter régulièrement le site web Hocoma (www.hocoma.com/legalnotes).
Contactez Hocoma en cas de questions.
Certains produits Hocoma sont commercialisés pour un usage à domicile et
doivent être utilisés de manière strictement conforme au Manuel de l'utilisateur. En
cas de doute sur l'utilisation correcte du produit, renseignez-vous auprès de votre
prestataire de soins qui connaît vos besoins spécifiques. Respectez le Manuel de
l'utilisateur et/ou les recommandations de votre prestataire de soins médicaux sous
peine de blessures graves.
Aucune de ces informations ne pourra être interprétée comme une garantie des
caractéristiques du produit.
Respectez les consignes de sécurité et les instructions d'utilisation de cet
appareil sous peine de blessures graves et de dégâts matériels. Valedo ne
devra pas être utilisé pour d'autres indications ni en combinaison avec des
appareils ou un logiciel non expressément certifiés et spécifiés dans le
Manuel de l'utilisateur par Hocoma AG.
Garantie
Le fabricant garantit que Valedo est dépourvu de défauts de fabrication et de
matériaux pendant 24 mois à partir de la date d'achat lorsqu'il est utilisé avec le
présent Manuel de l'utilisateur. La garantie s'adresse seulement à l'utilisateur final.
Hocoma remettra à neuf ou remplacera gratuitement, au choix, le système Valedo
couvert par la garantie. La réparation, la modification ou le remplacement relève
seulement de la décision de Hocoma AG. Hocoma AG ne garantie aucun résultat
thérapeutique lié à l'utilisation de Valedo.
En cas de divergence d'interprétation entre la version traduite de ce manuel et
l'original en anglais, c'est la version anglaise qui aura préséance.
25
Chapitre 6 : Mention légale
V_UM1.1_fr_1407


IT
Manuale utente
Italiano
We move you

IT
Il presente manuale utente, inclusi figure e disegni, contiene informazioni di
proprietà di Hocoma e/o terzi protette dal diritto d'autore, ed è fornito
esclusivamente per l’uso e la manutenzione del dispositivo. La distribuzione o la
riproduzione del presente contenuto per scopi diversi dalla finalità sono proibite
salvo consenso scritto da parte di Hocoma.
Il presente manuale si applica al dispositivo Valedo
Produttore
Hocoma AG
Industriestrasse 4
CH-8604 Volketswil
Svizzera
Tel. +41 (43) 4442200
Fax +41 (43) 4442201
info@hocoma.com
www.hocoma.com
Soggetto a modifiche tecniche.
Copyright Hocoma AG
Ultima revisione: 2014-07-04
®

IT
Introduzione ................................................................................. 4
Qualche approfondimento... .......................................................... 4
Capitolo 1: panoramica e sicurezza .......................................... 5
Conoscere Valedo® ....................................................................... 5
I sensori .............................................................................................................5
Il cavo ................................................................................................................6
La cintura (opzionale) .......................................................................................7
Il dispositivo informatico....................................................................................7
La custodia Valedo ...........................................................................................7
L'applicazione Valedo .......................................................................................7
Norme di sicurezza ........................................................................ 8
Destinazione d'uso ............................................................................................8
Indicazioni .........................................................................................................8
Controindicazioni ..............................................................................................9
Fattori di rischio .................................................................................................9
Effetti negativi ....................................................................................................10
Manutenzione ................................................................................ 10
Aggiornamenti del firmware ..............................................................................10
Segnalazione di eventi accidentali ................................................ 10
Capitolo 2: impostazione della sessione di riabilitazione ...... 11
Sessione di riabilitazione iniziale ................................................... 11
Preparazione degli spazi per la sessione di riabilitazione ..............................11
Utilizzo dei sensori ............................................................................................11
Utilizzo della cintura ..........................................................................................12
Sessione di riabilitazione ............................................................... 12
Capitolo 3: Applicazione Valedo................................................ 13
Come iniziare ................................................................................. 13
Prima installazione ............................................................................................13
Schermata principale ........................................................................................13
Gestione profilo .................................................................................................15
Impostare l'angolo di mobilità (ROM) ...............................................................15
Eseguire gli esercizi ....................................................................... 16
Capitolo 4 : dati tecnici ............................................................... 18
I sensori .............................................................................................................18
Il cavo ................................................................................................................18
Nastro medico biadesivo ..................................................................................18
La cintura (opzionale) .......................................................................................19
Condizioni generali di funzionamento ........................................... 19
Compatibilità elettromagnetica ...................................................... 19
Dichiarazioni FCC e IC .................................................................. 20
Gestione del rischio ....................................................................... 20
Capitolo 5: risoluzione di problemi ........................................... 21
Risoluzione di problemi ................................................................. 21
Problemi con i sensori ......................................................................................21
Problemi durante la preparazione di una sessione di riabilitazione ...............21
Problemi durante la sessione di riabilitazione .................................................22
Notifiche.............................................................................................................23
Capitolo 6: informazioni di carattere legale ............................. 24
Spiegazione dei simboli usati ...........................................................................24
Simboli sul pacchetto ........................................................................................24
Clausola di esclusione di responsabilità ....................................... 25
Termini e condizioni della garanzia ............................................... 25

IT
Introduzione
Benvenuto e grazie per aver acquistato Valedo!
Se sta leggendo questo manuale, significa che lei è uno dei milioni di utenti in tutto
il mondo che soffre di lombalgia. La buona notizia è che ha appena fatto un primo
passo importante nel trattamento di questo disturbo cronico.
Molti non sanno che servono solo pochi minuti al giorno per combattere la
lombalgia. Basta tenere Valedo a portata di mano per eseguire degli esercizi prima
di andare al lavoro, in pausa pranzo, o perfino quando si viaggia!
Per lavoro o per svago, Valedo è facile da usare, coinvolgente e divertente.
Che cosa aspetta? Iniziamo a muoverci insieme!
Qualche approfondimento...
Hocoma è un nome associato a una vasta gamma di prodotti per la riabilitazione
fisica, come Lokomat®, Armeo® e Erigo®, ma siamo anche un’azienda pioniere
nell'implementazione della sensoristica nelle nostre terapie funzionali contro la
lombalgia. È qui che Valedo® e i suoi prodotti clinici affiliati Valedo®Motion e
Valedo®Shape entrano in gioco.
Per ulteriori informazioni su tutti i nostri prodotti clinici, visitare la pagina
www.hocoma.com e per ulteriori informazioni su Valedo®, visitare la pagina
www.valedotherapy.com.
Questo manuale utente descrive l'uso corretto e in sicurezza di Valedo. Si prega di
seguire le informazioni relative alla sicurezza e le istruzioni contenute nel presente
manuale utente e le norme generali di sicurezza e igiene.
Quando esegue una sessione di riabilitazione con Valedo, è considerato un
paziente. Per tutte le altre attività, è considerato un operatore.
Tenere questo manuale a portata di mano per consultarlo e leggerlo di quando in
quando.
Per facilitare la lettura, viene utilizzata la forma maschile (egli, lui, suo) anche nei
riferimenti ad ambo i sessi.
Introduzione
V_UM1.1_it_1407
4

IT
Capitolo 1: panoramica e sicurezza
Conoscere Valedo®
Il nome Valedo, si riferisce ai seguenti componenti:
sensori
nastro medico biadesivo
cavo di carica o per gli aggiornamenti del firmware
custodia di alloggiamento e trasporto Valedo
Per Valedo System si intendono tutti i componenti con il dispositivo informatico.
I sensori
I due sensori forniti con Valedo sono leggeri e facili da usare. Sono dotati di un
pulsante, di un LED e di una porta micro-USB per la carica e per gli aggiornamenti
del firmware.
Il LED è visibile solo se illuminato.
Se usati regolarmente, i sensori si attivano facilmente dalla modalità standby; è
sufficiente scuoterli delicatamente. Se i sensori sono in modalità standby per oltre
48 ore, entrano in modalità deep sleep.
Se i sensori sono in modalità standby, scuoterli leggermente per riattivarli.
Se i sensori sono in modalità deep sleep, premere il pulsante per attivarli.
Per attivare la modalità deep sleep manualmente, tenere premuto il pulsante
per 4 secondi.
Se i sensori non trovano un dispositivo informatico a cui abbinarsi,
entreranno in modalità standby dopo 30 secondi.
I sensori entrano in modalità deep sleep dopo circa 5 minuti se non riescono
a connettersi al dispositivo informatico, pur rilevando un movimento
continuo; questo è un fattore importante durante il trasporto per risparmiare
la carica della batteria.
Una volta attivi, tramite i rispettivi LED, i sensori indicheranno che stanno cercando
una connessione Bluetooth® (vedere la tabella sottostante); appena abilitata la
connessione Bluetooth sul dispositivo di visualizzazione, è possibile abbinare i
sensori al dispositivo informatico (vedere la sezione Il dispositivo informatico sotto).
1. Connettere le estremità micro-USB del cavo di carica ai sensori.
2. Connettere l'estremità USB del cavo di carica al PC OPPURE ad un
caricabatterie USB approvato IEC 60950.
Potrebbe già disporre di un caricabatterie, poiché molti nuovi cellulari o altri
dispositivi mobili sono dotati di un caricatore USB conforme IEC 60950.
Per una carica completa, caricare i sensori per almeno 90 minuti.
Figura 1: panoramica di Valedo
Attivare e spegnere i sensori
Caricare i sensori
Capitolo 1: panoramica e sicurezza
5
V_UM1.1_it_1407

IT
Modalità dei
LED
Stato del
sensore
Spiegazione della modalità
On
Carica in
corso—carica
completata
I sensori sono connessi e sono
caricati interamente.
Impulso
invertito: lungo
on - corto off
Carica in
corso—carica
non completata
interamente
I sensori sono connessi ma non sono
caricati interamente.
Off
Standby
I sensori non stanno cercando
attivamente un segnale Bluetooth.
Scuotere per riattivare i sensori.
Off
Deep Sleep
I sensori si sono spenti
automaticamente. Ciò avviene dopo
48 ore in modalità standby. Premere
il pulsante per riattivare i sensori.
Impulso: corto
on – lungo off
In attesa di
connessione
Il sensore è acceso ed è in attesa
della connessione Bluetooth con il
dispositivo informatico.
Lampeggio
lento
(1 secondo on,
1 secondo off)
Connesso
Il sensore è acceso e connesso
correttamente tramite Bluetooth con
il dispositivo informatico.
Lampeggio
veloce (~0,5
secondi on,~0,5
secondi off)
Connesso—
Avviso
Il sensore è acceso e connesso con
il dispositivo informatico, ma è
presente un messaggio di
avvertenza.*
Lampeggio
triplo
(3 volte al
secondo)
Batteria quasi
scarica
Il sensore è in funzione con la
batteria quasi scarica e necessita di
carica.*
Non è possibile eseguire una sessione di riabilitazione, quando i sensori
sono in carica.
I sensori sono provvisti di un LED che lampeggia per comunicare informazioni
sull’attività o se necessita di carica. La tabella sottostante mostra le diverse
modalità dei LED e le rispettive spiegazioni.
* I messaggi di avvertenza e le notifiche di batteria scarica appaiono anche sul dispositivo
informatico.
Non immergere o sommergere i sensori in qualunque tipo di liquido. Per
pulire le superfici, usare un panno umido.
Il cavo
Il cavo fornito con Valedo è un cavo USB standard - dual micro-USB. Usare questo
cavo per la carica e per gli aggiornamenti del firmware dei sensori.
Entrambi i connettori micro-USB possono essere usati per la carica, ma solo uno di
essi può essere usato per gli aggiornamenti del firmware. Inserire semplicemente;
è possibile caricare entrambi i sensori simultaneamente, ma è possibile aggiornare
solo un sensore per volta. Per informazioni su come aggiornare i sensori,
consultare la sezione Manutenzione sottostante.
Figura 2: testina USB a sinistra, due testine micro-USB a destra. La testina micro-USB al centro
può essere usata per la carica e per gli aggiornamenti del firmware.
Capitolo 1: panoramica e sicurezza
V_UM1.1_it_1407
6

IT
La cintura (opzionale)1
1
Se si desidera eseguire la sessione di riabilitazione senza usare il nastro medico
biadesivo, si suggerisce l'uso della nostra cintura speciale. Il sensore scatta in
posizione nella fibbia della cintura. Tirare il cavo per regolare facilmente le
dimensioni desiderate.
Figura 3: cintura per la sessione di riabilitazione. Lavare a mano e appendere per asciugare.
Il dispositivo informatico
Tutte le sessioni di riabilitazione richiedono un dispositivo informatico. Per un
elenco dei dispositivi supportati, consultare il sito www.valedotherapy.com. Aver
cura del dispositivo informatico aggiornando regolarmente il sistema operativo.
Sul dispositivo informatico, sarà necessario scaricare e installare l'applicazione
Valedo (consultare il Capitolo 3).
Stabilire una connessione Bluetooth tra i sensori e il dispositivo informatico
1. Abilitare Bluetooth sul dispositivo informatico (solitamente situato in
“impostazioni” o “configurazione”).
2. Attivare i sensori.
3. Aprire l'applicazione Valedo.
4. Creare un nuovo profilo assicurandosi di indicare che si dispone dei sensori.
Consultare il Capitolo 3 per ulteriori informazioni su come creare un profilo.
5. Collegare i sensori nella schermata Gestione sensori.
Per la messa in funzione iniziale è necessario seguire i passaggi da 1 a 5. Una
volta avviata l’applicazione Valedo, la connessione Bluetooth abbinerà
automaticamente i sensori al dispositivo informatico.
La custodia Valedo
La custodia fornita con Valedo non ha la sola funzione di proteggerlo durante la
spedizione, ma consente di tenerlo al sicuro durante il trasporto o lo stoccaggio. La
custodia è raffigurata nella Figura 1 sopra.
Dopo ogni sessione di riabilitazione, si raccomanda di riporre sempre i sensori
Valedo nella custodia.
L'applicazione Valedo
L'applicazione Valedo per la terapia standard della lombalgia può essere scaricata
gratuitamente. Opzioni o applicazioni aggiuntive potrebbero essere disponibili in
acquisto. L’ubicazione per lo scaricamento dell’applicazione Valedo dipende dal
dispositivo informatico in possesso; è sufficiente eseguire una ricerca con il criterio
“Valedo”. Per esempio, gli utenti di iPad possono scaricare dall'App Store.
Per tutti i dettagli completi sull'applicazione software Valedo, consultare il Capitolo 3.
Proteggere il dispositivo informatico dai virus.
L'applicazione Valedo conserva solo una quantità minima di informazioni,
incluso il profilo immesso da ogni utente e la prestazione del cliente negli
esercizi eseguiti.
Consultare regolarmente il sito www.valedotherapy.com per eventuali
aggiornamenti disponibili dell'applicazione Valedo.
La cintura è un accessorio opzionale, disponibile in acquisto da Hocoma. Per ulteriori dettagli,
visitare la pagina www.valedotherapy.com.
7
Capitolo 1: panoramica e sicurezza
V_UM1.1_it_1407

IT
Norme di sicurezza
È necessario conformarsi alle norme di sicurezza elencate sotto e a quelle
elencate all'interno del manuale per assicurare un uso sicuro di Valedo.
Ogni messaggio di avvertenza deve essere osservato appieno.
I sensori Valedo non sono giocattoli e comportano rischio di soffocamento.
Tenere lontano dalla portata di bambini e animali.
Non usare Valedo se i componenti sono danneggiati o modificati.
Annotare le indicazioni, controindicazioni e i fattori di rischio prima dell'uso.
Quando si usa del nastro, usare solo quello di tipo medico.
Deve pulire i sensori prima e dopo l'uso. Si consiglia l'uso di un panno
soffice e umido.
Destinazione d'uso
Valedo è un sistema di terapia individuale il cui scopo è migliorare la salute
lombare e favorire la prevenzione di fenomeni di lombalgia non specifici. Valedo
offre esercizi di mobilizzazione, allungamento, forza, stabilizzazione, equilibrio e
movimento per pazienti da eseguire comodamente in casa. In linea generale, si
consiglia una sessione di riabilitazione di 20 minuti al giorno.
I movimenti del tronco e del bacino sono misurati da due sensori wireless fissati al
corpo e trasferiti ad un dispositivo informatico individuale (ad es. un tablet). Questi
segnali di movimento sono analizzati per fornire un feedback di prestazione in
tempo reale incrementato (Augmented Performance Feedback) in ambiente ludico,
relativamente al tipo e alla correttezza del movimento. Il feedback di prestazione
incrementato offre la motivazione necessaria e un approccio sicuro per eseguire
una terapia di movimento. Il sistema controlla la prestazione dei movimenti
guidando il paziente negli esercizi studiati specificatamente per il trattamento della
lombalgia.
Indicazioni
Lombalgia non specifica
Dolori all'articolazione iliosacrale (per es., dolore al cingolo pelvico, blocco)
Fibromialgia (dolore persistente e diffuso, indolenzimento, problemi di
insonnia, e affaticamento)
Sindrome di ipermobilità articolare benigna (dolore alle articolazioni o agli
arti, sublussazione articolare, dislocazione articolare, ecc.)
Spondilolistesi (dislocazione anteriore di una vertebra) (I grado senza segni
neurologici)
Necessità di riabilitazione della stabilità del tronco e della muscolatura
spinale
Necessità di riabilitazione della mobilità della colonna spinale e del cingolo
pelvico
Necessità di riabilitazione avanzata dell'equilibrio corporeo e della postura
I pazienti neurologici o che hanno sofferto di un ictus, e che necessitano di
una stabilità del tronco e una percezione corporea migliorate (che
presentano poca o nessuna aprassia (incapacità di eseguire movimenti
appresi volontariamente))
Se non si è sicuri di avere indicazioni sufficienti, consultare un esperto medico (un
dottore, un fisioterapista, un chiropratico o un medico). Valedo può essere usato su
pazienti che presentano i seguenti quadri clinici, ma solo dopo aver consultato
l’esperto medico e sotto la supervisione di quest’ultimo
Ernia al disco, incluso stato post-operatorio
Stenosi spinale (restringimento del canale vertebrale), incluso stato post-
operatorio
Fratture vertebrali stabili
Spondilite anchilosante (tipo di artrite in grado di provocare rigidità o fusione
vertebrale (anche: morbo di Bechterew) con limitazioni dolorose del
movimento spinale
Osteoporosi (perdita della sostanza ossea) di grado leggero o medio con
conseguenze dolorose
Capitolo 1: panoramica e sicurezza
V_UM1.1_it_1407
8

IT
Sclerosi multipla (sindrome del sistema nervoso centrale) (stadio non
progressivo) con disturbi alla percezione corporea
Morbo di Parkinson (disturbo al sistema nervoso progressivo) con postura e
bilancio corporeo scarsi
I pazienti neurologici o che hanno sofferto di un ictus con 3 mesi o meno
dall'ultima incidenza, che necessitano una stabilità del tronco e una
percezione corporea migliorate (presentano poca o nessuna aprassia)
Controindicazioni
La riabilitazione funzionale con Valedo non è sempre possibile o indicata. In
generale, per evitare danni, Valedo non deve essere usato nei sottoelencati casi.
Le seguenti controindicazioni devono quindi essere osservate, in particolare:
Tumore osseo, inclusi tumori spinali e metastasi vertebrali
Instabilità spinale, come fratture vertebrali instabili o spondilolistesi
(dislocazione anteriore di una vertebra) (II grado o superiore), in particolare
con segni neurologici
Artrite reumatoide acuta o spondiloartrite acuta (infiammazione acuta delle
ossa o delle articolazioni)
Infezione delle ossa o delle articolazioni
Compressioni croniche della radice del nervo toracico, lombare o sacrale
acute che comportano un deficit della funzione sensorimotoria
Alto grado di osteoporosi (perdita della sostanza ossea) o osteomalacia
(rammollimento delle ossa) con rischio di frattura latente
Materiali ferromagnetici da impianto o dispositivi attivi nel corpo
Fusioni spinali entro i primi 3 mesi post-operatori
Malattie o lesioni alla pelle in prossimità dei punti di contatto con i sensori
(inclusi tagli, pelle strappata, eczema, ecc.)
I pazienti sottoposti a lunga degenza.
Gli elenchi di cui sopra non pretendono di essere esaustivi. Se non si è sicuri di
presentare controindicazioni, consultare un esperto medico. Se sono presenti
controindicazioni, ma si desidera eseguire la sessione di riabilitazione con Valedo,
è necessario prima consultare un esperto medico. La decisione se un trattamento
particolare è indicato nonostante le controindicazioni è demandata all’esperto
medico presso il quale il paziente è in cura. Egli dovrà valutare i possibili rischi ed
effetti collaterali del trattamento rispetto ai benefici, per ogni singolo caso. La sua
situazione individuale e la valutazione del rischio generale per specifici gruppi di
pazienti sono di pari importanza a tale riguardo.
Deve essere anche preso in considerazione un’eventuale sviluppo incrementale
dell’osteoporosi nei pazienti cronici. L'osteoporosi grave è una controindicazione;
è quindi responsabilità del paziente rispettare le raccomandazioni dell’esperto
medico presso il quale è in cura e seguirne le indicazioni per il trattamento.
Se lei è un paziente cronico o se è stato immobile per un lungo periodo di tempo, si
raccomandano brevi sessioni di riabilitazione. È piuttosto comune una tendenza
iniziale al sovrallenamento e, se le sessioni sono troppo lunghe, ciò può
comportare affaticamento muscolare, dolore, o disturbi alle articolazioni.
Come con qualsiasi altro programma di riabilitazione, è cruciale all’inizio eseguire
brevi passi per evitare il sovrallenamento e i dolori che ne conseguono. Con il
passare del tempo, il suo corpo si adatterà alla riabilitazione e sarà in grado di
eseguire sessioni più lunghe e di svolgere esercizi avanzati.
Non prosegua con le sessioni se si sente affaticato. Se si esegue una
sessione di riabilitazione quando si è stanchi, ciò può comportare movimenti
supercompensati e scorretti.
Esegua autoesami frequenti per notare eventuali irritazioni alla pelle o
sintomi di possibili reazioni allergiche. Se insorgono complicazioni alla pelle
dovute al nastro medico, interrompere la riabilitazione e consultare un
medico.
Fattori di rischio
Valedo non sostituisce l'esperienza del suo esperto medico. Se non si è sicuri di
essere soggetti a eventuali rischi, consultare un esperto medico. Valedo è uno
strumento di terapia che favorisce il trattamento della lombalgia e migliora la
stabilità del tronco, la mobilità e l'equilibrio in generale. Si prega tenere in
considerazione i fattori di rischio elencati di seguito.
Capitolo 1: panoramica e sicurezza
9
V_UM1.1_it_1407

IT
Se si è verificato un evento accidentale, usare l’apparecchiatura di nuovo solo
dopo aver ricevuto l’autorizzazione da parte di Hocoma AG.
Gravi incidenti recenti (per es., colpo di frusta, contusione spinale) dovuti a
mancata consulenza medica
Ernia spinale al disco acuta (per es., erniazione al disco)
Evento cardiovascolare severo o cerebrovascolare, come un infarto
miocardiale (attacco cardiaco), aneurisma aortico (ingrandimento dell'aorta)
o ictus, a tre mesi dall'ultima incidenza
Disabilità neurologica grave, inclusa compressione della corda spinale o
cauda equina (raggruppamento a fascio dei nervi nella zona lombare),
compressione alla radice del nervo, ecc.
Deficit severi all'equilibrio con maggiore rischio di caduta
Deficit cognitivi che impediscono la comprensione degli esercizi
Gravidanza
Attacchi di epilessia negli ultimi 2 anni che non possono essere controllati a
livello medico, o pazienti fotosensibili
Malattia della retina eventualmente aggravata da video giochi
Effetti negativi
Hocoma AG ha profuso grande impegno nel selezionare i materiali a contatto con i
nostri clienti in clinica e a casa. Tali materiali, approvati per la compatibilità
biologica che presentano, vengono continuamente controllati dai produttori.
Tuttavia, esiste sempre la remota possibilità che alcuni materiali possano
comportare reazioni allergiche in individui in circostanze eccezionali.
Manutenzione
La manutenzione di Valedo è indispensabile. Pulire i sensori con un panno umido
prima e dopo la sessione di riabilitazione e conservarli nella custodia Valedo al
termine per proteggerli da lanugine, polvere, umidità e luce solare. Rimuovere
qualunque residuo colloso dal nastro medico biadesivo. Assicurarsi che i sensori
siano carichi prima dell’uso.
Aggiornamenti del firmware
Il cavo da USB a micro-USB fornito non è usato solo per la carica ma anche per gli
aggiornamenti del firmware dei sensori.
Il firmware dei sensori può essere aggiornato inserendo il micro-USB nel sensore
per avviare il trasferimento dati (vedere la Figura 2), quindi connettere l'USB ad un
computer. Visitare la pagina www.valedotherapy.com per gli aggiornamenti del
firmware e seguire le istruzioni sullo schermo. Si prega di NON scollegare il
sensore dal computer durante l'aggiornamento del firmware.
Segnalazione di eventi accidentali
In caso di eventi gravi correlati all’apparecchiatura Hocoma AG, che abbiano
comportato (o che avrebbero potuto comportare) gravi lesioni (lesioni preoccupanti
o che mettono a repentaglio la vita o casi di decesso) o gravi danni materiali, questi
vanno comunicati immediatamente a Hocoma AG sulla la pagina
www.valedotherapy.com o telefonicamente.
Capitolo 1: panoramica e sicurezza
V_UM1.1_it_1407
10

IT
Capitolo 2: impostazione della
Disporre il sensore per la zona
lombare
Disporre il sensore per il petto
Figura 4: disposizione corretta del sensore
lombare
Figura 5: area di disposizione corretta del
sensore pettorale
1. Pulire il sensore con un panno umido.
2. Disporre un lembo di nastro medico biades ivo nella parte posteriore del
sensore.
3. Rimuovere lo strato coprente del nastro medico.
4. Disporre il sensore. (Assicurarsi che porta micro USB sia rivolta verso il
basso).
sessione di riabilitazione
Sessione di riabilitazione iniziale
Accendere i sensori e abbinarli al dispositivo informatico. Quindi preparare gli spazi
per la sessione di riabilitazione e apprendere i punti in cui posizionare i sensori.
Preparazione degli spazi per la sessione di riabilitazione
Assicurarsi di disporre di sufficiente spazio per eseguire la sessione in sicurezza. È
possibile scegliere di eseguire la sessione di riabilitazione mantenendo il
dispositivo informatico contemporaneamente o posizionandolo su un tavolo nelle
vicinanze.
Molti dispositivi informatici tablet sono provvisti di copertine che fungono
anche da base per appoggiare il dispositivo.
Alcuni dispositivi di calcolo possono anche essere collegati alla televisione o
al monitor di un computer. Consultare il manuale utente del suo dispositivo
per maggiori informazioni.
Se non si connette il dispositivo informatico al televisore o al monitor di un
computer, si ricordi di tenerlo nelle vicinanze, poiché i sensori sono connessi
a tale schermo e dovrà toccare i pulsanti sullo schermo durante la sessione
di riabilitazione.
Durante la riabilitazione, disconnettere il dispositivo informatico dalla
rispettiva base di carica.
Rimuovere eventuali cavi intorno ai suoi piedi o altri oggetti per evitare di
cadere durante la sessione di riabilitazione.
Si prega di prestare attenzione se si esegue la riabilitazione su un tappeto,
al fine di evitare cadute. Si consiglia di scegliere uno spazio nuovo per la
sessione di riabilitazione o di rimuovere il tappeto.
Assicurarsi che i sensori si trovino ad almeno 1 m di distanza da qualsiasi
oggetto elettromagnetico, ferromagnetico (come altoparlanti o
elettrodomestici) o metallico.
Cellulari, orologi, adattatori di alimentazione (per laptop), o altri dispositivi
che contengano elementi magnetici possono distorcere i segnali del
sensore. Mantenere questi oggetti ad una distanza appropriata dai sensori. I
muri e i pavimenti possono anche contenere cavi elettrici, tubi metallici o
strutture rinforzate.
Utilizzo dei sensori
Capitolo 2: impostazione della sessione di riabilitazione
11
V_UM1.1_it_1407

IT
Se si indossa una cintura per pantaloni durante la sessione, quest’ultima
potrebbe causare la caduta del sensore o creare una distorsione del segnale
del sensore.
Potrebbe risultare più facile, soprattutto durante le prime sessioni, disporre il
sensore sul petto, senza la maglia e davanti a uno specchio.
Scollegare sempre i sensori dalla base di carica prima di posizionarli sul
corpo.
Consigliamo di pulire la parte posteriore di entrambi i sensori e le parti del
corpo dove si intende collocare i sensori con un panno umido, e poi lasciare
asciugare. Ciò consente al nastro medico di attaccarsi saldamente al
sensore e alla pelle.
Entrambi i sensori sono intercambiabili e possono essere usati sul petto o
sulla parte posteriore della schiena.
Assicurarsi di disporre i sensori in modo corretto. Se i sensori vengono
disposti scorrettamente, è possibile che si generi un risultato visivo diverso e
con movimenti esagerati sul dispositivo di visualizzazione.
Utilizzo della cintura
Disposizione del sensore nella cintura e della cintura
1. Far scattare il sensore nella cintura (vedere Capitolo 1).
2. Tirare la cintura intorno al petto o al bacino.
3. Agganciare la fibbia nell’anello.
4. Tirare le estremità della cintura per stringerla.
5. Muovere il sensore fino a raggiungere la corretta posizione, al petto o al
bacino (vedere sopra per informazioni sulla posizione del sensore).
6. Stringere di nuovo fino ad ottenere l’immobilità dei sensori durante il
movimento del paziente.
Sessione di riabilitazione
Una volta posizionati i sensori, la sessione di riabilitazione può essere avviata. La
sessione prevede vari esercizi in ambiente ludico; ogni esercizio è stato studiato
appositamente per eseguire movimenti specifici.
La sessione viene eseguita tramite l'applicazione Valedo sullo schermo del suo
dispositivo informatico. Premere l'icona per accedere all'applicazione.
Iniziare la sessione di riabilitazione
Figura 6: icona sul dispositivo informatico (esempio tratto da iPad, l’icona può variare leggermente
Tutti gli esercizi di riabilitazione sono stati progettati in modo mirato su un preciso
movimento della zona lombare e ogni movimento viene dimostrato prima di iniziare
l'esercizio corrispondente. Imitare il movimento in modo esatto; ciò diminuisce il
rischio di movimenti impropri e delle lesioni alle quali possono dar luogo.
Aver cura di evitare il sovrallenamento, specialmente durante le prime
sessioni con Valedo. La motivazione è un aspetto sempre positivo, ma le
sessioni troppo lunghe o il sovrallenamento possono causare affaticamento
muscolare e di conseguenza lesioni, durante le attività giornaliere.
Se l'esercizio richiede un movimento oltre le sue capacità, non si sforzi per
eseguire il movimento corretto. Il miglior modo per evitare questa
circostanza è reimpostare l’angolo di mobilità (ROM) per ristabilire i limiti
della sua mobilità individuale.
1. Chiudere l'applicazione software dallo schermo del suo dispositivo
informatico.
2. Rimuovere i sensori.
3. Rimuovere il nastro medico biadesivo (dal corpo o dai sensori).
4. Smaltire il nastro medico biadesivo usato.
5. Pulire i sensori con un panno umido.
6. Riporre i sensori nella custodia Valedo .
Capitolo 2: impostazione della sessione di riabilitazione
V_UM1.1_it_1407
in base al dispositivo usato).
Fine della sessione di riabilitazione
12

IT
Capitolo 3: Applicazione Valedo
Come iniziare
Avviare l’applicazione Valedo premendo l’icona .
Per "premere" intendiamo “toccare" o "cliccare" in base al suo dispositivo
informatico.
Per l’elenco dei dispositivi informatici supportati, visitare la pagina
www.valedotherapy.com
Prima installazione
Prima di iniziare la sessione di riabilitazione, è necessario impostare Valedo.
Premere sulla schermata iniziale; se i sensori non sono ancora attivi, il software le
chiederà di accenderli e di creare il suo profilo. Immettere nome, data di nascita e
sesso. È possibile anche importare le informazioni personali da Facebook,
premendo l’icona Facebook e seguendo le istruzioni sullo schermo.
È possibile tornare a questa schermata in ogni momento e modificare le
informazioni o aggiungere nuovi profili, che offrono l'opportunità di condividere
Valedo con altri sullo stesso dispositivo informatico.
Dopo aver immesso le informazioni personali, l’applicazione Valedo la guiderà
nella taratura iniziale dei sensori e delle misurazioni dell’angolo di mobilità (ROM).
La taratura è facile: con i sensori in posizione, rimanere fermi, quindi piegarsi
quando indicato per continuare.
Anche la misurazione dell'angolo di mobilità è un’operazione semplice: all’interno
delle schermate del ROM, le verrà chiesto di imitare la posa dell'esempio. La
definizione accurata del suo angolo di mobilità è importante per permettere
all'applicazione di riconoscere i limiti delle sue capacità di movimento per essere in
grado di ricreare successivamente i suoi stessi movimenti in modo preciso sullo
schermo. Per maggiori informazioni sull’impostazione del ROM, consultare la
sezione Impostare l'angolo di mobilità (ROM) sottostante.
Se si necessita ulteriore assistenza, visitare il sito www.valedotherapy.com per
saperne di più sui movimenti e sul ROM.
Dopo l'impostazione iniziale, verrà reindirizzato alla schermata principale dalla
quale potrà liberamente esplorare il villaggio!
Schermata principale
Qui ci troviamo sulla schermata principale. Per ora non c'è molto; infatti gli abitanti
hanno bisogno del tuo aiuto!
Fai visita ai vicini per vedere quali esercizi stanno svolgendo.
Scorrere a destra o sinistra per muoversi nel vicinato.
Figura 7: schermata principale
13
Capitolo 3: Applicazione Valedo
V_UM1.1_it_1407

IT
Nell'angolo in alto a sinistra dello schermata principale, è
presente un nastro con il nome che è stato immesso nel
profilo. Oltre a indicare chi sta giocando, il nastro è anche un
pulsante! È un collegamento alla sezione Gestione profilo
(vedere sotto).
Obiettivo dell'esercizio (non impostato): tocca qui per
stabilire e monitorare il tuo obiettivo.
Obiettivo dell'esercizio (impostato): una volta stabilito
obiettivo, appare un punto sul bersaglio. Il colore del punto
mostra il progresso: rosso significa obiettivo non raggiunto;
giallo significa in corso; e verde significa obiettivo raggiunto.
Stretching: questa è una sezione sbloccabile dell'applicazione
Valedo. Qui si apprende come svolgere diversi esercizi di
allungamento.
Coccarde: durante la progressione del gioco, si guadagnano
diverse coccarde. Qui è possibile vedere quanto si ha
guadagnato e cosa manca ancora!
Report: come stiamo andando? Qui è possibile vedere il
tempo di gioco, il numero il numero di oggetti raccolti e altre
informazioni.
Angolo di mobilità: qui è possibile definire nuovamente il
ROM. La schermata è identica quella dell’impostazione iniziale,
ma è un'ottima idea rivisitare questa sezione durante la
progressione del gioco. Forse si sente già pronto a spingersi
oltre!
Pulsante Valedo: Toccare questo pulsante per andare a
www.valedotherapy.com o inviare un email a Valedo.
Pulsante sensore: indica il livello di batteria e la forza della
connessione del sensore. Funziona anche come collegamento
allo schermo Gestione sensori.
Terapia veloce: tocca qui per facilitare la scelta degli esercizi
e far scegliere a Valedo gli esercizi per te in modo casuale.
Sblocca cinque case per attivare questa funzionalità; solo gli
esercizi che hai sbloccato possono essere selezionati come
esercizi casuali.
Informazioni: facendo clic qui è possibile ottenere
informazioni su Valedo. Sulla schermata principale, il pulsante
Info è situato nell'angolo in basso a destra.
Sulla schermata:
Capitolo 3: Applicazione Valedo
V_UM1.1_it_1407
14

IT
Gestione profilo
Figura 8: schermata Gestione Profilo. Notare i pulsanti Back up e Ripristina.
Nella sezione Gestione profilo è possibile aggiungere modificare o eliminare profili.
Qui è anche possibile effettuare un back up e ripristinare tutti i profili caricati su
iCloud.
è necessario aver installato iCloud sul proprio dispositivo.
Toccare [Back up] per caricare tutti i profili su iCloud e [Ripristina] per scaricare i
profili recentemente caricati sul proprio dispositivo.
Questo significa che è possibile eseguire gli esercizi mediante più dispositivi con
l'account Valedo o iCloud installati, senza perdere un solo passo!
Impostare l'angolo di mobilità (ROM)
Figura 9: Esempio di una schermata di angolo di mobilità.
Durante l'installazione iniziale, o premendo il pulsante sulla schermata
principale, è possibile impostare, aggiornare e monitorare l’angolo di mobilità
(ROM). L'impostazione dell'angolo di mobilità (ROM) è importante per settare il
gioco correttamente e per la sicurezza durante la sessione di riabilitazione.
Lo scopo dell'impostazione personalizzata dell’angolo di mobilità (ROM) è
semplice: grazie ai valori ROM, il software regola gli esercizi sul suo movimento
individuale, facendo in modo che non siano troppo difficili o troppo facili. Se i giochi
sono troppo difficili, la motivazione può venir meno e la probabilità di lesioni
aumenta a causa di movimenti supercompensati. Se i giochi sono troppo facili,
diventano rapidamente noiosi.
Come si fa
Il software mostra una posa da imitare, lei dovrà mantenere questa posa
brevemente, quindi premere [Cattura], il software calcola successivamente il suo
angolo di mobilità (ROM) per quel movimento specifico. La barra dell'angolo di
15
Capitolo 3: Applicazione Valedo
V_UM1.1_it_1407

IT
mobilità deve essere verde (vedere Figura 9); questo assicura che l'angolo di
mobilità sia sufficientemente ampio per i movimenti degli esercizi di sensibilità e
quindi per la giocabilità. Se il colore è rosso, non sarà possibile toccare [Cattura] e
passare al movimento successivo. Le pose sono molteplici, ma l’impostazione
dell'angolo di mobilità non richiede più di un minuto.
Nelle schermate ROM, la figura sta eseguendo una posa in forma
SPECULARE rispetto a quella che lei dovrà eseguire. Immagini che
l'istruttore del movimento sia un piccolo specchio.
Eseguire gli esercizi
Toccare uno degli edifici in uno dei distretti per iniziare.
Figura 10: esempio di una schermata introduttiva della sessione di riabilitazione.
Nella schermata di introduzione, avrà l'opportunità di cambiare la modalità di
esercizio. In generale, le modalità di esercizio sono le seguenti:
Precisione: con quale precisione vengono controllati i movimenti di entrambi
i sensori
Precisione isolata: con quale precisione vengono controllati i movimenti di
un sensore mentre si tiene fermo l'altro sensore
Stabilizzazione: quanto correttamente viene mantenuta una posizione
Stabilizzazione isolata: quanto correttamente mantiene una posizione
concentrandosi su un sensore mentre si tiene fermo l'altro sensore
Modalità libera: squat alla propria cadenza, senza seguire la barra del
tempo, come in Precisione e Stabilizzazione
Non tutte le modalità sono disponibili per tutti gli esercizi.
Le modalità di esercizio sono spiegate nell'applicazione.
Il livello di difficoltà è determinato dalla frequenza di esecuzione degli
esercizi.
È possibile anche cambiare la durata e visualizzare i risultati migliori ottenuti in
precedenza.
La voce Accuratezza indica il grado di precisione dei movimenti in relazione
all’obiettivo dell’esercizio
La voce Fluidità indica l’agevolezza dei movimenti eseguiti
La voce Isolamento (solo in modalità Isolamento) indica la bontà del
movimento di uno dei sensori mentre l’altro viene mantenuto fermo
Come è possibile notare, il Villaggio è piuttosto vuoto ad eccezione di alcuni siti in
costruzione nei vari distretti. Completando ogni esercizio, aiuta a costruire le case
nei siti.
Ora per esempio, ci troviamo nel Distretto Torso. L'unica casa a sinistra
rappresenta il primo esercizio da svolgere. Sblocca le altre case nel distretto e altre
ancora completando ogni esercizio.
Capitolo 3: Applicazione Valedo
V_UM1.1_it_1407
16

IT
È possibile costruire case e sbloccare nuovi distretti se si seguono sessioni
Tempo rimasto alla fine del livello
Punti guadagnati
Moltiplicatore di punti
Barra di energia: mostra l'energia rimasta. Si
guadagna energia seguendo il percorso, saltando,
e altro ancora!
Pulsante Pausa: (nel gioco) permette di
eseguire la taratura, di lasciare l'esercizio o
semplicemente di fare una pausa!
Pulsante dell'istruttore di movimento: (nel
gioco) premendo questa icona nell'angolo in
basso a destra durante il gioco, si apre un
suggerimento per l’esecuzione corretta del
movimento per il gioco. Il suggerimento si chiude
dopo due secondi.
Inversione sinistra/destra e su/giù: (solo
Distretto Anca) premendo [Pausa] durante uno
qualsiasi degli esercizi del Distretto Anca, è
possibile cambiare il movimento dell’anca.
regolari, ma bisogna fare attenzione, le case diminuiscono se non ci si
allena regolarmente!
Per ogni esercizio, far uscire il robot per raccogliere le gemme. Al ritorno del robot,
si disporrà delle risorse necessarie per costruire la casa e sbloccare nuovi
movimenti e distretti!
Prendere note dei punti bianchi sotto l’icona di movimento (vedere Figura 7).
Questi indicano quanto manca per costruire il prossimo livello della casa. Si ottiene
un punto bianco al completamento di un esercizio, e quando si hanno abbastanza
punti bianchi, la casa cresce.
Premere [Gioca] per andare all'esercizio da fare. Avrà luogo quindi una breve
taratura e successivamente una breve introduzione al movimento. Dopodiché, si
parte!
Eseguire i movimenti come spiegato per muovere il robot correttamente. Se i
movimento non sono corretti, il robot si farà sentire! In alcuni esercizi è necessario
seguire un percorso, in alcuni si vola attraverso dei cerchi e in altri ci sono obiettivi
completamente diversi. Assicurarsi di leggere le istruzioni all'inizio di ogni esercizio
per sapere cosa fare!
Sulla schermata:
Figura 11: esempio di schermata di gioco.
Capitolo 3: Applicazione Valedo
17
V_UM1.1_it_1407

IT
Informazioni generali
Dimensioni (L x A x P)
42 mm × 32 mm × 16 mm
Peso
18 grammi (ciascuno)
Vita tecnica stimata
3 anni
Elettronica
Alimentazione
Soluzione di carica integrata
(litio-ione-polimero, 3,7 V, 160 mAh)
Frequenza di trasmissione senza
filo
Fascia 2,4 GHz (Bluetooth Low Energy)
Potenza di emissione radiata
Max. 1 mW
Accuratezza
Campo del giroscopio
Max 2.000 gradi al secondo
Velocità dell'acceleratore
Max. ± 16 g
Bussola digitale
Accuratezza 1-2 gradi
Orientamento
± 360 su tutti gli assi
Campo operativo
20 metri con una linea visibile chiara al
dispositivo informatico.
Tuttavia, il campo operativo preciso dei
sensori dipende dall'ambiente circostante.
Informazioni generali
Dimensioni cavo principale (L)
900 mm
Dimensioni della prolunga (L)
300 mm
Peso
30 grammi
Revisione
USB revisione 2
Vita tecnica stimata
3 anni
Informazioni generali
Dimensioni (due pezzi) (L x A)
39 x 38 mm
Vita tecnica stimata
3 anni se conservato a una temperatura di 10
a 27°C e con un’umidità relativa da 40 a
60%.
Capitolo 4 : dati tecnici
I sensori
L'applicazione Valedo non riconosce i sensori non prodotti da Hocoma.
Non utilizzare con Valedo sensori prodotti da aziende terze.
Ulteriori complicazioni scaturite dal tentativo di utilizzo di sensori non Hocoma
possono includere, ma non essere limitate al danneggiamento delle informazioni
salvate nell’applicazione Valedo, delle informazioni salvate nel dispositivo
informatico esternamente all'ambiente dell’applicazione Valedo e danni ai sensori
di terzi oltre a lesioni personali.
Il cavo
Nastro medico biadesivo
Capitolo 4 : dati tecnici
V_UM1.1_it_1407
18
 Loading...