

Page 1

Hochiki Europe (UK) Limited Page 1 of 5 2-3-0-456/ISS6/JAN16
Hochiki SDP-3 Duct Probe
Installation Instructions
Hochiki's Duct Probe housing allows a standard
photoelectric smoke detection device, either a
conventional detector or an analogue sensor, to be
mounted on the outside of an air duct for the purpose
of monitoring the air within the duct. Air within the
duct is drawn via a pipe into the duct probe's
housing. This allows constant sampling with a
standard, LPCB approved smoke detector and
makes smoke detection within the duct simple,
effective and easy to maintain.
Compatible Hochiki devices that can be used within
the SDP-3 are:
ESP
Analogue
Sensors
ACA (inc all variants),
ACC (inc all variants)
ALG (inc all variants),
ALN (inc all variants)
ALK (inc all variants)
CDX
Conventional
Detectors
SLR (inc all variants)
SLV (inc all variants)
Compatible Hochiki Bases that can be used within
the SDP-3 are:
ESP
Analogue
YBN-R/3, YBN-R/3(SCI),
YBO-R/SCI
CDX
Conventional
YBN-R/6, YBN-R/6SK,
YBO-R/6R, YBO-R/6RN,
YBO-R/6RS.
Mounting Position
The SDP-3 should be installed with the arrow on
the cover corresponding to the direction of airflow in
the duct.
The SDP-3 can be placed horizontally or vertically,
on the top, side or bottom of the duct. Hochiki
recommends that the unit is mounted away from
heating, cooling or humidity devices following the
same guidelines for flow monitors.
The SDP-3 smoke detector must be installed
pointing towards the air flow direction.
A distance of 3 times the duct diameter should be
left before a damper, filter or change of the duct
direction, and 5 times the diameter after these
devices.
NOTE: The word “diameter” has been used
throughout. In the case of square-section ducts this
should be read to mean width.
Hydraulic Diameters
Example of
installations at sources
of interference
Fan
Damper
Silencer
Battery
Air handling unit
Duct Bend
Duct Branching
Duct Narrowing
or Expansion
www.acornfiresecurity.com
www.acornfiresecurity.com
Page 2
Hochiki Europe (UK) Limited Page 2 of 5 2-3-0-456/ISS6/JAN16
Installation Procedure
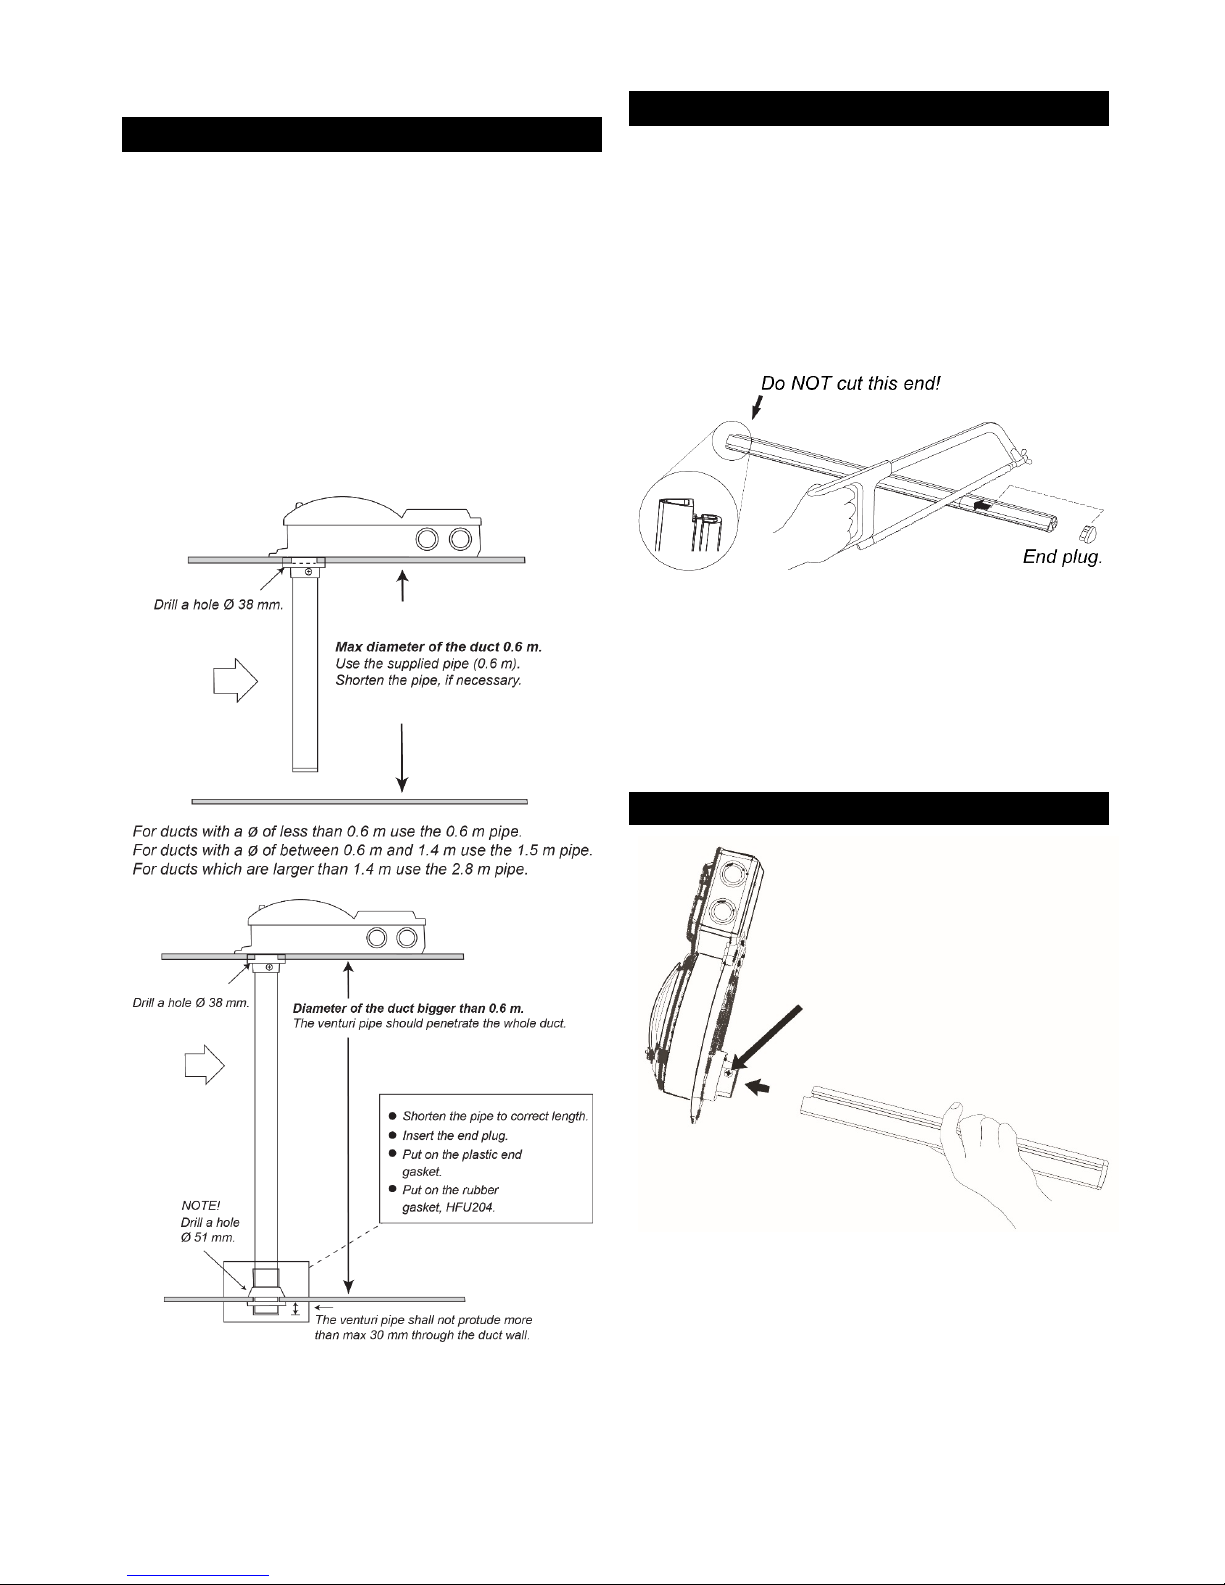
STEP 1 - Selecting Pipe Length
The supplied 600mm sampling pipe can only be
used with ducts up to a maximum diameter of
600mm, but the pipe can be shortened if required
(see STEP 2).
For ducts with a diameter greater than 600mm
use the 1200mm sampling pipe cut to size but
penetrating the whole width of the duct (see
“Large Diameter Ducts” on Page 2).
For ducts with a diameter greater than 1200mm
contact Hochiki Europe Customer Support for
advice (psupport@hochikieurope.com).
STEP 2 - Adjusting Pipe Length
• After measuring the diameter of the duct and
deducing the length of pipe required, shorten
the pipe if necessary.
• The pipe should penetrate a minimum of 90%
of the width of the duct.
• Do not cut the end of the pipe with warning
label.
• Only cut between sampling holes.
• Once cut to length, insert the end plug.
Large Diameter Ducts
• When using a sampling pipe within a duct
greater than 600mm diameter the pipe should
penetrate the whole duct.
• Shorten the pipe to correct length if required
• Insert the end plug
• Fit the end plastic gasket
• Fit the sealing sleeve
STEP 3 – Insert Pipe into SDP-3
• Insert the pipe into the bottom of the SDP-3.
• Secure the pipe with the locking
(7) Locking screw
(6)
www.acornfiresecurity.com
www.acornfiresecurity.com
Page 3

Hochiki Europe (UK) Limited Page 3 of 5 2-3-0-456/ISS6/JAN16
STEP 4 – Drill Hole in Duct
Before mounting the SDP-3, drill a hole in the duct
for the sampling pipe:
• Without bracket – hole diameter = 35mm
• With bracket – hole diameter = 48mm (see
“Using the Optional Mounting Bracket” on page
4)
STEP 5 – Mounting the SDP-3 on the Duct
• Carefully mount the SDP-3, inserting the sampling
pipe into the drilled hole in the duct wall.
• Secure the SDP-3 with the three supplied three
25mm self-tapping screws (positions shown).
STEP 6 – Base & Detector Installation
Remove the housing
cover (four screws).
Remove the airflow
guide before
installing the base
and detector. This
part MUST be
replaced (see STEP
7).
The smoke detector or sensor is mounted on a
base which is fixed and wired to the SDP-3. The
mounting base needs to be mounted on the
centreline of the unit, using the provided fixing
holes.
Once the base is fitted refer to the wiring table at
the end of these instructions and follow the colour
coding for connecting the flying wires to the
mounting base terminals.
NOTE - IMPORTANT! When using Hochiki
CONVENTIONAL Optical Smoke Detectors. If only one
smoke detector is connected to the Control Panel, this
detector’s base should be fitted with an End Of Line
(EOL) device compatible with that Control Panel.
When several smoke detectors are connected to one
Control Panel, the EOL device should be connected to
the last base. There should only be one EOL device
per zone.
The two tables below explain which mounting
holes are used to fix the specific mounting bases
for each detector type.
ESP Sensors: ALG or ALK
ESP Bases:
YBN-R/3, YBN-R/3(SCI),
YBO-R/SCI
CDX Detectors: SLR or SLV
Bases:
YBN-R/6, YBN-R/6SK,
YBO-R/6R,
YBO-R/6RN, YBO-R/6RS.
Fit Base to Mounting Holes 2 and 3
ESP Sensors: ALN or ACC
ESP Bases:
YBN-R/3, YBN-R/3(SCI),
YBO-R/SCI
Fit Base to Mounting Holes 2 and 9
• Connect the base to the wires from the terminal
block within the SDP-3. Use the wiring guide on
page 4.
• External cabling should be passed through the
knock-out holes located at the end of the SDP-3
housing. The unit features one central cable
opening, two additional cable opening knockouts are provided.
• Suitable glands must be used such as PG13.5
or M20.
• Once base is fixed and connected, mount the
sensor/detector ensuring the rib lines up with
one on the base.
STEP 7 – Fitting the Airflow Guide
The airflow guide ensures sampled air from the
duct directly enters the smoke detection chamber
of the installed sensor/detector and its position
and correct fitting are critical to the unit’s
performance.
Insert the airflow guide into its mounting pillar
and adjust the hinged nozzle to rest directly on
the detector, thus ensuring the air from the duct
is directed into the detector’s smoke chamber.
www.acornfiresecurity.com
www.acornfiresecurity.com
Page 4

Hochiki Europe (UK) Limited Page 4 of 5 2-3-0-456/ISS6/JAN16
The airflow guide features a metallic airflow
indicator strip which oscillates when a suitable
airflow is present. If this strip isn’t moving check the
airflow in the duct and the mounting position of the
unit.
Replace the unit’s cover using the four screws.
STEP 8 – Testing the Sensor/Detector
Check the airflow around the detector with a
suitable smoke detector tester. Move the “test hole
plug” to the side and briefly release a spray of
aerosol smoke. Check the detector goes into
alarm, i.e. the red alarm LEDs are activated. Also
inspect the appropriate fire control panel indicators.
IMPORTANT! Replace the “test hole plug”.
DO NOT drill any holes in the unit’s cover. Holes
will cause air leakages and seriously disturb the
function of the unit.
Fitting a Cover
Use the SDP-3 COVER when mounting the unit in
places where condensation problems could arise,
e.g. cold attics or outdoors.
Fitting a Bracket
When installing the SDP-3 on circular ducts or on
insulated rectangular ducts use the optional Bracket
(SDP-3 BRACKET). The bracket can also be used
on ducts with a diameter as small as 100mm.
• The SDP-3 BRACKET is supplied flat and can easily
be bent or shaped to fit a circular or rectangular duct.
• When using the bracket the diameter of the hole in
the duct wall should be 48mm.
• The bracket should be fixed to the duct wall with
appropriate fixings (not supplied).
• The supplied rubber gasket and sealing sleeve
should be used.
Final Checks
• Check that the unit has been installed facing
into the flow of air within the duct (in other
words the slot in the sampling pipe is facing
into the air flow).
• Check that the circular rubber gasket between
the cover and top edge of the SDP-3 is air-tight.
• Check that the plastic plug of the test hole is
also air-tight.
• Check that the air flow indicator oscillates
ensuring proper air-flow through the detector.
• It is recommended that smoke from a smoke
generator is introduced into the duct to check
the function of the unit.
Trouble Shooting
If only the Control Panel indicates an
alarm/fault:
• Check that the EOL device is fitted in the last smoke
detector base on the zone (conventional panels
only).
• Check that the EOL device is the correct type
(conventional panels only).
• Check the loop for bad connections or short-circuits.
• Check the detector base with a voltmeter for approx
24Vdc and ensure the voltage is the correct polarity.
www.acornfiresecurity.com
www.acornfiresecurity.com
Page 5

Hochiki Europe (UK) Limited Page 5 of 5 2-3-0-456/ISS6/JAN16
If the Smoke Detector and Control Panel
indicate an alarm without smoke (and cannot be
reset):
• Check the detector; it may be contaminated with dirt
or condensation.
• Replace the detector as it may be faulty.
Terminal Block to Base Wiring
Refer to LOOP/ZONE CABLES column featuring
the intended mounting base in the wiring table
opposite.
Wire the loop/zone cables to the terminal block
within the SDP-3 as shown. Connect the coloured
wires from the terminal block to the base terminals
as shown.
B=BLUE, 2=BLACK, R=RED, P=PINK, Y=YELLOW,
G=GREEN, BR=BROWN, W=WHITE
Hochiki Europe (UK) Ltd. reserves the right to alter the
specification of its products from time to time without notice.
Although every effort has been made to ensure the accuracy of
the information contained within this document it is not warranted
or represented by Hochiki Europe (UK) Ltd. to be a complete and
up-to-date description. Please check our web site for the latest
version of this document.
www.acornfiresecurity.com
www.acornfiresecurity.com
 Loading...