

Hobo RX3003, RX3004, RX3001 Quick Start Manual

HOBO® RX3000 Remote Monitoring Station Quick Start
RX3000 Station Key Components
LCD
Select
button
Ethernet
port
(RX3001
model)
USB port
Charging port
Log in to HOBOlink.
1
Go to www.hobolink.com and log into an existing account or
create a new one. You’ll receive an email to activate the new
account.
Register the station.
2
In HOBOlink, click Devices and then click the Register a Device
link. Give the station a name and enter the serial number and
device key from the label inside the station door.
Install optional modules or user-supplied SIM.
3
Ensure the station is powered off by pulling the battery and
charger connections. Insert optional RXMOD-x analog, relay, or
RXW Manager modules into the Module 1 or Module 2 slot by
plugging the connector into the receptacle on the station. Screw
the module in place with the provided screw. If there is just one
relay module, install it on the right.
If you are installing an RXW Manager module, plug the cable from
the RXW Manager mote into the jack on the module, making sure
the cable is inserted through the bottom of the station case. Do not
reconnect the power on the station until the mote is plugged in as
shown.
WARNING: If you inadvertently install modules while the power is
on, you must disconnect and then reconnect the battery and
charging device to guarantee proper operation.
Battery port, cable connected
Insert the connector on
the module here
Start/
Stop
button
Connect/
Search
button
Slots for
optional userinstalled
modules
Note: If you are using your own SIM card, follow the instructions
at https://www.onsetcomp.com/support/manuals/installing-simrx3000-station before continuing.
Plug in the battery and charging device.
4
Connect the battery port connector followed by the appropriate
charging port connector. Once the battery cable is plugged in,
“Initializing System” will flash on the LCD. A checkmark appears
next to “System” after the system initialization is complete.
Tip: Refer to the RX3000 manual for instructions on wire routing
and environmental sealing of wires.
Check or configure device communications.
5
For RX3003 or RX3004 cellular models:
The station will automatically connect to HOBOlink after powering
up the station in the previous step. Continue to step 6.
A checkmark
appears next
to Last
Connection
after
connecting to
HOBOlink
Connect button
For RX3001 Ethernet models:
a. Plug in the Ethernet cable.
Note: The RX3001 Ethernet station is automatically configured
to use DHCP. If your network uses static IP addresses, contact
your Network Administrator for the correct addresses and
follow the Ethernet configuration steps in the RX3000 manual
at www.onsetcomp.com/manual/rx3000.
b. Press the Connect button (under the cloud icon) on the station
to connect to HOBOlink. Wait for a checkmark to appear next
to Last Connection as shown in the example in this step.
For RX3002 Wi-Fi models:
a. Connect the station to the computer with the USB cable.
b. In HOBOware 3.7.2 or later, select Manage RX3000 from the
Device menu. (Select Domain networks and click Allow Access
if you see a Windows® Firewall warning.)
c. In the RX3000 Manager, click the Actions button.
d. Enter the Security information for your Wi-Fi network. Type
the Network Name, select the Security Type, and type the
Security Key. Consult your Network Administrator or wireless
router documentation for help with determining your network
security type.
Note: The station uses DHCP by default. If your network uses
static IP addresses, contact your Network Administrator for the
correct addresses to enter in the Networking fields.
e. Click Save in the RX3000 Manager. Click Done and then close
the RX3000 Manager.
f. Disconnect the USB cable.
g.
Press the Connect button (under the cloud icon) on the station
to connect to HOBOlink. Wait for a checkmark to appear next
to Last Connection as shown in the example in this step.
18254-I MAN-QSG-RX3000
Plug in and search for any smart sensors.
6
Important: If this RX3000 station is a replacement for an
existing U30 station, it is imperative that you power down the
U30 station being replaced (disconnect the battery and AC
adapter or solar panel) before you remove the smart sensors
and connect them to the RX3000. Do not repower the U30
station or allow it to connect to HOBOlink again unless at least
one different smart sensor is connected to the U30 station first.
a. Plug in smart sensors into the ports in the bottom of the case.
c. Watch the mote LCD during the process of joining the
network.
i.
ii.
This signal strength icon blinks
while searching for a network.
iii.
Once a network is found, the icon
will stop flashing and the bars will
cycle from left to right.
iv.
Tip: Refer to the RX3000 manual for instructions on wire
routing and environmental sealing of wires.
b. Press the Select button to view the smart sensors on the LCD
and then press the Search button (the magnifying glass icon
should be visible as in the example below). The station will
search for all connected smart sensors and show the number
of channels after a few seconds. Note that some smart sensors
have multiple channels (such as the temperature/RH sensors).
Press the Select button to view
the smart sensor channels
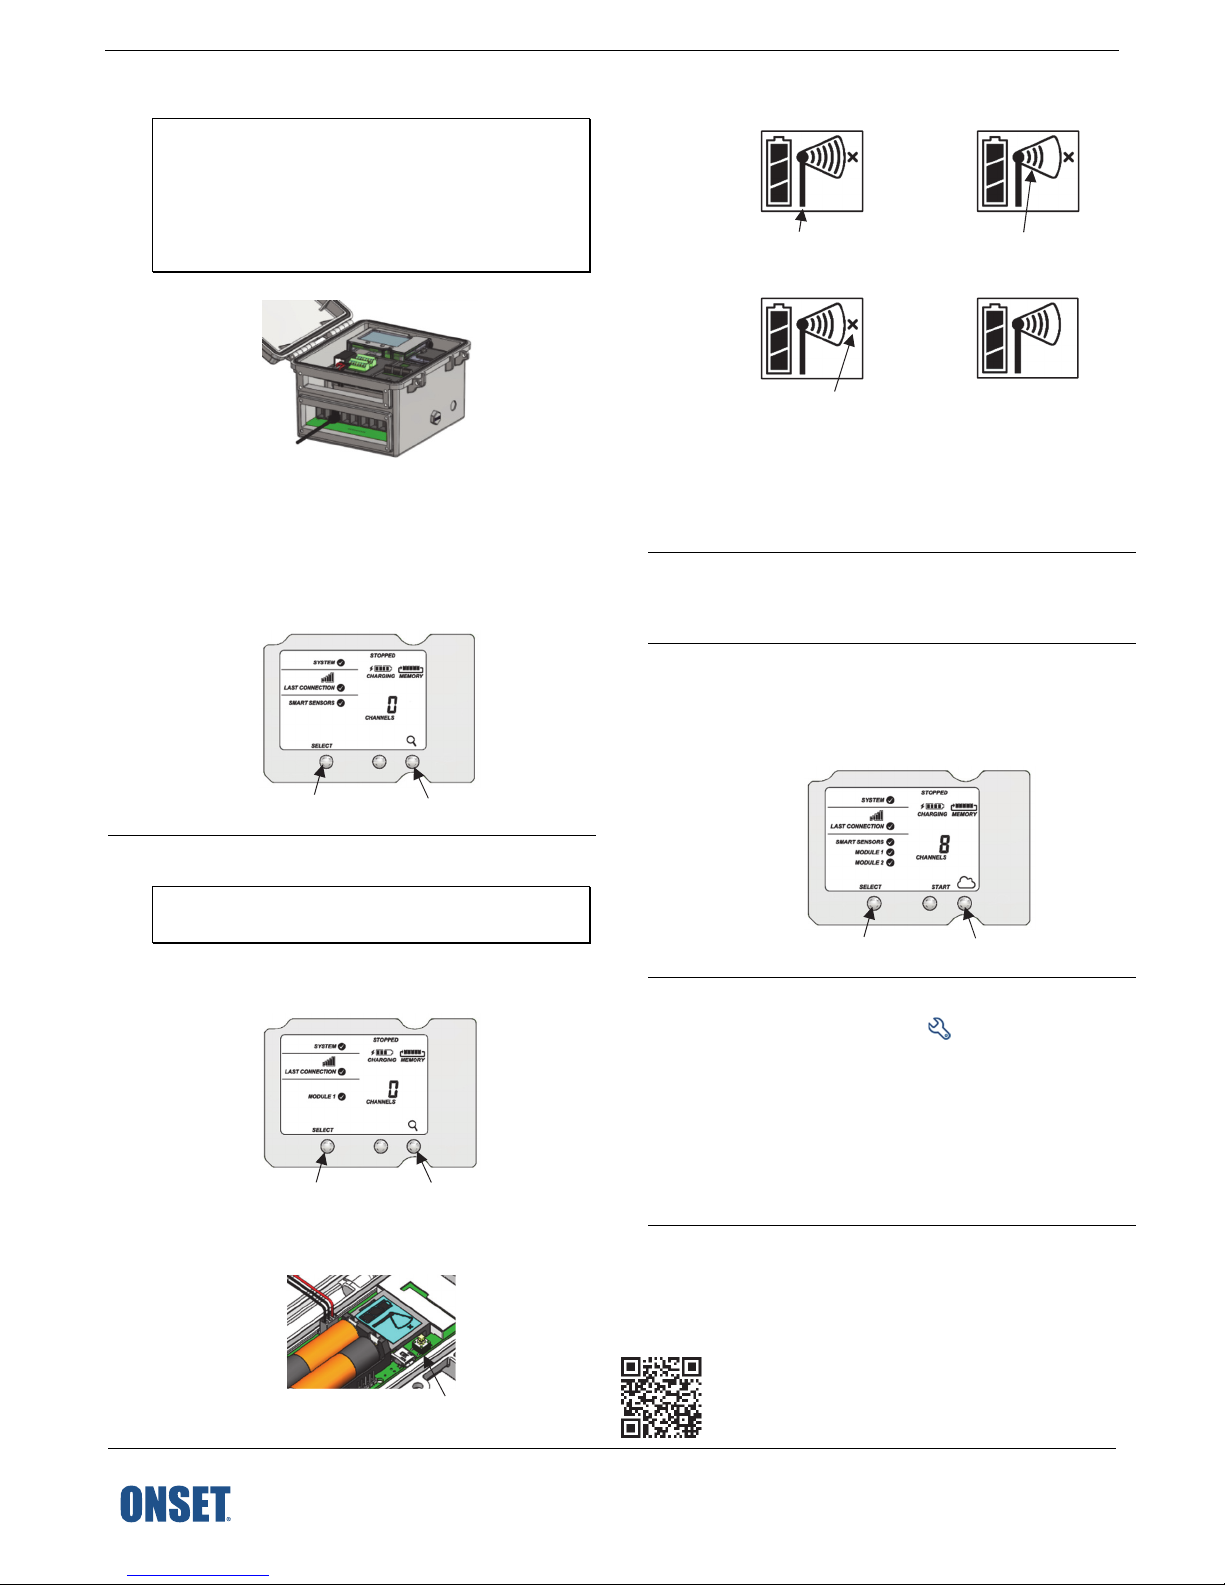
Add any wireless sensor motes.
7
Important: Keep the mote(s) near the RX3000 station while
completing these steps.
a. Press select to switch to the module where the RXW Manager
is installed (Module 1 or Module 2) and then press the Search
button to wait for motes to join the network.
Press the Select button to switch to the
module with RXW Manager installed
b. Install the rechargeable batteries in the mote and press the
button on the mote for 3 seconds.
Press the Search button for the station
to identify connected smart sensors
Press the Search button for the
station to search for motes to join
Press this button for 3 seconds
This network connection “x” icon
blinks while the mote completes
the registration process, which
may take up to five minutes.
Repeat steps to add other motes. Press the Search button on
the station when finished adding motes.
Connect analog sensors or relay devices.
8
Connect any sensors or devices to the optional modules. Refer
to the RX3000 manual for details.
Connect to HOBOlink.
9
Use the Select button to return to the main LCD screen that
shows all sensors and modules. Press the Connect button (the
cloud icon should be visible as shown in the example). This is
necessary for HOBOlink to identify newly added sensors.
Once the mote has finished joining
the network, the “x” icon is
removed and the channel count on
the station LCD increases by the
number of measurement channels
for the mote plus the battery.
Press the Select button to
return to the main LCD screen
Configure the station in HOBOlink.
10
Go to Devices > List and click the icon next to your station.
Make changes and click Save as you configure the following:
• System settings and connection interval.
• Smart sensor logging interval and sampling interval.
• Settings for each sensor (e.g. labels, graph, and scaling).
• Optional modules and associated channels.
Any configuration changes will be transferred to the station
the next time it connects with HOBOlink.
Start logging.
11
Press the Start button on the station to start logging. For
details on using HOBOlink including checking the latest
conditions, creating dashboards, or setting up a map, go to
www.hobolink.com and click Help.
For additional information:
Monitoring Station Manual for specifications and detailed operation,
including deployment guidelines, mounting instructions, and steps for
installing the weatherproof rubber cable channels. Go to
www.onsetcomp.com/manual/rx3000 or scan the code at left.
Press the Connect button
See the HOBO RX3000 Remote
1-800-LOGGERS (564-4377) • 508-759-9500
www.onsetcomp.com/support/contact
© 2015–2019 Onset Computer Corporation. All rights reserved. Onset, HOBO, and HOBOlink are trademarks or registered
trademarks of Onset Computer Corporation. All other trademarks are the property of their respective companies.
This product has been manufactured by Onset Computer Corporation and in compliance with Onset’s ISO 9001:2015 Quality
Management System.
18254-I MAN-QSG-RX3000
 Loading...