

Hobo MX2301, MX2303, MX2304, MX2305, MX2302 User Manual
HOBO® MX2300 Series Data Logger Manual
Temperature Sensor
Range
Accuracy
Resolution
Response Time
(Typical to 90%)
xx seconds in stirred water
Stability (
R
Range
sensor error by an additional 1%
Accuracy
Resolution
Response Time
(Typical to 90%)
(Stability)
Logger
Operating Range
Radio Power
Transmission Range
Wireless Data
Logging Rate
Logging Modes
Memory Modes
Start Modes
Stop Modes
Restart Mode
Time Accuracy
Battery Type
HOBO MX2300 Series
The HOBO MX2300 series data loggers record and transmit temperature and/or relative
humidity (RH) in outdoor environments. These Bluetooth® Low Energy-enabled loggers are
designed for wireless communication with a mobile device. Using the HOBOmobile® app, you
can easily configure the logger, read it out, and view data on your phone or tablet, or export
the data for further analysis. The logger can calculate minimum, maximum, average, and
PLACEHOLDER
standard deviation statistics and be configured to trip alarms at thresholds you specify. The
logger also supports burst logging in which data is logged at a different interval when sensor
readings are above or below certain limits. The Temp and Temp/RH models have internal
sensors while the External Temp/RH, External Temp, and 2x External Temp include built-in
external sensors, offering a wide range of solutions for monitoring outdoor temperature and
RH.
Specifications
Data Logger
Models:
• MX2301, temp/RH
• MX2302, ext temp/RH
• MX2303, 2 ext temp
• MX2304, ext temp
• MX2305, temp
Included Items:
• Screws
• Cable ties
Required Items:
• HOBOmobile app
• Device with iOS and
Bluetooth
Accessories:
• Solar radiation shield (RS1
or M-RSA)
• Mounting bracket for solar
radiation shield (MX2300RS-BRACKET), for use with
MX2301 and MX2305
models
• Replacement battery
(HP-B)
0.04°C (0.072°F)
Drift) <0.01°C (0.018°F) per year
elative Humidity Sensor* (MX2301, MX2302 only)
0.05% at 25°C (77°F)
Drift <1% per year typical
-40° to 70°C (-40° to 158°F)
1 mW (0 dBm)
Approximately 30.5 m (100 ft) line-of-sight
Standard Bluetooth Low Energy (Bluetooth Smart)
1 second to 18 hours
Fixed interval (normal, statistics) or burst
Wrap when full or stop when full
Immediate, push button, date & time, or next interval
When memory full, push button, date & time, or after a set logging period
Push button
±1 minute per month 0° to 50°C (32° to 122°F)
2/3 AA 3.6 Volt lithium, user replaceable
MX2301 and MX2305 internal sensors: -40 to 70°C (-40 to 158°F)
MX2302 external temperature sensor: -40 to 70°C (-40 to 158°F)
MX2303 and MX2304 external sensors: -40 to 100°C (-40 to 212°F), with
tip and cable immersion in fresh water up to 50°C (122°F) for one year
±0.25°C from -40 to 0°C (±0.45 from -40 to 32°F)
±0.2°C from 0 to 70°C (±0.36 from 32 to 158°F)
±0.25°C from 70 to 100°C (±0.45 from 158 to 212°F), MX2303 and
MX2304 only
MX2301 and MX2305 internal sensors: xx minutes in air moving 1 m/sec
MX2302 external temperature sensor: xx minutes in air moving 1 m/sec
MX2303 and MX2304 external sensors: xx minutes in air moving 1 m/sec;
0 to 100% RH, -40° to 70°C (-40° to 158°F); exposure to conditions below
-20°C (-4°F) or above 95% RH may temporarily increase the maximum RH
±2.5% from 10% to 90% (typical) to a maximum of ±3.5% including
hysteresis, see Plot A for full range
MX2301: xx minute in air moving 1 m/sec with protective cap
MX2302: xx minutes in air moving 1 m/sec with protective cap
20923-1
Specifications (continued)
Battery Life
Memory
Full Memory
Time
Cable Length
Dimensions
Weight
Materials
Environmental Rating
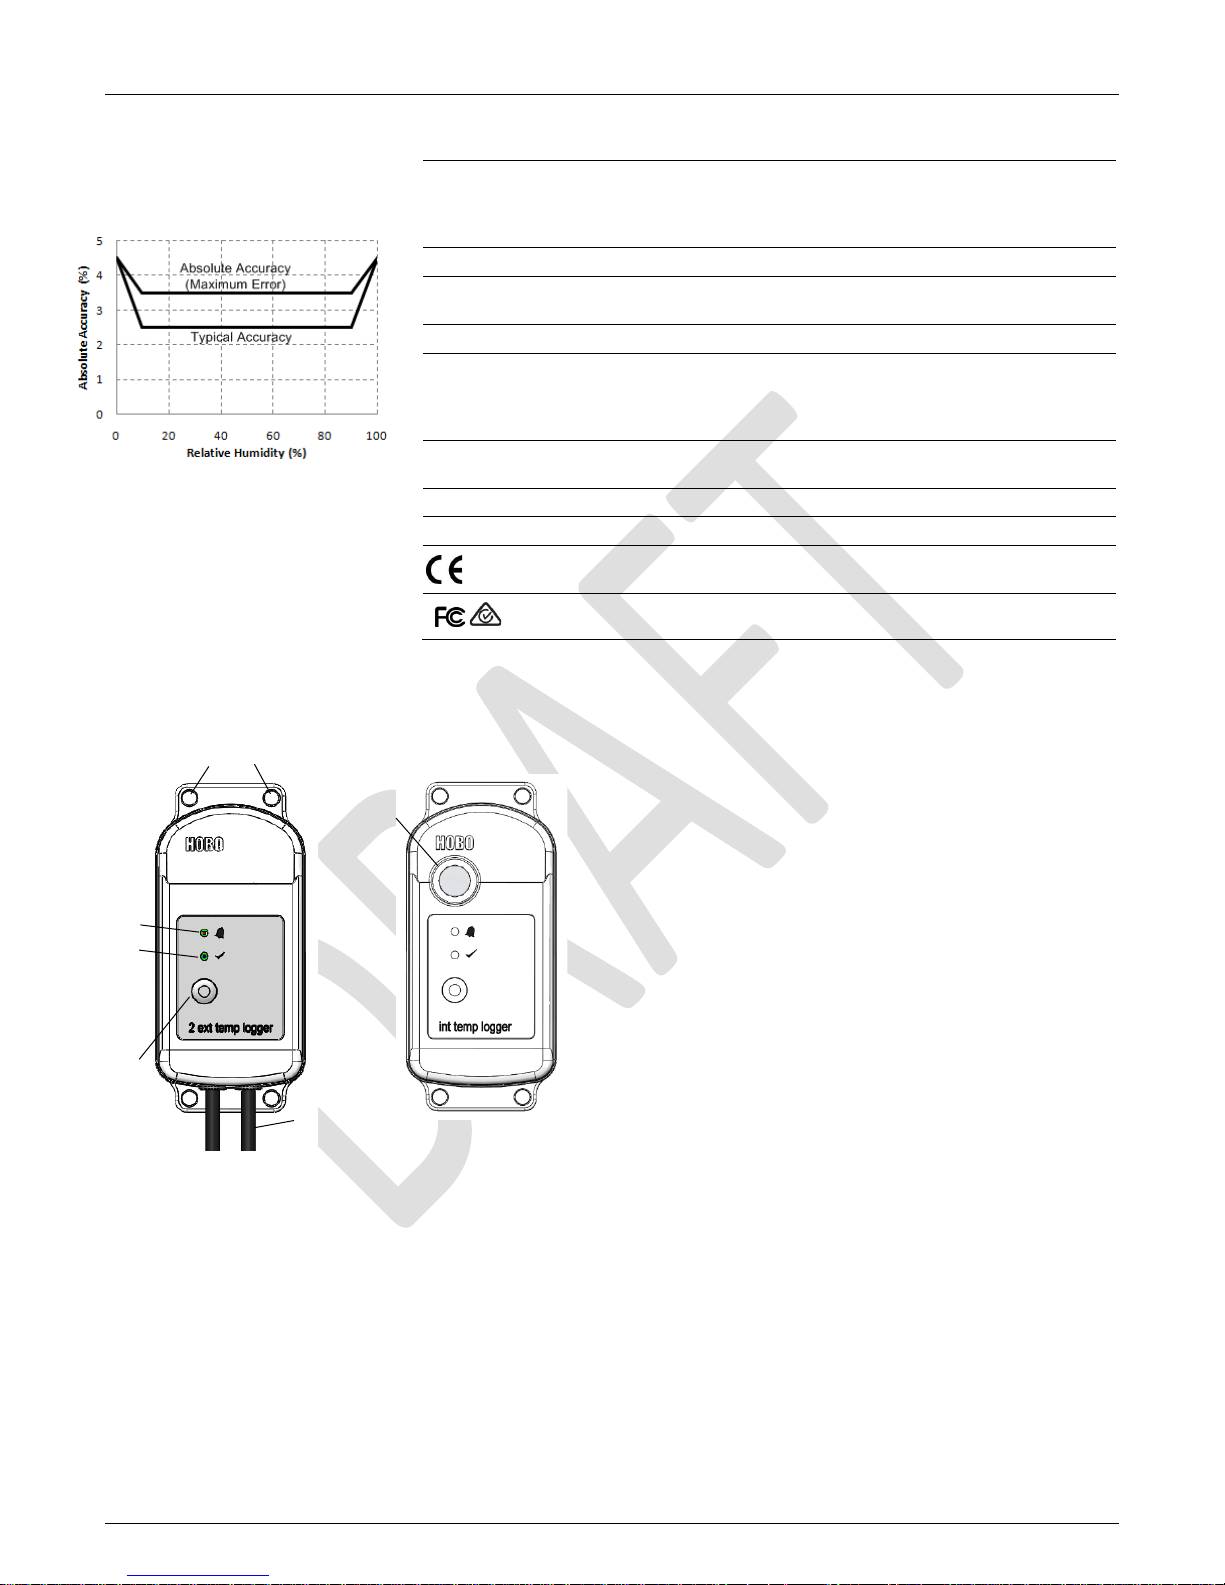
MX2303 model shown
Vent
Plot A: RH Accuracy
Alarm LED
Mounting
Start Button
External Sensor
Status LED
MX2305 model shown
HOBO MX2300 Series Data Logger Manual
*Per RH sensor manufacturer data sheet
Logger Components and Operation
128 KB (84,650 measurements, maximum)
Download
2 m (6.56 ft)
placeholder
xx year, typical with logging interval of 1 minute and Power Saving Mode
disabled; xx years, typical with logging interval of 1 minute and Power
Saving Mode enabled. Faster logging intervals, remaining connected with
the app, excessive downloads, and paging may impact battery life.
Approximately 60 seconds; may take longer the further the device is from
the logger
Logger housing: 3.66 x 8.48 x 2.29 cm (1.44 x 3.34 x 0.9 in.)
External temperature sensor diameter: 0.5 cm (0.2 in.)
External temperature/RH sensor diameter: 1 cm (0.4 in.)
Solar radiation shield bracket: xx cm (xx in.)
Logger: xx g (xx oz)
Solar radiation shield bracket: xx g (xx oz)
NEMA 4x and IP66
The CE Marking identifies this product as complying with all relevant
directives in the European Union (EU).
See last page
Holes
Mounting Holes: Use the holes at the top and bottom of the
logger to mount it (see Deploying and Mounting the Logger).
Alarm LED: This LED blinks red every 4 seconds when an alarm
is tripped (unless Show LED is disabled as described in
Configuring the Logger). Both this LED and the status LED will
blink once when you press the start button to wake up the
logger before configuring it. If you select Page Logger LED in the
HOBOmobile app, both LEDs will be illuminated for 4 seconds.
Status LED: This LED blinks blue every 4 seconds when the
logger is logging (unless Show LED is disabled as described in
Configuring the Logger). If the logger is waiting to start logging
1-800-LOGGERS 2 www.onsetcomp.com
because it was configured to start “On Button Push” or with a
delayed start, it will blink green every 8 seconds.
Start Button: Press this button for 1 second to wake up the
logger; both the alarm and status LEDs will blink. Once the
logger is awake, press this button for 1 second to move it to the
top of the loggers list in HOBOmobile. Press this button for 4
seconds to start or stop the logger when it is configured to start
or stop “On button push” (see Configuring the Logger). Both
LEDs will blink four times when you press the button to start or
stop logging. Press this button for 10 seconds to reset a
password (see Setting a Password).
External Sensor: This is the external probe attached to the
bottom of the logger that measures temperature or
temperature/RH. The MX2302 logger has one external sensor
that measures both temperature and RH. The MX2303 logger
(shown at left) has two external temperature sensors while the
MX2304 logger has one external temperature sensor.
Vent: This vent is on the front of the models with internal
sensors (MX2301 and MX2305). In the MX2301 model, the RH
sensor is located behind the vent.
Downloading HOBOmobile and
Connecting to a Logger
Install the HOBOmobile app to connect to and work with the
logger.
1. Download the HOBOmobile app from the App Store.
2. Open the app and enable Bluetooth in the device settings if
prompted.
3. Press the button on the logger to wake it up.
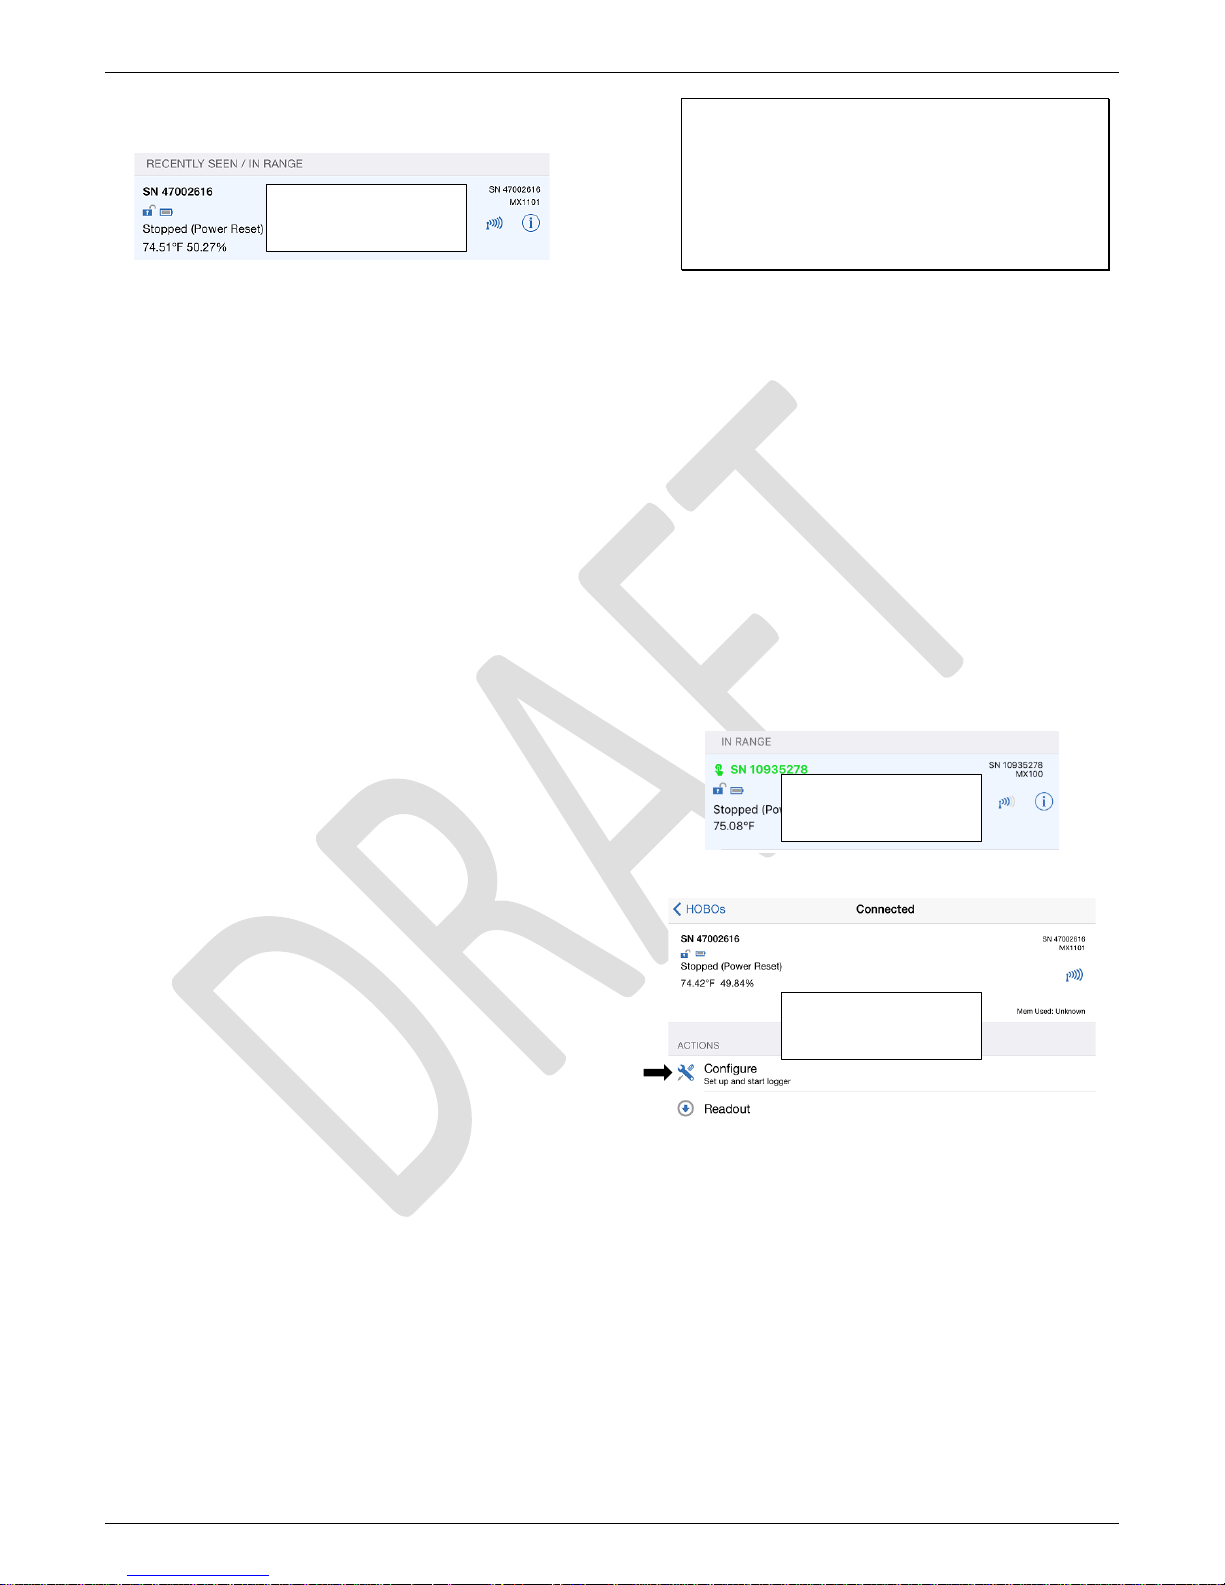
HOBO MX2300 Series Data Logger Manual
4. Tap the HOBOs icon at the bottom of the screen. Tap the
logger in the list to connect to it.
PLACEHOLDER
If the logger does not appear in the list or if it is having trouble
connecting, follow these tips:
• Make sure the logger is “awake” by pressing the start
button. The alarm and status LEDs will blink once when
the logger wakes up. You can also press the button a
second time to bring it to the top of the list if you are
working with multiple loggers.
• Make sure the logger is within range of your mobile
device. The range for successful wireless communication
is approximately 30.5 m (100 ft) with full line-of-sight.
• If your device can connect to the logger intermittently or
loses its connection, move closer to the logger, within
sight if possible.
• If the logger appears in the list, but you cannot connect
to it, close HOBOmobile and power cycle the mobile
device. This forces the previous Bluetooth connection to
close.
Once connected to the logger you can select one of the
following actions:
Important: Before updating the firmware on the
logger, always read out the logger first. Check the
remaining battery level by selecting Full Status Details
and make sure it is no less than 30%. Make sure you
have the time to complete the entire update process,
which requires that the logger remains connected to
the device during the upgrade.
• Force Offload. This may appear if an error was
encountered when loading configure settings. Select this
to offload all the data on the logger before reconfiguring
the logger.
Configuring the Logger
Use HOBOmobile to set up the logger, including selecting the
logging options, configuring alarms, and enabling Power Saving
Mode. These steps provide an overview of setting up the
logger. For complete details, see the HOBOmobile User’s Guide.
1. Press the button on the logger to wake it up.
2. Find the logger in the list and tap it to connect to it. If you
are working with multiple loggers, you can press the button
on the logger a second time to bring it to the top of the list.
The logger name (or serial number if no name has been
assigned) turns green when the logger moves to the top of
the list. Note that the current readings are displayed even
when the logger is not logging.
• Configure. Select logger settings and load them onto the
logger to start logging. See Configuring the Logger.
• Readout. Download logger data. See Reading Out the
Logger.
• Full Status Details. Check the battery level and view the
configuration settings currently selected for the logger.
• Start Logging. Select this option to begin logging (if the
logger is configured to start “On Button Push” as
described in Configuring the Logger).
• Stop Logging. Stop the logger from recording data. This
overrides any Stop Logging settings described in
Configuring the Logger.
• Page Logger LED. Press and hold this option to illuminate
the alarm and status LEDs for 4 seconds.
• Logger Password. Select this to create a password for the
logger that will be required if another mobile device
attempts to connect to it. To reset a password, connect
to the logger, tap Set Logger Passkey, and select Reset to
Factory Default. You can also press the button on the
logger for 10 seconds to reset a password.
• Update Firmware. When new logger firmware is
available, this action appears in the list. Select it and
follow the instructions on the screen. Note that if there is
a communication failure during the firmware update
process, the logger will revert to the previous firmware.
PLACEHOLDER
3. Once connected, tap Configure.
PLACEHOLDER
4. Tap Name and type a name for the logger up to 20
characters (optional). Tap Done. If no name is selected, the
logger serial number is used as the name.
5. Tap Group to add the logger to the Favorites group, an
existing custom group, or create a new group name with up
to 20 characters (optional). Tap Done.
6. Tap Logging Interval and choose how frequently the logger
will record data unless operating in burst logging mode (see
Burst Logging).
7. Tap Start Logging and select when logging will begin:
• Now. Logging will begin immediately after tapping Start
in the Configure screen.
1-800-LOGGERS 3 www.onsetcomp.com
 Loading...