

Hobie torqeedo Owner's Manual

Owner’s Manual

2
• Indicates a danger or a procedure that may cause injury and
property damage.
• Indicates a danger or a procedure that may cause property
damage.
Contents
1. Introductions.....................................................................4
2. Important Safety and Operating Instructions....................6
3. Kit Breakdown...................................................................8
4. Thru Hull Fitting Installation............................................10
5. Hobie evolve Mirage Well Operation..............................14
6. Hobie Mirage evolve Disassembly.................................16
7. Hobie evolve Twist-N-Stow Rudder Conversion............17
8. Time to Hit the Water......................................................20
9. Operating Elements........................................................22
10. Troubleshooting and Care Instructions..........................28
11. Warranty..........................................................................30
12. Contact Information...........................................Back Page
This operating manual will help you use your Hobie evolve safely
and efciently. All information is given according to our latest
knowledge. Content is subject to technical changes.

3

4
Introductions
Dear Customer,
Thank you for choosing the Hobie evolve. As a
member of the Hobie family, you are now on the road to
pure adventure in electric boating. This owner’s manual is
designed to help you get maximum enjoyment from your
new Hobie ev
olve. But more important, it is designed to
help you use it safely.
We are delighted that you have chosen our motor.
Your Hobie evolve is powered by the Torqeedo 403 motor
and is state-of-the-art in terms of motor, battery, and propeller technology. It has been designed and manufactured with
the utmost care and with a special focus on comfort, userfriendliness, and safety, and has been extensively tested
before delivery.
We hope you will enjoy this product.
Sincerely,

5

6
Important Safety and Operating Instructions
Important safety instructions
Torqeedo motors are designed to operate safely and reliably as long
as they are used according to the operating manual. Please read this
manual carefully before you start the motor. Ignoring the instructions in
this operating manual can cause damage or personal injury. Hobie Cat
Company and Torqeedo accept no liability for any damage caused by actions that contradict this operating manual.
To ensure safe operation of the motor:
• Familiarize yourself with all the motor controls. For instance, you should
be able to stop the motor quickly if necessary.
• Only allow adults who have been instructed on how to operate the motor
or have read the operating instructions to run it.
• Never operate the motor if someone is in the water close to the boat.
Stop the motor immediately if someone goes overboard.
• Always have a paddle and/or MirageDrive® on board for another source
of propulsion.
• Check the status and function of the device before each tour.
• Note that the on-board computer does not include changes to currents
and wind conditions in the range calculation. If you are moving with the
wind or current the remaining range is calculated assuming you continue
going with the wind or current. If you change direction or if wind/current
change, your remaining range may be signicantly lower. Therefore you
should note the effects that the wind and current have on your range.
• Never use the motor as an attachment point for your kayak; never use
the motor as a handle for lifting, carrying or tieing to.
• Do not open the battery casing; protect the battery pack from mechanical damage.
• Do not short circuit the battery pack.
• Avoid submerging the battery pack and remote throttle for long periods
of time.
• If the error code E46 is shown in the display or if you changed the fuse
of the battery, the battery charge status in the display is not accurate. After
a complete charge of the battery, the battery charger status displayed will
be reliable again.
• The battery of your Torqeedo 403 motor has been declared a hazardous
item in UN Class 9. Private transportation is not critical, but if shipped by
a transport company the relevant statutory provisions must be observed.
• Keep the supplied magnetic key at least 50 cm / 20 inches away from
pacemakers.
• Keep the supplied magnetic key away from magnetic information media
(e.g. debit/credit cards, music cassettes, magnetic tapes etc.). The magnet integrated in the key has enough strength to render the saved data
unusable.

7
Important operating instructions
The following is a selection of the most important instructions for handling Torqeedo motors. In addition to these instructions, please observe
the complete operating instructions to prevent damage to your motor.
• Only run the motor when the propeller is under water. If it is run in the
air for longer periods, the shaft sealant rings that seal the motor to the
drive shaft may become damaged. If the motor is run in air for long periods, the motor itself can overheat.
• The Hobie evolve product range, the associated remote throttle, battery
pack, and all electric plug-in connections are protected against dirt and
water in line with protection type IP68.
• The Torqeedo 403 has an integrated protective device that switches the
motor off when it reaches a particular slope of 90°. This prevents the
propeller from turning if the boat capsizes or tilts.
• After use, always take the motor out of the water.
• After operation in salty or brackish water, wash all components in fresh
water.
• Occasionally use contact spray to care for all cable connections. If you
use the motor in salt or brackish water, we recommend applying contact
spray once a month.
• You will extend the life of your battery if you do not expose it for longer
than necessary to a very hot environment. In order to guarantee that the
life of the battery is as long as possible, the battery should be stored for
longer period of time (e.g. over the winter) at around 50 % charge and
between 0 °C and +15 °C / +32 °F and +60 °F.
• Only charge the battery at environmental temperatures between 0 °C
and +45 °C / +32 °F and +113 °F.
• If the motor malfunctions an error code is shown on the display. After
resolving the error the motor can be restarted out of the stop position
again. In rare cases it may be necessary to switch the motor off using the
“on/off” button. You will find descriptions and details in Section 9.3.
• Do not disconnect the cable connections when the propeller is turning.
• If you have a problem with your motor, please follow the instructions in
this operating manual for handling warranty claims.

8
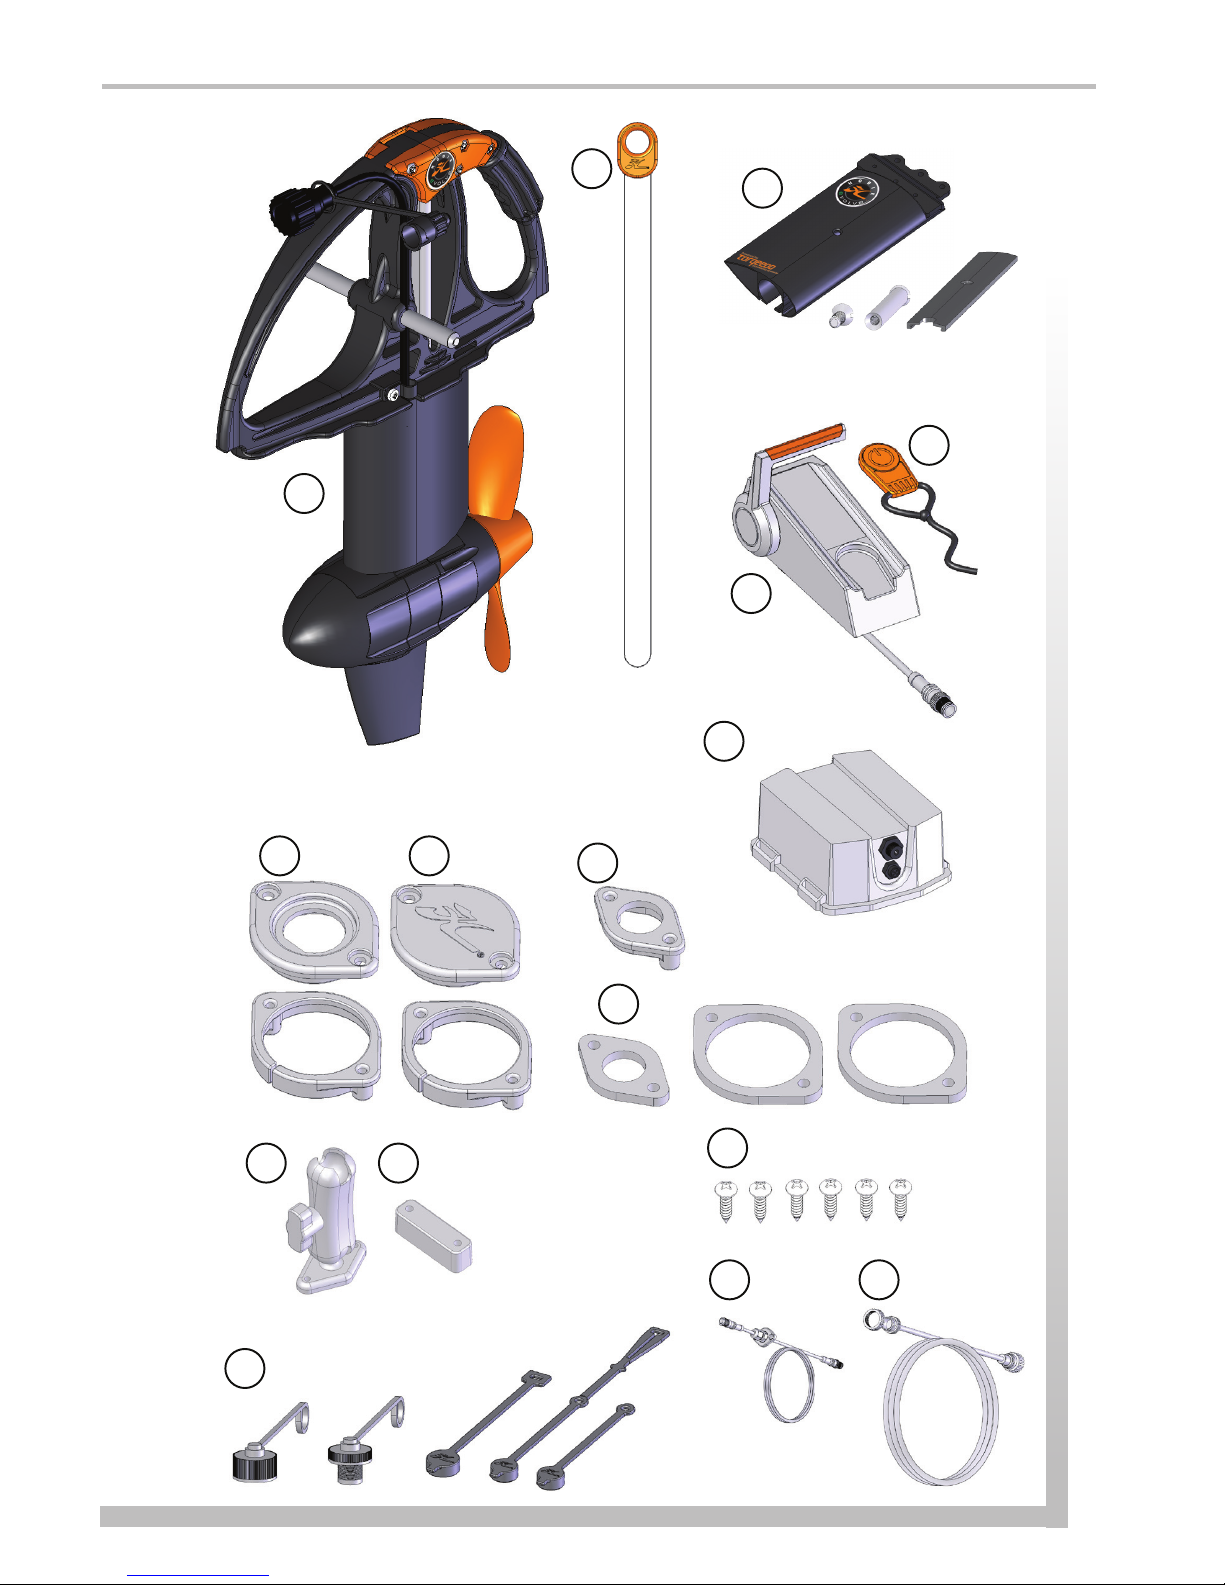
Kit Breakdown
1. Hobie evolve Mirage Well Assembly
2. Prop Alignment Tool
3. Hobie Twist and Stow Rudder Mount and Hardware
(The Hardware is assembled to the aluminum piece and include the cover plate slide, sister screw,
10-32 Flat head screw to match the sister screw, three 10-32 x 1/4” Truss head screws and three
10-32x 7/8” Truss head screws with self locking nuts)
4. Magnetic Key
5. Throttle
6. Battery
7. Misc. Small Parts:
a. Power Cable Thru-Hull Fitting w/ Backing Plate
b. Hole Cover Plate w/ Backing Plate
c. Throttle Cable Mounting Backing Plate
d. Gasket Pack (3 Pieces)
e. Ram® Mounting Arm
f. Ram Backing Plate w/ Hardware
g. Screws for Thru Hull Fittings (QTY 6 #10 Sheet Metal Screws)
h. Assorted Caps for Connectors
i. Throttle Cable Extension
j. Power Cable Extension
k. 9/64” Allen Key (Not shown here)
l. Small tube of thread Loctite® (Not shown here)
m. Charger (Not shown here)
Tools Required:
Phillips Head Screwdriver
Flat Head Screwdriver
Electric Drill
1/8” Drill Bit
3/4” Drill Bit
1-3/4” Hole Saw
6/64” Allen Key (included with this kit)
9
Mounting hardware included,
but not shown here
1
6
2
4
5
7a 7b
7c
7d
7e 7f
7g
3
Items not illustrated to scale
7h
7i 7j
10
Thru Hull Fitting Installation
Components included with this kit give you the option of having a
majority of the wires in the kit be run inside your kayak. Using these
ttings will make the deck of your kayak less cluttered, but will require
that you do some drilling and part installation. Here are the instructions
for installing these parts. If you do not want to run the wires internally,
you can keep everything on the deck and organize the wires to your
liking.
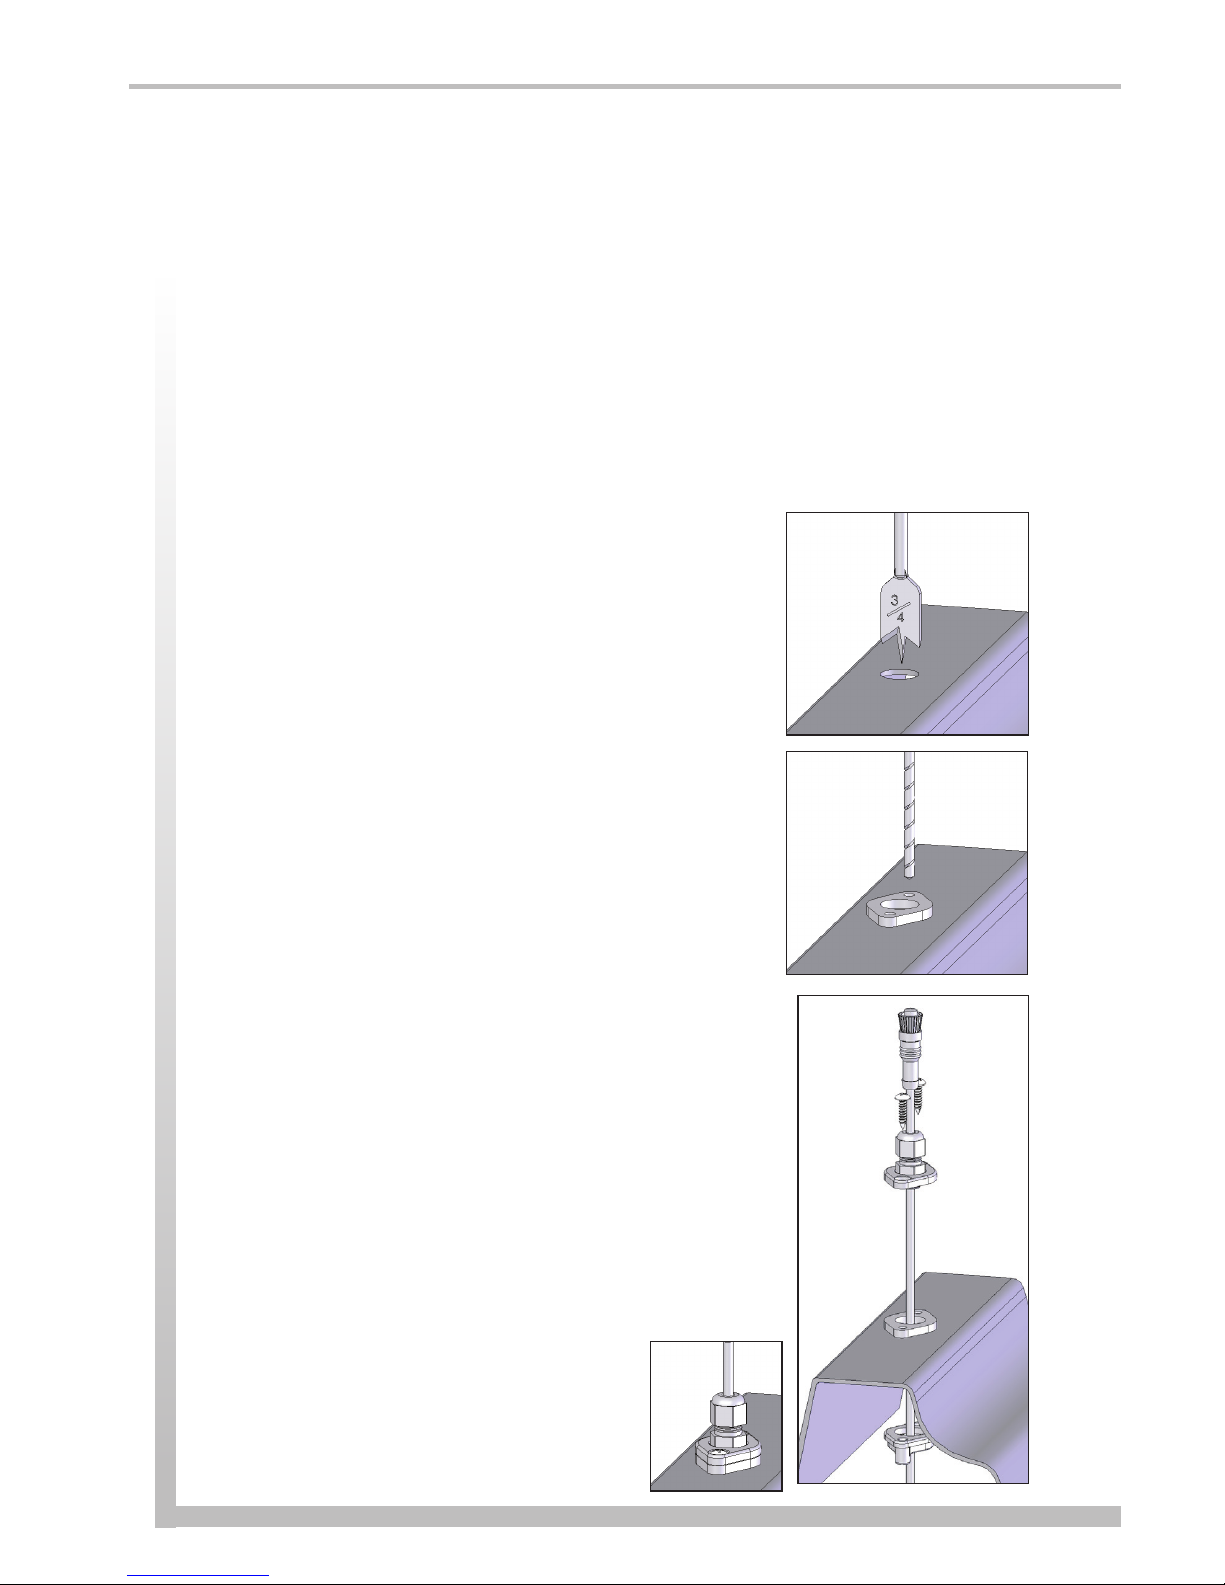
Throttle Cable Thru Hull Installation
1. Choose a location for mounting your throttle.
The location of the thru-hull tting will change
from boat to boat. The closer you can mount
the tting to where you would like the throttle to
be, the less cable you will have to feed. When
choosing your location, also consider that you
will need to be able to reach inside to attach the
backing ring. Be sure to evaluate and test t
a couple different locations prior to drilling any
holes.
2. After choosing your location, drill a 3/4” hole.
3. Place the small diamond shaped gasket
(provided with this kit) centered over the hole
you just drilled and use the two smaller holes in
the gasket as a guide to drill two 1/8” holes.
4. Place the small diamond shaped gasket over
the holes you just drilled. Now feed the throttle
cable through the gasket and hole in the kayak
until the throttle cable mounting plate butts up
against the gasket.
5. Thru bolt the mounting plate to the kayak
using the provided backing plate and sheet
metal screws.
 Loading...