

Page 1
ASSEMBLY MANUAL
TABLE OF CONTENT
List of parts....................................2
Hull assembly ................................4
Trampoline.....................................5
Rudder assembly...........................7
Tiller crossbar & stick ....................8
Mast set up....................................9
Spreader bars..............................10
Preparation for mast
assembly .....................................11
Stepping the mast........................12
Trapeze .......................................13
Boom ...........................................14
Mainsail .......................................15
Cunningham ................................16
Jib................................................17
Jib sheet system..........................18
Main sheet system.......................19
Spinnaker kit................................21
Mise à jour/Last up-date : June 2003
1
Page 2
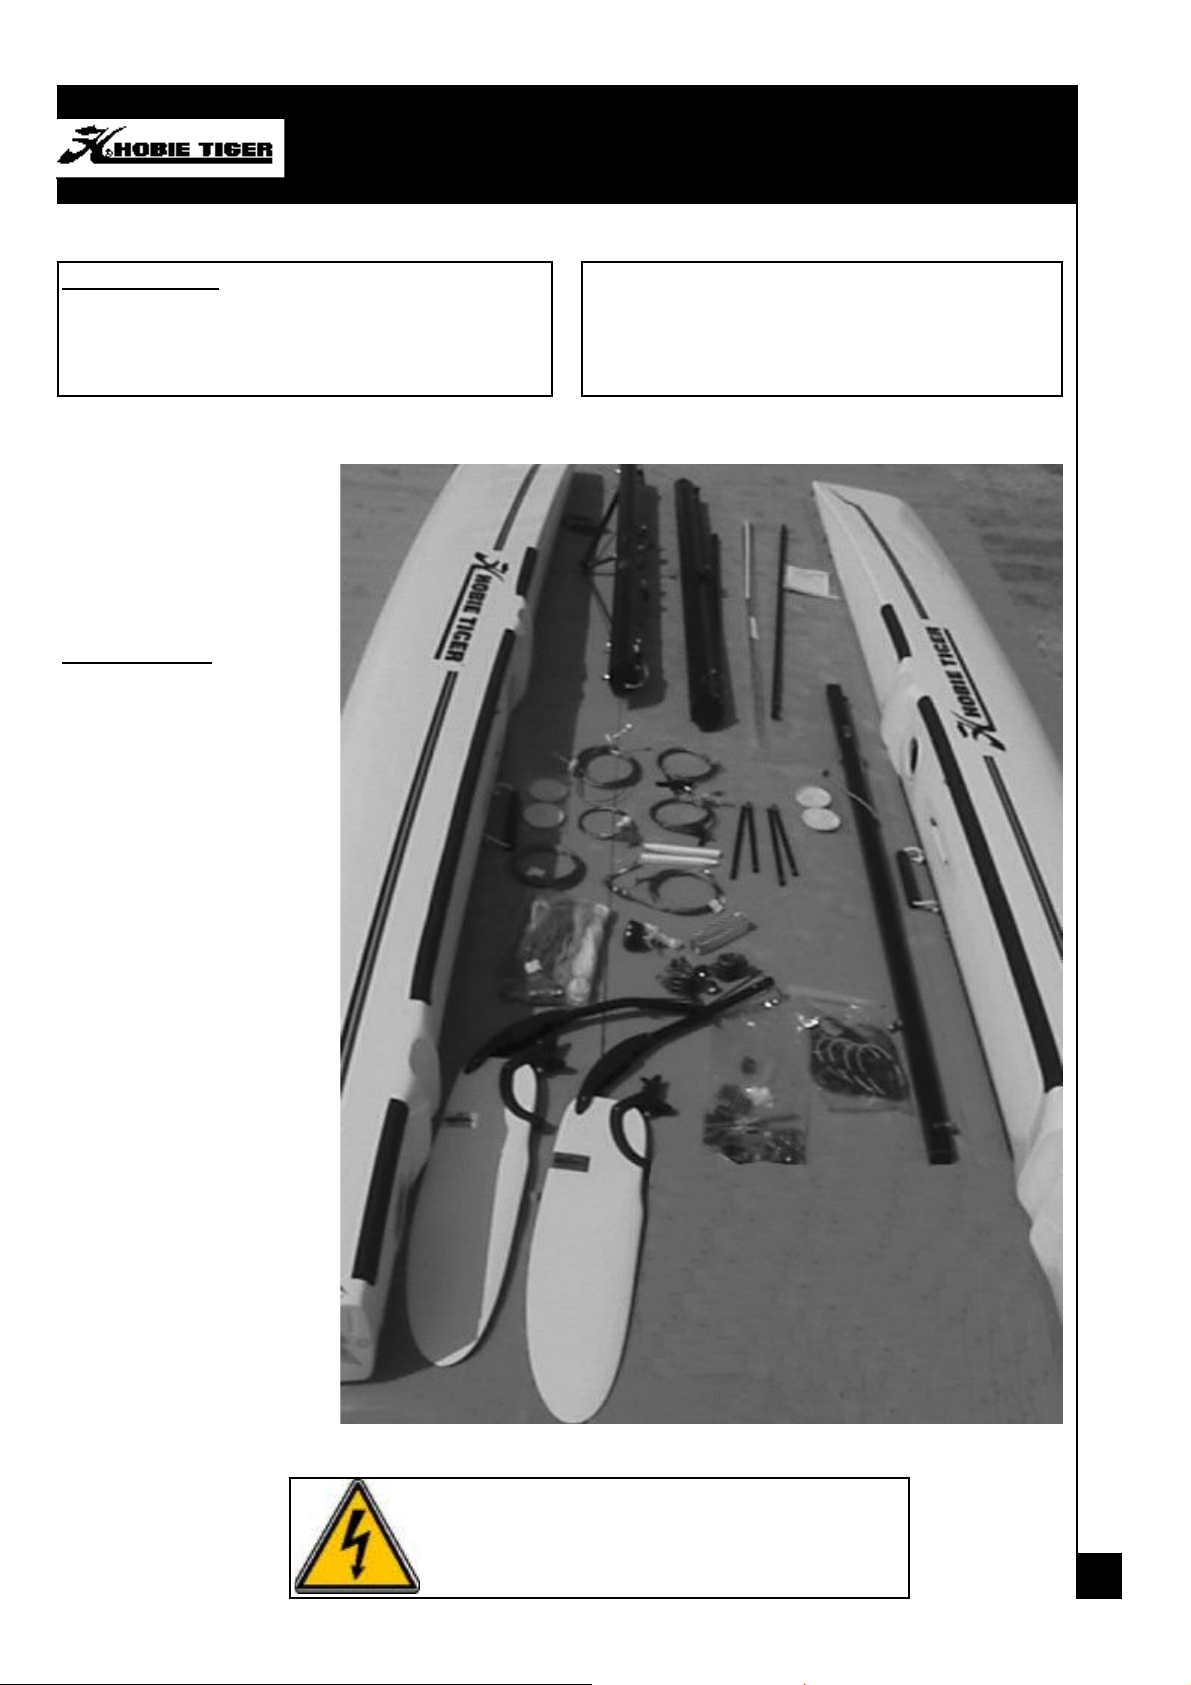
List of Parts
Tools necessary
⇒ 2 spanners - No. 17
⇒ 1 pair of universal pliers
LIST OF PARTS
Hulls (2)
Front crossbar
Rear crossbar
Mast
Boom
Trampoline
Part bag (wires)
Rigging bag
Ropes bag
Rudder assemblies (2)
Tiller crossbar
Tiller extension
Mainsail + battens (7)
Jib
Trampoline lacing rod
Daggerboards (2)
It is advisable to be at least 2 people to assemble
the Hobie Tiger .
CAUTION - DANGER ALUMINIUM
MAST - STAY AWAY OF
ELECTRICAL WIRES
2
Page 3
List of parts
2
1
9
6
5
4
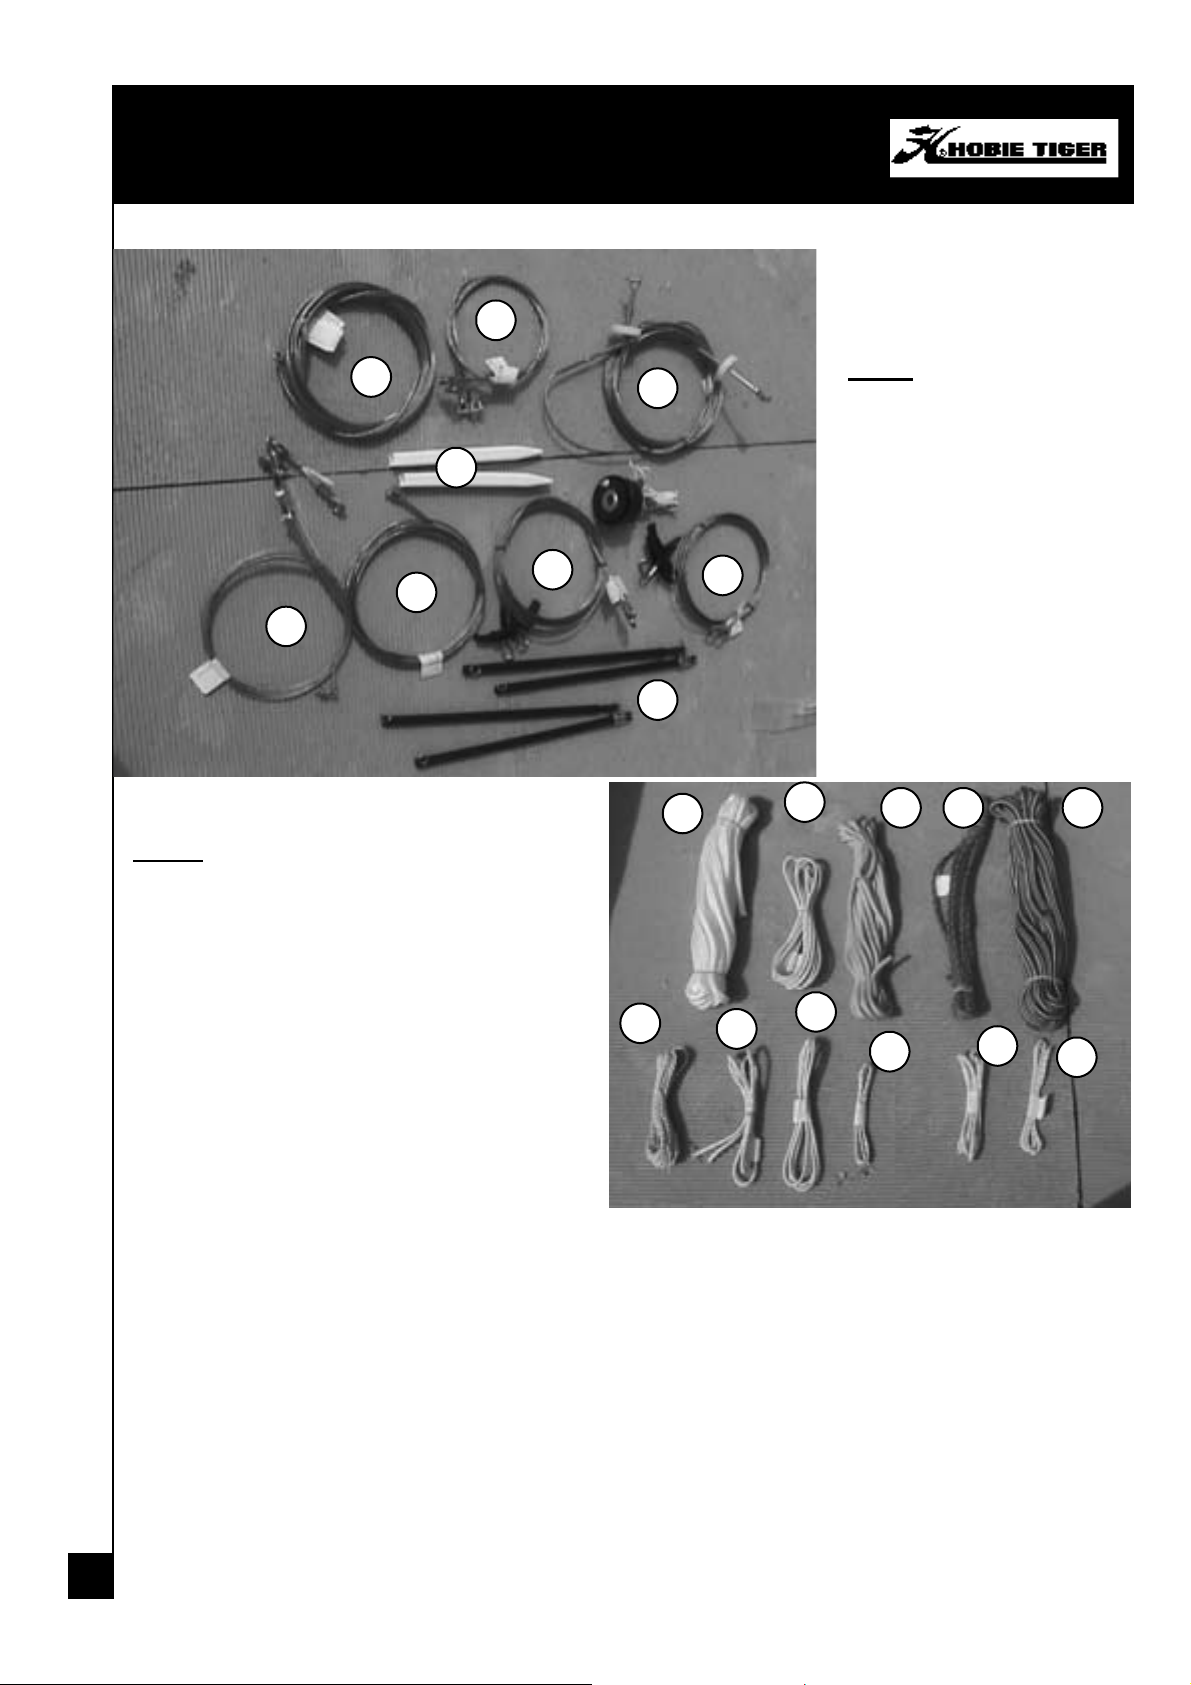
ROPES :
All ropes are labelled with ref. number and name.
Please check carefully before using.
3
7
8
1
WIRES :
1. Shrouds
2. Bridles
3. Spreader diamond wires
4.5. Jib halyard + forestay
6.7. Trapeze wires
8. Spreader wire
9. Stay adjuster cover
2
3 4 5
1. Righting line (white)
2. Trapeze shock cord (white)
3. Jib sheet (yellow)
4. cunningham line (red)
5. Mainshjeet (black and yellow)
6. Jib halyard rope
7. 10. Rotation line
8. jib sheet shock cord
9. Jib clew line
11. Bout étarquage de foc
6
7
8
9
10
11
3
Page 4
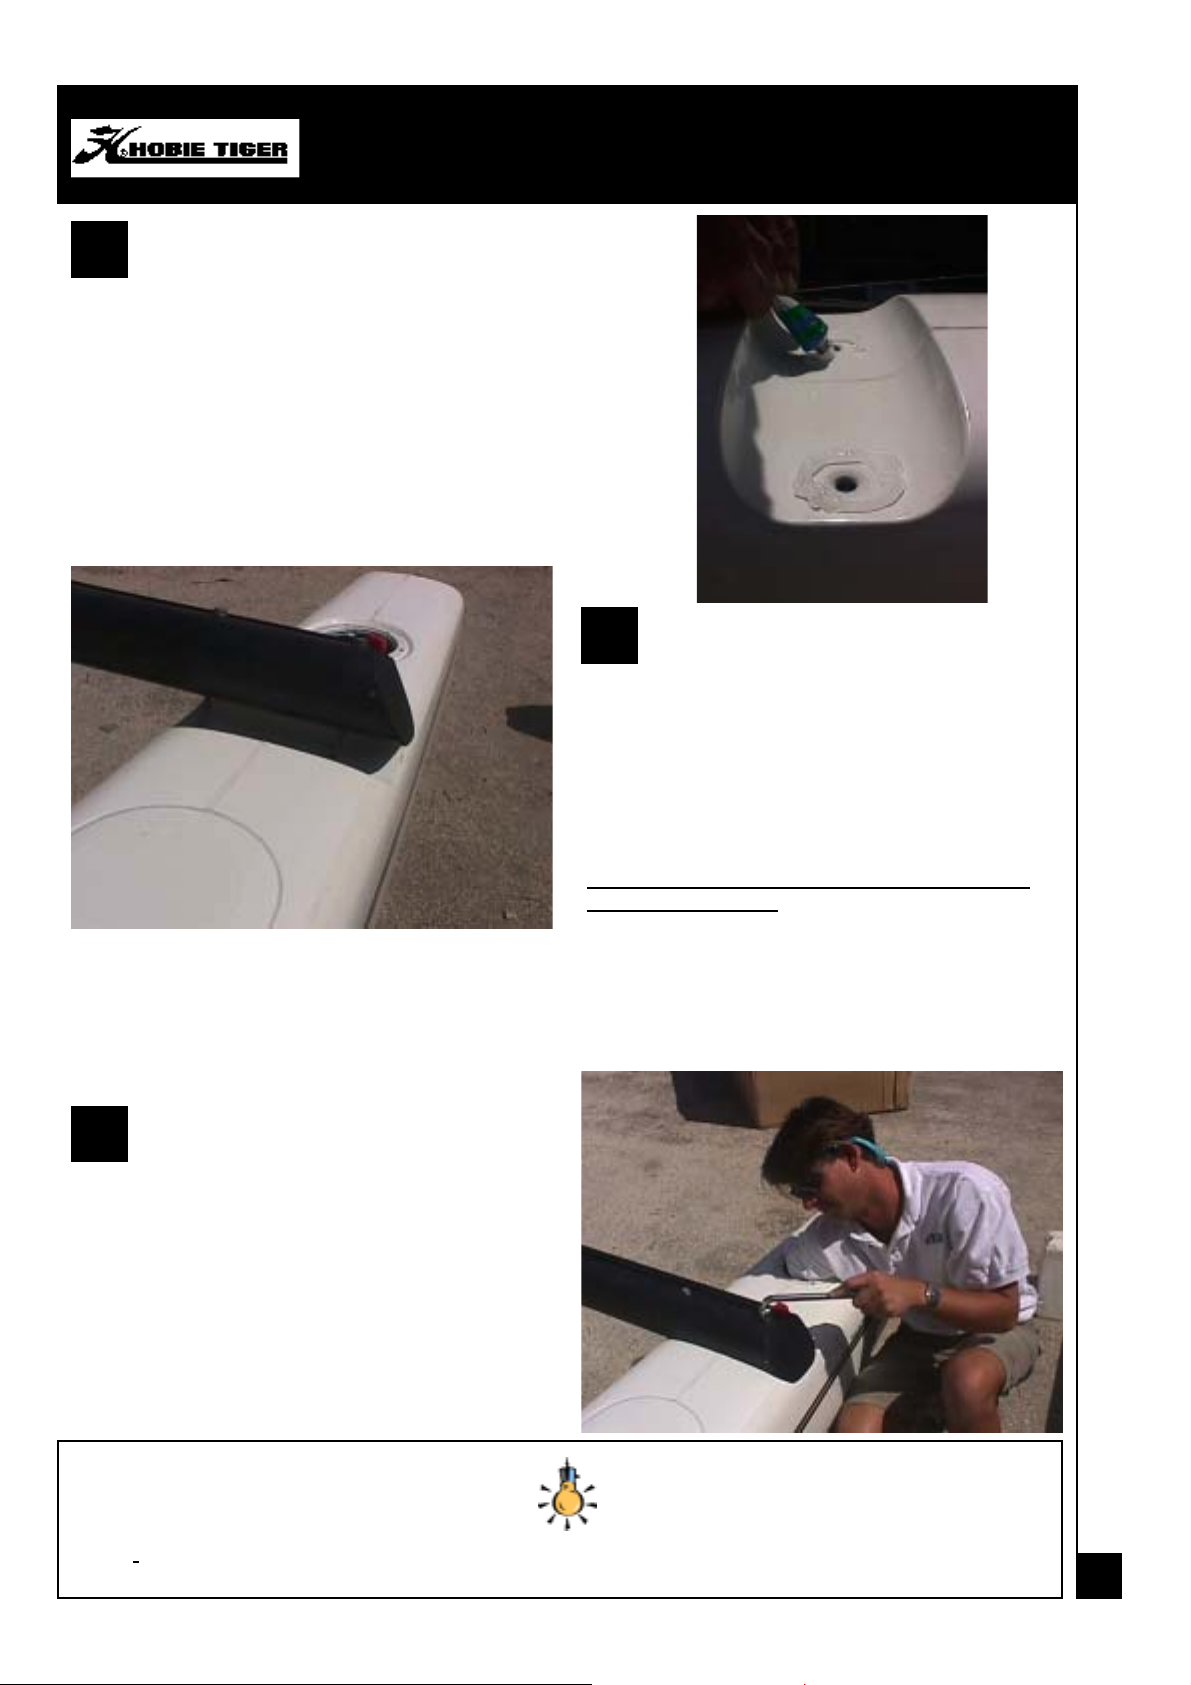
1
Position the hulls in parallel with the inner sides facing the ground.
Lift the right hull. One person straddles the hull to
hold it in place. The other person applies the silicone
sealant (for waterproofing) around the screw holes.
Hull assembly
2
Take the front crossbar (with dolphin striker). Place it
in its support so that the trampoline track faces the
rear of the boat. Insert the two bolts. Pass your
hand through the inspection port to position the nuts
and washers onto the screws photo). Fasten loosely.
Lift the left hull, and follow the same steps as for the
right hull. Do not fully tighten the screws.
3
Apply silicone sealant around the screw holes at the
back of the hulls. Place the rear crossbar on the right
side. Insert the bolts, washers and nuts as shown
for the front crossbar. Do the same thing for the left
side.
Once the frame has been mounted, tighten all the
bolts fully and then install the lock nuts.
***Respect same order for the washers as
bled at the delivery***
assem-
I t is advisable to check the fastening of the bolts after the first trip out onto the water, and
recheck these at regular intervals.
4
Page 5
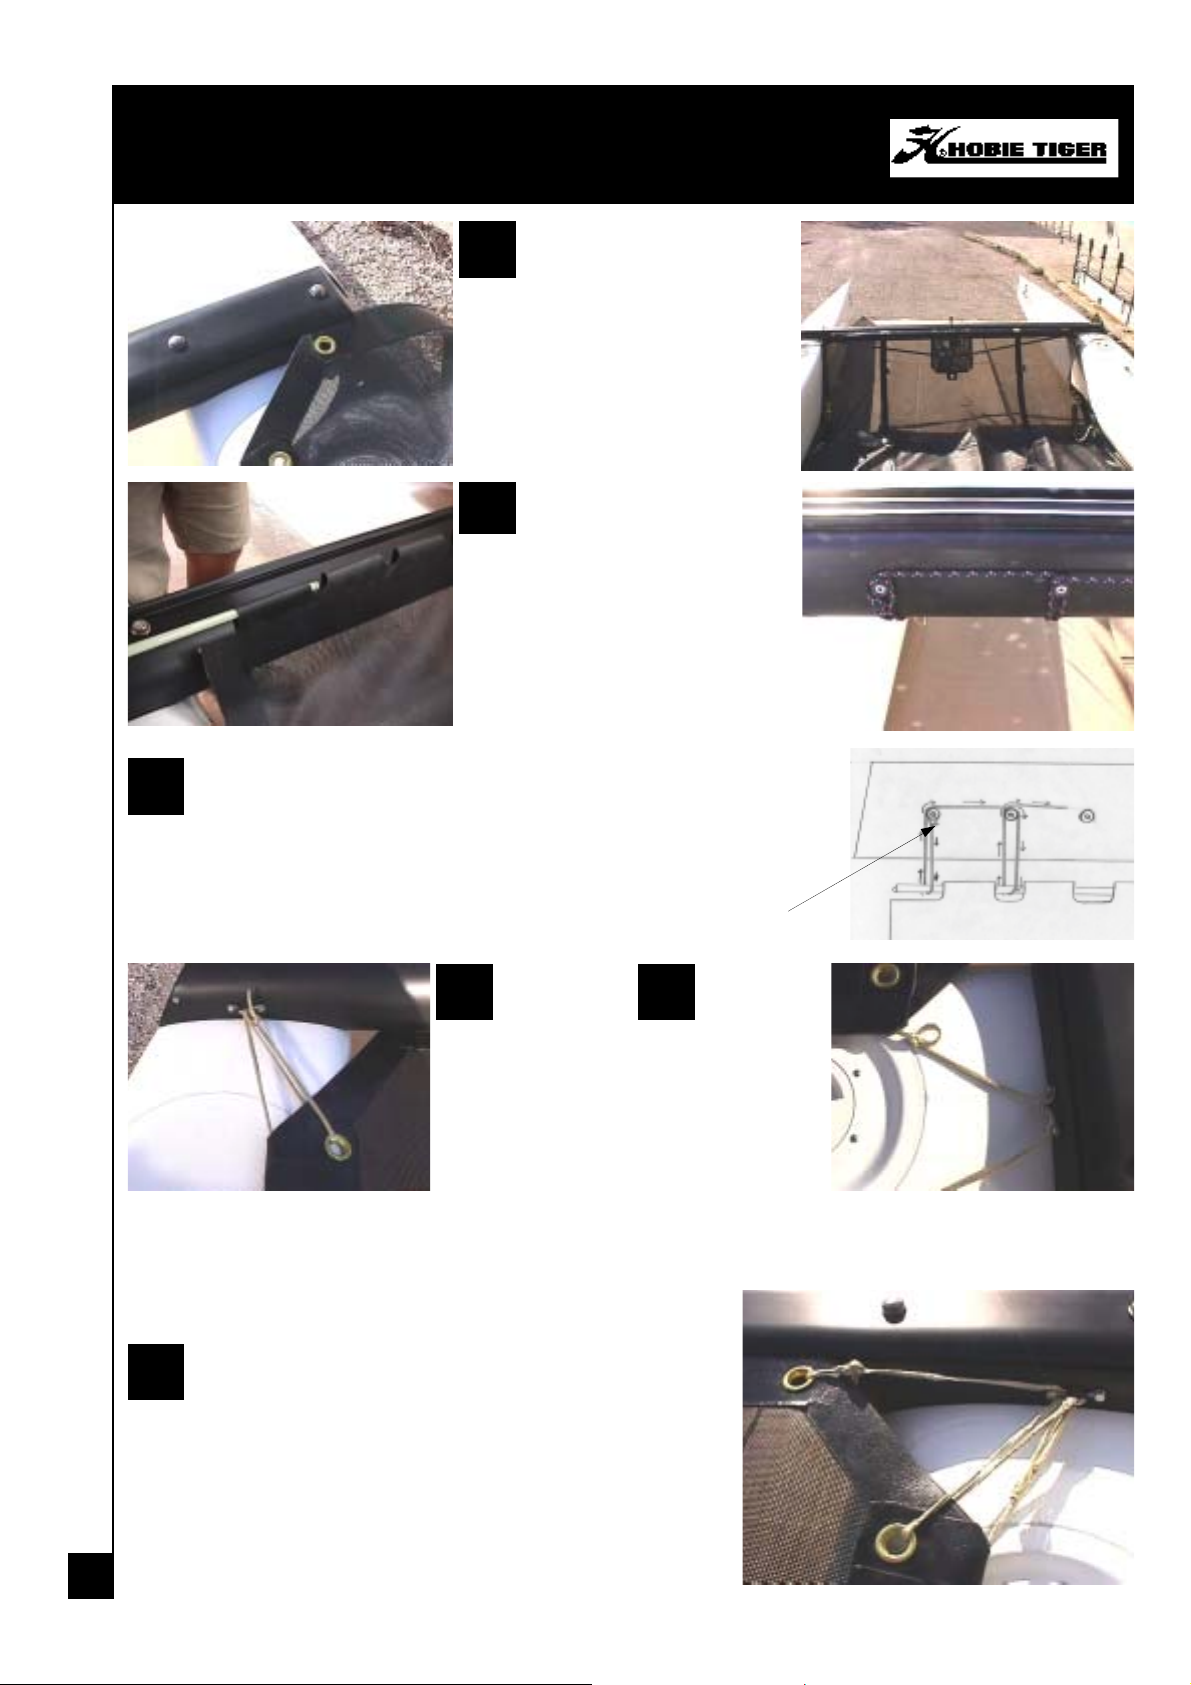
Trampoline
Unfold the trampoline. Note
1
that the side tension lines are
prethreaded. Insert the front
sealed bolt rope edge into the trampoline track of the front corssbar.
Continue feeding the trampoline into
the trampoline track and position it in
the centre. Line up the grommet in
the centre of the front edge of the
trampoline with the dolphin striker
Pull the trampoline to the
2
back of the boat and insert
the fibreflass rod into the rear
flap of the trampoline. Leave an
equal amount protruding from each
side.
Commence lacing the rear of the trampoline. The lacing line ties off on the
3
lacing post at the left rear of the rear beam. Pass the line around the rod
and back around the first lacing post. Lead the line around the second lacing post and pass it around the rod on the first trampoline cut out. Now, come
back around the second lacing post and continue towards the third. Continue all
the way across the beam in the same fashion and tie off loosely. Do not attempt to tighten the rear lacing too much at this
stage.
Tensioning
4
the sides :
starting at
the right rear corner, take the line
that emerges from
the trampoline.
Lead it through the
eye strap on the
rear beam and
then through the grommet/eyelet. Tie it off with a
bowline knot or similar.
Beginning
Move to the
5
front right cor-
ner of the
trampoline. Pull on
the line as firmly as
possible and tie a
bowline knot or loop
in the line as close
to the trampoline
edge as possible.
This will enable a 2:1 purchase to be used for tensioning. Tie off once tensioned to secure.
Now lead the end of the line through the eyestrap on the rear
6
of the front beam and back through the loop. Lead the end
back through the eyestrap and apply as much tension as possible. Maintaining the tension, lead the line through the grommet
and back to the eyestrap. Next, lead the line through the grommet in
the front edge of the trampoline and tie off securely. Repeat procedure for port side.
5
Page 6
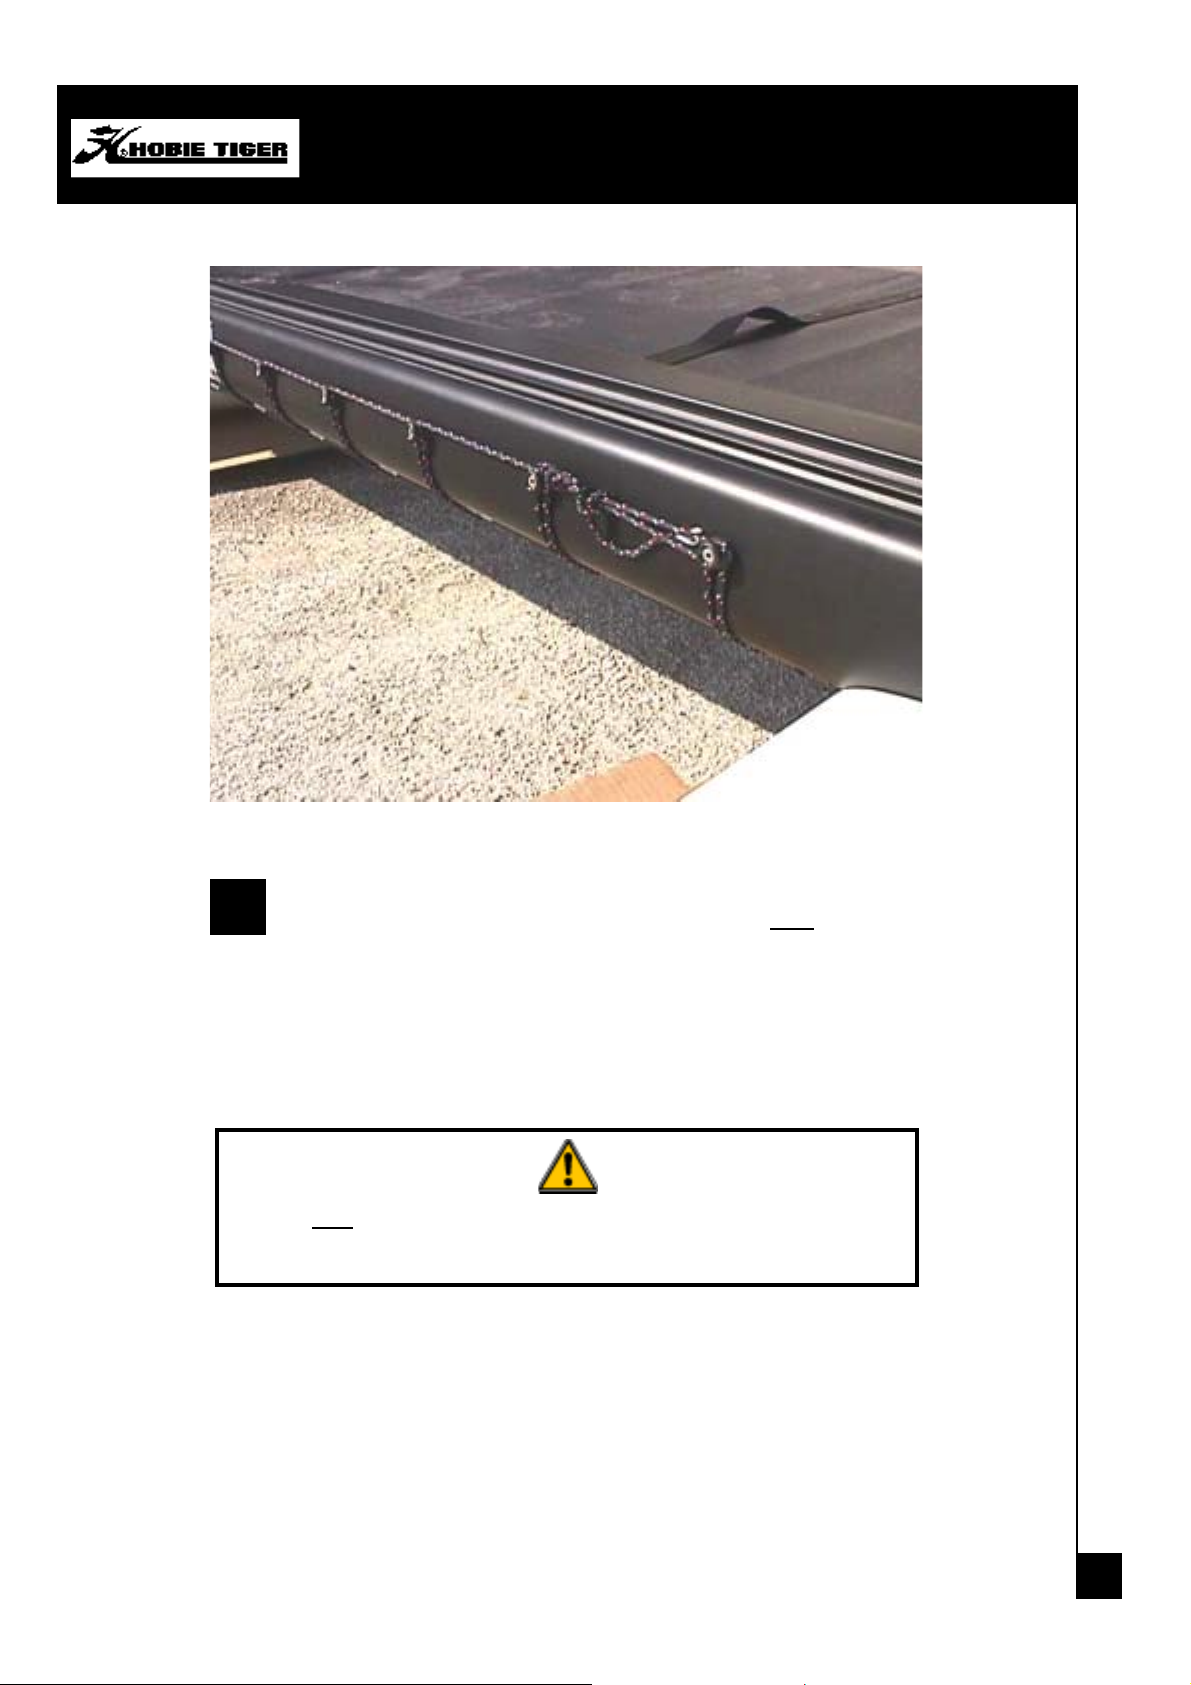
Trampoline
Retighten rear lacing from left to right. Tie the rear lacing off securely at
7
the eyelet posts on the right hand end of the rear beam. NB :
tant that the trampoline lacing is kept very tight.
NB : Check the trampoline tension on a regular basis.
Remember : all ropes streches!
It is impor-
6
Page 7
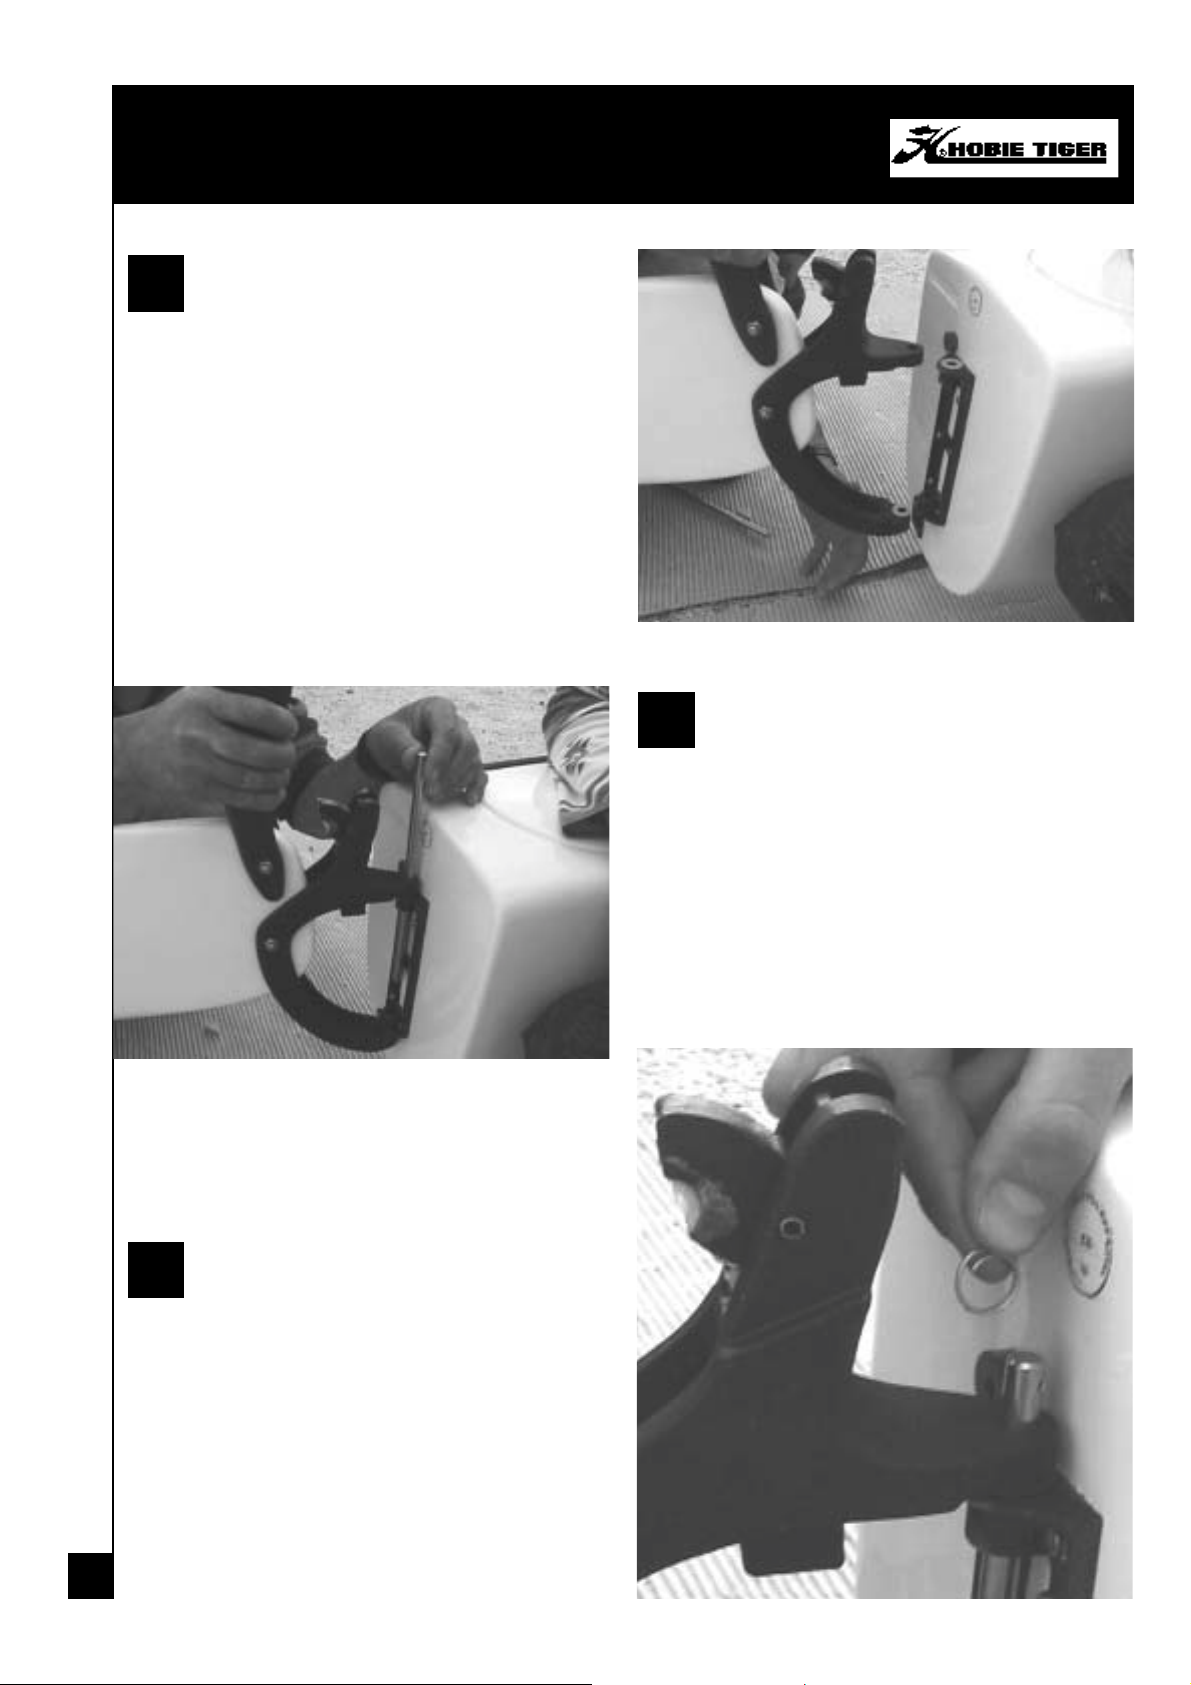
Rudder assembly
1
Identify the right rudder from the left rudder (green
sticker = right ; red sticker = left)
Take the left rudder, and align the upper rudder casting onto the rear gudgeon.
2
3
Repeat the procedure for the right rudder assembly.
Insert the rudder pin, and do not forget to put in the
two split rings: one on top and one at the bottom of the
rudder pin.
7
Page 8

1
Take the tiller crossbar and insert the right side into
the right rudder arm and the left side into the left rudder arm.
Tiller crossbar & extension
3
Then fix the tiller head into the yoke connection as
shown on the photo.
2
Take the yoke connection of the tiller extension and fix
it into the middle of the tiller crossbar
8
Page 9

Mast Set-up
1
Place the mast onto two supports (eg: two
pieces of polystyrene).
Unroll the trapeze wires and fix them using a
shackle to the upper hole on the mast tang (two
on each side).
Trapeze wires
Forestay
Shrouds
Trapeze wires
2
Unroll the shrouds and the forestay wire (with
the jib halyard block) and fix them to the lower
hole of the mast tang using a shackle. The
shrouds go onto each side of the forestay.
3
IMPORTANT : Do not forget to attach the jib halyard rope to the small single block at the end of
the jib halyard wire. Tie off the jib halyard wire
and rope near the base of the mast.
9
Page 10

Spreader Bars
1
Unroll the diamond wires. Attach the joint end of the diamond wires onto the turnbuckle
adjuster near the base of the
mast (level with the security sticker) using the pin and split
ring.
Take the loose ends of the diamond wires and hold tight to adjust to the same length, using
the turnbuckle adjuster which is
located on the lower section of
one of the wires. Once they are
the same length, attach the two
wires to the shield plaes situated on each side of the mast
under the mast tang.
2
Assemble the spreaders on the
centre of the mast. The spreader
root attaches to the front of t he m as t
section onto the one-piece stainless
steel strap. The spreader rake adjuster barrel attaches on each si de
to the individual fittings on both
sides of the mast nearer the sail
track. To adjust the spreader rake,
adjust the length of the barrel (by
winding in or out) and measure from
the wire positions at the tips of each
spreader.
Caution : do not try to adjust spreader rake while diamond wires are
tensioned. Only adjust under no diamond wire tension and screwing the
barrel by hand.
3
Slide the diamond Wires into the correspon ding sl ot s
at the end of the spreaders. Ensure the black plastic
roller is above the spreader arm. It may be necessary
to release tension from the diamond wire turnbuck le
adjuster near the base of the mast . Sec u re the diamond wire with the thin wire supplied. Pass the wire
through the small hole near the spreader tip, bend t he
wire and on one side of the spreader t urn the wire
around the thicker diam ond wires two or three times.
Do the same for the other side of the spreader. Cut off
the excess thin wire ensuring it is bent ne at ly onto the
diamond wires as to prevent the wire from tearing the
sails. Once secured, tape over the spreader ti ps to further ensure there are no sharp edges.
10
Page 11

Mast Set-up
1
Lay the mast on top of the boat with the sail track to
the bottom and the mast base toward the bows.
Place padding under the mast to prevent scratch in g.
2
Lay the shroud wires and trapeze wires down each
side of the mast. Secure the trapeze wires temporarily
near the base of the mast.
3
Ensure that the shroud anchor pins are sealed, tight
and pointing at 90° to the centreline of the hull. Attach
the twist toggles to the anchor pins using the clevis
pins and rings. If you have the optional spinnaker kit
use the 6-mm bow shackles provided instea d of th e
clevis pins .
Attach the stay adjusters to the twist toggles with the
clevis pins and rings.
Attach both shrouds into the top hole of the respective
stay adjusters. This is only a temporary position for
11
Attach the bridle wires to the bow tangs.
4
raising the mast.
Now, attach the jib furler to the bridle wires.
NB
: Ensure that the hole in the furler housing is facing
towards the front crossbar. Now also is a good time to
roll some line onto the furler drum. Leave enough line
unfurled to reach the front crossbar mounted furler
5
cleat.
Page 12

CAUTION - DANGER - ALUMINIUM MAST
STAY AWAY OF
ELECTRICAL WIRES
1
Place the mast foot on the mast base
and place the pin in it. This prevents the
mast from leaving its base when lifted.
Check that the wires are not tangled.
2
Then, with one person on the trampoline, the second person lifts the
mast by the top and moves down the mast until the person on the
trampoline can take the mast on their shoulder. Then this person
pushes his feet against the rear crossbar and pushes the mast forward with the weight of his body.
Once the mast is secured, remove the pin from the base of the
Stepping the mast
4
Once the mast is secure
remove the bolt from the base
of the mast and stow it in a
secure place. You will need
the bolt later for safe lowering
of the mast.
3
The second person can now take
the forestay, make sure it is not
tangled and pin it into one of the
top holes of the furler mounted
stay adjuster.
5
Now you can affix the cunningham blocks to the brackets on
each side of the mast.
NB : For the 1st time you raise the
mast, it is recommended
you use 3 people for extra safety.
12
Page 13

Trapeze
1
Release the trapeze wires from the base of the mast. The crew’s trapeze has the clamcleat swaged to the
wire. Ensure that the crews trapeze wire is positioned in front of the shroud.
Attach the trapeze handles and kits to the trapeze wires.
CREW SKIPPER
2
Pass the trapeze shock cords underneath the trampoline and up through the grommets at the side of the trampoline. Attach to the trapeze system as shown in the photographs.
13
Page 14

1
Slide the outboard end of the boom through
the webbing loop attached to the clew of the
mainsail.
2
Connect the boom to the
mast using the hinge vertex, clevis pin and split
ring.
Boom
3
Connect the shackle on the boom outhaul
line to the grommet in the clew of the
mainsail.
4
Tie one end of the rotation line to the front of the clamcleat on top of the boom. Pass the other end of the line
through the end of the rotation arm on the mast. Take the line ba ck th ro ug h the cla mc l ea t an d fit a pla stic ball
stopper at the end.
14
Page 15

Mainsail
1
Always point your Hobie directly into the wind before you raise the mainsail.
Unfold the mainsail onto the trampoline and insert each batten into its respective pocket. The battens are
numbered (from 1 to 7) the smallest (N ° 1) goes at the top of the sail and the longest (N° 7) at the bottom of
the sail. Attach the batten end caps with the batten lines as shown on the photos.
2
Undo the main halyard rope which is rolled around the mast.
Pass one end through the hole in the mainsail head plate and
stop with a 8 figure knot.
3
Go onto the trampoline. Feed the luff of the mainsail
into the opening of the mast track ensuring that the
hook is on one side of the mast and the halyard rope
on the other side. Raise the mainsail by pulling the halyard and feeding the sail until it reaches the top.
When the sail is all the way up, turn the mast slightly
to the left in order to hook on the mainsail. Insert the
bottom end of the luff into the base of the mast track.
Roll up the halyard rope and place it into the pocket
on the trampoline at the foot of the mast.
15
Page 16

Attach the cunningham blocks (with the ho ok s) into the
1
grommet of the mainsail tack. Take the cunningham line
and feed as follows : (NB : the line must go through the inside of the rotation arm).
Cunningham
-
Start from the cunningha block ont t he left side of the mast.
Feed the rope into the cleat around the s he ave
- pus h the c ord up t hrou gh the fi rst s hea v e of t he lef t bloc k
from back to front
- t ake the rope back down, thread it through the left sheave at
the base of the mast from fro nt to bac k
- t ake it up through the second sheave of the left block from
back to front
- t ake it back down and through the single block,
- t ake it bac k up int o t he fi rs t s heav e of t he right hand bloc k
from front to back
- t ake it bac k down through the sh eav e at the righ t of the m as t
base from back to front
- t ake it up throug h the s ec ond sheav e in t he right bloc k fro m
front to back
- f inally thread the line through the cun ningham block and in
the cleat.
Attach each end of the cunningham line to the shrouds.
2
Take the righting line from the rope bag. Attach it to the dolphin striker post under the front crossbar (photo).
Pass it under the trampoline through the grommet at the base of the mast. Fold up the end of the line and stow
it in the trampoline pocket at the base of the mast.
16
Page 17

Jib
1
Unroll the jib and open the zipper
on the luff. Using the 4mm bow shackle connect the tack to the stay adjuster.
3
Shackle the jib head to the jib halyard. Then positi the
jib and the halyard line against the forestay. Close the
zipper ensuring that the halyard line remains inside
the zipper. As you pull down on the halyard line close
the zipper as the sail is raised.
4
Once the jib is fully raised, take the jib luff tensioner line and secure it
to the bottom holes in the stay adjuster.
17
5
Now pass the line through the small pulley at the end of the jib
halyard, then back down through the cleat on the tack of the jib.
Remove the jib halyard line and stow it in the trampoline pocket.
Page 18

Jib sheet (self tacking system)
Now take the yellow thicker sheet rope and starting from one
6
swivel cam cleat on the front crossbar pass the rope under the
thinner white spectra rope through the middle size pulley (2)
and back to the other side swivelling cam cleat (also on the front
crossbar).
Once the jib is hoisted, attach the
carbo block (5) with shackle to the
jib clew and use the yellow sheet
rope to trim.
2
Take the white
spectra rope
and to one end
tie on to the top
of the middle
size block.
This spectra then passes
5
through the other carbo
block (also supplied in kit
which attaches with shackle to the
jib clew) and then ties off to the
carbo block mounted on the traveller car. Tie a bowline knot through
the hole in the middle of the pulley.
4
1
3
Lead the other
end of this rope
through the smaller pulley that was
shackled to the
spinnaker pole in
step 1.
Further Suggestions
⇒ To furl the jib you will need to untie the knot on the traveller car for the jib and tie the sheet off to the jib
clew block. Otherwise the jib will not furl completely.
⇒ As the track is mounted on the front section of the beam you may find that the hole you use on the jib clew
board may now have to become one of the lower, more forward holes. Also it may be necessary to tack
the jib at a lower position on the forestay adjuster.
⇒ The spinnaker halyard system still works exactly the same as the standard Hobie Tiger original system
however it has moved to a more outboard position on the beam.
Firstly, attach the smallest pulley supplied in the kit to
the spinnaker pole centre pad eye (also where the
centre supports attach for the spinnaker pole). Attach
this pulley with one of the shackles supplied.
then back to the
carbo pulley attached to the traveller car on the selftacking track.
18
Page 19

Mainsheet system
1
Your mainsheet system has been pre-assembled for
you by your Hobie dealer.
2
Shackle the boom
block to the boom
block hanger.
3
Shackle the mainsheet
ratchet block to the top of
the main traveller car.
4
Thread the tail of the main sheet through the swivel cleat assy
on the rear beam, through the sheaves on the traveller car, down
through the eyestrap on the rear of the beam and tie a figure «8»
knot in the end.
19
Page 20

1
Install the drain plugs – do not overtighten, hand tight is sufficient.
Overtightening may cause the drain plug flange to distort and cause
leakage.
2
Tension the rig. This can be accomplished by having your assistant
hang from the trapeze or you can use mainsheet tension on one
side at a time so that you can adjust the shroud position in the side
stay adjusters.
Fit the daggerboards into the daggerboards wells. The dag-
3
gerboard roller shock cord should be tight enough to prevent
the daggerboard from slipping down.
Before Sailing
It is recommended that beach rollers be used
4
to move your Hobie. This will save your back
and the bottom of the boat.
Always wash traveller with fresh water after
5
use in salty water.
Always wear your Hobie buoyancy vest, look out
for overhead power lines and
HAVE LOTS OF FUN!
20
Page 21

Classical Spinnaker kit
1
Attach the Spi halyard block
Shackle the spi halyard block through the small bow
shackle attached to the thin cord at the top of your FXOne mast. Now pass the halyard through the pulley
and thread as per the photograph.
2
Fit the two ratchet blocks and stand-up springs to the
eye straps on the inboard side of the daggerboards.
Jib furler bridle
Mid pole support wire
3
Attach the spinnaker pole to the tang at the middle of the
front crossbar.
4
Attach the spinnaker pole bridles and the mid pole suppor t wir es to
the small hole in the front of the bow tang.
21
Spi pole bridle
Page 22

Classical Spinnaker kit
5
Use the small length of 3mm line to hold up and induce some prebend into the pole. Enough tension must be used as to take the
slack out of the mid pole support wires.
6
One end of the tack line ties off at the eyestrap at the front tip of the
pole. Lead the line through one of the
sister blocks and back out through
the block at the pole tip. Then take
the line over all the bridles and wires
to the trampoline and tie off to the
spinnaker tack.
7
Untie the spinnaker halyard from the base of the mast. Taking the end of the
piece that runs through the spreaders lead it through the block at the inner
end of the pole. Then pass it through the sister block and lead it back to the
swivel cam cleat on the front crossbar. Put a plastic ball stopper on this end.
NB
: The tack line, sister blocks and this end of the halyard should hang be-
low all
the wires.
8
Tie the other end of the spinnaker halyard to the he ad of the spi.
9
The spinnaker sheet (red) can now be rigged as per the schematic. Tie both ends of the spinnaker sheet to the
clew of the spinnaker using either bowline knots or figure «8» knots.
NB
: ensure that the spinnaker sheet runs through the ratchet blocks in the right direction.
10
Stow the spinnaker in the spinnaker bag on the trampoline.
If the wind is not too strong a trial spinnaker set and drop is re-
11
commended on the beach before you try it on the water.
22
Page 23

Classical Spinnaker kit
Schematic of Tiger
classical spi set-up
head
Tack
d
r
a
y
l
a
H
clew point
T
a
c
k
l
i
n
e
S
p
i
s
h
e
e
t
23
 Loading...