

Page 1

ASSEMBLY MANUAL
1
Last up-date : December 2003
Page 2

TABLE OF CONTENT
List of parts....................................................................3
Hull assembly................................................................6
Trampoline ....................................................................7
Rudder installation.........................................................9
Mast set up..................................................................10
Spreader bars..............................................................11
Preparation for mast raising........................................12
Stepping the mast .......................................................13
Trapeze assembly.......................................................14
Mainsail.......................................................................15
Cunningham/Righting line...........................................16
Jib sail .........................................................................17
Jib sheet system..........................................................18
Mainsheet system .......................................................19
Spinnaker Kit...............................................................21
Caution & safety tips ...................................................24
2
Page 3
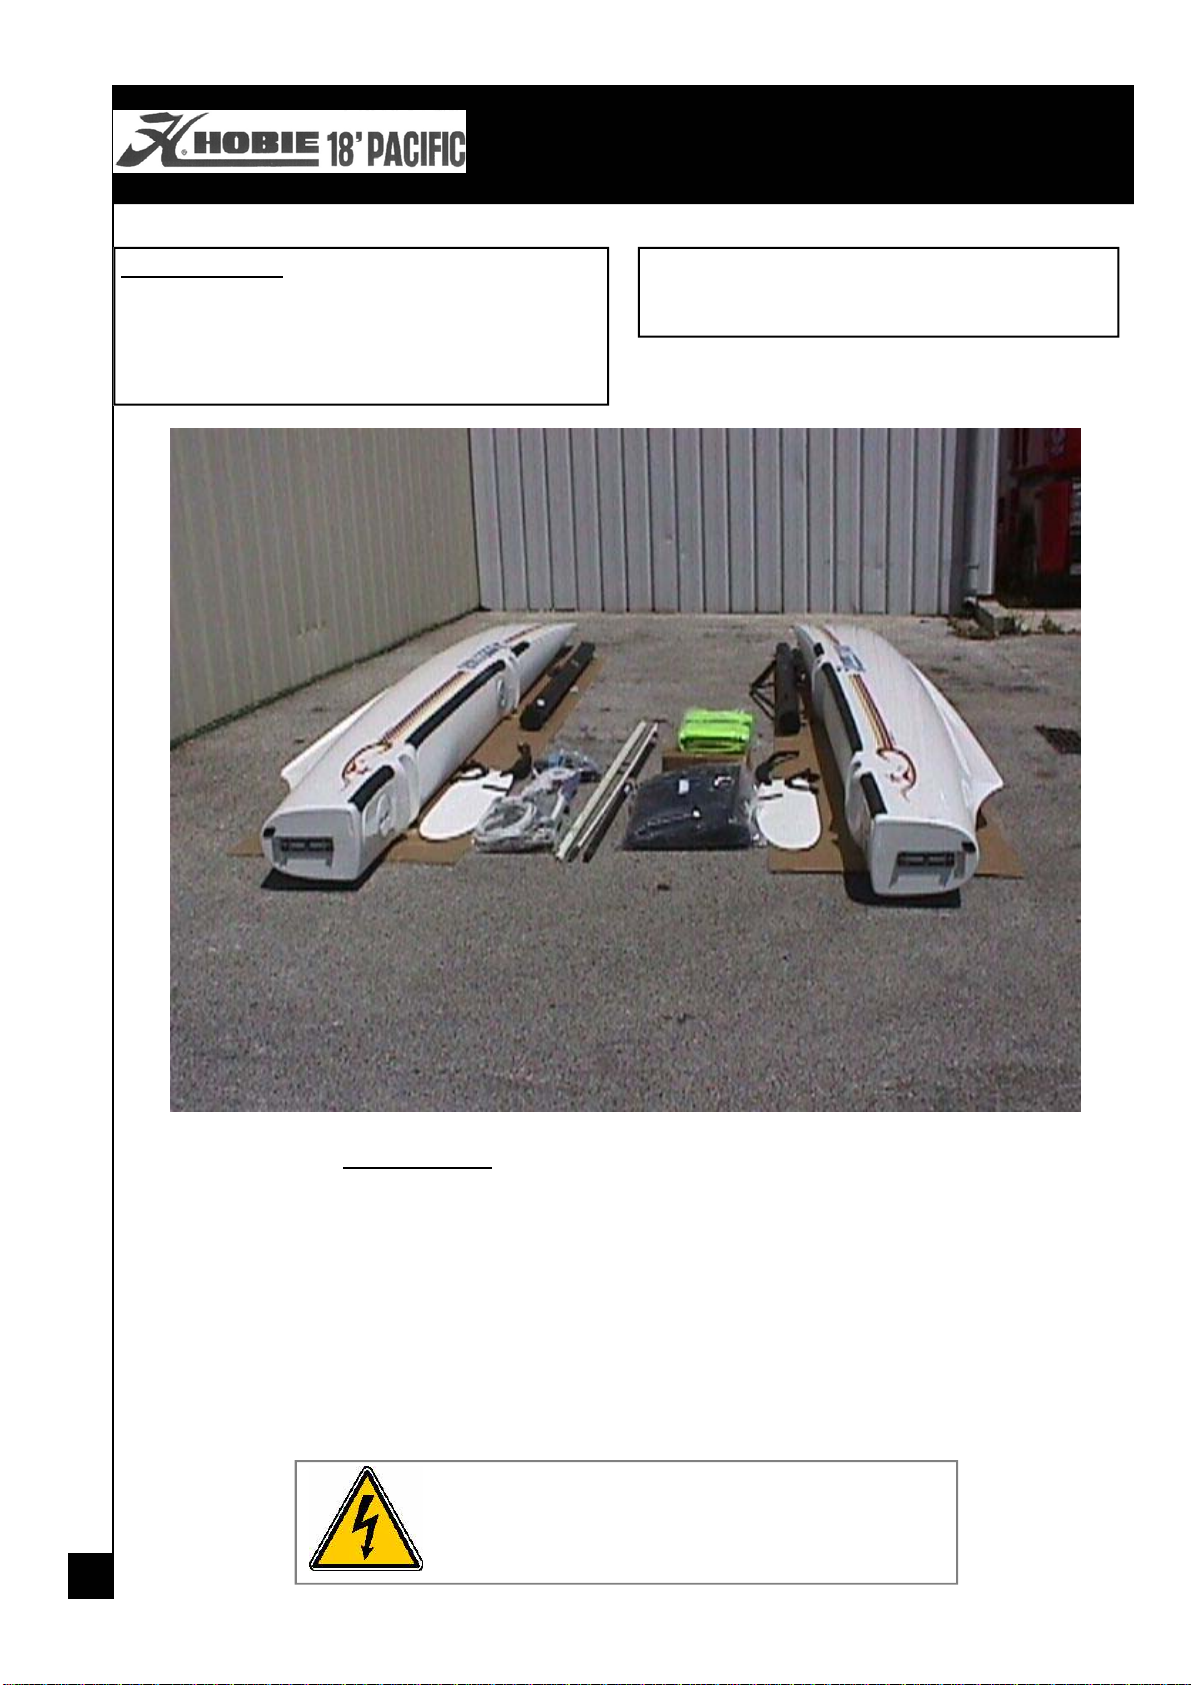
LIST OF PARTS
Tools necessary :
⇒ 2 wrenches - No. 17
⇒ 2 wrenches - No. 10
⇒ 1 pair of universal pliers
It is advisable to have at least 2 people to assemble
the Hobie Pacific .
3
LIST OF PARTS
Hulls (2)
Front crossbar
Rear crossbar
Mast
Trampoline assembly
Rear trampoline strip
Rudder assemblies (2)
ALUMINIUM MAST - STAY AWAY OF
Tiller crossbar
Tiller extension
Mainsail + battens (7)
Jib sail
Wires bag
Ropes bag
Parts bag
CAUTION - DANGER
ELECTRICAL WIRES
Page 4
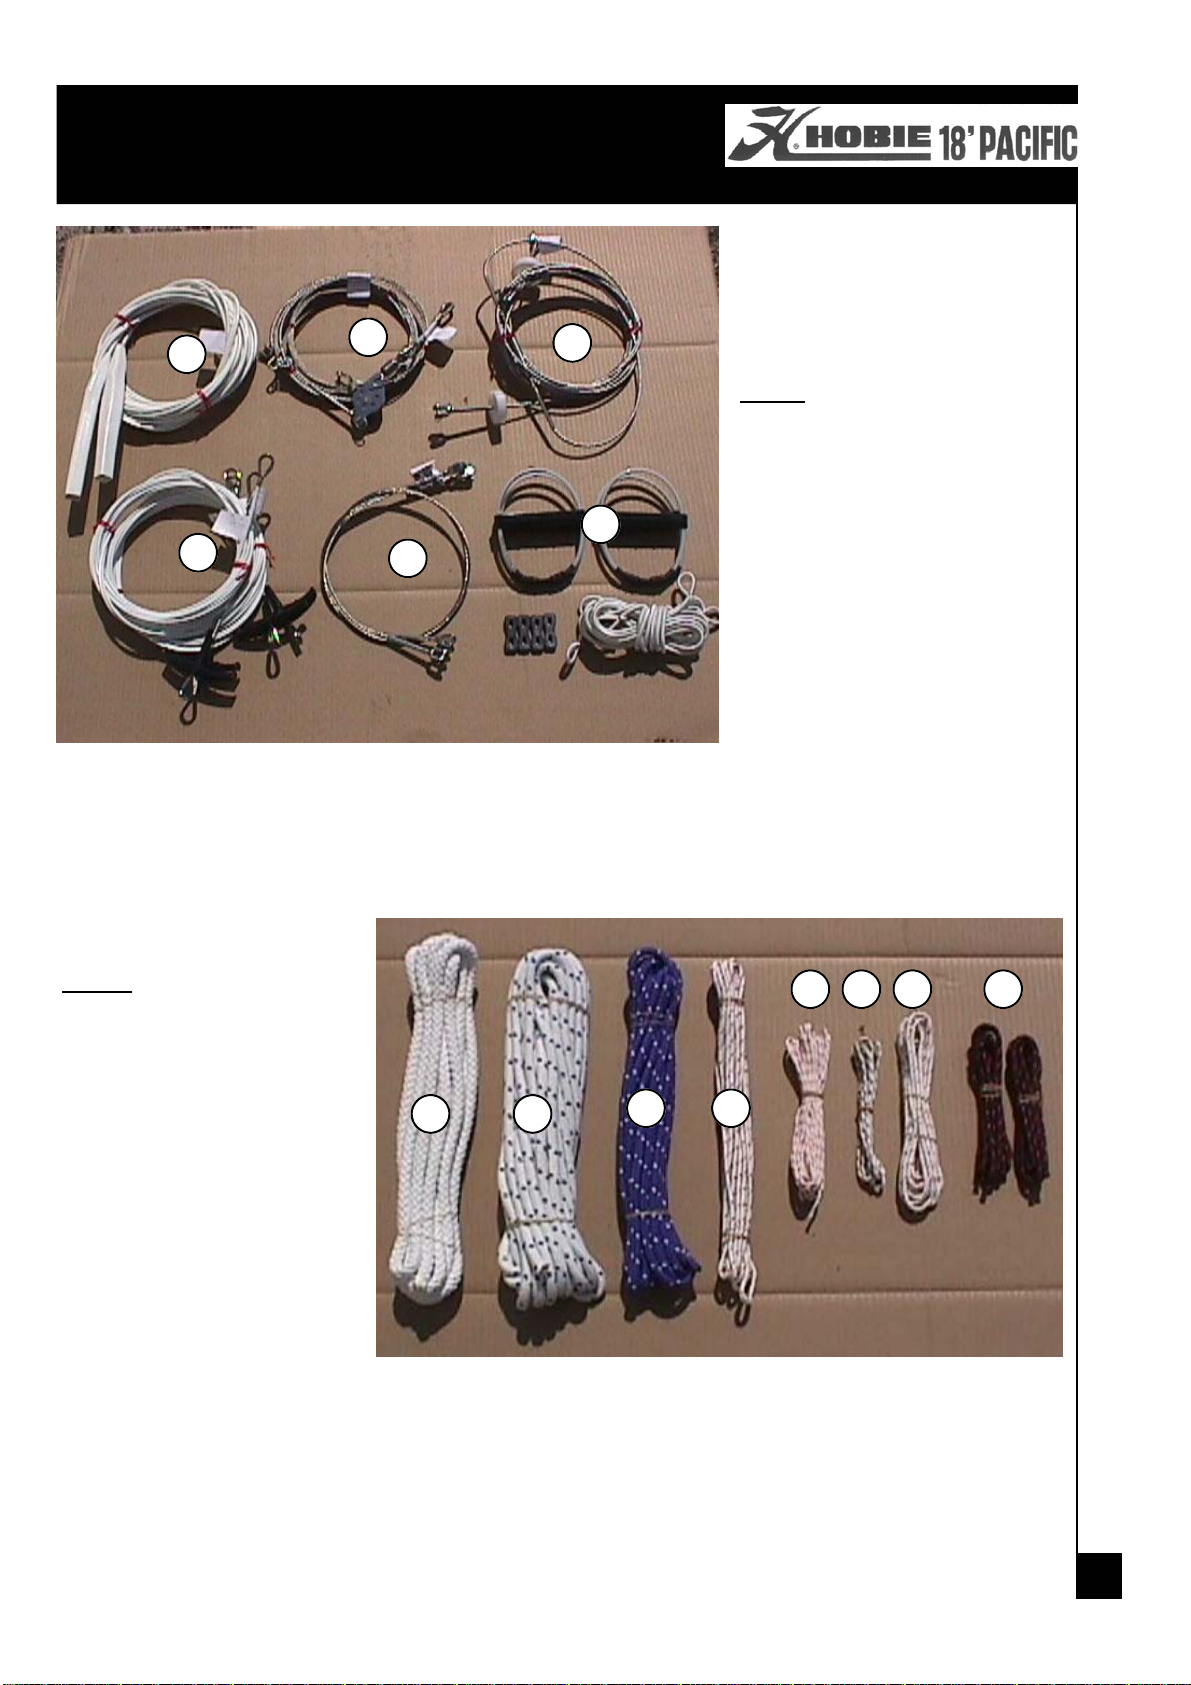
LIST OF PARTS
1
4
2
5
3
6
WIRES :
1. Shrouds with adjuster covers
2. Jib halyard + forestay + pigtail
3. Diamond wire assembly
4. Trapeze wires (4)
5. Bridles (2)
6. Trapeze handles (J & H) (4)
Rope locks (4)
Trapeze shock cords (2)
ROPES :
All ropes are labelled with ref.
number and name. Please
check carefully before using.
1. Righting line
2. Mainsheet
3. Jib sheet
4. Main halyard
5. Jib halyard
6. Jib luff tensioner line
7. Cunningham line
8. Trapeze adjustment line
1 2
5 6 7 8
3 4
4
Page 5
LIST OF PARTS
13
8
12
11
14
15
7
5
1
10
2
3
4
9
6
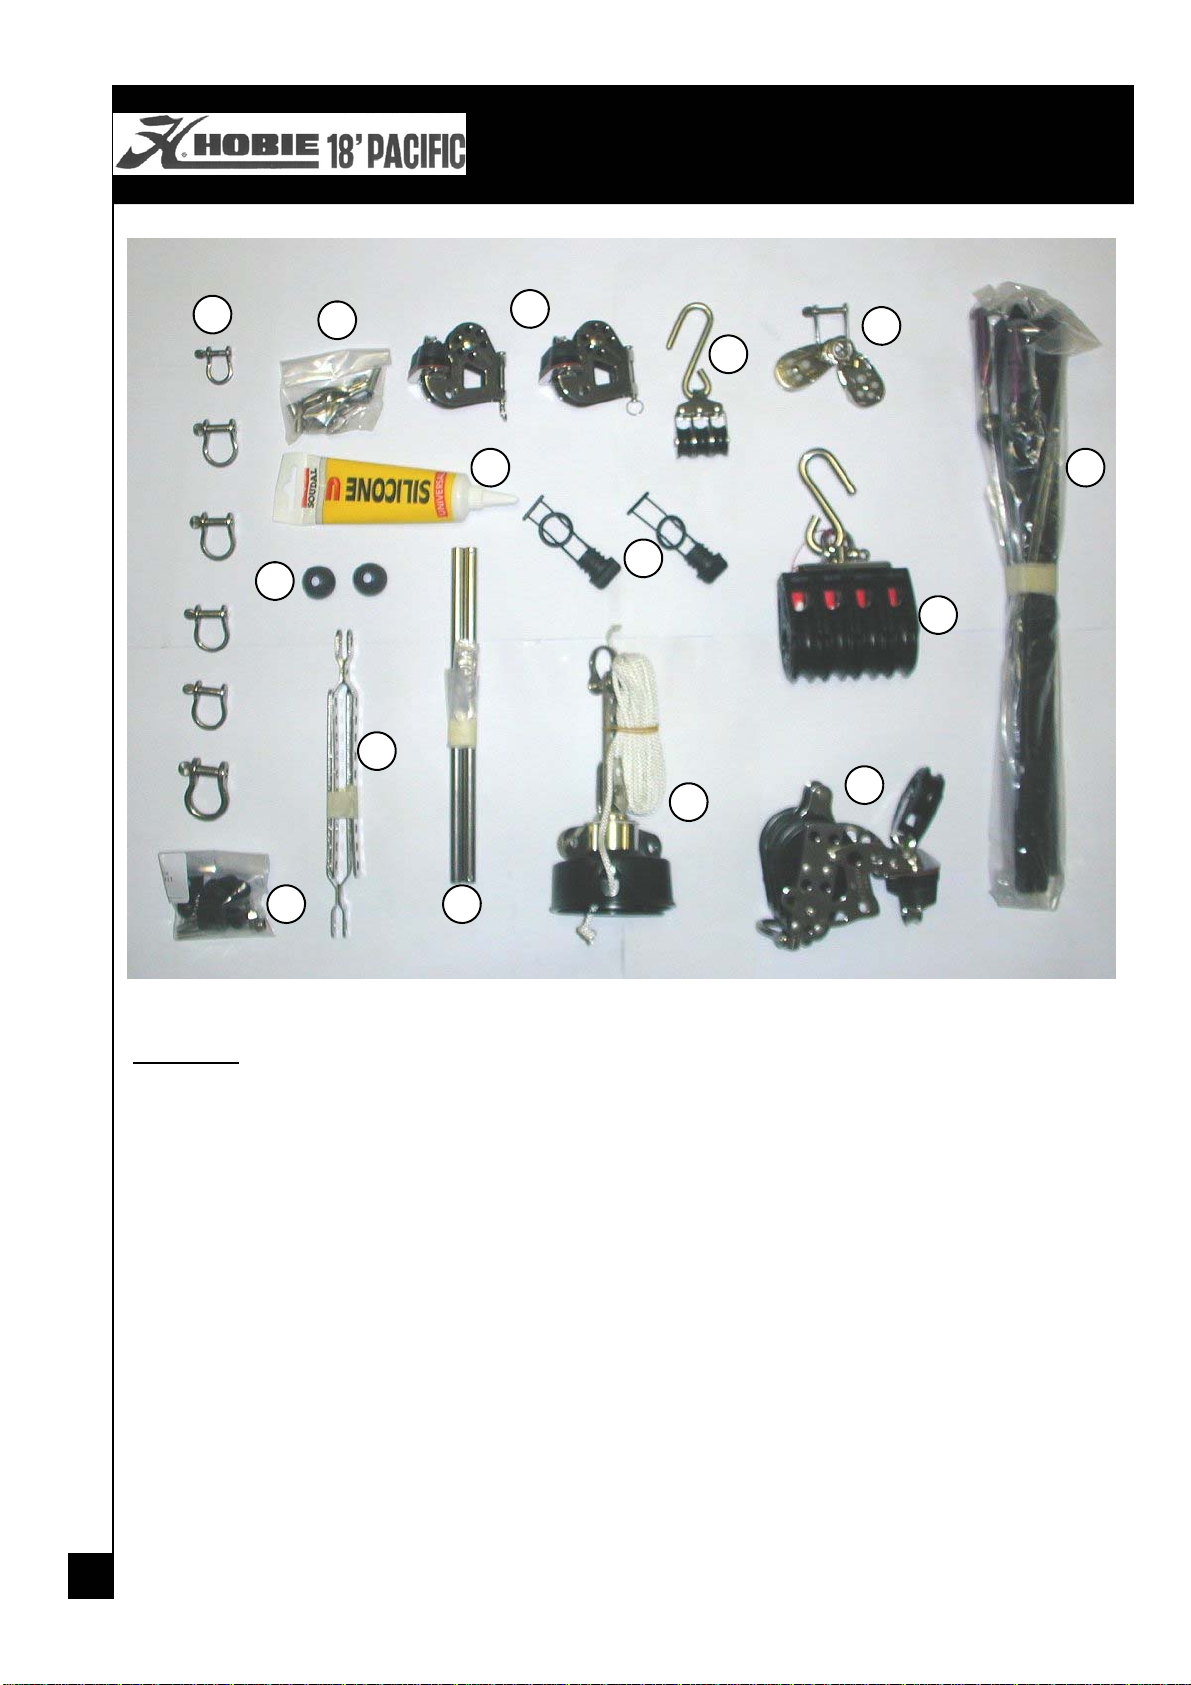
Parts Bag
1. Spreader bar assembly (2)
2. Mainsheet top block with hook
3. Mainsheet ratchet block
4. Jib furler
5. Cunningham block with hook
6. Rudder Pins (2)
Nylon Washers (4)
Ring clips (4)
7. Jib clew blocks (2) with clew shackle
8. Plastic ball stops (2) for cunningham line
9. Tiller connector kits - TCM (2)
10. Drain plugs (2)
11. Stay adjusters (2)
12. toggles (2)
clevis pins (6)
split rings (6)
13. Shackles : 8 mm (1)
6 mm (4)
4 mm (1)
14. Tube silicone sealant
15. Cunningham cleats
5
Page 6
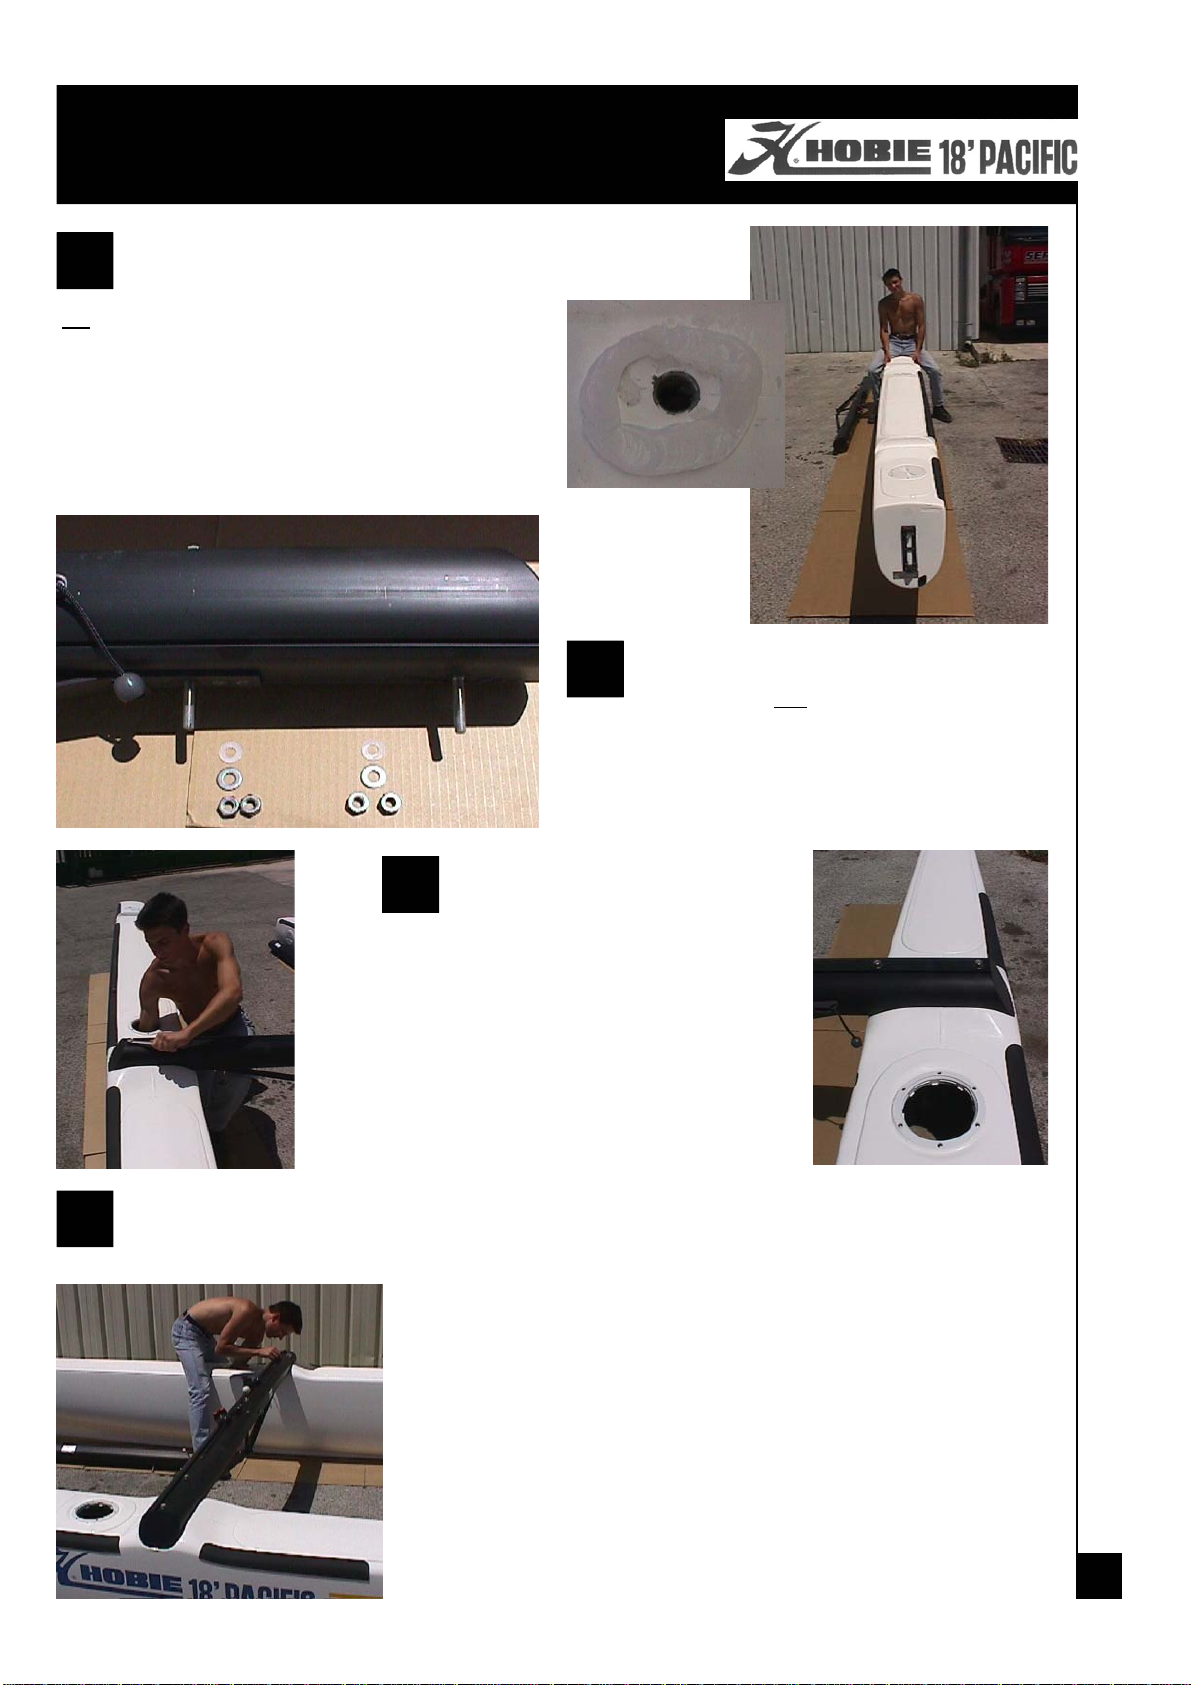
Hull assembly
Position the hulls in parallel with the inner
1
sides facing the ground.
NB
: It is advisable to put some padding under the
hulls to prevent scratching and damage.
Lift the right hull. One person straddles the hull to
hold it in an upright position. The other person
applies the Silicone sealant (for waterproofing)
around the bolt holes in the deck saddles.
Take the front crossbar and remove the 2 nuts
2
(one stainless washer and one nylon washer
from each bolt). NB:
trampoline track faces the rear of the boat. NB: it is
advisable to place a small amount of grease on each
bolt.
Ensure that the
Position the front crossbar in
3
the deck saddle and push the
bolts into the holes. Reach in
through the inspection port and
position the nylon washer, the
stainless washer and then one nut on
the thread of each bolt. Tighten the
nuts by hand or loosely with the #17
wrench - Do not overtighten at this
stage.
Lift the port hull, and repeat the mounting process.
4
Install the rear crossbar now in the same manner as the front crossbar.
Now using the # 17 wrench tighten all 8 bolts and nuts securely, then install the lock nuts.
NB : Check all nuts after your first sailing and afterwards on a regular basis
6
Page 7
Trampoline Assembly
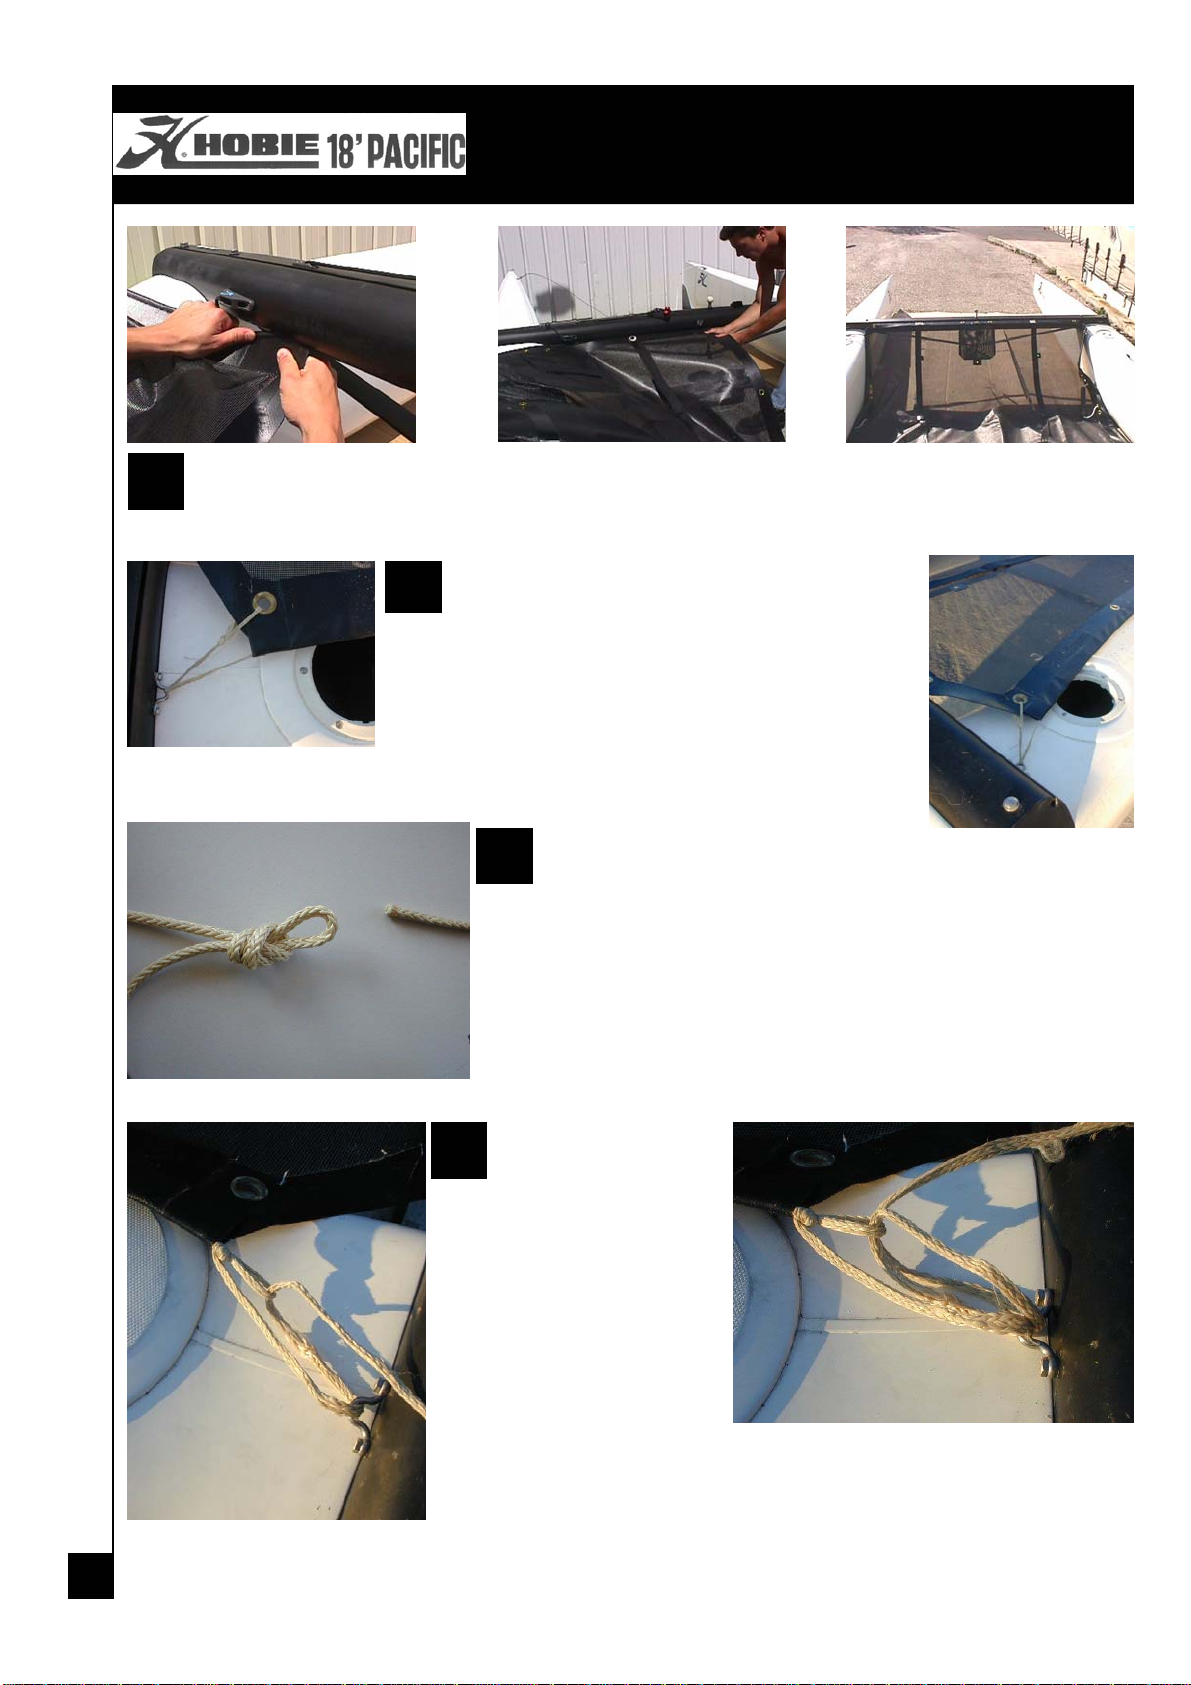
Unfold the trampoline. Note that the trampoline has side tension lines that are already pre-threaded.
1
Insert the front edge of the trampoline into the track at the left, rear side of the front crossbar. Continue
feeding the trampoline into the track and position it in the center. line up the grommet in the center of the
trampoline with the dolphin striker post to ensure it is centered.
2
Take one of the side tensioning lines and pass the line
through the pad-eye that is fixed to the front crossbar.
Then tie with a bowline knot the line onto the grommet of
the trampoline near where the rope exits the trampoline.
Repeat this step at the opposite side front corner.
7
3
Move to the rear of the trampoline. Very closely to where the side
tensioning line exits the rear of the trampoline tie a loop. ensure you
pull the side tensioning line firmly as to tie the loop as closely to the
trampoline where the rope exits as possible. Tie a bowline or a similar
loop in the line which will be used for a 4:1 purchase of the side
tensioning lines. Repeat this step for the opposite side rear corner.
4
Now take the tale of the side
tensioning line and pass the
rope through the pad-eye
mounted on the rear cross beam
closest to where the line exits
the trampoline. Then pass the
line back through the loop tied in
step3. Again go through the
pad-eye on the beam and back
through the loop. This will
provide a 4:1 purchase. Pull the
line slightly as to take some tension for
the sides but do not completely tension
at this stage. Repeat this step for the
opposite side rear corner. Ensure that
the trampoline is still centered.
Page 8
Trampoline
Début
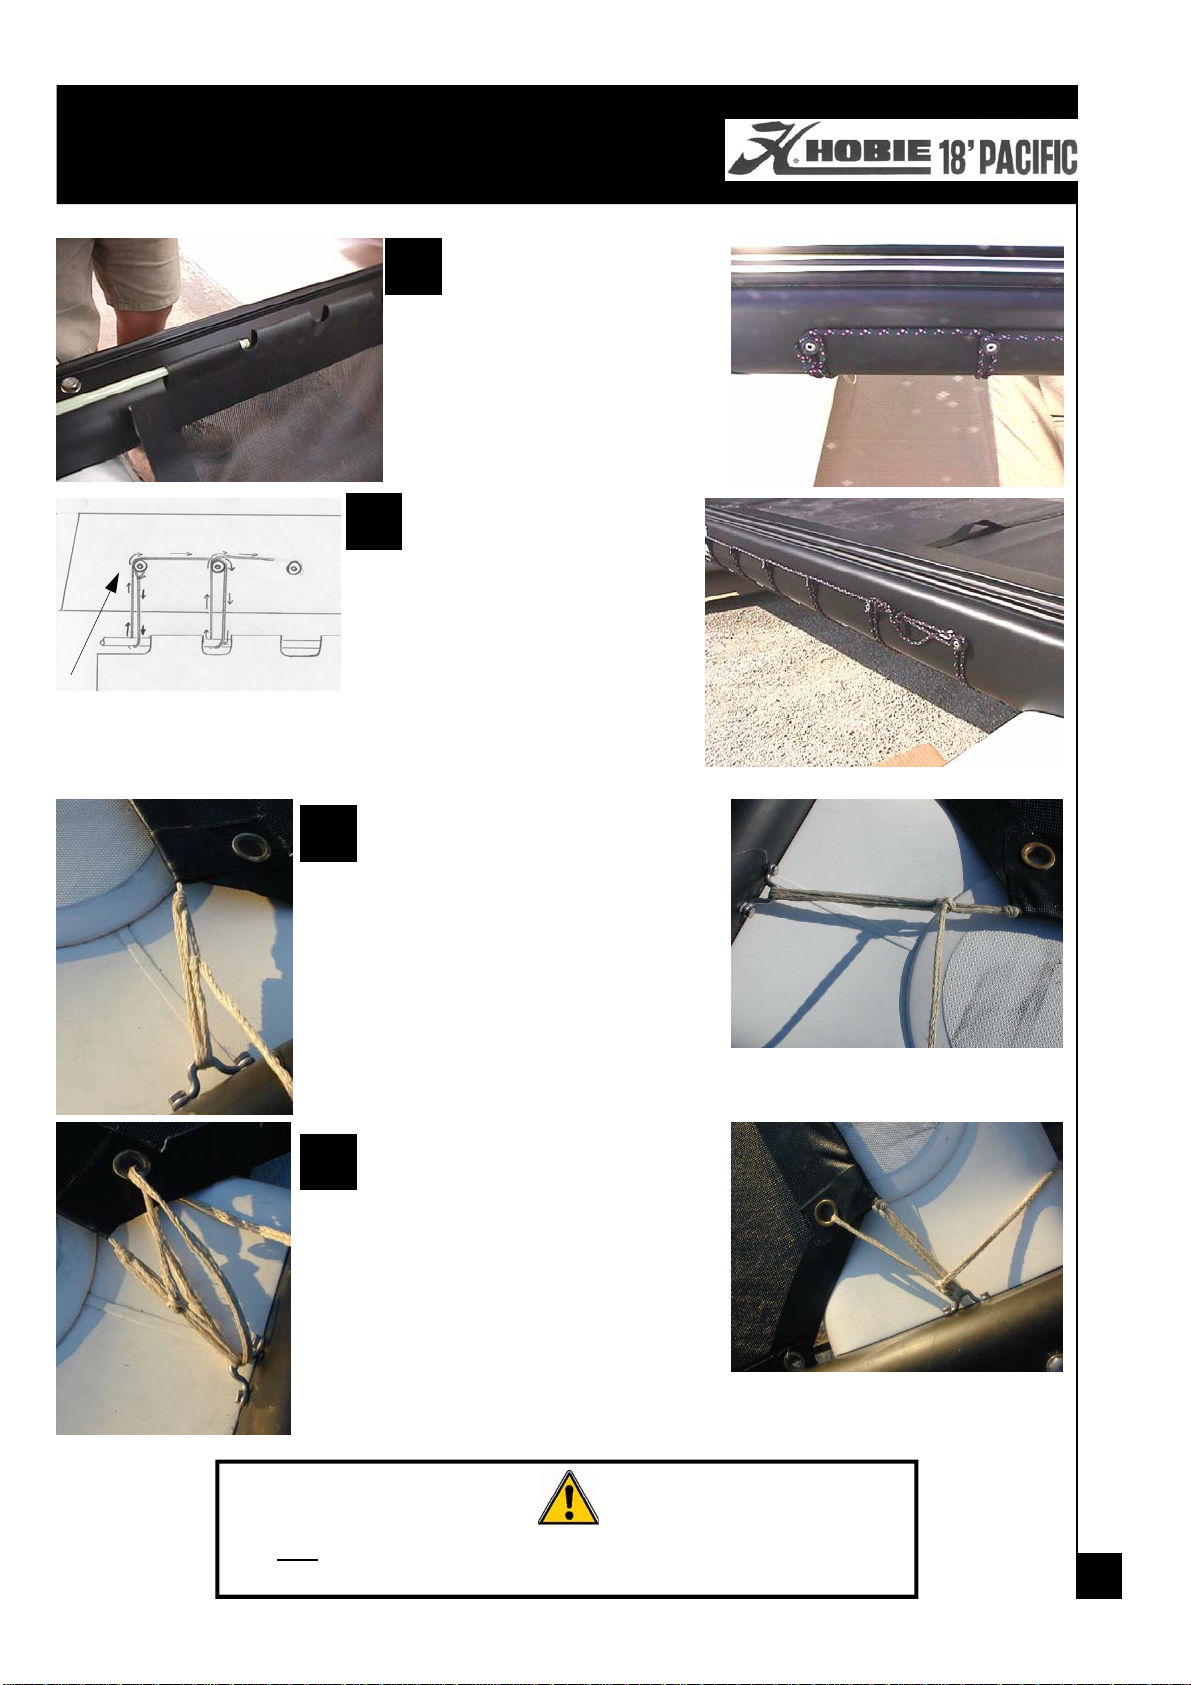
5
Find the trampoline rod and insert it
into the rear of the trampoline.
6
Commence lacing the rear of the
trampoline. The lacing line starts at the
left, rear lacing button on the rear
crossbar. Lace the rear of the
trampoline as tightly as possible as per
the photographs and diagrams
supplied. Continue across the rear
crossbar and tie off securely when
7
Again, take the side tensioning line and very
firmly pull the line. Once as tight as possible tie
off the line with an adequate knot. Repeat this
for the opposite side rear corner.
8
Now, once the side tension line has been tied
off, using the long tail, pass it back through the
grommet at the rear corner of the trampolin e
near where the side tensioning line exits the
trampoline. Then pass the line through the
pad-eye on the rear crossbar. Agai n pa ss th e
tail through the grommet on the trampoline and
pull the line firmly. Once the sides of the
trampoline have been further tightened, tie off the line and hide the tail under
the trampoline. Repeat this step for the opposite side rear corner.
NB :
It is important that the trampoline be strongly tightened.
Check the tension on a regular basis.
8
Page 9

Rudder installation
Identify the rudder assemblies (green
1
sticker on tiller arm = starboard ; red
sticker on tiller arm = port)
Take the port rudder, place the 2 Nylon washers
in position, align the holes in the lower rudder
casting with the holes in the gudgeon, and insert
the rudder pin. Fit the 2 split rings.
NB
: confirm that you have installed the port
rudder on the port
Repeat the procedure for the starboard rudder and hull.
hull.
Identify the left hand end of the tiller crossbar. Fasten it to the tiller
2
connector at the front of the left rudder arm using the tiller connector kit.
Install as per photo. Repeat above procedure for the right side.
NB
: Rudder toe in - toe out can be adjusted with the tiller crossbar adjuster. 3 - 5
mm toe is advised.
Connect the tiller extension to the pin located
3
in the centre of the tiller crossbar using the
clevis pin and ring clip supplied.
9
Page 10

Mast set up
Place the mast onto two supports (eg: two
1
pieces of polystyrene).
Unroll the trapeze wires and fix them using a
shackle to the upper hole on the mast tang (two on
each side).
Trapeze wires
Forestay
Shrouds
Unroll the shrouds and the forestay wire (with
2
the jib halyard block) and fix them to the lower
hole of the mast tang using a shackle.
The shrouds go onto each side of the forestay.
Trapeze wires
IMPORTANT : Attach the jib halyard rope to
3
the small single block at the end of the jib
halyard wire.
Attach the main halyard rope to the thimble on the
end of the main halyard wire.
NB
: Secure both wire and rope halyards at the base
of the mast. Ensure that the 2 shackles on the mast
tang are tightened with pliers or shackle key.
10
Page 11

Spreader bars
1
Unroll the diamond wires.
Attach the joint end of the
diamond wires onto the
turnbuckle adjuster near the
base of the mast (level with the
security sticker) using the pin
and split ring.
Take the loose ends of the
diamond wires and hold tight to
adjust to the same length, using
the turnbuckle adjuster which is
located on the lower section of
one of the wires. Once they are
the same length, attach the two
wires to the shiel d plaes
situated on each side of the
mast under the mast tang.
2
Assemble the spreaders on the
centre of the mast. The spreader
root attaches to the front of the mast
section onto the one-piece stainless
steel strap. The spreader rake
adjuster barrel attaches on each
side to the individual fittings on both
sides of the mast nearer the sail
track. To adjust the spreader rake,
adjust the length of the barrel (by
winding in or out) and measure from
the wire positions at the tips of each
spreader.
Caution : do not try to adjust
spreader rake while diamond wires
are tensioned. Only adjust under no
diamond wire tension and screwing
the barrel by hand.
11
3
Slide the diamond Wires into the corresponding slots at
the end of the spreaders. Ensure the black plastic roller
is above
release tension from the diamond wire turnbuckle
adjuster near the base of the mast. Secure the
diamond wire with the thin wire supplied. Pass the wire
through the small hole near the spreader tip, bend the
wire and on one side of the spreader turn the wire
around the thicker diamond wires two or three times.
Do the same for the other side of the spreader. Cut off
the excess thin wire ensuring it is bent neatly onto the
diamond wires as to prevent the wire from tearing the
sails. Once secured, tape over the spreader tips to
further ensure there are no sharp edges.
the spreader arm. It may be necessary to
Page 12

Locate the bridle wires and Jib furler. Fasten
1
the bridle wires to the bow tangs on each hull
and after ensuring that they are not twisted,
fasten the inner ends of the bridle wires to the Jib
furler.
Ensure that the
hole in the furler
drum cover is
pointing towards the front crossbar.
Now, wind the furler drum in a clockwise direction to prime the furler. Leave
enough line to reach the furler ‘V’’ jam cleat mounted on the rear of the front
crossbar.
Pass the line under the front of the crossbar, through the grommets and up
through the cleat.
Preparation for mast raising
Place the mast assembly on top of the platform
2
(on some padding or foam to prevent damage)
with the sail track to the bottom and the mast
base to the front. Separate or untwist all the wires and
lay the corresponding shroud and trapezes down each
side of the boat.
Pin the stay adjusters to the twist toggles and
3
then pin the twist toggles to the shroud anchor
pins. Ensure that the adjusters are facing in a
fore and aft direction.
NB
: For initial rigging, pin the shrouds into any of the
top 3 holes in each adjuster and the trapeze wires
can be left hanging loose.
The trapezes can be connected when the mast is up
and the shroud position in the stay adjusters can be
changed to alter mast rake and tension.
12
Page 13

Stepping and raising the mast
Look around and make sure that there are no power lines or other obstructions that the mast may
come in contact with. For the first few times, three people will make it easier and safer to raise the
Remove the bolt & nut from the front of the mast base casting but
1
keep them handy. Now, pick up the mast - one person at the head,
one at the base.
Walk the mast back and rotate it 90
degrees. Place the mast base
casting over the mast step ball and
reinstall the bolt and nut. This will
prevent the mast base from
jumping off the mast step ball,
check again that all wires are not
twisted, tangled or caught under
the rudders and that the forestay is
free.
One person can now get on
2
the trampoline just forward of
the rear crossbar and the
person at the mast head can walk
toward the rear of the boat raising
the mast hand over hand.
The person on the trampoline can
assist here until they can support the
full weight of the mast.
Now, the other person can assist by
either getting on the trampoline and
lifting or by walking forward with the
forestay or a trapeze wire.
When the mast is fully raised, one person on the trampoline
can hold the mast upright whilst the other connects the
forestay to the top of the chainplate of the furler.
NB: The rig will be loose at this stage. It can be tightened now or later to
achieve desired tension rake. It is best to do this before the jib is
attached. When adjusting forestay chainplate position, have your
assistant walk forward and pull down with a trapeze wire for added
security.
Similarly when adjusting shroud position, have your assistant pull down
on a trapeze wire at the side of the boat.
13
Page 14

trampoline.
1
Locate the trapeze handles (4), ropelocks (4),
and adjuster lines (4).
Assemble the trapezes as per photo.
Take care to run the adjuster lines through the rope
Trapeze assembly
locks correctly - if not done
3
properly, they may slip.
After ensuring the trapeze
wires are not twisted or wrapped
around the shrouds, tie off the tail
end of the adjuster lines to the
loops in the ends of the trapeze
shock cords. Trapeze height can
simply be adjusted by changing
the position of the rope lock on
the adjuster line. It is a good idea
to check your trapezing height
before you launch the
Pacific.
Locate the 2
2
trapeze
shockcords from
the wires bag and lead
them underneath the
trampoline and up
through the grommets at
the side edges of the
14
Page 15

Mainsail / Fitting battens
Always point your Hobie directly into the wind before you raise the mainsail.
Unfold the
1
mainsail onto
the trampoline
and insert each batten
into its respective
pocket in the sail. The
battens are numbered
(from 1 to 7) the
smallest (N ° 1) goes at
the top of the sail and
the longest (N° 7) at
the bottom of the sail.
Insert the battens into their pockets and secure them using the webbing straps and plastic clips. Apply enough
tension to remove the wrinkles from the pocket.
Attach the main halyard shackle to the sail headboard.
2
Feed the bolt rope of the sail into the cut out in the sail
track. Proceed to pull down on the main halyard whilst
your assistant feeds the bolt rope into the cut out.
15
3
the halyard lock when the sail is pulled down
slightly. Feed the bottom part of the bolt rope
into the sail track below the cut out.
Lead the rope halyard around behind the shroud and trapeze wires and
4
secure at the cleat on the side of the mast. Stow the excess halyard
line in the trampoline pocket.
Raise the mainsail fully. Position the
wire halyard at the front of the mast so
that the stopper swage will engage in
Page 16

Cunningham / Righting line
CUNNINGHAM:
1
Attach the cunningham triple block with hook to the
grommet in the tack of the mainsail.
Locate the cunningham line and thread it through the
cleats, cunningham block and mast base sheaves as
per photo.
Attach the plastic ball stops at each end of the
cunnigham line.
RIGHTING LINE:
2
Locate the righting line. Pass one end through the
grommet in the centre of the trampoline and secure it
to the dolphin striker post.
Pull any slack back up through the trampoline
grommet and stow the righting line in the trampoline
pocket.
A knot in the righting line just above the grommet will
prevent the righting line from slipping down and
dragging in the water.
16
Page 17

Jib sail
Unroll the jib and open the zipper on the luff of
1
the sail. Shackle the jib tack as low as
possible to the adjuster mounte d in th e fur le r.
Ensure that the jib halyard wire and line are not twisted
2
around the forestay. Attach the small jib halyard shackle
to the loop at the head of the sail. Hold the head of the
jib so that when the zipper is fastened,the forestay AND
halyard line will be inside the zipper pocket.
After the zipper is fastened, pull slowly down on the jib halyard line and
3
slowly fasten the zipper at the same time. Hoist the jib fully but only close
the zipper as far as the small block on the halyard wire.
Locate the jib luff tensioner line. Make a
4
figure ‘8’ knot in one end and pass the other
end through one of the vacant holes in the
forestay adjuster.
Now, thread the line through the small jib halyard
block and then back down to the cleat on the tack
of the jib.
Apply enough pressure to remove any creases in
the jib luff. Cleat the line off. The line can then be
tied off to prevent any slippage.
Remove the long jib halyard line and stow it in the
trampoline pocket.
17
Page 18

Locate the jib sheet line, the jib clew blocks
1
and the clew shackle. Shackle the blocks to
the clew of the jib sail.
Jib sheet
Pass one end of the jib sheet down through
2
the hole in the front of the jib car plate and the
A knot in the end. The other end of the sheet is
led through one of the jib clew blocks and then back
down through the fairlead on the jib car.
Pass the line behind the mast and then through the
fairlead on the other jib car - from back to front. Take
the line up through the other clew block and then back
down through the hole in the front of the jib car plate.
Tie a knot in the end of the sheet line.
The jib sail can now be furled.
3
Ensure that the jib sheet is not cleated and
pull down the furler line.
When the sail is fully furled, secure the furler line in
the ‘V’’ jam cleat on the rear of the crossbar.
18
Page 19

Main Sheet System
1 2 3
4 5 6
7
8 9
10 11
19
Page 20

Thread the mainsheet line
2
through the blocks as per the
photos.
Consult your Hobie dealer if any
difficulty.
Attach the ratchet block to the traveller car on the
rear crossbar.
Main Sheet System
3
Tread the tail of the mainsheet line through
the swivel cam cleat in the centre of the
20
Page 21

Classical Spinnaker kit
1
Attach the Spi halyard block
Shackle the spi halyard block through the small bow
shackle attached to the thin cord at the top of your FX-
One mast. Now pass the halyard through the pulley
and thread as per the photograph.
2
Fit the two ratchet blocks and stand-up springs to the
eye straps on the inboard side of the daggerboards.
Jib furler bridle
Mid pole support wire
3
Attach the spinnaker pole to the tang at the middle of the
front crossbar.
4
Attach the spinnaker pole bridles and the mid pole support wires to
the small hole in the front of the bow tang.
21
Spi pole bridle
Page 22

Classical Spinnaker kit
5
Use the small length of 3mm line to hold up and induce some prebend into the pole. Enough tension must be used as to take the
slack out of the mid pole support wires.
6
One end of the tack line ties off at the eyestrap at the front tip of the
pole. Lead the line through one of the
sister blocks and back out through
the block at the pole tip. Then take
the line over all the bridles and wires
to the trampoline and tie off to the
spinnaker tack.
7
Untie the spinnaker halyard from the base of the mast. Taking the end of the
piece that runs through the spreaders lead it through the block at the inner
end of the pole. Then pass it through the sister block and lead it back to the
swivel cam cleat on the front crossbar. Put a plastic ball stopper on this end.
NB
: The tack line, sister blocks and this end of the halyard should hang
below all
8
9
The spinnaker sheet (red) can now be rigged as per the schematic. Tie both ends of the spinnaker sheet to the
clew of the spinnaker using either bowline knots or figure «8» knots.
NB
: ensure that the spinnaker sheet runs through the ratchet blocks in the right direction.
the wires.
Tie the other end of the spinnaker halyard to the head of the spi.
10
Stow the spinnaker in the spinnaker bag on the trampoline.
If the wind is not too strong a trial spinnaker set and drop is
11
recommended on the beach before you try it on the water.
22
Page 23

Classical Spinnaker kit
Schematic of Pacific
classical spi set-up
head
d
r
a
y
l
a
H
23
Tack
T
clew point
a
c
k
l
i
n
e
S
p
i
s
h
e
e
t
Page 24

Caution / Safety tips
CAUTION / SAFETY TIPS
♦ Whether on land or on the water, watch for overhead power lines.
Contact with power lines can cause serious injury or death.
♦ DO NOT sail while under the influence of alcohol and/or drugs
♦ Only sail in conditions in which you feel comfortable and where you feel
confident that you can safely sail the boat. Never go out in conditions
beyond your ability.
♦ Everyone on board should wear a life jacket at all times.
♦ If you are in the water, remain in contact with the boat, even if it is
capsized. A sailboat can drift away faster than a person can swim.
♦ Never sail without a righting line.
♦ Wear appropriate clothes. Wear a wet suit or dry suit in cold weather or
cold water conditions.
♦ Remain seated while sailing.
♦ Learn the right of way rules and when in doubt, give way to others.
♦ When not sailing, always keep the boat pointed into the wind whether in
the water of on the beach.
♦ Read the instruction manual carefully.
♦ Make sure everyone on the boat reads and understnads these safety
instructions.
♦ ALWAYS check that the drain plugs are screwed in before launching your
Pacific
♦ ALWAYS HAVE FUN !!
24
 Loading...