

Page 1
INFLATABLE
STAND UP PADDLEBOARD
MANUAL AND WARRANTY
INFORMATION
Page 2
Thank you for choosing a Hobie
Stand Up Paddleboard
How to Use
• Assume a comfortable stance with your feet positioned roughly shoulder width apart Knees
slightly bent in a relaxed upright stance, shoulders back, looking straight ahead.
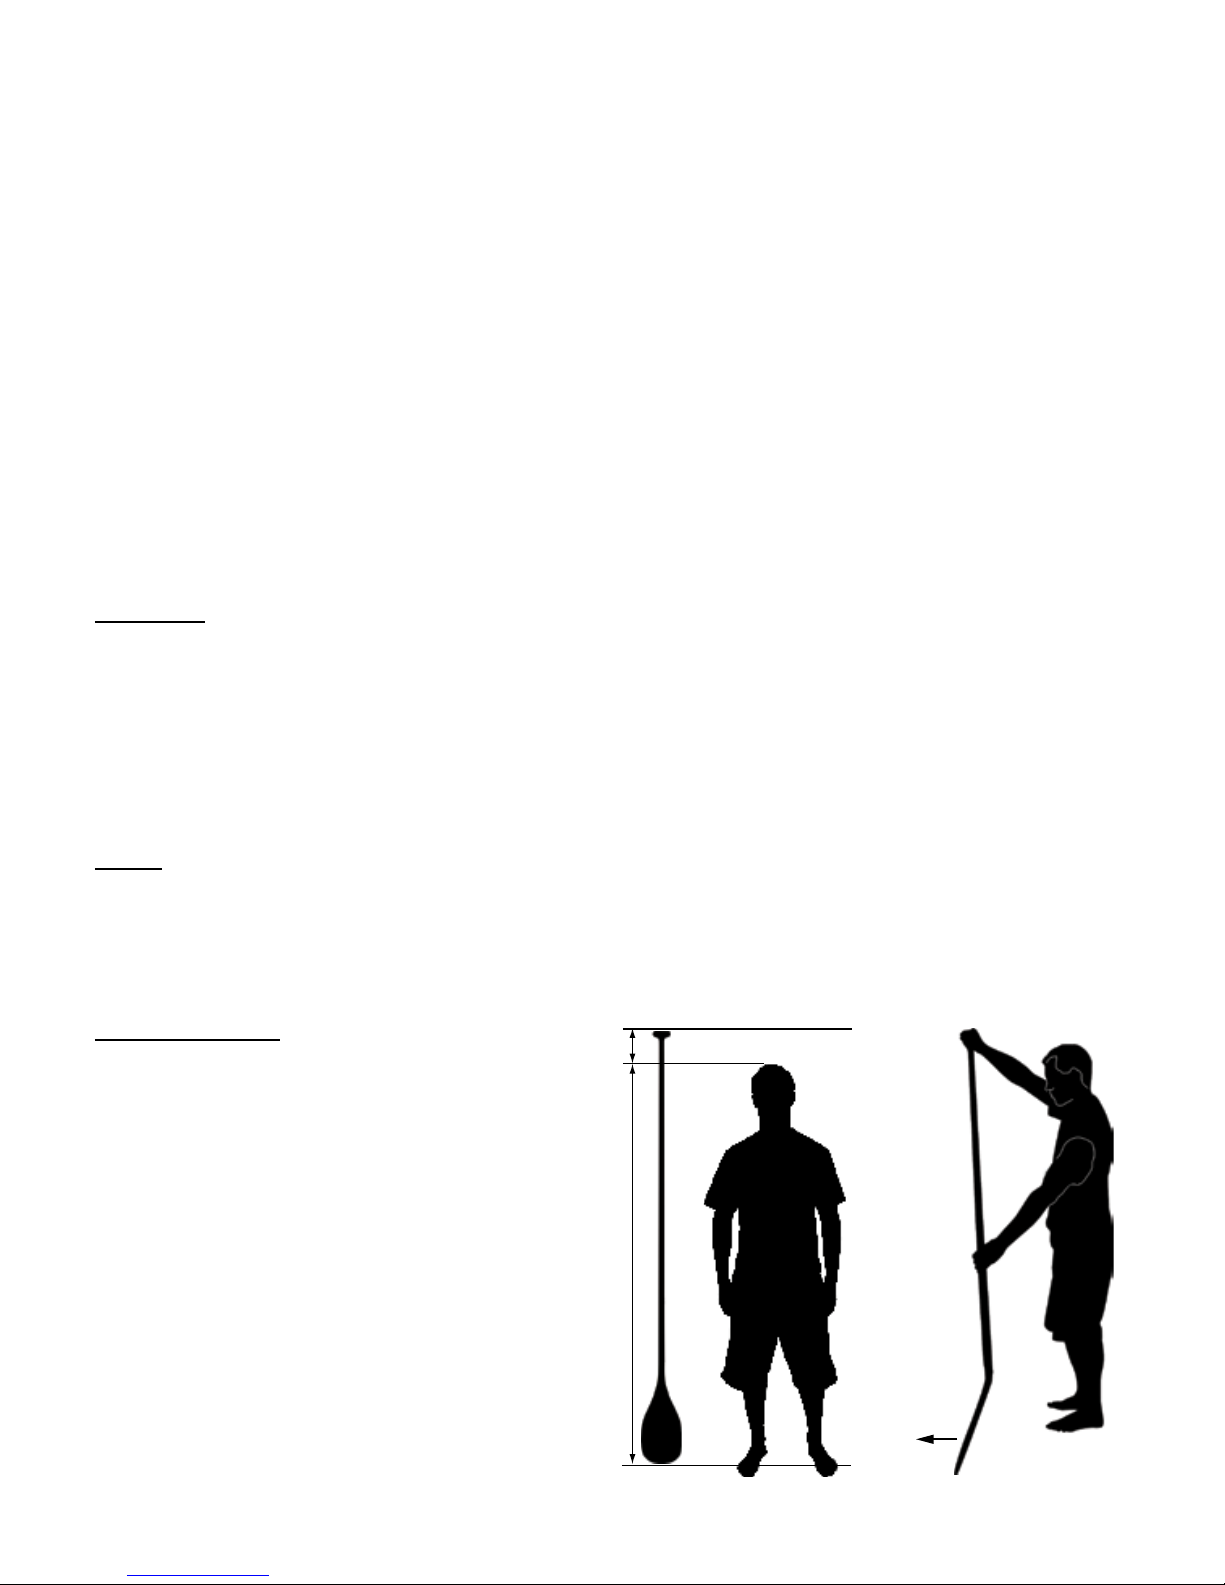
• Paddle grip. Place your top hand on end of handle and your bottom hand approximately 24” down shaft
of paddle. Paddle in a comfortable forward motion, with arms slightly bent.
• To turn left concentrate paddling on the right hand side of the board to turn right concentrate paddling
on the left hand side of the board.
Safety
Paddle sports can be dangerous and physically demanding. Users of this product should understand that
participating in stand up paddling can result in serious injury or death. Observe all applicable watercraft laws, and
use common sense
GENERAL PADDLING INFORMATION
Start with an unmatched 60 years of revolutionary board building experience, Add the racing
and surng DNA of Hobie’s team riders. The nal result is a desire to push development
boundaries, and the results are unequaled.
The Hobie Stand Up Paddle Development Team has worked tirelessly developing a line of
boards that allows everyone the opportunity to explore and experience the sport of stand up
paddleboarding. From the elite racer to the paddle surfer to the family that simply enjoys being
on the water, Hobie’s line up of high quality stand up paddlerboards offers a board to t your
stand up paddle lifestyle.
Hobie’s simple goal of making things better has never changed, and remains at the core of our
team of professional riders and board designers.
• View more stand up paddle instructional videos on line
http://www.hobie.com/stand-up-paddleboards/support
HEAD HEIGHT
12”-18”
FOWARD
Safety Check list
• Always paddle with others.
• Always wear a leash attaching you to the board.
• Wear a Coast Guard approved personal otation
device
• Always wear protective clothing.
• Always paddle in safe conditions.
• Be aware of changing weather conditions.
• Avoid paddling in off shore wind or windy conditions.
• Do not exceed your paddling ability; be aware
of your limitations.
• DO NOT use alcohol or mind altering drugs
prior to or while using this product.
Paddle Height Paddle Position
Page 3
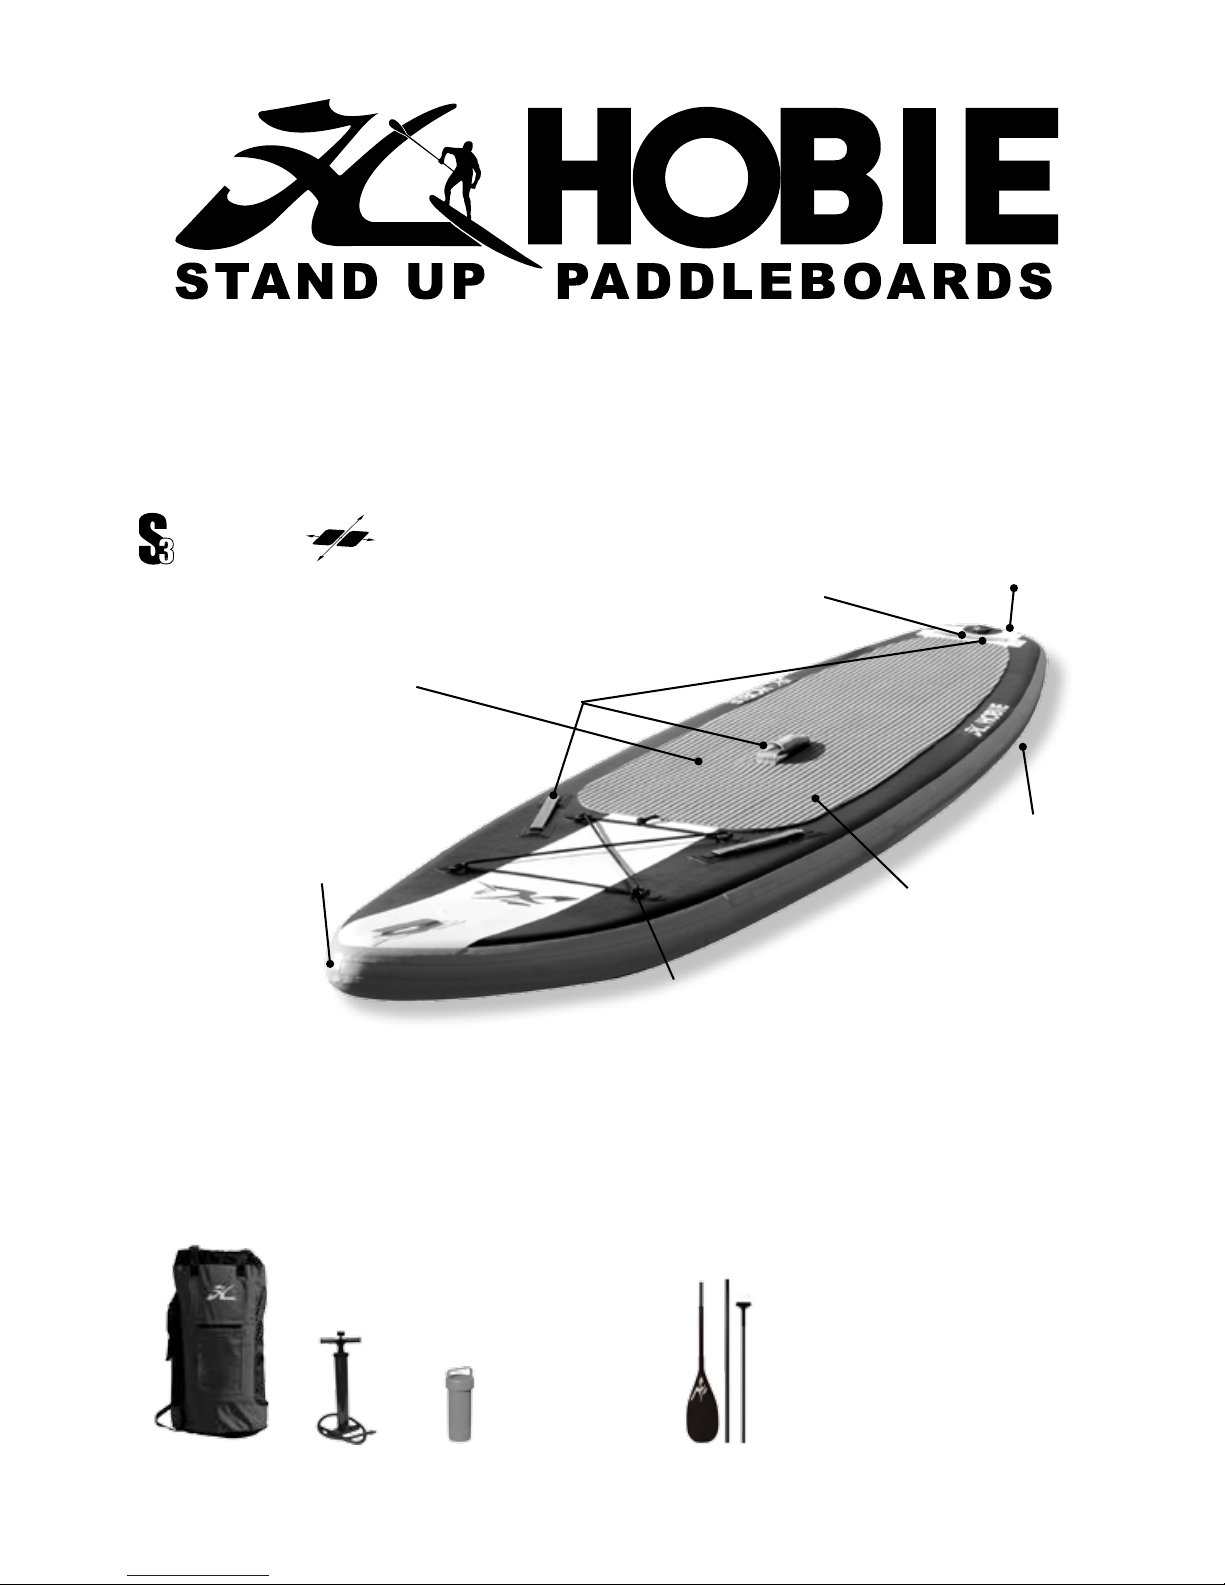
Pump w/ gauge
Repair Kit
Heavy duty
backpack
storage bag
EXP - 3 Piece Paddle
*optional
Included Equipment Optional Equipment
High pressure spring valve
for quick and easy ination
and deation
Built in cargo staps for
carrying light cargo
Large EVA foot pad on the
board provides grip and
comfort
Heavy duty built in carrying
handles
Serial Number
Heavy duty drop stitch PVC
Removable center n
An innovative system developed by Hobie , the
S3 control plates provide additional stability
and rigidity in the standing areas of the board,
providing a superior paddling experience yet
maintaining optimal portability
STAND UP PADDLE
STABILITY CONTROL
Page 4
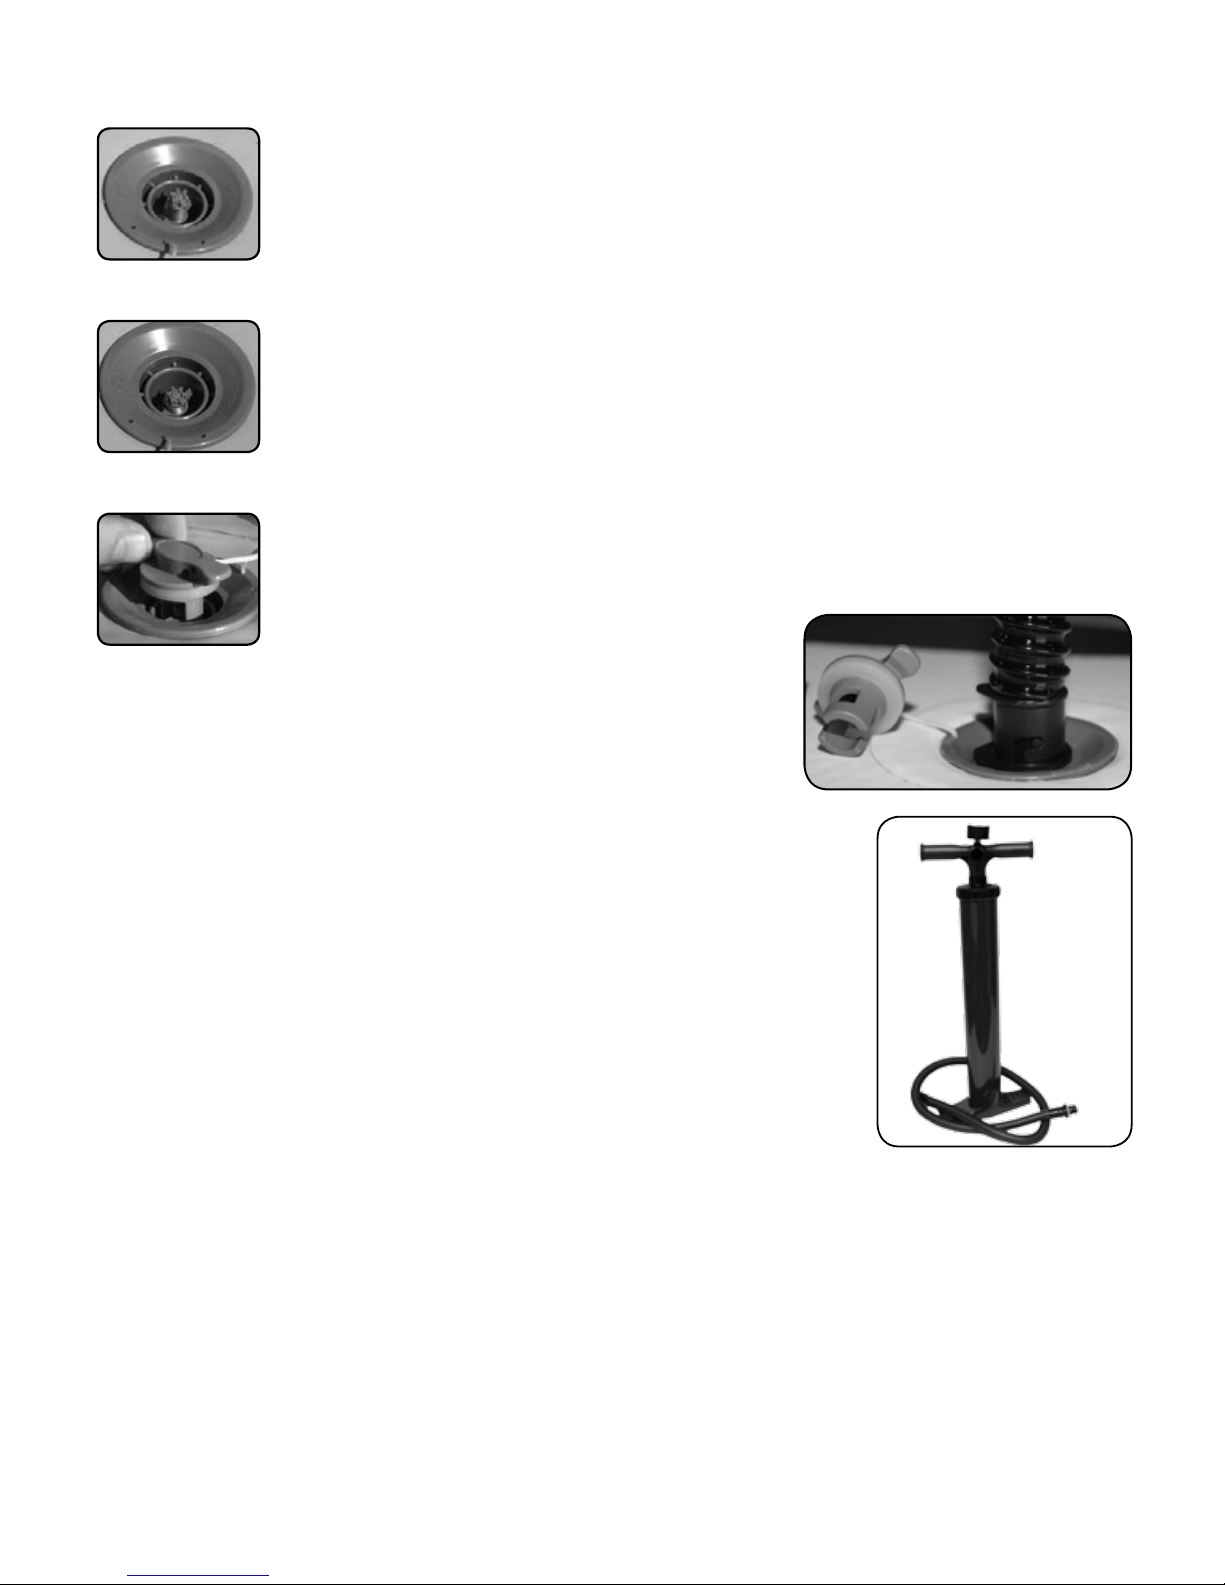
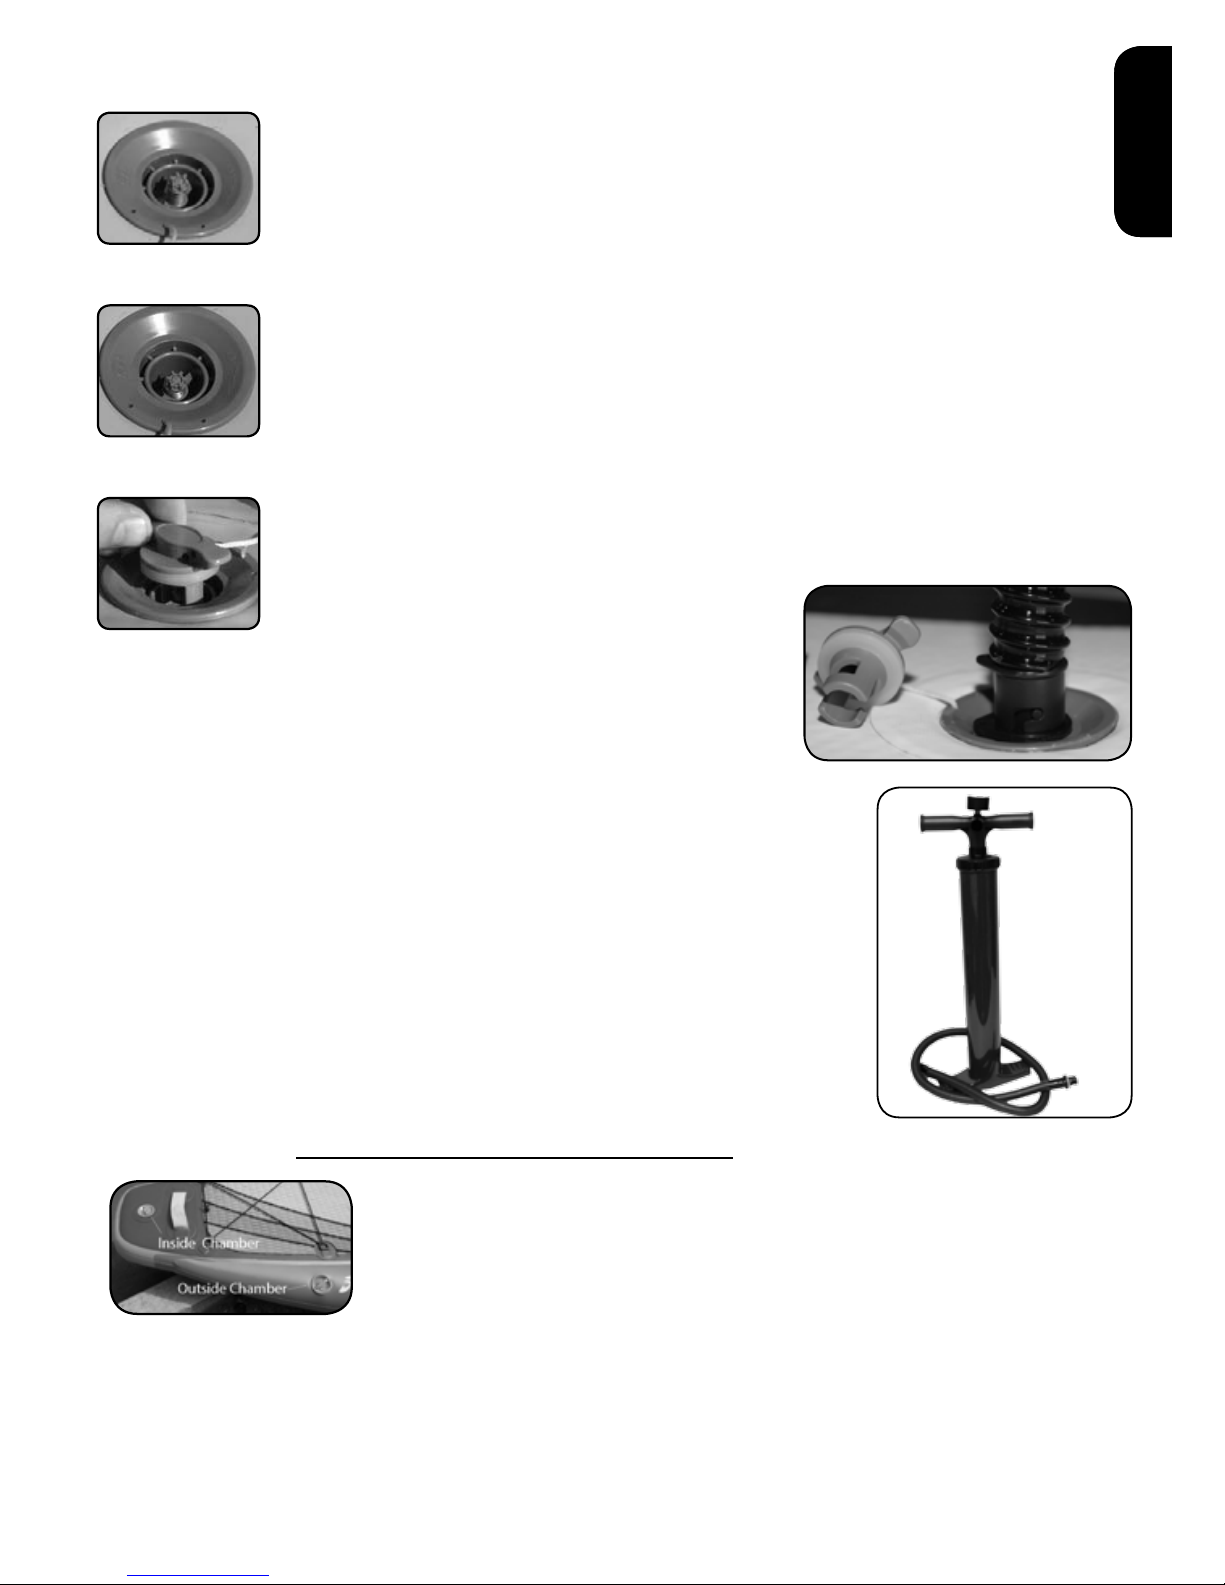
Follow the instructions below for valve operation and correct ination and deation procedures.
A. Valve Operation: The board’s ination valve is located near the nose of the board.
To close off the valve for ination, make sure that the center valve pin is in the “up” position. If it is
in the “down” position, press down on the valve pin and turn it counterclockwise until it pops up.
B. To open the valve for deation, press down on the valve pin and turn it clockwise so it locks
down. Be careful of any sand or debris around the valve area when deating as small
particles could become airborne with the release of air pressure!
C. Always lock the valve cover over the valve stem when in use. This will prevent accidental air
release and entrance of any particles into the air chambers.
6. BOARD INFLATION STEPS
A. Make sure that the valve is in the closed position (valve pin up)
B. Make sure the pump hose is connected to the “inate“ outlet
C. Connect the pump nozzle into the valve receptacle.
D. Start pumping air into the board by sliding the pump piston up and down.
Tip: If the pump piston starts to squeak, apply some spray silicone on the piston
shaft.
7. BOARD DEFLATION STEPS
A. Clear any water or debris out of the valve areas.
B. Slowly press down on the valve stem to start letting air out of the board. There will be an initial
burst of air, but that will slow down very quickly. Once the air ow has slowed down, press the
valve stem all the way down and turn it clockwise to lock it into the “open” position.
5. INFLATING YOUR BOARD
Page 5
INFLATION TIPS AND PRECAUTIONS
• The board can be inated either with our hand pump or an electric pump. The electric pump can inate the board
to a moderate pressure and save a lot of time with about 90% of the required air volume. You will need to use
your hand pump to inate the chambers to the correct pressure.
• Do not use an air compressor. Damage to your board caused by over ination from an air compressor is not
covered by your warranty.
• After 2 or 3 days there may be a small decrease of pressure due to temperature change. If so, add a few pumps of
air.
• Before undertaking a long paddle, inate the board for a full 24 hours to be sure the board is airtight. If you are
seeing a consistent decrease in air pressure, follow the instructions for leak detection in the board repair section
of this manual.
• Do not over-inate the board. A max pressure of 10 - 14 PSI is adequate. The easiest gauge of a good working
pressure is to have the chambers inated to a rm pressure when you press on them.
• If you are inating a Triple Air Chambered board ( Sportsmans or Day Trip Air
models), be aware to NOT OVER INFLATE the outside chambers.
** MAX INFLATION PRESSURE FOR OUTSIDE CHAMBERS IS 5 PSI
• Do not pump to a high pressure and let the board sit out in the sun. If the board is going to be in a warm
environment, slightly under-inate the board and allow the heat from the sun to increase the internal pressure.
When paddling, the colder temperature of the water may cause a slight loss in chamber pressure. It is a good
idea to carry a pump with you so that you can add some air to the chambers if necessary.
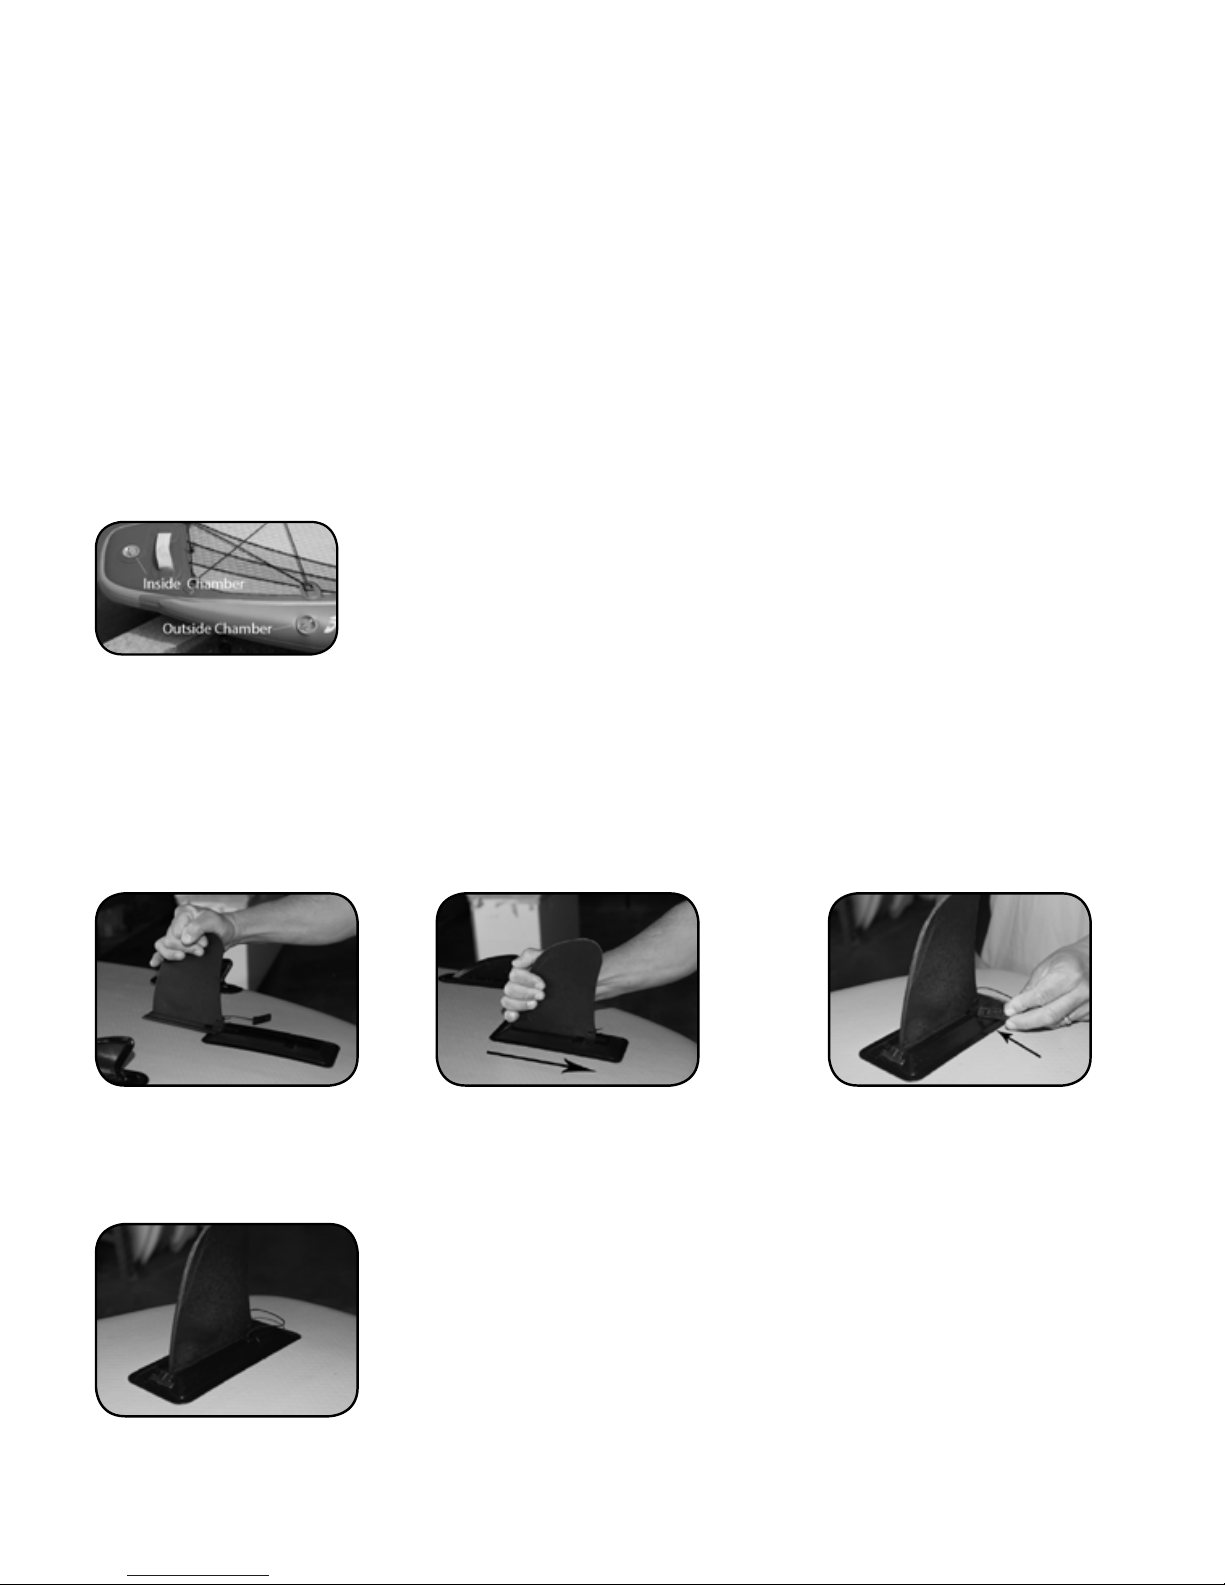
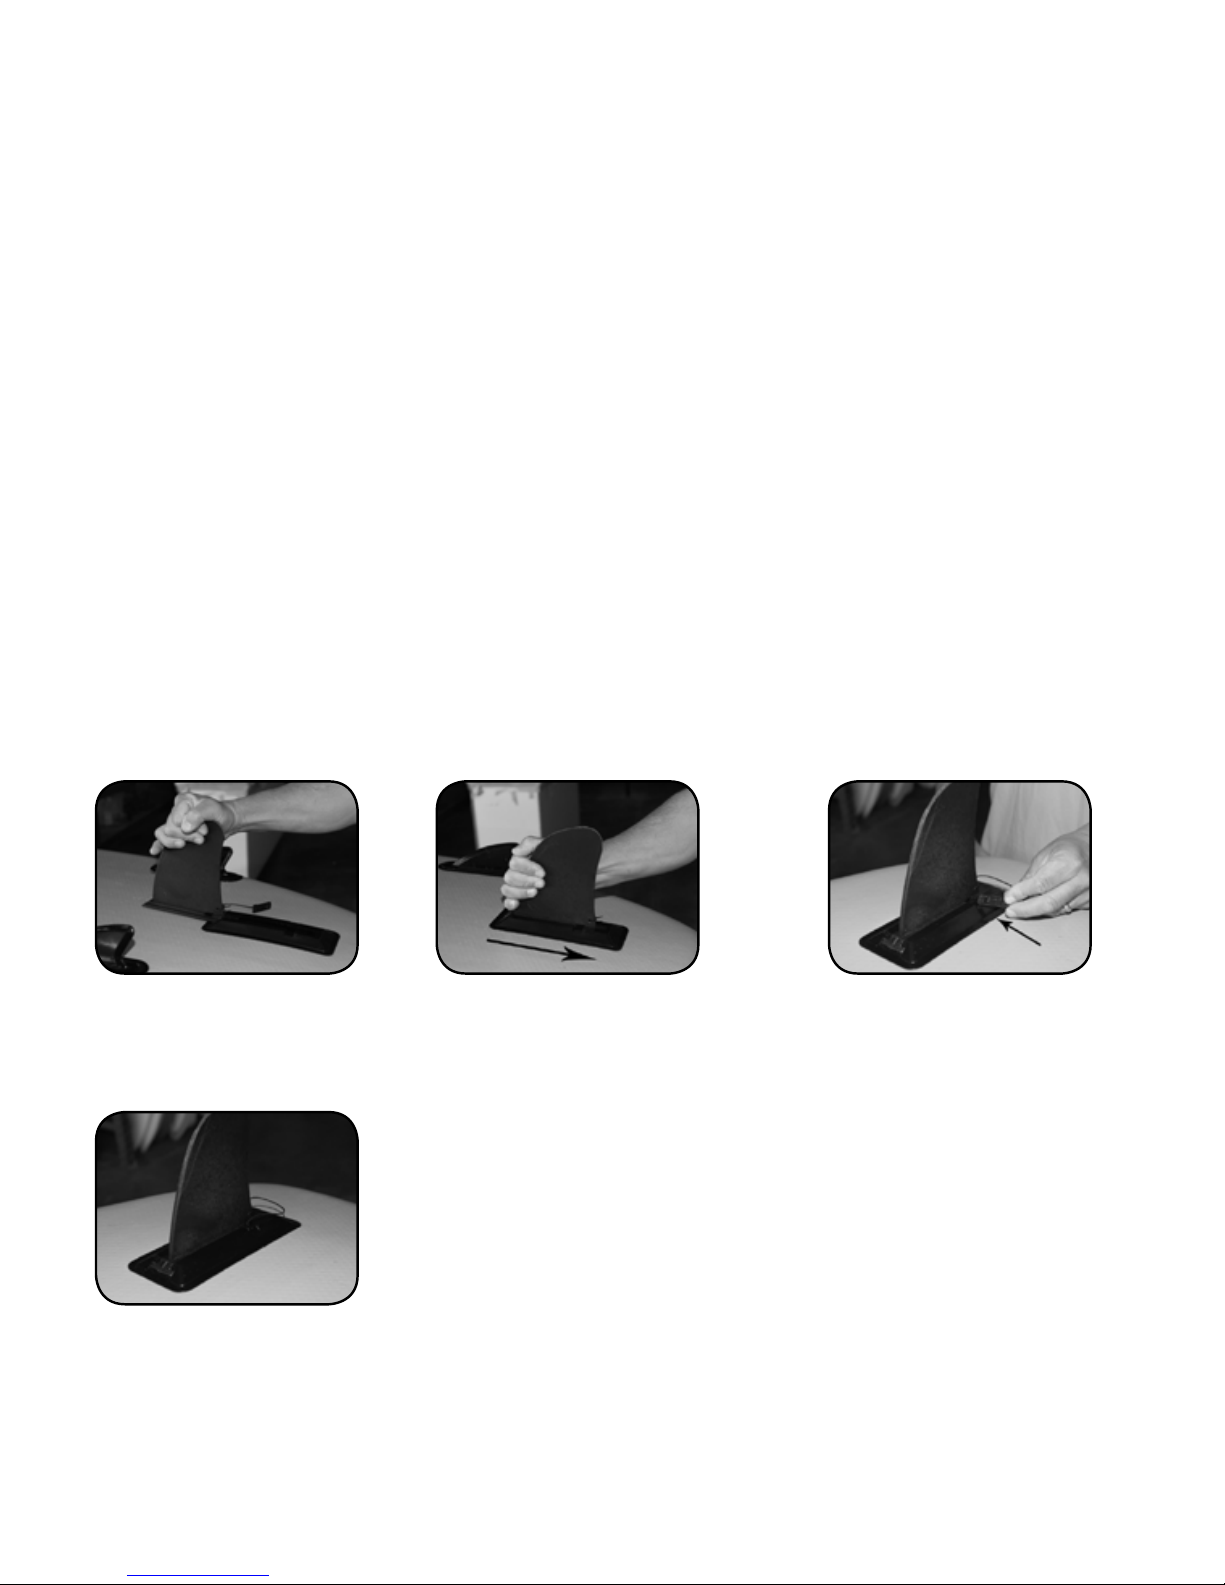
8. CENTER FIN INSTALLATION
1. Slide n base
into n box
2. Slide n all the way
to back of the n box
3. Insert n retention
pin through slot
4. Correct n installation
Page 6

9-10. STORING YOUR HOBIE STAND UP PADDLEBOARD
Hobie has chosen PVC to provide superior protection from ultraviolet light. However, to ensure extra years of
exibility and bright colors, avoid storing the board where it will be exposed to weather or in direct sunlight. Please
review the following list for storage and board care tips.
• Before storing, hose off the board and let it dry completely to prevent mildew buildup.
• Do not use harsh chemicals for cleaning. Most dirt can be removed with a mild soap and fresh water.
• You may store the board inated or deated. If you deate the board, we recommend that you store it in the
protective bag that came with the board
• If storing the board outdoors, raise it up off the ground and cover it with a tarp to prevent exposure to the elements
• We do not recommend hanging the board.
• Do not store in extreme conditions (i.e. above 150F or below -10F)
• Store in a clean, dry place.
BOARD CARE AND STORAGE
The board storage bag is designed to allow you to get your board into the bag as easily as possible with
minimal folds.
Follow the diagram below for the best folding procedures
Make your folds so that the folding pattern will match the S3 Deck Plates
** DO NOT TRY AND FOLD OR BEND S3 DECK PLATES
** Always use the supplied side n covers to prevent n damage and bending
11. BOARD FOLDING STEPS
STEP 1
STEP 2
STEP 3
Page 7

About PVC
Your new stand up paddleboard is made from a
durable PVC. If a tear or puncture does occur, PVC is
very easy to repair. Repairs are easily done with your
included patch kit. Read the following paragraphs for
leak detection and repair tips.
Air Leak Detection
If you are losing air pressure, not caused by colder
temperatures, check the board for leaks, starting with the
valves. A leaking valve is rare, but if you do nd a leak
we can send you a replacement valve. To locate a leak,
we recommend mixing soap and water in a spray bottle.
Spray around the valve. If you see bubbles forming,
check your valve seating and base and be sure the valve
insert is screwed tight. If you continue to have problems
it’s probably time to order a new valve. Replacement
of the whole valve can be done with a simple tool that
comes with the replacement valve.
If the board is losing air and all the valves are good, you
probably have a small puncture. Small punctures can be
repaired easily and permanently. Spray around the inside
and outside of the board until air bubbles become visible
and mark the position of the leak. If you do not nd air
bubbles, inate the board to maximum air pressure and
try to listen to nd the leak. If you can narrow the area
down, return with a spray bottle to identify the source of
the leak.
Punctures less than 1/8”in size can be repaired simply
without a patch. Deate your board, then clean and dry
the area to be repaired. Apply a small drop of glue to
cover the puncture, and let dry 12 hours.
Small Repairs
Your board comes with a repair kit as standard equipment.
If you no longer have your repair kit, you can order a new
one from your dealer. Cut a piece of repair material large
enough to overlap the damaged area by approximately
1/2”, and round off the edges. Apply glue to the under
side of the patch and around the area to be repaired.
Too much glue will interfere with a proper repair. Allow
adhesive to become tacky for 2-4 minutes, and then
place patch on the damaged area. Use a weight to apply
3-5 lbs. of pressure for 12 hours. After patch has dried,
apply glue around the edges for a complete seal (dry for
4 hours).
Large or Difcult Repairs
If you have a difcult repair, give our ofce a call and
We will advise you on the best way to repair it.
12. LEAK DETECTION AND REPAIR
HOBIE STAND UP PADDLEBOARD REGISTRATION AND INFORMATION CARD
First Name
Last Name
Address
Store Where Purchased
Date Purchased
State / Province Zip / Postal CodeCity
EmailCountry
Age of Primary User
Gender M
F
13. WARRANTY REGISTRATION FORM
Hobie Stand Up Paddleboards is collecting this information in order to serve our customers better. We will not sell or
trade your personal information with any other business or organization. Void in any state where prohibited
• Online Registration - http://www.hobie.com/stand-up-paddleboards/support
• Mail in Registration - Remove completed card at perforation, afx postage and mail
USA & GLOBAL
Hobie stand up paddleboards
E: sup@hobie.com
T: (888)hobie-21
T: (949)240-5105
www.hobie.com
AUSTRALIA & S. PACIFIC
Hobie Cat Australasia
E: sales@hobiesup.com.au
T: +61(0)244418400
www.hobiesup.com.au
EUROPE
Double V
E: contact@sunshort.com
T: +33 (0)6 29 12 36 46
www.sunshort.com
BRAZIL
RocketSports Ltda.
E: alex@rocketsports.com.br
T: +55 11 99106-9696
Model
10’6” TOUR 6
12’6 TOUR 6
10’ 2 SCHOOL 4
10’ DRIFTER 4
10’8 AVENTURE 6
10’8 FITNESS 6
10’8” ADVENTURE 4
10’8” FITNESS 4
Page 8

Hobie Stand Up Paddleboards provides a limited one year board warranty.
Your warranty registration card is packaged with this owner’s manual or available online and should be completed
and returned within 30 days of the date of purchase. If you have problems with your board contact your dealer rst.
If you need further assistance, contact Hobie Stand Up Paddleboards. To help process any warranty problems,
please complete your warranty card on line or mail it directly to Hobie Stand Up Paddleboards.
Hobie warrants each stand up paddlboard to be free from defects in materials and workmanship for the period listed
below. Hobie Stand Up Paddleboards will repair or, at its discretion, replace defective parts.
The warranty period for the board is one year
This warranty does not cover:
• Normal wear and tear and discoloration from evironmental exposure
• Damage caused by abuse or failure to perform normal maintenance.
• Damage caused by hitting submerged objects, beaching, or dropping
• Damage caused by mooring or storing board in water.
• Damage caused by alterations or modications.
• Transportation of board or parts to Hobie Stand Up Paddleboards or its dealers.
• Any board used as a rental or placed in commercial service.
• Any other consequential damage, incidental damages or incidental expenses, including damage to property.
Some states do not allow the exclusion or limitation of incidental or consequential damages, so the above
limitation may not apply to you.
15. Return Conditions
To Obtain Warranty Service: Within 30 days of discovering a defect, take your board, along with the proof of
purchase (sales receipt) to the authorized Hobie Stand Up Paddleboard dealer from whom you purchased your
board, unless you have moved or are traveling. In that case, take it to the nearest authorized Hobie Stand Up
Paddleboard Dealer.
16. Liability Limitations
Implied Warranties: Any implied warranties, including implied warranty of merchantability and tness for a particular
purpose, shall be no longer than the duration of this expressed warranty. Some states do not allow limitations on
how long an implied warranty lasts, so the above limitations may not apply to you. Hobie Stand Up Paddleboards
makes no expressed warranties in addition to this limited warranty. Hobie Dealers have no authority to make
warranties on behalf of Hobie Stand Up Paddleboards in addition to, or inconsistent with, those stated herein.
To the extent any provision of this warranty is prohibited by Federal, State or Municipal law and cannot be
preempted, it shall not be applicable. This warranty gives you specic legal rights.
14. WARRANTY
HOBIE STAND UP PADDLEBOARDS
32921 Calle Perfecto #B
San Juan Capistrano, CA 92675
USA
Place
Postage
Here
Page 9

English
FRANÇAIS
GONFLABLE STAND UP PADDLE
MANUEL D’UTILISATION ET INFORMATIONS DE
GARANTIE
VALVE HAUTE PRESSION
FILET DE PONT FILET
DE PONT
CONFORTABLE DECK PAD 3 MM
POIGNÉES DE TRANSPORT
NUMERO DE SERIE
STRUCTURE PVC RENFORCEE
AILERON AMOVIBLE
INSERT DE FILET DE PONT
Tour 12’6
Tour 10’6
Adventure 10’8
POMPE AVEC
MANOMETRE DE
CONTROLE DE
PRESSION
BOITE ETANCHE
AVEC KIT DE
REPARATION
SAC DE
TRANSPORT / DE
STOCKAGE
EXP 3 PARTIES
AJUSTABLE
*optional
Accessories
Page 10

1. MISE EN GARDE
Les sports de pagaie sont potentiellement dangereux et physiquement éprouvants.
L’utilisateur du présent produit doit comprendre que la pratique des sports de pagaie peut entraîner des
blessures graves ou la mort.
Respectez les normes de sécurité suivantes à chaque utilisation du produit.
L’utilisateur du présent produit reconnaît qu’il comprend et accepte les risques associés aux sports de
pagaie.
Si vous avez des questions au sujet de ce produit, n’hésitez pas à nous contacter.
2. MISE EN GARDE D’UTILISATION
Les sports de rame peuvent être très dangereux et physiquement éprouvant.
L’utilisateur de ce produit doit comprendre que la participation aux sports de rame peut impliquer des
dangers pouvant aller jusqu’à la mort.
Observez les normes de sécurité adéquate en utilisant ce produit.
L’utilisateur de ce produit lié à l’activité du sport de rame, accepte les risques de cette même activité.
Après avoir goné votre Stand Up Paddle HOBIE SUP et avant que vous le mettiez à l’eau, inspectez
votre équipement pour vous assurer d’un usage sans le moindre risque. Passez en revue les règlementations locales.
Informez-vous sur les marées et les éventuels courants locaux avant de vous mettre à l’eau. Faites attention de ne pas surévaluer votre force, votre résistance ou vos compétences. Evaluez bien les dangers avant de vous mettre à l’eau.
Tenez bien compte de votre niveau de compétence.
3. CONSEIL GENERAL
Les sports de pagaie permettent à tous, quels que soient son âge ou sa forme physique, de pratiquer
une activité fantastique en contact étroit avec la nature. Que ce soit une promenade de quelques
heures, un minimum de précautions et quelques règles élémentaires de sécurité s’imposent.
• Consultez votre médecin avant de commencer un sport de pagaie.
• Ne surestimez pas vos capacités physiques et techniques.
• Portez toujours un gilet de ottaison individuel homologué.
• Le port d’un leash chevilles est obligatoire
• Respectez la réglementation en vigueur dans le pays d’utilisation.
• Ne partez jamais seul, Informez toujours un proche de votre parcours
• Un enfant seul non accompagné ou surveillé ne doit pas utiliser le Stand Up Paddle HOBIE SUP.
• En France, vous ne devez pas vous éloigner de la bande des 300m du rivage car le Stand Up
Paddle gonable est considéré comme un engin de plage.
• Informez vous sur les conditions propres au plan d’eau sur lequel vous avez choisi de naviguer.
• Consultez la météo et son évolution dans la journée pour ne pas vous faire surprendre par le vent
ou le froid.
• Ne pas utiliser de Stand Up Paddle HOBIE SUP dans des conditions d’inondation.
• Ne consommez pas d’alcool ou de psychotropes avant d’aller sur l’eau.
• Adaptez votre habillement en fonction des conditions météo.
• Nous vous conseillons de ne pas l’utiliser dans un vent supérieur a 15 noeuds. Ce conseil devient
une obligation par vent de terre.
Page 11
English
FRANÇAIS
Pour le gonage :
Dévisser le bouchon d’étanchéité de la valve.
Assurez vous que la valve est en position “ haute “ de gonage en la tournant dans
le sens contraire des aiguilles d’une montre.
Pour le dégonage :
Dévisser le bouchon d’étanchéité de la valve.
Appuyer sur la valve en la tournant dans le sens des aiguilles d’une montre pour la bloquer
Toujours remettre en place le bouchon d’étanchéité de la valve avant utilisation
6. PROCEDURE DE GONFLAGE
A. Dévisser le bouchon d’étanchéité de la valve
B. Vérier que la valve est en position gonage
C. Connecter la pompe à la planche en pressant sur l’embout et en le tournant
D. Poser vos pieds de chaque coté du socle et pomper.
E. Vous arriverez facilement à 10 PSI, lorsque l’effort demandé devient plus
dicile, ne remontez pas complètement le manche de la pompe, contentez
vous de petits coups secset pompez jusqu’à obtenir une pression de comprise
entre 10 PSI et 14 PSI. Le manomètre vous indique la pression.
F. Revisser le bouchon d’étanchéité de la valve.
Attention : il est inutile de dépasser la pression de 15 PSI. Vous ne gagnerez rien
en performances et vous risquez d’endommager votre planche d’une anière
irréversible . N’utilisez en aucun cas de compresseur d’air
Si vous gonez un conseil Triple Air chambré (Sportsmans ou des modèles de
Air Jour de voyage), être conscient de ne pas se déployer sur les chambres à
l’extérieur.
Pression de gonage maximale pour les chambres extérieur est 5 PSI
7. PROCEDURE DE DEGONFLAGE
A. Dévisser le bouchon d’étanchéité de la valve. Appuyer sur la valve en la tournant dans le sens des aiguilles
d’une montre pour la bloquer. Attention ! Lors du dégonage, la pression de l’air expirée peut projeter du
sable ou de petits débris au visage !
B. Toujours remettre en place le bouchon d’étanchéité de la valve aprés utilisation.
Page 12
PRECAUTIONS
Votre Stand Up Paddle HOBIE SUP peut être goné à l’aide d’une pompe manuelle ou électrique. Dans
le cas d’un gonage à l’aide d’une pompe électrique, celui-ci ne pourra assurer que 90 % du gonage et
devra être complété par un gonage manuel.
Conseil important : Si vous laissez votre Stand Up Paddle HOBIE Sup goné entre deux utilisations ou
exposé en plein soleil, il est indispensable de relâcher un peu de pression, pour éviter tout risque de
surpression dûe aux variations de température ou de pression atmosphérique.
Pour votre information, votre Stand Up Paddle HOBIE Sup peut perdre un peu de pression de gonage.
Il est donc obligatoire de vérier la pression votre Stand Up Paddle HOBIE Sup avant chaque sortie.
Si vous constatez un défaut de gonage, suivez les instructions de détection de fuites et réparations sur
ce guide.
1. Insérez l’aileron dans le
boitier
2. Glissez-le jusqu’à la
butée
3. Insérez la patte de
rétention
4. L’aileron est monté
8. INSTALLATION DE L’AILERON CENTRAL
Page 13

English
FRANÇAIS
9. ENTRETIEN
Votre embarcation est conçue de façon à ne demander qu’un entretien minimal qui vous garantira
de nombreuses heures de plaisir sur l’eau.
Après une sortie, rincez toujours votre Stand Up Paddle HOBIE Sup complètement avec de l’eau
claire an de le débarrasser du sel et du sable (le sable étant très abrasif).
Ne pas utiliser de matériel de nettoyage à haute pression.
N’utilisez en aucun cas de produits chimiques, chlorés ou de détergents agressifs, ou de produits à
base de silicone, pour le nettoyage. Un savon et de l’eau douce sufsent.
Il est normal de constater une baisse ou une augmentation de pression due à une surexposition au
soleil ou au froid.
Procédez à un séchage complet avant le ranger dans son sac et de le stocker.
10. STOCKAGE
Avant de le stocker, laisser sécher votre planche complètement an d’éviter tout développement de
moisissure, qui pourrait détériorer votre SUP prématurément.
Il est préférable de stocker votre Stand Up Paddle dégoné, à l’abri de la lumière directe durant une
longue période, à l’abris des intempéries, dans un lieu sec, propre et protéger des températures
extrêmes (inférieure à -10° ou supérieur à +50°)
Rouler le Stand Up Paddle en partant de l’arrière, en utilisant les soufets de protection pour les 2
ailerons latéraux
11. CONSEIL DE PLIAGE
ETAPE 1
ETAPE 2
ETAPE 3
Page 14

12. RÉPARATIONS
A propos de PVC
Votre nouveau stand up Paddle HOBIE Sup est fait à partir d’un PVC de qualité supérieure. Si une
déchirure ou une perforation se produit, le PVC est très facile à réparer.
Un kit de réparation est fourni lors de votre achat comprenant un tube de colle spéciale PVC et 3
empiècements PVC.
Lisez attentivement les paragraphes suivants pour effectuer, une détection de fuite d’air et des
réparations.
Localisation une fuite d’air.
Toute baisse de pression anormale doit donner lieu à une vérication minutieuse des valves et de leurs
joints.
Vériez dans un premier temps la valve placée à l’avant, l’ensemble des joints. En l’aspergeant d’eau
savonneuse, si des bulles se forme l’endroit de la fuite est localisé.
Si une fuite ou un trou est localisé, veuillez utiliser le kit de réparation inclus lors de votre achat.
Conditions pour une qualité de réparation optimale :
1. Réparer à l’abri du soleil et au sec - Flotteur à plat, dégoné.
2. Découper une pièce ronde débordant d’au moins 5 cm de la déchirure du otteur. Tracer sur le
otteur l’emplacement de la pièce. Pour une coupure, il est préférable de découper une pièce
rectangulaire.
3. Nettoyer la pièce et l’emplacement autour de la déchirure à l’aide d’une pierre ponce
uniquement.
4. Encoller le otteur et la pièce
5. Attendre 2-4 minutes que la colle sèche partiellement, poser la pièce. Presser du centre vers
l’extérieur pour aplatir les éventuelles bulles d’air.
6. Lisser fortement la pièce avec un objet arrondi en commençant par le centre de la pièce.
7. Ré appliquer un joint de colle d’étanchéité autour de la pièce.
8. Utiliser un poids pour appliquer une pression sur la pièce pendant 12 heures.
9. Eviter si possible d’exposer la réparation au soleil ou à la pluie.
10. Laisser sécher pendant 24 heures avant de procéder au regonage.
Précautions à prendre lorsque l’on utilise de la colle :
• Ne laissez pas le tube de colle en plein soleil ou à proximité d’une amme ou d’une source de
chaleur. La colle peut se conserver si vous rebouchez le tube immédiatement après usage.
• Travaillez toujours dans un local aéré, évitez de respirer les vapeurs de colle et de l’ingérer et évitez
le contact avec la peau.
Page 15

English
FRANÇAIS
BON DE GARANTIE - Enregistrement : ( * Champs Obligatoires )
Nom*
Prénom *
Adresse 1 *
Nom du revendeur *
Date et lieu d’achat *
Code Postal *Ville *
Email*
Pays*
ENREGISTREMENT GARANTIE
Lors de votre achat, conservez précieusement votre facture, elle constitue votre preuve d’achat et vous permettra d’actionner
votre garantie et de remplir votre ENREGISTREMENT.
Pour rendre votre garantie applicable, veuillez procéder à son enregistrement dans les trente (30) jours suivant la date d’achat.
L’enregistrement peut s’effectuer de façon électronique à partir du site web www.hobie.com à l’adresse suivante : http://www.
hobie.com/stand-up-paddleboards/support
Vous pouvez également procéder à l’enregistrement de votre produit par courrier en renvoyant votre carte ci-dessous à
l’adresse suivante:
Par la présente carte de garantie,
Les produits bénécient de la garantie constructeur Hobie Stand Up paddleboards de un an à compter de la date d’achat pour le premier
acquéreur d’un produit neuf.
La garantie constructeur HOBIE Stand Up PADDLEBOARDS s’entend sans préjudice de vos autres droits légaux et réglementaires en tant
que consommateur.
Cette garantie s’applique uniquement si le produit défectueux est présenté durant la période de garantie, accompagné de la facture d’origine
ou du reçu d’origine (sur lequel est indiqué la date d’achat, le modèle et le nom du revendeur). HOBIE Stand Up Paddleboard se réserve
le droit de refuser l’application gratuite de la garantie si ces documents ne sont pas présentés ou s’ils sont incomplets ou illisibles, ou si
l’enregistrement n’a pas été réalisé dans les 30 jours suivant la date d’achat.
Cette garantie ne sera pas applicable si le nom du modèle ou le numéro de série gurant sur le produit a été modié, effacé, supprimé ou rendu
illisible
Dans tous les cas, un an est la période maximum de garantie, le remplacement d’un quelconque élément durant ce temps ne prolonge pas cette
durée.
Cette garantie ne couvre pas les dommages suivants :
• Les dommages résultant du transport
• Les dommages résultant de l’usure normale des produits, à l’exposition anormale et prolongée aux U.V en particulier pour les couleurs des
décors, la décoloration, aux changements de l’aspect en raison d’usure, d’exposition ou de toute autre condition environnementale.
• Les dommages résultant du stockage.
• Les dommages résultant d’une utilisation non conforme à la destination des produits.
• Les dommages résultant du non respect des instructions d’utilisation des produits telles que dénies dans les notices accompagnant les
produits.
• Les dommages résultant du non respect ou l’abus des conseils d’entretien tels que dénis dans les
• notices accompagnant les produits
• Les dommages causés par des altérations ou de la modication des produits.
• Les dommages résultant d’un choc, causés par un ou des objets,par un écrasement, par une torsion, une compression, une chute de l’objet,
un impact anormal et autres actions échappant au contrôle de HOBIE Stand Up Paddleboards.
• Les dommages résultant d’une utilisation à des ns commerciales, associatives et locatives.
• Les accessoires ne sont pas pris en charge dans le cadre de la garantie. (Sac de transport, pompe, embouts, manomètre de pression,let de
pont, les poignées de portage, anneaux inox)
• Tout autre dommage indirect, dommages indirects ou les frais accessoires, y compris les dommages à la propriété.
Cette garantie n’est pas exécutoire si :
• Le Produit n’est pas restitué dans son emballage d’origine, s’il a été modié ou réparé par toute personne ou entité autre qu’un revendeur
agréé service après vente HOBIE Stand Up Paddleboard
• Le produit n’a pas été enregistré et le formulaire d’enregistrement de la garantie, dûment rempli, n’est pas parvenu à HOBIE Stand Up
Paddleboard dans les délais prescrits.
14. GARANTIE
Adresse 2 *
Téléphone*
Model
10’6” TOUR 6
12’6 TOUR 6
10’ 2 SCHOOL 4
10’ DRIFTER 4
10’8 AVENTURE 6
10’8 FITNESS 6
10’8” ADVENTURE 4
10’8” FITNESS 4
N° de série *
Page 16

USA & GLOBAL
Hobie stand up paddleboards
E: sup@hobie.com
T: (888)hobie-21
T: (949)240-5105
www.hobie.com
AUSTRALIA & S. PACIFIC
Hobie Cat Australasia
E: sales@hobiesup.com.au
T: +61(0)244418400
www.hobiesup.com.au
EUROPE
Double V
E: contact@sunshort.com
T: +33 (0)6 29 12 36 46
www.sunshort.com
BRAZIL
RocketSports Ltda.
E: alex@rocketsports.com.br
T: +55 11 99106-9696
HOBIE STAND UP PADDLEBOARDS
32921 Calle Perfecto #B
San Juan Capistrano, CA 92675
USA
Place
Postage
Here
15. CONDITIONS DE RETOUR :
Tout retour du produit au titre de la garantie précitée doit faire l’objet d’un accord préalable de HOBIE Stand Up Paddleboards.
Aucun retour ne sera accepté sans autorisation préalable de HOBIE Stand Up Paddleboards. Le produit défectueux doit être retourné dans son
emballage d’origine, comporter l’ensemble du produit et de ses accessoires et être accompagné de façon lisible du numéro de retour de produit
communiqué par HOBIE Stand Up Paddleboards et du numéro de série du produit.
Tout produit incomplet, abîmé, endommagé et/ou dont l’emballage d’origine aura été détérioré, ne sera ni repris ni échangé dans le cadre de la
garantie.
La responsabilité de tous les frais de transport d’aller-retour du lieu d’origine au lieu convenu de réparation ou de remplacement incombe à
l’Acheteur.
Le produit sous garantie sera, au choix du fabricant, échangé ou réparé.
HOBIE Stand Up Paddleboards n’est pas responsable, de quelques dommages que ce soit pouvant
être encourus pendant le transport, ni de l’entreposage ou des frais de transport, ni des désagréments, de la perte de temps et / ou d’argent
occasionnée pendant que s’effectuent les réparations.
La garantie du constructeur est la seule et unique garantie écrite offerte par HOBIE Stand Up Paddleboards sur les produits HOBIE Stand Up
Paddleboards. Aucuns distributeurs, concessionnaires, revendeurs, agents ou employés n’est autorisé à prolonger ou augmenter cette garantie au
nom de HOBIE Stand Up Paddleboards par toute déclaration écrite ou verbale ou toute publicité.
Cette garantie n’exclut pas les droits spéciques à chaque pays. Les consommateurs peuvent jouir de droits différents selon leur lieu de résidence.
Certaines juridictions ne prévoient aucune exclusion ou limitation de dommages spéciques, accidentels ou indirects, ni de limitations durant la
période de garantie. En conséquence, les exclusions et limitations susmentionnées ne s’appliquent pas à tous. Des taxes locales, des droits de
douanes ou des frais de port peuvent être appliqués. Aux Etats-Unis peuvent aussi s’appliquer des droits supplémentaires qui sont différents d’un
Etat à l’autre.
Cette garantie peut ne pas être disponible dans certains pays.
Si une partie de cette garantie était déclarée non valable en vertu de procédures administratives ou légales, le reste de la garantie resterait valable.
16. LIMITATION DE RESPONSABILITES :
DANS LE CADRE DES LOIS NATIONALES, LA PRESENTE GARANTIE EST EXCLUSIVE DE TOUT AUTRE RECOURS
ET TIENT LIEU DE TOUTE GARANTIE DÉCLARÉE OU IMPLIQUÉE. LA RESPONSABILITE DE HOBIE STAND UP
PADDLEBOARDS NE SAURAIT ETRE ENGAGEE POUR TOUT DOMMAGE INDIRECT INCLUANT NOTAMMENT LA PERTE
DE CHANCE OU DE GAINS, LA PERTE DE L’UTILISATION DU PRODUIT OU DE DISPOSITIF ASSOCIÉ, LE COÛT DE TOUT
ÉQUIPEMENT DE SUBSTITUTION, LES RÉCLAMATIONS DE TIERCES PARTIES AINSI QUE LES DOMMAGES CAUSÉS
À LA PROPRIÉTÉ RÉSULTANT DE L’ACHAT OU DE L’UTILISATION DU PRODUIT OU ENCORE CONSÉCUTIFS A UNE
INOBSERVATION DE LA GARANTIE. HOBIE STAND UP PADDLEBOARDS NE SAURAIT ÊTRE TENU RESPONSABLE DE LA
PERTE D’UTILISATION DU PRODUIT DURANT SA PÉRIODE DE RÉPARATION.
 Loading...