

Page 1

Please read the instruction manual before using this product.
Fishfinder Installation
Kit III
Page 2

2
These instructions will guide you through the installation
of the fish finder kit on your kayak. These are basic guidelines that will allow you to understand the kit, but keep
in mind that all kayaks are slightly different and you can
customize your installation in many ways.
Page 3
3
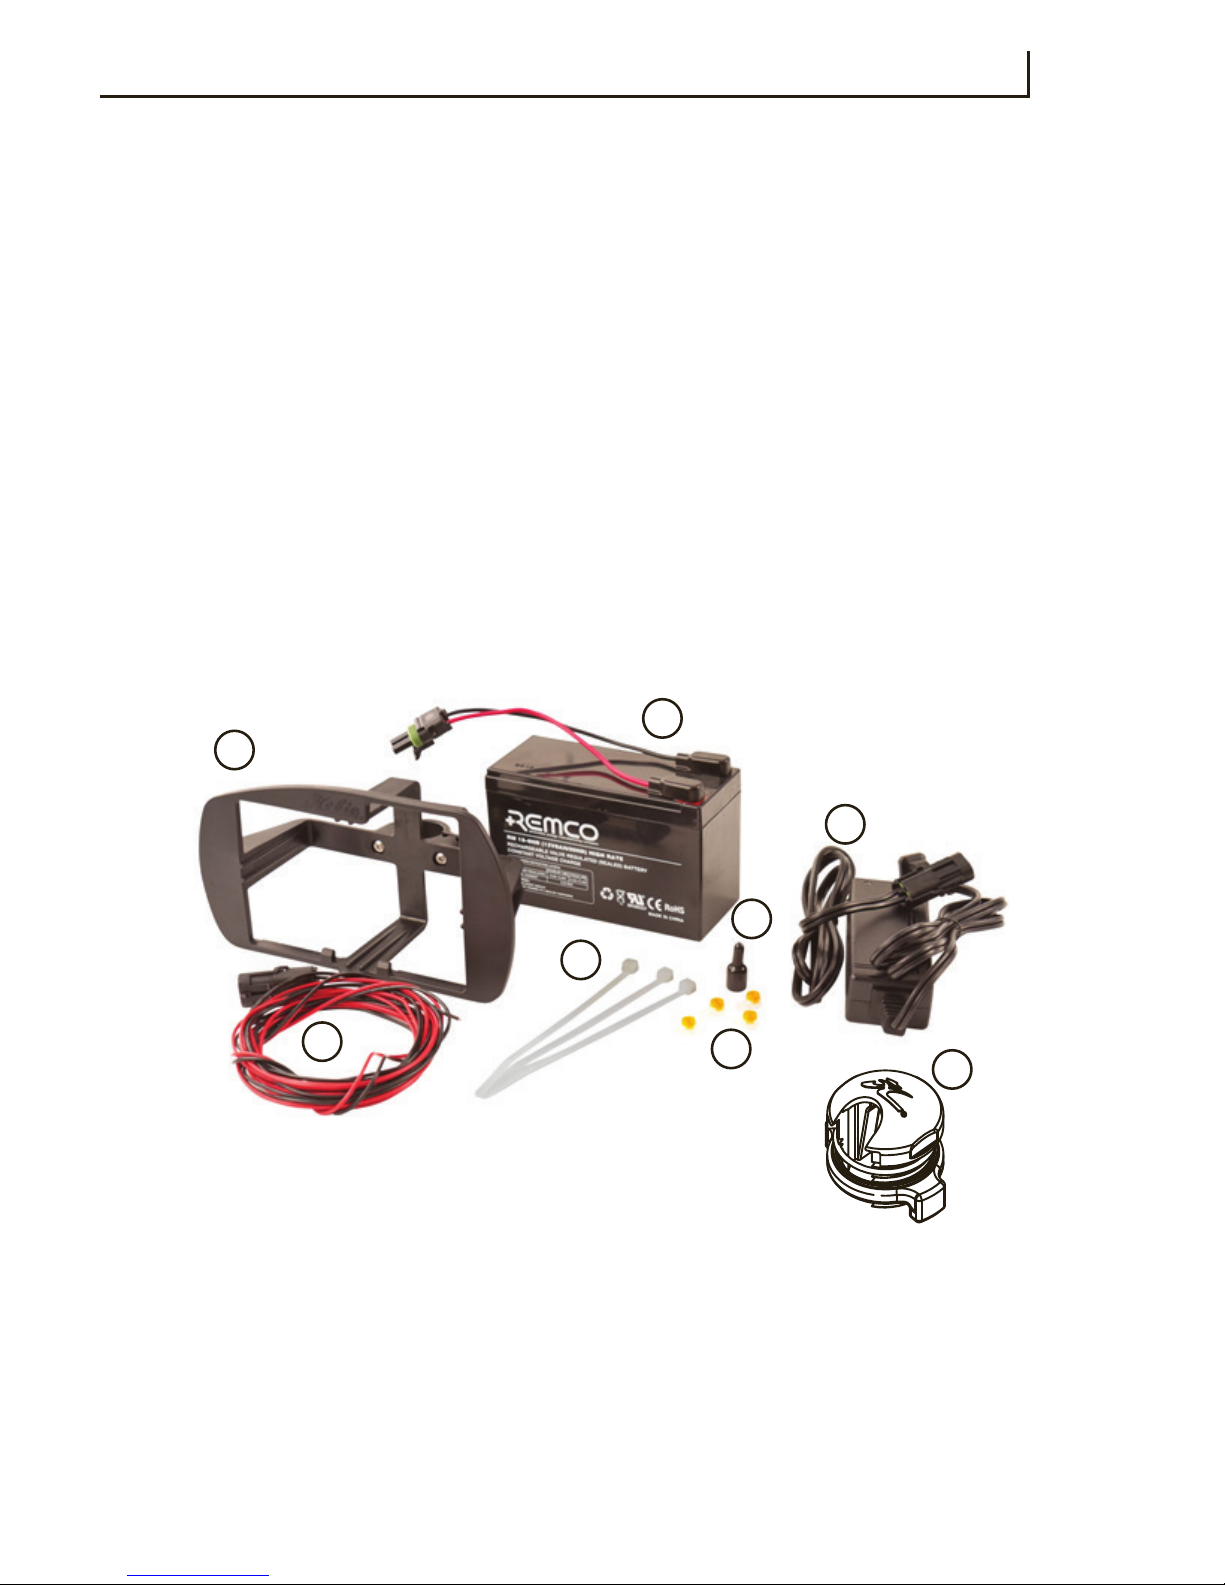
Parts
1. 12V Battery Holder
2. 12V Battery
3. 12V Battery Charger
4. Female Pigtail Wire
5. Wire Ties
6. Wire Connectors
7. Terminal Cap
8. Thru-Hull Wire Plug
Parts
1
2
5
4
6
7
8
3
Page 4

4
1/8”
3mm
Metal clips
1
Mount your transducer to the
Lowrance Ready Plate located
on the underside of the kayak.
You will need to remove the 3
screws that attach the plate
to the hull and then use the
Lowrance Ready hardware
that comes with the boat in the
owner’s manual to install the
transducer to the plate.
Mounting the Transducer
Once the transducer is installed, feed the transducer wire though the scupper
hole and screw the plate back in to place. You should now have the transducer
cable accessible in the cockpit of the kayak.
Page 5

5
1.
2.
1.
There are plugs for the wire to
come out on either side of the
boat if you prefer a right/left side
screen location.
NOTE: Some plugs are located in
cup holders and mesh pockets.
2
1. Run the
cable into
the plug just
behind the
transducer
scupper.
3
2. Lead the cable through
the insde of the boat and
exit the cable out through
the thru-hull fitting.
(See next page for installing Thru-Hull Pugs)
Running Transducer & Power Cable
Page 6

6
Running Transducer & Power Cable
4
Locate the thru-hull
plug and unscrew the
nut on the inside of the
boat.
Thru-Hull Plugs
5
Remove the solid
rubber plug.
6
Choose the correct
plug for your wire size
and insert the wire by
opening the plug along
the slit.
7
Press the new plug
with the wire installed
into the plastic plug
making sure it fits
tightly.
8
Bolt the thru-hull wire
assembly to the hull
using the nut, and
making sure you have
the o-ring installed.
O-ring
Page 7

7
Running Transducer & Power Cable
9
With most fishfinders you will be able to get both cables to fit using the existing thru hull wire plug and appropriate rubber plug.
For certain fishfinders, like the Lowrance HDI models, you may want to install
an additional thru hull wire plug for running cables out of the kayak hull. If
this is the case you will need to drill a 1” diameter hole using a spade bit or
hole saw in the desired location that the wires will exit. We have included an
additional thru hull wire plug in this kit for this reason.
.
Page 8

8
Locate the small red and black wires that are coming from the transducer
power cable. You will need to connect these to the Pigtail wire assembly.If
desired, install the fuse box and fuse provided by Lowrance in the fishfinder
package before going on to the next step. Some fishfinders come with fuses
and some do not. You can use the wire connectors provided in the installation kit for most connections.
Take the end of the red wire coming from the fishfinder power cable and the
red wire that is on the battery harness pigtail wire and put them in the small
orange and clear connectors. Once the wires are all the way in, press the
button on the connectors with a pair of pliers until the button presses all the
way in. When the button is depressed, it connects the wires and pops a gel
pack to insulate the wires from water. Repeat this same procedure with the
black wires.
Connect your transducer cable and power cable to the Fish Finder display
screen. Connect the female pigtail to the male pigtail on the battery. Turn
on the fishfinder and make sure that everything is working. Note: Make sure
your battery is charged before doing this (Battery Charging Instructions
Below). If desired, place some epoxy glue around where the wires enter the
wire nut to ensure and even more watertight seal.
Select a location you would like the 12V battery and battery holder to be
stored. The 2 best locations are connecting the battery holder to the mast
base or storing it by resting the battery holder on the lip of an 8” round Twist
and Seal hatch. Depending on location you can run the excess pigtail wire for
or aft.
.
Connecting Power Cable to Power Source
10
11
12
13
Page 9

9
Bundle up the extra transducer cable and power cable wire and lightly
wrap a wire tie around each of them to keep it organized. DO NOT CUT THE
EXCESS WIRES ON THE TRANSDUCER CABLE TO SHORTEN THEM. THIS
WILL RUIN THE QUALITY OF THE SIGNAL TO THE TRANSDUCER. We also
recommend that you attach the wires to something in the kayak to keep
them from sliding around (like the sail mast base or scupper). If you have a
large bundle, you can link the wire ties together to form a bigger loop. DO
NOT PUT EXCESSIVE TENSION ON THE WIRE TIE. IT SHOULD ONLY HOLD
ENOUGH PRESSURE TO HOLD THE WIRE IN PLACE.
The terminal cap can be used to put over fishfinder power cable plug to
prevent corrosion.
12V Battery Charging Instructions: Plug the battery in to the battery charger making sure the tab on the
male pigtail aligns with the clip on the female pigtail. Plug the battery charger
in to an electrical outlet. If the light on the charger turns red the battery is in
need of charging and should remain plugged in until the light turns green. A
green light means the battery is charged and the charger has switched to
trickle charge. At this point it is ready to be unplugged from the socket and
used.
Connecting Power Cable to Power Source
14
15
Page 10

Hobie Cat Company
Oceanside, California, USA
1-800-HOBIE-49
hobiecat.com
Hobie Cat Australasia
Huskisson, New South Wales Australia
1-800-4-HOBIE
hobiecat.com.au
Hobie Kayak Europe
Stellendam, The Netherlands
+31(0)187 499 440
hobie-kayak.com
PN 72020070
REV 140327
 Loading...